

Page 1
CH-9101Herisau/Switzerland
Tel. ++41 71 353 85 85
Fax ++41 71 353 89 01
Internet www.metrohm.ch
E-Mail info@metrohm.ch
6.6016.103
Metrodata VA Database
2.0
8.746.8003 Instructions for Use
15.07.97 / dö
Page 2

Contents
1 Introduction.................................................................................................. 1
1.1 Purpose of program.............................................................................1
1.2 Installation.............................................................................................1
Hardware requirements for the PC......................................................1
Full program and demo version ..........................................................2
Hardware Installation...........................................................................2
Software Installation ............................................................................2
Configure Windows 95 for VA Database .............................................3
Configuration of 746 VA Trace Analyzer..............................................3
Compatibility with 693 VA Processor...................................................4
Registration .........................................................................................4
Contents
1.3 Overview of program windows...........................................................4
1.4 Overview of file types ..........................................................................4
File types of 746 VA Trace Analyzer ....................................................4
File types of VA Database ...................................................................5
Export file types...................................................................................6
1.5 Context sensitive menus.....................................................................6
2 Main window ................................................................................................ 7
2.1 Main Window overview........................................................................7
2.2 Starting/closing the program..............................................................7
Starting the VA Database program .....................................................7
Closing the VA Database program......................................................8
2.3 Databases..............................................................................................8
Database organization ........................................................................8
Handling of databases........................................................................8
Import VA determinations....................................................................9
Backup database files.......................................................................10
VA Database 2.0
2.4 Printing of text and curves................................................................10
Document printing.............................................................................10
Document print preview ....................................................................10
Document page setup.......................................................................11
2.5 Export of text and curves..................................................................13
Copy text or curves to clipboard .......................................................13
Export of curves.................................................................................13
I
Page 3

Contents
2.6 Display of curves................................................................................14
Display of substance and segment curves .......................................14
Display of overlay curves...................................................................15
Display of calibration curves .............................................................16
Appearance of curves .......................................................................17
Scaling of curve axes ........................................................................18
Zooming of curve windows ...............................................................19
2.7 Settings................................................................................................19
Sweep settings..................................................................................19
Calibration settings............................................................................20
Export settings...................................................................................21
Report generator settings..................................................................21
Templates settings ............................................................................22
Default locations settings ..................................................................23
Graphic settings ................................................................................24
Text report settings............................................................................24
Save settings.....................................................................................25
2.8 Windows and subwindows ...............................................................25
Opening of VA windows ....................................................................25
Arrangement of VA windows .............................................................26
Arrangement of subwindows.............................................................26
3 VA Database Table ..................................................................................27
3.1 VA Database Table overview............................................................27
3.2 Opening/closing of VA Database Table ..........................................27
Opening the VA Database Table.......................................................27
Closing the VA Database Table.........................................................27
3.3 Printing of tables ................................................................................28
Table printing.....................................................................................28
Table print preview ............................................................................28
Table page setup ..............................................................................28
3.4 Selection of determinations..............................................................30
3.5 Export from VA Table.........................................................................30
Export of table text from VA Table.....................................................30
Copy table text to clipboard ..............................................................31
Send determinations to VA Trace Analyzer from VA Table................31
Export of determination files from VA Table ......................................31
Export of measurement points from VA Table...................................31
3.6 View reports and curves from VA Table .........................................32
View text report from VA Table ..........................................................32
View substance curve from VA Table ................................................32
View calibration curve from VA Table ................................................32
View segment curve from VA Table...................................................32
II
VA Database 2.0
Page 4

Contents
3.7 Options for VA Table display............................................................32
Filtering determinations for VA Table.................................................32
Sorting determinations for VA Table..................................................34
Defining visible fields for VA Table ....................................................35
3.8 Database fields overview ..................................................................37
Fields from page "MONITORING"......................................................37
Fields from page "RESULTS".............................................................38
4 VA Database Explorer ............................................................................41
4.1 VA Database Explorer overview.......................................................41
4.2 Opening/closing of VA Database Explorer.....................................41
Opening the VA Database Explorer...................................................41
Closing the VA Database Explorer ....................................................41
4.3 Explorer views ....................................................................................42
View selection....................................................................................42
View items .........................................................................................42
4.4 View reports and curves from VA Explorer....................................44
View text reports from VA Explorer ....................................................44
View substance curves from VA Explorer..........................................44
View calibration curves from VA Explorer..........................................45
View segment curves from VA Explorer.............................................45
4.5 Export from VA Explorer ...................................................................46
Send determinations to VA Trace Analyzer from VA Explorer ...........46
Export of determination files from VA Explorer..................................46
Export of measurement points from VA Explorer ..............................47
4.6 Options for VA Explorer display ......................................................47
Filtering determinations for VA Explorer ............................................47
Sorting determinations for VA Explorer..............................................47
5 VA Communication ..................................................................................49
5.1 VA Communication overview ...........................................................49
5.2 Opening/closing of VA Communication..........................................49
Opening the VA Communication window..........................................49
Closing the VA Communication window ...........................................49
VA Database 2.0
5.3 COM port configuration.....................................................................50
Opening/closing COM ports .............................................................50
Default directories .............................................................................51
COM port settings .............................................................................52
Automatic printing .............................................................................53
5.4 Data transfer........................................................................................54
Receiving data...................................................................................54
Sending data.....................................................................................54
Data transfer protocol........................................................................55
COM port reset..................................................................................55
III
Page 5

Contents
6 VA Report Generator...............................................................................57
6.1 VA Report Generator overview.........................................................57
6.2 Opening/closing of VA Report Generator.......................................57
Opening the VA Report Generator ....................................................57
Closing the VA Report Generator ......................................................57
6.3 Templates............................................................................................58
Template functions............................................................................58
Handling of template files..................................................................58
Method associated templates...........................................................59
6.4 Design templates................................................................................59
Switch design mode on/off................................................................59
Defining template regions .................................................................59
Text labels .........................................................................................60
Text fields ..........................................................................................61
Curve fields........................................................................................64
6.5 Printing of custom reports................................................................66
Report printing...................................................................................66
Report print preview ..........................................................................66
Report page setup.............................................................................66
6.6 Export of custom reports ..................................................................68
Copy custom report to clipboard ......................................................68
7 How to ...? ...................................................................................................69
7.1 Installation and configuration...........................................................69
Connect the 746 VA Trace Analyzer..................................................69
7.2 Data transfer 746 ---> VA Database..................................................70
Send determinations to the database ...............................................70
Send determinations to the backup directory ...................................70
Send methods to the backup directory (binary and ASCII files) .......71
Send methods to the backup directory (only binary files).................71
Send sample tables to the backup directory.....................................72
Send rack definition files to the backup directory .............................72
7.3 Data transfer VA Database ---> 746..................................................73
Send determinations from the database
to the 746 VA Trace Analyzer ............................................................73
Send determination files from the backup
directory to the 746 VA Trace Analyzer..............................................73
Send method files from the backup directory
to the 746 VA Trace Analyzer ............................................................74
Send sample table files from the backup
directory to the 746 VA Trace Analyzer..............................................74
Send rack definition files from the backup
directory to the 746 VA Trace Analyzer..............................................75
IV
VA Database 2.0
Page 6

Contents
7.4 Database Table ...................................................................................76
Add fields to the database table .......................................................76
Remove fields from the database table.............................................76
Change the position of the fields in the database table....................76
Change the width of the columns in the database table...................77
Filter the database content................................................................77
Disable filtering of the database content...........................................78
Sort the database content.................................................................79
Disable sorting of the database content ...........................................79
Print the database table ....................................................................79
Copy the database table text to clipboard ........................................80
Export the database table text...........................................................80
Export measurement points ..............................................................81
7.5 Text reports.........................................................................................81
Display text reports from VA Table ....................................................81
Display text reports from VA Explorer................................................81
Print the text report ............................................................................82
Copy the text report to clipboard.......................................................82
7.6 Curves..................................................................................................82
Display curves from VA Table ...........................................................82
Display curves from VA Explorer .......................................................83
Display overlay curves.......................................................................83
Remove curves from the overlay view...............................................84
Change the curve selection...............................................................84
Change the appearance of curves....................................................84
Zoom curves by mouse.....................................................................84
Print curves........................................................................................85
Copy curves to clipboard ..................................................................85
Export curves.....................................................................................85
7.7 Custom reports...................................................................................86
Create a new template ......................................................................86
Open an existing template ................................................................86
Save a template.................................................................................86
Design a template .............................................................................87
Change the report item properties ....................................................88
Define method associated templates................................................88
Use method associated templates....................................................89
Browse the database with VA Report Generator...............................89
Print a custom report.........................................................................89
Copy custom reports to clipboard ....................................................90
VA Database 2.0
V
Page 7

Contents
8 Troubleshooting........................................................................................91
8.1 Data transfer: What to do if ..............................................................91
No data is received on the PC...........................................................91
The received data is not in the database ..........................................91
No data is received on the 746 VA Trace Analyzer ...........................91
Character buffer overrun or Invalid control check
sum message appears (error in log file) ...........................................92
Data is transferred to PC but not imported in
VA Database (error in log file) ...........................................................92
Data cannot be stored or the access is denied
on the specified device (error in log file) ...........................................92
8.2 Printing: What to do if .......................................................................92
Text reports are not printed completely.............................................92
Curves are missing in curve printing .................................................93
Curves in custom reports are missing in printing..............................93
Curve and axes lines are very thin.....................................................93
The automatic template load cannot be activated ............................94
The custom reports are not printed with the
currently loaded template..................................................................94
The automatic custom report printing is not working ........................94
Not all custom reports are printed with manual selection and
automatic template load enabled......................................................94
8.3 Display: What to do if ........................................................................94
No overlay curves are created...........................................................94
Curves in subwindows are not displayed..........................................95
Curves in custom reports are not displayed......................................95
8.4 Database: What to do if ....................................................................95
Background curves are missing........................................................95
Some replications of substances are missing...................................95
No calibration curves are available ...................................................95
Several determinations appear more than once in the database .....96
Filtering is not carried out correctly, e.g. for concentrations .............96
VA Database has become very slow in performance........................96
8.5 Export: What to do if .........................................................................96
Curves are not copied to clipboard correctly ....................................96
9 Appendix......................................................................................................97
9.1 Software license.................................................................................97
9.2 Ordering designations.......................................................................97
VI
10 Index ...........................................................................................................98
VA Database 2.0
Page 8

1 Introduction
1.1 Purpose of program
VA Database 2.0 is a database tool for archiving and administration of determinations and methods of the 746 VA Trace Analyzer
and the 693 VA Processor.
Up to four 746 VA Trace Analyzers can be connected to one PC.
All measurement data sent by the 746 VA Trace Analyzer is
stored in a database. This data can be sorted and filtered with
the help of different criteria. All curves and reports can be displayed and printed out. With the VA Report Generator it is possible to create format reports for single determinations and also table reports for a summary of sample series.
1 Introduction
VA Database 2.0 can also be used for saving determination and
method files on the PC. All other file types created by the 746 VA
Trace Analyzer like sample tables and rack definitions can also
be saved.
1.2 Installation
Hardware requirements for the PC
Computer Pentium with 133 MHz or higher
Operating system Windows 95 or Windows NT
Free space on hard disk 5 MB for program files
Working memory RAM Windows 95: 16 MB
50 MB recommended for data files
Windows NT: 32 MB
VA Database 2.0
RS232 Interfaces 1 for each 746 VA Trace Analyzer
Graphics resolution 640×480, better 1024×768 or more
Printer Any printer supported by
Windows 95/NT
1
Page 9

1 Introduction
Full program and demo version
Hardware Installation
The 6.2145.030 Dongle is part of the standard equipment of the
6.6016.103 Full Program version and 6.6016.901 Update
version. Install this dongle into LPT port 1 or 2 (see Hardware In-
stallation).
The 6.6016.108 Demo version of VA Database contains only
the software without dongle. This version can be used for 100
days. After this 100 days you may continue to use the program
without the possibility to store determinations to a database. You
can upgrade your demo version at any time if you install a
6.2145.030 Dongle into the LPT port.
1. Connect the RS232 interface 1 or the RS232 interface 2 on
the rear side of the 746 VA Trace Analyzer or the 693 VA
Processor to one of the serial COM ports of your PC with the
6.2125.060 RS interface cable (often COM port 1 is already
used by a serial mouse). If the PC has only 9 pin connector,
the 6.2125.010 adapter cable (25 pin to 9 pin) has to be used
in addition.
2. If the PC has one LPT port, install the 6.2145.030 Dongle
into the LPT1 printer port and the printer cable into the
dongle.
3. If the PC has two LPT ports, install the printer cable into the
LPT1 port and the 6.2145.030 Dongle into the LPT2 printer
port.
Software Installation
Insert setup disk 1 into drive "A:", click on <Start> and Run. Enter
"A:\setup.exe". Follow the instructions given in the setup program.
The software package will be installed in the desired directory. In
addition to the program files, the following folders are installed:
Data Folder for storage of databases and filters,
Backup Folder for storage of backup files with an exam-
contains a demonstration database Demo.* for
first exercises and some example filtering criteria
files *.vaf
ple (Test747.*)
Templates Folder for storage of custom report files *.vat,
contains some example templates
2
VA Database 2.0
Page 10
Configure Windows 95 for VA Database
It is recommended to install the COM port driver with FIFOBuffers. Proceed as follows:
1. <Start> → Settings → Control panel → System
2. In SYSTEM PROPERTIES window choose the tab Device Man-
ager.
3. In the tree expand Ports by clicking on + and mark COM1 or
COM2 depending to which port the 693/746 is connected.
4. Click on Properties, choose tab Port settings and click on
<Advanced>.
5. Change the settings as follows.
1 Introduction
6. Click on <OK> in each window.
Configuration of 746 VA Trace Analyzer
On page "VA TRACE ANALYZER" the following settings are recommended:
Baud rate 9600
Data bits 8
Stop bit 1
Parity none
Handshake HW Short
Receive Mode on
Printer Type none
Printer Width 1.0
Remote keyboard off
When the configuration of the interface has to be changed, it is
important to save the new parameter by pressing the softkey
<Save Ifc.par.> (F7) before leaving the page.
VA Database 2.0
Note: The COM port settings on both the 746 VA Trace Analyzer
and the PC have to be the same.
3
Page 11

1 Introduction
Compatibility with 693 VA Processor
Registration
The compatibility of the VA Database 2.0 program with a 693 VA
Processor depends on the program version used:
• Program 5.693.0010
Not compatible with VA Database 2.0. Ask your local representative for a program upgrade.
• Program 5.693.0020, 5.693.0021, 5.693.0022
Not all functions of the VA Database 2.0 software are active.
From substance views only the first replication (VR = *0) is
available. Calibration curves are not available at all.
• Program 5.746.0100
Full compatibility with VA Database 2.0.
Please send us your 8.746.8017 Registration card as soon as
possible so we can register you as an official user. Only registered users will get updated program versions at a special price.
1.3 Overview of program windows
VA Database 2.0 consists of different windows whose functionality is linked together. The different windows are:
MAIN WINDOW Administration of databases,
Display of reports and curves
VA DATABASE TABLE Tabular view of database,
Sorting and filtering possibilities
VA DATABASE EXPLORER File manager view of database
VA COMMUNICATION Transfer of data between 746 VA
Trace Analyzer and PC
VA REPORT GENERATOR User definable reports
Not all of the existing windows have to be used at the same time.
Some of them can be closed.
1.4 Overview of file types
File types of 746 VA Trace Analyzer
The following file types are produced by the 746 VA Trace Analyzer and the 693 VA Processor:
*.dtm Determination file (binary file)
Contains determination data and method.
Determination files can be sent from the 746 VA
4
VA Database 2.0
Page 12

Trace Analyzer to the backup directory specified
in the VA Database program and vice versa.
The *.dtm file is stored automatically in the database if a determination is added to the database.
*.mth Method file (binary file)
Contains the method.
Method files can be sent from the 746 VA Trace
Analyzer to the backup directory specified in the
VA Database program and vice versa.
*.smp Sample data file (ASCII file)
Contains data of the sample data table.
Sample data files can be sent from the
"SAMPLES" page of the 746 VA Trace Analyzer to
the backup directory specified in the VA Database program and vice versa.
*.aut Rack data file (binary file)
Contains data for racks of 695 Autosampler.
Rack data files can be sent from the data card of
the 746 VA Trace Analyzer to the backup directory specified in the VA Database program and
vice versa.
1 Introduction
*.rpt Report file (ASCII file)
Contains all information about determination or
method in ASCII format.
By sending an actual determination report Report
ActDetm, the contents of the *.rpt file are stored
automatically in the database together with the
corresponding binary file *.dtm. Additionally, the
*.rpt file can be stored in the backup directory
specified in the VA Database program together
with the corresponding binary file *.dtm.
By sending an actual method report Report Act-
Meth, the *.rpt file is stored in the backup direc-
tory specified in the VA Database program together with the corresponding binary file *.mth.
File types of VA Database
The following file types are produced automatically by the VA
Database program when a new database is created:
*.vad Configuration file
Contains all current settings of the VA Database
program and its windows.
VA Database 2.0
*.db Database file
Paradox database file.
5
Page 13

1 Introduction
*.mb Database file
Paradox database file with blob fields (curves,
binary determination file, etc.).
*.px Special database file
Special index file created automatically.
Note: These 4 files on the hard disk should never be renamed
with the Windows Explorer or another file manager tool. For this
purpose the function Save Database As... should be used.
The following file types are produced by the VA Database program when saving templates or filter definitions:
*.vat Database template
Template file for VA Report Generator.
*.vaf Filtering criteria file
Special file for storing defined filtering criteria
(see Filtering determinations, page 32).
Export file types
The following file types can be exported by the VA Database program:
*.txt ASCII text file
*.wmf Windows metafile
*.emf Enhanced Windows metafile
*.bmp Bitmap file
*.dat Measurement data file
ASCII text file format for export of database table
contents (see Export of table text, page 30).
Graphic file format for export of curve subwindows (see Export of curves, page 13).
Graphic file format for export of curve subwindows (see Export of curves, page 13).
Graphic file format for export of curve subwindows (see Export of curves, page 13).
Data file format for export of measurement points
(see Export of measurement points, page 31).
1.5 Context sensitive menus
Most of the menu functions of the program windows or subwindows are also accessible by clicking on the desired window or
item and pressing the right mouse button. The pop up windows
have different contents and functions depending on the selected
active window or item type.
6
VA Database 2.0
Page 14

2 Main window
2.1 Main Window overview
The MAIN WINDOW is the center of the VA Database software.
From here the current working database is opened. In the window detailed information about the stored determinations
(reports, voltammograms, and calibration curves) can be displayed in subwindows. The content of the displayed subwindows
can be printed and exported. The other VA Database windows
are also opened from the MAIN WINDOW.
2 Main window
2.2 Starting/closing the program
Starting the VA Database program
Start the Program
Double-click the VA Database icon or the
VADB.EXE file to start the VA Database 2.0 pro-
gram. The WELCOME TO VA DATABASE window
appears. Select the desired option for creating a
new, open the last or open an existing database
and click <OK>.
VA Database 2.0
7
Page 15

2 Main window
Note: If you start the program after dongle installation for the first
time, you are asked to restart Windows 95/NT to complete the
dongle installation.
Closing the VA Database program
2.3 Databases
Database organization
Each database consists of the 4 files *.vad, *.mb, *.db, *.px, which
are created automatically when a new database is created (see
also File types of VA Database, page 5). All changes in the database will be stored immediately to this 4 files on the hard disk.
MAIN WINDOW / File / Exit
Quit the VA Database 2.0 program. The current
database will be closed and saved (the same
function can be done by pressing the button
of the MAIN WINDOW).
Note: These four files on the hard disk should never be renamed
with the Windows Explorer or another file manager tool. For this
purpose the function Save Database As... should be used.
The current working database may be different from databases
opened in background for data transfer (see Data transfer, page
54).
Handling of databases
In order to handle measurement data sent by a 746 VA Trace
Analyzer these data must be stored in a database.
MAIN WINDOW / File / New Database
MAIN WINDOW / File / Open Database...
Create a new database. The CREATE NEW VA
DATABASE window appears where the name of
the database configuration file *.vad and its directory have to be entered. Then the new database will be opened.
Open an existing database. The OPEN VA DATA-
BASE window appears where the name of the
database configuration file *.vad and its directory
have to be selected.
8
VA Database 2.0
Page 16
MAIN WINDOW / File / Save Database As...
Save the current database under a new name.
The SAVE VA DATABASE window appears where
the name of the database configuration file *.vad
and its directory have to be entered.
MAIN WINDOW / File / Close Database
Close the current database.
MAIN WINDOW / File / 1 … #
The list of the previous opened databases. When
an entry of the list is clicked on the corresponding database will be opened.
Import VA determinations
MAIN WINDOW / File / Import VA Determinations
Import determinations which had been transferred to the PC with the 6.6017.000 «VA Back
Up» program. In the appearing IMPORT VA DE-
TERMINATIONS window the list of existing *.rpt
files (ASCII reports) is shown.
2 Main window
VA Database 2.0
Select the file(s) which should be imported and
click the <Open> button.
Note: It is necessary that a Report ActDtm has been transferred
from the page "DOCUMENTATION" of the 746 VA Trace Analyzer
to the PC. Then two files with the same file name but with the two
extensions *.dtm and *.rpt respectively are present. If one of those
is missing the import will not be carried out. With the function
<Copy to><RSIfc.1> on the page "METHODS" or "DETERMINA-
TIONS" of the 746 VA Trace Analyzer only the binary file (*.dtm)
will be transferred.
9
Page 17
2 Main window
Backup database files
Changes in the database will be stored immediately to the 4 database files *.vad, *.mb, *.db, *.px on the hard disk and can not be
canceled by an undo function. So if you want to return to a former
version of the database, this database must have been copied
before by means of the function Save Database As... under a new
name. This backup copy can then be opened again and stored
under the original name with Save Database As... .
Note: These 4 files on the hard disk should never be renamed
with the Windows Explorer or another file manager tool. For this
purpose the function Save Database As... should be used.
2.4 Printing of text and curves
Document printing
MAIN WINDOW / File / Print... (Ctrl+P)
Print the content of the selected subwindow. The
number of prints and the pages to be printed
can be selected in the appearing PRINT window
which depends on the selected printer.
Document print preview
MAIN WINDOW / File / Print Preview
The PRINT PREVIEW window appears. The content of the current window is shown in the appearance formatted for the desired printer. The
following functions are available by pressing the
corresponding buttons or selecting the menu
items in the PRINT PREVIEW window or in the
context sensitive menu:
10
First Page Go to first page
Previous Page Go to previous page
Next Page Go to next page
VA Database 2.0
Page 18

Document page setup
MAIN WINDOW / File / Page Setup...
2 Main window
Last Page Go to last page
Print... see Document printing
Page Setup... see Document page setup
Close Close preview window
The format of the page to be printed can be
changed in the appearing PAGE SETUP window
which contains up to three tabs:
Page layout
The printer, the paper size, the page
margins, and the page orientation are
adjustable.
VA Database 2.0
Text properties (only for text windows)
Font, font style, font size and line spacing for text printing can be changed.
With Interline space set to Exactly, the
space can be adjusted exactly to the
desired point value.
11
Page 19
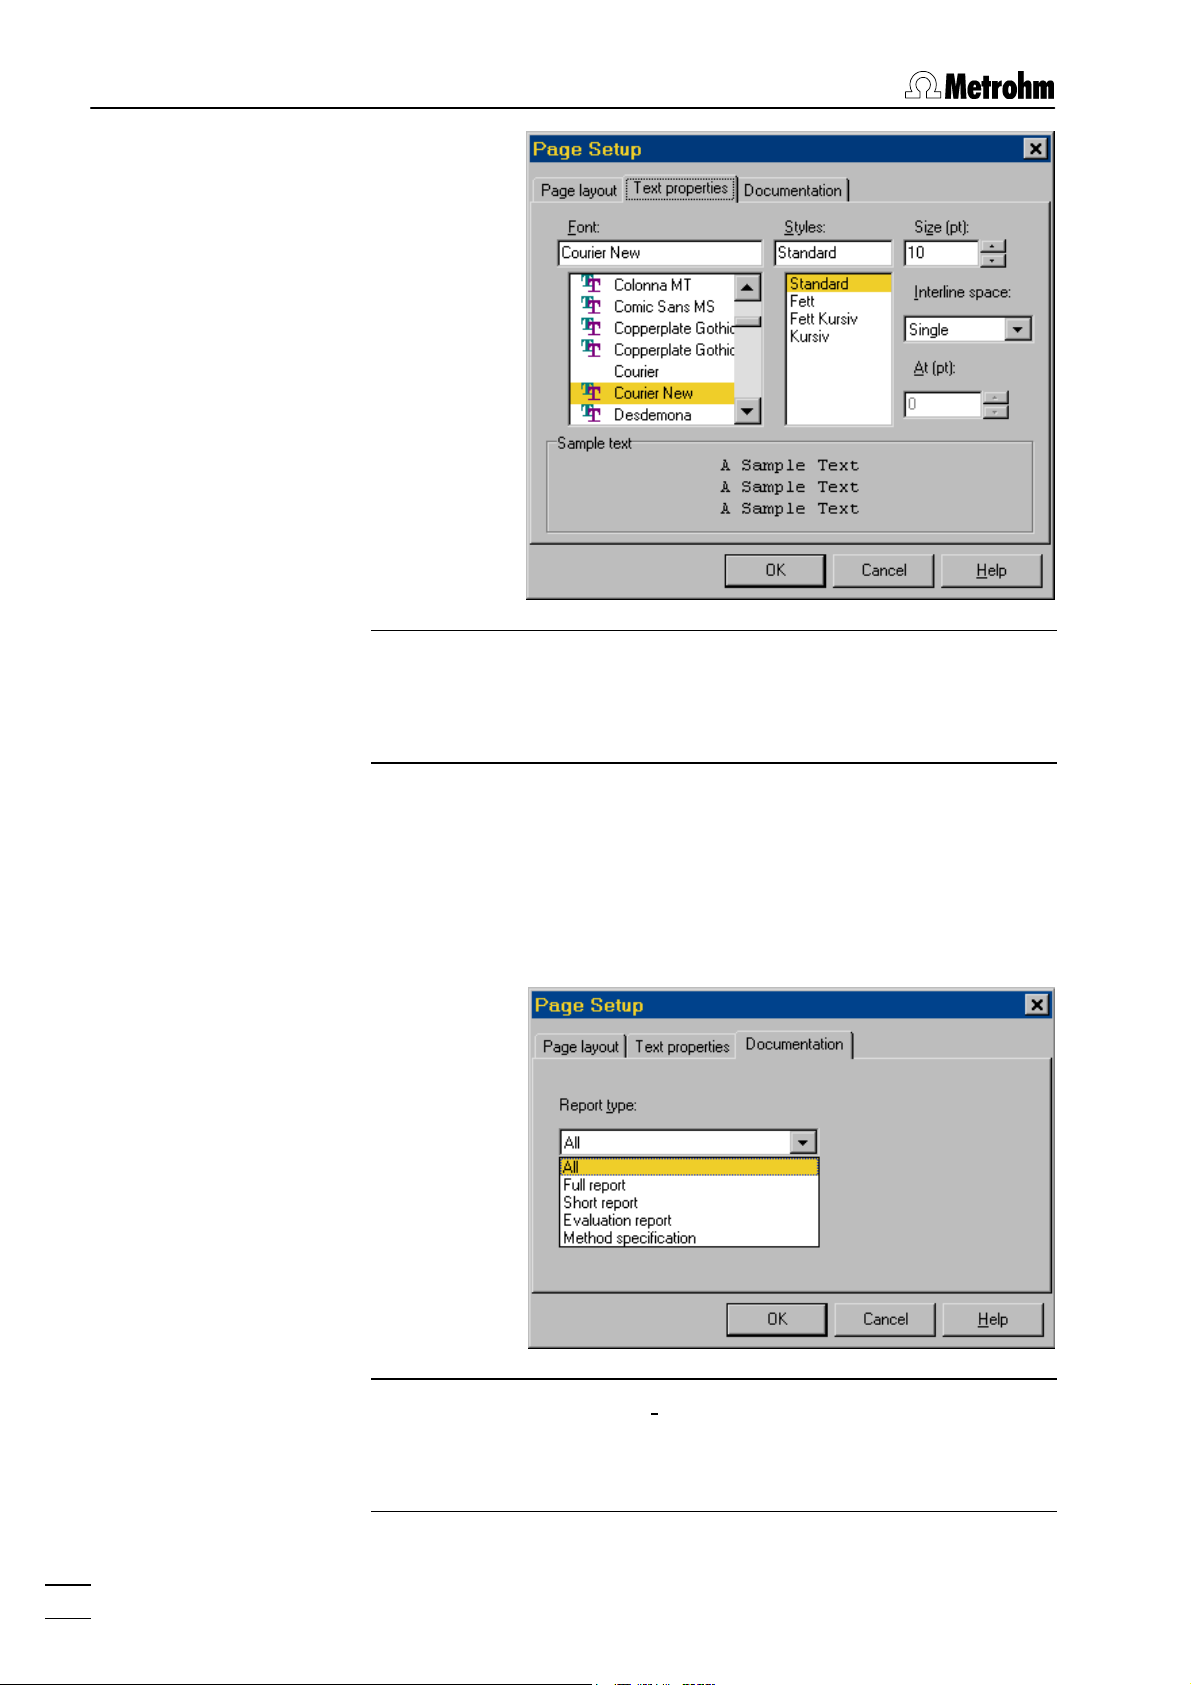
2 Main window
Note: The selected settings is not saved permanently and reset
to the default values if a new text report is opened. These default
settings can be changed in the GENERAL PREFERENCES window
(see Text report settings, page 24).
Documentation (only for text windows)
The type of text report to be printed can
be specified. The formats of the text reports are identical to the formats available on the 746 VA Trace Analyzer.
Note: The selected Report type is not saved permanently and reset to All if a new text report is opened. This default setting can
be changed in the GENERAL PREFERENCES window (see Text re-
port settings, page 24).
12
VA Database 2.0
Page 20
2.5 Export of text and curves
Copy text or curves to clipboard
MAIN WINDOW / Edit / Copy (Ctrl+C)
Text report: Copy the selected text in the text
subwindow to the clipboard. If no text is selected, the whole content of the subwindow is
copied.
Curves: Copy substance, segment or calibration
curve to the clipboard.
Note: With VA Database under Windows 95, curves are copied to
the clipboard in square size. If you import the curves into other
programs from the clipboard, always resize the graphic window
to its initial aspect ratio, otherwise axes, labels, and texts are not
displayed correctly. Alternatively, export and import the curve in
the *.emf, *.wmf or *.bmp format where the aspect ratio is retained.
2 Main window
Export of curves
MAIN WINDOW / Edit / Export as Metafile... (*.wmf)
MAIN WINDOW / Edit / Export as Enhanced Metafile... (*.emf)
MAIN WINDOW / Edit / Export as Bitmap... (*.bmp)
Note: Some programs (e.g. Microsoft Word 6 and 7) cannot im-
port of files in the *.emf format. In this case, export and import the
curve in the *.wmf or *.bmp format.
For exporting curves to graphic files it is recommended to use
the *.wmf or *.emf format for better resolution and the possibility to
rescale the graphics.
The content of the current curve subwindow will
be saved as a graphics file on the hard disk. The
destination directory and the file name have to
be entered in the appearing EXPORT window.
The graphics file can be imported into other programs like Microsoft Word or Excel.
VA Database 2.0
13
Page 21
2 Main window
2.6 Display of curves
Display of substance and segment curves
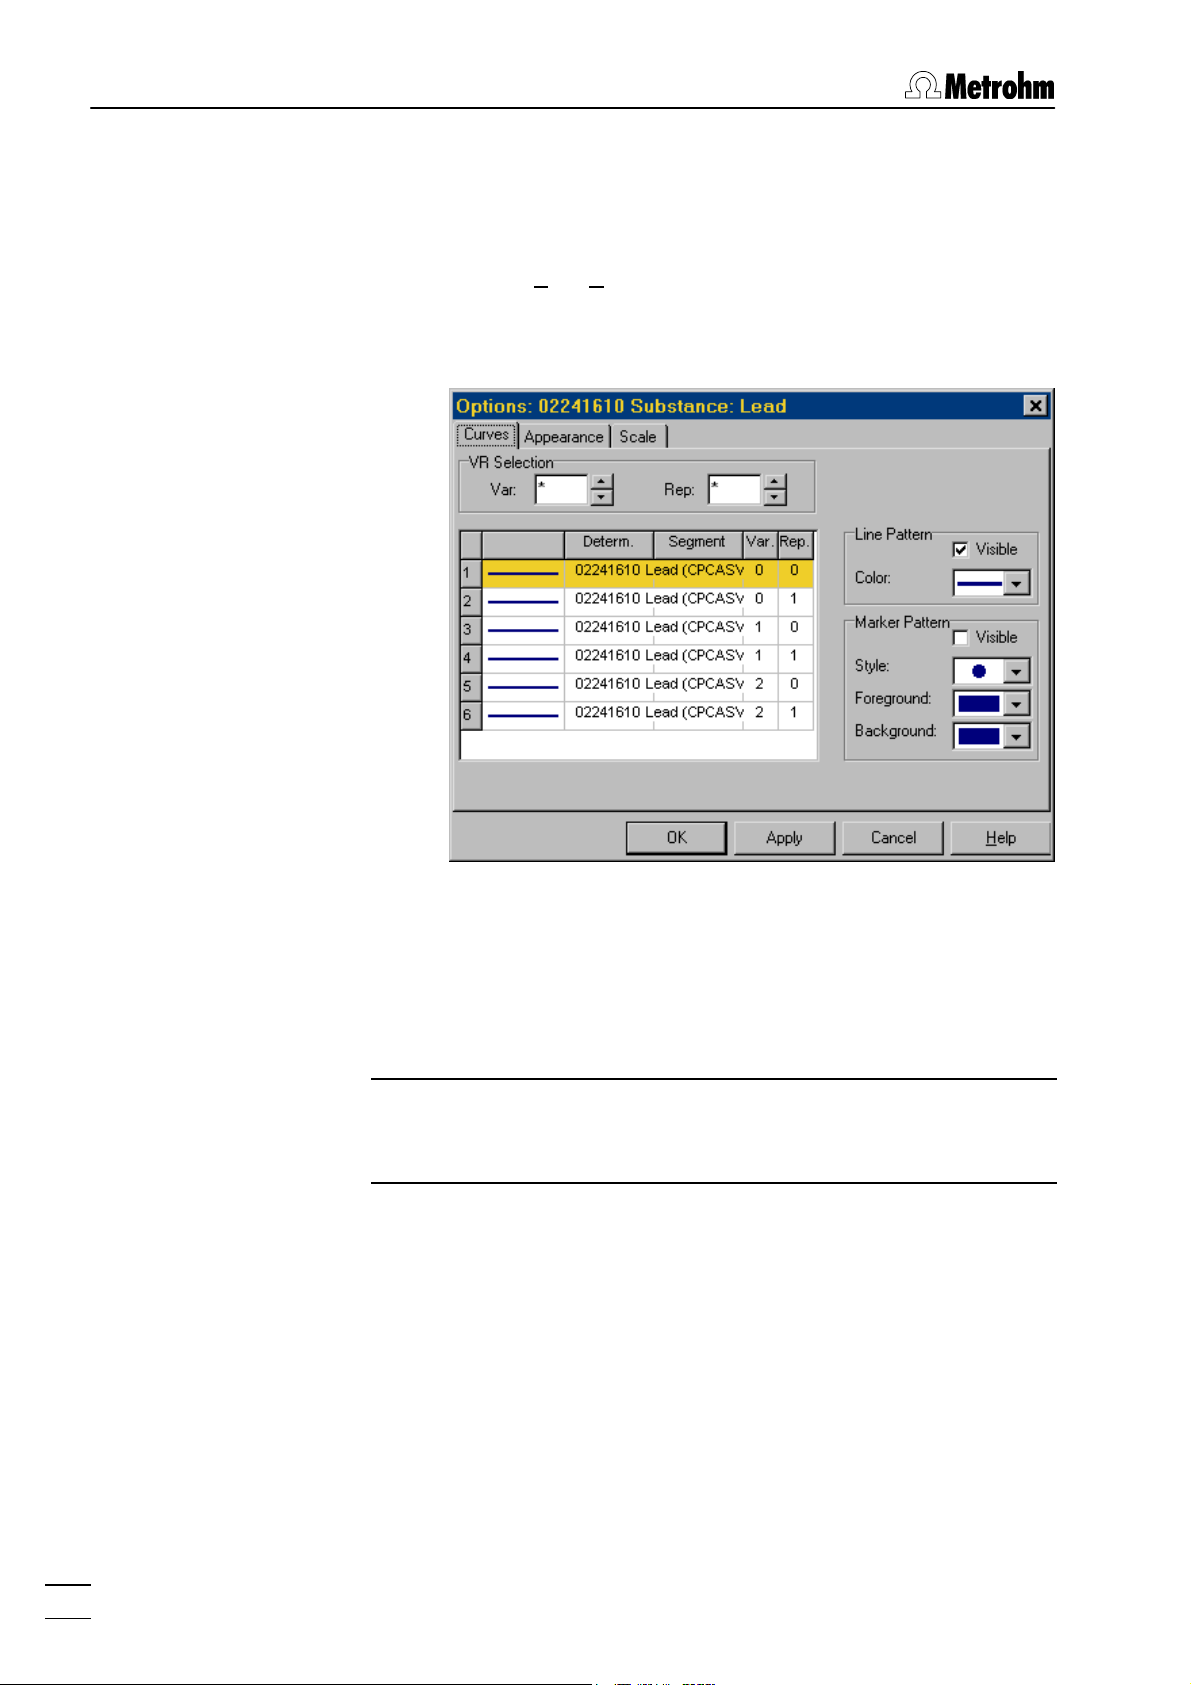
MAIN WINDOW / Edit / Options...
The display of substance and segment curves
can be changed in the appearing OPTIONS window with the tab Curves:
VR Selection
Selection of curves to be displayed by means of
the two fields Var (Variation) and Rep (Replication). Selections have to be done in the same
way as in the 746 VA Trace Analyzer.
Note: With determinations recorded by the 693 VA Processor
(program version 5.693.0022 or older) only the replications "0“
(VR = *0) are available for display of substance curves.
List of curves
The list shows all existing curves. The not selected curves of the determination are marked
with "not visible“.
Line Pattern
Make line visible or not and change color.
Marker Pattern
Make measurement points visible or not and
change style and colors.
14
VA Database 2.0
Page 22
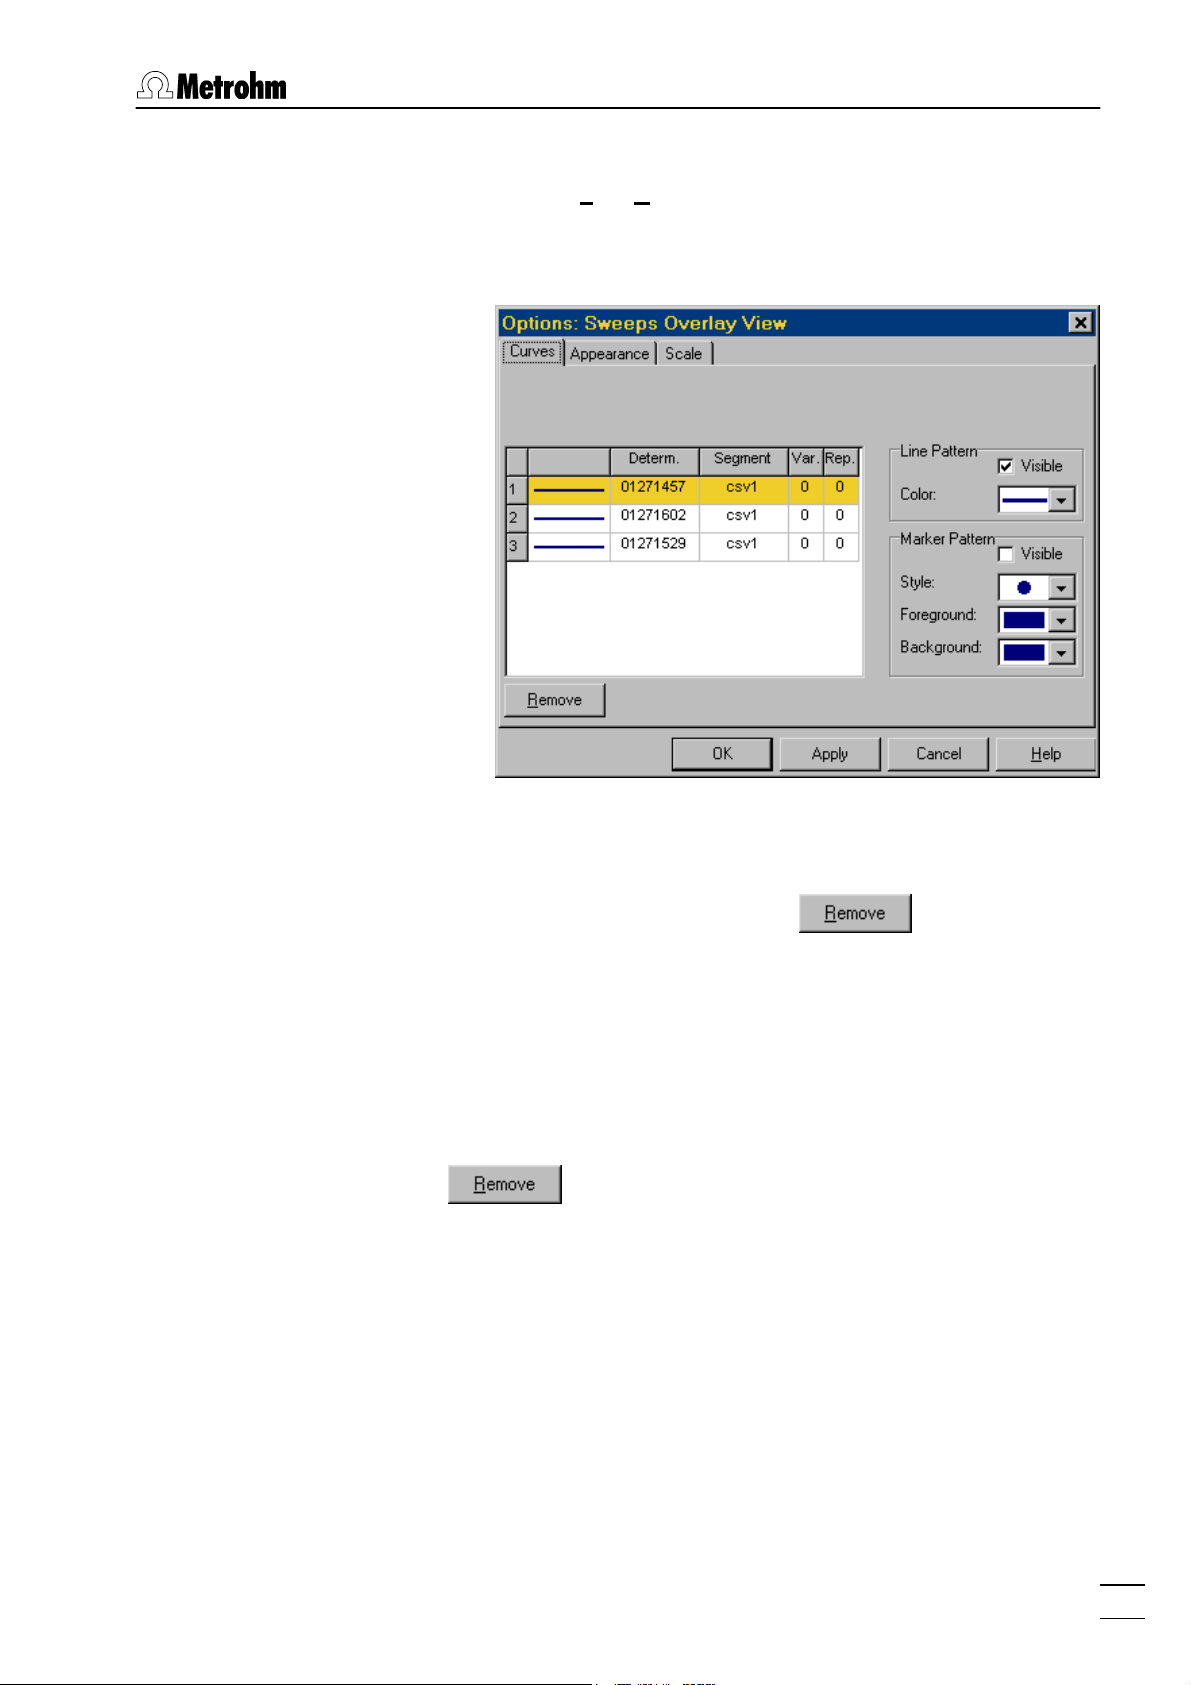
Display of overlay curves
MAIN WINDOW / Edit / Options...
The display of substance or segment overlay
curves can be changed in the appearing OP-
TIONS window with the tab Curves:
2 Main window
List of curves
The list shows all overlay curves. Single curves
can be deleted with . New curves can
be added by drag and drop of curve symbols
from the VA DATABASE EXPLORER.
Line Pattern
Make line visible or not and change color.
Marker Pattern
Make measurement points visible or not and
change style and colors.
Remove selected curve.
VA Database 2.0
15
Page 23
2 Main window
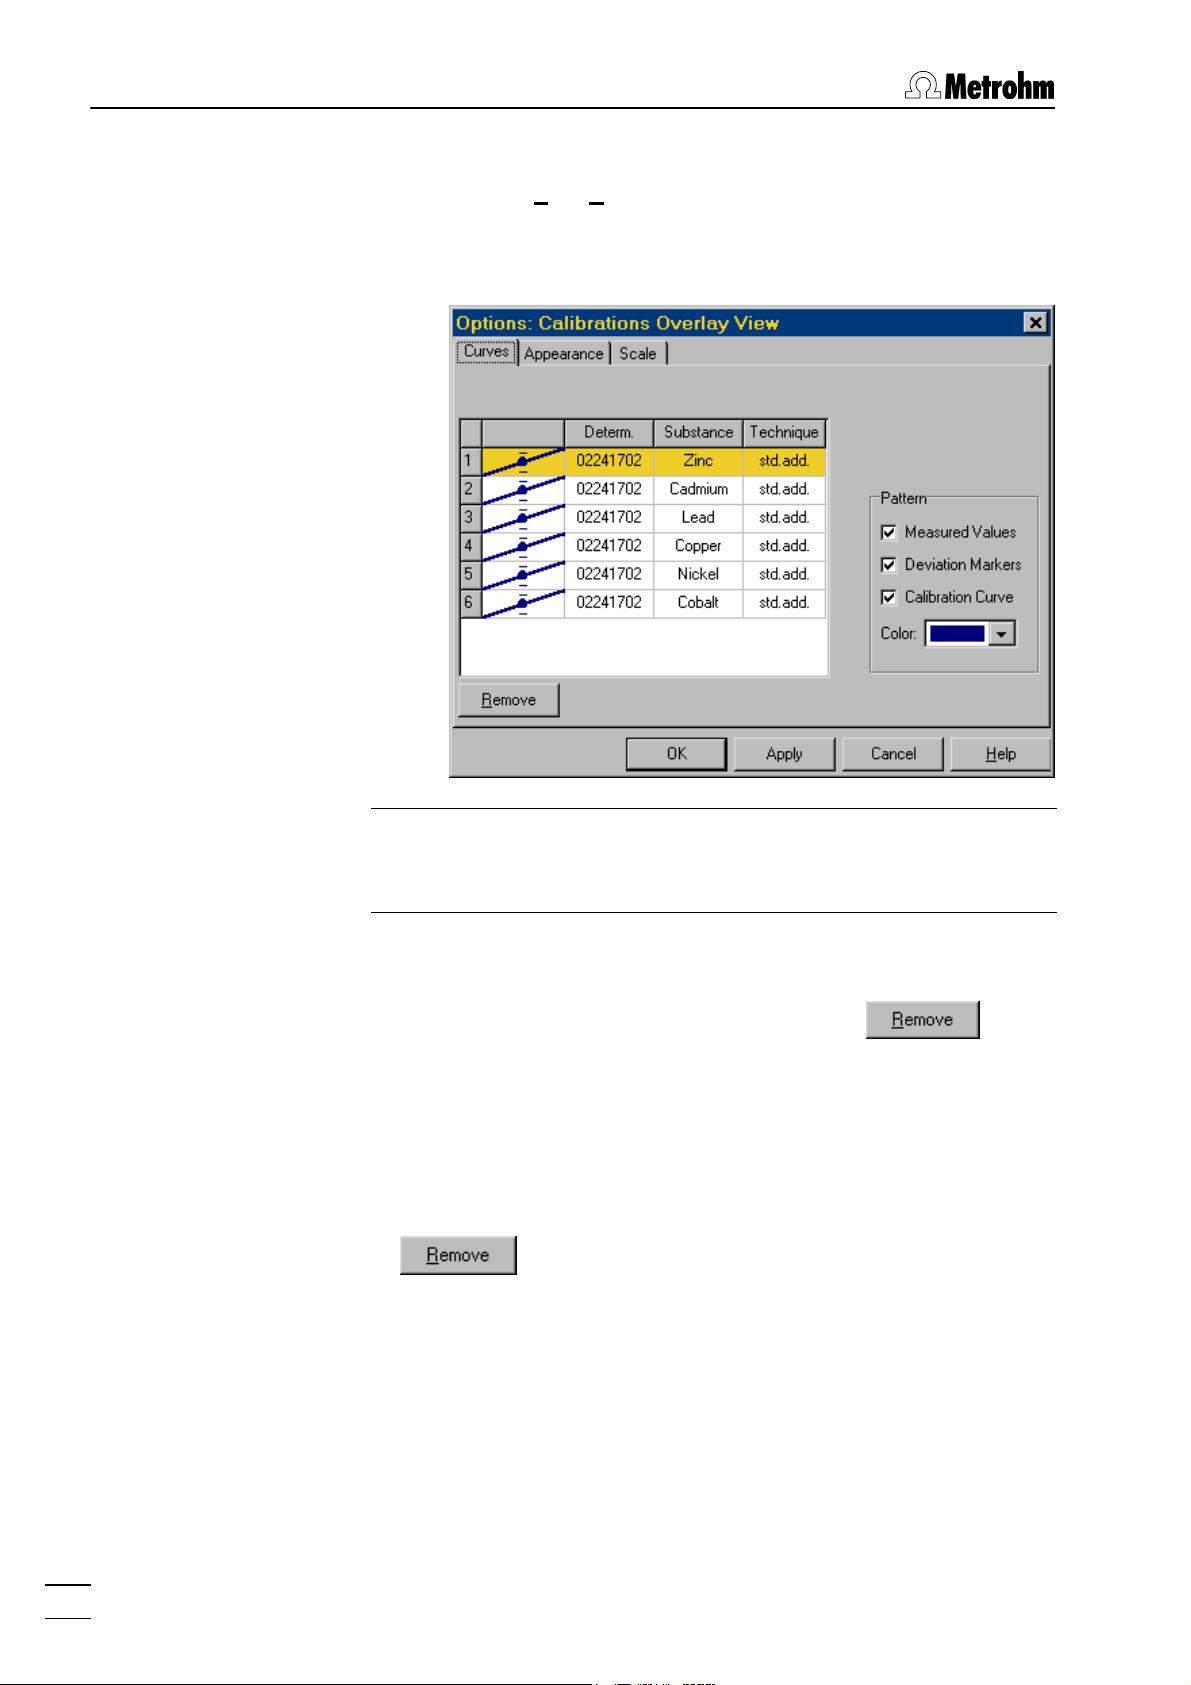
Display of calibration curves
MAIN WINDOW / Edit / Options...
The display of calibration curves (single or overlay curves) can be changed in the appearing
OPTIONS window with the tab Curves:
Note: With determinations recorded by the 693 VA Processor
(program version 5.693.0022 or older) no calibration curves can
be displayed.
List of curves
The list shows all overlay calibration curves. Single curves can be deleted with . New
curves can be added by drag and drop of curve
symbols from the VA DATABASE EXPLORER.
Pattern
Switch display of measured values, deviation
markers and calibration curve on/off, change line
colors.
Remove selected calibration curve from overlay
curves.
16
VA Database 2.0
Page 24
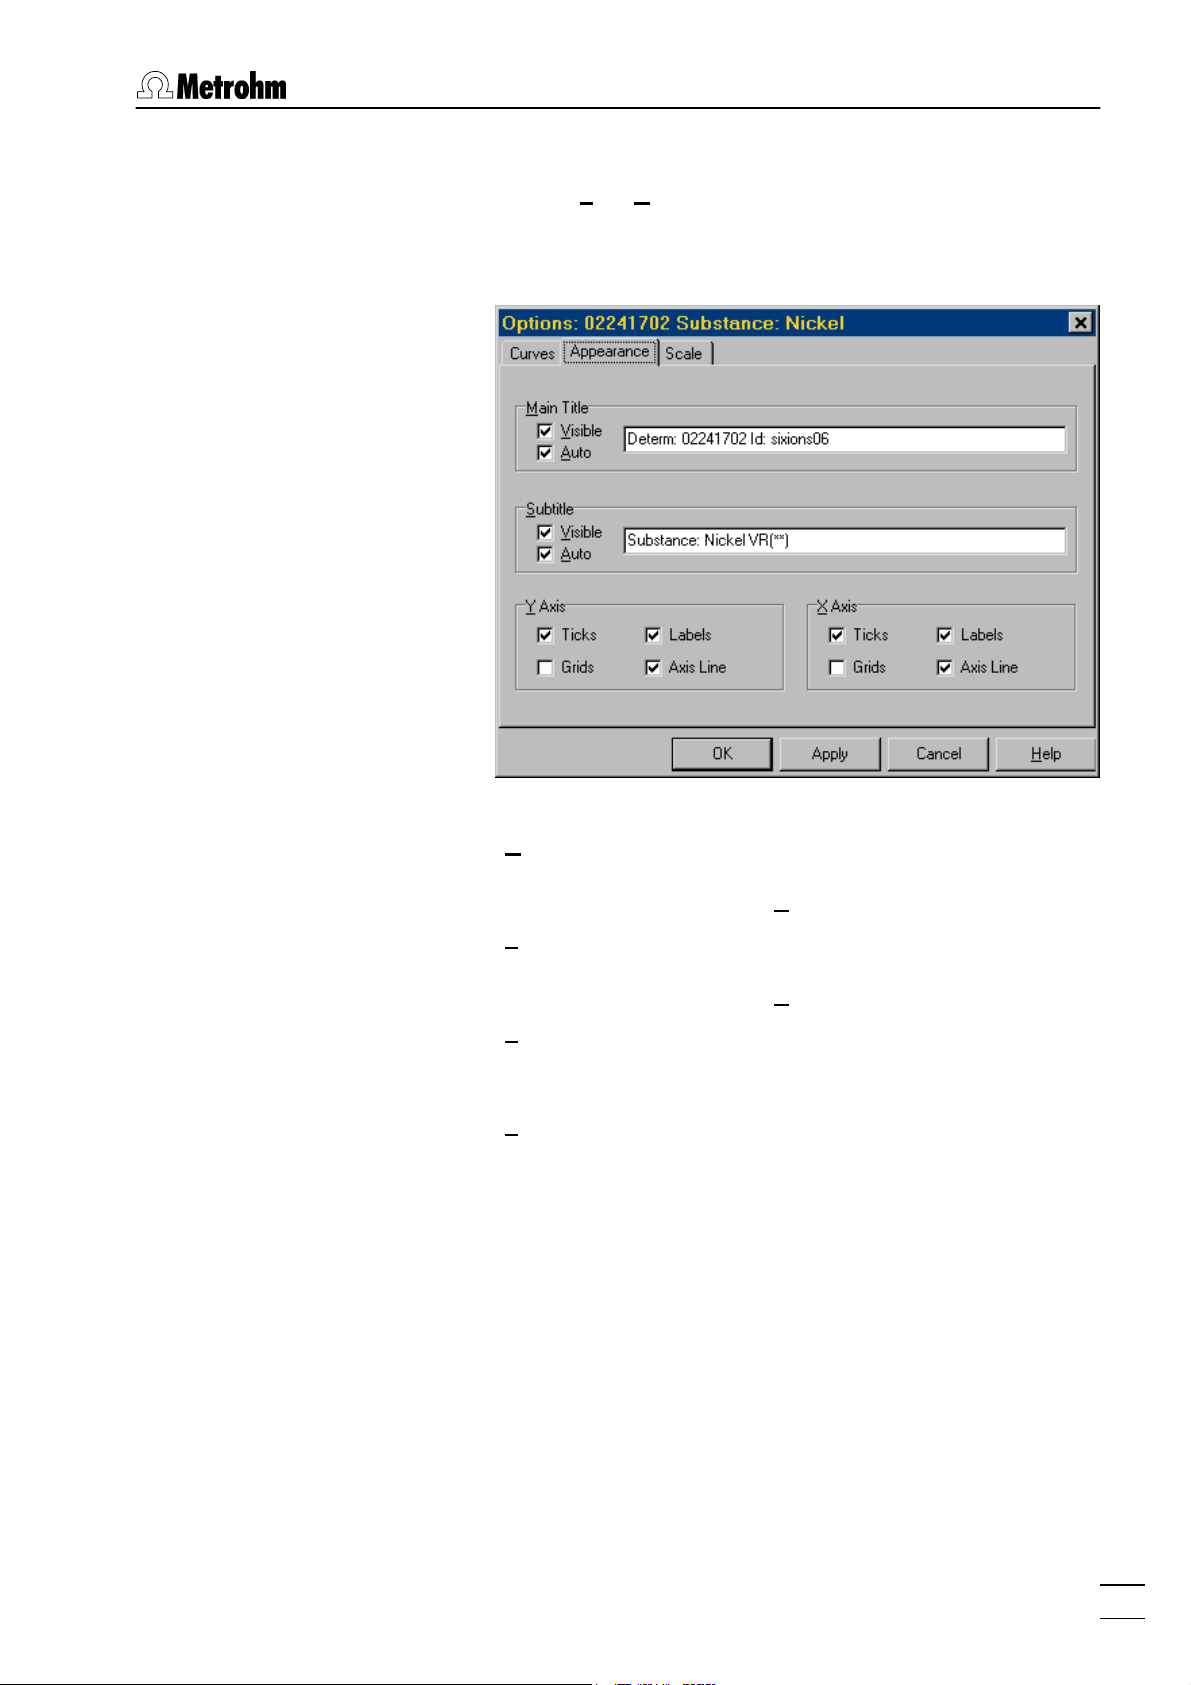
Appearance of curves
MAIN WINDOW / Edit / Options...
2 Main window
The appearance of all types of curves can be
changed in the appearing OPTIONS window with
the tab Appearance:
Main Title
Subtitle
Y Axis
X Axis
The main title can be disabled, changed or set to
the default value (Auto).
The subtitle can be disabled, changed or set to
the default value (Auto).
Ticks, grids, labels, and axis lines can be enabled or disabled.
Ticks, grids, labels, and axis lines can be enabled or disabled.
VA Database 2.0
17
Page 25
2 Main window
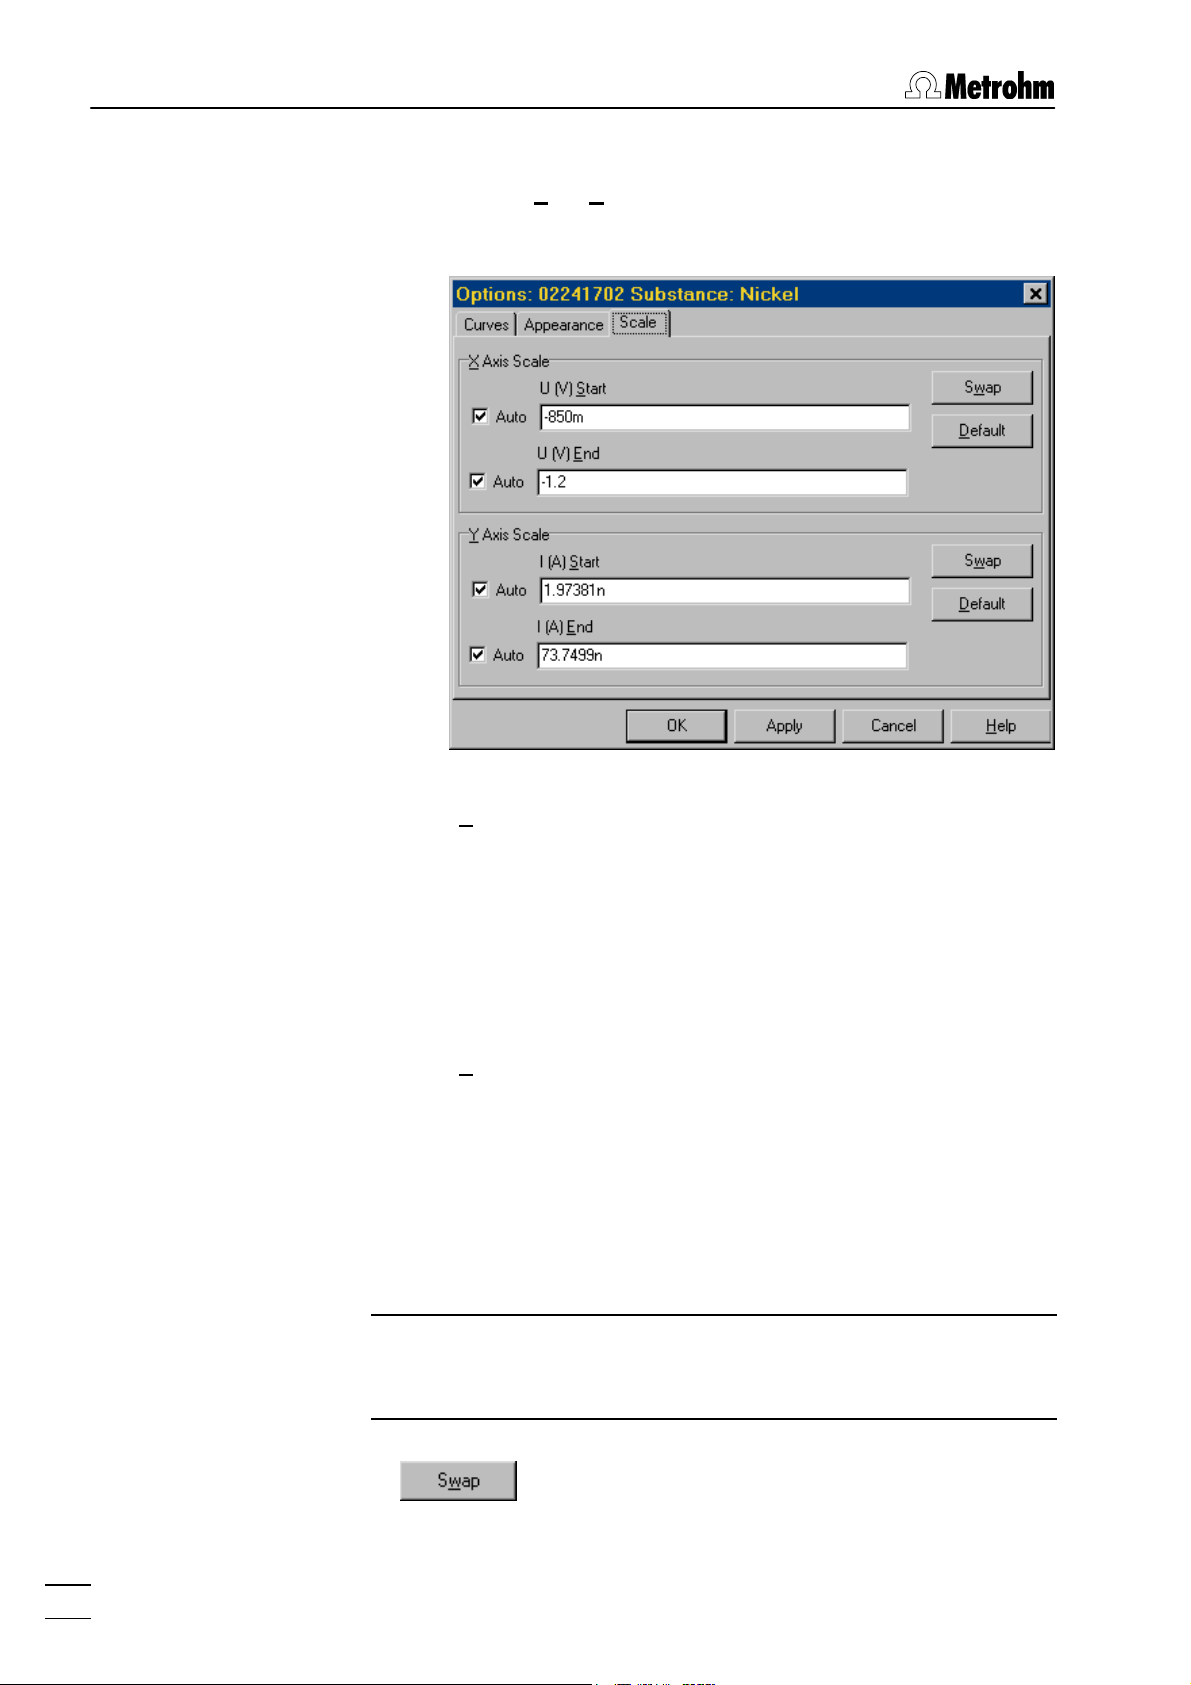
Scaling of curve axes
MAIN WINDOW / Edit / Options...
The scaling of curve axes can be changed in the
appearing OPTIONS window with the tab Scale:
X Axis Scale
The start and end value of the x axis can be
changed manually. The default settings are
made according to the method of the 746 VA
Trace Analyzer. With Auto enabled the lower or
upper border of the whole segment will be used
for the display.
Y Axis Scale
The start and end value of the y axis can be
changed manually. The default settings are
made according to the method of the 746 VA
Trace Analyzer. With Auto enabled the y axis is
scaled automatically so that all measurement
points are visible. The potential range of the predefined substance scale may be exceeded.
Note: The stored numerical values are displayed with automatically calculated prefixes. Entries can also be done using prefixes
(m, u, n, p).
18
Invert orientation of y or x axis.
VA Database 2.0
Page 26
Set start and end values back to the original
borders defined in the 746 VA Trace Analyzer.
This function is also available with the Set Default
Scale option of the context sensitive menu or by
pressing the <F8> key.
Zooming of curve windows
Zoom Curve regions can be enlarged by zooming the
desired section while pressing the left mouse
button.
Reset zoom The curve display is set back to the original bor-
ders defined in the 746 VA Trace Analyzer by
pressing the <F8> key or selecting the Set De-
fault Scale option of the context sensitive menu
opened by clicking the right mouse button.
2 Main window
2.7 Settings
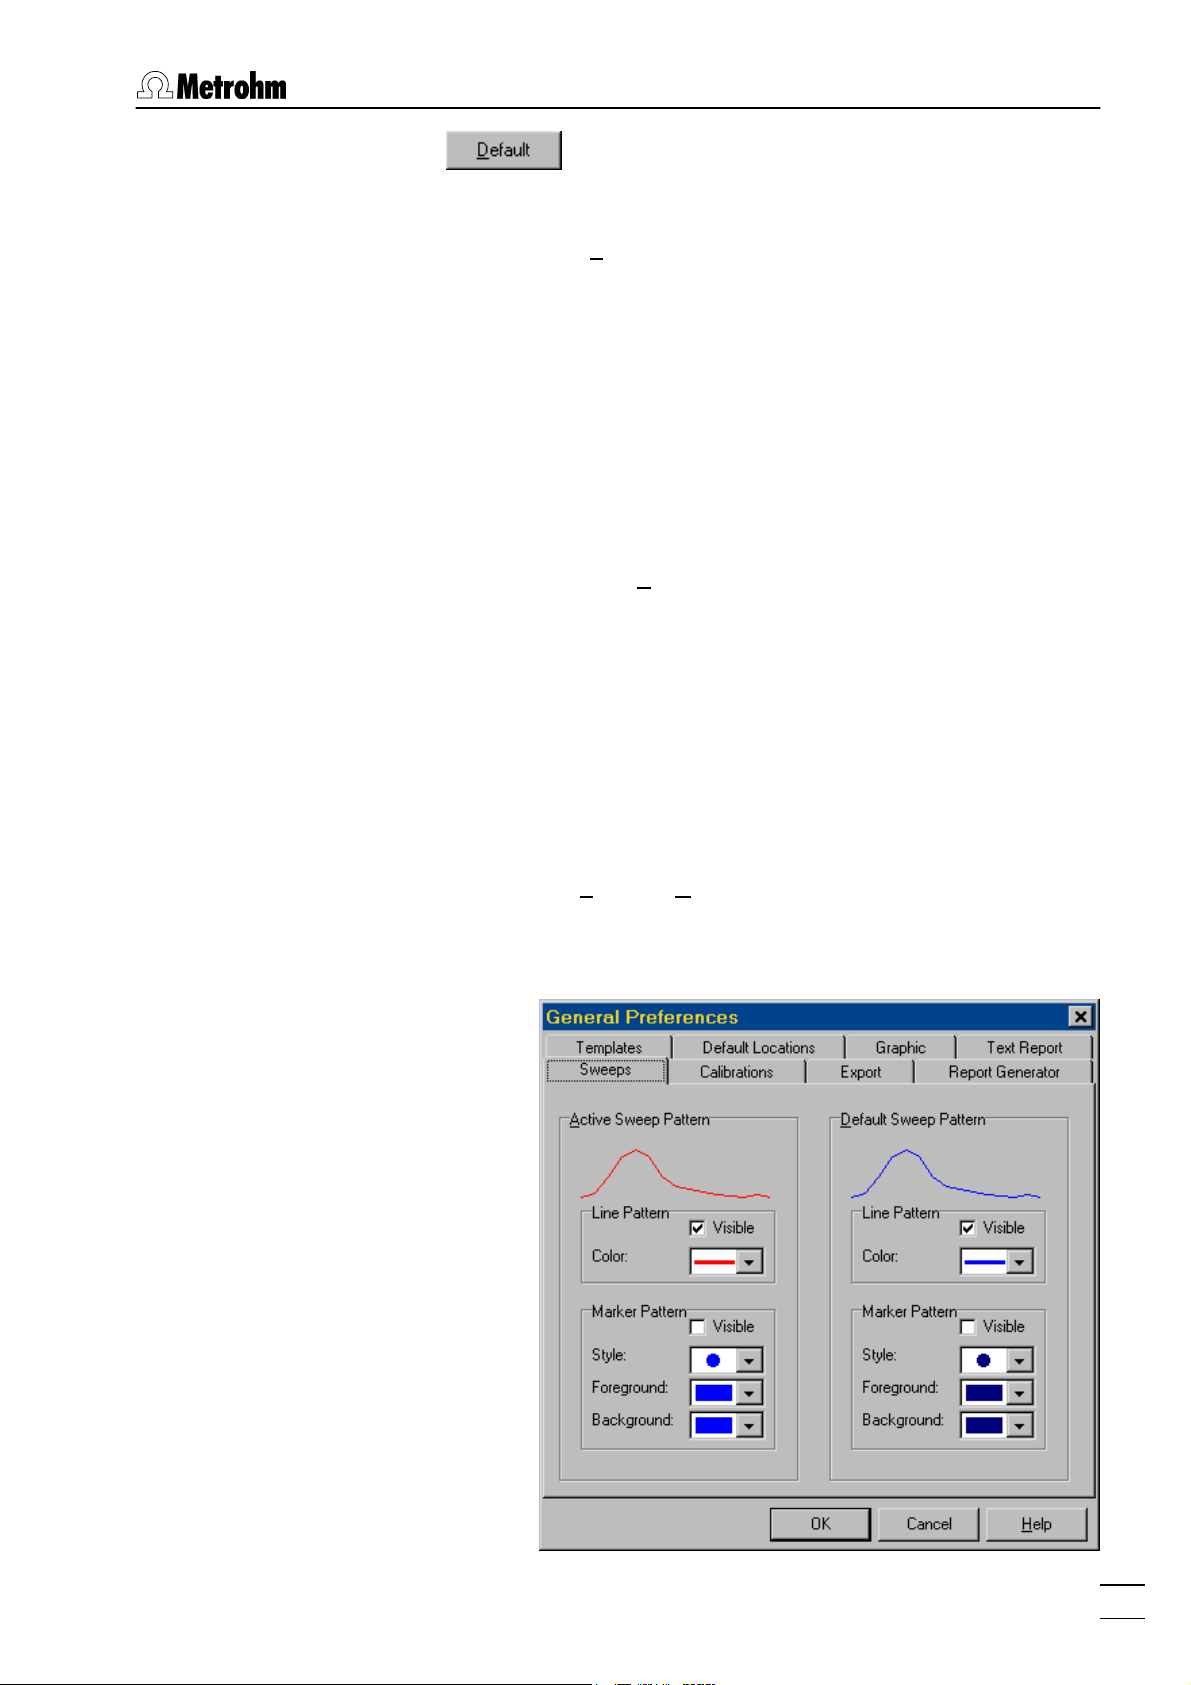
Sweep settings
MAIN WINDOW / Settings / General Preferences...
In the GENERAL PREFERENCES window the default curve styles for substance and segment
curves can be defined with the Sweeps tab:
VA Database 2.0
19
Page 27
2 Main window
Calibration settings
Active Sweep Pattern
Parameters for line and marker patterns of the
active (selected) substance or segment curve.
Default Sweep Pattern
Parameters for line and marker patterns of the
non-active substance or segment curves.
Line Pattern
Make line visible or not and change color.
Marker Pattern
Make measurement points visible or not and
change style and colors.
MAIN WINDOW / Settings / General Preferences...
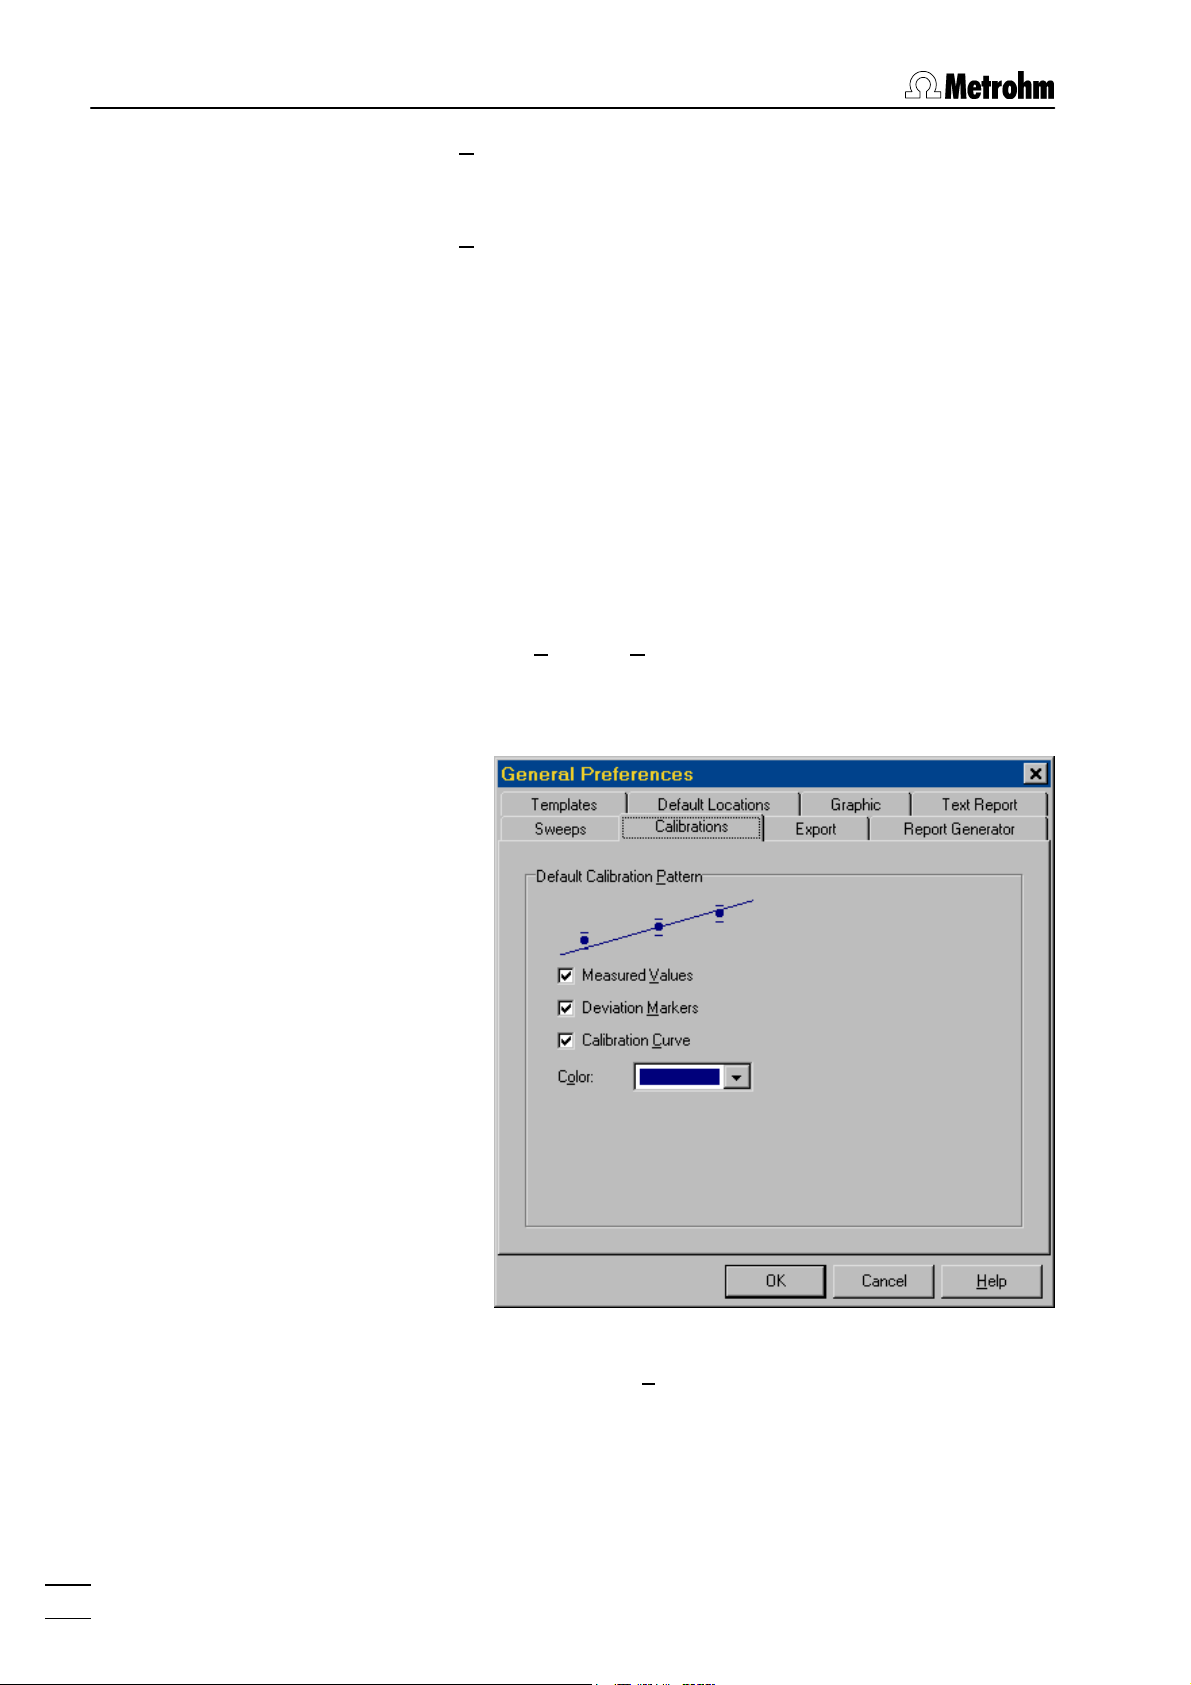
In the GENERAL PREFERENCES window default
curve styles for substance and segment curves
can be defined with the Calibrations tab:
20
Default Calibration Pattern
Switch on/off display of measured values, deviation markers and calibration curve, change color.
VA Database 2.0
Page 28
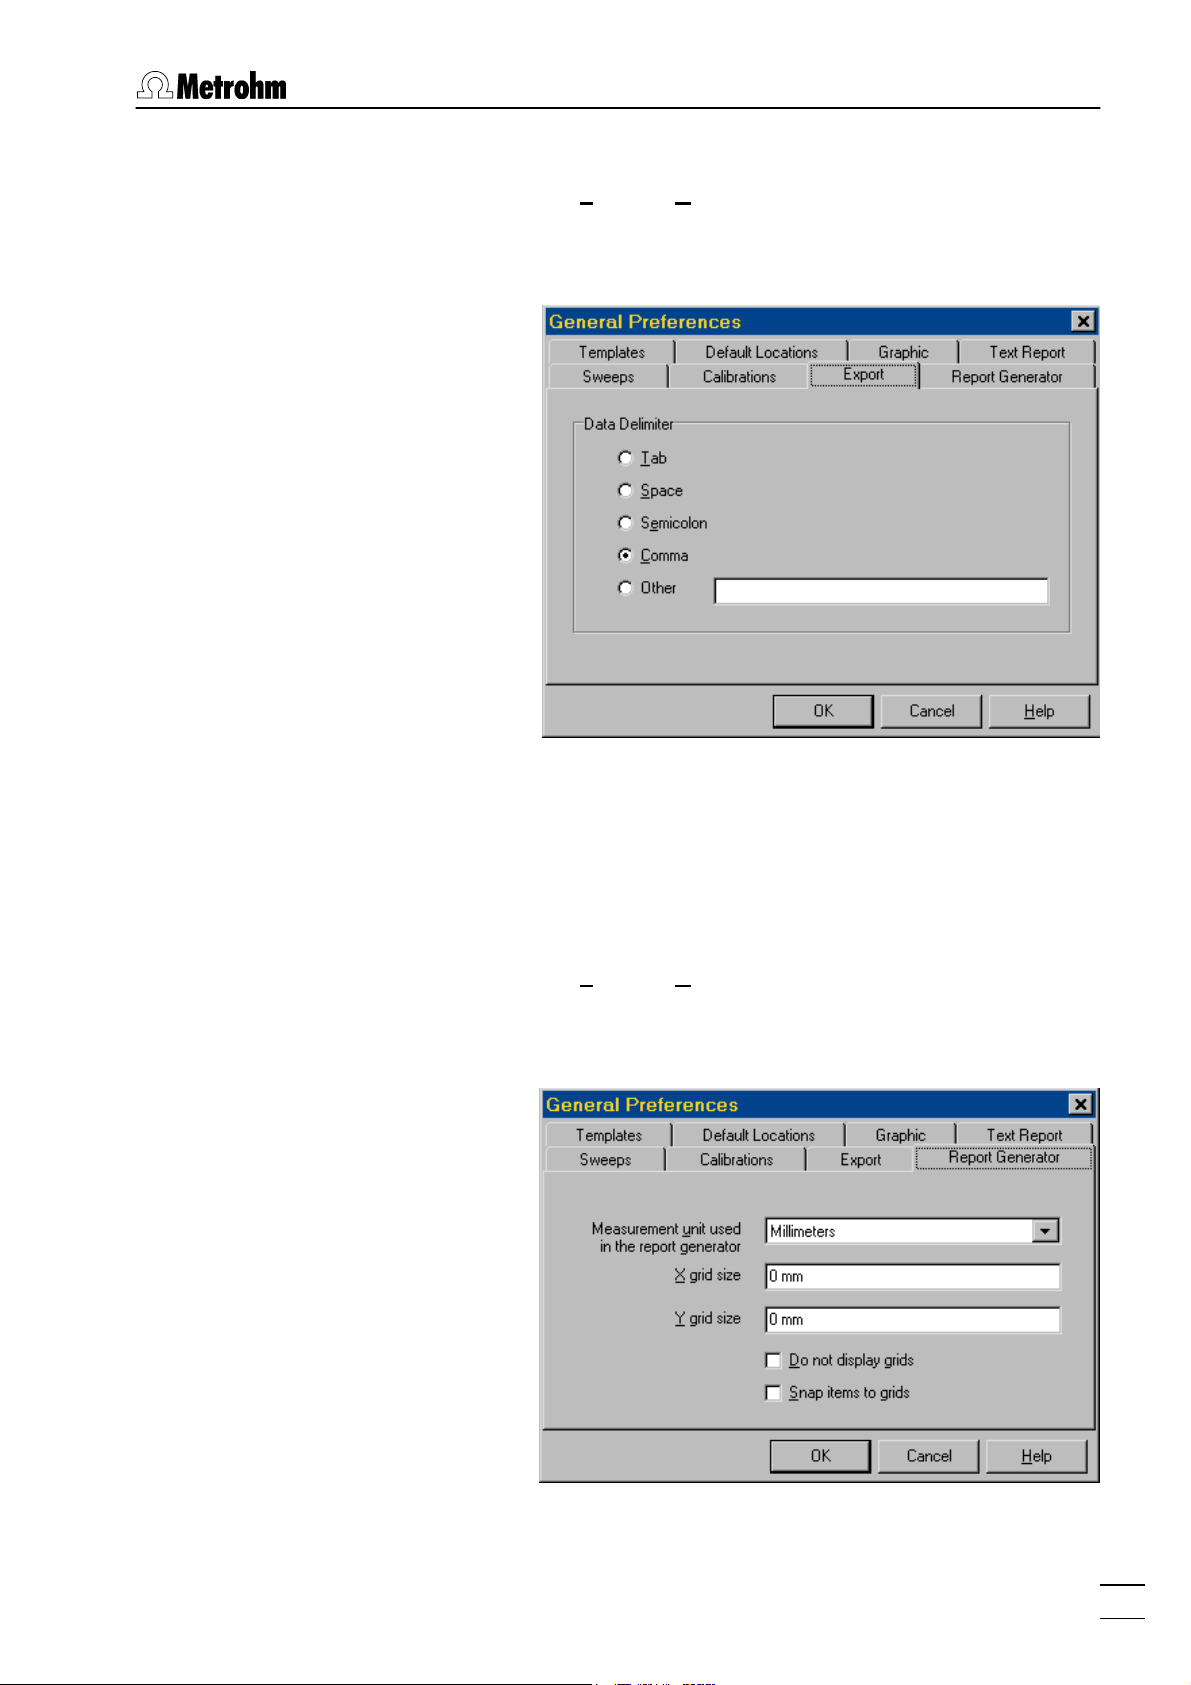
Export settings
MAIN WINDOW / Settings / General Preferences...
2 Main window
In the GENERAL PREFERENCES window the default settings for text export can be defined with
the Export tab:
Data Delimiter
Definition of data delimiter: tab, space, semicolon, comma or other character (user-defined).
Report generator settings
MAIN WINDOW / Settings / General Preferences...
In the GENERAL PREFERENCES window the default settings for the report generator can be defined with the Report Generator tab:
VA Database 2.0
Selection of measurement unit, grid size, grid
display and snapping of items to grids.
21
Page 29
2 Main window
Templates settings
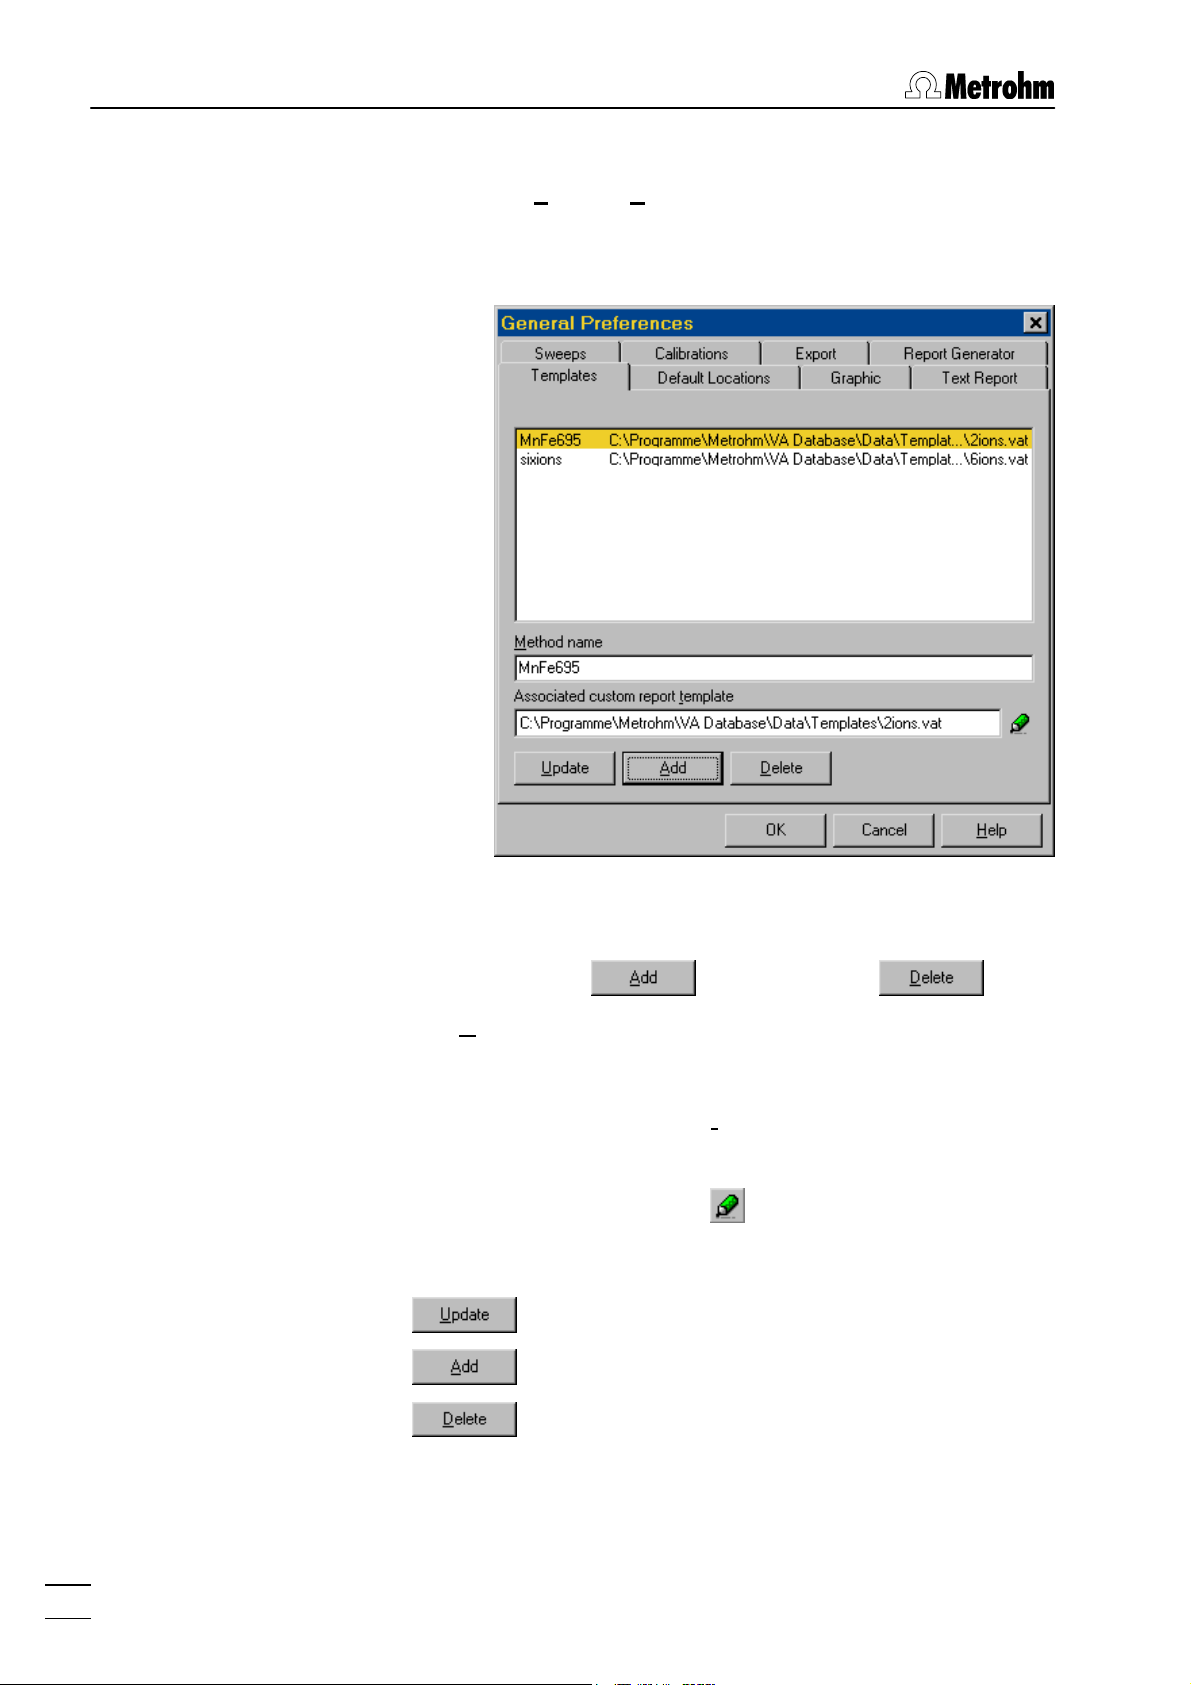
MAIN WINDOW / Settings / General Preferences...
In the GENERAL PREFERENCES window method
associated templates can be defined with the
Templates tab:
List of methods with associated template
The list shows all methods with a defined associated report template. New methods are added
with and deleted with .
Method name
Name of the method used by the 746 VA Trace
Analyzer. Enter this name for a new entry.
Associated custom report template
Selection of a report template for the method.
For adding a new entry or changing an existing
entry, press the button and select the desired
template (*.vat file) in the SELECT CUSTOM RE-
PORT TEMPLATE window.
Update the list after changing the template.
Add a new entry to the list.
Delete an entry of the list.
22
VA Database 2.0
Page 30
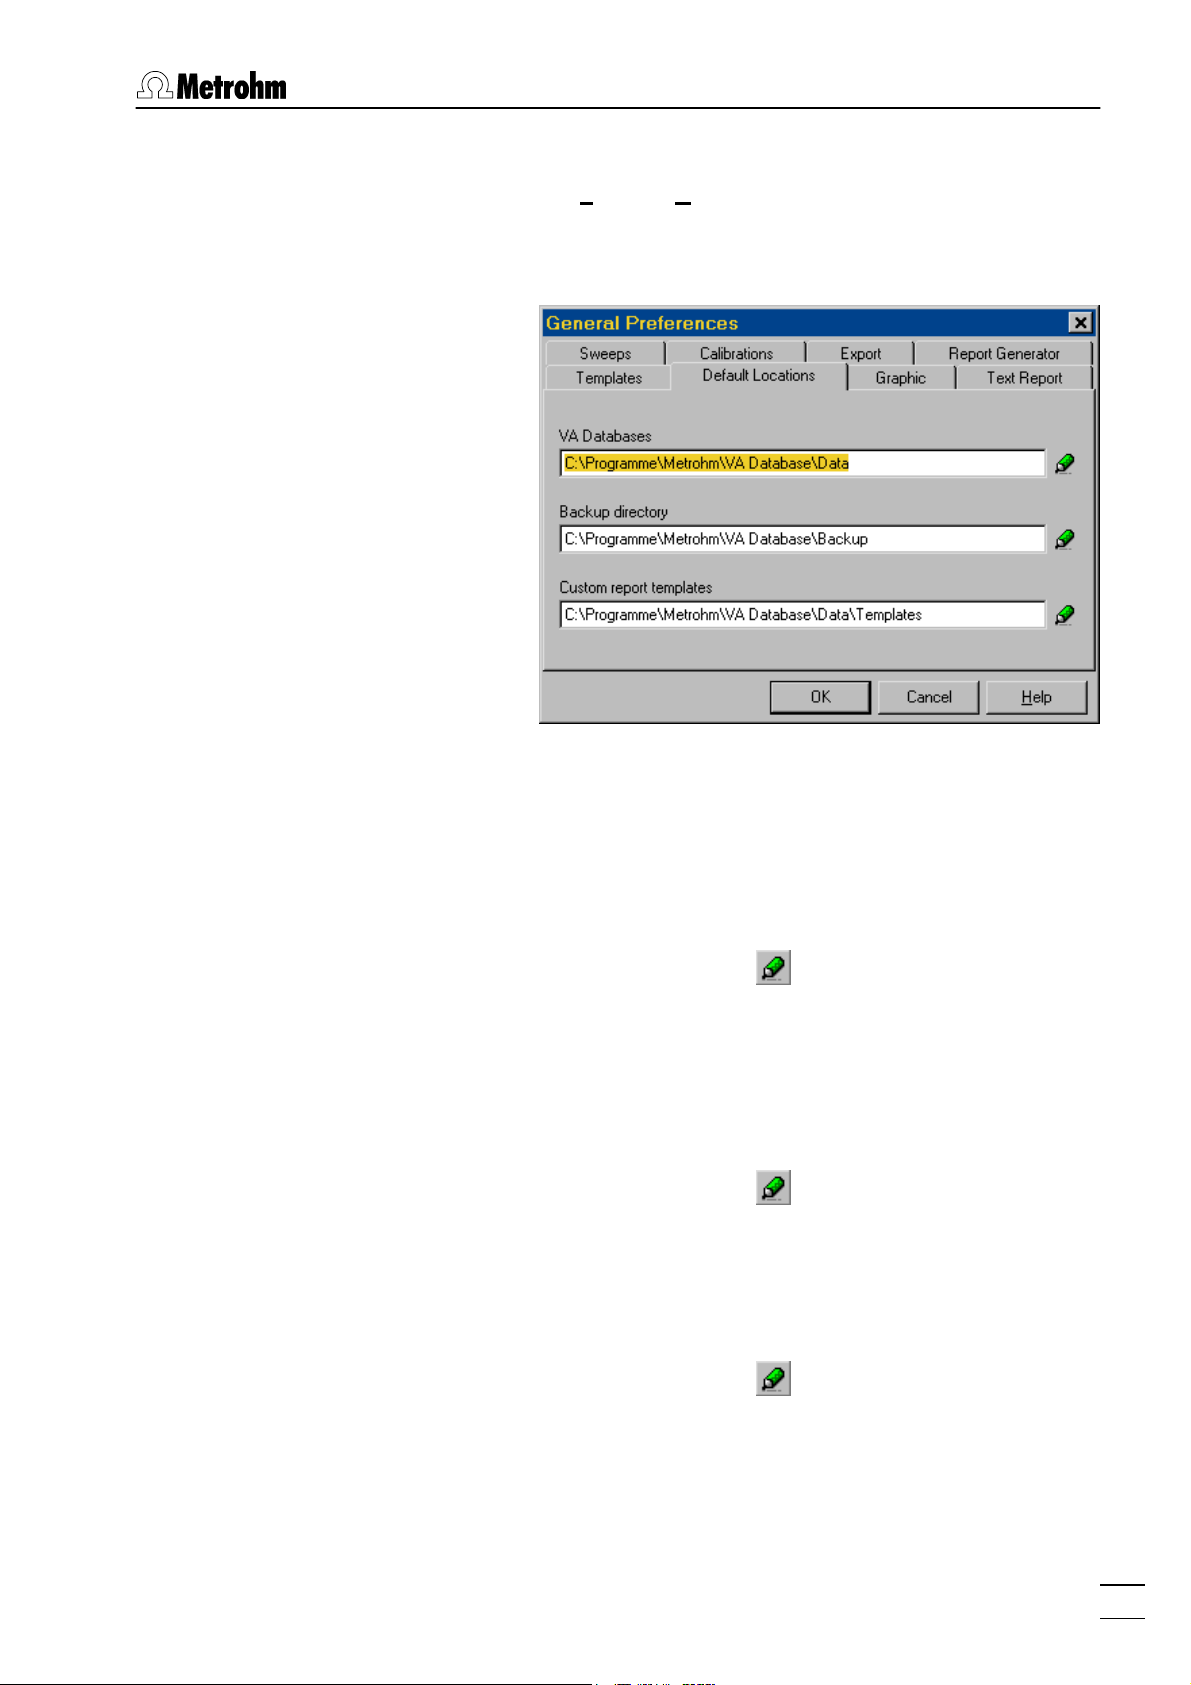
Default locations settings
MAIN WINDOW / Settings / General Preferences...
In the GENERAL PREFERENCES window default
directories for storage of files and templates can
be defined with the Default Locations tab:
2 Main window
VA Databases
Selection of the directory for storage of VA Database files (*.vad, *.db, *.mb, *.px), filter definition
files (*.vaf) and export files (*.txt, *.bmp, *.wmf,
*.emf, *.dat).
For adding a new entry or changing an existing
entry, press the button and select the desired
directory in the CHANGE DIRECTORY window.
Backup directory
Selection of the directory for storage of the *.rpt,
*.dtm, *.mth, *.smp and *.aut files sent by the 746
VA Trace Analyzer.
For adding a new entry or changing an existing
entry, press the button and select the desired
directory in the CHANGE DIRECTORY window.
Custom report templates
Selection of the directory for storage of custom
report template files (*.vat).
For adding a new entry or changing an existing
VA Database 2.0
entry, press the button and select the desired
directory in the CHANGE DIRECTORY window.
23
Page 31

2 Main window
Graphic settings
MAIN WINDOW / Settings / General Preferences...
In the GENERAL PREFERENCES window default
settings for graphics can be defined with the
Graphic tab:
Default Title Appearance
Default Y Axis Appearance
Default X Axis Appearance
Text report settings
The display of main title and subtitle can be enabled or disabled.
Ticks, grids, labels, and axis lines can be enabled or disabled.
Ticks, grids, labels, and axis lines can be enabled or disabled.
24
MAIN WINDOW / Settings / General Preferences...
In the GENERAL PREFERENCES window default
settings for font, font style, font size, and report
type for text report printing can be defined with
the Text report tab:
VA Database 2.0
Page 32

2 Main window
Save settings
MAIN WINDOW / Settings / Save Now
This function saves the actual settings of the
software: Open windows, window position and
size, general preferences. Also the active items
and the selection criteria in VA DATABASE TABLE
are stored. These information is stored related to
the database. This means that for different databases different software appearances can be set
and stored. Open subwindows in MAIN WINDOW
cannot be stored.
MAIN WINDOW / Settings / Save On Exit
If this function is enabled, the software settings
are stored when the database software is quit or
when the database is closed.
2.8 Windows and subwindows
Opening of VA windows
VA Database 2.0
MAIN WINDOW / Window / Explorer (F9)
The VA DATABASE EXPLORER window will be
opened or (if it is already open) put on top.
MAIN WINDOW / Window / Table (F10)
The VA DATABASE TABLE window will be opened
or (if it is already open) put on top.
25
Page 33

2 Main window
Arrangement of VA windows
MAIN WINDOW / Window / Report Generator (F11)
The VA DATABASE REPORT GENERATOR window
will be opened or (if it is already open) put on
top.
MAIN WINDOW / Window / Communication (F12)
The VA COMMUNICATION window will be opened
or (if it is already open) put on top.
The opened windows are marked with a checkbox sign. If the desired window is hidden or minimized it will be maximized again and put on top.
MAIN WINDOW / Window / Arrange Windows
The open VA windows are tiled on the screen so
that they are all visible.
Arrangement of subwindows
MAIN WINDOW / Window / Tile
All
Text Reports
Segments
Substances
Calibrations
The selected subwindows in the MAIN WINDOW
are tiled. The rest of the subwindows will be
minimized.
MAIN WINDOW / Window / Cascade
All
Text Reports
Segments
Substances
Calibrations
The selected subwindows in the MAIN WINDOW
are cascaded. The rest of the subwindows will
be minimized.
MAIN WINDOW / Window / Arrange Icons
The minimized window icons will be arranged at
the bottom of the MAIN WINDOW.
26
MAIN WINDOW / Window / Minimize All
All subwindows will be minimized.
MAIN WINDOW / Window / Restore All
All minimized subwindows will be maximized
again back to the previous size.
MAIN WINDOW / Window / Close All
All subwindows will be closed.
VA Database 2.0
Page 34

3 VA Database Table
3 VA Database Table
3.1 VA Database Table overview
The VA DATABASE TABLE window shows a tabular view of data
fields of the current database. The most important analysis results as well as sample and method information of the determinations in the database are displayed here. The display of fields
and their order in the table are defined by the user. It is also possible to create filters with filtering criteria, so that only the interesting part of the data is displayed. More detailed information is
then available by opening subwindows in the MAIN WINDOW.
VA DATABASE EXPLORER and VA DATABASE TABLE are linked. If a
determination in the VA DATABASE TABLE is marked the same
determination in the VA DATABASE EXPLORER is highlighted.
The displayed table view can be printed and exported to spreadsheet programs like Microsoft Excel.
3.2 Opening/closing of VA Database Table
Opening the VA Database Table
MAIN WINDOW / Window / Table (F10)
The VA DATABASE TABLE window will be opened
or (if it is already open) put on top.
Closing the VA Database Table
VA DATABASE TABLE / Table / Close
The VA DATABASE TABLE window will be closed
(the same function can be done by pressing the
button of the VA DATABASE TABLE window)
and the current settings are stored.
VA Database 2.0
Note: The settings of the VA DATABASE TABLE window can be
stored at any time with MAIN WINDOW / Settings / Save Now.
27
Page 35

3 VA Database Table
3.3 Printing of tables
Table printing
VA DATABASE TABLE / Table / Print... (Ctrl+P)
Table print preview
VA DATABASE TABLE / Table / Print Preview...
Print the selected (highlighted) lines of the VA
Database table. The number of prints and the
pages to be printed can be selected in the appearing PRINT window which depends on the
selected printer.
The PRINT PREVIEW window appears. The selected (highlighted) lines of the VA Database table are shown in the appearance formatted for
the desired printer. The following functions are
available by pressing the corresponding buttons
or selecting the menu items in the PRINT PRE-
VIEW window or in the context sensitive menu:
Table page setup
First Page Go to first page
Previous Page Go to previous page
Next Page Go to next page
Last Page Go to last page
Print... see Table printing
Page Setup... see Table page setup
Close Close preview window
VA DATABASE TABLE / Table / Page Setup...
The format of the page to be printed can be
changed in the appearing PAGE SETUP window
which contains three tabs:
28
Page layout
The printer, the paper size, the page
margins, and the page orientation are
adjustable.
VA Database 2.0
Page 36

Text properties
Font, font style, font size and line spacing for text printing can be changed.
With Interline space set to Exactly, the
space can be adjusted exactly to the
desired point value.
3 VA Database Table
VA Database 2.0
Appearance
The appearance of the table report can
be specified by enabling/disabling the
printing of grids, the printing of filter and
sorting definitions and the highlighting of
all odd lines.
29
Page 37

3 VA Database Table
3.4 Selection of determinations
Selection of one determination
Select a determination by clicking on the desired
line, which is then highlighted and marked by an
arrow and a point ( ) on the left side. At the
same time the related entry in the VA EXPLORER
window (if it is open) will be selected too.
Selection of several determinations
Select additional determinations by simultaneously pressing the <Ctrl> key and clicking on
the desired lines, which are then highlighted. The
last line (active determination) is marked by an
arrow and a point ( ), the other selected lines
are marked by a point on the left side.
VA DATABASE TABLE / Edit / Select All
Select all determinations of the database table.
VA DATABASE TABLE / Edit / Unselect All
Unselect all determinations of the database table.
3.5 Export from VA Table
Export of table text from VA Table
30
VA DATABASE TABLE / Table / Save As Text...
Save the header line and the selected part of the
table (highlighted lines) into an ASCII text file
(extension *.txt). This file can be imported into
other programs like Microsoft Word or Excel. The
table fields are separated by the default data delimiter set in the General Preferences (see Export
settings, page 21).
VA Database 2.0
Page 38

3 VA Database Table
Copy table text to clipboard
VA DATABASE TABLE / Edit / Copy (Ctrl+C)
Copy the selected part of the table (highlighted
lines) to the clipboard. This function can be used
for copying the table fields of the selected determinations to other programs like Microsoft Word
or Excel. The table fields are always separated
by a tab.
Send determinations to VA Trace Analyzer from VA
Table
VA DATABASE TABLE / Determination / Send to COM#
Send the selected determinations (highlighted
lines) to the chosen COM port. The data transfer
is then carried out in the background. If you want
to see the progress of the data transfer, open the
VA COMMUNICATION window.
Note: Before sending determinations, the connection to the 746
VA Trace Analyzer has to be set active (see Opening/closing
COM ports, page 50) and the 746 VA Trace Analyzer has to be
set to receive mode by pressing the softkeys <Copy from> <RS232
Ifc.#> on the dialog pages "DETERMINATIONS" or "DATA CARD".
Export of determination files from VA Table
VA DATABASE TABLE / Determination / Save As...
Save the determination files (binary files with extension *.dtm) of the selected part of the table
(highlighted lines) into the directory specified in
the SAVE DETERMINATION AS FILE window.
Export of measurement points from VA Table
VA DATABASE TABLE / Determination / Export Measurement
Points...
Save the measurement points of all sweeps of
the selected determinations of the table (highlighted lines) into a data file (extension *.dat). The
file contains blocks of X and Y values preceded
by a header line for each sweep. The data files
can be imported into spreadsheet programs like
Microsoft Excel. The table fields are separated
by the default data delimiter set in the General
Preferences (see Export settings, page 21).
VA Database 2.0
31
Page 39

3 VA Database Table
3.6 View reports and curves from VA Table
View text report from VA Table
VA DATABASE TABLE / Determination / View Text Report
Open a subwindow in the MAIN WINDOW which
contains the Full report and the Method Specifica-
tions of the selected determination.
View substance curve from VA Table
VA DATABASE TABLE / Determination / View Substance
Open a subwindow in the MAIN WINDOW which
contains all substance curves of the chosen
substance of the selected determination.
View calibration curve from VA Table
VA DATABASE TABLE / Determination / View Calibration
Open a subwindow in the MAIN WINDOW which
contains the calibration curve of the chosen substance of the selected determination.
View segment curve from VA Table
VA DATABASE TABLE / Determination / View Segment
Open a subwindow in the MAIN WINDOW which
contains all segment curves of the chosen segment of the selected determination.
3.7 Options for VA Table display
32
Filtering determinations for VA Table
VA DATABASE TABLE / Options / Define Filter...
Define a new logical filter for selection of some
determinations out of the whole set of determinations stored in the database. The FILTER DEFI-
NITION window appears where the filtering criteria
can be entered:
VA Database 2.0
Page 40

3 VA Database Table
Filtering criteria
Current expression
Logical Operator
Field
Comparison Operator
Value
Tree view of all defined filtering criteria with expressions and subexpressions. The current expression is highlighted.
Definition of the current filtering expression with
the following items:
Selection of the logical operator AND or OR. The
first expression has no operator.
Selection of a database field for the logical expression (details see Database fields overview,
page 37).
Selection of one of the following comparison operators: =, <>, <, <=, >, >=
Entry of a numeric or alphanumeric value for
comparison.
VA Database 2.0
Add the current expression to
the filtering criteria in the same
hierarchy level as the selected
expression.
33
Page 41

3 VA Database Table
Add the current expression to
the filtering criteria in the next
lower hierarchy level as the selected expression (this corresponds to entering a bracket in
the filtering criteria expression).
Update the current expression
after changing some of the entries.
Clear all items of the current expression.
Delete selected expression or
subexpression.
Delete all expressions or subexpressions.
Save the filtering criteria to a file
with extension *.vaf into the directory specified in the SAVE
FILTER DEFINITION TO A FILE
window.
Load the filtering criteria from a
previously stored file with extension *.vaf from the directory
specified in the LOAD FILTER
DEFINITION FROM A FILE window.
After closing the FILTER DEFINITION window the
determinations are filtered. The filtering expression is shown in the Select pop-up field of the
Menu bar in the VA DATABASE TABLE window,
where the 10 previously defined filtering expressions can be easily selected.
34
Sorting determinations for VA Table
VA DATABASE TABLE / Options / Define Sorting...
Define a new sorting order for display of the determinations in the database. The SORTING DEFI-
NITION window appears where the sorting criteria
can be selected:
VA Database 2.0
Page 42

First sort by
Selection of a database field for main sorting of
the determinations (details see Database fields
overview, page 37). The selected field is high-
lighted. The sorting order can be set to Ascend-
ing or Descending.
3 VA Database Table
Then sort by
Selection of a database field for further sorting of
the determinations. The selected field is highlighted. The sorting order can be set to Ascend-
ing or Descending.
Deactivate the sorting function.
After closing the SORTING DEFINITION window the
determinations are sorted. The sorting expression is shown in the Sort by pop-up field of the
Menu bar in the VA DATABASE window, where
the 10 previously defined sorting expressions
can be easily selected.
Defining visible fields for VA Table
VA Database 2.0
VA DATABASE TABLE / Options / Define Visible Fields...
Define the visible fields of the determinations in
the database. The VISIBLE FIELDS DEFINITION
window appears where the items to be shown
can be selected:
35
Page 43

3 VA Database Table
Available fields
List of all available database fields which can be
displayed in the VA DATABASE window (details
see Database fields overview, page 37).
Copy selected field(s) to the list of visible fields
(additional fields can be selected by simultaneously pressing the <Shift> or <Ctrl> key).
Visible fields
List of the database field which are displayed in
the VA DATABASE window.
Delete selected field(s) from the list of visible
fields (additional fields can be selected by simultaneously pressing the <Shift> or <Ctrl>
key).
Change the position of the selected field(s) in the
list of visible fields (additional fields can be selected by simultaneously pressing the <Shift> or
<Ctrl> key).
Note: The position of the fields in the database table can also be
changed by clicking a field and moving it to the desired position
with the left mouse-button pressed down. The column width of
the field can be adjusted by tearing the border line to the desired
width.
36
VA Database 2.0
Page 44

3.8 Database fields overview
All fields stored in the database are taken from the Full Report text
of the 746 VA Trace Analyzer. These fields can be selected for
filtering, sorting and display options.
Note: The items which can be selected for filtering are marked
with the corresponding name in brackets which is used in the
parameter Field of the FILTER DEFINITION window. For some
numbered items, only a general expression is available for filtering (e.g. Ident, Subst).
Fields from page "MONITORING"
Determination (Determ)
Determination name which is automatically created by the 746 VA Trace Analyzer. It is identical
with the name on page "DETERMINATIONS" in
the 746 VA Trace Analyzer.
3 VA Database Table
User Name (UserName)
User name defined on page "MONITORING" of
the 746 VA Trace Analyzer.
Dtm. Date (DtmDate)
Date on which the determination has been
made. It is stored automatically by the 746 VA
Trace Analyzer.
Modified (Modified)
Indicates whether the determination has been
modified manually. If no modification has been
made there is no content in this field. If the determination has been changed manually the
modification date is shown.
Run (Run)
Run number of the 746 VA Trace Analyzer according to page "MONITORING".
Sample Table (SampleTbl)
Name of the sample table which has been used
on the 746 VA Trace Analyzer when recording
the determination. If no sample table has been
used a dash is displayed.
VA Database 2.0
Position (Pos)
Position of the sample according to the entry on
page "MONITORING" or "SAMPLES" of the 746
VA Trace Analyzer. Usually this is the position of
the sample on the 695 Autosampler rack.
37
Page 45

3 VA Database Table
Id1 (Ident)
Sample Identification 1 (S1) of the sample according to the entry on page "MONITORING" or
"SAMPLES" of the 746 VA Trace Analyzer.
Id2 (Ident)
Sample Identification 2 (S2) of the sample according to the entry on page "MONITORING" or
"SAMPLES" of the 746 VA Trace Analyzer.
Id3 (Ident)
Sample Identification 3 (S3) of the sample according to the entry on page "MONITORING" or
"SAMPLES" of the 746 VA Trace Analyzer.
Sample Size (SampleSize)
Numeric value of the sample size (S0) according
to the entry on page "MONITORING" or
"SAMPLES" of the 746 VA Trace Analyzer.
Sample Meas. Unit (Meas. Unit)
Measuring unit of the sample size (S0) according
to the entry on page "MONITORING" or
"SAMPLES" of the 746 VA Trace Analyzer.
Method (Method)
Name of the method which has been used for
recording the determination.
Title (Title)
Title of the used method.
Remark1 (Remark1)
Remark 1 of the used method according to the
entry on page "MONITORING" of the 746 VA
Trace Analyzer.
Remark2 (Remark2)
Remark 2 of the used method according to the
entry on page "MONITORING" of the 746 VA
Trace Analyzer.
For more detailed information about the different fields we refer to
the user manual of the 746 VA Trace Analyzer.
Fields from page "RESULTS"
38
Substance 1...8 (Subst)
Substance name of the specific substance.
Mass Concentration 1...8 (MassConc)
Mass concentration ρ
of the related substance
s
in the sample. The unit is always g/L and displayed with automatic calculated prefixes.
VA Database 2.0
Page 46

3 VA Database Table
Abs. MC Deviation 1...8 (MassConcAbsDev)
Absolute deviation of the mass concentration ρ
in g/L with automatic calculated prefixes.
Rel. MC Deviation 1...8 (MassConcRelDev)
Relative deviation of the mass concentration ρ
%.
Final Result 1...15 (FinalResult)
Identification of the final result.
Result Value 1...15 (ResValue)
Numerical quantity of the related final result. The
unit is specified in Result Unit. The final results
are calculated according to the page "CALCULATION" of the 746 VA Trace Analyzer. If no formulae have been entered no final results are calculated.
Result Unit 1...15 (Meas. Unit)
Result unit of the related final result.
s
s
in
Abs. Result Deviation 1...15 (ResAbsDev)
Absolute deviation of the related final result. The
unit is specified in "Result Unit“.
Rel Result Deviation 1...15 (ResRelDev)
Relative deviation of the related final result in %.
Comment 1...15 (Comment)
Comment on any error or difficulty in the evaluation of the final result.
Note: Depending on the entered formula on page "CALCULATION" of the 746 VA Trace Analyzer the quantity in final results is
treated in two different ways:
1. The defined Res.unit starts with "#“ as first character. The
transmitted result unit begins with an automatically calculated
prefix. When storing the numerical value for the Result Value
and the Abs. Result Dev. to the database this prefix is taken
into account and the Result Unit is stored without prefix. So
selections with different magnitudes in the concentration
range are carried out correctly.
2. The defined result unit starts with any alphabetical character
as first character. The Result unit is stored unchanged. The
numerical values for the Result Value and the Abs. Result Dev.
are also stored without further calculation.
VA Database 2.0
We recommend to use only units with automatic prefix calculation
which means that they must have a "#" as first character.
For more detailed information about the different fields we refer to
the user manual of the 746 VA Trace Analyzer.
39
Page 47

3 VA Database Table
40
VA Database 2.0
Page 48

4 VA Database Explorer
4 VA Database Explorer
4.1 VA Database Explorer overview
The VA DATABASE EXPLORER window displays the content of the
database in a file manager way (tree view). Detailed information
about the determinations is accessible by expanding the different
branches of the tree. From the VA DATABASE EXPLORER window,
text reports and single or overlay curves can be opened directly
in the MAIN WINDOW.
VA DATABASE EXPLORER and VA DATABASE TABLE are linked. If
an entry in the VA DATABASE EXPLORER is marked the pointer in
the VA DATABASE TABLE jumps automatically to this determination.
4.2 Opening/closing of VA Database Explorer
Opening the VA Database Explorer
MAIN WINDOW / Window / Explorer (F9)
The VA DATABASE EXPLORER window will be
opened or (if it is already open) put on top.
Closing the VA Database Explorer
VA DATABASE EXPLORER / Explorer / Close
The VA DATABASE EXPLORER window will be
closed (the same function can be done by
pressing the button of the VA DATABASE EX-
PLORER window) and the current settings are
stored.
VA Database 2.0
Note: The settings of the VA DATABASE EXPLORER window can
be stored at any time with MAIN WINDOW / Settings / Save Now.
41
Page 49

4 VA Database Explorer
4.3 Explorer views
View selection
VA DATABASE EXPLORER / Explorer / 1st Level
VA DATABASE EXPLORER / Explorer / 2nd Level
VA DATABASE EXPLORER / Explorer / 3rd Level
Show the first level of the database explorer tree.
For each determination its name and (in brackets) the 3 sample identifications are shown.
Show the first two levels of the database explorer
tree. In addition to the determination name the
main contents of the tree are shown: Determina-
tion Info, Substances, Calibrations, Final Results,
Method Specification, Segments.
Show the first three levels of the database explorer tree.
VA DATABASE EXPLORER / Explorer / All Levels
Show all levels of the database explorer tree.
VA DATABASE EXPLORER / Explorer / All Segments
Show all segments in the database explorer tree
with the segment name.
VA DATABASE EXPLORER / Explorer / All Substances
Show all substances in the database explorer
tree with substance name and found mass concentration.
VA DATABASE EXPLORER / Explorer / All Calibrations
Show all calibration curves in the database explorer tree with the substance name.
VA DATABASE EXPLORER / Explorer / All Final Results
Show all final results in the database explorer
tree with result name and found value.
42
View items
Open next level
Open this expandable level of the tree by clicking
on the "+" sign.
Close this level
Close this expanded level of the tree by clicking
on the "-" sign.
VA Database 2.0
Page 50

Determination
Folder with all determination data entitled with
determination name and 3 sample identifications.
Determination Info
Folder with date and method.
Date
Recording date of the determination.
Method
Method used for recording the determination.
Substances
Folder with all substance curves.
Substance 1...8
Folder with all substance curves of one substance entitled with substance name and found
mass concentration.
4 VA Database Explorer
Substance curve
Single curve of the substance with VR number
(variation and replication).
Calibrations
Folder with all calibration curves.
Calibration curve
Single calibration curve of the substance entitled
with substance name.
Final Results
Folder with all final results.
Final Result 1...15
Single final result entitled with result name and
value.
Method Specification
Specification of the method used for recording
the determination.
Segments
Folder with all segment curves.
VA Database 2.0
Segment 1...8
Folder with all curves of one segment entitled
with segment name.
Segment curve
Single segment curve with VR number (variation
and replication).
43
Page 51

4 VA Database Explorer
4.4 View reports and curves from VA Explorer
View text reports from VA Explorer
VA DATABASE EXPLORER / Determination / View
Open a subwindow in the MAIN WINDOW which
contains the Full report and the Method Specifica-
tions of the selected determination. This text re-
port is opened by selecting this menu point and
simultaneously one of the following view items:
Determination
Determination Info
Date
Method
Substances
Calibrations
Final Results
Final Result 1...15
Method Specification
The text report window can also be opened by
drag and drop of the view item directly to an
empty space of the MAIN WINDOW.
Note: The part of the text report which is shown in the text report
window in the MAIN WINDOW depends on the view item selected.
However, the text report window contains always the whole text
with full report and method specification.
View substance curves from VA Explorer
VA DATABASE EXPLORER / Determination / View
Open a subwindow in the MAIN WINDOW which
contains the substance curves of the chosen
item of the selected determination. The curve
window is opened by selecting this menu point
and simultaneously one of the following view
items:
44
Substance 1...8
Shows all substance curves of the selected substance.
Substance curve
Shows a single substance curve.
VA Database 2.0
Page 52

4 VA Database Explorer
The curve window can also be opened by drag
and drop of the view items directly to an empty
space of the MAIN WINDOW.
Substance overlay curves
Overlay curves of several substances can be
opened by drag and drop of the view item directly into an open substance curve window in
the MAIN WINDOW.
Note: Overlay curves can only be created if the units of the x and
y axes are identical (e.g. no overlay of VA and PSA curves).
View calibration curves from VA Explorer
VA DATABASE EXPLORER / Determination / View
Open a subwindow in the MAIN WINDOW which
contains the calibration curve of the chosen substance of the selected determination. The curve
window is opened by selecting this menu point
and simultaneously the following view item:
Calibration curve
The calibration curve window can also be
opened by drag and drop of the view element
directly to an empty space of the MAIN WINDOW.
Calibration overlay curves
Overlay calibration curves of several substances
can be opened by drag and drop of the view
item directly into an open calibration curve window in the MAIN WINDOW.
Note: Overlay curves can only be created if the units of the x and
y axes are identical (e.g. no overlay of VA and PSA curves).
View segment curves from VA Explorer
VA DATABASE EXPLORER / Determination / View
Open a subwindow in the MAIN WINDOW which
contains all segment curves of the chosen segment of the selected determination. The segment
window is opened by selecting this menu point
and simultaneously one of the following view
items:
VA Database 2.0
Segment 1...8
Segment curve
45
Page 53

4 VA Database Explorer
The segment curve window can also be opened
by drag and drop of the view item directly to an
empty space of the MAIN WINDOW.
Segment overlay curves
Overlay segment curves of several segments
can be opened by drag and drop of the view
item directly into an open segment curve window
in the MAIN WINDOW.
Note: Overlay curves can only be created if the units of the x and
y axes are identical (e.g. no overlay of VA and PSA curves).
4.5 Export from VA Explorer
Send determinations to VA Trace Analyzer from VA
Explorer
VA DATABASE EXPLORER / Determination / Send to COM#
Send the selected determination (highlighted
line) to the chosen COM port. The data transfer
is then carried out in the background. If you want
to see the progress of the data transfer, open the
VA COMMUNICATION window.
Note: Before sending determinations, the connection to the 746
VA Trace Analyzer has to be set active (see Opening/closing
COM ports, page 50) and the 746 VA Trace Analyzer has to be
set to receive mode by pressing the softkeys <Copy from> <RS232
Ifc.#> on the dialog pages "DETERMINATIONS" or "DATA CARD".
46
Export of determination files from VA Explorer
VA DATABASE EXPLORER / Determination / Save As...
Save the determination file (binary file with extension *.dtm) of the selected determination
(highlighted line) into the directory specified in
the SAVE DETERMINATION AS FILE window.
VA Database 2.0
Page 54

4 VA Database Explorer
Export of measurement points from VA Explorer
VA DATABASE EXPLORER / Determination / Export Measurement
Points...
Save the measurement points of all sweeps of
the selected determination (highlighted line) into
a data file (extension *.dat). The file contains
blocks of X and Y values preceded by a header
line for each sweep. The data file can be imported into spreadsheet programs like Microsoft
Excel. The table fields are separated by the default data delimiter set in the General Preferences
(see Export settings, page 21).
4.6 Options for VA Explorer display
Filtering determinations for VA Explorer
VA DATABASE EXPLORER / Options / Define Filter...
Define a new logical filter for selection of some
determinations out of the whole set of determinations stored in the database. The FILTER DEFI-
NITION window appears where the filtering criteria
can be entered (details see Filtering determinations for VA Table, page 32).
Sorting determinations for VA Explorer
VA DATABASE EXPLORER / Options / Define Sorting...
Define a new sorting order for display of the determinations in the VA EXPLORER window. The
SORTING DEFINITION window appears where the
sorting criteria can be selected (details see Sorting determinations for VA Table, page 34).
VA Database 2.0
47
Page 55

4 VA Database Explorer
48
VA Database 2.0
Page 56

5 VA Communication
5 VA Communication
5.1 VA Communication overview
In the VA COMMUNICATION window the connections to the 746 VA
Trace Analyzers and 693 VA Processors are installed. The COM
port setup and the default destination for storing the incoming
data is defined. It is possible to connect up to four VA instruments to a PC. To every connected instrument a specific destination database can be defined where the incoming data is stored.
When the VA COMMUNICATION window is opened the course of
the data transfer on the different ports is shown.
Data which is not stored in the database itself (methods, determinations, sample tables, rack data) can be sent back to the 746
VA Trace Analyzer from this window.
5.2 Opening/closing of VA Communication
Opening the VA Communication window
MAIN WINDOW / Window / Communication (F12)
The VA COMMUNICATION window will be opened
or (if it is already open) put on top.
Closing the VA Communication window
VA Database 2.0
Closing the Window
The VA COMMUNICATION window will be closed
by pressing the button of the VA COMMUNICA-
TION window.
Note: The settings of the VA COMMUNICATION window can be
stored at any time with MAIN WINDOW / Settings / Save Now.
49
Page 57

5 VA Communication
5.3 COM port configuration
Opening/closing COM ports
The VA COMMUNICATION window shows the
available COM ports which can be opened or
closed.
Interfaces Available for VA Communication
List of all available COM ports (serial interfaces)
of the PC.
Open the selected COM port and activate connection to database. For each
opened COM port a subwindow is
shown which indicates its status:
Interface on COM port ready, related
database open.
Interface on COM port not ready, no
database open.
Close the selected COM port and deactivate connection to database.
50
VA Database 2.0
Page 58

Default directories
5 VA Communication
Opens the SERIAL INTERFACE SETTINGS window
for COM port settings. The default directories
can be set with the General tab.
Associated database
Directory and file name for database associated
to the selected COM port. All incoming actual
determinations are stored in this database.
For adding a new entry or changing an existing
entry, press the button. In the OPEN window
select the desired database configuration file
(*.vad file) or enter a new name to create a new
database.
Backup directory
Default directory for storage of incoming binary
files (*.dtm, *.mth, *.rpt, *.smp, *.aut) from the 746
VA Trace Analyzer.
For adding a new entry or changing an existing
entry, press the button and select the desired
directory in the CHANGE BACKUP DIRECTORY
window.
Save original files
If this option is enabled, the *.rpt and *.dtm files
are stored automatically in the backup directory
when an actual determination is sent to the database.
VA Database 2.0
51
Page 59

5 VA Communication
COM port settings
Log File
Directory for the log file where all activities on the
related COM port are recorded.
For adding a new entry or changing an existing
entry, press the button. In the CHANGE LOG
FILE NAME window select the desired log file (*.txt
file) or enter a new name to create a new log file.
Disable event logging
If this option is enabled, no activities are recorded in the log file.
The content of the selected
log file will be deleted.
Opens the SERIAL INTERFACE SETTINGS window
for COM port settings. The parameters for the
serial interface can be set with the Port Settings
tab.
52
Recommended default settings.
Note: Make sure that these settings are identical to the RS232
settings on the 746 VA Trace Analyzer.
VA Database 2.0
Page 60

Automatic printing
5 VA Communication
Opens the SERIAL INTERFACE SETTINGS window
for COM port settings. The automatic printing
can be set with the Printing tab.
Automatic Report print out
If this option is enabled, a report is automatically
printed out when an actual determination is sent
to the database.
Print to
Selection of the printer for print out.
Report Template
Default report template for automatic report print
out (must be set if the automatic report print out
is enabled). For adding a new entry or changing
an existing entry, press the button and select
the desired template in the CHANGE REPORT
TEMPLATE window.
Use method Associated templates
If this option is enabled, the template associated
to the method is used to print out the report instead of the default report template.
Print only If the following condition is met
If this option is enabled, the report is only printed
out if the following condition is met. The printing
condition can be entered or changed by press-
VA Database 2.0
ing the button. The FILTER DEFINITION window appears where the filtering criteria for the
printing condition can be entered (details see
Filtering determinations for VA Table, page 32).
53
Page 61

5 VA Communication
5.4 Data transfer
The progress of the data transfer between PC and 746 VA Trace
Analyzer is visible in the open VA COMMUNICATION window. However, it is not necessary to keep this window open for the data
transfer which can be carried out in the background.
Note: The connection between 746 VA Trace Analyzer and PC is
not checked automatically. So make sure that the two instruments are connected properly and that the 746 VA Trace Analyzer is ready to send or receive data.
Receiving data
If data is sent from the 746 VA Trace Analyzer to an opened COM
port, the progress of the data transfer is shown in the upper bar
of the COM port subwindow in the VA COMMUNICATION window.
The name of the file to be received is indicated above this bar.
Determinations sent by the 746 VA Trace Analyzer are only entered automatically into the predefined database if an Report
ActDetm is sent to RSIfc.1 or RSIfc.2 on the dialog page
"DOCUMENTATION".
Determinations (*.dtm), methods (*.mth), sample tables (*.smp),
and rack definition tables (*.aut) which are sent to the PC with the
softkey <Copy to> <RS232 Ifc.#> are stored in the predefined
backup directory (see also Default directories, page 51).
Sending data
Note: Before sending data, make sure that the 746 VA Trace
Analyzer has been set to the receive mode on the dialog pages
"METHODS" (*.mth files), "DETERMINATIONS" (*.dtm files), "DATA
CARD" (*.dtm, *.mth, *.aut files) or "SAMPLES" (*.smp files).
Send stored files to the 746 VA Trace Analyzer.
The files to be sent (*.dtm, *.mth, *.smp, *.aut) can
be selected in the opening SEND VA FILES window.
54
VA Database 2.0
Page 62

If data is sent from the VA Database program (via or
directly from the VA DATABASE TABLE or VA DATABASE EX-
PLORER window) to the 746 VA Trace Analyzer, the progress of
the data transfer is shown in the lower bar of the COM port subwindow in the VA COMMUNICATION window. The name of the file
being sent is indicated above this bar.
Data transfer protocol
5 VA Communication
COM port reset
Open the log file where all activities on the related COM port are recorded with the Windows
Editor. For details concerning the log file settings
see Default directories, page 51.
Abort all data transfer actions between PC and
746 VA Trace Analyzer and reset the selected
COM port. Files in queue to be sent to the 746
VA Trace Analyzer must be sent again afterwards.
If the sending of data is aborted, the data receipt
at the 746 VA Trace Analyzer is also canceled
automatically.
If the receiving of data is aborted, the
sending of data from the 746 VA Trace
Analyzer is not canceled automatically
and an error can occur at the COM port.
VA Database 2.0
In this case, press again.
Note: Use this button only if problems in the data transfer occur.
55
Page 63

5 VA Communication
56
VA Database 2.0
Page 64

6 VA Report Generator
6 VA Report Generator
6.1 VA Report Generator overview
The VA REPORT GENERATOR is a powerful tool for creating custom reports using the content of the database. It can also be
used for browsing the content of the open database.
For this purpose templates have to be created where the database fields and curves to be printed out are selected and arranged on a template page.
6.2 Opening/closing of VA Report Generator
Opening the VA Report Generator
MAIN WINDOW / Window / Report Generator (F11)
The VA REPORT GENERATOR window will be
opened or (if it is already open) put on top.
Closing the VA Report Generator
VA REPORT GENERATOR / Report / Close
The VA REPORT GENERATOR window will be
closed (the same function can be done by
pressing the button of the VA REPORT GEN-
ERATOR window) and the current settings are
stored.
Note: The settings of the VA REPORT GENERATOR window can be
stored at any time with MAIN WINDOW / Settings / Save Now.
VA Database 2.0
57
Page 65
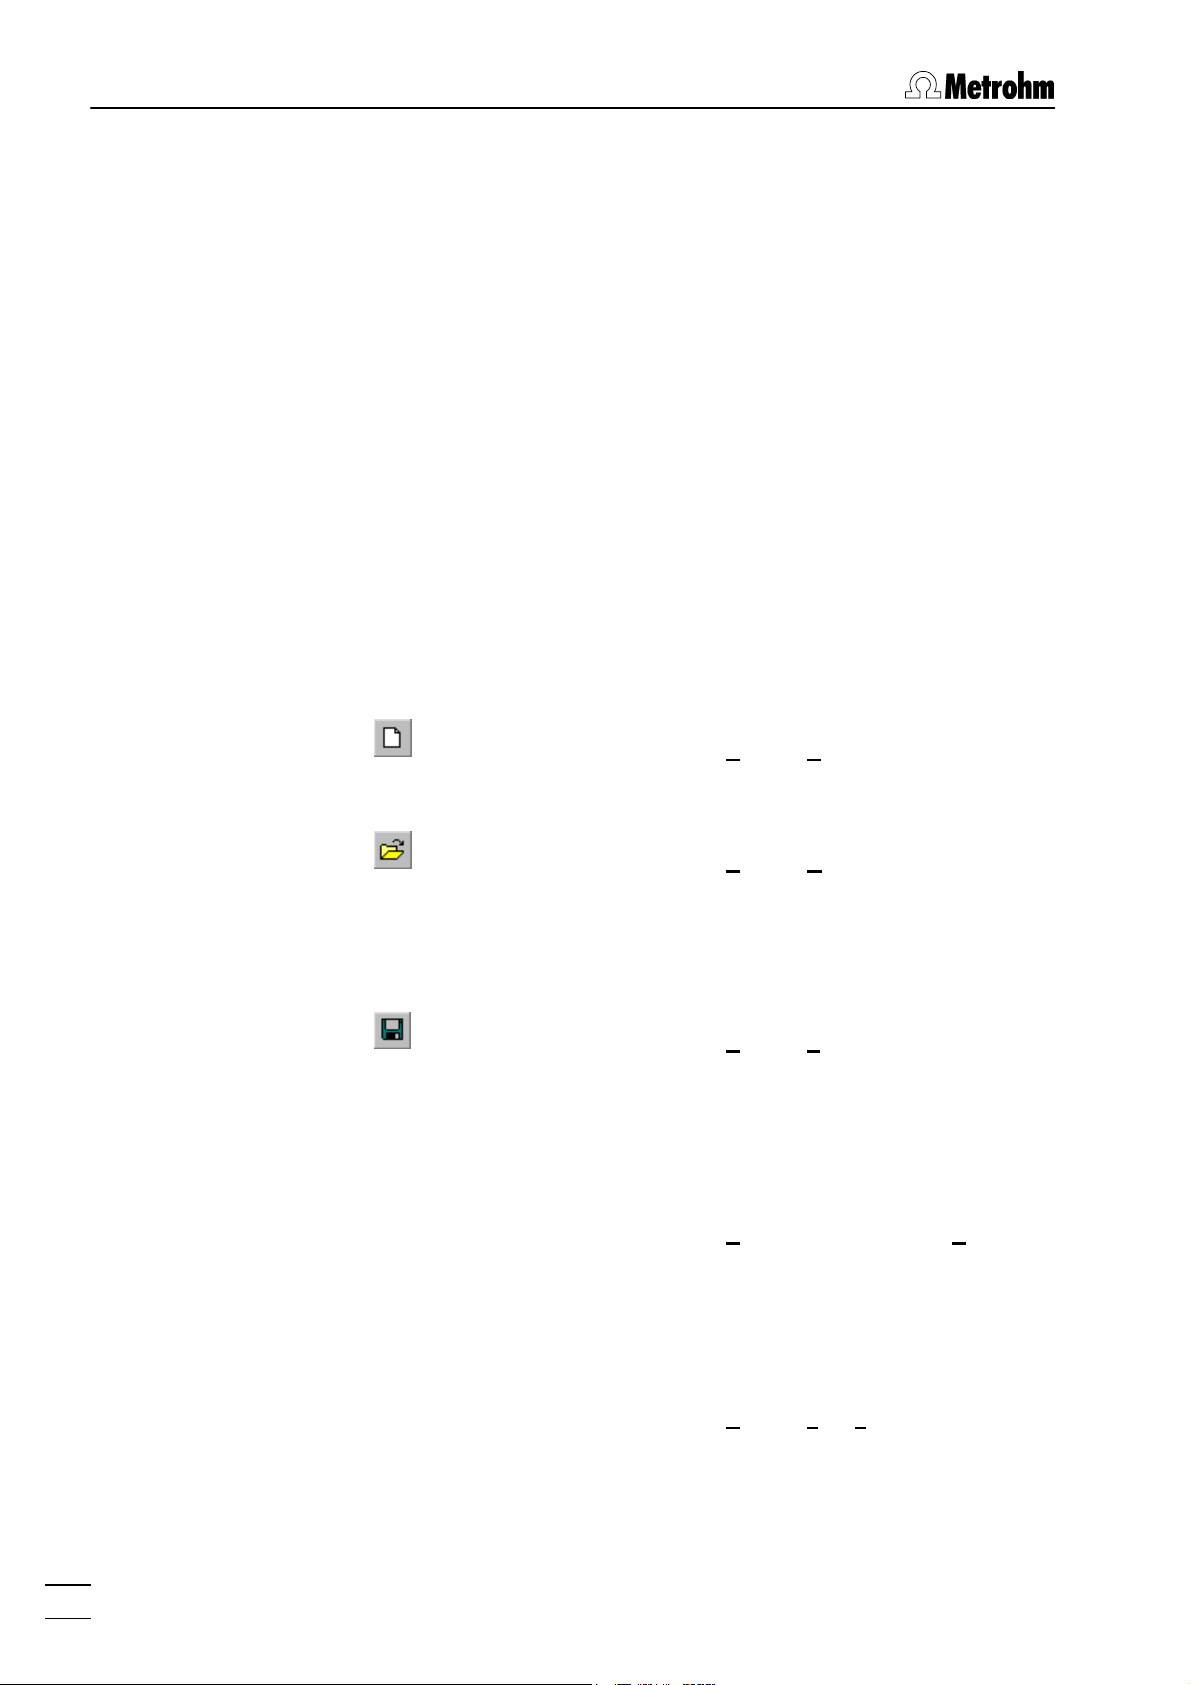
6 VA Report Generator
6.3 Templates
Template functions
Templates for custom reports are created by the user and stored
in a template file *.vat. Based on the determination data stored in
the database, the fields in the template are filled automatically
with the corresponding data (text or graphics) as soon as a specific determination in the VA DATABASE TABLE or VA DATABASE
EXPLORER window has been selected.
Templates can be used for creating user defined printouts but
also for a fast browsing of the analysis results. With a suitable
template all important results and curves are shown in an window. To get more detailed information text or curve subwindows
have to be opened in the MAIN WINDOW.
Handling of template files
VA REPORT GENERATOR / Report / New Template
Create a new report template. A new empty template will be opened.
VA REPORT GENERATOR / Report / Open Template...
Open an existing report template. The OPEN VA
DATABASE REPORT TEMPLATE window appears
where the name of the template file *.vat and its
directory have to be selected.
VA REPORT GENERATOR / Report / Save Template
Save the current report template. If the template
has not yet been stored before, the SAVE VA DA-
TABASE REPORT TEMPLATE window appears
where the name of the template file *.vat and its
directory have to be entered.
VA REPORT GENERATOR / Report / Save Template As...
Save the current report template under a new
name. The SAVE VA DATABASE REPORT TEM-
PLATE window appears where the name of the
template file *.vat and its directory have to be
entered.
58
VA REPORT GENERATOR / Report / 1 … #
The list of the previous opened templates. When
an entry of the list is clicked on the corresponding template will be opened.
VA Database 2.0
Page 66

Method associated templates
Load method associated template
6.4 Design templates
Switch design mode on/off
6 VA Report Generator
If this button is pressed down the method associated template defined in the General settings will
be loaded automatically (see Template settings,
page 22).
Set to design mode
The template is set to the design mode where
text and curve items can be added and
changed.
Set to read-only mode
The template is set to the read-only mode where
the template cannot be changed.
Defining template regions
Template area
The maximum area of the template available for
insertion of labels and fields is defined by the
margins and page orientation set in the VA CUS-
TOM REPORT OPTIONS window (see Report page
setup, page 66).
Template regions
Each template contains the three regions
Header, Report region and Footer, which can be
adjusted vertically by moving the border line to
the desired height with the mouse.
VA Database 2.0
HeaderHeader
Report regionReport region
FooterFooter
59
Page 67

6 VA Report Generator
Text labels
VA REPORT GENERATOR / Item / New / Text Label
Add a new text label to the template by opening
a rectangle at the desired location. Text labels
can be added to all regions of the template.
VA REPORT GENERATOR / Item / Edit...
Change the content of the text label.
VA REPORT GENERATOR / Item / Delete
Delete the text label.
VA REPORT GENERATOR / Item / Properties
The properties of the text label can be changed
in the appearing TEXT LABEL PROPERTIES window which contains two tabs:
Text label
The content of the text label, its alignment, position and size can be adjusted.
With Auto size enabled, the size of the
field is automatically limited to the text
size. For text fields with more than one
line, Word wrap has to be enabled.
60
Alignment
The text alignment can also be changed
with the following icons:
Align text left.
Center text.
Align text right.
VA Database 2.0
Page 68

Font
The font family, font style, font size and
font color can be changed.
Font properties
The text font can also be changed with
the following icons:
6 VA Report Generator
Text fields
Increase font size.
Decrease font size.
Set text style to bold.
Set text style to italic.
Underline text.
VA REPORT GENERATOR / Item / New / Text Field
Add a new text field out of the database to the
report region of the template by opening a rectangle at the desired location. When the field has
been placed, the EDIT TEXT FIELD window opens
where the content of the field has to be selected.
VA Database 2.0
Prefix Possibility to insert text before field text.
Field Selection of the text field from the current
database (details see Database fields
overview, page 37).
Suffix Possibility to insert text after field text.
61
Page 69

6 VA Report Generator
VA REPORT GENERATOR / Item / Edit...
Change the content of the text field by selection
of another field in the EDIT TEXT FIELD window.
VA REPORT GENERATOR / Item / Delete
Delete the text field.
VA REPORT GENERATOR / Item / Properties
The properties of the text field can be changed in
the appearing DATA TEXT PROPERTIES window
which contains two tabs:
Data text
The content of the text field with prefix
and suffix, its alignment, position and
size can be adjusted. With Auto size enabled, the size of the field is automatically limited to the text size. For text
fields with more than one line, Word wrap
has to be enabled.
62
VA Database 2.0
Page 70

Alignment
The text alignment can also be changed
with the following icons:
Align text left.
Center text.
Align text right.
Font
The font family, font style, font size and
font color can be changed.
6 VA Report Generator
Font properties
The text font can also be changed with
the following icons:
Increase font size.
Decrease font size.
Set text style to bold.
Set text style to italic.
Underline text.
VA Database 2.0
63
Page 71

6 VA Report Generator
Curve fields
VA REPORT GENERATOR / Item / New / Segment Field
Add a new segment field out of the database to
the report region of the template by opening a
rectangle at the desired location.
VA REPORT GENERATOR / Item / New / Substance Field
Add a new substance field out of the database to
the report region of the template by opening a
rectangle at the desired location.
VA REPORT GENERATOR / Item / New / Calibration Field
Add a new calibration field out of the database to
the report region of the template by opening a
rectangle at the desired location.
VA REPORT GENERATOR / Item / Delete
Delete the curve field.
VA REPORT GENERATOR / Item / Properties
The properties of the curve field can be changed
in the appearing SEGMENT, SUBSTANCE or CALI-
BRATION FIELD PROPERTIES window which con-
tain three tabs:
Graph
The content of the curve field (segment,
substance or calibration curve), variation
and replication (for segment and substance curves), and the field position
and size can be adjusted.
64
Axes and titles
Main title, subtitle, ticks, grids, labels
and axis line of the X and Y axis can be
enabled or disabled.
VA Database 2.0
Page 72

Appearance
For segment and substance curves, the
line and marker pattern can be changed.
6 VA Report Generator
VA Database 2.0
Pattern
For calibration curves, the display of
measured values, deviation markers and
calibration curve can be enabled or disabled and the line color can be
changed.
65
Page 73

6 VA Report Generator
6.5 Printing of custom reports
Report printing
VA REPORT GENERATOR / Report / Print... (Ctrl+P)
Print the custom report for the selected determinations. The number of prints and the pages to
be printed can be selected in the appearing
PRINT window which depends on the selected
printer. To print only the determinations selected
manually, select Selection in this window.
Report print preview
VA REPORT GENERATOR / Report / Print Preview...
The preview window appears. The custom report
is shown in the appearance formatted for the desired printer. The following functions are available by pressing the corresponding buttons or
selecting the menu items in the PRINT PREVIEW
window or in the context sensitive menu:
Report page setup
VA REPORT GENERATOR / Report / Page Setup...
First Page Go to first page
Previous Page Go to previous page
Next Page Go to next page
Last Page Go to last page
Print... see Report printing
Page Setup... see Report page setup
Close Close preview window
The format of the page to be printed can be
changed in the appearing VA CUSTOM REPORT
OPTIONS window which contains two tabs:
66
Page layout
The printer, the paper size, the page
margins, and the page orientation are
adjustable.
VA Database 2.0
Page 74

6 VA Report Generator
Report parameters
The report type can be changed.
Tabular report
A continuos report for all selected determinations will be created. The space
available for text and graphic items of a
single determination can be adjusted. In
the VA REPORT GENERATOR window only
the current determination is shown. In
the printout, all selected determinations
are lined up to one tabular report.
VA Database 2.0
67
Page 75

6 VA Report Generator
Form report
Each determination will get one or more
pages when printing the report. With
Multi page report enabled, the number of
pages for a single form report can be
adjusted to the desired value.
6.6 Export of custom reports
Copy custom report to clipboard
VA REPORT GENERATOR / Edit / Copy (Ctrl+C)
Copy custom report (in a graphic format) to the
clipboard.
Note: With VA Database under Windows 95, custom reports are
copied to the clipboard in square size. If you import the graphics
into other programs from the clipboard, always resize the graphic
window to its initial aspect ratio, otherwise axes, labels, and texts
are not displayed correctly.
68
VA Database 2.0
Page 76

7 How to ...?
7.1 Installation and configuration
Connect the 746 VA Trace Analyzer
1. Connect the RS232 interface 1 or the RS232 interface 2 on
the rear side of the 746 VA Trace Analyzer or the 693 VA
Processor to one of the serial COM ports of your PC with the
6.2125.060 RS interface cable (25 pin to 25 pin). If the COM
port has only a 9 pin connector, the 6.2125.010 Adapter cable (25 pin to 9 pin) has to be used in addition.
7 How to ...?
2. Click on or MAIN WINDOW / Window / Communication. The
VA COMMUNICATION window will be opened or (if it is already
open) put on top.
3. In the frame Interfaces Available for VA Communication, select
the COM port connected to the 746 VA Trace Analyzer and
click on .
4. Click on . The SERIAL INTERFACE SETTINGS window appears.
5. Select tab General and click on in the frame Associated da-
tabase. Select an existing database from the list or enter a
new one. Click on <Open>.
6. Click on in the frame Backup directory. Select a directory
for storage of backup files. Click on <Open>.
7. Select tab Port Settings. Click on . Confirm the appearing settings (see COM port settings, page 52) by clicking
<OK>.
VA Database 2.0
8. Make sure that the settings of the RS232 interface on the 746
VA Trace Analyzer are identical with those in the VA Database
software.
9. Click <OK> in the SERIAL INTERFACE SETTINGS window. The
destination database for automatic data storage is now defined and opened. All incoming data is stored in this database.
69
Page 77

7 How to ...?
7.2 Data transfer 746 ---> VA Database
Send determinations to the database
1. If you want to observe the process of data transfer, click on
or MAIN WINDOW / Window / Communication to open the VA
COMMUNICATION window (the data transfer works also in the
background).
2. Load the determination to be sent into the working storage of
the 746 VA Trace Analyzer.
3. On dialog page "DOCUMENTATION" in the 746 VA Trace
Analyzer enter on a new line Report ActDetm in the COPY Re-
ports, Curves column and RSIfc.1 or RSIfc.2 in the TO destination column.
4. Activate the data transfer by moving the cursor to the described line and pressing the softkey <Exec. line>.
Using this procedure both the binary determination file (*.dtm)
and the ASCII determination report file (*.rpt) are transferred and
stored in the database.
Note: If a method contains the line COPY Report ActDetm TO
RSIfc.# on the dialog page "DOCUMENTATION", the determina-
tion is sent automatically to the database after termination of the
analysis.
Each time a determination is sent to the database, determination
files (*.dtm) and ASCII determination report files (*.rpt) will be
stored automatically to the backup directory if the option Save
original files is enabled in the SERIAL INTERFACE SETTINGS win-
dow (see Default directories, page 51).
Send determinations to the backup directory
1. If you want to observe the process of data transfer, click on
or MAIN WINDOW / Window / Communication to open the VA
COMMUNICATION window (the data transfer works also in the
background).
70
2. Select the determination(s) to be sent on the dialog page
"DETERMINATIONS" or "DATA CARD" in the 746 VA Trace
Analyzer.
3. Press the softkeys <Copy to> and <RS232 Ifc.1>/<RS232 Ifc.2>.
The binary determination files (*.dtm) will be transferred to the
predefined backup directory (see Default directories, page 51).
VA Database 2.0
Page 78

7 How to ...?
Note: Each time a determination is sent to the database, a determination file (*.dtm) and an ASCII determination report file (*.rpt)
will be stored automatically to the backup directory if the option
Save original files is enabled in the SERIAL INTERFACE SETTINGS
window (see Default directories, page 51).
Send methods to the backup directory (binary and
ASCII files)
1. If you want to observe the process of data transfer, click on
or MAIN WINDOW / Window / Communication to open the VA
COMMUNICATION window (the data transfer works also in the
background).
2. Load the method to be sent into the working storage of the
746 VA Trace Analyzer.
3. On dialog page "DOCUMENTATION" in the 746 VA Trace
Analyzer enter on a new line Report ActMeth in the COPY Re-
ports, Curves column and RSIfc.1 or RSIfc.2 in the TO destination column.
4. Activate the data transfer by moving the cursor to the described line and pressing the softkey <Exec. line>.
Using this procedure both the binary method file (*.mth) and the
ASCII method report file (*.rpt) are transferred and stored in the
backup directory.
Note: If a method contains the line COPY Report ActMeth TO
RSIfc.# on the dialog page "DOCUMENTATION", the method files
are sent automatically to the backup directory after termination of
the analysis.
Send methods to the backup directory (only binary
files)
1. If you want to observe the process of data transfer, click on
or MAIN WINDOW / Window / Communication to open the VA
COMMUNICATION window (the data transfer works also in the
background).
VA Database 2.0
2. Select the method(s) to be sent on the dialog page
"METHODS" or "DATA CARD" in the 746 VA Trace Analyzer.
3. Press the softkeys <Copy to> and <RS232 Ifc.1>/<RS232 Ifc.2>.
The binary method files (*.mth) will be transferred to the predefined backup directory (see Default directories, page 51).
71
Page 79

7 How to ...?
Send sample tables to the backup directory
1. If you want to observe the process of data transfer, click on
or MAIN WINDOW / Window / Communication to open the VA
COMMUNICATION window (the data transfer works also in the
background).
2. On the dialog page "SAMPLES" in the 746 VA Trace Analyzer
press the softkeys < >> > and <Copy to RS Ifc.1>.
The current sample table will be transferred as ASCII sample table file (*.smp) to the predefined backup directory (see Default
directories, page 51).
Note: The transfer of sample table files can only be done via RS
Interface 1 at the 746 VA Trace Analyzer.
Send rack definition files to the backup directory
If a 695 Autosampler is connected to the 746 VA Trace Analyzer,
the rack data configuration files stored in the 695 Autosampler
can be saved first on a data card and then on the PC. Proceed
as follows:
1. If you want to observe the process of data transfer, click on
or MAIN WINDOW / Window / Communication to open the VA
COMMUNICATION window (the data transfer works also in the
background).
2. Press the softkeys <Settings>, <695 Autosampler>, and <Rack
def> on the dialog page "STAND" in the 746 VA Trace Ana-
lyzer.
3. Load the desired rack data by entering the Rack name and
pressing the softkey <Load from 695>.
4. Store the rack definition file to the data card inserted in the
746 VA Trace Analyzer by pressing the softkey <Copy to Data
Cd.>.
72
5. Select the desired rack definition file (*.aut) on the dialog
page "DATA CARD" and press the softkeys <Copy to> and
<RS232 Ifc.1>/<RS232 Ifc.2>.
The current rack definition data will be transferred as binary rack
definition file (*.aut) to the predefined backup directory (see De-
fault directories, page 51).
VA Database 2.0
Page 80

7.3 Data transfer VA Database ---> 746
Send determinations from the database to the 746 VA
Trace Analyzer
1. If you want to observe the process of data transfer, click on
or MAIN WINDOW / Window / Communication to open the VA
COMMUNICATION window.
2. Open the dialog pages "DETERMINATIONS" or "DATA CARD"
in the 746 VA Trace Analyzer.
3. Press the softkeys <Copy from> and <RS232 Ifc.1>/<RS232
Ifc.2>.The SYSTEM window will appear indicating that data can
be received via the RS232 interface.
4. Click on or MAIN WINDOW / Window / Table to open the VA
DATABASE TABLE window. In the appearing table view select
on or more entries and click on Determination / Send to and the
desired destination COM1, COM2, COM3, or COM4 (this function
is also available in the context sensitive menu opened by
pressing the right mouse button).
7 How to ...?
5. Confirm the message Make sure that VA Trace Analyzer is ready
to receive files with <OK>. All *.dtm files of the selected deter-
minations will be transferred to the 746 VA Trace Analyzer.
6. After termination of the data transfer close the SYSTEM window in the 746 VA Trace Analyzer by pressing the <Esc>
key. The transferred determinations can be loaded to the
working storage then.
Note: Single determinations can also be sent from the VA DATA-
BASE EXPLORER window. Click on the desired determination in
the tree and press the right mouse button. Click on Send to and
the desired destination COM1, COM2, COM3, or COM4. Confirm the
message Make sure that VA Trace Analyzer is ready to receive files
with <OK>.
Send determination files from the backup directory to
the 746 VA Trace Analyzer
VA Database 2.0
1. Open the dialog pages "DETERMINATIONS" or "DATA CARD"
in the 746 VA Trace Analyzer.
2. Press the softkeys <Copy from> and <RS232 Ifc.1>/<RS232
Ifc.2>.The SYSTEM window will appear indicating that data can
be received via the RS232 interface.
73
Page 81

7 How to ...?
Send method files from the backup directory to the
746 VA Trace Analyzer
3. Click on or MAIN WINDOW / Window / Communication. The
VA COMMUNICATION window will be opened or (if it is already
open) put on top.
4. Click on . Select the determination files (*.dtm) to
be sent in SEND VA FILES window and click on <Open>.
5. Confirm the message Make sure that VA Trace Analyzer is ready
to receive files with <OK>. All selected *.dtm files will be trans-
ferred to the 746 VA Trace Analyzer.
6. After termination of the data transfer close the SYSTEM window in the 746 VA Trace Analyzer by pressing the <Esc>
key. The transferred determinations can be loaded to the
working storage then.
1. Open the dialog pages "METHODS" or "DATA CARD" in the
746 VA Trace Analyzer.
2. Press the softkeys <Copy from> and <RS232 Ifc.1>/<RS232
Ifc.2>.The SYSTEM window will appear indicating that data can
be received via the RS232 interface.
3. Click on or MAIN WINDOW / Window / Communication. The
VA COMMUNICATION window will be opened or (if it is already
open) put on top.
4. Click on . Select the method files (*.mth) to be sent
in SEND VA FILES window and click on <Open>.
5. Confirm the message Make sure that VA Trace Analyzer is ready
to receive files with <OK>. All selected *.mth files will be trans-
ferred to the 746 VA Trace Analyzer.
6. After termination of the data transfer close the SYSTEM window in the 746 VA Trace Analyzer by pressing the <Esc>
key. The transferred methods can be loaded to the working
storage then.
74
Send sample table files from the backup directory to
the 746 VA Trace Analyzer
1. Open the dialog pages "SAMPLES" in the 746 VA Trace Analyzer.
VA Database 2.0
Page 82

7 How to ...?
2. Press the softkeys < >> > and <Copy fr. RS Ifc.1>.The SYSTEM
window will appear indicating that data can be received via
the RS232 interface.
3. Click on or MAIN WINDOW / Window / Communication. The
VA COMMUNICATION window will be opened or (if it is already
open) put on top.
4. Click on . Select the sample table file (*.smp) to be
sent in SEND VA FILES window and click on <Open>.
5. Confirm the message Make sure that VA Trace Analyzer is ready
to receive files with <OK>. The selected *.smp file will be trans-
ferred to the working storage of the 746 VA Trace Analyzer.
6. After termination of the data transfer close the SYSTEM window in the 746 VA Trace Analyzer by pressing the <Esc>
key.
Note: The transfer of sample table files can only be done via RS
Interface 1.
Send rack definition files from the backup directory to
the 746 VA Trace Analyzer
1. Open the dialog pages "DATA CARD" in the 746 VA Trace
Analyzer.
2. Press the softkeys <Copy from> and <RS232 Ifc.1>/<RS232
Ifc.2>.The SYSTEM window will appear indicating that data can
be received via the RS232 interface.
3. Click on or MAIN WINDOW / Window / Communication. The
VA COMMUNICATION window will be opened or (if it is already
open) put on top.
4. Click on . Select the rack definition files (*.aut) to
be sent in SEND VA FILES window and click on <Open>.
5. Confirm the message Make sure that VA Trace Analyzer is ready
to receive files with <OK>. All selected *.aut files will be trans-
ferred to the 746 VA Trace Analyzer.
6. After termination of the data transfer close the SYSTEM window in the 746 VA Trace Analyzer by pressing the <Esc>
key. The transferred rack definition files can be loaded from
the data card to the 695 Autosampler then (procedure see
746 Instruction manual).
VA Database 2.0
75
Page 83

7 How to ...?
7.4 Database Table
Add fields to the database table
1. Click on or MAIN WINDOW / Window / Table. The VA DATA-
BASE TABLE window will be opened or (if it is already open)
put on top.
2. Click on or VA DATABASE TABLE / Options / Define Visible
Fields.... The VISIBLE FIELDS DEFINITION window appears. In
the left column all available fields are displayed. The right
column displays the active fields.
3. Select the desired field(s) in the left column. Click on the field
above the position where the new field(s) should be posi-
tioned. Click on . The selected fields are copied from
the left to the right column under the selected field. If no field
has been selected the new fields are added at the end of the
column.
4. Click on <OK> to close the VISIBLE FIELDS DEFINITION window.
Remove fields from the database table
1. Click on or MAIN WINDOW / Window / Table. The VA DATA-
BASE TABLE window will be opened or (if it is already open)
put on top.
2. Click on or VA DATABASE TABLE / Options / Define Visible
Fields.... The VISIBLE FIELDS DEFINITION window appears. In
the left column all available fields are displayed. The right
column displays the active fields.
3. Select the desired field(s) in the right column. Click on
. The selected fields are deleted from the right column.
4. Click on <OK> to close the VISIBLE FIELDS DEFINITION window.
Change the position of the fields in the database table
1. Click on or MAIN WINDOW / Window / Table. The VA DATA-
BASE TABLE window will be opened or (if it is already open)
put on top.
76
2. Click on or VA DATABASE TABLE / Options / Define Visible
Fields.... The VISIBLE FIELDS DEFINITION window appears.
VA Database 2.0
Page 84

7 How to ...?
3. To change the order of the fields in the database table select
the field(s) to be rearranged in the right column. Click on
or to shift the selected field(s) one position upwards or
downwards.
4. Click on <OK> to close the VISIBLE FIELDS DEFINITION window.
Note: The position of the fields in the database table can also be
changed by clicking a column header in the VA DATABASE TABLE
window and moving it to the desired position with the left mousebutton pressed down.
Change the width of the columns in the database table
1. Click on or MAIN WINDOW / Window / Table. The VA DATA-
BASE TABLE window will be opened or (if it is already open)
put on top.
2. Move the cursor to the border in the table header between the
two fields which should be moved until the cursor changes to
.
3. Press the left mouse button and move the border to the desired position.
Filter the database content
1. Click on or MAIN WINDOW / Window / Table. The VA DATA-
BASE TABLE window will be opened or (if it is already open)
put on top.
2. Click on or VA DATABASE TABLE / Options / Define Filter....
The FILTER DEFINITION window appears.
3. Define the filtering criterion by entering the desired values in
the fields Field, Name (if shown), Comparison Operator, Value,
and Meas. unit (if shown).
VA Database 2.0
4. Press to add the current expression to the
filtering criteria list.
5. Select AND or OR in the Logical Operator field for the next expression to be added.
6. Define the filtering criterion by entering the desired values in
the fields Field, Name (if shown), Comparison Operator, Value,
and Meas. unit (if shown).
77
Page 85

7 How to ...?
7. Press to add the current expression to the
filtering criteria list in the same hierarchy level as the selected
expression or
press to add the current expression to the
filtering criteria list in the next lower hierarchy level as the selected expression.
8. Repeat steps 4...6 for each expression or subexpression you
want to add.
9. If you wish to store the filtering criteria permanently, press
to save them in an external *.vaf file.
10. Click on <OK>. The determinations in the database table will
be filtered. Only determinations which fulfill the defined filtering criteria will be displayed. The filtering expression is shown
in the Select pop-up field of the Menu bar in the VA DATABASE
TABLE window.
Note: If no entry is made in the fields Name or Meas. unit, all pos-
sible substances, final results or units are taken into consideration.
For entries in the field Value, prefixes (m, u, n, etc.) can be used.
With Field = ResValue, the possible entries in the field Meas. unit
depend on the calculation formula used in the method (for details, see Note in Fields from page "RESULTS", page 38).
Disable filtering of the database content
1. Click on or MAIN WINDOW / Window / Table. The VA DATA-
BASE TABLE window will be opened or (if it is already open)
put on top.
2. Click on or VA DATABASE TABLE / Options / Define Filter....
The FILTER DEFINITION window appears.
3. Press to delete all expressions in the filtering
criteria list.
78
4. Click on <OK>. All determinations in the database table will be
displayed. The filtering expression All is shown in the Select
pop-up field of the Menu bar in the VA DATABASE TABLE window.
VA Database 2.0
Page 86

Sort the database content
1. Click on or MAIN WINDOW / Window / Table. The VA DATA-
BASE TABLE window will be opened or (if it is already open)
put on top.
2. Click on or VA DATABASE TABLE / Options / Define Sort-
ing.... The SORTING DEFINITION window appears.
3. Select the desired database field for main sorting in the left
column and set the sorting order to Ascending or Descending.
4. Select the desired database field for further sorting in the right
column and set the sorting order to Ascending or Descending.
5. Click on <OK>. The determinations in the database table will
be sorted. The sorting expression is shown in the Sort by popup field of the Menu bar in the VA DATABASE TABLE window.
Disable sorting of the database content
7 How to ...?
1. Click on or MAIN WINDOW / Window / Table. The VA DATA-
BASE TABLE window will be opened or (if it is already open)
put on top.
2. Click on or VA DATABASE TABLE / Options / Define Sort-
ing.... The FILTER DEFINITION window appears.
3. Press to deactivate the sorting in the left column.
4. Press to deactivate the sorting in the right column.
5. Click on <OK>. The determinations in the database table will
be displayed in an unsorted order. The sorting expression
shown in the Select pop-up field of the Menu bar in the VA
DATABASE TABLE window will be empty.
Print the database table
1. Click on or MAIN WINDOW / Window / Table. The VA DATA-
BASE TABLE window will be opened or (if it is already open)
put on top.
VA Database 2.0
2. Select the determinations to be printed (additional determinations are selected by clicking on them while pressing the
<Ctrl> key). If you want to print all determinations, click on
or VA DATABASE TABLE / Edit / Select All.
3. If you want to change the page setup, click on or VA DA-
TABASE TABLE / Table / Page Setup.... Set all the parameters in
79
Page 87

7 How to ...?
Copy the database table text to clipboard
three tabs Page layout, Text properties, and Appearance to the
desired values and close the PAGE SETUP window by clicking
<OK>.
4. If you want to see the print preview, click on or VA DATA-
BASE TABLE / Table / Print Preview.... .
5. To print the selected determinations, click on or VA DA-
TABASE TABLE / Table / Print.... . Select the number of prints
and the pages to be printed in the PRINT window and click
<OK>.
1. Click on or MAIN WINDOW / Window / Table. The VA DATA-
BASE TABLE window will be opened or (if it is already open)
put on top.
2. Select the determinations whose table text should be copied
(additional determinations are selected by clicking on them
while pressing the <Ctrl> key). If you want to copy the whole
database text, click on or VA DATABASE TABLE / Edit / Se-
lect All.
3. Click on or VA DATABASE TABLE / Edit / Copy. The header
line and the selected part of the table (highlighted lines) are
copied into the clipboard from where it can be imported into
other programs like Microsoft Word or Excel. The table fields
are always separated by a tab.
Export the database table text
1. Click on or MAIN WINDOW / Window / Table. The VA DATA-
BASE TABLE window will be opened or (if it is already open)
put on top.
2. Select the determinations whose table text should be exported (additional determinations are selected by clicking on
them while pressing the <Ctrl> key). If you want to export the
whole database text, click on or VA DATABASE TABLE /
Edit / Select All.
80
3. Click on VA DATABASE TABLE / Table / Save As Text.... . The
header line and the selected part of the table (highlighted
lines) are saved into an ASCII text file (extension *.txt). This file
can be imported into other programs like Microsoft Word or
Excel. The table fields are separated by the default data delimiter set in the General Preferences (see Export settings, page
21).
VA Database 2.0
Page 88

Export measurement points
1. Click on or MAIN WINDOW / Window / Table. The VA DATA-
BASE TABLE window will be opened or (if it is already open)
put on top.
2. Select the determinations whose measurement points should
be exported (additional determinations are selected by clicking on them while pressing the <Ctrl> key). If you want to
export measurement points of all determinations, click on
or VA DATABASE TABLE / Edit / Select All.
3. Click on VA DATABASE TABLE / Determination / Export Measure-
ment Points.... . The measurement points of all sweeps of the
selected determinations are saved into data files (extension
*.dat). This files can be imported into other programs like Mi-
crosoft Word or Excel. The table fields are separated by the
default data delimiter set in the General Preferences (see Export
settings, page 21).
7 How to ...?
7.5 Text reports
Display text reports from VA Table
1. Click on or MAIN WINDOW / Window / Table. The VA DATA-
BASE TABLE window will be opened or (if it is already open)
put on top.
2. Select the determination whose text report should be displayed.
3. Click on VA DATABASE TABLE / Determination / View Text Report
or select View Text Report in the context sensitive menu. The
TEXT REPORT subwindow is opened in the MAIN WINDOW.
Display text reports from VA Explorer
1. Click on or MAIN WINDOW / Window / Explorer. The VA DA-
TABASE EXPLORER window will be opened or (if it is already
open) put on top.
VA Database 2.0
2. Select the determination whose text report should be displayed.
3. Click on VA DATABASE EXPLORER / Determination / View or select View in the context sensitive menu or drag and drop the
view item directly to an empty space of the MAIN WINDOW.
The TEXT REPORT subwindow is opened in the MAIN WINDOW.
81
Page 89

7 How to ...?
Print the text report
Note: The part of the text report displayed (which contains always the whole full report and method specification) depends on
the view item selected in the VA DATABASE EXPLORER window
(details see View text reports from VA Explorer, page 44).
1. Select the subwindow of the text report to be printed in the
MAIN WINDOW.
2. If you want to change the page setup, click on or MAIN
WINDOW / File / Page Setup.... Set all the parameters in three
tabs Page layout, Text properties, and Documentation to the desired values and close the PAGE SETUP window by clicking
<OK>.
3. If you want to see the print preview, click on or MAIN WIN-
DOW / File / Print Preview....
Copy the text report to clipboard
7.6 Curves
Display curves from VA Table
4. To print the text report, click on or MAIN WINDOW / File /
Print.... . Select the number of prints and the pages to be
printed in the PRINT window and click <OK>.
1. Select the text to be copied in the subwindow of the text re-
port in the MAIN WINDOW. If no text is selected, the whole window content will be copied.
2. Click on or MAIN WINDOW / File / Copy. The selected part of
the text report is copied to clipboard from where it can be imported into other programs like Microsoft Word or Excel.
82
1. Click on or MAIN WINDOW / Window / Table. The VA DATA-
BASE TABLE window will be opened or (if it is already open)
put on top.
2. Select the determination whose curve should be displayed.
3. Click on VA DATABASE TABLE / Determination and select View
Substance and the substance name for substance curves,
View Calibration and the substance name for calibration
curves, or View Segment and the segment name for segment
VA Database 2.0
Page 90

curves (or select the corresponding item in the context sensitive menu). The curve subwindow containing all substance,
calibration, or segment curves is opened in the MAIN WIN-
DOW.
Display curves from VA Explorer
1. Click on or MAIN WINDOW / Window / Explorer. The VA DA-
TABASE EXPLORER window will be opened or (if it is already
open) put on top.
2. Expand the database explorer tree until you see the curve
items.
3. Select the curve item whose curve should be displayed.
4. Click on VA DATABASE EXPLORER / Determination / View or select View in the context sensitive menu or drag and drop the
view item directly to an empty space of the MAIN WINDOW.
The curve subwindow is opened in the MAIN WINDOW.
Whether it contains a single curve or all curves depends on
the view item selected (details see View reports and curves
from VA Explorer, page 44).
7 How to ...?
Display overlay curves
1. Click on or MAIN WINDOW / Window / Explorer. The VA DA-
TABASE EXPLORER window will be opened or (if it is already
open) put on top.
2. Expand the database explorer tree until you see the desired
curve items.
3. Select the curve item whose curve should be displayed.
4. Click on VA DATABASE EXPLORER / Determination / View or select View in the context sensitive menu or drag and drop the
view item directly to an empty space of the MAIN WINDOW.
The curve subwindow is opened in the MAIN WINDOW.
Whether it contains a single curve or all curves depends on
the view item selected (details see View reports and curves
from VA Explorer, page 44).
5. Select another curve item of the same type (substance, calibration, or segment) as the curve displayed.
6. Drag and drop the view item directly to the open curve subwindow in the MAIN WINDOW. The related curves will be
added to the existing curve set. The axes are automatically
expanded to show all the curves completely.
VA Database 2.0
7. Repeat steps 5...6 until all desired curves are displayed in the
curve subwindow.
83
Page 91

7 How to ...?
Remove curves from the overlay view
Change the curve selection
1. Select the desired overlay curve subwindow in the MAIN WIN-
DOW.
2. Click on MAIN WINDOW / Edit / Options... or select Options... in
the context sensitive menu.
3. In the OPTIONS window displayed, select the tab Curves.
4. Select the curves to be deleted in the curves list, press
and close the window by clicking <OK>.
1. Select the desired substance or segment curve subwindow in
the MAIN WINDOW.
2. Click on MAIN WINDOW / Edit / Options... or select Options... in
the context sensitive menu.
3. In the OPTIONS window displayed, select the tab Curves,
change the Var and Rep parameters to the desired values and
close the window by clicking <OK>.
Change the appearance of curves
1. Select the desired curve subwindow in the MAIN WINDOW.
2. Click on MAIN WINDOW / Edit / Options... or select Options... in
the context sensitive menu.
3. In the OPTIONS window displayed, select the tab Curves.
Change the parameters for line and marker patterns to the
desired values.
4. Select the tab Appearance and change the parameters for
headers and axes to the desired values.
5. Select the tab Scale, change the scaling parameters to the
desired values and close the OPTIONS window by clicking
<OK>.
Zoom curves by mouse
84
1. Select the desired curve subwindow in the MAIN WINDOW.
2. Select the curve section to be zoomed by opening a frame
while pressing the left mouse button down.
3. If you want to reset the zooming, press the <F8> key or select Set Default Scale in the context sensitive menu.
VA Database 2.0
Page 92

Print curves
1. Select the curve subwindow to be printed in the MAIN WIN-
DOW.
2. If you want to change the page setup, click on or MAIN
WINDOW / File / Page Setup.... Set the parameters in tab Page
layout to the desired values and close the PAGE SETUP win-
dow by clicking <OK>.
3. If you want to see the print preview, click on or MAIN WIN-
DOW / File / Print Preview....
4. To print the curve, click on or MAIN WINDOW / File / Print....
Select the number of prints and the pages to be printed in the
PRINT window and click <OK>.
Copy curves to clipboard
7 How to ...?
1. Select the curve subwindow to be copied in the MAIN WINDOW
2. Click on or MAIN WINDOW / File / Copy. The current content
Note: With VA Database under Windows 95, curves are copied to
the clipboard in square size. If you import the curves into other
programs from the clipboard, always resize the graphic window
to its initial aspect ratio, otherwise axes, labels, and texts are not
displayed correctly. Alternatively, export and import the curve in
the *.emf, *.wmf or *.bmp format where the aspect ratio is retained.
Export curves
1. Select the curve subwindow to be exported in the MAIN WIN-
and adjust the window to the desired size.
of the curve subwindow is copied to clipboard from where it
can be imported into other programs like Microsoft Word or
Excel.
DOW and adjust the window to the desired size.
VA Database 2.0
2. Click on MAIN WINDOW / Edit / Export as... and select the desired export format Metafile... (*.wmf), Enhanced Metafile...
(*.emf), or Bitmap... (*.bmp) or select the corresponding menu
item in the context sensitive menu.
3. Enter the destination directory and the file name in the appearing EXPORT window and click <OK>. The content of the
current curve subwindow will be saved as a graphics file on
the hard disk from where it can be imported into other programs like Microsoft Word or Excel.
85
Page 93

7 How to ...?
Note: With some programs (e.g. Microsoft Word 6 and 7) no
*.emf format import is possible. In this case, export and import the
curve in the *.wmf or *.bmp format.
For exporting curves to graphic files it is recommended to use
the *.wmf or *.emf format for better resolution and the possibility to
rescale the graphic.
7.7 Custom reports
Create a new template
1. Click on or MAIN WINDOW / Window / Report Generator. The
VA REPORT GENERATOR window will be opened or (if it is al-
ready open) put on top.
2. Click on or VA REPORT GENERATOR / Report / New Tem-
plate. A new empty template will be opened.
3. Click on or VA REPORT GENERATOR / Report / Page Setup....
Define printer, paper size, page margins, and page orientation in the tab Page layout.
4. Define the report type (tabular or form report) in the tab Report
parameters and close the PAGE SETUP window by clicking
<OK>.
Open an existing template
1. Click on or MAIN WINDOW / Window / Report Generator. The
VA REPORT GENERATOR window will be opened or (if it is al-
ready open) put on top.
2. Click on or VA REPORT GENERATOR / Report / Open Tem-
plate....
3. Select the desired template in the OPEN VA DATABASE RE-
PORT TEMPLATE window and click <OK>.
86
Save a template
1. Click on or MAIN WINDOW / Window / Report Generator. The
VA REPORT GENERATOR window will be opened or (if it is al-
ready open) put on top.
2. Open an existing template or create a new template. Design
the template as you like.
VA Database 2.0
Page 94

3. Click on or VA REPORT GENERATOR / Report / Save Tem-
plate to save a template which has been changed under the
same name.
4. Click on VA REPORT GENERATOR / Report / Save Template As...
to save a new template or a template which has been
changed under a new name. Enter the new name and directory in the SAVE VA DATABASE REPORT TEMPLATE window
and click <OK>.
Design a template
1. Click on or MAIN WINDOW / Window / Report Generator. The
VA REPORT GENERATOR window will be opened or (if it is al-
ready open) put on top.
2. Open an existing template or create a new template.
3. If the template is in read-only mode, click on to change to
the design mode.
7 How to ...?
4. Click on or VA REPORT GENERATOR / Report / Page Setup....
Define printer, paper size, page margins, and page orientation in the tab Page layout.
5. Define the report type (tabular or form report) in the tab Report
parameters and close the PAGE SETUP window by clicking
<OK>.
6. Define the report regions for header, report and footer (details
see Defining template regions, page 59).
7. Select the item type which should be added by pressing
(text label), (text field), (segment field),
(substance field), or (calibration field) or select the ap-
propriate menu item under VA REPORT GENERATOR / Item /
New (details see Design templates, page 59).
8. Add the selected item to the template by opening a frame at
the desired location while pressing the left mouse button
down.
9. Click on or VA REPORT GENERATOR / Item / Properties or
select Properties ... in the context sensitive menu. Change the
item properties in the PROPERTIES window and close the window with <OK>.
VA Database 2.0
10. Move the item to the desired location by dragging while
pressing the left mouse button and resize it by dragging the
border lines or edges.
87
Page 95

7 How to ...?
Change the report item properties
11. Repeat steps 7...10 until all desired report items are added to
the template.
12. If you want to save the template, click on VA REPORT GEN-
ERATOR / Report / Save Template As... to save a new template
or a template which has been changed under a new name.
Enter the new name and directory in the SAVE VA DATABASE
REPORT TEMPLATE window and click <OK>.
1. Click on or MAIN WINDOW / Window / Report Generator. The
VA REPORT GENERATOR window will be opened or (if it is al-
ready open) put on top.
2. Open an existing template or create a new template.
3. If the template is in read-only mode, click on to change to
the design mode.
4. Select the report item which should be changed and click on
or VA REPORT GENERATOR / Item / Properties or select
Properties ... in the context sensitive menu. Change the item
properties in the PROPERTIES window and close the window
with <OK> (details see Design templates, page 59).
5. Move the item to the desired location by dragging while
pressing the left mouse button and resize it by dragging the
border lines or edges.
6. Repeat steps 4...5 until all desired report items are changed.
7. If you want to save the template, click on or VA REPORT
GENERATOR / Report / Save Template to save the template un-
der the same name.
Define method associated templates
1. Click on MAIN WINDOW / Settings / General Preferences....
2. Select tab Templates in the GENERAL PREFERENCES window.
3. Enter the name of the method for which a template should be
associated in the field Method name.
88
4. Press the button of the Associated custom report template
field and select the desired template (*.vat file) in the SELECT
CUSTOM REPORT TEMPLATE window.
5. Press to add the new entry to the list of methods
with associated template.
6. Repeat steps 3...5 until all desired method associated templates are defined.
VA Database 2.0
Page 96

7. Click <OK> to close the GENERAL PREFERENCES window.
Use method associated templates
1. Click on or MAIN WINDOW / Window / Report Generator. The
VA REPORT GENERATOR window will be opened or (if it is al-
ready open) put on top.
2. Open an existing template or create a new template.
3. If the template is in design mode, click on to change to
the read-only mode.
4. Click on to enable the automatic loading of the defined
method associated templates for each determination recorded with such a method.
Browse the database with VA Report Generator
7 How to ...?
1. Click on or MAIN WINDOW / Window / Report Generator. The
VA REPORT GENERATOR window will be opened or (if it is al-
ready open) put on top.
2. Open an existing template or create a new template for
browsing the determination.
3. If you want to use method associated templates, click on
to enable the automatic loading of the defined method associated templates for each determination recorded with such a
method.
4. Adjust the size of the VA REPORT GENERATOR window so that
it will be visible beside the open VA DATABASE TABLE window
or VA DATABASE EXPLORER window.
5. Select the determination in the VA DATABASE TABLE window
or VA DATABASE EXPLORER window. The VA REPORT GEN-
ERATOR window shows the template filled with the contents of
the selected determination.
Print a custom report
VA Database 2.0
1. Click on or MAIN WINDOW / Window / Report Generator. The
VA REPORT GENERATOR window will be opened or (if it is al-
ready open) put on top.
2. Open an existing template or create a new template for
browsing the determination.
3. If you want to use method associated templates, click on
to enable the automatic loading of the defined method asso-
89
Page 97

7 How to ...?
Copy custom reports to clipboard
ciated templates for each determination recorded with such a
method.
4. Adjust the size of the VA REPORT GENERATOR window so that
it will be visible beside the open VA DATABASE TABLE window
or VA DATABASE EXPLORER window.
5. Select the determination in the VA DATABASE TABLE window
or VA DATABASE EXPLORER window whose report should be
printed.
6. If you want to see the print preview, click on or VA RE-
PORT GENERATOR / Report / Print Preview... in the VA REPORT
GENERATOR window.
7. To print the curve, click on or VA REPORT GENERATOR /
Report / Print.... Select the number of prints and the pages to
be printed in the PRINT window and click <OK>.
1. Click on or MAIN WINDOW / Window / Report Generator. The
VA REPORT GENERATOR window will be opened or (if it is al-
ready open) put on top.
2. Open an existing template or create a new template for
browsing the determination.
3. If you want to use method associated templates, click on
to enable the automatic loading of the defined method associated templates for each determination recorded with such a
method.
4. Adjust the size of the VA REPORT GENERATOR window so that
it will be visible beside the open VA DATABASE TABLE window
or VA DATABASE EXPLORER window.
5. Select the determination in the VA DATABASE TABLE window
or VA DATABASE EXPLORER window whose report should be
copied.
6. Click on or VA REPORT GENERATOR / Edit / Copy. The
current content of the VA REPORT GENERATOR window is
copied to clipboard from where it can be imported into other
programs like Microsoft Word or Excel.
90
Note: With VA Database under Windows 95, custom reports are
copied to the clipboard in square size. If you import the graphics
into other programs from the clipboard, always resize the graphic
window to its initial aspect ratio, otherwise axes, labels, and texts
are not displayed correctly.
VA Database 2.0
Page 98

8 Troubleshooting
8.1 Data transfer: What to do if ...
No data is received on the PC
1. Check cables and connections.
2. Make sure that the interface settings on the PC and the 746
VA Trace Analyzer are identical.
8 Troubleshooting
3. Check advanced interface settings on the PC (see Configure
Windows 95, page 3).
4. Press on the VA COMMUNICATION window.
5. If the problem continues, reduce the baud rate to 4800 or
2400 bits/s on the PC and the 746 VA Trace Analyzer.
The received data is not in the database
1. Check the destination database Associated database for the
COM port in the SERIAL INTERFACE SETTINGS window (see
Default directories, page 51).
2. Open this database and check the filtering criteria.
3. Make sure the an actual determination report Report ActDetm
has been sent form the 746 VA Trace Analyzer.
No data is received on the 746 VA Trace Analyzer
1. Check cables and connections.
VA Database 2.0
2. Make sure that the interface settings on the PC and the 746
VA Trace Analyzer are identical.
3. Check advanced interface settings on the PC (see Configure
Windows 95, page 3).
4. Press on the VA COMMUNICATION window.
5. Set VA Trace Analyzer to receive mode by pressing <Copy
from> <RS232 Ifc.#>.
91
Page 99

8 Troubleshooting
Character buffer overrun or Invalid control check sum
message appears (error in log file)
Data is transferred to PC but not imported in VA
Database (error in log file)
6. If the problem continues, reduce the baud rate to 4800 or
2400 bits/s on the PC and the 746 VA Trace Analyzer.
1. Check cables and connections.
2. Check advanced interface settings on the PC (see Configure
Windows 95, page 3).
3. If the problem continues, reduce the baud rate to 4800 or
2400 bits/s on the PC and the 746 VA Trace Analyzer.
4. If the problem continues, store the database on a local drive
and not on a network drive (problems may be due to heavy
network traffic interfering with serial interface transfer).
1. Check your program version on the 694 VA Processor. The
5.693.0010 program version is not compatible with VA Database 2.0. Ask your representative for a program update.
2. If this error occurs with other program versions, try to send
another determination to the VA Database (e.g. dummy cell
test determination Test747.dtm stored in the Backup directory).
Data cannot be stored or the access is denied on the
specified device (error in log file)
1. Check if the specified device (hard drive, network drive,
floppy disk, etc.) is full. Delete obsolete directories or files to
make more space available.
2. Check if you have access rights to write on the specified device (e.g. network drive).
8.2 Printing: What to do if ...
Text reports are not printed completely
1. Check the general settings for text report printing in the GEN-
ERAL PREFERENCES window (see Text report settings, page
24). Select the tab Text Report and set the Report type to All if
you want to print the whole text report as a default.
92
VA Database 2.0
Page 100

2. Check the settings for text report printing in the PAGE SETUP
window (see Document page setup, page 11). Select the tab
Documentation and set the Report type to All if you want to print
the whole text report.
Curves are missing in curve printing
1. Check the color settings for curve lines (some colors may
vanish on a black and white printer). Select black or dark colors as default in the GENERAL PREFERENCES window (see
Settings, page 19) or OPTIONS window (see Display of curves,
page 14).
2. Check the curve subwindow in the MAIN WINDOW. If no curve
is visible, the scaling may be wrong. Adjust the scaling in the
OPTIONS window (see Scaling of curve axes, page 18) or re-
set the curve window to the default scale by pressing the
<F8> key or select the Set Default Scale option of the context
sensitive menu.
8 Troubleshooting
3. If the curve is not visible with default scale settings, change
the x and y axes scales to Auto in the OPTIONS window (see
Display of curves, page 14).
4. Since the changed scaling settings are not stored in the database, you should correct the wrong scaling settings in the
746 VA Trace Analyzer. For this, send the selected determination to the 746 VA Trace Analyzer and check the Dis-
play/Plot parameters for segments or substances. Correct the
scaling to the desired values and send the determination
back to the VA Database.
Curves in custom reports are missing in printing
1. Check the color settings for curve lines (some colors may
vanish on a black and white printer). Select black or dark colors as default in OPTIONS window (see Curve fields, page 64).
2. If the curve is still not visible, send the selected determination
to the 746 VA Trace Analyzer and check the Display/Plot parameters for segments or substances. Correct the scaling to
the desired values and send the determination back to the VA
Database.
Curve and axes lines are very thin
VA Database 2.0
This problem may occur with printers with a high graphics
resolution. Reduce the graphics resolution on your printer
(e.g. to 600 dpi or 300 dpi).
93
 Loading...