

Page 1
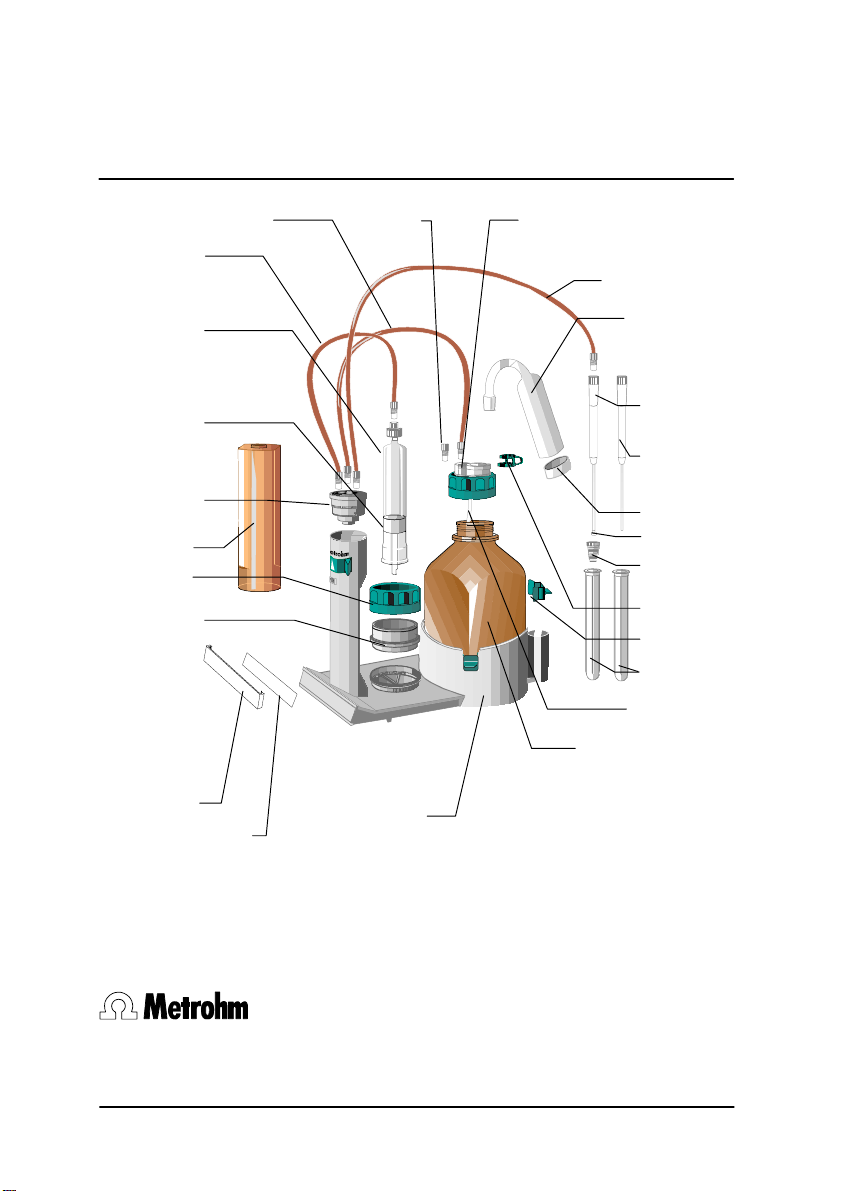
Wechseleinheit
PTFE
Unité interchangeable 6.3013.XXX/6.3014.XXX
Exchange Unit
6.1805.XXX
.050 1 mL
.010 5...50 mL
6.1518.XXX
.113 1 mL
.150 5 mL
.210 10 mL
.220 20 mL
.250 50 mL
6.1556.XXX
.110 1 mL
.150 5 mL
.210 10 mL
.220 20 mL
.250 50 mL
6.1542.XXX
.010 Ceramics
.020 PCTFE/
6.1563.000
6.2044.005
6.2045.XXX
.000 1...10 mL
.010 20 mL
.020 50 mL
6.2046.060
6.2244.010
6.1805.080
6.1446.080
6.1569.XXX
.110 1 mL
.150 5 mL
.210 10 mL
.220 20 mL
.250 50 mL
6.1602.105
6.1805.100
6.1609.000
6.1543.050
6.1543.060
(6.2701.020)
(6.2726.060)
6.1446.030
6.2023.020
6.2043.005
6.1228.000
6.1819.020
6.1608.023
CH-9101 Herisau/Switzerland
Phone ++41 71 353 85 85
Fax ++41 71 353 89 01
Page 2
CH-9101 Herisau/Switzerland
Phone ++41 71 353 85 85
Fax ++41 71 353 89 01
Wechseleinheit
6.3013.XXX
6.3014.XXX
Unité interchangeable
Unidad intercambiable
Exchange Unit
Gebrauchsanweisung.........................................................3
Mode d'emploi (pages jaunes) .........................................13
Instrucciones para el uso (páginas amarillas) ..................23
Instructions for use...........................................................33
8.110.1346
07.96/Ti
Page 3

Inhalt
Gebrauchsanweisung
Inhalt
1. Inbetriebnahme...................................................................... 4
Füllen der 1 mL Wechseleinheit
Verwendung von Original-Reagenzienflaschen
2. Wechseln der Wechseleinheit................................................ 5
3. Bürettenspitzen...................................................................... 6
4. Hahn...................................................................................... 7
Wartung eines "verhockten" Hahns
5. Thermostatmantel.................................................................. 8
6. Reinigung der Wechseleinheit................................................ 9
7. Genauigkeit............................................................................ 9
8. Troubleshooting.................................................................... 10
9. Bestellnummern und Zubehör.............................................. 11
Wechseleinheit 6.3013.XXX und 6.3014.XXX, 8.110.1346 3
Page 4
1. Inbetriebnahme
1. Inbetriebnahme
1. Entfernen Sie das Styroporteil unter der Reagenzienflasche.
2. Montieren Sie die Halteklammern 6.2043.005, so dass die
Reagenzienflasche gut in der Wechseleinheit steht.
3. Stellen Sie sicher, dass die Reagenzienflasche Reagenz
enthält.
4. Füllen Sie das Adsorberrohr mit einem geeigneten Schutzmittel und setzen Sie es auf die Reagenzienflasche. Für
NaOH - Natronkalk (CO2 Adsorber)
KF-Reagenz - Molekularsieb (Trockenmittel)
Wenn kein spezielles Schutzmittel nötig ist, kann das Adsorberrohr leer aufgesetzt werden.
5. Kontrollieren Sie, ob die Schlauchverbindungen gut festgezogen sind. Wenn nötig mit dem Schlüssel 6.2739.000
nachziehen.
6. Wechseleinheit auf das Steuergerät aufsetzen und bis zur
Bürettenspitze füllen indem Sie die Tasten <DOS> und
<FILL> drücken. Wenn Sie eine 1 mL-Wechseleinheit haben, siehe unten.
Kleine Luftbläschen stören erfahrungsgemäss nicht, da sie
selbst bei rascher Kolbenbewegung an der Wand haften
bleiben.
7. Wechseleinheit beschriften: Die farbigen Beschriftungsschilder unter den Halter klippen.
8. Im Köcher wird die Bürettenspitze aufbewahrt. Im zweiten
Köcher können Sie z.B. die zum Reagenz passende Elektrode aufbewahren.
Füllen der 1 mL-Wechseleinheit
1. Wechseleinheit füllen bis die Flüssigkeit in den Glaszylinder
kommt (Tasten <DOS> und <FILL>).
2. Den Verbindungsschlauch oben am Glaszylinder lösen und
den Glaszylinder mit einer Spritze luftblasenfrei füllen.
3. Den Verbindungsschlauch oben am Glaszylinder wieder
festziehen und die Wechseleinheit bis zur Bürettenspitze
fertig füllen.
4 Wechseleinheit 6.3013.XXX und 6.3014.XXX, 8.110.1346
Page 5
2. Wechseln der Wechseleinheit
Verwendung von Original-Reagenzienflaschen
Sie benötigen evtl. einen speziellen Flaschenaufsatz oder einen
Gewindeadapter zusätzlich zum mitgelieferten Standard-Flaschenaufsatz 6.1602.105:
Flaschen mit Gewinde GL45, z.B. Riedel-de
Haën (1 L), Baker
Flaschen mit Gewinde S40, z.B. Merck 6.1602.115
Flaschen mit Gewinde GL32, z.B. Fluka, Riedelde Haën (500 mL)
Flaschen mit 28 mm Gewinde, z.B. Fisher 6.1602.105 +
2. Wechseln der Wechseleinheit
Vor dem Aufsetzen prüfen, ob sich der Hahn manuell drehen
lässt. Ist dies nicht der Fall, siehe Abschnitt 4.
Wechseleinheit auf das Steuergerät aufsetzen und nach hinten
schieben bis sie einrastet.
Für das Aufsetzen oder Abnehmen der Wechseleinheit muss sich
der Dosierer in Nullstellung befinden.
Kann eine Wechseleinheit nicht aufgesetzt werden, so muss die
Kupplung des PTFE-Kolbens mit dem Schlüssel 6.2739.010 bündig zum Steg (auf der Unterseite der Wechseleinheit) justiert
werden.
Vorsicht:
Wird beim Füllen der Wechseleinheit – trotz gefüllter Reagenzflasche und ordnungsgemässen Schlauchverbindungen – keine
Flüssigkeit in den Glaszylinder gesaugt, kann im Zylinder ein Vakuum entstehen. Das Abziehen der Wechseleinheit kann unter
diesen Bedingungen gefährlich sein (Glasbruch). Der Zylinder
muss vorher unbedingt von oben belüftet werden (Schlauchverbindung öffnen).
Wechseleinheit immer mit Lichtschutz betreiben (Schutz bei
Glasbruch im Zylinder).
Standard
6.1602.105 +
6.1618.000
6.1618.010
Wechseleinheit 6.3013.XXX und 6.3014.XXX, 8.110.1346 5
Page 6
3. Bürettenspitzen
3. Bürettenspitzen
Im Standardzubehör sind folgende Bürettenspitzen enthalten:
Spitze mit diffusionsminderndem Ventil.
Für Arbeiten, wo die Spitze eingetaucht wird,
z.B. Titrationen.
Offene Spitze.
Für Arbeiten, wo die Spitze nicht eingetaucht
wird, z.B. Dosierungen.
Um das Auskristallisieren in der Spitze zu vermindern wird sie am
besten im gleichen Lösemittel wie das Reagenz aufbewahrt: Aufbewahrungsköcher mit Lösemittel füllen, Bürettenspitze durch
den Kugelstopfen führen. Im Fall von KF-Reagenz: Methanol als
Aufbewahrungs-Lösemittel verwenden.
Wichtig:
Vor dem Dosieren kontrollieren, ob die Bürettenspitze nicht verstopft ist.
6.1543.050
6.1543.060
6 Wechseleinheit 6.3013.XXX und 6.3014.XXX, 8.110.1346
Page 7
4. Hahn
4. Hahn
Es steht ein PCTFE/PTFE-Hahn 6.1542.020 und ein Keramikhahn 6.1542.010 zur Verfügung.
Grundsätzlich ist der Keramikhahn dann vorzuziehen, wenn aus
der Lösung harte Kristalle ausfallen können oder für Dauerbetrieb. Wenn weiche Kristalle ausfallen oder für nur gelegentlich
benutzte Reagenzien empfehlen wir den PCTFE/PTFE-Hahn.
Der PCTFE/PTFE-Hahn ist einer gewissen Abnützung unterworfen. Dieser Hahn muss daher häufiger ersetzt werden als der Keramikhahn.
Im speziellen empfehlen wir folgenden Hahntyp:
Alkali, wässrig
Dauerbetrieb
EDTA, Komplexone
HClO4 in Eisessig
Jodlösung
Karl Fischer Reagenz
KOH in Ethanol
Organische Lösemittel
Permanganat, KMnO
Säuren, wässrig
Silbernitrat, AgNO
3
TBAOH
Thiosulfat, Na2S2O
3
PCTFE/PTFE
6.1542.020
l
l
l l
l
l
l
l
4
l
l l
l l
l
l l
Keramik
6.1542.010
l
Wartung eines "verhockten" Hahns
1. Flachhahn aus dem Griff der Wechseleinheit heben.
2. Hahn in ein Lösemittel einlegen. Bei
wässrigen Lösungen - heisses Wasser
nicht-wässrigen Lösungen - entsprechendes Lösemittel
KF-Reagenz - Methanol, dann Wasser, dann Methanol
3. Wenn sich der Hahn wieder bewegen lässt, kann er wieder in
die Wechseleinheit eingesetzt werden.
Der Hahn kann durch Lösen der Gewindemutter geöffnet werden. Die polierten Dichtflächen dürfen keine Kratzer oder Beschädigungen aufweisen. Die Teile trocken wieder montieren. Dichtflächen dabei nicht berühren.
Wechseleinheit 6.3013.XXX und 6.3014.XXX, 8.110.1346 7
Page 8
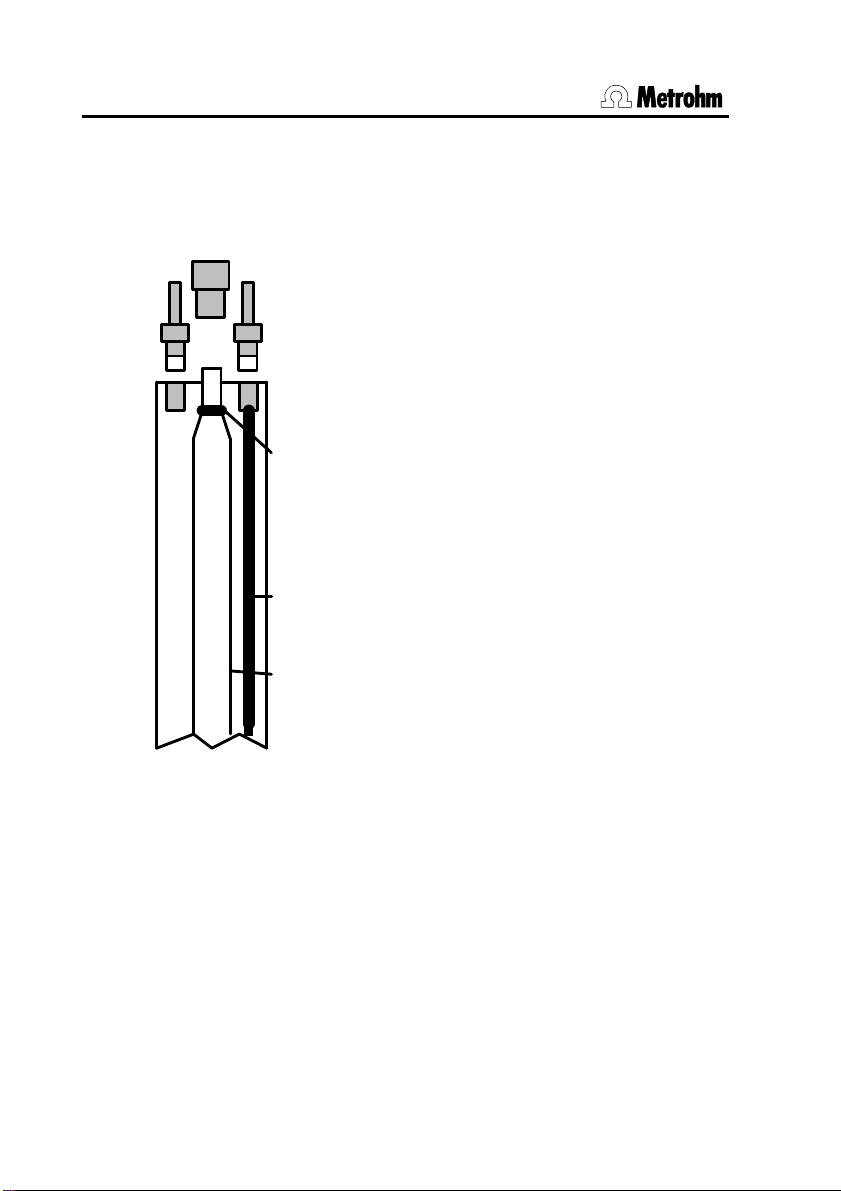
5. Thermostatmantel
6.1811.000
6.1819.040
6.1518.XXX
6.1808.050
E.301.0022
6.1808.050
5. Thermostatmantel
Der Thermostatmantel wird wie folgt montiert:
1. Schlauchverbindung zum Glaszylinder lösen.
2. Lichtschutz entfernen.
3. Verschraubung 6.1811.000 am
Glasstutzen abschrauben.
4. O-Ring aus dem Nut am Glasstutzen
nach oben rollen. Keine Harten Gegenstände benutzen, um den O-Ring
zu entfernen, da sonst die Kante des
Glasstutzens absplittern kann! Wenn
nicht anders möglich, O-Ring anschneiden.
5. Thermostatmantel unten auf der
Innenseite leicht fetten und aufsetzen.
6. O-Ring leicht fetten und am
Glasstutzen anbringen.
7. Oberer Teil der Verschraubung
6.1811.000 am Glasstutzen anbringen.
8. Verbindung zum Hahn wieder herstellen.
9. PTFE-Kanüle 6.1819.040 in Thermostatmantel einführen und Thermostatschläuche via Kupplungsstück 6.1808.050 anschliessen.
Thermostatmantel nur mit einem Thermostaten betreiben, der eine Druck- und Saugpumpe besitzt (der Zulaufdruck darf nicht zu
hoch sein).
8 Wechseleinheit 6.3013.XXX und 6.3014.XXX, 8.110.1346
Page 9
6. Reinigung der Wechseleinheit
Die Wechseleinheit muss nur dann entleert und gereinigt werden,
wenn sich das Reagenz zersetzt hat oder wenn Sie ein anderes
Reagenz einfüllen wollen. Entleeren und reinigen Sie die Wechseleinheit wie folgt:
1. Reagenz so weit wie möglich ausstossen.
2. Dosierer in Nullstellung bringen.
3. Schlauchverbindungen zu Flasche und Bürettenspitze abnehmen.
4. Lichtschutz oder Thermostatmantel entfernen.
5. Befestigung des Glaszylinders lösen.
6. Zylinder mit dem Schlüssel 6.2739.010 vollständig entleeren
und Kolben sorgfältig herausziehen.
7. Einzelteile reinigen. Speziell darauf achten, dass kein Reagenz in den Gewindelöchern der Verschraubungen zurückbleibt.
8. Kolben mit Fett 6.2803.010 seitlich leicht fetten. Vordere
Kante des Kolbens abwischen, damit das Reagenz nicht mit
dem Fett in Kontakt kommt.
Für Pipettierungen sollte der Kolben nicht gefettet werden.
9. Wechseleinheit wieder zusammensetzen.
Die Schlauchverbindung Hahn - Glaszylinder zuerst am
Glaszylinder festziehen, dann am Hahn.
6. Reinigung der Wechseleinheit
7. Genauigkeit
Genauigkeitsangaben:
Nennvolumen
mL
1 0.003 0.001
5 0.015 0.005
10 0.02 0.01
20 0.03 0.01
50 0.05 0.04
Überprüfung der Genauigkeit:
Dosiergenauigkeit Application Bulletin Nr. 238
Potentiometrische Titrationen Application Bulletin Nr. 252
KF Titrationen Application Bulletin Nr. 255
Wechseleinheit 6.3013.XXX und 6.3014.XXX, 8.110.1346 9
abs. Fehler auf V
mL
Wiederholfehler
Nenn
mL
Page 10
8. Troubleshooting
8. Troubleshooting
Problem Abhilfe
Bürettenspitze ist verstopft. – In geeignetes Lösemittel einlegen.
In Lösemittel aufbewahren, siehe
Abschnitt 3.
Dosiertes Volumen stimmt nicht. – Test nach Application Bulletin Nr.
238 durchführen.
– Prüfen, ob Flüssigkeit bei den
Schlauchgewinden oder beim Hahn
austritt.
– Glaszylinder und evtl. Kolben er-
setzen.
Hahn ist verstopft/undicht. – Hahn reinigen. Speziell darauf
achten, dass sich in den Gewindelöchern keine Verunreinigungen
befinden, siehe Abschnitt 4.
Hahn lässt sich nicht drehen. – Hahn reinigen, siehe Abschnitt 4.
– Evtl. PCTFE/PTFE Hahn verwen-
den.
"Kolben" ist undicht. Es befindet sich
Flüssigkeit unter dem Kolben.
Luftblasen werden angesaugt. – Enthält die Reagenzflasche noch
Zylinder lässt sich nicht luftblasenfrei
füllen.
– Glaszylinder und evtl. Kolben er-
setzen.
genügend Reagenz? (Der Ansaug-
schlauch muss eintauchen.) Evtl.
Reagenz entgasen.
– Schlauchverbindungen überall
festziehen.
– Hahn reinigen, siehe Abschnitt 4,
evtl. ersetzen.
– Kleine Luftblasen stören nicht,
siehe Abschnitt 1.
– Glaszylinder und vodere Kolben-
kante müssen fettfrei sein.
– Evtl. Reagenz entgasen.
10 Wechseleinheit 6.3013.XXX und 6.3014.XXX, 8.110.1346
Page 11

9. Bestellnummern und Zubehör
Standardzubehör zu den Wechseleinheiten siehe Titelblatt.
Zusätzlich:
Schlüssel zum Festziehen der Nippel 6.2739.000
Fett (für Kolben) 6.2803.010
Wechseleinheit mit Keramikhahn
1 mL 6.3013.113
5 mL 6.3013.153
10 mL 6.3013.213
20 mL 6.3013.223
50 mL 6.3013.253
Wechseleinheit mit PCTFE/PTFE-Hahn
1 mL 6.3014.113
5 mL 6.3014.153
10 mL 6.3014.213
20 mL 6.3014.223
50 mL 6.3014.253
Optionen
Zubehör, das auf separate Bestellung und gegen Aufpreis geliefert werden kann.
9. Bestellnummern und Zubehör
Flaschen und Zubehör
Flaschenaufsatz für Flaschen mit Gewinde GL45
(Riedel-de Haën...) 6.1602.120
Flaschenaufsatz für Flaschen mit Gewinde S40
(Merck...) 6.1602.130
Gewindeadapter GL32/GL45 6.1618.000
Gewindeadapter 28mm/GL45 6.1618.010
Braunglasflasche, 1 L, mit Gewinde GL45 6.1608.023
Klarglasflasche, 1 L, mit Gewinde GL45 6.1608.030
PE-Flasche, 1 L, mit Gewinde GL45 6.1608.043
Klarglasflasche, 100 mL, mit Gewinde GL45 6.1608.050
Halter für 100 mL-Flaschen 6.2055.000
Wechseleinheit 6.3013.XXX und 6.3014.XXX, 8.110.1346 11
Page 12

9. Bestellnummern und Zubehör
Schläuche und Zubehör
Verbindungsschlauch mit Gewinde M6
Länge 40 cm
Länge 80 cm
Länge 150 cm
T-Verbindung, Gewinde M6 6.1808.060
Kupplung mit Gewinde M6 und Schlaucholive für
Schlauch mit Innendurchmesser ca. 3 mm 6.1808.020
Gewindestopfen M6 6.1446.040
Verschraubung Glasstutzen – Schlauch M6 6.1811.000
Verbindungsschlauch mit Gewinde M8
Länge 25 cm
Länge 50 cm
T-Verbindung, Gewinde M8 6.1808.070
Kupplung mit Gewinde M8 und Schlaucholive für
Schlauch mit Innendurchmesser ca. 3 mm 6.1808.050
Verschraubung Glasstutzen – Schlauch M8 6.1811.010
Verschlauchung mit grösserem Innendurchmesser
und Gewinde M8
Verbindung Flasche – Hahn:
Blindstopfen, Gewinde M6
PTFE-Kanüle
Schlauch, 25 cm, Gewinde M8
Gewindeadapter, M6 aussen, M8 innen
Verbindung Hahn – Bürettenspitze:
Gewindeadapter, M6 aussen, M8 innen
Schlauch, 50 cm, Gewinde M8
Spitze M8
6.1805.100
6.1805.110
6.1805.030
6.1805.210
6.1805.200
6.1446.040
6.1819.030
6.1805.210
6.1808.040
6.1808.040
6.1805.200
6.1543.120
Bürettenspitzen
Erdung für Bürettenspitze 6.1808.030
Spitze mit diffusionsminderndem Ventil, Gewinde
M6 6.1543.050
Offene Spitze, Gewinde M6 6.1543.060
Spitze, Gewinde M8 6.1543.120
Thermostatieren
Thermostatmantel 6.1563.010
PTFE-Kanüle für Thermostatmantel 6.1819.040
Kupplung für Schlauch zum Thermostatmantel 6.1808.050
12 Wechseleinheit 6.3013.XXX und 6.3014.XXX, 8.110.1346
Page 13

Table des matières
Mode d'emploi
Table des matières
1. Préparation .......................................................................... 14
Remplir l'Unité interchangeable à 1 mL
Utiliser les flacons à réactif directement
2. Changer l'Unité interchangeable .......................................... 15
3. Pointes de burette................................................................ 16
4. Robinet ................................................................................ 17
Que faire avec un robinet bloqué?
5. Chemise thermostatique ...................................................... 18
6. Nettoyer l'Unité interchangeable .......................................... 19
7. Précision.............................................................................. 19
8. Troubleshooting.................................................................... 20
9. Numéros de commande et accessoires ............................... 21
Unités interchangeables 6.3013.XXX et 6.3014.XXX, 8.110.1346 13
Page 14
1. Préparation
1. Préparation
1. Enlever la plaquette de l'emballage sous le flacon à réactif.
2. Monter les agrafes de fixation 6.2043.005 de manière que le
3. Le flacon à réactif, est-il rempli?
4. Remplir le tube d'adsorption avec un agent protecteur:
5. Les tuyaux doivent être bien serrés. Si nécessaire, les ser-
6. Monter l'Unité interchangeable sur le Dosimate/Titrino et la
7. Etiqueter l'Unité interchangeable. Mettre l'étiquette dans son
8. Conserver la pointe de burette dans le carquois. Dans le
flacon à réactif soit bien positionné dans l'Unité interchangeable.
Calcaire natron (adsorbe le CO2) en cas de NaOH,
tamis moléculaire (agent dessiccateur) en cas de réactif KF.
Si vous n'avez pas besoin d'un agent protecteur, vous
monter le tube d'adsorption vide.
rer avec la clef 6.2739.000.
remplir en pressant les touches <DOS> et <FILL> du Dosimate/Titrino. Pour les Unités à 1 mL, voir ci-dessous.
On sait par expérience que les petites bulles d'air ne gênent
pas, parce qu'elles adhèrent au parois, même si le piston se
déplace rapidement.
support.
deuxième carquois vous pouvez ranger l'électrode du réactif.
Remplir l'Unité interchangeable à 1 mL
1. Remplir l'Unité interchangeable jusqu'à ce que le liquide
entre dans le cylindre en verre (touches <DOS> et <FILL>).
2. Ouvrir le tuyau au-dessus du cylindre en verre et remplir le
cylindre à l'aide d'une seringue.
3. Resserrer le tuyau au-dessus du cylindre en verre et finir le
remplissage de l'Unité interchangeable.
14 Unités interchangeables 6.3013.XXX et 6.3014.XXX, 8.110.1346
Page 15

2. Changer l'Unité interchangeable
Utiliser les flacons à réactif directement
Vous avez peut-être besoin d'un siphon spécial et/ou d'un adaptateur de filet. Le siphon 6.1602.105 fait partie des accessoires
standards.
Flacon à filet GL45, p.ex. Riedel-de Haën (1 L),
Baker
Flacons à filet S40, p.ex. Merck 6.1602.115
Flacons à filet GL32, p.ex. Fluka, Riedel-de
Haën (500 mL)
Flacons à filet 28 mm, p.ex. Fisher 6.1602.105 +
2. Changer l'Unité interchangeable
Avant de monter l'Unité interchangeable, s'assurer que le robinet
tourne. Si non, voir section 4.
Glisser l'Unité interchangeable sur le Dosimate/Titrino jusqu'à ce
qu'elle enclenche.
Pour mettre en place ou enlever l'Unité interchangeable, le Dosimate/Titrino doit être en position zéro.
Si l'Unité interchangeable ne peut pas être mise en place, ajuster
l'accouplement du piston à l'aide de la clef 6.2739.010 (il doit être
parallèle à la moulure au-dessous de l'Unité interchangeable).
Attention:
Si le liquide n'est pas aspiré dans le cylindre en verre en remplissant l'Unité interchangeable - bien que le flacon à réactif soit
rempli et les connexions des tuyaux soient correctes - le cylindre
peut être sous vide. Dans ce cas, il peut être dangereux de retirer
l'Unité interchangeable: le cylindre peut se casser. Ouvrez
d'abord la connexion du tuyau au dessus du cylindre pour évacuer le vide.
N'utiliser les Unités interchangeables qu'avec la protection lumière (protection si le cylindre casse).
Standard
6.1602.105 +
6.1618.000
6.1618.010
Unités interchangeables 6.3013.XXX et 6.3014.XXX, 8.110.1346 15
Page 16

3. Pointes de burette
3. Pointes de burette
Vous recevez le pointes de burette suivantes comme accessoire
standard:
Pointe avec vanne anti-diffusion
Pour les travaux avec la pointe immergée, p.ex.
les titrages.
Pointe ouverte.
Pour les travaux avec la pointe non-immergée,
p.ex. les distributions.
Pour éviter la cristallisation du réactif dans la pointe, la conserver
dans le même solvant comme le réactif: Remplir le carquois du
solvant et introduire la pointe à travers le bouchon à bille. Pour le
réactif KF: Utiliser méthanol.
Important:
Avant de distribuer, vérifier si la pointe de burette n'est pas bouchée.
6.1543.050
6.1543.060
16 Unités interchangeables 6.3013.XXX et 6.3014.XXX, 8.110.1346
Page 17

4. Robinet
4. Robinet
Le robinet en PCTFE/PTFE 6.1542.020 et le robinet en céramique 6.1542.010 sont disponibles.
S'il y a une précipitation de cristaux dures ou si vous utilisez
l'Unité interchangeable en marche continu, nous recommandons
le robinet en céramique. Si la précipitation de la solution est
douce ou si vous utilisez l'Unité interchangeable seulement occasionnellement, le robinet en PCTFE/PTFE est recommandé. Celui-ci s'use plus vite que le robinet en céramique, il faut donc le
remplacer plus souvent.
Pour les applications suivantes nous recommandons le robinet:
Acides, aqueux
Alcalis, aqueux
EDTA
HClO4 en acide acétique
Hyposulfite, Na2S2O
3
Iode, solution
KOH en éthanol
Marche continu
Nitrate de l'argent, AgNO
Permanganate, KMnO
4
Réactif KF
Solvants organiques
TBAOH
PCTFE/PTFE
6.1542.020
l l
l
l
l l
l l
l
l
3
l l
l
l
l
l
Céramique
6.1542.010
l
Que faire avec un robinet bloqué?
1. Enlever le robinet de la poignée de l'Unité interchangeable.
2. Tremper le robinet dans un solvant:
Eau chaude pour les solutions aqueuses;
le solvant correspondant pour les solutions non-aqueuses;
méthanol, puis eau, puis méthanol pour réactif KF.
3. Si le robinet tourne, on peut le remettre dans l'Unité interchangeable.
Vous pouvez ouvrir le robinet si vous dévisser l'écrou. Les surfaces polies
des plaquettes du robinet doivent être lisses et sans dommage.
Rassembler les parties sèches. Ne touchez pas les surfaces des plaquettes du robinet.
Unités interchangeables 6.3013.XXX et 6.3014.XXX, 8.110.1346 17
Page 18

5. Chemise thermostatique
6.1811.000
6.1819.040
6.1518.XXX
6.1808.050
E.301.0022
6.1808.050
5. Chemise thermostatique
Montage comme suit:
1. Dégager la connexion du cylindre en
2. Enlever la protection lumière.
3. Dévisser le raccord 6.1811.000 du
4. Rouler vers le haut, hors de la rai-
5. Graisser légèrement la chemise
6. Graisser légèrement le joint torique
7. Fixer la partie supérieure du raccord
8. Rétablir la connexion cylindre en
9. Introduire la canule 6.1819.040 dans
verre.
manchon en verre.
nure, le joint torique. Ne pas utiliser
des outils durs, pour éviter d'ébrécher le bord du manchon! Couper le
joint si nécessaire.
thermostatique en bas sur la face
intérieure puis la mettre en place.
et le fixer sur le manchon en verre.
6.1811.000 au manchon en verre.
verre – robinet.
la chemise thermostatique et raccorder les tuyaux avec l'accouplement
6.1808.050.
Utiliser un thermostat avec une pompe de pression et aspirante
(pour éviter une haute pression dans la chemise thermostatique).
18 Unités interchangeables 6.3013.XXX et 6.3014.XXX, 8.110.1346
Page 19

6. Nettoyer l'Unité interchangeable
6. Nettoyer l'Unité interchangeable
Il ne faut nettoyer l'Unité interchangeable que si le réactif s'est
décomposé ou si vous voulez la remplir avec un réactif différent.
Procédez comme suit pour nettoyer l'Unité interchangeable:
1. Expulser le réactif aussi complètement que possible.
2. Dosimate/Titrino en position zéro.
3. Enlever les tuyaux du flacon à réactif et de la pointe de bu-
rette.
4. Enlever la protection lumière (ou la chemise thermostati-
que).
5. Dégager le cylindre en verre.
6. Vider le cylindre complètement à l'aide de la clef 6.2739.010
et retirer soigneusement le piston.
7. Nettoyer les différentes parties. Il est important qu'aucune
trace de réactif ne reste dans les raccords tubulaires.
8. Graisser légèrement les côtés du piston avec la graisse
6.2803.010. Essuyer l'arrête arrière pour éviter que la
graisse n'ait contact avec le réactif.
Ne pas graisser le piston pour les pipettages.
9. Rassembler l'Unité interchangeable.
Serrer la connexion d'abord au cylindre en verre, puis au
robinet.
7. Précision
Volume nominal V
nom
mL
1 0.003 0.001
5 0.015 0.005
10 0.02 0.01
20 0.03 0.01
50 0.05 0.04
Vérification:
Pour les distributions selon Bulletin d'application No. 238
Pour les titrages potentiométriques selon Bulletin d'application
No.252
Pour le titrages KF selon Bulletin d'application No. 255
Unités interchangeables 6.3013.XXX et 6.3014.XXX, 8.110.1346 19
Erreur abs. par
rapport au V
nom
mL
Erreur répétitive
mL
Page 20

8. Troubleshooting
8. Troubleshooting
Problème Mesures
Bulles d'air sont aspirées. – Est-ce qu'il y a encore du réactif
dans le flacon? (Le tube d'aspiration doit être immergé.) Evtl. désaérer le réactif.
– Serrer toutes les connexions des
tubes.
– Nettoyer le robinet, voir section 4,
si nécessaire le remplacer.
Cylindre ne se remplit pas sans bulles
d'air.
"Piston" joint mal. Il y a du liquide audessous du piston.
Pointe de burette est bouchée. – La tremper dans un solvant appro-
Robinet est bouché/non étanche. – Nettoyer le robinet. Vérifier qu'il ne
Robinet ne tourne plus. – Nettoyer le robinet, voir section 4.
Volume distribué n'est pas correct. – Exécuter le test selon Application
– Petites bulles d'air ne gênent pas,
voir section 1.
– Le cylindre en verre et l'arrête
arrière du piston doivent être sans
graisse.
– Evtl. désaérer le réactif.
– Remplacer le cylindre en verre et
évtl. le piston.
prié. La stocker dans du solvant,
voir section 3.
reste aucune trace de réactif dans
les raccords tubulaires, voir section
4.
– Utiliser le robinet en PCTFE/PTFE.
Bulletin No. 238.
– Vérifier qu'il n'y ait pas de liquide
aux connexions des tubes et au
robinet.
– Remplacer le cylindre en verre et
évtl. le piston.
20 Unités interchangeables 6.3013.XXX et 6.3014.XXX, 8.110.1346
Page 21

9. Numéros de commande et accessoires
9. Numéros de commande et accessoires
Accessoires standards voir page de titre. En plus:
Clef pour serrer les raccords 6.2739.000
Graisse (pour le piston) 6.2803.010
Unité interchangeable à robinet en céramique
1 mL 6.3013.113
5 mL 6.3013.153
10 mL 6.3013.213
20 mL 6.3013.223
50 mL 6.3013.253
Unité interchangeable à robinet en PCTFE/PTFE
1 mL 6.3014.113
5 mL 6.3014.153
10 mL 6.3014.213
20 mL 6.3014.223
50 mL 6.3014.253
Options
Accessoires fournis sur commande exprès et contre facturation
séparée:
Flacons et accessoires
Siphon pour flacon à réactif avec filet GL45
(Riedel-de Haën...) 6.1602.120
Siphon pour flacon à réactif avec filet S40
(Merck...) 6.1602.130
Adaptateur de filet GL32/GL45 6.1618.000
Adaptateur de filet 28mm/GL45 6.1618.010
Flacon en verre brun, 1 L, filet GL45 6.1608.023
Flacon en verre, 1 L, filet GL45 6.1608.030
Flacon en PE, 1 L, filet GL45 6.1608.043
Flacon en verre, 100 mL, filet GL45 6.1608.050
Support pour flacons à 100 mL 6.2055.000
Unités interchangeables 6.3013.XXX et 6.3014.XXX, 8.110.1346 21
Page 22

9. Numéros de commande et accessoires
Tuyaux et accessoires
Tuyau avec filets M6
Longueur 40 cm
Longueur 80 cm
Longueur 150 cm
Raccord en T, filet M6 6.1808.060
Raccord avec filet M6 et raccord pour tuyau avec
diamètre intérieur 3 mm 6.1808.020
Bouchon fileté M6 6.1446.040
Raccord cylindre en verre – tuyau M6 6.1811.000
Tuyau avec filets M8
Longueur 25 cm
Longueur 50 cm
Raccord en T, filet M8 6.1808.070
Raccord avec filet M8 et raccord pour tuyau avec
diamètre intérieur 3 mm 6.1808.050
Raccord cylindre en verre – tuyau M8 6.1811.010
Connexions tubulaires de diamètre plus grand et
avec
filet M8
Connexion flacon à réactif – robinet:
Bouchon, filet M6
Canule en PTFE
Tuyau, 25 cm, filet M8
Adaptateur, filet intérieur M6, filet extérieur M8
Connexion robinet – pointe de burette:
Adaptateur, filet intérieur M6, filet extérieur M8
Tuyau, 50 cm, filet M8
Pointe, filet M8
6.1805.100
6.1805.110
6.1805.030
6.1805.210
6.1805.200
6.1446.040
6.1819.030
6.1805.210
6.1808.040
6.1808.040
6.1805.200
6.1543.120
Pointes de burette
Mise à la terre pour pointe de burette 6.1808.030
Pointe avec vanne anti-diffusion, filet M6 6.1543.050
Pointe ouverte, filet M6 6.1543.060
Pointe, filet M8 6.1543.120
Chemise thermostatique
Chemise thermostatique 6.1563.010
Canule en PTFE pour chemise thermostatique 6.1819.040
Accouplement de tuyau à la chemise thermostatique
22 Unités interchangeables 6.3013.XXX et 6.3014.XXX, 8.110.1346
6.1808.050
Page 23

Contenido
Instrucciones para el uso
Contenido
1. Preparación ......................................................................... 24
Llenar la Unidad intercambiable de 1 mL
Utilizar botellas de reactivo originales
2. Cambio de Unidad ............................................................... 25
3. Puntas de bureta.................................................................. 26
4. Grifo..................................................................................... 27
Mantenimiento de un grifo bloqueado
5. Camisa termostática ............................................................ 28
6. Limpiar la Unidad intercambiable......................................... 29
7. Precisión.............................................................................. 29
8. ¿Qué hacer si hay problemas?............................................. 30
9. Referencias de pedido y accesorios .................................... 31
Unidades intercambiables 6.3013.XXX y 6.3014.XXX, 8.110.1346 23
Page 24

1. Preparación
1. Preparación
1. Quite la placa de embalaje de debajo de la botella de
reactivo.
2. Monte las abrazaderas para la botella de reactivo de forma
que la botella esté bien puesta en la Unidad.
3. La botella de reactivo tiene que contener el reactivo.
4. Llene el tubo de adsorción con un reactivo de protección.
Utilice
cal sódico (adsorción de CO2) para NaOH,
tamiz molecular (desecante) para reactivo KF.
Si no se utilice ningún reactivo de protección, monte el tubo
vacío.
5. Verifique que las conexiones de los tubos estén
enroscadas. Si no, enrósquelas con la llave 6.2739.000.
6. Monte la Unidad intercambiable en el Dosimat/Titrino y
llénala hasta la punta de bureta pulsando las teclas <DOS>
y <FILL> del Dosimat/Titrino. Con una Unidad de 1 mL, vea
abajo.
Las pequeñas burbujas de aire no molestan, ya que
adhieren a las paredes del cilindro incluso cuando el pistón
se mueve rápidamente.
7. Ponga la etiqueta en su soporte.
8. Conserva la punta de bureta en el carcaj. Se puede utilizar
el segundo carcaj para guardar el electrodo
correspondiente con el reactivo.
Llenar la Unidad intercambiable de 1 mL
1. Llene la Unidad hasta que el líquido entre el cilindro de
vidrio (teclas <DOS> y <FILL>).
2. Desenrosque el tubo de conexión del cilindro. Llene el
cilindro con una jeringa sin burbujas de aire.
3. Enrosque el tubo de conexión del cilindro y llene la Unidad
hasta la punta de bureta.
24 Unidades intercambiables 6.3013.XXX y 6.3014.XXX, 8.110.1346
Page 25

2. Cambio de Unidad
Utilizar botellas de reactivo originales
Es posible que necesita un cabezal especial o un adaptador de
rosca. El cabezal 6.1602.105 es accesorio standard:
Botellas con rosca GL45, p.ej. Riedel-de Haën
(1 L), Baker
Botellas con rosca S40, p.ej. Merck 6.1602.115
Botellas con rosca GL32, p.ej. Fluka, Riedel-de
Haën (500 mL)
Botellas con rosca 28 mm, p.ej. Fisher 6.1602.105 +
2. Cambio de Unidad
Verifique antes de montar la Unidad si se puede girar el grifo
manualmente. Si no, vea sección 4.
Empuje la Unidad en el Dosimat/Titrino hasta que se enganche.
Al desmontar o montar la Unidad intercambiable, el Dosimat/Titrino debe estar en posición cero.
Si no se puede montar una Unidad, se debe ajustar el
acoplamiento del pistón con la llave 6.2739.010 (el acoplamiento
debe estar enrasado con los anillos en la parte inferior de la
Unidad).
Cuidado:
Si no se aspira líquido en el cilindro de vidrio rellanando la
Unidad – con la botella de reactivo llena y tubos de conexión
correctos – el cilindro podría ser bajo vacío. En este caso, quitar
la Unidad podría ser peligroso: el cilindro podría romperse. Tiene
que abrir el tubo de conexión en la parte arriba del cilindro para
evacuar el vacío.
Solo utilizar la Unidad intercambiable con el protector de la luz
(protección si el cilindro se rompe).
Standard
6.1602.105 +
6.1618.000
6.1618.010
Unidades intercambiables 6.3013.XXX y 6.3014.XXX, 8.110.1346 25
Page 26

3. Puntas de bureta
3. Puntas de bureta
Las puntas siguientes son accesorios standard:
Punta con válvula antidifusión.
Para trabajos con punta sumergida, p.ej.
titraciones.
Punta abierta.
Para trabajos con punta no sumergida, p.ej.
dosificaciones.
Para evitar la cristalización en la punta de bureta es conveniente
conservarla en el disolvente del reactivo: Llene el carcaj del
disolvente e introduzca la punta de bureta por el tapón esférico.
En caso de reactivo KF, utilice metanol.
Importante:
Antes de la dosificación, compruebe que la punta de bureta no
está bloqueada.
6.1543.050
6.1543.060
26 Unidades intercambiables 6.3013.XXX y 6.3014.XXX, 8.110.1346
Page 27

4. Grifo
4. Grifo
El grifo de PCTFE/PTFE 6.1542.020 y el grifo de cerámica
6.1542.010 son disponibles.
Utilice el grifo de cerámica si se precipitan cristales duros de la
solución o si utilice la Unidad en marcha permanente. Si se
precipitan cristales blandos o para reactivos utilizados sólo de
vez en cuando recomendamos el grifo de PCTFE/PTFE. Este
grifo se gasta más rápido que el grifo de cerámica y se necesita
remplazarlo de vez en cuando.
Recomendamos el grifo siguiente:
Ácido, acuoso
Álcali, acuoso
Disolventes orgánicos
EDTA
HClO4 en ácido acético glacial
KOH en etanol
Marcha permanente
Nitrato de plata, AgNO
Permanganato, KMnO
3
4
Reactivo KF
TBAOH
Tiosulfato, Na2S2O
3
Yodo, solución
PCTFE/PTFE
6.1542.020
l l
l
l
l
l l
l
l l
l
l
l
l l
l
Cerámica
6.1542.010
l
Mantenimiento de un grifo bloqueado
1. Quitar el grifo del mango de la Unidad.
2. Remoje el grifo en un disolvente. Utilice
agua caliente para soluciones acuosas,
el disolvente correspondiente para soluciones no acuosas,
metanol, después agua, después metanol para reactivo KF.
3. Si el grifo se mueve, se puede remontarlo en la Unidad.
El grifo se abre con la tuerca. Las superficies pulidas de los discos del
grifo no tienen que tener ningún daño.
Montar las partes secas. No toque las superficies pulidas de los discos.
Unidades intercambiables 6.3013.XXX y 6.3014.XXX, 8.110.1346 27
Page 28

5. Camisa termostática
6.1811.000
6.1819.040
6.1518.XXX
6.1808.050
E.301.0022
6.1808.050
5. Camisa termostática
Para montarla siga lo siguiente:
1. Quite el tubo del cilindro de vidrio.
2. Quite el protector de la luz.
3. Desenrosque la conexión
6.1811.000 del cilindro.
4. Haga rodar hacia arriba el anillo "O"
de la ranura del cilindro. No utilice
ningún objeto duro para quitar el
anillo "O", ya que se podría rajar el
cilindro. Si no queda otra alternativa,
corte el anillo.
5. Engrase ligeramente la camisa
termostática por la parte interior y
móntela.
6. Engrase ligeramente el anillo "O" y
móntelo sobre el cilindro.
7. Coloque la parte superior de la
conexión 6.1811.000 al soporte del
cilindro.
8. Conecte el grifo.
9. Introduzca la cánula 6.1819.040 en
la camisa termostática y conecte el
tubo del termostato por medio del
acoplamiento 6.1808.050.
Utilice un termostato con una bomba de presión y de aspiración
para evitar alta presión en la camisa termostática.
28 Unidades intercambiables 6.3013.XXX y 6.3014.XXX, 8.110.1346
Page 29

6. Limpiar la Unidad intercambiable
6. Limpiar la Unidad intercambiable
Se necesita vaciar y limpiarlo sólo si la solución está
descompuesta o si quiere utilizar la Unidad con otro reactivo.
Proceda según lo siguiente:
1. Expulse el reactivo que sea posible.
2. Ponga el Dosimat/Titrino en posición cero.
3. Quite los tubos de la botella y de la punta de bureta.
4. Quite el protector de la luz o la camisa termostática.
5. Desenrosque el cilindro de vidrio.
6. Vacíe completamente el cilindro con la llave 6.2739.010 y
empuje el pistón cuidadosamente.
7. Limpie cada una de las piezas. Tenga especial cuidado en
que no quede reactivo en el orificio roscado de las
conexiones de tubo.
8. Engrase ligeramente el pistón al lado con el lubricante
6.2803.010. Limpie los bordes delanteros de modo que el
reactivo no entre en contacto con el lubricante.
No engrase el pistón para los pipetajes.
9. Ensamble la Unidad intercambiable.
Enrosque el tubo en primer lugar al cilindro de vidrio,
después al grifo.
7. Precisión
Datos de precisión:
Volumen de la bureta
V
mL
nom
1 0.003 0.001
5 0.015 0.005
10 0.02 0.01
20 0.03 0.01
50 0.05 0.04
Prueba de precisión:
para dosificaciones según Application Bulletin No. 238
para titraciones potenciométricas según Application Bulletin No.
252
para titraciones KF según Application Bulletin No. 255
Unidades intercambiables 6.3013.XXX y 6.3014.XXX, 8.110.1346 29
Error abs. sobre
V
mL
nom
Reproducibilidad
mL
Page 30
8. ¿Qué hacer si hay problemas?
8. ¿Qué hacer si hay problemas?
Problema Corrección
Se aspira burbujas de aire. – ¿Hay suficiente reactivo en la
botella? (El tubo de aspiración
tiene que inmergir.) Si necesario,
desgasifique el reactivo.
– Enrosque los tubos de conexión.
– Limpie el grifo, vea sección 4, si
necesario remplácelo.
No se puede llenar el cilindro sin
burbujas de aire.
Grifo atascado/mal ajustado. – Limpie el grifo. Tenga cuidado que
Grifo no se mueve. – Limpie el grifo, vea sección 4.
"Pistón" mal ajustado. Hay líquido
debajo del pistón.
Punta de bureta atascada. – Remójela en un disolvente
Volumen de dosificación no es
correcto.
– Pequeñas burbujas de aire no
molestan, vea sección 1.
– Tenga cuidado que el cilindro de
vidrio y el borde delantero del
pistón estén sin grasa.
– Si necesario, desgasifique el
reactivo.
no quede reactivo en los orificios
roscados, vea sección 4.
– Utilice el grifo de PCTFE/PTFE.
– Remplazar el cilindro de vidrio y, si
necesario, el pistón.
apropiado. Consérvela en
disolvente, vea sección 3.
– Ejecute la prueba según
Application Bulletin No. 238.
– Verifique que no expulsa líquido en
las conexiones o en el grifo.
– Remplazar el cilindro de vidrio y, si
necesario, el pistón.
30 Unidades intercambiables 6.3013.XXX y 6.3014.XXX, 8.110.1346
Page 31

9. Referencias de pedido y accesorios
9. Referencias de pedido y accesorios
Para los accesorios vea portada. Suplementario:
Llave para enroscar los niples 6.2739.000
Lubricante (para el pistón) 6.2803.010
Unidad intercambiable con grifo de cerámica
1 mL 6.3013.113
5 mL 6.3013.153
10 mL 6.3013.213
20 mL 6.3013.223
50 mL 6.3013.253
Unidad intercambiable con grifo de PCTFE/PTFE
1 mL 6.3014.113
5 mL 6.3014.153
10 mL 6.3014.213
20 mL 6.3014.223
50 mL 6.3014.253
Opciones
Accesorios separados y no incluso en el precio.
Botellas y accesorios
Cabezal para botellas con rosca GL45 (Riedel-de
Haën...) 6.1602.120
Cabezal para botellas con rosca S40 (Merck...) 6.1602.130
Adaptador de rosca GL32/GL45 6.1618.000
Adaptador de rosca 28mm/GL45 6.1618.010
Botella de vidrio marrón, 1 L, con rosca GL45 6.1608.023
Botella de vidrio, 1 L, con rosca GL45 6.1608.030
Botella de PE, 1 L, con rosca GL45 6.1608.043
Botella de vidrio, 100 mL, con rosca GL45 6.1608.050
Soporte para botellas de 100 mL 6.2055.000
Unidades intercambiables 6.3013.XXX y 6.3014.XXX, 8.110.1346 31
Page 32

9. Referencias de pedido y accesorios
Tubos y accesorios
Tubos de conexión, con rosca M6
Longitud 40 cm
Longitud 80 cm
Longitud 150 cm
Conexión T, con rosca M6 6.1808.060
Acoplamiento con rosca M6 y cabo para tubo con
diámetro interior de 3 mm 6.1808.020
Tapón con rosca M6 6.1446.040
Conexión cilindro de vidrio – tubo con rosca M6 6.1811.000
Tubos de conexión, con rosca M8
Longitud 25 cm
Longitud 50 cm
Conexión T, con rosca M8 6.1808.070
Acoplamiento con rosca M8 y cabo para tubo con
diámetro interior de 3 mm 6.1808.050
Conexión cilindro de vidrio – tubo con rosca M8 6.1811.010
Tubos con diámetro interior mayor y rosca M8
Conexión botella – grifo:
Tapón con rosca M6
Cánula de PTFE
Tubo, 25 cm, con rosca M8
Adaptador, rosca exterior M6, rosca interior M8
Conexión grifo – punta de bureta:
Adaptador, rosca exterior M6, rosca interior M8
Tubo, 50 cm, con rosca M8
Punta de bureta M8
6.1805.100
6.1805.110
6.1805.030
6.1805.210
6.1805.200
6.1446.040
6.1819.030
6.1805.210
6.1808.040
6.1808.040
6.1805.200
6.1543.120
Puntas de bureta
Toma de tierra para puntas de bureta 6.1808.030
Punta con válvula antidifusión, con rosca M6 6.1543.050
Punta abierta, con rosca M6 6.1543.060
Punta abierta, con rosca M8 6.1543.120
Camisa termostática
Camisa termostática 6.1563.010
Cánula de PTFE 6.1819.040
Acoplamiento para tubos del termostato 6.1808.050
32 Unidades intercambiables 6.3013.XXX y 6.3014.XXX, 8.110.1346
Page 33

Contents
Instructions for Use
Contents
1. Setting up............................................................................. 34
Filling the 1 mL Exchange Unit
Using original reagent bottles
2. Changing the Exchange Unit................................................ 35
3. Buret tips.............................................................................. 36
4. Stopcock.............................................................................. 37
What can you do with a blocked stopcock?
5. Thermostat jacket ................................................................ 38
6. Cleaning............................................................................... 39
7. Accuracy.............................................................................. 39
8. Troubleshooting.................................................................... 40
9. Ordering designations and accessories ............................... 41
6.3013.XXX and 6.3014.XXX Exchange Units, 8.110.1346 33
Page 34

1. Setting up
1. Setting up
1. Remove packing plate below reagent bottle.
2. Mount the 6.2043.005 retaining clips so that the reagent
3. Make sure that there is reagent in your reagent bottle.
4. Fill the adsorber tube with an appropriate protective reagent
5. Check the tubing connections. If necessary, tighten them
6. Plug Exchange Unit onto the Dosimat/Titrino. Fill the Ex-
7. Label your Exchange Unit. Clip the label in its support.
8. Store the buret tip in the plastic tube. You may use the sec-
Filling the 1 mL-Exchange Unit
1. Fill until you see the liquid in the glass cylinder (keys
2. Open the tubing connection at the glass cylinder. Fill the
3. Tighten the tubing to the glass cylinder and fill the Exchange
bottle sits snugly in the Exchange Unit.
and mount it on the reagent bottle. Use
soda lime (CO2 Adsorber) for NaOH
molecular sieve (drying agent) for KF reagent.
If you don't need any protective reagent, mount the empty
adsorber tube.
with 6.2739.000 key.
change Unit up to the buret tip, pressing keys <DOS> and
<FILL> of the Dosimat/Titrino. For 1 mL Exchange Units,
see below.
Experience has shown that small air bubbles do not disturb
as they remain connected to the wall even when the piston
moves quickly.
ond tube for the electrode associated with the reagent.
<DOS> and <FILL> of Dosimat/Titrino).
glass cylinder with a syringe.
Unit up to the buret tip.
34 6.3013.XXX and 6.3014.XXX Exchange Units, 8.110.1346
Page 35
2. Changing the Exchange Unit
Using original reagent bottles
You may need a special bottle siphon and/or a thread adapter.
The 6.1602.105 siphon makes part of the standard equipment.
Bottles with GL45 thread, e.g. Riedel-de Haën
(1 L), Baker
Bottles with S40 thread, e.g. Merck 6.1602.115
Bottles with GL32 thread, e.g. Fluka, Riedel-de
Haën (500 mL)
Bottles with 28 mm thread, e.g. Fisher 6.1602.105 +
2. Changing the Exchange Unit
Before mounting the Exchange Unit onto the Dosimat/Titrino,
check if you can turn the stopcock manually. If the stopcock is
blocked, see section 4.
Mount the Exchange Unit onto the Dosimat/Titrino and lock it into
place.
The Dosimat/Titrino has to be in the zero position for mounting/removing the Exchange Unit.
If an Exchange Unit can not be mounted, adjust the coupling of
the PTFE piston with the 6.2739.010 key (it has to be flush with
the ridge on the bottom of the Exchange Unit).
Note:
If no liquid is aspirated into the glass cylinder upon filling - despite
a filled reagent bottle and correct tubing connections - the cylinder can be under vacuum. In this case, it may be dangerous to
remove the Exchange Unit (the cylinder may break). Aerate the
cylinder by opening the tubing connection at the head of the cylinder.
Always use the Exchange Unit with light protection jacket
(protection if the cylinder breaks).
Standard
6.1602.105 +
6.1618.000
6.1618.010
6.3013.XXX and 6.3014.XXX Exchange Units, 8.110.1346 35
Page 36

3. Buret tips
3. Buret tips
You receive the following buret tips as standard accessories:
Tip with anti-diffusion valve.
Use it if you immerse the tip, e.g. for titrations.
Open tip.
Use it if you do not immerse the tip, e.g. for
dosing.
It is best to store the buret tip in the same solvent as the reagent
to prevent crystallization of reagent: Fill plastic tube with solvent,
set buret tip in bulb stopper. For KF reagent: Use methanol as
solvent.
Important:
Check that the buret tip is not blocked before dosing.
6.1543.050
6.1543.060
36 6.3013.XXX and 6.3014.XXX Exchange Units, 8.110.1346
Page 37

4. Stopcock
Two stopcocks are available: The 6.1542.020 PCTFE/PTFE
stopcock and the 6.1542.010 ceramics stopcock.
Use the ceramics stopcock if hard crystals can precipitate from
your solution or if your dosing is continuously running. If the precipitate is soft and if you use the Exchange Unit at greater time
intervals, we recommend the PCTFE/PTFE stopcock.
PCTFE/PTFE stopcocks are worn out after a certain time. They
have to be replaced more frequently than ceramics stopcocks.
For the following reagents and applications, we recommend:
4. Stopcock
Acids, aqueous
Alkali, aqueous
Continuous running
EDTA
HClO4 in acetic acid
Iodine, solution
Karl Fisher reagent
KOH in ethanol
Organic solvents
Permanganate, KMnO
Silver nitrate, AgNO
3
TBAOH
Thiosulphate, Na2S2O
6.1542.020
PCTFE/PTFE
l l
l
l
l l
l
l
l
l
4
l
l l
l
3
l l
6.1542.010
ceramics
l
What can you do with a blocked stopcock?
1. Remove stopcock from the handle of the Exchange Unit.
2. Soak stopcock in appropriate solvent. Use
hot water for aqueous solutions;
the corresponding organic solvent for non-aqueous solutions;
methanol, than water, than methanol for KF reagent.
3. If you can turn the stopcock, remount it onto the Exchange
Unit.
You may open the stopcock opening the screw nut. The polished surfaces
of the cock plates must be without damage.
Mount the dried parts and do not touch the polished surface of the cock
plates.
6.3013.XXX and 6.3014.XXX Exchange Units, 8.110.1346 37
Page 38

5. Thermostat jacket
6.1811.000
6.1819.040
6.1518.XXX
6.1808.050
E.301.0022
6.1808.050
5. Thermostat jacket
Mount the thermostat jacket as follows:
1. Undo the tubing connection of the
glass cylinder.
2. Remove light protection.
3. Unscrew the 6.1811.000 screw fitting
at glass cylinder.
4. Roll O-ring upwards out of groove on
the glass fitting. Do not use any hard
objects to remove O-ring, otherwise
the edge of the glass fitting can
splinter! If all else fails, cut O-ring.
5. Lightly grease inside of thermostat
jacket at the bottom and mount it.
6. Lightly grease O-ring and attach to
glass fitting.
7. Attach upper part of 6.1811.000
screw fitting at the glass cylinder.
8. Screw tubing connection to stopcock.
9. Insert 6.1819.040 PTFE tubing in
thermostat jacket and attach thermostat tubing using 6.1808.050 coupling.
Use a thermostat with a pressure and drawing pump in order to
keep the pressure in the thermostat jacket low.
38 6.3013.XXX and 6.3014.XXX Exchange Units, 8.110.1346
Page 39
6. Cleaning
The Exchange Unit has to be emptied and cleaned only if the
reagent caused any precipitation or if you wish to fill the Exchange Unit with a different reagent. Proceed as follows:
1. Empty the Exchange Unit as much as possible.
2. Set Dosimat/Titrino in zero position.
3. Remove the tubing connections of the reagent bottle and of
4. Remove light protection (thermostat jacket).
5. Undo the screw nut of the glass cylinder.
6. Empty cylinder completely using the 6.2739.010 key and
7. Clean all parts. Take care that no reagent remains in the
8. Lightly grease piston at the side with 6.2803.010 grease.
9. Reassemble Exchange Unit.
6. Cleaning
the buret tip.
carefully pull out the piston.
threaded holes.
Wipe off leading edge to ensure that the reagent does not
come into contact with the grease.
Do not grease piston for pipetting.
Tighten the tubing connection first at the glass cylinder, then
at the stopcock.
7. Accuracy
Accuracy data:
Buret volume V
nominal
mL
1 0.003 0.001
5 0.015 0.005
10 0.02 0.01
20 0.03 0.01
50 0.05 0.04
Checking accuracy:
Dosing accuracy - Application Bulletin No. 238
Potentiometric titrations - Application Bulletin No. 252
KF titrations - Application Bulletin No. 255
6.3013.XXX and 6.3014.XXX Exchange Units, 8.110.1346 39
Abs. error rel. to
V
mL
nominal
Reproducibility
mL
Page 40
8. Troubleshooting
8. Troubleshooting
Problem Remedial action
Air bubbles are aspirated. – Is there sufficient reagent in the
bottle? (The aspirating tube has to
be immersed.) If necessary deaer-
ate reagent.
– Tighten all tubing connections.
– Clean stopcock, see section 4, if
necessary replace it.
Cylinder can not be filled without air
bubbles.
Buret tip is blocked. – Soak in appropriate solvent. Store
Dosed volume is not correct. – Carry out test according to Appli-
"Piston" is leaking. There is liquid
below the piston.
Stopcock is blocked/leaking. – Clean stopcock. Take care not to
Stopcock can not be turned. – Clean stopcock, see section 4.
– Small air bubbles do not disturb,
see section 1.
– Keep glass cylinder and leading
edge of piston free of grease.
– Deaerate reagent if necessary.
buret tip in solvent, see section 1.
cation Bulletin No. 238.
– Check that there is no liquid at the
tubing connections or at the stop-
cock.
– Change glass cylinder and if nec-
essary piston.
– Change glass cylinder and if nec-
essary piston.
have any solids in the threaded
holes, see section 4.
– Use PCTFE/PTFE stopcock.
40 6.3013.XXX and 6.3014.XXX Exchange Units, 8.110.1346
Page 41

9. Ordering designations and accessories
9. Ordering designations and accessories
Standard accessories see title-page. Additional:
Key for tightening nipples 6.2739.000
Grease (for piston) 6.2803.010
Exchange Unit with ceramics stopcock
1 mL 6.3013.113
5 mL 6.3013.153
10 mL 6.3013.213
20 mL 6.3013.223
50 mL 6.3013.253
Exchange Unit with PCTFE/PTFE
1 mL 6.3014.113
5 mL 6.3014.153
10 mL 6.3014.213
20 mL 6.3014.223
50 mL 6.3014.253
Options
Accessories to separate order and on payment of extra charge.
Bottles and accessories
Siphon for bottles with GL45 thread (Riedel-de
Haën...) 6.1602.120
Siphon for bottles with S40 thread (Merck...) 6.1602.130
Thread adapter GL32/GL45 6.1618.000
Thread adapter 28mm/GL45 6.1618.010
Brown glass bottles, 1 L, with GL45 thread 6.1608.023
Glass bottle, 1 L, with GL45 thread 6.1608.030
PE bottle, 1 L, with GL45 thread 6.1608.043
Glass bottle, 100 mL, with GL45 thread 6.1608.050
Holder for 100 mL bottles 6.2055.000
6.3013.XXX and 6.3014.XXX Exchange Units, 8.110.1346 41
Page 42

9. Ordering designations and accessories
Tubing and accessories
Tubing with M6 thread
Length 40 cm
Length 80 cm
Length 150 cm
T-connector, M6 thread 6.1808.060
Coupling with M6 thread and stub for tubing with
inner diameter of 3 mm 6.1808.020
Stopper with M6 thread 6.1446.040
Screw fitting for glass cylinder – tubing (M6 thread) 6.1811.000
Tubing with M8 thread
Length 25 cm
Length 50 cm
T-connector, M8 thread 6.1808.070
Coupling with M8 thread and stub for tubing with
inner diameter of 3 mm 6.1808.050
Screw fitting for glass cylinder – tubing (M8 thread) 6.1811.010
Tubing connections with larger internal diameter and
M8 thread at Exchange Unit
Connection bottle – stopcock:
Stopper, M6 thread
PTFE tubing
Tubing, 25 cm, M8 thread
Thread adapter, M6 outer thread, M8 inner thread
Connection stopcock – buret tip:
Thread adapter, M6 outer thread, M8 inner thread
Tubing, 50 cm, M8 thread
Tip, M8 thread
6.1805.100
6.1805.110
6.1805.030
6.1805.210
6.1805.200
6.1446.040
6.1819.030
6.1805.210
6.1808.040
6.1808.040
6.1805.200
6.1543.120
Buret tips
Earthing for buret tip 6.1808.030
Tip with anti-diffusion valve, M6 thread 6.1543.050
Open tip, M6 thread 6.1543.060
Tip, M8 thread 6.1543.120
Thermostat
Thermostat jacket 6.1563.010
PTFE tubing for thermostat jacket 6.1819.040
Coupling for tubing to thermostat jacket 6.1808.050
42 6.3013.XXX and 6.3014.XXX Exchange Units, 8.110.1346
 Loading...