

Page 1

736 GP Titrino, Short instructions for use
CH-9101 Herisau/Switzerland
Phone ++41 71 53 85 85
Fax ++41 71 53 89 01
736 GP Titrino
Short instructions for use
8.736.1023
95.12 Ti/pr
Page 2

736 GP Titrino, Short instructions for use
Table of contents
Page
1. Getting started ........................................................................1
1.1 Principle of data input .........................................................1
1.2 Development of a method................................................... 3
1.3 Storing methods .................................................................7
1.4 Working with several dosing units.....................................10
2. Titration, dosing and measuring modes .............................12
2.1 Survey of the titration modes ............................................ 12
2.2 Mode DET and MET, parameters ..................................... 14
2.3 Mode SET, parameters.....................................................15
2.4 Mode KFT, parameters.....................................................16
2.5 Mode STAT, parameters ..................................................17
2.6 Mode DOS, parameters....................................................19
2.7 Mode DOC, parameters....................................................20
2.8 Mode MEAS and CAL, parameters................................... 21
2.9 Mode TIP, parameters......................................................22
2.10 Calculations .................................................................... 23
3. Other functions .....................................................................25
3.1 Method memory................................................................25
3.2 Sample data, keys <smpl data> and <silo> ......................27
3.3 Configuration, key <configuration> ...................................28
Index ..........................................................................................29
Page 3
1.1 Principle of data input
736 GP Titrino: Getting started
1
1 Getting started
This is a step by step introduction into the operation of the
Titrino.
You learn how to go round with the Titrino and you get an
idea of the possibilities that the Titrino offers you.
1.1 Principle of data input
Entering data, setting the dialog languageEntering data, setting the dialog language
<configuration>
<enter>
<select>
<enter>
2 x <QUIT>
Press <STOP> if the Titrino is busy. It is now in the inactive
standby state. Then press the <configuration> key. The display shows:
This is the title of the inquiry group "peripheral units". This
group contains various inquiries about peripheral units.
Press the <configuration> key once more. You see the title of
a new group of inquiries:
This is the title of the "auxiliaries" group. This group contains
the inquiry for the dialog language. Note the ">" sign. All titles
are prefixed by this sign.
Pressing the <enter> key takes you to the different inquiries of
the group "auxiliaries". The display shows
This is the selection of the dialog language. You select the
various dialog languages with the <select> key. Note the ‘’:’’
sign after the word "dialog". It appears if the values can be
selected with key <select>. Press <select> repeatedly until
"english" appears in the display.
Accept the new "value" with <enter> and the next inquiry appears.
Other inquiries of the "auxiliaries" group are not of interest at
the moment. Exit the inquiries with <QUIT>. Press <QUIT>
once again to exit the inquiries of the <configuration> key.
date 1997-12-16
dialog: deutsch
dialog: english
>peripheral units
>auxiliaries
Page 4

1.1 Principle of data input
736 GP Titrino: Getting started
2
Summary of the most important signsSummary of the most important signs
Signs in the Titrino dialog:
> Title of inquiry groups, e.g. ">auxiliaries"
: Values can be chosen by the key <select>, e.g.
"dialog:"
Signs that are used in the instructions for use
<> sign for "key", e.g. <select>
Page 5
1.2 Development of a method
736 GP Titrino: Getting started
3
1.2 Development of a method
You learn how to elaborate a method .
First you select a titration mode. A general survey of the different titration modes is given on page 12.
Selecting the modeSelecting the mode
<mode>
<enter>
<select>
<enter>
Press <mode> repeatedly until "DET" appears in the display.
DET stands for Dynamic Equivalence point Titration. In this
titration, the size of the volume increments vary as a function
of the slope of the titration curve. After each increment, a preset measured value drift (or time) is awaited until the next
increment is added (so called "equilibrium titration"). After the
titration, the equivalence points are evaluated automatically.
Confirm "DET" with <enter>.
Now select the measured quantity: Press <select> until "pH"
appears in the display.
Confirm the measured quantity "pH" with <enter>.
You are now ready to titrate.
For the titration, you need an Exchange Unit with NaOH,
c=0.1 mol/L. If you have not yet prepared an Exchange Unit,
see page 188 ff of the Instructions for Use.
Plug a combined pH glass electrode into measuring input
("Ind I").
Pipette 2 mL HCI, c =0.1 mol/L into the titration vessel, dilute
it with ca. 20 mL. dist. water, adjust the stirrer and press
<START>.
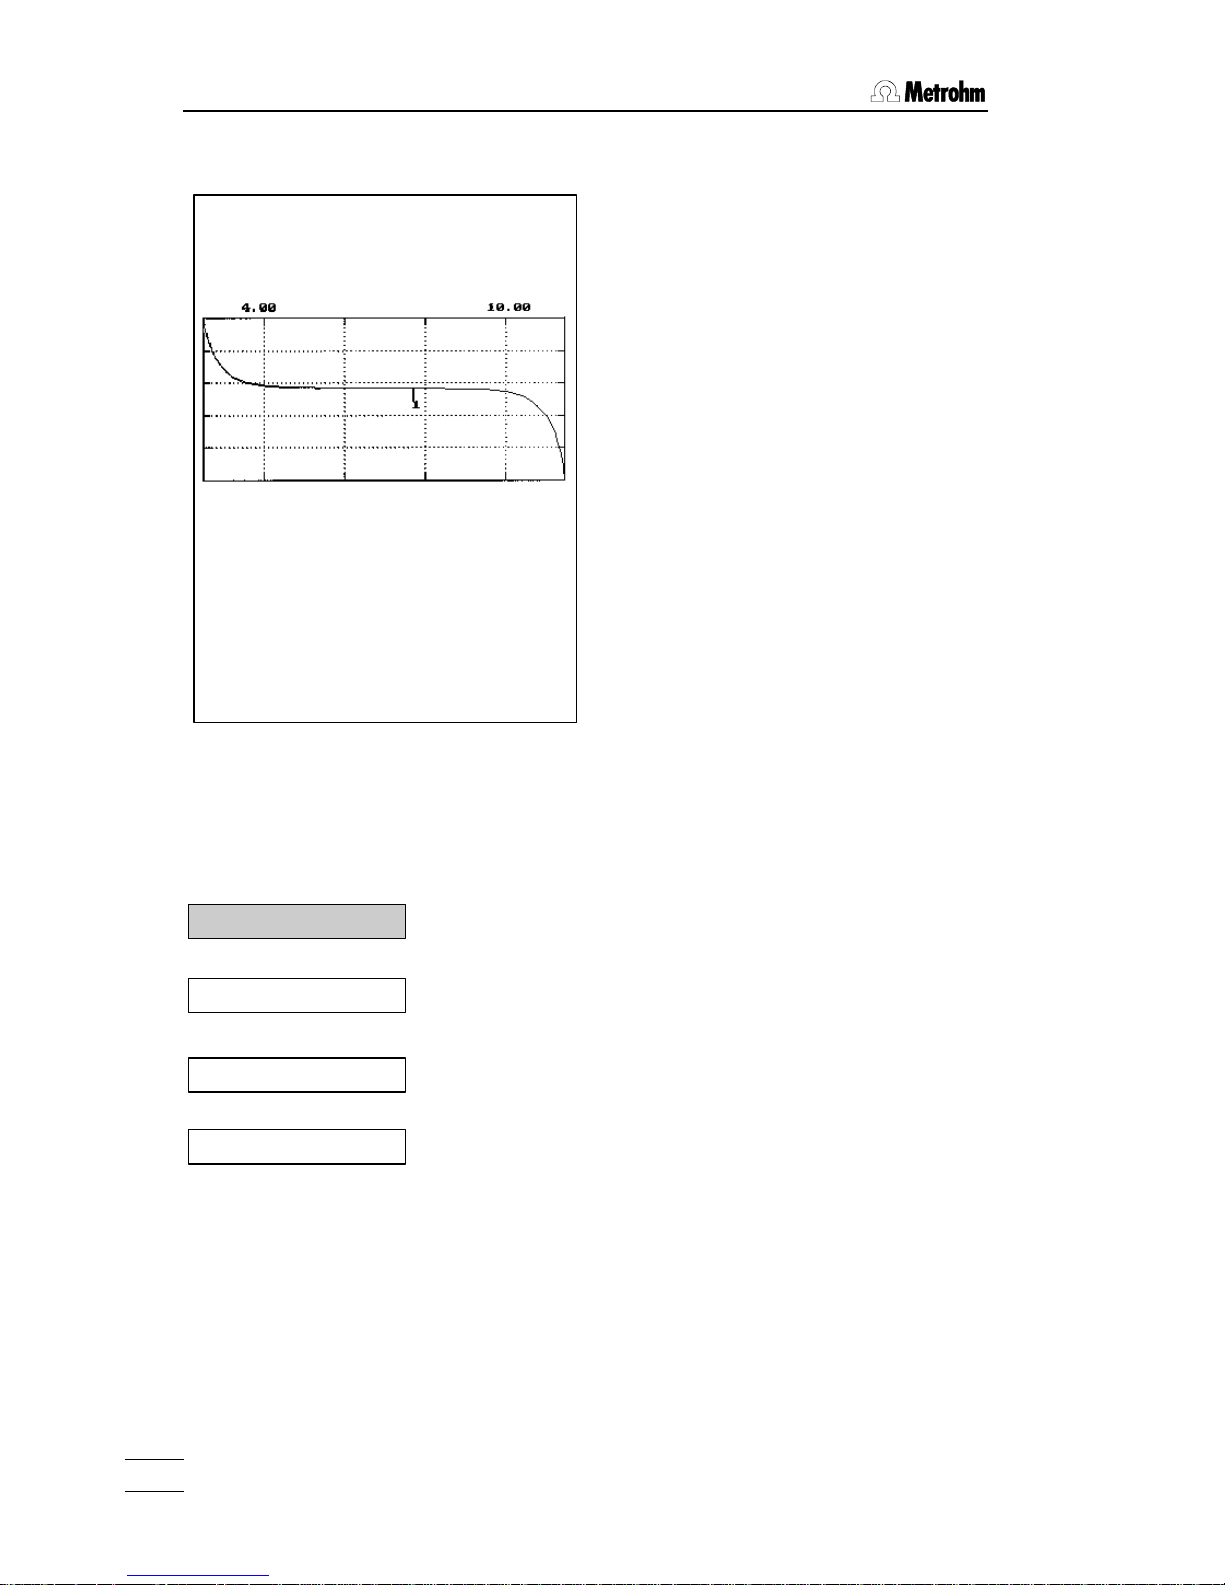
During the titration, the first line of the display shows the current measured value and the volume already dispensed:
As soon as the instrument has found an equivalence point,
this is shown on the second line:
Let the titration continue for a short while, e.g. until ca.
pH=11.50. Now stop it with <STOP>.
The second line shows the equivalence point found, e.g.:
If more than one equivalence point has been found, the second equivalence point can be viewed with <enter>
DET pH D0a ********
DET: pH
DET: U
mode DET
pH 2.78 0.351 ml
EP1
EP1 2.083 ml pH 7.64
Page 6
1.2 Development of a method
736 GP Titrino: Getting started
4
Calculation of the result, entry of a formulaCalculation of the result, entry of a formula
You may calculate results with the equivalence point.
<def>
<enter>
<1>
<enter>
<enter>
<enter>
<enter>
<select>
<enter>
2 x <QUIT>
Press <def> . The display shows
Press <enter> to move on to the formula entry. The display
now shows "RS? ".
Press "1", i.e. the first formula.
You can now enter a formula. Note here the top inscription on
the keys of the keypad and the numbers.
You can use mathematical operations, parentheses as well as
the following symbols:
EP# EP’s with 1-digit number, e.g. EP1.
RS# Previously calculated results, e.g. RS1 in the second
formula.
C## Calculation values, e.g. C01. C00 is reserved for the
sample size. The meaning of the different calculation
values is given on page 23.
Calculate the content of your hydrochloric acid in g/L:
RS1=EP1*C01*C02/C00
EP*conc(titrant)*molar mass/sample size
Confirm the formula with <enter>.
You may enter a text for the result output, see page 7.
Enter the desired number of decimal places for the result.
Select the unit g/I with <select> or enter a text as unit.
Quit the formula entry by pressing <QUIT> twice.
Entry of the calculation constantsEntry of the calculation constants
<C-fmla>
0.1 <enter>
36.47 <enter>
Press <C-fmla>. The constants which have been used in the
formula are requested:
C01: Concentration of your titrant = 0.1 mol/L.
C02: Molar mass of HCI = 36.47 g/mol
>formula
RS1 unit: %
RS1 decimal places 2
RS1 text RS1
RS1=EP1*C01*C02/C00
RS?
C01
C02
Page 7
1.2 Development of a method
736 GP Titrino: Getting started
5
Entry of the sample sizeEntry of the sample size
4 x <smpl data>
2 <enter>
<select>
<enter>
Press <smpl data> repeatedly until "smpl size" appears
in the display.
Enter 2 (= 2 ml).
Use <select> to select the unit "ml" and confirm the
new value with <enter>.
The result is now calculated and can be displayed in place
of the equivalence point. If your method already includes a
formula at the end of the titration, the calculated result is
displayed directly after the titration. As we have entered the
formula later, we now have to select the result display:
Display of the resultDisplay of the result
<select>
<enter>
Press <select> repeatedly until ">display results" appears
in the display.
Press <enter> to move on to the result display.
Selection of the automatic report outputSelection of the automatic report output
If you have a printer connected, you can have the curve
and a result report printed out automatically at the end
of the titration.
4 x <def>
<enter>
<select>
<enter>
<QUIT>
Press <def>repeatedly until the display shows ">report".
Press <enter> to move to the definition of reports.
With <select> you select the individual report blocks
Use a ";" as delimiter between the report blocks. If you
wish to print out a curve and a full result report, enter
"curve;full".
Confirm the entry with <enter> and quit the inquiries
with <QUIT>
>display results
>report
smpl unit: ml
smpl size 1.0 g
RS1 3.80 g/l
report:curve;full
report:
Page 8
1.2 Development of a method
736 GP Titrino: Getting started
6
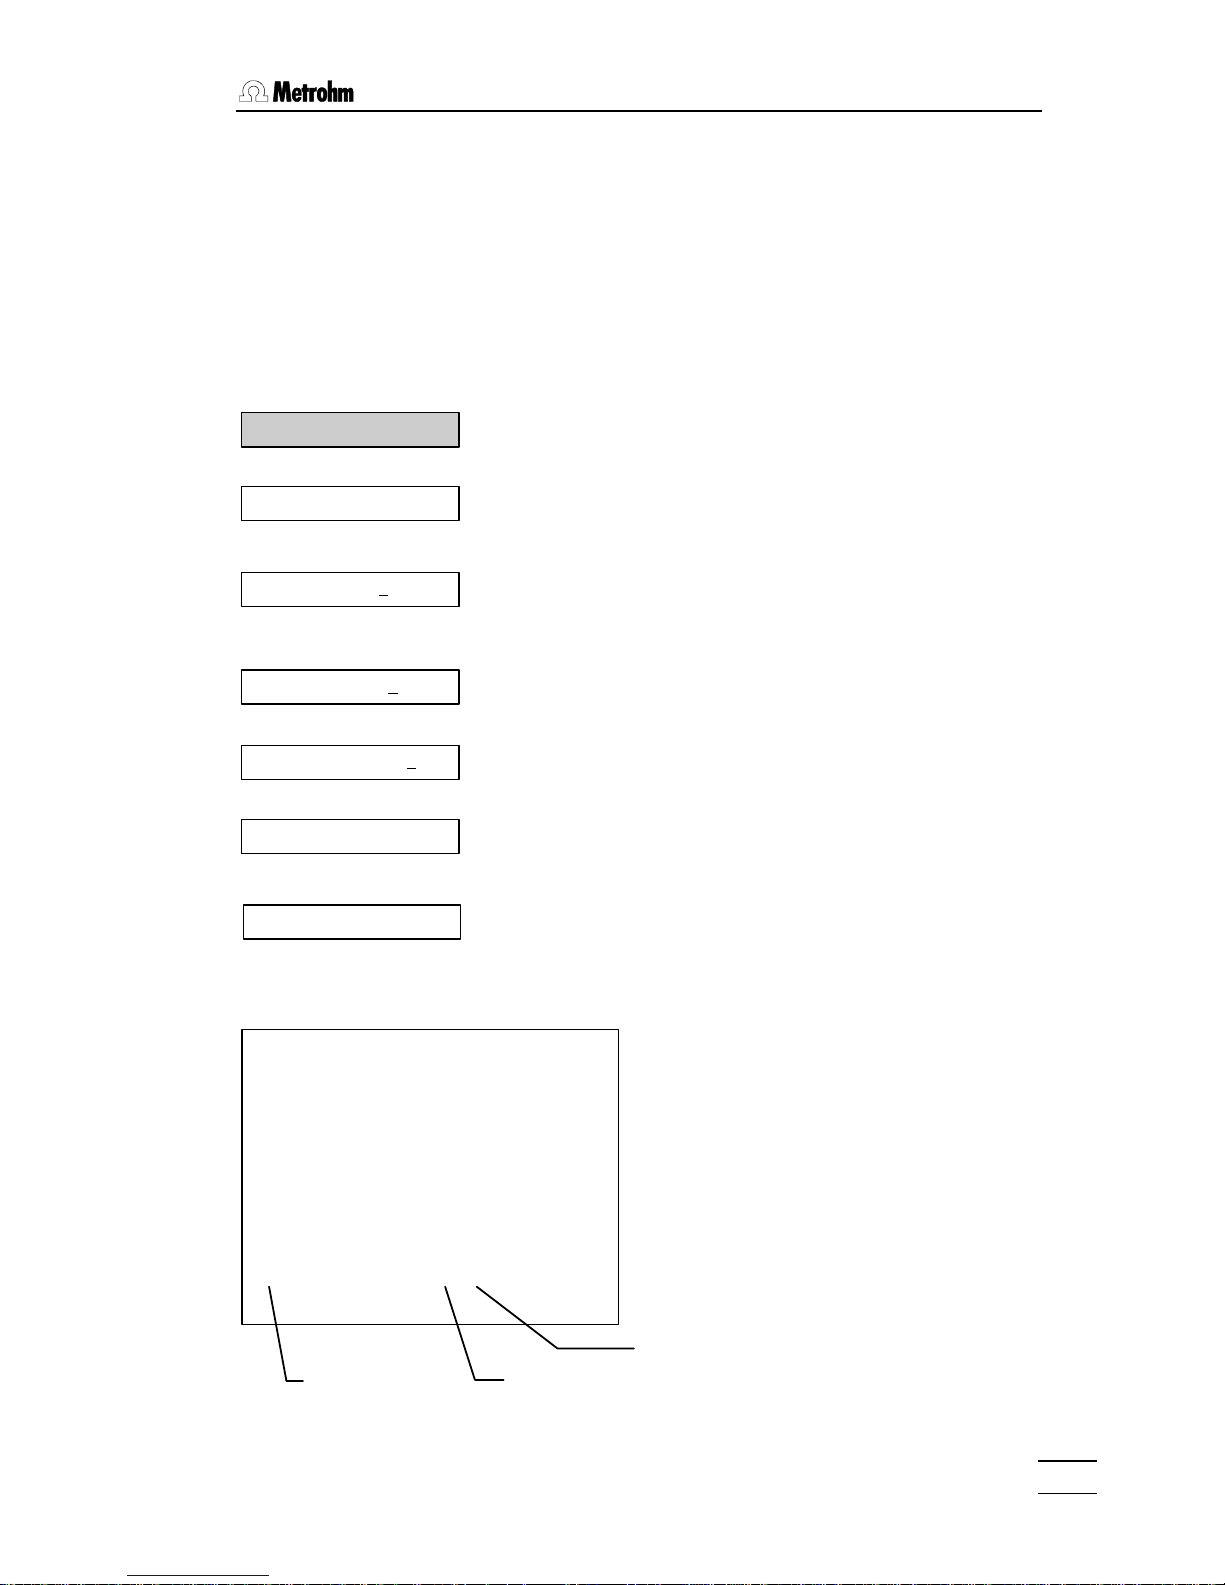
Press <print> <reports> <enter> .
Your printout will look as follows:
Identification of the report type
(cu = curve)
Start volume and method identification
Scaling of curve axis
- Identification of the report type
- Initial pH and method with identification
- Volume and pH value of EP1
- Calculated result with result text
Entry of a stop criterionEntry of a stop criterion
You don't want to stop your titration manually each time. Let
us enter an automatic stop criterion.
2 x <parameters>
<enter>
<enter>
<enter>
11.5 <enter>
2 x <QUIT>
Press <parameters> twice to display the title ">stop conditions".
The absolute stop volume. It can be used as a safety volume
to prevent overflow of the titration vessel.
Enter a value for the stop volume that appears suitable for
your titration vessel.
Set the pH value, e.g. 11.5 as stop criterion.
If several stop criteria have been set, the one that is reached
first, applies.
Confirm the input with <enter> and quit the inquiry with
<QUIT>.
Try another titration with this method.
'cu
736 GP Titrino 05325 736.0010
date 1997-12-16 time 09:07 1
start V 0.000 ml DET pH ********
1.0 ml/div dpH=2.0/div
−−−−−−−−−−−−−−−−
'fr
736 GP Titrino 05325 736.0010
date 1997-12-16 time 09:07 1
pH(init) 2.88 DET pH ********
smpl size 2 ml
EP1 2.083 ml 7.64
RS1 3.80 g/l
manual stop
−−−−−−−−−−−−−−−−
>stop conditions
stop pH OFF
stop V 99.99 ml
stop V: abs.
Page 9
1.3 Storing methods
736 GP Titrino: Getting started
7
1.3 Storing methods
You learn how to operate the method memories.
The Titrino offers 2 types of method memories:
• Internal method memory, key <user meth>
• External method memory on the card, key <card>
Storing a method in the internal method memoryStoring a method in the internal method memory
2 x <user meth>
<enter>
< << >
< << > + < >> >
<enter>
:
<QUIT>
<enter>
Press key <user meth> repeatedly until ">store method" appears in the display.
Enter an identification for your method, e.g. HCl:
Press key < << >. The display shows a row of letters. The first
position of this row is blinking. This is the input position.
You can move this row of letters pressing the < << > and
< >> >. Press < >> > until an "H" appears in the blinking posi-
tion and confirm it with <enter>.
The next position is now blinking. Enter the next letter here,
confirm it with <enter> etc.
If the identifier is complete, quit the text input with <QUIT>.
Confirm the value with <enter>. The method is stored in the
memory.
The method runs now under the identifier "HCl".
A list of contents of the method memory can be printed with
the key sequence <print><user meth><enter>.
>store method
method name: HCl
DET pH D0a HCl
method name: HClmnopq
method name: HIJKLMNO
method name: ABCDEFGH
method name: ********
'um
736 GP Titrino 02103 736.0010
date 1997-09-13 time 07:49
user methods bytes
DET pH Titer_pH D0 190
DET U Blank D0 178
DET U Chloride D0 234
MET U Diazo D0 208
MET Ipol Br-Index D0 226
DET U Ca-Mg D0 278
DET U EDTA-NTA D0 216
DET U Metals D0 190
DET U Perox.No D0 172
DET pH HCl D0 108
remaining bytes 7330
------------
mode and
measured
quantity
method
name
dosing unit, that
is being used
Page 10
1.3 Storing methods
736 GP Titrino: Getting started
8
Recall a method from the internal method memoryRecall a method from the internal method memory
Stored methods can always be recalled into the working
memory.
<user meth>
<enter>
<select>
<enter>
Press the key <user meth>. In the display appears ">recall
method".
You can choose a method with <select> or enter its name
directly.
Recall the method with <enter>.
The method is now ready to work.
Method memory on the cardMethod memory on the card
The card offers additional memory space for methods. It may
be used e.g.
• as a backup-medium for the internal method memory
• as an extended method memory, where the methods can
be organized in various directories
• if every user wants to store his methods on his own card
• for exchanging methods between various laboratories,
apparatus, and/or users
The card has a battery, which should be exchanged periodically, see page 85 of the Instructions for Use.
As an example, perform a backup from the internal method
memory to the card. If the card is not formatted, see page 86
of the Instructions for Use.
7 x <card>
<enter>
name + <enter>
Press the key <card> repeatedly until ">backup" appears in
the display.
Confirm this function with the key <enter> and give a name
for the backup directory.
If you wish to overwrite an existing directory, choose a name
with <select>.
The backup will be effected.
>recall method
>backup
DET pH D0a HCl
method name: HCl
directory:
Page 11

1.3 Storing methods
736 GP Titrino: Getting started
9
Printing a list of contents of the cardPrinting a list of contents of the card
The following card reports can be printed:
'ad
736 GP Titrino 02103 736.0010
date 1997-09-13 time 07:49
card label: appl.736 dev.label:
KF Titr. bytes
KFT Ipol TarTiter D0 150
KFT Ipol H2OTiter D0 150
KFT Ipol Blank_KF D0 132
KFT Ipol KF-Blank D0 206
KFT Ipol KF D0 170
remaining bytes 121892
------------
Current directory
<print><card><enter>
name of the current
directory
methods in this directory
remaining bytes on
this card
'cd
736 GP Titrino 02103 736.0010
date 1997-09-13 time 07:50
card label: appl.736 dev.label:
directory: user meth.
Acid Tit.NaOH Tit.HCl
W-Liquor
bytes: 620
directory: KF Titr.
TarTiter H2OTiter Blank_KF
KF-Blank KF
bytes: 808
remaining bytes on card: 121892
------------
Contents of the whole card
<print><select><enter>
Press <select> repeatedly until
"mem card" appears in the display.
bytes, that are being used
in the directory "user
meth."
the directory "KF Titr."
contains 5 methods
Page 12

1.4 Working with several dosing units
736 GP Titrino: Getting started
10
1.4 Working with several dosing units
Here you will learn how to work with several dosing units.
Several dosing units can be used
• if a working station will be permanently installed for spe-
cific analysis, e.g. having a dosing unit specially prepared
for Karl Fisher titrations
• if several titrations are being carried out in the same
sample. The linking of various methods is possible with
TIP (Titration Procedure), see page 81 of the Instructions
for Use.
• for addition of auxiliary solutions
Selection of the dosing unit in the titration methodSelection of the dosing unit in the titration method
The dosing unit is selected in the method. The method runs
always with the selected dosing unit.
Connect the dosing unit D1 and arm it with an Exchange Unit
(the Dosino with a Dosing Unit, resp.).
<user meth>
<enter>
<select>, <enter>
n x <parameters>
m x <enter>
<select>
<enter>
2 x <QUIT>
<START>
Recall the method "HCl" from the user memory: Press the key
<user meth>. In the display appears ">recall method". Press
<enter>.
Select the method name "HCl" with the key <select> and recall the method with <enter>.
The dosing unit of this method is D0, i.e. the Titrino itself.
To change the dosing unit, press the key <parameters> repeatedly until ">titration parameters" appears in the display.
Press <enter> until "dos.element:" appears. With <select>
you can choose between
internal D0: Dosing unit of the Titrino
external D1: externally connected dosing unit 1, or 2, resp.
Choose e.g. "external D1", confirm the input with <enter> and
quit with the key <QUIT>.
The display shows now e.g. "DET pH D1 HCl". D1
means, that in this method the external dosing unit D1 is being used.
Start the method.
After the titration "D1a" appears in the display. "a" means
"active", the dosing unit D1 is now active.
>titration parameters
>recall method
DET pH D1 HCl
dos.element:internal D0
DET pH D1a HCl
method name:
DET pH D0 HCl
Page 13

1.4 Working with several dosing units
736 GP Titrino: Getting started
11
Manual dosingManual dosing
Manual dosing can be used
• to prepare an Exchange Unit (or Dosing Unit, resp.)
• for quick dosing
If you press the key <DOS>, the dosing unit from the method
is working. This dosing unit appears in the display.
If you wish to dose with another dosing unit, use the key
<prep> to select the dosing unit and press <DOS> to dose.
<prep>
<prep>
<DOS>
<FILL>
<START>
<select>
<START>
<QUIT>
Press the key <prep>. In the display appears
"internal D0 prep", i.e. the dosing unit of the Titrino has been
chosen.
Press the key <prep> again. In the display appears
"external D1: prep".
Press the key <DOS> on the Titrino: The external dosing unit
D1 doses. If you press the key <STOP/FILL> on the Titrino, it
will fill again.
With <START>, the function "prep" is started. This prepares
the dosing units. (The parameters for "prep" are under the key
<configuration>, in the group ">prep.dosing elements").
Attention: With the function "prep", liquid will be expelled!
If the dosing unit D1 is a Dosino, you can empty the dosing
unit completely (e.g. for cleaning). Choose the function
"empty" with the key <select> and start with <START>.
Attention: With the function "empty", liquid will be expelled!
Quit the selection of dosing units with <QUIT>.
internal D0 prep
external Dl: empty
external D1: prep
Page 14

2.1 Survey of the titration modes
736 GP Titrino: Titration, dosing and measuring modes
12
2 Titration, dosing and measuring modes
This chapter gives you a survey over the titration, dosing and
measuring modes. You will find the parameters of all modes.
The standard values are printed in bold face in the following
tables.
2.1 Survey of the titration modes
DET
Dynamic Equivalence point
Titration
MET
Monotonic Equivalence point
Titration
Titration
Reagent feeding:
Variable volume increments, depending on the slope of the curve.
Drift controlled ("equilibrium titration")
and/or
after a fixed equilibration time.
Reagent feeding:
Constant volume increments,
independent of the slope of the
curve.
Drift controlled ("equilibrium titration")
and/or
after a fixed equilibration time.
Evaluation
The evaluation of EP' s is based
on the zero crossing of the second derivative with a Metrohm
correction for the distortion of the
curve from superimposed jumps.
Can be combined with selectable
recognition criteria.
Recognition criteria:
as for MET
The evaluation of EP's is based
on the Fortuin interpolation.
Recognition criteria:
all EP's
only the last EP
only the greatest EP
EP windows
Applications
Suitable titration mode for most
problems. Specially recommended if jumps lie very close
together and for very flat jumps.
Note: The reagent feeding algorithm is based on measured data.
The curve should therefore not
deviate markedly from S-shape.
For
• slow titration reactions
(diazotations, coupling reactions)
• sluggish electrode response.
V/mL
U/mV
V/mL
U/mV
Page 15

2.1 Survey of the titration modes
736 GP Titrino: Titration, dosing and measuring modes
13
If you are looking for more information to the different quantities, you will find the display text as a keyword in the index of
the Instructions for Use.
SET, KFT
Endpoint Titration
STAT
Holding a measured value
DOC
Controlled dosing
Titration to preset end-point. The reagent addition is con-
trolled such that a preset
measured value is adhered to
as accurately as possible.
The dosing function is controlled such that a nominal
measured value is adhered to
as accurately as possible. The
nominal measured value follows a linear ramp.
Volume that has been dispensed up to the endpoint
(EPX in ml).
Evaluation of
• rates dV/dt in the set time
windows and the mean
rate over the entire measuring point list.
• volumes associated with a
preset time (fix V).
• times associated with a
preset fraction of the total
volume (fix time).
The total volume (C41) and the
time needed for dosing (C42)
can be used for calculation.
• For rapid, quantitative
determinations in analytical chemistry. Requirement: EP of the titration
reaction is known and
does not change during a
determination series.
• If an excess of titrant must
be avoided.
• KFT: Determinations of
water contents.
For
• the controlled dosing to a
preset endpoint in the synthesis laboratory.
• activity determinations, e.g.
of enzymes.
• kinetic investigations (first
order kinetics).
Sweeping a measured value
gradient for reaction formulations in the syntheses laboratory.
V/mL
U/mV
continuously
Control
range
EP
t/s
V/ml
rate
t/s
U/mV
V/ml
U
set
Page 16

2.2 Mode DET and MET, parameters
736 GP Titrino: Titration, dosing and measuring modes
14
2.2 Mode DET and MET, parameters
Display Meaning Input range
>titration parameters
meas.pt.density
min.incr.
[V step]
titr.rate
signal drift
equilibr.time
start V:
start V
factor
dos.rate
pause
dos.element:
meas.input:
temperature
Measuring point density.
Minimum increment for DET.
Volume increment for MET.
Dosing rate for increments.
Drift for measured value acquisition.
Waiting time for value acquisition.
Type of start volume: absolute, relative.
Volume for absolute start volume.
Factor for calculation of relative start
volume: factor * smpl size.
Dosing rate for start volume.
Waiting time, e.g. after start volume.
Selection of the dosing unit.
Measuring input for pH and U.
Titration temperature.
0...4...9
0...10.0...999.9 ul
0...0.10...9.999 ml
0.01...150 ml/min, max.
pH, U:0.5..50..999 mV/min, OFF
0...26...9999 s, OFF
abs., rel., OFF
0...999.99 ml
0...±999 999
0.01...150 ml/min, max.
0...999 999 s
internal D0, external D1/D2
1, 2, diff.
-170.0...25.0...500.0 °C
>stop conditions
stop V:
stop V
factor
stop pH
stop EP
filling rate
Type of stop volume: absolute or relative.
Volume for absolute stop volume.
Factor for calculation of relative stop
volume: factor * smpl size.
Stop at measured value pH, U, I.
Stop after a number of EP's have been
found.
Filling rate after the titration.
abs., rel., OFF
0...99.99...9999.99 ml
0...±999 999
pH: 0.00...±20.00, OFF
U: 0...±2000 mV, OFF
1...9, OFF
0.01...150 ml/min, max.
>statistics
status:
mean n=
res.tab:
delete n=
Status of statistics calculation.
Number n of single values for statistics.
Result table for statistics calculation.
Delete data from sample number n.
ON, OFF
2...20
original, delete n, delete all
1...20
>evaluation
EPC
EP recognition:
fix EP1 at pH
pK/HNP:
Endpoint criterion.
Type of EP recognition: all EP's, only
greatest EP, only last EP, only EP's in
windows, no evaluation. If ”window” is
selected, lower and upper limits of
windows are inquired.
Interpolation of volume at given pH, U, or I,
resp. Up to 9 fix EP's.
Evaluation of pK or half neutralization
potential (HNP).
DET 0...5...200
MET pH: 0.10...0.50...9.99
U: 1...30...999 mV
all, greatest, last, window, OFF
pH: 0.00...±20.00, OFF
U: 0...±2000 mV, OFF
ON, OFF
>preselections
Preselections for the sequence see DOS,
page 19
Page 17

2.3 Mode SET, parameters
736 GP Titrino: Titration, dosing and measuring modes
15
2.3 Mode SET, parameters
Display Meaning Input range
>SET1
EP at pH
dynamics
max.rate
min.rate
stop crit:
stop drift
t(delay)
stop time
Individual parameters for EP1.
Preset EP1 at pH, U, or I, resp.
Distance from EP where constant dosing
stops and controlling begins.
Maximum dosing rate.
Minimum dosing rate.
Type of stop criteria.
Titration stops if stop drift is reached.
Stop if there is no dosing during t(delay).
If t(delay) is ”INF”:
stop after a time.
pH: 0.00...±20.00, OFF
(0...±2000 mV, 0.0...±200.0 uA)
pH: 0.01...20.00, OFF
(1...2000 mV, 0.1...200.0 uA)
0.01...10...150 ml/min, max.
0.01...25.0...999.9 ul/min
drift, time
1...20...999 ul/min
0...10...999 s, INF
0...999 999 s, OFF
>SET2 Parameters for EP2. Identical as SET1.
>titration parameters
titr.direction:
pause 1
start V:
start V
factor
dos.rate
pause 2
extr.time
dos.element
meas.input:
temperature
General titration parameters.
+:Titration to higher pH, voltage, or current.
Auto: Direction is set automatically.
Waiting time before start volume.
Type of start volume: absolute or relative.
Volume for absolute start volume.
Factor for calculation of relative start
volume: factor * smpl size.
Dosing rate for start volume.
Waiting time after start volume.
Extraction time.
Selection of the dosing unit.
Measuring input for pH and U.
Titration temperature.
+, -, auto
0...999 999 s
abs., rel., OFF
0...999.99 ml
0...±999 999
0.01...150 ml/min, max.
0...999 999 s
0...999 999 s
internal D0, external D1/D2
1, 2, diff.
-170.0...25.0...500.0 °C
>stop conditions
stop V:
stop V
factor
filling rate
Type of stop volume: absolute or relative.
Volume for absolute stop volume.
Factor for calculation of relative stop
volume: factor * smpl size.
Filling rate after titration.
abs., rel., OFF
0...99.99...9999.99 ml
0...±999 999
0.01...150 ml/min, max.
>statistics Statistics calculation see at DET, page 14
>preselections
conditioning:
display drift:
drift corr:
drift value
req.ident:
req.smpl size:
activate pulse:
Automatic conditioning of titration vessel
Display of drift during conditioning.
Type of drift correction.
Value for manual drift correction.
Request of identifications after start.
Request of sample size after start.
Pulse output on I/O line L6.
ON, OFF
ON, OFF
auto, man., OFF
0.0...99.9 ul/min
id1, id1 & 2, all, OFF
value, unit, all, OFF
first, all, cond., OFF
Page 18

2.4 Mode KFT, parameters
736 GP Titrino: Titration, dosing and measuring modes
16
2.4 Mode KFT, parameters
Display Meaning Input range
>control parameters
EP at ...
dynamics
max.rate
min.volume incr.
stop crit:
stop drift
t(delay)
stop time
Controlling parameters for KFT.
Endpoint for Ipol.
Endpoint for Upol
Distance from EP where constant dosing
stops and controlling begins.
Maximum dosing rate.
Minimum volume increment
Type of stop criteria.
Titration stops if stop drift is reached.
Stop if there is no dosing during t(delay).
If t(delay) is ”INF”: stop time.
U: -2000 ... 250...2000 mV
I: -200.0... 25.0...200.0 uA
U: 1...100...2000 mV
I: 0.1...10...200.0 uA
0.01...150 ml/min, max.
0.1...9.9 ul, min
drift, time
1...20...999 ul/min
0...10...999 s, INF
0...999 999 s, OFF
>titration parameters
titr.direction:
pause 1
start V:
start V
factor
dos.rate
pause 2
extr.time
dos.element
I(pol)
U(pol)
electrode test:
temperature
General titration parameters.
+: Titration to higher voltage or current.
auto: Direction is set automatically.
Waiting time before start volume.
Type of start volume: absolute or relative.
Volume for absolute start volume.
Factor for calculation of relative start
volume: factor * smpl size.
Dosing rate for start volume.
Waiting time after start volume.
Extraction time.
Selection of the dosing unit.
Polarization current for ipol or voltage for upol in 10 mV-intervals.
Performing of electrode test
Titration temperature.
+, -, auto
0...999 999 s
abs., rel., OFF
0...999.99 ml
0...±999 999
0.01...150 ml/min, max.
0...999 999 s
0...999 999 s
internal D0, external D1/D2
-127...50...127 uA bzw.
-1270...400...1270mV
ON, OFF
-170.0...25.0...500.0 °C
>stop conditions
stop V:
stop V
factor
filling rate
Type of stop volume: absolute or relative.
Volume for absolute stop volume.
Factor for calculation of relative stop
volume: factor * smpl size.
Filling rate after the titration.
abs., rel., OFF
0...99.99...9999.99 ml
0...±999 999
0.01...150 ml/min, max.
>statistics Statistics calculation see at DET, page 14
>preselections
conditioning:
display drift:
drift corr:
drift value
req.ident:
req.smpl size:
activate pulse:
Automatic conditioning of titration vessel.
Display of drift during conditioning.
Type of drift correction.
Value for manual drift correction.
Request of identifications after start.
Request of sample size after start.
Pulse output on I/O line L6.
ON, OFF
ON, OFF
auto, man., OFF
0.0...99.9 ml/min
id1, id1 & 2, all, OFF
value, unit, all, OFF
first, all, cond., OFF
Page 19

2.5 Mode STAT, parameters
736 GP Titrino: Titration, dosing and measuring modes
17
2.5 Mode STAT, parameters
Display Meaning Input range
>control parameters
EP at pH
dynamics
max.rate
min.rate
Endpoint, control point: This value is kept
constant.
Distance from EP where constant dosing
stops and controlling begins.
Maximum dosing rate
Minimum dosing rate
pH: 0.00...±20.00, OFF
(0...±2000 mV, 0.0...±200.0 uA)
pH: 0.01...1...20.00, OFF
(1..60..2000 mV, 0.1.6..200.0uA)
0.01...10...150 ml/min, max.
0.01...25.0...999.9 ul/min
>titration parameters
start V:
start V
factor
dos.rate
pause
start time
start pH
start rate
time interval
titr.direction:
dos.element
meas.input:
temperature
General titration parameters.
Type of start volume: absolute or relative.
Volume for absolute start volume.
Factor of relative start volume.
Dosing rate for start volume.
Waiting time, after start volume.
Start time for data acquisition.
Start measured value for data acquisition.
Start rate for data acquisition.
Time interval for data acquisition.
+: Titration to higher pH, U or I. auto:
Direction is set automatically.
Selection of dosing unit.
Measuring input for pH and U.
Temperature.
abs., rel., OFF
0...999.99 ml
0...±999 999
0.01...150 ml/min, max.
0...999 999 s
0...999 999 s
pH: 0.00...±20.00, OFF
(0...±2000 mV, 0.0...±200.0 uA)
0.01...150 ml/min, OFF
1...2...999 999 s
+, -, auto
internal D0, external D1/D2
1, 2, diff.
-170.0...25.0...500.0 °C
>stop conditions
stop time:
stop time
factor
t(delta)
t(delay)
stop V:
stop V
factor
stop rate
filling rate
Type of stop time: absolute or relative.
Time for absolute stop time.
Factor for calculation of relative stop time.
Time after EP is once reached.
Time after last dosing step.
Type of stop volume: absolute or relative.
Volume for absolute stop volume.
Factor of relative stop volume.
Stop when the dosing rate is smaller than..
Filling rate.
abs., rel., delta, delay, OFF
0...999 999 s
0...±999 999
0...999 999 s
0...999 999 s
abs., rel., OFF
0...99.99...9999.99 ml
0...±999 999
0.01...150 ml/min, OFF
0.01...150 ml/min, max.
>statistics Statistics calculation see at DET, page 14
>evaluation
low lim.
up lim.
fix V1
fix time 1
Evaluation of dosing rates within
programmed time windows (→ C8X).
Max. 9 windows.
Interpolation of volumes at fixed times (→
C5X). Up to 9 fix V's.
Interpolation of times at fixed volume
rations of the end volume (→ C6X). Up to
9 fix times.
0...999 999 s, OFF
0...999 999 s, OFF
0...999 999 s, OFF
0.01...1, OFF
Page 20

2.5 Mode STAT, parameters
736 GP Titrino: Titration, dosing and measuring modes
18
Display Meaning Input range
>monitoring
meas.val:
low lim.pH
up lim.pH
action:
rate:
temperature:
assign output:
L4 output:
Monitoring of measured values.
Limits for measured values.
Action, if a limit is exceeded. End: Abort.
Wait: Dosing interrupted, until measured
value is within limits again, then continue.
Monitoring of rate (same actions as
above).
Monitoring of temperature (same actions
as above).
Assignment of output L4 for monitoring.
Set a signal when values are out of limit.
ON, OFF
pH: 0.00...±20.00
(0...±2000 mV, 0.0...±200.0 uA)
end, hold, wait, none
ON, OFF
ON, OFF
meas, temp, rate, all, none
active, pulse
>preselections
req.ident:
req.smpl size:
display rate:
activate pulse:
Request of identifications after start.
Request of sample size after start.
Display of rate.
Pulse output on I/O line L6.
id1, id1 & 2, all, OFF
Value, unit, all, OFF
ON, OFF
ON, OFF
Page 21

2.6 Mode DOS, parameters
736 GP Titrino: Titration, dosing and measuring modes
19
2.6 Mode DOS, parameters
Display Meaning Input range
>dosing parameters
dispensing type:
volume
disp.crit:
rate
disp.time
pause
time interval
dos.element
temperature
Volume, time or rate. Inquiry of 2 values.
3rd value is calculated .
1st criterion i.e. volume.
Selection of 2nd criterion.
2nd value, i.e. rate or
dispensing time.
Waiting time before start.
Time interval for data acquisition.
Selection of the dosing unit
Temperature.
volume, time, rate
0...10...99 999.99 ml
time, rate
0.001...150 ml/min, max.
1...100...999 999 s
0...999 999 s
1...10...999 999 s
internal D0, external D1/D2
-170.0...25.0...500.0 °C
>stop conditions
stop V:
stop V
factor
filling rate
Type of stop volume: absolute or relative.
Volume for absolute stop volume.
Factor of relative stop volume:
Filling rate.
abs., rel., OFF
0...99.99..99 999.99 ml
0...±999 999
0.01...150 ml/min, max.
>statistics Statistics calculation see at DET, page 14
>monitoring
meas.mode:
meas.input:
low lim.pH
up lim.pH
action:
temperature:
low lim.
up lim.
action:
assign output:
L4 output:
Measured quantity for monitoring.
Meas. input for pH and U.
Limits for measured values.
Action, if a limit is exceeded. End: Abort.
Wait: Dosing interrupted, until measured
value is within limits again, then continue.
Monitoring of temperature.
Limits for temperature.
Action, if a limit is exceeded .
Assignment of output L4 for monitoring.
Set a signal when values are out of limit.
pH, U, I(pol), U(pol), OFF
1, 2, diff
pH: 0.00...±20.00
(0...±2000 mV, 0.0...±200.0 uA)
end, hold, wait, none
ON, OFF
-170.0...500.0 °C
-170.0...500.0 °C
end, hold, wait, none
meas, temp, all, none
active, pulse
>preselections
req.ident:
req.smpl size:
activate pulse:
Request of identifications after start.
Request of sample size after start.
Pulse output on I/O line L6.
id1, id1 & 2, all, OFF
value, unit, all, OFF
ON, OFF
Page 22

2.7 Mode DOC, parameters
736 GP Titrino: Titration, dosing and measuring modes
20
2.7 Mode DOC, parameters
Display Meaning Input range
>dosing parameters
begin at
end at
sweep time
dynamics
max.rate
min.rate
direction:
start V:
start V
factor
dos.rate
pause
time interval
dos.element
meas.input:
temperature
Begin of measured value sweep.
End of measured value sweep.
Time required for sweep.
Distance from EP where constant dosing
starts. OFF means no constant dosing.
Maximum dosing rate.
Minimum dosing rate.
Direction of sweep. +: Titration to higher
pH, voltage, or current. Auto: Direction is
set automatically.
Type of start volume: absolute or relative.
Volume for absolute start volume.
Factor for of relative start volume:
Dosing rate for start volume.
Waiting time, after start volume.
Time interval for data acquisition
Selection of dosing unit.
Meas. input for pH and U.
Temperature.
pH: 0.00...±20.00, init
(0...±2000 mV, 0.0...±200.0 uA)
pH: 0.00...±20.00, OFF
(0...±2000 mV, 0.0...±200.0 uA)
0...300...999 999 s
pH: 0.01...0.25...20.00, OFF
(1...15...2000 mV, 0.1...6...200
uA)
0.01...150 ml/min, max.
0.01...5...999.9 ul/min
+, -, auto
abs., rel., OFF
0...999.99 ml
0...±999 999
0.01...150 ml/min, max.
0...999 999 s
1...10...999 999 s
internal D0, external D1/D2
1, 2, diff.
-170.0...25.0...500.0 °C
>stop conditions
stop V:
stop V
factor
filling rate
Type of stop volume: absolute or relative.
Volume for absolute stop volume.
Factor of relative stop volume.
Filling rate.
abs., rel., OFF
0...99.99...9999.99 ml
0...±999 999
0.01...150 ml/min, max.
>statistics Statistics calculation see at DET, page 14
>monitoring
meas.val:
low lim.pH
up lim.pH
action:
temperature:
low lim.
up lim.
action:
assign output:
L4 output:
Monitoring of measured value.
Limits for measured value.
Action, if a limit is exceeded. End: Abort.
Wait: Dosing interrupted, until measured
value is within limits again, then continue.
Monitoring of temperature.
Limits for temperature.
Action, if a limit is exceeded .
Assignment of output L4 for monitoring.
Set a signal when values are out of limit.
ON, OFF
pH: 0.00...±20.00
(0...±2000 mV, 0.0...±200.0 uA)
end, hold, wait, none
ON, OFF
-170.0...500.0 °C
-170.0...500.0 °C
end, hold, wait, none
meas, temp, all, none
active, pulse
>preselections
req.ident:
req.smpl size:
display rate:
activate pulse:
Request of identifications after start.
Request of sample size after start.
Display of rate.
Pulse output on I/O line L6.
id1, id1 & 2, all, OFF
value, unit, all, OFF
ON, OFF
ON, OFF
Page 23

2.8 Mode MEAS and CAL, parameters
736 GP Titrino: Titration, dosing and measuring modes
21
2.8 Mode MEAS and CAL, parameters
MEASMEAS
Display Meaning Input range
>measuring parameters
signal drift
equilibr.time
meas.input:
temperature
Drift for measured value acquisition.
Waiting time for meas. value acquisition.
Measuring input for pH and U.
Measuring temperature.
pH, U: 0.5..999 mV/min, OFF
T: 0.5...999 °C/min, OFF
0...9999 s, OFF
1, 2, diff.
-170.0...25.0...500.0 °C
>statistics Statistics calculation see at DET, page 14.
>preselections
req.ident:
req.smpl size:
activate pulse:
Request of identifications after start.
Request of sample size after start.
Pulse output on I/O line L6.
id1, id1 & 2, all, OFF
value, unit, all, OFF
ON, OFF
CALCAL
Display Meaning Input range
>cal. parameters
meas.input:
cal.temp.
buffer 1 pH
signal drift
equilibr.time
electr.id
sample changer cal:
activate pulse:
Measuring input.
Calibration temperature.
pH-value for buffer 1. up to 9 buffer.
Drift for measured value acquisition.
Waiting time for meas. value acquisition.
Electrode identification.
Calibration with Sample Changer.
Pulse output on I/O line L6.
1, 2, diff.
-20.0...25.0...120.0 °C
0...±20.00
0.5..2...999 mV/min, OFF
0...110...999 s, OFF
up to 8 ASCII characters
ON, OFF
all, first, OFF
>statistics Statistics calculation see at DET, page 14.
Page 24

2.9 Mode TIP, parameters
736 GP Titrino: Titration, dosing and measuring modes
22
2.9 Mode TIP, parameters
With TIP, methods and other functions can be linked to a titration sequence. Press the key <def> to define the titration
sequence.
Display Meaning Input range
>sequence
method:
pause
L4 output:
L6 output:
info
prep
Method from the internal method memory
or from the card.
Waiting time. Can be aborted with <QUIT>.
Set a signal when on I/O line L4.
Set a signal when on I/O line L6.
The sequence will be held and an info
appears in the display.
Preparation of the dosing unit.
method name
0...999 999 s, inf.
active, inactive, pulse, OFF
active, inactive, pulse, OFF
up to 16 characters
internal D0, external D1/D2
>statistics Statistics calculation see at DET, page 14.
>preselections
req.ident:
req.smpl size:
meas.mode:
meas.input:
temperature
Request of identifications after start.
Request of sample size after start.
Selection of the measured quantity for
<meas/hold>.
Measuring input for pH and U.
Temperature for the compensation of the
pH values.
id1, id1 & 2, all, OFF
value, unit, all, OFF
pH, U, I(pol), U(pol), T, OFF
1, 2, diff.
-170.0...500.0 °C
Page 25

2.10 Calculations
736 GP Titrino: Titration, dosing and measuring modes
23
2.10 Calculations
The results are calculated with the formulas given in the
method. For the calculation, the raw values, determined in
the method (EP's and C variables), are available.
The results and the raw values can be assigned for further
calculations, e.g. for statistics or as common variables.
Formula Formula input input and and assignments, assignments, key <key <def>def>
Display Meaning Input range
>formula
RS?
RS1=EP1*C01/C00
RS1 text
RS1 decimal places
RS1 unit:
Input of formula.
Enter result number.
Enter formula by means of 3rd functions of
keyboard.
Text for result output.
Number of decimal places for result output.
Select result unit.
Enter values of calculation variables with
<C-fmla>.
1...9
RS1 or up to 8 ASCII characters
0...2...5
%, ppm, g/l, mg/ml, mg/pc,mol/l,
mmol/l, g, mg, ml, s, ml/min, no
unit or up to 6 ASCII characters
>silo calculations
C24=
C25=
match id:
Allocations for silo calculation,see page 93
of the Instructions for Use.
Enter values to be stored in the silo
memory.
Indication which id's must coincide for the
statistical evaluation in the silo memory.
RSX, EPX, CXX
id1, id1 & 2, all, OFF
>commmon variables
C3?=
Allocations of common variables C3X.
Enter the number of the common variable
and RSX, EPX, CXX, or MNX.
RSX, MNX, EPX, CXX
>report
report:
Selection of report blocks for data output.
Depends on the selected mode. If you
wish several reports, use ”;” as separator.
full, short, mplist, curve, derive,
comb, meas crv, temp crv, scalc
full, scalc srt, calc, param, calib,
ff
>mean
MN?=
Allocations for statistics.
Enter mean number and result RSX, EPX,
or CXX.
RSX, EPX, CXX
>temporary variables
C7?=
Allocations of temporary variables for
calculations under TIP. RSX, EPX, CXX
Page 26

2.10 Calculations
736 GP Titrino: Titration, dosing and measuring modes
24
Meaning Meaning of of the the calculation variablescalculation variables
C variables are
• determined by the method (C24...C27, C4X, C5X, C6X,
C7X, C8X)
• entered as sample specific data (C00, C21...C23)
• given as fixed constants in the methods (C01...C19)
Variable Meaning
C00
C01...C19
C21...C23
C24, C25
C26, C27
C30...C39
C40
C41
C42
C43
C44
C45
C46
C47
C51...C59
C61...C69
C70...C79
C80
C81...C89
Sample size, key <smpl data>.
Method specific calculation values, such as molecular mass, factors, key <Cfmla>.
Sample specific calculation values, such as dilution factors, key <smpl data>.
Variables for storing determination results in the silo memory.
Means from silo calculations.
Common variables, e.g. for titer.
Initial measured value of the sample.
End volume.
Determination time.
Volume drift for KFT and SET with conditioning.
Temperature.
Dispensed start volume.
Asymmetry pH (pH calibration).
Electrode slope (pH calibration).
Fix EP for DET and MET or fix V for STAT.
pK/HNP values for DET and MET or fix times for STAT.
Temporary variables for calculations in TIP.
Mean rate for STAT: Overall rate, evaluated over all points of the measuring list.
Rates, evaluated in preset time windows for STAT.
Sample Sample data, data, key <key <smpl smpl data>data>
• Sample identifications or sample specific calculation val-
ues C21...C23
• Sample size C00
For working with the silo memory, see page 27.
Display Meaning Input range
id#1 or C21
id#2 or C22
id#3 or C23
smpl size
smpl unit:
Inquiries with silo = OFF (LED ”silo” is
OFF):
Sample identification. Can be used as
sample specific calculation values.
Sample size
Unit of sample size
up to 8 ASCII characters
-999 999...1...999 999
g, mg, ml, ul, pc, no unit or up to
5 ASCII characters
}
Page 27

3.1 Method memory
736 GP Titrino: Other functions
25
3 Other functions
This chapter gives you a survey over other functions of the
Titrino.
If you are looking for more information to the different quantities, you will find the display text as a keyword in the index of
the Instructions for Use.
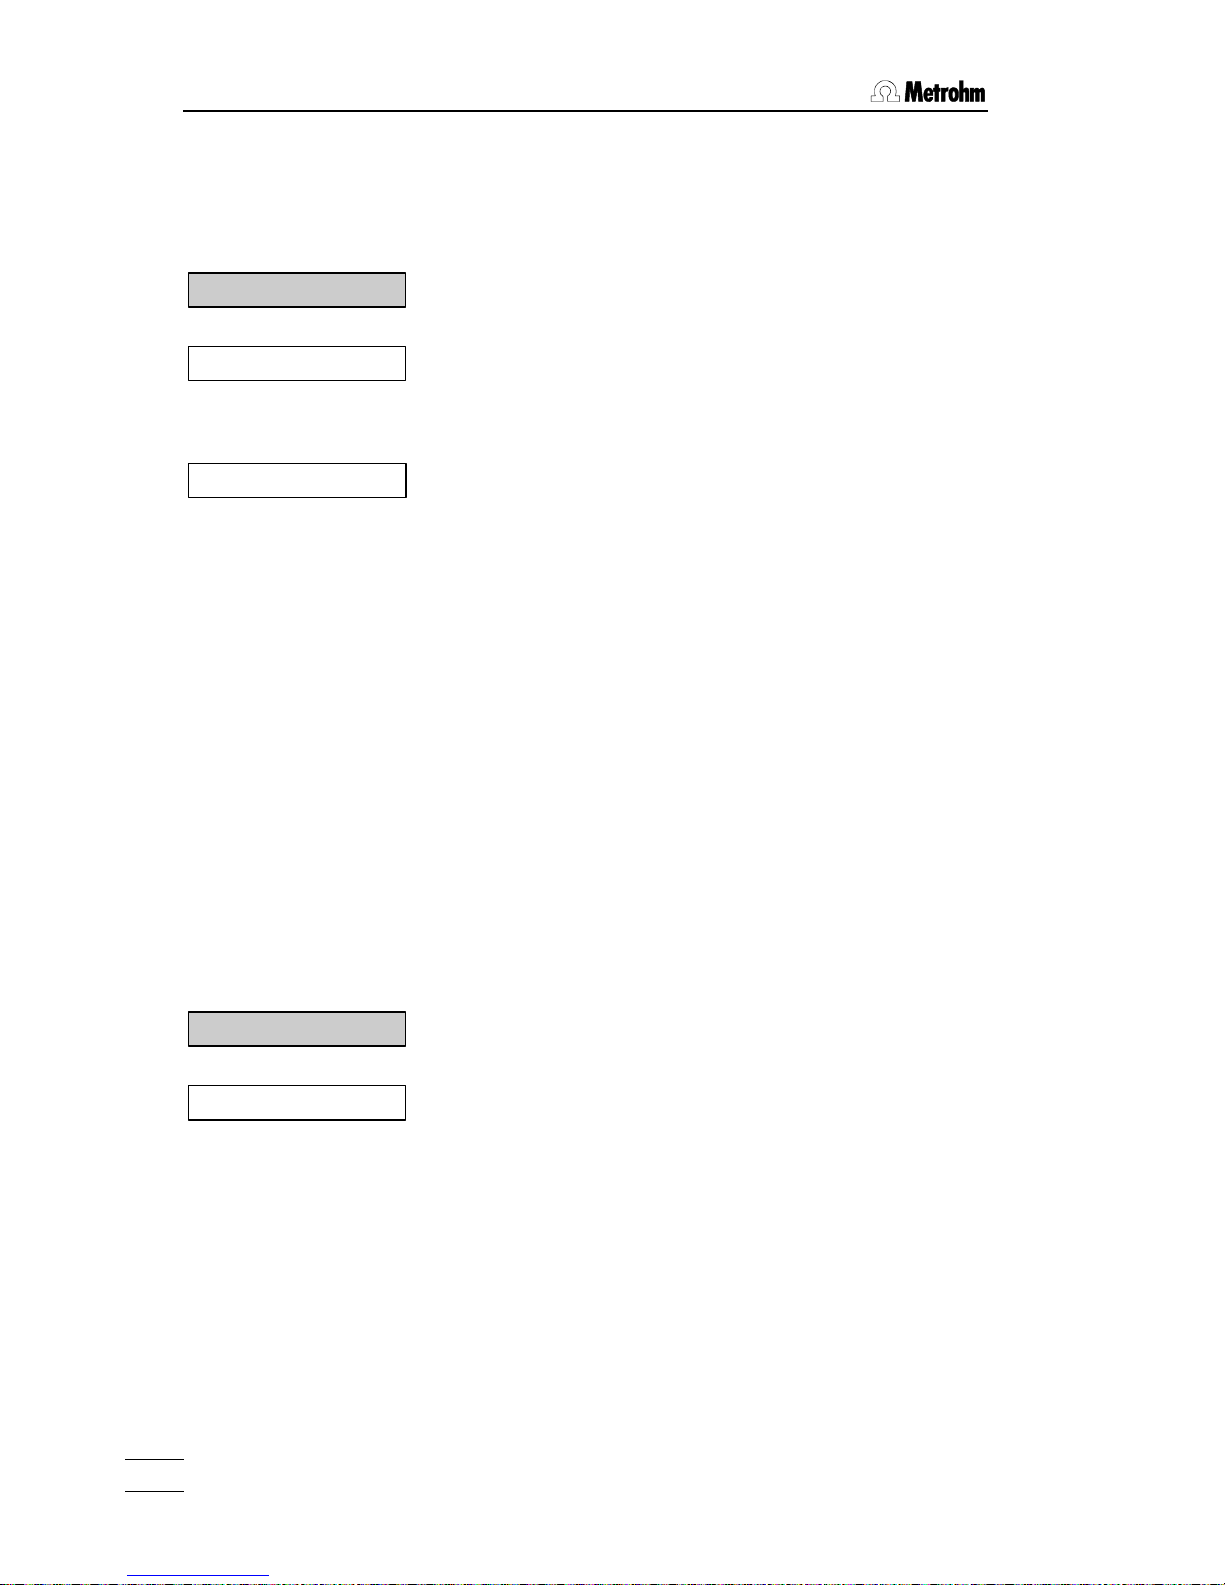
3.1 Method memory
Methods can be stored in the internal method memory or on
the memory card. These method memories are organized as
follows:
Memory CardMemory Card
Directory 7
Directory 6
Directory 5
Directory 4
Directory 3
Directory 2
Directory 1Directory 1
current directory of the
Memory Card
ReloadReload
internal method meinternal method memm--
oryory
DirectoryDirectory
Back-Back-
upup
Working memory:Working memory:
method
data of last analysis
sample data
Single methodSingle method
recallrecall
recall
recall
storestore
storestore
Page 28

3.1 Method memory
736 GP Titrino: Other functions
26
Internal method memory, key <user Internal method memory, key <user meth>meth>
Display Meaning Input range
>recall method
method name:
Recall method from the internal method
memory to the working memory.
up to 8 characters
>store method
method name:
Store method from the working memory to
the internal method memory.
up to 8 characters
>delete method
method name:
Delete method from the internal method
memory.
up to 8 characters
Method memory on the card, key <card>Method memory on the card, key <card>
Display Meaning Input range
>recall method
method name:
Recall method from the card (current
directory) to the working memory.
up to 8 characters
>store method
method name:
Store method from the working memory to
the current directory on the card.
up to 8 characters
>delete method
method name:
Delete method from the current directory
on the card.
up to 8 characters
>change directory
dir.name:
Change current directory on the card.
up to 10 characters
>create directory
dir.name:
Create new directory on the card.
up to 10 characters
>delete directory
dir.name:
Delete directory on the card together with
its methods.
up to 10 characters
>backup
dir.name:
Backup of the internal method memory on
the card.
up to 10 characters
>reload
dir.name:
Reload of the whole directory from the card
to the internal method memory.
up to 10 characters
>format
card label
format:
Card formatting.
Card labeling.
Confirm formatting.
up to 8 characters
ON, OFF
>change battery
date
Date for changing the card battery.
YYYY-MM-DD
Page 29

3.2 Sample data, keys <smpl data> and <silo>
736 GP Titrino: Other functions
27
}
3.2 Sample data, keys <smpl data> and <silo>
In the silo memory sample datas can be stored on reserve.
For working without the silo memory see page 24 of the instructions for use.
Press the key <silo> for working with the silo memory, and
the key <smpl data> to input datas.
Display Meaning Input range
>edit silo lines
id#1 or C21
id#2 or C22
id#3 or C23
smpl size
smpl unit:
Input for the silo memory:
Sample identification. Can be used as
specific calculation values.
Sample size
Unit of sample size.
up to 8 ASCII characters
-999 999...1...999 999
g, mg, ml, ul, pc, no unit or up
to 5 ASCII characters
>delete silo lines
delete line n
Delete individual silo lines.
Line number of the line to be deleted. 1...99, OFF
>delete all silo lines
delete all:
Delete all silo lines.
Confirmation. ON, OFF
cycle lines:
save lines:
With "ON", worked off silo lines will be
copied to the highest line of the silo
memory.
Determination results will be stored as
C24 or C25 in the silo memory according
to the allocations in the methods, see
page 23.
ON, OFF
ON, OFF
Page 30

3.3 Configuration, key <configuration>
736 GP Titrino: Other functions
28
3.3 Configuration, key <configuration>
Display Meaning Input range
>peripheral units
send to:
balance:
record:
Settings of peripheral units.
Selection of printer.
Selection of balance.
Selection of record at the analog output.
Epson, Seiko, Citizen, HP, IBM
Sartorius, Mettler, Mettler AT, AND,
Precisa
U, dU/dt, V, dV/dt, U(rel), T
>auxiliaries
dialog:
date
time
run number
auto start
start delay
dev.label
program
General settings.
Selection of dialog language.
Current run number for result output.
Automatic starts of titrations.
Waiting time before start of titration.
Device label.
Program version.
english, deutsch, français, español,
portuguese, italiano, svenska
YYYY-MM-DD
HH:MM
0...9999
1...9999, OFF
0...999 999 s
up to 8 characters
read only
>RS232-settings
baud rate:
data bit:
stop bit:
parity:
handshake:
RS control:
Settings of RS232 interface.
Baud rate.
Data bit.
Stop bit.
Parity.
Handshake.
Receiving of commands via RS.
300,600,1200, 2400, 4800, 9600
7, 8
1, 2
none, odd, even
HWs, HWf, SWchar, SWline, none
ON, OFF
>common variables Common variables C30...C39.
>prep.dosing elements
power ON prep:
report:
dos.element:
warn.interv.
dos.drive:
Preparation of titration burets.
Warning after power ON.
Report.
Selection of dosing unit.
Warning interval.
Selection of type of dosing unit.
ON, OFF
ON, OFF
internal D0, external D1/D2
5...9999 min, OFF
Dosimat, Dosino
volume DX
cycle DX
dos.rate.DX
fill rate.DX
Parameters for the internal dosing unit
and for 685 Dosimat:
Volume.
Number of cycles.
Dosing rate.
Filling rate.
0...3.5...99 999.99 ml
1...2...9
0.01...150 ml/min, max.
0.01...150 ml/min, max.
output:
len.dos.tub.
diam.dos.tub.
len.asp.tub.
diam.asp.tub.
dos.rate DX
fill rate DX
Parameters for the 700 Dosino:
Location, where liquid is expelled.
Length of the dosing tube.
Diameter of the dosing tube.
Length of the aspiration tube.
Diameter of the aspiration tube.
Dosing rate.
Filling rate.
tip, flask
1.0...40.0...999.9 cm
0.1...2.0...9.9 mm
1.0...25.0...999.9 cm
0.1... 2.0...9.9 mm
0.01...150 ml/min, max.
0.01...150 ml/min, max.
Page 31

Index
736 GP Titrino: Index
29
4 Index
Backup........................................ 8, 26
Balance.............................................5
Burets .............................................10
C-Variables .....................................24
CAL.................................................21
Calculations ................................4, 23
Calibration.......................................21
Card............................................ 8, 25
Configuration................................... 28
Data input...................................... 1, 7
DET................................................. 14
Dialog language ................................1
DOC................................................20
DOS................................................ 19
Dosing unit ...................................... 10
Formula....................................... 4, 23
Internal method memory ............. 7, 26
KFT................................................. 16
Linkage ...........................................22
Manual dosing................................. 11
MEAS.............................................. 21
MET ................................................14
Method memory .............................. 25
- Printing .......................................9
Methods
- Backup .......................................8
- Development ..............................3
- Recalling..................................... 8
- Storing........................................7
Modes .......................................... 12ff
- Selection..................................... 3
- Survey ......................................12
Operands ....................................4, 24
Parameters ...................................14ff
pH Stat............................................17
Printing.............................................. 5
Recall methods .................................8
Report ............................................... 5
- Definitions................................. 23
Result
- Calculation.................................. 4
- Printing .......................................5
- View............................................5
Sample data..............................24, 27
Sample size ......................................5
Selection
- Mode ..........................................3
- Report.........................................5
SET.................................................15
Silo calculation ................................23
Silo memory.................................... 27
STAT............................................... 17
Stop criteria.......................................6
Store methods............................. 7, 25
Summary...........................................2
Survey............................................. 12
Text input ..........................................7
TIP ..................................................22
Titration modes ............................. 12ff
-Survey .......................................12
-Selection...................................... 3
Titration procedure.......................... 22
Titration stop .....................................6
Variables......................................... 24
Weight............................................... 5
 Loading...