MAYTAG MVWB750W, MVWB800V, MVWB450W User Manual

BRAVOS®®AUTOMATIC
WASHER
USE & CARE GUIDE
FOR QUESTIONS ABOUT FEATURES, OPERATION/PERFORMANCE, PARTS, ACCESSORIES OR SERVICE CALL: 1.800.688.9900
OR VISIT OUR WEBSITE AT WWW.MAYTAG.COM
IN CANADA, CALL: 1.800.807.6777
OR VISIT OUR WEBSITE AT WWW.MAYTAG.CA
Quick Start Guide/Washer Use ............ |
pg. 4 |
Para una versión en español, visite: www.whirlpool.com Número de pieza W10092825A
LAVEUSE
AUTOMATIQUE
BRAVOS®®
GUIDE D’UTILISATION ET D’ENTRETIEN
AU CANADA, POUR ASSISTANCE, INSTALLATION OU SERVICE,
COMPOSER LE : 1.800.807.6777
OU VISITER NOTRE SITE INTERNET À
WWW.MAYTAG.CA
Guide de démarrage rapide/Utilisation de la laveuse .... |
pg. 19 |
Table of Contents |
|
WASHER SAFETY........................................................................ |
2 |
BENEFITS AND FEATURES.......................................................... |
3 |
QUICK START GUIDE/washer use.......................................... |
4 |
Starting Your Washer................................................................ |
6 |
Cycles...................................................................................... |
7 |
Additional Features.................................................................. |
8 |
Modifiers.................................................................................. |
8 |
Options.................................................................................... |
9 |
Changing Cycles, Modifiers, and Options................................ |
9 |
Normal Sounds........................................................................ |
9 |
LAUNDRY TIPS......................................................................... |
10 |
WASHER CARE.......................................................................... |
10 |
Cleaning your Washer............................................................ |
10 |
Water Inlet Hoses................................................................... |
11 |
Vacation, Storage, and Moving Care...................................... |
11 |
TROUBLESHOOTING............................................................... |
12 |
Washer and Components....................................................... |
12 |
Washer Operation.................................................................. |
13 |
Clothing Care......................................................................... |
14 |
WARRANTY.............................................................................. |
16 |
Assistance or service........................................ |
Back Cover |
TABLE DES MATIÈRES |
|
|
SÉCURITÉ DE LA LAVEUSE......................................................... |
|
17 |
AVANTAGES ET CARACTÉRISTIQUES........................................ |
|
18 |
GUIDE DE DéMARRAGE RAPIDE/UTILISATION |
|
|
DE LA LAVEUSE.......................................................................... |
|
19 |
Mise en marche de la laveuse.................................................. |
|
21 |
Programmes............................................................................ |
|
22 |
Caractéristiques Supplémentaires............................................ |
|
24 |
Modificateurs.......................................................................... |
|
24 |
Options................................................................................... |
|
25 |
Changement des programmes, modificateurs, et options......... |
25 |
|
Sons normaux.......................................................................... |
|
25 |
CONSEILS DE LESSIVAGE........................................................... |
|
26 |
ENTRETIEN DE LA LAVEUSE...................................................... |
|
26 |
Nettoyage de la laveuse........................................................... |
|
26 |
Tuyaux d’arrivée d’eau............................................................. |
|
27 |
Précautions à prendre avant les vacances, |
|
|
un entreposage, ou un déménagement.................................... |
|
27 |
DÉPANNAGE.............................................................................. |
|
28 |
La laveuse et ses composants................................................... |
|
28 |
Fonctionnement de la laveuse................................................. |
|
30 |
Soin des vêtements.................................................................. |
|
33 |
GARANTIE.................................................................................. |
|
33 |
ASSISTANCE OU SERVICE....................... |
COUVERTURE ARRIÈRE |
|
W10330935A |
1 |
W10332292A - SP |
washER SAFETY
2

BENEFITS AND FEATURES
Your washer has several benefits and features which are summarized here. Some items may not apply to your model.
Benefits
High-Efficiency Wash System
Your new top loading, high-efficiency washer saves you time by allowing you to do fewer, larger loads. It also conserves resources and lowers your water and energy bills by using the following innovations.
INTELLIFILL™ Water Level Control
This washer senses the load size and composition through a series of fills and wash motion. It then adjusts the water level for the best cleaning and rinsing performance. It eliminates the guesswork. The water level is just right for every wash load size.
NOTE: You may notice during a cycle that the wash load is not completely submerged in water. This is normal for your washer.
Auto Temperature Control
The Auto Temperature Control system on this washer electronically senses and maintains a uniform water temperature by regulating incoming water temperatures. Using Auto Temperature Control will help dissolve detergent.
Washer Impeller System
Your new washer works differently than most washers that you may be accustomed to. The most striking difference is that the washer has a washer impeller system. It uses this new innovative washer impeller at the bottom of the wash basket to move your load through a mixture of water and detergent. The load is moved from the outside toward the middle with items coming up in the center and down on the outside edges.
Dispensers
The dispensers make your washer truly automatic. It is unnecessary for you to return to the washer during the cycle to add detergent, bleach, fabric softener, laundry boosters, or oxi. Laundry products are added to the load at the proper time in the wash cycle.
Spin Speeds
This washer is preset to automatically select the spin speed based on the cycle selected. Depending on your wash load, you can change the preset speeds. The spin speed on this washer is nearly twice as fast as that of a conventional washer. You may notice different sounds during a spin cycle because of this higher speed.
High Efficiency (HE) Detergent
This washer is designed for High Efficiency (HE) detergent use only. HE detergents are made to produce the right amount of suds and give the best performance in low water wash systems.
Use only High Efficiency (HE) detergent
Features
Innovative Features
Your new washer includes these features that help to reduce noise, increase the ease of use, and improve wash performance.
Electronic Controls
Electronic controls with preset cycles are easy to use whether you are a beginner or an “expert.”
Quiet Operation
This washer is insulated with sound-dampening materials to reduce washer operation sounds and noises.
Suspension System
To reduce washer “vibration,” “walk,” and “out of balance” conditions, your new washer combines:
■■4 Spring damper struts to isolate vibration
■■Balance ring at the top and bottom of the wash basket to minimize vibration
■■Operating software designed to sense and correct off-balance loads
Clean Washer with AFFRESH™ Cycle
This washer features an easy-to-use Clean Washer with AFFRESH™ cycle that thoroughly cleans the inside of your washing machine using higher water volumes in combination with AFFRESH® washer cleaner or liquid chlorine bleach. The use of AFFRESH® washer cleaner or liquid chlorine bleach with this cycle, will remove and help avoid odor-causing residue.
Stainless Steel Basket
The stainless steel basket is corrosion resistant and enables higher spin speeds for more water extraction, reducing drying time.
Self-clean Wash and Rinse Filter System
This washer filters 100% of the wash and rinse water. The water is filtered then recirculated. The force filter traps sand and dirt,
flushing them down the drain, so they are not redeposited onto the clean clothes.
End Signal - Off - Low - Hi
The End Signal produces an audible sound when the wash cycle is finished. This signal is helpful when you are removing items from the washer as soon as it stops.
Water Save Spray Rinse
This washer is designed to have the option of saving water by using a spray rinse instead of a deep water rinse. This option is the default setting on some cycles. The option is selectable on other cycles. When using fabric softener, always select the Fabric Softener button, or select Extra Rinse; both of these options will dispense fabric softener in a deep rinse.
3
QUICK START GUIDE/WASHER USE
For a summary of how to use your washer following installation, see the QUICK START GUIDE on the next page.
4
QUICK START GUIDE
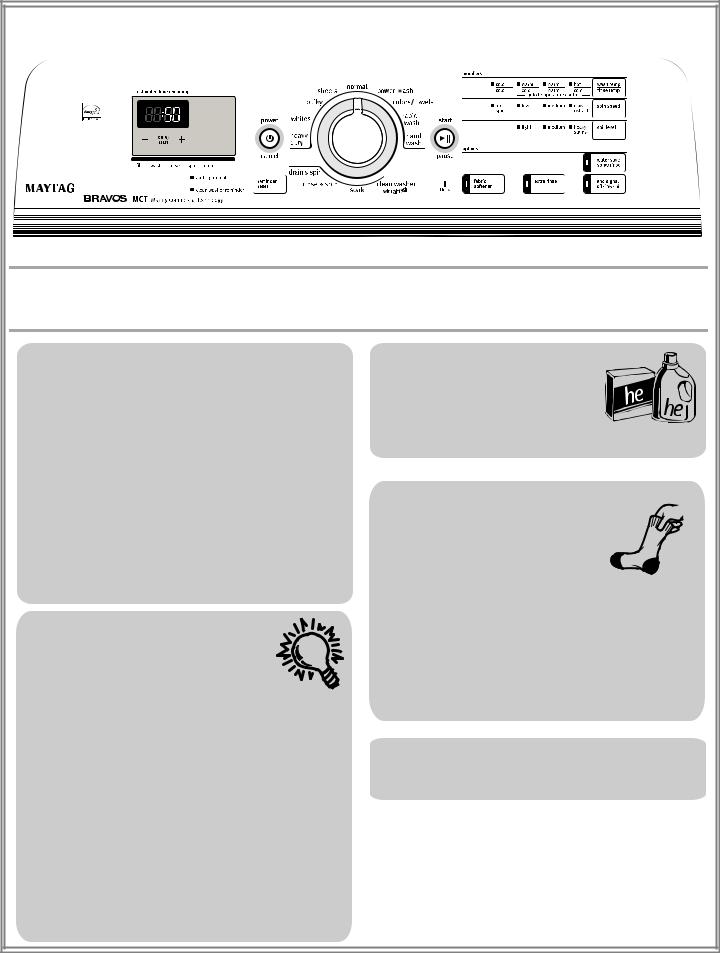
NOTE: The panel shown above may be different from that of your model.
WARNING: To reduce the risk of fire, electric shock, or injury to persons, read the IMPORTANT SAFETY INSTRUCTIONS before operating this appliance.
The following is a guide to using your washer. Please refer to specific sections of this manual for more detailed information.
OPERATING CONTROLS
POWER/CANCEL - Press POWER/CANCEL to turn the washer on or off.
Start - Press START/PAUSE to start your washer after a cycle has been selected. Be sure all desired Modifiers and Options
have been selected. The lid must be closed for the washer to start.
START/PAUSE - Press START/PAUSE to start your washer after a cycle has been selected. Be sure all desired Modifiers and Options have been selected. Press START/PAUSE once to unlock the lid and add a garment. Press START/PAUSE to complete the cycle from where it was stopped. The lid must be closed for the washer to start. Press POWER/CANCEL to stop the wash cycle. The washer will then drain and turn off.
Lid Lock - When the Lid Lock status light glows, the washer lid is locked. The lid must be closed for the washer to Start. NOTE: You must wait until the Lid Lock Light turns off before the lid can be opened.
OPTIONS AND MODIFIERS
You can change Options and Modifiers anytime
before Start/Pause is pressed. Press POWER/CANCEL. Select Wash Cycle.
Select desired OPTIONS and MODIFIERS.
Press START/PAUSE or select DELAY START (on some models) to start wash at a later time.
Changing cycles after pressing Start:
Press POWER/CANCEL once to cancel the cycle. The washer will drain
Select desired Wash Cycle.
Select desired OPTIONS and MODIFIERS.
Press START/PAUSE or select DELAY START (on some models) to start wash at a later time. Washer restarts at the beginning of the new cycle.
NOTE: An error tone will sound if your selection is unavailable.
DETERGENT USE
Use only High Efficiency (HE) detergents.
Using regular detergent will likely result in wash errors, longer cycle times, and reduced rinsing performance.
For more information, see “Using the Proper Detergent.”
ADD A GARMENT, PAUSING, OR RESTARTING THE WASHER
You can place additional clothing in the wash
when the “Add a Garment” status light is glowing without sacrificing wash
performance, at which time, you can:
Press START/PAUSE once. (Lid Lock light turns off, then open the lid.)
Add garments. (Close washer lid.) Press START/PAUSE to restart.
To unlock the lid after the Add a garment period, Press START/PAUSE once. Pressing POWER/CANCEL will cancel the wash cycle.
STOPPING THE WASHER
You can stop the wash cycle and drain the tub by pressing the Power/Cancel button once.
5
Starting Your Washer
■■Your Maytag washer is equipped with an “Auto Wake-up” feature. Press any button or open and close the washer lid, and the display will illuminate. The washer will automatically shut down if a cycle is not selected and started right away.
■■Your Maytag washer will memorize and save all options and modifiers that have been changed during setting mode (exceptions apply to options for Super Wash, Rapid Wash, and Normal cycles. They will default back to factory default settings.)
Using the Proper Detergent
Use only High Efficiency detergents. The package for this type of detergent will be marked “HE” or “High Efficiency.” This wash system, along with less water, will create too much sudsing with a regular non-HE detergent. Using regular detergent will likely result in washer errors, longer cycle times, and reduced
rinsing performance. It may also result in component failures and noticeable mold or mildew. HE detergents are made to produce the right amount of suds for the best performance. Follow the manufacturer’s instructions to determine the amount of detergent to use. Remember, concentrated detergents such as 2x or higher will use less detergent based on load size.
Use only HE detergent.
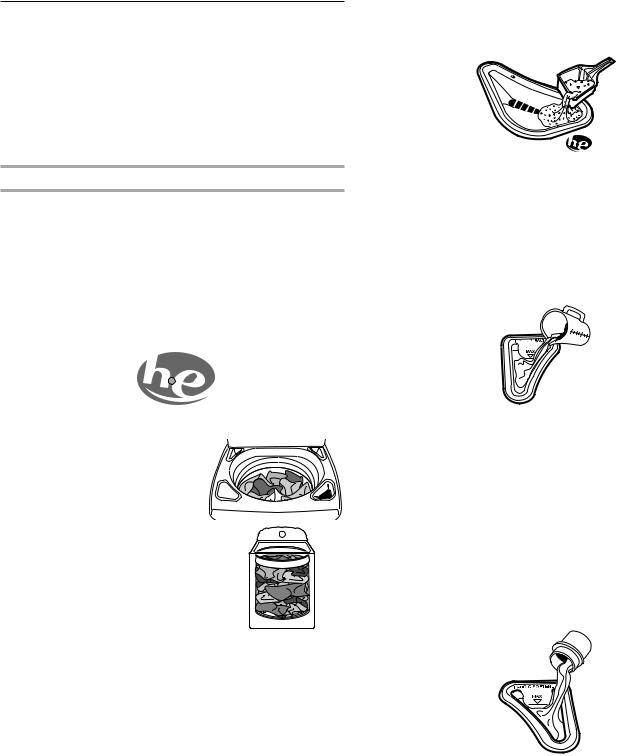
1. Place a load of sorted clothes into the washer. See “Laundry Tips.”
■■ Load evenly to maintain washer balance. Mix large and small items. Items should move easily through the wash water.
■■ Tightly packed loads can cause poor cleaning. Items need to move easily through the wash water.
■■ For best performance, load garments in loose heaps evenly around the basket wall.
2.Pour measured powdered or liquid HE detergent into the High Efficiency detergent dispenser. Always use the detergent
dispenser, and do not put detergent directly onto clothes in the washer.
Use |
Only |
|
High Efficiency Detergent
NOTE: If you do not press Start/Pause within 5 minutes of pressing Power/Cancel, the washer automatically shuts off.
3.Add color-safe bleach (powdered or liquid) to this dispenser, if needed. Be sure to match powdered color-safe bleach with powdered detergent or match liquid color-safe bleach with liquid detergent.
4.Pour measured liquid chlorine bleach into the liquid bleach dispenser, if needed. Bleach is diluted and automatically dispensed at the proper time during the wash cycle.
■■Do not overfill. Do not dilute. Do not use more than 1 cup (250 mL) for a full load. Use less with a smaller load size.
■■ Follow the garment and the chlorine bleach manufacturer’s directions for proper use.
■■ To avoid spilling, use a cup with a pouring spout. Do not let bleach splash, drip, or run down into the washer basket.
■■ At the end of the cycle, a small amount of water may be left in the dispenser. This is normal.
NOTE: Use only liquid chlorine bleach in this dispenser.
5.Pour measured liquid fabric softener into the fabric softener dispenser, if desired.
■■ If you are using fabric softener, be sure to select Fabric Softener from the options to assure proper dispensing.
■■ Do not overfill. Do not dilute. The dispenser holds 3 oz (94 mL), or a capful of fabric softener.
■■ Fabric softener is dispensed in a deep rinse when the Fabric Softener option is selected. If Extra Rinse is selected, the fabric softener will be dispensed during the final rinse.
■■ Do not use fabric softener dispensing balls in this washer. Dispensing balls will not operate correctly with this washer.
■■ Do not spill or drip any fabric softener onto the clothes.
■■ At the end of the cycle, a small amount of water may be left in the dispenser. This is normal.
■■ NOTE: Use only liquid fabric softener in this dispenser.
6
6.Close the washer lid.
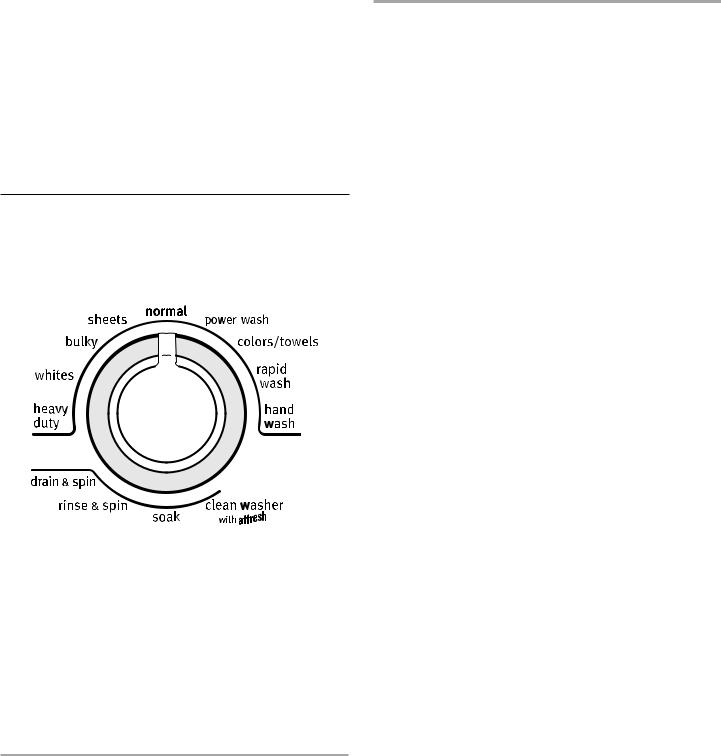
7.Select a Wash Cycle. See “Cycles.”
8.Select the desired Modifiers. See “Modifiers.”
9.Select an Option, if desired. See “Options.” Select Fabric Softener or Extra Rinse option if you are using liquid fabric softener.
10.Select Delay Start, if desired. See “Delay Start” in the “Modifiers” section.
11.Press START/PAUSE. The wash cycle begins, and the display shows the estimated remaining time. The lid will lock.
NOTE: If you do not press Start/Pause within 5 minutes of pressing Power/Cancel, the washer automatically shuts off.
Cycles
Turn the knob to choose the correct wash cycle for the type of fabrics you are washing. When the knob points to a cycle, the cycle and Start/Pause indicator lights will blink. If the default settings for the Modifiers and Options are acceptable, you may press Start/Pause to begin the wash cycle.
Preset Cycle Settings
For ease of use, preset cycle settings provide the recommended fabric care settings for each cycle.
To use the preset cycle settings:
1.Press POWER/CANCEL.
2.Select the cycle you want by turning the knob. The preset cycle settings will be displayed (see following chart).
NOTE: The preset times may vary slightly depending on your model.
3.Press START/PAUSE. The wash cycle will begin.
Preset Cycle Settings
Cycle |
Preset |
Soil Level** |
Wash/Rinse |
|
Minutes* |
|
Temp |
Heavy Duty |
0:52 |
Extra Heavy |
Warm/Cold |
|
|
|
|
Whites |
1:19 |
Extra Heavy |
Hot/Cold |
Bulky |
0:52 |
Heavy |
Warm/Cold |
|
|
|
|
Sheets |
0:49 |
Heavy |
Warm/Cold |
Cycle |
Preset |
Soil Level** |
Wash/Rinse |
|
Minutes* |
|
Temp |
Normal |
0:41 |
Heavy |
Warm/Cold |
Power Wash |
1:09 |
Extra Heavy |
Hot/Cold |
|
|
|
|
Colors/Towels |
0:45 |
Heavy |
Warm/Cold |
Rapid Wash |
0:33 |
Light |
Warm/Warm |
|
|
|
|
Hand Wash |
0:36 |
Light |
Cool/Cold |
|
|
|
|
Clean Washer |
1:02 |
Not |
Not |
with AFFRESH™ |
|
applicable |
applicable |
Soak |
0:31 |
Light |
Cool/Cold |
|
|
|
|
Rinse & Spin |
0:24 |
Not |
Cool/Cold |
|
|
applicable |
|
Drain & Spin |
0:13 |
Not |
Not |
|
|
applicable |
applicable |
*These times are for reference only and may not match your model exactly.
**Cycle time in hours and minutes will appear in the display while you are making selections. The total cycle time will appear, including an estimated time for drain and fill times, once Start/ Pause is pressed.
IMPORTANT: When washing waterproof/water-resistant items such as plastic lined mattress pads, shower curtains, tarps, jackets, or sleeping bags, select the lowest spin speed setting available for the cycle and washer model being used.
Heavy Duty
Use this cycle for heavily soiled or sturdy cotton items. Cycle combines high-speed wash action and high-speed spin. A Water Save Spray Rinse is a preset cycle setting for this cycle.
Whites
This cycle introduces liquid chlorine bleach to the load at the proper time for improved whitening of your heavily soiled white fabrics. This cycle combines high-speed wash action and highspeed spin speed. For maximum soil and stain removal, liquid chlorine bleach can be used in the liquid bleach dispenser. This cycle can also be used for sturdy color fabrics such as towels without liquid chlorine bleach.
Bulky
Use this cycle to wash large items such as comforters, sleeping bags, and blankets. This cycle starts with a soak to thoroughly saturate your large load. This is followed by medium wash action and medium spin speeds to maintain load balance.
Sheets
Use this cycle for sheets, pillowcases, and light blankets or throws. The wash action of this cycle is designed to keep large items from tangling and balling up.
IMPORTANT: For best performance, drop items in loose heaps evenly around the basket wall. Do not load items directly on the impeller for this cycle.
Normal
Use this cycle for normally soiled cottons and mixed fabric loads. This cycle combines high-speed wash action and medium-speed spin. A Water Save Spray Rinse is a preset cycle setting for this cycle.
When washing waterproof/water-resistant items such as plastic lined mattress pads, shower curtains, tarps, jackets, or sleeping bags, select the lowest spin speed setting available for the cycle and washer model being used.
7
Power Wash
Use this special cycle for overly soiled garments and household items that need additional cleaning effort. cycle combines highspeed wash action, medium-speed spin and a deep rinse to flush excess dirt from the load.
Colors/Towels
Use this cycle for lightly soiled, colored clothing or towels. This cycle is also a good choice for garments with a wrinkle free finish. This cycle uses medium-speed wash action and medium-speed spin.
Rapid Wash
Use this cycle to wash small, lightly soiled loads that are needed in a hurry. This short cycle combines high-speed wash action and high-speed spin for the optimal cleaning and shortened dry times. A Water Save Spray Rinse is a preset cycle setting for this cycle.
Hand Wash
This cycle combines low-speed wash and low-speed spin action to clean items labeled as “Machine Washable” on the garment care label. Pre Soak and Deep Clean options are not available in this cycle.
Clean Washer with AFFRESH™
Use the Clean Washer with AFFRESH™ cycle once a month to keep the inside of your washer fresh and clean. This cycle uses a higher water level. Use with AFFRESH® washer cleaner tablet or liquid chlorine bleach to thoroughly clean the inside of your washing machine. This cycle should not be interrupted. See “Cleaning Your Washer.”
IMPORTANT: Do not place garments or other items in the washer during the Clean Washer with AFFRESH™ cycle. Use this cycle with an empty wash tub.
Soak
This cycle is preset for a 31-minute cycle and soak time can be adjusted according to your needs by selecting Soil Level. After the selected soak period has ended, the washer will drain but does not spin the load. At the end of Soak, the washer will drain and wait for a wash cycle to be selected, to complete the cleaning process.
NOTE: Automatic bleach dispensing is not part of the soak cycle.
Rinse & Spin
Use this option to get a deep rinse followed by a high-speed spin. The time display will include an estimate of how long it will take to fill and drain the washer.
When to use RINSE & SPIN:
■■For loads that need rinsing only.
■■For completing a cycle after the power has been off. The machine will return to pause mode if the power was interrupted or unplugged while cycle was running.
Drain & Spin
Drain & Spin may help shorten drying times for some heavy fabrics or special-care items. Drain & Spin may also be used for draining the washer after canceling a cycle or completing a cycle after a power failure.
Additional Features
Indicator lights
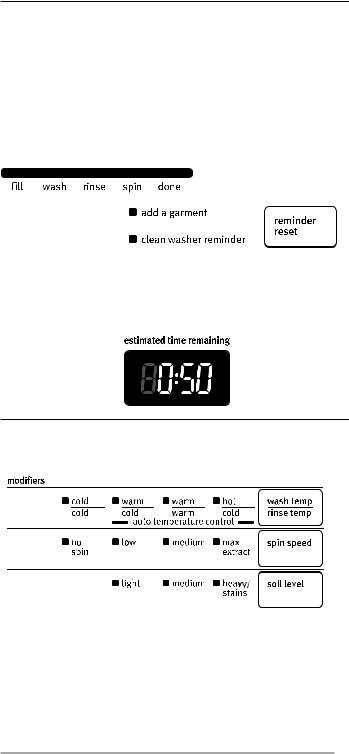
These lights show which portion of the cycle is operating. They also indicate when you can add other garments to the wash load.
Clean Washer Reminder
The Clean Washer Reminder indicator lights after 45 wash cycles without a clean washer cycle. See the “Cleaning your washer” section to run the clean washer cycle, or you can press Remindr Reset button to manually reset clean washer cycle counter.
Estimated Time Remaining
When a wash cycle is started, the estimated time remaining for the cycle, including fills and drains, will be displayed. The time will count down to the end of the cycle.
Modifiers
Modifiers allow you to further customize your cycles and save energy.
Wash Temp/Rinse Temp
Select a water temperature based on the type of load you are washing. Use the warmest wash water safe for fabrics. Follow garment label instructions.
Warm rinses leave the loads drier and more comfortable to handle than cold rinses. However, warm rinses also increase wrinkling. Cold rinses may help with wrinkling and save energy.
Temperature Guide
Wash Water Temperature |
Suggested Fabrics |
|
|
Hot |
Whites and pastels |
|
|
Warm |
Bright colors |
Cold |
Colors that bleed or fade |
NOTE: In wash water temperatures colder than 60°F (15.6°C), detergents do not dissolve well. Soils may be difficult to remove.
Spin Speed
This washer automatically selects the spin speed based on the cycle selected. The preset speeds can be changed. Spin speeds may vary by cycle.
8
Soil Level
Soil Level (wash time) is preset for each wash cycle. See “Preset Cycle Settings” in “Cycles.” As you press the Soil Level pad, the cycle time will increase or decrease in the Estimated Time Remaining display and a different wash time will appear. To get the minimum wash time, press the pad until the indicator light next to Light illuminates. This is the shortest wash time available for that cycle with the wash options selected.
■■For most loads, use the time recommended in the preset cycle settings.
■■For heavy soil and sturdy fabrics, press Soil Level to select more wash time, if needed.
■■For light soil and delicate fabrics, press Soil Level to select less wash time, if needed.
Auto Temperature Control
Auto Temperature Control (ATC) electronically senses and maintains a uniform wash and rinse water temperature. ATC regulates incoming hot and cold water. The ATC is automatically turned On when a cycle is selected. (See “Preset Cycle Settings” in “Cycles.”)
ATC is available with Warm/Warm, Warm/Cold, and Cool/Cold settings. The water temperature in the Hot/Cold and Cold/Cold settings depends on the water temperature at the water inlet faucets.
■■ATC ensures consistent cleaning.
■■Heated water consumes the largest amount of energy that a washer uses.
■■Today’s detergents work well at temperatures above 60°F (15.6°C).
Options
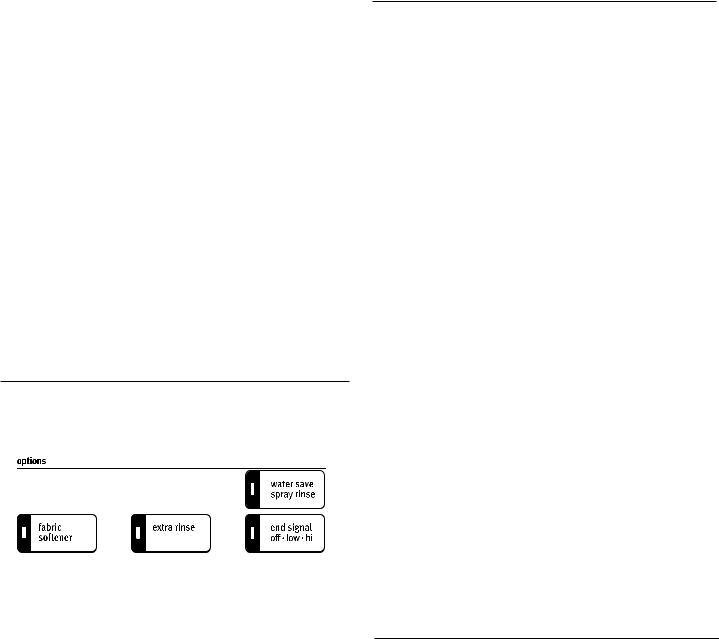
Use these pads to select or deselect the options for your wash cycle. Options may add time to the wash cycle.
Water Save Spray Rinse
The Water Save Spray Rinse option reduces rinse water in the cycle. This option is available on most cycles and must be selected prior to the start of the cycle. Do not use liquid fabric softener with the Water Save Spray Rinse option. Select the Fabric Softener option if using liquid fabric softener to assure proper dispensing.
Fabric Softener
Fabric Softener option must be selected if liquid fabric softener is added to the fabric softener dispenser. Fabric softener will also be dispensed in the last rinse of the Extra Rinse cycle, if selected. This option flushes the dispenser at the correct time in a deep water rinse for optimal distribution.
Extra Rinse
An Extra Rinse can be used to aid in the removal of detergent or bleach residue, or particulates such as sand and lint, from the load. This option provides an additional rinse with the same water temperature as the first rinse. This is the default rinse setting for the Whites cycle.
End Signal - Off - Low - Hi Cycle Volume
The End Signal produces an audible sound when the wash cycle is finished. This signal is helpful when you are removing items from the washer as soon as it stops. Select Off, Low, or Hi for volume sound.
Changing Cycles, Modifiers,
and Options
You can change Cycles, Modifiers, and Options anytime before Start/Pause is pressed. Not all Modifiers and Options are available for all cycles.
■■A short tone sounds when a change is selected. If you press and hold the End Signal option for more than five seconds, all valid beeps will be eliminated. To turn the signals back on, press and hold the End Signal button for five seconds.
■■Three short tones sound if an unavailable combination is selected. The last selection will not be accepted.
■■To return all options and modifiers to Factory Default, press POWER/CANCEL, select Drain & Spin cycle, and then press Extra Rinse, Fabric Softener, Extra Rinse, Fabric Softener within 5 seconds. When done correctly, the 7-segment displays show “Fd” for 3 seconds and then unit returns to Standby Mode.
Changing Cycles after pressing Start
1.Press POWER/CANCEL once to cancel the cycle. The washer will drain.
2. Select the desired wash cycle.
3.Select the desired Modifiers and Options.
4.Press START/PAUSE.
The washer restarts at the beginning of the new cycle.
NOTE: If you do not press Start/Pause within 5 minutes of pausing the washer, the washer automatically shuts off.
Changing Modifiers and Options after pressing Start/Pause
You can change a Modifier or Option anytime before the selected Modifier or Option begins by choosing the desired Modifiers and/ or Options.
NOTE: An error tone will sound if your selection is unavailable.
To manually drain the washer and spin the load
1.Press POWER/CANCEL once to cancel the wash cycle and drain the washer.
2.Turn knob to select DRAIN & SPIN.
3.Press START/PAUSE.
When the spin is complete, the lid unlocks. Items can be removed from the washer.
Normal Sounds
Your new washer may make sounds your old one didn’t. Because the sounds might be unfamiliar, you may be concerned about them. These sounds are normal.
During washing
You will hear spin/spray noise throughout the cycle.
During drain
If water is drained quickly from your washer (depending on your installation), you may hear air being pulled through the pump during the end of draining.
During wash and spin
This washer does not have a transmission. The motor provides direct drive for agitation and spin. You will hear sounds that are
different from those of a conventional washer.
9

laundry tips
Preparing clothes for washing
Follow these recommendations to help you prolong the life of your garments.
■■Use only High Efficiency detergents. The package for this type of detergent will be marked “HE” or “High Efficiency.” This wash system, along with less water, will create too much sudsing with a regular non-HE detergent. Using regular detergent will likely result in washer errors, longer cycle times, and reduced rinsing performance. It may also result
in component failures and noticeable mold or mildew. HE detergents are made to produce the right amount of suds for the best performance. Follow the manufacturer’s instructions to determine the amount of detergent to use. Remember, concentrated detergents such as 2x or higher will use less detergent based on load size.
Use only HE detergent.
■■Close zippers, snaps, and hooks to avoid snagging other items. Tie strings and sashes to avoid tangles.
■■Remove pins, buckles, and other hard objects to avoid scratching the washer interior. Remove non-washable trim and ornaments.
■■Empty pockets and turn them inside out; turn down cuffs. Turn wool and synthetic knits inside out to avoid pilling.
■■Brush away lint and dirt. Treat spots and stains; stained or wet garments should be washed promptly for best results.
■■Mend tears, loose hems, and seams.
Sorting
■■Separate heavily soiled items from lightly soiled ones, even if they would normally be washed together. Separate lintgivers (towels, chenille) from lint-takers (corduroy, synthetics, permanent press). When possible, turn lint-givers inside out.
■■Separate dark colors from light colors, colorfast items from noncolorfast items.
■■Sort by fabric and construction (sturdy cottons, knits, delicate items).
■■Separate bulky, nonabsorbent items such as comforters, pillows, and poly-filled jackets. Use the Bulky cycle for these items.
■■Separate sheets, pillowcases, and light blankets or throws and use the Sheets cycle for these items. For best performance, drop items in loose heaps evenly around the basket wall and do not load items directly on the impeller for this cycle.
■■When washing waterproof/water-resistant items such as plastic lined mattress pads, shower curtains, tarps, jackets, or sleeping bags, select the lowest spin speed setting available for the cycle and washer model being used.
Loading/Unloading
■■For best performance, load garments in loose heaps evenly around the basket wall.
■■Remove clothes from washer after the cycle is completed. Metal objects such as zippers, snaps, and buckles may rust if left in the washer basket for a long time.
WASHER CARE
Cleaning Your Washer
Washer Maintenance Procedure
This washer has a special cycle that uses higher water volumes, in combination with AFFRESH® washer cleaner or liquid chlorine bleach to thoroughly clean the inside of the washer.
NOTES:
■■Read these instructions completely before beginning the cleaning process.
■■After every 45 cycles, the Clean Washer Reminder status light glows. Light can be deactivated by running the Clean Washer with AFFRESH™ cycle or you can press the Reminder Reset button and start the Clean Washer Reminder cycle count over again.
■■It is recommended that you allow the cleanout cycle to complete without interruptions. If necessary, the cleanout cycle may be cancelled by pressing the Power/Cancel button once.
IMPORTANT: If the cleanout cycle is cancelled, run a Rinse & Spin cycle to ensure that all remaining washer cleaner or bleach is rinsed from the washer.
Begin procedure
1.Open the washer lid and remove any clothing or items from the washer.
2.Using the AFFRESH® washer cleaner (Recommended):
Add one AFFRESH® washer cleaner tablet to the washer basket.
If using liquid chlorine bleach:
Add 1 cup (250 mL) liquid chlorine bleach to the bleach dispenser.
NOTE: Do not add any detergent or load to this cleaning cycle. Use of more than 1 cup (250 mL) of bleach will cause product damage over time.
3.Close the lid.
4.Turn Cycle Control knob to Clean Washer with AFFRESH™ cycle.
■■ The Estimated Time Remaining display will show approximately 1:02.
5.Press START/PAUSE.
■■ The cycle will begin and water will dispense in the washer for a moment and pause, then the lid will lock and the cycle will continue.
■■ Once the cleaning cycle has begun, allow the cycle to complete. An estimated cycle time will appear on the display.
10
Always do the following to maintain washer freshness
■■Use only HE detergent when washing a clothes load.
■■Repeat the cleaning procedure monthly, using one AFFRESH® clean washer tablet or 1 cup (250 mL) of liquid chlorine bleach.
■■If the procedure does not sufficiently improve washer freshness, evaluate your installation and usage conditions for other causes.
Cleaning the exterior
Use a soft damp cloth or sponge to wipe up any spills. Occasionally wipe the outside of your washer to keep it looking new. Use mild soap and water. Do not use abrasive products.
Water Inlet Hoses
Replace inlet hoses after 5 years of use to reduce the risk of hose failure. Periodically inspect and replace inlet hoses if bulges, kinks, cuts, wear, or leaks are found.
When replacing your inlet hoses, mark the date of replacement on the label with a permanent marker.
Vacation, Storage, and Moving Care
Install and store your washer where it will not freeze. Because some water may stay in the hoses, freezing can damage your washer. If storing or moving your washer during freezing weather, winterize it.
Non-use or vacation care:
Operate your washer only when you are at home. If you will be on vacation or not using your washer for an extended period of time, you should:
■■Unplug washer or disconnect power.
■■Turn off the water supply to the washer. This helps avoid unintended flooding (due to a water pressure surge) while you are away.
To winterize washer:
1.Shut off both water faucets.
2.Disconnect and drain water inlet hoses.
3.Put 1 qt (1 L) of R.V.-type antifreeze in the basket.
4.Run washer on the Rinse & Spin setting for about 30 seconds to mix the antifreeze and remaining water.
5.Unplug washer or disconnect power.
To use washer again:
1.Flush water pipes and hoses. Reconnect water inlet hoses. Turn on both water faucets.
2.Plug in washer or reconnect power.
3.Run the washer through the Bulky cycle to clean the washer and remove the antifreeze, if used. Use only HE detergent. Use 1/2 the manufacturer’s recommended amount for a medium-size load.
To transport the washer:
1.Shut off both water faucets.
2.Disconnect and drain water inlet hoses.
3.If the washer will be moved during freezing weather, put 1 qt (1 L) of R.V.-type antifreeze in the basket. Run washer on the Rinse & Spin setting for about 30 seconds to mix the antifreeze and remaining water.
4.Disconnect the drain from the drain system.
5.Unplug the power cord.
6.Place the inlet hoses into the basket.
7.Drape the power cord and drain hose over edge into the basket.
8.Place foam packing ring from the original shipping materials in the top of washer. If you do not have the original foam packing ring, place heavy blankets, towels, etc. into basket opening.
Close the lid and put a piece of tape over the lid and down to the front of the washer. Keep lid taped until the washer is placed into the new location.
Reinstalling the washer
1.Follow the “Installation Instructions” to locate, level, and connect the washer.
2.Run the washer through the Bulky cycle to clean the washer and remove the antifreeze, if used. Use only HE detergent. Use 1/2 the manufacturer’s recommended amount for a medium-size load.
11
 Loading...