


Maytag MGT18AL, MGT18AW, MGT21AL, MGT21AW, MMT18AL Owner's Manual
...Top Freezer
Refrigerator
Owner’s
Manual
Keep these instructions for future reference. Be sure this manual stays with refrigerator
Contents |
Electrical Requirements |
Parts and Accessories ................................................ |
2 |
Electrical Requirements .............................................. |
2 |
Model Identification ..................................................... |
2 |
Service ....................................................................... |
3 |
Asure™ Extended Service Plan .................................. |
3 |
Proper Disposal of Your Refrigerator .......................... |
3 |
Installation Instructions ............................................... |
3 |
Space Requirements ............................................... |
3 |
Leveling Refrigerator ............................................... |
3 |
Door Reversal ......................................................... |
4 |
Connect Ice Maker Water Supply Line |
|
(Some models) ....................................................... |
6 |
Installation Checklist ................................................... |
7 |
Controls ...................................................................... |
8 |
Refrigerator and Freezer Controls .............................. |
8 |
Setting Controls ....................................................... |
8 |
Exterior Moisture Control ......................................... |
8 |
Fresh Food Features .................................................. |
8 |
Fresh Food Shelves ................................................ |
8 |
Temperature Controlled Meat Drawer |
|
(Some models) ........................................................ |
9 |
Crisper Drawers (Some models) ............................. |
9 |
Covered Storage Bucket (Some models) ................ |
9 |
Dairy Center (Some models) ................................. |
10 |
Door Buckets......................................................... |
10 |
Door Shelves ......................................................... |
10 |
Freezer Features ...................................................... |
11 |
Automatic Ice Maker (Some models) .................... |
11 |
Reversible Utility Rack(Some models) .................. |
11 |
Wire Shelf ............................................................. |
11 |
Tall Package Retainer (Some models) .................. |
11 |
Care and Cleaning .................................................... |
12 |
General ................................................................. |
12 |
Odor Removal ....................................................... |
12 |
Adhesives .............................................................. |
12 |
Door Gaskets ........................................................ |
12 |
Condenser Coils .................................................... |
12 |
Glass Shelves ....................................................... |
12 |
Light Bulbs ............................................................ |
13 |
Energy Tips .............................................................. |
13 |
Vacation Tips ............................................................ |
13 |
Normal Operating Sounds ........................................ |
14 |
Before Calling For Service ........................................ |
15 |
Warranty ................................................................... |
16 |
Parts and Accessories
Purchase replacement parts and additional accessories (e.g. refrigerator shelves) over the phone. To order accessories for your Amana product, call 1-800-843- 0304 inside U.S.A. or 319-622-5511 outside U.S.A.
!Recognize this symbol as a safety precaution.
! WARNING
To avoid electrical shock which can cause severe personal injury or death, do not, under any circumstances cut or remove the round grounding prong from the plug. Refrigerator must be grounded at all times.
Do not remove warning tag from power cord.
Do not use a two-prong adapter. Do not use an extension cord.
This refrigerator is equipped with a three-prong (grounding) plug for protection against possible shock hazards. If a two-prong wall receptacle is encountered, contact a qualified electrician and have the two-prong wall receptacle replaced with a properly grounded three-prong wall receptacle in accordance with the National Electrical Code.
Refrigerator is designed to operate on a separate 103 to 126 volt, 15 amp., 60 cycle line.
Model Identification
Thank you for purchasing this Amana® refrigerator. Please read this Owner's Manual thoroughly. This manual provides proper maintenance information. Any questions, call the Consumer Affairs Department at
1-800-843-0304 inside U.S.A. and 1-319-622-5511 outside U.S.A.
Complete registration card and promptly return. If registration card is missing, call the Consumer Affairs Department.
When contacting Amana Appliances, provide product information. Product information is on the serial plate, located on (upper left corner, ceiling) of refrigerator section. Record the following information:
Model Number:
Manufacturing Number:
S/N or Serial Number:
Date of purchase:
Dealer’s name and address:
2
Service |
Installation Instructions |
Keep a copy of sales receipt for future reference or in case warranty service is required. Any questions or to locate an authorized servicer, call 1-800-NAT-LSVC (1- 800-628-5782) inside U.S.A. 319-622-5511 outside U.S.A. Warranty service must be performed by an authorized servicer. Amana, also recommends contacting an authorized servicer if service is required after warranty expires.
Asure™ Extended Service
Plan
Amana offers long-term service protection for this new refrigerator. Asure™ Extended Service Plan is specially designed to supplement Amana’s strong warranty. This plan covers parts, labor, and travel charges. Call 1-800- 528-2682 for information.
!DANGER
Proper Disposal of Your
Refrigerator
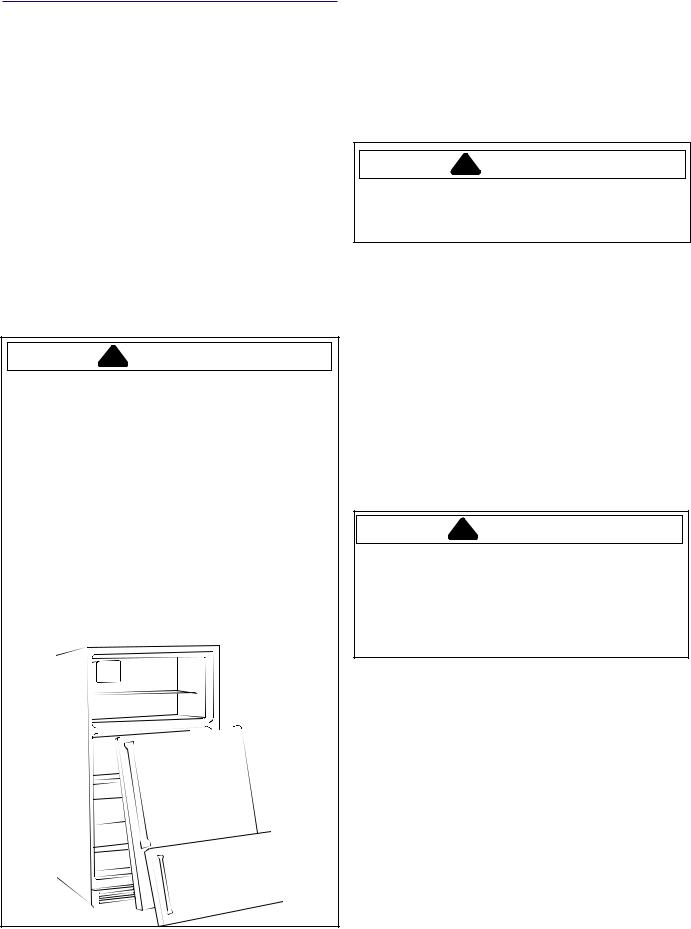
IMPORTANT: Child entrapment and suffocation are not problems of the past. Junked or abandoned refrigerators are still dangerous—even if they will sit for "just a few days." If you are getting rid of your old refrigerator, please follow the instructions below to help prevent accidents.
BEFORE YOU THROW AWAY YOUR OLD REFRIGERATOR OR FREEZER:
•Take off the doors.
•Leave the shelves in place so children may not easily climb inside.
Proper installation will ensure that this refrigerator operates most efficiently. Amana cannot be responsible for improper installation.
Space Requirements
!WARNING
Keep flammable materials and vapors, such as gasoline, away from refrigerator. Failure to do so can result in death, explosion, fire, or burns.
•To ensure proper ventilation for your refrigerator, allow a 1" (2.5 cm) space at the top of your refrigerator.
•If your refrigerator has an ice maker, make sure you allow extra space at the back for the water line connection. The refrigerator can be flush with the back wall if you do not have an ice maker installed.
•If you are installing your refrigerator next to a fixed wall, leave 21/2" (6.5 cm) minimum on each side (depending on your model) to allow the door to swing open 90°.
NOTE: Do not install the refrigerator near an oven, radiator, or other heat source, nor in a location where the temperature will fall below 55°F (13° C).
Leveling Refrigerator
!CAUTION
To avoid property damage, protect soft vinyl or other flooring with cardboard, rugs, or other protective material when moving refrigerator. If model uses stabilizing leg, verify leg is raised before moving refrigerator. Raise stabilizing leg by turning counterclockwise.
Some installations may require door reversal to achieve full door swing. If so proceed to Door Reversal section before leveling your refrigerator.
If your refrigerator requires ice maker water supply connection, proceed to Connect Ice Maker Water Supply section before leveling your refrigerator.
1.Plug in power cord.
2.Move refrigerator into final location.
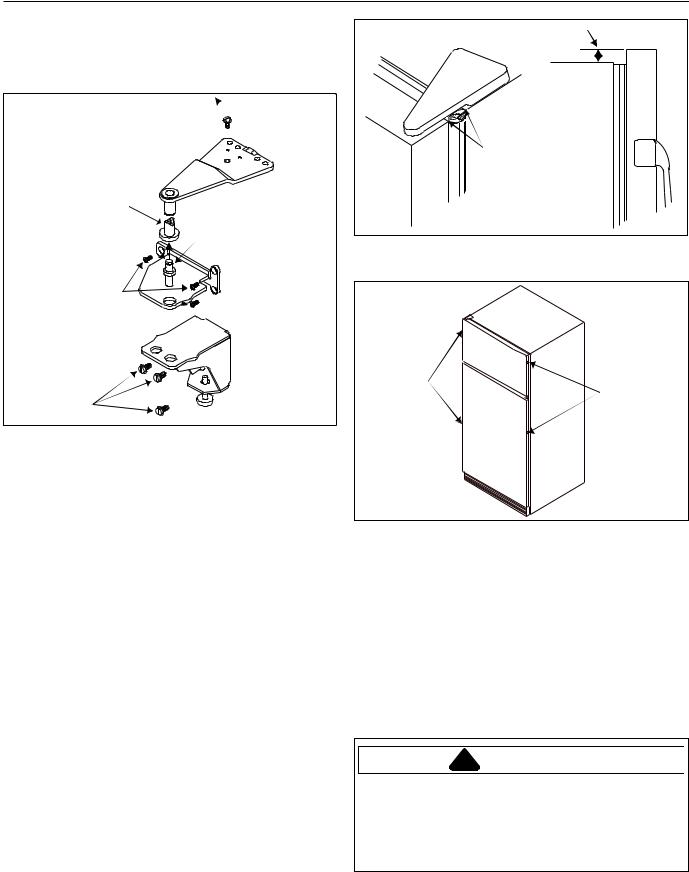
3.Level refrigerator using a level placed on top of the refrigerator.
•Remove toe grille. Remove bottom hinge cover if refrigerator has a stabilizing leg.
•Turn 3/8" hex head roller adjustment screws to raise or lower refrigerator cabinet. Front of refrigerator must be 1/4" (6 mm), or 1/2 bubble on
3

your level, higher than the back of refrigerator.
•Make sure refrigerator cabinet is level from side to side by adjusting left and right roller adjustment screw. Turn stabilizing leg (some models) clockwise until firmly against floor.
Roller adjustment 
 screw
screw
Bottom hinge cover
Stabilizing leg (some models)
Door Reversal
!WARNING
To avoid electrical shock which can cause severe personal injury or death, disconnect power to refrigerator before removing doors. After replacing doors, connect power.
Tools Required
Putty knife (blade covered with masking tape) 9/32" hex nut driver (some models)
5/16" hex nut driver (some models)
3/8" hex nut driver Phillips screwdriver Blade screwdriver
Some installations require door reversal to achieve full door swing. To reverse door swing perform the following steps:
1.Remove and reverse refrigerator and freezer handles performing the following steps:
IMPORTANT: For plug removal requiring use of flat blade screwdriver or putty knife, blade of tool must be covered with masking tape to avoid damage to refrigerator finish. For plugs using a screwdriveror nut driverstyle head, use appropriate tool to avoid damage to plugs.
•Remove handle screw from top handle trim. Pry up edge of handle trim using a putty knife with the blade covered with masking tape. Remove handle from door by removing 2 remaining mounting
screws at each end of handle.
End  cap
cap
Handle  screws
 or
or
End cap
•Models with automatically reversing logo.
Remove end cap from top of freezer handle using a screwdriver with the blade covered with masking tape (see illustration below). Remove one top and two bottom mounting screws.
•Handles with removable logo on handle. Remove screw caps from handles using a screwdriver with the blade covered in masking tape. Remove handle screws to remove freezer handle. Remove freezer handle cover by lifting end. Bend tabs behind nameplate up and remove nameplate. Rotate nameplate and cover.
Handle with
removeablelogologo
End caps
_
Mounting screws
2.Remove top hinge cover. Top hinge cover snaps off. Remove top hinge and shim using hex nut driver.
3.Lift freezer door off center hinge.
4.Lift door closure off center hinge pin. Remove center hinge pin with 5/16" or 9/32" hex nut driver.
5.Remove refrigerator door by lifting off bottom hinge.
6.Remove center hinge bracket and shim using
4
Phillips screwdriver.
7.Remove toe grille and bottom hinge cover. Both snap off.
8.Remove bottom hinge and shim using hex nut driver.
5/16" screws

Top hinge
Door closure
5/16" or  9/32"
9/32" 

Center hinge hex nut
Phillips screws 

Bottom hinge
3/8" screws
Center hinge pin
 Center hinge bracket
9.Reverse doors by performing the following steps:
•Replace bottom hinge and shim on opposite side of cabinet.
•Remove screws from center mullion. Place screws in holes left when center hinge bracket was removed. Rotate center hinge bracket 180° and install center hinge bracket on opposite side of cabinet with hinge screws. Reuse plastic hinge pin washers.
•Place refrigerator door on bottom hinge. Install center hinge pin in center hinge bracket. Place door closure on center hinge pin.
•Remove plugs from top of refrigerator cabinet. Replace plugs in holes left when top hinge was removed. Remove hinge hole cover from freezer door. Replace on opposite side of freezer door.
•Place freezer door on center hinge and door closure. Install top hinge and shims on opposite side of cabinet using hex nut driver. Snap hinge cover in place on hinge.
•Use a penny at top to space door 3/4" (19 mm)
from cabinet. Make sure handle side of door is 1/8" (3 mm) higher than hinge side of door before tightening top hinge screws.
1/8" (3 mm)
3/4" (19 mm)
10.Remove plugs from side of refrigerator and freezer doors.
Install
plugs here
Remove plugs
11.Mount freezer handle on opposite side of refrigerator door using mounting screws previously removed. Snap end cap(s) into place.
12.Mount refrigerator handle on opposite side of freezer door using mounting screws previously removed. Snap end cap(s) into place.
13.Replace plugs in empty side mounting holes on refrigerator doors.
14.Proceed to Leveling Refrigerator procedures for final placement of refrigerator.
Connect Ice Maker Water Supply Line
(Some models)
!CAUTION
To avoid property damage, protect soft vinyl or other flooring with cardboard, rugs, or other protective materials when moving refrigerator. Make sure stabilizing leg is raised before moving refrigerator. Raise stabilizing leg by turning counterclockwise.
5

!CAUTION
Observe the following to avoid property damage:
•Confirm water pressure to water valve is between 20 and 100 pounds per square inch.
•Copper supply tubing must be routed where the temperature is 55°F (13°C) or higher to prevent freeze-ups.
•Start adaptor fitting and nuts by hand to avoid cross threading. Tighten adaptor fitting and nuts with pliers and wrenches. Do not overtighten.
•Check for water leaks and correct if necessary before returning refrigerator to normal location, and 24 hours after connecting.
Important
•Before connecting water supply, contact a plumber to connect copper tubing to household plumbing in compliance with local codes and ordinances.
•DO NOT use self-piercing type or 3/16" saddle valves! Both reduce water flow, develop sediment build-up more rapidly, and may cause leaks if repair is attempted. The correct type of shut-off valve requires a 1/4" hole to be drilled on top or side (not bottom of horizontal pipe) of water supply pipe prior to valve attachment.
Materials Required
1/4" O.D. (6 mm) flexible copper tubing. Length of copper tubing must reach from water supply connection to water valve inlet port on back of refrigerator plus an additional 8 ft. (2 m) of tubing for a service loop. A service loop will allow refrigerator to be pulled away from the wall without disconnecting tubing.
Procedure
1. Remove plastic cap from water valve inlet port.
Water valve inlet port


 Plastic
cap
2.Place brass nut and brass sleeve on copper tubing (Brass nut and sleeve are found in literature packet). Insert copper tubing into water valve inlet port. Connect brass nut on copper tubing to water valve inlet port. Start connection by hand then use a 1/2" (13 mm) open end wrench. Make sure copper tubing is secure by pulling on copper tubing.
|
"P" clamp |
|
Copper tubing |
|
Brass sleeve |
Water valve |
|
inlet port |
Brass nut |
3.Turn on water supply to refrigerator and check for leaks. Correct any leaks at connection. Be careful not to overtighten connection.
4.Create a service loop using extreme care to avoid kinks. Secure copper tubing to refrigerator cabinet with a “P” clamp.
5.Proceed to Leveling Refrigerator for final refrigerator placement.
6.Review Installation Checklist in Owner’s Manual with consumer.
6
 Loading...