


MGR6772BDW
ORDER # 74007065
MAYTAG GEMINI TMGAS RANGE
_ ]VIA_A t3
Installer:Pleaseleavethismanualwith
thisappliance.
Consumer:Pleasereadand keepthis
manualfor futurereference.Keepsales
receiptand/orcancelledcheckasproofof
purchase.
ModelNumber
SerialNumber
DateofPurchase
,,=..._FETY,............... Pages 1-3
'_S_ACECOOKING....... Pages 4"5
_N COOKING......... Pages 6-10
&CLEANING..... Pages 11-14
_EFOREYOUCALL........ Page 15
In ourcontinuingeffortto im-
provethe quality and perfor-
manceof ourcookingproducts,
it may be necessaryto make
changesto theappliancewith-
outrevisingthisguide.
Ifyou havequestions,call:
1-888-4MAYTAG(1-888-462-9824)
1-800-688-2080(U.S.TTYfor
hearingor speechimpaired)
(Mon.-Fri..8 am-8pmEasternTime)
Internet: http://www.maytag.com
Forserviceinformation,see page 17.
__ARRANTY............ Page17
_glDE DEL'UTILISATEUR...Page 18
_;_UiADELUSUARIO....... Page 38
Form No. B/08/02 Part No. 8113P383-60 74007065 ' '" http://www.maytag.com © 2002 Maytag Appliances Sa)es Co.
IMPORTANTSAFETYIFISTRUCTIOFIS
SAFTEYINSTRUCTIONS
Warning and Important Safety Instructions
appearinginthisguidearenotmeantto cover
allpossibleconditionsandsitpationsthatmay
occur.Commonsense,caution,andcaremust
beexercisedwheninstalling,maintaining,or
operatingtheappliance.
Tocheck if deviceis properly installed, look
underneath rangewitha flashlight to make
sure oneof the rear levelinglegs is properly
engaged in the bracketslot.The antHip de-
vice securesthe rear levelinglegto thefloor
whenproperlyengaged.Youshouldcheckthis
anytimetherangehas beenmoved.
Alwayscontact yourdealer,distributor,ser-
viceagent,or manufactureraboutproblems
orconditionsyoudo not understand.
RECOGNIZESAFETYSYMBOLS,WORDS,
ANDLABELS
If the information in this
manual is not followed exactly,
a fire or explosion may result
causing property damage, per-
sonal injury or death.
A WARNING
WARNING - Hazardsor unsafe practices
whichCOULDresultin severepersonalinjury
or death.
A CAUTION I
CAUTION-Hazardsorunsafepracticeswhich
COULDresultin minorpersonalinjury.
Read and follow all instructionsbefore
usingthisappliancetopreventthepotential
riskoffire, electric shock,personalinjury or
damagetothe applianceas a result ofim-
properusageoftheappliance.Useappliance
onlyforitsintendedpurposeas describedin
thisguide.
GENERALINSTRUCTIONS
]
- Do not store or use gasoline or
other flammable vapors and liq-
uids in the vicinityofthis or any
appliance,
- WHAT TO DO IF YOU SMELL
GAS:
• Do not try to light any appli-
ance.
• Do not touch any electrical
switch.
Do not use any phone in your
building.
Immediately call your gas
supplier from a neighbor's
phone. Follow the gas
supplier's instructions.
• If you cannot reach your gas
supplier,call thefire depart-
ment.
- INSTALLATION AND SERVICE
MUST BE PERFORMED BY A
QUALIFIED INSTALLER, SER-
VICE AGENCY OR THE GAS
SUPPLIER.
ALL RANGES CAN
TIP AND CAUSE
INJURIES TO
PERSONS
>" INSTALL ANTI-TIP
DEVICE PACKED Becausegasmayescapefrom your sys-
WITH RANGE
> FOLLOW ALL IN-
STALLATION
INSTRUCTIONS
WARNING:Toreduceriskoftippingof
the appliancefrom abnormalusageor
byexcessive loadingofthe ovendoor,
the appliance must be secured by a
properlyinstalled anti-tip device.
ternwhichmaynot bedetectedby smell
alone,resultingin a potentiallyextremely
dangeroussituation,itisrecommendedby
gassuppliersthatyoupurchaseandinstall
aULapprovedgasdetector(s)inyourhome.
Yourlocalgassuppliercan assist youin
obtaininga gas detector.Please install,
maintainandusethegasdetectorinaccor-
dancewiththe gasdetectormanufacturer's
instructions.
To ensure proper and safe operation:
Appliancemustbeproperlyinstalledand
groundedbya qualifiedtechnician.Donot
attempttoadjust,repair,service,orreplace
anypartofyourapplianceunlessitisspe-
cifically recommended in thisguide.All
otherservicingshouldbe referredto a
qualifiedservicer.Havetheinstallershow
youthelocationofthegasshutoffvalve
andhowtoshut itoffinanemergency.
Alwaysdisconnectpowertoappliancebe-
foreservicing.
TOPREVENTFIREOR
SMOKEDAMAGE
Be sureallpackingmaterialsareremoved
fromthe appliancebeforeoperatingit.
Keepareaaroundapplianceclearandfree
fromcombustiblematerials,gasoline,and
otherflammablevaporsandmaterials.
If appliance is installed near a window,
properprecautionsshouldbetakentopre-
vent curtainsfrom blowingoverburners.
NEVER leaveany itemson the cooktop.
The hotairfromthe ventmayigniteflam-
mableitemsand may increasepressure
in closed containers which may cause
them to burst.
Manyaerosol-typespraycansareEXPLO-
SIVEwhenexposedto heatand maybe
highlyflammable.Avoidtheiruseor stor-
age nearan appliance.
Manyplasticsarevulnerableto heat.Keep
plasticsawayfrom partsof the appliance
that maybecomewarmorhot.Donotleave
plasticitemson the cooktopas theymay
meltorsofteniflefttoo closeto theventor
a lightedsurfaceburner.
Toeliminatethehazard of reachingover
hot surface burners, cabinet storage
should not be provided directly abovea
unit.Ifstorageisprovided,it shouldbelira-
ited to itemswhichare usedinfrequently
andwhicharesafelystoredinanareasub-
jectedtoheatfromanappliance.Tempera-
tures maybe unsafeforsomeitems,such
as volatileliquids, cleanersor aerosol
sprays.
INCASEOfFIRE
Turnoffapplianceandventilatinghoodtoavoid
spreadingtheflame.Extinguishflamethenturn
on hoodto removesmokeandodor.
_-Cooktop: Smotherfire or flame in a pan
withalidor cookiesheet.
NEVERpickupor movea flamingpan.
_-Oven: Smotherfireor flamebyclosingthe
ovendoor.
Donot usewaterongreasefires.Usebaking
soda,adrychemicalorfoam-typeextinguisher
tosmotherfireorflame.
CHILDSAFETY
NEVERleavechildrenaloneor unsupervised
inareawhereapplianceis in useor isstJlJhot.
NEVERallowchildrentositorstandonanypart
ofapplianceastheycouldbeinjuredor burned.
NEVERstoreitemsofinteresttochildrenin
cabinetsaboveanapplianceoronbackguard
ofa range.Childrenclimbingonappliance,
doorordrawertoreachitemscoulddamage
applianceorbeburnedorseriouslyinjured.
Childrenmustbetaughtthattheapplianceand
utensilsinor onitcanbehot.Lethotutensils
coolin a safeplace,outof reachofsmallchil-
dren.Childrenshouldbetaughtthat anappli-
anceisnotatoy.Childrenshouldnotbeallowed
toplaywithcontrolsor otherpartsoftheunit.
ABOUTYOURAPPLIANCE
NEVERuseappliancedoor,or drawer,if
equipped,as a stepstoolor seat as this
mayresultinpossibletippingofthe appli-
ance,damagetotheappliance,andseri-
oosinjuries.
NEVERuseapplianceasaspace heaterto
heatorwarmaroomtopreventpotentialhaz-
ardtotheuseranddamageto the appliance.
Also,do not use thecooktopor oven as a
storageareaforfoodorcookingutensils.
Do notobstructthe flowof combustionand
ventilationair by blockingthe oven vent or
airintakes.Restrictionofairflowtotheburner
preventsproperperformanceand increases
carbonmonoxideemissionto unsafelevels.
Theovenventislocatedatthebaseofthe
controlpanel.
Avoidtouchingovenventareawhileovenis
onandforseveralminutesafterovenisturned
off.Some partsof theventandsurrounding
areabecomehot enoughto causeburns.Af-
ter ovenisturnedoff,do nottouchthe oven
ventorsurroundingareasuntiltheyhavehad
sufficienttimeto cool
Donottouchahotovenlightbulbwithadamp
clothasthebulbcouldbreak.Shouldthebulb
break,disconnectpowertotheappliancebe-
foreremovingbulbto avoidelectricalshock.
Other potentially hot surfaces include:
Cooktop,areasfacingtheceoktop,ovenvent
and surfaces near the ventopening,oven
door,areasaroundthe door and ovenwin-
dow.
COOKINGSAFETY
Alwaysplacea panona surfaceburnerbe-
fore turningiton. Be sure you knowwhich
knob controls which surface burner.Make
surethecorrectburneristurnedonandthat
theburnerhasignited.Whencookingiscom-
pleted,turn burneroff beforeremovingpan
to preventexposureto burnerflame.
Alwaysadjustsurfaceburnerflamesothatit
doesnotextendbeyondthebottomedgeof
the pan.An excessiveflame is hazardous,
wastesenergyandmay damagethe appli-
ance,panor cabinetsabovetheappliance.
NEVER leave a surfacecookingoperation
unattendedespeciallywhenusingahighheat
setting or when deep fat frying. Boilovers
causesmokingandgreasyspilloversmayig-
nite.Cleanup greasyspillsassoonaspos-
sible.Donot usehighheatforextendedcook-
ingoperations.
NEVERheatan unopenedcontaineronthe
surfaceburnerorintheoven.Pressurebuild-
up maycausecontainerto burstresultingin
seriouspersonalinjuryordamagetotheap-
pliance.
Usedry,sturdy potholders.Damppotholders
may causeburnsfromsteam.Dishtowelsor
other substitutes should never be used as
potholdersbecausethey can trail across hot
surfaceburners and igniteor get caught on
applianceparts.
Alwaysletquantitiesof hotfat usedfor deep
fat frying coot before attemptingto move or
handle.
Donot letcookinggreaseorotherflammable
materialsaccumulateinorneartheappliance,
hoodorventfan.Cleanhoodfrequentlyto pre-
vent greasefromaccumulating on hood or
filter.Whenflamingfoodsunderthehoodturn
thefanon.
NEVER wear garmentsmadeof flammable
materialorloosefittingorlong-sleevedapparel
while cooking.Clothingmayigniteor catch
utensilhandles.
OVENS
Alwaysplaceovenracksin the desiredposi-
tionswhileoveniscool.Slideovenrackoutto
add or remove food, using dry, sturdy
potholders.Alwaysavoidreaching into the
ovento add orremovefood.ifa rackmustbe
movedwhilehot, usea drypotholder.Always
turnthe ovenoffattheendofcooking.
Usecarewhenopeningtheovendoor.Lethot
air or steamescapebeforemovingor replac-
ingfood.
PREPAREDFOODWARNING:Followfood
manufacturer'sinstructions.Ifa plasticfrozen
foodcontainerand/oritscoverdistorts,warps,
or is otherwisedamagedduringcooking,ira-
mediatelydiscardthe food andits container.
Thefoodcouldbe contaminated.
NEVERusealuminumfoiltocoverovenracks
or oven bottom.Thiscould result in risk of
electricshock, fire, or damageto the appli-
ance.Usefoil only as directedinthis guide.
UTENSILSAFETY
Use pans withflat bottomsand handlesthat
areeasily graspedandstaycool.Avoidusing
unstable, warped, easily tipped or loose-
handledpans.Also avoidusing pans, espe-
cia[lysmallpans,withheavyhandlesasthey
IMPORTAHTSAFETYIHSTRUCTIOHS,cont.
couldbe unstableandeasilytip.Pansthatare
heavytomovewhenfilled withfoodmayalso
be hazardous.
Be sure utensil is large enough to properly
contain food and avoidboilovers.Pansize is
particularlyimportantindeepfatfrying.Besure
panwillaccommodatethevolumeoffoodthat
istobe addedaswellas thebubbleactionof
fat.
Tominimizeburns,ignitionofflammablema-
terials and spillagedue to unintentionalcon-
tact withthe utensil,do not extend handles
overadjacentsurfaceburners.Alwaysturnpan
handlestowardtheside or back oftheappli-
ance, not out into the room where they are
easilyhit or reachedbysmall children.
Neverleta panboildry as this coulddamage
theutensiland theappliance.
Follow the manufacturer's directions when
usingovencookingbags.
Only certain types of glass, glass/ceramic,
ceramic or glazed utensils are suitable for
cooktopor ovenusagewithout breakingdue
to the suddenchange in temperature.Follow
manufacturer'sinstructionswhenusingglass.
This appliance has been tested forsafeper-
formanceusingconventionalcookware.Donot
useany devicesor accessoriesthat are not
specificallyrecommendedinthisguide.Do not
useeyelidcoversforthesurfaceunits,stovetop
grills,oradd-onovenconvectionsystems.The
use of devicesor accessories that are not
expressly recommended in this manual can
create serious safetyhazards, result inper-
formance problems, and reduce the life of
the components of the appliance.
CLEANINGSAFETY
Turn off all controlsand waitfor appliance
parts to cool before touching or cleaning
them. Do not touch the burner grates or
surroundingareasuntiltheyhave had suffi-
cienttimeto cool.
Clean appliancewith caution. Use care to
avoidsteambums ifawetspongeorclothis
usedto wipe spills on a hot surface.Some
cleanerscan producenoxiousfumes if ap-
pliedto a hotsurface.
SELF-CLEANINGOVENS
Cleanonly parts listedin thisguide.Donot
cleandoorgasket.Thedoorgasketisessen-
tialforagoodseal.Careshouldbetakennot
to rub,damage,or movethe gasket.Donot
useovencleanersofany kindin oraround
anypartoftheself-cleanoven.
Beforeself-cleaningtheoven,removebroiler
pan,ovenracksandother utensilsandwipe
upexcessivespilloverstopreventexcessive
smoke,flare-upsorflaming.
CAUTION: Do not leave food or cooking
utensils,etc.intheovenduringtheself-clean
cycle.
It is normalfor the cooktopofthe range to
becomehotduringa serf-cleancycle.There-
fore, touching the cooktop during a clean
cycleshould beavoided.
IMPORTANTSAFETYNOTICE
ANDWARNING
The California Safe Drinking Water and
ToxicEnforcementActof198G(Proposition
65) requiresthe Governorof Californiato
publisha list of substancesknownto the
StateofCalrfomiatocausecancerorrepro-
ductivehan_, and requiresbusinessesto
warncustomersof potentialexposuresto
suchsubstances.
Usersof thisapplianceare herebywarned
thattheburningofgascanresultinlow-level
exposuretosomeofthelistedsubstances,
includingbenzene,formaldehydeandsoot,
dueprimarilytothe incompletecombustion
ofnaturalgasor liquidpetroleum(LP)fuels.
Proporlyadjustedburnerswillminimizein-
completecombustion. Exposureto these
substancescanalsobeminimizedbyprop
erlyventingthe burnersto the outdoors.
Usersof thisapplianceare herebywarned
that when it is engaged in the self-clean
cycle,there maybe lowlevel exposureto
some of the listed substances,including
carbonmonoxide.Exposurecan be mini-
mizedby properlyventing the ovento the
outdoorsduringtheserf-cleancyclebyopen-
ingawindowand/ordoorintheroomwhere
theapplianceis located.
IMPORTANTNOTICEREGARDINGPET
BIRDS:Neverkeeppetbirdsinthekitchen
orinroomswherethefumesfromthekitchen
could reach.Birdshavea very sensitive
respiratorysystem.Fumesreleasedduring
anovenserf-cleaningcyclemaybeharmful
or fatal to birds.Fumesreleaseddueto
overheatedcookingoil,fat,margarineand
overheatednon-stickcookwaremay be
equallyharmful.
3
SAVETHESEINSTRUCTIONSFORFUTUREREFERENCE
SURFACECOOKING
SURFACECONTROLS
I Ifflame shouldgooutduringa cooking
operation,turntheburneroff. Ifa strong
gasodorisdetected,openawindowand
wait five minutesbefore relightingthe
burner.
| Besureallsurfacecontrolsaresetinthe
OFFpositionpriortosupplyinggastothe
range.
I NEVERtouchcooktopuntilithascooled.
Expectsomepartsof thecooktop,espe-
cially aroundthe burners, to become
warmorhotduringcookingorself-clean-
ing.Usepotholderstoprotecthands.
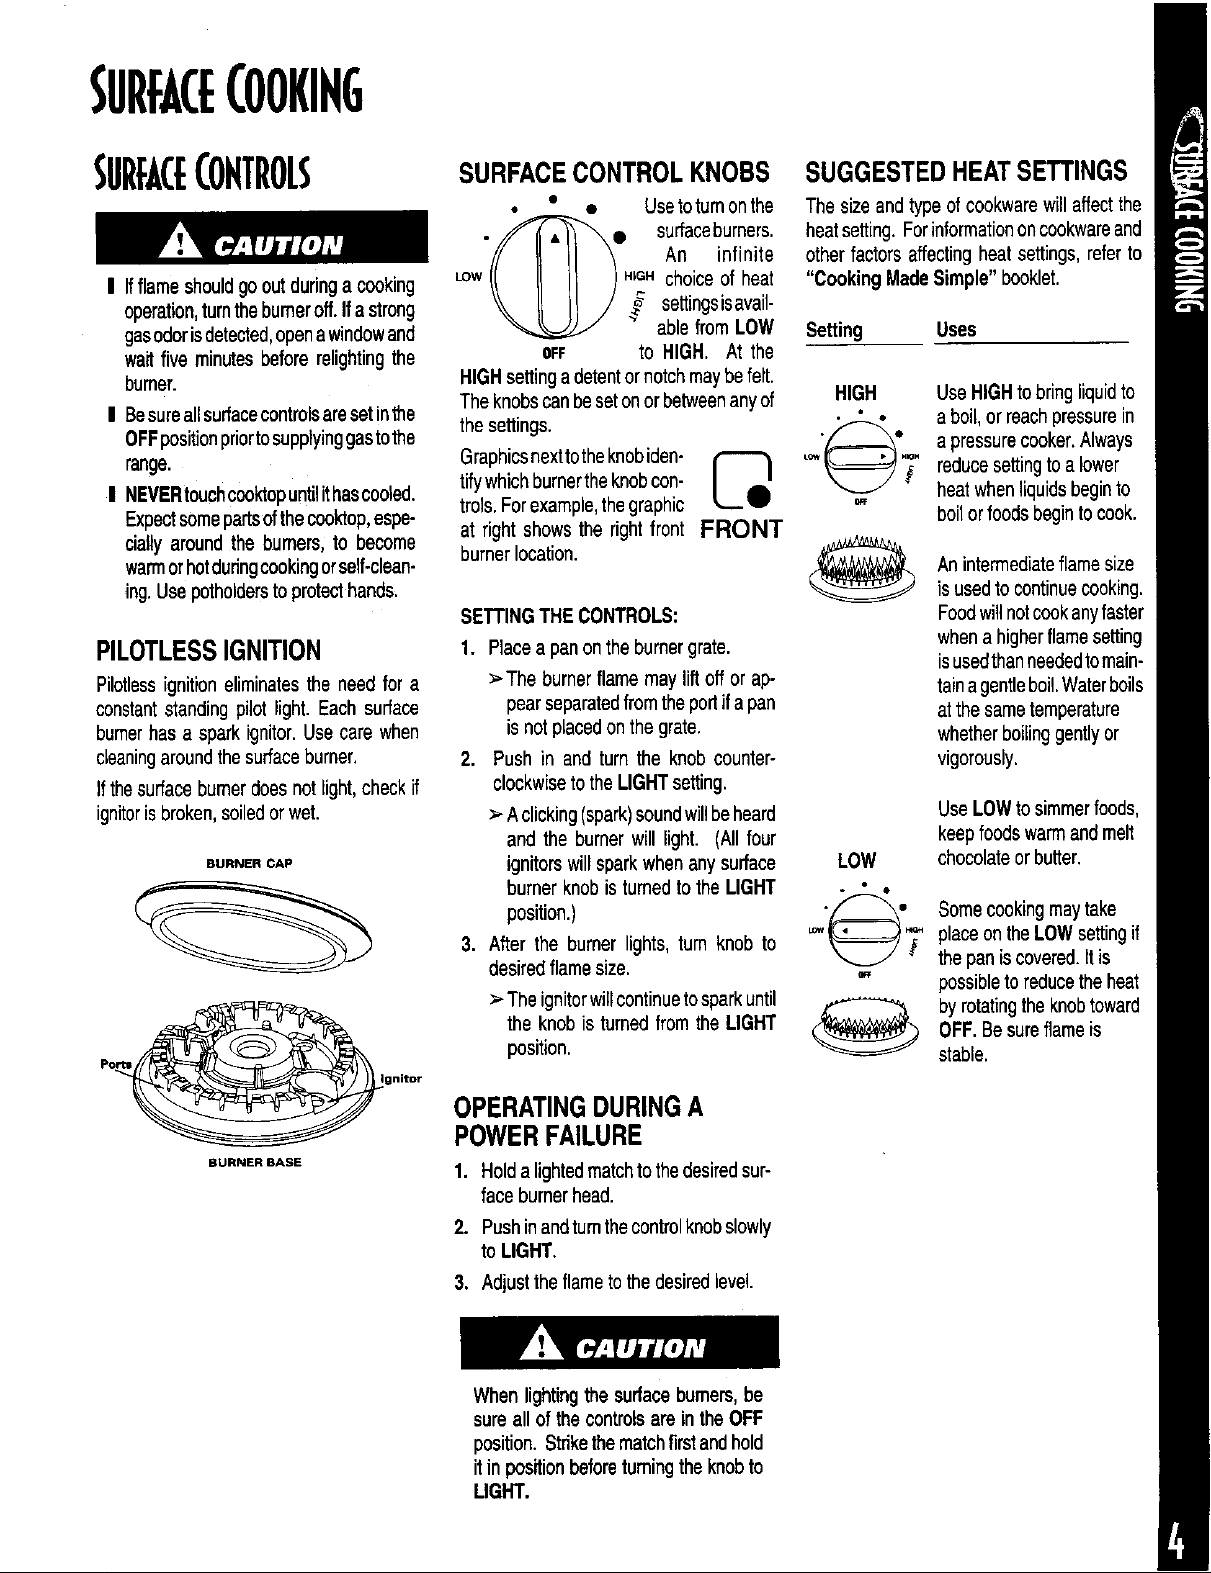
PILOTLESSIGNITION
Pilotlessignitioneliminatesthe need fora
constantstanding pilot light. Each surface
burnerhas a spark ignitor.Use care when
cleaningaroundthe surfaceburner.
If thesurfaceburnerdoesnotlight,checkif
ignitorisbroken,soiledor wet.
BURNER CAP
P°_g nit°r
BURNER BASE
SURFACECONTROLKNOBS SUGGESTEDHEATSETTINGS
• • Usetotumonthe
surfaceburners.
An infinite
choice of heat
settingsisavail-
able from LOW
Setting Uses
oFF to HIGH. At the
HIGHsettingadetentornotchmaybefelt,
Theknobscanbesetonorbetweenanyof HIGH
the settings.
Graphicsnexttotheknobiden- _ .....
tifywhichburnertheknobcon-
trois.Forexample,thegraphic
at right shows the rightfront FRONT
burnerlocation.
SETrlNG THE CONTROLS:
1. Placea panonthe burnergrate.
>-The burnerflame may lift off or ap-
pearseparatedfromthe portif a pan
is notplacedonthe grate.
2. Push in and turn the knob counter-
clockwiseto theLIGHTsetting.
>-Aclicking(spark)soundwillbeheard
and the burner will light. (All four
ignitorswillsparkwhenany surface LOW
burner knob is turned to the LIGHT
position.) _,'_" " "
3. Afterthe burner lights,turn knob to _ 7"
desiredflamesize. _.,
>-Theignitorwillcontinuetosparkuntil
the knobis turned from the LIGHT
position.
The sizeand typeofcookwarewillaffectthe
heatsetting. Forinformationoncookwareand
other factorsaffecting heatsettings, refer to
"Cooking MadeSimple"booklet.
UseHIGHtobringliquidto
a boil,or reachpressurein
a pressurecooker.Always
reducesettingtoa lower
heatwhenliquidsbeginto
boilorfoodsbeginto cook.
An intermediateflamesize
is usedtocontinuecooking.
Foodwillnotcookanyfaster
whena higherflamesetting
isusedthanneededtomain-
tainagentleboil.Waterboils
atthe sametemperature
whetherboilinggentlyor
vigorously.
UseLOWto simmerfoods,
keepfoodswarmand melt
chocolateorbutter.
Somecookingmaytake
placeontheLOWsettingif
the paniscovered.It is
possibleto reducethe heat
byrotatingtheknobtoward
OFF.Besureflameis
stable.
OPERATINGDURINGA
POWERFAILURE
1, Holda lightedmatchtothedesiredsur-
faceburnerhead.
2. Pushinandturnthecontrolknobslowly
toLIGHT.
3. Adjustthe flametothedesiredlevel
Whenlightingthe surfacebumem,be
sureallof the controlsare inthe OFF
position. Strikethematchfirstandhold
it in positionbeforetuming theknobto
LIGHT.
SURFACECOOKING,CONT.
COOKTOP
To preventthecooktopfromdiscol-
oringorstaining:
I Cleancooktopafter eachuse.
I Wipeacidicorsugaryspillsassoon
asthe cooktophascooledasthese
spillsmay discolorthe porcelain.
HIGHPERFORMANCE
BURNER*
Thereisonehighspeedburner i_
on your range,locatedin the
leftfrontposition. Thisburner
offers higher speed cooking POWER
that can be used to quickly BOOST
bringwater to a boil andfor large-quantity
cooking.
Unlikea rangewithstandardgas burners,
thiscooldopdoesnot lift-upnorisitremov-
able. Donot attemptto lift the cooktop
for anyreason.
SEALEDBURNERS
The sealedburnersof your range are se-
curedto the cooktopandare notdesigned
to be removed. Since the burners are
sealedintothe cooktop,boiloversor spills
willnotseepunderneaththe cooktop.
However,the burner should be cleaned
after each use. The head portion of the
burnerhasa removablecap thatis easily
removedfor cleaning. (See page 12 for
cleaningdirections.)
Bumercapsmustbecorrectlyplacedonthe
burner base for proper operation of the
burner.
SIMMERBURNER*
This burnerislocatedin the (--('3
rightrear position.Thesim-
U
merburneroffersalowerBTU
flamefor delicatesauces or SIMMER
meltingchocolate.
*BTUratingswillvarywhenusingLPgas.
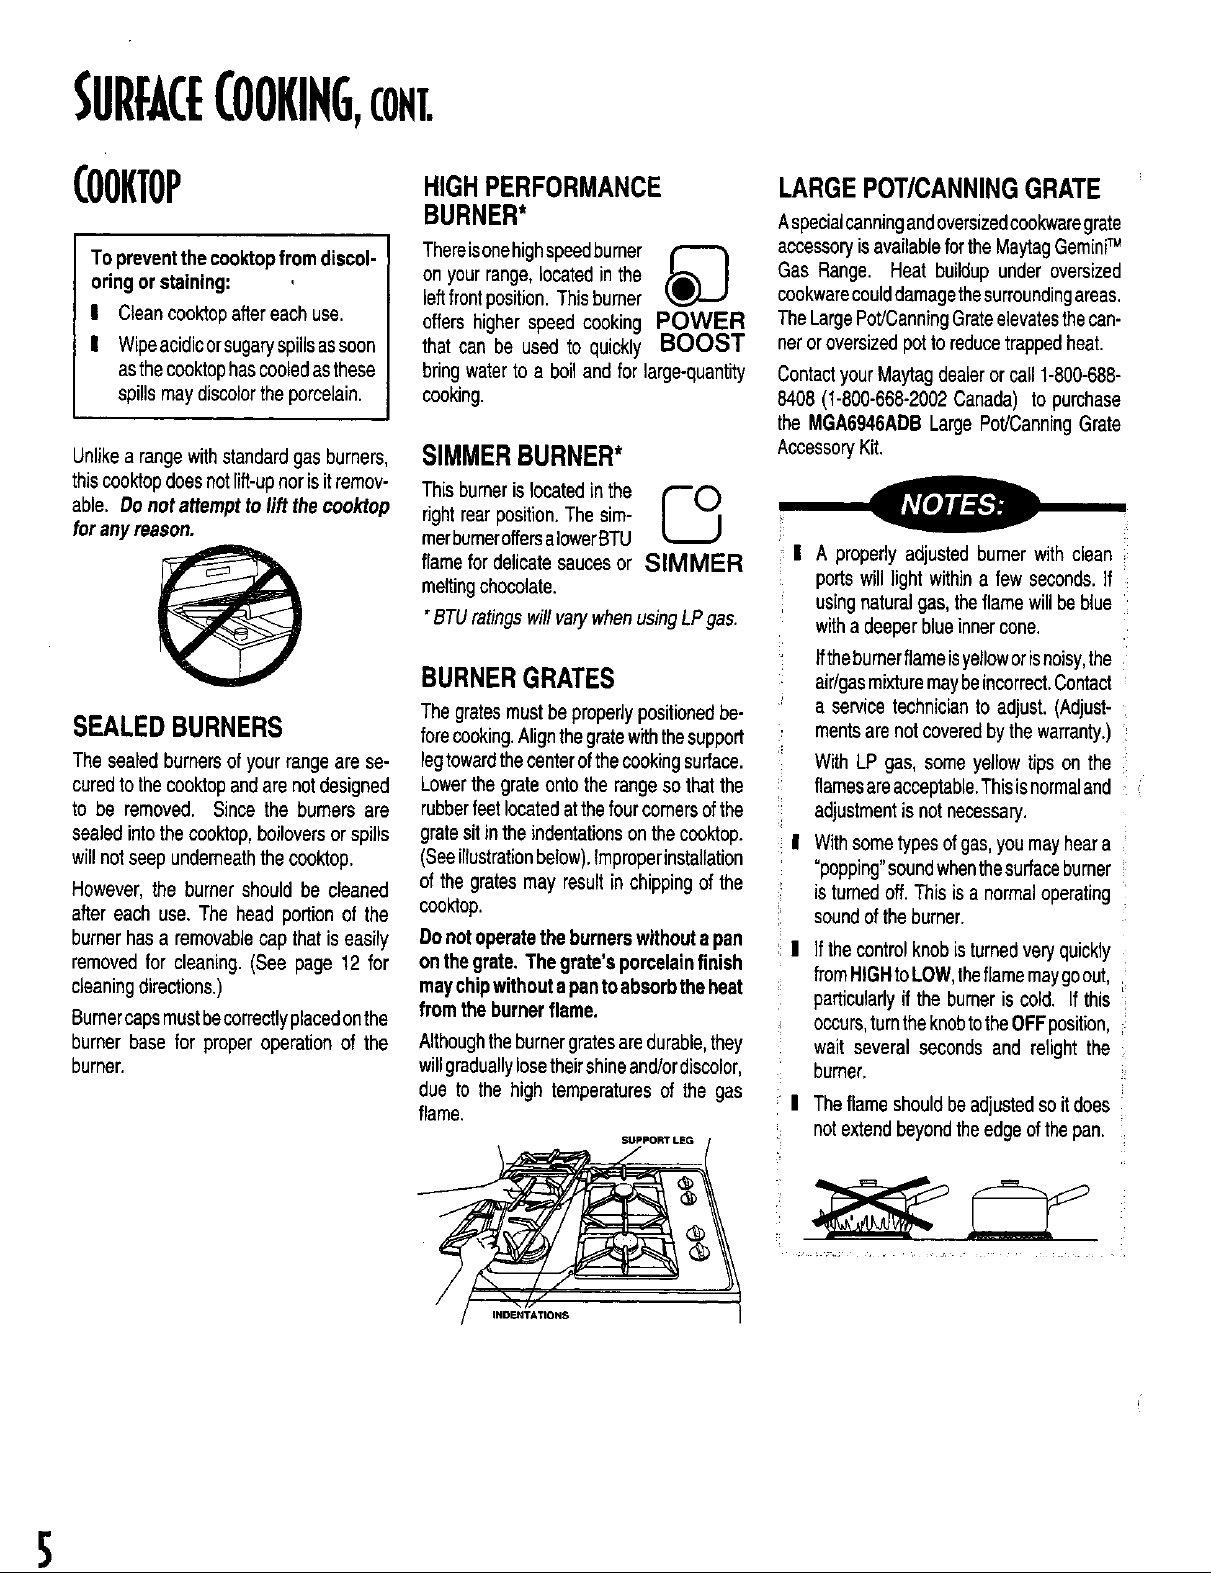
BURNERGRATES
Thegratesmustbe properlypositionedbe-
forecooking.Alignthegratewiththesupport
legtowardthecenterofthecookingsurface.
Lowerthe grate onto the rangesothat the
rubberfeetlocatedatthefourcomersofthe
gratesit inthe indentationsonthecooktop.
(Seeillustrationbelow).Improperinstallation
of the gratesmay resultinchipping of the
cooktop.
Donotoperatethe burnerswithoutapan
onthe grate. Thegrate'sporcelainfinish
maychipwithouta pantoabsorbtheheat
fromthe burnerflame.
Althoughtheburnergratesaredurable,they
willgraduallylosetheirshineand/ordiscolor,
due to the high temperatures of the gas
flame.
SUPPORT LE_
IND _
LARGEPOT/CANNINGGRATE
Aspecialcanningandoversizedcookwaregrate
accessoryisavailablefortheMaytagGeminiTM
Gas Range. Heat buildup under oversized
cookwarecoulddamagethesurroundingareas.
TheLargePot/CanningGrateelevatesthecan-
ner oroversizedpot to reducetrappedheat.
ContactyourMaytagdealeror call 1-800-688-
8408 (1-800-668-2002Canada) to purchase
the MGA6946ADBLargePot/CanningGrate
AccessoryKit.
A properly adjusted burner with clean
ports will light withina few seconds.If
usingnaturalgas, theflame willbeblue
witha deeperblueinnercone.
Ifthebumetflameisyelloworisnoisy,the
air/gasmixturemaybeincorrect.Contact
a service technicianto adjust. (Adjust-
mentsare notcoveredbythewarranty.)
With LP gas, some yellow tips on the
flamesareacceptable.Thisisnormaland
adjustmentis notnecessary.
Withsometypesofgas,you mayheara
°popping"soundwhenthesurfaceburner
isturnedoff.This is a normaloperating
soundoftheburner.
Ifthe controlknobisturned veryquickly
fromHiGHtoLOW,theflamemaygoout,
particularlyif the burneris cold. If this
occurs,turntheknobtotheOFFposition,
wait several seconds and relight the :
burner.
Theflameshouldbeadjustedsoitdoes '
notextendbeyondtheedge ofthepan.
S
OVENCOOKING
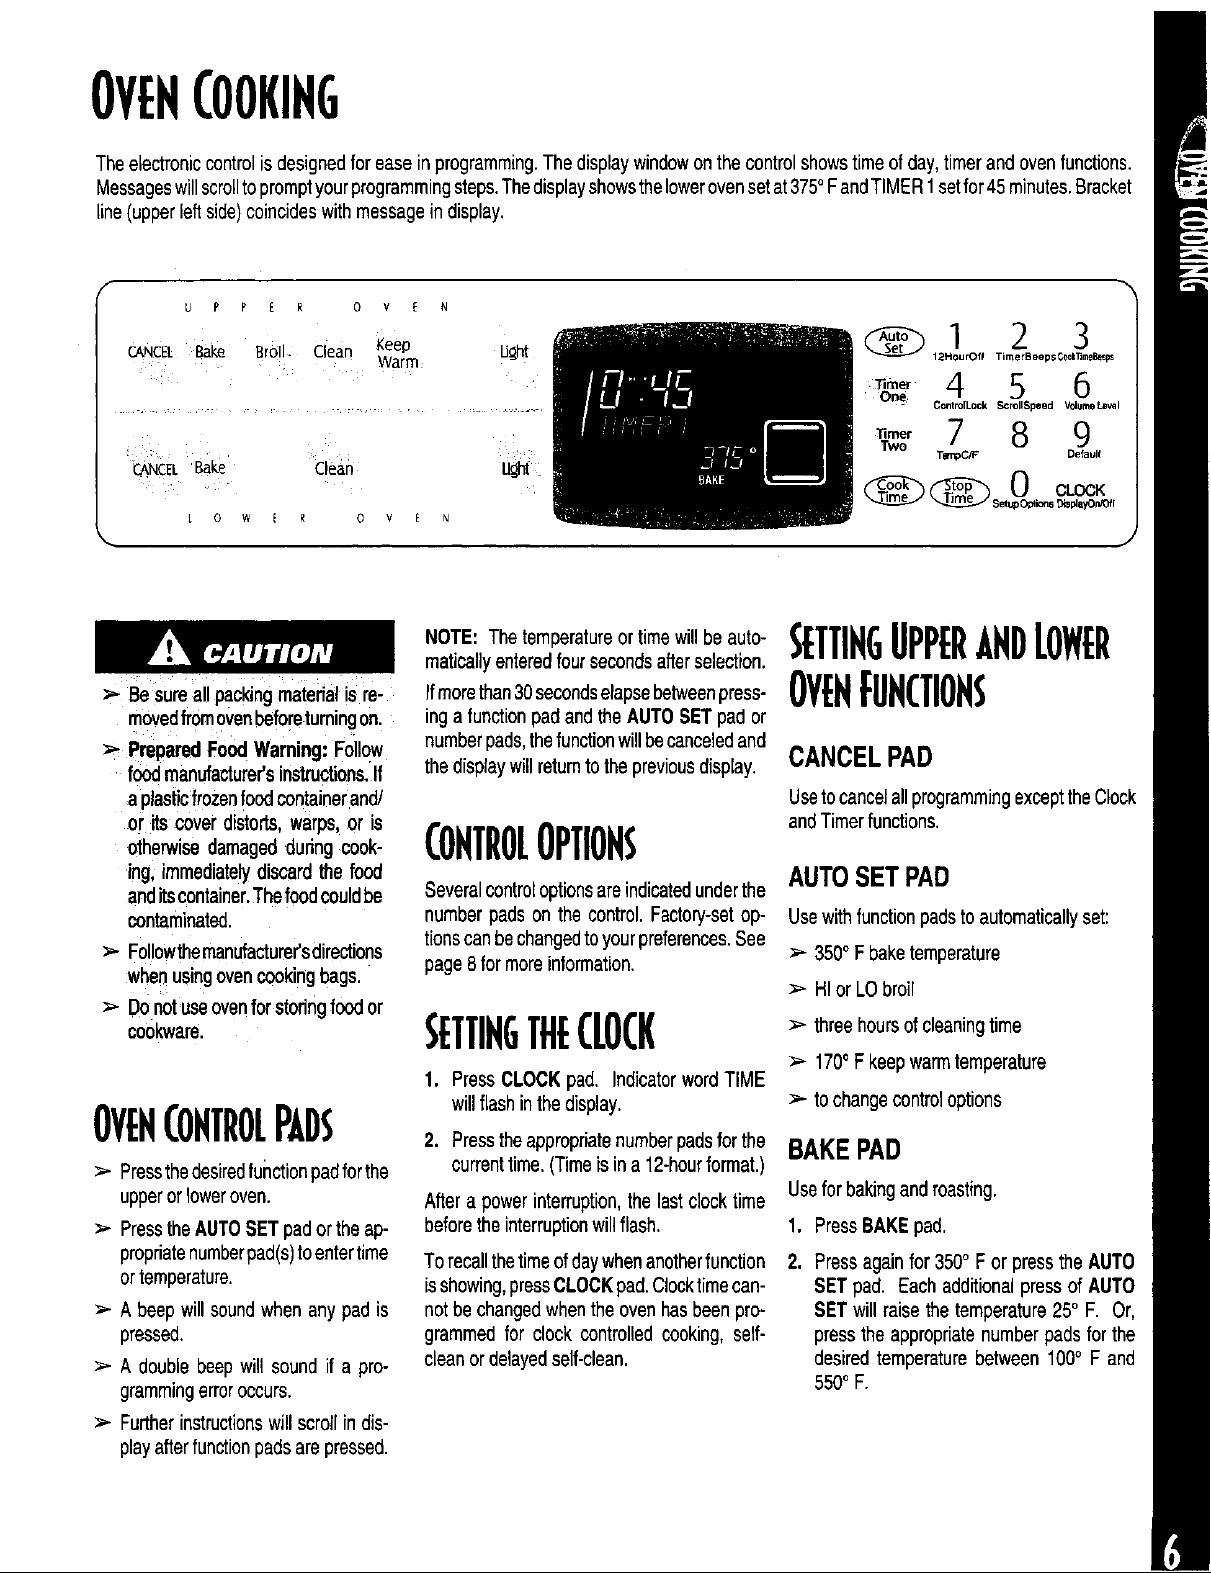
Theelectroniccontrolis designedforeasein programming.The displaywindowon thecontrolshowstimeofday,timerand ovenfunctions.
Messageswillscrolltopromptyourprogrammingsteps.Thedisplayshowsthelowerovensetat375°FandTIMER1setfor 45minutes.Bracket
line(upperleftside)coincideswith messagein display.
f
UPPER OV[N
CANCELsake Broil. clean Keep u_t
Warm
_._A_ICELBake Clean U_h_.
L 0 W E R 0 V E N
, _H_ourOfl Tim?B eep, CooT3ri_Bl_ps
4 5 6
One
ContrOlLOck SCrollSpeed V01Ut_IJ_I
7 8 9
Two
T_C_ = Defaul(
@ ooo oss;,
>'.-Be sure allpackingmaterialis re-
movedfromovenbeforeturningon.
_,- PreparedFoodWarning: Follow
foodmanufacturer'sinstructions.If
aplasticfrozenfoodcontainerand/
or itscoverdistorts,warps,or is
otherwisedamagedduring cook-
ing,immediatelydiscardthefood
anditscontainer.Thefoodcouldbe
contaminated.
>,- Followthemanufacturer'sdirections
whenusingovencookingbags.
:=,-Donotuseovenfor storingfoodor
COOKware,
OVENCONTROLPADS
>- Pressthedesiredfunctionpadforthe
upperor loweroven.
> PresstheAUTOSET pad orthe ap-
propriatenumberpad(s)to entertime
ortemperature.
> Abeep willsoundwhen any pad is
pressed.
> A doublebeepwill sound if a pro-
grammingerroroccurs.
> Furtherinstructionswill scroll in dis-
playafterfunctionpadsare pressed.
NOTE: Thetemperatureortime willbe auto-
maticallyenteredfoursecondsafterselection.
Ifmorethan30secondselapsebetweenpress-
ing a functionpad andthe AUTOSETpador
numberpads,thefunctionwillbecanceledand
thedisplaywillreturntothe previousdisplay.
CONTROLOPTIONS
Severalcontroloptionsareindicatedunderthe
numberpads on the control. Factory-setop-
tionscanbechangedtoyour preferences.See
page8 formoreinformation.
SETTIN5THECLOCK
1. PressCLOCK pad. IndicatorwordTIME
willflashin thedisplay.
2. Presstheappropriatenumberpedsforthe
currenttime.(Timeisin a 12-hourformat.)
After a powerinterruption,the last clocktime
beforethe interruptionwill flash.
Torecallthetimeofdaywhenanotherfunction
isshowing,pressCLOCKpad.Clocktimecan-
notbe changedwhentheovenhasbeenpro-
gremmedfor clock controlledcooking,serf-
cleanordelayedself-clean.
SETTINGUPPERANDLOWER
OVENFUNCTIONS
CANCELPAD
Usetocancelallprogrammingexceptthe Clock
andTimerfunctions.
AUTOSETPAD
Usewithfunctionpadsto automaticallyset:
350°F baketemperature
> HIor LObroil
> threehoursof cleaningtime
_- 1700F keepwarmtemperature
to changecontroloptions
BAKEPAD
Useforbakingand roasting.
1. PressBAKEpad.
2. Pressagainfor 350° F or presstheAUTO
SETpad. Eachadditionalpressof AUTO
SETwill raisethe temperature250F. Or,
presstheappropriatenumberpadsfor the
desiredtemperaturebetween 100° F and
5500F.
OVENCOOKING,com.
3. Whenthe oven turns on, a red preheat
indicatorwilllight•
LOWER PREHEAT BAKE
OVEN ICON
4. A single beep will indicate the oven is
preheatedto the settemperature.Thepre-
heatindicatorwillturnoff.
5. Whencookingiscomplete,pressCANCEL
pad. Removefoodfrom oven.
BROILPAD(UppEaOVENONLY)
Use for top browningor broiling. For best
results,usethebroilerpanprovidedwithyour
range•Toprackpositionisontheovenrack.
Removeovenrackandplacebroilerpanon
theovenbottomfor bottomrackposition.
1.PresstheBROILpad.
2, Press the AUTO SET pad for HI broil,
press again for LO broil, or pressthe
appropriatenumber pads to set desired
broil temperature between 3000 and
5500F.
3.Foroptimalbroiling,preheatfive minutes.
4.Placefood in oven.Closeovendoor.
5.Followbroilingrecommendationsinchart.
6. Whenbroilingis complete,pressCANCEL
pad. Removefood and broilerpan from
oven.
BROILING(UPPEROVENONLY)
I HI broil is usedfor mostbroiling.Use
LO broilwhen broilinglongercooking
foodstoallowthemtocooktowelldone
stagewithoutexcessivebrowning.
I Nevercoverbroilerpaninsertwith alu-
minumfoil.Thispreventsfatfromdrain-
ingto thepanbelow•
I Broilingcanbedoneontheovenrackor
removeovenrackandplacebroilerpan
ontheovenbottom.
BAKING
! To recall the set temperatureduring
preheatpressthe BAKEpad.
I To changeoven temperatureduring
cooking,pressthe BAKEpad andthe
appropriatenumberpads.
I Allow9-13 minutesforthe upperoven
topreheat.Allow 7-12 minutesforthe
loweroven to preheat.
I Allow at least 1/2-inchbetween the
bakingpanorcasseroleandthebroil
burnerinthe upperoven.Loaf,angel
food or bundt pans are not recom-
mendedinthe upperoven.
! Donotusetemperaturesbelow140° F
to keepfood warmor below200`)Ffor
cooking.Forfoodsafetyreasons,lower
temperaturesarenotrecommended.
I Foradditionalbakingandroastingtips,
referto the "Cooking MadeSimple"
booklet.
I Asovenheats,youmayhearsoundsof
metalpartsexpandingandcontracting.
This is normal and will not damage
oven.
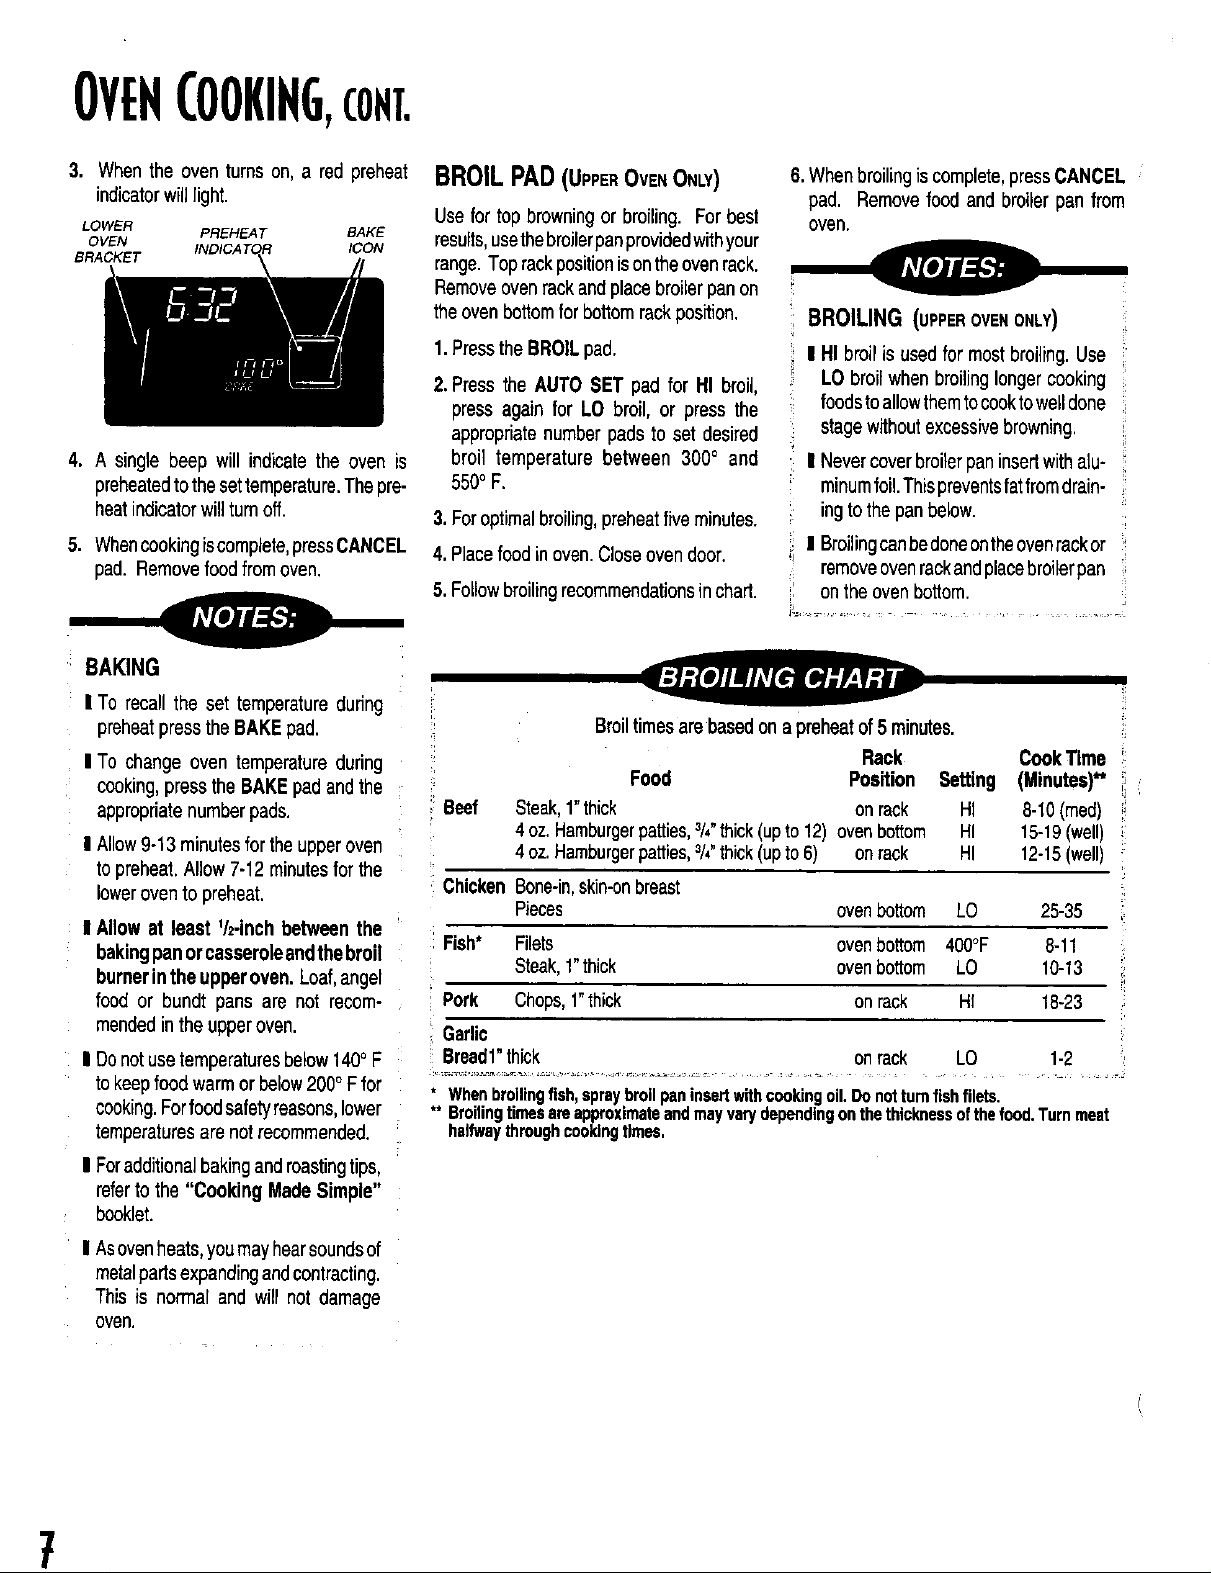
Broiltimes arebasedona preheatof5 minutes.
Beef
Rack
Food PosRion
CookTime
Setting (Minutes)**
Steak,1"thick on rack HI 8-10(reed)
4 oz.Hamburgerpatties,3/4"thick(upto 12) ovenbottom HI 15-19(well)
4 oz.Hamburgerpatties,3/4"thick(upto6) onrack HI 12-15(well)
: ChickenBone-in,skin-onbreast
Pieces ovenbottom LO 25-35
Fish* Filets ovenbottom 400°F 8-11
Steak,1"thick ovenbottom LO 10-13
Pork Chops,1"thick on rack Hf 18-23
Garlic
Bread1"thick onrack LO 1-2
* Whenbroilingfish, spraybroilpaninsertwithcookingoil.Do notturnfishfilets.
** Broilingtimesareapproximateandmay varydependingonthethicknessofthefood.Turnmeat
halfwaythroughcookingtimes.
7
KEEPWARMPAD
(UPPER OVEN ONLY)
Forsafelykeepingfoodswarmor forwarming
breadsandplates.
1.PressKEEPWARMpad.
2.PressAUTOSETpadfor170°Forpressthe
appropriatenumberpadsfor temperatures
between145°and 1900F.
3.KEEPWARMandthetemperatureselected
willbedisplayedwhenthefunctionis active.
4.Whenwarmingiscomplete,pressCANCEL
pad.Removefoodfromtheoven.
KEEPWARM
I For optimalfood quality and nutrition,
ovencookedfoodsshouldbekeptwarm
for nolongerthan1 to2 hours.
' I Foroptimalfoodqualityandcolor,foods
cookedonthe rangetop shouldbe kept
warmforan houror less.
I Tokeepfoodsfromdrying,coverloosely
withfoilora lid.
I To warmdinnermils:
- coverrollslooselywithfoil andplacein
upperoven.
- pressKEEPWARMandAUTO SET
pads.
- warmfor 12-15minutes.
I Towarm plates:
- place2stacksofuptofourplateseach
intheupperoven.
- pressKEEPWARMandAUTOSET
pads.
- warmforfive minutes,turnofftheoven
andleaveplatesinthe ovenfor15
minutesmore.
- use onlyoven-safeplates,checkwith
themanufacturer.
- do notsetwarmdishesone coldsur-
faceas rapidtemperaturechanges
couldcausecrazing.
COOKTIME/STOPTIMEPADS
CLOCKCONTROLLEDOVENCOOKING
Use to programthe ovensto start and stop
automatically.Cooktimemaybesetfor upto
11 hoursand59 minutes(11:59). Theclock
mustbefunctioningand correctlysetforthis
featureto work.
To StartImmediatelyandTurnOff
Automatically:
1.PressCOOKTIME padonceforthe upper
ovenor twice for the lower oven.COOK
TIMEwillflash,thenpresstheappropriate
numberpadstoentercookingtimeinhours
andminutes.
2, Pressthe upperor lowerovenBAKEpad
and select the baketemperature. COOK
TiMEwillbedisplayedalongwiththetem-
perature.
3.One minute before the end of the pro-
grammedcooktime,thelight willturnon,a
beepwillsoundandCHECKFOODwillbe
displayed.Light will turn off automatically
whenCANCELpadispressedorafteroven
door is openedandclosed.
4.Attheendofcooktime,theovenwillshutoff
automatically,"End"and COOKTiMEwill
be displayedandfourbeepswill sound.
5. PressCANCEL pad. Removefood from
oven. Ifthe programisnot canceled,there
willbe 1reminderbeepeveryminuteforup
to 30 minutes.
NOTE:TheCookTime/StopTimereminder
beepsmay be changed.See ControlOp-
tions(CookTime Beeps,page9).
To Delaythe Start of CookingandTurn
OffAutomatically:
1. PressCOOKTIMEpad. COOKTIMEwill
flash,then press theappropriatenumber
pads to enter cookingtime in hoursand
minutes.
2. Pressthe upperor lowerovenBAKEpad
and selectthe baketemperature. COOK
TIMEwillbe displayedalongwith thetam-
perature.
3.PressSTOPTIMEpad.Displayshowswhen
theovenwill stop basedon animmediate
start.
4.PressSTOPTIMEpadagain.STOPTIME
mustbe flashingto set the delay stop
time.
5. Pressthe appropriatenumberpadsto
enterthetimeyouwanttheoventostop.
6. DELAYandBAKEwillbe displayed.
7.Atthe end of the delay period, COOK
TIME will be displayedalong with the
temperature.
8.Followsteps3-5in precedingsection.
BothOvens May Be SetforClock Con-
trolledCooking.To Start Immediately
andTurnOff Automatically:
1.SetCOOKTIMEandOvenTemperature
forthe upperoven.
2.Press COOK TIME pad twice and set
COOKTIMEandOvenTemperaturefor
theloweroven.
Todelaythe startandturnoff automati-
callyfollowsteps 1&2 above.
3. SetSTOP TIMEforboth ovens.
I Highlyperishablefoodssuchasdairy
products,pork, poultryor seafood
are not recommendedfor delayed
cooking.
I Clockcontrolledbakingisnotracom-
mendedforbakeditemsthatrequire
a preheated oven, such as cakes,
cookiesandbreads.
TIMERPADS
Thetimer(s)maybesetfor anytimeperiod
upto 99hours and59 minutes(99:59).
Thetimer(s)operateindependentlyofany
otherfunctionandcanbesetwhileanother
oven functionisoperating. THE TIMER
DOESNOTCONTROLTHEOVEN.
°
PresstheTIMER1 or2 pad. TIMER1
or 2 willflash respectively.0HR:00will
appearinthedisplay.
2. Presstheappropriatenumberpadsto
enterdesiredtime.
. TIMER1orTIMER2 willbedisplayed.
IfbothtimersareactiveTIMER1+2will
be displayed.
EXAMPLE:Tosetatimerfor5 minutes,
presstheTIMER1 padandthenumber
pad5.Thecontrolwillbegincountdown
after afourseconddelay.

OVENCOOKING,COHT,
9
4. Thelastminuteofthe countdownwillbe
displayedin seconds.
5. Atthe endofthesettime,"END"willbe
displayedandonefoursecondbeepwill
soundfollowedby two beepsevery30
secondsfor up to five minutes.Press
thecorrespondingTIMERpadtocan-
celthe beeps.
NOTE:TheTimerraminderbeepsatthe
endofa settime maybechanged.See
ControlOptions(TimerBeeps),below.
To Cancela SetTime:
Pressand holdthe correspondingTIMER
padforseveralseconds.Afteraslightdelay
thetimeof daywillappear.
OR
Pressthe TIMER padand the "0"number
pad. After a slight delay the timer will be
canceled.
CONTROLOPTIONS
ToChangeFactorySetDefaultOptions:
1. Controloptionsmaybechangedby se-
lectingtheSetupOptions(0)pad,then
the desired option pad. (See Options
below.)
2. Currentoptionwillappearin thedisplay.
3. PresstheAUTOSETpadto changethe
option.
4, PressCANCELpadtosetthe displayed
optionand exittheprogram.
OPTIONSAVAILABLE:
12HOUROFF(1)
The ovenmay be setto turnoffafter12
hoursor stayon indefinitely.Thedefault
issettoturnoffafter12 hours,
TruERBEEPS(2)
There are three choices for the end of
"timer" remindersignals.
> Onebeepfollowedbytwo beepsevery
30 secondsforup to fiveminutes (de-
fault setting).
One beepfollowedby twobeeps every
minuteforup to30 minutes.
>- Onebeepfollowedby nootherbeeps.
COOKTIMEBEEPS(3)
Thereare threechoicesfor the endof
"clock-controited-cooking"remindersig-
nals,
>'- Fourshort beeps followedby one beep
everyminuteforupto30minutes(default
setting).
> Fourshort beepsfollowedby no other
beeps.
>- Fourshod beepsfollowedby one beep
every30secondsforuptofiveminutes.
CONTROLLOCK(4)
The function padson the control can be
lockedtopreventunwantedusefor safety
and cleaningbenefits.Thecurrenttimeof
daywillremain in the display.Press Setup
Options (O), ControlLock (4) and AUTO
SETto unlock.
SCROLLSPEED (5)
The scroll speedof the messagesin the
display may be changedfrom FAST to
MEDIUMtoSLOW.Thedefaultissetforthe
mediumspeed.
VOLUMELEVEL(6)
The volumelevel of beepsmay be ad-
justad froma settingof 8 (the loudest
level)to 1 (thelowestlevel).The defaultis
set for level 6.
TEMFC/F (7)
Thetemperaturescalemaybechangedto
Centigradeor Fahrenheit.Thedefaultisset
for Fahrenheit.
LANGUAGE(8)
Thewordswhichscrollinthe displaymay
be changedfrom Englishto French or
Spanish.DefaultisEnglish.
DEFAULT(9)
Thecontrolcanberesetto restorethe
factorysettingforeachoption,
DISPLAYON'OFF (CLocK)
The time-of-daydisplaymay beshut off
when the oven is not in a cooking or
cleaningfunction.
OVENTEMPERATUREADJUSTMENT
Ifyouthinkthe ovenis operatingtoo coldor
hot, you can adjust it. Bake severaltest
itemsand thenadjust the temperatureset-
ting notmorethan 100F at a time.
To Adjust:
1. Press the BAKE pad (upper or lower
oven)andenter550° F.
.
.
Pressandholdthe BAKEpad(upperor
lower oven) for several seconds until
TEMPADJis displayed.
Pressthe AUTOSET pad- eachpress
changesthetemperatureby 5° F. The
controlwillacceptchangesfrom-35°to
+35oF.
o
.
If the ovenwaspreviouslyadjusted,the
changewill be displayed.Forexample,
iftheoventemperaturewas reducedby
15° F, the displaywillshow-15oF.
Whenyou havemadethe adjustment,
presstheCANCELpadandthe timeof
day will reappear in the display. The
ovenwillnowbakeatthe adjustedtem-
perature.
NOTE:It is notrecommendedto adjustthe
oventemperatureifonlyoneortwo recipes
are inquestion.
PILOTLESSIGNITION
Yourrangeisequippedwithpilotlessignition.
With this type of ignitionsystem,the gas
automaticallyshutsoffandtheovenwillnot
operateduringapower failure.
A lightedmatch willnot light the oven
burner. No attemptshouldbe made to
operatethe ovenduringapower failure.
OVENLIGHTS
Theovenlightsautomaticallycomeon when
thedoorsare opened.Whenthe doorsare
closed,pressthe LIGHTpad(upperor lower
oven)onthecontrolpaneltoturnthelightson
oroff.
Theovenlightswillnotoperateduringaclean
cycle.
Theovenlightswillcomeonautomaticallyone
minutebeforethe end of a clock controlled
cookingoperation.
OVENVENT
Whenthe ovenisinuse,theareanearthe
ventmaybecomehotenoughto cause
bums.Neverblocktheventopening.
Theovenvent is locatedat the base of the
controlpanel.
Donotplaceplasticsneartheventopeningas
heatfrom the vent could distortor meltthe
plastic.
OVENRACKS
All racksaredesignedwitha lock-stopedge.
UPPEROVEN
Isequippedwithone rack.
>- Whenpullingthe up- I _ \_
per oven rack out to i u ii tl\.L,,.._,j_
removeorcheckfood,
graspthetop edgeof
therack.
LOWEROVEN
Is equippedwithone RollerGlideTMrack
andoneregularflat rack(selectmodels),
ortwo regularflatracks.
ToREMOVEOVENRACKS:
_- Pull rack straightout until it stops at the
lock-stopposition;liftuponthefrontofthe
rackandpull out.
>- For RollerGlideTMrack,pull boththe rack
glideand rackbaseout together.
ToREPLACEOVENRACKS:
>- Placerackontheracksupportintheoven;
tiltthefrontendupslightly;slide rackback
untilitclearsthe lock-stopposition;lower
front andslidebackintotheoven.
BAKINGANDROASTINGWITH
THEROLLERGLIDET=RACK
(SELECTMODELS)
BAKING
> Foroptimalbakingresultswhenbakingon
onerack,usetheRollerGlideT=rack.
When baking on two racks, use the
RollerGlideTMrackin thetop rackposition,
andtheflat rackin thelower rackposition.
ROASTING
>- Whenroastinglargecutsofmeatandpoul-
try,usetheRollerGlideTMrack foreaseof
movement.
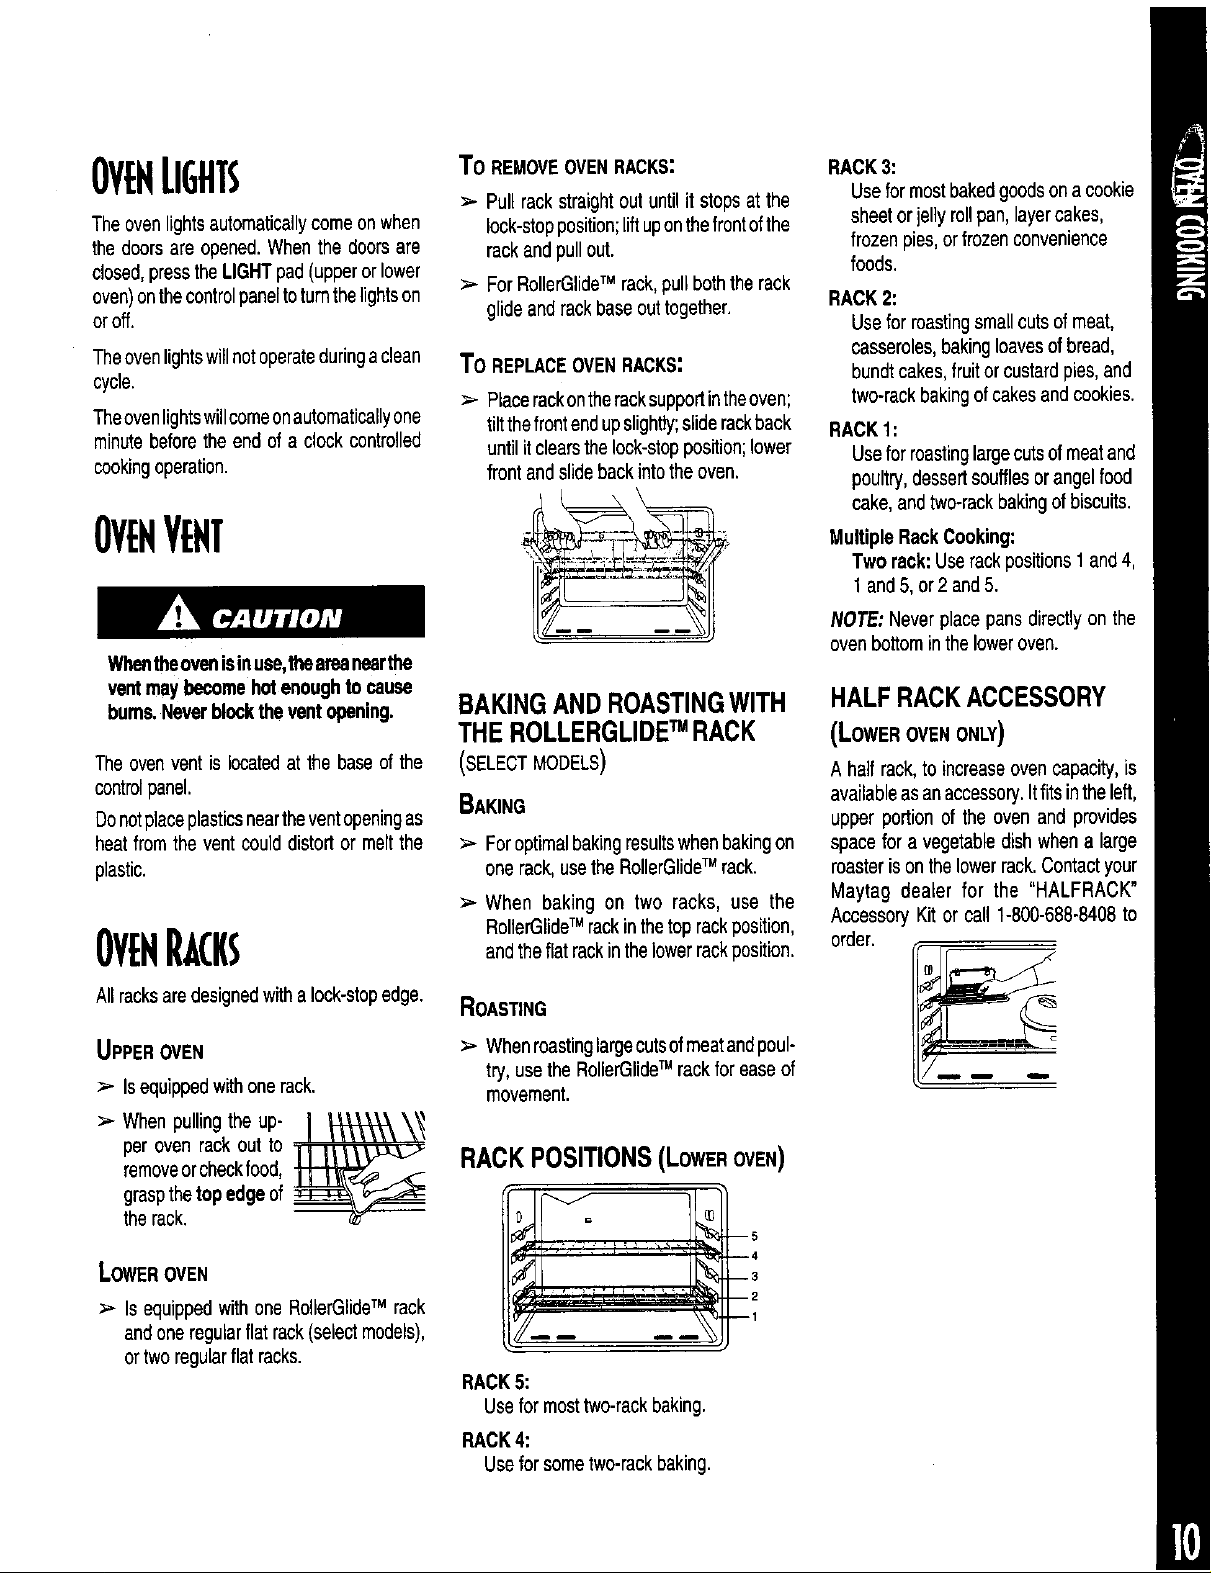
RACKPOSITIONS(LowEROVEN)
v
D
RACK5:
Usefor mosttwo-rackbaking.
RACK4:
Useforsometwo-rackbaking.
RACK3:
Usefor mostbakedgoodsona cookie
sheetorjelly rollpan,layercakes,
frozenpies,orfrozenconvenience
foods.
RACK2:
Useforroastingsmallcuts of meat,
casseroles,bakingloavesof bread,
bundtcakes,fruitor custardpies,and
two-rackbakingof cakesandcookies.
RACK1:
Useforroastinglargecutsof meatand
poultry,dessertsoufflesorangelfood
cake,andtwo-rackbakingofbiscuits.
Multiple RackCooking:
Two rack:Userackpositions1 and4,
1 and5, or2 and5.
NOTE:Neverplace pans directlyon the
ovenbottom intheloweroven.
HALFRACKACCESSORY
(LowEROVEN ONLY)
A halfrack,toincreaseovencapacity,is
availableasanaccessory.Itfitsintheleft,
upper portion of the oven and provides
spacefor a vegetabledishwhen a large
roasterison thelowerrack.Contactyour
Maytag dealer for the "HALFRACK"
AccessoryKit or call 1-800-688-8408to
order.
CARE&CLEANING
_- It is normalfor partsofthe rangeto
becomehotduringa cleancycle.
>- To preventdamageto ovendoor, do
notattempttoopenthedoorwhenthe
LOCKindicatorwordisdisplayed.
>- Donottouchcooktop,door,window,or
ovenventareaduringa cleancycle.
Do not use commercialovenclean.
ere on the self-cleanoven finish or
aroundanypartoftheovenastheywill
damagethefinishorparts.
Theserf-cleancycleusesabovenormalcook-
ing temperaturesto automaticallycleanthe
entireoven interior.
It is normal for excessiveflare-ups,smoking
andflamingtooccurduringcleaningiftheoven
is heavilysoiled.It is betterto cleanthe oven
regularlyratherthan to wait until there is a
heavybuild-upofsoilintheoven.
Duringthecleaningprocess,thekitchenshould
be well ventilatedto help eliminatenormal
odorsassociatedwithcleaning.
Thecleaningtimecanbevarieddependingon
the amount of soil. Pressthe appropriate
numberpads to set any amountof time be-
tween two and four hours. '_:00" hours of
cleaningfor light soil, up to "4:00" hours of
cleaningfor heavysoil.
BEFORESELF-CLEANING
Turnoff theovenlightbeforecleaningas the
lightmayburnoutduringthecleancycle.
Removebroilerpen,allpansandtheovenrecks
fromtheoven.Theovenracks will discolor
and may notslideeasilyafler a self.clean
cycle.
Cleanoven frame,
door frame (area
outside the door
gasket)andaround
the opening in the
door gasket with a
nonabrasiveclean-
ingagentsuchas BonAmi*or detergentand
water.Theseareasarenot exposedto clean-
ingtemperaturesandshouldbe cleanedto pre-
ventsoilfrombakingon duringthecleancycle.
Topreventdamage,donot clean or rub the
gasketaroundtheovendoor.Thegasketisde-
signedtosealinheatduringthecleancycle.
Wipeupexcessgreaseorspilloversfromtheoven
bottomto preventexcessivesmoking,flare-ups
orflamingduringthecleancycle.
Wipe up sugary and acidicspilloverssuch as
sweetpotatoes,tomato or milk-basedsauces.
Porcelainenamelisacidresistant,notacidproof.
The porcelainfinish may discolor if acidic
spillsare not wipedup prior to a self.clean
cycle.
CLEANPAD
Usetosetaself-cleancycle. (Onlyoneoven
may be cleanedat a time. Both ovenswill
lockwheneitheris being cleaned.)
1. PressCLEANpad.
2. Pressthe AUTOSET pad for 3 hours of
cleaningtime,pressagainfor 4hoursand
again if2 hoursofcleantimeisdesired.
3. CLEANINGandLOCplusthecleantimewill
appear in thedisplayand both ovenswill
lock.
,
.
6,
Whenthecleancycleiscomplete,CLEANED
willbe displayed.LOCwillremainon until
theovenhascooled(approx.1 hour).
Whentheoveniscool,LOCwillnolongerbe
displayedand bothdoorsmay beopened.
Wipeouttheoveninteriorwithadampcloth.
Ifsoilremainsitindicatesthecyclewasnot
long enough.
To Cancel Self-CleanCycle:
1. PressCANCELpad.
2. IfLOCisNOTdisplayed,openovendoor. If
LOCis displayed,allowoventocool.
To Delaythe Startof a Self-CleanCycle:
1. Followsteps1-4above.
2. PresstheSTOPTIMEpad. STOPTIMEwill
flash,
3. As STOPTIMEflashes,pressthe ap-
proprlatenumber pads to enter the
timeyouwishthe oven to stop.
4. DELAYCLNandLOCwillbedisplayed.
5, When the delay period is completed
andcleaningbegins,CLEANING,LOC
andthecleantimewill be displayed.
DURINGCLEANCYCLE
WhentheLOCKindicatorlightislit,thedoor
cannotbe opened.To preventdamageto
door, do not force door open when the
LOCKindicatorlightis lit.
Somesmokeandodormaybedetectedthe
firstfew timesthe oveniscleaned.This is
normalandwilllessonintime.Smokemay
alsooccurifovenisheavilysoiledorifbroiler
panwasleftin oven.
As ovenheats,you may hear soundsof
metalpartsexpandingandcontracting.This
isnormalandwillnotdamageoven.
AFTERSELF-CLEANING
Aboutonehouraftertheendoftheclean
cycle, theLOCKindicatorwordwillturn
off.Atthispoint,thedoorcanbe opened.
Somesoilmayleavea lightgray,powdery
ashwhichcan be removedwith a damp
cloth.If soil remains,it indicatesthat the
cleancyclewasnot longenough.Thesoil
willberemovedduringthenextcleancycle.
If the ovenreckswereleft inthe ovenand
donotslidesmoothlyaftera cleancycle,
wiperacksandembossedrecksupportswith
a smallamountof vegetableoilto restore
easeof movement.
Awhitediscolorationmayappearafterclean-
ingifacidicorsugaryfoodswerenotwiped
upbeforethecleancycle.Thisdiscoloration
isnormalandwill NOTaffectperformance.
Finelinesmayappearin theporcelainre-
suitingfromthe heatingandcoolingofthe
finish. This isnormal and will not affect
performance.
*Brandnamesfor cleaningproductsareregisteredtrademarksof therespectivemanufacturers.
]]

CLEANINGPROCEDURES
>- Be sure applianceis oft andall parts
arecoolbefore handlingor cleaning.
Thisis toavoiddamageand possible
bums.
> To preventstaining or discoloration,
cleanapplianceaftereach use.
_- If a partis remo_/ed,be sureit iscot-
rectlyreplaced.
BROILER PAN AND INSERT
Nevercoverinsertwithaluminumfoilasthis
preventsthe fat from drainingto the pan
below.
> Placesoapyclothover insertand pan;let
soaktoloosensoil.
> Washin warmsoapywater.Usescouring
padto removestubbornsoil.
)- Broilerpan and insert can be cleanedin
dishwasher.
BURNER CAPS AND SEALED
GAS BURNERS
Removable Burner Caps
> Allowburnerto cool. Removeburnercap
andwashinsoapywaterwithaplasticscour-
ing pad. For stubbornsoils,cleanwith a
soap-filled,nonabrasivepad or Cooktop
CleaningCreme(Part#20000001)**anda
sponge.
> Donotcleanindishwasherorself-cleaning
oven.
Sealed Gas Burner
)- Cleanfrequently.Allowburnertocool.Clean
withsoapandplasticscouringpad.Forstub-
bornsoils,cleanwitha soap-filled,nonabra-
sivepad.
)- Becarefulnottogetwaterintothecenterof
theburner.
> Usecarewhencleaningthe ignitor.If the
ignitoriswetordamagedthesurfaceburner
willnotlight.
BURNER GRATES
PORCEI.AINON CASTIRON
ENAMEL (PAINTED)
SIDEPANELS& DOOR HANDLES
Washgrateswithwarm,soapywaterand
a nonabrasive,plasticscrubbingpad. For
stubborn soils, clean with a soap-filled,
nonabrasive pad or Cooktop Cleaning
Creme(Part#20000001)**anda sponge.
If soil remains,reapplyCooktopCleaning >
Creme,coverwithadamppapertoweland
soak for 30 minutes.Scrubagain, rinse
and dry.
> Donotcleanindishwasherorself-cleaning
oven.
CLOCK AND CONTROL
PAD AREA
> Toactivate"ControlLock"forcleaning,see
page9.
> Wipewitha dampclothanddry.
Glasscleanersmaybeusedifsprayedon
a clothfirst. DO NOTspraydirectlyon
controlpad anddisplayarea.
CONTROL KNOBS
> Removeknobs in the OFF positionby
pullingforward.
> Wash,rinseanddry.Donotuseabrasive
cleaningagentsas theymayscratchthe
finish.
Turnoneachburnertobesuretheknobs
havebeencorrectlyreplaced.
COOKTOP AND
CONTROLPANEL
PORCE_IN EN_EL
Porcelainenamelisglassfusedonmetaland
maycrackorchipwithmisuse.Itisacidresis-
tant, notacidproof.All spillovers,especially
acidicorsugaryspillovers,shouldbewipedup
immediatelywitha drycloth.
> Whencool,washwithsoapywater,rinse
anddry.
> Neverwipeofta warmorhotsurfacewith
a dampcloth.Thismaycausecrackingor
chipping.
> Neveruseovencleaners,abrasiveoroaus-
tic cleaning agentson exteriorfinish of
range.
When cool, wash withwarmsoapy
water,rinseanddry.Neverwipea warm
or hot surfacewitha dampclothas this
maydamagethesurfaceandmaycause
a steamburn.
For stubbornsoil, use mildlyabrasive
cleaningagentssuch as bakingsoda
pasteor BonAmi*.Do not useabrasive
cleanerssuchassteelwoolpadsoroven
cleaners.Theseproductswillscratchor
permanentlydamagethesurface.
NOTE:Usedrytowelor clothtowipeup
spills,especiallyacidicor sugaryspills.
Surfacemaydiscolorordullif soilis not
immediatelyremoved.Thisis especially
importantfor whitesurfaces.
GLASS
OVEN WINDOW &, [:_OR
> Avoidusingexcessiveamountsofwater
whichmayseepunderor behindglass
causingstaining.
> Washwith soapandwater. Rinsewith
clearwateranddry. Glasscleanercan
beusedif sprayedona clothfirst.
)- Donot useabrasivematerialssuchas
scouringpads,steelwoolor powdered
cleanersastheywillscratchglass.
METAL FINISHES
TRIM
> Wash with soapand water, a glass
cleaner,or mildliquidsprays.
> To preventscratchingor dulling of the
finish,do notusemildlyabrasive,abra-
sive harsh or causticcleanerssuch as
ovencleaners.
OVEN INTERIOR
> Followinstructionsonpage11for self-
cleaningoven.
OVEN RACKS
> Cleanwithsoapywater.
> Removestubbornsoilwithcleansingpow-
der or soap-filledscouringpad. Rinse
anddry.
* Brandnamesforcleaningproductsareregisteredtrademarksoftherespectivemanufacturers.
**Toorderdirect,call1-800-688-8408.
CARE&CLEANING,CONT.
:_ Rackswillpermanentlydiscolorand may
notslideout smoothlyifleft in theoven
duringa self-cleanoperation.If this oc-
curs,wipethe rackand embossedrack
supportswithasmallamountofvegetable
oiltorestoreeaseofmovehlent,thenwipe
oftexcessoil.
PLASTIC FINISHES
CONTROLPANELTRIM& END CAPS
MAINTENANCE
OVENDOORS
>- When cool, cleanwithsoap and water,
rinseanddry. _-
:_ Useaglasscleanerand asoftcloth.
NOTE:Neveruseovencleaners,abrasiveor
causticliquidorpowderedcleansersonplastic ).
finishes.Thesecleaningagentswillscratchor
marfinish.
NOTE:To preventstainingor discoloration,
wipeup fat,greaseor acid (tomato,lemon,
vinegar,milk, fruitjuice, marinade)immedi-
atelywitha drypapertowelor cloth.
STAINLESS STEEL
(SELECTMODELS)
>"DONOT USE ANY CLEANINGPROD-
UCTCONTAININGCHLORINEBLEACH.
>"ALWAYSWIPEWITHTHEGRAINWHEN
CLEANING.
>-DailyCleaning/LightSoil -- Wipe with
oneof the following- soapywater,white
vinegar/watersolution,Formula409 Glass
andSurfaceCleaner*or a similarglass
cleaner- usingaspongeorsoftcloth.Rinse
anddry.Topolishandhelppreventfinger-
prints,follow withStainlessSteel Magic
Spray(PartNo.20000008)**.
>-Moderate/HeavySoil-- Wipewithoneof
thefollowing-BonAmi,SmartCleanser,or
SoftScrub*- usinga dampspongeorsoft
cloth.Rinseanddry.Stubbornsoilsmaybe
removedwith a dampScotch-Brite*pad;
rubevenlywiththegrain.Rinseanddry.To
restorelusterand removestreaks,follow
withStainlessSteelMagicSpray*.
_-Discoloration-- Usingadampspongeor
softcloth,wipewithCameoStainlessSteal
Cleaner*.Rinseimmediatelyand dry. To
removestreaksand restoreluster,follow
withStainlessSteelMagicSpray*.
Do not placeexcessiveweightonor
standonanopenovendoor.Thiscould
causetherangetotipover,breakthe
door,orinjurethe user.
Donotattempttoopenorclosedooror
operateoven until doorisproperlyre-
placed.
Neverplacefingersbetweenhingeand
frontovenframe.Hingearmsarespring
mounted.Ifaccidentallyhit, thehinge
willslamshutagainstovenframeand
couldinjureyourfingers.
Both the upper and lower oven doors are
removable.
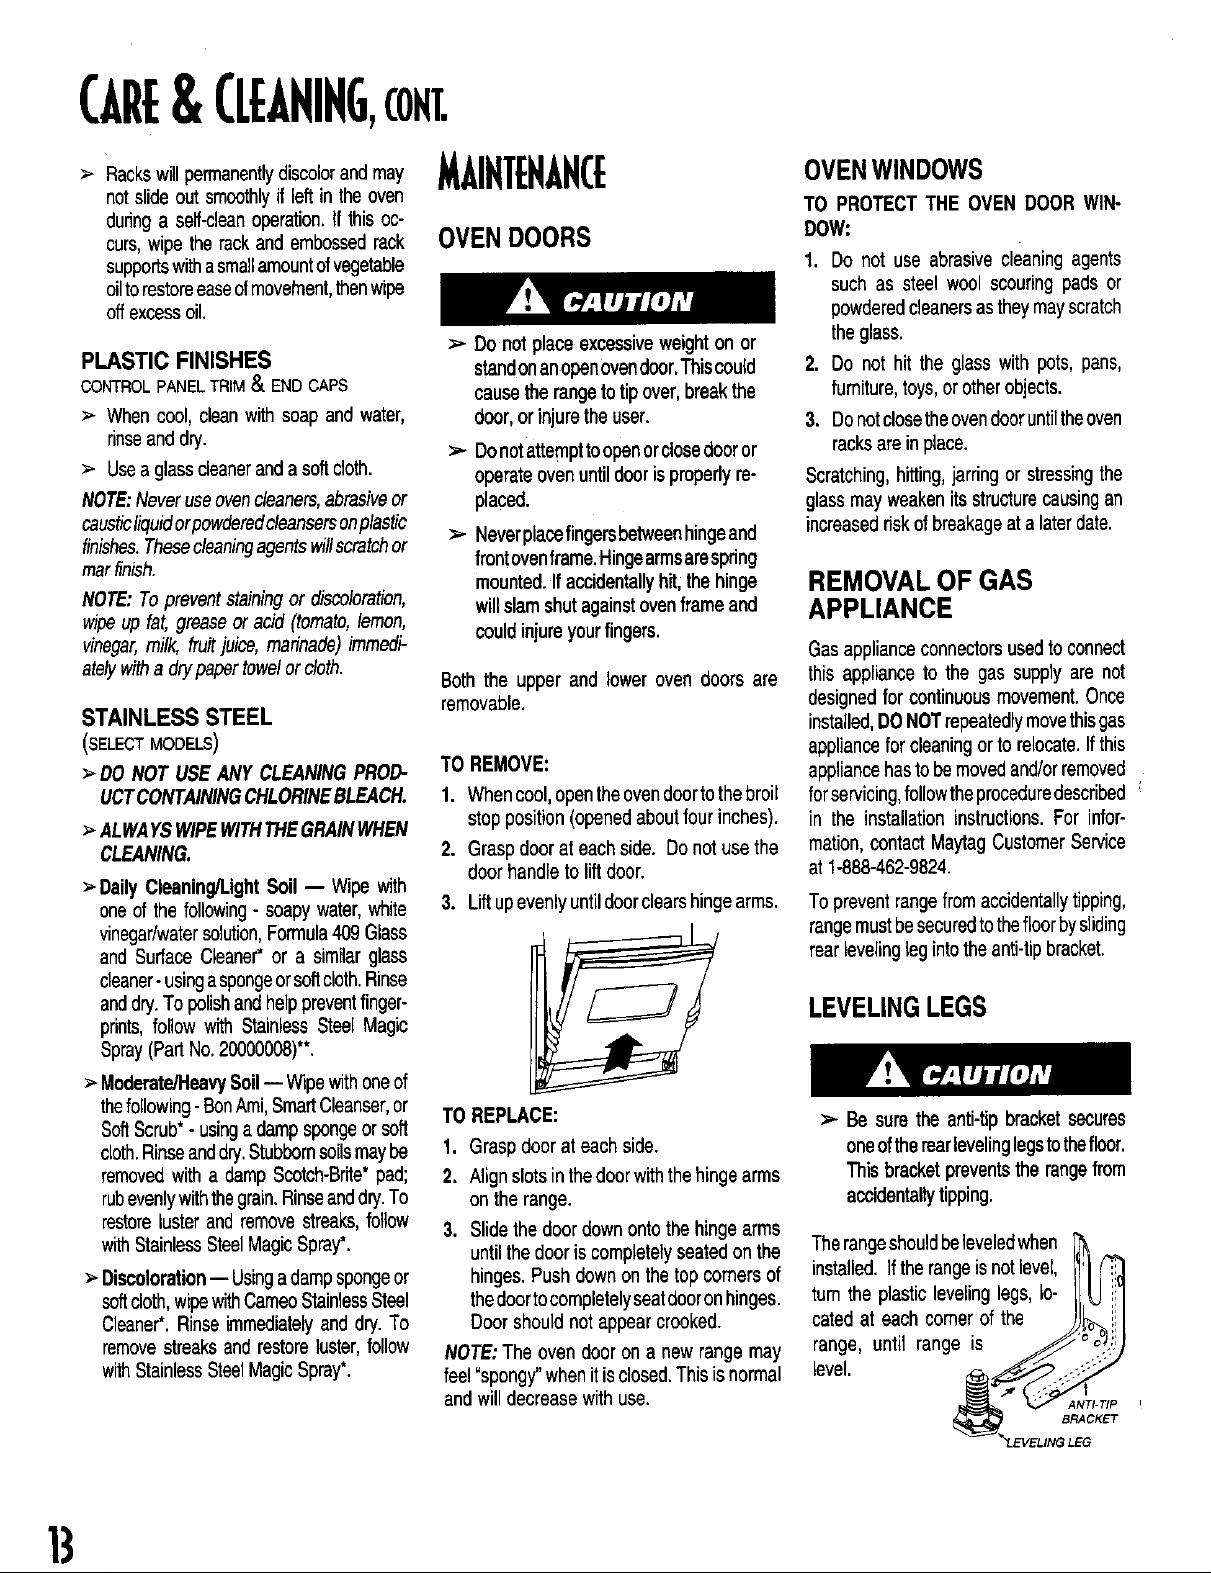
TO REMOVE:
1. Whencool,opentheovendoortothebroil
stopposition(openedaboutfourinches).
2. Graspdoor at eachside. Donotusethe
doorhandle to liftdoor.
3. Liftupevenlyuntildoorclearshingearms.
TOREPLACE:
1. Grasp doorat eachside.
2. Alignslotsin thedoorwifhthehingearms
on the range.
3. Slidethe doordownonto the hinge arms
untilthedooris completelyseatedon the
hinges.Pushdownon thetop comers of
thedoortocompletelyseatdooronhinges.
Doorshouldnot appearcrooked.
NOTE:The oven door on a newrange may
feel=spongy"whenit is closed.This isnormal
andwill decreasewith use.
OVENWINDOWS
TO PROTECTTHE OVEN DOOR WIN-
DOW:
1. Do not use abrasive cleaningagents
suchas steel wool scouringpads or
powderedcleanersastheymayscratch
theglass.
2. Do not hit the glass with pots, pans,
furniture,toys,orotherobjects.
3. Donotclosetheovendooruntiltheoven
racksareinplace.
Scratching,hitting,jarring or stressingthe
glass mayweakenitsstructurecausingan
increasedriskof breakageata laterdate.
REMOVAL OF GAS
APPLIANCE
Gasapplianceconnectorsusedto connect
this applianceto the gas supplyare not
designedfor continuousmovement.Once
installed,DO NOTrepeatedlymovethisgas
appliancefor cleaningor to relocate.If this
appliancehastobemovedand/orremoved ,
forservicing,followtheproceduredescribed
in the installation instructions.For infor-
mation,contact MaytagCustomerService
at 1-888-462-9824.
Topreventrangefrom accidentallytipping,
rangemustbesecuredtothe floorbysliding
rearlevelingleginto the anti-tipbracket.
LEVELINGLEGS
>- Be sure the anti-tipbracketsecures
oneoftherearlevelinglegstothefloor.
Thisbracketpreventstherangefrom
accidentallytipping.
Therangeshouldbeleveledwhen
installed,iftherangeisnotlevel,
turn the plasticlevelinglegs, lo-
catedat each comer of the
range, until range is
level.
ANTI-TIP
BRACKET
1}
OVEN BOTTOM
Protectoven bottomagainstspillovers,espe-
ciallyacidicor sugaryspills,as theymaydis-
colortheporcelainenamel.Usethecorrectpan
sizeto avoidspilloversandboUovers.Donot
placealuminumfoil directlyon the oven
bottom.
UPPER AND LOWER OVEN
LIGHTS(SELECTMODELS)
Toassuretheproperreplacementbulbis
used,orderbulb fromMaytagCustomer
Service.Carl1-800.6888408,ask forpert
number74004458.halogenbulb.
).- DisconnectDowerto range before
replacinglightbulb.
)- Allowovento coolbeforereplacing
lightbulb.
> Makesurebulbcoverandbulbare
coolbeforetouching.
TOREPLACEOVENLIGHT BULB:
1. Whenoveniscool,usefingertipstograsp
edgeofbulbcover.Pulloutandremove.
2. Carefully remove old bulb by pulling
straightoutofceramicbase.
3. To avoiddamagingordecreasingthe life
ofthe newbulb,donottouchthebulbwith
barehandsorfingers.Holdwithaclothor
paper towel. Push new bulb prongs
straightintosmallholesofceramicbase.
4. Replacebulbcoverbysnappingintoplace.
5. Reconnectpower to the range. Reset
clock.
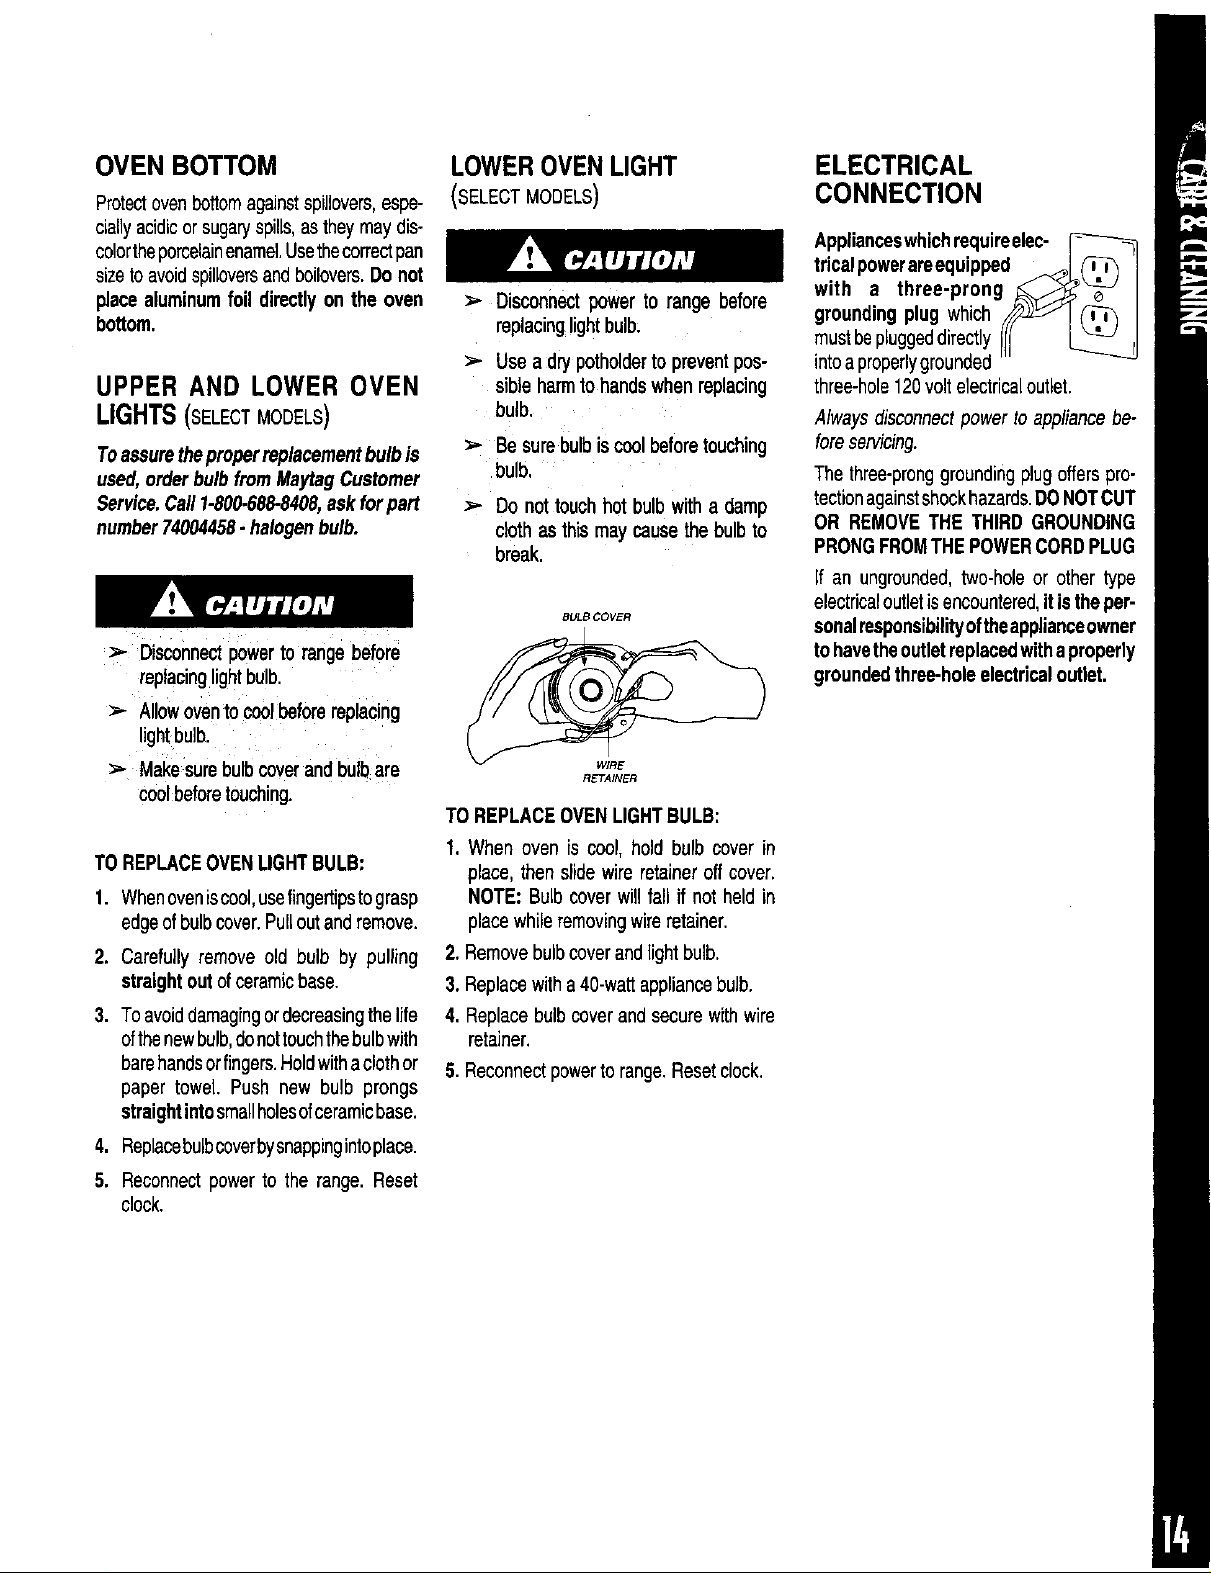
LOWEROVENLIGHT
(SELECTMODELS)
)- Disconnectpower to range before
replacinglightbulb.
_- Use adry potholderto preventpos-
sible harmto hands whenreplacing
bulb.
Be surebulbiscool beforetouching
bulb.
Do not touch hotbulbwitha damp
cloth as this may cause thebulb to
break.
BULB COVER
RETAINER
TO REPLACEOVENLIGHTBULB:
1. When oven is cool, holdbulb coverin
place, thenslidewireretaineroffcover.
NOTE: Bulbcoverwillfall if not heldin
placewhileremovingwireretainer.
2. Removebulbcoverandlight bulb.
3. Replacewitha40-wattappliancebulb.
4. Replacebulbcoverandsecurewithwire
retainer.
5. Reconnectpowerto range.Resetclock.
ELECTRICAL
CONNECTION
Applianceswhichrequireelec-
tricalpowerareequipped I
with a three-prong ,_---._-' I
groundingplug which/_jz_J! _ I
mustbepluggeddirectly Ill L_"-_ rl
intoaproperlygrounded '
three-hole120volt electricaloutlet.
Always disconnectpower to appliancebe-
foreservicing.
The three-pronggroundingplugofferspro-
tectionagainstshockhazards.DONOTCUT
OR REMOVETHE THIRD GROUNDING
PRONGFROMTHEPOWERCORDPLUG
if an ungrounded,two-hole or other type
electricaloutletisencountered,itistheper-
sonalresponsibilityoftheapplianceowner
tohavetheoutletreplacedwithaproperly
groundedthree-holeelectricaloutlet.
BEFOREYOUCALLFORSERVICE
FOR MOST CONCERNS, TRY
THESE FIRST:
Checkifovencontrolshavebeenproperly
set.
Checktobesureplugissecurelyinserted
intoreceptacle.
Checkor re-setcircuitbreaker. Checkor
replacefuse.
Checkpowersupply.
PART OR ALL OF APPLIANCE
DOES NOT WORK.
I Checkifsurfaceand/orovencontrolshave
beenproperlyset.Seepgs.4 &6.
I Checkif ovendoorisunlockedafterself-
cleancycle. See pg.11.
I Checkif oven is setfor a delayedcookor
cleanprogram.Seepgs.8 & 11.
SURFACEBURNERFAILSTO
LIGHT.
I Checktobesure unitis properlyconnected
topowersupply.
I Checkfor a blowncircuitfuse or a tripped
maincircuitbreaker.
I Checkto be sureignitorisdry and clicking.
Burnerwill not lightif ignitoris damaged,
soiled or wet. If ignitordoesn't dick, turn
controlknobOFF.
THE FLAME IS UNEVEN.
I Burnerportsmaybeclogged.
I Flamesettingmayneedto be adjusted.
SURFACEBURNERFLAMELIFTS
OFF PORTS.
I Checktobesureapanissittingonthegrate
above.
BAKING RESULTS ARE NOT AS
EXPECTED OR DIFFER FROM
PREVIOUS OVEN.
I Checktheoventemperatureselected.Make
sureovenispreheatedwhenrecipeordirec-
tionsrecommendpreheat.
I Make sure the ovenvent has not been
blocked. Seepg. 9 forlocation.
I Checkto make surerangeislevel.
I Temperaturesoftenvarybetweena new
ovenandan oldone.Asovensage,the
oventemperatureoften"drifts"and may
becomehotteror cooler. See pg. 9 for
instructionson adjustingthe oven tam-
perature.NOTE: Itisnot recommended
to adjustthe temperatureif onlyone or
tworecipesare inquestion.
I Usecorrectpan.Darkpansproducedark
browning.Shinypansproducelightbrown-
ing.See"Cooking MadeSimple"book-
letfor moreinformationonbakeware.
I Checkrackpositionsandpanplacement.
Staggerpanswhenusingtworacks.Allow
1-2inchesbetweenpansandovenwall.
I Checktheuseoffoilintheoven.Neveruse
foilto coveran entireovenrack.Placea
smallpieceoffoilontherackbelowthepan
to catchspillovers.
FOOD IS NOT BROILING
PROPERLY OR SMOKES
EXCESSIVELY.
Checkoven rackposition.Foodmay be
toocloseto burner.
Broiltemperaturetoohigh.
Aluminumfoilwasincorrectlyused.Never
linethebroilerinsertwithfoil.
Trimexcessfatfrommeatbeforebroiling.
A soiledbroilerpanwas used.
Removeovenrackand placebroilerpan
ontheovenbottom.
OVEN WILL NOT SELF-CLEAN.
I Checktomakesuretbecycleisnotsetfor
a delayedstart.Seepg.11.
I Checkifdoorisctosed.
OVEN DID NOT CLEAN PROPERLY.
I Longercleaningtimemaybe needed.
I Excessivespillovere,especiallysugary
and/oracidicfoods,werenotremoved
priortotheself-cleancycle.
OVENDOORWILL NOT UNLOCK
AFTERSELF-CLEANCYCLE.
I Oveninteriorisstillhot.Allowaboutone
hourfortheoventocoolafterthecomple-
tionofa self-cleancycle.Thedoorcanbe
openedwhenthe LOCindicatorwordis
notdisplayed.
I Bothovens will lockwhen eitheroven is
cleaned.
MOISTURE COLLECTS ON OVEN
WINDOW OR STEAM COMES
FROM OVEN VENT.
I Thisisnormalwhencookingfoodshighin
moisture,
I Excessivemoisturewasusedwhenclean-
ingthe window.
THEREIS A STRONGODOROR
LIGHTSMOKE WHENOVENIS
TURNEDON.
I Thisis normalfor a new rangeand will
disappearafter a few uses. Initiatinga
cleancycle will =burnoff' theodorsmore
quickly.
I Turningon a ventilationfan will help re-
movethe smokeand!orodor.
I Excessivefoodsoilsontheovenbottom.
Usea serf-cleancycle.
"F" PLUSANUMBERAND
THEMESSAGE:"CALLAN
AUTHORIZEDSERVICER"
I This iscalledafault code. If afaultcode
appearsinthe displayand beepssound,
pressthe CANCELpad. Ifthefaultcode
andbeepscontinue,disconnectpowerto
theappliance.Wait a few minutes,then
reconnectpower.If faultcodeandbeeps
sttil continue, disconnect power to the
applianceandcallanauthorizedservicer.
I If the oven is heavily soiled,excessive
flare-upsmayresultin afaultcodeduring
a clean cycle. Press CANCELpad and
allow the ovento cool completely,wipe
outsoil then resetthe cleancycle.If the
faultcode and beeps still continue,dis-
connectpowerto theapplianceand call
an authorizedservicer.
* FORPRIORITYONESERVICECALLTOLL-FREE
1-888-4MAYTAG(1-888-462-9824),
15

NOTES
 Loading...