


MBF2254HEQ4
Maytag MBF2254HEQ4, MBF2254HEW14, MFF2558KEW11, MFF2558KES12, MFF2558KEB11 Owner’s Manual
...


Style1-Standard Door
A. Top Hinge Cover
B. 5_6"Hex-Head Hinge Screws
C. Top Hinge
Side Mount
1st
3rd
2nd
4th
A. Cabinet Hinge Hole Plugs
A. Hinge Pin Cover
B. Center Hinge
C. Hinge Screws
Bottom Hinge
A. Trim Screw
B. Handle Screws
C. Top Trim
D. Bottom Trim
A ............... _ |
A. Door Hinge Hole Plug
iiiiiiiiiiiiiiiiii
.I
A. Door Stop Screws
B. Door Stop
Front View
D
A. 5_,, Hex-Head Hinge Screws
-
Door Handle
Seal Screw
Front
Some Standard Door
models have plastic
handles. See French
Doors graphic.
A Flat-Head Handle A Door Hinge Hole Plugs
Screws
I
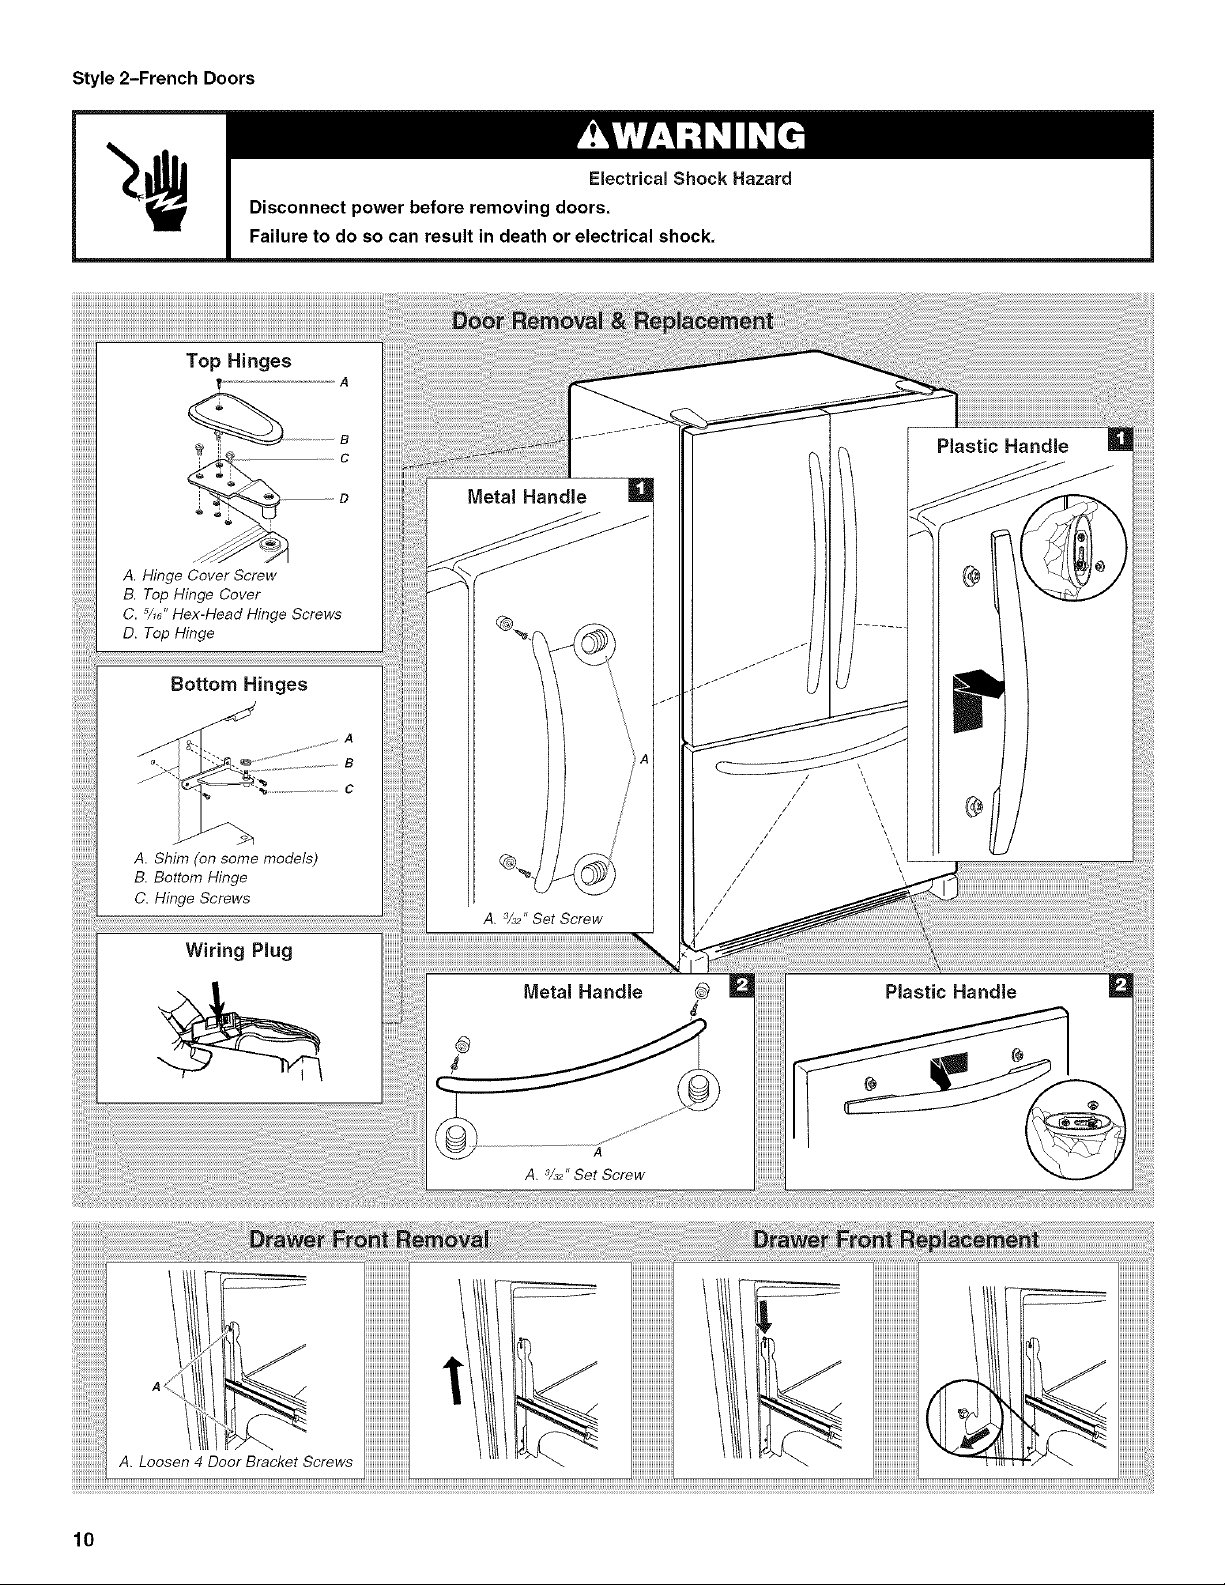
Style 2-French Doors
A. Hinge Cover Screw
B. Top Hinge Cover
C. 5/_6"Hex-Head Hinge Screws
D. Top Hinge
Plastic Handle
Metal Handle
Bottom Hinges
A. Shim (on some models)
B. Bottom Hinge
C. Hinge Screws
Wiring Plug
A. _/32"Set Screw
Metal Handle
A. %2" Set Screw
/ /
//
//
//
//
//
//
//
//
//
//
@
A
Plastic Handle
iiiiiiiiiiiiiiiii
A. Loosen 4 Door Bracket Screws
10
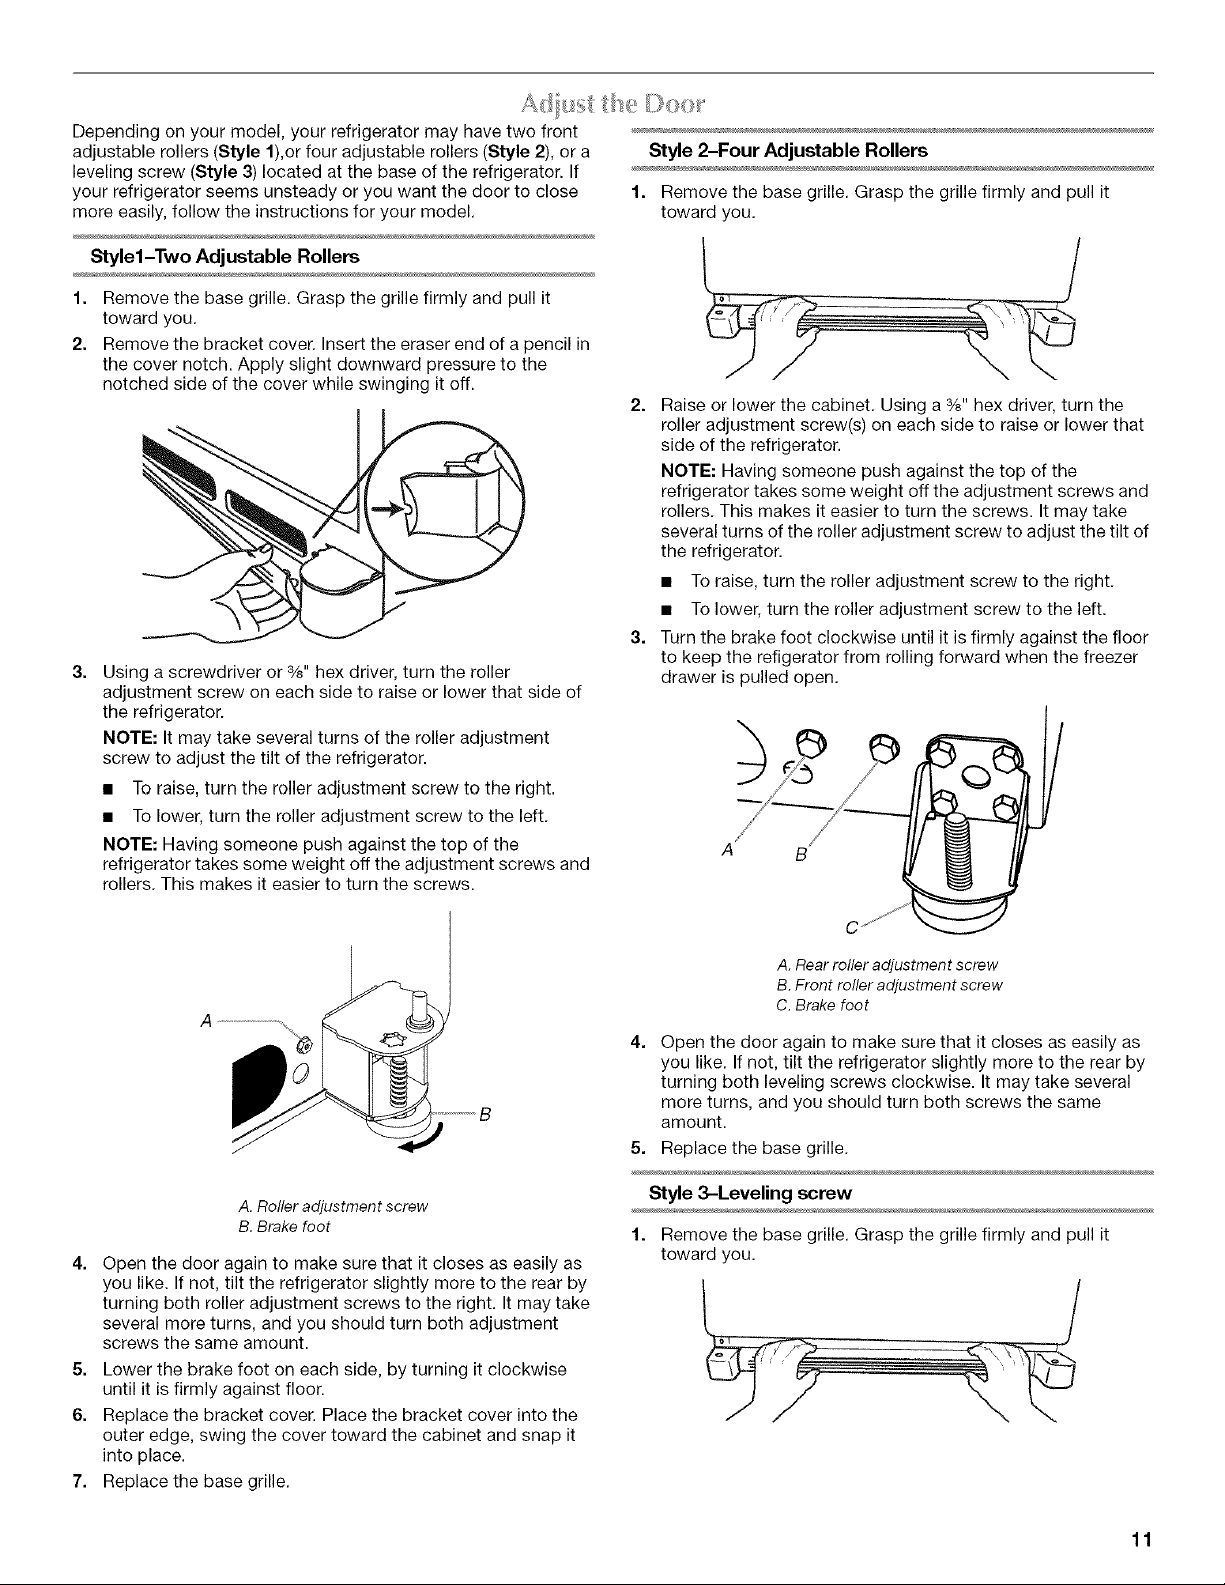
Depending on your model, your refrigerator may have two front
adjustable rollers (Style 1),or four adjustable rollers (Style 2), or a
leveling screw (Style 3) located at the base of the refrigerator. If
your refrigerator seems unsteady or you want the door to close
more easily, follow the instructions for your model.
Stylel-Two Adjustable Rollers
1. Remove the base grille. Grasp the grille firmly and pull it
toward you.
2. Remove the bracket cover. Insert the eraser end of a pencil in
the cover notch. Apply slight downward pressure to the
notched side of the cover while swinging it off.
t4,
3=
Using a screwdriver or %" hex driver, turn the roller
adjustment screw on each side to raise or lower that side of
the refrigerator.
NOTE: It may take several turns of the roller adjustment
screw to adjust the tilt of the refrigerator.
• To raise, turn the roller adjustment screw to the right.
• To lower, turn the roller adjustment screw to the left.
NOTE: Having someone push against the top of the
refrigerator takes some weight off the adjustment screws and
rollers. This makes it easier to turn the screws.
Style 2-Four Adjustable Rollers
1. Remove the base grille. Grasp the grille firmly and pull it
toward you.
2=
Raise or lower the cabinet. Using a %" hex driver, turn the
roller adjustment screw(s) on each side to raise or lower that
side of the refrigerator.
NOTE: Having someone push against the top of the
refrigerator takes some weight off the adjustment screws and
rollers. This makes it easier to turn the screws. It may take
several turns of the roller adjustment screw to adjust the tilt of
the refrigerator.
• To raise, turn the roller adjustment screw to the right.
• To lower, turn the roller adjustment screw to the left.
3=
Turn the brake foot clockwise until it is firmly against the floor
to keep the refigerator from rolling forward when the freezer
drawer is pulled open.
A B
A. Roller adjustment screw
B. Brake foot
4=
Open the door again to make sure that it closes as easily as
you like. If not, tilt the refrigerator slightly more to the rear by
turning both roller adjustment screws to the right. It may take
several more turns, and you should turn both adjustment
screws the same amount.
5. Lower the brake foot on each side, by turning it clockwise
until it is firmly against floor.
6. Replace the bracket cover. Place the bracket cover into the
outer edge, swing the cover toward the cabinet and snap it
into place.
7. Replace the base grille.
u
A. Rear roller adjustment screw
B. Front roller adjustment screw
C. Brake foot
4. Open the door again to make sure that it closes as easily as
you like. If not, tilt the refrigerator slightly more to the rear by
turning both leveling screws clockwise. It may take several
more turns, and you should turn both screws the same
amount.
5. Replace the base grille.
Style 3-Leveling screw
1. Remove the base grille. Grasp the grille firmly and pull it
toward you.
11
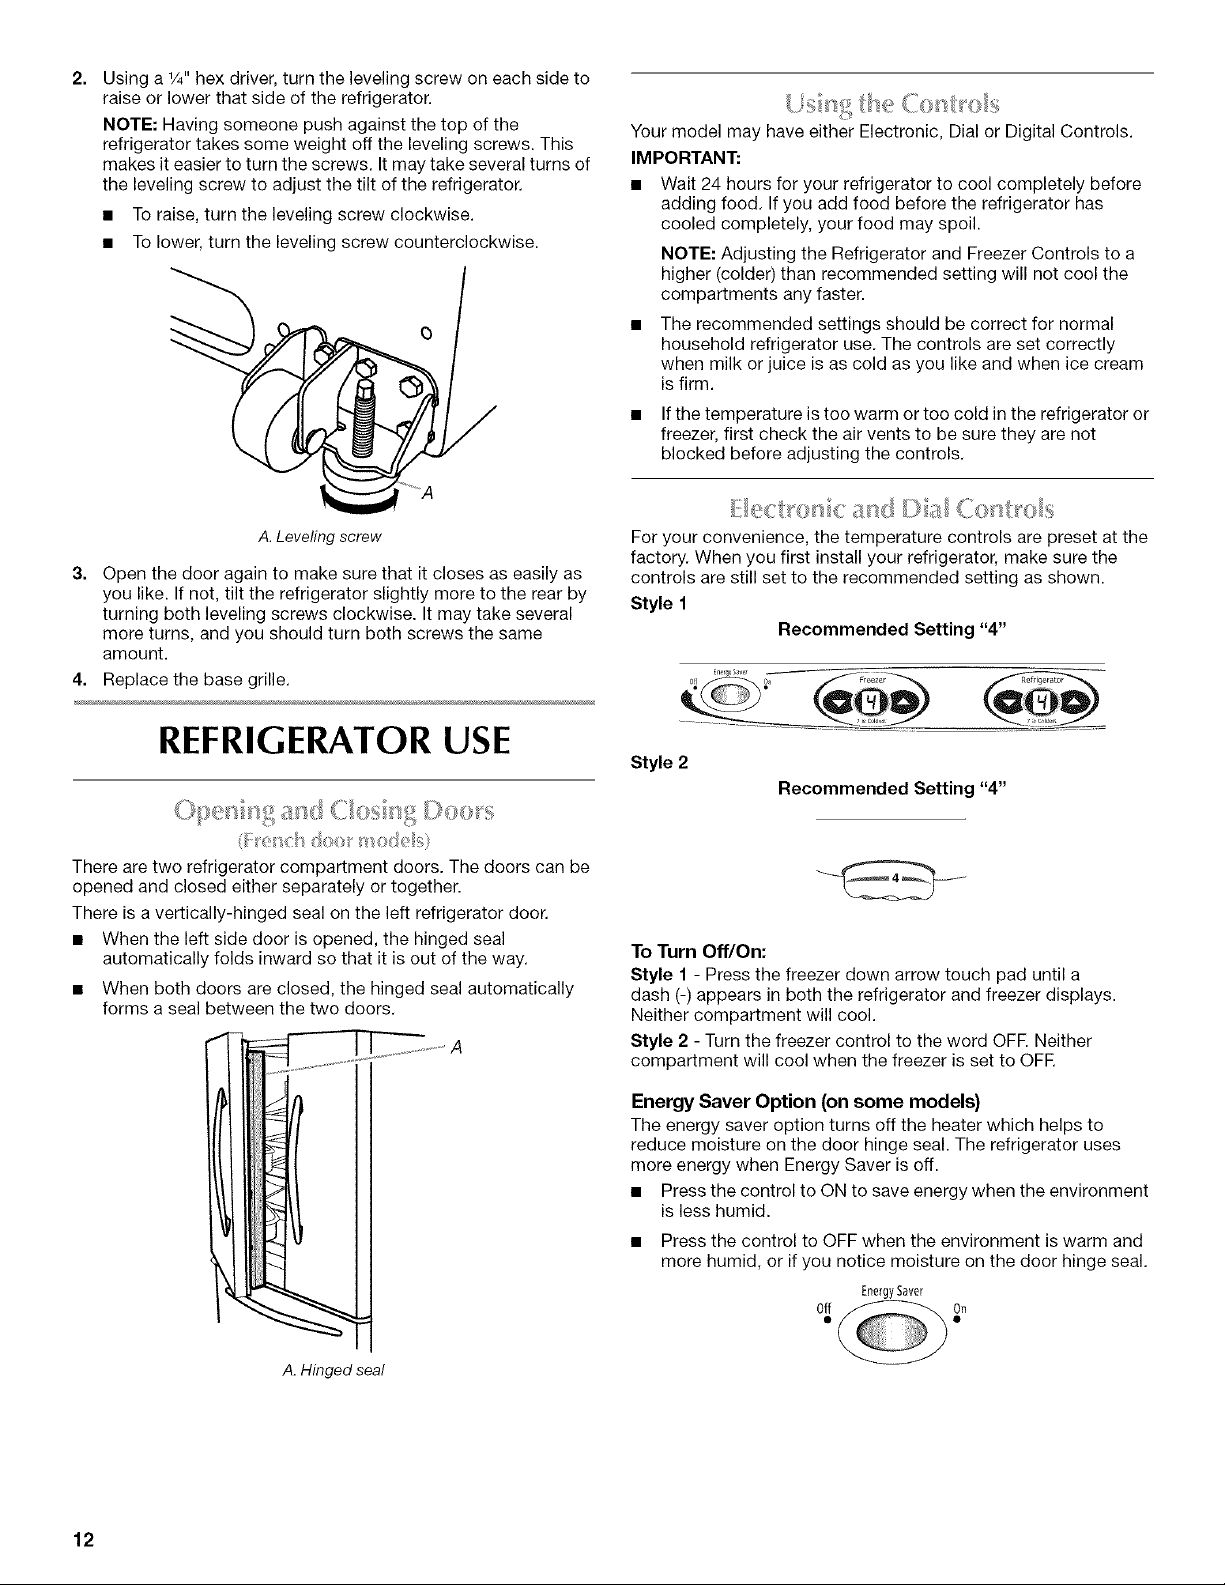
2=
Using a 1/4"hex driver, turn the leveling screw on each side to
raise or lower that side of the refrigerator.
NOTE: Having someone push against the top of the
refrigerator takes some weight off the leveling screws. This
makes it easier to turn the screws. It may take several turns of
the leveling screw to adjust the tilt of the refrigerator.
• To raise, turn the leveling screw clockwise.
• To lower, turn the leveling screw counterclockwise.
A. Leveling screw
3. Open the door again to make sure that it closes as easily as
you like. If not, tilt the refrigerator slightly more to the rear by
turning both leveling screws clockwise. It may take several
more turns, and you should turn both screws the same
amount.
4. Replace the base grille.
' IQ, ." ......
Your model may have either Electronic, Dial or Digital Controls.
IMPORTANT:
• Wait 24 hours for your refrigerator to cool completely before
adding food. If you add food before the refrigerator has
cooled completely, your food may spoil.
NOTE: Adjusting the Refrigerator and Freezer Controls to a
higher (colder) than recommended setting will not cool the
compartments any faster.
The recommended settings should be correct for normal
household refrigerator use. The controls are set correctly
when milk or juice is as cold as you like and when ice cream
is firm.
• If the temperature is too warm or too cold in the refrigerator or
freezer, first check the air vents to be sure they are not
blocked before adjusting the controls.
I_I{_1 IF() II< ii}(I '= "' " ".. "{.y ICol'ol
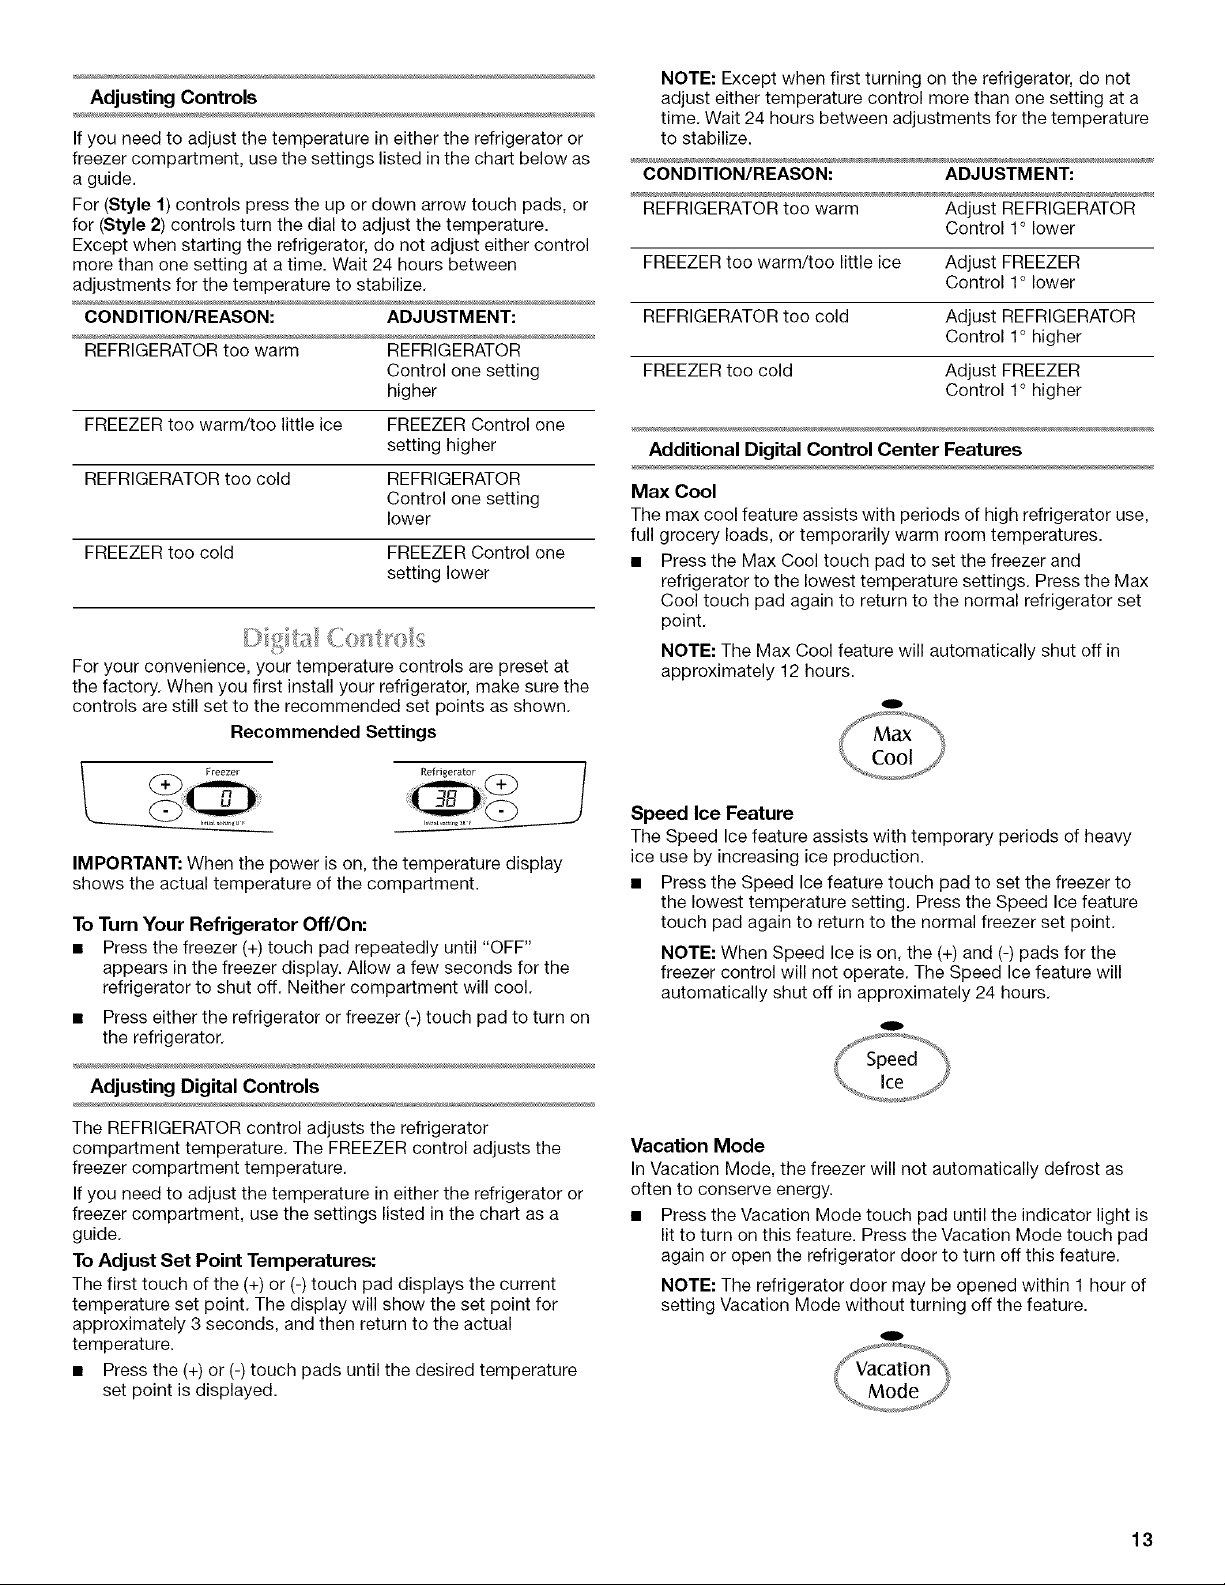
For your convenience, the temperature controls are preset at the
factory. When you first install your refrigerator, make sure the
controls are still set to the recommended setting as shown.
Style 1
Recommended Setting "4"
REFRIGERATOR USE
ii _1} .... " i'I
(I_Q _QI'_i_'i" iii<,)
There are two refrigerator compartment doors. The doors can be
opened and closed either separately or together.
There is a vertically-hinged seal on the left refrigerator door.
• When the left side door is opened, the hinged seal
automatically folds inward so that it is out of the way.
• When both doors are closed, the hinged seal automatically
forms a seal between the two doors.
Style 2
Recommended Setting "4"
To Turn Off/On:
Style 1 - Press the freezer down arrow touch pad until a
dash (-) appears in both the refrigerator and freezer displays.
Neither compartment will cool.
Style 2 - Turn the freezer control to the word OFR Neither
compartment will cool when the freezer is set to OFR
Energy Saver Option (on some models)
The energy saver option turns off the heater which helps to
reduce moisture on the door hinge seal. The refrigerator uses
more energy when Energy Saver is off.
• Press the control to ON to save energy when the environment
is less humid.
• Press the control to OFF when the environment is warm and
more humid, or if you notice moisture on the door hinge seal.
fne_gySaver
12
A. Hinged seal
AdjustingControls
If you need to adjust the temperature in either the refrigerator or
freezer compartment, use the settings listed in the chart below as
a guide.
For (Style 1) controls press the up or down arrow touch pads, or
for (Style 2) controls turn the dial to adjust the temperature.
Except when starting the refrigerator, do not adjust either control
more than one setting at a time. Wait 24 hours between
adjustments for the temperature to stabilize.
CONDITION/REASON: ADJUSTMENT:
REFRIGERATOR too warm REFRIGERATOR
Control one setting
higher
FREEZER too warm/too little ice FREEZER Control one
setting higher
REFRIGERATOR too cold REFRIGERATOR
Control one setting
lower
FREEZER too cold FREEZER Control one
setting lower
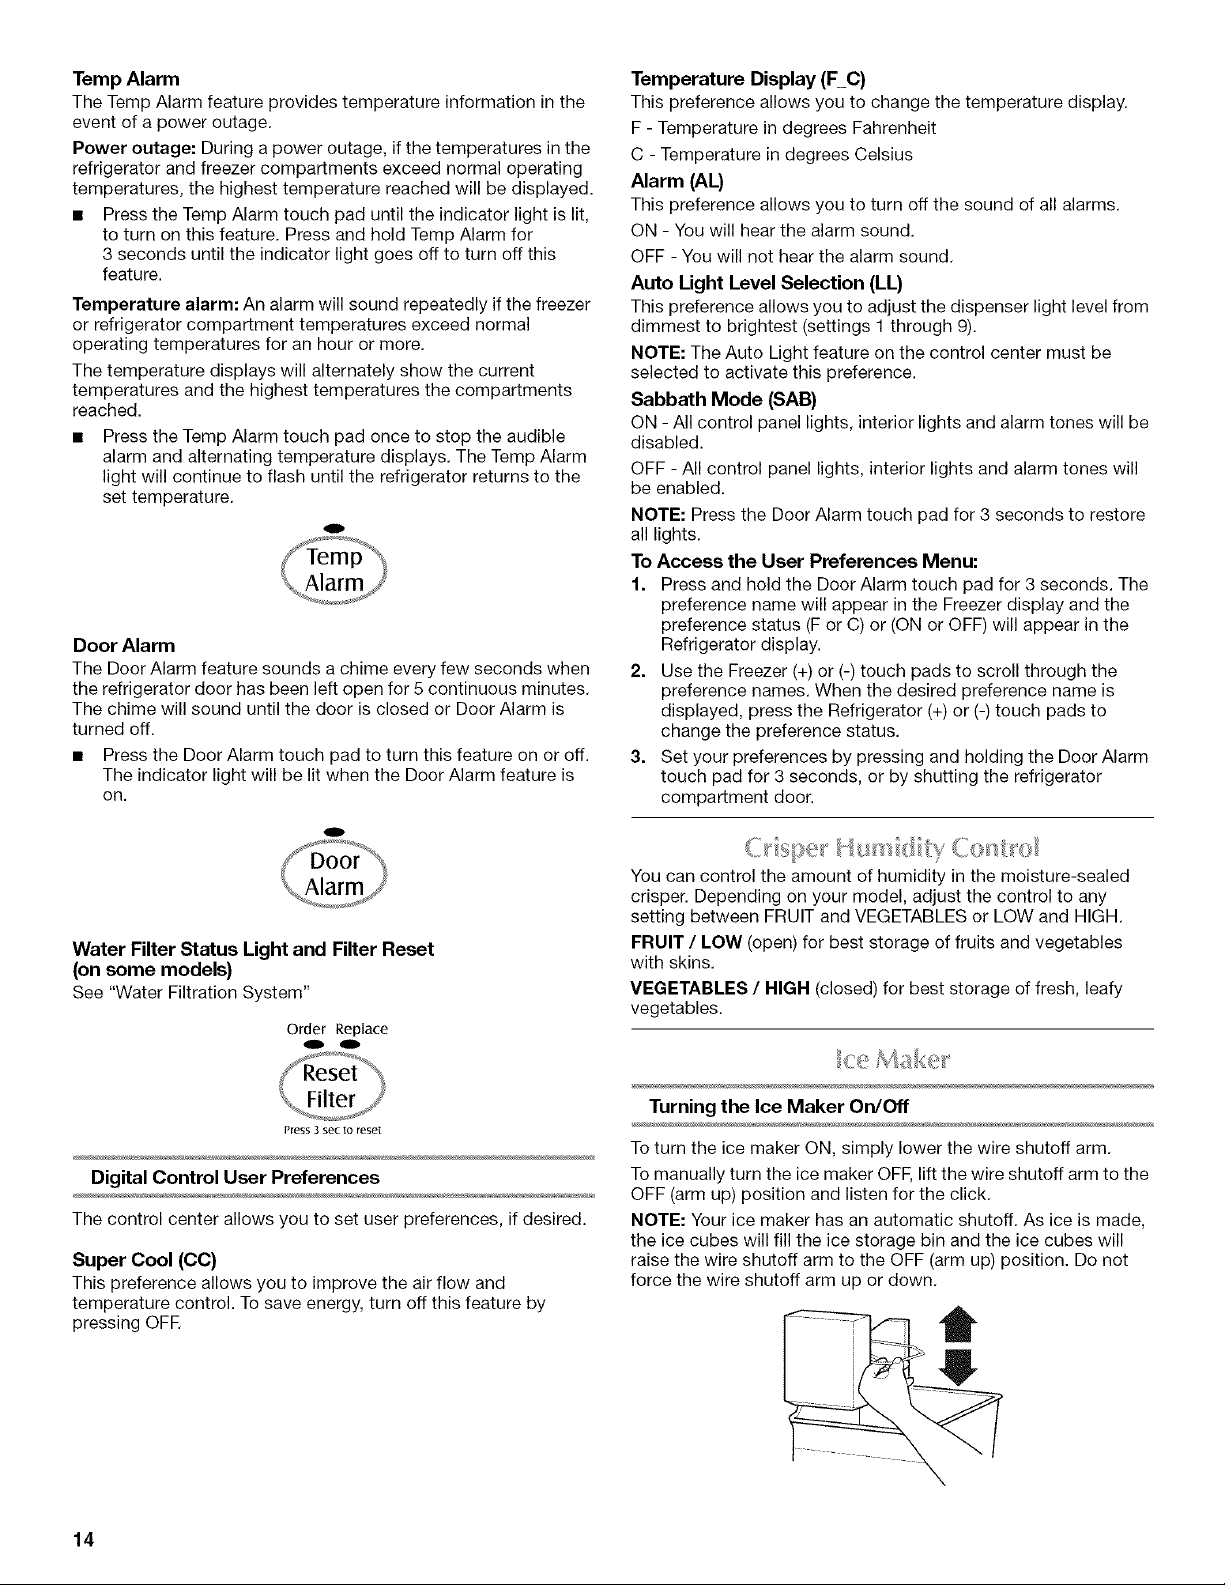
For your convenience, your temperature controls are preset at
the factory. When you first install your refrigerator, make sure the
controls are still set to the recommended set points as shown.
Recommended Settings
NOTE: Except when first turning on the refrigerator, do not
adjust either temperature control more than one setting at a
time. Wait 24 hours between adjustments for the temperature
to stabilize.
CONDITION/REASON: ADJUSTMENT:
REFRIGERATOR too warm Adjust REFRIGERATOR
Control 1° lower
FREEZER too warm/too little ice Adjust FREEZER
Control 1° lower
REFRIGERATOR too cold Adjust REFRIGERATOR
Control 1° higher
FREEZER too cold Adjust FREEZER
Control 1° higher
Additional Digital Control Center Features
Max Cool
The max cool feature assists with periods of high refrigerator use,
full grocery loads, or temporarily warm room temperatures.
• Press the Max Cool touch pad to set the freezer and
refrigerator to the lowest temperature settings. Press the Max
Cool touch pad again to return to the normal refrigerator set
point.
NOTE: The Max Cool feature will automatically shut off in
approximately 12 hours.
o
L Freezer Refriserator
IMPORTANT: When the power is on, the temperature display
shows the actual temperature of the compartment.
To Turn Your Refrigerator Off/On:
• Press the freezer (+) touch pad repeatedly until "OFF"
appears in the freezer display. Allow a few seconds for the
refrigerator to shut off. Neither compartment will cool.
• Press either the refrigerator or freezer (-) touch pad to turn on
the refrigerator.
Adjusting Digital Controls
The REFRIGERATOR control adjusts the refrigerator
compartment temperature. The FREEZER control adjusts the
freezer compartment temperature.
If you need to adjust the temperature in either the refrigerator or
freezer compartment, use the settings listed in the chart as a
guide.
To Adjust Set Point Temperatures:
The first touch of the (+) or (-) touch pad displays the current
temperature set point. The display will show the set point for
approximately 3 seconds, and then return to the actual
temperature.
• Press the (+) or (-) touch pads until the desired temperature
set point is displayed.
Speed Ice Feature
The Speed Ice feature assists with temporary periods of heavy
ice use by increasing ice production.
• Press the Speed Ice feature touch pad to set the freezer to
the lowest temperature setting. Press the Speed Ice feature
touch pad again to return to the normal freezer set point.
NOTE: When Speed Ice is on, the (+) and (-) pads for the
freezer control will not operate. The Speed Ice feature will
automatically shut off in approximately 24 hours.
o
Vacation Mode
In Vacation Mode, the freezer will not automatically defrost as
often to conserve energy.
• Press the Vacation Mode touch pad until the indicator light is
lit to turn on this feature. Press the Vacation Mode touch pad
again or open the refrigerator door to turn off this feature.
NOTE: The refrigerator door may be opened within 1 hour of
setting Vacation Mode without turning off the feature.
o
13
 Loading...