


INSTALLATION INSTRUCTIONS
(original instructions)
Commercial Washer
Models MAT20CSAGW, MAT20MNAGW, MAT20PDAGW, and MAT20PNAGW
INSTRUCTIONS D’INSTALLATION
(Instructions d’origine)
Lave-Linge commercial
Modèles MAT20CSAGW, MAT20MNAGW, MAT20PDAGW et MAT20PNAGW
INSTRUCCIONES DE INSTALACIÓN
(Instrucciones originales)
Lavadora Comercial
Modelos MAT20CSAGW, MAT20MNAGW, MAT20PDAGW y MAT20PNAGW
ISTRUZIONI D’INSTALLAZIONE
(Istruzioni originali)
Lavatrice Commerciale
Modellos MAT20CSAGW, MAT20MNAGW, MAT20PDAGW e MAT20PNAGW
W10837717A |
www.maytagcommerciallaundry.com |
|
|
TABLE OF CONTENTS
. |
Page |
Washer Safety.......................................................................... |
3 |
FOR OWNER |
|
General Use Instructions......................................................... |
4 |
Typical Full Load Sizes............................................................ |
4 |
Transporting Your Washer....................................................... |
5 |
If You Need Assistance or Service......................................... |
5 |
FOR MAYTAG AUTHORIZED SERVICE PERSON |
|
Tools & Parts............................................................................. |
6 |
Alternate Parts & Accessories................................................ |
6 |
Dimensions............................................................................... |
7 |
Location Requirements........................................................... |
8 |
Installation Instructions........................................................... |
9 |
Level Washer.......................................................................... |
10 |
Connect Drain Hose............................................................... |
11 |
Drain System.......................................................................... |
12 |
Connect Inlet Hoses.............................................................. |
13 |
Electrical Requirements........................................................ |
14 |
Complete Installation............................................................. |
15 |
Installing Coin Slide and Coin Box....................................... |
15 |
Electronic Controls Set-Up Instructions |
|
(PD & PN Models)................................................................... |
16 |
Washer Disposal.................................................................... |
20 |
Warranty.................................................................................. |
21 |
MODEL NOMENCLATURE:
MAT – Maytag |
MN – Timer Non-Pay |
20 – Model Type Number |
PD – Coin Drop |
CS – Coin Slide |
PN – Electronic Non-Pay |
|
|
ÍNDICE
. |
|
|
Página |
Seguridad de la lavadora........................................................ |
|
42 |
|
PARA EL PROPIETARIO |
|
|
|
Instrucciones del uso general................................................ |
|
43 |
|
Tamaños de cargas típicas de volumen completo.............. |
43 |
||
Transporte de la lavadora....................................................... |
|
44 |
|
Si necesita asistencia o servicio........................................... |
|
44 |
|
PARA EL PERSONAL DE SERVICIO AUTORIZADO |
|||
DE MAYTAG |
|
|
|
Herramientas y piezas............................................................ |
|
45 |
|
Piezas y accesorios alternativos........................................... |
|
45 |
|
Dimensiones............................................................................ |
|
46 |
|
Requisitos de ubicación......................................................... |
|
47 |
|
Instrucciones de instalación.................................................. |
|
48 |
|
Nivelación de la lavadora....................................................... |
|
49 |
|
Conexión de la manguera de desagüe................................. |
50 |
||
Sistema de desagüe............................................................... |
|
51 |
|
Conexión de las mangueras de entrada............................... |
52 |
||
Requisitos eléctricos.............................................................. |
|
53 |
|
Complete la instalación ......................................................... |
|
54 |
|
Instalación del tragamonedas y la caja de monedas.......... |
54 |
||
Instrucciones para programar los controles |
|
||
electrónicos (Modelos PD y PN)............................................ |
|
55 |
|
Eliminación de la lavadora..................................................... |
|
60 |
|
Garantía................................................................................... |
|
61 |
|
NOMENCLATURA DEL MODELO: |
|
||
|
|
|
|
MAT – Maytag |
|
MN – Temporizador |
|
20 – Número de tipo de |
|
operado sin monedas |
|
modelo |
|
PD – Depósito de monedas |
|
CS – Tragamonedas |
|
PN – Operado sin monedas |
|
|
|
electrónico |
|
TABLE DES MATIÈRES
|
|
|
Page |
|
Sécurité du lave-linge............................................................ |
|
22 |
||
POUR LE PROPRIÉTAIRE |
|
|
||
Instructions de l’utilisation général...................................... |
23 |
|||
Taille typique des charges complètes.................................. |
23 |
|||
Transport du lave-linge.......................................................... |
|
24 |
||
Si vous avez besoin d’assistance ou service...................... |
24 |
|||
POUR LE PERSONNEL D’ENTRETIEN AUTORISÉ |
||||
PAR MAYTAG |
|
|
|
|
Outillage et pièces................................................................. |
|
25 |
||
Pièces supplémentaires et accessoires.............................. |
25 |
|||
Dimensions............................................................................. |
|
26 |
||
Exigences d’emplacement.................................................... |
|
27 |
||
Instructions d’installation...................................................... |
|
28 |
||
Établissement de l’aplomb du lave-linge............................. |
29 |
|||
Raccordement du tuyau de vidange.................................... |
30 |
|||
Système de vidange............................................................... |
|
31 |
||
Raccordement des tuyaux d’arrivée d’eau.......................... |
32 |
|||
Spécifications électriques..................................................... |
|
33 |
||
Achever l’installation............................................................. |
|
34 |
||
Installation de la glissière et de la boîte à monnaie............ |
34 |
|||
Instructions de paramétrage des commandes |
|
|
||
électroniques (Modèles PD et PN)........................................ |
35 |
|||
Élimination du lave-linge....................................................... |
|
40 |
||
Garantie.................................................................................. |
|
41 |
||
NOMENCLATURE DES MODÈLES : |
|
|
||
|
|
|
|
|
MAT – Maytag |
|
MN – Minuterie non payant |
||
20 – ## (p. ex. 25) Numéro |
|
PD – Chute de pièce |
|
|
de type du modèle |
|
PN – Non payant électronique |
||
CS – Glissière à pièces |
|
|
|
|
|
|
|
|
|
SOMMARIO |
|
|
|
|
. |
|
|
Pagina |
|
Sicurezza della lavatrice........................................................ |
|
62 |
||
PER IL PROPRIETARIO |
|
|
|
|
Istruzioni del uso generale.................................................... |
|
63 |
||
Dimensioni tipiche a carico completo................................. |
63 |
|||
Transporto della lavatrice...................................................... |
|
64 |
||
Se avete bisogno dell’assistenza o servizio........................ |
64 |
|||
PER IL PERSONALE DI ASSISTENZA |
|
|
||
AUTORIZZATO MAYTAG |
|
|
||
Attrezzi e componenti............................................................ |
|
65 |
||
Parti e accessori alternativi.................................................. |
|
65 |
||
Dimensioni.............................................................................. |
|
66 |
||
Requisiti di posizionamento.................................................. |
|
67 |
||
Istruzioni d’installazione........................................................ |
|
68 |
||
Livellamento della lavatrice.................................................. |
|
69 |
||
Connessione del tubo di scarico.......................................... |
70 |
|||
Sistema di scarico.................................................................. |
|
71 |
||
Collegare i tubi d’ingresso.................................................... |
|
72 |
||
Requisiti elettrici.................................................................... |
|
73 |
||
Completamento dell’installazione........................................ |
74 |
|||
Installazione dello scivolo monete e della gettoniera........ |
74 |
|||
Istruzioni di configurazione dei comandi elettronici |
|
|
||
(Modelli PD e PN)................................................................... |
|
75 |
||
L’eliminazione della lavatrice................................................ |
|
79 |
||
Garanzia.................................................................................. |
|
80 |
||
NOMENCLATURA DI MODELLO: |
|
|
||
|
|
|
|
|
MAT – Maytag |
|
MN – Temporizzatore |
|
|
20 – Numero di Tipo |
|
non a gettoni |
|
|
di modello |
|
PD – Imbuto monete |
|
|
CS – Scivolo gettoni |
|
PN – Non a gettoni |
|
|
|
|
elettroniche |
|
|
2

WASHER SAFETY
NOTE: Washer installation and service must be performed by a Whirlpool authorized service person.
IMPORTANT SAFETY INSTRUCTIONS
WARNING: To reduce the risk of fire, electric shock, or injury to persons when using the washer, follow basic precautions, including the following:
ν Read all instructions before using the |
. |
|
washer. |
||
|
νDo not wash articles that have been previously cleaned in, washed in, soaked in, or spotted with petrol, dry-cleaning solvents, or other flammable or explosive substances as they give off vapours that could ignite or explode.
νDo not add petrol, dry-cleaning solvents, or other flammable or explosive substances to the wash water. These substances give off vapours that could ignite or explode.
νUnder certain conditions, hydrogen gas may be produced in a hot water system that has not been used for 2 weeks or more. HYDROGEN GAS IS EXPLOSIVE. If the hot water system has not been used for such a period, before using the washer, turn on all hot water taps and let the water flow from each for several minutes. This will release any accumulated hydrogen gas. As the gas is flammable, do not smoke or use an open flame during this time.
νThe appliance must be disconnected from its power source during service and when
replacing parts. The power cord plug should be visible at all times once disconnected to verify that power remains removed.
νThis appliance is not intended for use by children or by persons with reduced physical, sensory, or mental capabilities, or lack of experience and knowledge, unless they have been given supervision or instructions concerning safe use of the appliance by persons responsible for their safety. Such persons must also understand the possible hazards involved during use.
νThe appliance can be used by children age 8 years and above and persons with reduced physical, sensory, or mental capabilities, or lack of experience and knowledge if they have been given supervision or instructions concerning safe use of the washer, and if they understand the hazards involved.
νChildren of less than 3 years should be kept away unless continuously supervised.
νThis appliance is intended to be used in household and similar applications such as staff kitchen areas, shops, offices, other working environments, farm houses. It can also be used by clients in hotels, motels, other residential type environments, bed and breakfast type environments, areas for communal use in blocks of flats, or in launderettes.
SAVE THESE INSTRUCTIONS
3

ν No washer can completey remove oil. Do not |
ν Do not install or store the washer where it will be |
|
dry anything that has ever had any type of oil |
exposed to the weather. |
|
on it (including cooking oils). Doing so can result |
ν Do not tamper with controls. |
|
in death, explosion, or fire. |
ν After installation, access to mains plug or |
|
ν It is recommended that fiberglass items not |
||
mains supply via a double-pole switch must |
||
be washed in coin-operated washers. If these |
be maintained at all times in order to ensure |
|
items are washed in the washer, run the washer |
immediate deactivation of the washer in case |
|
through a complete cycle to rinse away any |
of emergency. |
|
residue that might be left in the washer. |
ν Do not repair or replace any part of the washer |
|
ν Cleaning and user maintenance by children must |
||
or attempt any servicing unless specifically |
||
be supervised. |
recommended in this manual. You must also |
|
ν Do not allow children to play on, in, or with |
understand these instructions and have the |
|
the washer. Close supervision of children is |
skills to carry them out. |
|
necessary when the washer is used near children. |
ν See “Electrical Requirements” for grounding |
|
ν Before the washer is removed from service or |
instructions. |
|
discarded, remove the door or lid. |
|
ν Do not reach into the washer if the basket, tub, or agitator is moving.
SAVE THESE INSTRUCTIONS
GENERAL USE INSTRUCTIONS
νWater pressure of 138–690 kPa (20–100 psi) is needed for operation of the washer.
νUse new hoses supplied with the washer. Do not reuse old hoses.
νIf the supply cord is damaged, it must be replaced by the manufacturer, its service agent, or similarly qualified persons in order to avoid a hazard.
TYPICAL FULL LOAD SIZES
Load Type |
Loading Suggestion |
Load Type |
Loading Suggestion |
|
|
|
|
Mixed Load |
3 double sheets |
Heavy Work Clothes |
3 pair pants |
|
4 pillowcases |
|
3 shirts |
|
6 pair shorts |
|
1 coverall |
|
8 T-shirts |
|
4 pair jeans |
|
2 shirts |
|
1 overall |
|
2 blouses |
|
|
|
8 handkerchiefs |
|
|
|
|
|
|
Permanent Press |
2 double or 1 king size sheet |
Knits |
3 blouses |
|
1 tablecloth |
|
4 slacks |
|
1 dress |
|
6 shirts |
|
1 blouse |
|
4 tops |
|
2 slacks |
|
4 dresses |
|
3 shirts |
|
|
|
2 pillowcases |
|
|
|
|
|
|
4

TRANSPORTING YOUR WASHER
νShut off both water faucets. Disconnect and drain water inlet hoses.
νDisconnect drain from drain system and drain any remaining water into a pan or bucket. Disconnect drain hose from back of washer.
νUnplug power cord.
νPlace inlet hoses and drain hose inside washer basket.
νDrape power cord over edge and into washer basket.
νPlace packing tray from original shipping materials back inside washer and reuse shipping base to support the motor and tub. If you do not have original packaging, place heavy blankets
or towels above basket, between the washer top and the tub ring. Close lid and place tape over lip and down the front of the washer. Keep lid taped until washer is moved to new location.
IF YOU NEED ASSISTANCE OR SERVICE
Your installation may require additional parts. To order, please contact your authorised commercial laundry distributor from whom you purchased your washer or an authorised service company.
You will need the washer model number and serial number. Both numbers can be found on the serial-rating plate located on the washer.
IF YOU NEED SERVICE:
Contact your authorized Maytag® Commercial Laundry distributor. To locate your authorized Maytag® Commercial Laundry distributor, visit www.MaytagCommercialLaundry.com.
For written correspondence:
Maytag® Commercial Laundry Service Department
2000 N M 63
Benton Harbor, Michigan 49022-2632 USA
5
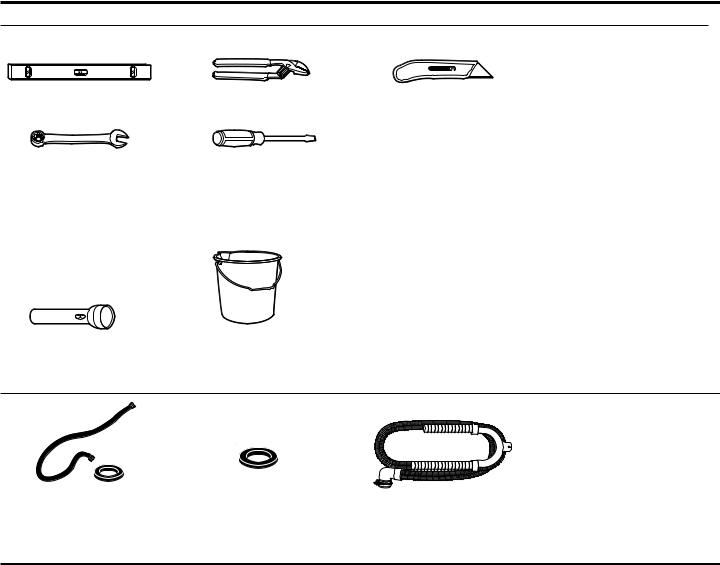
TOOLS & PARTS
Tools Needed:
Level |
Pliers |
Utility Knife |
14 mm (9/16") |
Flat-Blade Screwdriver |
Open-End Wrench |
|
or Adjustable Wrench |
|
Optional tools:
Flashlight |
Bucket |
Parts Supplied:
|
|
|
Drain Hose with Clamp, |
Water Inlet Hoses (2) |
Inlet Hose Washers (4) |
||
|
|
|
U-Form, and Cable Tie |
ALTERNATE PARTS & ACCESSORIES
Your installation may require additional parts. To order, please contact the dealer from whom you purchased your washer or an authorised service company.
If You Have: |
You Will Need: |
|
|
Overhead sewer |
Standard 76 L (20 gal.) 990 mm |
|
(39") tall drain tub or utility sink, |
|
sump pump, and connectors |
|
(available from local plumbing |
|
suppliers) |
25 mm (1") standpipe |
51 mm (2") diameter to |
|
25 mm (1") diameter Standpipe |
|
Adapter Part Number 3363920, |
|
Connector Kit Part Number |
|
285835 |
|
|
Lint clogged drain |
Drain Protector Part Number |
|
367031, Connector Kit Part |
|
Number 285835 |
|
|
Floor drain system |
Siphon Break Part Number |
|
285320, Connector Kit (x2) Part |
|
Number 285835, Extension Drain |
|
Hose Part Number 285863 |
|
|
If You Have: |
|
You Will Need: |
|
|
|
Water faucets beyond |
|
2 longer water fill hoses: |
reach of fill hoses |
|
1.8 m (6 ft.) 90° bend hose |
|
|
Part Number 76314, 3.0 m (10 ft.) |
|
|
Part Number 350008 |
|
|
|
|
|
Inlet hoses are sold as a pair |
|
|
in kit W10575888 |
|
|
|
|
Accessories |
|
|
|
|
If You Have: |
|
You Will Need: |
|
|
|
|
|
Washer Drip Trays |
|
|
Part Number 8212526 |
|
|
|
|
|
Fabric Softener Dispenser Kit |
|
|
Part Number 63594 |
|
|
|
Drain beyond the reach |
|
1.2 m (4 ft.) Drain Hose Extension |
of drain hose |
|
Part Number DRNEXT4 |
|
|
|
6
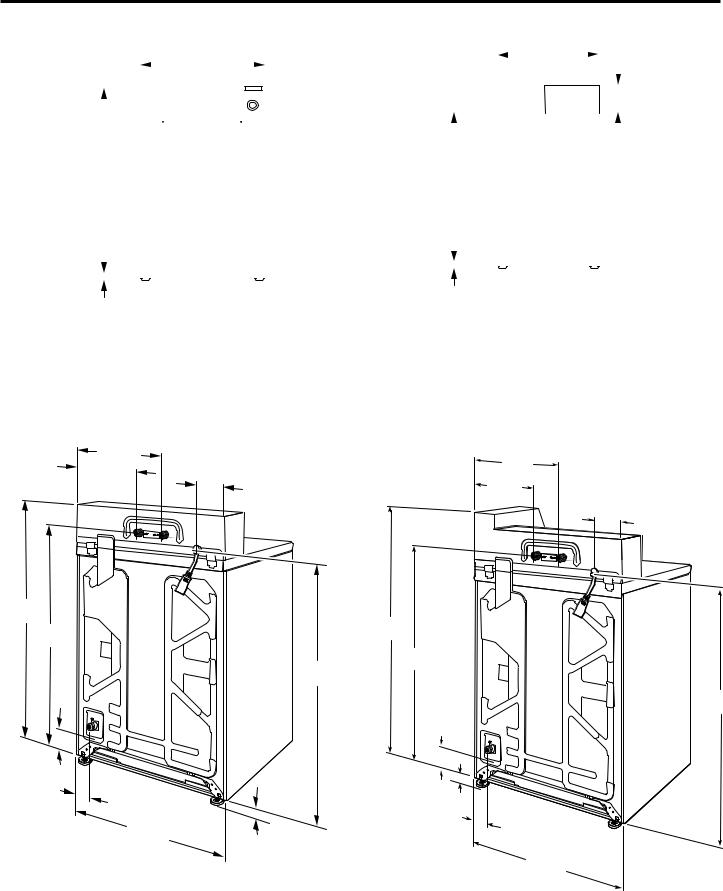
DIMENSIONS
|
|
Front View |
|
|
|
|
|
|
|
Side View |
|
|
|
|
||||||||||||||||||||||
|
|
|
|
|
|
|
|
|
686 mm |
|
|
|
|
|
|
|
|
|
|
|
|
|
|
686 mm |
|
|
|
|
|
|
|
|||||
|
|
|
|
|
|
|
|
|
|
|
|
|
|
|
|
|
|
|
|
|
|
|
|
|
|
|
|
|
|
|||||||
|
|
|
|
|
|
|
|
|
|
|
|
|
|
|
|
|
|
|
|
|
|
|
|
|
|
|
|
|||||||||
|
|
|
|
|
|
(27") |
|
|
|
|
|
|
|
|
(27") |
|
|
|
|
|
|
|
Non-coin-operated |
|||||||||||||
|
|
|
|
|
|
|
|
|
|
|
|
|
|
|
|
|
|
|
|
|
||||||||||||||||
|
|
|
|
|
|
|
|
|
|
|
|
|
|
|
|
|
|
|
|
|
|
|
|
|
|
|
|
|
|
|
|
|
|
|
|
models: |
|
|
|
|
|
|
|
|
|
|
|
|
|
|
|
|
|
|
|
|
|
|
|
|
|
|
|
|
|
|
|
|
|
|
|
|
|
|
|
|
|
|
|
|
|
|
|
|
|
|
|
|
|
|
|
|
|
|
|
|
|
|
|
|
|
|
|
|
|
|
|
|
210 mm159 mm (61⁄4") |
|
|
|
|
|
|
|
|
|
|
|
|
|
|
|
|
|
|
|
|
|
|
|
|
|
|
|
|
|
|
|
|
|
|
||||
|
|
|
|
|
|
|
|
|
|
|
|
|
|
|
|
|
|
|
|
|
|
|
|
|
|
|
|
|
|
|
|
|
( |
81/4" |
||
|
|
|
|
|
|
|
|
|
|
|
|
|
|
|
|
|
|
|
|
|
|
|
|
|
|
|
|
|
|
|
|
|
||||
|
|
|
|
|
|
|
|
|
|
|
|
|
|
|
|
|
|
|
|
|
|
|
|
|
|
|
|
|
|
|
|
|
Coin-operated |
|||
|
|
|
|
|
|
|
|
|
|
|
|
|
|
|
|
|
|
|
|
|
|
|
|
|
|
|
|
|
|
|
|
|
) |
|||
|
|
|
|
|
|
|
|
|
|
|
|
|
|
|
|
|
|
|
|
|
|
|
|
|
|
|
|
|
|
|
|
|
|
|
|
models: |
|
|
|
|
|
|
|
|
|
|
|
|
|
|
|
|
|
|
|
|
|
|
|
|
|
|
|
|
|
|
|
|
|
|
|
|
210 mm (91⁄4") |
|
|
|
|
|
|
|
|
|
|
|
|
|
|
|
|
|
|
|
|
|
|
|
|
|
|
|
|
|
|
|
|
|
|
|
|
|
|
|
|
|
|
|
|
|
|
|
|
|
|
|
|
|
|
|
|
|
|
|
|
|
|
|
|
|
|
|
|
|
|
|
|
|
|
|
|
|
|
|
|
|
|
|
|
|
|
|
|
|
|
|
|
|
|
|
|
|
|
|
|
|
|
|
||||||||
|
|
|
|
|
|
|
|
|
|
|
|
|
|
|
|
|
|
921 mm |
|
|
|
|
|
|
|
|||||||||||
1.080 m |
|
|
|
|
|
|
|
|
|
|
|
|
|
|
|
|
|
|||||||||||||||||||
|
|
|
|
|
|
|
|
|
(361 |
/4") |
|
|
|
|
|
|
|
|
|
|
|
|
|
|
|
|
||||||||||
(421/2") |
|
|
|
|
|
|
|
|
|
|
|
|
|
|
|
|
|
|
|
|
|
|
|
|
|
|
|
|
||||||||
|
|
|
|
|
|
|
|
|
|
|
|
|
|
|
|
|
|
|
|
|
|
|
|
|
|
|
|
|
|
|
|
|
||||
|
|
|
|
|
|
|
|
|
|
|
|
|
|
|
|
|
|
|
|
|
|
|
|
|
|
|
|
|
|
|
|
|
|
|
|
|
|
|
|
|
|
|
|
|
|
|
|
|
|
|
|
|
|
|
|
|
|
|
|
|
|
|
|
|
|
|
|
|
|
|
|
|
|
|
|
|
|
|
|
|
|
|
|
|
|
|
|
|
|
|
|
|
|
|
|
|
|
|
|
|
|
|
|
|
|
|
|
|
|
|
25 mm
25 mm (1")
(1")
|
|
Back View |
|
Non-coin-operated models |
Coin-operated models |
|
406 mm |
406 mm |
267 mm |
(16") |
(16") |
(101/2") |
|
267 mm |
|
140 mm |
(101/2") |
|
(51/2") |
140 mm |
|
|
|
|
|
(51/2") |
1.080 m |
|
|
(421/2") |
1.130 m |
|
946 mm |
||
(441/2") |
||
(371/4") |
946 mm |
|
933 mm |
(371/4") |
|
(363/4") |
|
171 mm (63/4")
171 mm (63/4")
108 mm |
|
25 mm |
|
(41/2") |
|
(1") |
108 mm |
686 mm |
25 mm |
|
(41/4") |
(27") |
|
|
|
|
(1") |
|
686 mm |
|
|
|
|
|
|
|
(27") |
933 mm (363/4")
7
 Loading...