


COMMERCIAL TOP LOAD WASHER INSTALLATION, USER & SET-UP INSTRUCTIONS
MODELS: MAT12CS, MAT12PD,
MAT13MN, MAT13PN
LEAVE THESE INSTRUCTIONS WITH THE OWNER
MAYTAG COMPANY, NEWTON, IOWA 50208 |
2207647 |
IMPORTANT SAFETY INSTRUCTIONS
WARNING: To reduce the risk of fire, explosion, electric shock, property damage or injury to persons when using your appliance, follow basic precautions, including the following:
1.Read all instructions before using the appliance. It is for use only in washing, rinsing and spin drying household textiles and garments.
2.As with any equipment using electricity and having moving parts, there are potential hazards. To use this appliance safely, the operator should become familiar with the instructions for operation of the appliance and always exercise care when using it.
3.Do not install or store this appliance where it will be exposed to the weather.
4.Install and level the clothes washer on a floor that can support the weight.
5.This appliance must be properly earthed. Never plug the appliance cord into an electrical socket outlet which is not adequately earthed and in accordance with local and national codes. See installation instructions for earthing this appliance.
6.To avoid the possibility of fire or explosion:
a.Do not wash items that have been previously cleaned in, washed in, soaked in, or spotted with petrol, dry-cleaning solvents, other flammable or explosive substances as they give off vapours that could ignite or explode. Hand wash and line dry any items containing these substances.
Any material on which you have used a cleaning solvent, or which is saturated with flammable liquids or solids, should not be placed in the clothes washer until all traces of these liquids or solids and their fumes have been removed.
These items include acetone, denatured alcohol, petrol, paraffin, some liquid household cleaners, some spot removers, turpentine, waxes and wax removers.
b.Do not add petrol, dry-cleaning solvents, or other flammable or explosive substances to the wash water. These substances give off vapours that could ignite or explode.
c.Do not wash or dry items that are soiled with vegetable or cooking oil. These items may contain some oil after laundering. Due to the remaining oil, the fabric may smoke or catch fire by itself.
d.Under certain conditions, hydrogen gas may be produced in a hot water system that has not been used for two weeks or more. HYDROGEN GAS IS EXPLOSIVE. If the hot water system has not been used for such a period, before using the washing machine or combination washer-dryer, turn on hot water taps and let the water flow from each for several minutes. This will release any accumulated hydrogen gas. As the gas is flammable, do not smoke or use an open flame during this time.
7.Do not use chlorine bleach and ammonia or acids (such as vinegar or rust remover) in the same wash. Hazardous fumes can form.
8.Do not machine wash fibre glass materials. Small particles can stick to fabrics washed in following loads and cause skin irritation.
9.Store laundry aids and other materials in a cool, dry place where children cannot reach them.
10.This appliance is not intended for use by young children or infirm persons without supervision.
11.Do not allow children to play on or in the appliance. Close supervision of children is necessary when the appliance is used near children.
12.Do not sit on top of the clothes washer.
13.Do not tamper with controls.
14.Do not reach into the appliance if the drum is moving.
15.A drum brake is fitted for your safety. It stops the drum very quickly when the lid is opened. Wait for the drum to stop before reaching inside.
1
16.Unplug power supply cord when not in use, before cleaning or carrying out any owner maintenance tasks on your clothes washer.
17.Do not repair or replace any part of the appliance or attempt any servicing. Repairs and servicing should only be carried out by qualified service personnel.
18.Before the appliance is removed from service or discarded, remove the lid to the wash tub.
2
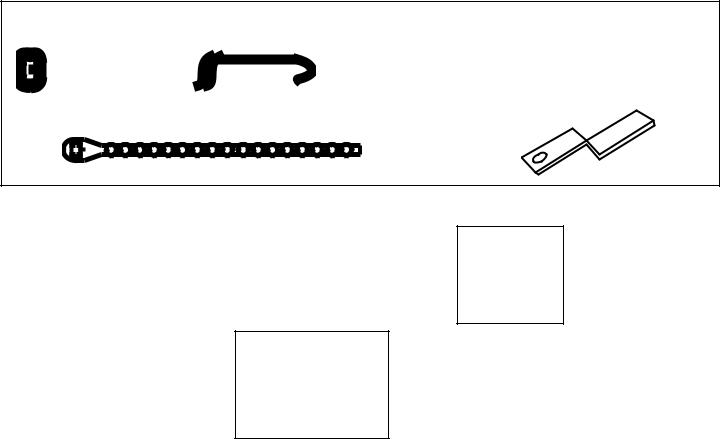
PARTS supplied for installation:
Cable tie to secure drain hose to standpipe, |
4 washers and 2 screens for water hoses |
|||||
inlet hose or laundry tub |
|
|||||
|
|
|
|
|
|
|
|
|
|
|
|
|
|
|
|
|
|
|
|
|
|
|
|
|
|
|
|
|
|
|
|
|
|
Beaded tie to secure drain hose to cabinet (if required) |
Locking cam |
||||
|
|||||
|
|
|
|
|
|
|
|
|
|
|
|
|
|
|
|
|
|
STEP 1
PREPARE WASHER
1.Remove tape on lid. Remove accessory package from tub.
2.Tip the washer backward. Loosen front leveling leg lock nuts.
3.Tip washer slightly forward. Loosen rear leveling leg lock nuts.
4.REMOVE THE TUB BLOCK.
5.Remove the inlet hoses.
STEP 2
INSTALL WASHER
WATER SUPPLY
Cold water supply:
Pressure: 0.14–0.8 MPa (20–120 p.s.i)
Temperature: 25°C max. (77°F max.)
Hot water supply:
Pressure: 0.14–0.8 MPa (20–120 p.s.i)
Temperature: 49°C—60°C (120°F—140°F)
These water pressures are required to correctly fill the washer in the proper time. Pressures of less than 0.14 MPa may cause a failure in the machine water valve, and it may also not shut off completely.
Fit water supply stop-taps to allow easy disconnection of fill hoses. Always turn taps off when washer is not in use (make sure they are accessible).
This appliance should be connected to the water supply using the new hose-sets supplied with it. Old hose-sets should not be reused.
ELECTRICAL
WARNING—This is a 3-wire appliance which must be earthed.
The washer is fitted with an electrical supply cord and a selection of plugs. Select the plug which matches your socket-outlets, and connect to the in-line connector using the snap-fit cover provided. It should be connected to an electricity supply socket at the voltage shown on the data plate. The minimum supply fuse capacity should be 13A. The washer must be positioned so that the plug is accessible. If the supplied plugs are not suitable, the electrical connection must be carried out by a competent electrician in accordance with local or national wiring regulations.
3

If the supply cord is damaged, it must be replaced with a specially terminated cord by an authorized service agent or a similarly qualified person in order to avoid a hazard.
Do not connect via a cord extension set or electrical portable outlet device.
HOSE CONNECTION
1.Never reuse old hose sets. Insert the rubber hose washer from accessory package into the SAE threaded end of the inlet hose. The SAE threaded end is pointed to by the flow arrow on the hoses. Attach the inlet hoses to the HOT and COLD connections of the water valve on the back of the washer with the flow arrows pointing into the machine. HOT and COLD connections are identified by H & C stamped on the bracket, HOT on top, COLD on bottom. Be sure the hose marked “HOT” is attached to the HOT connection. When connecting the inlet hoses, be sure the hose connections are not cross-threaded on the water valve. Tighten by hand until snug and then two-thirds of a turn with pliers. Do not overtighten as this will strip threads on the water valve.
2.Insert both a rubber hose washer and a screen into the hoses for the tap connections. The dome on the screen strainer must point towards the tap. Attach the inlet hoses to the HOT and COLD taps, being sure the hose marked
“HOT” is attached to the HOT water tap. NOTE: Accessory inlet hoses are available in various lengths up to 3m (10 ft.).
3.Place the drain hose in the drain facility. To change drain hose direction or prevent collapsing, turn the short end of the hose while holding the base of the hose stationary.
Hose |
Retainer |
HoseOSE
RetainerE
NOTE: If you must make an airtight seal, use a floor drain, or if the standpipe is not at least 91cm (36 in.), a siphon break kit must be used (see Siphon Break installation). The drain hose should be tied down with the cable tie provided.
4.Slide the washer into position. Do not collapse or damage the drain hose.
5.Level the washer by turning the leveling legs in or out as necessary. When the washer is level, tighten the leveling lock nuts.
4
 Loading...