

Page 1

Model PMD620 User Guide
Handheld Solid State Recorder
Page 2
CAUTION
RISK OF ELECTRIC SHOCK
DO NOT OPEN
CAUTION: TO REDUCE THE RISK OF ELECTRIC SHOCK,
DO NOT REMOVE COVER (OR BACK).
NO USER-SERVICEABLE PARTS INSIDE.
REFER SERVICING TO QUALIFIED SERVICE PERSONNEL.
The lightning flash with arrowhead symbol within an
equilateral triangle is intended to alert the user to the
presence of uninsulated "dangerous voltage" within the
product's enclosure that may be of sufficient magnitude to
constitute a risk of electric shock to persons.
The exclamation point within an equilateral triangle is
intended to alert the user to the presence of important
operating and maintenance (servicing) instructions in the
literature accompanying the product.
WARNING
TO REDUCE THE RISK OF FIRE OR ELECTRIC SHOCK,
DO NOT EXPOSE THIS APPLIANCE TO RAIN OR MOISTURE.
CAUTION:
USE OF CONTROLS OR ADJUSTMENTS OR PERFORMANCE
OF PROCEDURE OTHER THAN THOSE SPECIFIED HEREIN
MAY RESULT IN HAZARDOUS RADIATION EXPOSURE.
Copyright
Recording and playback of any material may require consent. For
further information refer to the following US ordinances:
• Copyright act of 1956
• Dramatic and Musical Performance Act 1958
• Performers Protection Acts 1963 and 1972
• any subsequent statutory enactments and orders
ii
Page 3

IMPORTANT SAFETY
INSTRUCTIONS
READ BEFORE OPERATING EQUIPMENT
This product was designed and manufactured to meet strict quality and
safety standards. There are, however, some installation and operation
precautions which you should be particularly aware of.
1. Read these instructions.
2. Keep these instructions.
3. Heed all warnings.
4. Follow all instructions.
5. Do not use this apparatus near water.
6. Clean only with dry cloth.
7. Do not block any ventilation openings. Install in accordance with the
manufacture’s instructions.
8. Do not install near any heat sources such as radiators, heat
registers, stoves, or other apparatus (including amplifiers) that
produce heat.
9. Do not defeat the safety purpose of the polarized or
grounding-type plug. A polarized plug has two blades
with one wider than the other. A grounding type plug
has two blades and a third grounding prong. The
wide blade or the third prong are provided for your
safety. If the provided plug does not fit into your
outlet, consult an electrician for replacement of the obsolete outlet.
10. Protect the power cord from being walked on or pinched particularly
at plugs, convenience receptacles, and the point where they exit
from the apparatus.
11. Only use attachments/accessories specified by the manufacturer.
12. Use only with the cart, stand, tripod, bracket, or table specified by
the manufacturer, or sold with the apparatus. When a cart is used,
use caution when moving the cart/apparatus combination to avoid
injury from tip-over.
13. Unplug this apparatus during lightning storms or when unused for
long periods of time.
14. Refer all servicing to qualified service personnel. Servicing is
required when the apparatus has been damaged in any way, such
as power-supply cord or plug is damaged, liquid has been spilled
or objects have fallen into the apparatus, the apparatus has been
exposed to rain or moisture, does not operate normally, or has been
dropped.
Additional Safety Information!
• This product should not be placed in a built-in installation such
as a bookcase or rack unless proper ventilation is provided or the
manufacturer’s instructions have been adhered to.
• Apparatus shall not be exposed to dripping or splashing and that
no objects filled with liquids, such as vases, shall be placed on the
apparatus.
• The AC adaptor shall be installed near the Socket-Outlet and shall
be easily accessible.
iii
Page 4

NOTE:
This equipment has been tested and found to comply with the limits for a Class B digital device, pursuant to Part 15 of the FCC Rules. These limits are
designed to provide reasonable protection against harmful interference in a residential installation. This equipment generates, uses and can radiate
radio frequency energy and, if not installed and used in accordance with the instructions, may cause harmful interference to radio communications.
However, there is no guarantee that interference will not occur in a particular installation. If this equipment does cause harmful interference to radio or
television reception, which can be determined by turning the equipment off and on, the user is encouraged to try to correct the interference by one or
more of the following measures:
• Reorient or relocate the receiving antenna.
• Increase the separation between the equipment and receiver.
• Connect the equipment into an outlet on a circuit different from that to which the receiver is connected.
• Consult the dealer or an experienced radio/TV technician for help.
NOTE:
Changes or modifications may cause this unit to fail to comply with Part 15 of the FCC Rules and may void the user's authority to operate the equipment.
This Class B digital apparatus complies with Canadian ICES-003.
Cet appareil numérique de la Classe B est conforme á la norme NMB-003 du Canada.
iv
Page 5

Declaration of Conformity
English
We declare under our sole responsibility that this product, to which this declaration relates, is in
conformity with the following standards:
EN55022, EN55024, EN61000-3-2 and EN61000-3-3 Following the provisions of 2004/108/EC
Directive.
Français
Nous déclarons, sous notre responsabilité exclusive que ce produit, auquel cette déclaration se
rapporte, est conforme aux normes suivantes :
EN55022, EN55024, EN61000-3-2 et EN61000-3-3 suivant les prescriptions de la directive 2004/108/
EC.
Español
Declaramos bajo nuestra responsabilidad que el producto al que se refiere esta declaración cumple
con las siguientes normas:
EN55022, EN55024, EN61000-3-2 y EN61000-3-3, siguiendo las disposiciones de la Directiva
2004/108/CE.
Deutsch
Wir erklären in alleiniger Verantwortung, dass dieses Produkt, auf das sich diese Erklärung bezieht, mit
den folgenden Normen übereinstimmt:
EN55022, EN55024, EN61000-3-2 und EN61000-3-3 Gemäß den Bestimmungen der Richtlinie
2004/108/EG.
Italiano
Il produttore dichiara, sotto la propria esclusiva responsabilità, che il presente prodotto, al quale la
dichiarazione fa riferimento, è conforme ai seguenti standard:
EN55022, EN55024, EN61000-3-2 e EN61000-3-3 secondo le disposizioni della Direttiva 2004/108/EC.
v
Page 6

Português
Declaramos sob nossa total responsabilidade que este produto, com o qual a presente declaração está
relacionada, está em conformidade com as seguintes normas :
EN55022, EN55024, EN61000-3-2 e EN61000-3-3 de acordo com as disposições da Directiva
2004/108/EC.
Svenska
Vi förkunnar under vårt egna ansvar att denna produkt, för vilken detta tillkännagivande gäller,
överrensstämmer med följande normer:
EN55022, EN55024, EN61000-3-2 and EN61000-3-3 Enligt villkor i direktiv 2004/108/EC.
Nederlands
Wij verklaren uitsluitend op onze verantwoordelijkheid dat dit product, waarop deze verklaring
betrekking heeft, in overeenstemming is met de volgende normen:
EN55022, EN55024, EN61000-3-2 en EN61000-3-3. Volgens de bepalingen van Richtlijn 2004/108/EC.
DMi D&M Installation Europe
Kingsbridge House
Padbury Oaks
Longford
Middlesex
UB7 0EH
UK
vi
Page 7

English
WARNINGS
Do not handle the AC adaptor with wet hands.
Do not cover the ventilation with any items such as tablecloths, newspapers, curtains, etc.
No naked flame sources, such as lighted candles, should be placed on the equipment.
When disposing of used batteries, please comply with governmental regulations or environmental public instruction’s rules that apply in your country
or area.
Make a space of about 0.1 meter around the unit.
No objects filled with liquids, such as vases, shall be placed on the apparatus.
When the switch is in the OFF position, the equipment is not completely switched off from MAINS.
To completely disconnect this product from the mains, disconnect the plug from the wall socket outlet.
When setting up this product, make sure that the AC outlet you are using is easily acceptable.
Français
AVERTISSEMENTS
Ne manipulez pas l’adaptateur AC avec les mains mouillées.
Ne pas recouvrir les ouïes de ventilation avec un objet quelconquecomme une nappe, un journal, un rideau, etc.
Ne placer aucune source de flamme nue, comme une bougieallumée, sur l'appareil.
Pour mettre au rebut les piles usées, respecter les loisgouvernementales ou les règlements officiels concernantl’environnement qui s'appliquent à
votre pays ou région.
Veiller à ce qu’aucun objet ne soit à moins de 0,1 mètre des côtésde l'appareil.
Aucun objet rempli de liquide, un vase par exemple, ne doit êtreplacé sur l'appareil.
Lorsque l'interrupteur est sur la position OFF, l'appareil n'est pascomplètement déconnecté du SECTEUR (MAINS).
Pour déconnecter complètement ce produit du courant secteur, débranchez la prise de la prise murale.
Lors de l’installation de ce produit, assurez-vous que la prise CA que vous utilisez est compatible.
vii
Page 8

Español
ADVERTENCIAS
No manipule el adaptador de CA si tiene las manos mojadas.
No cubra la ventilación con objetos como manteles, periódicos, cor-tinas, etc.
No deben colocarse sobre el equipo elementos con fuego, porejemplo velas encendidas.
Cuando se eliminen baterías usadas, deben cumplirse las regla-mentaciones oficiales o las normas de protección medioambientalaplicables en su
país o en su zona.
Deje un espacio de unos 0,1 metro alrededor de la unidad.
No se deben colocar sobre el aparato recipientes que contenganlíquidos, como por ejemplo jarrones.
Cuando el interruptor está en la posición OFF, el equipo no estácompletamente desconectado de la alimentación MAINS.
Para desconectar completamente este producto de la alimentación eléctrica, desconecte el enchufe del enchufe de la pared.
Al ajustar este producto, asegúrese de que la toma de salida de CA que esté utilizando sea fácilmente aceptable.
Deutsch
WARNHINWEISE
Fassen Sie das Netzgerät nicht mit nassen Händen an.
Decken Sie die Lüftungsöffnungen nicht mit einem Tischtuch, einerZeitung, einem Vorhang usw. ab.
Es dürfen keine Gegenstände mit offener Flamme, wie etwabrennende Kerzen, auf dem Gerät aufgestellt werden.
Beachten Sie bei der Entsorgung der verbrauchten Batterien allegeltenden lokalen und überregionalen Regelungen.
Auf allen Geräteseiten muß ein Zwischenraum von ungefähr 0,1meter vorhanden sein.
Auf das Gerät dürfen keine mit Flüssigkeiten gefüllte Behälter, wieetwa eine Vase, gestellt werden.
Wenn der Schalter ausgeschaltet ist (OFF-Position), ist das Gerätnicht vollständig vom Stromnetz (MAINS) abgetrennt.
Um dieses Gerät vollständig von der Stromversorgung abzutrennen, ziehen Sie bitte den Netzstecker von der Wandsteckdose ab.
Stellen Sie bei der Aufstellung des Gerätes sicher, dass die zu verwendende Wechselstrom-Steckdose leicht zugänglich ist.
viii
Page 9

Italiano
AVVERTENZE
Non maneggiare l’adattatore CA con le mani umide.
Non coprire le fessure di ventilazione con tovaglie, giornali, tendeod oggetti analoghi.
Non posare sull'apparecchio sorgenti di fiamme scoperte qualicandele accese.
Smaltire le pile usate in conformità alle norme governative odisposizioni ambientali vigenti nel proprio paese o zona.
Lasciare 0,1 metro liberi tutto intorno l'unità.
Non mettere sull'apparecchiatura alcun contenitore di liquido, comead esempio dei vasi.
Quando l'interruttore è nella posizione OFF, l'apparecchiatura non ècompletamente scollegata da MAINS.
Per scollegare definitivamente questo prodotto dalla rete di alimentazione elettrica, togliere la spina dalla relativa presa.
Durante l’installazione, assicurarsi che la presa in CA utilizzata sia facilmente raggiungibile.
Português
ADVERTÊNCIAS
Não toque no adaptador de AC com as mãos molhadas.
Não cobrir os orifícios de ventilação com objectos tais como toalhas de mesa, jornais, cortinas, etc.
Não colocar chamas abertas tais como velas acesas, sobre o aparelho.
Ao deitar fora as pilhas usadas, favor observar os regulamentos governamentais ou as regras com respeito ao meio ambiente quese aplicam no seu
país ou área de residência.
Deixar um espaço de cerca de 0,1 metro ao redor do aparelho.
Não colocar recipientes com água, tal como vasos, sobre o aparelho.
Quando o interruptor está na posição OFF, o equipamento não fica totalmente desligado de MAINS.
Para desligar totalmente este produto da corrente, desligue a ficha da tomada de parede.
Quando instalar este produto, certifique-se de que a tomada AC que está a utilizar pode ser facilmente acedida.
ix
Page 10

Svenska
VARNINGAR
Hantera inte nätadaptern med våta händer.
Täck inte för ventilationsöppningarna med några föremål som tillexempel bordsdukar, dagstidningar, gardiner e.d.
Inga föremål med öppen låga, som till exempel tända stearinljus,bör placeras på utrustningen.
Följ de lagar och miljöskyddsråd som gäller i det land eller områdedär du bor när du gör dig av med batterier.
Se till att det finns omkring 0,1 meter fri plats runt omkring enheten.
Inga objekt som är fyllda med någon vätska, till exempelblomstervaser, bör placeras på apparaten.
Även om strömbrytaren står i det avstängda läget OFF, så ärutrustningen inte helt bortkopplad från det elektriska nätet (MAINS).
Koppla loss stickproppen från eluttaget för att helt skilja produkten från nätet.
Vid installationen av produkten ska du se till att eluttaget den ansluts till är nära utrustningen.
Nederlands
WAARSCHUWINGEN
Raak de netspanningsadapter niet met natte handen aan.
Bedek de ventilatieopeningen niet met enige voorwerpen, zoalstafelkleden, kranten, gordijnen, enz.
Plaats geen brandende voorwerpen, zoals kaarsen, op hetapparaat.
Volg bij het weggooien van verbruikte batterijen deoverheidswetgeving of milieuvoorschriften op die van kracht zijn inhet land of de regio waarin u
zich bevindt.
Zorg dat er 0,1 meter vrije ruimte rond het toestel is.
Plaats geen voorwerpen met een vloeistof erin, zoals eenbloemenvaas, op het apparaat.
Als de schakelaar op OFF staat, is het apparaat niet vollediglosgekoppeld van de netspanning (MAINS).
Om de voeding van dit product volledig te onderbreken moet de stekker uit het stopcontact worden getrokken.
Let er bij het plaatsen van dit product op dat het te gebruiken stopcontact goed bereikbaar is.
x
Page 11

A NOTE ABOUT RECYCLING:
This product's packaging materials are recyclable and can be reused. Please dispose of any materials in accordance with the local recycling
regulations.
When discarding the unit, comply with local rules or regulations.
Batteries should never be thrown away or incinerated but disposed of in accordance with the local regulations concerning chemical waste.
This product and the accessories packed together constitute the applicable product according to the WEEE directive except batteries.
English
UNE REMARQUE CONCERNANT LE RECYCLAGE:
Les matériaux d’emballage de ce produit sont recyclables et peuvent être réutilisés. Veuillez disposer de toutmatériau conformément aux
réglements de recylage locaux.
Lorsque vous mettez cet appareil au rebut, respectez les lois ou réglementations locales.
Les piles ne doivent jamais être jetées ou incinérées, mais mises au rebut conformément aux réglementslocaux concernant les déchets
chimiques.
Ce produit et les accessoires emballés ensemble sont des produits conformes à la directive DEEE sauf pourles piles.
ACERCA DEL RECICLAJE:
Los materiales de embalaje de este producto son reciclables y se pueden volver a utilizar. Disponga de estos materiales siguiendo los
reglamentos de reciclaje de su localidad.
Cuando se deshaga de la unidad, cumpla con las reglas o reglamentos locales.
Las pilas nunca deberán tirarse ni incinerarse. Deberá disponer de ellas siguiendo los reglamentos de su localidadrelacionados con los
desperdicios químicos.
Este producto junto con los accesorios empaquetados es el producto aplicable a la directiva RAEE excepto pilas.
HINWEIS ZUM RECYCLING:
Das Verpackungsmaterial dieses Produktes ist für zum Recyceln geeignet und kann wieder verwendetwerden. Bitte entsorgen Sie alle
Materialien entsprechend der örtlichen Recycling-Vorschriften.
Beachten Siebei der Entsorgung des Gerätes die örtlichen Vorschriften und Bestimmungen.
Die Batterien dürfen nicht in den Hausmüll geworfen oder verbrannt werden; bitte geben Sie die Batteriengemäß örtlichen Bestimmungen
an den Sammelstellen oder Sondermüllplätzen ab.
Dieses Produkt zusammen mit den Zubehörteilen ist das geltende Produkt der WEEE-Direktive, davonausgenommen sind die Batterien.
Français
Español
Deutsch
xi
Page 12

NOTA RELATIVA AL RICICLAGGIO:
I materiali di imballaggio di questo prodotto sono riutilizzabili e riciclabili. Smaltire i materiali conformementealle normative locali sul
riciclaggio.
Per smaltire l’unità, osservare la normativa in vigore nel luogo di utilizzo.
Non gettare le batterie, né incenerirle, ma smaltirle conformemente alla normativa locale sui rifiuti chimici.
Questo prodotto e gli accessori inclusi nell’imballaggio sono applicabili alla direttiva RAEE, ad eccezione dellebatterie.
Italiano
UMA NOTA SOBRE A RECICLAGEM:
Os materiais de embalagem deste produto são recicláveis e podem ser reutilizados. Elimine quaisquer materiais de acordo com as normas
de reciclagem locais.
Quando eliminar a unidade, obedeça às regras ou normas locais.
As pilhas nunca devem ser deitadas fora ou incineradas, mas sim eliminadas de acordo com as normais locais relativas aos resíduos
químicos.
Este produto e os respectivos acessórios embalados em conjunto constituem o produto aplicável de acordo com a directiva WEEE, excepto
as pilhas.
EN KOMMENTAR OM ÅTERVINNING:
Produktens emballage är återvinningsbart och kan återanvändas. Kassera det enligt lokalaåtervinningsbestämmelser.
När du kasserar enheten ska du göra det i överensstämmelse med lokala regler och bestämmelser.
Batterier får absolut inte kastas i soporna eller brännas. Kassera dem enligt lokala bestämmelser för kemisktavfall.
Denna apparat och de tillbehör som levereras med den är de som uppfyller gällande WEEE-direktiv, medundantag av batterierna.
EEN AANTEKENING WAT BETREFT HET RECYCLEREN:
Het inpakmateriaal van dit product is recycleerbaar en kan opnieuw gebruikt worden. Er wordt verzocht omzich van elk afvalmateriaal te
ontdoen volgens de plaatselijke voorschriften.
Volg voor het wegdoen van despeler de voorschriften voor de verwijdering van wit- en bruingoed op.
Batterijen mogen nooit wordenweggegooid of verbrand, maar moeten volgens de plaatselijke voorschriften betreffende chemisch
afvalworden verwijderd.
Op dit product en de meegeleverde accessoires, m.u.v. de batterijen is de richtlijn voor afgedankteelektrische en elektronische apparaten
(WEEE) van toepassing.
Português
Svenska
Nederlands
xii
Page 13

Table of Contents
Package Contents....................................................3
Introduction ..............................................................4
Quick Start Guide ....................................................6
Names and Functions .............................................8
Front .......................................................................................8
Left ........................................................................................10
Right .....................................................................................11
T op ........................................................................................12
Bottom ..................................................................................12
Rear Back .............................................................................13
Preparations Before Use .......................................14
AC adapter connection .........................................................14
Using batteries ......................................................................14
Installing a memory card .......................................................17
Removing a memory card .....................................................17
Clock Setting .........................................................................18
Font Size ...............................................................................19
Basic Recording Operation ..................................20
Connection Diagram .............................................................20
Recording Procedure ............................................................20
Audio Input for Recording .....................................................22
Recording Format .................................................................23
Recording Time Chart ...........................................................24
Recording Level Control .......................................................25
Basic Playback Operation ....................................26
Connection Diagram .............................................................26
Playback Procedure ..............................................................26
Access from File List .............................................................27
Search ..................................................................................28
Skip Back ..............................................................................28
Display ....................................................................29
Advanced Features ...............................................32
Microphone(s) .......................................................................32
Low Cut Filter ........................................................................33
Silent Skip .............................................................................33
Manual Track ........................................................................33
Auto Track .............................................................................33
Copy Segment ......................................................................34
Key Lock ...............................................................................35
Remote .................................................................................36
USB mode ..............................................................37
How to connect via the USB port ..........................................37
Diagram of file structure ........................................................38
Menu .......................................................................39
Menu List ..............................................................................39
Preset Load ..........................................................................40
Preset Save ..........................................................................41
1
Page 14

Utility Menu ............................................................42
File Rename .........................................................................42
File Delete .............................................................................43
Card Format ..........................................................................44
Preset Menu ...........................................................45
Table of Preset ......................................................................46
1. Input ...............................................................................47
2. Rec Format ....................................................................47
3. Rec Channel ..................................................................48
4. Input Jack .......................................................................48
5. Sample Rate ..................................................................49
6. Manual Track ................................................................49
7. Auto Track ......................................................................50
8. Silent Skip ......................................................................50
9. Level Control ..................................................................51
10. Mic Attenuator ................................................................51
11. Low Cut ..........................................................................52
12. Mic Power ......................................................................52
13. Level LED ......................................................................53
14. Skip Back .......................................................................53
15. File Sort ..........................................................................54
16. Date Form ......................................................................54
17. Font Size ........................................................................55
18. Auto Power Off ...............................................................55
19. Battery ............................................................................56
20. Key Lock ........................................................................56
21. LED ................................................................................57
22. Brightness ......................................................................57
23. Machine ID .....................................................................58
24. Default ............................................................................59
Troubleshooting .....................................................60
Error Message ........................................................61
Specifications ........................................................62
Limited Warranty ....................................................63
2
Page 15

Package Contents
• PMD620
• Audio cable
• USB cable
• AC adapter
ST
OP/CANCEL
• User Guide
PH
ONES
MIC
LEVEL
O
VER
REC
PA
USE
VOL
ENTER
V
OL
SOLI
D
S
TATE
RECORDER
MENU/S
PM
REC LEVEL
REC
DISPL
A
Y
KEY LOCK
T
ORE
SK
IP
BACK
POWER
D
620
• CD-ROM
• Handy Strap
• Customer Registration Document
(USA only)
• Tripod Adapter
• SD Card
3
Page 16

Introduction
Thank you for selecting the Marantz Professional PMD620
Handheld Solid State Recorder.
The PMD620 is an audio recorder that records in digital audio
formats onto a SD (Secure Digital) memory card.
SD cards, also used in digital cameras, are widely available at
consumer electronics retailers and computer resellers.
Features
– Stereo (2 channels) and mono (1 channel) audio recording and
playback.
– Audio inputs may be from :
• the built-in microphone(s),
• condenser or dynamic microphone(s) connected to the MIC
IN jack, or
• line level audio sources connected to the LINE IN jack.
– Audio outputs may be from :
• the built-in speaker,
• headphones connected to the PHONES jack, or
• analog audio devices such as an amplifier or other devices
connected to the LINE OUT jack.
– Records onto various types of SD cards.
4
Page 17

– Computer compatible
The PMD620 records directly onto SD cards.
Recordings can be transferred to your desktop or laptop
computer by removing the SD card from the PMD620 or by
connecting the PMD620 to your computer via the USB port.
Audio recorded in the popular MP3 compression format is
directly available for intranet or internet file sharing.
MS-DOS™ and Windows compatible file system.
– Easy one control recording
Simply press the REC button.
– Automatic recording
The PMD620 can be set to stop recording when there is silence
(Silent Skip) and automatically start when sound resumes.
– Manual and automatic record level control (ALC).
– Different recording formats :
• Compressed recording using MP3 (MPEG1 Layer III) mono
and stereo. MP3 compressed at 64/128/192kbps (Stereo) or
32/64/96kbps (Mono).
• Uncompressed recording using 16/24-bit linear PCM (Pulse
Code Modulation).
– Copy Segment
Copy Segment works just like the copy and paste function
of your standard word processing program. It allows you to
“highlight” a section of a file by setting an in point and an
out point, and then paste that section into a new file without
destroying the original file(s).
– Data secured
The recorded audio data until the recording stops is kept even
if the power is interrupted suddenly during recording.
5
Page 18
Quick Start Guide
Follow the instructions on this page to Quick Start your new
PMD620 Solid State Recorder and begin recording.
The PMD620 comes with factory preset defaults for MP3
recording using internal microphones.
Unpack the AC adapter and the PMD620
1.
Setup the power supply
2.
• Use either the provided AC adapter or batteries.
• You can use 2 AA type batteries of Alkaline, or Nickel-Metal
Hydride.
VER
O
L
E
V
E
L
I
N
L
I
NE
OUT
REM
C
E
R
USE
AY
A
P
L
P
S
I
REC
D
RE
O
T
K
S
C
/
A
U
N
B
E
P
I
OP/CANCEL
T
S
OTE
M
SK
L
O
V
R
E
NT
E
DC IN
0
62
D
M
P
RDER
OL
V
E RECO
T
A
T
S
D
I
L
SO
Slide and hold the POWER switch
3.
POWER KEYLOCK
6
Page 19
Press the REC button to begin recording
4.
REC PAUSESTOP/CANCEL
REC
Press the STOP/CANCEL button to stop playback
8.
REC PAUSESTOP/CANCEL
REC
VOL
Press the STOP/CANCEL button to stop recording
5.
Press the 3/8¥ENTER button to play the just recorded file via
6.
DISPLAY
headphones or speaker.
VOL
ENTER
VOL
Press the 3/8¥ENTER button again to pause playback.
7.
DISPLAY
MENU/STORE
SKIP BACK
VOL
DISPLAY
• For other recording condition, see page 20.
• For the clock setting, see page 18.
• For to select the display font size or brightness of the
display, see page 45.
7
Page 20
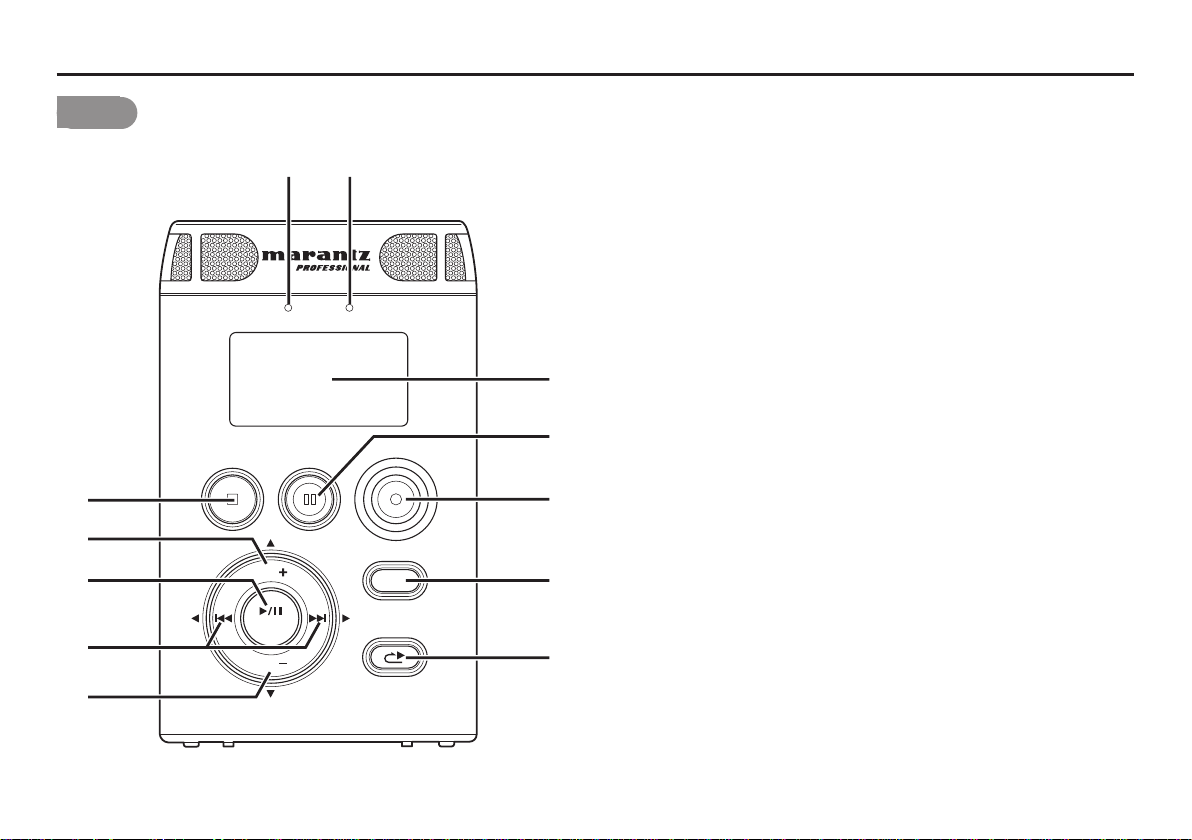
Names and Functions
Front
i
o
!0
!1
qw
LEVEL OVER
REC PAUSESTOP/CANCEL
VOL
ENTER
VOL
REC
DISPLAY
MENU/STORE
SKIP BACK
e
r
t
y
u
q LEVEL LED (Green)
When a sound is input during Record or Rec-Pause
mode, it turns on. A level to turn on is decided in
presetting. (
☞
P.53)
w OVER LED (Red)
When a sound is over peak level during Record or RecPause mode, it turns on.
e DISPLAY
The display shows information of the PMD620.
(
P.29)
☞
r REC PAUSE button
Press to enter the Rec-Pause mode from Stop or
Record mode.
t REC button
Press to start recording from Stop or Rec-Pause mode.
The REC button also works to create new file during
recording if the “Manual Track” in the menu is placed
in “On”.
Press to set IN/OUT point for Copy Segment function
during Playback or Play-Pause mode. (☞ P.34)
8
!2
SOLID STATE RECORDER
PMD620
Page 21

y DISPLAY/MENU/STORE button
Press to change the display contents like the time
information with toggle operation. The content is
different depending on each operation mode. (
From Stop mode press and hold to access the menu.
The menu lets you set or change recording and
playback parameters, such as changing inputs and
setting the Date and Time. During the menu mode,
press to exit the menu mode with saving preset
changes. (
u SKIP BACK button
Press to skip back during Playback or Play-Pause
mode.
☞
P.39)
☞
P.29)
!0 3/8/ENTER button
From stop, press to begin playback.
During Playback mode, press to pause playback. Also,
if this button is pressed when playback is paused,
playback restarts.
During Menu mode, this is used to decide the choice.
!1 4 button
• In Stop, Playback or Play-Pause mode, press to choose the
file (Jump to previous file)
• In Play-Pause mode, press and hold this for high speed
reverse searching without audio.(Search -)
• In Playback mode, press and hold this to “rewind” and do a
2X speed search. (Audible Search -)
i STOP/CANCEL button
Press to stop the Playback or Record mode and to
release the Play-Pause or Rec-Pause mode. During
menu mode, press to exit menu mode without saving
preset changes.
o VOL + button
Press to make a level big of both headphones and
speaker.
During menu mode, this button is used to change item.
¢ button
Same as 4 button except a difference of a direction.
!2 VOL – button
Press to make a level small of both headphones and
speaker.
During menu mode, this button is used to change item.
9
Page 22
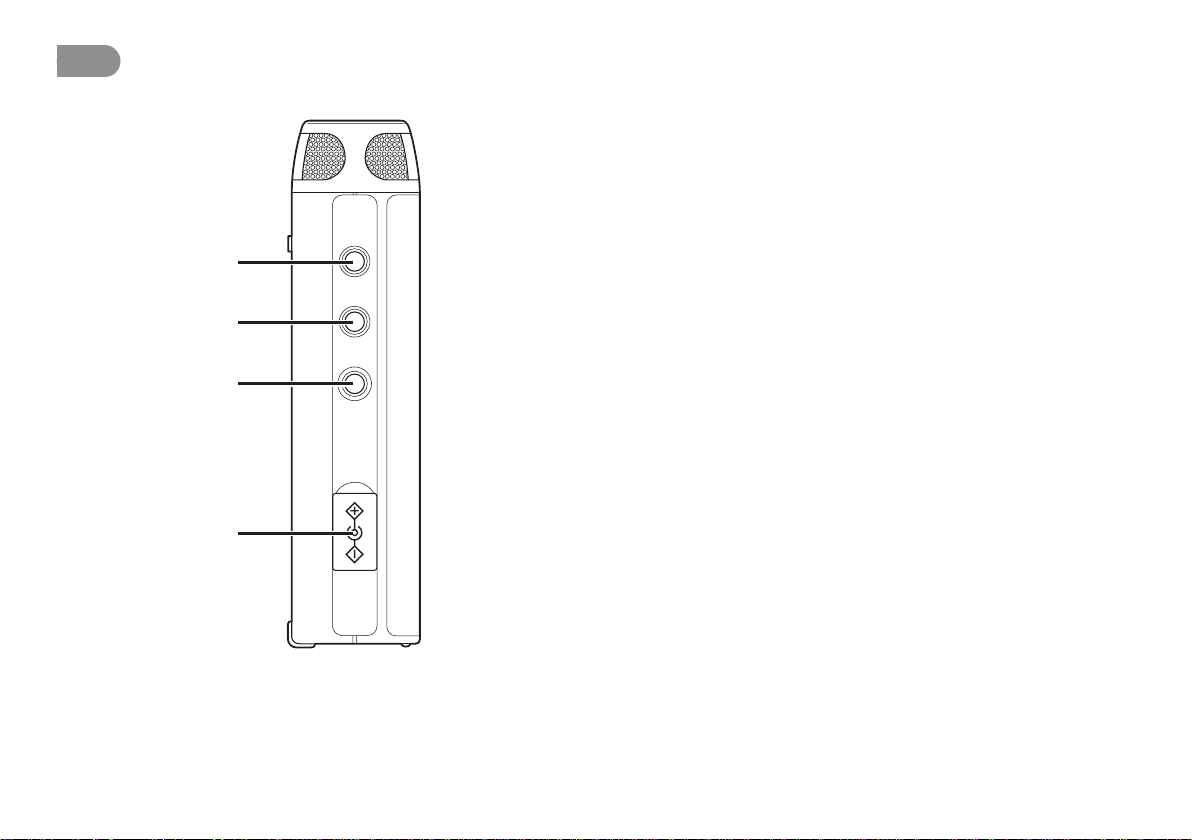
Left
q
w
IN
LINE
OUT REMOTE DC IN
q LINE IN jack
Insert an audio cable plug connected to an external
audio device into this jack to input the signals output
from the external device into the recorder.
w LINE OUT jack
Insert an audio cable plug connected to an external
audio device into this jack to output audio signals to an
external device (amp, etc.).
e REMOTE jack
Connect microphone remote RC600PMD (sold
separately) to this jack. There is a recording indicator
lamp on the RC600PMD.
10
e
r
r DC IN jack
Insert the provided AC adapter plug. The power supply
is DC5V, 1.5A.
If the AC adapter plug is inserted while using the
recorder on battery power, the recorder will
automatically switch to adapter power. Also, if the AC
adapter plug is removed, the recorder will automatically
switch to battery power.
Page 23

Right
q
w
e
q REC LEVEL + button
Press to make a level big of input audio during Record
or Rec-Pause mode.
w REC LEVEL – button
Press to make a level small of input audio during
Record or Rec-Pause mode.
e KEY LOCK switch
Slide switch for the Key Lock On and Off control.
r POWER slide switch
Slide and hold to turn power On or Off.
During Record and Rec-Pause mode, the POWER
switch is invalid.
POWER KEYLOCK REC LEVEL
r
11
Page 24
Top
Bottom
qw
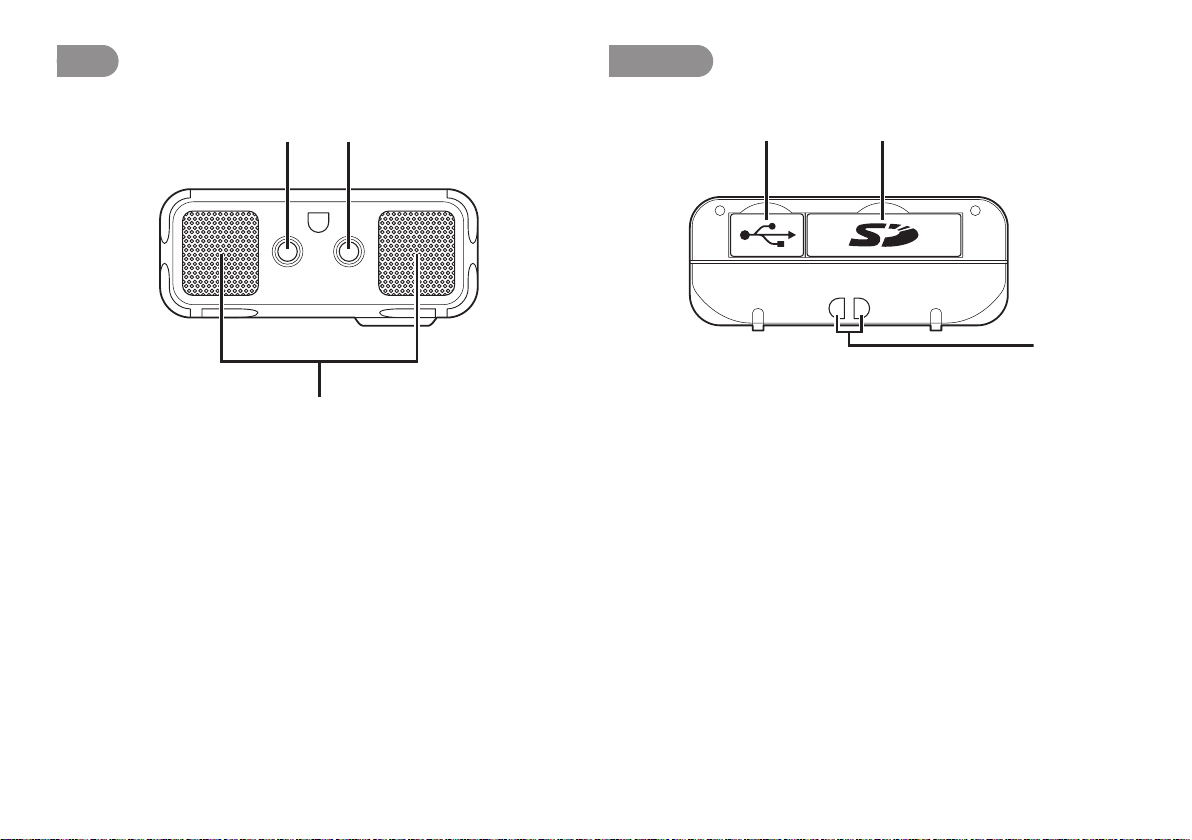
PHONES MIC
e
q PHONES jack
Insert the stereo headphones plug here.
w MIC jack
Insert the external microphones plug.
e Internal MIC
Stereo internal microphones.
rt
y
r USB compar tment
Pull the lid to connect PC via USB cable.
t Card compartment
Pull the lid to access the SD card.
y Strap hole
This hole is for handy strap.
12
Page 25

Rear Back
q
w
e
q Strap hole
This hole is for handy strap.
w Speaker
Monaural build-in speaker.
e Battery compartment
Slide and pull the lid to open the Battery compartment.
13
Page 26

Preparations Before Use
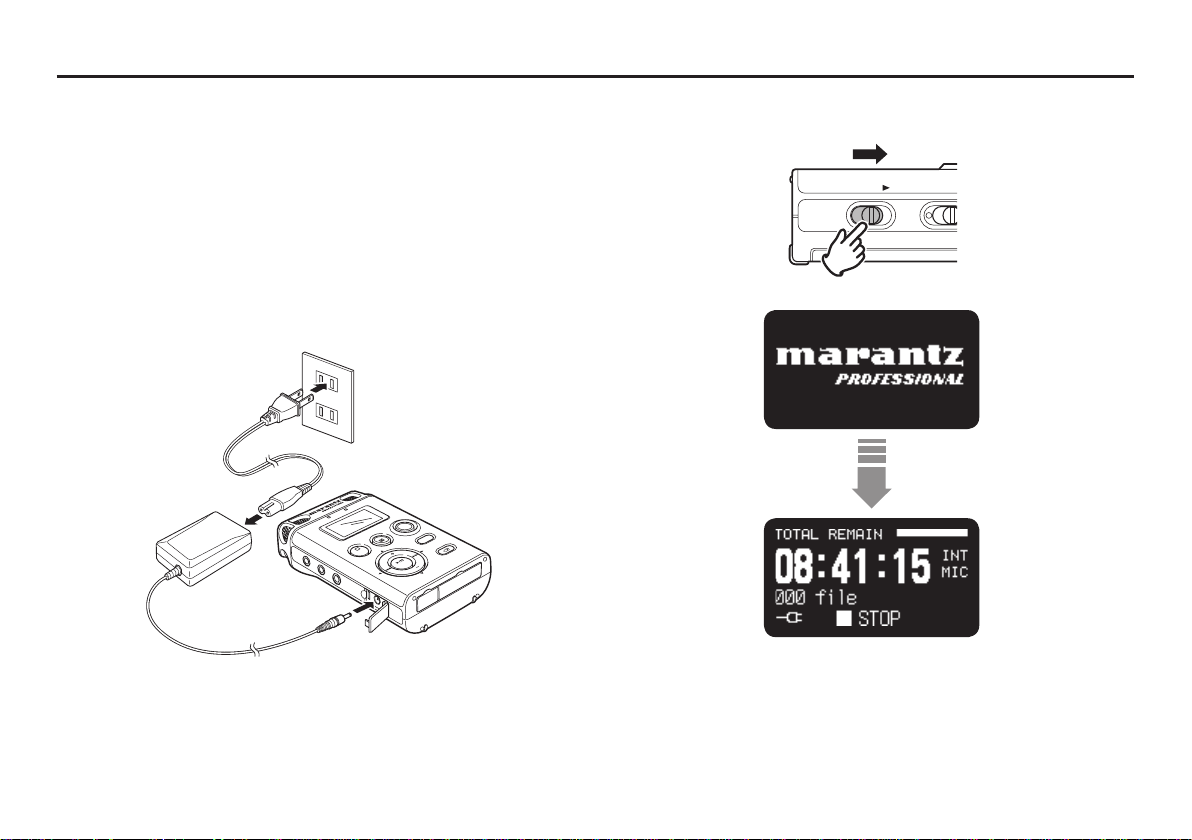
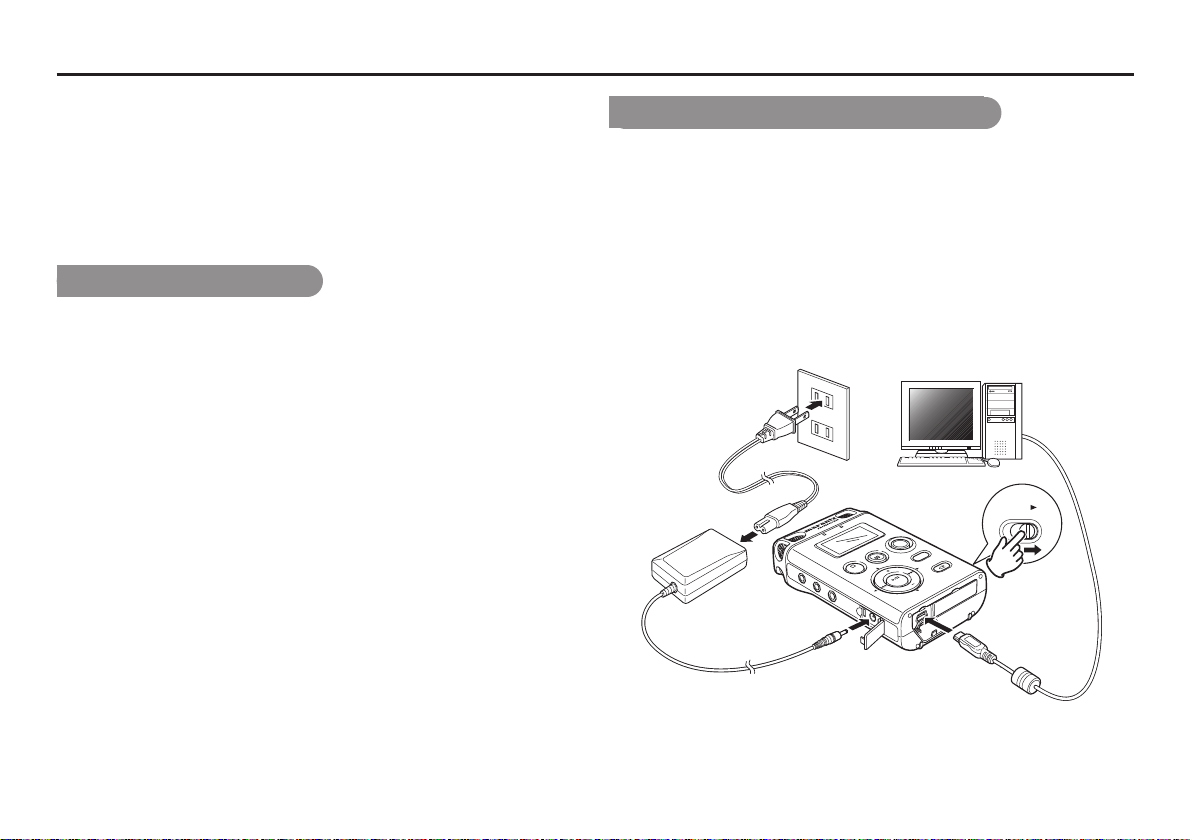
AC adapter connection
When using the recorder with the provided AC adapter, follow the
procedure below to connect the AC adapter.
If you wish to use batteries, please refer to the Using batteries
section.
Notes:
Only use the AC adapter that is provided with the recorder.
•
Running the recorder on DC power without using the provided AC adapter
•
will cause damage to the recorder.
Connect the plug of AC power pack into the DC IN jack on the
1.
recorder.
Connect the Power cord to a regular household plug socket.
2.
POWER
VER
O
L
E
V
E
L
I
N
L
I
NE
OUT
REM
C
E
R
USE
AY
A
P
L
P
S
I
REC
D
RE
O
T
K
S
C
/
A
U
N
B
E
P
OP/CANCEL
T
S
OTE
M
SKI
L
O
V
R
E
NT
E
V
DC IN
0
62
D
M
P
RDER
OL
E RECO
T
A
T
S
D
I
L
SO
Using batteries
If you wish to run the recorder on battery power, follow the
procedure below to install batteries into the recorder. The
following types of battery can be used.
• Alkaline batteries (AA type)
• Nickel-Metal Hydride batteries (AA type)
Notes:
When alkaline batteries (1450mAh type) are used recording: about 4 hours
•
When running the recorder on batteries, always set the battery type in the
•
preset menu to the correct setting for the batteries used. (☞ P.56)
If the batteries run out during recording, recording automatically stops and
•
the file information is updated before the recorder shuts down.
AC adapter is priority than battery. In both power driven, when the AC
•
adapter is taken off, the battery can backup and keep the all behavior on the
PMD620.
Check that the power is turned off.
1.
Slide and pull the battery compartment.
2.
14
Page 27
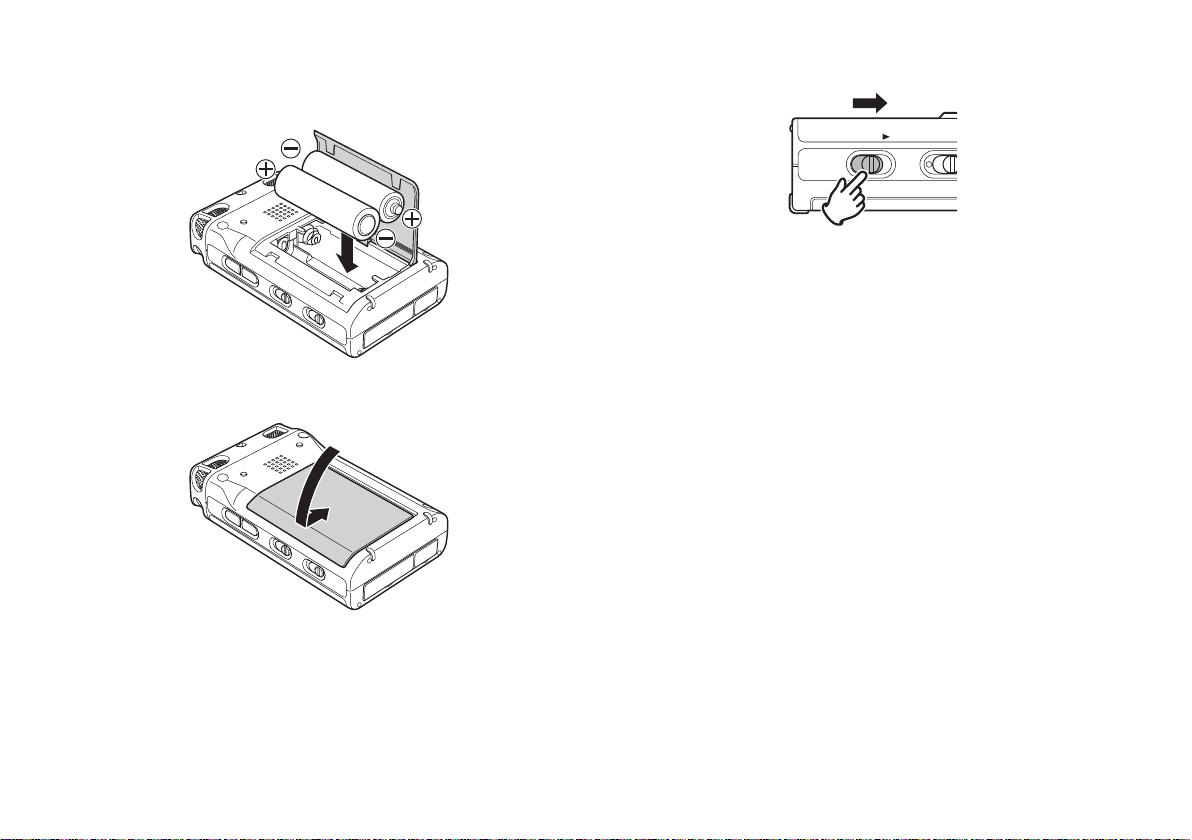
Insert 2 batteries into the recorder correctly as shown in the
3.
diagram below, while paying attention to the polarity displays
(
ª: plus, and ·: minus).
Close the battery compartment.
4.
Slide and hold the POWER switch to turn on.
5.
POWER KEYLOCK
Set the battery type for the recorder to match the type of
6.
batteries you are using. (
☞
P.56)
15
Page 28
Safety cautions on handling batteries
Always follow the points below when using batteries to avoid
electrolyte leakage, overheating, fire, rupturing, ingestion, etc.
• Electrolyte leakage or corrosion may occur if batteries are kept
inside the recorder for prolonged periods of time. If the recorder
is not to be used for a prolonged period, remove the batteries to
prevent electrolyte leakage.
• Make sure that the + and – markings on the batteries are
aligned with the corresponding markings in the battery case
and the battery holder .
• Do not insert old or exhausted batteries into the recorder.
• Do not mix the type of battery, and do not use both old and new
batteries together.
• If the recorder does not operate correctly, replace the old
batteries with new ones.
• If electrolyte has leaked, thoroughly wipe the inside of the
battery holder , and then insert new batteries.
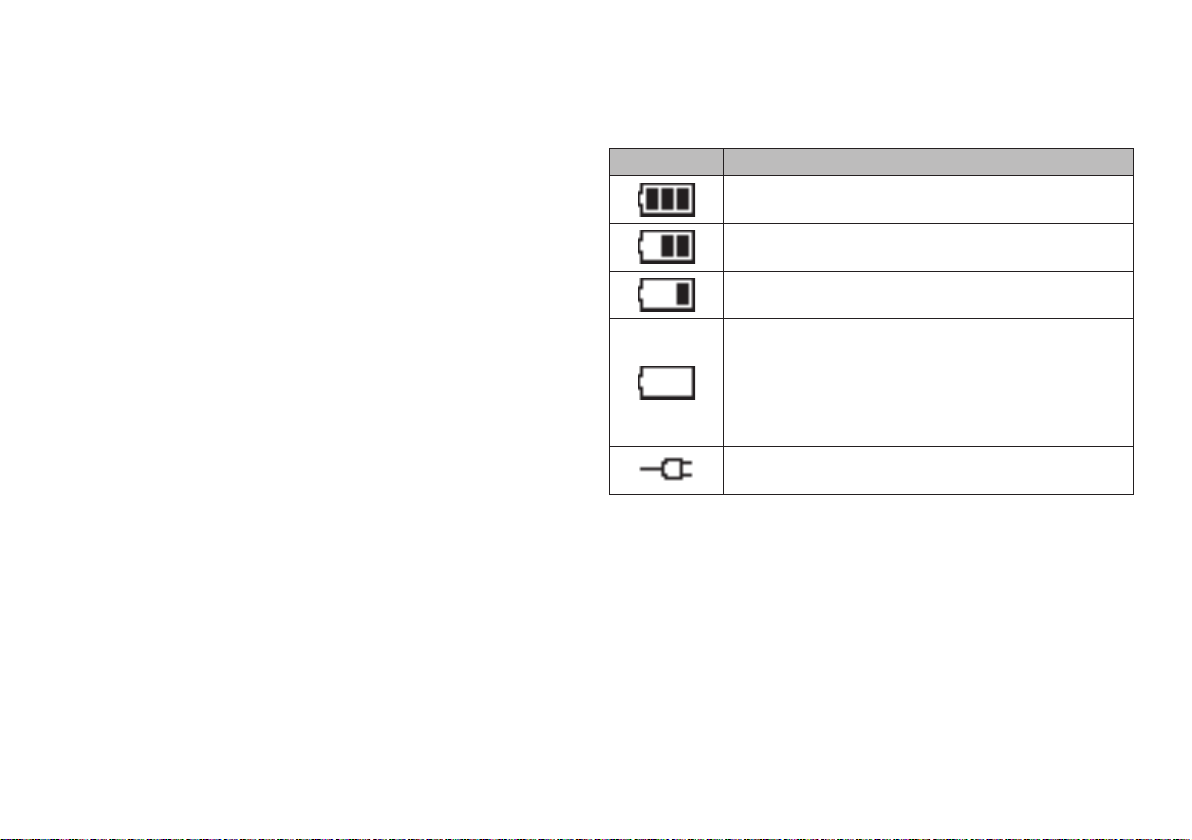
Battery remaining indicator
The recorder operates using commercially available AA size
alkaline or Ni-MH batteries. During operation, the battery
remaining indicator is as follows.
Indicator Meaning
There is still ample battery power remaining.
The amount of battery power remaining has decreased
to approximately half.
Only a small amount of battery power remaining.
There is not enough battery power remaining to record
or playback. Either replace the batteries with new ones,
or recharge the rechargeable batteries.
If you continue recording while this indicator is flashing,
recording/playback will stop, and the recorder will shut
down.
The AC adapter is being used. The adapter power
supply is valid.
16
Page 29

Installing a memory card
ST
CK
DC IN
MENU/ST
S
KIP
B
A
CK
SO
LID S
TA
TE RECO
RD
ER
P
MD6
2
0
VOL
E
NTER
VOL
DC IN
ME
N
U/
S
T
SKIP
B
ACK
SOLI
D S
TATE RECO
RDER
PMD620
V
OL
ENTER
VOL
The PMD620 records onto various types of SD cards.
Check that the power is turned off.
1.
Pull the SD card lid.
2.
A
NU/
B
P
I
ME
K
S
L
Fully insert the SD card.
3.
Close the SD card lid.
4.
VO
ENTER
DC IN
PMD620
OL
V
CORDER
RE
TE
TA
SOLID S
Removing a memory card
Check that the power is turned off.
1.
Pull the SD card lid.
2.
Push the card, then pull it to remove it.
3.
Close the SD card lid.
4.
Notes:
If the SD card lid opens while power is on, “Door Open” is displayed.
•
If recording is in progress, opening the SD card lid automatically stops
•
recording and writes critical file information to properly close the file.
17
Page 30

Clock Setting
Set the current time (year, month, day, hour, minute).
From Stop, press and hold the DISPLAY button for three
1.
seconds.
Press the 3/8/ENTER button to enter the Time/Date setting.
3.
VOL
ENTER
VOL
Press the VOL + or VOL – button to select “Time/Date”.
2.
DISPLAY
MENU/STORE
SKIP BACK
• Press the STOP/CANCEL button to cancel.
• Press the 4 or ¢ button to select the item.
• When the hour is set, press the 4 button to return to the
Top Menu.
• When the year is selected, the ¢ button does not work.
• Press the VOL + or VOL – button to select the value.
Press the DISPLAY button to write on the Real Time Clock.
4.
Note:
If it happens to be the date which does not exist such as Feb. 31, it gets revised
as back to Feb. 28.
18
Page 31

Font Size
You can increase the font size of the text on the file list screen
and preset setting screen.
From Stop, press and hold the DISPLAY button for 3 seconds.
1.
VOL
ENTER
VOL
DISPLAY
MENU/STORE
SKIP BACK
Press the VOL + or VOL – button to select the Font Size item.
4.
Then press the ¢ or 4 button to tab through the Font Size
choices (Large or Small).
Press the DISPLAY button to store the changes.
5.
• Press the STOP/CANCEL button to cancel.
Note:
For example, the file list screens are follows.
Press the VOL + or VOL – button to select “Preset Menu”.
2.
Then press the 3/8/ENTER button to accept.
Press the VOL + or VOL – button to select Preset 1, 2 or 3.
3.
Then press the 3/8/ENTER button to accept the selected
Preset.
Large font Small font
19
Page 32

Basic Recording Operation
Connection Diagram
MICROPHONE
IN-LINE-OUT REMOTE DC IN
LINE
IN
PHONES MIC
LINE
OUT
MIC IN
AMPLIFIER
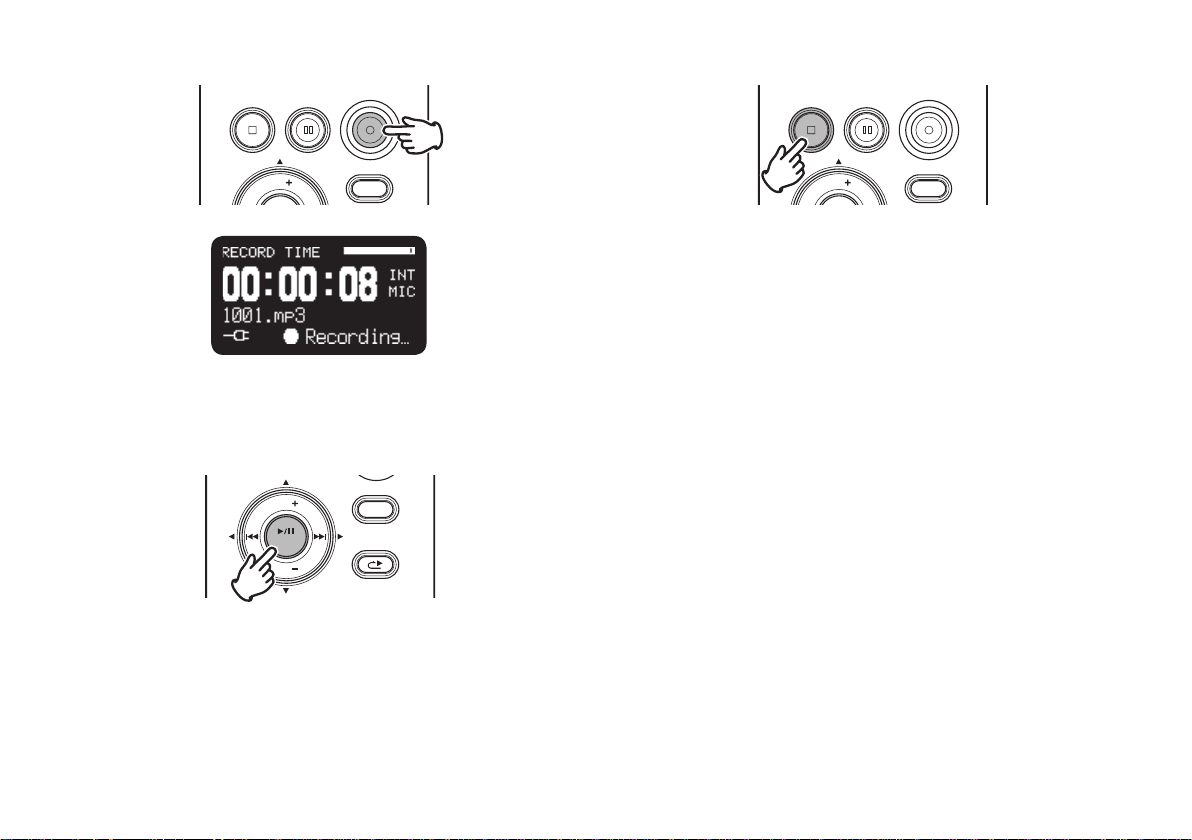
Recording Procedure
Slide and hold the POWER switch to turn on.
1.
POWER KEYLOCK
Press the REC button to begin recording.
2.
REC PAUSESTOP/CANCEL
VOL
• The Rec indicator will be lit and steady while recording.
REC
DISPLAY
20
Page 33
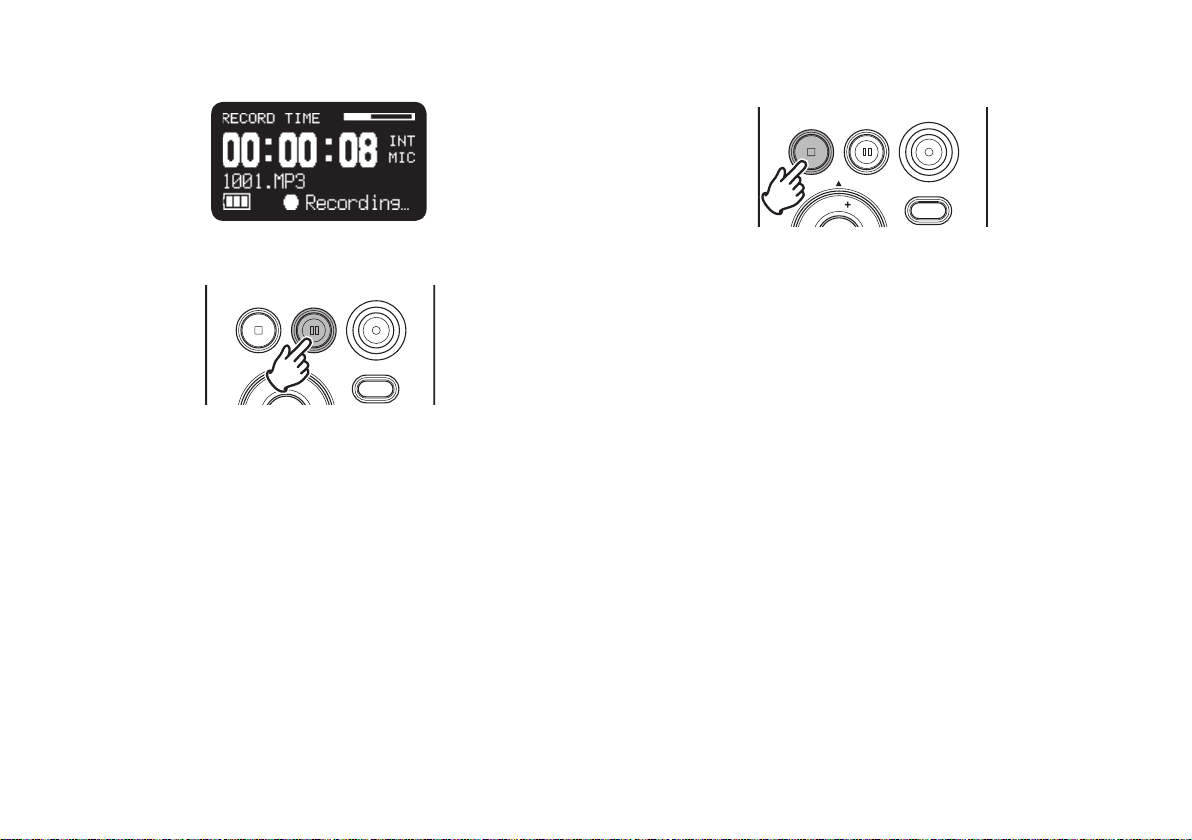
• The display will show the information display of recording.
(
P.30)
☞
Press the STOP/CANCEL button to stop recording and end
4.
the file (close the audio file).
REC PAUSESTOP/CANCEL
REC
Press the REC PAUSE button to pause recording.
3.
REC PAUSESTOP/CANCEL
VOL
REC
DISPLAY
VOL
DISPLAY
The display switches to information about the just recorded file.
You can press the 3/8¥ENTER button to play the just recorded
file, or push the STOP/CANCEL button again to enter Stop
mode. Then pressing the 3/8¥ENTER button will play the
beginning of the first audio file.
21
Page 34

Audio Input for Recording
The audio input for recording can be set from the “Input” menu. (☞ P.47)
If “Input” of menu is Auto and External MIC is connected, Recording source is External MIC. When LINE jack is connected, Recording
source is LINE audio. When the both connected at the same time the External MIC is active as priority.
You can perform 4 types of recording using combinations of the Preset “Rec Channel” (
Rec Channel Setting Input Jack Setting Description
Stereo Stereo The L channel and R channel input is recorded to a stereo file. This is standard stereo
recording.
Mono The input audio is recorded to the L channel and R channel of the stereo file. The same
audio is recorded into the L channel and R channel of the stereo file. When the input is
stereo, the input is only recorded to the L channel.
Mono Stereo Audio mixed from the L channel and R channel is recorded to a monaural file.
Mono The input audio is recorded to a monaural file. When the input is stereo, it is only recorded
to the L channel.
P.48) and “Input Jack” (☞ P.48).
☞
22
Page 35

Recording Format
The PMD620 can record in several compression algorithms.
• Compressed recording using MP3 or uncompressed r ecording 16/24-bit linear PCM (
• Stereo or Mono format. (
Rec Format Sample Rate Channel Bitrates File Extension
MP3-H 44.1KHz Stereo 192 kbps mp3
MP3-M 44.1KHz Stereo 128 kbps mp3
MP3-L 44.1KHz Stereo 64 kbps mp3
PCM-16 44.1KHz Stereo 1411 kbps wav
PCM-24 44.1KHz Stereo 2116 kbps wav
P.48).
☞
Mono 96 kbps mp3
48KHz Stereo 192 kbps mp3
Mono 96 kbps mp3
Mono 64 kbps mp3
48KHz Stereo 128 kbps mp3
Mono 64 kbps mp3
Mono 32 kbps mp3
48KHz Stereo 64 kbps mp3
Mono 32 kbps mp3
Mono 705 kbps wav
48KHz Stereo 1536 kbps wav
Mono 768 kbps wav
Mono 1058 kbps wav
48KHz Stereo 2304 kbps wav
Mono 1152 kbps wav
☞
P.47).
The record file of PCM is BWF(Broadcast Wave Format).
23
Page 36

Recording Time Chart
All times are approximated record times.
Different media manufacturers allow more or less space for error correction and the like on their respective products.
Recording Time (hours : minutes)
Stereo channel
Settings
MP3-H 2:57 5:54 11:48 23:36 47:12
MP3-M 4:26 8:52 17:44 35:28 70:56
MP3-L 8:52 17:44 35:28 70:56 141:52
PCM-16(44.1kHz) 0:24 0:48 1:36 3:12 6:24
PCM-16(48kHz) 0:22 0:44 1:28 2:56 5:52
PCM-24(44.1kHz) 0:16 0:32 1:04 2:08 4:16
PCM-24(48kHz) 0:14 0:28 0:56 1:52 3:44
256MB 512MB 1GB 2GB 4GB
Mono channel
Settings
MP3-H 5:54 11:48 23:36 47:12 94:24
MP3-M 8:52 17:44 35:28 70:56 141:52
MP3-L 17:44 35:28 70:56 141:52 283:44
PCM-16(44.1kHz) 0:48 1:36 3:12 6:24 12:48
PCM-16(48kHz) 0:44 1:28 2:56 5:52 11:44
PCM-24(44.1kHz) 0:32 1:04 2:08 4:16 8:32
PCM-24(48kHz) 0:28 0:56 1:52 3:44 7:28
256MB 512MB 1GB 2GB 4GB
Card Size
Card Size
24
Page 37

Recording Level Control
The recording level control lets you select the type of input level
control.
– At the Manual Level Control
When Manual is set in the Level Control setting, press the REC
LEVEL + or REC LEVEL – button to control the audio input
level. The optimum record level is when the level meter goes as
close to 0dB as possible but does not go OVER. When Level
display is off, press the REC LEVEL + or REC LEVEL – button
to display the level information for 1 seconds without changing
recording level.
KEYLOCK REC LEVEL
– At ALC (Automatic Level Control)
The PMD620 automatically responds to changes in input
level. The REC LEVEL controls do not work when the ALC is
selected. Set the Level Control of the preset menu “ALC” (
P.51).
☞
25
Page 38

Basic Playback Operation
Connection Diagram
IN-LINE-OUT REMOTE DC IN
LINE
OUT
PHONES MIC
PHONES
LINE
IN
AMPLIFIER
Playback Procedure
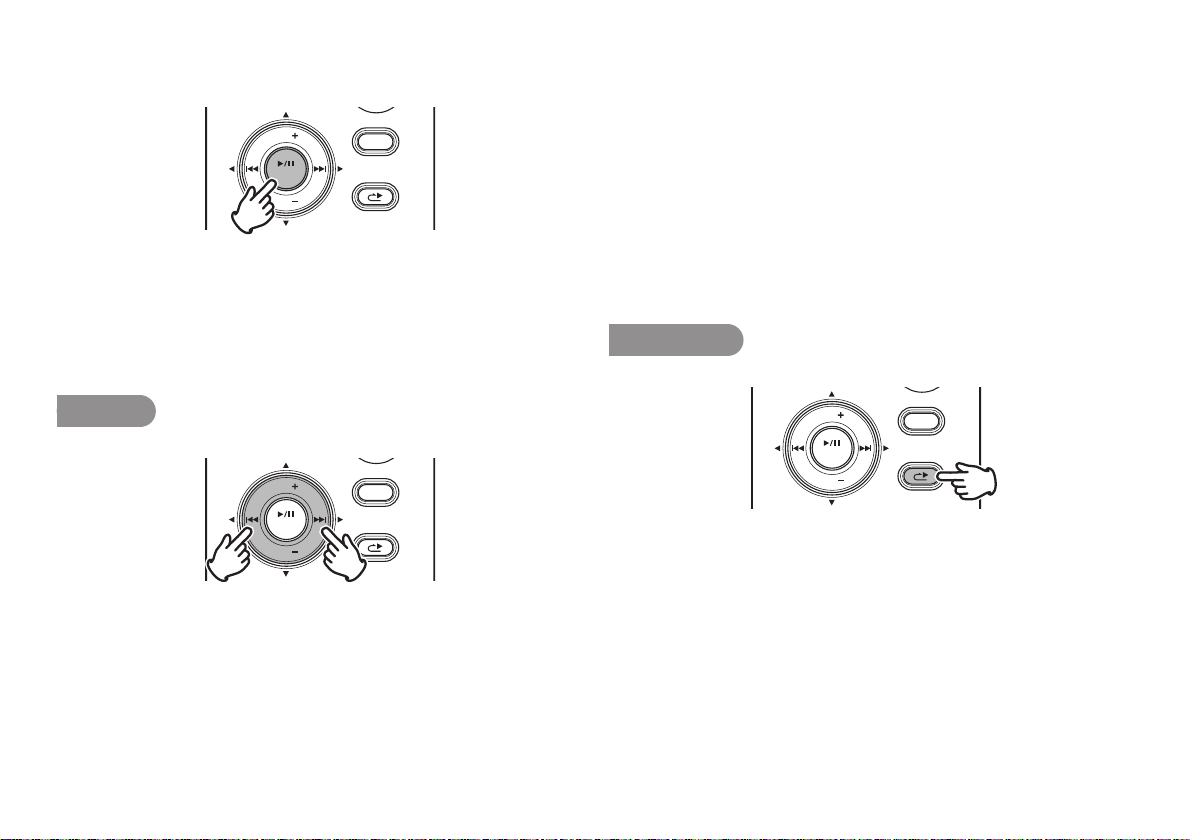
Slide and hold the POWER switch to turn on.
1.
POWER KEYLOCK
Press the 4 or ¢ button to choose the file.
2.
VOL
ENTER
VOL
DISPLAY
MENU/STORE
SKIP BACK
26
HEADPHONE
Page 39

Press the 3/8¥ENTER button to begin playback.
3.
VOL
ENTER
VOL
DISPLAY
MENU/STORE
SKIP BACK
Access from File List
There are 2 ways to select the file you want to playback. Either
use the 4 or ¢ buttons during Stop mode, or select the files
from the File List.
From Stop, press and hold the DISPLAY button for three
1.
seconds.
Press the 3/8¥ENTER button again to pause playback.
4.
Press the STOP/CANCEL button to stop playback
5.
REC PAUSESTOP/CANCEL
VOL
REC
DISPLAY
You can press the 3/8¥ENTER button to play the just played
file, or push the STOP button again to enter Stop mode. Then
pressing the 3/8/ENTER button will play the beginning of the
first audio file.
Note:
The file sort order can be changed using the preset “File Sort”. (☞ P.54)
When set to Alphabet, files are sorted in order of symbol, number, and
alphabet. When set to Time/Date, audio files are sorted into the order in which
they were created.
VOL
ENTER
VOL
Press the 3/8/ENTER button to display the file list.
2.
VOL
ENTER
VOL
Press the VOL + or VOL – button to select the audio file.
3.
DISPLAY
MENU/STORE
SKIP BACK
DISPLAY
MENU/STORE
SKIP BACK
27
Page 40
Press the 3/8/ENTER button to begin playback the selected
4.
file.
VOL
ENTER
VOL
DISPLAY
MENU/STORE
SKIP BACK
• Press the 4 button to return to the Menu list.
• Press the STOP/CANCEL button to exit the menu.
Note:
If the text is small and difficult to see, you can increase the font size using the
preset “Font Size”. (☞ P.55)
Search
VOL
ENTER
VOL
In Play-Pause mode, press and hold the 4 or ¢ button for
high speed searching without audio. 10X searching speed from
beginning to 3 seconds, and 140X speed over 3 seconds until
release the button. When you release the button, the recorder
returns to playback paused.
DISPLAY
MENU/STORE
SKIP BACK
If the end of the file is passed with ¢ button still held down,
search moves to the next file and continues searching in the
forward direction.
If the tip of the file is passed with 4 button still held down,
search moves to the previous file and continues searching in the
reserve direction.
During playback, press and hold the 4 button to “rewind” and
do a 2X speed audible search in the reverse direction.
During playback, press and hold the ¢ button to “fast forward”
and do a 2X speed audible search in the forward direction.
Release to return to normal forward playback.
Skip Back
VOL
ENTER
VOL
Press the SKIP BACK button during playback or pause to return
the amount of time set in the preset Skip Back from the current
playback point. (
☞
P.53)
DISPLAY
MENU/STORE
SKIP BACK
28
Page 41

Display
Press the DISPLAY button to alternate infor mation displays. Displays are slightly different in
Stop, Record and Playback mode.
During Stop mode:
q Total Remain
Total remain time
Number of files
Battery icon
w Current Time/Date
Current time
Current date
• If “Date Form” setting in preset menu is M/D/Y, the date field shows MMMDD/YYYY.
If “Date Form” setting is D/M/Y, the date field shows DDMMM/YYY. (
e Record Setup
q Total Remain (Default display)
Input source
(INT MIC/MIC/LINE)
Record Format
Quantization
ALC icon AUTO TRK icon
• The MP3 bitrate is disappeared if the “Rec Format” setting is PCM.
• The ALC icon is disappeared if the “Level Cont.” setting is Manual.
• The AUTO TRK icon is disappeared if the “Auto Track” setting is Off.
VOL
ENTER
VOL
Remaining space of the card.
Input source
(INT MIC/MIC/LINE)
Status
☞
Chennel
MP3 bitrate
Sample rate
DISPLAY
MENU/STORE
SKIP BACK
P.54)
29
Page 42
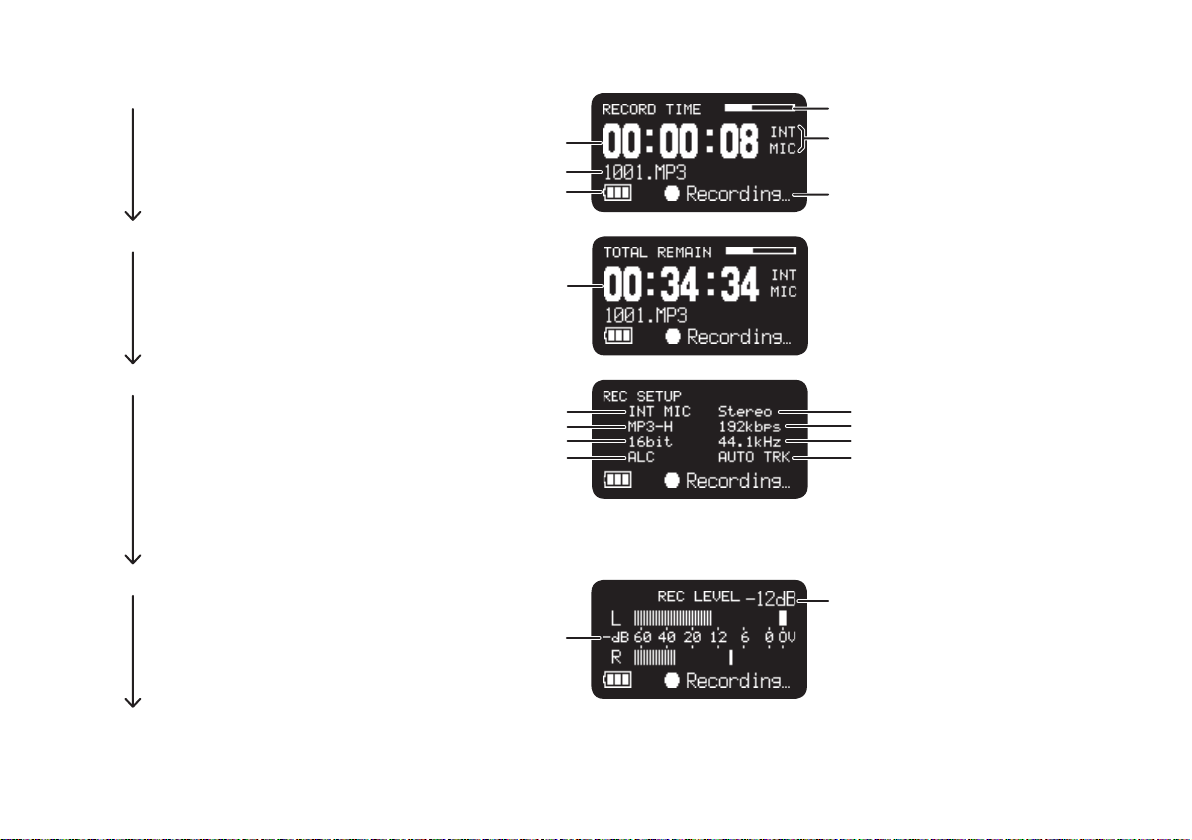
During Record mode:
q Record Time
w Total Remain
e Record Setup
r Record Level
Recording time
File name
Battery icon
Total remain time
Input source
(INT MIC/MIC/LINE)
Record Format
Quantization
ALC icon AUTO TRK icon
Input audio level
Remaining Space on the Card.
Input source
(INT MIC/MIC/LINE)
Status
Channel
MP3 bitrate
Sample rate
• The MP3 bitrate is disappeared if the “Rec Format” setting is PCM.
• The ALC icon is disappeared if the “Level Cont.” setting is Manual.
• The AUTO TRK icon is disappeared if the “Auto Track” setting is Off.
Record level setting(0 to 30)
q Record Time (Default display)
30
Page 43

During Playback mode:
q Elapsed Time
w Remain Time
e File Properties
q Elapsed Time (Default display)
Elapsed time
File name
Battery icon
Remaining time
Created time
Channel
MP3 bitrate
Current position on the file
Status
Sample rate
Quantization
• If “Date Form” setting in preset menu is M/D/Y, the date field shows MMMDD/YYYY.
If “Date Form” setting is D/M/Y, the date field shows DDMMM/YYY. (
☞
P.54)
31
Page 44

Advanced Features
Microphone(s)
– Attenuator
The microphone attenuation switch permits the direct use of
microphones that differ in sensitivity.
• 0dB : No microphone attenuation.
• –12dB : Input from a microphone(s) connected to the MIC
jack is cut by 12dB.
• –24dB : Input from a microphone(s) connected to the MIC
jack is cut by 24dB.
Setup the “Mic Attenuator” of the preset menu.
(
P.51)
☞
– Mic Power
Switch “Mic Power” setting to On to provide +5V of power for a
condenser microphone(s).
On : +5V is supplied to power condenser microphone(s).
Off : No microphone power is supplied.
Setup the “Mic Power” of the pr eset menu. (
☞
P.52)
Microphone recommendations
Professional condenser microphone(s) (which require additional
power from either the PMD620’s phantom power or from another
source) are recommended because they provide greater
sensitivity and higher quality audio recording.
Dynamic microphone(s) can be used, but they do not yield
optimum audio quality recordings in some applications.
Consult with your local dealer to select the appropriate
microphone(s) for your specific application. In many cases, they
can demonstrate the various performances and characteristics
of microphones for your use.
32
Page 45

Low Cut Filter
Auto T rack
The bass region of the input audio is cut as the audio is recorded.
Set to On to reduce noise, such as the sound of the wind when
recording outdoors.
Setup the “Low Cut” of the preset menu. (
☞
P.52)
Silent Skip
The Silent Skip automatically pauses recording when there is a
period of silence and resumes recording when sound resumes.
“Silent Skip” menu setting permits:
• Adjusting the margin sound level that defines silence in Off,
–60dB, –54dB, –38dB, –20dB.
Setup the “Silent Skip” of the preset menu. (
☞
P.50)
Manual T rack
When the Manual Track (Manual T rack incrementing) is On during
recording, press the REC button to increment the audio file.
A new audio file is created at that point. The continuity of sound
is not guaranteed and depends on the speed of a card or the
audio file size.
Setup the “Manual Track” of the preset menu. (
☞
P.49)
With the Auto Track (Automatic Track incrementing) On, a
new audio file is begun automatically at specified intervals of
recording time. The Auto Track can be set to increment every 1,
5, 10, 15 or 30 minutes, or every 1, 2, 6, 8, 12 or 24 hours. The
Auto Track makes finding a particular point in a recording easier.
For example, if a new audio file begins every minute during
playback, the Auto Track makes finding a particular passage
easier because of the relationship between file numbers and
time. During playback, you can select file number 3 to play
approximately the 3rd minute of recording. To go directly to the
beginning of the 10th minute, select file number 10, etc.
Recording time
# minutes:seconds
001..............................0:00 – 1:00
002..............................1:01 – 2:00
003..............................2:01 – 3:00
The continuity of sound is not guaranteed and depends on the
speed of a card or the file size.
Setup the “Auto Track” of the preset menu. (
☞
P.50)
33
Page 46
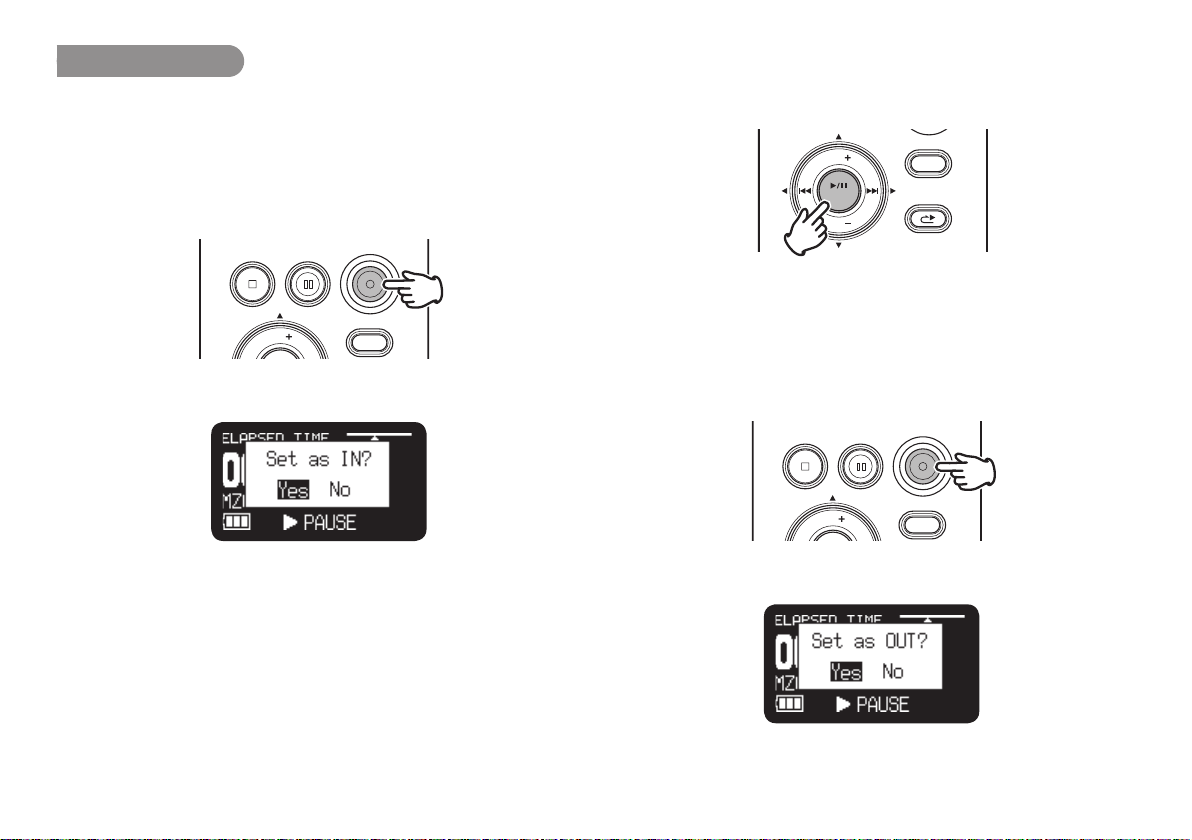
Copy Segment
Copy Segment physically turns your “highlighted” section into
a new and separate file, without destroying the original source
file(s).
During playback, press the REC button when the audio
1.
reaches your desired In Point.
REC PAUSESTOP/CANCEL
VOL
“Set as IN?” is displayed.
REC
DISPLAY
Press the 3/8/ENTER button to store the In point. “IN-” will
2.
flash in the display to indicate the In point has been stored and
playback of the file resumes.
VOL
ENTER
VOL
Continue to let the PMD620 play to your desired Out point, or
3.
DISPLAY
MENU/STORE
SKIP BACK
use the standard transport controls like the ¢ or 4 button
to span greater time lengths.
When you have reached your desired Out point, press the
4.
REC button.
REC PAUSESTOP/CANCEL
REC
34
VOL
“Set as OUT?” is displayed.
DISPLAY
Page 47
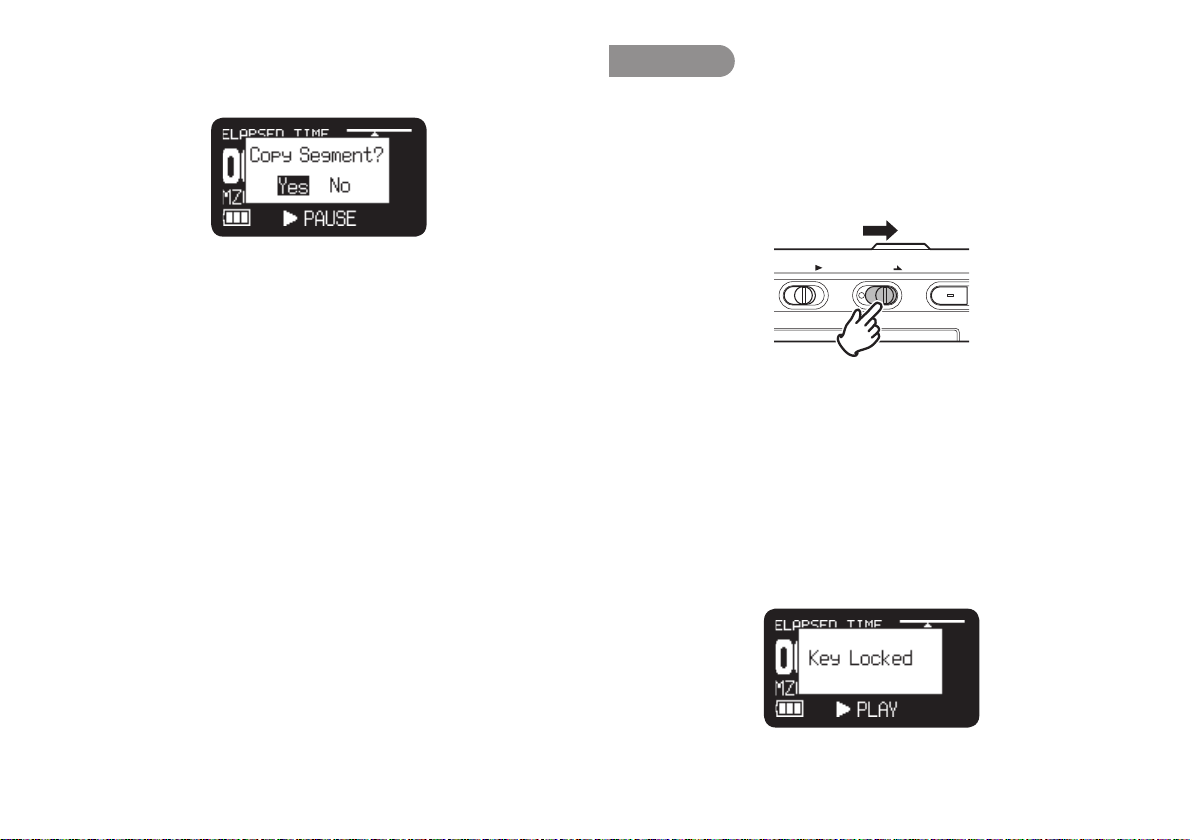
Press the 3/8/ENTER button to store the Out point.
L
5.
“Copy Segment?” is displayed.
Key Lock
Slide the Key Lock switch to lock the keys.
The key lock secures the PMD620 in the state it is in during
recording, playback or stop.
During Record and Rec-Pause mode, the POWER switch is
always invalid.
Press the 3/8/ENTER button to start the Copy process.
6.
“Executing...” will be shown on the display. When the copy
procedure is completed, the display will show “Completed” for
1 sec. and then returns to stop mode with your new file as the
current file.
Notes:
When a copy area spans across two or more files, a file is connected and
•
copied.
When the copy area spans across files of different “Rec Format” or “Rec
•
Channel” setting, it can not copy.
The copy area can not exceed 80 minutes.
•
POWER KEYLOCK REC
Notes:
If “Key Lock” setting is All, only the optional remote controller RC600PMD
•
is accepted.
If “Key Lock” setting is Partial, the REC, REC PAUSE and STOP/
•
CANCEL buttons on the panel, and RC600PMD are accepted.
Setup the “Key Lock” of the preset menu. (☞ P.56)
• “Key Locked” is displayed for 1 seconds when the key is
pressed during key lock.
35
Page 48

Remote
The RC600PMD includes:
The PMD620 allows you to use an optional remote controller
RC600PMD. (sold separately). The RC600PMD is designed
for microphone interviews. It attaches to your microphone.
The remote’s five feet cord with a four contact mini plug, plugs
into the PMD620. The RC600PMD does not require any menu
changes for use.
IN-LINE-OUT REMOTE DC IN
REMOTE
RC600PMD
a
b
c
d
a An indicator light:
• (green) lit and steady during standby or stop
• (red) lit and steady while recording
• (flashing red) during Rec-Pause mode
• (orange) flashes for 1/2 second when an over peak level
signal is input during Record or Rec-Pause mode, then it
goes back to red.
b push to pause recording
c push to start/resume recording and to manually increment files
d Invalid
36
Page 49
USB mode
The PMD620 records directly onto SD cards.
Recordings can then be transferred to your desktop or laptop
computer by removing the SD card from the PMD620, or by
connecting the PMD620 to your computer via the USB port.
Audio recorded in the popular MP3 compression format is
directly available for intranet or internet file sharing.
Computer compatible
On your computer you can then:
• log and archive audio files
• play audio files
• save audio files to your drive
How to connect via the USB port
The SD card in the PMD620 appears as an external drive on a
connected computer.
Power up the computer.
1.
Insert an SD card.
2.
Power up the PMD620.
3.
During Stop mode, connect the cable to the PMD620 and your
4.
computer.
POWER
VER
O
L
E
V
LE
I
N
L
IN
E
OUT
REM
EC
R
USE
Y
PA
PLA
IS
REC
D
RE
O
T
K
S
C
A
U/
B
N
E
P
M
TOP/CANCEL
S
OTE
DC IN
KI
S
OL
V
NTER
E
0
62
MD
P
R
L
RDE
O
V
RECO
E
TAT
D S
I
L
SO
37
Page 50

• While USB is on, a set screen is displayed.
• The SD card in the PMD620 appears as a removable device
on your computer.
• The audio files are in a folder that is named MPGLANG1.
Notes:
•
Check the operating system of your computer.
Windows Me, 2000, XP, Vista, MAC OS 10
•
USB Bus Power activates.
•
No buttons other than the POWER switch function.
Caution:
•
Do not remove a SD card during USB mode. The Data and the SD card may
be damaged.
•
During recording and playback, do not connect the cable to the PMD620 and
your computer. The PMD620 may turn itself off or stop, by the USB Bus
Power condition.
Diagram of file structure
A folder (directory) titled MPGLANG1 will appear on your
computer. Files within the MPGLANG1 folder are numbered from
aaaaa001 through the number of files recorded to a maximum
of aaaaa999. (“aaaaa” depends on the “Machine ID” parameter.
The default setting of “Machine ID” is 1) The file extension will be
.mp3 or .wav depending on the “Rec Format” parameter that is
set for the recording.
Root
MPGLANG1
1001.mp3
1002.mp3
1003.mp3
Changes made to file names or structures on your computer will
prevent file recognition and playback in the PMD620.
Machine ID
An audio file has Machine ID information. This information is
included in a file name. For example, if the Machine ID is “1”,
the first file is numbered “1001.wav” or “1001.mp3”. Setup the
“Machine ID” of the preset menu. (
☞
P.58)
38
Page 51

Menu
Menu List
VOL
ENTER
VOL
From Stop, press and hold the DISPLAY button for 3 seconds.
1.
• Menu List appears in the display.
• The selected item is highlighted.
• When the first item is selected, press VOL + button to jump
to the last item.
• When the last item is selected, press VOL – button to jump
to the first item.
Press the VOL + or VOL – button to select the item.
2.
DISPLAY
MENU/STORE
SKIP BACK
Press the 3/8/ENTER button to confirm or execute the
3.
selected item.
Items and functions
# Display Description Reference
1 File List Browse audio files Page 27
2 Utility Menu Go to Utility menu Page 42
3 Preset Menu Go to Preset menu Page 45
4 Time/Date Adjust current time and date Page 18
5 Preset Load Load preset data from SD card Page 40
6 Preset Save Save preset data to SD card Page 41
7 F/W Version Displays the firmware version –
39
Page 52
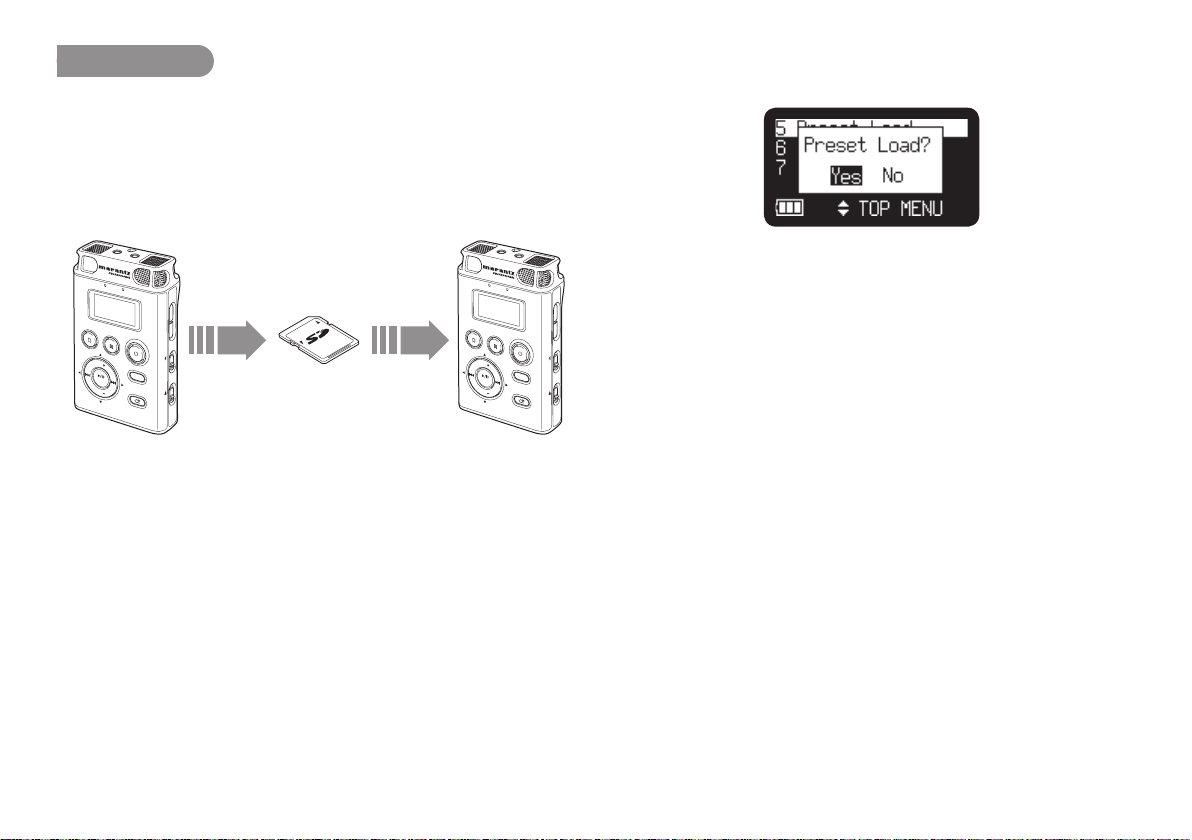
Preset Load
Preset Load allows you to load the preset value from the SD card
in the PMD620.
When performing preset load, use a SD card in which the preset
contents from Preset Save (
This function is particularly useful when setting multiple PMD620s
with the same settings.
P.41) are stored.
☞
Press the 3/8/ENTER button. “Preset Load?” message is
3.
displayed.
PH
ON
E
S
MIC
LEVEL
O
VER
ST
OP/CANCEL
REC
PA
USE
VOL
EN
TER
MENU/STORE
SKIP
V
OL
SOLI
D
S
T
A
TE
RECORDER
P
Preset Save Preset Load
REC LEVEL
REC
DISP
L
A
Y
KEY LOCK
BAC
K
POWER
MD620
SD Card
PH
LEVEL
ST
OP/CANCEL
REC
VOL
EN
TER
V
OL
SOLI
D
S
T
A
TE
PMD620 PMD620
From Stop, press and hold the DISPLAY button for 3 seconds.
1.
Press the VOL + or VOL – button to select “Preset Load”.
2.
40
ON
PA
RECORDER
ES
MIC
O
VER
USE
REC LEVEL
REC
DISP
L
A
Y
KEY LOCK
MENU/STORE
SKIP
BAC
K
POWER
P
MD620
• Press the STOP/CANCEL button to cancel loading items
and return to Stop mode.
While “Preset Load?” message is displayed, select “Yes”
4.
and press 3/8/ENTER button to load the preset value in text
format from the file in a route folder on card. The title of the
file load is “620preset.cfg”. During preset loading it displays
“Executing...”. After the file load is completed, “Completed” is
displayed for 1 second and returns to Stop mode.
Page 53

Preset Save
Preset Save saves all of the preset values onto the SD card. To
set the saved files onto the PMD620, perform Preset Load (
P.40).
From Stop, press and hold the DISPLAY button for 3 seconds.
1.
Press the VOL + or VOL – button to select “Preset Save”.
2.
Press the 3/8/ENTER button. “Preset Save?” message is
3.
displayed.
• Press the STOP/CANCEL button to cancel saving item and
return to Stop mode.
☞
While “Preset Save?” message is displayed, select “Yes”
4.
and press 3/8/ENTER button to output preset value in text
format into the file in a route folder on card. The title of the
file output is “620preset.cfg”. During preset output it displays
“Executing...”. After the file output is completed, “Completed” is
displayed for 1 second and returns to Stop mode.
41
Page 54

Utility Menu
Utility menu lets you rename files, erase files and format the SD
card.
From Stop, press and hold the DISPLAY button for 3 seconds.
1.
Press the VOL + or VOL – button to select “Utility Menu”.
2.
Press the 3/8/ENTER button.
3.
• During Utility menu mode, press the STOP/CANCEL
button to return to Stop mode.
Utility Functions
# Display Description Reference
1 File Rename Edit the name of audio file Page 42
2 File Delete Delete a audio file Page 43
3 Card Format Delete all files Page 44
File Rename
From Stop, press and hold the DISPLAY button for 3 seconds.
1.
Press the VOL + or VOL – button to select “Utility Menu”. Then
2.
press the 3/8/ENTER button.
Press the VOL + or VOL – button to select “File Rename”.
3.
Then press the 3/8/ENTER button.
• File List appears in the display.
• Press the 4 button to return to the Utility Menu.
• Press the STOP/CANCEL button to return to Stop mode.
Press the VOL + or VOL – button to select the file you want
4.
to rename. Then press the 3/8/ENTER button to access the
rename window.
42
Page 55

Rename the file title.
5.
Text can be inserted and deleted. Press the 4 or ¢ button
to move the cursor to the place you wish to insert text into or
delete text from.
To insert text
Press the VOL + or VOL – button to select the character
you want to insert. When the character that you want
to insert is displayed, press the 3/8/ENTER button to
enter the character. The selected character for insertion is
highlighted.
To delete text
Press the SKIP BACK button to delete the selected
character.
Press the 3/8/ENTER button to enter the changes.
6.
Notes:
If there has been a file with the title changed with the 3/8/ENTER button
•
exists, “Exist Title” is displayed for 1 seconds.
If Last letter of the file title is Space(SP) character, the changed title do not
•
include the last letter.
Extensions are not displayed.
•
If number of file title letter is more than 60, last letter is deleted when a new
•
letter is added.
The characters which you can insert are A a B b C c D d E e F f G g H h I i J
•
j K k L l M m N n O o P p Q q R r S s T t U u V v W w X x Y y Z z (Space) !
“ # $ % & ’ ( ) + , – . ; = @ ] ^ _ ` { } ~ 0 1 2 3 4 5 6 7 8 9.
File Delete
From Stop, press and hold the DISPLAY button for 3 seconds.
1.
Press the VOL + or VOL – button to select “Utility Menu”. Then
2.
press the 3/8/ENTER button.
Press the VOL + or VOL – button to select “File Delete”. Then
3.
press the 3/8/ENTER button.
• File List appears in the display.
• Press the 4 button to return to the Utility List.
• Press the STOP/CANCEL button to return to Stop mode.
43
Page 56

Press the VOL + or VOL – button to select the file you want
4.
to delete. Then press the 3/8/ENTER button. “File Delete?”
message is displayed.
• Press the STOP/CANCEL button to cancel a File Delete
item and return to STOP.
While “File Delete?” message is displayed, select “Yes” and
5.
press the 3/8/ENTER button to delete the selected file. While
deleting “Executing...” is displayed. “Completed” is displayed
for 1 second.
Card Format
From Stop, press and hold the DISPLAY button for 3 seconds.
1.
Press the VOL + or VOL – button to select “Utility Menu”. Then
2.
press the 3/8/ENTER button.
Press the VOL+ or VOL– button to select “Card Format”. Then
3.
press the 3/8/ENTER button.
• “Card Format?” message is displayed.
• Press the ST OP/CANCEL button to cancel a Card Format
item and return to STOP.
While “Card Format?” message is displayed, select “Yes”
4.
and press the 3/8/ENTER button to format the SD card.
While formatting “Executing...” is displayed. After displaying
“Completed” for a second, PMD620 return to Stop mode.
44
Page 57
Preset Menu
You can store to 3 detailed presets on the recorder for such
settings as recording input, recording format, playback mode,
etc. There are 23 setting items in the preset menu, and 3 presets
can be set with the desired conditions.
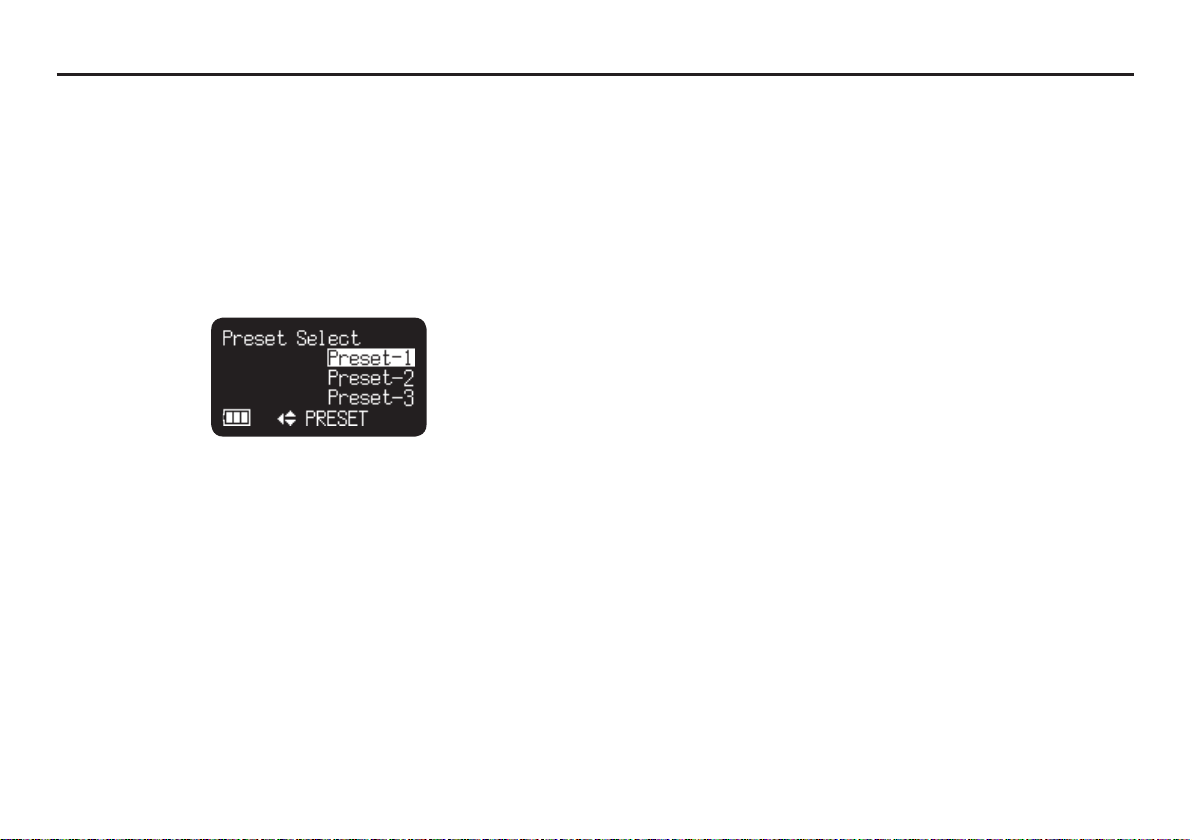
Preset Select allows you to select a preset number.
From Stop, press and hold the DISPLAY button for 3 seconds.
1.
Press the VOL+ or VOL– button to select “Preset Menu”. Then
2.
press the 3/8/ENTER button.
Press the VOL + or VOL – button to select Preset 1, 2 or 3.
3.
Press the 3/8/ENTER button to accept the selected Preset.
4.
Also press the DISPLAY button to store the changes, or press
5.
the STOP/CANCEL button to exit Menu mode without storing
any changes. Or press the 3/8/ENTER button to access each
preset items.
45
Page 58

Table of Preset
Order Display Settings
1 Input Auto/INT MIC/MIC/LINE Auto Auto Auto
2 Rec Format MP3-H/MP3-M/MP3-L/PCM-16/PCM-24 MP3-M MP3-H PCM-24
3 Rec Channel Stereo/Mono Stereo Stereo Stereo
4 Input Jack Stereo/Mono Stereo Stereo Stereo
5 Sample Rate 44.1kHz/48kHz 44.1kHz 44.1kHz 48kHz
6 Manual Track On/Off On On On
7 Auto Track Off/1min/5min/10min/15min/30min/1hour/2hour/6hour/8hour/12hour/24hour Off Off Off
8 Silent Skip Off/–60dB/–54dB/–38dB/–20dB Off Off Off
9 Level Cont. Manual/ALC ALC Manual Manual
10 Mic Atten. 0dB/–12dB/–24dB 0dB 0dB 0dB
11 Low Cut On/Off Off Off Off
12 Mic Power On/Off Off Off Off
13 Level LED –54dB/–38dB/–20dB/–12dB/–6dB –12dB –6dB –6dB
14 Skip Back
15 FileSort Alphabet/Time/Date Time/Date Time/Date Time/Date
16 Date Form M/D/Y/D/M/Y M/D/Y M/D/Y M/D/Y
17 Font Size Large/Small Small Small Small
18 Auto Power Off On/Off On On On
19 Battery Alkaline/Ni-MH Alkaline Alkaline Alkaline
20 Key Lock All/Partial All All All
21 LED On/Off On On On
22 Brightness 1 to 10 555
23 MachineID Max 8 digit ASCII code 1 1 1
24 Preset Default –––
1sec/2sec/3sec/4sec/5sec/6sec/7sec/8sec/9sec/10sec/15sec/20sec/25sec/
30sec/35sec/40sec/45sec/50sec/55sec/ 60sec
Preset-1 Preset-2 Preset-3
3sec 3sec 3sec
Meeting
Compressed
Default
Music
Compressed
Highest Quality
Uncompressed
* Factory default of “Date Form” setting for Europe is D/M/Y.
46
Page 59

1. Input
2. Rec Format
Audio input for recording are selected using the Input Menu.
If Input of menu is Auto and External MIC is connected,
Recording source is External MIC. When LINE jack is connected,
Recording source is LINE audio. When the both connected at the
same time the External MIC is active as priority.
From Stop, press and hold the DISPLAY button for 3 seconds.
1.
Press the VOL + or VOL – button to select Preset Menu. Then
2.
press the 3/8/ENTER button to accept.
Press the VOL + or VOL – button to select Preset 1, 2 or 3.
3.
Then press the 3/8/ENTER button to accept the selected
Preset.
Press the VOL + or VOL – button to select the Input item. Then
4.
press the ¢ or 4 button to tab through the Input choices
(Auto, INT MIC, MIC or LINE).
Press the VOL + or VOL – button to select other Menu choices.
5.
When changing the Preset is complete, press the DISPLAY
button to store the changes, or press the STOP/CANCEL
button to exit Menu mode without storing any changes.
The PMD620 can record in several compression algorithms. See
explanation and chart below.
MP3-H : MP3 compression with 192kbps (Mono:96kbps)
MP3-M : MP3 compression with 128kbps (Mono:64kbps)
MP3-L : MP3 compression with 64kbps (Mono:32kbps)
PCM-16 : Linear PCM with 16-bit depth
PCM-24 : Linear PCM with 24-bit depth
From Stop, press and hold the DISPLAY button for 3 seconds.
1.
Press the VOL + or VOL – button to select Preset Menu. Then
2.
press the 3/8/ENTER button to accept.
Press the VOL+ or VOL– button to select Preset 1, 2 or 3.
3.
Then press the 3/8/ENTER button to accept the selected
Preset.
Press the VOL + or VOL – button to select the Rec Format
4.
item. Then press the ¢ or 4 button to tab through the Rec
Format choices (MP3-H, MP3-M, MP3-L, PCM-16 or PCM-24).
Press the VOL + or VOL – button to select other Menu choices.
5.
When changing the Preset is complete, press the DISPLAY
button to store the changes, or press the STOP/CANCEL
button to exit Menu mode without storing any changes.
47
Page 60

3. Rec Channel
4. Input Jack
The Rec Channel menu choice allows you to select the channel
of the audio file.
From Stop, press and hold the DISPLAY button for 3 seconds.
1.
Press the VOL + or VOL – button to select Preset Menu. Then
2.
press the 3/8/ENTER button to accept.
Press the VOL + or VOL – button to select Preset 1, 2 or 3.
3.
Then press the 3/8/ENTER button to accept the selected
Preset.
Press the VOL + or VOL – button to select the Rec Channel
4.
item. Then press the ¢ or 4 button to tab through the Rec
Channel choices (Stereo or Mono).
Press the VOL + or VOL – button to select other Menu choices.
5.
When changing the Preset is complete, press the DISPLAY
button to store the changes, or press the STOP/CANCEL
button to exit Menu mode without storing any changes.
The Input Jack menu choice allows you to select the type of the
Input Jack for Stereo or Mono.
From Stop, press and hold the DISPLAY button for 3 seconds.
1.
Press the VOL + or VOL – button to select Preset Menu. Then
2.
press the 3/8/ENTER button to accept.
Press the VOL + or VOL – button to select Preset 1, 2 or 3.
3.
Then press the 3/8/ENTER button to accept the selected
Preset.
Press the VOL + or VOL – button to select the Input Jack item.
4.
Then press the ¢ or 4 button to tab through the Input
Jack choices (Stereo or Mono).
Press the VOL + or VOL – button to select other Menu choices.
5.
When changing the Preset is complete, press the DISPLAY
button to store the changes, or press the STOP/CANCEL
button to exit Menu mode without storing any changes.
48
Page 61

5. Sample Rate
6. Manual Track
The Sample Rate menu choice allows you to select the sampling
rate 44.1kHz or 48kHz.
From Stop, press and hold the DISPLAY button for 3 seconds.
1.
Press the VOL + or VOL – button to select Preset Menu. Then
2.
press the 3/8/ENTER button to accept.
Press the VOL + or VOL – button to select Preset 1, 2 or 3.
3.
Then press the 3/8/ENTER button to accept the selected
Preset.
Press the VOL + or VOL – button to select the Sample Rate
4.
item. Then press the ¢ or 4 button to tab through the
Sample Rate choices (44.1kHz or 48kHz).
Press the VOL + or VOL – button to select other Menu choices.
5.
When changing the Preset is complete, press the DISPLAY
button to store the changes, or press the STOP/CANCEL
button to exit Menu mode without storing any changes.
When the Manual Track (Manual T rack incrementing) is On during
recording, press the REC button to increment the audio file.
A new audio file is created at that point.
From Stop, press and hold the DISPLAY button for 3 seconds.
1.
Press the VOL + or VOL – button to select Preset Menu. Then
2.
press the 3/8/ENTER button to accept.
Press the VOL + or VOL – button to select Preset 1, 2 or 3.
3.
Then press the 3/8/ENTER button to accept the selected
Preset.
Press the VOL + or VO L – button to select the Manual Track
4.
item. Then press the ¢ or 4 button to tab through the
Manual Track choices (On or Off).
Press the VOL + or VOL – button to select other Menu choices.
5.
When changing the Preset is complete, press the DISPLAY
button to store the changes, or press the STOP/CANCEL
button to exit Menu mode without storing any changes.
49
Page 62

7. Auto Track
8. Silent Skip
With the Auto Track (Automatic Track incrementing) on, a new file
begins automatically at specified intervals of recording time.
The Auto Track can be set to increment every 1, 5, 10, 15 or 30
minutes, or every 1, 2, 6, 8, 12 or 24 hours.
From Stop, press and hold the DISPLAY button for 3 seconds.
1.
Press the VOL + or VOL – button to select Preset Menu. Then
2.
press the 3/8/ENTER button to accept.
Press the VOL + or VOL – button to select Preset 1, 2 or 3.
3.
Then press the 3/8/ENTER button to accept the selected
Preset.
Press the VOL + or VOL – button to select the Auto Track item.
4.
Then press the ¢ or 4 button to tab through the Auto
Track choices (Off, 1, 5, 10, 15 or 30min, or 1, 2, 6, 8, 12 or
24hours).
Press the VOL + or VOL – button to select other Menu choices.
5.
When changing the Preset is complete, press the DISPLAY
button to store the changes, or press the STOP/CANCEL
button to exit Menu mode without storing any changes.
The Silent Skip automatically pauses recording when there is a
period of silence and resumes recording when sound resumes.
This feature is often referred to as voice activated recording.
Silent Skip looks for sound below a preset level for three
seconds time. When that occurs, the PMD620 switches to record
pause. When a signal above the preset level is input, recording
resumes.
From Stop, press and hold the DISPLAY button for 3 seconds.
1.
Press the VOL + or VOL – button to select Preset Menu. Then
2.
press the 3/8/ENTER button to accept.
Press the VOL + or VOL – button to select Preset 1, 2 or 3.
3.
Then press the 3/8/ENTER button to accept the selected
Preset.
Press the VOL + or VOL – button to select the Silent Skip item.
4.
Then press the ¢ or 4 button to tab through the Silent
Skip choices (Off, –60dB, –54dB, –38dB or –20dB).
Press the VOL + or VOL – button to select other Menu choices.
5.
When changing the Preset is complete, press the DISPLAY
button to store the changes, or press the STOP/CANCEL
button to exit Menu mode without storing any changes.
50
Page 63

9. Level Control
10. Mic Attenuator
The Level Control allows you to select the type of input level
control for recording.
From Stop, press and hold the DISPLAY button for 3 seconds.
1.
Press the VOL + or VOL – button to select Preset Menu. Then
2.
press the 3/8/ENTER button to accept.
Press the VOL + or VOL – button to select Preset 1, 2 or 3.
3.
Then press the 3/8/ENTER button to accept the selected
Preset.
Press the VOL + or VOL – button to select the “Level Cont.”
4.
item. Then press the ¢ or 4 button to tab through the
“Level Cont.” choices (Manual or ALC).
Press the VOL + or VOL – button to select other Menu choices.
5.
When changing the Preset is complete, press the DISPLAY
button to store the changes, or press the STOP/CANCEL
button to exit Menu mode without storing any changes.
The Mic Attenuator let you select the direct use of microphone(s)
that differ in sensitivity.
From Stop, press and hold the DISPLAY button for 3 seconds.
1.
Press the VOL + or VOL – button to select Preset Menu. Then
2.
press the 3/8/ENTER button to accept.
Press the VOL + or VOL – button to select Preset 1, 2 or 3.
3.
Then press the 3/8/ENTER button to accept the selected
Preset.
Press the VOL + or VOL – button to select the “Mic Atten.”
4.
item. Then press the ¢ or 4 button to tab through the “Mic
Atten.” choices (0dB, –12dB or –24dB).
Press the VOL + or VOL – button to select other Menu choices.
5.
When changing the Preset is complete, press the DISPLAY
button to store the changes, or press the STOP/CANCEL
button to exit Menu mode without storing any changes.
51
Page 64

11. Low Cut
12. Mic Power
The bass region of the input audio is cut and the audio is
recorded. Set to On to reduce noise, such as the sound of the
wind when recording outdoors.
From Stop, press and hold the DISPLAY button for 3 seconds.
1.
Press the VOL + or VOL – button to select Preset Menu. Then
2.
press the 3/8/ENTER button to accept.
Press the VOL + or VOL – button to select Preset 1, 2 or 3.
3.
Then press the3/8/ENTER button to accept the selected
Preset.
Press the VOL + or VOL – button to select the Low Cut item.
4.
Then press the ¢ or 4 button to tab through the Low Cut
choices (On or Off).
Press the VOL + or VOL – button to select other Menu choices.
5.
When changing the Preset is complete, press the DISPLAY
button to store the changes, or press the STOP/CANCEL
button to exit Menu mode without storing any changes.
The Mic Power allows you to switch the power on or off so supply
to the external condenser microphone from the MIC jack of the
PMD620.
From Stop, press and hold the DISPLAY button for 3 seconds.
1.
Press the VOL + or VOL – button to select Preset Menu. Then
2.
press the 3/8/ENTER button to accept.
Press the VOL + or VOL – button to select Preset 1, 2 or 3.
3.
Then press the 3/8/ENTER button to accept the selected
Preset.
Press the VOL + or VOL – button to select the Mic Power
4.
item. Then press the ¢ or 4 button to tab through the Mic
Power choices (On or Off).
Press the VOL + or VOL – button to select other Menu choices.
5.
When changing the Preset is complete, press the DISPLAY
button to store the changes, or press the STOP/CANCEL
button to exit Menu mode without storing any changes.
52
Page 65

13. Level LED
14. Skip Back
When a sound is input during Record or Rec-Pause mode, the
LEVEL LED(Green) turns on. A level to turn on is decided in
presetting.
From Stop, press and hold the DISPLAY button for 3 seconds.
1.
Press the VOL + or VOL – button to select Preset Menu. Then
2.
press the 3/8/ENTER button to accept.
Press the VOL + or VOL – button to select Preset 1, 2 or 3.
3.
Then press the 3/8/ENTER button to accept the selected
Preset.
Press the VOL + or VOL – button to select the Level LED item.
4.
Then press the ¢ or 4 button to tab through the Level
LED choices (–54dB, –38dB, –20dB, –12dB or –6dB)
Press the VOL + or VOL – button to select other Menu choices.
5.
When changing the Preset is complete, press the DISPLAY
button to store the changes, or press the STOP/CANCEL
button to exit Menu mode without storing any changes.
How to change the Skip Back parameters.
From Stop, press and hold the DISPLAY button for 3 seconds.
1.
Press the VOL + or VOL – button to select Preset Menu. Then
2.
press the 3/8/ENTER button to accept.
Press the VOL + or VOL – button to select Preset 1, 2 or 3.
3.
Then press the 3/8/ENTER button to accept the selected
Preset.
Press the VOL + or VOL – button to select the Skip Back item.
4.
Then press the ¢ or 4 button to tab through the Skip
Back choices (1sec to 60sec)
Press the VOL + or VOL – button to select other Menu choices.
5.
When changing the Preset is complete, press the DISPLAY
button to store the changes, or press the STOP/CANCEL
button to exit Menu mode without storing any changes.
53
Page 66

15. File Sort
16. Date Form
The File Sort menu choice allows you to select the file order in
the list by name (Alphabetical) or time (Time/Date).
From Stop, press and hold the DISPLAY button for 3 seconds.
1.
Press the VOL + or VOL – button to select Preset Menu. Then
2.
press the 3/8/ENTER button to accept.
Press the VOL + or VOL – button to select Preset 1, 2 or 3.
3.
Then press the 3/8/ENTER button to accept the selected
Preset.
Press the VOL + or VOL – button to select the File Sort item.
4.
Then press the ¢ or 4button to tab through the File Sort
choices (Alphabetical or Time/Date).
Press the VOL + or VOL – button to select other Menu choices.
5.
When changing the Preset is complete, press the DISPLAY
button to store the changes, or press the STOP/CANCEL
button to exit Menu mode without storing any changes.
The Date form is the date order month/day/year (M/D/Y) or day/
month/year (D/M/Y).
From Stop, press and hold the DISPLAY button for 3 seconds.
1.
Press the VOL + or VOL – button to select Preset Menu. Then
2.
press the 3/8/ENTER button to accept.
Press the VOL + or VOL – button to select Preset 1, 2 or 3.
3.
Then press the 3/8/ENTER button to accept the selected
Preset.
Press the VOL + or VOL – button to select the Date Form item.
4.
Then press the ¢ or 4 button to tab through the Date
Form choices (M/D/Y or D/M/Y).
Press the VOL + or VOL – button to select other Menu choices.
5.
When changing the Preset is complete, press the DISPLAY
button to store the changes, or press the STOP/CANCEL
button to exit Menu mode without storing any changes.
54
Page 67

17. Font Size
18. Auto Power Off
You can increase the font size of the text on the file list screen
and preset setting screen.
From Stop, press and hold the DISPLAY button for 3 seconds.
1.
Press the VOL + or VOL – button to select Preset Menu. Then
2.
press the 3/8/ENTER button to accept.
Press the VOL + or VOL – button to select Preset 1, 2 or 3.
3.
Then press the 3/8/ENTER button to accept the selected
Preset.
Press the VOL + or VOL – button to select the Font Size item.
4.
Then press the ¢ or 4 button to tab through the Font Size
choices (Large or Small).
Press the VOL + or VOL – button to select other Menu choices.
5.
When changing the Preset is complete, press the DISPLAY
button to store the changes, or press the STOP/CANCEL
button to exit Menu mode without storing any changes.
If the PMD620 is not operated for 15 minutes during Stop or PlayPause mode, the power can be automatically shut off to conserve
battery life.
From Stop, press and hold the DISPLAY button for 3 seconds.
1.
Press the VOL + or VOL – button to select Preset Menu. Then
2.
press the 3/8/ENTER button to accept.
Press the VOL + or VOL – button to select Preset 1, 2 or 3.
3.
Then press the 3/8/ENTER button to accept the selected
Preset.
Press the VOL + or VOL – button to select the Auto Power
4.
Off item. Then press the ¢ or 4 button to tab through the
Auto Power Off choices (On or Off).
Press the VOL + or VOL – button to select other Menu choices.
5.
When changing the Preset is complete, press the DISPLAY
button to store the changes, or press the STOP/CANCEL
button to exit Menu mode without storing any changes.
55
Page 68

19. Battery
20. Key Lock
The PMD620 operates on 2 standard AA size Alkaline, or Ni-MH
batteries.
From Stop, press and hold the DISPLAY button for 3 seconds.
1.
Press the VOL + or VOL – button to select Preset Menu. Then
2.
press the 3/8/ENTER button to accept.
Press the VOL + or VOL – button to select Preset 1, 2 or 3.
3.
Then press the 3/8/ENTER button to accept the selected
Preset.
Press the VOL + or VOL – button to select the Battery item.
4.
Then press the ¢ or 4 button to tab through the Battery
choices (Alkaline or Ni-MH).
Press the VOL + or VOL – button to select other Menu choices.
5.
When changing the Preset is complete, press the DISPLAY
button to store the changes, or press the STOP/CANCEL
button to exit Menu mode without storing any changes.
The key lock secures the PMD620 in the state it is in during
Record, Playback or Stop. If this setting is All, all buttons on
PMD620 are invalid. If this setting is Partial, the REC, REC
PAUSE and
From Stop, press and hold the DISPLAY button for 3 seconds.
1.
Press the VOL + or VOL – button to select Preset Menu. Then
2.
press the 3/8/ENTER button to accept.
Press the VOL + or VOL – button to select Preset 1, 2 or 3.
3.
Then press the 3/8/ENTER button to accept the selected
Preset.
Press the VOL + or VOL – button to select the Key Lock item.
4.
Then press the ¢ or 4 button to tab through the Key Lock
choices (All or Partial).
Press the VOL + or VOL – button to select other Menu choices.
5.
When changing the Preset is complete, press the DISPLAY
button to store the changes, or press the STOP/CANCEL
button to exit Menu mode without storing any changes.
STOP/CANCEL buttons are accepted.
56
Page 69

21. LED
22. Brightness
The LED menu choice allows you to turn off the light of all LEDs.
From Stop, press and hold the DISPLAY button for 3 seconds.
1.
Press the VOL + or VOL – button to select Preset Menu. Then
2.
press the 3/8/ENTER button to accept.
Press the VOL + or VOL – button to select Preset 1, 2 or 3.
3.
Then press the 3/8/ENTER button to accept the selected
Preset.
Press the VOL + or VOL – button to select the LED item. Then
4.
press the ¢ or 4 button to tab through the LED choices
(On or Off).
Press the VOL + or VOL – button to select other Menu choices.
5.
When changing the Preset is complete, press the DISPLAY
button to store the changes, or press the STOP/CANCEL
button to exit Menu mode without storing any changes.
The Brightness menu choice allows you to adjust the brightness
of the OLED (Organic Light-Emitting Diode) display on the
PMD620.
From Stop, press and hold the DISPLAY button for 3 seconds.
1.
Press the VOL + or VOL – button to select Preset Menu. Then
2.
press the 3/8/ENTER button to accept.
Press the VOL + or VOL – button to select Preset 1, 2 or 3.
3.
Then press the 3/8/ENTER button to accept the selected
Preset.
Press the VOL + or VOL – button to select the Brightness
4.
item. Then press the ¢ or 4 button to tab through the
Brightness choices (1, 2, 3, 4, 5, 6, 7, 8, 9 or 10).
Press the VOL + or VOL – button to select other Menu choices.
5.
When changing the Preset is complete, press the DISPLAY
button to store the changes, or press the STOP/CANCEL
button to exit Menu mode without storing any changes.
57
Page 70

23. Machine ID
An audio file has Machine ID information. This information is
included in the file name.
For example, if the Machine ID is “aaaaa”, the first file is
numbered “aaaaa001.wav” or “aaaaa001.mp3”.
The Machine ID setting applies to all three presets.
From Stop, press and hold the DISPLAY button for 3 seconds.
1.
Press the VOL + or VOL – button to select Preset Menu. Then
2.
press the 3/8/ENTER button to accept.
Press the VOL + or VOL – button to select Preset 1, 2 or 3.
3.
Then press the 3/8/ENTER button to accept the selected
Preset.
Press the VOL + or VOL – button to select the “MachineID”
4.
item. Then press the 3/8/ENTER button to rename.
Rename the Mechinae ID.
5.
Text can be inserted and deleted. Press the 4 or ¢ button
to move the cursor to the place you wish to insert text into or
delete text from.
To insert text
Press the VOL + or VOL – button to select the character
you want to insert. When the character that you wish to
insert is displayed, press the 3/8/ENTER button to enter
the character. The selected character for insertion is
highlighted.
To delete text
Press the SKIP BACK button to delete the selected
character.
Press the 3/8/ENTER button to enter the changes. When
6.
changing the Preset is complete, press the DISPLAY button to
store the changes, or press the STOP/CANCEL button to exit
Menu mode without storing any changes.
Notes:
If Last letter of the Machine ID is Space(SP) character, the changed ID do
•
not include the last letter.
If number of letter is more than 8, last letter is deleted when a new letter is
•
added.
The characters which you can insert are A a B b C c D d E e F f G g H h I i J
•
j K k L l M m N n O o P p Q q R r S s T t U u V v W w X x Y y Z z (Space) !
“ # $ % & ’ ( ) + , – . ; = @ ] ^ _ ` { } ~ 0 1 2 3 4 5 6 7 8 9.
58
Page 71

24. Default
Returns the settings of the selected preset number to default.
See page 44 for a table of menu defaults.
From Stop, press and hold the DISPLAY button for 3 seconds.
1.
Press the VOL + or VOL – button to select Preset Menu. Then
2.
press the 3/8/ENTER button to accept.
Press the VOL + or VOL – button to select Preset 1, 2 or 3.
3.
Then press the 3/8/ENTER button to accept the selected
Preset.
Press the VOL + or VOL – button to select the Preset Default
4.
item. Then press the 3/8/ENTER button to initialize.
While “Default?” message is displayed, select “Yes” and then
5.
press the 3/8/ENTER button, then preset value returns to
default and to starts writing on non-volatile memory.
59
Page 72

Troubleshooting
Should problems occur, it is often unnecessary to consult
your dealer or technical service department. On the basis of
the following checks, you may be able to rectify a number of
conditions yourself without difficulty. If the condition cannot be
remedied after the following check, please consult your dealer.
The PMD620 does not turn on.
• Install fresh batteries.
• Check AC adapter connections.
The PMD620 turns on then turns itself off.
• Install fresh batteries.
The PMD620 seems to record, but there is no sound on
playback.
• Check input settings.
(For example, if LINE input is selected and no input is
connected to the LINE jack, the PMD620 will record silence.
The PMD620 will not playback.)
There is no audio playback through headphones or internal
speaker.
• Check VOL+/– control setting.
• Check a different audio file or the card.
The PMD620 will not record.
• Check that the maximum of 999 files have not been recorded.
• Check that the PMD620 acknowledges the card.
No signal from microphone input.
• Check input selection.
• Check REC LEVEL control settings.
• Check if microphone(s) require(s) Phantom power.
There is excessive noise on the PMD620.
• Check cable connections and/or replace cable.
• Check for proper gain levels.
Playback on a PC results in poor sound.
• Check quality of PC sound card and program.
• Check frequency conversion program.*
* The PMD620 records audio files with a sampling frequency
of 48kHz. Some PC programs convert the files to 44.1kHz
(using a sample rate converter). Only high quality sample rate
converters should be used.
PC cannot read files
• Check the capability of the PC program. Some playback and
editing programs do not support MP3 or Broadcast Wave
(.wav) formats.
If the PMD620 exhibits erratic behavior, the microprocessor can
be reset by powering off, disconnecting AC power and removing
batteries.
Care and Maintenance
Use a soft cloth slightly moistened with mild detergent solution.
Media cards that are heavily used should be occasionally
reformatted to avoid audio problems due to fragmentation.
60
Page 73

Error Message
Details of error processsing
Display Description
No Card Card cannot be found
Unformat Format other than FAT16/32, or card format error
Full Card Memory is not enough
Full 999 Files are more than 999
No File No file found
Key Locked Operation during Key Lock
Card Locked Prohibition of writing into the card
ALC REC LEVEL operation during ALC On
VBR FWD or RWD of VBR file
Can not... Command is invalid
Need DC IN No DC input
Low Battery (flashing highlighted) Remaining battery is below set value
Low Battery automatic power down in low battery level last time.
No PresetFile No preset setting file is found
ErrPresetFile File contents of preset setting has errors
ErrUpdateFile Version up file or file system does not function normally
Door Open CF door is open
Err Format Error in file format of MP3 or PCM
Exist Title Same file title is found
Limit 80m Over 80 minutes in copy segment process
Long Title File title exceeds 64 Bytes
Err Card Error is found in the card
Err RTC Error is found in RTC
Err SRAM Error is found in SRAM
Err FlashROM Error is found in Flash ROM
61
Page 74

Specifications
Digital audio system
System .................................................................. Solid State Recorder
Usable media ...............................................................SD/SDHC cards
Recording format
MP3 .................................................MPEG1 LayerIII Compression
WAV ...............................................................16/24 bit linear PCM
Recording MP3 bitrate
Stereo ................................................................. 192/128/64 kbps
mono ....................................................................... 96/64/32 kbps
Sample rate ........................................................................ 44.1/48 kHz
Number of channels ............................................... 2 (Stereo)/1 (Mono)
Frequency response ...................20 Hz (±0.5 dB) to 16 kHz (±0.5 dB)
S/Noise Ratio IEC-A weighted
MIC .......................................................................................65 dB
LINE ......................................................................................80 dB
Total harmonic distortion at 0 VU
MIC ........................................................................................0.1%
LINE ...................................................................................0.015%
Dynamic range .............................................................................90 dB
Inputs
External MIC
Type .......................................................................1/8" stereo jack
Input sensitivity ..............................................12 mVrms/30 kohms
LINE
Type .......................................................................1/8" stereo jack
Input sensitivity ............................................500 mVrms/20 kohms
Outputs
LINE
Type .......................................................................1/8" stereo jack
Standard level ........................................................1.0 V/10 kohms
Headphone
Type .......................................................................1/8" stereo jack
Standard level ...................................................... 16 mW/16 ohms
Speaker
Standard level ...................................................... 150 mW/8 ohms
General
Power consumption
Recording/Playback .....................................................4.0 W (DC)
Battery life (Alkaline) ............................................ 4 hours (typical)
Phantom power ................................................................. 5V, 1mA
Environmental conditions
Operational temperature ...........................0 to 40°C (32 to 104°F)
Operational humidity ......................25 to 85% (no condensation)
Storage temperature .............................–20 to 60°C (–4 to 140°F)
Dimensions
Width ...........................................................................102 mm (4")
Height ........................................................................62 mm (2.5")
Depth ............................................................................25 mm (1")
Weight ................................................................. 0.11 kg (0.3 lbs.)
Included accessories
Audio cable
USB cable
AC adapter
User guide
CD-ROM
Handy Strap
Customer Registration Document (USA only)
Tripod Adapter
SD Card
62
• Specifications are subject to change without prior notice.
Page 75

Limited Warranty
Your Marantz Professional product is warranted against
manufacturer defects in material and workmanship for a period
of one year parts and labor.
Except as specified below, this warranty covers defects in
material and workmanship. The following are not covered under
warranty:
1. Damage, deterioration, malfunction or failure to meet
performance specifications resulting from:
a) Accidents, acts of nature, misuse, abuse, neglect or
unauthorized product modification.
b) Improper installation, removal or maintenance, or failure to
follow supplied instructions.
c) Repair or attempted repair by a non-Marantz authorized
agent.
d) Any shipment (claims must be presented to the carrier).
e) Any cause other than a defect of manufacturing.
2. Cleaning, check-ups with no fault found or changes incurred for
installation, removal or reinstallation of the product.
3. Any serialized product on which the serial number has been
defaced, modified or removed.
4. Batteries and battery chargers.
5. Accessories, including but not limited to: cables, mounting
hardware and brackets, cleaning accessories, power cords
and adapters, and carry cases.
Non-transferable warranty
This Warranty may be enforced only by the original purchaser.
What We Will Pay For
We will pay for all labor and material expenses for items covered
by the warranty.
How You Can Get Service (Americas only)
1. If your unit needs service in the USA, contact our service
referral at the appropriate telephone number indicated below.
We will advise you of the name and location of one or more
authorized service centers from which service may be obtained.
Please do not return the unit directly to us.
2. You must pay any shipping charges if it is necessary to ship the
product for service. If the necessary repairs are covered by the
warranty, we will pay return shipping charges to your location
anywhere in the United States or its territories.
3. Whenever warranty service is required, you must present the
original dated sales receipt or other proof of date purchased.
Limitation of Implied Warranties
All implied warranties, including warranties of merchantability
and fitness for a particular purpose, are limited in duration to the
length of this warranty.
63
Page 76

Exclusion of Damages (Americas only)
Liability for any defective product is limited to repair or
replacement of the product at manufacturer’s option.
Manufacturer shall not be liable for damage to other products
caused by any defects in Marantz products, damages based
on inconvenience or loss of use of the product, or any other
damages, whether incidental, consequential, or otherwise.
Some States do not allow limitations on how long an implied
warranty lasts and/or do not allow the exclusion or limitation of
incidental or consequential damages, so the above limitations
and exclusions may not apply to you.
How State Law Relates to the Warranty (Americas only)
This warranty gives you specific legal rights, and you may have
other rights which may vary from State to State.
Marantz Professional Service Number (Americas only):
Marantz Professional Factory Service (630) 741-0330, toll free
within the US (866) 405-2154.
Products purchased outside of the United States, its possessions
or territories.
This warranty is enforceable only in the United States and its
possessions or territories.
Marantz Professional products Sales Office Site:
For inquiries or information on repair service of Marantz
Professional Products, please contact our Sales Office or Tech
Support Centre near you which are listed in D&M Professional
website below.
AMERICA
D&M Professional America http://www.d-mpro.com
Service number : 866-405-2154 (Toll Free)
EUROPE
D&M Professional Europe http://www.d-mpro.eu.com
ASIA/OTHERS
D&M Professional Asia http://www.d-mproasia.com
64
Page 77

D&M Holdings Inc.
PROFESSIONAL BUSINESS COMPANY
2007/09 00M10CS851010 ecmf-g
 Loading...