


PMD-901V
Quickstart Guide
Guía de inicio rápido
Guide d’utilisation rapide
Guida rapida
Schnellstart-Anleitung
Appendix
English (3–12)
Español (13–22)
Français (23–32)
Italiano (33–42)
Deutsch (43–53)
English (54–55)


Quickstart Guide (English)
Introduction
Thanks for choosing the Marantz Pro PMD-901V. Please see this guide’s
Features chapter to learn about PMD-901V’s features, and then refer to the
Operation chapter to start using PMD-901V.
Important: Before using PMD-901V for the first time, charge it fully. See
Operation > Charging to learn how to do this.
Box Contents
PMD-901V USB Power Adapter
Body Clamp Charging Base
Shoulder Clip Car Charging Adapter
External Camera Quickstart Guide
Mini-USB Cable Safety & Warranty Manual
Important: Download the full PMD-901V User Guide at marantzpro.com.
Support
For the latest information about this product (system requirements, compatibility
information, etc.) and product registration, visit marantzpro.com.
3
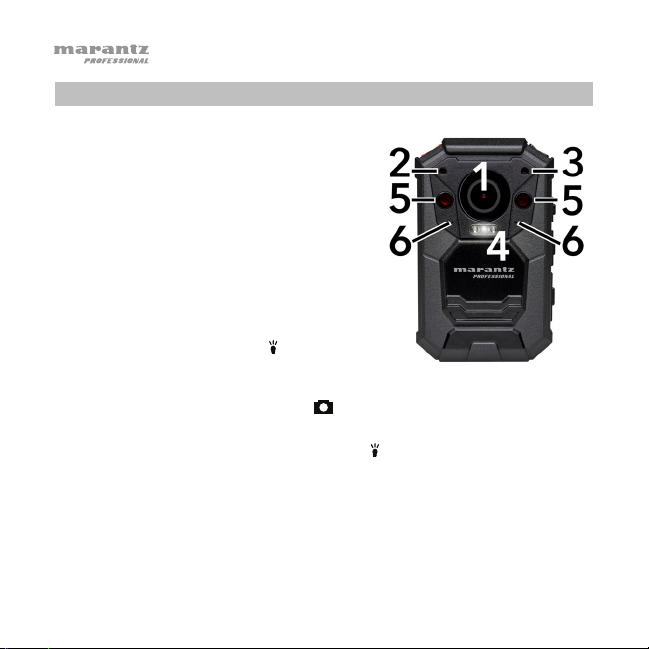
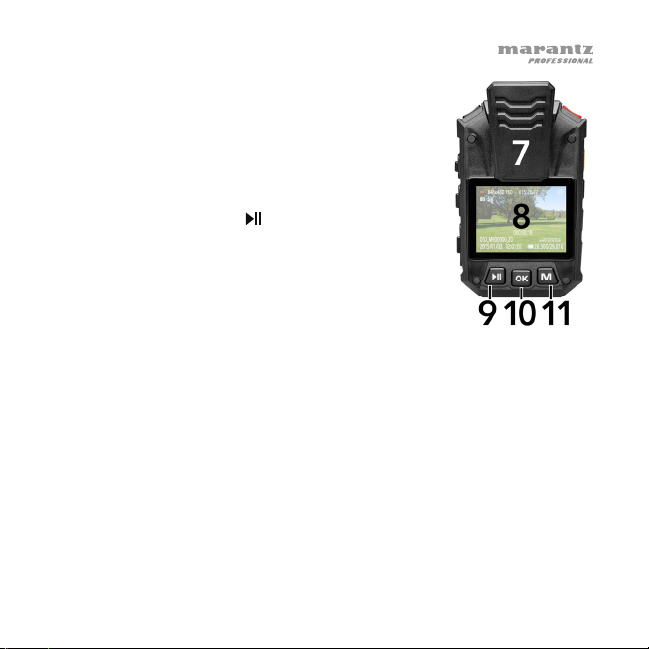
Features
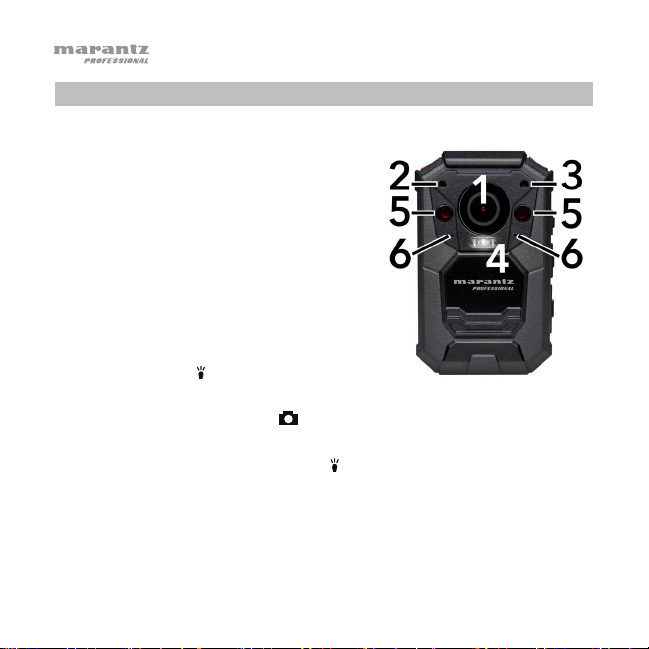
1. Camera Lens: Keep this lens clean
and free from dirt, grease, or other
obstructions.
2. Laser Pointer: Press and hold the OK
button for 2 seconds to turn this laser
pointer on/off. Do not look directly into
this light.
3. Light Sensor: Keep this sensor clean
and free from dirt, grease, or other
obstructions.
4. Flashlight / Strobe Light: Press and
hold the Light (
to turn the flashlight on/off.
Press and hold the Photo (
light on/off.
5. Infrared Lights: Press the Light (
on/off. Use them in low-light environments (night vision). You can set
these lights to activate automatically based on the light sensor’s
reading (see the User Guide to learn more about this).
6. Speakers: PMD-901V’s audio signal comes out of these pinhole-sized
speakers.
4
) button for 2 seconds
) button for 2 seconds to turn the strobe
) button to turn the infrared lights
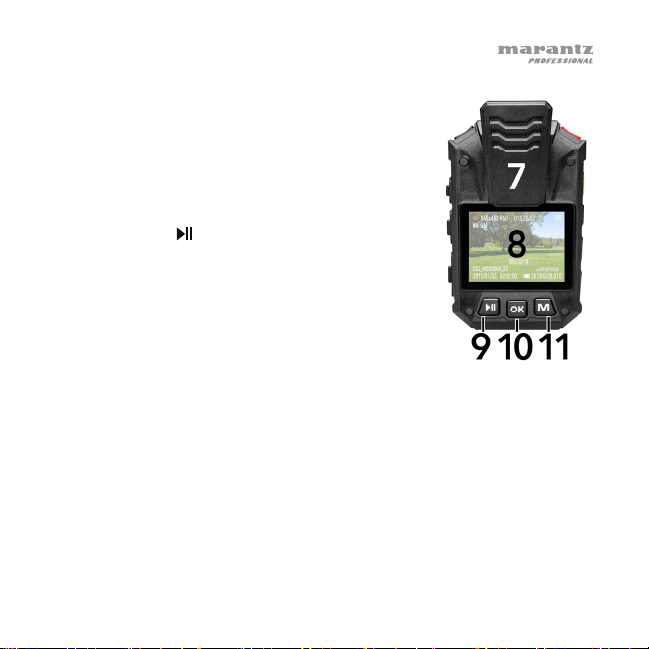
7. Body Clamp: Attach the included body clamp to
PMD-901V here, and use it to secure PMD-901V to
your clothes, belt, etc.
8. Display: This display shows the image captured by
the lens and/or other status information. See the
Operation > Display section for an overview of
what information is shown here.
9. Play/Pause (
button to rewind. Press it additional times to
increase the rewind speed. While not recording,
press this button to play/view the last-recorded file.
While playing audio, press this button to return to
the start of the file. While browsing through options
in the display, press this button to move up/left
one option.
10. OK: Press this to confirm a selection shown in PMD-901V’s display.
Press and hold this button for 2 seconds to turn the laser pointer on/off.
Press this button once while not recording and then enter your password
to browse and play any of the video, photo, or audio files in PMD-901V’s
memory (see the User Guide to learn how to set and enter your password).
11. M: Press this button to access PMD-901V’s Settings menu (see the User
Guide to learn more about this). While playing video, press and hold this
button to fast-forward. Press it additional times to increase the fastforward speed. While browsing through options in the display, press this
button to move down/right one option.
): While playing video, press this
5
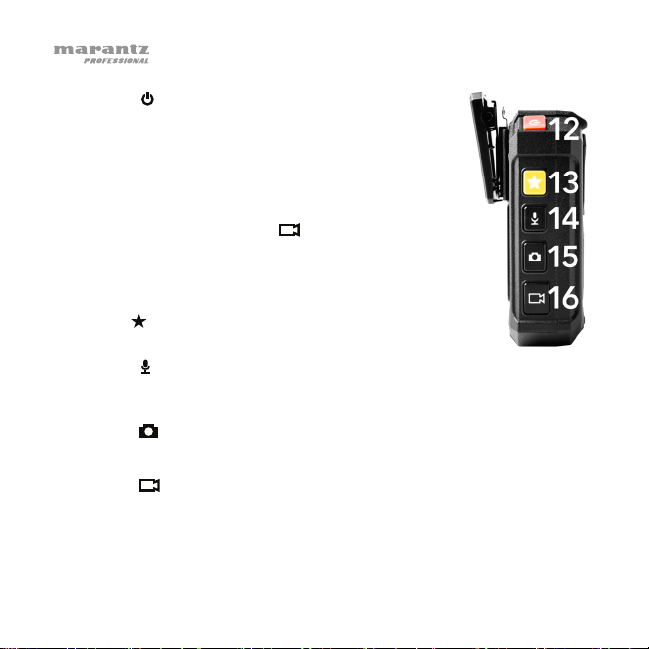
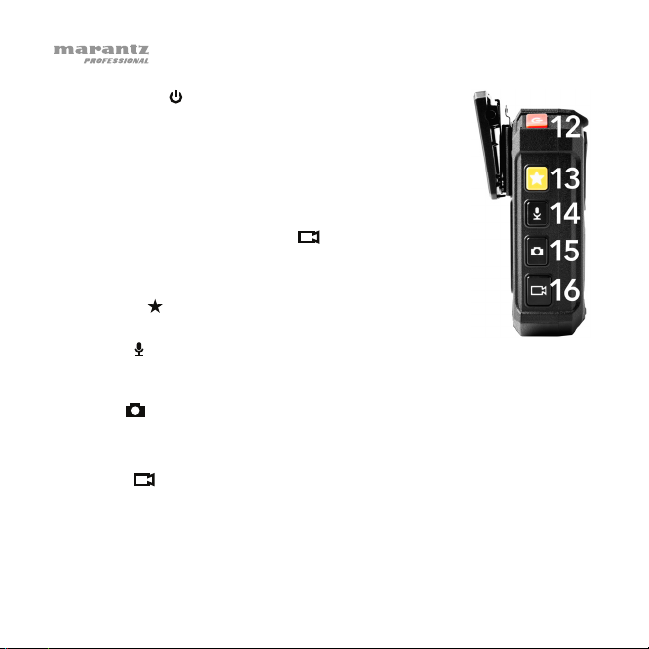
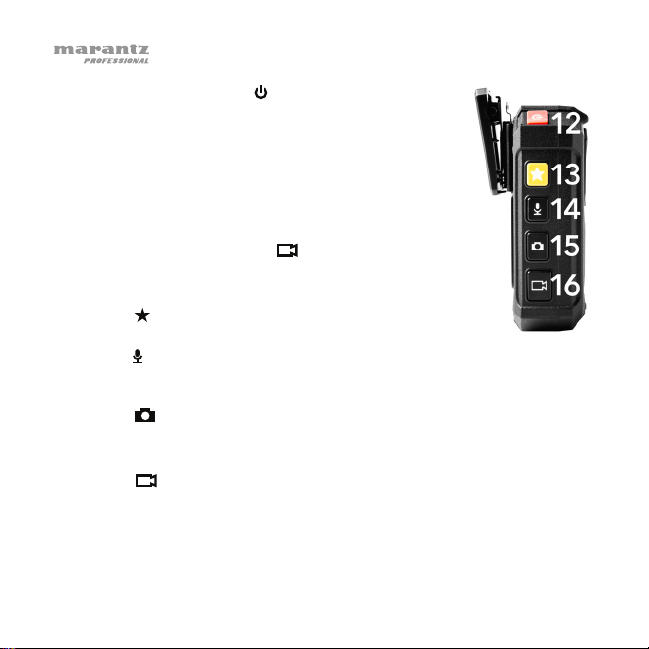
12. Power (
): Press and hold this button for 2 seconds
to power PMD-901V on/off. When you power it on,
you will hear a “beep,” the display will light up, and
PMD-901V will start video recording. (This autorecord feature was added for convenience as PMD901V will be most commonly used for continuous
and immediate video recording. To stop video
recording, press the Video (
) button.)
While browsing through PMD-901V’s menus in the
display, press this button to return to the previous
menu.
13. Star (
): Press this button to mark a file as
“important.”
14. Audio (
): Press this button to start/stop recording audio. (If PMD-
901V is powered off, you can press and hold this button for 2 seconds
to start audio recording immediately.)
15. Photo (
): Press this button to take a photo.
Press and hold this button for 2 seconds to turn the strobe light on/off.
16. Video (
): Press this button to start/stop video recording. (If PMD-
901V is powered off, you can press and hold this button for 2 seconds
to start video recording immediately.)
6

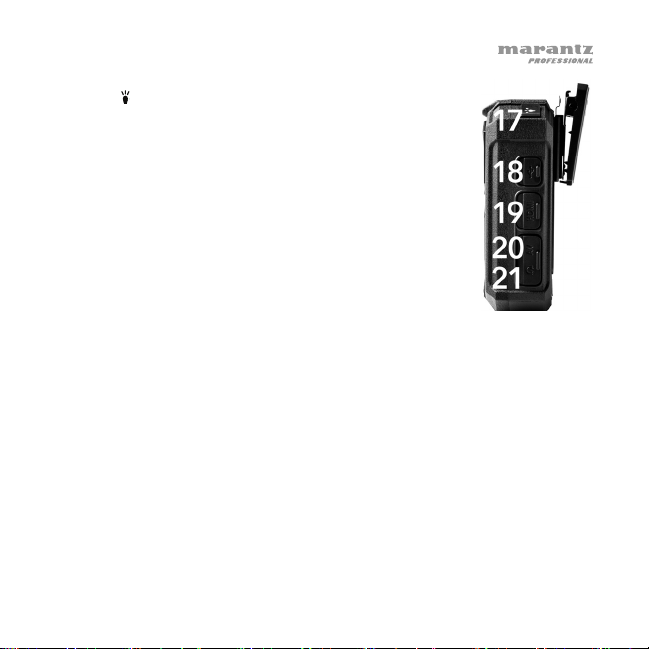
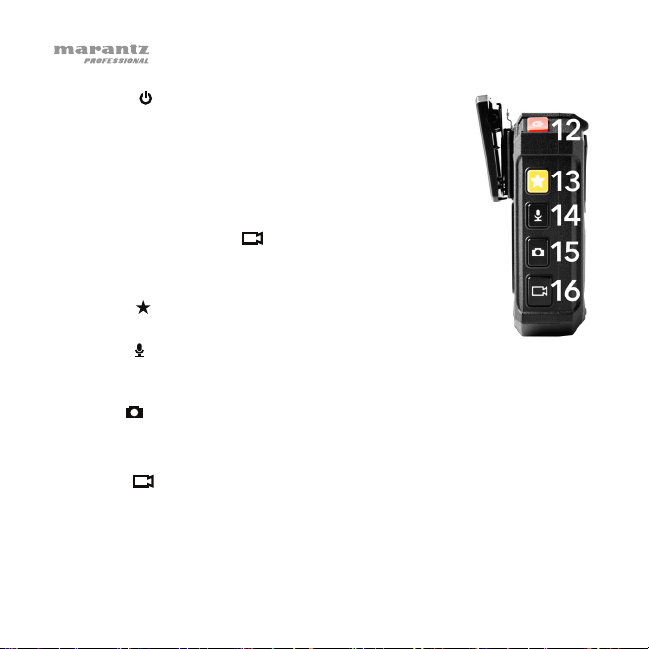
17. Light (
): Press this button to turn the infrared
lights (night vision) on/off.
Press and hold this button for 2 seconds to turn the
flashlight on/off.
18. USB Port: Use a standard mini-USB cable to
connect this port to a USB port on your computer.
This connection will charge and power PMD-901V,
which will act as a mass-storage device. You can
then transfer PMD-901V’s files to your computer.
Alternatively, connect it to the included USB power
adapter, or use the charging base.
19. HDMI Port: Use a standard HDMI cable to connect
this port to an HDMI port on an HD TV or monitor.
You can then view or play files directly from PMD-901V’s memory.
Next to this port is a recessed Reset button. If PMD-901V “freezes,”
press this button (using a pen, paper clip, etc.) to power-cycle it,
returning it to normal operation.
20. AV Port: Use a 3/32” (2.5 mm) cable to connect this port to an
external mini camera (720 x 576, 25 fps, included). The camera’s video
and audio signals will then be sent into PMD-901V through this port.
21. Headphone Port: Connect standard 1/8” (3.5 mm) stereo headphones
(TRS or TRRS) to this output to listen to the sound of your files directly
on PMD-901V. (Using headphones does not disable PMD-901V’s
built-in speakers.)
7
Operation
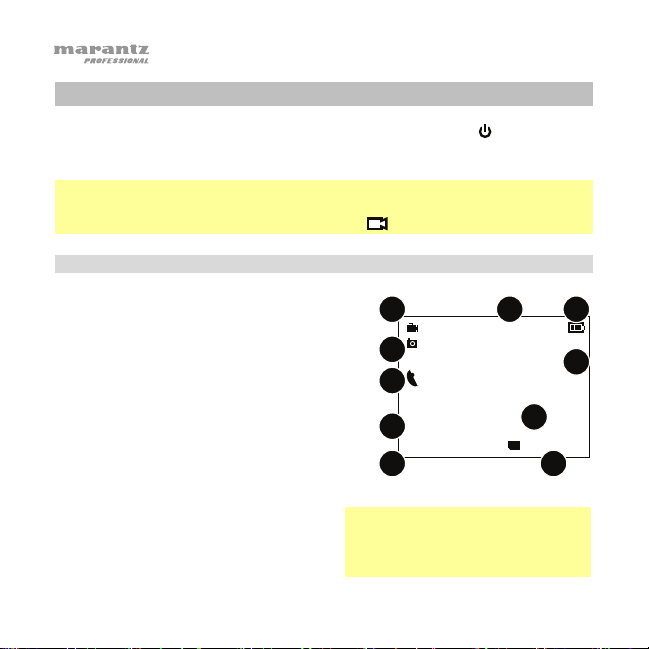
To power PMD-901V on/off, press and hold the Power ( ) button for 2
seconds. When you power it on, you will hear a “beep,” the display will turn on,
and PMD-901V will start video recording.
Note: This auto-record feature was added for convenience as PMD-901V will
be most commonly used for continuous and immediate video recording. To
stop video recording, simply press the Video ( ) button.
Display
1. Video Resolution
during normal operation. While in CarDV Mode,
the icon will be a car. See the User Guide to
learn more about this.)
2. Available Recording Time
3. Available Battery Life
4. Megapixels
5. Current GPS Position
be shown only when GPS is active.)
6. GPS Status (no icon = off / red = not connected
/ green = connected)
7. Elapsed Recording Time
8. Camera ID
9. Current Date/Time
10. Available Memory
8
(This icon will be a camera
(This information will
1
4
1280x720 P60
5M
2
015:26:07
3
41.994, 71.467
5
6
000:01:23
DSJ_M9000000_Z0
8
2015/05/12 02:01:02 26.50G/29.01G
9
Note: All icons will be white or gray
while not recording, flashing red
while recording, or solid red while
in “pre-record” mode.
7
10
Video
To start/stop video recording, press the Video ( ) button.
Tip: If PMD-901V is powered off, press and hold the Video ( ) button for 2
seconds. PMD-901V will power on and start video recording immediately.
To switch the video resolution between WVGA and HD, press and hold the
Audio ( ) button for 2 seconds. This will switch between 1280x720 (30 fps,
16:9) and 848x480 (30 fps, 16:9).
Tip: You can select additional video resolutions in the Settings menu (see the
User Guide to learn more).
To adjust the zoom distance, press and hold the Play/Pause ( ) button or M
button for more than 1 second.
To play/view the last-recorded file, press the Play/Pause ( ) button while
you are not recording.
To fast-forward or rewind during video playback, press the M button to
fast-forward or press the Play/Pause ( ) button to rewind. Press the button
additional times to increase the speed (2X, 4X, 8X, 16X, 32X, 64X).
PMD-901V can also “tag” your videos with the current GPS coordinates. The
satellite dish ( ) icon on the left side of the display indicates when its GPS is
connected (green), not connected (red), or off (gray). When connected, the
coordinates will be shown in the upper-right corner of the display and “tagged”
to your video.
9
Audio
To start/stop audio recording, press the Audio ( ) button.
Tip: If PMD-901V is powered off, press and hold the Audio ( ) button for 2 seconds.
PMD-901V will power on and start audio recording immediately.
To play/view the last-recorded file, press the Play/Pause ( ) button while
you are not recording.
Photo
To take a photo, press the Photo ( ) button.
Tip: You can take a photo while also video recording.
Lights
To turn the laser pointer on/off, press and hold the OK button for 2 seconds.
To turn the strobe light on/off, press and hold the Photo ( ) button for 2
seconds.
To turn the infrared lights (night vision) on/off, press the Light ( ) button. When
on, PMD-901V can record video in a dark environment.
To turn the flashlight on/off, press and hold the Light ( ) button for 2 seconds.
To turn the display on/off, press the Power (
) button. PMD-901V will still
operate normally while its display is off as long as it remains powered on.
Note: If you do not press any buttons for 30 seconds, the display will turn off
automatically. You change the amount of time in the Settings menu (see the User
Guide to learn more). To conserve battery life, we recommend turning the display off
if you are not using it.
10

Charging
When PMD-901V’s battery life is low, the battery ( ) icon will flash in the
display, and you will hear an alert tone. When this happens, charge PMD-901V.
To charge PMD-901V, do either of the following:
A. Use a standard mini-USB cable to connect PMD-901V’s USB port to one
of the following:
• a USB port on your computer (powered on)
• the included USB power adapter (connected to a power outlet)
• the included car charger (connected to the cigarette lighter of a car,
while running)
B. Attach PMD-901V to the charging base (make sure PMD-901V’s display is
facing the same direction as the charging base’s USB port). Use a standard
mini-USB cable to connect the charging base to one of the following:
• a USB port on your computer (powered on)
• the included USB power adapter (connected to a power outlet)
• the included car charger (connected to the cigarette lighter of a car,
while running)
Alternatively, use a power adapter (5 V, 1 A, center-positive, 2.5 mm barrel
diameter, sold separately) to connect the charging base to a power outlet.
If PMD-901 is in CarDV Mode, when you remove PMD-901V from the charging
base, it will power off automatically. See the User Guide to learn more about this.
11
While PMD-901V is charging, a light next to the Power (
) button will be
lit blue. This light will turn off after it is fully charged.
Note: It takes approximately 3 hours to charge PMD-901V fully while not
being used.
Memory
When PMD-901V’s memory is full, Card Full will appear in the display,
and you will hear an alert tone. When this happens, make more space
available in its memory. PMD-901V cannot record when its memory is full.
To transfer files from PMD-901V:
1. Use a standard mini-USB cable to connect PMD-901V’s USB port to
your computer (powered on).
2. Your computer will recognize PMD-901V as a mass-storage device
(Removable Disk), similar to a USB drive or SD card. Enter your
password (see the User Guide to learn how to set and enter your
password).
3. Open Removable Disk to view its contents.
4. Click and drag the files from PMD-901V onto your computer’s hard
disk. We recommend deleting the files from PMD-901V after moving
them to make more space available in its memory.
12

Guía de inicio rápido (Español)
Introducción
Gracias por elegir el Marantz Pro PMD-901V. Consulte el capítulo Características
de esta guía para aprender sobre las características del PMD-901V y luego
consulte el capítulo Operación para comenzar a utilizar el PMD-901V.
Importante: Antes de utilizar el PMD-901V por primera vez, cárguelo
completamente. Consulte Operación > Carga para aprender a hacer esto.
Contenido de la caja
PMD-901V Adaptador de corriente USB
Funda para hombro Base de carga
Clip para vestimenta Adaptador para carga en el vehículo
Mini cámara externa Guía de inicio rápido
Cable mini-USB Manual de seguridad y garantía
Importante: Descargue la guía del usuario completa en marantzpro.com.
Soporte
Para obtener la información más reciente acerca de este producto (requisitos de
sistema, información de compatibilidad, etc.) y registrarlo, visite marantzpro.com.
13
Características
1. Lente de la cámara: Mantenga esta lente
limpia y libre de suciedad, grasa u otras
obstrucciones.
2. Puntero láser: Mantenga pulsado el
botón OK (Aceptar) durante 2 segundos
para encender o apagar este puntero
láser. No mire a esta luz directamente.
3. Sensor de luz: Mantenga este sensor
limpio y libre de suciedad, grasa u otras
obstrucciones.
4. Linterna / luz estroboscópica: Mantenga
pulsado el botón Luz (
segundos para encender o apagar la
linterna.
Mantenga pulsado el botón Foto ( ) durante 2 segundos para encender o
apagar la luz estroboscópica.
5. Luces infrarrojas: Pulse el botón Luz (
luces infrarrojas. Utilícelas en ambientes de baja luminosidad (visión
nocturna). Puede ajustar estas luces para que se activen automáticamente
según la lectura del sensor de luz (consulte la guía del usuario para
aprender más sobre esto).
6. Altavoces: La señal de audio del PMD-901V proviene de estos altavoces
del tamaño de un agujero de alfiler.
14
) durante 2
) para encender o apagar las
7. Clip para vestimenta: Sujete la pinza para vestimenta
incluida al PMD-901V en este punto, y utilícela para
sujetar el PMD-901V a su vestimenta, cinturón, etc.
8. Pantalla: Esta pantalla muestra la imagen capturada
por la lente y/u otra información de estado. Consulte la
sección Operación > Pantalla para obtener un vistazo
general de la información que se muestra aquí.
9. Reproducción / pausa ( ): Al reproducir vídeo, pulse
este botón para rebobinar. Púlselo más veces para
aumentar la velocidad de rebobinado. Mientras no esté
grabando, pulse este botón para reproducer/ver el
último archivo grabado. Al reproducir audio, pulse este
botón para regresar al principio del archivo. Al recorrer
las opciones de la pantalla, pulse este botón para
desplazarse una opción a la izquierda/arriba.
10. Aceptar: Pulse este botón para confirmar la selección que se muestra en
la pantalla del PMD-901V. Mantenga pulsado este botón durante 2
segundos para encender o apagar el puntero láser. Pulse este botón una
vez cuando no esté grabando y luego introduzca su contraseña para explorar
y reproducir cualquier archivo de video, fotos o audio des la memoria del
PMD-901V (consulte la guía del usuario para aprender a establecer e
introducir su contraseña).
11. M: Pulse este botón para acceder al menú Ajustes del PMD-901V (consulte
la Guía del usuario para aprender más sobre esto). Al reproducir vídeo, pulse
este botón para realizar un avance rápido. Púlselo más veces para aumentar
la velocidad del avance rápido. Al recorrer las opciones de la pantalla, pulse
este botón para desplazarse una opción a la derecha/abajo.
15
12. Encendido ( ): Mantenga pulsado este botón durante
2 segundos para encender o apagar el PMD-901V. Al
encenderlo, escuchará un pitido, la pantalla se
iluminará, y el PMD-901V comenzará a grabar vídeo.
(Esta característica de grabación automática fue
agregada por conveniencia ya que la mayoría de
veces el PMD-901V se utilizará para grabación de
vídeo continua e inmediata. Para detener la grabación
de vídeo, pulse el botón Vídeo ( ).)
Al recorrer los menús del PMD-901V en la pantalla,
pulse este botón para volver al menú anterior.
13. Estrella ( ): Pulse este botón para marcar un archivo
como “importante”.
14. Audio ( ): Pulse este botón para iniciar o detener la grabación de audio. (Si
el PMD-901V está apagado, puede mantener pulsado este botón durante 2
segundos para comenzar a grabar audio inmediatamente).
15. Foto ( ): Pulse este botón para tomar una fotografía.
Mantenga pulsado este botón durante 2 segundos para encender o apagar
la luz estroboscópica.
16. Vídeo ( ): Pulse este botón para iniciar/detener la grabación de vídeo. (Si
el PMD-901V está apagado, puede mantener pulsado este botón durante 2
segundos para comenzar a grabar vídeo inmediatamente).
16
17. Luz ( ): Pulse este botón para encender y apagar las
luces infrarrojas (visión nocturna).
Mantenga pulsado este botón durante 2 segundos para
encender o apagar la linterna.
18. Puerto USB: Utilice un cable mini-USB estándar para
conectar este puerto a un puerto USB de su ordenador.
Esta conexión cargará y suministrará corriente al PMD901V, el cual se comportará como un dispositivo de
almacenamiento masivo. Entonces será capaz de
transferir los archivos del PMD-901V a su ordenador.
Como alternativa, conéctelo al adaptador de corriente
USB incluido o utilice la base de carga.
19. Puerto HDMI: Utilice un cable HDMI estándar para conectar este puerto a
un puerto HDMI en un TV HD o un monitor. Entonces podrá ver o
reproducir los archivos directamente desde la memoria del PMD-901V.
Junto a este puerto hay un botón Reiniciar embutido. Si el PMD-901V se
“congela”, pulse este botón (con una lapicera, clip para papel, etc.) para
reiniciarlo y volver a su funcionamiento normal.
20. Puerto AV: Utilice un cable de 2,5 mm (3/32 pulg.) para conectar este
puerto a una mini cámara externa de (720 x 576, 25 fps, incluida). Las
señales de vídeo y audio de la cámara se transmitirán entonces hacia el
PMD-901V a través de este puerto.
21. Puerto para auriculares: Conecte auriculares estéreo TRS o TRRS de 3,5
mm (1/8 pulg.) a esta salida para escuchar el sonido de sus archivos
directamente en el PMD-901V. (Utilizar auriculares no deshabilitará los
altavoces internos del PMD-901V).
17

Operación
Para apagar y encender el PMD-901V, mantenga pulsado el botón Encendido
) durante 2 segundos. Al encenderlo, escuchará un pitido, la pantalla se
(
iluminará, y el PMD-901V comenzará a grabar vídeo.
Nota: Esta característica de grabación automática fue agregada por
conveniencia ya que la mayoría de veces el PMD-901V se utilizará para grabación
de vídeo continua e inmediata. Para detener la grabación de vídeo, pulse el botón
Vídeo ( ).
Pantalla
1. Resolución de video (Este icono será una
cámara durante el funcionamiento normal. En modo
CarDV, el icono será un automóvil. Para aprender
más sobre esto, consulte la Guía del usuario.)
2. Tiempo de grabación disponible
3. Vida útil disponible de la batería
4. Megapíxeles
5. Posición actual del GPS
solo se muestra cuando el GPS está activo.)
6. Estado GPS (sin icono = desactivado/ rojo =
no conectado / verde = conectado)
7. Tiempo de grabación transcurrido
8. ID de la cámara
9. Fecha/hora actual
10. Memoria disponible
18
(Esta información
Nota: Todos los iconos serán blancos o
grises mientras no esté grabando, rojos
intermitentes mientras esté grabando o
rojos permanentes cuando esté en modo
“pre-grabación”.
1
1280x720 P60
5M
4
6
8
DSJ_M9000000_Z0
2015/05/12 02:01:02 26.50G/29.01G
9
2
015:26:07
000:01:23
3
41.994, 71.467
5
7
10
Vídeo
Para comenzar/detener la grabación de vídeo, pulse el botón Vídeo (
Consejo: Si el PMD-901V está apagado, mantenga pulsado el botón Vídeo ( ) durante
2 segundos. El PMD-901V se encenderá y comenzará a grabar vídeo inmediatamente.
Para alternar la resolución de vídeo entre WVGA y HD, mantenga pulsado el
botón Audio (
848x480 (30 fps, 16:9).
Consejo: Puede seleccionar resoluciones de vídeo adicionales en el menú Ajustes
(consulte la guía del usuario para aprender más).
Para ajustar la distancia de zoom, mantenga pulsado el botón Reproducción /
pausa (
Para reproducer/ver el último archivo grabado, pulse el botón Reproducción /
pausa (
Para realizar un avance rápido o rebobinar durante la reproducción de vídeo,
pulse el botón M para realizar un avance rápido o pulse el botón Reproducción /
pausa (
(2X, 4X, 8X, 16X, 32X, 64X).
El PMD-901V también puede etiquetar sus vídeos con las coordenadas del GPS
actuales. El icono de antena satelital (
cuando el GPS está conectado (verde), no conectado (rojo) o desactivado (sin icono).
Cuando se encuentra conectado, las coordenadas se muestran en la esquina superior
derecha de la pantalla y se “etiquetarán” en su vídeo.
) durante 2 segundos. Esto alternará entre 1280x720 (30 fps, 16:9) y
) o el botón M durante más de 1 segundo.
) cuando no esté grabando.
) para rebobinar. Pulse el botón más veces para aumentar la velocidad
) del lado izquierdo de la pantalla indica
).
19
Audio
Para comenzar/detener la grabación de audio, pulse el botón Audio ( ).
Consejo: Si el PMD-901V está apagado, mantenga pulsado el botón Audio ( ) durante 2
segundos. El PMD-901V se encenderá y comenzará a grabar audio inmediatamente.
Para reproducer/ver el último archivo de grabado, pulse el botón Reproducción /
pausa (
) cuando no esté grabando.
Foto
Para tomar una fotografía, pulse el botón Foto ( ).
Consejo: También puede tomar fotografías mientras graba vídeo.
Luces
Para encender/apagar el puntero láser, mantenga pulsado el botón OK durante 2
segundos.
Para encender/apagar la luz estroboscópica, mantenga pulsado el botón Foto
(
) durante 2 segundos.
Para encender/apagar las luces infrarrojas (visión nocturna), pulse el botón Light
). Cuando se encuentran encendidas, el PMD-901V puede grabar vídeo en
(
ambientes oscuros.
Para encender/apagar la linterna, mantenga pulsado el botón Luz (
) durante 2
segundos.
Para encender/apagar la pantalla, pulse el botón Encendido (
). El PMD-901V
continuará funcionando normalmente con su pantalla apagada siempre que
permanezca encendido.
Nota: Si no pulsa ningún botón en un lapso de 30 segundos, la pantalla se apagará
automáticamente. Puede modificar el lapso de tiempo en el menú Ajustes (consulte
la guía del usuario para aprender más). Para conservar la vida útil de la batería,
recomendamos apagar la pantalla si no la está utilizando.
20

Carga
Cuando la vida útil de la batería del PMD-901V esté baja, parpadeará el ícono
battery (batería) (
esto, ponga el PMD-901V a cargar.
Para cargar el PMD-901V, haga una de las siguientes acciones:
A. Utilice un cable mini-USB estándar para conectar el puerto USB del PMD-
901V a uno de los siguientes dispositivos:
• un puerto USB de su ordenador (encendido)
• el adaptador USB de corriente incluido (conectado a una toma de corriente)
• El cargador para vehículos incluido (conectado al encendedor de
cigarrillos de un vehículo con el motor en marcha)
B. Conecte el PMD-901V a la base de carga (asegúrese de que la pantalla del
PMD-901V esté orientada en la misma dirección que el puerto USB de la base
de carga). Utilice un cable mini-USB estándar para conectar la base de carga a
uno de los siguientes dispositivos:
• un puerto USB de su ordenador (encendido)
• el adaptador USB de corriente incluido (conectado a una toma de corriente)
• El cargador para vehículos incluido (conectado al encendedor de
cigarrillos de un vehículo con el motor en marcha)
Como alternativa, utilice un adaptador de corriente (5 V, 1 A, centro positivo y
cilindro de 2,5 mm de diámetro que se vende por separado) para conectar la
base de carga a una toma de corriente.
Si el PMD-901V se encuentra en modo CarDV, al retirarlo de la base de carga, se
apagará automáticamente. Para aprender más sobre esto, consulte la Guía del usuario.
) en la pantalla y escuchará un tono de alerta. Cuando ocurra
21

Mientras el PMD-901V se esté cargando, se encenderá una luz azul junto
al botón Encendido (
). Esta luz se apagará una vez que esté
completamente cargado.
Nota: Se necesitan aproximadamente 3 horas para cargar el PMD-901V
completamente si no se está usando.
Memoria
Cuando la memoria del PMD-901V esté llena, aparecerá Card Full (Tarjeta
llena) en la pantalla, y escuchará un tono de alerta. Cuando esto ocurra,
libere más espacio en su memoria. El PMD-901V no puede grabar si su
memoria está llena.
Cómo transferir archivos desde el PMD-901V:
1. Utilice un cable mini-USB estándar para conectar el puerto USB del
PMD-901V a su ordenador (encendido).
2. Su ordenador reconocerá al PMD-901V como un dispositivo de
almacenamiento masivo (disco extraíble), similar a una unidad USB o
una tarjeta SD. Introduzca su contraseña (consulte la guía del usuario
para aprender a establecer e introducir su contraseña).
3. Abra el disco extraíble para ver su contenido.
4. Arrastre los archivos del PMD-901V al disco rígido de su ordenador.
Recomendamos borrar los archivos del PMD-901V luego de
transferirlos para liberar más espacio en su memoria.
22

Guide d’utilisation rapide (Français)
Présentation
Nous vous remercions d’avoir choisi la caméra corporelle PMD-901V de Marantz Pro.
Veuillez consulter la section Caractéristiques de ce guide afin d’en savoir plus sur
ses caractéristiques, puis la section Fonctionnement afin de pouvoir commencer à
utiliser la PMD-901V.
Important : Assurez-vous de recharger complètement la batterie de la PMD-901V
avant la première utilisation. Veuillez consulter la section Fonctionnement >
Rechargement de la batterie afin d’en savoir plus.
Contenu de la boîte
PMD-901V Adaptateur d’alimentation USB
Sangle de fixation à l’épaule Socle de rechargement
Pince de fixation Adaptateur de rechargement pour voiture
Câble mini-USB Guide d’utilisation rapide
Minicaméra externe Consignes de sécurité et
informations concernant la garantie
Important : Téléchargez le Guide d’utilisation complet à partir du site marantzpro.com.
Assistance technique
Pour les toutes dernières informations concernant ce produit (configuration système,
compatibilité, etc.), veuillez visiter le site marantzpro.com.
23

Caractéristiques
1. Objectif : Veuillez maintenir l’objectif de la
caméra propre et exempt de saleté, de
graisse ou d’autres obstructions.
2. Faisceau laser : Maintenez la touche OK
enfoncée pendant 2 secondes afin d’activer
et désactiver le faisceau laser. Ne regardez
pas directement dans cette lumière.
3. Capteur de luminosité : Veuillez maintenir ce
capteur propre et exempt de saleté, de graisse
ou d’autres obstructions.
4. Lampe-torche/lumière stroboscopique : Maintenez la touche Lumière ( )
enfoncée pendant 2 secondes afin d’activer et désactiver la lampe-torche.
Maintenez la touche Photo ( ) enfoncée pendant 2 secondes afin
d’activer et désactiver la lumière stroboscopique.
5. Lumières infrarouges : Appuyez sur la touche Lumière (
désactiver les lumières infrarouges. Utilisez-les dans les environnements
à faible luminosité (vision nocturne). Vous pouvez programmer ces lumières
afin qu’elles s’activent automatiquement selon la lecture du capteur de
luminosité (veuillez consulter le guide d’utilisation afin d’en savoir plus à ce
sujet).
6. Haut-parleurs : Le signal audio de la PMD-901V est transmis par ces
haut-parleurs de la grosseur d’une pointe d’épingle.
24
) afin d’activer et

7. Pince de fixation : Fixez la pince de fixation fournie à la
PMD-901V, puis utilisez-la afin de sécuriser la PMD901V à vos vêtements, ceinture, etc.
8. Écran d’affichage : Cet écran affiche l’image capturée par
l’objectif et/ou toute autre information d’état. Veuillez
consulter la section Fonctionnement > Écran d’affichage
pour une vue d’ensemble des informations affichées.
9. Lancer/interrompre la lecture (
vidéo, appuyez sur cette touche afin de rembobiner.
Appuyez plusieurs fois afin d’augmenter la vitesse de
rembobinage. Lorsque l’appareil n’est pas en cours
d’enregistrement, appuyez sur cette touche afin de lire ou
afficher le dernier fichier enregistré. Lors de la lecture
audio, appuyez sur cette touche afin de revenir au début
du fichier. Lorsque vous parcourez les options à l’écran,
appuyez sur cette touche afin de déplacer le curseur sur
l’option du haut/de gauche.
10. OK : Cette touche permet de confirmer la sélection affichée sur écran de la PMD-
901V. Maintenez cette touche enfoncée pendant 2 secondes afin d’activer et
désactiver le faisceau laser. Lorsque l’appareil n’est pas en cours d’enregistrement,
appuyez sur cette touche puis entrez votre mot de passe afin de parcourir et
visionner les vidéos, photos et fichiers audio sauvegardés dans la mémoire de la
PMD-901V (veuillez consulter le Guide d’utilisation afin d’en savoir plus).
11. M : Cette touche permet d’accéder au menu Paramètres de la PMD-901V
(veuillez consulter le Guide d’utilisation afin d’en savoir plus). Lors de la lecture
vidéo, maintenez cette touche enfoncée afin d’avancer rapidement. Appuyez
plusieurs fois afin d’augmenter la vitesse d’avancement. Lorsque vous
parcourez les options à l’écran, appuyez sur cette touche afin de déplacer le
curseur sur l’option du bas/de droite.
) : Lors de la lecture
25
12. Touche d’alimentation ( ) : Maintenez cette touche
enfoncée pendant 2 secondes afin de mettre la PMD901V sous et hors tension. Lorsque vous mettez la PMD901V sous tension, un signal sonore retentit, l’affichage
s’allume et l’enregistrement vidéo est lancé. (Cette
fonctionnalité d’enregistrement automatique a été ajoutée
pour plus de commodité comme la PMD-901V sera plus
couramment utilisée pour l’enregistrement vidéo en
continu et immédiat. Pour arrêter l’enregistrement vidéo,
appuyez sur la touche Video ( ).
Lorsque vous parcourez les menus à l’écran, appuyez
sur cette touche afin de retourner au menu précédent.
13. Étoile ( ) : Cette touche permet de marquer un fichier
comme « important ».
14. Audio ( ) : Cette touche permet de lancer ou d’arrêter l’enregistrement audio.
(Lorsque la PMD-901V est hors tension, maintenez cette touche enfoncée
pendant 2 secondes afin de lancer immédiatement l’enregistrement audio.)
15. Photo ( ) : Cette touche permet de prendre une photo.
Maintenez cette touche enfoncée pendant 2 secondes afin d’activer et
désactiver la lumière stroboscopique.
16. Vidéo ( ) : Cette touche permet de lancer ou d’arrêter l’enregistrement
vidéo. (Lorsque la PMD-901V est hors tension, maintenez cette touche
enfoncée pendant 2 secondes afin de lancer immédiatement l’enregistrement
vidéo.)
26

17. Lumière ( ) : Cette touche permet d’activer et
désactiver les lumières infrarouges (vision nocturne).
Maintenez cette touche enfoncée pendant 2 secondes
afin d’activer et désactiver la lampe-torche.
18. Port USB : Utilisez un câble mini-USB standard pour
relier ce port au port USB de votre ordinateur. Cette
connexion permet d’alimenter la PMD-901V et de
recharger sa batterie. Votre ordinateur reconnaîtra la
PMD-901V comme un périphérique de stockage.
Vous pourrez ensuite transférer les fichiers de la PMD901V sur votre ordinateur.
Il est également possible de la brancher à l’adaptateur
d’alimentation USB inclus ou d’utiliser le socle de
rechargement.
19. Port HDMI : Utilisez un câble HDMI standard pour relier ce port au port
HDMI d’un téléviseur ou d’un moniteur. Vous pouvez alors visualiser ou lire
des fichiers directement à partir de la mémoire de la PMD-901V.
À côté de ce port, il y a un bouton de réinitialisation encastré. Si la
PMD-901V « fige », appuyez sur ce bouton (à l’aide d’un stylo, d’un
trombone, etc.) afin de la mettre hors tension puis à nouveau sous tension.
20. Port A/V : Utilisez un câble 2,5 mm pour brancher ce port à une
minicaméra externe (720 x 576, 25 ips, inclus). Les signaux vidéo et audio
de la caméra seront alors transmis à la PMD-901V par ce port.
21. Sortie casque : Un casque d’écoute TRS ou TRRS stéréo 3,5 mm peut être
branché à cette sortie afin d’écouter l’audio des fichiers de la PMD-901V.
(L’utilisation d’un casque ne désactive pas les haut-parleurs intégrés de la
PMD-901V.)
27

Fonctionnement
Pour mettre la PMD-901V sous et hors tension, maintenez la touche d’alimentation
(
) enfoncée pendant 2 secondes. Lorsque vous mettez la PMD-901V sous tension, un
signal sonore retentit, l’affichage s’allume et l’enregistrement vidéo est lancé.
Remarque : Cette fonctionnalité d’enregistrement automatique a été ajoutée pour plus
de commodité comme la PMD-901V sera plus couramment utilisée pour
l’enregistrement vidéo en continu et immédiat. Pour arrêter l’enregistrement vidéo,
appuyez simplement sur la touche Vidéo ( ).
Écran d’affichage
1. Résolution vidéo
appareil-photo durant son fonctionnement
normal. Alors qu’en mode CarDV, l’icône sera
une voiture. Veuillez consulter le Guide
d’utilisation afin d’en savoir plus.)
2. Durée d’enregistrement disponible
3. Autonomie de la batterie
4. Mégapixels
5. Position GPS actuelle
uniquement lorsque la fonction GPS est activée.)
6. Statut GPS (sans icône = désactivé / rouge = pas
connecté / vert = connecté)
7. Durée d’enregistrement écoulée
8. ID caméra
9. Date/Heure actuelle
10. Mémoire libre
28
(Cette icône est un
(Cette information apparaît
Remarque : Toutes les icônes sont blanches ou
grises lorsqu’aucun enregistrement n’est en cours,
clignotent rouges durant l’enregistrement et
demeurent rouges en mode de pré-enregistrement.
1
4
1280x720 P60
5M
2
015:26:07
41.994, 71.467
6
000:01:23
8
DSJ_M9000000_Z0
2015/05/12 02:01:02 26.50G/29.01G
7
9
3
5
10

Vidéo
Pour lancer et arrêter l’enregistrement vidéo, appuyez sur la touche Vidéo (
Astuce : Si la PMD-901V est hors tension, maintenez la touche Vidéo ( ) enfoncée
pendant 2 secondes. La PMD-901V se mettra sous tension et lancera immédiatement
l’enregistrement vidéo.
Pour basculer la résolution vidéo entre WVGA et HD, maintenez la touche Audio
(
) enfoncée pendant 2 secondes. Ceci basculera entre 1280 x 720 (30 ips, 16:9) et
848 x 480 (30 ips, 16:9).
Astuce : Vous pouvez choisir parmi d’autres résolutions vidéo dans le menu
Paramètres (veuillez consulter le Guide d’utilisation afin d’en savoir plus).
Pour régler la distance de zoom, maintenez la touche Lancer/interrompre la
lecture (
Pour lire ou afficher le dernier fichier enregistré, appuyez sur la touche
Lancer/interrompre la lecture (
Pour avancer rapidement ou rembobiner lors de la lecture vidéo, appuyez sur la
touche M pour avancer rapidement ou appuyez sur la touche Lancer/interrompre la
lecture (
4X, 8X, 16X, 32X, 64X).
La PMD-901V peut également « étiqueter » les vidéos avec les coordonnées GPS.
L’icône d’antenne parabolique (
fonction GPS est connectée (verte), pas connectée (rouge) ou désactivée (sans
icône). Lorsqu’elle est connectée, les coordonnées seront indiquées dans le coin
supérieur droit de l’écran et « étiquetées » à la vidéo.
) ou la touche M pendant plus d’une seconde.
) lorsqu’aucun enregistrement n’est en cours.
) pour rembobiner. Appuyez plusieurs fois afin d’augmenter la vitesse (2X,
) sur le côté gauche de l’écran indique lorsque la
).
29
Audio
Pour lancer/arrêter l’enregistrement audio, appuyez sur la touche Audio ( ).
Astuce : Si la PMD-901V est hors tension, maintenez touche Audio ( ) enfoncée pendant 2
secondes. La PMD-901V se mettra sous tension et lancera immédiatement l’enregistrement
audio.
Pour lire ou afficher le dernier fichier enregistré, appuyez sur la touche
Lancer/Interrompre la lecture (
Photo
Pour prendre une photo, appuyez sur la touche Photo ( ).
Astuce : Vous pouvez prendre une photo lorsque l’enregistrement vidéo est en cours.
Lumières
Pour activer et désactiver le faisceau laser, maintenez la touche OK enfoncée pendant 2
secondes.
Pour activer et désactiver la lumière stroboscopique, maintenez la touche Photo (
enfoncée pendant 2 secondes.
Pour activer et désactiver les lumières infrarouges (vision nocturne), appuyez sur la touche
Lumière (
Pour activer et désactiver la lampe-torche, maintenez la touche Lumière (
pendant 2 secondes.
Pour activer et désactiver l’écran d’affichage, appuyez sur la touche d’alimentation
(
). La PMD-901V continuera de fonctionner normalement même si l’écran est éteint tant
qu’elle demeure sous tension.
Remarque : Lorsqu’aucune touche n’est enfoncée pendant plus de 30 secondes, l’écran
s’éteint automatiquement. Vous pouvez modifier ce délai dans le menu Paramètres (veuillez
consulter le Guide d’utilisation afin d’en savoir plus). Afin de préserver l’autonomie de
la batterie lorsque vous ne l’utilisez pas, veuillez désactiver l’écran d’affichage.
30
) lorsqu’aucun enregistrement n’est en cours.
)
). Lorsqu’activée, la PMD-901V peut enregistrer de la vidéo dans l’obscurité.
) enfoncée

Rechargement de la batterie
Lorsque la batterie de la PMD-901V est faible, l’icône de la batterie (
clignoter sur l’écran, et un signal sonore retentit. Lorsque cela se produit, rechargez
la PMD-901V.
Pour recharger la PMD-901V, utilisez l’une des méthodes suivantes :
A. Utilisez un câble mini-USB standard pour relier le port USB de la PMD-901V :
• au port USB de votre ordinateur sous tension.
• à un adaptateur d’alimentation USB branché à une alimentation secteur.
• au chargeur de voiture inclus branché sur l’allume-cigare d’une voiture en
marche.
B. Fixer la PMD-901V sur le socle de rechargement en vous assurant que l’écran
d’affichage de la PMD-901V est placé dans la même direction que le port USB
du socle de rechargement). Utilisez un câble mini-USB standard pour relier le
socle de rechargement :
• au port USB de votre ordinateur sous tension.
• à un adaptateur d’alimentation USB branché à une alimentation secteur.
• au chargeur de voiture inclus branché sur l’allume-cigare d’une voiture en
marche.
Vous pouvez également utiliser un câble d’alimentation (5 V, 1 A, centre positif,
2,5 mm de diamètre, vendu séparément) pour brancher le socle de
rechargement à une prise secteur.
Lorsque vous retirez la PMD 901 du socle de rechargement alors qu’elle est en mode
CarDV, elle s’éteint automatiquement. Veuillez consulter le Guide d’utilisation afin
d’en savoir plus.
) se met à
31

Lors du rechargement de la batterie de la PMD-901V, le témoin près de la
touche d’alimentation ( ) devient bleu. Ce témoin s’éteint lorsqu’elle est
complètement rechargée.
Remarque : Il faut environ 3 heures pour recharger complètement la batterie
de la PMD-901V lorsque celle-ci n’est pas utilisée.
Mémoire
Lorsque la mémoire de la PMD-901V est pleine, Card Full s’affiche et un signal
sonore retentit. Lorsque cela se produit, vous devez libérer de l’espace dans sa
mémoire. La PMD-901V ne peut enregistrer lorsque sa mémoire est pleine.
Pour transférer des fichiers de la PMD-901V :
1. Utilisez un câble mini-USB standard pour relier le port USB de la
PMD-901V à votre ordinateur sous tension.
2. Votre ordinateur reconnaîtra la PMD-901V comme un périphérique de
stockage (Disque amovible), telles une clé USB ou une carte SD. Entrez votre
mot de passe (veuillez consulter le Guide d’utilisation afin d’en savoir plus).
3. Cliquez sur le disque amovible afin de visualiser son contenu.
4. Cliquez et faites glisser les fichiers de la PMD-901V sur le disque dur de
votre ordinateur. Nous vous recommandons de supprimer les fichiers de la
PMD-901V après les avoir transférés sur votre ordinateur afin de libérer de
l’espace disque.
32

Guida rapida (Italiano)
Introduzione
Grazie per aver scelto il Marantz Pro PMD-901V. Si veda il capitolo
Caratteristiche della presente guida per saperne di più sulle funzioni del PMD-
901V, quindi fare riferimento al capitolo Operazione per iniziare a utilizzare il
PMD-901V.
Importante: prima di utilizzare il PMD-901V per la prima volta, caricarlo a
fondo. Si veda Operazione > Carica per sapere come fare.
Contenuti della confezione
PMD-901V Adattatore di alimentazione USB
Clip da spalla Base di carica
Morsetto per il corpo Adattatore di ricarica per auto
Mini videocamera esterna Guida rapida
Cavo mini-USB Manuale di sicurezza e garanzia
Importante: scaricare la Guida per l’uso completa alla pagina marantzpro.com.
Assistenza
Per le ultime informazioni in merito a questo prodotto (requisiti di sistema,
informazioni sulla compatibilità, ecc.) e per la registrazione del prodotto, recarsi
alla pagina marantzpro.com.
33

Caratteristiche
1. Lente della videocamera: mantenere la
lente pulita e priva di sporcizia, grasso o
altre ostruzioni.
2. Puntatore laser: tenere premuto il tasto
OK per 2 secondi per accendere o
spegnere il puntatore laser. Non guardare
direttamente questa luce.
3. Sensore luminoso: mantenere il sensore
pulito e privo di sporcizia, grasso o altre
ostruzioni.
4. Flash / luce stroboscopica: tenere
premuto il tasto Luce ( ) per 2 secondi per
accendere o spegnere il flash.
tenere premuto il tasto Foto (
la luce stroboscopica.
5. Luci a infrarossi: premere il tasto Luce (
luci a infrarossi. Servirsi di tali luci in ambienti con scarsa illuminazione
(visione notturna). Si possono impostare queste luci in modo che si attivino
automaticamente in base alla lettura del sensore luminoso (si veda Guida
per l’uso per saperne di più).
6. Casse: il segnale audio del PMD-901V esce da queste casse a foro.
34
) per 2 secondi per accendere o spegnere
) per accendere e spegnere le

7. Clip di montaggio: fissare la clip di montaggio in
dotazione al PMD-901V a questo livello e utilizzarla per
fissare il PMD-901V agli abiti, alla cintura, ecc.
8. Display: questo display mostra l’immagine captata
dalla lente e/o altre informazioni sullo stato. Si veda il
paragrafo Operazione > Display per una panoramica
delle informazioni illustrate a questo livello.
9. Play/Pause ( ): quando si riproducono i video,
premere questo tasto per riavvolgere. Premerlo più
volte per aumentare la velocità di riavvolgimento.
Quando non si registrano, premere questo tasto per
riprodurre/visualizzrare il file registrato per ultimo.
Quando si riproduce audio, premere questo tasto per
tornare all’inizio del file. Mentre si naviga tra le opzioni
a display, premere questo tasto per spostarsi in alto/sinistra di un’opzione.
10. OK: premere questo tasto per confermare una scelta illustrata sul display
del PMD-901V. Tenere premuto questo tasto per 2 secondi per accendere o
spegnere puntatore laser. Premere questo tasto una volta quando non si
sta registrando, quindi inserire la password per navigare tra i video, le foto o
i file audio presenti nella memoria del PMD-901V e riprodurli (si veda la
Guida per l’uso per sapere come impostare e come inserire la password).
11. M: premere questo tasto per accedere al menu Impostazioni del PMD-
901V (si veda la Guida per l’uso per saperne di più in merito). Quando si
riproducono i video, tenere premuto questo tasto per avanzare veloce.
Premerlo più volte per aumentare la velocità di avanzamento. Mentre si
naviga tra le opzioni a display, premere questo tasto per spostarsi in
basso/destra di un’opzione.
35
12. Power ( ): tenere premuto questo tasto per 2 secondi
per accendere o spegnere il PMD-901V. Al momento
dell’accensione si sente un “bip”, il display si accende
e il PMD-901V inizia a registrare video. (Questa
funzione di registrazione automatica è stata aggiunta
per comodità in quanto il PMD-901V sarà utilizzato più
comunemente per una registrazione video continua e
immediata. Per interrompere la registrazione del video,
premere il tasto Video (
Quando si naviga tra i menu del PMD-901V a display,
premere questo tasto per tornare al menu precedente.
13. Stella ( ): premere questo tasto per contrassegnare
un file come “importante”.
14. Audio ( ): premere questo tasto per avviare o interrompere la registrazione
dell’audio. (Se il PMD-901V è spento, si può tenere premuto questo tasto per
2 secondi per avviare immediatamente la registrazione dell’audio.)
15. Foto ( ): premere questo tasto per scattare una foto.
Tenere premuto questo tasto per 2 secondi per accendere o spegnere la
luce stroboscopica.
16. Video ( ): premere questo tasto per avviare o interrompere la registrazione
del video. (Se il PMD-901V è spento, si può tenere premuto questo tasto per
2 secondi per avviare immediatamente la registrazione del video.)
36
).

17. Luce ( ): premere questo tasto per accendere e spegnere
le luci a infrarossi (visione notturna).
Tenere premuto questo tasto per 2 secondi per accendere
o spegnere il flash.
18. Porta USB: servirsi di un cavo mini-USB standard per
collegare questa porta a una porta USB del computer.
Questo collegamento ricarica e alimenta il PMD-901V, che
funzionerà come dispositivo di memoria di massa. Si
potranno quindi trasferire i file del PMD-901V al computer.
Alternativamente, collegarlo all’adattatore di alimentazione
USB in dotazione o utilizzare la base di ricarica.
19. Porta HDMI: servirsi di un cavo HDMI standard per collegare questa porta
a una porta HDMI su una TV HD o un monitor. Si possono quindi
visualizzare o riprodurre i file direttamente dalla memoria del PMD-901V.
Accanto a questa porta è presente un tasto Reset incassato. Se il PMD901V si “congela”, premere questo tasto (servendosi di una penna, una
graffetta, ecc.) per resettarlo, facendolo tornare al funzionamento normale.
20. Porta AV: servirsi di un cavo da 3/32” (2,5 mm) per collegare questa porta
a una mini videocamera esterna (720 x 576, 25 fps, in dotazione). I segnali
audio e video della videocamera saranno quindi inviati al PMD-901V
tramite questa porta.
21. Porta cuffie: collegare cuffie TRS o TRRS stereo standard da 1/8” (3,5
mm) a questa uscita per ascoltare il suono dei file direttamente sul PMD901V. (L’uso delle cuffie non disattiva le casse incorporate del PMD-901V.)
37

Operazione
Per accendere/spegnere il PMD-901V, tenere premuto il tasto Power ( ) per
2 secondi. Al momento dell’accensione si sente un “bip”, il display si accende
e il PMD-901V inizia a registrare video.
Nota bene: questa funzione di registrazione automatica è stata aggiunta per
comodità in quanto il PMD-901V sarà utilizzato più comunemente per una
registrazione video continua e immediata. Per interrompere la registrazione del
video, premere il tasto Video ( ).
Display
1. Risoluzione video (Durante l’uso normale,
questa icona sarà una videocamera. In modalità
CarDV, l’icona sarà un’automobile. Si veda la
Guida per l’uso per saperne di più in merito a
questa modalità.)
2. Tempo di registrazione disponibile
3. Durata della batteria disponibile
4. Megapixel
5. Posizione GPS attuale (Questa informazione
viene visualizzata sono quando il GPS è attivo.)
6. Stato GPS (senza icona = spento / rosso = non
collegato / verde = collegato)
7. Tempo di registrazione trascorso
8. ID videocamera
9. Data/ora corrente
10. Memoria disponibile
38
1
4
1280x720 P60
5M
2
015:26:07
3
41.994, 71.467
5
6
000:01:23
8
DSJ_M9000000_Z0
2015/05/12 02:01:02 26.50G/29.01G
9
Nota bene: tutte le icone saranno bianche o
grigie quando la registrazione non è in
corso, di colore rosso lampeggiante durante
la registrazione o di colore rosso fisso in
modalità di “pre-registrazione”.
7
10
Video
Per avviare/interrompere la registrazione del video, premere il tasto Video (
Suggerimento: se il PMD-901V è spento, tenere premuto il tasto Video ( ) per 2
secondi. Il PMD-901V si accende e avvia immediatamente la registrazione video.
Per commutare la risoluzione video tra WVGA e HD, tenere premuto il tasto Audio (
per 2 secondi. Questa commuterà tra 1280x720 (30 fps, 16:9) e 848x480 (30 fps, 16:9).
Suggerimento: si possono selezionare ulteriori risoluzioni video nel menu Impostazioni
(si veda la Guida per l’uso per saperne di più).
Per regolare la distanza dello zoom, tenere premuto il tasto Play/Pause (
tasto M per più di 1 secondo.
Per riprodurre/visualizzare l’ultimo file registrato, premere il tasto Play/Pause
) mentre non si sta registrando.
(
Per eseguire l’avanzamento rapido o il riavvolgimento durante la riproduzione
del video, premere il tasto M per l’avanzamento rapido o premere il tasto
Play/Pause (
(2X, 4X, 8X, 16X, 32X, 64X).
Il PMD-901V può anche “taggare” i video con le coordinate GPS correnti. L’icona del
satellite (
non collegato (rosso) o spento (senza icona). Quando è colleagato, le coordinate saranno
mostrate nell’angolo superiore destro del display e “taggate” al video.
) per riavvolgere. Premere il tasto più volte per aumentare la velocità
) presente sul lato sinistro del display indica quando il GPS è collegato (verde),
).
) o il
39
)

Audio
Per avviare/interrompere la registrazione dell’audio, premere il tasto Audio ( ).
Suggerimento: se il PMD-901V è spento, tenere premuto il tasto Audio ( ) per 2
secondi. Il PMD-901V si accende e avvia immediatamente la registrazione audio.
Per riprodurre/visualizzare l’ultimo file registrato, premere il tasto Play/Pause
(
) mentre non si sta registrando.
Foto
Per scattare una foto, premere il tasto Foto ( ).
Suggerimento: si può scattare una foto anche mentre si registra un video.
Luci
Per accendere/spegnere il puntatore laser, tenere premuto il tasto OK per 2 secondi.
Per accendere/spegnere la luce stroboscopica, tenere premuto il tasto Foto (
per 2 secondi.
Per accendere/spegnere le luci infrarosse (visione notturna), premere il tasto Luz
(
). Quando è acceso, il PMD-901V può registrare video in un ambiente buio.
Per accendere/spegnere il flash, tenere premuto il tasto Luz (
Per accendere/spegnere il display, premere il tasto Power (
funzionerà normalmente mentre il display spento, finché rimane acceso.
Nota bene: se non si preme alcun tasto per 30 secondi, il display si spegnerà
automaticamente. Si può cambiare la quantità di tempo nel menu Impostazioni (si
veda la Guida per l’uso per saperne di più). Per risparmiare la batteria, si consiglia di
spegnere il display quando non è in uso.
40
) per 2 secondi.
). Il PMD-901V
)

Carica
Quando la batteria del PMD-901V è scarica, l’icona della batteria ( )
lampeggerà a display, e si sentirà un suono di avviso. Quando ciò accade,
caricare il PMD-901V.
Per caricare il PMD-901V, procedere come segue:
A. Servirsi di un cavo mini-USB standard per collegare la porta USB del
PMD-901V a:
• una porta USB del computer (acceso)
• un adattatore di alimentazione USB in dotazione (collegato a una
presa elettrica)
• un caricabatterie per auto in dotazione (collegato all’accendisigari
dell’auto, in moto)
B. Collegare il PMD-901V alla base di carica (assicurarsi che il display del PMD-
901V sia rivolto nella stessa direzione della porta USB della base di carica).
Servirsi di un cavo mini-USB standard per collegare la base di carica a:
• una porta USB del computer (acceso)
• un adattatore di alimentazione USB in dotazione (collegato a una
presa elettrica)
• un caricabatterie per auto in dotazione (collegato all’accendisigari
dell’auto, in moto)
Alternativamente, servirsi di un adattatore di alimentazione (5 V, 1 A, polo
centrale positivo, diametro del cilindro 2,5 mm, venduto separatamente)
per collegare la base di carica a una presa elettrica.
Se il PMD-901 è in modalità CarDV, quando lo si rimuove dalla base di carica,
si spegnerà automaticamente. Si veda la Guida per l’uso per saperne di più.
41

Mentre il PMD-901V è in carica, una spia accanto al tasto Power (
illuminerà di blu. Una volta completata la carica, la spia si spegne.
Nota bene: occorrono circa 3 ore per caricare il PMD-901V quando non è
in uso.
) si
Memoria
Quando la memoria del PMD-901V è piena, Card full (scheda piena) apparirà
a display, e si sentirà un suono di avviso. Quando ciò accade, liberare spazio
in memoria. Il PMD-901V non può registrare se la memoria è piena.
Per trasferire file dal PMD-901V:
1. Servirsi di un cavo mini-USB standard per collegare la porta USB del
PMD-901V al computer (acceso).
2. Il computer riconoscerà il PMD-901V come dispositivo di memoria di
massa (Disco removibile), similmente a un drive USB o a una scheda
SD. Inserire la password (si veda la Guida per l’uso per sapere come
impostare e come inserire la password).
3. Aprire il Disco removibile per visualizzarne i contenuti.
4. Cliccare sui file e trascinarli dal PMD-901V all’hard disk del computer.
Si consiglia di cancellare i file dal PMD-901V dopo averli spostati per
fare più spazio in memoria.
42

Schnellstart-Anleitung (Deutsch)
Einführung
Vielen Dank, dass Sie sich für das Marantz Pro PMD-901V entschieden haben.
Bitte lesen Sie das Kapitel Funktionen, um sich mit den Funktionen des PMD901V vertraut zu machen und lesen anschließend das Kapitel Betrieb, um mit
der Verwendung des Geräts beginnen zu können.
Wichtig: Laden Sie das Gerät vor der ersten Inbetriebnahme vollständig auf.
Siehe Betrieb > Laden, um mehr darüber zu erfahren.
Lieferumfang
PMD-901V USB-Netzteil
Schulter-Clip Ladestation
Befestigungsclip Autoladeadapter
Externen Mini-Kamera Schnellstart-Anleitung
Mini-USB-Kabel Sicherheitshinweise & Garantieinformationen
Wichtig: Laden Sie das vollständige Benutzerhandbuch von marantzpro.com
herunter.
Kundendienst
Für die neuesten Informationen zu diesem Produkt (Systemanforderungen,
Informationen zur Kompatibilität etc.) und zur Produktregistrierung besuchen
Sie marantzpro.com.
43

Funktionen
1. Kameraobjektiv: Halten Sie das Objektiv
sauber und frei von Schmutz, Fett oder
anderen Verunreinigungen.
2. Laserpointer: Halten Sie die Taste OK 2
Sekunden lang gedrückt, um diesen
Laserpointer ein-/auszuschalten. Blicken Sie
nicht direkt in das Licht.
3. Lichtsensor: Halten Sie den Sensor sauber
und frei von Schmutz, Fett oder anderen
Verunreinigungen.
4. Taschenlampe / Stroboskop: Halten Sie die
Lichttaste (
die Taschenlampe ein-/auszuschalten.
Halten Sie die Taste Foto (
ein-/auszuschalten.
5. Infrarotlichter: Drücken Sie die Lichttaste (
/auszuschalten. Verwenden Sie dies in Umgebungen mit schwacher
Beleuchtung (Nachtsicht). Sie können diese Lichter so einstellen, dass sie
automatisch bei einem gewissen Lichtsensorwert aktiviert werden (siehe
Benutzerhandbuch, um mehr darüber zu erfahren).
6. Lautsprecher: Das PMD-901V-Audiosignal kommt aus diesen
stecknadelkopfgroßen Lautsprechern.
44
) 2 Sekunden lang gedrückt, um
) 2 Sekunden lang gedrückt, um das Stroboskop
), um das Infrarotlicht ein-

7. Befestigungsclip: Bringen Sie den beiliegenden
Befestigungsclip hier am PMD-901V an und verwenden Sie
ihn, um das Gerät an Kleidung, Gürtel etc. zu befestigen.
8. Display: Diese Anzeige zeigt das vom Objektiv erfasste Bild
und/oder andere Statusinformationen. Siehe Abschnitt
Betrieb > Display, um sich einen Überblick zu verschaffen,
welche Informationen hier dargestellt werden.
9. Wiedergabe/Pause (
Videos drücken Sie diese Taste, um zurückzuspulen.
Drücken Sie diese Taste weitere Male, um die
Rücklaufgeschwindigkeit zu erhöhen. Wenn Sie gerade nicht
aufnehmen, können Sie diese Taste drücken, um die zuletzt
aufgezeichnete Datei zu spielen/anzuzeigen. Während der
Wiedergabe von Audio drücken Sie diese Taste, um zum
Anfang der Datei zurückzuspringen. Beim Navigieren durch die Optionen im Display
können Sie diese Taste drücken, um eine Option nach oben/links zu springen.
10. OK: Drücken Sie diese Taste, um eine am PMD-901V-Display angezeigte
Auswahl zu bestätigen. Halten Sie diese Taste 2 Sekunden lang gedrückt, um
den Laserpointer ein-/auszuschalten. Drücken Sie diese Taste einmal während
Sie gerade nicht aufnehmen und geben Sie Ihr Passwort ein, um eine Video-,
Foto- oder Audio-Datei aus dem PMD-901V-Speicher wiederzugeben (siehe
Benutzerhandbuch, um zu lernen, wie Sie Ihr Passwort einstellen und eingeben).
11. M: Drücken Sie diese Taste, um Zugriff auf das Einstellungen-Menü des PMD-901V
zu erlangen (siehe Benutzerhandbuch, um mehr darüber zu erfahren). Halten Sie
diese Taste während der Wiedergabe des Videos gedrückt, um den Schnellvorlauf
zu betätigen. Drücken Sie die Taste weitere Male, um die SchnellvorlaufGeschwindigkeit zu erhöhen. Beim Navigieren durch die Optionen im Display
können Sie diese Taste drücken, um eine Option nach unten/rechts zu springen.
): Während der Wiedergabe des
45

12. Ein-/Ausschalter ( ): Halten Sie diese Taste 2 Sekunden
lang gedrückt, um das PMD-901V ein-/auszuschalten. Wenn
Sie es einschalten, werden Sie einen „Piepton“ hören, das
Display leuchtet auf und das PMD-901V wird die
Videoaufnahme starten. (Diese Autoaufnahmefunktion wurde
aus praktischen Gründen hinzugefügt, da das PMD-901V am
häufigsten für die kontinuierliche und sofortige
Videoaufzeichnung verwendet wird. Um die Videoaufnahme
zu stoppen, drücken Sie die Video-Taste (
Beim Blättern in den PMD-901V-Menüs am Display können
Sie diese Taste drücken, um zum vorherigen Menü
zurückzukehren.
13. Stern (
„wichtig“ zu markieren.
14. Audio (
(Wenn das PMD-901V ausgeschaltet ist, können Sie diese Taste 2 Sekunden
lang gedrückt halten, um die Tonaufnahme sofort zu starten.)
15. Foto (
Halten Sie diese Taste 2 Sekunden lang gedrückt, um das Stroboskop ein/auszuschalten.
16. Video (
(Wenn das PMD-901V ausgeschaltet ist, können Sie diese Taste 2 Sekunden lang
gedrückt halten, um die Videoaufnahme sofort zu starten.)
46
-Taste).
): Drücken Sie diese Taste, um eine Datei als
): Drücken Sie diese Taste, um die Audioaufnahme zu starten/stoppen.
): Drücken Sie diese Taste, um ein Foto zu machen.
): Drücken Sie diese Taste, um die Videoaufnahme zu starten/stoppen.

17. Licht ( ): Drücken Sie diese Taste, um die Infrarotlichter
(Nachtsicht) ein-/auszuschalten.
Halten Sie diese Taste 2 Sekunden lang gedrückt, um die
Taschenlampe ein-/auszuschalten.
18. USB-Port: Verwenden Sie ein handelsübliches Mini-
USB-Kabel, um diesen USB-Port mit Ihrem Computer zu
verbinden. Über diese Verbindung wird Ihr PMD-901V,
das nun als Massenspeichergerät agiert, aufgeladen und
mit Strom versorgt. Anschließend können Sie die PMD901V-Dateien auf den Computer übertragen.
Wahlweise verbinden Sie es mit dem mitgelieferten USBNetzteil oder verwenden die Ladestation.
19. HDMI-Port: Verwenden Sie ein Standard-HDMI-Kabel,
um diesen Anschluss mit einem HDMI-Anschluss an
einen HD-Fernseher oder Monitor zu verbinden.
Anschließend können Sie die Dateien ansehen oder
direkt vom PMD-901V-Speicher abspielen.
Neben diesem Port befindet sich eine Zurücksetzen-Taste. Wenn das PMD-901V
nicht mehr reagiert, drücken Sie diese Taste (mit einem Stift, Büroklammer usw.),
um es ein- und wieder auszuschalten und zum Normalbetrieb zurückzukehren.
20. AV-Port: Verwenden Sie ein 2,5 mm (3/32”) Kabel, um diese Buchse mit der
externen Mini-Kamera (720 x 576, 25 fps, im Lieferumfang enthalten) zu
verbinden. Die Video- und Audiosignale der Kamera werden dann durch diese
Buchse an das PMD-901V gesendet.
21. Kopfhörer-Anschluss: Schließen Sie 3,5 mm (1/8”) TRS oder TRRS Stereo-
Kopfhörer an diesen Ausgang an, um die Audiosignale Ihrer Dateien direkt am
PMD-901V anzuhören. (Die Verwendung von Kopfhörern deaktiviert die
eingebauten Lautsprecher des PMD-901V nicht.)
47

Betrieb
Um das PMD-901V ein-/auszuschalten, halten Sie den Ein-/Ausschalter ( )
2 Sekunden lang gedrückt. Wenn Sie es einschalten, werden Sie einen
„Piepton“ hören, das Display schaltet sich ein und das PMD-901V wird die
Videoaufnahme starten.
Hinweis: (Diese Autoaufnahmefunktion wurde aus praktischen Gründen
hinzugefügt, da das PMD-901V am häufigsten für die kontinuierliche und
sofortige Videoaufzeichnung verwendet wird. Um die Videoaufnahme zu
stoppen, drücken Sie einfach die Video-Taste ( ).
Display
1. Videoauflösung (Dieses Symbol ist im
Normalbetrieb eine Kamera. Im CarDV-Modus ist das
Symbol ein Auto. Lesen Sie das Benutzerhandbuch,
um mehr über diesen Modus zu erfahren.)
2. Verfügbare Aufnahmezeit
3. Verfügbare Akkulaufzeit
4. Megapixel
5. Aktuelle GPS-Position (Dieses Symbol wird nur
angezeigt, wenn GPS aktiviert ist.)
GPS-Status (kein Symbol = ausgeschaltet / rot =
6.
nicht angeschlossen / grün = angeschlossen)
7. Aufnahmelaufzeit
8. Kamera-ID
9. Aktuelles Datum/Uhrzeit
10. Verfügbarer Speicher
48
1
1280x720 P60
5M
4
2
015:26:07
3
41.994, 71.467
5
6
000:01:23
8
DSJ_M9000000_Z0
2015/05/12 02:01:02 26.50G/29.01G
9
Hinweis: Wenn nicht aufgenommen wird,
werden alle Symbole weiß oder grau sein,
wenn aufgenommen wird, werden sie rot
blinken und im Modus „Vor-Aufnahme“
werden sie durchgehend rot leuchten.
7
10

Video
Um die Videoaufnahme zu stoppen, drücken Sie die Video-Taste (
Tipp: Wenn das PMD-901V ausgeschaltet ist, halten Sie die Video-Taste ( ) 2
Sekunden lang gedrückt. Das PMD-901V wird sich einschalten und sofort mit der
Videoaufnahme beginnen.
Um die Videoauflösung von WVGA auf HD zu schalten, halten Sie die AudioTaste (
) 2 Sekunden lang gedrückt. Dies wechselt zwischen 1280x720 (30 fps,
16:9) und 848x480 (30 fps, 16:9).
Tipp: Sie können zusätzliche Videoauflösungen im Einstellungen-Menü auswählen
(siehe Benutzerhandbuch, um mehr zu erfahren).
Zum Einstellen der Zoom-Entfernung halten Sie die Taste Wiedergabe/Pause (
oder die M-Taste länger als 1 Sekunde gedrückt.
Um die zuletzt aufgezeichnete Datei abzuspielen/anzuzeigen, drücken Sie die
Taste Wiedergabe/Pause (
Zum schnellen Vor- oder Rücklauf während der Wiedergabe drücken Sie die M-
Taste für den schnellen Vorlauf oder die Wiedergabe/Pause-Taste (
Rücklauf. Drücken Sie die Taste weitere Male, um die Geschwindigkeit zu erhöhen
(2X, 4X, 8X, 16X, 32X, 64X).
PMD-901V kann Ihre Videos auch mit einem Kennzeichen („Tag“) mit den aktuellen
GPS-Koordinaten versehen. Das Satellitenschüsselsymbol (
Displays zeigt an, wenn das GPS angeschlossen (grün), nicht angeschlossen (rot) oder
ausgeschaltet (kein Symbol) ist. Ist es angeschlossen, werden die Koordinaten in der
oberen rechten Ecke des Displays angezeigt und Ihr Video wird mit „Tags“ versehen.
), während Sie nicht aufnehmen.
) auf der linken Seite des
-Taste).
) für den
49
)

Audio
Um die Audioaufnahme zu starten/stoppen, drücken Sie die Audio-Taste (
Tipp: Wenn das PMD-901V ausgeschaltet ist, halten Sie die Audio-Taste ( ) 2 Sekunden
lang gedrückt. Das PMD-901V wird sich einschalten und sofort mit der Audioaufnahme
beginnen.
Um die zuletzt aufgezeichnete Datei abzuspielen/anzuzeigen, drücken Sie die
Taste Wiedergabe/Pause (
), während Sie nicht aufnehmen.
).
Foto
Um ein Foto aufzunehmen, drücken Sie die Foto-Taste (
Tipp: Sie können während der Videoaufzeichnung ein Foto machen.
).
Beleuchtung
Halten Sie die Taste OK 2 Sekunden lang gedrückt, um den Laserpointer ein-
/auszuschalten.
Halten Sie die Foto-Taste (
/auszuschalten.
Drücken Sie die Lichttaste (
eingeschaltet, kann das PMD-901V Video in einer dunklen Umgebung aufnehmen.
50
) 2 Sekunden lang gedrückt, um das Stroboskop ein-
), um das Infrarotlicht ein- /auszuschalten. Ist es

Halten Sie die Lichttaste (
/auszuschalten.
Um die Anzeige ein-/auszuschalten, drücken Sie den Ein-/Ausschalter (
Solange das PMD-901V eingeschaltet bleibt, wird es weiterhin normal funktionieren
auch wenn das Display ausgeschaltet ist.
Hinweis: Wenn Sie 30 Sekunden lang keine Taste drücken, wird das Display
automatisch ausgeschaltet. Sie können diese Zeitspanne im Einstellungen-Menü
ändern (siehe Benutzerhandbuch, um mehr zu erfahren). Um den Akku zu schonen,
empfehlen wir, das Display auszuschalten, wenn Sie es nicht benutzen.
) 2 Sekunden lang gedrückt, um die Taschenlampe ein-
Laden
Wenn der Akkuladestand des PMD-901V niedrig ist, wird das Akku-Symbol
( ) am Display aufscheinen und Sie werden einen Signalton hören. Wenn dies
geschieht, müssen Sie das PMD-901V aufladen.
Um das PMD-901V aufzuladen, müssen Sie entweder:
A. Ein standardmäßiges Mini-USB-Kabel verwenden, um den USB-Anschluss
des PMD-901V mit einer der folgenden Optionen zu verbinden:
• einem USB-Anschluss an einem (eingeschalteten) Computer
• dem mitgelieferten USB-Netzteil (mit Steckdose verbunden)
• dem mitgelieferten Auto-Ladegerät (Anschluss an den Zigarettenanzünder
eines Autos bei laufendem Motor)
51
).

B. Verbinden Sie das PMD-901V mit der Ladestation (achten Sie darauf, dass
die PMD-901V-Anzeige in die gleiche Richtung wie der USB-Anschluss der
Ladestation zeigt). Verwenden Sie ein standardmäßiges Mini-USB-Kabel,
um die Ladestation mit einer der folgenden Optionen zu verbinden:
• einem USB-Anschluss an einem (eingeschalteten) Computer
• dem mitgelieferten USB-Netzteil (mit Steckdose verbunden)
• dem mitgelieferten Auto-Ladegerät (Anschluss an den Zigarettenanzünder
eines Autos bei laufendem Motor)
Alternativ können Sie ein Netzteil verwenden (5 V, 1 A, Mitte-positive, 2,5
mm Zylinderdurchmesser, separat erhältlich), um die Ladestation mit einer
Steckdose zu verbinden.
Wenn sich das PMD-901 im CarDV-Modus befindet, wenn Sie es von der
Ladestation entfernen, wird es automatisch ausgeschaltet. Lesen Sie das
Benutzerhandbuch, um mehr über diesen Modus zu erfahren.
Während das PMD-901V aufgeladen wird, leuchtet das Licht neben dem Ein-
/Ausschalter ( ) blau. Dieses Licht erlischt, sobald das Gerät vollständig
geladen ist.
Hinweis: Es dauert ungefähr 3 Stunden, das PMD-901V vollständig aufzuladen,
während es nicht verwendet wird.
52

Speicher
Wenn der Speicher des PMD-901V voll ist, erscheint Karte voll am Display und
Sie werden einen Signalton hören. Wenn dies geschieht, sorgen Sie für freien
Speicherplatz. Das PMD-901V kann nicht aufzeichnen, wenn der Speicher voll ist.
Um Dateien vom PMD-901V zu übertragen:
1. Verwenden Sie ein standardmäßiges Mini-USB-Kabel, um den USB-Anschluss
des PMD-901V mit Ihrem (eingeschalteten) Computer zu verbinden.
2. Ihr Computer wird PMD-901V als Massenspeichergerät (Wechseldatenträger)
erkennen, ähnlich einem USB-Stick oder einer SD-Karte. Geben Sie Ihr
Passwort ein (siehe Benutzerhandbuch, um zu lernen, wie Sie Ihr Passwort
einstellen und eingeben).
3. Öffnen Sie den Wechseldatenträger, um seinen Inhalt anzuzeigen.
4. Ziehen Sie die Dateien vom PMD-901V auf die Festplatte Ihres Computers.
Wir empfehlen, die Dateien nach dem Transfer vom PMD-901V zu löschen,
um mehr Speicherplatz freizugeben.
Allgemeinhinweis zur Konformitätserklärung: Hiermit erklären wir, daß sich das Gerät
PMD-901V in Übereinstimmung mit den grundlegenden Anforderungen der europäischen
Richtlinie 1999/5/EG befindet. Die vollständige EG Konformitätserklärung kann unter
folgender Adresse angefordert werden:
inMusic GmbH
Harkortstrasse 12 - 32
40880 Ratingen
GERMANY
53

Appendix (English)
Technical Specifications
Specifications are subject to change without notice.
Camera Sensor
Video
Resolutions
Lens
Memory
Display
Positioning System
54
32 GB, internal memory
Approximately 10 hours of video recording
2” (51 mm) TFT-LCD HD clear color screen
GPS
21 megapixels
Normal and night-vision modes
2304 x 1296 (at 30 fps, 16:9)
1920 x 1080 (at 30 fps, 16:9)
1440 x 1080 (at 30 fps, 16:9)
1280 x 720 (at 30 or 60 fps, 16:9)
848 x 480 (at 30 or 60 fps, 16:9)
720 x 480 (at 30 fps; 4:3)
140° wide-angle

Connections
Mini-USB port
HDMI 1.3 port (1080p)
3/32” (2.5 mm) AV in port (NTSC)
1/8” (3.5 mm) TRS/TRRS stereo headphone output
Waterproof
Power
IP-67 (submersible up to 30 minutes at 3.3 ft./ 1 m)
Internal lithium-ion battery
Approximately 3 hours to charge fully when off
Approximately 8.5 hours to charge fully when on
Approximately 10 hours of continuous recording time
(varies with use)
Charges via charging base (included) or via USB
(computer or USB power adapter, not included)
Dimensions
(width x depth x height)
PMD-901V: 2.36” x 1.22” x 3.70” / 60 x 31 x 94 mm
Charging base: 2.83” x 3.74” x 1.57” / 72 x 95 x 40 mm
Weight PMD-901V: 0.40 lbs. / 0.180 kg (with clip)
Charging base: 0.17 lbs. / 0.079 kg
Trademarks and Licenses
Marantz is a trademark of D&M Holdings Inc., registered in the U.S. and other
countries. The term HDMI is a trademark or registered trademark of HDMI Licensing
LLC in the United States and other countries. All other product or company names
are trademarks or registered trademarks of their respective owners.
55

marantzpro.com
Manual Version 1.1
 Loading...