

Page 1

Model PMD580 User Guide
Network Solid State Recorder
Page 2
IMPORTANT TO SAFETY
WARNING:
To reduce the risk of fire and electric shock,
this apparatus should not be exposed to rain or
moisture and objects filled with liquids, such as
vases, should not be placed on this apparatus
LABELS (for U.S.A. model only)
CAUTION:
USE OF CONTROLS OR ADJUSTMENTS OR
REFOR-MANCE OF PROCEDURES OTHER THAN
THOSE SPECIFIED HEREIN MAY RESULT IN
HAZARDOUS RADIATION EXPOSURE.
CAUTION
1. Handle the power supply cord carefully
Do not damage or deform the power supply cord.
If it is damaged or deformed, it may cause electric
shock or malfunction when used. When removing
from wall outlet, be sure to remove by holding the
plug attachment and not by pulling the cord.
2. Do not open the rear cover
In order to prevent electric shock, do not open the
top cover.
If problems occur, contact your Marantz professional
DEALER.
3. Do not place anything inside
Do not place metal objects or spill liquid inside the
system.
Electric shock or malfunction may result.
Please, record and retain the Model name and serial
number of your set shown on the rating label.
Model No. PMD-580
Serial No.
CAUTION
RISK OF ELECTRIC SHOCK
DO NOT OPEN
CAUTION:
TO REDUCE THE RISK OF ELECTRIC SHOCK,
DO NOT REMOVE COVER (OR BACK). NO
USER-SERVICEABLE PARTS INSIDE. REFER
SERVICING TO QUALIFIED SERVICE
PERSONNEL.
The lightning flash with arrowhead
symbol, within an equilateral triangle,
is intended to alert the user to the
presence of uninsulated “dangerous
voltage” within the product’s enclosure
that may be of sufficient magnitude
to constitute a risk of electric shock to
persons.
The exclamation point within an
equilateral triangle is intended to
alert the user to the presence of
important operating and maintenance
(servicing) instructions in the literature
accompanying the appliance.
FCC INFORMATION
(For US customers)
1. PRODUCT
This product complies with Part 15 of the FCC Rules.
Operation is subject to the following two conditions:
(1) this product may not cause harmful interference,
and (2) this product must accept any interference
received, including interference that may cause
undesired operation.
2. IMPORTANT NOTICE:
DO NOT MODIFY THIS PRODUCT
This product, when installed as indicated in the
instructions contained in this manual, meets FCC
requirements. Modification not expressly approved by
Marantz professional may void your authority, granted
by the FCC, to use the product.
3. NOTE
This product has been tested and found to comply
with the limits for a Class B digital device, pursuant to
Part 15 of the FCC Rules. These limits are designed
to provide reasonable protection against harmful
interference in a residential installation.
This product generates, uses and can radiate radio
frequency energy and, if not installed and used in
accordance with the instructions, may cause harmful
interference to radio communications. However, there
is no guarantee that interference will not occur in a
particular installation. If this product does cause harmful
interference to radio or television reception, which can
be determined by turning the product OFF and ON, the
user is encouraged to try to correct the interference by
one or more of the following measures:
• Reorient or relocate the receiving antenna.
• Increase the separation between the equipment
and receiver.
•
Connect the product into an outlet on a circuit
different from that to which the receiver is connected.
• Consult the local retailer authorized to distribute
this type of product or an experienced radio/TV
technician for help.
This Class B apparatus complies with Canadian ICES-003.
Cet appareil numérique de la classe B est conforme à
la norme NMB-003 du Canada.
ii
Page 3

IMPORTANT SAFETY INSTRUCTIONS
READ BEFORE OPERATING EQUIPMENT
This product was designed and manufactured to meet strict quality and safety standards. There are, however, some installation
and operation precautions which you should be particularly aware of.
1. Read these instructions.
2. Keep these instructions.
3. Heed all warnings.
4. Follow all instructions.
5. Do not use this apparatus near water.
6. Clean only with dry cloth.
7. Do not block any ventilation openings. Install in accordance
with the manufacture's instructions.
8. Do not install near any heat sources such as radiators, heat
registers, stoves, or other apparatus (including amplifiers) that
produce heat.
9. Do not defeat the safety purpose of the polarized or groundingtype plug. A polarized plug has two blades with one wider
than the other. A grounding type plug has two blades and
a third grounding prong. The wide blade or the third prong
are provided for your safety. If the provided plug does not fit
into your outlet, consult an electrician for replacement of the
obsolete outlet.
10. Protect the power cord from being walked on or pinched
particularly at plugs, convenience receptacles, and the point
where they exit from the apparatus.
Only use attachments/accessories specified by the manufacturer.
11.
12.
Use only with the cart, stand, tripod,
bracket, or table specified by the
manufacturer, or sold with the apparatus.
When a cart is used, use caution when
moving the cart/apparatus combination
to avoid injury from tip-over.
13. Unplug this apparatus during lightning
storms or when unused for long
periods of time.
14. Refer all servicing to qualified service personnel. Servicing is
required when the apparatus has been damaged in any way,
such as power-supply cord or plug is damaged, liquid has been
spilled or objects have fallen into the apparatus, the apparatus
has been exposed to rain or moisture, does not operate
normally, or has been dropped.
Additional Safety Information!
15. Marked terminals are HAZARDOUS LIVE and that the
external wiring connected to those terminal requires
installation by an instructed person or the use of readymade leads or cords.
16. This product is equipped with a three-wire grounding type
plug, a plug having a third (grounding) pin.
This plug will only fit into a grounding-type power outlet.
If you are unable to insert the plug into the outlet, contact your
electrician to replace your obsolete outlet. Do not defeat the
safety purpose of the grounding-type plug.
iii
Page 4

CAUTION:
To completely disconnect this product from the
mains, disconnect the plug from the wall socket
outlet.
The mains plug is used to completely interrupt
the power supply to the unit and must be within
easy access by the user.
VORSICHT:
Um dieses Gerät vollständig von der
Stromversorgung abzutrennen, trennen Sie bitte
den Netzstecker von der Wandsteckdose ab.
Die Hauptstecker werden verwendet, um
die Stromversorgung zum Gerät völlig zu
unterbrechen; er muss für den Benutzer gut und
einfach zu erreichen sein.
PRECAUTION:
Pour déconnecter complètement ce produit du
courant secteur, débranchez la prise de la prise
murale.
La prise secteur est utilisée pour couper
complètement l’alimentation de l’appareil et l’
utilisateur doit pouvoir y accéder facilement.
PRECAUCIÓN:
Para desconectar completamente este producto
de la alimentación eléctrica, desconecte el
enchufe del enchufe de la pared.
El enchufe de la alimentación se utiliza para
interrumpir por completo el suministro de
alimentación a la unidad y debe de encontrarse
en un lugar al que el usuario tenga fácil acceso.
VOORZICHTIGHEID:
Om de voeding van dit product volledig te
onderbreken moet de stekker uit het stopcontact
worden getrokken.
De netstekker wordt gebruikt om de
stroomtoevoer naar het toestel volledig te
onderbreken en moet voor de gebruiker
gemakkelijk bereikbaar zijn.
FÖRSIKTIHETSMÅTT:
Koppla loss stickproppen från eluttaget för att helt
skilja produkten från nätet.
Stickproppen används för att helt bryta
strömförsörjningen till apparaten, och den måste
vara lättillgänglig för användaren.
ATTENZIONE:
Per scollegare definitivamente questo prodotto
dalla rete di alimentazione elettrica, togliere la
spina dalla relativa presa.
La spina di rete viene utilizzata per interrompere
completamente l’alimentazione all’unità e deve
essere facilmente accessibile all’utente.
PRECAUÇÃO:
Para desligar completamente este produto da
corrente, desligue a ficha da tomada de parede.
A ficha de corrente é utilizada para cortar
completamente a alimentação eléctrica à unidade
e deve estar facilmente acessível para o utilizador.
iv
Page 5
NOTE ON USE / HINWEISE ZUM GEBRAUCH /
OBSERVATIONS RELATIVES A L’UTILISATION / NOTE SULL’USO /
NOTAS SOBRE EL USO / ALVORENS TE GEBRUIKEN / OBSERVERA/
NOTA SOBRE A UTILIZAÇÃO
• Do not let foreign objects in the set.
• Avoid high temperatures.
Allow for sufficient heat dispersion when
installed on a rack.
• Vermeiden Sie hohe Temperaturen.
Beachten Sie, daß eine ausreichend
Luftzirkulation gewährleistet wird, wenn das
Gerät auf ein Regal gestellt wird.
• Eviter des températures élevées
Tenir compte d’une dispersion de chaleur
suffisante lors de l’installation sur une étagère.
• Evitate di esporre l’unità a temperature alte.
Assicuratevi che ci sia un’adeguata dispersione
del calore quando installate l’unità in un mobile
per componenti audio.
• Evite altas temperaturas
Permite la suficiente dispersión del calor
cuando está instalado en la consola.
• Vermijd hoge temperaturen.
Zorg voor een degelijk hitteafvoer indien het
apparaat op een rek wordt geplaatst.
• Undvik höga temperaturer.
Se till att det finns möjlighet till god
värmeavledning vid montering i ett rack.
• Evite temperaturas elevadas.
Se instalar numa prateleira, deixe espaço
suficiente para a dispersão do calor.
• Handle the power cord carefully.
Hold the plug when unplugging the cord.
• Gehen Sie vorsichtig mit dem Netzkabel um.
Halten Sie das Kabel am Stecker, wenn Sie den
Stecker herausziehen.
• Manipuler le cordon d’alimentation avec
précaution.
Tenir la prise lors du débranchement du cordon.
• Manneggiate il filo di alimentazione con cura.
Agite per la spina quando scollegate il cavo
dalla presa.
• Maneje el cordón de energía con cuidado.
Sostenga el enchufe cuando desconecte el
cordón de energía.
• Hanteer het netsnoer voorzichtig.
Houd het snoer bij de stekker vast wanneer
deze moet worden aan- of losgekoppeld.
• Hantera nätkabeln varsamt.
Håll i kabeln när den kopplas från el-uttaget.
• Manuseie o cabo de alimentação
cuidadosamente.
Segure na ficha ao desligar o cabo.
• Keep the set free from moisture, water, and
dust.
• Halten Sie das Gerät von Feuchtigkeit, Wasser
und Staub fern.
• Protéger l’appareil contre l’humidité, l’eau et
lapoussière.
• Tenete l’unità lontana dall’umidità, dall’acqua e
dalla polvere.
• Mantenga el equipo libre de humedad, agua y
polvo.
• Laat geen vochtigheid, water of stof in het
apparaat binnendringen.
• Utsätt inte apparaten för fukt, vatten och
damm.
• Mantenha o aparelho livre de humidade, água e
pó.
• Unplug the power cord when not using the set
for long periods of time.
• Wenn das Gerät eine längere Zeit nicht
verwendet werden soll, trennen Sie das
Netzkabel vom Netzstecker.
• Débrancher le cordon d’alimentation lorsque l’
appareil n’est pas utilisé pendant de longues
périodes.
• Disinnestate il filo di alimentazione quando
avete l’intenzione di non usare il filo di
alimentazione per un lungo periodo di tempo.
• Desconecte el cordón de energía cuando no
utilice el equipo por mucho tiempo.
• Neem altijd het netsnoer uit het stopkontakt
wanneer het apparaat gedurende een lange
periode niet wordt gebruikt.
• Koppla ur nätkabeln om apparaten inte kommer
att användas i lång tid.
• Desligue o cabo de alimentação quando não
utilizar o aparelho durante longos períodos de
tempo.
* (For sets with ventilation holes)
• Do not obstruct the ventilation holes.
• Die Belüftungsöffnungen dürfen nicht verdeckt
werden.
• Ne pas obstruer les trous d’aération.
• Non coprite i fori di ventilazione.
• No obstruya los orificios de ventilación.
• De ventilatieopeningen mogen niet worden
beblokkeerd.
• Täpp inte till ventilationsöppningarna.
• Não tape as ranhuras de ventilação.
• Keine fremden Gegenstände in das Gerät
kommen lassen.
• Ne pas laisser des objets étrangers dans l’
appareil.
• E’ importante che nessun oggetto è inserito all’
interno dell’unità.
• No deje objetos extraños dentro del equipo.
• Laat geen vreemde voorwerpen in dit apparaat
vallen.
• Se till att främmande föremål inte tränger in i
apparaten.
• Não introduza objectos estranhos no aparelho.
• Do not let insecticides, benzene, and thinner
come in contact with the set.
• Lassen Sie das Gerät nicht mit Insektiziden,
Benzin oder Verdünnungsmitteln in Berührung
kommen.
• Ne pas mettre en contact des insecticides, du
benzène et un diluant avec l’appareil.
• Assicuratevvi che l’unità non venga in contatto
con insetticidi, benzolo o solventi.
• No permita el contacto de insecticidas, gasolina
y diluyentes con el equipo.
• Laat geen insektenverdelgende middelen,
benzine of verfverdunner met dit apparaat in
kontakt komen.
• Se till att inte insektsmedel på spraybruk,
bensen och thinner kommer i kontakt med
apparatens hölje.
• Não deixe que insecticidas, benzeno e diluente
entrem em contacto com o aparelho.
• Never disassemble or modify the set in any
way.
• Versuchen Sie niemals das Gerät auseinander
zu nehmen oder auf jegliche Art zu verändern.
• Ne jamais démonter ou modifier l’appareil d’
une manière ou d’une autre.
• Non smontate mai, nè modificate l’unità in
nessun modo.
• Nunca desarme o modifique el equipo de
ninguna manera.
• Nooit dit apparaat demonteren of op andere
wijze modifiëren.
• Ta inte isär apparaten och försök inte bygga om
den.
• Nunca desmonte ou modifique o aparelho de
nenhuma forma.
v
Page 6

CAUTION
• The ventilation should not be impeded by covering the ventilation openings with items, such as newspapers, tablecloths,
curtains, etc.
• No naked flame sources, such as lighted candles, should be placed on the apparatus.
• Attention should be drawn to the environmental aspects of battery disposal.
• The apparatus shall not be exposed to dripping or splashing for use.
• No objects filled with liquids, such as vases, shall be placed on the apparatus.
VORSICHT
• La ventilation ne doit pas être entravée en recouvrant les ouvertures de ventilation avec des objets tels des journaux,
vêtements, rideaux, etc.
•
Ne pas placer de bougies ou autre objet de ce type sur l’appareil.
Un soin particulier doit être apporté à l’aspect environnemental de la mise au rebut.
•
•
L’appareil ne doit pas être exposé à des suintements ou éclaboussures pendant l’utilisation.
•
Ne pas placer d’objets remplis de liquide, tels des vases, sur l’appareil.
PRECAUTION
• The ventilation should not be impeded by covering the ventilation openings with items, such as newspapers, tablecloths,
curtains, etc.
• No naked flame sources, such as lighted candles, should be placed on the apparatus.
• Attention should be drawn to the environmental aspects of battery disposal.
• The apparatus shall not be exposed to dripping or splashing for use.
• No objects filled with liquids, such as vases, shall be placed on the apparatus.
ATTENZIONE
• Evitare di ostacolare la ventilazione coprendo le aperture con oggetti quali giornali, tovaglie, tende e così via.
•
Evitare di posizionare sull'apparecchio oggetti che producono fiamme libere, ad esempio candele accese.
•
Prestare attenzione agli aspetti di conservazione dell'ambiente per lo smaltimento delle pile.
•
Non esporre l'apparecchio a spruzzi o al contatto con l'acqua.
•
Non posizionare sull'apparecchio oggetti riempiti con liquidi, ad esempio vasi.
PRECAUCIÓN
• No se debe obstruir la ventilación cubriendo las aberturas de ventilación con objetos como periódicos, manteles o cortinas.
•
No se deben colocar objetos con llama descubierta (como, por ejemplo, una vela) encima del aparato.
•
A la hora de desechar las baterías se deben tener en cuenta las normativas medioambientales.
•
El aparato no debe exponerse a goteos ni salpicaduras.
•
No coloque encima del aparato recipientes que contengan líquidos, como, por ejemplo, floreros.
VOORZICHTIGHEID
• De ventilatie mag niet aangetast worden door het bedekken van de ventilatieopeningen met items zoals kranten, tafelkleden,
gordijnen, etc.
Geen open vuur zoals brandende kaarsen mogen op het apparaat worden geplaatst.
•
•
U dient te letten op de omgevingsaspecten bij het weggooien van batterijen.
•
Het apparaat mag niet worden blootgesteld aan druppelen of opspatten voor gebruik.
•
Er mogen geen objecten gevuld met water, zoals vazen op het apparaat geplaatst worden.
FÖRSIKTIHETSMÅTT
• Ventilationen får inte hindras genom att ventilationsöppningarna täcks med t.ex. tidningar, bordsdukar, gardiner eller andra
objekt.
•
Inga öppna lågor, som exempelvis tända ljus, får placeras på apparaten.
Var uppmärksam på miljöaspekterna när du avyttrar batterier.
•
•
Apparaten får inte utsättas för droppande eller stänkande vätskor.
•
Inga vätskefyllda föremål, t.ex. vaser, får placeras på apparaten.
PRECAUÇÃO
• A ventilação não deve ser obstruída tapando as ranhuras de ventilação com objectos, tais como jornais, toalhas de mesa,
cortinas, etc.
•
Não devem ser colocados no aparelho objectos com chamas abertas, tais como velas acesas.
•
Deve ter em atenção os aspectos ambientais relacionados com a eliminação da bateria.
•
Não deve expor o aparelho a salpicos ou gotas de água na utilização.
Não deve colocar no aparelho objectos que contenham líquidos, tais como vasos.
•
vi
Page 7

• DECLARATION OF CONFORMITY
We declare under our sole responsibility that this product,
to which this declaration relates, is in conformity with the
following standards:
EN60065, EN55013, EN55020, EN61000-3-2 and
EN61000-3-3.
EN55022, EN55024 for USB and Ethernet terminal as
multifunction terminal.
Following the provisions of 73/23/EEC, 2004/108/EC and
93/68/EEC Directive.
• ÜBEREINSTIMMUNGSERKLÄRUNG
Wir erklären unter unserer Verantwortung, daß dieses
Produkt, auf das sich diese Erklärung bezieht, den folgenden
Standards entspricht:
EN60065, EN55013, EN55020, EN61000-3-2 und
EN61000-3-3.
EN55022, EN55024 für USB und Ethernet-Anschluss als
Multifunktions-Anschluss.
Entspricht den Verordnungen der Direktive 73/23/EEC,
2004/108/EC und 93/68/EEC.
• DECLARATION DE CONFORMITE
Nous déclarons sous notre seule responsabilité que l’
appareil, auquel se réfère cette déclaration, est conforme
aux standards suivants:
EN60065, EN55013, EN55020, EN61000-3-2 et
EN61000-3-3.
EN55022, EN55024 pour les prises USB et Ethernet en tant
que prises multifonction.
D’après les dispositions de la Directive 73/23/EEC,
2004/108/EC et 93/68/EEC.
• DICHIARAZIONE DI CONFORMITÀ
Dichiariamo con piena responsabilità che questo prodotto,
al quale la nostra dichiarazione si riferisce, è conforme alle
seguenti normative:
EN60065, EN55013, EN55020, EN61000-3-2 e
EN61000-3-3.
EN55022, EN55024 per USB e terminale Ethernet come
terminale multifunzione.
In conformità con le condizioni delle direttive 73/23/EEC,
2004/108/EC e 93/68/EEC.
QUESTO PRODOTTO E’ CONFORME
AL D.M. 28/08/95 N. 548
• DECLARACIÓN DE CONFORMIDAD
Declaramos bajo nuestra exclusiva responsabilidad que
este producto al que hace referencia esta declaración, está
conforme con los siguientes estándares:
EN60065, EN55013, EN55020, EN61000-3-2 y EN61000-3-3.
EN55022, EN55024 para USB y terminal Ethernet como
terminal multifunción.
Siguiendo las provisiones de las Directivas 73/23/EEC,
2004/108/EC y 93/68/EEC.
• EENVORMIGHEIDSVERKLARING
Wij verklaren uitsluitend op onze verantwoordelijkheid dat
dit produkt, waarop deze verklaring betrekking heeft, in
overeenstemming is met de volgende normen:
EN60065, EN55013, EN55020, EN61000-3-2 en
EN61000-3-3.
EN55022, EN55024 voor USB en Ethernet-aansluiting als
multifunctionele aansluiting.
Volgens de bepalingen van de Richtlijnen 73/23/EEC,
2004/108/EC en 93/68/EEC.
• ÖVERENSSTÄMMELSESINTYG
Härmed intygas helt på eget ansvar att denna produkt,
vilken detta intyg avser, uppfyller följande standarder:
EN60065, EN55013, EN55020, EN61000-3-2 och
EN61000-3-3.
EN55022, EN55024 för USB- och Ethernetterminal som
flerfunktionsterminal.
Enligt stadgarna i direktiv 73/23/EEC, 2004/108/EC och
93/68/EEC.
• DECLARAÇÃO DE CONFORMIDADE
Declaramos sob nossa exclusiva responsabilidade que este
produto, ao qual diz respeito esta declaração, se encontra
em conformidade com as seguintes normas: EN60065,
EN55013, EN55020, EN61000-3-2 e EN61000-3-3.
EN55022, EN55024 para terminal USB e Ethernet como
terminal multifuncional.
De acordo com as provisões das Directivas 73/23/CEE,
2004/108/CE e 93/68/CEE.
DMi D&M Installation Europe
Kingsbridge House
Padbury Oaks
Longford
Middlesex
UB7 0EH
UK
vii
Page 8

A NOTE ABOUT RECYCLING:
This product's packaging materials are recyclable and can be reused. Please dispose of any materials in accordance with the local
recycling regulations.
When discarding the unit, comply with local rules or regulations.
Batteries should never be thrown away or incinerated but disposed of in accordance with the local regulations concerning chemical waste.
This product and the accessories packed together constitute the applicable product according to the WEEE directive except batteries.
English
UNE REMARQUE CONCERNANT LE RECYCLAGE:
Les matériaux d’emballage de ce produit sont recyclables et peuvent être réutilisés. Veuillez disposer de toutmatériau conformément aux
réglements de recylage locaux.
Lorsque vous mettez cet appareil au rebut, respectez les lois ou réglementations locales.
Les piles ne doivent jamais être jetées ou incinérées, mais mises au rebut conformément aux réglementslocaux concernant les déchets
chimiques.
Ce produit et les accessoires emballés ensemble sont des produits conformes à la directive DEEE sauf pourles piles.
ACERCA DEL RECICLAJE:
Los materiales de embalaje de este producto son reciclables y se pueden volver a utilizar. Disponga de estos materiales siguiendo los
reglamentos de reciclaje de su localidad.
Cuando se deshaga de la unidad, cumpla con las reglas o reglamentos locales.
Las pilas nunca deberán tirarse ni incinerarse. Deberá disponer de ellas siguiendo los reglamentos de su localidadrelacionados con los
desperdicios químicos.
Este producto junto con los accesorios empaquetados es el producto aplicable a la directiva RAEE excepto pilas.
HINWEIS ZUM RECYCLING:
Das Verpackungsmaterial dieses Produktes ist für zum Recyceln geeignet und kann wieder verwendetwerden. Bitte entsorgen Sie alle
Materialien entsprechend der örtlichen Recycling-Vorschriften.
Beachten Siebei der Entsorgung des Gerätes die örtlichen Vorschriften und Bestimmungen.
Die Batterien dürfen nicht in den Hausmüll geworfen oder verbrannt werden; bitte geben Sie die Batteriengemäß örtlichen Bestimmungen
an den Sammelstellen oder Sondermüllplätzen ab.
Dieses Produkt zusammen mit den Zubehörteilen ist das geltende Produkt der WEEE-Direktive, davonausgenommen sind die Batterien.
NOTA RELATIVA AL RICICLAGGIO:
I materiali di imballaggio di questo prodotto sono riutilizzabili e riciclabili. Smaltire i materiali conformementealle normative locali sul
riciclaggio.
Per smaltire l’unità, osservare la normativa in vigore nel luogo di utilizzo.
Non gettare le batterie, né incenerirle, ma smaltirle conformemente alla normativa locale sui rifiuti chimici.
Questo prodotto e gli accessori inclusi nell’imballaggio sono applicabili alla direttiva RAEE, ad eccezione dellebatterie.
Français
Español
Deutsch
Italiano
EN KOMMENTAR OM ÅTERVINNING:
Produktens emballage är återvinningsbart och kan återanvändas. Kassera det enligt lokalaåtervinningsbestämmelser.
När du kasserar enheten ska du göra det i överensstämmelse med lokala regler och bestämmelser.
Batterier får absolut inte kastas i soporna eller brännas. Kassera dem enligt lokala bestämmelser för kemisktavfall.
Denna apparat och de tillbehör som levereras med den är de som uppfyller gällande WEEE-direktiv, medundantag av batterierna.
EEN AANTEKENING WAT BETREFT HET RECYCLEREN:
Het inpakmateriaal van dit product is recycleerbaar en kan opnieuw gebruikt worden. Er wordt verzocht omzich van elk afvalmateriaal te
ontdoen volgens de plaatselijke voorschriften.
Volg voor het wegdoen van despeler de voorschriften voor de verwijdering van wit- en bruingoed op.
Batterijen mogen nooit wordenweggegooid of verbrand, maar moeten volgens de plaatselijke voorschriften betreffende chemisch
afvalworden verwijderd.
Op dit product en de meegeleverde accessoires, m.u.v. de batterijen is de richtlijn voor afgedankteelektrische en elektronische apparaten
(WEEE) van toepassing.
UMA NOTA SOBRE A RECICLAGEM:
Os materiais de embalagem deste produto são recicláveis e podem ser reutilizados. Elimine quaisquer materiais de acordo com as normas
de reciclagem locais.
Quando eliminar a unidade, obedeça às regras ou normas locais.
As pilhas nunca devem ser deitadas fora ou incineradas, mas sim eliminadas de acordo com as normais locais relativas aos resíduos
químicos.
Este produto e os respectivos acessórios embalados em conjunto constituem o produto aplicável de acordo com a directiva WEEE,
excepto as pilhas.
Svenska
Nederlands
Português
Page 9

Table of Contents
Package Contents................................... 2
General Information ............................... 3
Introduction .............................................................3
Computer compatible ..............................................3
Setup ......................................................................3
External control .......................................................3
Security - CF cards .................................................3
Scheduled recording ...............................................3
Playback aids ..........................................................4
Web remote control .................................................4
Features ..................................................................4
Quick Start Guide ................................... 5
Part Names and Functions .................... 7
Front Panel .............................................................7
Rear Panel ..............................................................8
Display Unit .............................................................9
Preparation for Use .............................. 11
Installation .............................................................11
Connections .......................................................... 11
CF cards ................................................ 13
Playback ................................................18
Playback Procedure ..............................................18
Track jump ............................................................18
Search...................................................................19
Audible search ......................................................19
Preset & Utility ...................................... 20
Preset function and operation ..............................20
Utility Menu ...........................................................43
Network and Operations ...................... 52
Network functionality and Operation .....................52
How to hook up the PMD580 to your network ......52
How to set up a Shared Folder on a Server or
a Network Server .............................................53
Control Functions .................................54
Web Remote ........................................................54
REMOTE Jack .....................................................61
USB ......................................................................61
Serial Remote Control ..........................................62
Recording time chart ............................70
Troubleshooting ....................................71
Recording .............................................. 15
Recording Procedure ...........................................15
How to adjust Record Level ..................................16
How to adjust Record Balance..............................16
Add a track manually ............................................16
Add a track automatically ......................................16
How to set Scheduled Recording..........................16
Specifications ....................................... 72
Limited Warranty ................................... 73
1
Page 10
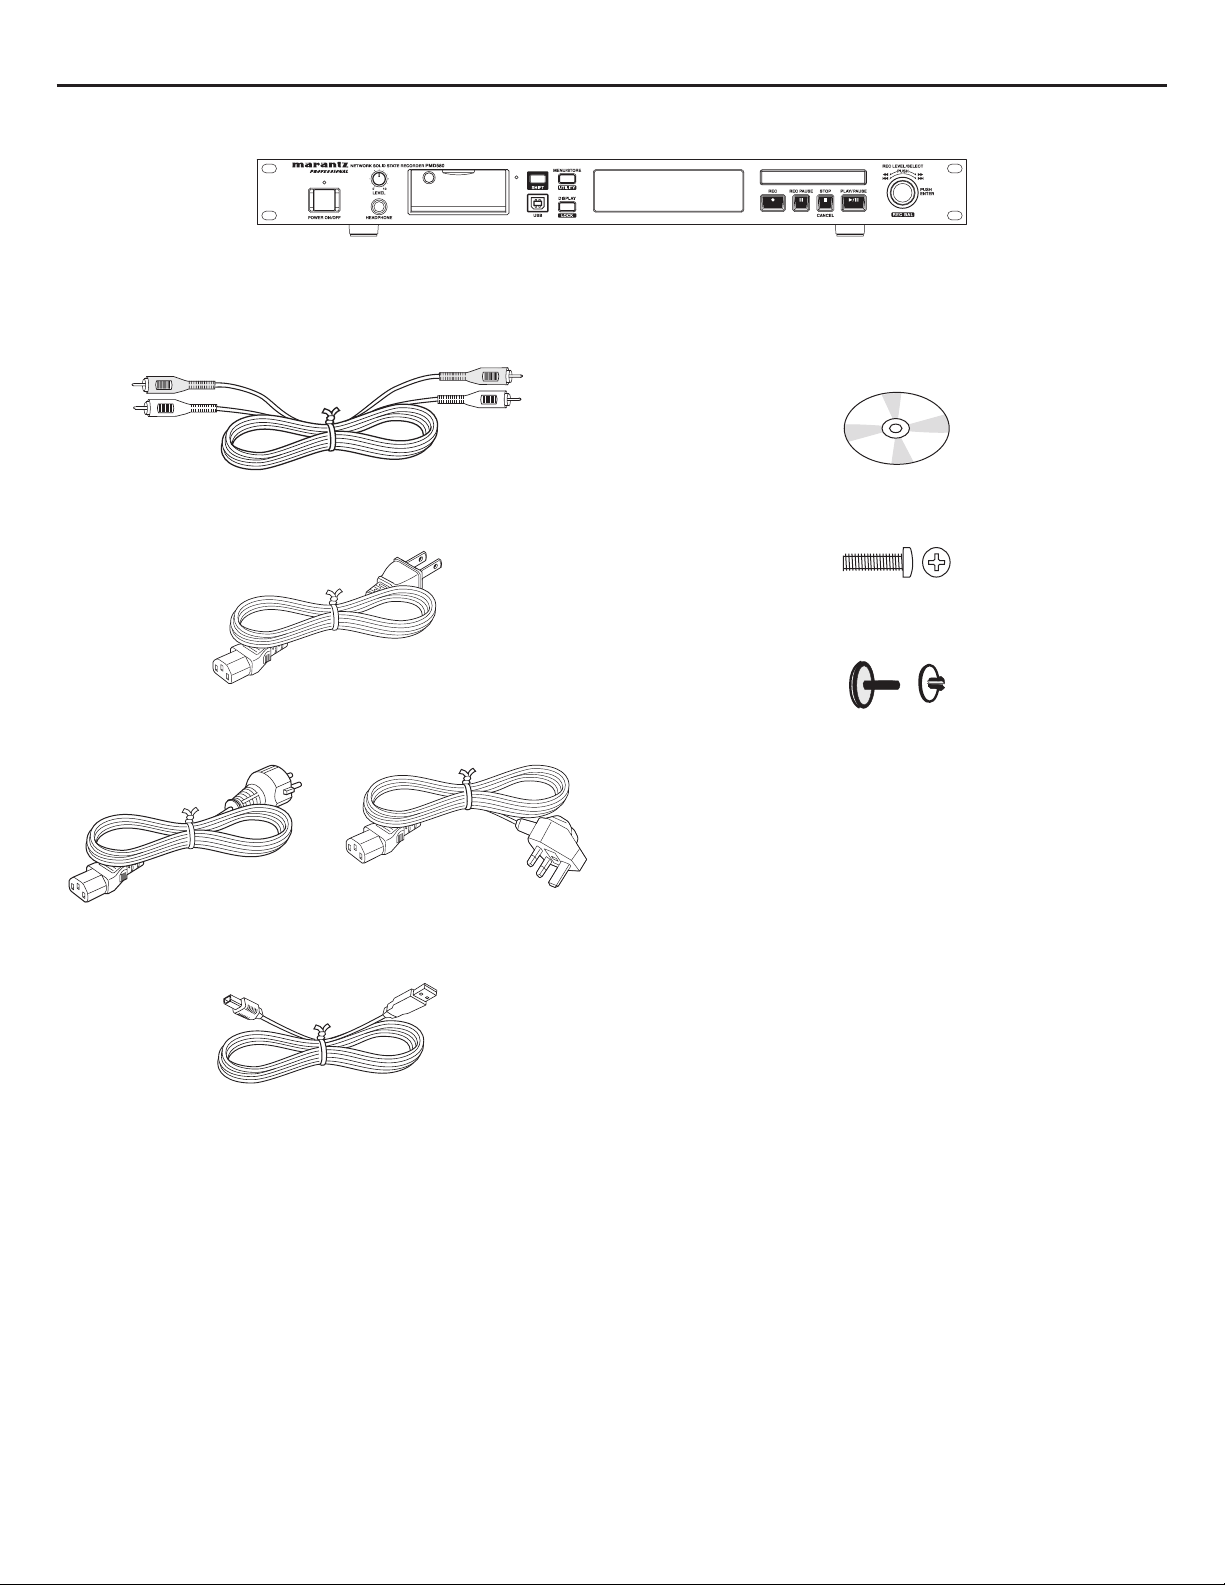
Package Contents
• PMD580
• Audio cable (2)
• Power cord (for US)
• Power cord (2 pieces for Europe)
(for Europe) (for UK)
• CD-ROM
PDF format manuals
• CF door screw (2)
• Retainer (1)
• Customer Registration Document (1) (only for US)
• USB cable
• This User Guide
2
Page 11

General Information
Introduction
■
Thank you for selecting the Marantz Professional PMD580
Network Recorder. The PMD580 is an audio recorder that
records in digital audio formats onto a Compact Flash™
memory card (CF card) or Microdrive™.
The PMD580 is an audio recorder. It accepts audio inputs
from your audio equipment, standard line level analog audio
inputs or a digital input, and records in digital audio formats
onto a removable flash memory card.
Removable flash memory cards, also used in digital cameras,
are widely available at appliance stores and computer
shop. Removable flash memory cards come in several
configurations (variations in the thickness and shape of the
card and connections). The PMD580 accepts “Compact
Flash™” memory cards or “Microdrive™” cards.
For convenience, this manual will refer to the memory card as
a “CF card”.
Note:
To record from a microphone, you have to plug the microphone
into a pre-amp to change the microphone level input(s) to a
line level input to the PMD580.
■
Computer compatible
The advantages of CF card digital recording are:
• The recording is directly digital, CF cards are available in
various sizes (see chart on page 70).
• Compressed recording can record long audio sessions
(at quality levels suitable for recording a meeting).
• Audio recorded in the popular MP3 compression format is
directly available for intranet or internet file sharing.
• High quality recording (CD level or greater) can be
selected.
• Recordings can be transferred to your desktop or laptop
computer by removing the CF card from the PMD580 or
by connecting the PMD580 to your computer via the USB
port or Ethernet.
On your computer you can then:
• log and archive audio files
• play audio files
• save audio files to:
– your hard drive
– a floppy
– a CD-R disc
• post streaming audio files on your web site
• use software and your computer to transcribe digital
recordings
• use software and your computer to manipulate high
quality audio files
Setup
■
Audio inputs may be from:
• line level sources connected to the BALANCED IN (XLR)
jacks.
• line level audio sources connected to the ANALOG IN
(RCA) jacks.
• digital audio sources in SPDIF or AES/EBU format
connected to the DIGITAL IN (RCA) jack.
• digital audio sources in SPDIF or AES/EBU format
connected to the BALANCED IN (XLR) jack.
Audio outputs may be to:
• headphones connected to the HEADPHONE (Phone)
jack.
• analog audio devices such as an amplifier or other device
connected to the ANALOG OUT (RCA) jacks.
• analog audio devices such as an amplifier or other device
connected to the BALANCED OUT (XLR) jacks.
• digital audio devices using SPDIF or AES/EBU format
connected to the DIGITAL OUT (RCA) jack.
• digital audio devices using SPDIF or AES/EBU format
connected to the BALANCED OUT (XLR) jack.
External control
■
• Web Remote enables external control of the PMD580 from
your computer in the network.
• RS-232C control codes enable full external control of the
PMD580.
• A wired remote connection (REMOTE) accepts a mono
Phone jack (remote control not supplied).
Depending on the menu selection, a simple contact
closure connected here permits:
• Start Pause : pause and resume
• StartPauseTR : restart after pause while recording initiates
a new track
• Manual Track : initiate a new track while recording (if
Seamless Play is Off during playback
initiating a track adds a small audio gap)
Security - CF cards
■
For security, the CF card compartment door can be
secured with a screw. Requiring a tool to open the CF card
compartment reduces casual removal of the CF card.
Scheduled recording
■
The PMD580 can be set to start recording when the preset
start time comes and end the recording when the preset end
time comes.
3
Page 12

Playback aids
■
A common problem with lengthy recordings is difficulty in
locating one or more specific passages for playback. The
PMD580 has several ways to mark or tag specific record
starting and/or ending points.
• Date and time
A built-in date and time generator marks the beginning of
each track.
• Tracks
– A new track (file) is automatically started each time you
begin a recording.
– It is not possible to record over a previously recorded
track unless it is first erased.
– An Auto Track feature can add tracks every minute
or other selectable recording interval. (Minute track:
Setting the interval to one minute provides a new track
every minute of a recording, permitting navigation of a
large audio recording by time.)
– A new track can be started during recording by
pressing the REC button. (Manual Track, Manual Track
incrementing, On.)
Web remote control
■
The PMD580 can be connected to your computer in the Local
Area Network, and can be controlled and set from the window
in your internet web browser.
Features
■
• Stereo (2 channels) and mono (1 channel) audio
recording and playback.
• Records onto various types of CF cards. (Please refer to
the Marantz Professional web site at www.d-mpro.com for
what kind of media is recommended.)
• Three different recording formats.
– Compressed recording using MPEG1 Layer III (MP3)
mono and stereo.
– Uncompressed recording using 16-bit linear Pulse
Code Modulation (PCM).
– Uncompressed recording using 24-bit linear Pulse
Code Modulation (PCM).
• MS-DOS™, Windows and Macintosh compatible audio
files.
• Selectable file types:
– Wave
– MP3
• Selectable recording bit rate
– MP3 compressed at 32 kbps (recommended for
dictation)
32, 48 or 64 kbps (recommended for voice recording)
128 or 192 kbps (recommended for recording music)
– PCM uncompressed at 768 kbps (mono) with 16bit or 24
bit resolution. (very high quality mono audio recording)
– PCM uncompressed at 1536 kbps (stereo) with 16 bit
or 24 bit resolution. (recommended for very high quality
audio recording)
• Record start and end times can be scheduled.
• Pre-Recording memory buffer that records 2 seconds of
audio before recording is started.
• Built-in Time and Date generator marks the beginning of
each track.
• Three remote options, including Remote jack, RS-232C
and Local Area Network, permit wired remote control.
• Network features
– Archiving can be set to make a copy of the recorded
files in a network drive.
– Web Remote settings from the network computer.
4
Page 13

Quick Start Guide
SERIAL NO.
AC IN
RS232C
BALANCED
UNBALANCED
L
R
LR
L
R
BALANCED UNBALANCED
LR
AES / EBU OUT
IN
ANALOG IN
ANALOG OUT DIGITAL
SERIAL NO.
AC IN
RS232C
BALANCED
UNBALANCED
L
R
LR
L
R
BALANCED UNBALANCED
LR
AES / EBU OUT
IN
ANALOG IN
ANALOG OUT DIGITAL
Follow the instructions on this page to Quick Start your new
PMD580 Network CF card Recorder and begin recording.
Quick Start Basic Instructions
■
a. Plug the power cord in.
Power cord
SERIAL NO.
RS232C
AC IN
PMD580
b. Connect balanced audio cables.
ANALOG IN
BALANCED
UNBALANCED
ANALOG O
BALANCED
■
Quick Start Detailed Instruction
The PMD580 comes factory preset for recording balanced
analog inputs. These are settings for recording a line level
stereo balanced inputs. Quick Start ignores your changing
any of these presets.
1. Unpack the PMD580.
a. Plug the power cord into household power.
Power cord
SERIAL NO.
RS232C
PMD580
b. Connect a couple of balanced audio cables into the
output of a CD player or other audio source.
ANALOG IN
ANALOG O
AC IN
R
L
R
Mixer or
L
OUTPUT
CD player
c. Press the POWER switch to turn on.
d. Insert a CF card.
e. Press the REC button to start recording.
f. Press the REC PAUSE button when recording is not
necessary.
g. Press the REC button to resume recording.
h. Press the STOP/CANCEL button to stop recording.
BALANCED
R
UNBALANCED
L
BALANCED
R
Mixer or
L
OUTPUT
CD player
5
Page 14
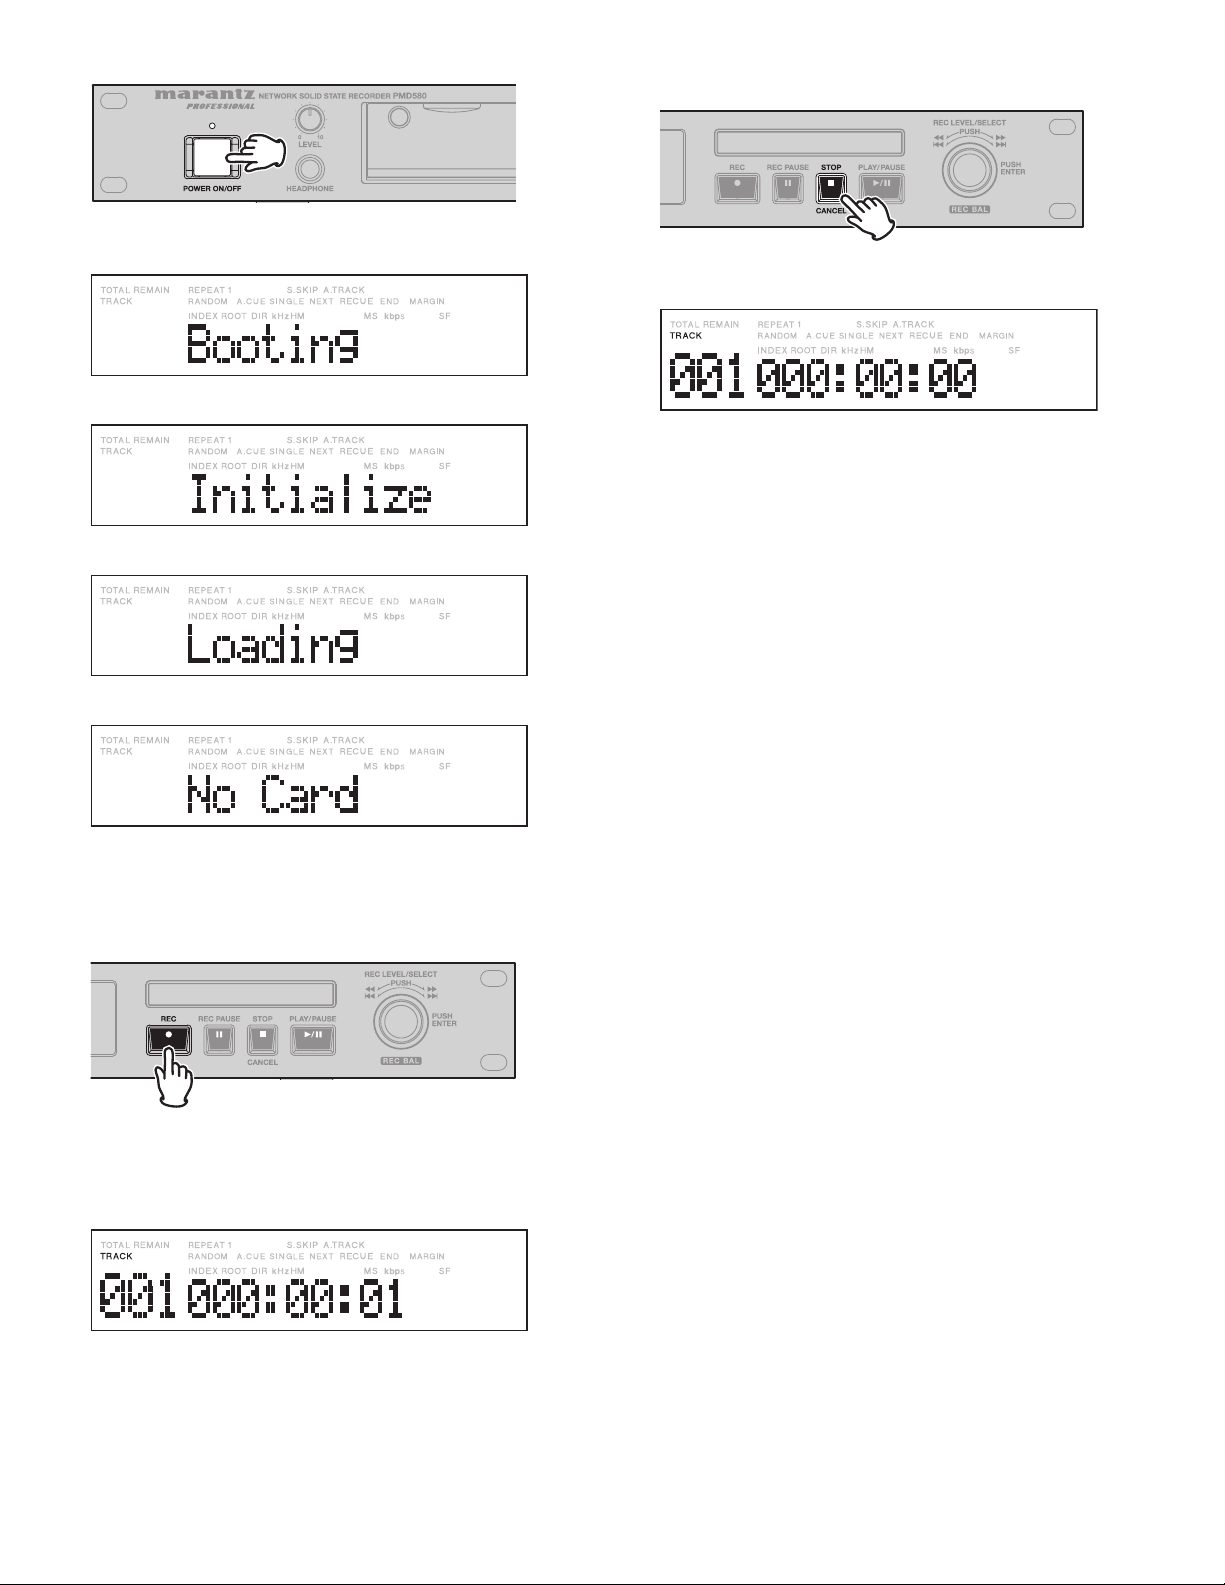
2. Press the POWER switch.
5. Press the STOP/CANCEL button to stop recording
and end the track (close the audio file).
On first power up, wait for the PMD580 to boot.
The display will change to Initialize.
The display will change to Loading.
The display change to No Card.
The display will show the remaining recording time at
current settings for the CF card.
• To transfer audio files to your computer, connect via
USB, see page “USB”.
• To archive audio files control the PMD580 via
Ethernet, connect LAN port. See page “Network and
Operations”.
• For the Time/Date setting, see pages 31, 32.
• For other recording condition, see page 20.
3. Insert a CF card. See page “CF cards”.
4. Press the REC button.
Recording begins.
The Rec indicator will be lit and steady while recording.
The display will show the recording time of the current
track (c).
6
Page 15

Part Names and Functions
q
w
e
r
t
y
u
i
o
!0
!1
!2
!3
!4
!5
!6
Front Panel■
rt
e uw y
iq
o!0
q POWER ON/OFF switch and indicator (Blue)
• Press this to turn the Power ON or OFF.
• The indicator lights when the power is turned on.
w LEVEL Control
Use this to adjust the level of the headphones.
e Card access light (Green)
This light flashes while the CF card is being read from or
written to. It is lit and steady while the CF card is ready.
r SHIFT button
Keep pressing this to set the unit while pressing the
SHIFT button.
t MENU/STORE/UTILITY button
• In stop, press this to set the unit in MENU mode.
• In MENU mode, press this to store the change in the
preset menu.
• In stop, press this while pressing the SHIFT button to
set the unit in Utility mode.
LCD unit
Displays time and other information.
See page 9.
LEVEL METER unit
Displays the strength of the recording or playback signal.
Jog wheel
• During stop or playback, turn this to select the file.
• During recording, turn this to control the recording
level.
• During shift record, turn this to control the Left/Right
recording level balance.
• During Menu or Utility, turn this to select the menu
items.
• During recording press this to reset the Margin level
display.
• During playback keep pressing this to continue audible
search.
• During Menu or Utility press this to enter.
!3!4 !6!5!1 !2
o PHONES Jack
For private listening, you can connect the headphones to
this jack.
Card compartment
Pull the Card door open to access the CF card.
USB port
USB mode is started by connecting a USB cable while
stopped.
USB mode is started when the unit is turned on or
stopped while a USB cable is connected.
The CF card in the PMD580 appears as an external
storage device on a connected computer.
No key operation valid in USB mode
!2 DISPLAY/LOCK button
• Press this to change the time display mode.
• Press this while pressing the SHIFT button to lock or
unlock the buttons on the front panel.
!3 REC button (Red)
Press this to start recording.
!4 REC PAUSE button (Red)
Press this to set the unit in record pause mode.
!5 STOP/CANCEL button
Press this to stop playback or recording. (Also to exit
from the Menu or Utility mode.)
!6 PLAY/PAUSE button (Green)
Press this to start playback (lit and steady) or pause
playback (flashing).
7
Page 16

Rear Panel■
z
x
c
v
b
n
m
,
.
⁄0
⁄1
⁄2
SERIAL NO.
AC IN
BALANCED
UNBALANCED
L
R
LR
L
R
IN
OUT
BALANCED
UNBALANCED
LR
AES /
EBU
SPDIF
REMOTE
LAN
RS232C
OUT
IN
ANALOG IN
ANALOG OUT
DIGITAL
z
ANALOG IN
BALANCED
UNBALANCED
x c v b mn
ANALOG OUT
BALANCED
UNBALANCED
,
z ANALOG (Balanced) INPUT
These are balanced inputs using XLR type connections.
Pin layout : 1. GND / 2. Hot / 3. Cold
Applicable connector : XLR-3-32 or equivalent.
Input attenuator (+4 dB /–20 dB) (See Preset Menu)
x ANALOG (Balanced) OUTPUT
These are active balanced outputs using XLR type
connections.
Pin layout : 1. GND / 2. Hot / 3. Cold
Applicable connector
XLR-3-31 or equivalent.
c DIGITAL (XLR) INPUT
• This is a balanced input using an XLR type jack.
• Signal format : SPDIF (IEC-958 Type II) or AES/EBU
• Sampling frequency : 44.1 /48
v DIGITAL (XLR) OUTPUT
• This is a balanced output using an XLR type jack.
1.GND / 2.Hot / 3.Cold.
• Signal format : SPDIF(IEC-958 Type II ) or AES/EBU
(select in menu)
• Sampling frequency : 44.1 /48 /Auto (select in menu)
• Applicable connector : XLR-3-31 or equivalent
b DIGITAL (RCA) INPUT
• This is a coaxial input using an RCA type jack.
• Signal format : SPDIF(IEC-958 Type II) or AES/EBU
• Sampling frequency : 44.1 /48
DIGITAL
AES
EBU
OUT
IN
IN
OUT
SPDIF
REMOTE
LAN
RS232C
SERIAL NO.
AC IN
⁄0 ⁄1 ⁄2.
RS232C connector
Using serial communication, a host device can control
the PMD580.
See page 62.
AC INLET
Connect the included power cord here.
, ANALOG (Unbalanced) INPUT
These are unbalanced inputs using RCA type jacks.
. ANALOG (Unbalanced) OUTPUT
These are unbalanced outputs using RCA type jacks.
⁄0 DIGITAL (RCA) OUTPUT
• This is a coaxial output using an RCA type jack.
• Signal format : SPDIF(IEC-958 Type II ) or AES/EBU
(select in menu)
• Sampling frequency : 44.1 /48 /Auto (select in menu)
⁄1 REMOTE (REMOTE input jack)
Function is selectable by MENU.
(StartPause (for Rec, Play)/StartPauseTR (for Rec, Play)
/Manual Track (for Rec))
See page 31.
LAN connector
Using local area network, a host device can control
the PMD580 and archive the recorded files in a shared
folder.
See page 52.
8
Page 17
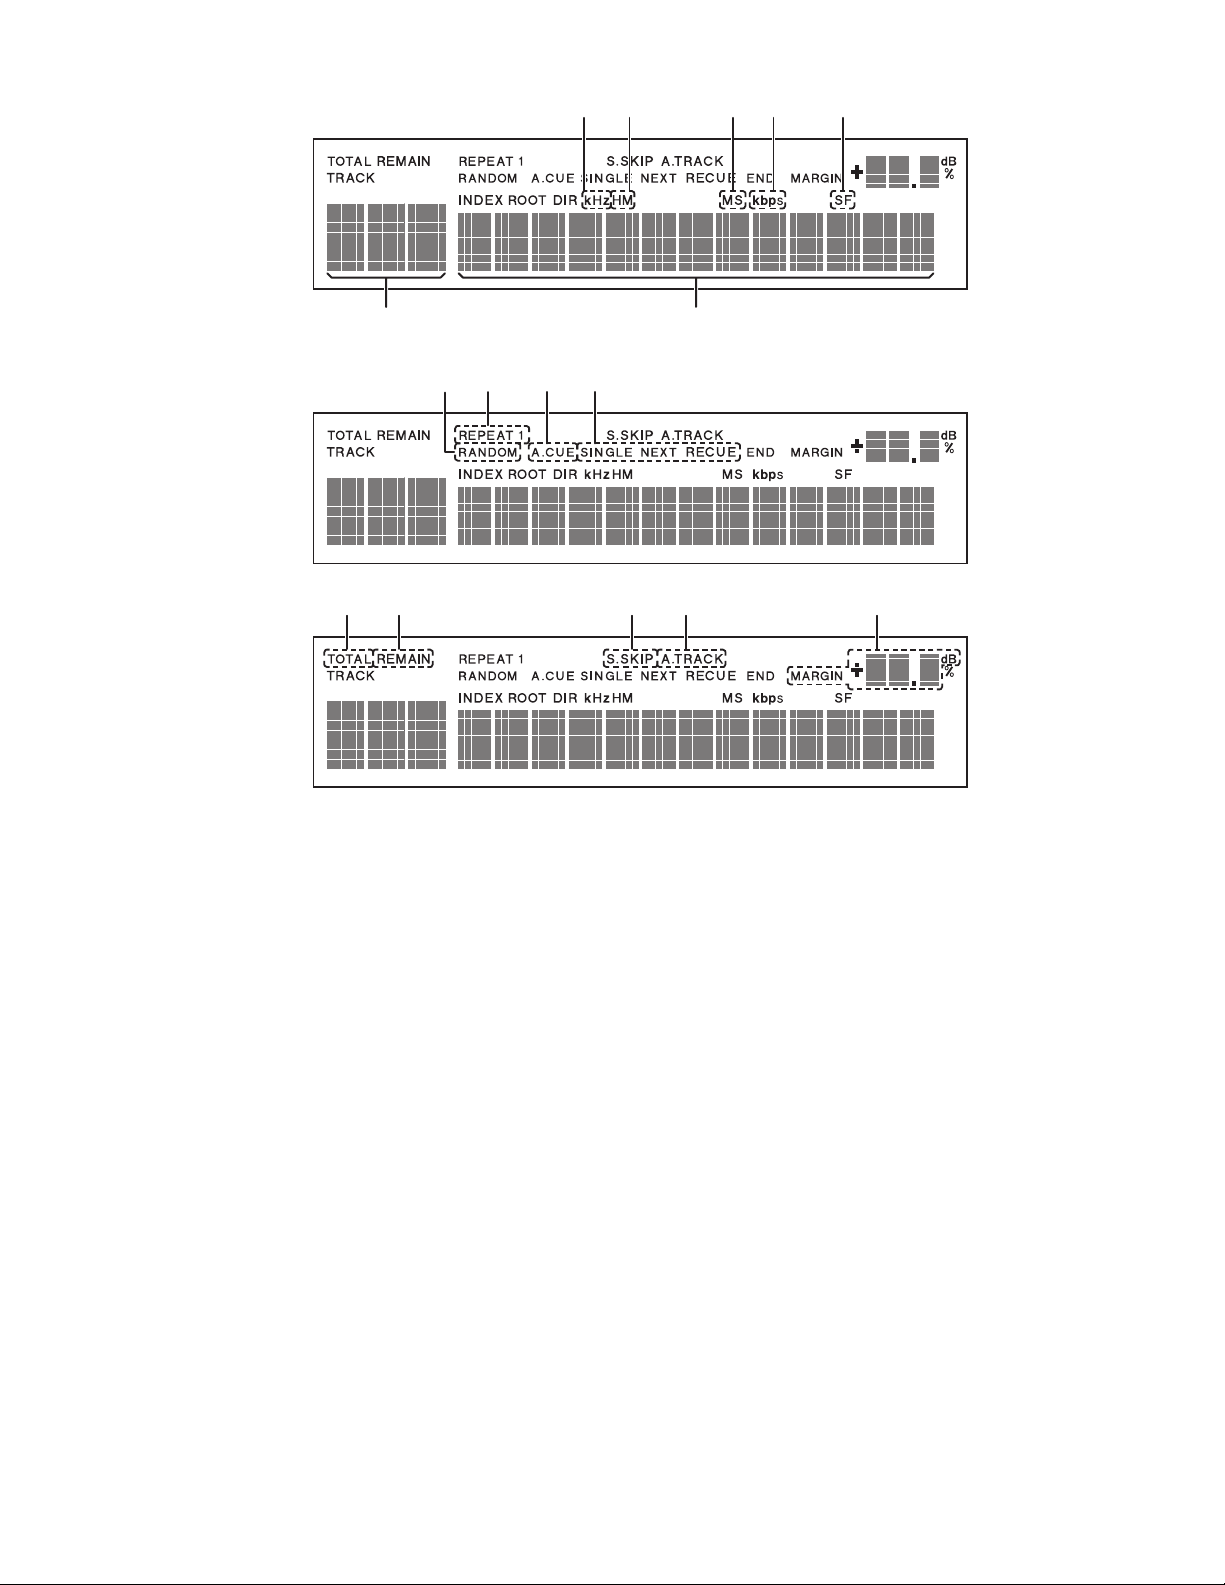
Display Unit
a
s
d
f
g
h
j
k
l
¡0
¡1
¡2
¡3
■
[Basic Operation]
[Playback features]
[Recording]
as s sa
df
gh j k
l¡0 ¡1 ¡2 ¡3
[Basic Operation]
a kHz/kbps
Lights when the sampling frequency or bit rate of the file
playing is available and displayed.
s H/M/S
Lights when the time is displayed in the letter display.
d 3-digit segment
Track number /Total number of Tracks
f 13-digit segment
Displays file information, time, and the other information
[Playback features]
g RANDOM
Lights in random playback mode.
h REPEAT/1
Lights in repeat playback mode.
j A-CUE
Lights when auto cue mode is on.
k SINGLE/NEXT/RECUE
Lights when single playback mode is on.
[Recording]
l TOTAL
Lights while total track number is displayed.
¡0 REMAIN
Lights while remain time is displayed.
¡1 S.SKIP
Lights while silent skip mode is on.
¡2 A.TRACK
Lights when auto track mode is on.
MARGIN ##dB
Displays the margin level.
9
Page 18
[Display Control]
1) During Stop
• Total Track, Remaining recordable time
3) During Play or Play-pause
• Track, Elapsed time
• Total Track, Rec format
• Current Date
• Current Time
• Total Track, Channel : “Stereo” or “Mono”
2) During Record or Record-pause
• Track, Recording elapsed time (HHH:MM:SS)
• Track, Remaining recordable time (HHH:MM:SS)
• Track, :File name (scrolls to the extension.)
• Track, Rec format
• Track, Recorded date
• Track, Recorded time
• Track, Channel : “Stereo” , “L-Mono” or “LR-Mono”
Key LED
Status REC Key LED
PLAY OFF OFF ON
PLAY PAUSE OFF OFF Flash
PLAY STOP OFF OFF OFF
REC PAUSE
Key LED
PLAY Key
LED
• Track, Remaining playback time
• Track, File name
• Track, File information
• Recorded date
• Recorded time
• Track, Channel : “Stereo” or “Mono”
PLAY Mode Icon
PLAY MODE ICON
NORMAL
REPEAT ALL REPEAT
REPEAT ONE REPEAT 1
Stop SINGLE END
SINGLE
RANDOM RANDOM
Next SINGLE NEXT
Recue SINGLE RECUE
KEY LED
Status REC Key LED
REC STANDBY OFF Flash OFF
REC ON OFF ON
REC PAUSE OFF Flash OFF
REC STOP OFF OFF OFF
REC PAUSE
Key LED
PLAY Key
LED
10
Page 19
Preparation for Use
BALANCED
UNBALANCED
L
R
LR
L
R
BALANCED
DUNBALANCED
LR
ANALOG IN
ANALOG OUT
BALANCED
LR
ANALOG IN
IN
OUT
AES /
EBU
SPDIF
OUT
IN
DIGITAL
Installation
■ Connections
How to mount in a rack
• The PMD580 is of 1U size, allowing it to be mounted in
EIA standard 19-inch racks.
When mounting the PMD580 in a rack, use guide rails
or shelf boards, etc., on the rack side to prevent weight
from being applied to the front of the PMD580. The fittings
alone cannot support the weight of the PMD580.
• Do not cover the top of the unit. Remember, heat is
dispersed from the PMD580’s upper surface.
• Set up the installation environment carefully. For example,
take care to protect the PMD580 from heat from other
devices. If necessary, use forced ventilation. The
surrounding conditions must meet the specifications
described in “SPECIFICATIONS” on Page 72.
• The PMD580 will work normally when the player unit is
mounted with the front panel within 10 degrees of the
vertical plane. If the unit is tilted excessively, discs may
not load or unload properly.
■
Follow the instructions on this page to install your new
PMD580 CF Recorder and begin recording.
The PMD580 comes factory preset for recording in stereo with
MP3 compression, recommended quality for music recording.
See page 52 for Network connections.
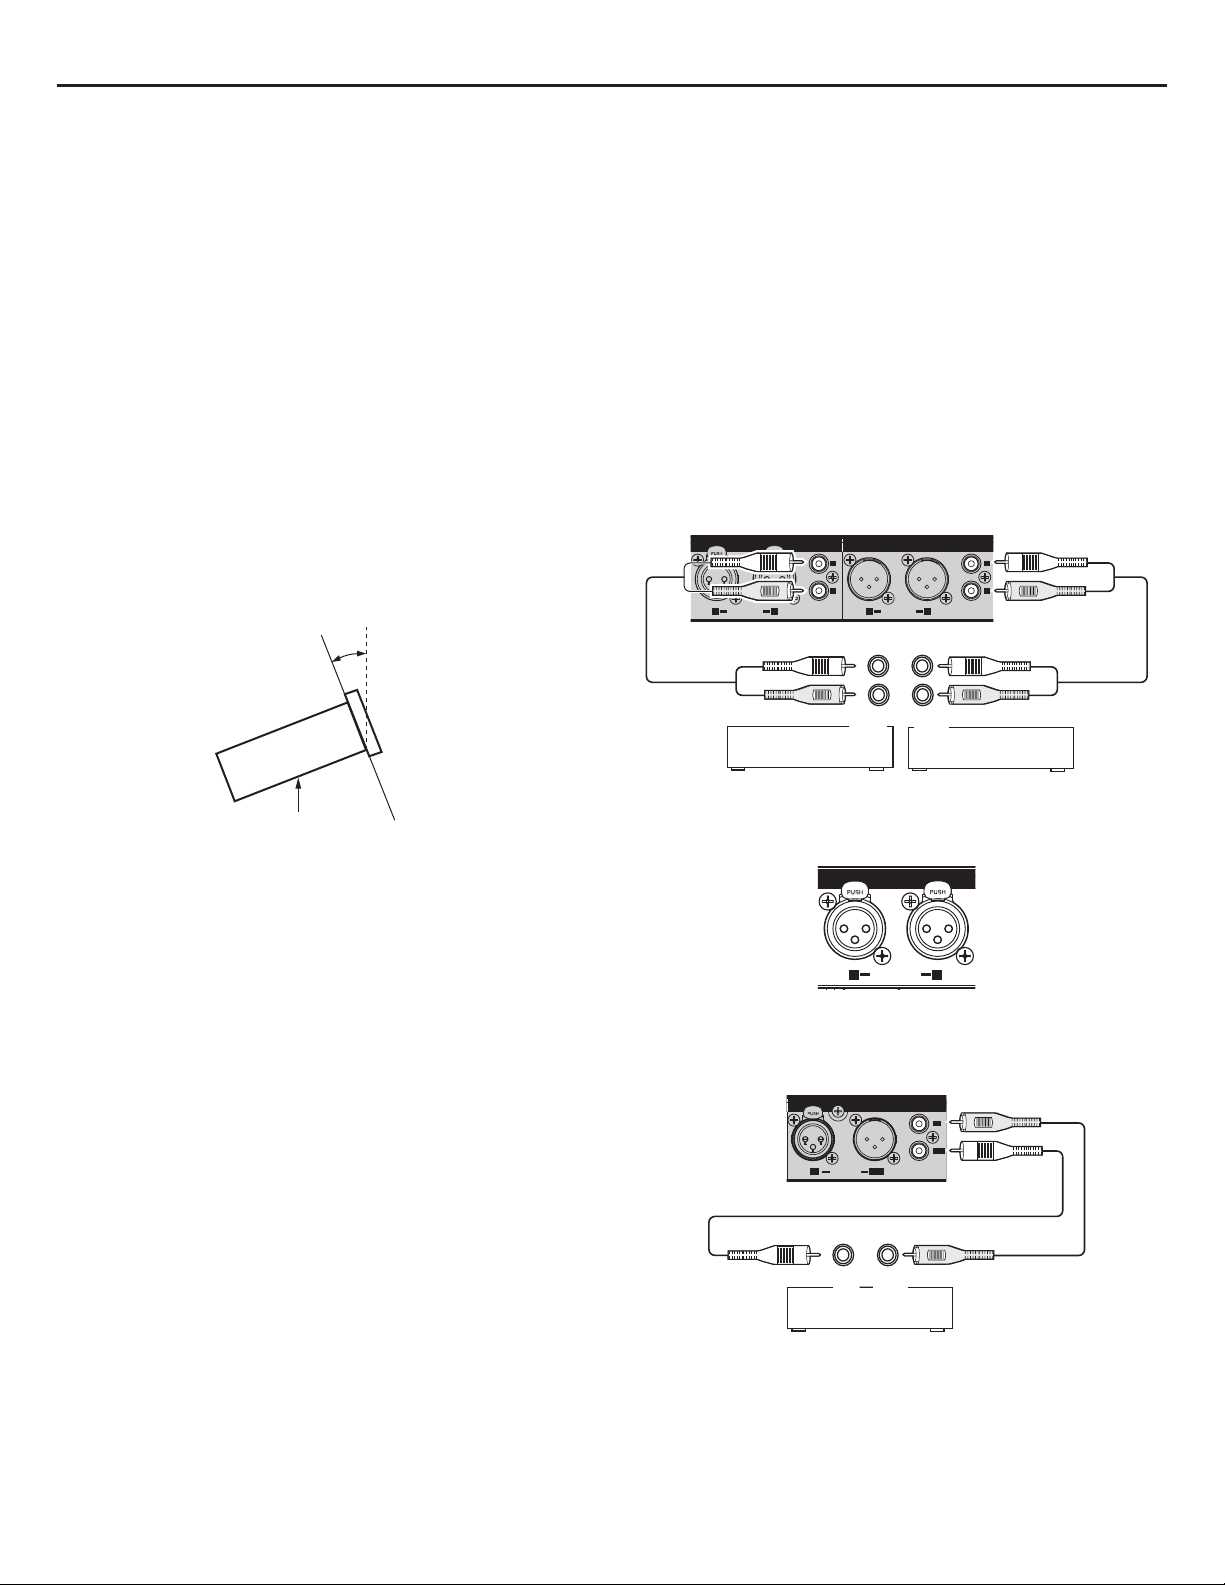
1. Connect to one or more audio inputs.
Note:
The PMD580 does not connect directly to microphone level
inputs.
• Connect line level analog inputs and/or outputs to the
ANALOG IN/OUT jacks.
PMD580
ANALOG IN
BALANCED
UNBALANCED
BALANCED
ANALOG OUT
UNBALANCE
Max. 10°
PMD580
• If the PMD580 is placed near an amplifier, tuner or other
components, noise (induced hum) or beat interference
may result (especially during AM or FM reception).
If this occurs, separate the PMD580 from other
components or reorient its position.
L
L
R
R
Mixer or
cassette player
OUTPUT
INPUT
Amp, Mixer /
Pre-Amp
• Connect line level XLR equipment for recording.
(For mono recording use either jack.)
ANALOG IN
3
12
BALANCED
12
3
• Connect DIGITAL input and/or output to SPDIF or
AES/EBU digital equipment for playing or recording.
PMD580
DIGITAL
AES
EBU
OUT
IN
IN
OUT
SPDIF
OUTPUT
INPUT
CDR, CD,DAT,
disc
11
Page 20
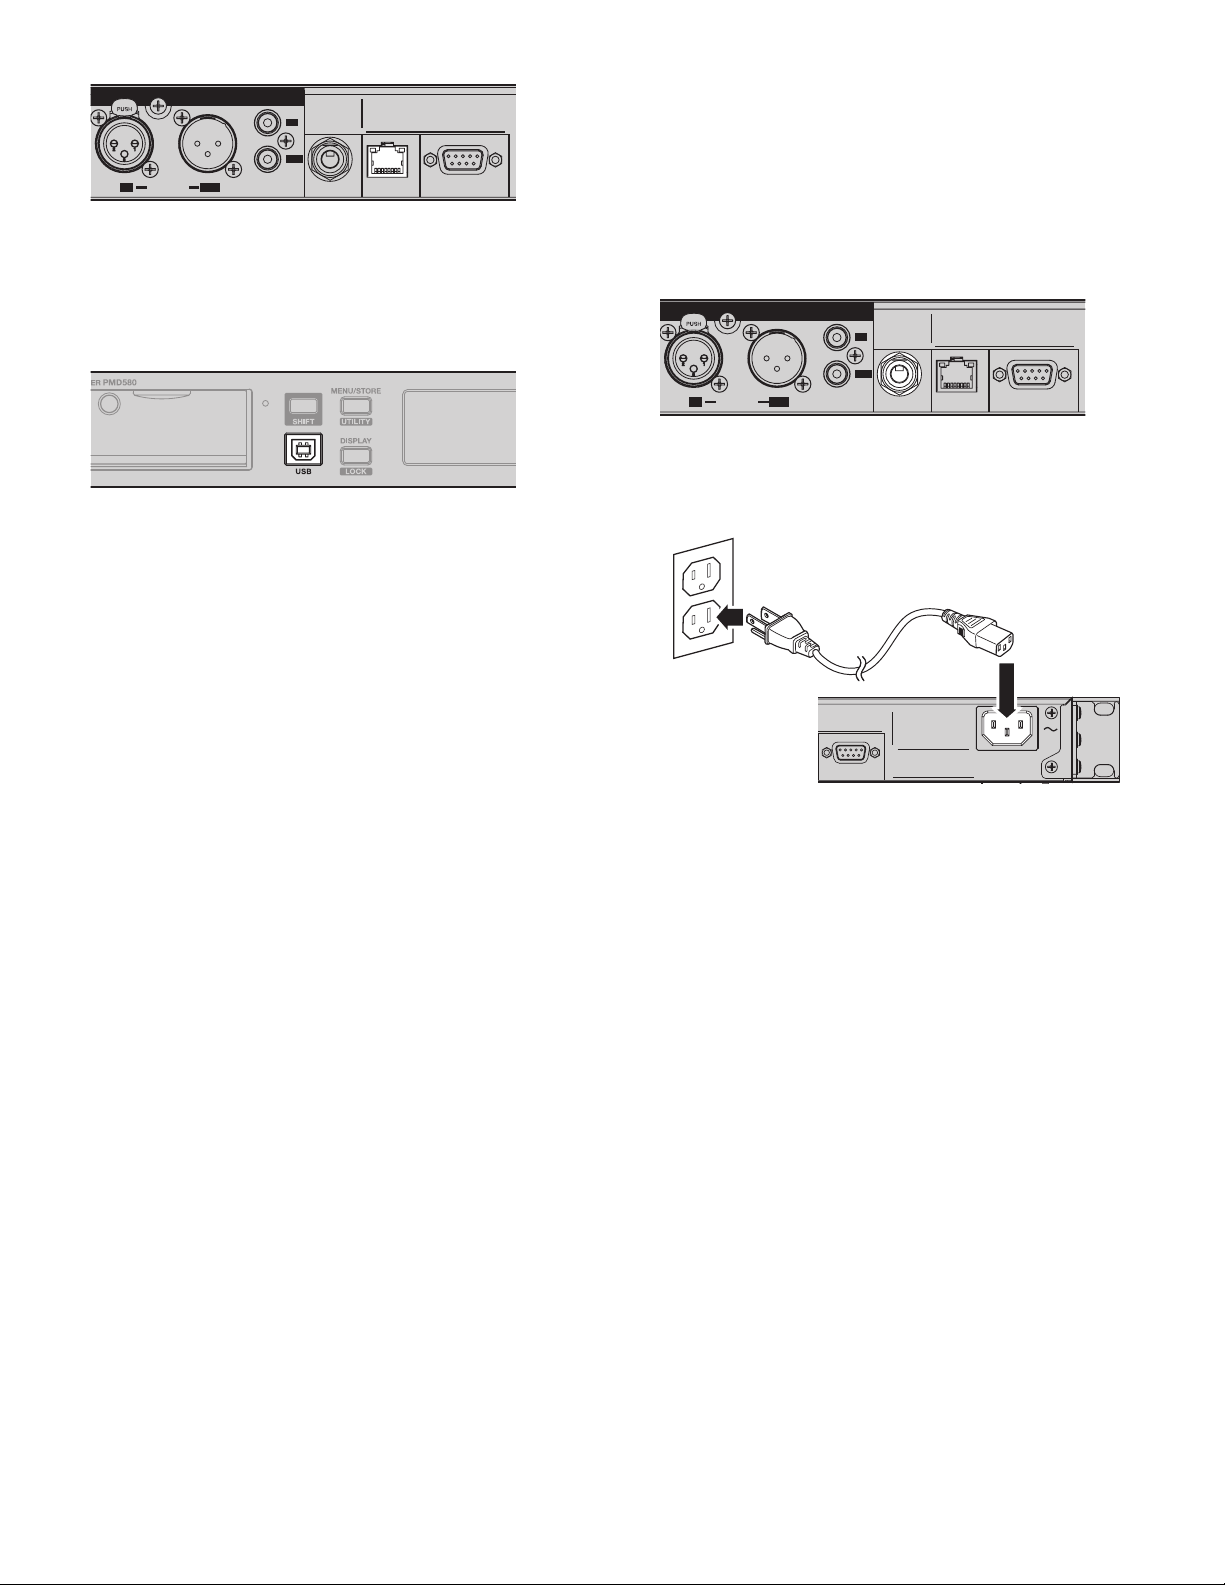
2. Connect to your computer via Local Area Network.
IN
OUT
AES /
EBU
SPDIF
REMOTE
LAN
RS232C
OUT
IN
DIGITAL
IN
OUT
AES /
EBU
SPDIF
REMOTE
LAN
RS232C
OUT
IN
DIGITAL
SERIAL NO.
AC IN
RS232C
DIGITAL
IN
OUT
AES
EBU
IN
SPDIF
OUT
REMOTE
LAN
RS232C
Control and setup of the PMD580 is available via network
web remote control.
See page “Network and Operations”.
3. Connect to your computer (PC or Mac) via the USB
port.
4. Connect external (remote) control (optional).
• RS-232C host equipment.
Full control and setup of the PMD580 is available via
RS-232C external control.
See page “RS232C” for RS-232C control codes.
• Connect a wired remote switch with mono phone jack
to REMOTE.
DIGITAL
IN
OUT
AES
EBU
IN
The connection offers four remote options outlined on
page “REMOTE”.
SPDIF
OUT
REMOTE
LAN
RS232C
This connection makes it easy to copy audio files to your
computer’s hard drive from the PMD580 CF card.
The USB connection can only be made active when the
PMD580 is off (neither recording nor during playback).
The CF card in the PMD580 appears as a removable
drive on your computer.
See page “USB”.
5. Use the supplied power cord to plug into power.
Power cord
SERIAL NO.
RS232C
PMD580
AC IN
12
Page 21
CF cards
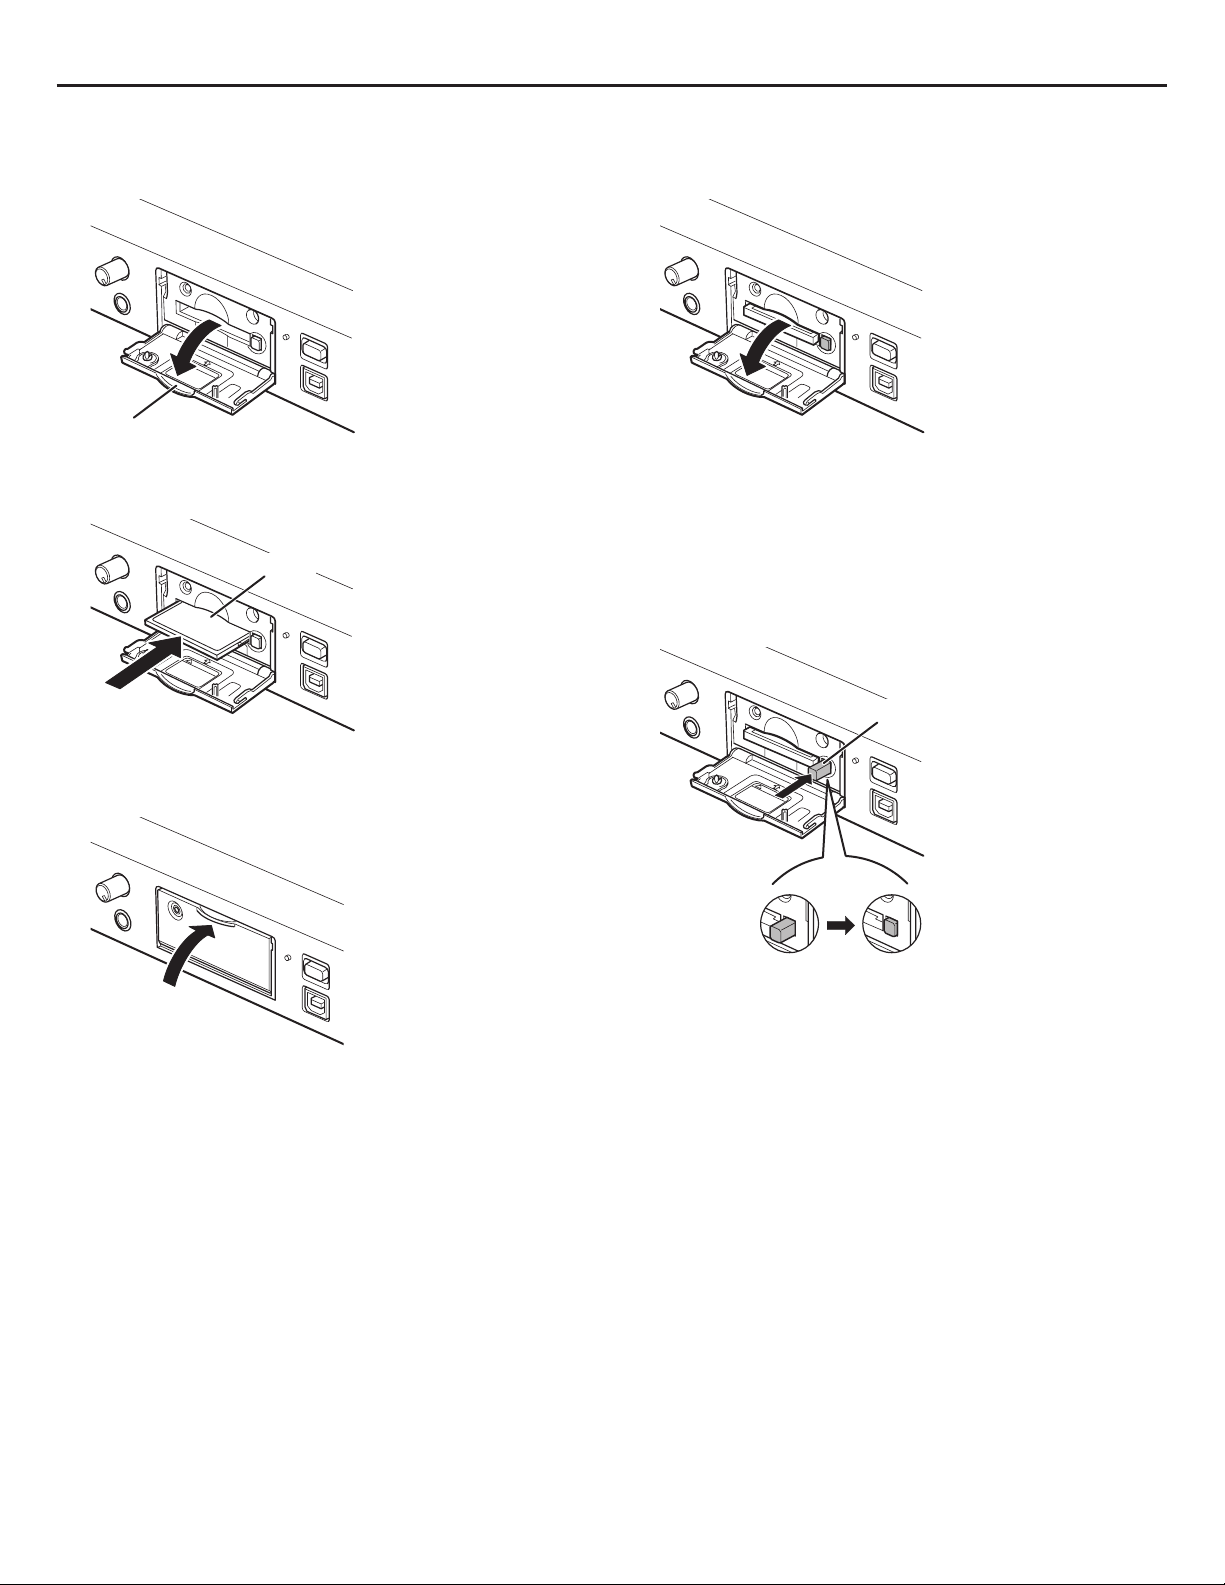
To insert a CF card:
1. Pull the CF card door to open.
CF card door
2. Fully insert the CF card.
CF card
To eject a CF card:
1. Open the CF card door.
Note:
If recording is in progress, opening the CF card door
automatically stops recording and writes critical track
information to properly close the file.
2. Press the Card eject button so it is in click out
position.
3. Close the CF card door.
Note:
If the CF card door won’t latch, check that the Card eject
button is in the click in position.
Card eject button
3. To eject the card, press the Card eject button from
the click out position to the click in position.
13
Page 22
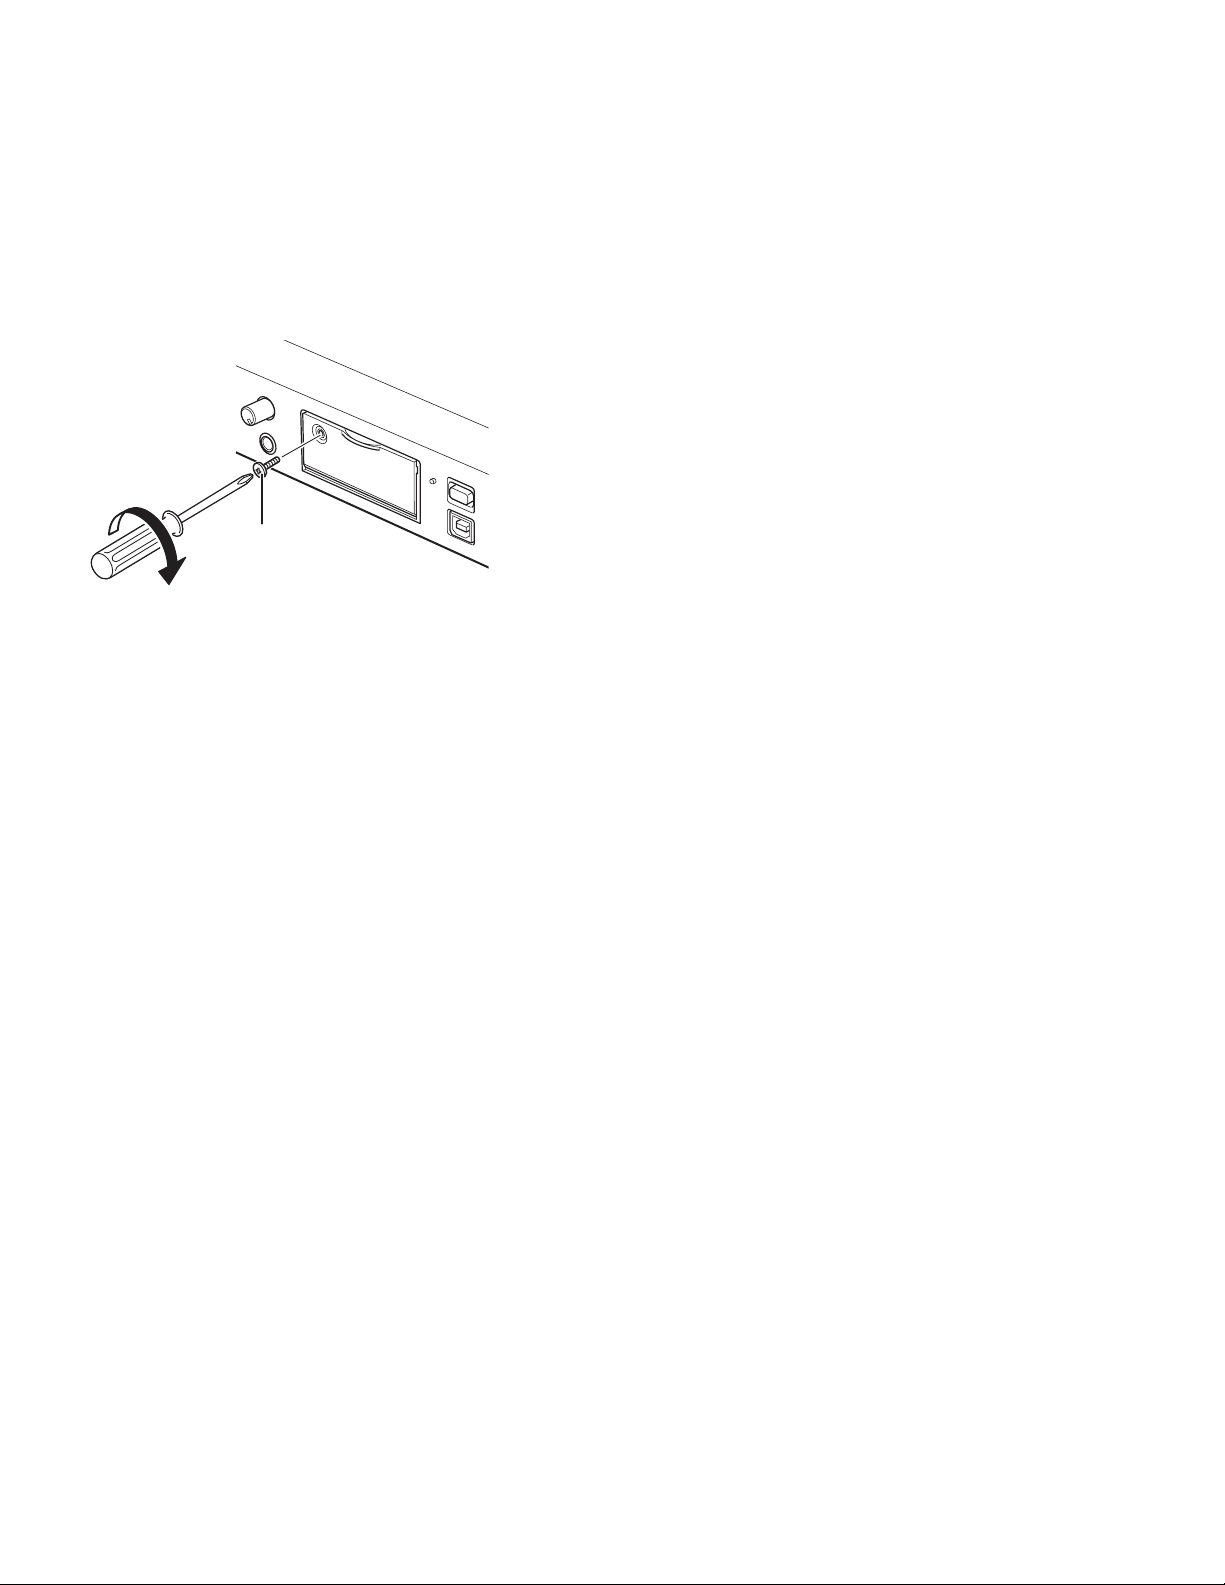
CF card security
(3 mm × 10 mm long)
The supplied CF card compartment security screw requires a
small Phillips screwdriver to open the CF card compartment
door. That reduces the possibility of the CF card being
misplaced or stolen.
1. Remove the plastic pin and then the retainer.
2. Add the screw. Tighten the screw with a small Phillips
screwdriver enough so that the screw cannot be
removed with a fingernail.
CF door screw
CF card Format
Formatting a CF card erases all audio files on the CF card
and prepares it for use in the PMD580.
Setup the “Format” in the Utility menu.
14
Page 23

Recording
Recording Procedure
■
1. Press the POWER switch to turn on the power.
• “Booting” appears in the display.
• “Initialize” appears after “Booting”.
• Remain time appears in the display.
2. Press the REC-PAUSE button to set the unit in
record-standby mode.
• “MARGIN XX dB” will be shown in the display. The
PMD580 holds this display at the highest level
achieved.
• The record level control is available.
6. Press the REC PAUSE button to set the unit in
record-pause mode.
• The REC PAUSE button is flashing and the record
level control is available.
• Margin level display will be reset automatically within
3 seconds in record pause mode.
7. Press the STOP/CANCEL button during record or
record-pause mode.
• The PMD580 stops recording and closes the
recording file(track).
• The PMD580 waits at the beginning of the recorded
track.
8. Press the STOP/CANCEL button again to go back to
the stop mode.
3. Turn the Jog wheel to adjust the record level. (Only
if analog is selected as inputs)
4. Press the Jog wheel.
• Margin level will be reset.
5. Press the REC button.
• The REC button is lit and steady during recording.
15
Page 24
How to adjust Record Level
■
Only in record or record pause mode, turn the Jog wheel to
change the record level setting for analog input sources.
• Clockwise increases the level setting,
counterclockwise decreases the level setting.
• The last setting value is memorized on non-volatile
memory.
• A “MUTE” selection is also provided.
• The record level setting adjusts in 1 dB steps from 0
to –59dB
■
How to adjust Record Balance
Turn the Jog wheel while pressing the SHIFT button to
change the Left/Right recording level balance.
• When the cursor is to the right of the center, turning the
Jog wheel clockwise decreases the recording level of
the Left channel by 1 dB, and turning it counterclockwise
increases the recording level by 1 dB.
• When the cursor is to the left of the center, turning the
Jog wheel clockwise increases the recording level of the
Right channel by 1 dB, and turning it counterclockwise
decreases the recording level by 1 dB.
■
Add a track manually
During recording press the REC button.
• A new track is started.
• This function works when the Manual Track in the Menu
mode is turned on.
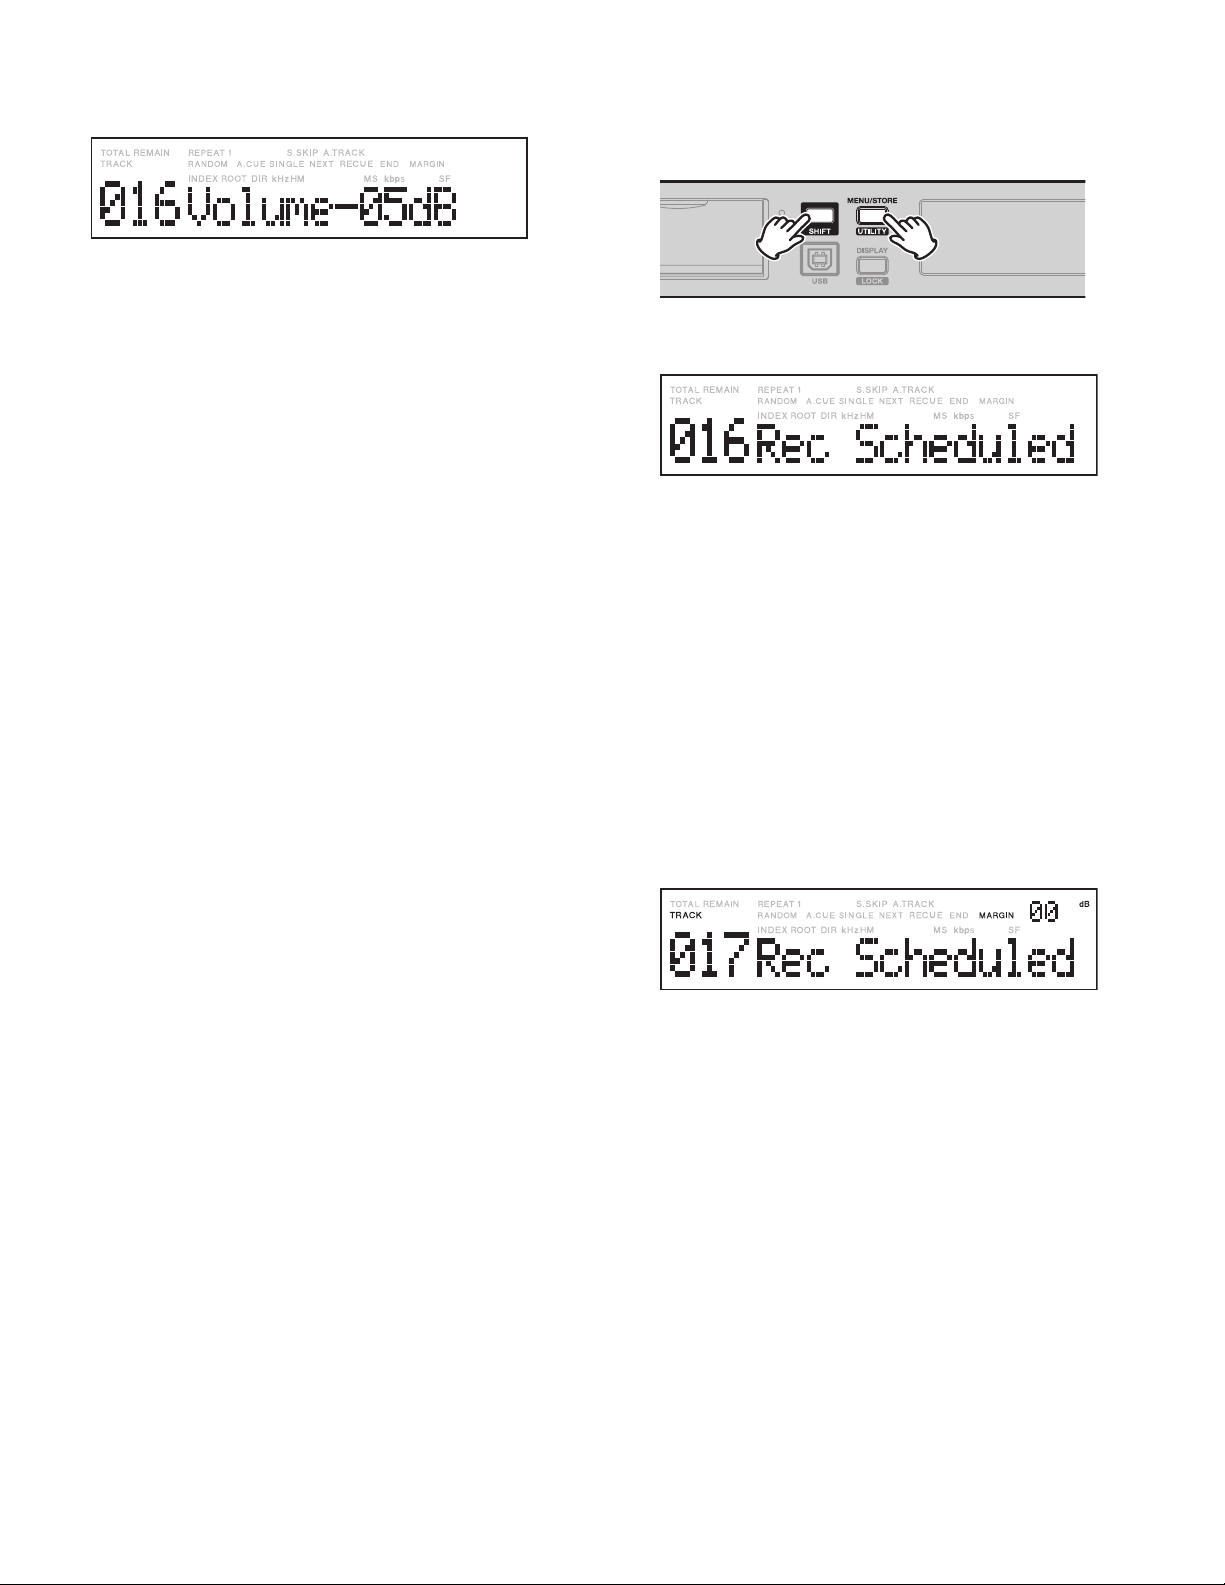
How to set Scheduled Recording
■
With Rec scheduler on in the Utility Menu, a recording starts
automatically according to the schedule.
1. Set the Rec Schedule On in the Utility Menu.
• Maximum number of event is 30. (Up to 10 events
/day)
• “Rec Scheduled” is displayed in stop after the Rec
Scheduler is turned On.
• When the DISPLAY/LOCK button is pressed the
display changes as following and returns ”Rec
Scheduled” in 5 seconds
“Rec Scheduled” → “Remaining Recordable Time”
→ “Set Record File Information” → “Current Date”
→ “Current Time” → “Set Record Channel” → “Rec
Scheduled”
Note:
The operation and display in Playback /Record work normally
but “Rec Scheduled” is displayed during stop.
2. The PMD580 starts recording when the start time
comes.
■
Add a track automatically
With Auto Track on in the Menu, a new track begins
automatically at specified intervals of recording time.
• The interval time can be set in the menu.
• Especially the time search will be possible to do easily on
a regular player for a long time non-stop recording if you
set the mode up 1 minute (Minute Track Recording).
• “Rec Scheduled” is displayed and key is unlocked.
• When the DISPLY/LOCK button is pressed the display
changes as following and returns “Rec Scheduled” in
5 seconds
“Rec Scheduled” → “Recording Elapsed Time” →
“Remaining Recordable Time” → “File Name” → “File
Information” → “Recorded Date” → “Recorded Time” →
“Channel” → “Rec Scheduled”
Note:
When the start time comes while in playback, the PMD580
stops playback and starts recording.
16
Page 25

Record status and Operation
Status Operation
STOP • From 10 seconds before Scheduled start time,
PLAY /REC STOP
Rec Standby • From 10 seconds before Scheduled start time,
Rec Pause • From 10 seconds before Scheduled start time,
REC • From 10 seconds before Scheduled start time,
PLAY, SEEK –/+ • From 10 seconds before Scheduled start time,
FWD, RWD • From 10 seconds before Scheduled start time,
PLAY PAUSE
Preset MENU
USB mode • “Can’tSchedRec” is displayed 3 seconds when the scheduled time comes.
Web remote
Serial remote
Parallel remote
During Archive
(Stop)
1) “Rec Scheduled” is displayed.
2) Countdown starts.
3) Front keys are locked.(Unlocked by SHIFT+DISPLAY)
• The Record starts when the scheduled time comes.
1) “Rec Scheduled” is displayed.
2) Countdown starts.
3) Front keys are locked.(Unlocked by SHIFT+DISPLAY)
• The Recorded starts when the scheduled time comes.
• The record data are saved in a file selected in standby mode.
1) “Rec Scheduled” is displayed.
2) Countdown starts.
3) Front keys are locked.(Unlocked by SHIFT+DISPLAY)
• The Record starts when the scheduled time comes.
• The recorded data are saved in the next file selected in REC PAUSE mode.
1) “Rec Scheduled” is displayed.
2) Countdown starts.
3) Front keys are locked.(Only the STOP, REC PAUS E button works.)
• The Record starts when the scheduled time comes.
• The recorded data are saved in a new file.(Same operation as Auto Track)
1) “Rec Scheduled” is displayed.
2) Countdown starts.
3) Front keys are locked.(Unlocked by SHIFT+DISPLAY)
• The Record starts when the scheduled time comes.
1) “Rec Scheduled” is displayed.
2) Countdown starts.
3) Front keys are locked.(Unlocked by SHIFT+DISPLAY)
• The Record starts when the scheduled time comes.
• Preset items are saved in the EEPROM and setting items are cancelled.
• “DidntSchedRec” is displayed 3 seconds after the USB cable is disconnected.
• From 10 seconds before Scheduled start time,
1) “Rec Scheduled” is displayed.
2) Countdown starts.
3) Front keys are locked.(cannot be unlocked during countdown.)
• The unit sends back “busy” or “nack” after the control command is received.
• The operation depends on the unit’s status while using Web remote.
• From 10 seconds before Scheduled start time,
1) “Rec Scheduled” is displayed.
2) Countdown starts.
• The unit stops archiving and starts recording when the start time comes.
Notes:
The operation during recording depends on the preset menu.
•
(Auto Track, Pre Record, Silent Skip,…)
If the end time of one scheduled recording is the same as the start time of another scheduled recording, the recording continues and a
•
new file starts like Auto Track recording.
17
Page 26

Playback
Playback Procedure
■
1. In stop mode, turn the Jog wheel to select the track
you want to listen to.
• Track number and the file name appear in the display.
(When file name is selected as a display mode.)
The PLAY/PAUSE button flashes.
2. Press the PLAY/PAUSE button.
5. Press the STOP/CANCEL button.
• The PMD580 waits at the beginning of the last
playback track.
• Press the STOP/CANCEL button again to go back to
the stop mode.
Track jump
■
1. Turn the Jog wheel clockwise during playback.
• The playback will advance to the beginning of the
next track and playback will continue.
• The playback starts and the elapsed time appears in
the display.
• The PLAY/PAUSE button is lit and steady.
3. Press the PLAY/PAUSE button during playback.
• Playback will be temporarily halted.
The PLAY/PAUSE button Flashes when in pause
mode.
4. To continue playback, press the PLAY/PAUSE
button.
• The playback will be continued from the same point in
the track.
2. Turn the Jog wheel counterclockwise during
playback.
• The playback will return to the beginning of the current
track and playback will continue.
18
Page 27

Search
■
Audible search
■
Search in reverse
1. During stop or play-pause, press and turn left the
Jog wheel one click, The PMD580 play-pause in the
first click.
2. Press and turn left the Jog wheel to rewind quickly.
The rewind is at 10x speed in the second click.
Then it speeds up to 60x speed in the 3rd click, 600x
speed in the 4th click.
Search in forward
1. During stop or play-pause, press and turn right the
Jog wheel one click, The PMD580 play-pause in the
first click.
Manual search forward
1. Press the Jog wheel and turn clockwise during
playback.
• Playback of the track is sped up while the Jog wheel
is pressed.
Manual search in reverse
1. Press the Jog wheel and turn counterclockwise
during playback.
• Playback of the track is sped up while the Jog wheel
is pressed.
2. Press and turn right the Jog wheel to wind quickly.
The forward is at 10x speed in the second click.
Then it speeds up to 60x speed in the 3rd click, 600x
speed in the 4th click.
Note:
If the Jog wheel is held past the end of a track, the last
•
forward will continue into the next track.
If the Jog wheel is held past the beginning of a track, the
•
rewind will continue into the previous track.
19
Page 28

Preset & Utility
Preset function and operation
■
Presets lets you set or change recording and playback
parameters, such as changing inputs and setting the Date/
Time and the IP address.
(1) General menu procedure
1. With the PMD580 at stop, press the MENU/STORE/
UTILITY button.
• A preset item appears in the display.
2. Turn the Jog wheel to scroll to the choice within
Menu.
3. When displayed, press the Jog wheel to select that
Menu choice.
• Preset setting data appears in the display. You will
now be able to edit the preset item.
4. Turn the Jog wheel to scroll through the submenu
displays.
5. When the desired parameter or value is displayed,
press the Jog wheel to select it.
6. Repeat steps 2-5 as needed.
7. Press the MENU/STORE/UTILITY button to save
your changes or STOP/CANCEL button to cancel all
changes and Return to stop mode.
20
Page 29

(2) Table of preset items
Defaults are different by an area. (US, Europe and Japan)
No. Display Selection Range
Analog Bal.,
R01 Input Select
R02 Rec Format
R03 PreRecord
R04 Input Ref
R05 Manual Track On / Off On On On
R06 Auto Track
R07 Silent Skip
Analog Unb.,
Digital Bal.,
Digital Unb.
PCM / MP3
44.1kHz / 48kHz
(MP3 Stereo)
32, 64, 96, 128,160kHz
(MP3 Mono)
16/24bit (PCM)
Stereo/L-Mono/LR-Mono
64,128,192,256,320kHz
4 seconds
2 seconds
Off
–20dB
+4dB
Off
1 / 5/ 10/ 15 / 30 minutes
1 / 2 / 6 / 8 / 12 / 24 hours
Trk / On / Off
1 - 5 sec (1 sec steps)
–60 - –20 dB( 5dB steps)
Analog Bal. Analog Bal. Analog Bal.
MP3
44.1kHz
Stereo
2 seconds 2 seconds 2 seconds
–20dB –20dB –20dB
Off Off Off
Off
3 seconds
–40dB
US Europe Japan
Default
PCM
48kHz
Stereo
Off
3 seconds
–40dB
PCM
48kHz
Stereo
Off
3 seconds
–40dB
R08 Output Ref –20dB, +4dB –20dB –20dB –20dB
R09 RecLevel Manual /ALC Manual Manual Manual
P01 Digi Out Form Broadcast/Consumer Broadcast Broadcast Broadcast
P02 Digi Out FS Auto / 44.1kHz / 48kHz Auto Auto Auto
P03 Play Mode
P04 Single Mode Stop / Next / Recue Next Next Next
P05 Auto Cue
C01 Remote
S01 Date
S02 Time
S03 Date Form MDY, DMY, YMD MDY DMY YMD
S04 Time Form 12h, 24h 12h 24h 12h
S05 Machine Name
Normal / Repeat All /
Repeat One / Single / Random
On/Off
–60dB –20dB
Start Pause
/Start PauseTR
/Manual Track
Jan01 2007
– Dec31 2037
00:00 –23:59
AM 12:00 – PM 11:59
Up to 12 characters
(0 – 9, A –Z, a – z)
Normal Normal Normal
Off
–40dB
Start Pause Start Pause Start Pause
–––
–––
PMD580A00000 PMD580A00000 PMD580A00000
Off
–40dB
Off
–40dB
S06 IP Address
S07 Show IP
S08 Subnet Mask 000 000 000 000 – 255 255 255 255 255 255 255 000 255 255 255 000 255 255 255 000
S09 Gateway
Auto /
000 000 000 000 – 255 255 255 255
Disable /
000 000 000 000 – 255 255 255 255
Auto Auto Auto
Disable Disable Disable
21
Page 30

No. Display Selection Range
Default
US Europe Japan
S10 DNS Server
S11 NTP Server
S12 Time Zone
S13 Password
S14 Archive Auto/ Schedule/ Off Off Off Off
S15 Archive IP 000 000 000 000 – 255 255 255 255 000.000.000.000 000.000.000.000 000.000.000.000
S16 Archive Folder
S17 Archive User Name
S18 Archive Password
S19 Auto Deletion
S20 Default
Disable /
000 000 000 000 – 255 255 255 255
Disable /
000 000 000 000 – 255 255 255 255
00:00 - 13:00
-12:00 - 00:00
(15min step)
None/ or up to 12 characters
0-9, A-Z, a-z
None/ or up to 64 characters
0-9, A-Z, a-z
None/ or up to 32 characters
0-9, A-Z, a-z
None/ or up to 12 characters
0-9, A-Z, a-z
Off
1 / 3 / 6 / 12 / 24 hours
Disable Disable Disable
Disable Disable Disable
00:00 00:00 00:00
None None None
None None None
None None None
None None None
Off Off Off
22
Page 31

(3) Description
(R01) Input Select
Audio input(s) and audio channels for recording are selected
using the Input Select.
Selection Range Description
Analog Bal. Selects Analog Balance Inputs.
Analog Unb. Selects Analog Unbalanced Inputs.
Digital Bal. Selects Digital Balanced Inputs.
Digital Unb. Selects Digital Unbalanced Inputs.
1. From stop press the MENU/STORE/UTILITY button.
2. Turn the Jog wheel until “Input Select” is displayed.
(R02) Rec Format
Selection Range (PCM)
Channel
Stereo
L-Mono
LR-Mono
Sampling
(KHz)
44.1
48
Resolution
24bit
16bit
Selection Range (MP3)
Channel
Stereo
L-Mono
LR-Mono
Sampling
(KHz)
44.1
48
44.1
48
Bitrate(Kbps)
64 128 192 256 320
32 64 96 128 160
1. From stop press the MENU/STORE/UTILITY button.
3. Press the Jog wheel while “Input Select” is
displayed.
• The input choice is flashing.
4. Turn the Jog wheel to tab through the input choices.
5. When correct press the Jog wheel Display returns to
Input flashing.
6. Turn the Jog wheel to select other Menu choices.
7. Press the MENU/STORE/UTILITY button to save
the changes and return to stop or press the STOP/
CANCEL button to exit Menu mode without making
any changes.
2. Turn the Jog wheel until “Rec Format” is displayed.
3. Press the Jog wheel while “Rec Format” is
displayed.
4. Turn the Jog wheel to select the audio format PCM
or MP3, then press the Jog wheel.
5. Turn and press the Jog wheel to select the sampling
frequency, resolution and channel in PCM format.
Or turn and press the Jog wheel to select the
sampling frequency, bit rate and audio channel in
MP3 format.
Display returns to Rec Format.
6. Turn the Jog wheel to select other Menu choices.
7. Press the MENU/STORE/UTILITY button to save
the changes and return to Stop or .press the STOP/
CANCEL button to exit Menu mode without making
any changes.
23
Page 32

(R03) Pre Record
When Pre Record is on and the PMD580 is in record-pause,
it ’listens’ to the selected audio input(s) and continuously
buffers 2 seconds of audio. When recording begins, the 2
second pre record buffer is written at the beginning of the
new track. The 2 seconds give you time to start recording
without missing the first seconds of audio.
(R04) Input Ref
The Input Ref menu allows you to select the reference level
for Analog Balanced Inputs.
Selection Range Note
+4 dB
–20 dB Default
Selection Range Note
4 seconds
2 seconds Default
Off
1. From stop, press the MENU/STORE/UTILITY button.
2. Turn the Jog wheel so Pre Record is displayed.
3. While Pre Record is displayed, press the Jog wheel.
The 4 seconds, 2 seconds or Off will be flashing.
4. Turn the Jog wheel to toggle among 4 seconds, 2
seconds and Off.
5. When correct, press the Jog wheel.
The display returns to Pre Record.
6. If you are done making Menu changes to the Preset,
press the MENU/STORE/UTILITY button to save
your changes.
Display returns to stop mode.
1. From stop, press the MENU/STORE/UTILITY button.
2. Turn the Jog wheel so Input Ref is displayed.
3. While Input Ref is displayed, press the Jog wheel
The +4 dB or –20 dB will be flashing.
4. Turn the Jog wheel to toggle between +4 dB and
–20 dB.
5. When correct, press the Jog wheel.
The display returns to Input Ref.
6. If you are done making Menu changes to the Preset,
press the MENU/STORE/UTILITY button to save
your changes.
Display returns to stop mode.
.
24
Page 33

(R05) Manual Track
When Manual Track is On during recording, press the REC
button to increment the track. A new track is created at that
point. A slight break might be heard during playback.
Selection Range Note
On Default
Off
1. From stop, press the MENU/STORE/UTILITY button.
2. Turn the Jog wheel so Manual Track is displayed.
3. While Manual Track is displayed, press the Jog
wheel. The On or Off will be flashing.
4. Turn the Jog wheel to toggle between On and Off.
5. When correct, press the Jog wheel.
The display returns to Manual Track.
6. If you are done making Menu changes to the Preset,
press the MENU/STORE/UTILITY button to save
your changes.
Display returns to stop mode.
(R06) Auto track
With Auto Track on, a new track begins automatically at
specified intervals of recording time.
Selection Range Note
1, 5, 10, 15, 30min., 1, 2, 6, 12, 24 hours
Off Default
1. From stop press the MENU/STORE/UTILITY button.
2. Turn the Jog wheel so Auto Track is displayed.
3. While Auto Track is displayed, press the Jog wheel.
The time or Off will be flashing.
4. Turn the Jog wheel to tab through the time interval
choices (1, 5, 10, 15 or 30 minutes, or 1, 2, 6, 8, 12
or 24 hours, or Off). When correct, push and release
the Jog wheel. The display returns to Auto Track.
5. If you are done making Menu changes to the Preset,
press the MENU/STORE/UTILITY button to save
your changes.
Display returns to stop mode.
Note:
You can press the STOP/CANCEL button to cancel all
changes at any point before completing step 5.
25
Page 34

(R07) Silent skip
Silent skip automatically pauses recording when there is
a period of silence and resumes recording when sound
resumes. Sometimes this feature is referred to as voiceactivated recording. Silent Skip looks for sound below a
preset level for a preset period of time.
When that occurs, the PMD580 switches to record pause.
When a signal is input, recording resumes.
Selection Range Note
Trk /On /Off Off (Default)
Time: 1 – 5 sec (1 sec step) 3 seconds (Default)
Level: -60 - –20 dB (5 dB step) –40 dB (Default)
(R08) Output Ref
Reference for Analog Balanced Outputs.
Selection Range Note
+4 dB
–20 dB Default
1. From stop, press the MENU/STORE/UTILITY button.
2. Turn the Jog wheel so Output Ref is displayed.
3. While Output Ref is flashing, press the Jog wheel.
The +4 dB or –20 dB will be flashing.
1. From stop press the MENU/STORE/UTILITY button.
2. Turn the Jog wheel so Silent Skip is displayed.
3. While Silent Skip is flashing, press the Jog wheel.
The On or Off will be flashing.
4. Turn the Jog wheel to toggle between On and Off.
5. When correct, press the Jog wheel.
The display switches to time interval.
6. Turn the Jog wheel to tab through the silent time
interval choices (1 - 5 seconds).
When correct, press the Jog wheel.
The display switches to -dB flashing.
7. Turn the Jog wheel to tab through the margin sound
level choices (–20 through –60 dB in 5 dB units).
When correct, press the Jog wheel. The display
returns to SilentSkp.
Display returns to stop mode.
Notes:
You can press the STOP/ CANCEL button to cancel all
•
changes at any point before completing step 7.
When Silent Skip is On, S.SKIP appears in the display during
•
Stop and record.
4. Turn the Jog wheel to toggle between +4 dB and
–20 dB.
5. When correct, press the Jog wheel.
The display returns to Output Ref.
6. If you are done making Menu changes to the Preset,
press the MENU/STORE/UTILITY button to save
your changes.
Display returns to stop mode.
26
Page 35

(R09) Rec Level
Before recording an analog source, perform the following
steps to obtain the appropriate recording level.
(P01) Digi Out Form
The digital output format is selectable from Broadcast or
Consumer using Digi Out Form.
Selection Range Note
Manual Default
ALC
Manual:
Recording level must be adjusted manually using the Jog
wheel on the front panel.
1. To have the PMD580 set the recording level
manually, set the Rec Level setting to Manual.
2. Set the PMD580 in record or record pause mode.
3. Watch the audio level meter(s) and monitor the
sound source you want to record.
4. Use the Jog wheel to adjust the audio level meter(s)
so that the 0 dB indicator(s) just barely flicker at the
highest peak from the input signal.
• The OVER indicator should not light (this would result
in clipping).
ALC (Automatic Level Control):
Automated recording level adjustment based on the level of
the input signal.
Selection Range Note
Broadcast Default
Consumer
1. From stop, press the MENU/STORE/UTILITY button.
2. Turn the Jog wheel so Digi Out Form is displayed.
3. While Digi Out Form is flashing, press the Jog
wheel. The Broadcast or Consumer will be flashing.
4. Turn the Jog wheel to toggle between Broadcast
and Consumer.
5. When correct, press the Jog wheel.
The display returns to Digi Out Form.
6. If you are done making Menu changes to the Preset,
press the MENU/STORE/UTILITY button to save
your changes.
Display returns to stop mode.
1. To have the PMD580 set the recording level
automatically, set the Rec Level setting to ALC.
2. Set the unit in record or record pause mode.
• Jog wheel does not effect the recording.
• “ALC On” appears in the display when the Jog wheel
is turned.
• Time constant is long to prevent sudden fluctuations
in the recording level.
27
Page 36

(P02) Digi Out FS
Select the sampling frequency of digital output.
Selection Range Note
44.1 kHz
48 kHz
Auto Default
1. From stop, press the MENU/STORE/UTILITY button.
2. Turn the Jog wheel so Digi Out FS is displayed.
3. While Digi Out FS is flashing, press the Jog wheel.
The 44.1 kHz, 48 kHz or Auto will be flashing.
4. Turn the Jog wheel to toggle among 44.1 kHz, 48 kHz
and Auto.
(P03) Play mode
Play Mode lets you choose what happens when the end of a
track is reached during playback.
Selection Range Note
Normal Default
Repeat All
Repeat One
Single
Random
Normal (Normal Playback)
When playback reaches the end of a track it automatically
begins the next track until all tracks on the CF card have been
played. After the last track on the CF card, playback stops.
The PMD580 returns to stop mode.
5. When correct, press the Jog wheel.
The display returns to Digi Out FS.
6. If you are done making Menu changes to the Preset,
press the MENU/STORE/UTILITY button to save
your changes.
Display returns to stop mode.
1. Select the Play Mode menu choice:
While in stop, press the MENU/STORE/UTILITY button.
2. Turn the Jog wheel until “Play Mode” is displayed.
3. Press the Jog wheel.
4. Turn the Jog wheel until “Normal” is displayed.
5. Press the MENU/STORE/UTILITY button.
• The Normal Playback is set and the unit returns to
stop mode.
Repeat All (All track repeat)
During playback all tracks are repeated. Same as Normal
except when playback reaches the end of the last track. It
automatically starts playback from the beginning of the first
track.
1. Select the Play Mode menu choice:
While in stop, press the MENU/STORE/UTILITY button.
2. Turn the Jog wheel until “Repeat All” is displayed.
3. Press the Jog wheel.
28
4. Turn the Jog wheel until “Repeat All” is displayed.
• The “REPEAT” indicators light in the display and the
all track repeat mode is set.
5. Press the MENU/STORE/UTILITY button.
• The unit returns to stop mode.
6. Press the PLAY/PAUSE button.
• The card is played repeatedly.
• If the All Track repeat is set during program play,
the tracks are played repeatedly in the programmed
order.
Page 37

Repeat One (Single track repeat)
When playback reaches the end of the track it automatically
starts playing again at the beginning of the same track.
Random (Random Playback)
This function rearranges the tracks into a random sequence
and it then plays all the tracks in this random sequence.
1. Select the Play Mode menu choice:
While in stop, press the MENU/STORE/UTILITY button.
2. Turn the Jog wheel until “Play Mode” is displayed.
3. Press the Jog wheel.
4. Turn the Jog wheel until “Repeat Track” is displayed.
• The “REPEAT 1” indicators light in the display and the
single track repeat mode is set.
5. Press the MENU/STORE/UTILITY button.
• The unit returns to stop mode.
6. Turn the Jog wheel to select the track to be played
repeatedly.
7. Press the PLAY/PAUSE button.
• The current track is played repeatedly.
Single (Single Playback)
When playback reaches the end of the track, it automatically
starts the operation according to the single mode setting. See
Single mode in the Preset Menu.
1. Select the Play Mode menu choice:
While in stop, press the MENU/STORE/UTILITY button.
2. Turn the Jog wheel until “Play Mode” is displayed.
3. Press the MENU/STORE/UTILITY button.
4. Turn the Jog wheel until “Random” is displayed.
• The “RANDOM” indicator lights in the display and the
random playback mode is set.
5. Press the MENU/STORE/UTILITY button.
• The unit returns to stop mode.
6. Press the PLAY/PAUSE button.
• The card is played in random order.
1. Select the Play Mode menu choice:
While in stop, press the MENU/STORE/UTILITY button.
2. Turn the Jog wheel until “Play Mode” is displayed.
3. Press the Jog wheel.
4. Turn the Jog wheel until “Single” is displayed.
5. Press the MENU/STORE/UTILITY button.
• The Single Playback is set and the unit returns to stop
mode.
29
Page 38

(P04) Single mode
Single mode set the operation after completing the playback
of a track in single playback mode.
Selection Range Note
Stop
Next Default
Recue
Stop:
The PMD580 returns to stop mode after the track has played.
(P05) Auto Cue
Auto Cue skips the silence at the beginning of an audio track
and pauses playback at the point where the audio begins
(sound is loud enough).
You can adjust how loud (dB’s) the audio has to be before
playback is cued.
Selection Range Note
On/Off Off (Default)
–60 dB - –20 dB
5 dB steps
–40 dB (Default)
Next:
The PMD580 advances to the next track and waits in cue
mode.
Recue:
The PMD580 returns to the beginning of the current track and
waits in cue mode.
1. From stop, press the MENU/STORE/UTILITY button.
2. Turn the Jog wheel so Single Mode is displayed.
3. While Single Mode is displayed, press the Jog
wheel. The Stop, Next or Recue will be flashing.
4. Turn the Jog wheel to toggle among Stop, Next and
Recue.
5. When correct, press the Jog wheel.
The display returns to Single Mode.
6. If you are done making Menu changes to the Preset,
press the MENU/STORE/UTILITY button to save
your changes.
Display returns to stop mode.
1. From stop press the MENU/STORE/UTILITY button.
2. Turn the Jog wheel so Auto Cue is displayed.
3. While Auto Cue is displayed, press the Jog wheel.
The On or Off will be flashing.
4. Turn the Jog wheel to toggle between On and Off.
5. When correct, press the Jog wheel. The display
switches to -dB flashing.
6. Turn the Jog wheel to tab through the sound level
choices (–20 through –60 dB in 5 dB steps). When
correct, press the Jog wheel. The display returns to
Auto Cue.
Display returns to stop mode.
Note:
You can press the STOP/ CANCEL button to cancel all
changes at any point before completing step 6.
30
Page 39

(C01) Remote
The Remote Menu setting is for a wired remote (not supplied)
plugged into the REMOTE Phone jack. There are three remote
modes.
Selection Range Note
Start Pause Default
Start Pause TR
Manual Track
(S01) Date
The date is written on each audio track (file) when the track
is started. When an audio track is viewed on a computer, this
date appears as when the file was “Created”.
Start Pause:
During recording or playback, close to start, open to pause.
Start Pause TR:
During recording, close to start, open to pause.
After a record pause, start begins the next track.
Manual Track:
During recording, close to increment the track. A new track is
created at that point.
1. From stop, press the MENU/STORE/UTILITY button.
2. Turn the Jog wheel so Remote is displayed.
3. While Remote is displayed, press the Jog wheel.
The Start Pause, Start Pause TR or Manual Track
will be flashing.
4. Turn the Jog wheel to toggle among Start Pause,
Start Pause TR and Manual Track.
5. When correct, press the Jog wheel.
The display returns to Remote.
Items Selection Range
Year 2007 – 2099
Month Jan – Dec
Day 01 – 31
1. From stop, press the MENU/STORE/UTILITY button.
2. Turn the Jog wheel until Date appears in the display.
3. Press the Jog wheel while Date is displayed.
The Date information will be displayed with the year
flashing.
4. Turn the Jog wheel until the current year is
displayed.
5. Press the Jog wheel to confirm the year.
The month will be flashing.
6. Turn the Jog wheel until the current month is
displayed.
7. Press the Jog wheel to confirm the month.
The day will be flashing.
6. If you are done making Menu changes to the Preset,
press the MENU/STORE/UTILITY button to save
your changes.
Display returns to stop mode.
8. Turn the Jog wheel until the current day is displayed.
9. Press the MENU/STORE/UTILITY button to save
your changes. (or press the STOP/CANCEL button
to cancel all changes.)
10. Display returns to stop mode.
31
Page 40

(S02) Time
The time is written on each audio track (file) when the track
is started. When an audio track is viewed on a computer, this
time appears as when the file was “Created”.
Item Selection Range
Time
00:00 - 23:59
or 12:00 - 11:59am /11:59pm
(S03) Date form
The date form is the date order month/day/year, day/month/
year or year/month/day.
Selection Range Description
M/D/Y M/D/Y: Jan01 2008
D/M/Y D/M/Y: 01Jan 2008
Y/M/D Y/M/D: 2008 Jan01
1. From stop, press the MENU/STORE/UTILITY button.
2. Turn the Jog wheel until Time appears in the display.
3. Press the Jog wheel while Time is displayed.
The Time information will be displayed with the Hour
flashing.
4. Turn the Jog wheel until the current hour is
displayed.
5. Press the Jog wheel to confirm the hour.
The minute will be flashing.
6. Turn the Jog wheel until the current minute is
displayed.
7. Press the MENU/STORE/UTILITY button to save
your changes. (or press the STOP/CANCEL button
to cancel all changes.
8. Display returns to stop mode.
1. From stop, press the MENU/STORE/UTILITY button.
2. Turn the Jog wheel so Date Form is displayed.
3. While Date Form is displayed, press the Jog wheel.
The MDY, DMY or YMD will be flashing.
4. Turn the Jog wheel to toggle among MDY, DMY and
YMD.
5. When correct, press the Jog wheel.
The display returns to Date Form.
6. If you are done making Menu changes to the Preset,
press the MENU/STORE/UTILITY button to save
your changes.
Display returns to stop mode.
32
Page 41

(S04) Time Form
The time form menu selects the 12 hour time display with am
(or pm) or 24 hour time display.
Selection Range Description
12h
24h 00:00 - 23:59
12:00 - 11:59 am
12:00 - 11:59 pm
(S05) Machine Name
Machine Name allows you to set the name of the PMD580.
Selection Range Description
5 to 12 characters
(0 – 9, A – Z, a – z)
“PMD580A000000” = Default
1. From stop, press the MENU/STORE/UTILITY button.
1. From stop, press the MENU/STORE/UTILITY button.
2. Turn the Jog wheel so Time Form is displayed.
3. While Time Form is displayed, press the Jog wheel.
The 12h or 24h will be flashing.
4. Turn the Jog wheel to toggle between 12h and 24h.
5. When correct, press the Jog wheel.
The display returns to Time Form.
6. If you are done making Menu changes to the Preset,
press the MENU/STORE/UTILITY button to save
your changes.
Display returns to stop mode.
2. Turn the Jog wheel until “Machine Name” is
displayed.
3. Press the Jog wheel while Machine Name is
displayed. The first character of the Machine Name
will flash.
4. Turn the Jog wheel to select a position to change or
add a character then press the Jog wheel.
5. Turn the Jog wheel to select a character.
33
Page 42

6. When correct, press the Jog wheel.
The right most position will flash.
Repeat steps from 4 to 6 until all Machine Name
characters are correct.
Press the SHIFT button and then press the Jog wheel to
delete the characters. Pressing the SHIFT button again
enables you to insert characters.
7. Press the MENU/STORE/UTILITY button to store the
changes, or press the STOP/CANCEL button to exit
MENU mode without saving any changes.
(S06) IP address
The IP address of the PMD580 is automatically assigned
by the DHCP server or device when the IP address menu
is set “Auto”(Default). When the IP address is not assigned
automatically, use the IP address menu to set the IP address
directly.
8. Display returns to stop mode.
Selection Range Description
Auto /
000.000.000.000
- 255.255.255.255
• Turn the Jog wheel to up or down 1 step.
• Turn with Press the Jog wheel to up or
down 10 steps.
1. From stop, press the MENU/STORE/UTILITY button.
2. Turn the Jog wheel until “IP address” is displayed.
3. Press the Jog wheel while IP address is displayed.
The first character of the IP address will flash.
4. Turn the Jog wheel to select the characters.
5. When correct, press the Jog wheel.
The next position will flash.
Repeat steps 4 and 5 until all IP address characters are
correct.
34
6. Press the MENU/STORE/UTILITY button to save the
changes, or press the STOP/CANCEL button to exit
MENU mode without saving any changes.
7. Display returns to stop mode.
Note:
If you are not familiar with the network environment where
you wish to connect your PMD580, please contact your
network or IT official or administrator.
Page 43

(S07) Show IP
The Show IP menu allows you to display the IP address of the
PMD580.
(S08) Subnet mask
The Subnet mask menu allows you to set the subnet mask to
identify the subnetwork.
1. While in stop, press the MENU/STORE/UTILITY
button.
2. Turn the Jog wheel until “Show IP” appear in the
display.
3. Press the Jog wheel.
The Display switches to the IP address.
4. Press the STOP/CANCEL button to exit the Menu.
Selection Range Description
000.000.000.000
- 255.255.255.000
• Turn the Jog wheel to up or down 1 step.
• Turn with Press the Jog wheel to up or
down 10 steps.
1. From stop, press the MENU/STORE/UTILITY button.
2. Turn the Jog wheel until “Subnet mask” is displayed.
3. Press the Jog wheel while IP address is displayed.
The first character of the IP address will flash.
4. Turn the Jog wheel to select the characters.
5. When correct, press the Jog wheel.
The next position will flash.
Repeat steps 4 and 5 until all Subnet mask characters
are correct.
6. Press the MENU/STORE/UTILITY button to save the
changes, or press the STOP/CANCEL button to exit
MENU mode without saving any changes.
7. Display returns to stop mode.
35
Page 44
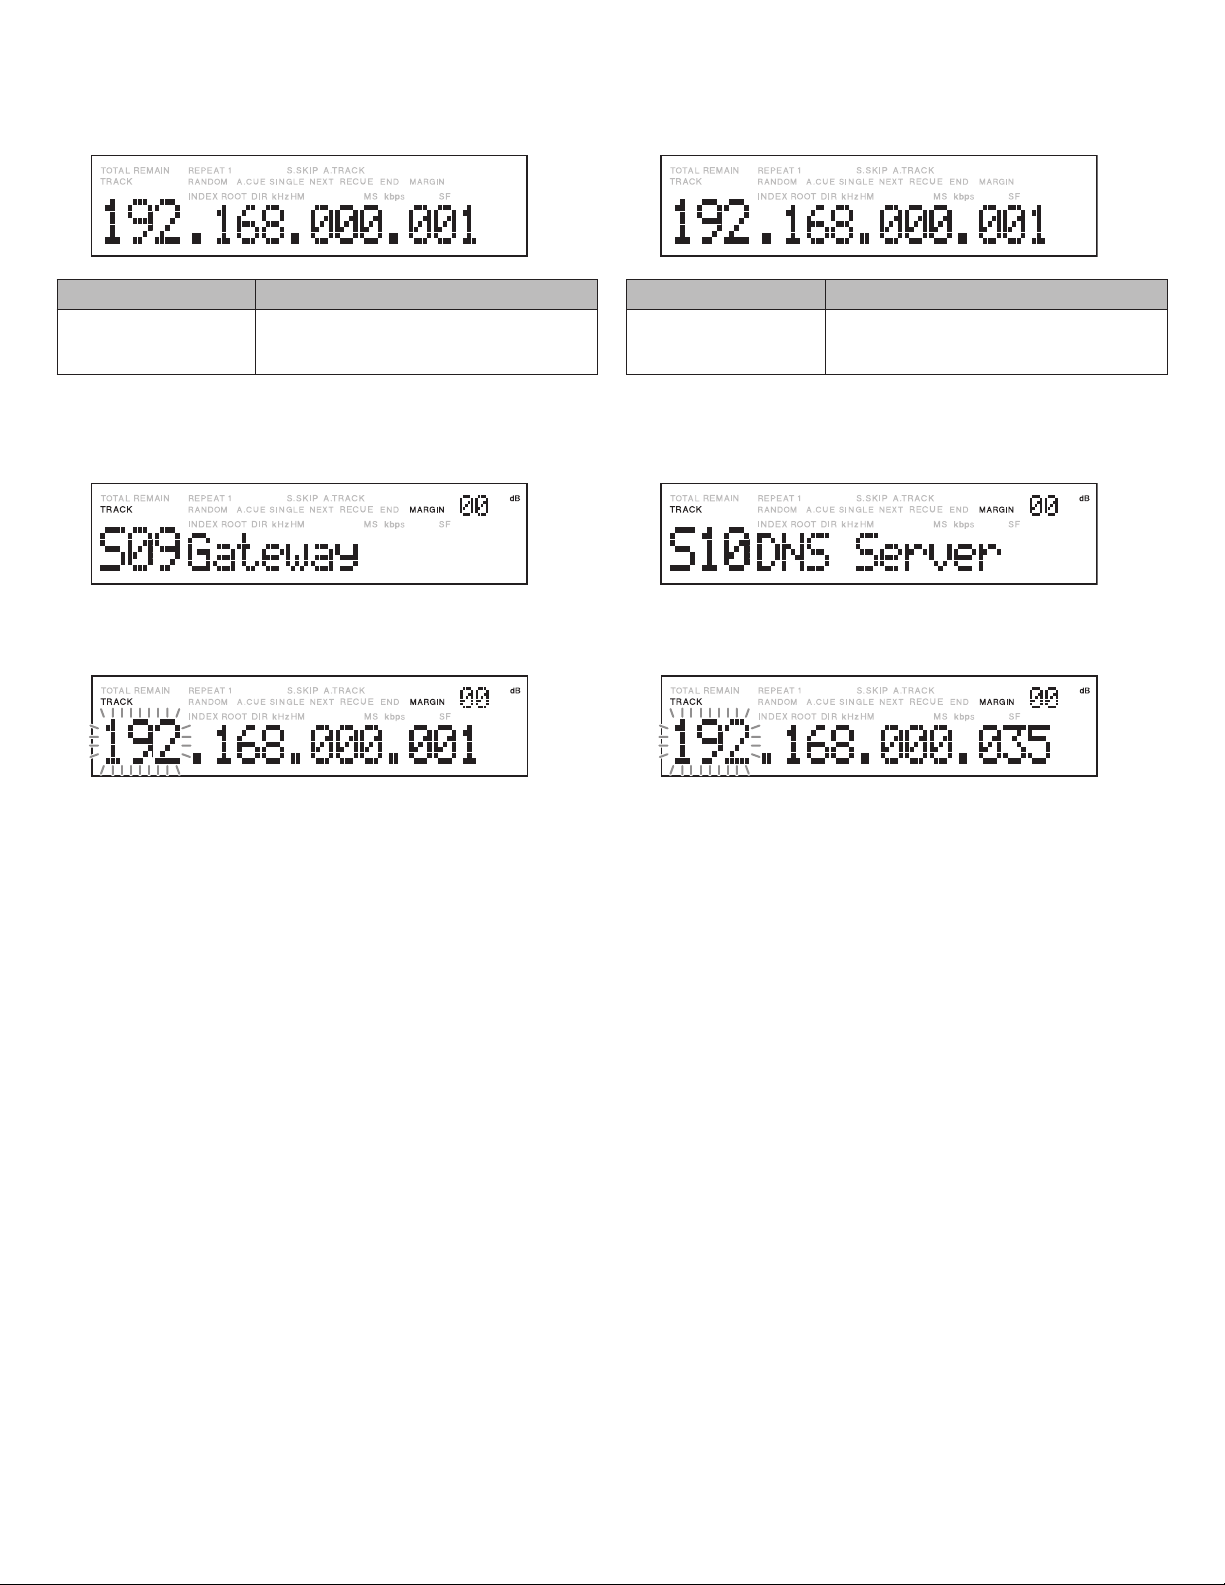
(S09) Gateway
The Gateway menu allows you to set the default gateway
Server that serves as an entrance to another network, and
vice-versa.
(S10) DNS Server
The DNS Server menu allows you to set the DNS (Domain
Name System) Server. The DNS server translates the Server
name into the IP address in the network.
Selection Range Description
Disable /
000.000.000.000
– 255.255.255.255
• Turn the Jog wheel to up or down 1 step.
• Turn with Press the Jog wheel to up or
down 10 steps.
1. From stop, press the MENU/STORE/UTILITY button.
2. Turn the Jog wheel until “Gateway” is displayed.
3. Press the Jog wheel while IP address is displayed.
The first character of the Gateway will flash.
4. Turn the Jog wheel to select the characters.
5. When correct, press the Jog wheel.
The next position will flash.
Repeat steps 4 and 5 until all Gateway characters are
correct.
Selection Range Description
Disable /
000.000.000.000
– 255.255.255.255
• Turn the Jog wheel to up or down 1 step.
• Turn with Press the Jog wheel to up or
down 10 steps.
1. From stop, press the MENU/STORE/UTILITY button.
2. Turn the Jog wheel until “IP address” is displayed.
3. Press the Jog wheel while DNS Server is displayed.
The first character of the DNS Server will flash.
4. Turn the Jog wheel to select the characters.
5. When correct, press the Jog wheel.
The next position will flash.
Repeat steps 4 and 5 until all DNS Server characters are
correct.
6. Press the MENU/STORE/UTILITY button to save the
changes, or press the STOP/CANCEL button to exit
MENU mode without saving any changes.
7. Display returns to stop mode.
36
6. Press the MENU/STORE/UTILITY button to save the
changes, or press the STOP/CANCEL button to exit
MENU mode without saving any changes.
7. Display returns to stop mode.
Page 45

(S11) NTP Server
The NTP Server menu allows you to set the NTP(Network
Time Protocol) server. The PMD580 gets the time information
from the NTP server.
Selection Range Description
Disable /
000.000.000.000
– 255.255.255.255
• Turn the Jog wheel to up or down 1 step.
• Turn with Press the Jog wheel to up or
down 10 steps.
(S12) Time Zone
The Time Zone menu allows you to set the NTP (Network Time
Protocol) Time Zone.
Selection Range Note
Time Zone
–12:00 to +13:00
00:00 (Default)
1. From stop press the MENU/STORE/UTILITY button.
1. From stop, press the MENU/STORE/UTILITY button.
2. Turn the Jog wheel until “NTP Server” is displayed.
3. Press the Jog wheel while NTP Server is displayed.
The first character of the NTP Server will flash.
4. Turn the Jog wheel to select the characters.
5. When correct, press the Jog wheel.
The next position will flash.
Repeat steps 4 and 5 until all NTP Server characters are
correct.
6. Press the MENU/STORE/UTILITY button to save the
changes, or press the STOP/CANCEL button to exit
MENU mode without saving any changes.
2. Turn the Jog wheel so Time Zone is displayed.
3. While Time Zone is flashing, press the Jog wheel.
The display switches to Time flashing.
4. Turn the Jog wheel to tab through the Time zone
choices (–12:00- to +13:00 in 15 minute steps).
When correct, press the Jog wheel. The display
returns to Time Zone.
Display returns to stop mode.
Note:
Press and turn the Jog wheel to up or down 1 hour steps.
7. Display returns to stop mode.
37
Page 46
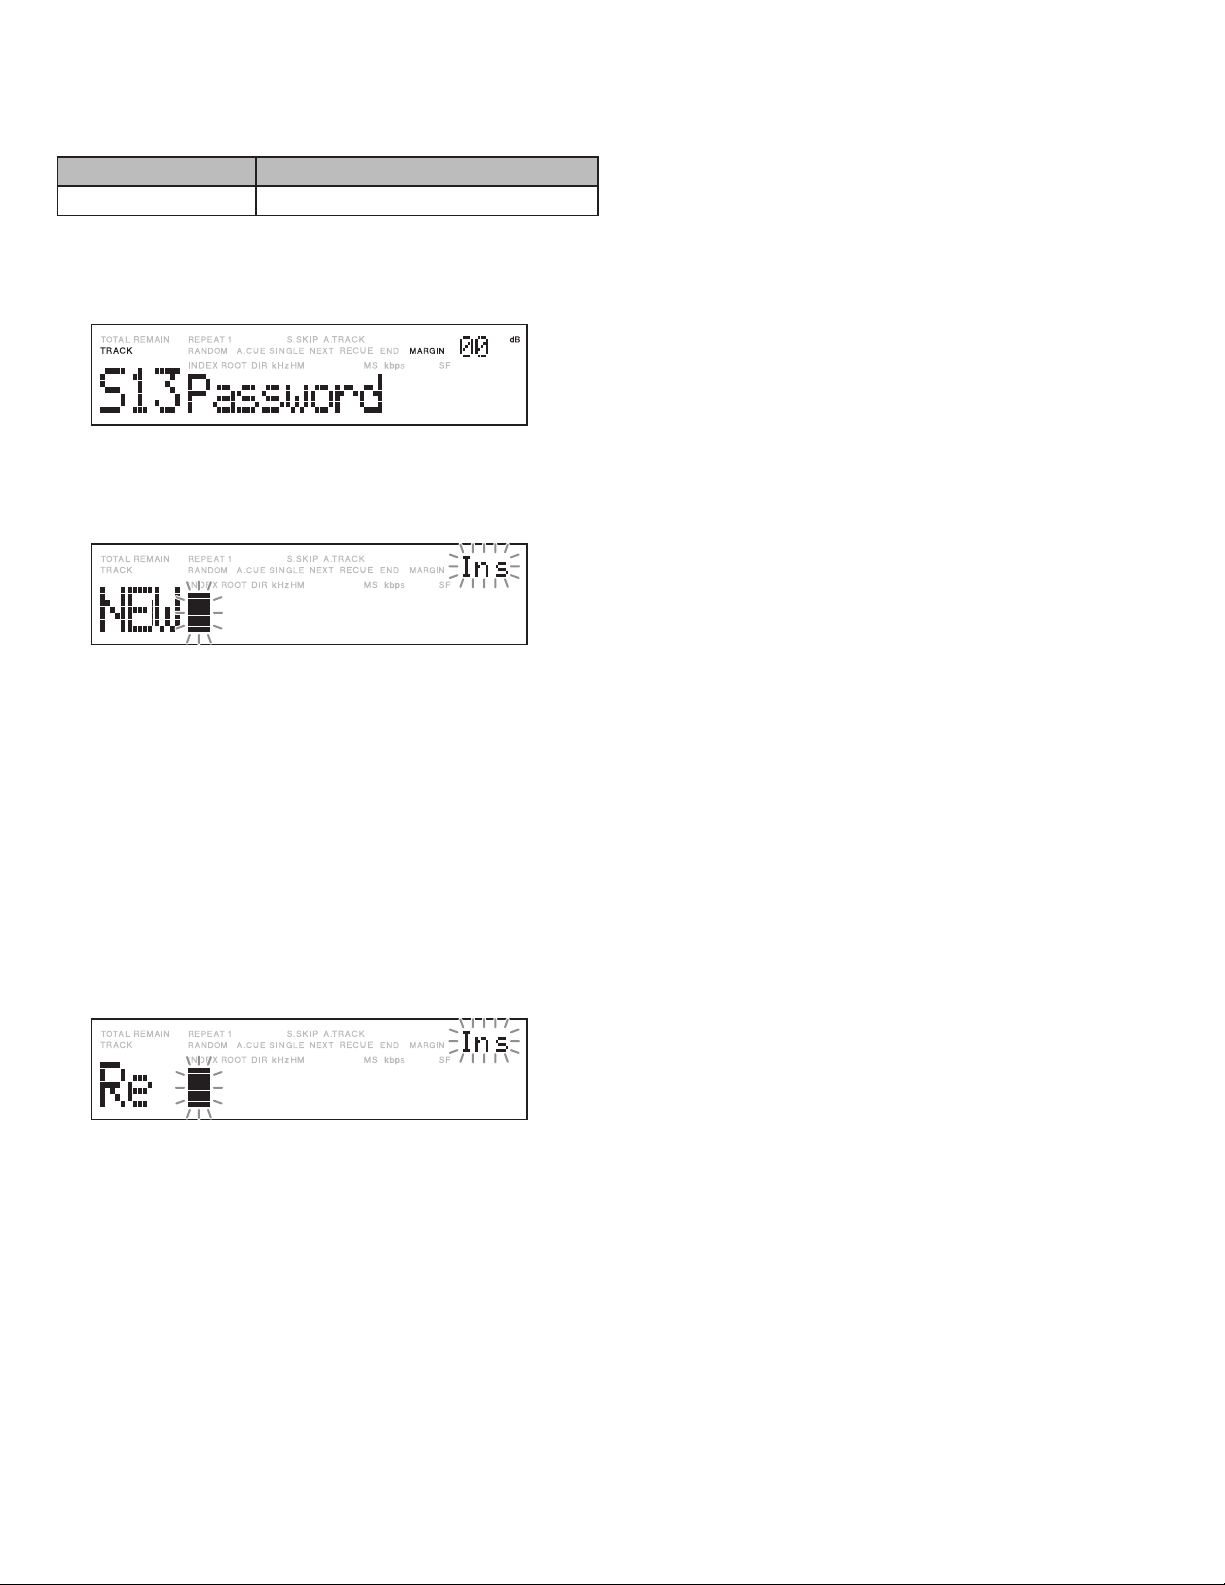
(S13) Password
The Password menu allows you to set the password to access
to the PMD580 while the user use the Web remote function in
the user’s computer.
Item Description
Password 0 to 9, A to Z, a to z, 6 to 12 characters
10. When correct, press the Jog wheel.
The next position will flash.
Repeat steps from 8 to 10 until all password characters
are correct.
Press the SHIFT button and then press the Jog wheel to
delete the characters. Pressing the SHIFT button again
enables you to insert characters.
1. From stop, press the MENU/STORE/UTILITY button.
2. Turn the Jog wheel until “Password” is displayed.
3. Press the Jog wheel while Password is displayed.
“New” is displayed, and the first character of the
password (blank) will flash.
4. Turn the Jog wheel to select a position and press
the Jog wheel.
5. Turn the Jog wheel to select the characters.
6. When correct, press the Jog wheel.
The next position will flash.
Repeat steps from 4 to 6 until all password characters
are correct.
Press the SHIFT button and then press the Jog wheel to
delete the characters. Pressing the SHIFT button again
enables you to insert characters.
11. Press the MENU/STORE/UTILITY button to save the
changes, or press the STOP/CANCEL button to exit
MENU mode without saving any changes.
12. Display returns to stop mode.
Notes:
The input word will not be displayed.
•
The password input is required twice.
•
“New” is displayed during the first password input.
•
“Re” is displayed during the second password input.
•
“Invalid” will be displayed if the second word is different
•
from the first one.
7. Press the PLAY/PAUSE button.
8. Turn the Jog wheel to select a position and press
the Jog wheel.
9. Turn the Jog wheel to select the characters.
38
Page 47

(S14) Archive
The Archive menu allows you to select the way to archive the
recorded files.
Selection Range Note
Auto
Schedule
Off Default
Auto:
The archive will be made during Rec stop mode.
Schedule:
The archive will be made according to the archive schedule.
Off:
The archive will not be made.
(S15) Archive IP(Archive Server)
The Archive IP menu allows you to set the IP address or
Server name to save the archive files.
Selection Range Description
Server name Up to 21 words
IP address 123.456.789.123
The input of Archive time will be required after
“Schedule” is selected.
(hh:mm:ss)
Selection Range Description
Hour (12h) 12 - 11am or 12 - 11pm
Hour (24h) 00 - 23
Minute 00 - 59
1. From stop, press the MENU/STORE/UTILITY button.
2. Turn the Jog wheel until “Archive IP” is displayed.
3. Press the Jog wheel while Archive IP is displayed.
The first character of the Archive IP or Server Name
will flash.
4. Turn the Jog wheel to select the position and press
the Jog wheel.
5. Turn the Jog wheel to select the characters.
6. When correct, press the Jog wheel.
The next position will flash.
Repeat steps from 4 to 6 until all Archive IP or Server
Name characters are correct.
7. Press the MENU/STORE/UTILITY button to save the
changes, or press the STOP/CANCEL button to exit
MENU mode without saving any changes.
8. Display returns to stop mode.
39
Page 48

(S16) Archive Folder (Archive folder name)
The Archive Folder menu allows you to set the shared folder
to save the archive files.
(S17) Arch UserName (Archive User Name)
The Archive User Name menu allows you to set the user
name to access to the archive server.
Item Selection Range
Folder name
Up to 64 characters
“-“, “ “, “.”, “_”, “\”, 0 to 9, A to Z,
a to z
1. From stop, press the MENU/STORE/UTILITY button.
2. Turn the Jog wheel until “ArchiveFolder” is
displayed.
3. Press the Jog wheel while ArchiveFolder is
displayed. The first character of the Archive Folder
name will flash.
4. Turn the Jog wheel to select a position and press
the Jog wheel.
5. Turn the Jog wheel to select the characters.
6. When correct, press the Jog wheel.
The next position will flash.
Repeat steps from 4 to 6 until all Archive IP or Server
Name characters are correct.
Press the SHIFT button and then press the Jog wheel to
delete the characters. Pressing the SHIFT button again
enables you to insert characters.
7. Press the MENU/STORE/UTILITY button to save the
changes, or press the STOP/CANCEL button to exit
MENU mode without saving any changes.
8. Display returns to stop mode.
Item Description
Archive User Name
Up to 32 characters
“-“, “ “, “.”, “_”, 0 to 9, A to Z, a to z
1. From stop, press the MENU/STORE/UTILITY button.
2. Turn the Jog wheel until “Arch UserName” is
displayed.
3. Press the Jog wheel while Arch UserName is
displayed. The first character of the Archive User
Name will flash.
4. Turn the Jog wheel to select a position and press
the Jog wheel.
5. Turn the Jog wheel to select the characters.
6. When correct, press the Jog wheel.
The next position will flash.
Repeat steps from 4 to 6 until all Archive User Name
characters are correct.
Press the SHIFT button and then press the Jog wheel to
delete the characters. Pressing the SHIFT button again
enables you to insert characters.
7. Press the MENU/STORE/UTILITY button to save the
changes, or press the STOP/CANCEL button to exit
MENU mode without saving any changes.
Display returns to stop mode.
40
Page 49

(S18) Archive Password
The Archive password menu allows you to set the password
to access to the archive server.
• The input password will not be displayed.
Item Description
Archive Password 0 to 9, A to Z, a to z, Up to 12 characters
1. From stop, press the MENU/STORE/UTILITY button.
2. Turn the Jog wheel until “Arch Password” is
displayed.
3. Press the Jog wheel while Password is displayed.
“New” is displayed, and the first character of the
password (blank) will flash.
11. Press the MENU/STORE/UTILITY button to save the
changes, or press the STOP/CANCEL button to exit
MENU mode without saving any changes.
12. Display returns to stop mode.
Notes:
The input word will not be displayed.
•
The password input is required twice.
•
“New” is displayed during the first password input.
•
“Re” is displayed during the second password input.
•
“Invalid” will be displayed if the second word is different
•
from the first one.
4. Turn the Jog wheel to select a position and press
the Jog wheel.
5. Turn the Jog wheel to select the characters.
6. When correct, press the Jog wheel.
The next position will flash.
Repeat steps from 4 to 6 until all password characters
are correct.
Press the SHIFT button and then press the Jog wheel to
delete the characters. Pressing the SHIFT button again
enables you to insert characters.
7. Press the PLAY/PAUSE button.
8. Turn the Jog wheel to select a position and press
the Jog wheel.
9. Turn the Jog wheel to select the characters.
10. When correct, press the Jog wheel.
The next position will flash.
Repeat steps from 8 to 10 until all password characters
are correct.
Press the SHIFT button and then press the Jog wheel to
delete the characters. Pressing the SHIFT button again
enables you to insert characters.
41
Page 50

(S19) Auto Deletion
The auto deletion process will run in the background while
recording. The PMD580 will delete recorded files when free
space is getting low.
The PMD580 checks if free CF space is less than 30 sec
or not. The physical free byte will depend on the recording
format. When the PMD580 detect less than free space, the
PMD580 will search oldest file. If the archived oldest file is
found, the PMD580 will delete it. If the file is not found, the
unit will stop recording with error.
Selection Range Note
On
Off Default
1. From stop, press the MENU/STORE/UTILITY button.
2. Turn the Jog wheel so Auto Deletion is displayed.
3. While Auto Deletion is displayed, press the Jog
wheel. The On or Off will be flashing.
(S20) Default
The Default menu choice resets all menu items to their
defaults. This is handy if you are setting up a new setting
configuration because you don’t have to check all the
settings, you know they are at the default.
1. From stop, press the MENU/STORE/UTILITY button.
2. Turn the Jog wheel so Default is displayed.
3. While Default is displayed, press the Jog wheel. The
Ok will be flashing.
4. Press the Jog wheel.
Executing will be displayed for a couple of seconds
while the default is being written.
4. Turn the Jog wheel to toggle between On and Off.
5. When correct, press the Jog wheel.
The display returns to Auto Deletion.
6. Press the MENU/STORE/UTILITY button to save
your changes.
Display returns to stop mode.
Completed will be displayed for a second.
Display returns to stop mode.
42
Page 51

Utility Menu
■
Utility menu, accessed from stop by pressing both the MENU/STORE/UTILITY button and the SHIFT button , lets you edit a
folder or file, set Rec scheduler and use other utility functions.
Utility Menu function table
No. Display Meaning Note
On : Letters will be added to the User area of the file
U01 User area
U02 Machine ID
U03 File Order
U04 Rec Schedule Scheduler recording On/Off Default = “Off”
U05 RecSched Time Set times of Scheduler REC. –
U06 All Shed CLR Delete All Rec Schedule. –
U07 Make Folder Creat a folder. –
U08 Select Folder Select a folder of record and playback files. Default = “MPGLANG1” or alphabetical top folder.
U09 Rename File Change the name of a file. U10 Rename Folder Change the name of a folder.
U11 Track Delete Delete a file.
U12 Format Format a CF card.
U13 Card check Check a CF card.
U14 Menu Load
U15 Menu Save
U16 F/W version Check the firmware version.
Off : Letters will not be added.
Letters : Up to 32✽1 letters can be set in the Utility Menu.
Letters : From 5 to 8 letters can be set for the Machine ID
Select the playback order of the files in alphabetical or
Date.
Load preset data from a file named 580preset.cfg in a CF
card.
Save preset data in a file named 580preset.cfg in a CF
card.
name.
area of the file name.
Default = “Off”
✽1 More than 0 letters automatically include “_” in the
right end of the User area.
Default =“MZ001”
Default = “Date”
43
Page 52

Description
(U01) User Area
The User Area menu allows you to have a user area in a file
name. The User Area is assigned in a top of a file name.
For example, if the User Area is “abcdefghijklm”, the file is
numbered “abcdefghijklm_070312_MZ001.wav”.
1. From stop, press the MENU/STORE/UTILITY button
while pressing the SHIFT button.
2. Turn the Jog wheel until “User Area” is displayed.
5. Turn the Jog wheel to select the character.
• Following characters can be used.
“A” to “Z”, “a” to “z”, “0” to “9”, “-“, “ “, “.”, “_”
Notes:
“ “(space) and “.”(dot) cannot be used at the top of the User
•
Area.
Select the space character to end the User Area.
•
6. When correct, press the Jog wheel.
The next position will flash.
Repeat steps 5 and 6 until all User Area characters are
correct.
When the space character is selected, the display
returns to the File name ID, so proceed to step 7.
Press the SHIFT button and then press the Jog wheel to
delete the characters. Pressing the SHIFT button again
enables you to insert characters.
7. After editing, Press the PLAY/PAU SE button.
The display returns to the User Area.
8. Turn the Jog wheel to select other Menu choices.
Press the MENU/STORE/UTILITY button to store
the changes, or press the STOP/CANCEL button to
exit Utility mode without making any changes.
Display returns to stop mode.
3. Press the Jog wheel.
• On or Off will flash.
4. Press the Jog wheel.
• The first character of the User area will flash.
44
Page 53

(U02) Machine ID
The Machine ID menu allows you to have a Machine ID
information in a file name. The Machine ID is assigned in the
last of a file name. For example, if the Machine ID is “MZ001”,
the first file is numbered “abcdefghijklm_070312_MZ001.
wav”.
1. From stop, press the MENU/STORE/UTILITY button
while pressing the SHIFT button.
(U03) File Order
The File Order menu allows you to select the way to sort the
files by name (aphabetical) or by time (Date).
Alphabetical
“Alphabetical” sorts the tracks by file name in alphabetical
order.
Example of alphabetical order
# > A > a >B >b >1 >2 - - -
2. Turn the Jog wheel until “Machine ID” is displayed.
3. Press the Jog wheel while Machine ID is displayed.
The first character of the Machine ID will flash.
4. Turn the Jog wheel to select a position and press
the Jog wheel.
5. Turn the Jog wheel to select the characters.
6. When correct, press the Jog wheel.
The next position will flash.
Repeat steps from 4 to 6 until all Machine ID characters
are correct.
When the space character is selected, the display
returns to the Machine ID, so proceed to step 7.
Press the SHIFT button and then press the Jog wheel to
delete the characters. Pressing the SHIFT button again
enables you to insert characters.
Date
“Date” sorts the tracks in order of date and time at which the
track is created.
1. While in stop, press the MENU/STORE/UTILITY
button while pressing the SHIFT button.
2. Turn the Jog wheel until “File Order” appears in the
display.
3. Press the Jog wheel.
The Display switches to “Alphabetical” or “Date”
flashing.
4. Turn the Jog wheel until the order you want to select
appears.
5. Press the Jog wheel to set the change or press the
STOP/CANCEL button to cancel.
7. After editing, Press the PLAY/PAU SE button.
The display returns to the Machine ID.
8. Turn the Jog wheel to select other Menu choices.
Press the MENU/STORE/UTILITY button to store
the changes, or press the STOP/CANCEL button to
exit MENU mode without making any changes.
Display returns to stop mode.
45
Page 54

(U04) Rec Schedule (Recording scheduler SW)
The Rec schedule menu set the Rec schedule function On or
Off.
1. Press the MENU/STORE/UTILITY button while
pressing the SHIFT button.
2. Turn the Jog wheel until “Rec Schedule” appears in
the display.
(U05) Rec Schedule Time
The Rec Schedule Time menu allows you to set or change
recording start time, stop time and the user area of the
filename.
1. Select the Rec Scheduler Time menu.
• Whine in stop, press the MENU/STORE/UTILITY
button while pressing the SHIFT button.
• Turn the Jog wheel until “Rec Sched Time” appears.
3. Press the Jog wheel to accept the selection.
4. Turn the Jog wheel until “On” appears in the display.
5. Press the Jog wheel to accept the selection.
6. Turn the Jog wheel to select other Menu choices.
Press the MENU/STORE/UTILITY button to store
the changes, or press the STOP/CANCEL button to
exit MENU mode without making any changes.
• Display returns to stop mode.
• Press the Jog wheel to accept the selection.
2. Select the Program number.
• Turn the Jog wheel to select the program number.
• The number flashes during selection.
• Turn the Jog wheel while pressing the SHIFT button
to select “DEL”, then press the Jog wheel to delete
the event.
• Turn the Jog wheel while pressing the SHIFT button
to select “CLR”, then press the Jog wheel to clear all
events.
• Press the Jog wheel to accept the selection.
3. Select the repeat or 1.
• “REPEAT”, or “1” flashes.
46
• “Weekly” appears while the REPEAT is selected.
• Select “1” to record one time only.
• “One Day” appears while the “1” is selected.
• Press the Jog wheel to accept the selection.
Page 55

4. Set the week or day.
• While the “REPEAT” is selected, week appears in the
display.
• While the “1” is selected, date appears in the display.
– The date order depends on the date form in the Preset
Menu.
– Press the Jog wheel to accept the selection.
6. Input the filename User Area.
• User area can be set for each event.
7. Write the schedules.
• Press the PLAY/PAUSE button to write the schedules.
“Executing” appears during writing. “Completed”
appears 1 second after the writing is completed.
• Press the STOP/CANCEL button to cancel any
schedule input and return to stop mode.
Notes:
•
Maximum event count is 30.
•
If a single scheduled recording (set as “1”) is completed, the
scheduled time is cleared.
•
If the STOP/CANCEL button is pressed while selecting
program number, the unit returns STOP.
•
If the STOP/CANCEL button is pressed other than selecting
program number, the unit returns number selection.
5. Set the start and end time.
[Week] [Start ] [ End ]
[Day] [ Start ] [End ]
• If the end time is earlier than the start time, the day
of the end time will be set to the next day of the start
time.
• The event can not take the same time with another
event. When the same time zone is set, “Duplication”
is displayed 2 seconds, the input is cancelled, then
the display goes back to the Rec Schedule Time set
menu.
• Turn the Jog wheel to select the week, start time, and
end time. Then press the Jog wheel to set the input
and go to the next. The setting item will flash.
• Time display(12H or 24H) depends on the “Time form”
in the Preset Menu.
A(P) is attached while in 12H AM(PM).
8. Delete the schedule.
• Turn the Jog wheel to select the program number.
• Press the SHIFT button.
“Del” flashes in the display.
• Press the Jog wheel.
“Delete OK” appears and “OK” flashes.
• Press the Jog wheel.
“Executing” appears in the display.
The display returns to program number selection.
• Press the STOP/CANCEL button to return to stop
mode.
47
Page 56

(U06) All Sched CLR (All Rec Scheduled Clear)
The All Sched CLR menu allows you to delete all contents in
Rec schedule.
(U07) Make Folder
The Make folder menu allows you to create a folder in a root
directory.
1. While in stop, press the MENU/STORE/UTILITY
button while pressing the SHIFT button.
2. Turn the Jog wheel until “All Sched CLR” appears in
the display.
3. Press the Jog wheel.
4. Turn the Jog wheel until “All Clear OK” appears.
5. Press the Jog wheel.
• “Executing” will be displayed until Erase is finished.
Then “Completed” will be displayed.
6. Press the STOP/CANCEL button to cancel.
How to create a folder:
1. While in stop, press both the MENU/STORE/UTILITY
button and SHIFT button.
2. Turn the Jog wheel until “Make Folder” appears in
the display.
3. Press the Jog wheel.
The display switches to the first character of the folder
name.
The first character of the folder name flashes.
4. Turn the Jog wheel until the character you want is
flashing.
5. Press the Jog wheel.
The display switches to the next character of the folder
name.
Press the SHIFT button and then press the Jog wheel to
delete the characters. Pressing the SHIFT button again
enables you to insert characters.
6. Repeat step 4 and 5 to complete the folder name
input(up to 64 characters).
7. Press the PLAY/PAUSE button to add the folder.
When Sel Folder Y/N appears, press the Jog wheel to
set the folder.
8. Press the STOP/CANCEL button to cancel.
48
Page 57

(U08) Select Folder
The Select Folder menu allows you to select a folder of record
or playback files in the CF card.
1. While in stop, press the MENU/STORE/UTILITY
button while pressing the SHIFT button.
2. Turn the Jog wheel until “Select Folder” appears in
the display.
3. Press the Jog wheel.
The Display switches to folder flashing.
4. Select a folder
• Turn the Jog wheel until the folder you want to select
appears.
5. Press the Jog wheel.
6. Press the STOP/CANCEL button to cancel.
(U09) Rename File
The Rename menu changes the name of a track(file).
1. While in stop, press the MENU/STORE/UTILITY
button while pressing the SHIFT button.
2. Turn the Jog wheel until “Rename File” appears in
the display then press the Jog wheel.
3. Select a track you want to change the name.
<Example>
• The first character of the track flashes.
• Turn the Jog wheel to change the character.
• The file name scrolls when the character not shown in
the display is selected.
Press the SHIFT button and then press the Jog wheel to
delete the characters. Pressing the SHIFT button again
enables you to insert characters.
4. Press the PLAY/PAUSE button to complete and
return to the Rename File.
49
Page 58

(U10) Rename Folder
The Rename Folder menu changes the name of a folder.
(U11) Track Delete
The Track Delete menu deletes a selected track.
1. While in stop, press the MENU/STORE/UTILITY
button while pressing the SHIFT button.
2. Turn the Jog wheel to select the “Rename Folder”,
then press the Jog wheel.
3. Select a folder you want to change the name.
<Example>
• The first character of the folder flashes.
• Turn the Jog wheel to change the character.
• The file name scrolls when the character not shown in
the display is selected.
Press the SHIFT button and then press the Jog wheel to
delete the characters. Pressing the SHIFT button again
enables you to insert characters.
4. Press the PLAY/PAUSE button to complete and
return to the Rename Folder.
1. While in stop, press the MENU/STORE/UTILITY
button while pressing the SHIFT button.
2. Turn the Jog wheel until “Track Delete” appears in
the display.
3. Press the Jog wheel.
The Display switches to track number flashing.
4. Select a track or a folder
• Turn the Jog wheel until the track number you want to
erase appears.
• Turn the Jog wheel while pressing the SHIFT button,
until the folder name you want to erase appears.
5. Press the Jog wheel.
“Executing” will be displayed until Erase is finished.
Then “Completed” will be displayed.
• Display returns to step 3 so you can erase another
track.
6. Press the STOP/CANCEL button to cancel.
(U12) Format
The Format menu erases all files and folders in the CF card
and prepares for use in the PMD580.
If the CF card is formatted other than FAT16 or FAT32, the
card have to be formatted in the computer.
50
1. While in stop, press the MENU/STORE/UTILITY
button while pressing the SHIFT button.
2. Turn the Jog wheel until “Format” is displayed.
3. Press the Jog wheel.
The Display switches to “OK?” flashing.
4. Press the Jog wheel.
“Executing” will be displayed until Format is finished.
Then “Completed” will be displayed.
The PMD580 and display return to stop mode.
5. Press the STOP/CANCEL button to cancel.
Page 59

(U13) Card check
The Card check menu does a sample read/write to check if a
CF card has problems.
(U15) Menu Save
This feature allows you to save preset data in a file named
580preset.cfg.
1. While in stop, press both MENU/STORE/UTILITY
button and the SHIFT button.
2. Turn the Jog wheel until “Card Check” is displayed.
3. Press the Jog wheel.
The Display switches to “OK?” flashing.
4. Press the Jog wheel.
“Executing” will be displayed until Card Check is
finished.
Then write speed and read speed will be displayed
alternately.
5. Press the STOP/CANCEL button to cancel.
(U14) Menu Load
This feature allows you to load the preset data from the CF
card to the PMD580.
1. Insert the CF card in which a preset data file is
stored.
2. While in stop, press the MENU/STORE/UTILITY
button while pressing the SHIFT button.
1. From stop, press the MENU/STORE/UTILITY button
while pressing the SHIFT button.
2. Turn the Jog wheel until “Menu Save” is displayed.
3. Press the Jog wheel.
The Display switches to ”Download OK?” flashing.
4. Press the STOP/CANCEL button to cancel.
5. Press the Jog wheel.
“Executing” will be displayed until Menu Save is
finished.
Then ”Completed” will be displayed.
The PMD580 and display return to stop mode.
(U16) F/W version
The F/W version menu displays the unit’s firmware version.
1. While in stop, press the MENU/STORE/UTILITY
button while pressing the SHIFT button.
2. Turn the Jog wheel until “F/W version” appear in the
display.
3. Turn the Jog wheel until “Menu Load” is displayed.
4. Press the Jog wheel to enter.
The Display switches to “Upload OK?” flashing.
5. Press the STOP/CANCEL button to cancel.
6. Press the Jog wheel.
“Executing” will be displayed until Menu load is finished.
Then “Completed” will be displayed.
The PMD580 and display return to stop mode.
3. Press the Jog wheel
The Display switches to the firmware version.
4. Press the STOP/CANCEL button to cancel.
51
Page 60

Network and Operations
SERIAL NO.
IN
OUT
SPDIF
REMOTE
LAN
RS232C
Network functionality and Operation
■ How to hook up the PMD580 to your
The network functionality of the Marantz Professional PMD580
allows you to archive recorded files in a shared folder in
the network and provide you with a simple web-based user
interface to control the PMD580 over your network.
The PMD580 has following functions.
■
network
Connect the PMD580 to the network using the Ethernet RJ-45
terminal (LAN) on the rear of the PMD580.
You can connect the PMD580 in any of the following ways:
1. Archive recorded files in a network drive
The PMD580 automatically archive the recorded audio
files in a shared folder on a network computer.
See page 39 for S14 Archive menu in system preset
settings.
2. Web remote control
The PMD580’s internal Web GUI allows any internet
ready computer on the network to have control of the
PMD580’s features. Record features on the front panel
and in the preset menu can be controlled by the unit’s
web remote.
• Through a corporate network
• Through a home network using a router or switch
• Directly to a computer using an Ethernet cross-over
cable.
The PMD580 supports the automatic acquisition of
IP addresses from a DHCP(Dynamic Host Configuration
Protocol) server. More often than not, you can connect your
PMD580 to a corporate network or home network in three
easy steps:
1. Before connecting the PMD580, set the preset
setting of “S06 IP Address“ to Auto (default).
It means that the PMD580 will attempt to acquire the
network settings from a DHCP server in the network.
2. Connect a network cable to the Ethernet RJ-45 jack
on the rear of the PMD580. And connect the other
end of the network cable to an Ethernet hub or
switch.
LAN/Intranet
Ethernet switching hub
PMD580
IN
OUT
SPDIF
REMOTE
LAN
RS232C
PMD580
Ethernet hub or switch
If you are not connected to a network, use a cross-over
Ethernet cable to connect the PMD580 directly to your
computer.
cross-over cable
PMD580
52
Page 61

3. Turn the unit on.
How to set up a Shared Folder on a
■
Server or a Network Server
[Using the Front Panel]
The PMD580 archives the recorded files in a shared folder of
a server or a network server.
The PMD580 automatically configures its network
settings and communications with the network or
computer without you having to do anything further.
Notes:
If you set the system settings of “IP Address” to Auto,
•
use the Show IP menu in the preset settings to find the IP
address of the PMD580 that is assigned by a DHCP server
automatically.
If the PMD580 can not find a DHCP server, when the
•
PMD580 is turned power on, it might take time to finish
initializing.
If you assign the network setting manually, at the first you
•
should set the following system settings of the PMD580.
– IP address
– Subnet Mask
– Gateway
Set “DNS Server” setting if necessary.
Note:
If you are not familiar with the network environment where
you wish to connect your PMD580, please contact your
network or IT official or administrator.
1. Create a shared folder on a network server.
2. Turn on the PMD580.
3. Select the Preset menu.
4. Set the archive folder parameters.
• S15 Archive IP (Archive server IP address)
• S16 Archive Folder (Archive folder name)
• S17 Arch UserName (Archive folder user name)
• S18 Arch Password (Archive folder password)
5. Turn off the PMD580 and on again to reboot.
[Using the Web Remote]
The PMD580 archives the recorded files in a shared folder of
a server or a network server.
1. Create a shared folder on a server.
2. Bring up the Web Remote on any network computer.
See page 54.
3. Click the System settings button.
4. Type the folder information in each text box.
• Archive IP (Archive server IP address)
• Archive Folder (Archive folder name)
• Arch UserName (Archive folder user name)
• Arch Password (Archive folder password)
5. Click the SAVE button.
6. Turn off the PMD580 and on again to reboot.
For detail of the Web remote, see page 54.
53
Page 62

Control Functions
Web Remote
■
The Web Remote controls the unit and configure settings from the computer.
The PMD580 supports common web browsing software applications.
The Web Remote has following pages and functions.
Pages Functions
Password screen Type your user name and password.
Main screen Rec Control and data download.
Setting screen Preset and Utility
Record Schedule screen
How to hook up and use this Web Remote.
To connect to the PMD580’s web remote, start up the web browser and specify the PMD580’s IP address.
(Example address: http://192.168.0.1/)
(See page 52 to connect the PMD580 to the network.)
Password screen
1. Type the password in the PASSWORD text box.
2. Click the GO button.
Note:
Type the S13 Password for the Password.
54
Page 63
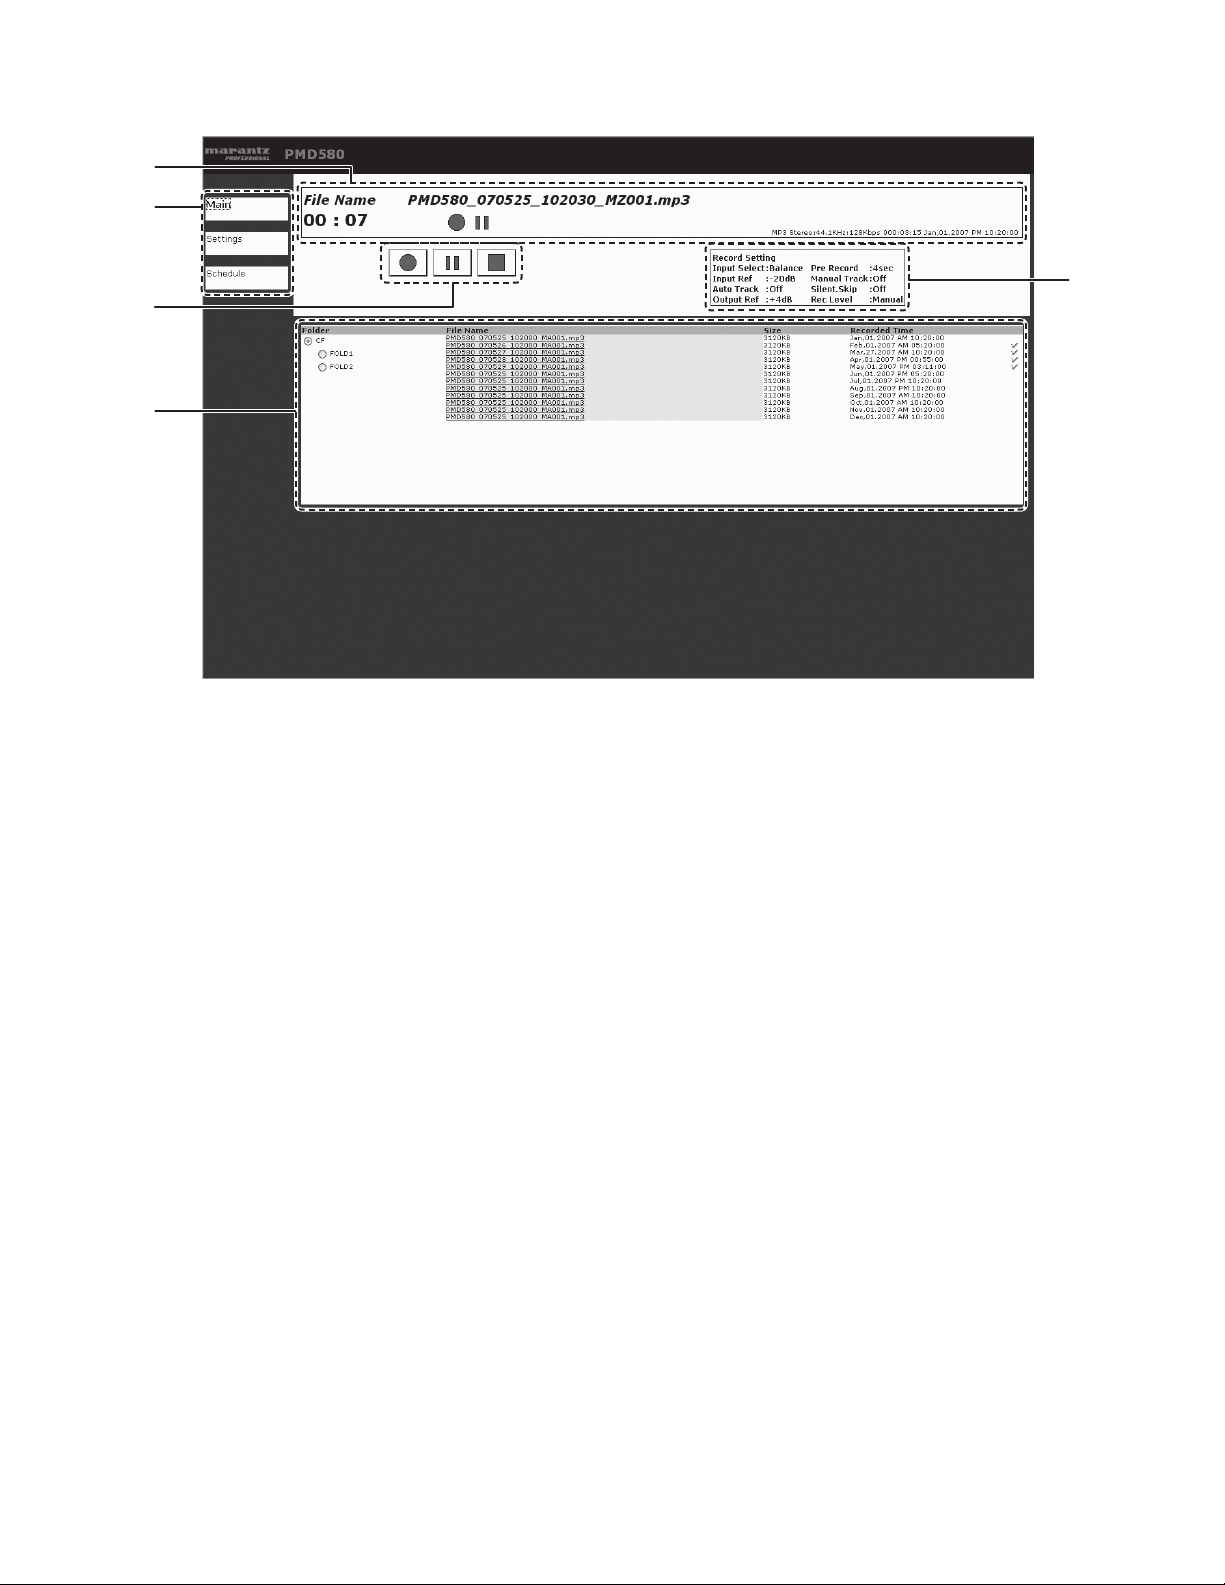
Main screen
q
w
e
r
t
q
w
e
r
t
q Status Indicator
The status of the PMD580, file name and the time
information is shown in this area.
w Page buttons
The display jumps to the other pages using these
buttons.
e Rec control
REC, REC-PAUSE and STOP allow you to control the
PMD580 in the same way as operating front panel.
r File List
The list of files in a CF card is shown in this area.
t Record settings
The record format and settings are shown in this area.
Note:
Click the file name you want to save in your computer. A file
download dialogue box will appear.
55
Page 64

Record Settings
The record settings screen allows you to modify the record settings in the preset menu.
Select an item from the list box.
Buttons and Functions
• Main button
The display changes to the main page. Changed settings
are not stored.
• Settings button
Nothing happens.
• Schedule button
The display changes to the Schedule page.
• Record Settings button
Nothing happens screen.
• Play Settings button
The display changes to the Play Settings page.
• System Settings button
The display changes to the System settings page.
• Utility button
The display changes to the Utility page.
• SAVE button
The changed settings are stored.
• CANCEL button
The changed settings are cancelled and returns to the
stored value.
• Default button
The record settings are cleared and the default values are
set.
56
Page 65

Playback Settings
The playback settings screen allows you to modify the playback settings in the preset menu.
Select an item from the list box.
Buttons and Functions
• Main button
The display changes to the main page. Changed settings
are not stored.
• Settings button
Nothing happens.
• Schedule button
The display changes to the Schedule page.
• Record Settings button
The display changes to the Rec Settings page.
• Play Settings button
Nothing happens.
• System Settings button
The display changes to the System settings page.
• Utility button
The display changes to the Utility page.
• SAVE button
The changed settings are stored.
• CANCEL button
The changed settings are cancelled and returns to the
stored value.
• Default button
The playback settings are cleared and the default values
are set.
57
Page 66

System Settings
The system settings screen allows you to modify the system settings in the preset menu.
Select an item from the list box.
Buttons and Functions
• Main button
The display changes to the main page. Changed settings
are not stored.
• Settings button
Nothing happens.
• Schedule button
The display changes to the Schedule page.
• Record Settings button
The display changes to the Rec Settings page.
• Play Settings button
The display changes to the Playback settings page.
• System Settings button
Nothing happens.
• Utility button
The display changes to the Utility page.
• SAVE button
The changed settings are stored.
• CANCEL button
The changed settings are cancelled and returns to the
stored value.
• Default button
The system settings are cleared and the default values
are set.
58
Page 67

Utility Settings
The Utility screen allows you to modify the utility settings in the utility menu.
Buttons and Functions
• Main button
The display changes to the main page. Changed settings
are not stored.
• Settings button
Nothing happens.
• Schedule button
The display changes to the Schedule page.
• Record Settings button
The display changes to the Rec Settings page.
• Play Settings button
The display changes to the Playback settings page.
• System Settings button
The display changes to the System setting page.
• Utility button
Nothing happens.
• SAVE button
The changed settings are stored.
• CANCEL button
The changed settings are cancelled and returns to the
stored value.
• Default button
The utility settings are cleared and the default values are
set.
• Edit button for Folder menu
The display changes to the Folder Edit page.
• Edit button for File menu
The display changes to the file Edit page.
• Execute button in Make Folder menu
The PMD580 makes a folder.
• Execute button in Format menu
The PMD580 format the CF card.
• Execute button in Card check menu
The PMD580 write and read data in the CF card to check
the CF card.
• Execute button for Preset Load menu
The PMD580 starts the Preset Load function.
• Execute button in Preset Save menu
The PMD580 starts the Preset Save function.
59
Page 68

Record Schedule
The Record Schedule screen allows you to modify the record schedule.
Buttons and Functions
• Main button
The display changes to the main page. Changed settings
are not stored.
• Settings button
Nothing happens.
• Schedule button
The display changes to the Schedule page.
• SAVE button
The changed settings are stored.
• Delete button
The selected schedule data are erased.
• CANCEL button
The changed settings are cancelled and returns to the
stored value.
60
Page 69

REMOTE Jack
IN
OUT
AES /
EBU
SPDIF
REMOTE
LAN
RS232C
OUT
IN
DIGITAL
■ USB
A connected switch on closing and opening does the
following depending on the Remote Menu setting.
DIGITAL
IN
■
The PMD580 records directly onto your CF cards.
Recordings can then be transferred to your desktop or laptop
computer by removing the CF card from the PMD580, or by
connecting the PMD580 to your computer via the LAN port or
the USB port.
OUT
AES
EBU
IN
SPDIF
OUT
REMOTE
LAN
RS232C
Audio recorded in the popular MP3 compression format is
directly available for intranet or internet file sharing.
Start Pause
Close to start open to pause during recording or playback.
StartPauseTR
Close to start, open to pause during recording or playback.
Start after a record pause, continues on the next track.
Manual Track
During recording, close to increment the track. A new track is
created at that point.
Computer compatible
On your computer you can then:
• log and archive audio files
• play audio files
(Universal Serial Bus)
Open → Close
Close → Open
Start Pause StartPauseTR Manual Track
Start Start
Pause
Pause at next
Tra ck
Create a new
track
---
Save audio files to:
• your hard drive
• a floppy
• a CD-R disc
• post streaming audio files on your web site
• use software and your computer to transcribe digital
recordings
• An editing program
61
Page 70

How to connect via USB port
The CF card in the PMD580 appears as an external drive on
a connected computer.
1. Power up the computer
Note:
Check the operating system of your computer.
Windows Me, 2000, XP, Vista., MAC OS 10
2. Insert a CF card.
3. Power up the PMD580.
How to disconnect via USB port
1. Disconnect the cable to the PMD580 and your
computer.
• An archive function resumes if it is set to be active.
Serial Remote Control
■
Connect a male (D-Sub 9 Pin) to female (D-Sub 9 Pin)
straight cable for RS-232C external control by host
equipment.
4. During STOP mode, connect the USB cable attached
to the PMD580 and your computer.
• While USB is on, a set screen is displayed.
• No buttons other than the POWER button function.
• During USB mode the eject or insert of a CF card is
possible, however, there is no guarantee for data in
case of ejecting.”
• An archive function stops while the USB is on.
• The CF card in the PMD580 appears as a removable
device on your computer.
• The audio files are in a folder that is named
MPGLANG1 or a folder you made using the Make
Folder function.
• Power off and back on to resume recording or
playback on the PMD580.
The RS-232C host can control functions of the PMD580
externally.
RS-232C specifications:
54321
9876
Pin Name
1. Ground
2. TxD
3. RxD
4. NC
5. S. Ground
6. NC
7. NC
8. NC
9. NC
(1) Physical specifications
Baud rate : 9600 bps
Data bits : 8 bit
Parity bit : None
Stop bit : 1 bit
Flow control : None
Notes:
OK(ACK:06h) or ERR(NACK:15h) is returned for the
•
Control Command.
The Status information is transmitted automatically when the
•
status is changed.
For sending Control Command or Status Request Command,
•
wait more than 100ms after reception of a response(OK, ERR
or status).
62
Page 71

(2) Control Command
You send a command via RS232C from a PC or a jig.
Code Command Note
“@02300”+CR 0
“@02301”+CR 1
“@02302”+CR 2
“@02303”+CR 3
“@02304”+CR 4
“@02305”+CR 5
“@02306”+CR 6
“@02307”+CR 7
“@02308”+CR 8
“@02309”+CR 9
“@02311”+CR DISPLAY
“@02312”+CR Standby
“@020PW”+CR PowerON
“@0RBT”+CR Reboot
“@023V+”+CR Rec Volume +
“@023V-”+CR Rec Volume –
“@023BR”+CR Rec Volume Balance Right
“@023BL”+CR Rec Volume Balance Left
“@02332”+CR Track Jump ¢
“@02333”+CR Track Jump 4
“@023DJttthhmmssff”+CR Direct Jump (to ttt hh mm ss ff) ttt is Track number
“@02348”+CR PAUSE
“@023501”+CR
“@023502”+CR X60
“@023503”+CR X600
“@0235001”+CR Off
“@023521”+CR
“@023522”+CR X60
“@023523”+CR X600
“@0235201”+CR Off
“@02353”+CR PLAY
“@02354”+CR STOP
“@02355”+CR Recording
“@023MT”+CR M.Track
“@023MR”+CR Margin Reset
“@023KL”+CR Lock Panel’s Key
“@023KU”+CR Unlock Panel’s Key
“@0INUB”+CR
“@0INBA”+CR Balance
“@0INDI”+CR Digi-In
“@0INDB”+CR Digital-Bal
RWD
FF
Preset: R01 InputSelect
X10
X10
Unbalance
63
Page 72

Code Command Note
“@0CHST”+CR
“@0CHML”+CR Channel:L-Mono
“@0CHMX”+CR Channel:LR-Mono
“@0AFPM”+CR File Format:WAV
“@0AFM3”+CR File Format:MP3
“@0BRXXX”+CR BPS
“@0BIXX”+CR Bit
“@0FSXX”+CR FS:44=44.1kHz, 48=48kHz
“@0PRXS”+CR
“@0PR01”+CR OFF
“@0IF20”+CR
“@0IF+4”+CR +4dB
“@0MT00”+CR
“@0MT01”+CR OFF
“@0AT0000”+CR
“@0AThhmm”+CR Time:hhmm
“@0SS00”+CR
“@0SS01”+CR OFF
“@0SS02”+CR Tra ck
“@0SCXX”+CR Time
“@0SLXX”+CR Level
“@0OF20”+CR
“@0OF+4”+CR +4dB
“@0RLMA”+CR
“@0RLAL”+CR ALC
“@0DOBC”+CR
“@0DOCS”+CR Consumer
“@0dFAT”+CR
“@0dF44”+CR 44.1KHz
“@0dF48”+CR 48KHz
“@0PMOF”+CR
“@0PMAL”+CR ALL
“@0PMAR”+CR A.REPEAT
“@0PMSP”+CR Single.PLAY
“@0PMRD”+CR RANDOM
“@0FMST”+CR
“@0FMNT”+CR Next
“@0FMRC”+CR Recue
“@0AC00”+CR
“@0AC01”+CR OFF
“@0CLXX”+CR Level
“@0RCSP”+CR
“@0RCST”+CR StartPauseTrack
“@0RCMT”+CR M.Track
“@0DFMD”+CR
“@0DFDM”+CR DMY
“@0DFYM”+CR YMD
Preset: R02 Algo/File
Preset: R03 PreRec
Preset: R04 Input Reference
Preset: R05 M.Track
Preset: R06 A.Track
Preset: R07 S.SKIP
Preset: R08 Output Reference
Preset: R09 Rec Level
Preset: P01 Digital Out
Preset: P02 Digital Out Fs
Preset: P03 Playmode
Preset: P04
Preset: P05 Auto Cue
Preset: C01 Remote
Preset: S03 DateForm
Finish Mode
(Single Mode)
Channel:Stereo
X (sec)
–20dB
ON
OFF
ON
−20dB
Manual
Broadcast
AUTO
OFF (Normal)
STOP
ON
StartPause
MDY
64
Page 73

Code Command Note
“@0TF12”+CR
“@0TF24”+CR 24h
“@0MNxxxxxxxxxxxx”+CR Preset: S05 Machine Name xxx:5 to 12 characters
“@0IPxxxxxxxxxxxx”+CR Preset: S06 IP Address xxx.xxx.xxx.xxx
“@0SMxxxxxxxxxxxx”+CR Preset: S08 Sub net mask xxx.xxx.xxx.xxx
“@0GWxxxxxxxxxxxx”+CR Preset: S09 Gateway xxx.xxx.xxx.xxx
“@0DNxxxxxxxxxxxx”+CR Preset: S10 DNS xxx.xxx.xxx.xxx
“@0NPxxxxxxxxxxxx”+CR Preset: S11 NTP Server xxx.xxx.xxx.xxx
“@0TZxxxxx”+CR Preset: S12 Time Zone xxxxx:±hhmm
“@0AR01”+CR
“@0ARAT”+CR AUTO
“@0ARSChhmm”+CR Schedule:hhmm
“@0AIxxxxxxxxxxxx”+CR Preset: S15 Archive Server IP xxx.xxx.xxx.xxx
“@0AOxxxxxxxxxxxx”+CR Preset: S16 Archive Folder xxx:Max 64 characters
“@0AUxxxxxxxxxxxx”+CR Preset: S17 Archive User Name xxx:Max 32 characters
“@0APxxxxxxxxxxxx”+CR Preset: S18 Archive Password xxx:5 to 12 characters
“@0ADOF”+CR
“@0ADxx”+CR
“@0DESY”+CR
“@0DEPL”+CR Play Preset
“@0DERE”+CR Rec Preset
“@0DEFL”+CR Preset(all)
“@0US00”+CR
“@0US01”+CR OFF
“@0UAxxxxxxxxxxxxxxxx”+CR xxx: Max 37 characters
“@0MIxxxxxxxx”+CR Utility: U02 MachineID xxx:5 to 8 characters
“@0FRAL”+CR
“@0FRDA”+CR Date/Time
“@0SH00”+CR
“@0SH01”+CR OFF
“@0SDDAYYMMDDhhmmHHMMXXXXXXXXXXX”+CR
“@0SDWEwwwhhmmHHMMXXXXXXXXX”+CR
“@0SDDDYYMMDDhhmmHHMMXXXXXXXXXXX”+CR Delete Date/Time setting
“@0SDWDwwwhhmmHHMMXXXXXXXXX”+CR Delete Weekly setting
“@0SHDL”+CR Utility: U06 All Delete
“@0MFxxxxxxxxxxx”+CR Utility: U07 Make Folder xxx:1 to 64 characters
“@0SFxxxxxxxxxxx”+CR Utility: U08 Select Folder xxx:1 to 64 characters
“@0RNttt:XXXXXXXXXXXX”+CR Utility: U09 Rename File ttt:Track number
“@0RFxxxxxxxxxxx:XXXXXXXXXXXX”+CR Utility: U10 Rename Folder
“@023TEttt”+CR Utility: U11 Track Erase ttt:Track number
“@023FOMAT”+CR Utility: U12 Format
“@0PVLD”+CR Utility: U14 Preset Load
“@0PVSA”+CR Utility: U15 Preset Save
Preset: S04 Time Form
Preset: S14 Archive
Preset: S19 Auto Deletion
Preset: S20 Preset Default
Utility: U01 User area
Utility: U03 File Order
Utility: U04 Schedule
Utility:U05
12h
OFF
OFF
xx hours
1 hour=01
24 hours=24
System Preset
ON
Alphabetical
ON
Date/Time,xxx:User area
(Max 37 characters)
Weekly,xxx:User area
(Max 37 characters)
xxx:old, XXX:new
(1 to 64 characters)
65
Page 74

(3) Status Information
When status of PMD580 changes, it is transmitted a message automatically to a host. When PMD580 sends a message
whenever time information changes, the exchanges of data become too frequent. Therefore, PMD580 sends time information
data and presetting value, when requested it.
Status Request command (to PMD580) Status Information (PMD580)
Request. Command Answer Command
On “@0PW00”+CR
Power Mode “@0?PW”+CR Power Mode
Door Sense “@0?DS”+CR Door Sense
Card “@0?CD”+CR Card
Status “@0?ST”+CR Status
Time Mode “@0?TM”+CR Time Mode
Track Number “@0?TR”+CR Track Number XXX “@0TRXXX”+CR
Display Time “@0?TI”+CR Display Time hhmmss “@0TIhhhmmss”+CR
Off -
Standby “@0PW01”+CR
Open “@0DS01”+CR
Close “@0DS00”+CR
No Card “@0CDNC”+CR
Reading “@0CDRE”+CR
Card In “@0CDCI”+CR
Card Error “@0CDCE”+CR
Card 999 “@0CD99”+CR
Card Full “@0CDFL”+CR
Blank Card “@0CDBC”+CR
Din Unlock “@0STRU”+CR
Recording “@0STRE”+CR
RecPause “@0STRP”+CR
STOP “@0STST”+CR
TRACK Select “@0STTS”+CR
Scheduled “@0STSH”+CR
PLAY “@0STPL”+CR
PLAYPAUSE “@0STPP”+CR
SEEK + “@0STS+”+CR
SEEK – “@0STS-”+CR
FF “@0STFF”+CR
RWD “@0STRW”+CR
TrackEdit/Preset “@0STED”+CR
Operation Error “@0STER”+CR
RecRemainTime “@0TMRE”+CR
Algo “@0TMAG”+CR
TrackTime
(Elapsed Time)
Current Date “@0TMCD”+CR
Current Time “@0TMCT”+CR
Recorded Time “@0TMRT”+CR
Recorded Data “@0TMRD”+CR
File name “@0TMFN”+CR
TrackRemainTime “@0TMTR”+CR
Recorded Channel “@0TMCH”+CR
“@0TMTT”+CR
Note
66
Page 75

Status Request command (to PMD580) Status Information (PMD580)
Request. Command Answer Command
Volume (Play ) “@0?VM”+CR Volume (Play ) XXX “@0VMXXX”+CR
Rec Volume “@0?RV”+CR Rec Volume LLRR “@0RVLLRR”+CR
TotalTorackNumber “@0?TT”+CR Number of Total Tracks “@0TTxxx”+CR xxx:TotalTrackNumber
Track Name (xxx:TrackNo ) “@0?Tnxxx”+CR Track Name NNNNNNN “@0TnNNNNNNN”+CR NNN:TrackName
Track Size (xxx:TrackNo ) “@0?Tsxxx”+CR Track Size xxxxxxx (byte) “@0Tsxxxxxx”+CR xxxxx:TrackSize(byte)
Folder list “@0?FL”+CR
Preset R01 InputSelect “@0?IN”+CR InputSelect
CH “@0?CH”+CR
Algo “@0?AF”+CR
Preset R02 Algo/File
BPS “@0?BR”+CR XXX “@0BRXXX”+CR
Bit “@0?BI”+CR XX “@0BIXX”+CR 16/24bit
FS “@0?FS”+CR XX “@0FSXX”+CR
Preset R03 PreRec On/Off “@0?PR”+CR PreRec
Preset R04 Input Level “@0?IF”+CR Input Level
Preset R05 M.Track “@0?MT”+CR M.Track
Preset R06 A.Track Time “@0?AT”+CR XXXX “@0ATXXXX”+CR
On/Off “@0?SS”+CR
Preset R07 S.SKIP
Time “@0?SC”+CR XX “@0SCXX”+CR
Level “@0?SL”+CR XX “@0SLXX”+CR
Preset R08 Output Level “@0?OF”+CR Output Level
Preset R09 Rec level “@0?RL”+CR Rec level
Preset P01 Digital Out “@0?DO”+CR Digital Out
Preset P02 Digital Out Fs “@0?dF”+CR Digital Out Fs
Folder Name List
Algo/File
S.SKIP
AAAAAAA
BBBBBBB
UNBALANCE “@0INUB”+CR
BALANCE “@0INBA”+CR
Digi-In “@0INDI”+CR
Digi-In Balance “@0INDB”+CR
STEREO “@0CHST”+CR
L-MONO “@0CHML”+CR
LR-MONO “@0CHMX”+CR
PCM “@0AFPM”+CR
MP3 “@0AFM3”+CR
OFF “@0PR01”+CR
XX (sec) “@0PRXS”+CR
–20dB “@0IF20”+CR
+4dB “@0IF+4”+CR
ON “@0MT00”+CR
OFF “@0MT01”+CR
ON “@0SS00”+CR
OFF “@0SS01”+CR
Track “@0SS02”+CR
–20dB “@0OF20”+CR
+4dB “@0OF+4”+CR
Manual “@0RLMA”+CR
ALC “@0RLAL”+CR
Broadcast “@0DOBC”+CR
Consumer “@0DOCS”+CR
Auto “@0dFAT”+CR
44.1KHz “@0dF44”+CR
48KHz “@0dF48”+CR
“@0FLAAAAAAAA:
BBBBBBBB”+CR
xxx: Folder Name
; separator between
folder names
XX:
48KHz=48, 44.10KHz=44,
32KHz=32, 22.10KHz=22
etc
off=0000
1min=0001, 30min=0030
1h=0100, 24h=2400
Note
67
Page 76

Status Request command (to PMD580) Status Information (PMD580)
Request. Command Answer Command
OFF “@0PMOF”+CR
ALL “@0PMAL”+CR
Preset P03 Playmode “@0?PM”+CR Playmode
Preset P04
Preset P05 Auto Cue
Preset C01 Remote “@0?RC”+CR
Preset S03 DateForm “@0?DF”+CR DateForm
Preset S04 Time Form “@0?TF”+CR Time Form
Preset S05 Machine Name “@0?MN”+CR Machine Name xxxxxxxxxxxxx “@0MNxxxxxxxxxxxx”+CR
Preset S06 IP Address “@0?IP”+CR IP Address xxx.xxx.xxx.xxx “@0IPxxxxxxxxxxxx”+CR
Preset S08 Sub net mask “@0?SM”+CR Sub net mask xxx.xxx.xxx.xxx “@0SMxxxxxxxxxxxx”+CR
Preset S09 Gateway “@0?GW”+CR Gateway xxx.xxx.xxx.xxx “@0GWxxxxxxxxxxxx”+CR
Preset S10 DNS “@0?DN”+CR DNS xxx.xxx.xxx.xxx “@0DNxxxxxxxxxxxx”+CR
Preset S11 NTP Server “@0?NP”+CR NTP Server xxx.xxx.xxx.xxx “@0NPxxxxxxxxxxxx”+CR
Preset S12 Time Zone “@0?TZ”+CR Time Zone XXXXX “@0TZXXXXX”+CR
Preset S14 Archive “@0?AR”+CR Archive
Preset S15 Archive Server IP “@0?AI”+CR
Preset S16 Archive Folder “@0?AO”+CR Archive Folder XXXXXXXXXXXX “@0AOXXXXXXXXXXXX”+CR
Preset S17 Archive User Name “@0?AU”+CR
Preset S19 Auto Deletion “@0?AD”+CR Auto Deletion
Preset PresetAll “@0?PA”+CR PresetAll
Finish Mode
(Single Mode)
“@0?FM”+CR
ON/OFF “@0?AC”+CR Auto Cue
Level “@0?CL”+CR XX “@0CLXX”+CR
Finish Mode
(Single Mode)
Archive Server
IP
Archive User
Name
Repeat One “@0PMAR”+CR
S.PLAY “@0PMSP”+CR
RANDOM “@0PMRD”+CR
STOP “@0FMST”+CR
Next “@0FMNT”+CR
Recue “@0FMRC”+CR
On “@0AC00”+CR
Off “@0AC01”+CR
M.Track “@0RCMT”+CR
StartPause “@0RCSP”+CR
StartPauseTrack “@0RCST”+CR
MDY “@0DFMD”+CR
DMY “@0DFDM”+CR
YMD “@0DFYM”+CR
12H “@0TF12”+CR
24H “@0TF24”+CR
OFF “@0AR01”+CR
Auto “@0ARAT”+CR
Scheduled “@0ARSChhmm”+CR hhmm:ArchiveTime
xxx.xxx.xxx.xxx “@0AIxxxxxxxxxxxx”+CR
XXXXXXXXXXXX “@0AUXXXXXXXXXXXX”+CR
OFF “@0ADOF”+CR
1 /3 /6 /12 /24 hours “@0ADOF”+CR
Note
@0IP192168000001
(IPaddress=192.168.0.1)
@0IPAUTO00000000
(IPaddress=Auto)
@0SMDISABLE00000
(IPaddress=Auto)
@0GWDISABLE00000
(Disable)
@0DNDISABLE00000
(Disable)
@0NPDISABLE00000
(Disable)
xx hours
1 hour=01
24 hours=24
68
Page 77

Status Request command (to PMD580) Status Information (PMD580)
Request. Command Answer Command
Note
ON/Off “@0?US”+CR
Utility U01 User area
xxxxxxxxxxxxxxxxx
Utility U02
Utility U03 File Order “@0?FR”+CR File Order
Utility
Utility U08 Select Folder “@0?SF”+CR Select Folder XXXXXXXXXXXX “@0SFXXXXXXXXXXXX”+CR
Utility U13 Card Cheak “@0?CK”+CR Card Cheak XX.XXX (MB/S) “@0CKXXXXX”+CR
Utility U16 Version “@0?VN”+CR Version xxxx “@0VNxxxx”+CR
MachineID
U04
Schedule
U05 Data “@0?SD”+CR Schedule Data
xxxxxxxxxxxxxxxxx
“@0?UA”+CR xxxxxxxxxxxxxxxxx
“@0?MI”+CR MachineID xxxxxxxx “@0MIxxxxxxxx”+CR
“@0?SH”+CR Schedule
User area
ON “@0US00”+CR
OFF “@0US01”+CR
“@0UAxxxxxxxxxxxxxxxx”
+CR
Date/Time “@0FRDA”+CR
Alphabetical “@0FRAL”+CR
ON “@0SH00”+CR
OFF “@0SH01”+CR
Date/Time
weekly
“@0SDDAYYMMDDhhmmHH
MMXXXXXXXXXXX”+CR
“@0SDWEwwwhhmmHHMMX
XXXXXXXX”+CR
@ between data blocks
69
Page 78

Recording time chart
All times are approximated record times.
Different media manufacturers allow more or less space for error correction and the like on their respective products.
Rec Format Sampling Rate Channel Bitrates
PCM-16 44.1KHz Stereo 1411 kbps 0 : 24 1 : 36 6 : 24
Mono 705.5 kbps 0 : 48 3 : 12 12 : 48
48KHz Stereo 1536 kbps 0 : 22 1 : 28 5 : 52
Mono 768 kbps 0 : 44 2 : 56 11 : 44
PCM-24 44.1KHz Stereo 2117 kbps 0 : 16 1 : 04 4 : 16
Mono 1058.5 kbps 0 : 32 2 : 08 8 : 32
48KHz Stereo 2304 kbps 0 : 14 0 : 56 3 : 44
Mono 1152 kbps 0 : 28 1 : 52 7 : 28
MP3 Stereo 320 kbps 1 : 46 7 : 06 28 : 22
Mono 160 kbps 3 : 32 14 : 12 56 : 45
Stereo 256 kbps 2 : 13 8 : 52 35 : 28
Mono 128 kbps 4 : 26 17 : 44 70 : 56
Stereo 192 kbps 2 : 57 11 : 48 47 : 12
Mono 96 kbps 5 : 54 23 : 36 94 : 24
Stereo 128 kbps 4 : 26 17 : 44 70 : 56
Mono 64 kbps 8 : 52 35 : 28 141 : 52
Stereo 64 kbps 8 : 52 35 : 28 141 : 52
Mono 32 kbps 17 : 44 70 : 56 283 : 44
Redording Time (hour:minute)
256MB 1GB 4GB
70
Page 79

Troubleshooting
Should problems occur, it is often unnecessary to consult
your dealer or technical service department. On the basis of
the following checks, you may be able to rectify a number of
conditions yourself without difficulty. If the condition cannot
be remedied after the following check, please consult your
dealer.
The PMD580 does not turn on.
• Check AC power cord connections.
The PMD580 seems to record, but there is no sound on
playback.
• Check input settings.
(For example, if LINE input is selected and no input is
connected to the LINE IN jack, the PMD580 will record
silence. The PMD580 will not playback.)
There is no audio playback through headphones.
• Check Level control setting.
• Check a different track or CF
The PMD580 will not record.
• Check that the maximum of 999 tracks have not been
recorded.
• Check that the PMD580 acknowledges the CF card.
PC cannot read files
• Check the capability of the PC program. Some playback
and editing programs do not support MP3 or Broadcast
Wave (.wav) formats.
If the PMD580 exhibits erratic behaviour, the microprocessor
can be reset by powering off, disconnecting AC power and
removing batteries.
Network is not working
• Check the network cable is plugged in on both the
PMD580 and the network.
• Ensure that you have selected the correct network type.
IP address cannot be obtained
• Check that there is a server or a device that works as a.
DHCP server.
Care and Maintenance
Use a soft cloth slightly moistened with mild detergent
solution.
Media cards that are heavily used should be occasionally
reformatted to avoid audio problems due to fragmentation.
There is excessive noise on the PMD580.
• Check cable connections and/or replace cable.
• Check for proper gain levels.
Playback on a PC results in poor sound.
• Check quality of PC sound card and program.
• Check frequency conversion program.
✽ The PMD580 records audio files with a sampling frequency of 48kHz.
Some PC programs convert the files to 44.1kHz (using a sample rate
converter). Only high quality sample rate converters should be used.
✽
71
Page 80

Specifications
Digital Audio System
System ................................................... Solid State Recorder
Usable Media ................CF memory cards, Microdrive cards
Recording and media methods
MP3 ....................................MPEG1 Layer III compression
WAV ...................................................16/24 bit linear PCM
Recording MP3 bit rate (selectable)
Mono ........................................ 160, 128, 96, 64, 32 kbps
Stereo ................................... 320, 256, 192, 128, 64 kbps
Sampling frequency ...................................... 44.1, 48 kHz
Number of channels ................................2 (stereo), 1 (mono)
Audio Frequency response ............. 10 to 20,000Hz ± 1.0 dB
Signal-to-Noise Ratio IEC-A weighted ...........................91 dB
Total Harmonic Distortion at 0 VU (PCM) .................... 0.01 %
Dynamic Range .............................................................94 dB
Inputs
Balanced Input
Type ................................... XLR (1:GND, 2:HOT, 3:COLD)
Input Sensitivity .................... +4 dBu /–20 dBu /24 kohms
Unbalanced Input
Type .................................................................... RCA jack
Input Sensitivity ..............................500 mVrms /22 kohms
UNBALANCED DIGITAL IN
Type .................................................................... RCA jack
Input impedance ..................................................75 ohms
Standard input level .............................................0.5 Vp-p
Sampling frequency ...................................... 44.1 /48 kHz
Format ..................... AES/EBU or SPDIF (IEC 958 Type II )
Balanced Digital Input
Type ................................... XLR (1:GND, 2:HOT, 3:COLD)
Sampling frequency ...................................... 44.1 /48 kHz
Format ..................... AES/EBU or SPDIF (IEC 958 Type II )
Outputs
Balanced output
Type ................................... XLR (1:GND, 2:HOT, 3:COLD)
Level ....................+18 dBu (+4dBu reference) /600 ohms
Unbalanced output
Type .................................................................... RCA jack
Standard level ........ 2 Vrms (+4dBu reference) /10 kohms
Balanced Digital output
Type ................................... XLR (1:GND, 2:HOT, 3:COLD)
Output impedance .............................................110 ohms
Standard output level ...........................................3.5 Vp-p
Format ....AES/EBU or SPDIF (IEC 958 Type II) selectable
Unbalanced Digital output
Type .................................................................... RCA jack
Output impedance ...............................................75 ohms
Standard output level ...........................................0.5 Vp-p
Sampling frequency ....................................... 44.1/48 kHz
Format ..................... AES/EBU or SPDIF (IEC 958 Type II )
LAN Interface
Format ........................................... 10Base-T/100Base-TX
Transmission rate ......................................... 10/100 Mbps
Connector .........................................................8pin RJ-45
General
Power requirements
US model ...................................................AC120 V 60 Hz
European model ..........................AC100 - 240 V 50/60 Hz
Power consumption ........................................................ 26 W
Environmental conditions
Operational temperature .................. 5 - 35 °C (41 - 95 °F)
Operational humidity ............. 25 - 85 %, no condensating
Storage temperature ...................–20 - 60 °C (–4 - 140 °F)
Headphone Output power ..............18 mW+18 mW /32 ohms
72
Dimensions
Width ......................................................... 483 mm (19.0")
Height ............................................................52 mm (2.0")
Depth .........................................................344 mm (13.5")
Weight ....................................................... 3.7 kg (8.2 lbs)
Included accessories
Power cord (for US) .............................................................. 1
Power cord (for Europe) ....................................................... 2
USB cable ............................................................................ 1
Audio cable .......................................................................... 2
CF door Screw. ..................................................................... 2
Retainer ................................................................................ 1
User Guide ........................................................................... 1
CD-ROM ............................................................................... 1
Customer Registration Document (only for US) ................... 1
• Specifications are subject to change without notice.
Page 81

Limited Warranty
Your Marantz Professional product is warranted against
manufacturer defects in material and workmanship for a
period of one year parts and labor.
Except as specified below, this warranty covers defects in
material and workmanship. The following are not covered
under warranty:
1. Damage, deterioration, malfunction or failure to meet
performance specifications resulting from:
a) Accidents, acts of nature, misuse, abuse, neglect or
unauthorized product modification.
b) Improper installation, removal or maintenance, or failure
to follow supplied instructions.
c) Repair or attempted repair by a non-Marantz authorized
agent.
d) Any shipment (claims must be presented to the
carrier).
e) Any cause other than a defect of manufacturing.
2. Cleaning, check-ups with no fault found or changes
incurred for installation, removal or reinstallation of the
product.
3. Any serialized product on which the serial number has
been defaced, modified or removed.
4. Batteries and battery chargers.
5. Accessories, including but not limited to: cables, mounting
hardware and brackets, cleaning accessories, power
cords and adapters, and carry cases.
Limitation of Implied Warranties
All implied warranties, including warranties of merchantability
and fitness for a particular purpose, are limited in duration to
the length of this warranty.
Exclusion of Damages (Americas only)
Liability for any defective product is limited to repair or
replacement of the product at manufacturer’s option.
Manufacturer shall not be liable for damage to other products
caused by any defects in Marantz products, damages based
on inconvenience or loss of use of the product, or any other
damages, whether incidental, consequential, or otherwise.
Some States do not allow limitations on how long an implied
warranty lasts and/or do not allow the exclusion or limitation of
incidental or consequential damages, so the above limitations
and exclusions may not apply to you.
How State Law Relates to the Warranty (Americas only)
This warranty gives you specific legal rights, and you may
have other rights which may vary from State to State.
Marantz Professional Service Number (Americas only):
Marantz Professional Factory Service (630) 741-0330, toll free
within the US (866) 405-2154.
Products purchased outside of the United States, its
possessions or territories.
Non-transferable warranty
This Warranty may be enforced only by the original purchaser.
What We Will Pay For
We will pay for all labor and material expenses for items
covered by the warranty.
How You Can Get Service (Americas only)
1. If your unit needs service in the USA, contact our service
referral at the appropriate telephone number indicated
below. We will advise you of the name and location of one
or more authorized service centers from which service
may be obtained. Please do not return the unit directly to
us.
2. You must pay any shipping charges if it is necessary
to ship the product for service. If the necessary repairs
are covered by the warranty, we will pay return shipping
charges to your location anywhere in the United States or
its territories.
3. Whenever warranty service is required, you must present
the original dated sales receipt or other proof of date
purchased.
This warranty is enforceable only in the United States and its
possessions or territories.
Marantz Professional products Sales Office Site:
For inquiries or information on repair service of Marantz
Professional Products, please contact our Sales Office or Tech
Support Centre near you which are listed in D&M Professional
website below.
AMERICA
D&M Professional America http://www.d-mpro.com
Service number : 866-405-2154 (Toll Free)
EUROPE
D&M Professional Europe http://www.d-mpro.eu.com
ASIA / OTHERS
D&M Professional Asia http://www.d-mproasia.com
73
Page 82

D&M Holdings Inc.
PROFESSIONAL BUSINESS COMPANY
Printed in Japan 2007/12 00M09CS851250 ecmf-g
 Loading...