

Malaguti Madison 125, Madison 150 Service Manual

MALAGUTI MADISON 125/150
1 12/99
MADISON 125-150
PREMESSA
•Il presente manuale d’officina, contempla le principali verifiche elettro/meccaniche, i controlli indispensabili ed il
montaggio di componenti forniti sfusi, per effettuare la consegna del motociclo nuovo di f abbrica (la sequenza delle
operazioni, non è impegnativa).
•È molto importante attenersi scrupolosamente a quanto descritto. Interventi superficialmente eseguiti o addirittura omessi, possono generare danni personali all’acquirente, al motociclo, ecc... o produrre, nella più semplice delle
ipotesi, spiacevoli contestazioni.
“Tempari” (tempi di intervento per operazioni durante il periodo di garanzia).
VORWORT
•Dieses Werkstatt-Handbuch enthält Anweisungen zu
den grundlegenden elektrischen/magnetischen
Kontrollen, unerlässlichen Prüfungen und der Montage
von abmontiert mitgelieferten Komponenten, für die
Lieferung des fabrikneuen Kraftrads (die Reihenfolge
der Operationen ist unverbindlich).
•Es ist sehr wichtig, dass die An weisungen genau befolgt
werden. Oberflächlich ausgeführte oder sogar
ausgelassene Eingriffe können zu Personenschäden für
den Käufer, Schäden des Kraftrades, usw., oder im
besten Fall zu unangenehmen Beschwerden führen.
“Tempari”
(Eingriffsdauer der Operationen während der
Garantiezeit).
AVANT-PROPOS
•Les informations qui figurent dans ce manuel
d’atelier concernent les principaux contrôles sur les
parties électriques et mécaniques, les contrôles
indispensables, et le montage de composants fournis
au détail, à effectuer avant de livrer le scooter neuf (il
n’est pas obligatoire de respecter la séquence des
opérations telle qu’elle est présentée).
PREAMBLE
•The present warehouse manual includes all main
electro-mechanical tests, indispensable controls and
assembling of loose supplied spare parts in order to
carry out delivery of this brand new motorbike (the
sequence of operations to be carried out is not a difficult
one).
•It is very important to car efully observe what described
herewith. Interventions, which are superficially carried
out, or even omitted, can cause injuries to buyer,
damages to the motorbike, etc. … or most probably,
unpleasant disputes.
“
Tempari
(intervention time for operations carried out
within the duration of guarantee)
”
INTRODUCCION
• El presente manual de taller suministra las
informaciones concernientes las principales
intervenciones de tipo eléctrico/mecánico, los controles
indispensables y el montaje de los componentes que
se suministran sueltos, para efectuar la entrega del
vehículo de motor nuevo de fábrica (la secuencia de
las operaciones no es obligatoria).
•Il est très important d’observer scrupuleusement les
indications. Les interventions effectuées de façon
superficielle ou omises, peuvent porter préjudice à
l’acheteur, endommager le scooter, etc... ou entraîner,
dans la meilleure des hypothèses, de désagréables
contestations.
“Profils temporels”
(moments d’intervention pour exécuter des
opérations pendant la période de garantie).
2 12/99
• Es muy importante observar escrupulosamente lo
indicado en el fascículo. Efectuar las intervenciones de
manera superficial o incluso olvidarse de efectuarlas,
puede ocasionar daños al comprador, al vehículo de
motor, etc… o causar, en el más simple de los casos,
desagradables reclamaciones.
“Esquemas de tiempos”
(tiempos de trabajo para operaciones durante
el periodo de garantía).
NOTE DI
CONSULTAZIONE
HINWEISE
ZUM NACHSCHLAGEN
NOTES FOR
EASY CONSULTATION
NOTES POUR
LA CONSULTATION
NOTAS
DE
CONSULTA
A
B
C
D
E
CONOSCERE LA
MOTO
REGOLAZIONI
MECCANICHE
CARENATURE
COMPONENTI
MECCANICI
COMPONENTI
ELETTRICI
KENNTNIS DES
MOTORROLLERS
MECHANISCHE
EINSTELLUNGEN
VERKLEIDUNGEN
MECHANISCHE
KOMPONENTEN
ELEKTROKOMPONENTEN
GETTING TO KNOW
THE MOTOR-BIKE
MECHANICAL
ADJUSTMENTS
FAIRING REMOVAL
MECHANICAL
COMPONENTS
ELECTRICAL
COMPONENTS
CONNAITRE LA
MOTO
REGLAGES
MECANIQUES
CARENAGES
PIECES
MECANIQUES
PIECES
ELECTRIQUES
CONOCER LA
MOTO
REGULACIONES
MECANICAS
CARENADOS
COMPONENTES
MECÁNICOS
COMPONENTES
ELÉCTRICOS
OPERAZIONI
SIMMETRICHE Operazio-
ni da ripetere sull’altro
lato del gruppo o del
componente.
SVUOTARE IL CIRCUITO
Abbreviazioni
di redazione
F Figura
Cs Coppia di serraggio
Min. Minuti
P Pagina
Pr Paragrafo
S Sezione
Sc Schema
T Tabella
V Vite
Simbologia
operativa
Festgelegte
Abkürzungen
Abbildung
Anzugsmoment
Minuten
Seite
Kapitel
Abschnitt
Schema
Tabelle
Schraube
Arbeitssymbole
SYMMETRISCHE
OPERATIONEN
Operationen, die auf der
anderen Seite der Gruppe
oder der Komponente zu
wiederholen sind.
KREISLAUF ENTLEEREN
Abbreviations
Figure
Tightening torque
Minutes
Page
Paragraph
Section
Diagram
Table
Screw
Other
symbols
SYMMETRICAL
OPERATIONS.
Indicates that the operation
must be repeated on the
opposite side of the unit
or component.
EMPTY THE CIRCUIT
Figure
Couple de serrage
Minutes
Page
Paragraphe
Section
Schéma
Tableau
Vis
Symboles
opérationnels
OPERATIONS
SYMETRIQUES
Opérations à répéter sur
l’autre côté du groupe ou
de la pièce.
VIDER LE CIRCUIT
Abréviations
rédactionnelles
Simbología
operativa
OPERACIONES
SIMÉTRICAS
Operaciones que hay
que repetir en el otro
lado del grupo o del
componente
VACIAR EL CIRCUITO
Abreviaturas de
redacción
Figura
Par de apretado
Minutos
Página
Párrafo
Sección
Esquema
Tabla
Tornillo
3 12/99
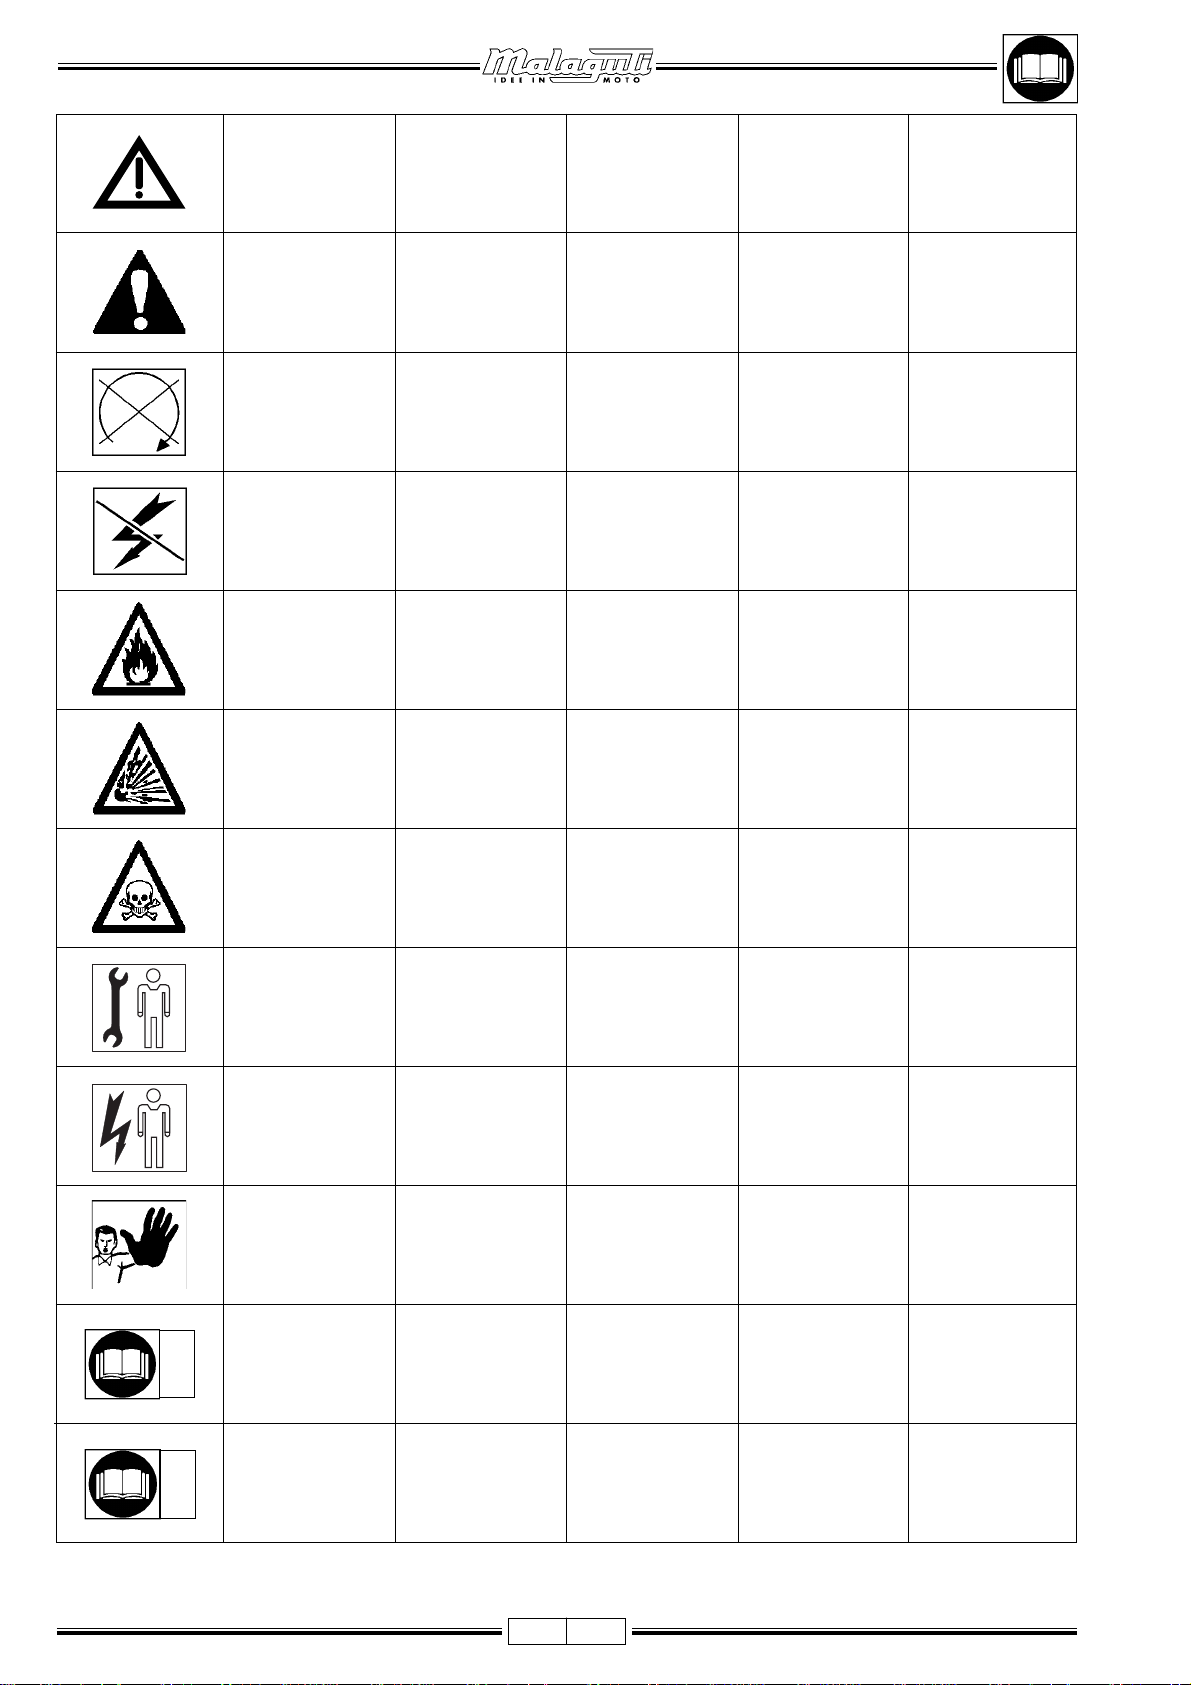
ATTENZIONE! Consigli prudenziali ed informazioni riguardanti la sicurezza del
motociclista (utente del motoveicolo) e la salvaguardia dell’integrità del motoveicolo stesso.
ATTENZIONE! Descrizioni riguardanti interventi pericolosi
per il tecnico manutentore o
riparatore, altri addetti all’officina o persone estranee, per l’ambiente, per il motoveicolo e le
attrezzature.
MOTORE SPENTO Evidenzia interventi da effettuare
assolutamente a motore
spento.
ACHTUNG! Ratschläge
und Informationen
betreffend die Sicherheit
des Kradfahrers (des
Kraftradbenutzers)und die
Unversehrtheit des
Motorrollers selbst.
ACHTUNG! Beschreibungen
betreffend Eingriffe mit Gefahren für:
den Wartungstechniker, Reparaturtechniker sowie sonstiges Werkstattpersonal oder Fremdpersonen,
für die Umwelt, das Kraftrad und die
Werkstattausrüstungen.
MOTOR AUS: Weist
auf Eingriffe hin, die
unbedingt bei
abgestelltem Motor
durchzuführen sind.
CAUTION!
Recommendations and
precautions regarding
rider safety and motor
vehicle integrity.
WARNING! Situations
entailing the risk of personal
injury to maintenance or repair
mechanics, other workshop
personnel or third parties, or
damage to environment,
vehicle or equipment.
ENGINE OFF. Indicates
operations to be
performed with engine
off.
ATTENTION! Conseils de
prudence et informations
concernant la sécurité du
motocycliste (utilisateur
du motocycle) et l’intégrité
du motocycle.
ATTENTION! Descriptions concernant
des interventions dange-reuses pour
le technicien chargé de l’entretien ou le
réparateur, pour les autres personnes
travaillant à l’atelier ou les personnes
étrangères, pour l’environnement, pour
le motocycle et les équipements.
MOTEUR ARRETE
Signale des interventions
à effectuer
impérativement moteur
arrêté.
ATENCIÓN! Consejos prudentes e informaciones que
hacen referencia a la
seguridad del motociclista
(usuario del vehículo a motor)
y la salvaguardia de la
integridad del vehículo mismo.
ATENCIÓN!Descripciones que hacen
referencia a intervenciones peligrosas
para el técnico de mantenimiento o
para el reparador, u otros encargados
de los Talleres o a personas extrañas,
para el ambiente, para el vehículo a
motor y para los equipos.
MOTOR APAGADO
Evidencia intervenciones
que hay que realizar
obligatoriamente con el
motor apagado.
TOGLIERE TENSIONE Prima dell’intervento descritto, scollegare il negativo
della batteria.
PERICOLO D’INCENDIO
Operazioni che potrebbero innescare incendio.
PERICOLO DI ESPLOSIONE Operazioni che potreb-
bero determinare una
esplosione.
ESALAZIONI TOSSICHE
Evidenzia il pericolo di intossicazione o infiammazione delle prime vie respiratorie.
MANUTENTORE MECCANICO Operazioni che pre-
vedono competenza in
campo meccanico/motoristico.
MANUTENTORE ELETTRICO Operazioni che preve-
dono competenza in campo elettrico/elettronico.
NO! Operazioni da evitare.
SPANNUNG
WEGNEHMEN: Vor der
Durchführung des
Eingriffs den Negativpol
der Batterie abtrennen.
BRANDGEFAHR:
Arbeiten, bei denen Brand
entstehen kann.
EXPLOSIONSGEFAHR:
Arbeiten, bei denen es zu
Explosionen kommen
kann.
GIFTIGE
AUSDÜNSTUNGEN: Weist
auf die Gefahr von
Vergiftung oder
Entzündung der direkten
Atemwege hin.
MECHANISCHER
WARTUNGSTECHNIKER:
Weist auf den
Zuständigkeitsbereich
Mechanik/Motortechnik
hin.
ELEKTRISCHER
WARTUNGSTECHNIKER:
Weist auf den
Zuständigkeitsbereich
Elektrik/Elektronik hin.
NEIN! Zu vermeidende
Operation.
POWER OFF. Indicates
that negative pole is to
be disconnected from
the battery before
performing the operation.
FIRE HAZARD. Indicates
operations which may
constitute a fire hazard.
RISK OF EXPLOSION.
Indicates operations
which may constitute a
risk of explosion.
TOXIC FUMES. Indicates
a possibility of
intoxication or
inflammation of the
upper respiratory tract.
MECHANICAL
MAINTENANCE.
Operations to be
performed only by an
expert mechanic.
ELECTRICAL
MAINTENANCE.
Operations be performed
only by an expert
electrical/electronic
technician.
NO! Operations to be
absolutely avoided.
METTRE HORS TENSION
Avant d’effectuer
l’intervention décrite,
débrancher le négatif de
la batterie.
DANGER D’INCENDIE
Opérations qui pourraient
provoquer un incendie.
DANGER D’EXPLOSION
Opérations qui pourraient
provoquer une explosion.
EMANATIONS
TOXIQUES
Signale le danger
d’intoxication ou
inflammation des
premières voies
respiratoires.
TECHNICIEN CHARGE
DE L’ENTRETIEN
MECANIQUE
Opérations impliquant
des compétences dans
le domaine mécanique/
motoriste.
TECHNICIEN CHARGE
DE L’ENTRETIEN
ELECTRIQUE
Opérations impliquant
des compétences dans
le domaine électrique/
électronique.
NON! Opérations à éviter.
QUITAR TENSIÓN
Antes de la intervención
descrita, desconectar el
negativo de la batería.
PELIGRO DE INCENDIO
Operaciones que podrían
provocar incendio.
PELIGRO DE
EXPLOSIÓN
Operaciones que podrían
determinar una explosión.
EXHALACIONES
TÓXICAS
Evidencia el peligro de
intoxicación o
inflamaciones de las
principales vías
respiratorias.
TÉCNICO ENCARGADO
DEL MANTENIMIENTO
MECÁNICO
Operaciones que prevén
competencia en el
campo mecánico/
motorístico.
TÉCNICO ENCARGADO
DEL MANTENIMIENTO
ELÉCTRICO
Operaciones que prevén
competencia en el
campo eléctrico/
electrónico.
¡NO! Operaciones que
hay que evitar.
M
R
MANUALE D’OFFICINA
DEL MOTORE Informazio-
ni deducibili da quella documentazione.
CATALOGO RICAMBI
Informazioni deducibili da
quella documentazione.
MOTORWERKSTATTHANDBUCH:
Aus dieser Unterlage zu
entnehmende
Informationen.
ERSATZTEILHANDBUCH:
Aus dieser Unterlage zu
entnehmende
Informationen.
4 12/99
ENGINE SERVICE
MANUAL. Indicates
information which may
be obtained by referring
to said manual.
SPARE PARTS
CATALOGUE. Indicates
information which may
be obtained by referring
to said catalogue.
MANUEL D’ATELIER DU
MOTEUR Informations
pouvant être déduites de
cette documentation
CATALOGUE DES
PIECES DETACHEES
Informations pouvant
être déduites de cette
documentation
MANUAL DE TALLER
DEL MOTOR
Informaciones que se
deducen de la
documentación.
CATALOGO PIEZAS DE
REPUESTO
Informaciones que se
deducen de la
documentación.
MADISON 125-150
PRE-DELIVERY -
N° INTERVENTO
1 Disimballo
Controllo estetico
Controllo dati
identificazione
2 Serraggi critici
Ruota anteriore
Ruota posteriore
Pinze freni
Ammortizzatori
Scarico e
marmitta
PRECONSEGNA -
AVANT LIVRAISON
EINGRIFF
Auspacken
Sichtkontrolle
Kontrolle der
Identifikationsdaten
Kritische
Befestigungen
Vorderrad
Hinterrad
Bremszangen
Stossdämpfer
Auspuff und
Auspuffschalldämpfer
INTERVENTION
Unpacking
Aesthetic control
Data control
identification
Critical
tightenings
Front wheel
Back wheel
Calipers
Shock absorbers
Exhaust and
silencer
EINGRIFFE
- ANTES DE LA ENTREGA
INTERVENTION
Décaissement
Contrôle esthétique
Contrôle des données
d’identification
Serrages
critiques
Roue avant
Roue arrière
Pinces freins
Amortisseurs
Echappement et tuyau
d’échappement
INTERVENCION SP
Desembalaje
Control “estético” A 13
Control datos de
identificación
Puntos de
apriete críticos
Rueda delantera D 0
Rueda trasera D 2
Pinza frenos D 6
Amortiguadores B 2
T ubo y silenciador
de escape
A 14
D12
Perno/fulcro
motore
Manubrio
Controllo livelli
3
(liquidi vari)
Batteria
Liquido di
raffreddamento
Olio motore
Olio trasmissione
Olio freni
Tabella
lubrificanti
4 Regolazioni
Gioco sterzo
Drehzapfen des
Motors
Lenkung
Standkontrolle
(verschiedene
Flüssigkeiten) (liquides divers)
Batterie
Kühlflüssigkeit
Motoröl
Getriebeöl
Bremsöl
T abelle der
Schmierstofftypen
Einstellungen
Spiel der Lenkung
Engine
pin/fulcrum
Handlebar
Levels control
(various fluids)
Battery
Coolant
Motor oil
T r ansmission oil
Brakes oil
Lubricants
table
Adjustments
Steering lash
Axe/point
d’appui moteur
Guidon
Contrôle des
niveaux
Batterie
Liquide
de refroidissement
Huile moteur
Huile transmission
Huile freins
Types
de lubrifiants
Réglages
Jeu direction
Perno/fulcro
motor
Manillar B 4
Control niveles
(líquidos varios)
Batería E 10
Líquido
refrigerante
Aceite motor A 32
Aceite transmisión A 34
Aceite frenos A 36
Tabla A 38
lubricantes
Regulaciones
Juego de la dirección B 4
D32
A30
Inclinazione manubrio
Ammortizzatori
Regime
minimo al ralentí
Fascio lumionoso
Neigung des Lenkers
Stossdämpfer
Leerlaufdrehzahl
Lichtbündel
Handlebar inclination
Shock absorbers
Idle
Luminous beam
Inclinaison guidon
Amortisseurs
Ralenti
Faisceau lumineux
Inclinación manillar B 4
Amortiguadores B 2
Régimen de giro
Haz luminoso E 4
5 12/99
B1
MADISON 125-150
N° INTERVENTO
5 Controlli vari
Pressione pneumatici
Avviamento
Bloccasterzo
Acceleratore
Comandi al
manubrio controls
Leve freni
Cavalletto laterale
Fusibili
6 Montaggi
Specchi
Parabrezza
EINGRIFF
Verschiedene Kontrollen
Reifendruck
Anlassen
Lenkersperre
Beschleuniger
Bedienungselemente
Bremshebel
Seitlicher Ständer
Schmelzsicherungen
Montagen
Rückspiegel
Windschutzscheibe
INTERVENTION
Various controls
Tyres pressure
Starting
Steering lock
Accelerator
Handlebar
Brake levers
Side stand
Fuses
Assembling
Rear-vision mirrors
Windscreen
INTERVENTION
Contrôles divers
Pression pneus
Démarrage
Verrou de direction
Accélérateur
Commandes
sur le guidon
Leviers de freinage
Béquille latérale
Fusibles
Montages
Rétroviseurs
Pare-brise
INTERVENCION SP
Controles varios
Presión neumáticos A 28
Arranque A 26
Seguro de dirección A 2 2
Acelerador A 20
Mandos en el
manillar
Palanca frenos C 14
Caballete lateral A 24
Fusibles E 10
Ensamblajes
Espejos retrovisores C 4
Parabrisas C 2
A18
Targa
7 Prova su strada
8 Pulizia generale
Kennzeichenschild
Fahrtest
Allgemeine Reinigung
Plate
Road testing
Overall cleaning
Plaque d’immatriculation
Test sur route
Nettoyage général
Placa de matrícula C 8
Prueba tráfico rodado
Limpieza general
•È consigliabile effettuare alcune regolazioni, ad esempio: inclinazione del manubrio, taratura degli ammortizzatori, pressione dei pneumatici, su specifiche indicazioni dell’acquirente. È consigliabile preventivamente, rendere
“attiva” la batteria. Fornire alla consegna del motociclo , il libretto di garanzia opportunamente timbrato e firmato
ed il manuale di uso e manutenzione.
•Es ist ratsam einige Einstellungen, wie z.B. die Neigung des Lenkers, die Eichung der Stossdämpfer, den
Reifendruck, auf Verlangen des Kunden durchzuführ en. Es ist ratsam die Batterie vorbeugend zu „aktivieren“.
Geben Sie bei der Lieferung des Kraftrads das abgestempelte und unterschriebene Garantiebuch und das
Gebrauchs- und Wartungshandbuch mit.
•It is advisable to carry out some adjustments to what herewith described: the inclination of the handlebar, the
shock absorbers calibration, and the pressure of the wheels according to customers’ specific requirements. It
is also advisable to “activate” battery, by charging it, beforehand. On the very moment of the motorbike deliv ery ,
be sure to also supply the guarantee booklet, duly stamped and signed, and the Use and Maintenance Manual.
•Nous conseillons d’effectuer certains réglages, comme : l’inclinaison du guidon, le calibrage des amortisseurs,
la pression des pneus, suivant les indications précises du client. Il est conseillé, au préalable, rendre la batterie
“active”. Au moment de la livraison du scooter, fournir le livret de garantie portant le tampon et la signatur e du
vendeur, ainsi que le manuel d’utilisation et d’entretien.
• Se aconseja efectuar algunas regulaciones, como por ejemplo: inclinación del manillar, ajuste de los amortiguadores,
presión de los neumáticos, ateniéndose a las específicas indicaciones del cliente. Se aconseja, “activar” previamente
la batería.
Al momento de la entrega del vehículo de motor no se olvide de entregar también el certificado de garantía
oportunamente timbrado y firmado junto con el manual de uso y mantenimiento.
6 12/99
MADISON 125-150
S INDICE
Dati tecnici
Disimballo
Controllo “estetico”
Dati per
l’identificazione data identificación
Elementi
principali components
Comandi al manubrio
Interruttore di
avviamento chiavi
Bloccasterzo
Cavalletto laterale
Cruscotto
Avviamento
A
elettrico starter
INHALT
Technische Daten
Auspacken
Sichtkontrolle
Identifikation
Hauptbestandteile
Bedienungselemente
Schlüssel-
Anlassschalter
Lenkersperre
Seitlicher Ständer
Armaturenbrett
Elektrostart
CONTENTS
Technical Data
Unpacking
“Aesthetic” control
Identification
Main
Controls
Switch-key
start
Steering lock
Side stand
Dashboard
Elettric
SOMMAIRE
Caract. techniques
Décaissement
Contrôle “esthétique”
Identification
Eléments
principaux
Commandes
Interrupteur de
démarrage clefs
Verrou de direction
Béquille latérale
T ableau de bord
Démarrage
électrique
ÍNDICE P
Datos técnicos 11
Desembalaje 13
Control “estético” 13
Datos de
Elementos
principales
Mandos en el manillar 18
Interruptor de
encendido/llaves
Seguro de dirección 22
Caballete lateral 24
T ablero de
instrumentos
Puesta en marcha
electrica
14
16
22
25
26
Mancato
avviamento
Pneumatici
Tubeless
Serbatoio
carburante
Serbatoio liquido
refrigerante tank
Olio motore
Olio trasmissione
Olio freni
Rabbocco
olio freni
Lubrificanti
Regolazione
minimo
Regolazione
ammortizzatore
Anlassen nicht
möglich
Schlauchlose
Reifen
Benzintank
Kühlflüssigkeitstank
Motoröl
Getriebeöl
Bremsenöl
Nachfüllung des
Bremsenöls
Kühlflüssigkeit
Regelung der
Leerlaufdrehzahl
Regelung des
Stoßdämpfers
Starting
failure
Tubeless
tyres
Fuel tank
Coolant
Motor oil
Transmission oil
Brakes oil
Brakes oil
topping up
Lubricants
Idle
tuning
Shock-absorber
tuning
Absence
de démarrage
Pneus
Tubeless
Réservoir
carburant
Réservoir liquide
réfrigérant
Huile moteur
Huile transmission
Huile freins
Mise à niveau
huile freins
Lubrifiants
Réglage
ralenti
Réglage
amortisseur
El motor
no arranca
Neumáticos
T ubeless
Depósito
combustible
Depósito líquido
refrigerante
Aceite motor 32
Aceite transmisión 34
Aceite frenos 36
Rellenado aceite
frenos
Lubricantes 38
Ajuste
ralentí
Regulación
amortiguador
27
28
29
30
37
1
2
B
Controllo
sterzo
Regolazione
inclinazione
manubrio
Regolazione
aggancio sella
Kontrolle der
Lenkung
Einstellung der
Neigung des
Lenkers
Einstellung der
Sattelkupplung
Steering
adjustment
Handlebar
inclination
adjustment
Saddle
adjustment
7 12/99
Contrôle
direction
Réglage
inclinaison
guidon
Réglage
encliquetage selle
Control
dirección
Ajuste
inclinación 4
manillar
Ajuste enganche
asiento
4
6

MADISON 125-150
S INDICE
Carrozzeria
Composizione delle
carenature
Parabrezza
Montaggio
specchietti laterali
Rimozione
specchietti laterali
Montaggio targa
Rimozione
coprimanubrio
Rimozione scudo
Rimozione
sgocciolatoio
Rimozione
cruscotto
Controllo
leve freni
INHALT
Karosserie
Zusammensetzung
CONTENTS
Body
Fairings
SOMMAIRE
Carrosserie
Composition des
der Verkleidungen carénages
Windschutzscheibe
Montage des
Seitenspiegels
Abmontieren des
Seitenspiegels
Montage des
Windscreen
Side mirrors
assembly
Side mirrors
removal
Plate assembly
Pare-brise
Montage rétroviseurs
latéraux
Dépose rétroviseurs
latéraux
Montage plaque
Kennzeichenschildes d’immatriculation
Abmontieren der
Lenkerverkleidung
Ab. der Frontschutzplatte
Abmontieren der
Tropfschale
Abmontieren des
Armaturenbrettes
Kontrolle der
Bremshebel
Handlebar cover
removal
Shield removal
Drainer
removal
Dashboard
removal
Brakes levers
control
Dépose protègeguidon
Dépose tablier
Dépose
gouttière
Dépose
tableau de bord
Contrôle leviers de
freinage
ÍNDICE P
Carrocería
Composición de 1
los carenados
Parabrisas 2
Montaje espejos
retrovisores laterales
Desmontaje espejos
retrovisores laterales
Montaje matrícula
Desmontaje protector
del manillar
Desmontaje escudo 10
Desmontaje
recogegotas
Desmontaje tablero
de instrumentos
Control palancas
de frenos
12
14
14
4
6
8
9
Rimozione
C
comandi
al manubrio
Rimozione
parafango
anteriore
Rimozione
paragambe
Rimozione
puntone
Rimozione
pedana
Rimozione vano
casco
Rimozione sella
Rimozione
carenatura
posteriore
Rimozione carter
coprimotore
Abmontieren der
Bedienungselemente
am Lenker
Abmontieren des
Vorderschutz-
Handlebar
controls
removal
Front fender
removal
Dépose des
commandes
au guidon
Dépose
garde-boue
bleches avant
Abmontieren Leg-guard removal Depose des protegedes beinschutzes jambes
Abmontieren der
Strebe
Abmontieren des
Trittbrettes
Abmontieren des
Helmfaches
Ab. des Sattels
Abmontieren der
hinteren
Seitenverkleidung
Abmontieren des
Motorgehäuses
Kickstand
removal
Footboard
removal
Helmet compartment
removal
Saddle removal
Rear
fairing
removal
Engine case
removal
Dépose
étrésillon
Dépose
tapis
Dépose coffre à
casque
Dépose selle
Dépose
carénage
arrière
Dépose
carter moteur
Desmontaje de los
mandos en el 16
manillar
Desmontaje
guardabarro 18
delantero
Desmontaje protección
para las piernas
Desmontaje perfil
carenado inferior
Desmontaje
plataforma apoyapiés
Desmontaje hueco
portacascos
Desmontaje asiento 28
Desmontaje
carenado 28
trasero
Desmontaje
cárter cubremotor
18
22
24
24
32
Rimozione parafango
posteriore
Rimozione codone
Rimozione
paraspruzzi
Abmontieren des
hinteren Schutzblechs
Ab. des Hecks
Abmontieren des
Spritzbleches
Rear fender
removal
Tail remov al
Mud flap
removal
8 12/99
Dépose
garde-boue arrière
Dépose queue
Dépose
bavette garde-boue
Desmontaje
guardabarros trasero
Desmontaje colín 34
Desmontaje
paragotas
32
34
MADISON 125-150
S INDICE
Rimozione ruota
anteriore
Rimozione ruota
posteriore
Rimontaggio ruota
posteriore
Rimozione
pompe freni
Rimozione pinza
freno anteriore
Rimozione pinza
freno posteriore
Verifica usura
pastiglie freno
anteriore/
posteriore
Sostituzione gruppo
pinza anteriore
Sostituzione gruppo
pinza posteriore
INHALT
Abmontieren des
Vorderrades
Abmontieren des
Hinterrades
Wiedereinbau des
Hinterrades
Abmontieren der
Bremspumpen
Abmontieren der
Bremszange vorne
Abmontieren der
Bremszange hinten
Kontrolle der
Abnutzung
der Bremsbeläge
vorne/hinten
Auswechselung der
Zangengruppe vorne
Auswechselung der
Zangengruppe hinten
CONTENTS
Front wheel
removal
Rear wheel
removal
Rear wheel
re-assembly
Brakes pumps
removal
Front brake
caliper removal
Rear brake caliper
removal
Wear-check of the
front/rear brake
pads
Front caliper unit
replacement
Rear caliper unit
replacement
SOMMAIRE
Dépose
roue avant
Dépose roue
arrière
Remontage roue
arrière
Dépose
pompes freins
Dépose pince
frein avant
Dépose
pince frein arrière
Vérification usure
plaquettes frein
avant/arrière
Substitution groupe
pince avant
Substitution groupe
pince arrière
ÍNDICE P
Desmontaje
rueda delantera
Remoción rueda
trasera
Reensamblaje
rueda trasera
Desmontaje
bomba de freno
Remoción zapatas
de freno delanteras
Desmontaje
pinza freno anterior
Control desgaste
pastillas freno 8
delantero/
trasero
Sustitución grupo
pinza anterior
Sustitución grupo
pinza posterior
0
2
2
4
6
6
8
10
D
Rimozione
marmitta
Abmontieren des
Auspuffschall-
Exhaust pipe
removal
Dépose pot
d’échappement
dämpfers
Forcella: rimozione
stelo-portaruota
Gabel: Abmontieren
der Gruppe Schaft /
Fork leg assembly
removal
Fourche: dépose
groupe tige
Radaufhängung porte-roue
Sostituzione olio
forcella
Forcella:
rimozione
Rimozione
commutatore
a chiave
Rimozione
avvisatore
acustico removal
Rimozione
serbatoio
carburante combustible
Rimozione gruppo
galleggiante
Auswechselung des
Gabelöls
Gabel:
Abmontieren
Abmontieren des
Schlüsselumschalters
Abmontieren des
Signalhorns
Abmontieren des
Benzintanks
Abmontieren der
Schwimmergruppe
Fork oil
replacement
Fork:
removal
Key-switch
removal
Acoustic
alarm
Fuel tank
removal
Float
removal
Substitution huile
fourche
Fourche:
dépose
Dépose
commutateur
à clef
Dépose
avertisseur
Déposer réservoir
de carburant
Dépose ensemble
flotteur
Remoción
silenciador 12
del escape
Horquilla: remoción
grupo barra 14
portarrueda
Sustitución aceite
horquilla
Horquilla:
remoción
Desmontaje
interruptor 20
de llave
Desmontaje
claxon 20
Desmontaje
depósito de 22
Remoción grupo
flotador
18
18
24
Rimozione
radiatore
Filtro aria:
manutenzione
Abmontieren der
Kühler
Luftfilter:
Wartung
Radiator
removal
Air cleaner:
maintenance
9 12/99
Dépose
radiateur
Filtre à air:
entretien
Remoción
radiador
Filtro de aire:
mantenimiento
26
28
MADISON 125-150
S INDICE
Rimozione
motore
D
Verifica
dimensionale
del telaio del chasis
Bifaro anteriore
Sostituzione
lampadine
Luce
di posizione light
Regolazione
fascio
luminoso
Fanale posteriore
Indicatori di
direzione
Cruscotto:
componenti
E
interni componentes internos
INHALT
Abmontieren des
motors
Kontrolle der Rah-
menabmessungen
Doppelleuchte vorne
Auswechselung
der Glühbirnen
Standlicht
Regelung des
Lichtbündels
Rücklicht
Richtungsan-
zeiger
Armaturenbrett:
Innenkomponenten
CONTENTS
Engine
removal
Dimensional
frame check
The two headlights
Light bulbs
replacement
Parking
Beam
adjustment
Taillight
Direction
indicators
Dashboard:
internals
SOMMAIRE
Depose
du moteur
Contrôle dimensionnel du cadre
Double optique avant
Substitution
ampoules
Feux
de position
Réglage
faisceau
lumineux
Feu arrière
Indicateurs de
direction
Tableau de bord:
éléments internes
ÍNDICE P
Remoción
del motor
Comprobación de
las dimensiones 33
Doble faro anterior 0
Sustitución
lamparillas
Luces
de estacionamiento
Regulación
haz 4
luminoso
Luz trasera 4
Indicadores de
dirección
Tablero de
instrumentos: 6
30
0
2
6
Sostituzione
lampadine
Regolatore
Bobina
Batteria
Intervento di
preconsegna
Fusibili
Ubicazione
componenti
elettrici
Cablaggi
lato sinistro
Cablaggi
lato destro
Impianto
elettrico diagram
Legenda colori dei
cavi elettrici
Auswechselung der
Glühbirnen
Regler
Zündspule
Batterie
Eingriff vor
der Lieferung
Schmelzsicherung
Unterbringung
der elektrischen
Komponenten
Verkabelung
linke Seite
Verkabelung
rechte Seite
Elektroanlage
Farblegende der
Elektrokabel
Bulb
replacement
Regulator
Spark coil
Pre-delivery
intervention
on battery
Fuses
Location of
electrical
components
Left-sided
harness
Right-sided
harness
Wiring
Electric cable colours
legend
Remplacement
lampes
Régulateur
Bobine
Batterie
intervention
avant livraison
Fusibles
Emplacement
pièces
électriques
Câblages
côté gauche
Câblages
côté droit
Circuit
électrique
Légende couleurs
des fils électriques
Sustitución
lamparillas
Regulador 8
Bobina 8
Batería Operación a
efectuar antes de la 10
entrega
Fusibles 10
Ubicación
componentes 12
eléctricos
Cableados lado
izquierdo
Cableados lado
derecho
Circuito
eléctrico
Leyenda colores de
los cables eléctricos
13
14
15
16
6
10 12/99
MADISON 125-150
A
DATI
TECNICI
CARATTERISTICHE
GENERALI
Passo
Lunghezza
Larghezza
Altezza max.
Altezza sella
Peso a vuoto
MOTORE
YAMAHA 4 T. - SOHC
N° Cilindri
Alesaggio
per corsa
Cilindrata
Rapporto di
compressione
Accensione
elettronica
CAPACITÀ
Carburante
Riserva
carburante
Olio motore
Olio trasmissione
Liquido
refrigerante
TRASMISSIONE
Variatore
automatico con
trasmissione
primaria a cinghia
trapezoidale
Frizione centrifuga
a secco
ALIMENTAZIONE
MOTOR
MERKMALE
Achsabstand
Länge
Breite
Höhe
Sattelhöhe
Leergewicht
ENGINE
Anzahl Zylinder
Bohrung
mal Hub pour la course
Hubraum
Kompressionsverhältnis
Elektronische
Zündung
FASSUNGSVERMÖGEN
Benzin
Benzinreserve
Motoröl
Getriebeöl
Kühlflüssigkeit
GETRIEBE
Drehzahl-
automatik mit
Primärantrieb und
Keilriemen
Trockenfliehkraftkupplung
SPEISUNG
TECHNISCHE
DATEN
ALLGEMEINE
TECHNICAL
CARACTERISTIQUES
DATA
GENERAL
CHARACTERISTICS
Wheelbase
Length
Width
Height
Saddle height
Dry weight
MOTEUR
No. of cylinders
Bore for stroke
Displacement
Compression
ratio
Electronic
ignition
CAPACITY
Fuel
Fuel reserve
Motor oil
Transmission oil
Coolant
TRANSMISSION
Automatic variator
with primary
V-belt
drive
Centrifugal
dry clutch
POWER SUPPLY
CARACTERISTIQUES
Pas
Longueur
Largheur
Hauteur
Hauteur selle
Poids à vide
MOTOR
N° Cylindres
Alésage
Cylindrée
Rapport de
compression
Allumage
électronique
CAPACITE
Carburant
Réserve de
carburant
Huile moteur
Huile transmission
Liquide
réfrigérant
TRANSMISSION
Variateur
automatique avec
transmission
primaire à courroie
trapézoïdale
Embrayage
centrifuge à sec
ALIMENTATION
TECHNIQUES
GENERALES
DATOS
TÉCNICOS
CARACTERÍSTICAS
GENERALES
Paso 1.445 mm
Largo 2.030 mm
Ancho 860 mm
Altura máxima 1.300 mm
Altura asiento 780 mm
Peso en vacío 150 Kg
Nº Cilindros 1
Diámetro por Ø 53,7 x 54,8 mm
carrera Ø 59,5 x 54,8 mm (*)
Cilindrada
Relación de
compresión
Encendido
electrónico
CAPACIDAD l.
Combustible 12
Reserva de
combustible
Aceite motor 1,4
Aceite transmisión 0.14
Líquido de
refrigeración
TRANSMISIÓN
Variador
automático con
transmisión primaria de correa
trapezoidal
Embrague
centrífugo en seco
ALIMENTACIÓN
124 cm
152 cm
11 ± 0,5
3
3
(*)
-
3
1
-
Carburatore
TEIKEI /5 DS - STARTER AUTOMATICO
Benzina
senza piombo
(*) MADISON 150
Vergaser
Bleifreies
Benzin
Carburettor
Unleaded
petrol
11 12/99
Carburateur
Essence
sans plomb
Carburador
Gasolina sin
plomo
MADISON 125-150
A
TELAIO
Monotrave in
tubolare d’ acciaio,
sdoppiato all’altezza della pedana
SOSPENSIONI
Anteriore:
forcella oleodinamica, telescopica
Steli
Corsa
Posteriore:
n° 2 ammortizzatori
idraulici con
precarica molla
regolabile
Corsa
FRENI
Anteriore:
a disco, con
trasmissione
oleodinamica
a 2 pistoncini
Posteriore:
a disco con
trasmissione
oleodinamica
a 2 pistoncini
IMPIANTO
ELETTRICO
Batteria
Generatore:
volano alternatore
Proiettore anteriore
con lampada al
quarzo (alogena)
Luce di posizione
anteriore
Luce di posizione
posteriore
con lampada stop
incorporata
Avvisatore
acustico alarm
Indicatore
di direzione
anteriore
Indicatore
di direzione
posteriore
Luce targa
RAHMEN
Einzelstahlrohr
rahmen, unterteilt
auf der Höhe des
FRAME
Single steel tube
branched at
footboard
Trittb re tt s niveau du tapis
AUFHÄNGUNGEN
Vorne:
Gabel
teleskopisch
Schäfte
Hub
Hinten:
2 Hydraulik
stoßdämpfer mit
einstellbarer
Vorbe
Hub
BREMSEN
Vorne:
Scheibenbremse
mit öldynamischer
2-SteuerkolbenTransmission
Hinten:
Scheibenbremse
mit öldynamischer
2-SteuerkolbenTransmission
ELEKTRISCHE
ANLAGE
Batterie
Generator: Wechsel-
stromschwungrad
Scheinwerfer
vorne mit (Halogen-)
Quarzlampe
Standlicht
vorne
Standlicht
hinten mit
integrierter
Bremslampe
Signalhorn
Richtungsanzeiger
vorne
Richtungsanzeiger
hinten
Beleuchtung des
SUSPENSIONS
Front:
hydraulic
telescopic fork
Stems
Travel
Rear:
No. 2 hydraulic
shock absorbers
with adjustable
pre-loaded spring
Travel
BRAKES
Front:
Oleo-dynamic
transmission disc
brakes working with
two small pistons
Rear:
Oleo-dynamic
transmission disc
brakes working with
two small pistons
ELECTRICAL
EQUIPMENT
Battery
Generator:
alternator flywheel
Front quartz
lamp
(halogenous)
Front parking
light
Rear parking
light with
built-in
stoplight
Acoustic
Front
direction
indicator
Rear
direction
indicator
Plate lamp
Kennzeichenschildes
CADRE
Monocadre
tubulaire d’acier,
se dédoublant au
SUSPENSIONS
Avant: fourche
oléodynamique,
télescopique
Tiges
Course
Arrière:
2 amortisseurs
hydrauliques avec
pré-bandage
ressort réglable
Course
FREINS
Avant:
à disque, avec
transmission
oléodynamique
à 2 pistons
Arrière:
à disque avec
transmission
oléodynamique
à 2 pistons
CIRCUIT
ELECTRIQUE
Batterie
Générateur:
volant alternateur
Projecteur avant
avec ampoule au
quartz (halogène)
Feu de position
avant
Feu de position
arrière avec
ampoule stop
incorporée
Avertisseur
Indicateur de
direction
avant
Indicateur de
direction
arrière
Feu de plaque
CHASIS
Larguero único en
llanta tubular de
acero desdoblado
a la altura del estribo
SUSPENSIONES
Delantera: Horquilla
oleodinámica,
telescópica.
Barras Ø
Carrera 97 mm
Trasera:
N° 2 amortiguadores hidráulicos con
precarga de muelle
regulable
Carrera 90 mm
FRENOS
Delantero:
de disco, con
transmisión
oleodinámica
de 2 pistoncitos
Trasero:
de disco con
transmisión
oleodinámica
de 2 pistoncitos
CIRCUITO
ELÉCTRICO
Batería 12V 9Ah MF
Generador:
volante alternador
Faro delantero con
lámpara de cuarzo
(halógena)
Luz de estacionamiento delantera
Luz de estacionamiento trasera con
luz de parada
incorporada
Claxon
Indicador de
dirección
delantero
Indicador de
dirección
trasero
Luz de
matrícula
36
mm
Ø
240
mm
Ø
220
mm
12V 85W
12V
12 12/99
MADISON 125-150
A
DISIMBALLO
•Disimballare il motociclo attenendosi alle indicazioni fornite sull’imballo stesso che dovrà essere poi smaltito, in conformità alle normative vigenti.
CONTROLLO “ESTETICO”
•Verificare visiv amente il corretto montaggio di tutti i componenti in materiale plastico e contemporaneamente, la totale
assenza di graffi, segni, ecc... su ogni parte dello scooter.
AUSPACKEN
• Das Kraftrad unter Befolgung der auf der Verpackung
geschilderten Anweisungen auspacken. Die V erpackung
gemäß den im jeweiligen Land geltenden Vorschriften
entsorgen.
SICHTKONTROLLE
•Die korrekte Montage aller Kunststoffteile durch
Sichtkontrolle überprüfen und gleichzeitig sicherstellen,
daß auf dem Motorroller keine Kratzer, Zeichen, usw.
vorhanden sind.
DECAISSEMENT
• Déballer la moto en observant les indications fournies
sur l’emballage qui ensuite devra être éliminé
conformément aux réglementations en vigueur.
UNPACKING
•Unpack the motorcycle by following the instructions
supplied with the packing itself, which will have to be
discharged in conformity with the regulation in force.
“AESTHETIC” CONTROL
• Have a look and verify the correct installation of all
plastic components and at the same time that there
aren’t any scratches or marks, etc..., on each part of
the scooter.
DESEMBALAJE
•Desembalar el vehículo a motor ateniéndose a las
instrucciones indicadas sobre el embalaje. Eliminar
sucesivamente el embalaje en el respeto de las normas
vigentes.
CONTROLE “ESTHETIQUE”
• Vérifier visuellement le montage correct de tous les
éléments en matière plastique et en même temps,
l’absence totale d’éraflures, de marques, etc. sur chaque
partie du scooter.
13 12/99
CONTROL “ESTETICO”
•Controlar visualmente el correcto montaje de todos los
componentes de material plástico y al mismo tiempo
verificar que no haya arañazos, señales, etc... en
ninguna parte del scooter.
MADISON 125-150
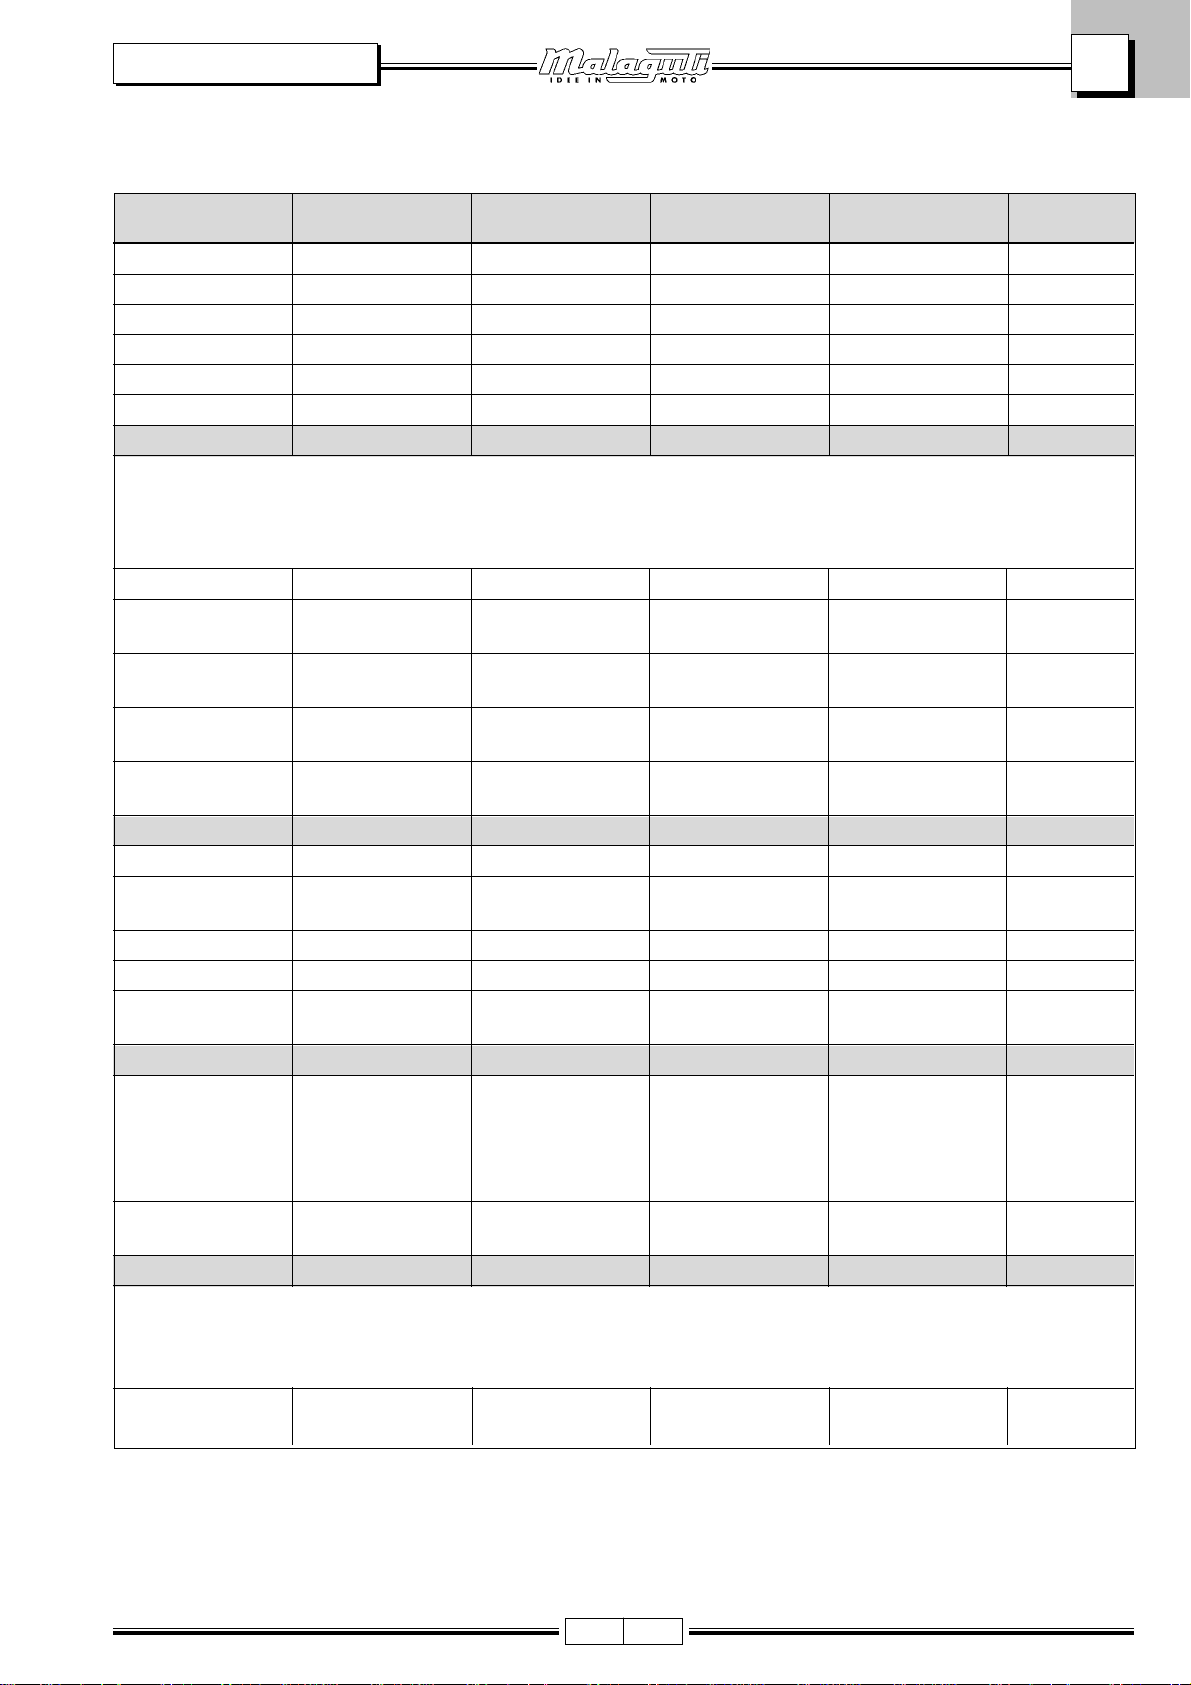
DATI PER L’IDENTIFICAZIONE
TELAIO - Per accedere al numero di identificazione del telaio, procedere come segue:
- Posizionare lo scooter sul cavalletto centrale.
- Inserire la chiave di accensione e ruotarla in senso antiorario, (senza premere) per sbloccare la
serratura della sella.
- Sollevare la sella.
- Rimuovere il coperchietto (A - F. 1) posto sul fondo del vano portacasco, al di sotto del quale, è
visibile il numero di telaio.
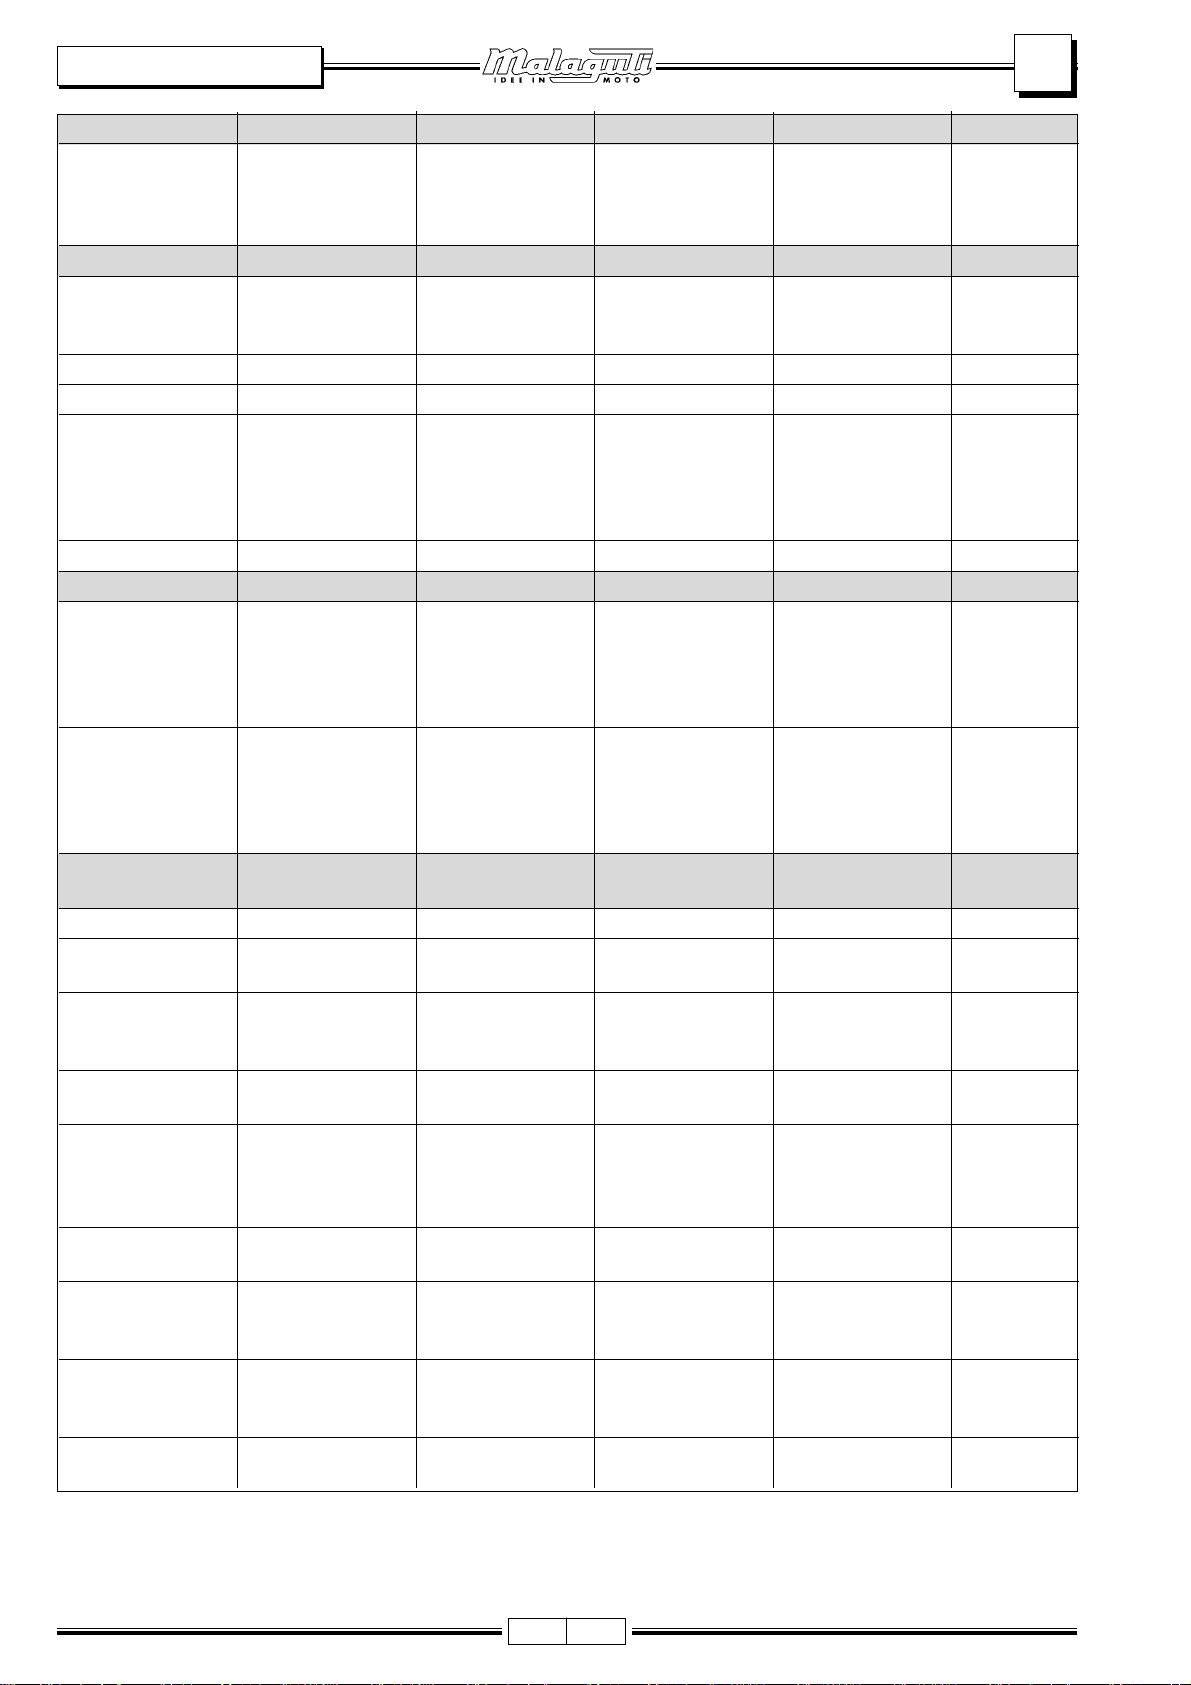
M O T OR E - Il numero di identificazione del motore, è visibile sul carter sinistro del motore stesso (B - F. 2).
IDENTIFIKATIONSDATEN
RAHMEN - Um Zugang zur Identifikationsnummer des Rahmens zu erhalten, folgendermaßen vorgehen:
- Den Motorroller auf dem Zentralen Ständer aufblocken.
- Den Zündschlüssel einstecken und (ohne zu drücken) gegen den Uhrzeigersinn drehen, um das
Schloss des Sattels zu öffnen.
- Den Sattel hochklappen.
- Den Deckel (A - Abb. 1) auf dem Boden des Helmfaches entfernen, um die darunter angebrachte
Identifikationsnummer zu kontrollieren.
M O T O R - Die Identifikationsnummer des Motors ist von der linken Seite des Motorgehäuses (B - Abb. 2)
sichtbar.
A
F. 1
A
B
F. 2
14 12/99
MADISON 125-150
IDENTIFICATION DATA
FRAME - In order to read the identification frame number proceed as follows:
- Place the scooter on its main stand
- insert the ignition key and rotate it anti-clockwise, (without making any pressure) in order to unblock
the saddle lock
- lift the saddle
- remove the small cover (A - F. 1) placed on the bottom of the helmet compartment. Once removed the
frame number will be visible.
ENGINE - The engine identification number can be seen on the left case of the engine itself (B - F. 2).
ELEMENTS D’IDENTIFICATION
CADRE - accéder au numéro d’identification du châssis, procéder de la manière suivante :
- positionner le scooter sur la béquille centrale ;
- introduire la clef de contact et la tourner dans le sens inverse des aiguilles d’une montre, (sans
appuyer) pour débloquer la serrure de la selle ;
- soulever la selle :
- enlever le petit couvercle (A - F. 1) placé sur le fond du coffre à casque, sous lequel on peut voir le
numéro d’identification du châssis.
A
MOTEUR - le numéro d’identification du moteur est visible sur le carter gauche du moteur (B - F. 2).
DATOS DE IDENTIFICACIÓN
CHASIS - Para acceder al número de identificación del chasis, efectuar las siguientes operaciones:
- Colocar el scooter sobre el caballete central.
- Introducir la llave de contacto y girarla en el sentido contrario a las agujas del reloj, (sin
presionar) para desbloquear la cerradura del asiento.
- Levantar el asiento.
- Quitar la tapa (A - F. 1) colocada en el fondo del hueco portacascos, debajo del cual se encuentra
el número de chasis.
M O TOR - El número de identificación del motor está indicado sobre el cárter izquierdo del motor (B - F. 2).
15 12/99
MADISON 125-150
A
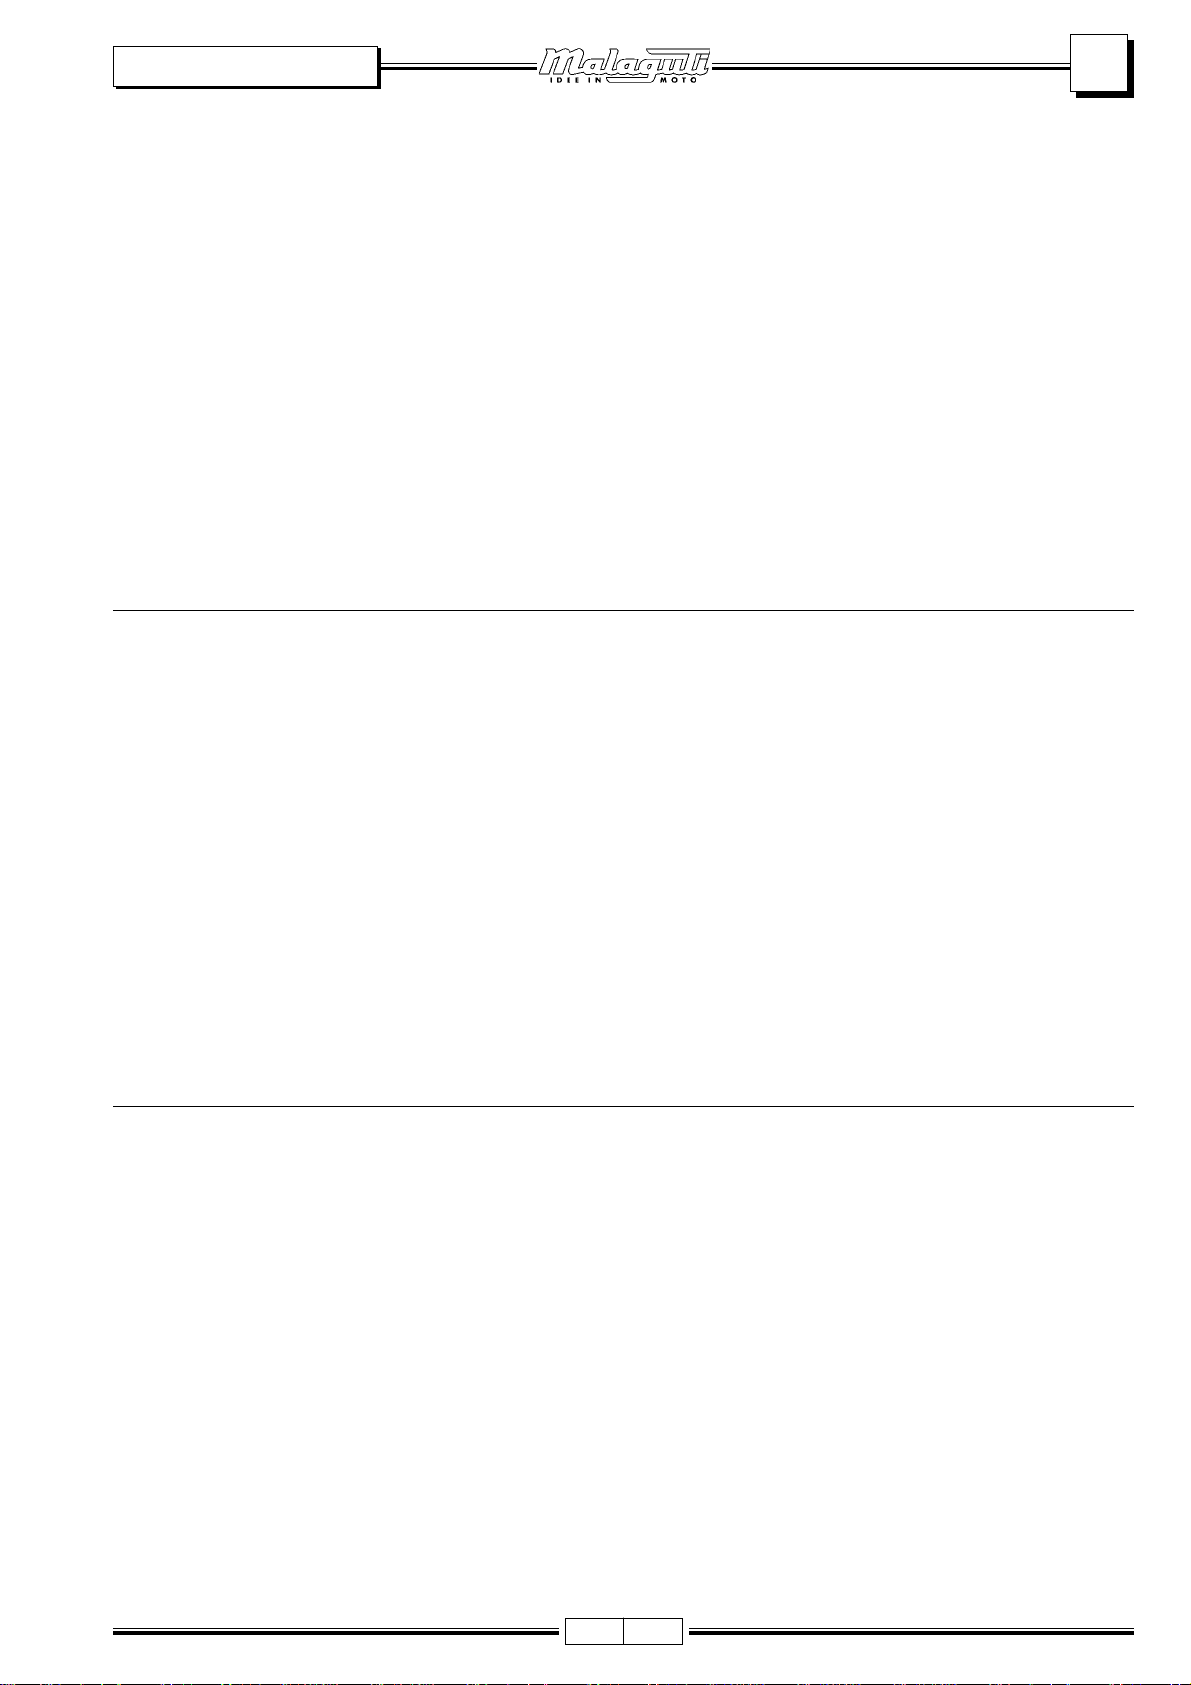
IDENTIFICAZIONE ELEMENTI PRINCIPALI
(Lato destro)
1) Parabrezza
2) Indicatore direzionale anteriore sinistro
3) Indicatore direzionale anteriore destro
4) Luce di posizione
5) Faro anteriore
6) Serbatoio carburante
7) Gancio antifurto
8) Marmitta
9) Vano porta casco
10) Sella biposto
KENNZEICHNUNG DER HAUPTELEMENTE
(Rechte Seite)
1) Windschutzscheibe
2) Richtungsanzeiger vorne links
3) Richtungsanzeiger vorne rechts
4) Standlicht
5) Scheinwerfer vorne
6) Benzintank
7) Diebstahlschutzhaken
8) Auspuffschalldämpfer
9) Helmfach
10) Zweisitziger Sattel
1
2
4
5
F. 3
10
3
9
8
7
6
IDENTIFICATION OF MAIN COMPONENTS
(Right side)
1) Windscreen
2) Front direction indicator on the left
3) Front direction indicator on the right
4) Parking light
5) Front light
6) Fuel tank
7) Anti-theft hook
8) Silencer
9) Helmet compartment
10) Two-seats saddle
IDENTIFICATION DES ELEMENTS
PRINCIPAUX (Côté droit)
1) Pare-brise
2) Clignotant avant gauche
3) Clignotant avant droit
4) Feu de position
5) Feu avant
6) Réservoir carburant
7) Anneau antivol
8) Pot d’échappement
9) Coffre à casque
10) Selle à deux places
IDENTIFICACIÓN DE LOS ELEMENTOS
PRINCIPALES (Lado derecho)
1) Parabrisas
2) Indicador de dirección delantero izquierdo
3) Indicador de dirección delantero derecho
4) Luz de estacionamiento
5) Faro delantero
6) Depósito combustible
7) Gancho antirrobo
8) Silenciador de escape
9) Hueco portacascos
10) Asiento biplaza
16 12/99
MADISON 125-150
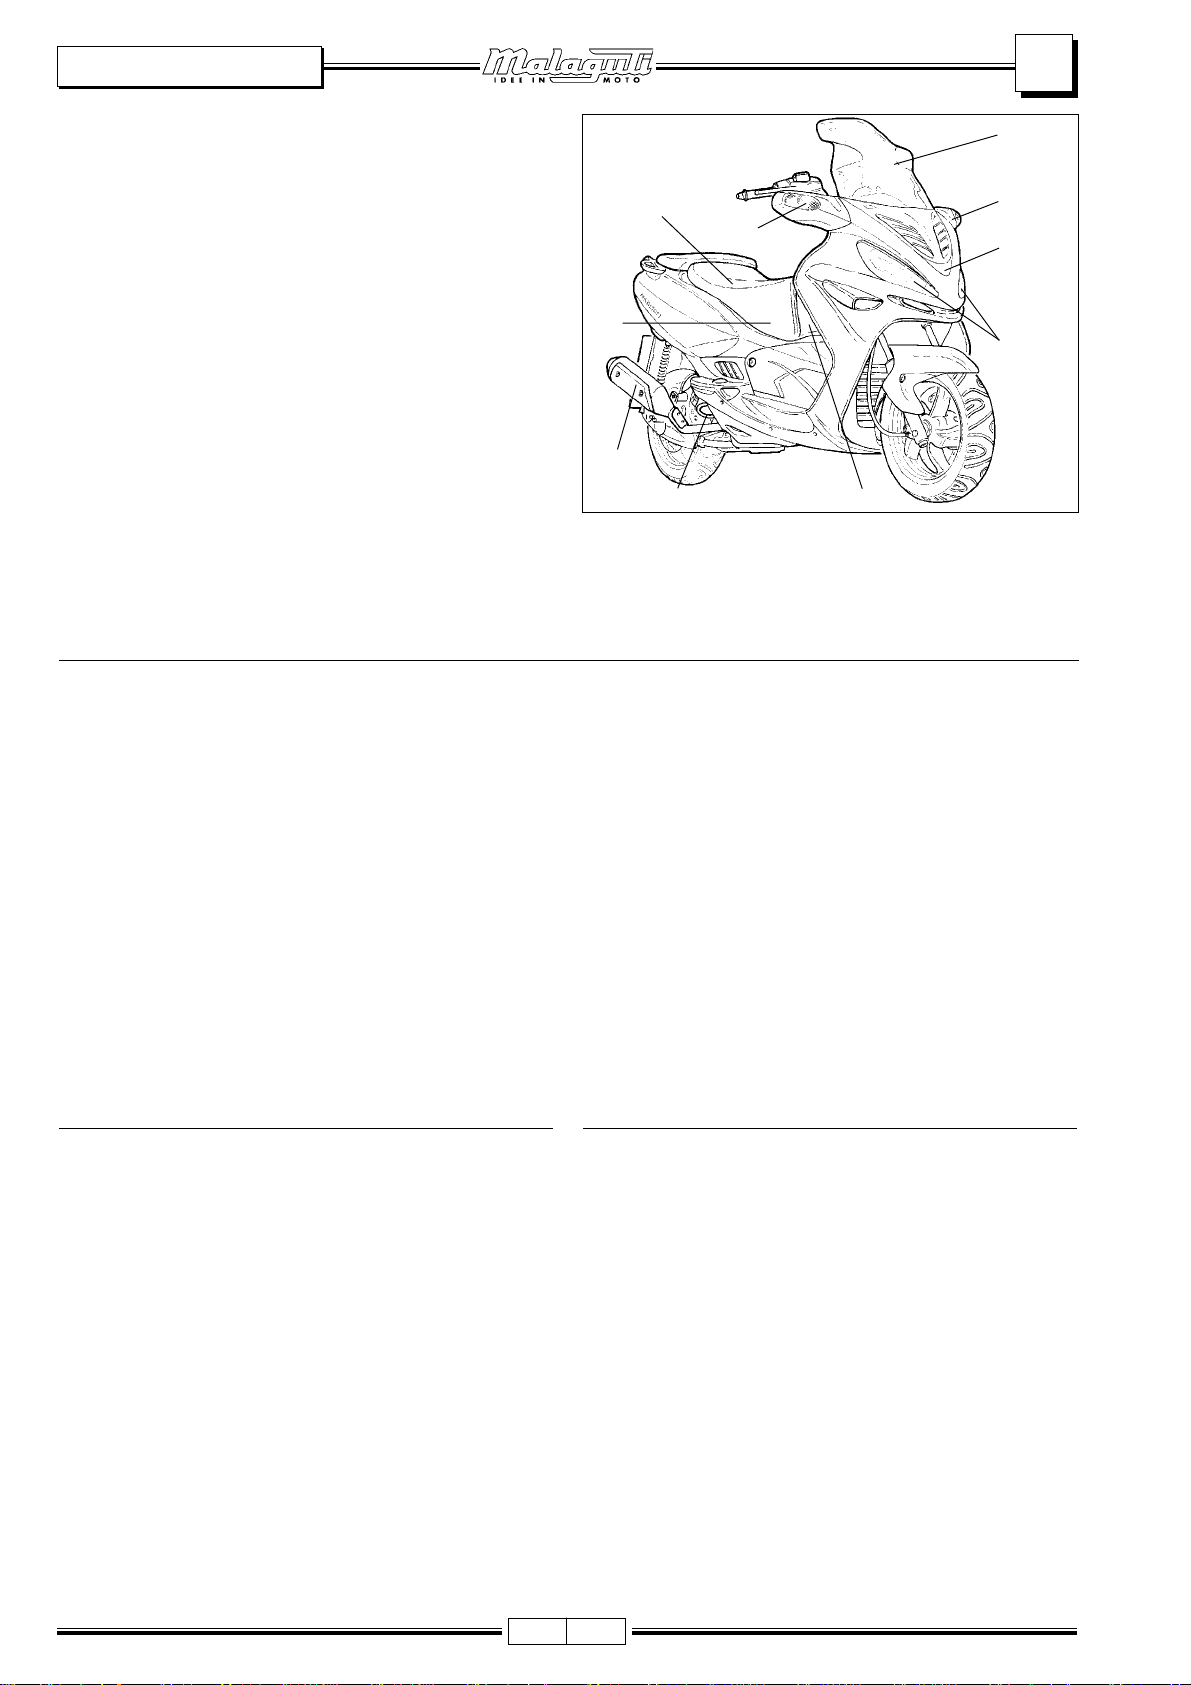
IDENTIFICAZIONE ELEMENTI PRINCIPALI
(Lato sinistro)
11) Commutatore a chiave
12) Vano porta oggetti
13) Luci di posizione e arresto
14) Indicatori di direzione posteriori
15) Porta targa
16) Filtro aria
17) Cavalletto centrale
18) Carburatore
19) Cavalletto laterale
20) Alloggio batteria
21) Vano centrale porta oggetti
22) Bauletto paragambe
23) Serbatoio liquido di raffreddamento
24) Specchio destro
25) Specchio sinistro
F. 4
22
25
23
21
20
18
19
24
12
161117
A
10
13
14
15
KENNZEICHNUNG DER HAUPTELEMENTE
(Linke Seite)
11) Schlüsselumschalter
12) Ablagefach
13) Stand- und Bremslichter
14) Richtungsanzeiger hinten
15) Kennzeichenschildträger
16) Luftfilter
17) Zentraler Ständer
18) Vergaser
19) Seitlicher Ständer
20) Batteriefach
21) Zentrales Ablagefach
22) Beinschutz-Kofferfach
23) Kühlflüssigkeitstank
24) Rechter Rückspiegel
25) Linker Rückspiegel
IDENTIFICATION DES ELEMENTS
PRINCIPAUX (Côté gauche)
11) Démarreur à clef
12) Boîte à gants
13) Feu de position et stop
14) Clignotant arrière
15) Porte plaque
16) Filtre à air
17) Béquille centrale
18) Carburateur
19) Béquille latérale
20) Logement batterie
21) Boîte à gants centrale
22) Tablier avant
23) Réservoir liquide de refroidissement
24) Rétroviseur droit
25) Rétroviseur gauche
IDENTIFICATION OF MAIN COMPONENTS
(Left side)
11) Key-switch
12) Glove compartment
13) Parking- and stoplights
14) Rear direction indicators
15) Plate holder
16) Air cleaner
17) Main stand
18) Carburettor
19) Side stand
20) Battery compartment
21) Central glove compartment
22) Leg-guard case
23) Coolant tank
24) Right mirror
25) Left mirror
IDENTIFICACIÓN DE LOS ELEMENTOS
PRINCIPALES (Lado izquierdo)
11) Interruptor de llave
12) Guantera portaobjetos
13) Luces de estacionamiento y parada
14) Indicadores de dirección traseros
15) Soporte de matrícula
16) Filtro de aire
17) Caballete central
18) Carburador
19) Caballete lateral
20) Alojamiento batería
21) Habi táculo central portaobjetos
22) Cofre protección para las piernas
23) Depósito líquido refrigerante
24) Espejo retrovisor derecho
25) Espejo retrovisor izquierdo
17 12/99
MADISON 125-150
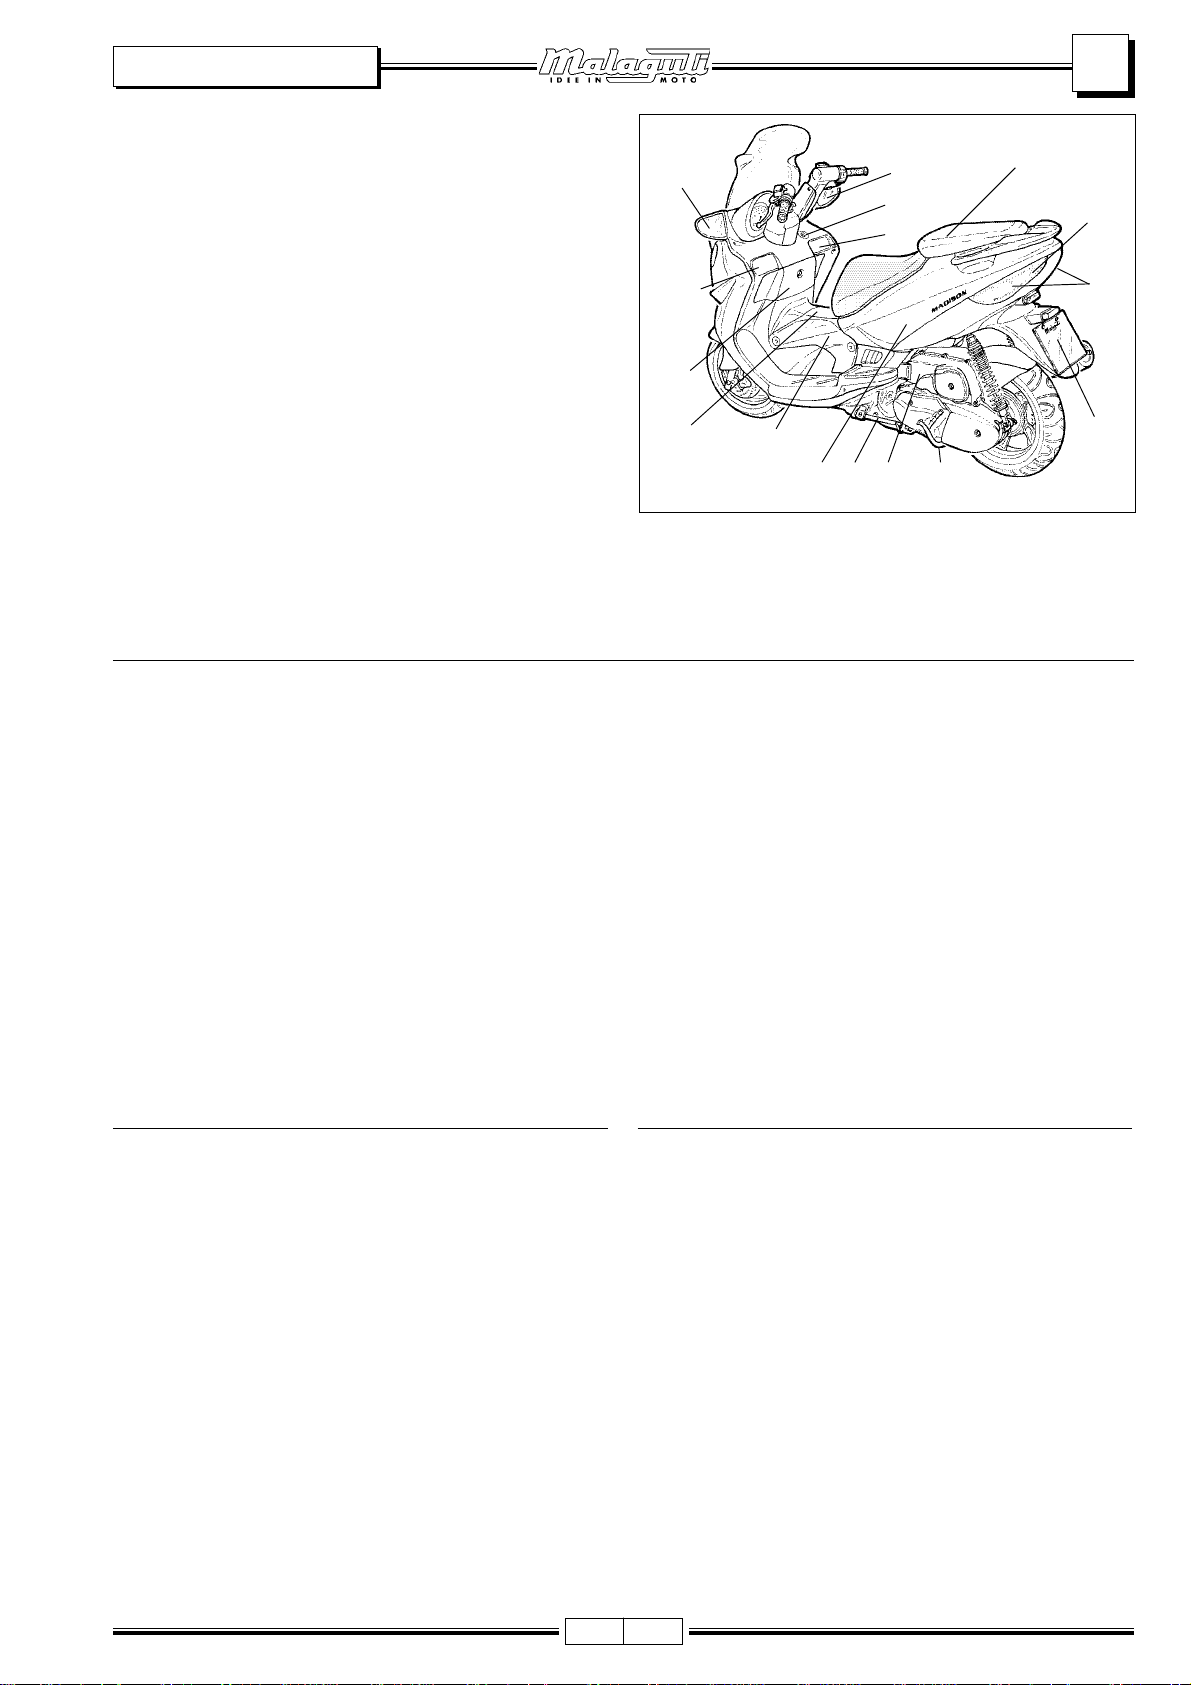
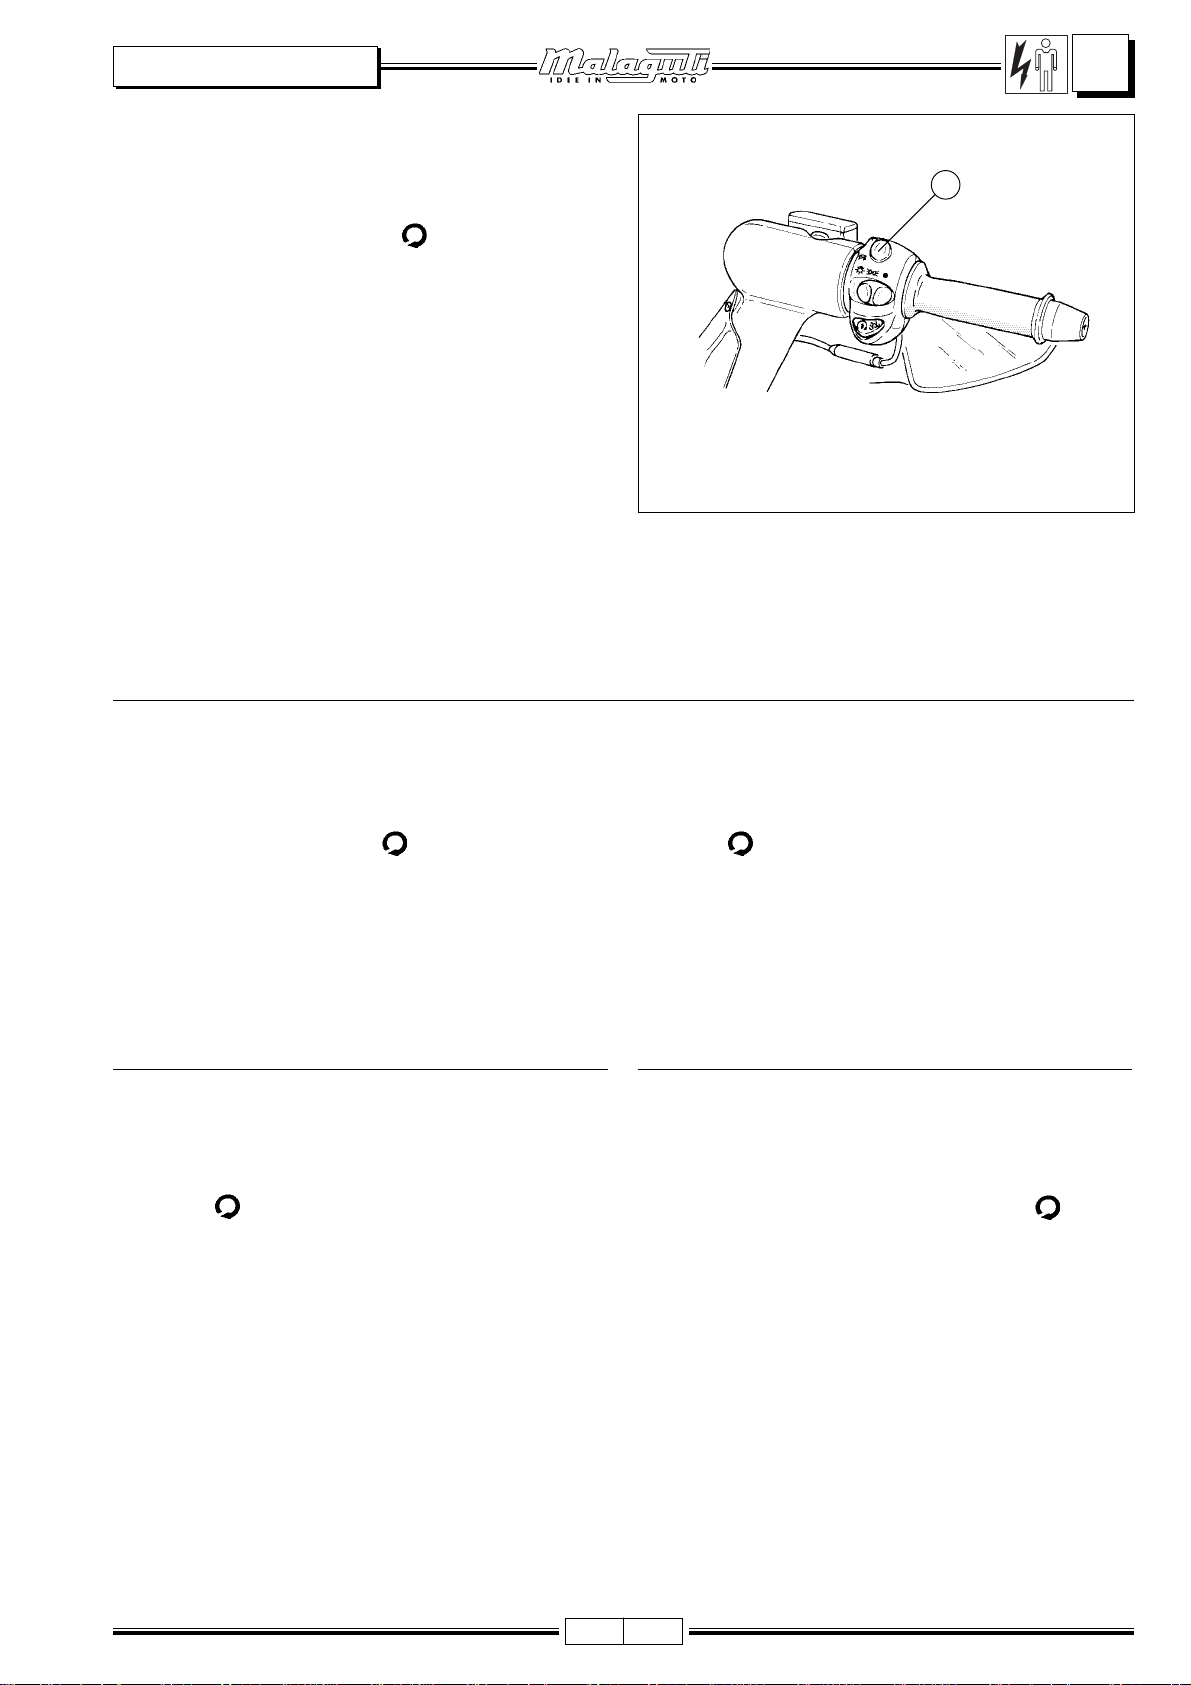
COMANDI AL MANUBRIO
Comando destro
1 ) Serbatoio olio freno anteriore
2 ) Leva freno anteriore
3 ) Manopola acceleratore
4 ) Pulsante avviamento elettrico.
5 ) Interruttore luci:
a destra = spento
posizione centrale = luci di posizione e cruscotto
a sinistra = luci anabbaglianti.
6 ) Interruttore d’emergenza, arresto motore.
Posizione - Avviamento motore
Posizione - Arresto motore
A
BEDIENUNGSELEMENTE
Bedienungselement rechts
1 ) Öltank Bremsen vorne
2 ) Bremshebel vorne
3) Drehgasgriff
4 ) Druckknopf elektrische Zündung
5) Lichtschalter:
nach rechts = aus
in der Mitte = Stand- und Armaturenlichter
nach links = Abblendlichter
6) Notschalter, Motor ausschalten
Position - Motor anlassen
Position - Motor ausschalten
1
6
3
4
2
F. 6F. 5
18 12/99
5
MADISON 125-150
HANDLEBAR CONTROLS
Right control
1 ) Front brake oil tank
2 ) Front brake lever
3 ) Accelerator handle
4) Electric start but ton
5 ) Lights button:
on the right = switched off
in the central position = parking and dashboard lights
on the left = traffic beam
6 ) Emergency button, engine cut-off device
Position - Starting motor
Position - Stop motor
A
COMMANDES SUR LE GUIDON
Commande de droite
1 ) Réservoir huile frein avant
2 ) Levier freinage avant
3 ) Poignée accélérateur
4 ) Touche démarrage électrique
5 ) Interrupteur feux :
à droite = éteint
au centre = feux de position et tableau de bord
à gauche = codes
6 ) Interrupteur d’urgence, arrêt moteur
Position - Démarrage moteur
Position - Arrêt moteur
MANDOS EN EL MANILLAR
Mando derecho
1) Depósito aceite freno delantero
2) Palanca freno delantero
3 ) Puño acelerador
4 ) Interruptor arranque eléctrico.
5 ) Interruptor luces:
a la derecha = apagado
posición central = luces de estacionamiento y tablero de instrumentos
a la izquierda = luces de cruce.
6 ) Interruptor de emergencia, parada motor .
Posición - Puesta en marcha del motor
Posición - Parada del motor
19 12/99
MADISON 125-150
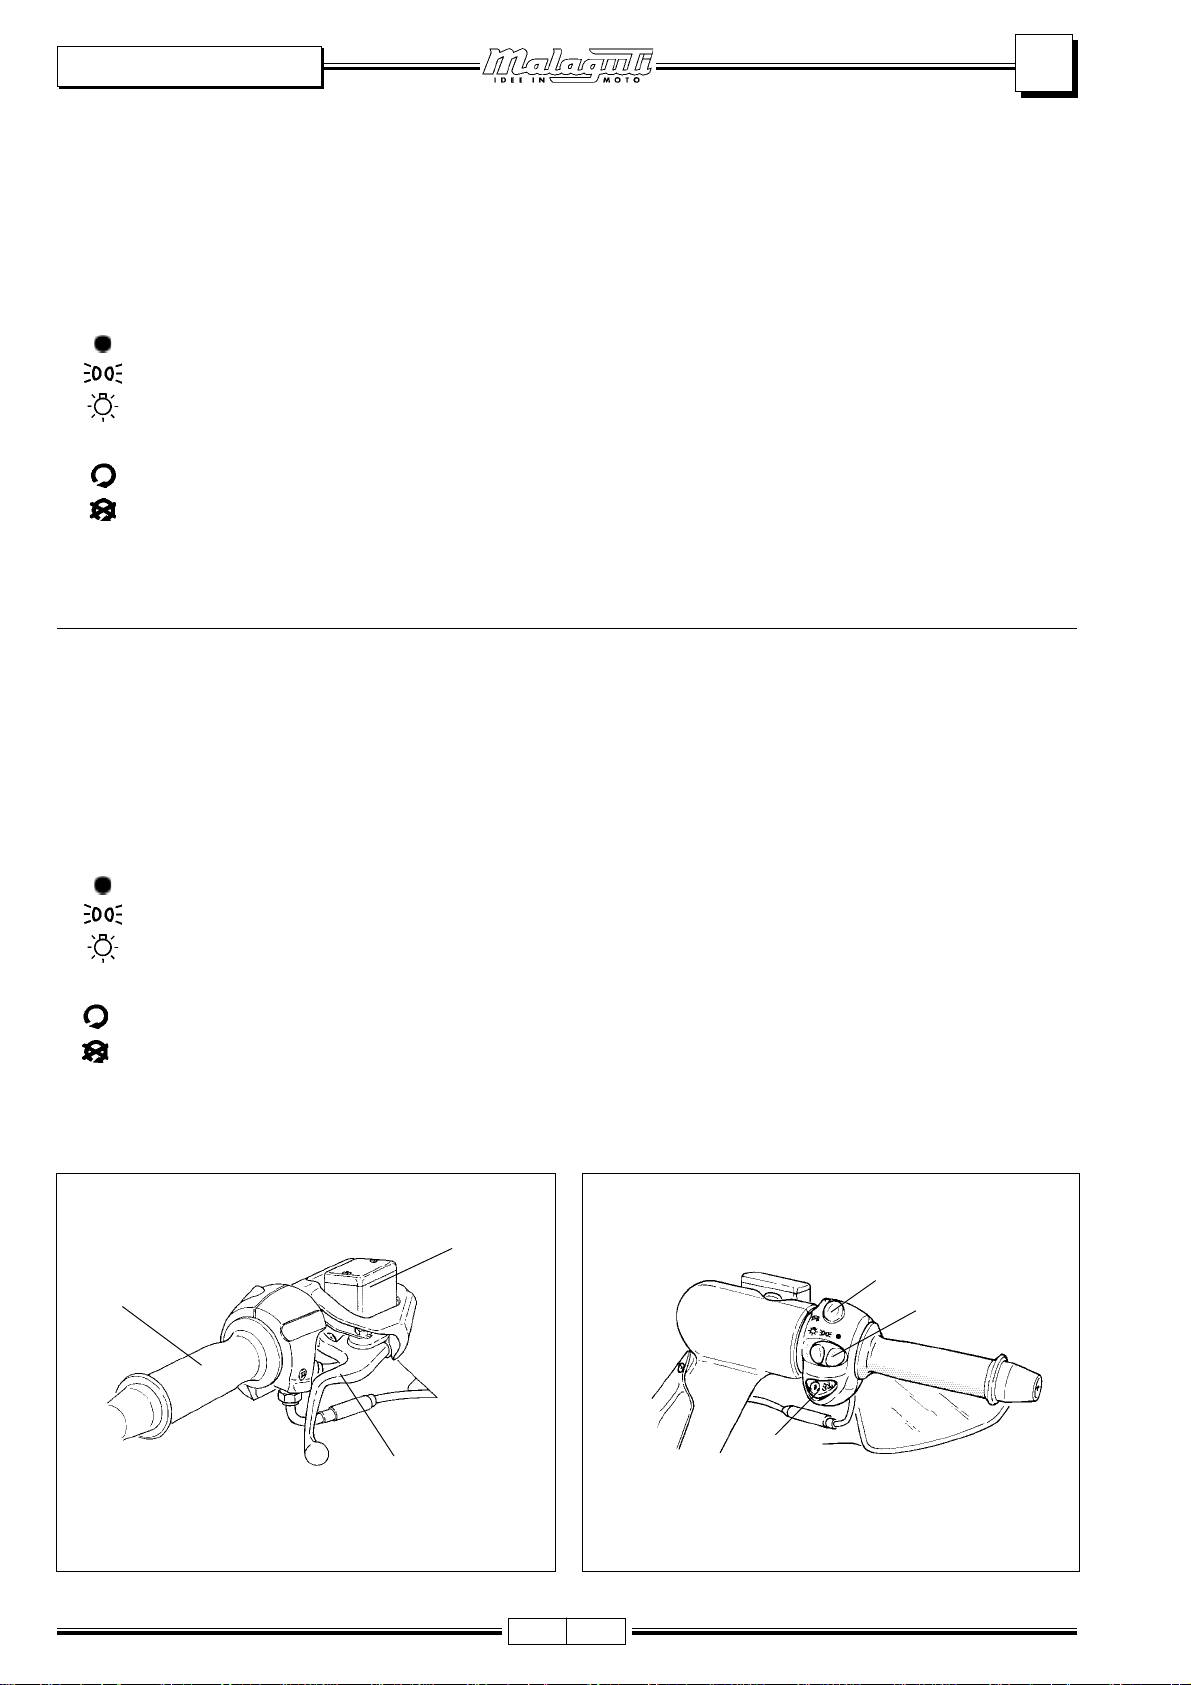
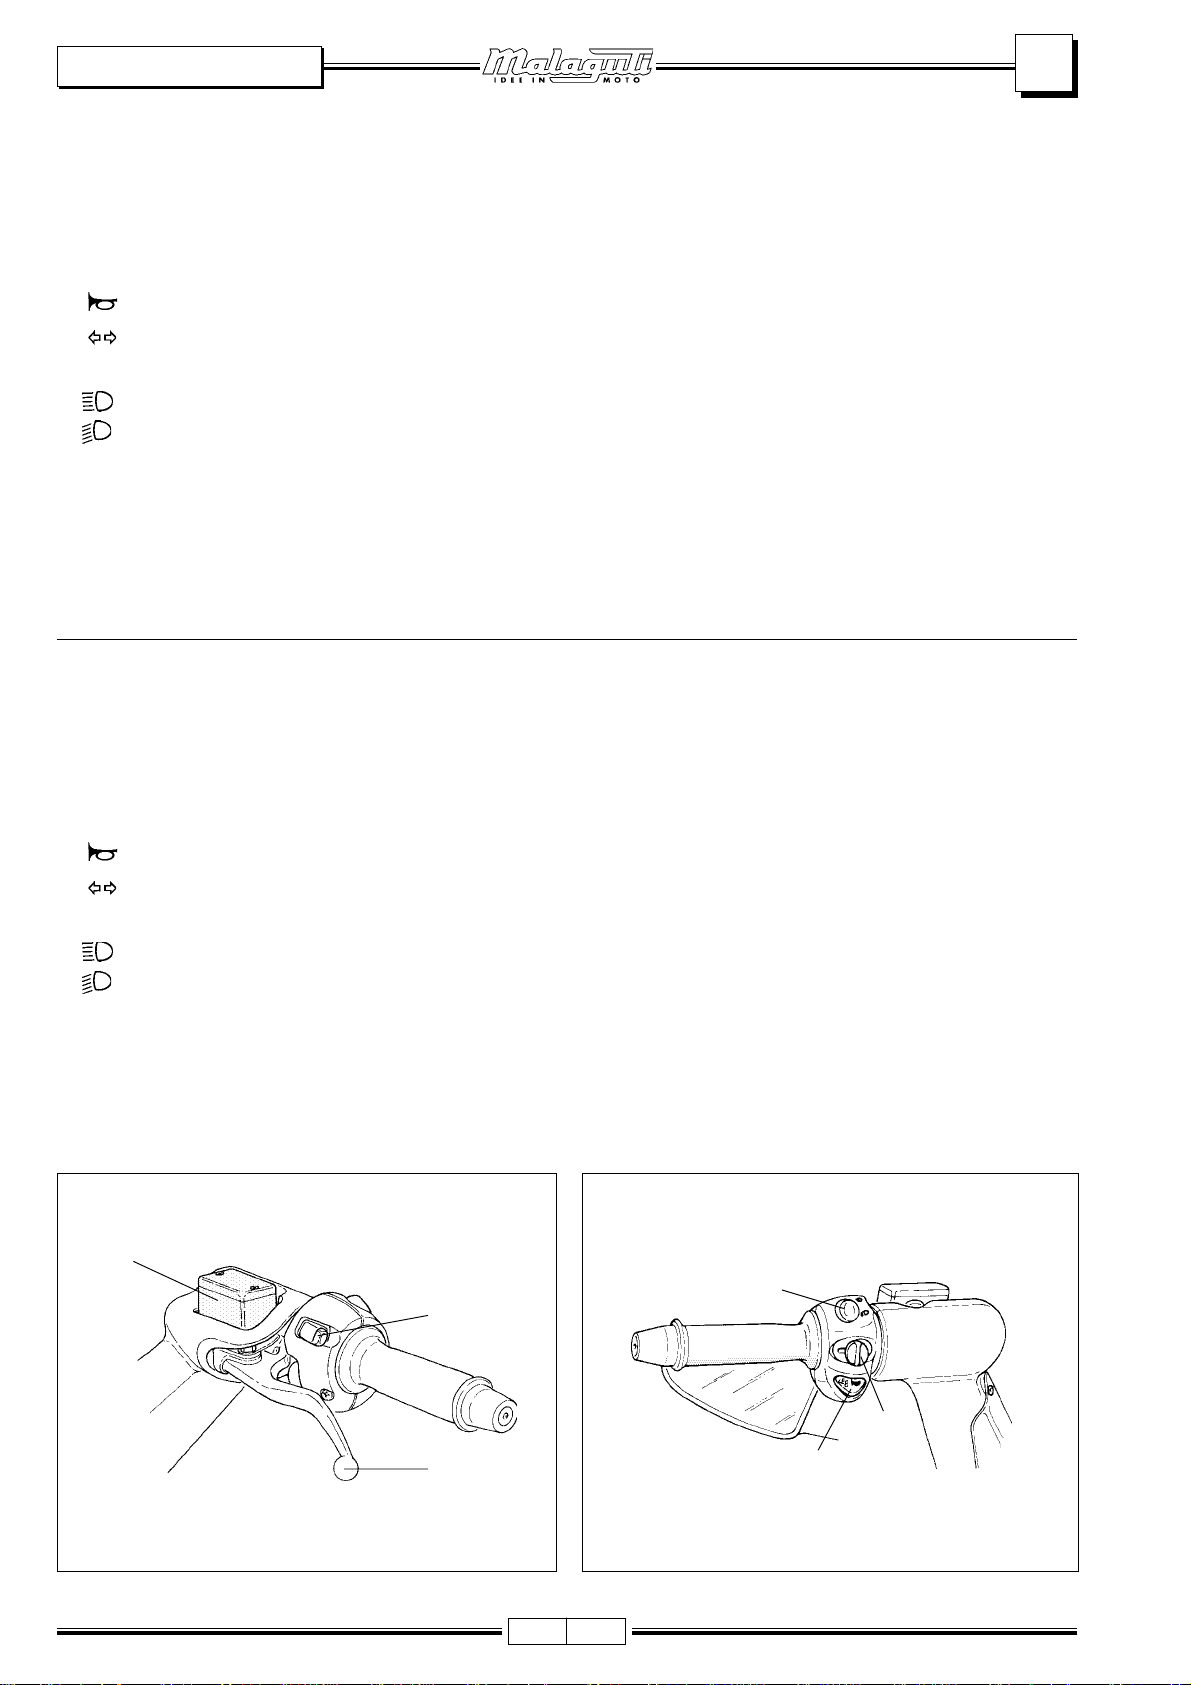
COMANDI AL MANUBRIO
Comando sinistro
1 ) Serbatoio olio freno posteriore
2 ) Leva freno posteriore
3 ) Leva “flash” luci abbaglianti (passing)
4) Pulsante avvisatore acustico.
5) Interruttore indicatori di direzione.
6 ) Interruttore luci:
abbaglianti
anabbaglianti.
A
BEDIENUNGSELEMENTE
Bedienungselement links
1 ) Öltank Bremsen hinten
2 ) Bremshebel hinten
3 ) “Flash-” Hebel Fernlichter (Passing)
4)
5)
6)
Druckknopf Signalhorn
Schalter Richtungsanzeiger
Lichtschalter:
Fernlichter
Abblendlichter
F. 7
1
6
3
5
2
F. 8
20 12/99
4
MADISON 125-150
HANDLEBAR CONTROLS
Left control
1 ) Rear brake oil tank
2 ) Rear brake lever
3 ) Driving beam “flash” (passing)
4) Acoustic alarm button
5) Direction indicators button
6 ) Light button:
traffic beam
driving beam
A
COMMANDES SUR LE GUIDON
Commande de gauche
1 ) Réservoir huile frein arrière
2 ) Levier freinage arrière
3 ) Manette “flash” codes (passing)
4)
5)
6)
Touche avertisseur
Interrupteur clignotants
Interrupteur feux :
phares de route
codes
MANDOS EN EL MANILLAR
Mando izquierdo
1 ) Depósito aceite freno trasero
2 ) Palanca freno trasero
3 ) Palanca “flash” luces de carretera (passing)
4) Interruptor claxon.
5) Interruptor indicadores di dirección.
6 ) Interruptor de las luces:
luces de carretera
luces de cruce.
21 12/99
MADISON 125-150
A
INTERRUTTORE
DI AVVIAMENTO/CHIAVI
•L’interruttore principale (F. 9)
controlla il circuito d’avviamento, il dispositivo bloccasterzo e
l’apertura della sella.
: ogni contatto elettrico è
disinserito.
: sono inseriti i contatti ed
il motore può avviarsi.
AVVIAMENTO: girare la chiave
in senso orario e azionare una
delle due leve freno quindi premere il pulsante di starter.
: inserimento bloccasterzo.
CHIAVI
Il veicolo è fornito di
due chiavi con codice
numerico, le quali consentono
di:
F. 9
ANLASSSCHALTER/
SCHLÜSSEL
•Der Hauptschalter (Abb. 9)
steuert den Anlasskreislauf, die
Vorrichtung der Lenkersperre
und das Öffnen des Sattels.
: Ale elektrischen Kontak-
te sind ausgeschalten.
: Alle elektrischen Kontakte
sind eingeschalten, der Motor kann angelassen werden.
ANLASSEN: Den Schlüssel im
Uhrzeigersinn drehen, während
Sie einen der beiden Bremshebel
betätigen, und schließlich den
Startknopf drücken.
: Lenker gesperrt.
SCHLÜSSEL
Das Kraftrad ist mit zwei
Schlüsseln ausgestattet,
die mit numerischem Kode
versehen sind und:
• Stabilire il contatto di avviamen-
to.
• Bloccare lo sterzo.
• Accedere al vano porta-casco.
• Aprire lo sportellino del vano
porta oggetti centrale e quello del paragambe.
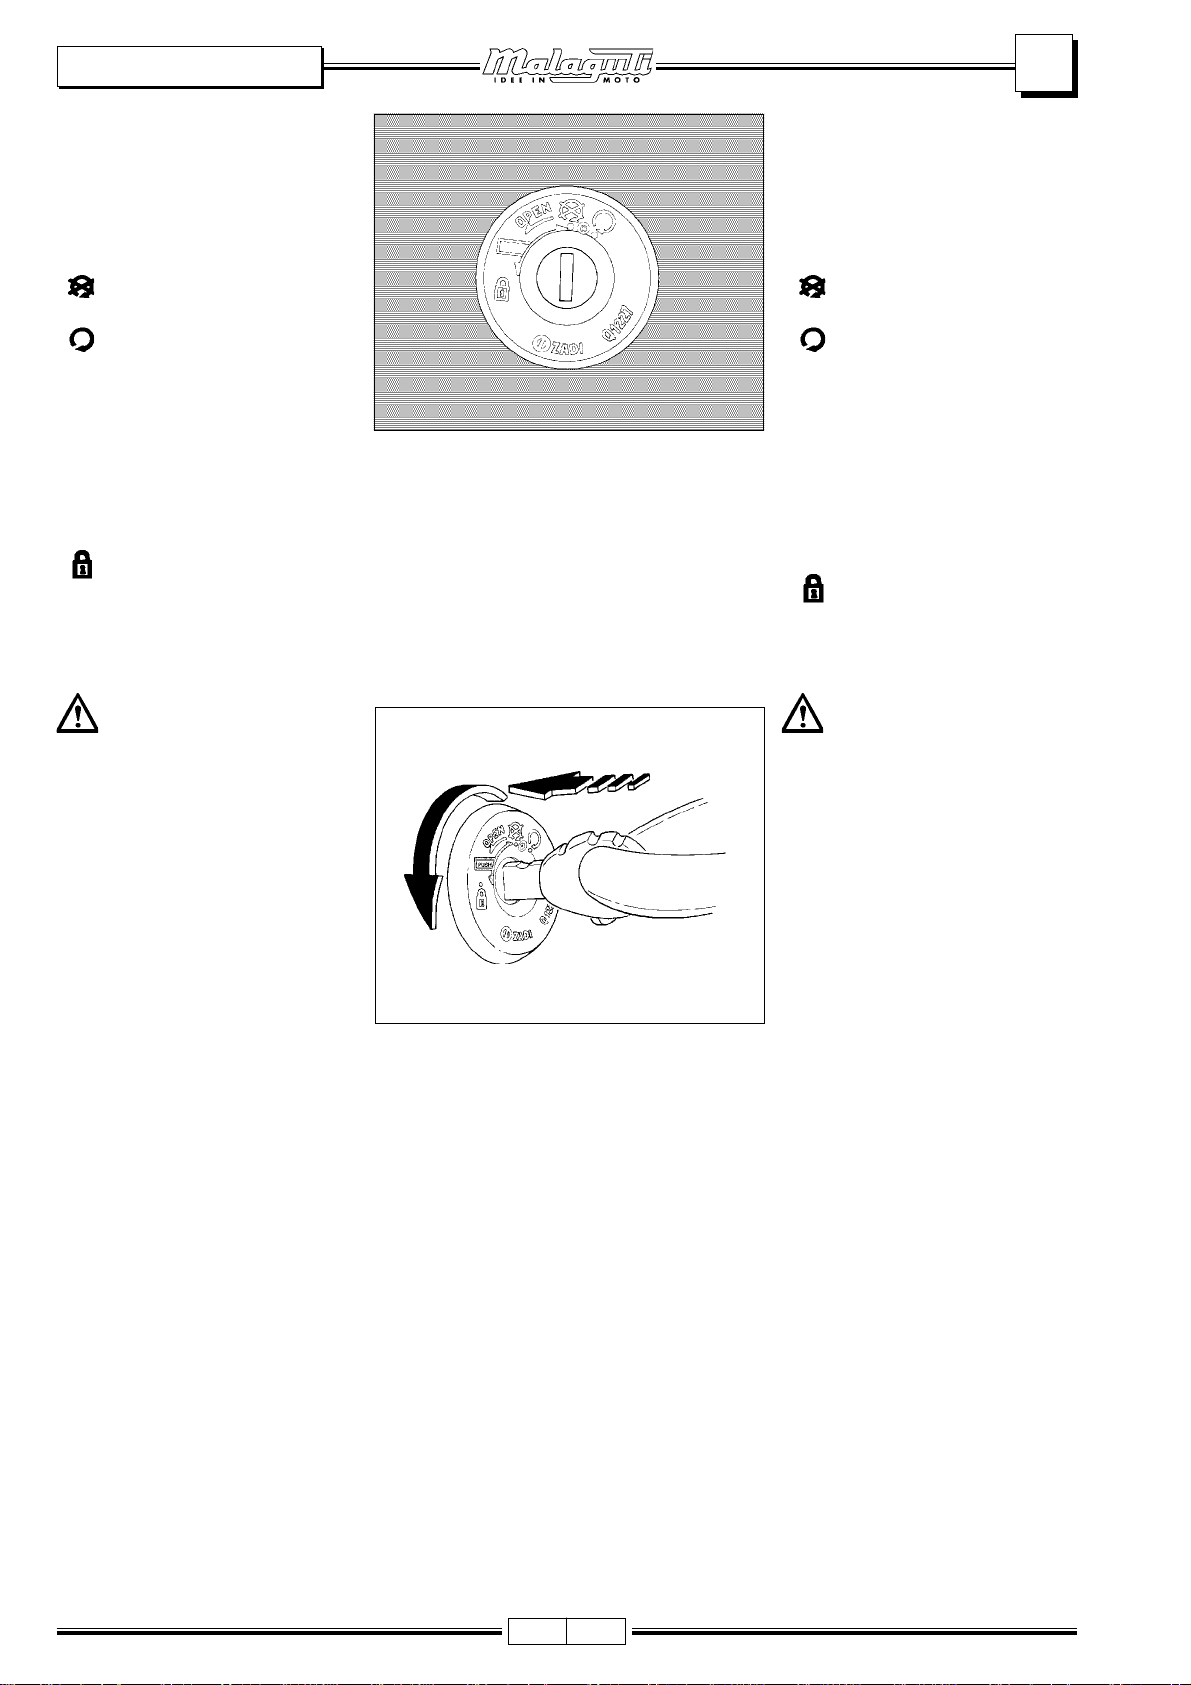
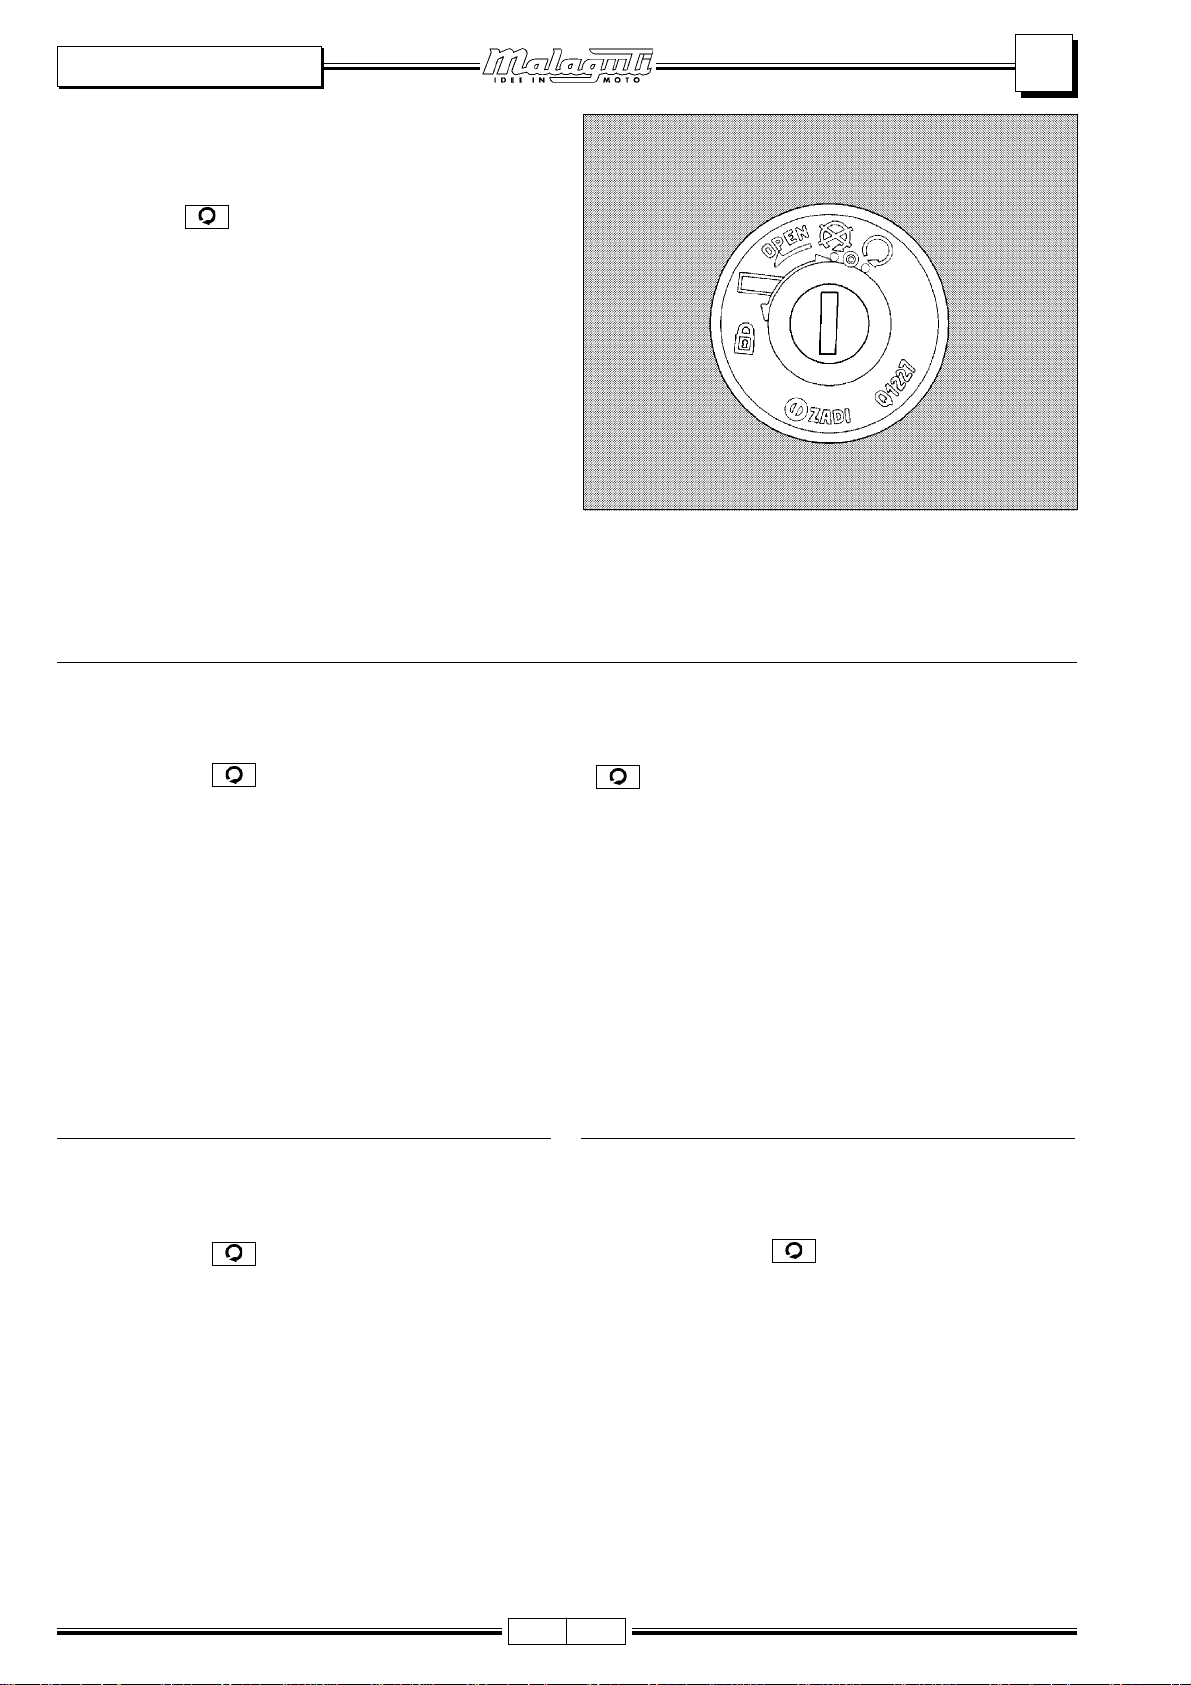
BLOCCASTERZO
Inserimento
Col manubrio sterzato a sinistra,
inserire a fondo la chiave e successivamente ruotarla in senso
antiorario (F. 10).
Disinserimento
Ruotare la chiave in senso orario.
Nota: il motociclo è sprovvisto
di pedivella di avviamento.
F. 10
• den Anlasskontakt herstellen,
• den Lenker sperren,
•das Helmfach öffnen,
•das zentrale und das
Beinschutz-Ablagefach öffnen.
LENKERSPERRE
Lenker sperren
Bei nach links gedrehtem Lenker
den Schlüssel ganz einschieben
und dann gegen den
Uhrzeigersinn drehen (Abb. 10).
Lenker entsperren
Den Schlüssel im Uhrzeigersinn
drehen.
Hinweis: Das Kraftrad ist nicht
mit Anlasstretkurbel ausgestattet.
22 12/99
MADISON 125-150
A
STARTER/KEYS
•The main button (F. 9) controls the
starting circuit, the steering block
device and the saddle opening.
:each electric contact is
disconnected.
: the various contacts are
connected and the engine
can start.
STARTING: turn the key clockwise,
activate one of the two brake levers
and then press the starter button.
: activation of the
steering block
KEYS
The motorbike is equipped
with two keys, with numeric
code, which allow to:
INTERRUPTEUR DE
DEMARRAGE/CLEFS
•L’interrupteur principal (F. 9) contrôle
le circuit de démarrage, le verrou
de direction et l’ouverture de la
selle.
: tout contact électrique
est déconnecté.
: les contacts sont mis et le
moteur peut démarrer.
DEMARRAGE : tourner la clef dans
le sens des aiguilles d’une montre
et actionner l’une des deux leviers
de freinage, puis appuyer sur la
touche de démarrage.
: fermeture du verrou de
direction.
CLEFS
Le véhicule est fourni avec
deux clefs avec code
numérique qui permettent :
INTERRUPTOR DE
ENCENDIDO/LLAVES
• El interruptor principal (F. 9)
controla el circuito de arranque, el
dispositivo del seguro de dirección
y la apertura del asiento.
: cada contacto eléctrico
está desconectado.
: los contactos están
conectados y el motor
puede ponerse en marcha.
PUESTA EN MARCHA: girar la
llave en el sentido de las agujas del
reloj y accionar una de las dos
palancas de freno. Seguidamente
pulsar el interruptor de starter.
: conexión del seguro de
dirección.
LLAVES
El vehículo está equipado
con dos llaves de código
numérico que permiten:
•determine the starting contact
• lock the steering
•open the helmet compartment
•Open the small cover of the central
glove compartment and the one of
the leg-guard case.
STEERING LOCK
Connecting
By keeping the handlebar steered
leftwards, thoroughly insert the key,
rotating it then anti-clockwise (F . 10).
Disconnecting
Rotate the key clockwise.
Note: the motorbike has not been
equipped with starting pedal crank.
•d’établir le contact de démarrage
•de verrouiller la direction
• d’accéder au coffre à casque
•d’ouvrir la porte de la boîte à gants
central et du tablier avant.
VERROU DE DIRECTION
Fermeture
Après avoir tourné le guidon à
gauche, introduire la clef à fond et
la tourner dans le sens inverse des
aiguilles d’une montre (F. 10).
Ouverture
Tourner la clef dans le sens des
aiguilles d’une montre.
Note : le scooter est dépourvu de
pédale de kick.
• Establecer el contacto de
encendido.
• Bloquear la dirección.
• Acceder al hueco portacascos.
• Abrir la tapa del habitáculo central
portaobjetos asícomo el cofre situado
en el espacio para las piernas.
SEGURO DE DIRECCION
Conexión
Con el manillar virado hacia la
izquierda, introducir a fondo la llave
y girarla seguidamente en el sentido
contrario a las agujas del reloj (F. 10).
Desconexión
Girar la llave en el sentido de las
agujas del reloj.
Nota: el vehículo de motor no está
equipado con pedal de arranque.
23 12/99
MADISON 125-150
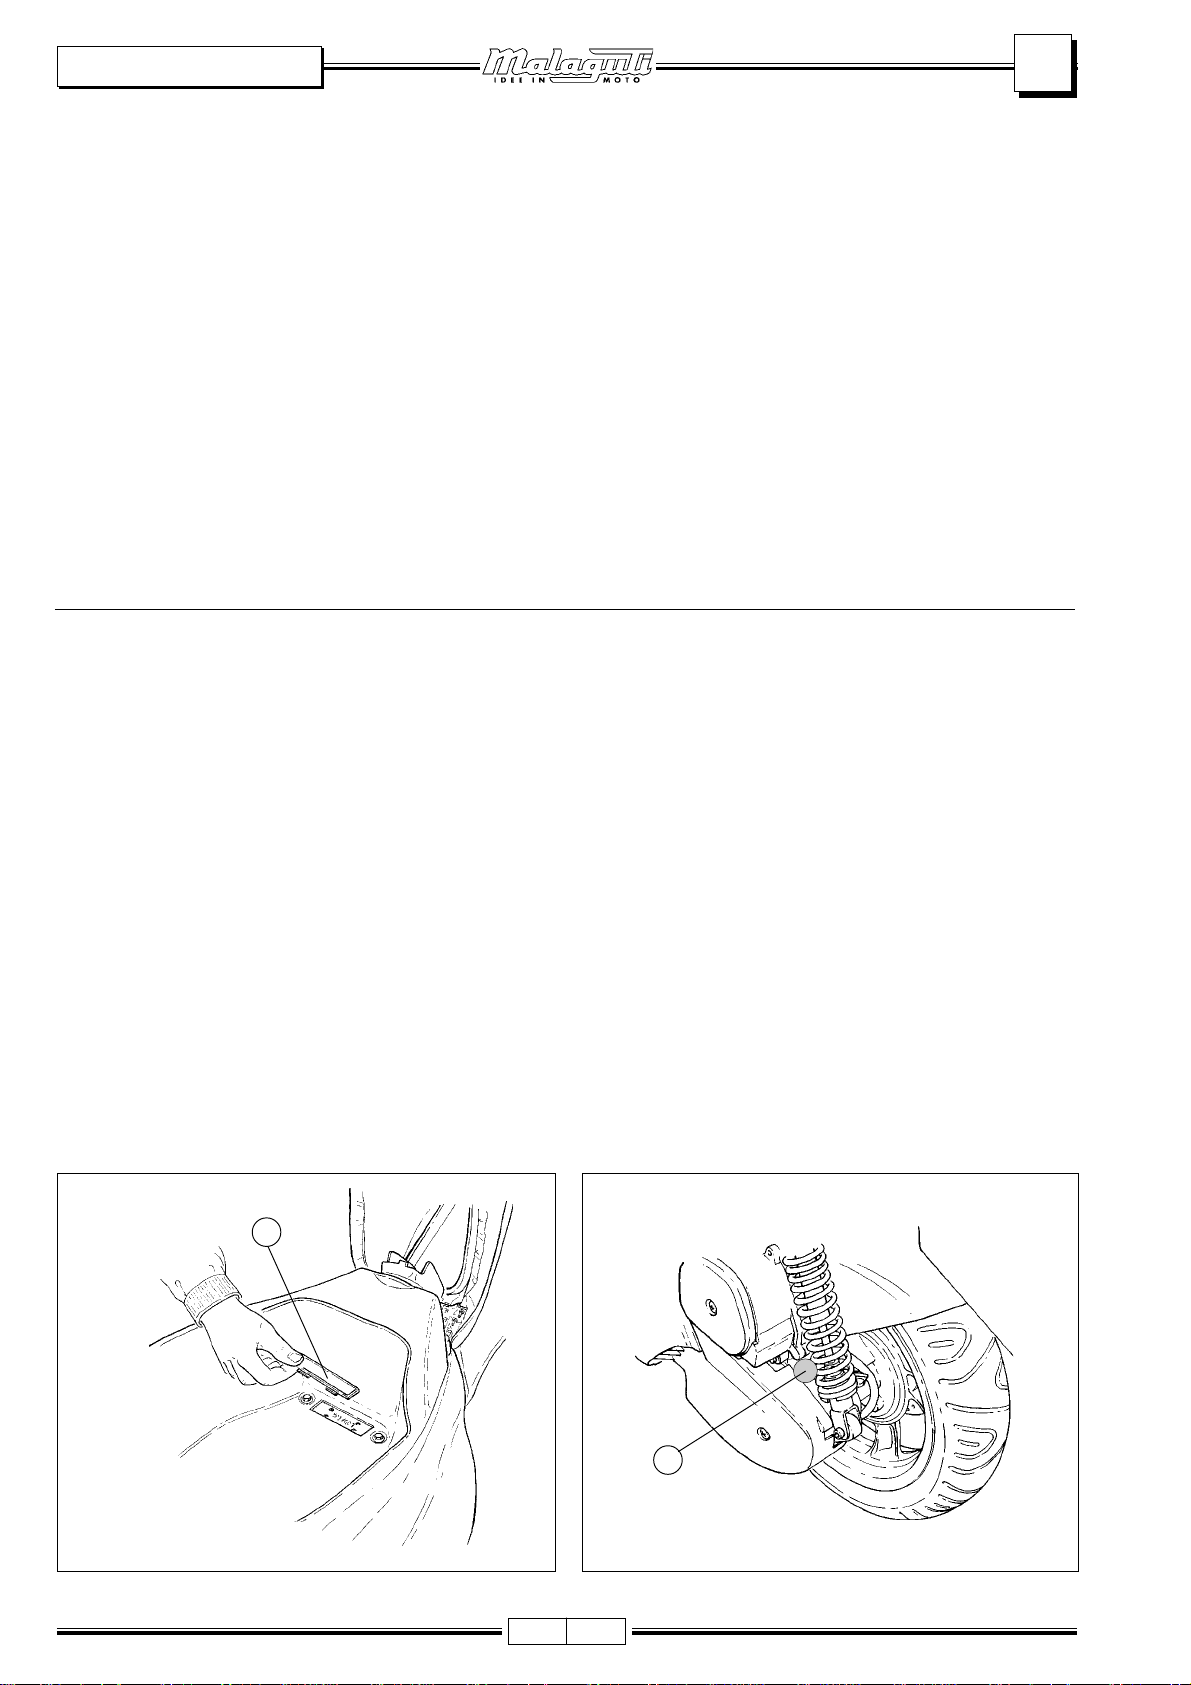
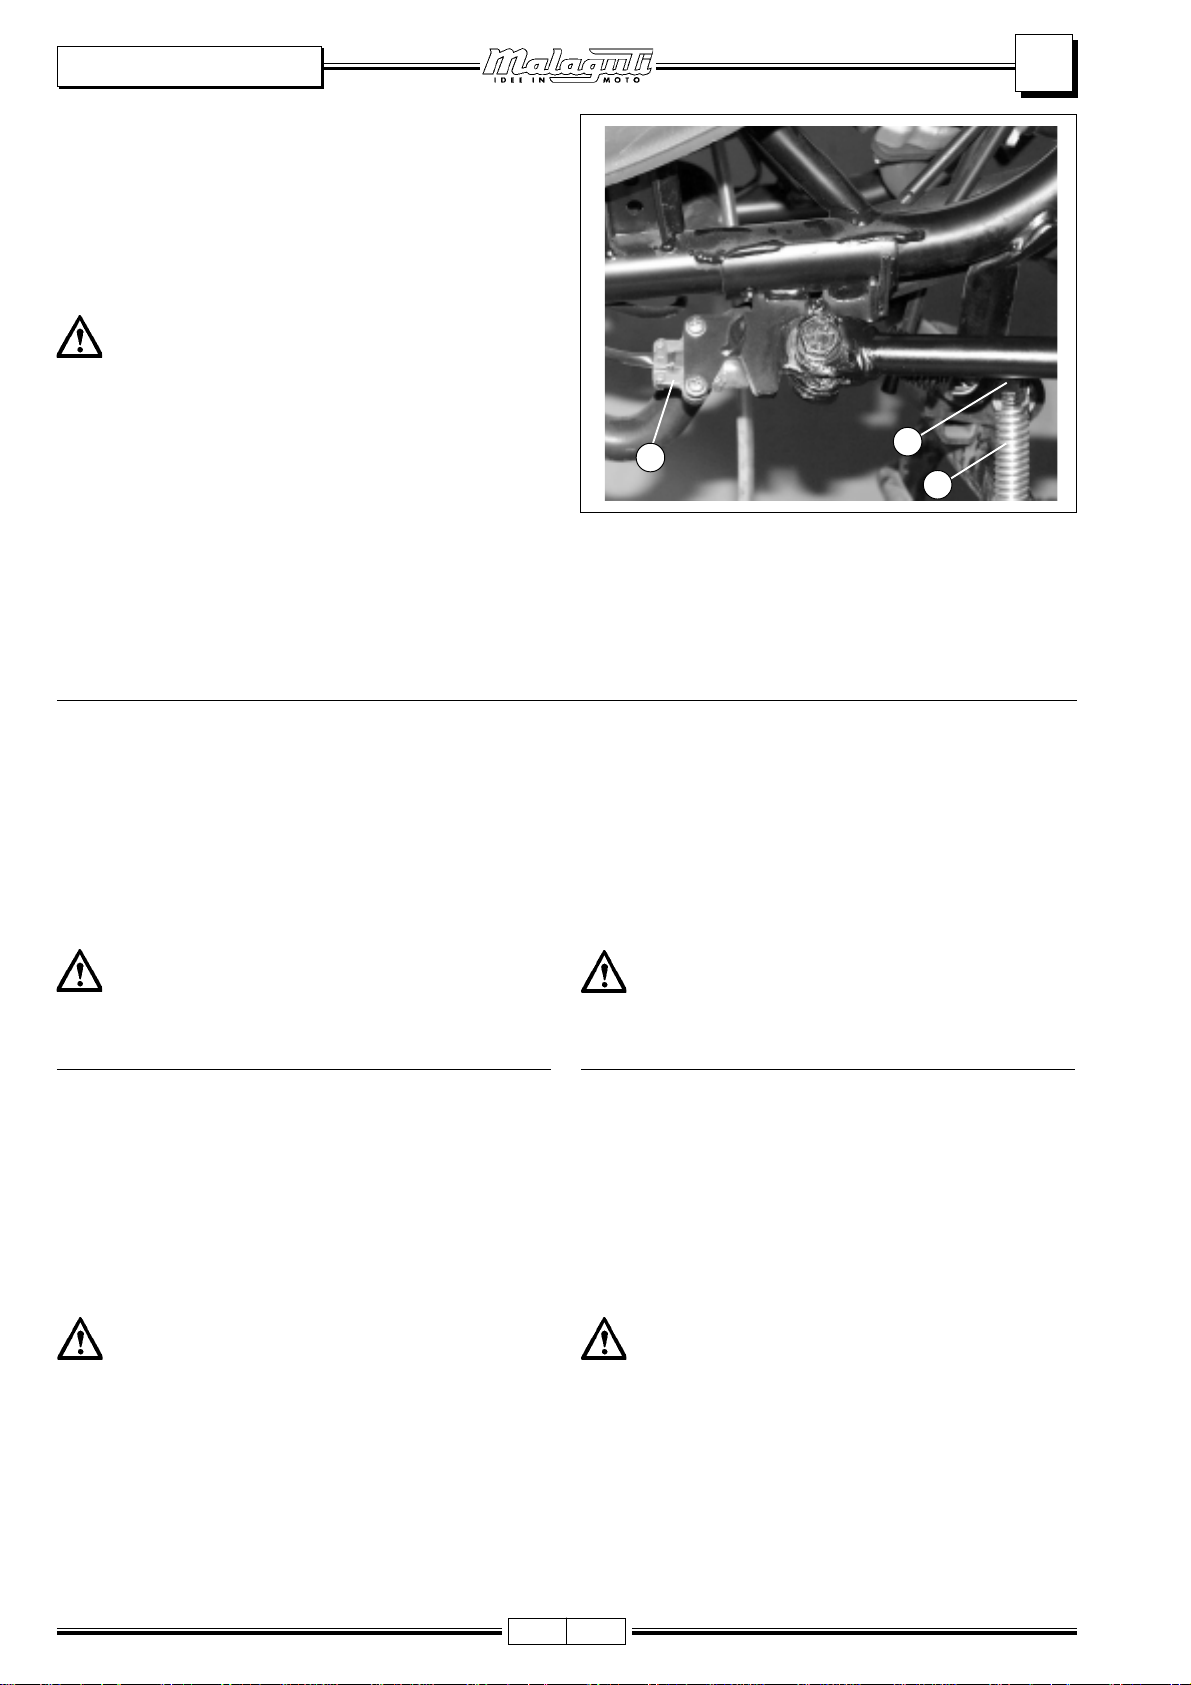
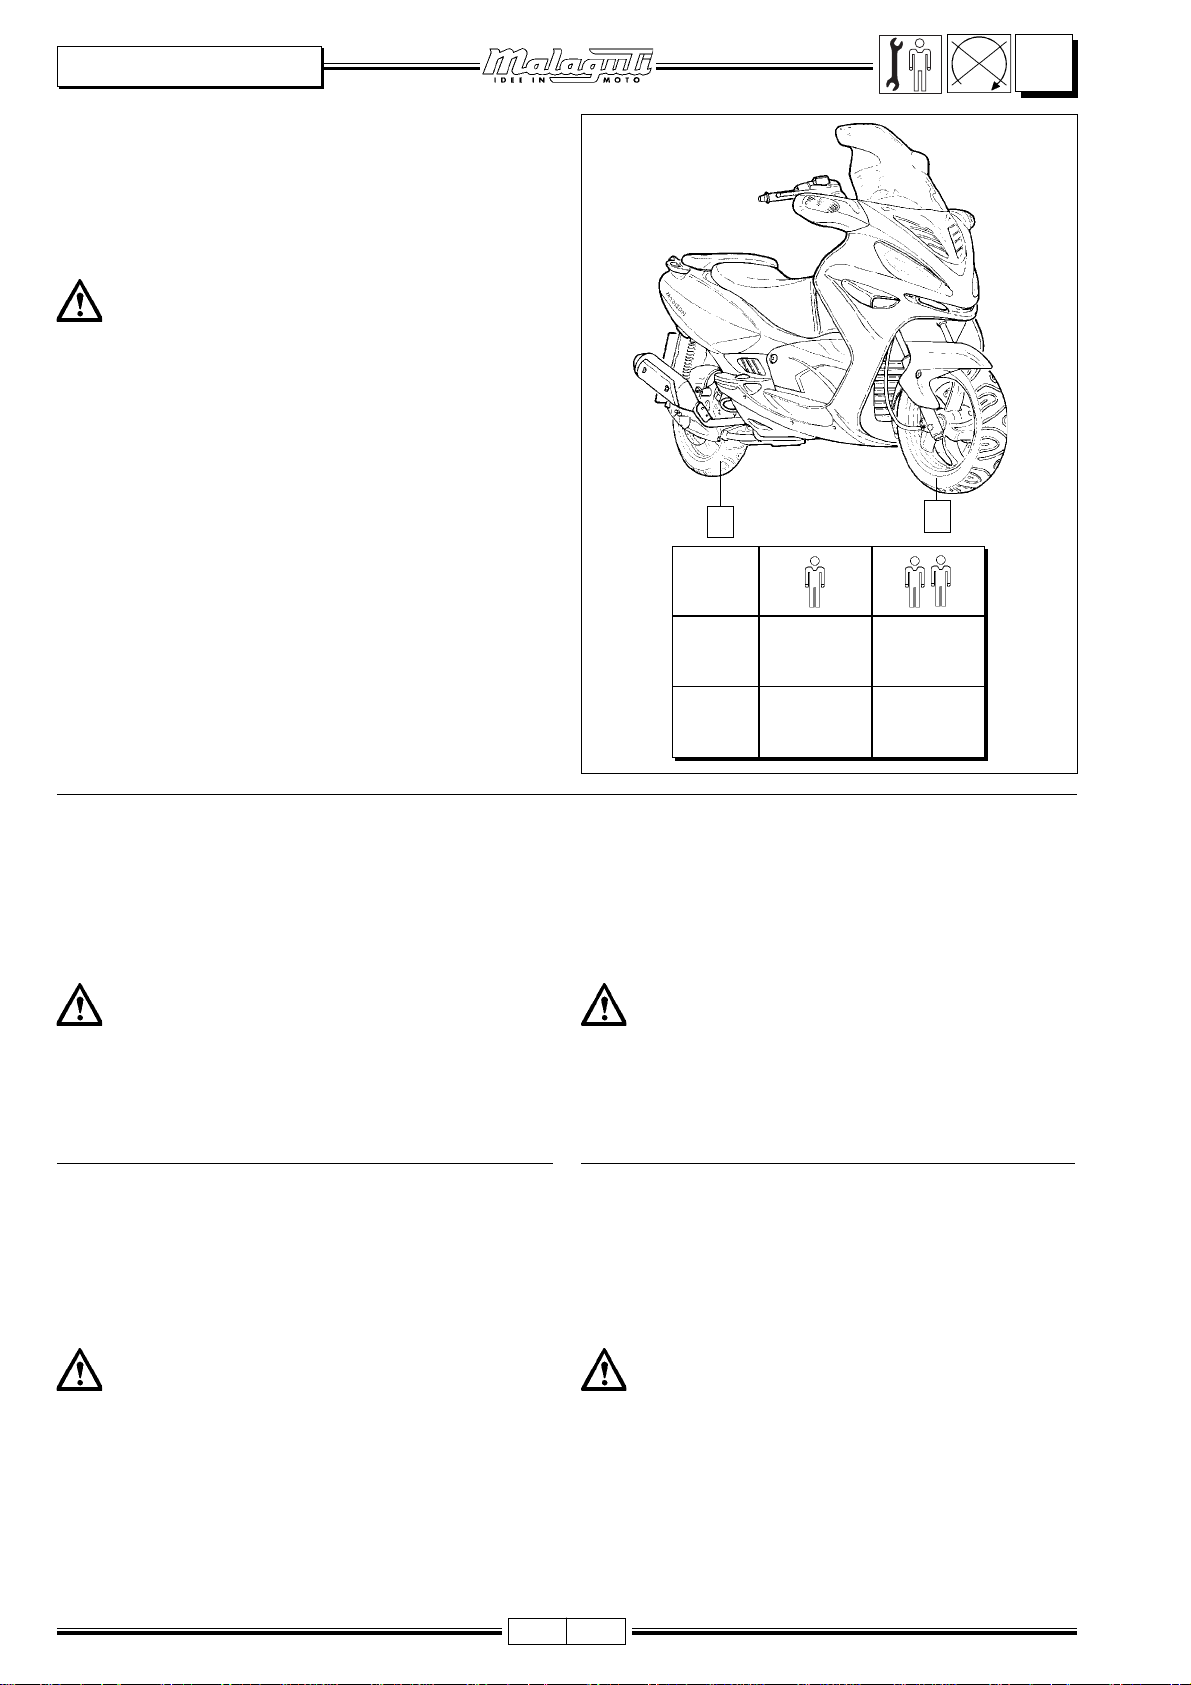
CAVALLETTO LATERALE:
Verificare il corret to fissaggio e mobilità del ca vallet to laterale ed il corretto ancoraggio delle molle (1 - 2).
Verificare inoltr e il corretto funzionamento del microinterruttore (A - F. 11) che deve impedire l’avviamento del motore, quando il cavalletto laterale non è in posizione di
riposo (in alto).
Non rimuovere o manomettere per nessuna ragione, questo dispositivo di sicurezza.
A
SEITLICHER STÄNDER:
Die ordnungsgemäße Befestigung und Beweglichkeit des
seitlichen Ständers und der Verankerung der Federn
prüfen (1 - 2).
Außerdem die korrekte Funktionsweise des Mikroschalters
(A - Abb. 11) überprüfen, der dazu dient das Anlassen des
Motors zu verhindern, falls der seitliche Ständer nicht in
Ruhestellung (nach oben) positioniert ist.
Entfernen oder verändern Sie aus keinem
Grund diese Sicherheitsvorrichtung!
A
F. 11
1
2
SIDE STAND:
Check the correct fastening and mobility of the side stand
and the correct anchoring of the springs (1 - 2).
Then check the correct working of the micro-switch
(A - F. 11), which has to inhibit the engine starting when
the side stand is not in its resting position (lifted).
Do not remove or tamper with this safety devise
for any reason.
BÉQUILLE LATERALE:
Vérifier si la béquille latérale est solidement fixée, si elle
est suffisamment mobile, et si l’ancrage des ressorts
(1 - 2) est correct.
Vérifier aussi le bon fonctionnement du minirupteur
(A - F. 11) qui doit empêcher le démarrage du moteur,
quand la béquille latérale n’est pas relevée.
Ne pas enlever et ne pas altérer ce dispositif
de sécurité.
24 12/99
CABALLETE LATERAL:
Comprobar la correcta fijación y mobilidad del soporte
lateral del caballete lateral y el correcto anclaje de los
muelles (1 - 2).
Comprobar además el correcto funcionamiento del
microinterruptor (A - F. 11) que tiene que impedir la
puesta en marcha del motor, cuando el caballete lateral
no se encuentra en posición de reposo (arriba).
No quitar o manipular por ningún motivo este
dispositivo de seguridad.
MADISON 125-150
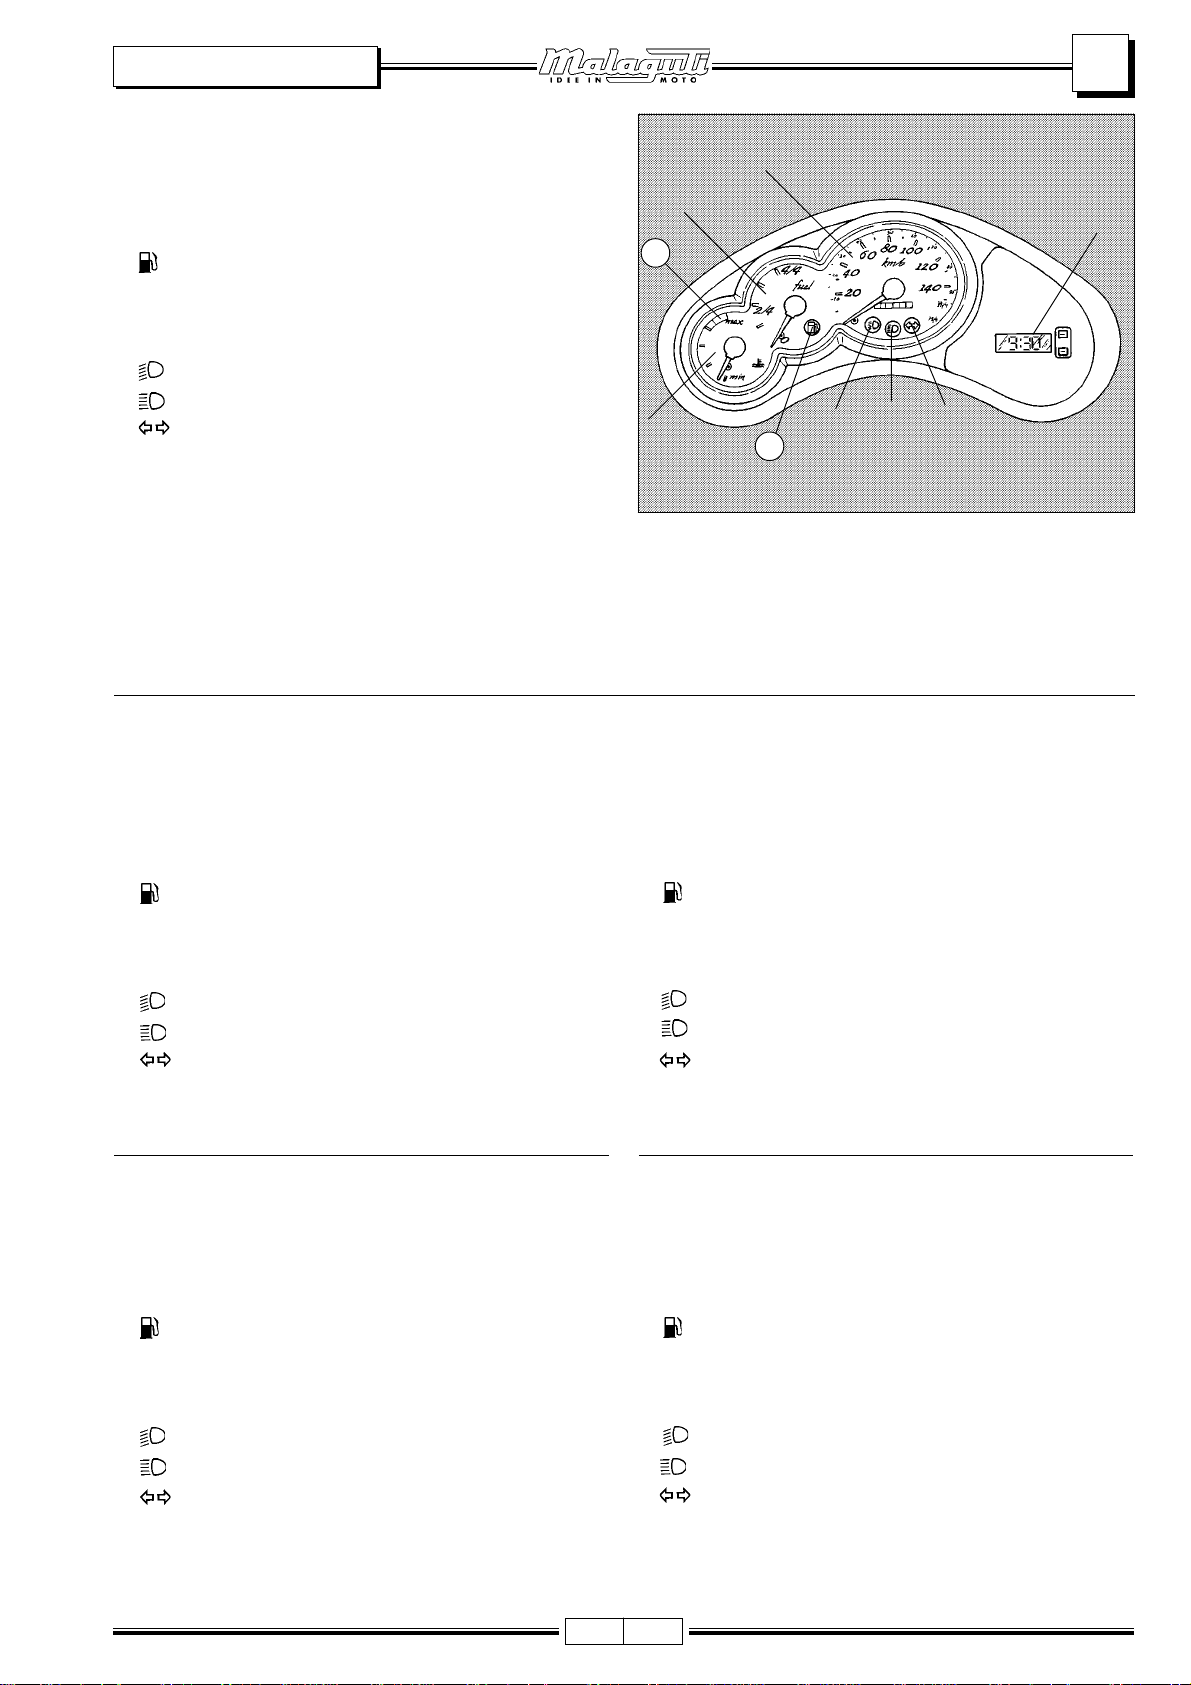
CRUSCOTTO
1 ) Indicatore temperatura liquido refrigerante. La zona
“rossa” (A) evidenzia una temperatura eccessiva
dovuta a funzionamento anomalo, guasti o liquido
in quantità insufficiente.
2) Indicatore livello carburante. La spia (B) indica l’entrata in riserva.
3 ) Tachimetro (numeri bianchi: km - numeri rossi: mi-
glia) e contachilometri.
4) Spia (verde) luci anabbaglianti.
5) Spia (blu) luci abbaglianti.
6) Spia (verde) indicatore di direzione.
7 ) Orologio.
A
1
F. 12
A
3
2
5
4
B
6
7
ARMATURENBRETT
1) Temperaturanzeige der Kühlflüssigkeit. Der “rote”
Bereich (A) weist auf eine übermäßige T emper atur
hin, dessen Ursache ein anormaler Betrieb, ein Fehler
oder eine ungenügende Kühlflüssigkeitsmenge sein
können.
2) Benzinstandanzeige: Die K ontrolllampe (B) zeigt den
Reservestand an.
3 ) T achometer (weiße Zahlen: Km - rote Zahlen: Meilen)
und Kilometerzähler .
4) (Grüne) Kontrolllampe Abblendlichter
5) (Blaue) Kontrolllampe F ernlichter
6) (Grüne) Kontrolllampe Richtungsanzeiger
7) Uhr.
TABLEAU DE BORD
1 ) Indicateur de température liquide réfrigérant. La zone
“rouge” (A) indique une température excessive due
à un fonctionnement anomal, à des pannes ou à
une quantité insuffisante de liquide.
2) Indicateur du niveau du carburant. Le voyant (B) in-
dique l’entrée en réserve.
3 ) T achymètre (numéros blancs : km - numéros
rouges : milles) et compteur kilométrique.
4) Voyant (vert) codes.
5) Voyant (bleu) phares de route
6) Voyant (vert) cl ignotant
7 ) Horloge.
DASHBOARD
1 ) Coolant temperatur e indicator . The “red” area (A) re-
veals an excessive temperature level due to irregular working, failures or a insufficient level of fluid.
2 ) Fuel level indicator: This indicator (B) reveals when
we are very low on petrol (reserve).
3 ) T achometer (white numbers: Km - red numbers: mi-
les) and odometer .
4 ) (Green) Indicator: traffic beam
5 ) (Blue) Indicator: driving beam
6 ) Indicator: direction indicator
7) Clock.
TABLERO DE INSTRUMENTOS
1)
Indicador de temperatura líquido refrigerante. La zona
“roja” (A) señala una temperatura excesiva debido a
funcionamiento anómalo, averías o cantidad de líqui-
do insuficiente.
2)
Indicador de nivel de combustible y testigo (B) de
reserva.
3)
T acómetro (números blancos: km - números rojos:
millas) y cuentakilómetros.
4)
Luz indicadora (verde) luces de cruce.
5)
Luz indicadora (azul) luces de carretera.
6)
Luz indicadora (verde) indicador de dirección.
7)
Reloj.
25 12/99
MADISON 125-150
AVVIAMENTO ELETTRICO
• Posizionare lo scooter sul cavalletto centrale.
• Inserire la chiave d’avviamento nell’interruttore e ruotarla
in posizione .
• Tirare una delle due leve dei freni (preferibilmente quella
inerente il freno posteriore).
• Premere il pulsante d’avviamento.
• Rilasciare il pulsante d’avviamento non appena il motore
si avvia.
Nota: se il motore non si avvia, rilasciare l’interruttore dello starter , aspet tare qualche secondo, poi premerlo di nuovo. Non azionare l’avviamento per più di 10 secondi per
ogni tentativo, per non esaurire l’energia della batteria. Per
garantire la massima durata del motore, non accelerare
mai a fondo a motore freddo.
A
F. 13
ELEKTROSTART
• Den Motorroller auf dem mittleren Ständer abstellen.
• Den Zündschlüssel ins Schloß stecken und auf diese
Position stellen .
• Einen der beiden Bremshebel ziehen (am besten den
Hebel für die Hinterradbremse).
• Die Starter-Taste drücken.
• Sobald der Motor anspringt, die Starter-Taste wieder
loslassen.
Hinweis: Wenn der Motor nicht anspringt, die Startertaste
loslassen, einige Sekunden warten und die T aste dann erneut drücken. Die Startertaste nicht länger als 10 Sekunden hintereinander gedrückt halten, da sonst die Batterie
zu sehr entladen wird. Für eine möglichst lange Lebensdauer des Motors, den Gas-drehgriff bei noch kaltem Motor
nie ganz aufdrehen.
DÉMARRAGE ÉLECTRIQUE
• Positionner le scooter sur la béquille centrale.
• Introduire la clef de contact dans l’interrupteur de démarrage
et la tourner sur .
• Serrer l’une des deux poignées des freins (de préférence
celui du frein arrière).
• Appuyer sur le bouton de démarrage.
• Relâcher le bouton de démarrage dès que le moteur part.
ELECTRIC STARTER
• Place the Scooter on the central stand.
• Insert the ignition k ey in the switch and turn it to position
.
• Pull one of the two brake levers (preferably the rear
one).
• Press the starter button.
• Release the starter button as soon as the engine starts.
Note: if the engine will not start, release the starter switch,
wait some seconds, then try again. Do not press the starter for more than 10 seconds each attempt, otherwise the
battery will discharge. To ensure long engine life, never
accelerate hard when the engine is cold.
PUESTA EN MARCHA ELECTRICA
• Posicionar el scooter sobre el caballete central.
• Introducir la llave de puesta en marcha en el interruptor y
girarla a la posición .
• Apretar una de las dos palancas de los frenos
(preferiblemente la del freno posterior).
• Pulsar el botón de puesta en marcha.
• Soltar el botón de puesta en marcha en cuanto el motor
empiece a funcionar.
Note: si le moteur ne part pas, relâcher l’interrupteur du
démarreur, attendre quelques secondes, puis appuyer de
nouveau sur le démarreur. Ne pas actionner le démarreur
pendant plus de 10 secondes à chaque tentative, afin de
ne pas décharger la batterie. Pour que le moteur dure le
plus longtemps possible, ne jamais accélérer à fond quand
le moteur est froid.
26 12/99
Nota: si el motor no se pone en marcha, soltar el interruptor del starter , esper ar algunos segundos y volver a apretarlo. No accionar la puesta en marcha durante más de 10
segundos cada vez para no agotar la energía de la batería.
Para garantizar la máxima dur ación del motor nunca aceleren a fondo con el motor frío.
MADISON 125-150
MANCATO AVVIAMENTO
•Se durante il test precedentemente descritto, il motore
non si avvia, verificare che il cavalletto laterale sia in
posizione di riposo e che il pulsante di arresto motore
(1 - F. 14) si trovi in posizione:
•Se cavalletto laterale ed interruttore risultano in posizione corretta, effettuare controlli sull’impianto elettrico.
.
A
1
F. 14
ANLASSEN NICHT MÖGLICH
•Falls während des oben beschriebenen Testes der Motor
nicht anspringt, überprüfen Sie, dass sich der seitliche
Ständer in Ruhestellung und der Abschaltdruckknopf
(1 - Abb. 14) in der Position befindet.
• Falls sich der seitliche Ständer und der Schalter in der
richtigen Position befinden, kontrollieren Sie die
elektrische Anlage.
ABSENCE DE DEMARRAGE
• Si pendant le test décrit précédemment, le moteur ne
démarre pas, vérifier si la béquille latérale est repliée
et si la touche d’arrêt du moteur (1 - F. 14) se trouve en
position : .
• Si la béquille et l’interrupteur sont en bonne position,
effectuer des contrôles sur l’installation électrique.
STARTING FAILURE
•In case, during the previously described test, the engine
does not start, verify the side stand to be in its resting
position and the engine cut-off devise (1 - F. 14) to be in
position: .
•If the side stand and the engine cut-off devise result to
be in correct position, then carry out controls on the
electrical equipment.
EL MOTOR NO ARRANCA
•Si durante la prueba previamente descrita, el motor no
arranca, comprobar que el caballete lateral se encuentre
en posición de reposo y que el interruptor de parada
motor (1 - F. 14) se encuentre en posición: .
•Si el caballete lateral y el interruptor de parada se
encuentran en posición correcta, controlar el sistema
eléctrico.
27 12/99
MADISON 125-150
PNEUMATICI TUBELESS
Dimensioni:120/70 - 13” 53L (anteriore)
130/60 - 13” 53L (posteriore)
CONTROLLO PRESSIONE
La pressione dei pneumatici deve essere controllata e regolata a “gomma fredda”.
A
SCHLAUCHLOSE REIFEN
Ausmaße: 120/70 - 13” 53L (vorne)
130/60 - 13” 53L (hinten)
DRUCKKONTROLLE
Der Reifendruck muß bei “kaltem Gummi”
kontrolliert und reguliert werrden.
Y
2
Kg/cm
X 2,0 2,0
Y 2,0 2,2
X
TUBELESS TYRES
Sizes: 120/70 - 13” 53L (front)
130/60 - 13” 53L (rear)
PRESSURE CONTROL
Wheel pressure has to be controlled and regulated
when tyres are “cold”.
PNEUS TUBELESS
Dimensions : 120/70 - 13”53L (avant)
130/60 - 13” 53L (arrière)
CONTROLE PRESSION
La pression des pneus doit être réglée quand les
pneus sont froids.
NEUMATICOS TUBELESS
Dimensiones: 120/70 - 13” 53L (delantero)
130/60 - 13” 53L (trasero)
CONTROL PRESION
La presión de los neumáticos tiene que ser
controlada y regulada con “neumáticos fríos”.
28 12/99
MADISON 125-150
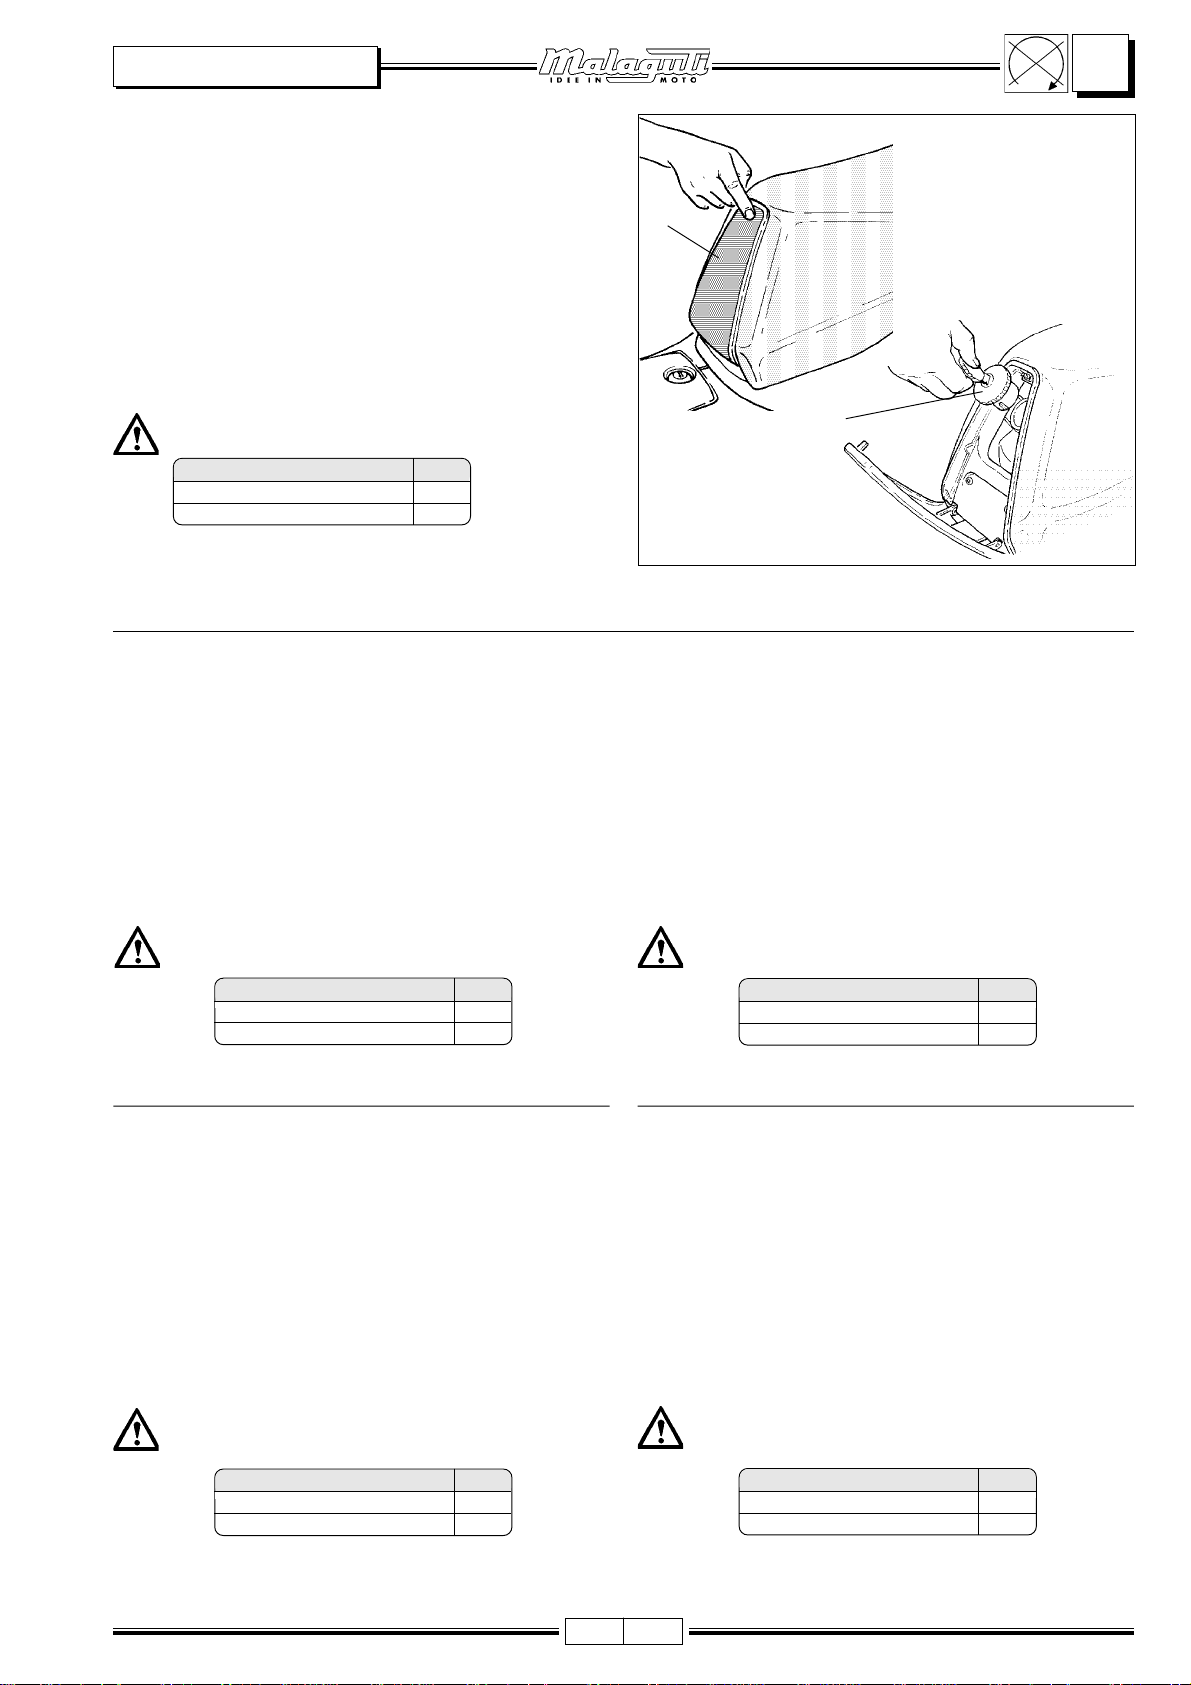
SERBATOIO CARBURANTE
Per accedere al serbatoio carburante, procedere come
segue:
• posizionare lo scooter sul cavalletto centrale.
• Estrarre la chiave di accensione.
• Premere nella parte superiore dello sportello (1- F. 15)
posto anteriormente alla sella.
• Inserire la chiave e svitare il tappo (2) e rifornire il serbatoio.
• Se dopo il rifornimento , si notano residui di benzina sulla
carrozzeria, è consigliabile pulire immediatamente la superficie interessata.
Utilizzare BENZINA VERDE SENZA PIOMBO.
SERBATOIO CARBURANTE litri
CAPACITÀ COMPLESSIVA 1 2
RISERVA 3
Nota: il rubinetto del serbatoio benzina è del tipo a depres-
sione; non richiede quindi alcun intervento manuale.
A
1
2
F. 15
BENZINTANK
Um den Benzintank zu öffnen befolgen Sie die
folgenden Anweisungen:
•Den Motorroller auf dem zentralen Ständer aufblocken.
• Den Zündschlüssel herausziehen.
•Auf den oberen Teil des Deckels (1 - Abb. 15), der sich
vor dem Sattel befindet, drücken.
• Den Schlüssel einschieben, den Deckel (2) aufdrehen
und Benzin tanken.
• Falls nach dem Tanken Benzinspuren auf der Karosserie
vorhanden sind, sollte die Oberfläche sofort gereinigt werden.
GRÜNES BLEIFREIES BENZIN benutzen.
BENZINTANK Liter
GESAMTE FÜLLMENGE 12
RESERVE 3
Hinweis: Der Benzintank ist mit einem Sauglufthahn
ausgestattet, es ist also kein weiterer manueller Eingriff nötig.
RESERVOIR CARBURANT
Pour accéder au réservoir du carburant, procéder comme
suit :
• positionner le scooter sur la béquille centrale.
•extraire la clef de contact.
• appuyer sur la partie supérieure de la porte (1 - F. 15)
placée à l’avant de la selle.
•introduire la clef et dévisser le bouchon (2) puis remplir
le réservoir.
•Si lors du ravitaillement, de l’essence a coulé sur la
carrosserie, il est conseillé de l’essuyer immédiatement.
FUEL TANK
In order to reach the fuel tank proceed as follows:
•The scooter must be positioned on its main stand.
•Remove the ignition key.
• Press on the top of the cover (1 - F. 15) placed in the
front of the saddle.
•Insert the key, loosen the cap (2) and fill up the tank.
•In case after the filling up of the tank, fuel traces should
appear on the body , it is advisable to immediately clean
the said areas.
Use GREEN PETROL WITHOUT LEAD.
FUEL TANK liters
TOTAL CAPACITY 12
RESERVE 3
Note: the tap of the petrol tank does not need any manual
intervention; in fact it is a vacuum-operated device.
DEPOSITO COMBUSTIBLE
Para acceder al depósito de combustible, efectuar las
siguientes operaciones:
• Colocar el scooter sobre el caballete central.
• Sacar la llave de contacto.
• Presionar la parte superior de la tapa (1 - F. 15) situada
delante del asiento.
• Introducir la llave y desenroscar el tapón (2). Llenar el depósito.
• Si tras el llenado quedan gotas de gasolina sobre la
carrocería, se aconseja limpiar inmediatamente la
superficie interesada.
Utiliser de l’ESSENCE SANS PLOMB
RESERVOIR CARBURANT litres
CAPACITE TOTALE 1 2
RESERVE 3
Note : le robinet du réserv oir d’essence est à dépression ;
il n’exige dont pas d’intervention manuelle.
29 12/99
Usar GASOLINA SIN PLOMO
DEPOSITO COMBUSTIBLE litros
CAPACIDAD TOTAL 1 2
RESERVA 3
Nota: el grifo del depósito de combustible es de tipo por
depresión; no necesita, por tanto, ninguna intervención manual.

MADISON 125-150
A
SERBATOIO LIQUIDO
REFRIGERANTE
• Il serbatoio di espansione del liquido refrigerante, si trova nella
parte anteriore dello scooter (vedi
F. 16). Per accedervi, rimuovere
il coperchio (1) facendo leva nella zona (A).
CONTROLLO LIVELLO
• Avviare il motore e lasciarlo al
minimo per un paio di minuti poi,
spegnerlo.
Non lasciare il motore acceso in locali chiusi o non
sufficientemente aerati.
•Attendere qualche minuto e svi-
tare il tappo (B - F . 17) con estre-
ma cautela.
•Controllare che il livello risulti fra
le tacche (min. - max.) (F. 18) in
caso contrario, rabboccare (possibilmente a motore in moto) con
liquido:
Q8 TOP FLUID.
1
F. 16
F. 17
KÜHLFLÜSSIGKEITSTANK
•Der Ausgleichsbehälter der
Kühlflüssigkeit befindet sich auf
der Vorderseite des Motorrollers
(siehe Abb. 16). Um Zugang zum
Ausgleichsbehälter zu erhalten,
ä
A
B
den Deckel (1) abnehmen und
dabei Druck auf den Bereich (A)
ausüben.
KONTROLLE:
• Den Motor anlassen und einige
Minuten im Leerlauf drehen
lassen. Anschließend den Motor
abstellen.
Den Motor in geschlossenen Räumen oder in
Räumen mit ungenügender
Belüftung nicht anlassen.
•Warten Sie einige Minuten und
drehen Sie den Deckel (B - Abb.
17) mit großer Vorsicht auf.
• Kontrollieren Sie, dass sich der
Stand zwischen den zwei
Zeichen (Min. - Max.) (Abb.18)
befindet, im Gegenfall (wenn
möglich bei laufendem Motor)
mit der Flüssigkeit:
Q8 TOP FLUID nachfüllen.
Non rabboccare assolutamente con acqua.
F. 18
Nel caso la quantità di liquido (per raggiungere il
livello ottimale) risulti superiore alla norma, oppu-
re, vi sia la necessità di rabbocchi troppo frequenti, con-
trollare scrupolosamente la tenuta di tutto l’ impianto di raffreddamento.
Zum Nachfüllen niemals
Wasser verwenden.
Falls die (zum Erreichen des optimalen Füllstands)
erforderliche Flüssigkeitsmenge außergewöhnlich
groß ist oder das Nachfüllen zu häufig notwendig ist,
muß unbedingt eine Kontrolle auf Dichtigkeit des
gesamten Kühlsystems vorgenommen werden.
30 12/99
 Loading...