


 Loading...
Mackie DL806 and DL1608 Reference Guide
Important Safety Instructions
1.Read these instructions.
2.Keep these instructions.
3.Heed all warnings.
4.Follow all instructions.
5.Do not use this apparatus near water.
6.Clean only with a dry cloth.
7.Do not block any ventilation openings. Install in accordance with the manufacturer’s instructions.
8.Do not install near any heat sources such as radiators, heat registers, stoves, or other apparatus (including amplifiers) that produce heat.
9.Do not defeat the safety purpose of the polarized or grounding-type plug. A polarized plug has two blades with one wider than the other. A grounding-type plug has two blades and a third grounding prong. The wide blade or the third prong are provided for your safety. If the provided plug does not fit into your outlet, consult an electrician for replacement of the obsolete outlet.
10.Protect the power cord from being walked on or pinched particularly at plugs, convenience receptacles, and the point where they exit from the apparatus.
11.Only use attachments/accessories specified by the manufacturer.
12. |
Use only with a cart, stand, tripod, bracket, or table specified |
PORTABLE CART |
||
|
by the manufacturer, or sold with the apparatus. When a cart |
|
WARNING |
|
|
is used, use caution when moving the cart/apparatus combina- |
|
|
|
13. |
tion to avoid injury from tip-over. |
|
|
|
|
|
|
||
Unplug this apparatus during lightning storms or when unused |
|
|
|
|
|
for long periods of time. |
|
|
|
|
|
|
|
|
14.Refer all servicing to qualified service personnel. Servicing is required when the apparatus has been damaged in any way, such as power-supply cord or plug is damaged, liquid has been spilled or objects have fallen into the apparatus, the apparatus has been exposed to rain or moisture, does not operate normally, or has been dropped.
15.This apparatus shall not be exposed to dripping or splashing, and no object filled with liquids, such as vases or beer glasses, shall be placed on the apparatus.
CAUTION
RISK OF ELECTRIC SHOCK. DO NOT OPEN
CAUTION: TO REDUCE THE RISK OF ELECTRIC SHOCK DO NOT REMOVE COVER (OR BACK) NO USER-SERVICEABLE PARTS INSIDE. REFER SERVICING TO QUALIFIED PERSONNEL
The lightning flash with arrowhead symbol within an equilateral triangle is intended to alert the user to the presence of uninsulated "dangerous voltage" within the product's enclosure, that may be of sufficient magnitude to constitute a risk of electric shock to persons.
The exclamation point within an equilateral triangle is intended to alert the user of the presence of important operating and maintenance (servicing) instructions in the literature accompanying the appliance.
16.Do not overload wall outlets and extension cords as this can result in a risk of fire or electric shock.
17.The MAINS plug or an appliance coupler is used as the disconnect device, so the disconnect device shall remain readily operable.
18.NOTE: This equipment has been tested and found to comply with the limits for a Class B digital device, pursuant to part 15 of the FCC Rules. These limits are designed to provide reasonable protection against harmful interference in a residential installation. This equipment generates, uses, and can radiate radio frequency energy and, if not installed and used in accordance with the instructions, may cause harmful interference to radio communications. However, there is no guarantee that interference will not occur in a particular installation.
If this equipment does cause harmful interference to radio or television reception, which can be determined by turning the equipment off and on, the user is encouraged to try to correct the interference by one or more of the following measures:
ss 2EORIENT ORERELOCATE THE RECEIVING ANTENNA
ss )NCREASE THE SEPARATIONEBETWEENPTHEREQUIPMENTNANDBTHETRECEIVER
ss#ONNECTNTHECEQUIPMENTEINTO ANUOUTLET ONNATCIRCUITTDIFFERENT FROMOTHAT TOHWHICH THE receiver is connected.
ss #ONSULTSTHELDEALER OREAN EXPERIENCED RADIO 46ATECHNICIAN FOR HELP
CAUTION: Changes or modifications to this device not expressly approved by LOUD Technologies Inc. could void the user's authority to operate the equipment under FCC
rules.
19.This apparatus does not exceed the Class A/Class B (whichever is applicable) limits for radio noise emissions from digital apparatus as set out in the radio interference regulations of the Canadian Department of Communications.
ATTENTION — Le présent appareil numérique n’émet pas de bruits radioélectriques dépassant las limites applicables aux appareils numériques de class A/de class B (selon le cas) prescrites dans le réglement sur le brouillage radioélectrique édicté par les ministere des
communications du Canada.
20.Exposure to extremely high noise levels may cause permanent hearing loss. Individuals vary considerably in susceptibility to noise-induced hearing loss, but nearly everyone will lose some hearing if exposed to sufficiently intense noise for a period of time. The U.S. Government’s Occupational Safety and Health Administration (OSHA) has specified the permissible noise level exposures shown in the following chart.
According to OSHA, any exposure in excess of these permissible limits could result in some hearing loss. To ensure against potentially dangerous exposure to high sound pressure levels, it is recommended that all persons exposed to equipment capable of producing high sound pressure levels use hearing protectors while the equipment is in operation. Ear plugs or protectors in the ear canals or over the ears must be worn when operating the equipment in order to prevent permanent hearing loss if exposure is in excess of the limits set forth here:
Duration, per |
Sound Level dBA, |
Typical Example |
|
day in hours |
Slow Response |
||
|
|||
|
|
|
|
8 |
90 |
Duo in small club |
|
6 |
92 |
|
|
4 |
95 |
Subway Train |
|
3 |
97 |
|
|
2 |
100 |
6ERYYLOUD CLASSICAL MUSIC |
|
1.5 |
102 |
|
|
1 |
105 |
Ben screaming at Troy about deadlines |
|
0.5 |
110 |
|
|
0.25 or less |
115 |
Loudest parts at a rock concert |
WARNING — To reduce the risk of fire or electric shock, do not expose this apparatus to rain or moisture.
Correct Disposal of this product: This symbol indicates that this product should not be disposed of with your household waste, according to the WEEE Directive (2011/65/EU) and your national law. This product should be handed over to an authorized collection site for recycling waste electrical and electronic equipment (EEE). Improper handling of this type of waste could have a possible negative impact on the environment and human health due to potentially hazardous substances that are generally associated with EEE. At the same time, your cooperation in the correct disposal of this product will contribute to the effective usage of natural resources. For more information about where you can drop off your waste equipment for recycling, please contact your local city office, waste authority, or your household waste disposal service.
2

Mackie DL806 and DL1608 Reference Guide
Table of Contents |
|
Important Safety Instructions .......................................................................................... |
2 |
Table Of Contents .............................................................................................................. |
3 |
Chapter 1: Welcome........................................................................................................... |
8 |
Master Fader V2.0 / My Fader V2.0............................................................................................................. |
8 |
About This Guide ......................................................................................................................................... |
8 |
Features ...................................................................................................................................................... |
9 |
Introduction............................................................................................................................................... |
10 |
Architecture Overview .............................................................................................................................. |
11 |
DL Series Mixer ......................................................................................................................... |
11 |
iPad ............................................................................................................................................ |
11 |
Master Fader app ...................................................................................................................... |
11 |
Chapter 2: Mixer Hardware : Front Panel....................................................................... |
12 |
Introduction............................................................................................................................................... |
12 |
iPad Dock Connector................................................................................................................................. |
12 |
iPad Tray and Tray Inserts ......................................................................................................................... |
13 |
PadLock™.................................................................................................................................................... |
16 |
Front Panel Introduction........................................................................................................................... |
17 |
Gain Knobs................................................................................................................................................. |
17 |
Sig / OL LEDs .............................................................................................................................................. |
17 |
Phones Output Jack................................................................................................................................... |
18 |
Phones Knob.............................................................................................................................................. |
18 |
Chapter 3: Mixer Hardware : Rear Panel ........................................................................ |
19 |
Rear Panel Introduction............................................................................................................................ |
19 |
Power Connector ....................................................................................................................................... |
19 |
Power Switch.............................................................................................................................................. |
20 |
Power LED .................................................................................................................................................. |
20 |
Phantom Power Switch ............................................................................................................................. |
20 |
Phantom Power LED.................................................................................................................................. |
21 |
XLR and 1/4" Inputs................................................................................................................................... |
21 |
L/R Main Outs............................................................................................................................................. |
22 |
Aux Sends................................................................................................................................................... |
22 |
Kensington Lock ........................................................................................................................................ |
23 |
Network Connector ................................................................................................................................... |
23 |
Force Update Button ................................................................................................................................. |
24 |
3

Mackie DL806 and DL1608 Reference Guide |
|
Chapter 4: Mixer Hardware : Wireless Setup ................................................................ |
25 |
Introduction............................................................................................................................................... |
25 |
Wi-Fi Router................................................................................................................................................ |
25 |
Network Connectivity ............................................................................................................................... |
25 |
Connect .................................................................................................................................................... |
26 |
Router Settings.......................................................................................................................................... |
28 |
Chapter 5: Mackie Master Fader Software .................................................................... |
29 |
Introduction............................................................................................................................................... |
29 |
Downloading and Installing the Master Fader App................................................................................ |
29 |
Updating the Master Fader App............................................................................................................... |
30 |
Updating the Firmware ............................................................................................................................. |
31 |
Lingo .................................................................................................................................................... |
32 |
Tapping, Dragging, Flicking, Swiping and Pinching.............................................................. |
32 |
Two Main Views......................................................................................................................... |
33 |
Mixer View ......................................................................................................................... |
33 |
Channel View..................................................................................................................... |
34 |
Grow & Glow, Current Parameter Display and The Swipe Zone............................................ |
35 |
Chapter 6: Mixer View : Channel Strips.......................................................................... |
37 |
Introduction............................................................................................................................................... |
37 |
The Swipe Zone.......................................................................................................................................... |
37 |
EQ Curve .................................................................................................................................................... |
38 |
Mute .................................................................................................................................................... |
38 |
Pan .................................................................................................................................................... |
38 |
Gain Reduction Meter ............................................................................................................................... |
38 |
Channel Faders and Input Meters ............................................................................................................ |
39 |
Selected Output Indicators....................................................................................................................... |
39 |
Solo .................................................................................................................................................... |
40 |
Channel ID Button ..................................................................................................................................... |
40 |
FX [Reverb / Delay] .................................................................................................................................... |
43 |
iPad / Playback........................................................................................................................................... |
44 |
Chapter 7: Mixer View : Master Fader............................................................................. |
46 |
Introduction............................................................................................................................................... |
46 |
Output Selector / Output Channels ......................................................................................................... |
46 |
Graphic EQ.................................................................................................................................................. |
47 |
Mute .................................................................................................................................................... |
47 |
Balance .................................................................................................................................................... |
48 |
Aux/FX Send Configuration Menu............................................................................................................ |
48 |
Output Gain Reduction Meter .................................................................................................................. |
50 |
Master Fader and Output Meters ............................................................................................................. |
50 |
Record and Solo......................................................................................................................................... |
51 |
Master ID Button........................................................................................................................................ |
53 |
Linking Auxes ............................................................................................................................................ |
55 |
4

|
Mackie DL806 and DL1608 Reference Guide |
Chapter 8: Level Setting Procedure ............................................................................... |
56 |
Introduction............................................................................................................................................... |
56 |
Level Setting Procedure............................................................................................................................ |
56 |
Headphones............................................................................................................................................... |
57 |
Chapter 9: Channel View : EQ.......................................................................................... |
58 |
Introduction............................................................................................................................................... |
58 |
EQ On / Off.................................................................................................................................................. |
59 |
Modern / Vintage....................................................................................................................................... |
59 |
Polarity Invert ............................................................................................................................................ |
59 |
Modern EQ Introduction........................................................................................................................... |
60 |
Modern EQ Swipe Zone............................................................................................................................. |
60 |
Modern EQ Gain, Frequency and Q [Bandwidth].................................................................................... |
61 |
Low Shelving – Band 1.............................................................................................................. |
61 |
Low-Mid Peaking – Band 2....................................................................................................... |
61 |
High-Mid Peaking – Band 3...................................................................................................... |
62 |
High Shelving – Band 4 ............................................................................................................ |
62 |
Modern EQ Shelf / Bell............................................................................................................................... |
63 |
Modern EQ HPF On / Off and Frequency.................................................................................................. |
64 |
Modern EQ at a Glance.............................................................................................................................. |
65 |
Vintage EQ Introduction ........................................................................................................................... |
66 |
Vintage EQ Swipe Zone ............................................................................................................................. |
66 |
Vintage EQ HPF Frequency Buttons......................................................................................................... |
66 |
Vintage EQ Gain and Frequency............................................................................................................... |
67 |
Low............................................................................................................................................. |
67 |
Mid ............................................................................................................................................. |
67 |
Wide / Narrow............................................................................................................................ |
67 |
High............................................................................................................................................ |
67 |
Vintage EQ at a Glance .............................................................................................................................. |
67 |
Chapter 10: Channel View : Gate and Compression...................................................... |
68 |
Introduction............................................................................................................................................... |
68 |
Gate On / Off............................................................................................................................................... |
69 |
Modern / Vintage....................................................................................................................................... |
69 |
Compressor On / Off .................................................................................................................................. |
69 |
Modern / Vintage....................................................................................................................................... |
69 |
Modern Gate and Compressor Introduction ........................................................................................... |
69 |
Modern Gate and Compressor Swipe Zone............................................................................................. |
70 |
Modern Gate Display and Settings .......................................................................................................... |
70 |
Modern Gate Meters.................................................................................................................................. |
70 |
Modern Compressor Display and Settings.............................................................................................. |
71 |
Soft Knee / Hard Knee Compression ........................................................................................................ |
71 |
Modern Compressor Meters ..................................................................................................................... |
71 |
Modern Gate at a Glance........................................................................................................................... |
71 |
Modern Compressor at a Glance .............................................................................................................. |
71 |
Vintage Gate and Compressor Introduction ........................................................................................... |
72 |
Vintage Gate and Compressor Swipe Zone ............................................................................................. |
72 |
Vintage Gate Settings ............................................................................................................................... |
73 |
Vintage Compressor Settings................................................................................................................... |
73 |
Vintage Gate / Compressor VU Meters..................................................................................................... |
74 |
Vintage Gate at a Glance........................................................................................................................... |
74 |
Vintage Compressor at a Glance .............................................................................................................. |
74 |
5

Mackie DL806 and DL1608 Reference Guide |
|
Chapter 11: Channel View : FX........................................................................................ |
75 |
Introduction............................................................................................................................................... |
75 |
The Swipe Zone.......................................................................................................................................... |
75 |
FX View .................................................................................................................................................... |
76 |
Reverb Type................................................................................................................................................ |
78 |
Reverb Sliders ............................................................................................................................................ |
79 |
Delay Type.................................................................................................................................................. |
80 |
Delay Sliders .............................................................................................................................................. |
81 |
Chapter 12: Channel View : Graphic EQ ......................................................................... |
82 |
Introduction............................................................................................................................................... |
82 |
The Swipe Zone.......................................................................................................................................... |
82 |
Graphic EQ On / Off.................................................................................................................................... |
82 |
31-Band EQ................................................................................................................................................. |
82 |
2X .................................................................................................................................................... |
83 |
Draw .................................................................................................................................................... |
83 |
Zeroing the GEQ ........................................................................................................................................ |
84 |
Graphic EQ at a Glance .............................................................................................................................. |
84 |
Chapter 13: Channel View : Output Compressor / Limiter............................................ |
85 |
Introduction............................................................................................................................................... |
85 |
Output Compressor / Limiter On / Off...................................................................................................... |
85 |
Modern / Vintage....................................................................................................................................... |
85 |
Modern Output Compressor / Limiter Introduction ............................................................................... |
85 |
Modern Output Compressor / Limiter Swipe Zone................................................................................. |
86 |
Modern Output Compressor / Limiter Display and Settings.................................................................. |
86 |
Soft Knee / Hard Knee Compression ........................................................................................................ |
86 |
Modern Output Compressor / Limiter Meters......................................................................................... |
86 |
Vintage Output Compressor / Limiter Introduction ............................................................................... |
87 |
Vintage Output Compressor / Limiter Swipe Zone ................................................................................. |
87 |
Vintage Output Compressor / Limiter Display and Settings.................................................................. |
88 |
Vintage Output Compressor / Limiter VU Meter..................................................................................... |
88 |
Chapter 14: Mixer View : Navigation Bar ....................................................................... |
89 |
Introduction............................................................................................................................................... |
89 |
Mixer .................................................................................................................................................... |
89 |
Current Parameter Display ....................................................................................................................... |
89 |
Tools .................................................................................................................................................... |
89 |
Devices....................................................................................................................................... |
90 |
Settings...................................................................................................................................... |
96 |
Help.......................................................................................................................................... |
101 |
File System ............................................................................................................................................... |
102 |
Shows ................................................................................................................................... |
102 |
Snapshots................................................................................................................................ |
104 |
Channel Safes.......................................................................................................................... |
106 |
Current Show vs Offline Shows.............................................................................................. |
108 |
Random Notes and Other Musings ....................................................................................... |
111 |
Presets ................................................................................................................................... |
112 |
Factory Presets vs User Presets.............................................................................................. |
113 |
Channel Presets vs DSP Presets............................................................................................. |
116 |
6

|
Mackie DL806 and DL1608 Reference Guide |
Quick Access Panel .................................................................................................................................. |
119 |
Clear Solo................................................................................................................................. |
119 |
Effects Controls ....................................................................................................................... |
120 |
Mute Group Control................................................................................................................ |
121 |
View Group Control ................................................................................................................ |
126 |
Chapter 15: Mackie My Fader Software....................................................................... |
129 |
Introduction............................................................................................................................................. |
129 |
Downloading, Installing and Updating the My Fader app................................................................... |
129 |
Using My Fader ........................................................................................................................................ |
129 |
My Fader vs Master Fader ....................................................................................................................... |
130 |
Tools .................................................................................................................................................. |
138 |
Shows .................................................................................................................................................. |
141 |
My Fader Wrap-Up................................................................................................................................... |
141 |
Appendix A: Service Information................................................................................. |
142 |
Troubleshooting ...................................................................................................................................... |
142 |
Repair .................................................................................................................................................. |
143 |
Appendix B: iOS Optimizations.................................................................................... |
144 |
iPad Optimizations.................................................................................................................................. |
144 |
iPhone / iPod touch Optimizations ........................................................................................................ |
150 |
Appendix C: Technical Information.............................................................................. |
153 |
Specifications........................................................................................................................................... |
153 |
Dimensions .............................................................................................................................................. |
157 |
Block Diagram.......................................................................................................................................... |
162 |
Appendix D: Hookup Diagrams.................................................................................... |
163 |
Appendix E: Release Notes ........................................................................................... |
169 |
Appendix F: Glossary Of Terms..................................................................................... |
182 |
Warranty Statement / GPL Statement.......................................................................... |
190 |
Open Source Code ......................................................................................................... |
191 |
7

Mackie DL806 and DL1608 Reference Guide
Chapter 1: Welcome
Master Fader V2.0 / My Fader V2.0
This is the new-and-improved version of the DL Series Reference Guide. The goal of our ninja-like Engineering team is to continue to make your experience even better, so the DL Series mixers and Master Fader / My Fader apps may be updated at any time. Be sure you are always using the latest version of each, as specific releases are designed to work together. This version of the Reference Guide is written
and designed to pair with Master Fader V2.0, My Fader V2.0 and the corresponding mixer firmware installed by these apps. With so many frequent changes, some screen shots may look slightly different than what you see within these pages and there could be some functional differences, as well.
About This Guide
***We strongly encourage checking out the Quick Start Guide before diving into this Reference Guide*** It is a great way to familiarize yourself with the basic ideas of the DL806 and DL1608, how to switch between
views, add color to a mix, gates & compressors, FX, graphic EQ and much more. Once you do that, this will be a breeze!
This guide is designed to be accessible, with subsections as complete as practical to minimize having to leaf back and forth looking for the whole story. The entire guide does not need to be read to figure out how to use this console. However, a certain amount of familiarity with analog mixing consoles, their features, and commonly used signal processing (compressors, limiters, gates, EQs) is assumed.
This guide provides the following resources: |
|
t " HFOFSBM PWFSWJFX PG UIF %- BOE %- T GBDJMJUJFT BOE GFBUVSFT |
|
t %JTTFDUJPO CZ EJTTFDUJPO EFTDSJQUJPO PG FBDI JOQVU BOE PVUQVU FWFSZ OPPL BOE DSBOOZ |
|
and — by golly — each doodad, too! |
|
t %FUBJMFE EFTDSJQUJPO PG FBDI TDSFFO PO UIF .BDLJF .BTUFS 'BEFS J1BE BQQ |
|
t "O FOUJSF DIBQUFS EFEJDBUFE UP .Z 'BEFS J1IPOF BOE J1PE UPVDI BQQ |
|
t "O FOUJSF DIBQUFS EFEJDBUFE UP UIF MFWFM TFUUJOH QSPDFEVSF |
|
t )PPLVQ EJBHSBNT EFQJDUJOH TPNF PG UIF NPSF DPNNPO TFUVQT |
|
t #PUUPN MJOF UIFSF JT B50/ PG TUVò JO IFSF 8F XPVME CF EVNCGPVOEFE JG UIFSF XBT BOZUIJOH NJTTJOH
"T UIF TBZJOH HPFT iB QJDUVSF UFMMT B XPSETw 8JUI UIBU UIPVHIU JO NJOE XF BEEFE RVJUF B GFX
pictures, screen shots, illustrations and other images throughout to accompany the text.
This icon marks information that is critically important or unique! For your own good, read and remember them because there is pop quiz built in to the Master Fader app. To confirm your knowledge of these features, the app will not function until all answers are correct. Ok, maybe
UIBUT OPU FOUJSFMZ BDDVSBUF PS FWFO TPNFXIBU BDDVSBUF CVU JU *4 B HPPE JEFB UP QBZ TQFDJBM BUUFOUJPO UP UIFTF BSFBT JO UIF 3FGFSFODF (VJEF NBSLFE XJUI UIFi7&3: *.1035"/5wIBOE JDPO
5IFSFT BO JMMVTUSBUJPO PG B NJDSPTDPQF TP PG DPVSTF ZPVSF HPJOH UP HFU NPSF EFUBJMFE
information when you see this little guy. There are explanations of features and practical tips listed here.
*UT B HPPE JEFB UP QBZ BUUFOUJPO UP UFYU EJTQMBZFE OFYU UP B OPUF JDPO BT UIJT JDPO ESBXT
BUUFOUJPO UP DFSUBJO GFBUVSFT BOE GVODUJPOT SFMBUJOH UP UIF VTBHF PG UIF NJYFS UIF J1BE and/or Master Fader app.
This seems like as good a place as any to have our first note together (and I will cherish this moment forever)! Whether you have a DL806 or a DL1608 mixer, this is THE place to be! This Reference Guide covers both mixers. The differences between the two are noted throughout. If not specifically noted, operation is the same for both mixers.
8

Mackie DL806 and DL1608 Reference Guide
Features
t 1SPWFO IBSEXBSF UIBU TPVOET HSFBU
t 0OZY NJD QSFBNQT
t )JHI FOE $JSSVT -PHJD¥ DPOWFSUFST
t 6MUSB MPX OPJTF IJHI IFBESPPN EFTJHO
t "VY TFOET GPS NPOJUPS NJYFT
t .BTUFS - 3 PVUQVU GPS NBJOT
t 5POT PG CVJMU JO QSPDFTTJOH
t $IPJDF PG QPXFSGVM UPVDI TFOTJUJWF QMVH JOT
t CBOE &2 HBUF BOE DPNQSFTTJPO PO JOQVUT
t CBOE (&2 BOE DPNQ MJNJUFS PO PVUQVUT
t (MPCBM SFWFSC BOE EFMBZ
t 8JSFMFTT NJYJOH
t 4FBNMFTT XJSFE UP XJSFMFTT NJYJOH
t 5VOF UIF SPPN GSPN BOZXIFSF
t (FU PO TUBHF UP SJOH PVU NPOJUPST
t 1FSTPOBM NPOJUPS NJYJOH XJUI BDDFTT DPOUSPM BCJMJUZ
t 6TF VQ UP J04 EFWJDFT TJNVMUBOFPVTMZ
t 5PUBM DPOUSPM GSPN ZPVS J1BE J1IPOF PS J1PE UPVDI
t *OUVJUJWF .BTUFS 'BEFS BQQ GPS BMM J1BE NPEFMT
t .Z 'BEFS BQQ GPS RVJDL DPOUSPM GSPN J1IPOF PS J1PE UPVDI
t i(SPX (MPXwWJTVBM GFFECBDL
t 1SFTFU BOE TOBQTIPU SFDBMM
t 3FDPSE UIF NJY UP UIF J1BE GPS JOTUBOU TIBSJOH
t *OUFHSBUF NVTJD GSPN BOZ BQQ JOUP UIF NJY
t Install friendly features
t 1BE-PDL GFBUVSF MPDLT EPXO J1BE GPS QFSNBOFOU JOTUBMMT
t *OEVTUSZ TUBOEBSE ,FOTJOHUPO MPDL TFDVSFT NJYFS
t $PNQBDU GPPUQSJOU TBWF QSFDJPVT XPSLTQBDF
t Y Y NN Y NN Y NN
t MC LH <%- > MC LH <%- >
t -JHIUOJOH BOE QJO WFSTJPOT BWBJMBCMF
8J 'J SPVUFS SFRVJSFE GPS XJSFMFTT PQFSBUJPO 8J 'J SPVUFS BOE J1BE J1PE UPVDI PS J1IPOF OPU JODMVEFE 8JSFMFTT DPOUSPM TVQQPSUFE GSPN BMM J1BE NPEFMT
%- TFSJFT NJYFST XJUI -JHIUOJOH EPDL TVQQPSU XJSFE DPOUSPM GSPN J1BE UI HFOFSBUJPO BOE J1BE NJOJ SFRVJSFT PQUJPOBM J1BE NJOJ USBZ BDDFTTPSZ %- TFSJFT NJYFST XJUI QJO EPDL TVQQPSU XJSFE DPOUSPM GSPN J1BE TU HFOFSBUJPO J1BE BOE J1BE SE HFOFSBUJPO
8JSFMFTT DPOUSPM TVQQPSUFE GSPN J1PE UPVDI UI BOE UI HFOFSBUJPO J1IPOF J1IPOF 4 BOE J1IPOF
J1BE NVTU CF EPDLFE BOE UIF BQQ NVTU TVQQPSU CBDLHSPVOE BVEJP QMBZCBDL
J1BE JT B USBEFNBSL PG "QQMF *OD SFHJTUFSFE JO UIF 64 BOE PUIFS DPVOUSJFT
9

Mackie DL806 and DL1608 Reference Guide
Introduction
/FBSMZ ZFBST BHP .BDLJF SFWPMVUJPOJ[FE UIF QSP BVEJP XPSME CZ VOMFBTIJOH UIF $3 DIBOOFM mixer. Today, Mackie redefines live mixing by combining the power of a digital mixer with the ease and
QPSUBCJMJUZ PG BO J1BE 5IJOL PG JU BT UPEBZT $3 CVU EJHJUBM BOE VOQMVHHFE
t $POUSPM UIF NJY GSPN BOZXIFSF
8JUI UIF .BDLJF %- 4FSJFT NJYFST TFBNMFTT XJSFE UP XJSFMFTT NJYJOH DBQBCJMJUJFT ZPV DBO NJY XJSFMFTTMZ JO SFBM UJNF GSPN BOZXIFSF JO UIF WFOVF PO ZPVS J1BE J1IPOF PS J1PE UPVDI 5IF CBS UIF CBUISPPN UIF CBDL closet. Instantly adjust mix functions from tuning front of house trouble spots to ringing out stage monitors.
%- TFSJFT NJYFST BDDPNNPEBUF J1BET DPOUBJOJOH FJUIFS B -JHIUOJOH PS QJO DPOOFDUPS
t $POUSPM UIF NJY GSPN ZPVS J1BE
%FTJHOFE TQFDJöDBMMZ GPS UIF J1BE UIF .BTUFS 'BEFS BQQ CSJOHT HSPVOE CSFBLJOH %"8 NJYJOH GFBUVSFT BOE functionality to the live environment. With this intuitive breakthrough app, you can create mix snapshots,
DIBOOFM QSFTFUT BOE FWFO SFDPSE TUFSFP USBDLT TUSBJHIU UP ZPVS J1BE 1MVT XJUIi(SPX BOE (MPXwHJWJOH ZPV WJTVBM JOEJDBUJPO PG UIF GVODUJPO ZPVSF DPOUSPMMJOH ZPV DBO CF DPOöEFOU UIBU ZPVSF BMXBZT JO DPOUSPM
t 1SPWFO IBSEXBSF UIBU TPVOET HSFBU
#Z DPNCJOJOH PVS øBHTIJQ 0OZY NJD QSFBNQT XJUI UIF QFSGPSNBODF PG CJU $JSSVT -PHJD "% %" DPOWFSUFST UIF .BDLJF %- BOE %- EFMJWFS VOQBSBMMFMFE TPVOE RVBMJUZ "EE UP UIBU NVMUJQMF balanced outputs, and you have a mixer that not only provides incredible dynamic range, fidelity and transparency, but also great versatility and outstanding value.
t 5POT PG CVJMU JO QSPDFTTJOH
5IF %- 4FSJFT NJYFST BSF MPBEFE XJUI B DIPJDF PG QPXFSGVM QMVH JOT PO FWFSZ DIBOOFM TP ZPV XPOU OFFE to set up additional racks of outboard gear. With just the touch of a finger, you have total control over
CBOE &2 DPNQSFTTJPO BOE HBUF QMVH JOT 1MVT TXFFUFO ZPVS TPVOE XJUI B GVMM GFBUVSFE SFWFSC BOE UBQ delay or adjust your mix to the room with the 31-band graphic EQ and limiter on the main and aux outs.
t 1FBDF PG NJOEXJUI BDDFTT DPOUSPM NVUF HSPVQT BOE WJFX HSPVQT
$VTUPNJ[F XIBU DPOUSPMT BSF BWBJMBCMF UP FBDI J04 EFWJDF (SFBU GPS QSPWJEJOH UIF SJHIU MFWFM PG BDDFTT GPS those with less experience, access limits even provides a password lock for ultimate protection.
'PVS JOEJWJEVBM NVUF HSPVQT BSF BWBJMBCMF GSPN UIF RVJDL BDDFTT QBOFM GPS XFMM RVJDL BDDFTT "TTJHO TQFDJöD input and output channels to these mute groups for customizable control of channel muting.
Only see the channels you want to see by assigning input channels to one or more of four separate view groups. This not only improves organization and allows for faster navigation, it is perfect for hiding channels from on-stage musicians when paired with access limiting.
t .VMUJQMF J04 EFWJDFT TVQQPSU
Supporting up to 10 iOS devices simultaneously, the Mackie DL Series allows multiple engineers to
DPOUSPM UIF NJY 1MVT JU HJWFT CBOE NFNCFST UIF BCJMJUZ UP BEKVTU UIFJS PXO NPOJUPST XJUI .Z 'BEFS PO UIFJS J1IPOF PS J1PE UPVDI /PX UIF CBOE DBO EJBM JO UIF NJY UIFZ XBOU UP IFBS JO SFBM UJNF SJHIU PO TUBHF
t 'PSXBSE MPPLJOH EFTJHO
The sleek and low profile Mackie DL806 and DL1608 are rooted in design innovation. Its powerfully small
GPSNBU EFTUSPZT UIF JOEVTUSZT OPUJPO UIBUiCJHHFS JT CFUUFSwCZ BMMPXJOH NPEFSO UFDIOPMPHZ UP FMJNJOBUF the need for bulky boards and racks of gear.
10
Mackie DL806 and DL1608 Reference Guide
Architecture Overview
"U UIF WFSZ DPSF UIF %- 4FSJFT TZTUFN DPOTJTUT PG UISFF TFQBSBUF QBSUT UIF %- 4FSJFT NJYFS BO J1BE and the Master Fader app. Each of these three components are equally important, none more so than
UIF PUIFS :PV DBO QMBZ XJUI FBDI DPNQPOFOU TFQBSBUFMZ CVU ZPV XPOU CF BCMF UP BDDPNQMJTI NVDI 5PHFUIFS UIPVHI ZPV CFDPNF .S .JY " -PU UIF FOWZ PG FOHJOFFST BU FWFSZ WFOVF UIF XPSME PWFS *UT JNQPSUBOU UP OPUF UIBU UIF %- BOE PS %- JT UIF EJHJUBM NJYFS XIJMF POF PS NPSF J04 EFWJDFT DPOUSPMT JU "MM %41 QSPDFTTJOH BOE SPVUJOH UBLF QMBDF JO UIF NJYFS JUTFMG NFBOJOH JUT OPU KVTU BiEPDLw -FUT UBLF B RVJDL MPPL BU FBDI XIBU UIFZ BSF BOE IPX UIFZ SFMBUF UP FBDI PUIFS
Wireless |
|
|
|
Wireless |
iPad |
|
|
|
|
Wireless |
|
|
Original iPad |
|
(4th generation) |
One |
|
Wireless |
|
|
iPhone 4S |
Wired |
iPod touch |
|
|
Piece |
|||
|
DL Series |
|
||
|
Mixer |
Missing |
iPad |
|
|
Wireless |
Match |
|
Wireless |
|
Made in |
|
iPhone 5 |
|
|
iPad mini |
One |
||
|
Heaven |
Wireless |
||
|
Impossible |
Piece |
||
|
|
|||
Wireless |
Mission |
|
Missing |
iPad |
iPad 2 |
|
|
|
(3rd generation) |
|
|
|
|
Wireless |
Master Fader App |
Future |
|
Wireless |
|||
iPhone 4 |
|||
|
|||
|
iOS Device |
||
|
|
DL Series Mixer — Every mixer in the universe has input and output jacks. The DL Series are no different. In addition to input and output jacks, this mixer contains gain knobs and accompanying SIG/OL LEDs.
0O UIF SFBS QBOFM BSF UIF QPXFS DPOOFDUPS BOE OFUXPSL DPOOFDUPS 1PXFS BOE 7 QIBOUPN QPXFS TXJUDIFT BOE -&%T SPVOE PVU UIF NJYFS 6OMJLF NPTU PUIFS NJYFST UIPVHI UIF %- 4FSJFT NJYFST EPOU IBWF
USBEJUJPOBM DPOUSPMT BOE XPOU XPSL XJUIPVU BO J1BE BOE UIF .BTUFS 'BEFS BQQ 'FFM GSFF UP NBLF BMM
the connections you want, but you need more to control it. Mixer details begin on the next page.
iPad 5IF "QQMF J1BE 4VDI B DPPM JOOPWBUJWF QSPEVDU IVI 4FOE BOE SFDFJWF FNBJM TVSG UIF XFC download and install apps for gaming, business, education, entertainment, social networking, sports,
USBWFM NVTJD BOE NPSF "MM UIJT GSPN OFBSMZ BOZXIFSF JO UIF XPSME )PME PO B TFDPOE XIBU XBT UIBU MBTU POF .VTJD :FQ NVTJD 5IJT JT XIFSF UIF .BTUFS 'BEFS BQQ DPNFT JOUP QMBZ 5IF J1BE JT B UPPM UIBU allows us to create the best user experience for you, a blank canvas for the Master Fader app.
Master Fader App — This is the third piece of the puzzle. Forgo the burden of carrying around a big, bulky
EFTL XJUI IVOESFET PG LOPCT " %- 4FSJFT NJYFS XJUI J1BE BOE .BTUFS 'BEFS BQQ BSF UIF XBZ UP HP "OE XJUI wireless capability, feel free to walk the venue creating mixes on the fly utilizing the large, full-color screen
UPVDI 6* .JYJOH XJSFMFTTMZ PO UIF øZ PO BO BQQ PO BO J1BE 5IBU TPVOET PVU PG UIJT XPSME *U NVTU CF TMPX BOE EJóDVMU UP DPNQSFIFOE UIPVHI SJHIU 8SPOH 5IF .BTUFS 'BEFS BQQ JT GBTU øVJE BOE JOUVJUJWF %POU CFMJFWF VT %PXOMPBE BOE JOTUBMM UIF .BTUFS 'BEFS BQQ GPS GSFF BOE TFF GPS ZPVSTFMG ZPV EPOU FWFO OFFE B mixer to test drive the app!
"O BEEJUJPOBM IBSEXBSF DPNQPOFOU UP BEE UP UIF NJY JT B XJSFMFTT SPVUFS 0OF PG UIF NBJO
reasons for utilizing a DL Series mixer is for its wireless capabilities. It certainly is possible without one, but then you would be missing out on one of the coolest features of
the mixer. More on the router later.
"T OPUFE BCPWF BU MFBTU POF J1BE JT OFDFTTBSZ UP VUJMJ[F B %- 4FSJFT NJYFS )PXFWFS VQ UP J04 EFWJDFT NBZ CF DPOOFDUFE UP JU XJSFMFTTMZ 5IJT JODMVEFT BOZ HFOFSBUJPO J1BE BO J1BE NJOJ BOZ HFOFSBUJPO J1IPOF BOE PS BO J1PE UPVDI :PV DBO FWFO NJY BOE NBUDI
11
Mackie DL806 and DL1608 Reference Guide
Chapter 2: Mixer Hardware : Front Panel
Introduction
8FSF HPJOH UP TUBSU UIJOHT Pò XJUI B MPPL BU UIF NJYFS JUT GFBUVSFT IPX BOE XIFSF UP NBLF DPOOFDUJPOT TJHOBM øPX BOE UIFO öOJTI Pò XJUI BO JO EFQUI DPNNFOUBSZ SFHBSEJOH UIF &UIFSOFU DPOOFDUPS -FUT LJDL Pò PVS GSPOU QBOFM IBSEXBSF EJTDVTTJPO XJUI UIF J1BE EPDL DPOOFDUPS
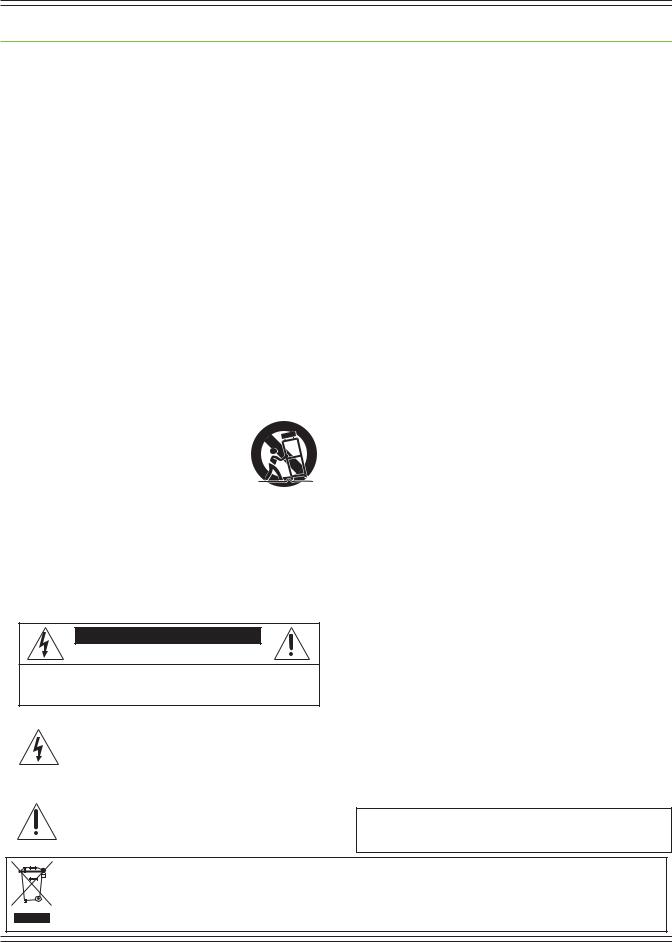
iPad Dock Connector
0O UIF GBS MFGU PG UIF NJYFS PVUMJOFE CZ UIF WFSUJDBM HSFFO SFDUBOHMF CFMPX JT UIF J1BE EPDL DPOOFDUPS %- TFSJFT NJYFST XJUI -JHIUOJOH EPDL TVQQPSU XJSFE DPOUSPM GSPN J1BE UI HFOFSBUJPO BOE J1BE NJOJ SFRVJSFT PQUJPOBM J1BE NJOJ USBZ BDDFTTPSZ %- TFSJFT NJYFST XJUI QJO EPDL TVQQPSU XJSFE DPOUSPM GSPN J1BE TU HFOFSBUJPO J1BE BOE J1BE SE HFOFSBUJPO
*G VTJOH BO J1BE J1BE SE HFOFSBUJPO PS J1BE UI HFOFSBUJPO TMJEF UIF J1BE SJHIU UP MFGU GBDF VQ IPNF CVUUPO PO UIF MFGU VOUJM JU NBUFT XJUI UIF J1BE EPDL DPOOFDUPS *G VTJOH BO PSJHJOBM J1BE PS NJOJ J1BE UIF USBZ JOTFSU XJMM OFFE UP CF SFNPWFE öSTU 4FF UIF OFYU UISFF QBHFT XIJDI FYQMBJO UIF J1BE USBZ BOE USBZ JOTFSUT
This connection serves multiple purposes. For one, recording and playback are possible when
BO J1BE JT DPOOFDUFE UP UIF NJYFS 'PS BOPUIFS BT MPOH BT UIF NJYFS JT QMVHHFE JO BOE UVSOFE PO UIF J1BE XJMM DIBSHF "OE NPTU JNQPSUBOUMZ .BTUFS 'BEFS XPSLT TBOT XJSFMFTT SPVUFS XIFO EPDLFE <3FDPSEJOH BOE QMBZCBDL BSF EFUBJMFE JO VQDPNJOH DIBQUFST> 1MVT JU KVTU MPPLT DPPM XIFO UIF UXP BSF NBSSJFE UPHFUIFS DPOOFDUFE BT POF 1FSGFDUJPO #MJTT %P JU BOE ZPVMM TFF XIBU XF NFBO
12 |

Mackie DL806 and DL1608 Reference Guide
iPad Tray and Tray Inserts
5IF MBSHFTU BSFB PO UIF NJYFS JT UIF J1BE USBZ XJUI UIF EPDL UP JUT MFGU 5IF J1BE USBZ JT B QBSU PG UIF %- 4FSJFT NJYFS BOE DBOOPU CF SFNPWFE 5IF J1BE TMJEFT JOUP UIF USBZ BOE NBUFT XJUI UIF EPDL DPOOFDUPS PO UIF NJYFS
One of the really cool things about these mixers is that it seamlessly transitions from wired to wireless
PQFSBUJPO 5IFSFGPSF UIF USBZ JT IJHIMZ EVSBCMF UP XJUITUBOE SFQFUJUJWF JOTFSUJPO BOE SFNPWBM PG BO J1BE
It does this by using a tray and insert design.
*U OFFET UP OPU POMZ BDDPNNPEBUF UIF DVSSFOU J1BE EFTJHOT CVU BMTP CF SFBEZ GPS GVUVSF WBSJBUJPOT 5IF JOUFHSBUFE USBZ öUT UIF PSJHJOBM J1BE XIJMF USBZ JOTFSUT BSF BEEFE UP öU BMM PUIFS J1BET JODMVEJOH UIF J1BE NJOJ 'PS CPUI UIF USBZ BOE JOTFSUT UIF BNB[JOH öU JT BDIJFWFE CZ VUJMJ[JOH UXP DFOUFS SBJMT BOE DVSWFE TVQQPSUT PO UIF TJEFT 5IFSF BSF BMTP UXP HVJEFT BCPWF UIF J1BE DSFBUJOH UIF QFSGFDU BMJHONFOU needed for docking.
5IF SFTVMU JT UIBU BMM J1BE WFSTJPOT BSF TVQQPSUFE "EEJUJPOBMMZ JU JT SFBEZ GPS BOZ OFX J1BE EFTJHO XJUI KVTU UIF BEEJUJPO PG B OFX USBZ JOTFSU )BWJOH TBJE UIBU XF DBOU QSFEJDU UIF GVUVSF JG XF DPVME XF XPVME BMM CF SFUJSFE zillionaires, traveling the world over. We do our best to plan for all possiblities, but there are no guarantees.
%- 4FSJFT NJYFST DPNF FRVJQQFE XJUI B TUBOEBSE J1BE USBZ JOTFSU BMSFBEZ JOTUBMMFE BOE TDSFXFE EPXO 5IF GPMMPXJOH JT B MJTU PG BMM DVSSFOU J1BE NPEFMT BOE XIBU JOTFSU JG BOZ JT OFFEFE UP EPDL JU
Original iPad – no tray insert necessary; the included tray insert needs to be removed. [See directions listed below].
iPad 2, iPad (3rd generation), iPad (4th generation) – standard tray insert (included with mixer).
iPad mini – iPad mini tray insert (sold separately). The included iPad tray insert needs to removed and replaced with an iPad mini tray insert. [See directions on the next page].
5IF USBZ JOTFSU JT OPU OFDFTTBSJMZ EFQFOEFOU PO XIBU UZQF PG DPOOFDUPS UIF J1BE IBT *O PUIFS XPSET XIJMF BO J1BE BOE J1BE SE HFOFSBUJPO <CPUI QJO DPOOFDUPST> BOE J1BE UI HFOFSBUJPO <-JHIUOJOH DPOOFDUPS> IBWF EJòFSFOU DPOOFDUPST BMM UISFF NPEFMT SFRVJSF UIF JODMVEFE TUBOEBSE USBZ JOTFSU )BWJOH TBJE UIBU BMM PSJHJOBM J1BET
IBWF B QJO DPOOFDUPS BOE BMM SFRVJSF UIBU UIF JODMVEFE USBZ JOTFSU CF SFNPWFE -JLFXJTF BMM J1BE minis have a Lightning connector and require that the included tray insert be removed and replaced
XJUI BO J1BE NJOJ USBZ JOTFSU
13

Mackie DL806 and DL1608 Reference Guide
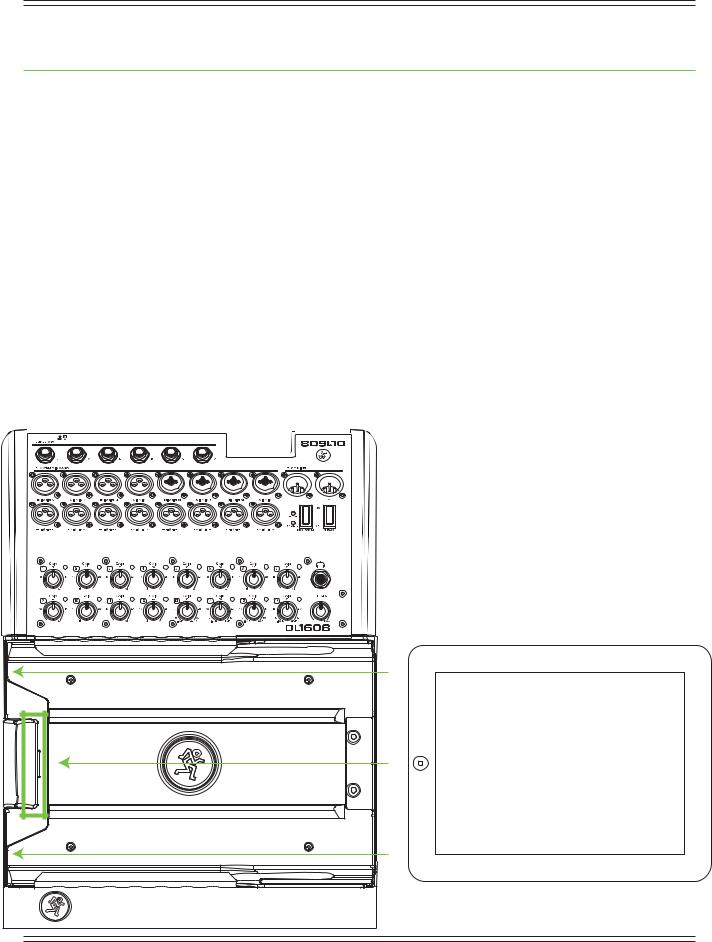
)FSFT IPX UP SFNPWF UIF J1BE USBZ JG NJYJOH XJUI BO PSJHJOBM J1BE
(1) remove the four screws holding the tray insert to the mixer, numbered 1 to 4 in the illustration below.
TMJEF UIF USBZ JOTFSU PVU GSPN UIF NJYFS BOE 4"7& *5 40.&8)&3& 4"'& 4IPVME ZPV FWFS VQHSBEF UP BO J1BE J1BE SE HFOFSBUJPO PS J1BE UI HFOFSBUJPO UIF USBZ XJMM CF OFDFTTBSZ
QVU UIF TDSFXT CBDL JOUP UIF NJYFS GSPN XIFSF ZPV KVTU SFNPWFE UIFN 5IJT XBZ UIFZ DBOU HFU MPTU
|
2 |
1 |
4 |
|
|
2 |
|
3 |
Tray Insert |
 1
1 


 4
4
 3
3
Tray
8JUI EJòFSFOU EJNFOTJPOT UIBO UIF PUIFS J1BET UIF J1BE NJOJ EPFTOU öU UIF JODMVEFE J1BE USBZ JUT UPP TNBMM %POU GSFU UIPVHI XFWF HPU ZPV DPWFSFE "T NFOUJPOFE PO UIF QSFWJPVT QBHF BO J1BE NJOJ NBZ CF EPDLFE to a DL Series mixer with a Lightning connector, but it requires a mini tray insert (sold separately).
)FSFT IPX UP JOTUBMM UIF J1BE NJOJ USBZ
(1) remove the four screws from the mixer, as seen in the illustration to the right.
(2) If applicable, slide the tray insert out from
UIF NJYFS BOE 4"7& *5 40.&8)&3& 4"'& 4IPVME ZPV EFDJEF UP EPDL BO J1BE J1BESE HFOFSBUJPO PS J1BE UI HFOFSBUJPO to the mixer, the tray will be necessary.
QMBDF UIF J1BE NJOJ USBZ JOTFSU PO UPQ of the mixer, making sure to line up the sides and the screw holes.
(4) put the screws back into the mixer from where you just removed them
BT EJTQMBZFE CFMPX UP IPME UIF J1BE mini tray insert into place.
(5) for the complete iPad mini tray kit installation instructions, click here!
14
Mackie DL806 and DL1608 Reference Guide
*G ZPV IBE CFFO NJYJOH XJUI BO PSJHJOBM J1BE PS J1BE NJOJ CVU XPVME SBUIFS VTF BO J1BE J1BE SE HFOFSBUJPO PS J1BE UI HFOFSBUJPO UIF JODMVEFE J1BE USBZ XJMM OFFE UP CF SFJOTUBMMFE 5IF J1BE USBZ insert only OFFET UP CF SFJOTUBMMFE JG ZPV BSF NJYJOH XJUI UIF J1BE J1BE SE HFOFSBUJPO PS J1BEUI HFOFSBUJPO )FSFT IPX UP SFJOTUBMM UIF J1BE USBZ
(1) remove the four screws from the mixer, numbered 1 to 4 in the illustration below.
SFNPWF UIF J1BE NJOJ USBZ JOTFSU JG BQQMJDBCMF
(3)slide the included standard tray insert into the mixer as displayed below.
(4)put the screws back into the mixer from where you just removed them to hold the tray insert into place.
|
2 |
1 |
4 |
|
|
2 |
|
3 |
Tray Insert |
 1
1 


 4
4
 3
3
Tray
5IF J1BE USBZ JOTFSU EPFTOU OFFE UP CF MPDLFE EPXO *G TXJUDIJOH SFHVMBSMZ CFUXFFO J1BET
Instead, hand-tighten the screws to the mixer before sliding the tray insert back in. This way
UIFZ DBOU HFU MPTU BOE ZPVSF TUJMM BCMF UP TMJEF UIF USBZ JOTFSU JO BOE PVU BT OFFEFE
15
Mackie DL806 and DL1608 Reference Guide
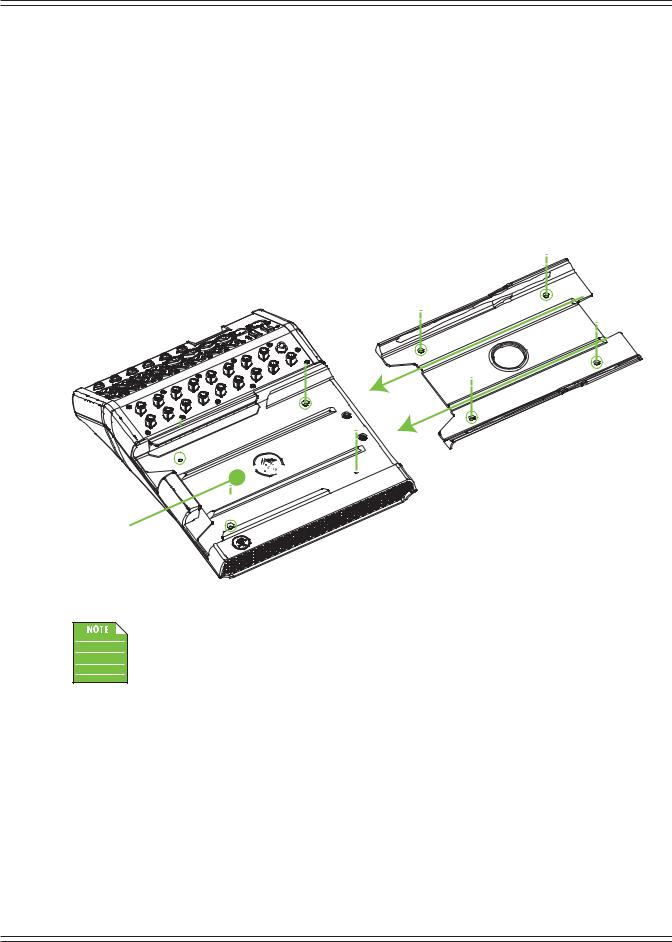
PadLock™
"MTP JODMVEFE XJUI UIF NJYFS JT B 1BE-PDL 5IJT JT VTFE UP MPDL UIF J1BE JOUP QMBDF PO UIF NJYFS 0OF NJHIU VTF UIJT GPS öYFE JOTUBMMT XIFSF B EFEJDBUFE J1BE JT VTFE BOE 1BE MPDLFE UP UIF NJYFS 0S MFBWF UIF 1BE-PDL Pò TP UIF J1BE NBZ CF DPOWFOJFOUMZ USBOTGFSSFE JO BOE PVU PG UIF NJYFS
"GUFS EPDLJOH UIF J1BE OPU TIPXO UIF 1BE-PDL OFFET UP CF BUUBDIFE CZ NPWJOH JU SJHIU UP MFGU <IPSJ[POUBM HSFFO BSSPXT> NOT downward. This ensures that the foam compresses
BHBJOTU UIF J1BE BOE IPMET JU TPMJEMZ JO QMBDF 5IFO IBOE UJHIUFO FBDI PG UIF UXP TFDVSJUZ TDSFXT EPXO <WFSUJDBM HSFFO EPUUFE MJOFT> VTJOH UIF TVQQMJFE XSFODI
8IJMF UIF 1BE-PDL QSPWJEFT TPNF MFWFM PG TFDVSJUZ JU JT /05 GPPMQSPPG PS HVBSBOUFFE
QSPUFDUJPO -06%5FDIOPMPHJFT *OD JT OPU SFTQPOTJCMF GPS UIF MPTT UIFGU EBNBHF PS
EFTUSVDUJPO PG ZPVS %- 4FSJFT NJYFS PS J1BE XIFUIFS B 1BE-PDL IBT CFFO VTFE PS OPU
16
Mackie DL806 and DL1608 Reference Guide
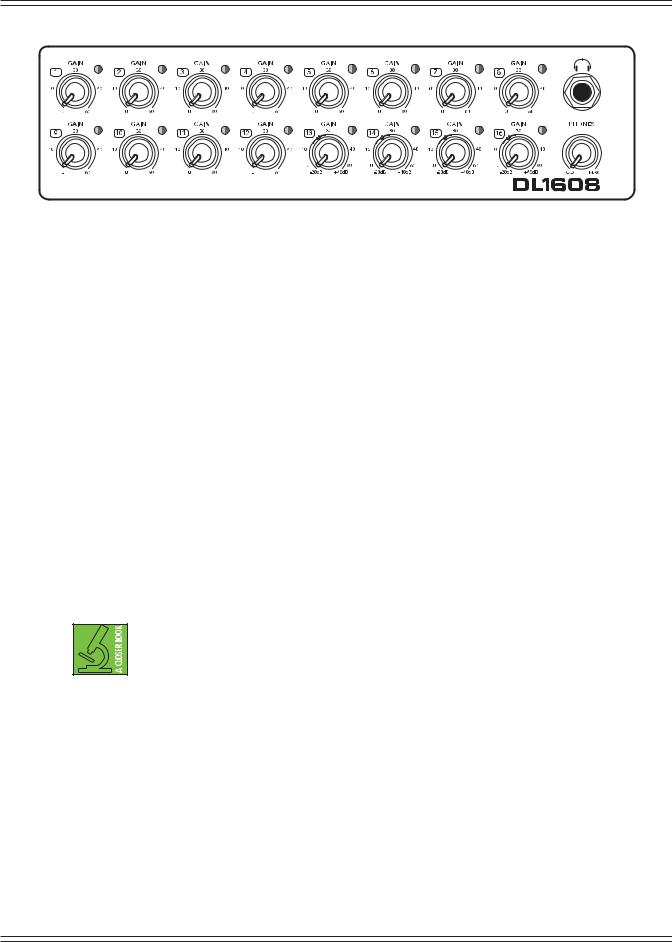
DL1608 Front Panel
Front Panel Introduction
Each DL1608 mixer is outfitted with 16 gain knobs, 16 sig / OL LEDs, one phones output jack and one phones knob. Each DL806 mixer is outfitted with eight gain knobs, eight sig / OL LEDs, one phones output
KBDL BOE POF QIPOFT LOPC -FUT UBLF B MPPL BU FBDI PG UIFTF GFBUVSFT TUBSUJOH XJUI UIF HBJO LOPCT
Gain Knobs
The gain knobs adjust the input sensitivity of the mic and mic/line inputs. This allows signals from the outside world to be adjusted to run through each channel at optimal internal operating
levels. "MM DIBOOFMT NBZ BDDFQU B CBMBODFE NJD PS MJOF MFWFM TJHOBM VTJOH BO 9-3 DPOOFDUPS XIJMF
channels 13-16 <PO UIF %- channels 5-8 PO UIF %- > BMTP BDDFQU MJOF MFWFM TJHOBMT 5IF HBJO LOPCT BSF BOBMPH DPOUSPMT BOE BSF UIFSFGPSF /05 SFDBMMBCMF
If a balanced mic or line-level signal is connected to any channel, there is 0 dB of gain with the knob fully down, ramping up to 60 dB of gain fully up.
*G B MJOF MFWFM TJHOBM JT DPOOFDUFE UIFSF JT E# PG BUUFOVBUJPO XJUI UIF LOPC GVMMZ EPXO BOE E#
PG HBJO GVMMZ VQ XJUI VOJUZ HBJOi6wBU
This 20 dB of attenuation can be very handy when inserting a hot signal from a line-level source. Without
UIJTiWJSUVBM QBEwUIFSF JT NPSF DIBODF PG DIBOOFM DMJQQJOH
Because of the low-noise, high-headroom Onyx mic preamps, it is possible to use the mixer strictly as a wireless system and store the mixer away (in an equipment room, for example). Just make sure to LOWER the gain knobs a touch to gain extra headroom before clipping.
Sig / OL LEDs
5IJT EVBM DPMPSFE -&% XJMM JMMVNJOBUF HSFFO XIFO UIF DIBOOFMT JOQVU TJHOBM JT QSFTFOU JOEJDBUJOH TJHOBM
It will remain lit so long as there is signal above –20 dBu present in that channel.
5IJT EVBM DPMPSFE -&% XJMM JMMVNJOBUF SFE XIFO UIF DIBOOFMT JOQVU TJHOBM JT UPP IJHI JOEJDBUJOH B TJHOBM overload. This should be avoided, as distortion will occur. If the OL LED comes on regularly, check that the gain knob is set correctly for the input device. The signal is at –3 dB before hard clip begins.
17
Mackie DL806 and DL1608 Reference Guide
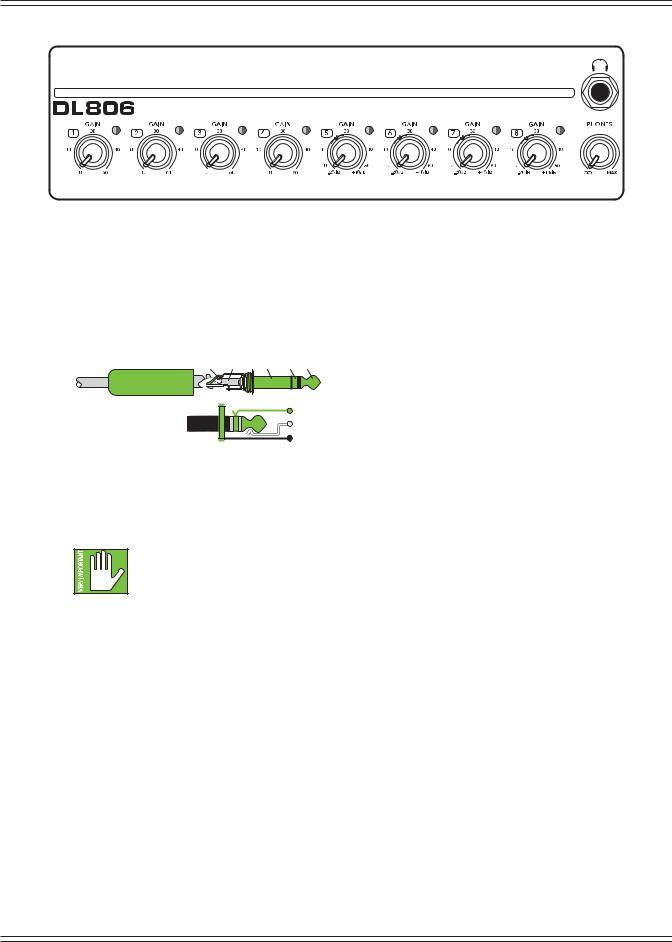
DL806 Front Panel
Phones Output Jack
5IJT 534 DPOOFDUPS TVQQMJFT UIF PVUQVU UP TUFSFP IFBEQIPOFT 5IF WPMVNF JT DPOUSPMMFE XJUI UIF phones knob located right below the output jack.
The phones output follows standard conventions:
RING SLEEVE |
SLEEVE RING TIP |
TIP
RING |
TIP |
SLEEVE |
Tip = Left channel Ring = Right channel Sleeve = Ground
Phones Knob
This knob is used to adjust the volume from the phones output jack, from off to maximum gain (max).
5IF QIPOFT LOPC JT BO BOBMPH DPOUSPM BOE JT UIFSFGPSF /05 SFDBMMBCMF
Warning: The headphone amp is loud and could cause permanent hearing damage.
&WFO JOUFSNFEJBUF MFWFMT NBZ CF QBJOGVMMZ MPVE XJUI TPNF IFBEQIPOFT #& $"3&'6- "MXBZT UVSO UIF QIPOFT LOPC BMM UIF XBZ EPXO CFGPSF DPOOFDUJOH IFBEQIPOFT TPMPJOH
a channel or doing anything new that may affect the headphone volume. Then turn it up slowly as you listen carefully.
18
Mackie DL806 and DL1608 Reference Guide
Chapter 3: Mixer Hardware : Rear Panel
Barrel Connector |
Locking Outer Ring |
The
Power
Block
DL1608 Rear Panel
Rear Panel Introduction
Each DL Series mixer is outfitted with a power connector, a power switch (and corresponding LED), a phantom power switch (and corresponding LED),
- 3 9-3 NBJO PVUQVU KBDLT B ,FOTJOHUPO MPDL B OFUXPSL DPOOFDUPS BOE B GPSDF update button. In fact, the only functional difference between the two is that the DL1608 has 16 input jacks and six aux sends jacks, whereas the DL806 has eight input jacks and four aux send jacks. Even though those numbers may vary slightly,
UIFJS GVODUJPO JT UIF TBNF -FUT UBLF B MPPL TIBMM XF
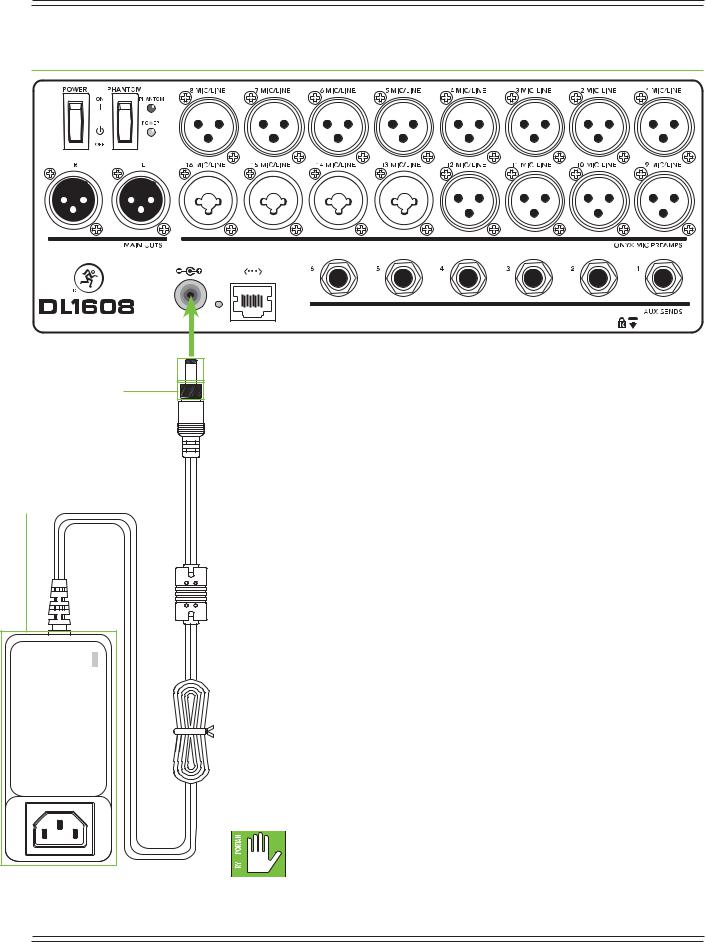
Power Connector
The DL Series mixers have a universal external power supply that accepts any
"$ WPMUBHF SBOHJOH GSPN 7"$ UP 7"$ /P OFFE GPS WPMUBHF TFMFDU TXJUDIFT *U XJMM XPSL WJSUVBMMZ BOZXIFSF JO UIF XPSME 5IBUT XIZ XF DBMM JU Bi1MBOFU &BSUIw power supply! It is less susceptible to voltage sags or spikes compared to conventional power supplies, and provides greater electromagnetic isolation
BOE CFUUFS QSPUFDUJPO BHBJOTU "$ MJOF OPJTF
"O FYUFSOBM 7 %$ QPXFS TVQQMZ <BLB5IF 1PXFS #MPDL> BOE B MJOF DPSE BSF JODMVEFE XJUI UIF NJYFS " MPDLJOH CBSSFM DPOOFDUPS SFTJEFT BU UIF FOE PG UIF DPSE BUUBDIFE UP 5IF 1PXFS #MPDL "UUBDI JU UP UIF QPXFS DPOOFDUPS PO UIF NJYFS BOE SPUBUF UIF outer ring clockwise to lock. Do not over-tighten! Screw until there is resistance, then
TUPQ $POOFDU UIF GFNBMF FOE PG UIF MJOF DPSE UP5IF 1PXFS #MPDL BOE QMVH UIF NBMF FOE JOUP B MJWF HSPVOEFE "$ PVUMFU "O -&% PO5IF 1PXFS #MPDL XJMM JMMVNJOBUF HSFFO to indicate success (whether the mixer is powered on or not).
 Warning: %JTDPOOFDUJOH UIF QMVHT HSPVOE QJO JT EBOHFSPVT %POU EP JU
 *O GBDU JUT B CBE JEFB UP SFNPWFanything from (or add anything to)
  5IF 1PXFS #MPDL PS MJOF DPSE "HBJO EPOU EP JU
19

Mackie DL806 and DL1608 Reference Guide
DL806 Rear Panel
Power Switch
1SFTT UIF UPQ PG UIJT SPDLFS TXJUDI JO UP UVSO UIF NJYFS PO BOE press the bottom of this switch to turn the mixer off.
"T B HFOFSBM HVJEF UIF NJYFS TIPVME CF UVSOFE PO öSTU CFGPSF BOZ FYUFSOBM QPXFS BNQMJöFST PS QPXFSFE TQFBLFST "T TVDI JU TIPVME BMTP CF UVSOFE Pò MBTU 5IJT XJMM SFEVDF UIF QPTTJCJMJUZ PG BOZ UVSO PO PS UVSO Pò UIVNQT JO UIF 1"
Power LED
This LED will illuminate green when the mixer is turned on *G JU EPFT OPU UVSO PO DPOöSN UIBU5IF 1PXFS #MPDL BOE MJOF DPSE BSF DPOOFDUFE DPSSFDUMZ UP FBDI PUIFS UIF NJYFS BOE UIF "$ PVUMFU UIF MPDBM "$ NBJOT supply is active and that the power switch is on.
Phantom Power Switch
1SFTT UIF UPQ PG UIJT SPDLFS TXJUDI JO JG BOZ NJDSPQIPOF SFRVJSFT QIBOUPN QPXFS "MXBZT DIFDL UIF QPTJUJPO PG UIJT TXJUDI CFGPSF DPOOFDUJOH NJDSPQIPOFT 5IJT JT B HMPCBM TXJUDI UIBU BòFDUT BMM NJD DIBOOFMT 9-3 KBDLT at once. 1SFTT UIF CPUUPN PG UIJT TXJUDI JO UP UVSO UIF QIBOUPN QPXFS Pò
Most modern professional condenser mics require 48V phantom power which lets the mixer send
MPX DVSSFOU %$ WPMUBHF UP UIF NJDT FMFDUSPOJDT UISPVHI UIF TBNF XJSFT UIBU DBSSZ BVEJP 4FNJ QSP
DPOEFOTFS NJDT PGUFO IBWF CBUUFSJFT UP BDDPNQMJTI UIF TBNF UIJOH i1IBOUPNwPXFT JUT OBNF UP BO
BCJMJUZ UP CFiVOTFFOwCZ EZOBNJD NJDT <4IVSF 4. 4. GPS FYBNQMF> XIJDI EP OPU OFFE FYUFSOBM power and are not affected by it, anyway.
/FWFS QMVH TJOHMF FOEFE VOCBMBODFE PS SJCCPO NJDSPQIPOFT JOUP UIF NJD JOQVU KBDLT
when phantom power is on. Do not plug instrument outputs into the mic XLR input jacks with phantom power on unless you know for certain that it is safe to do. When phantom power is engaged, be sure that the master fader is down when connecting microphones
UP UIF NJD JOQVUT UP QSFWFOU QPQT GSPN HFUUJOH UISPVHI UIF 1"
It is not a good idea to enable the phantom power unless it is actually needed. Line-level sources may be particularly unhappy when they are subjected to 48V phantom powering.
.BOZ NVTJDBM JOTUSVNFOU BNQT BOE LFZCPBSET XJUIiEJSFDU PVUQVUTwöU UIJT EFTDSJQUJPO
It takes approximately 15 seconds for the phantom power to shut off completely. Do not add or remove any inputs until the phantom power LED is completely off or mics could be ruined.
20
Mackie DL806 and DL1608 Reference Guide
Phantom Power LED
This LED will illuminate red when phantom power is engaged. If it does not turn on, confirm that the
QIBOUPN QPXFS TXJUDI JT PO UIBU5IF 1PXFS #MPDL BOE MJOF DPSE BSF DPOOFDUFE DPSSFDUMZ UP FBDI PUIFS UIF NJYFS BOE UIF "$ PVUMFU UIF MPDBM "$ NBJOT TVQQMZ JT BDUJWF BOE UIBU UIF QPXFS TXJUDI JT PO
It takes approximately 15 seconds for the phantom power to shut off completely. Do not add or remove any inputs until the phantom power LED is completely off or mics could be ruined.
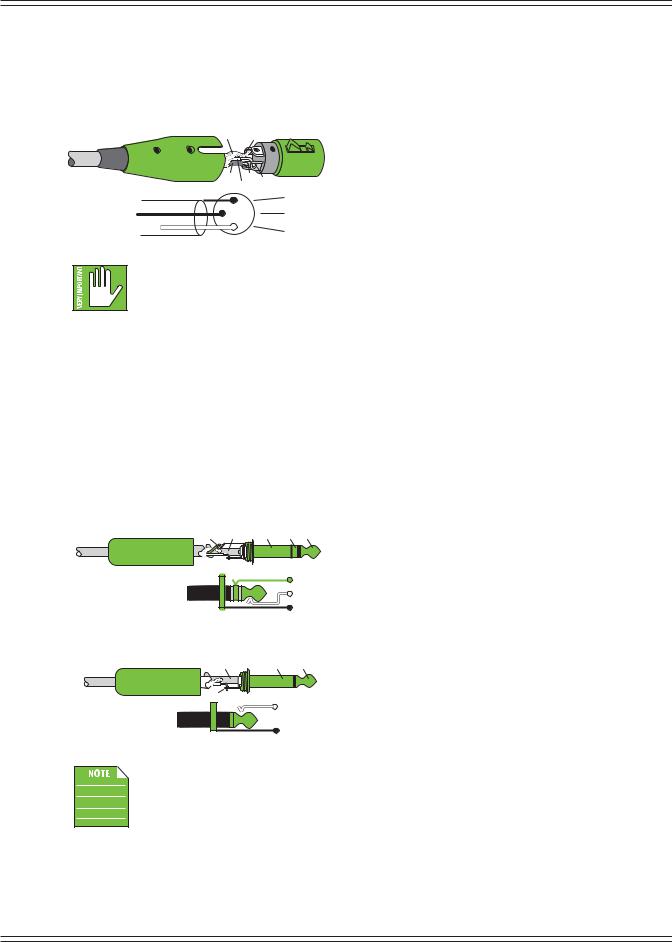
XLR and 1/4" Inputs
"MM DIBOOFMT NBZ BDDFQU B CBMBODFE NJD PS MJOF MFWFM TJHOBM VTJOH BO 9-3 DPOOFDUPS 5IFZ BSF XJSFE BT GPMMPXT BDDPSEJOH UP TUBOEBSET TQFDJöFE CZ UIF "&4 "VEJP &OHJOFFSJOH 4PDJFUZ
SHIELD |
|
2 |
|
HOT |
|
COLD |
3 |
1 |
1 |
|
SHIELD |
|
|
|
3 |
|
COLD |
2 |
|
HOT |
|
|
XLR Balanced Wiring:
1JO 4IJFME HSPVOE 1JO 1PTJUJWF PS IPU 1JO /FHBUJWF o PS DPME
In addition to accepting balanced mic or line-level signals using an XLR connector, channels 13-16
<PO UIF %- channels 5-8 PO UIF %- > NBZ BMTP BDDFQU MJOF MFWFM TJHOBMT ESJWFO CZ CBMBODFE or unbalanced sources.
5P DPOOFDU CBMBODFE MJOFT UP UIFTF JOQVUT VTF B 5JQ 3JOH 4MFFWF 534 QMVH i534wTUBOET GPS
5JQ 3JOH 4MFFWF UIF UISFF DPOOFDUJPO QPJOUT BWBJMBCMF PO B TUFSFP PS CBMBODFE QIPOF KBDL PS QMVH
TRS jacks and plugs are used for balanced signals and stereo headphones and are wired as follows:
RING SLEEVE |
SLEEVE RING TIP |
TIP
RING |
TIP |
SLEEVE |
534 #BMBODFE .POP8JSJOH
Sleeve = Shield
5JQ )PU 3JOH $PME o
5P DPOOFDU VOCBMBODFE MJOFT UP UIFTF JOQVUT VTF B NPOP 54 QIPOF QMVH XJSFE BT GPMMPXT
SLEEVE |
SLEEVE |
TIP |
|
|
|
|
|
|
|
|
|
|
|
|
|
|
|
|
|
TIP
TIP |
SLEEVE |
54 6OCBMBODFE .POP8JSJOH
Sleeve = Shield
5JQ )PU
:PV NBZ CF XFMM WFSTFE JO TFUUJOH MFWFMT PO NPTU BOBMPH BOE PS EJHJUBM DPOTPMFT CVU UIF
%- 4FSJFT NJYFST BSF RVJUF VOJRVF *U XPVME CF XJTF UP DIFDL PVUi$IBQUFS -FWFM 4FUUJOH 1SPDFEVSFw QBHFT UIF öSTU UJNF ZPV TFU MFWFMT PO UIJT NJYFS 5IBOLT JO BEWBODF
21
Mackie DL806 and DL1608 Reference Guide
L/R Main Outs
The male XLR connectors provide a balanced line-level signal that represent the end of the mixer, where
UIF GVMMZ NJYFE TUFSFP TJHOBM FOUFST UIF SFBM XPSME $POOFDU UIFTF UP UIF MFGU BOE SJHIU MJOF MFWFM JOQVUT PG powered speakers or to the left and right line-level inputs of an amplifier (with speakers already attached).
SHIELD |
1 |
COLD 3 |
2 |
HOT |
|
1 |
SHIELD |
|
|
3 |
COLD |
2
HOT
XLR Balanced Wiring:
1JO 4IJFME HSPVOE 1JO 1PTJUJWF PS IPU 1JO /FHBUJWF o PS DPME
:PV NBZ CF XFMM WFSTFE JO TFUUJOH MFWFMT PO NPTU BOBMPH BOE PS EJHJUBM DPOTPMFT CVU UIF
%- 4FSJFT NJYFST BSF RVJUF VOJRVF *U XPVME CF XJTF UP DIFDL PVUi$IBQUFS -FWFM 4FUUJOH 1SPDFEVSFw QBHFT UIF öSTU UJNF ZPV TFU MFWFMT PO UIJT NJYFS 5IBOLT JO BEWBODF
Aux Sends
5IFTF DPOOFDUPST BMMPX ZPV UP TFOE CBMBODFE BOE VOCBMBODFE MJOF MFWFM PVUQVUT UP FYUFSOBM FòFDUT devices, headphone amplifiers, or stage monitors. These could either be passive stage monitors powered
CZ BO FYUFSOBM BNQMJöFS PS QPXFSFE TUBHF NPOJUPST XJUI CVJMU JO QPXFS BNQMJöFST :PV NBZ SVO TFQBSBUF aux mixes since all aux sends are independent of each other. There are four aux sends on a DL806 mixer and six aux sends on a DL1608 mixer.
5P DPOOFDU CBMBODFE MJOFT UP UIFTF JOQVUT VTF B 5JQ 3JOH 4MFFWF 534 QMVH i534wTUBOET GPS
5JQ 3JOH 4MFFWF UIF UISFF DPOOFDUJPO QPJOUT BWBJMBCMF PO B TUFSFP PS CBMBODFE QIPOF KBDL PS QMVH
TRS jacks and plugs are used for balanced signals and stereo headphones and are wired as follows:
RING SLEEVE |
SLEEVE RING TIP |
TIP
RING |
TIP |
SLEEVE |
534 #BMBODFE .POP8JSJOH
Sleeve = Shield
5JQ )PU 3JOH $PME o
5P DPOOFDU VOCBMBODFE MJOFT UP UIFTF JOQVUT VTF B NPOP 54 QIPOF QMVH XJSFE BT GPMMPXT
SLEEVE |
SLEEVE TIP |
54 6OCBMBODFE .POP8JSJOH |
|
|
Sleeve = Shield |
TIP |
|
5JQ )PU |
TIP |
SLEEVE |
6OCBMBODFE DBCMFT DBO CF OPJTZ *G UIF JOQVU PG UIF OFYU EFWJDF JO UIF DIBJO TVQQPSUT
balanced cables, we highly recommend using those instead of unbalanced cables to connect gear.
22
Mackie DL806 and DL1608 Reference Guide
Kensington Lock
"O PQUJPOBM ,FOTJOHUPO -PDL QSPWJEFT BO FYUSB MFWFM PG TFDVSJUZ TIPVME UIF NJYFS CF MFGU BMPOF unwatched. There are a wide variety of cable apparatuses to choose from to secure your mixer
WJB UIF ,FOTJOHUPO -PDL TFDVSJUZ TMPU 'FFM GSFF UP EFDJEF PO XIBU UZQF XPSLT CFTU GPS ZPV CZ QFSVTJOH UIF ,FOTJOHUPO XFCTJUF IUUQ XXXLFOTJOHUPO DPN
8IJMF UIF ,FOTJOHUPO DBCMF BOE MPDL QSPWJEF TPNF MFWFM PG TFDVSJUZ JU JT /05 GPPMQSPPG PS HVBSBOUFFE QSPUFDUJPO -06%5FDIOPMPHJFT *OD JT OPU SFTQPOTJCMF GPS UIF MPTT UIFGU EBNBHF PS EFTUSVDUJPO PG ZPVS NJYFS PS J1BE XIFUIFS B ,FOTJOHUPO -PDL IBT CFFO VTFE PS OPU
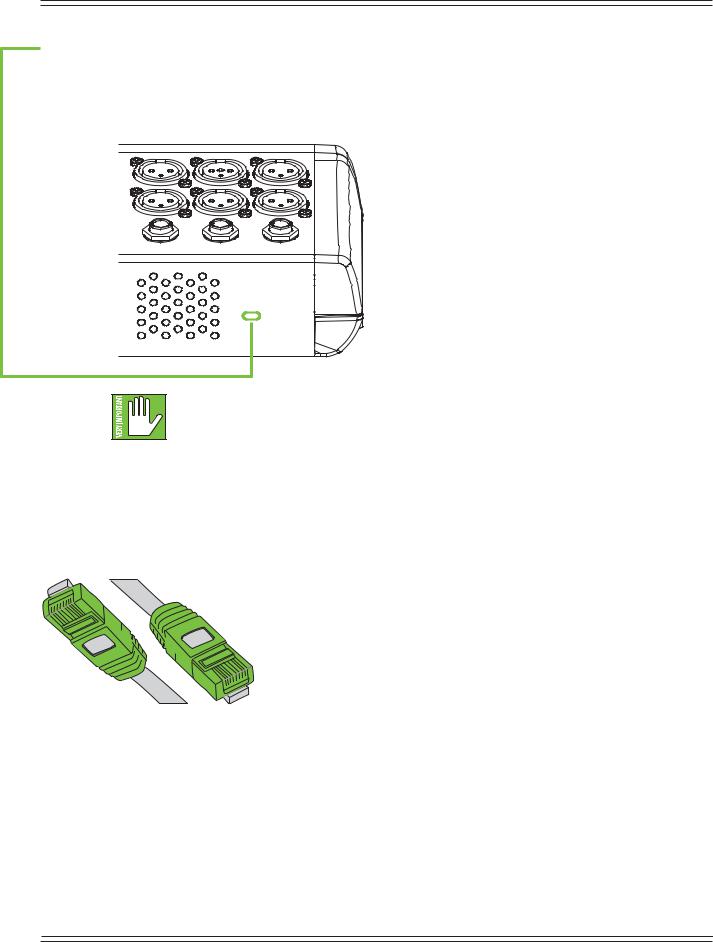
Network Connector
The 100MB network connector is conveniently located next to the power connector. Its purpose in life is to connect the mixer to a Wi-Fi router via $"5 &UIFSOFU DBCMF UIVT FOBCMJOH XJSFMFTT DPOUSPM
1MVH POF FOE PG UIF $"5 &UIFSOFU DBCMF JOUP UIF NJYFST OFUXPSL DPOOFDUPS BOE UIF PUIFS FOE PG UIF $"5 &UIFSOFU DBCMF JOUP B -"/ QPSU PO UIF SPVUFS /05 B8"/ QPSU .PTU SPVUFST BMMPX UIF VTF PG FJUIFS B TUSBJHIU XJSFE DBCMF PS DSPTTPWFS DBCMF CVU *G ZPV IBWF B DIPJDF B TUSBJHIU XJSFE $"5 &UIFSOFU cable is the way to go to ensure smooth operation with any router.
5IJT JT BMM XFSF HJWJOH ZPV GPS OPX %JSFDUJPOT GPS TFUUJOH VQ UIF SFTU PG UIF SPVUFS CFHJO PO DIBQUFS
That seems like such a long way off, but it starts on page 25!
23

Mackie DL806 and DL1608 Reference Guide
Force Update Button
The force update button is tucked in right between the power connector and network connector.
In a perfect world, this button would just sit there without a care in the world, umbrella drink in hand, beach, surf and sun on a daily basis. In all likelihood, this button will live his / her dream out, while the rest of us can only dream of such a life.
The DL Series mixers and Master Fader app do a great job at letting you know when either (or both) the software and firmware need updating, but this button here forces a complete firmware update if the need ever arrives.
)FSFT IPX UP GPSDF B öSNXBSF VQEBUF öSTU UVSO UIF NJYFS Pò /PX XJUI B CBMMQPJOU QFO PS B QBQFSDMJQ poke the force update button, then power up the mixer with the button depressed. The mixer will boot and
ZPV XJMM CF QSPNQUFE XJUI BO VQEBUF CVCCMF UIF OFYU UJNF BO J1BE XJUI UIF .BTUFS 'BEFS BQQ JT DPOOFDUFE to the mixer.
/PX UIBU ZPV LOPX IPX UP GPSDF BO VQEBUF IFSFT B GSJFOEMZ SFNJOEFS UIBU ZPV TIPVME MFU the button remain peaceful, calm and tranquil, only forcing a firmware update if instructed by Mackie Tech Support. Thank you for listening!
4BWF BOZ DVSSFOU TIPX UP ZPVS J1BE CFGPSF GPSDJOH BO VQEBUF PS ZPV NBZ MPTF JU
The show and your sanity!
24

Mackie DL806 and DL1608 Reference Guide
Chapter 4: Mixer Hardware : Wireless Setup
Introduction
%P ZPV XBOU XJSFMFTT DPOUSPM PG ZPVS NJYFS 0G DPVSTF ZPV EP -FUT EJH JO BOE HFU UIF SPVUFS TFU VQ BT UIJT JT RVJUF BO JNQPSUBOU GFBUVSF PG UIF %- 4FSJFT 6Q UP J04 EFWJDFT NBZ CF DPOOFDUFE UP UIF OFUXPSL BOE UIFSFGPSF ZPV NBZ DPOUSPM UIF NJYFS XJSFMFTTMZ <WJB8J 'J> PS XJSFE
Wi-Fi Router
'PS XJSFMFTT DPOUSPM BMM UIBUT OFDFTTBSZ JT UP DPOOFDU UIF NJYFS UP B8J 'J SPVUFS 8IJMF JU JT QPTTJCMF UP utilize an existing wireless network, a dedicated Wi-Fi router will give you complete control, resulting in the best possible performance.
*G ZPV EPOU BMSFBEZ IBWF B8J 'J SPVUFS OFBSMZ BOZ8J 'J SPVUFS GPVOE BU B SFQVUBCMF PóDF TVQQMZ TUPSF
(or other similar business) will work. When selecting a new router (or checking out your current router)
QMFBTF NBLF TVSF JU IBT "-- PG UIF GPMMPXJOH GFBUVSFT
(1) CAT5 Connection — .BLF TVSF UIF8J 'J SPVUFS DPOOFDUT WJB $"5 &UIFSOFU DBCMF OPU 64#
Most routers allow the use of either a straight-wired cable or crossover cable, but If you have a choice,
B TUSBJHIU XJSFE $"5 &UIFSOFU DBCMF JT UIF XBZ UP HP UP FOTVSF TNPPUI PQFSBUJPO XJUI BOZ SPVUFS
(2)DHCP — 5IF SPVUFS OFFET UP CF BCMF UP BTTJHO BO *1 BEESFTT UP B EFWJDF <UIF %- PS %- GPS FYBNQMF> DPOOFDUFE UP UIF &UIFSOFU QPSU *O NPTU DBTFT UIF SPVUFS XJMM IBOEMF UIJT UBTL )PXFWFS UIFSF BSF TPNF SPVUFST UIBU DBOU DPNQMFUF UIJT TJNQMF BTTJHONFOU BOE TIPVME OPU CF VTFE
Routers with a single Ethernet port often will not work well with the DL Series mixers for this reason.
(3)802.11n / 5GHz — Believe it or not, those numbers are not just a bunch of mumbo jumbo.
5IPTF OVNCFST SFøFDU B8J 'J NPEF < O> BOE CBOE < ()[> UIBU XF QSFGFS BOE TUSPOHMZ TVHHFTU
Wi-Fi mode 802.11g and band 2.4GHz also work, but all the cool kids are using 802.11n and 5GHz.
5IJT JT PGUFO QBDLBHFE BTi%VBM #BOEw
(4)Brand — We are not in the business of suggesting what Wi-Fi router to go with,
CVU DIPPTJOH POF XJUI BO JOTUBOUMZ SFDPHOJ[BCMF RVBMJUZ USVTUXPSUIZ OBNF EPFTOU IVSU |
|
|
|
4PNF FYBNQMFT XFWF IFBSE PG |
|
|
|
|
t "QQMF |
|
|
|
t #FMLJO |
|
|
|
t % -JOL |
|
|
|
t -JOLTZT |
|
|
|
t /&5(&"3 |
|
|
Network Connectivity
/PX JUT UJNF UP DPOOFDU UP UIF OFUXPSL )FSF BSF UIF TUFQT UP HFU TPNF DPOOFDUJWJUZ |
|
|
$POOFDUJWJUZ CFGPSF DSFBUJWJUZ |
|
|
(1)CAT5 Connection — 1MVH POF FOE PG UIF $"5 &UIFSOFU DBCMF JOUP UIF OFUXPSL DPOOFDUPS PO UIF NJYFS BOE UIF PUIFS FOE JOUP B -"/ QPSU PO UIF SPVUFS /05 B8"/ QPSU 3FBE UIBU TFOUFODF BHBJO
(2)Power to the Router — 5IF SPVUFS OFFET UP CF QPXFSFE VQ öSTU CFGPSF BOZUIJOH FMTF 1MVH JU JO
BOE øJQ UIF QPXFS TXJUDI UP UIFiPOwQPTJUJPO PL UIBU NJHIU IBWF CFFO B DSVFM USJDL 8JSFMFTT SPVUFST often power up when plugged in with no power switch to flip.
(3) The Waiting — Give the router a little time to boot up and do its thing. We know, we know,
UIF XBJUJOH JT UIF IBSEFTU QBSU 4PNFIPX * EPOU UIJOL5PN 1FUUZ XBT TJOHJOH BCPVU XJSFMFTT SPVUFS
CPPU VQ UJNFT 5IJT TIPVMEOU UBLF NPSF UIBO TFDPOET
(3) Power to the Mixer — Go ahead and power up the mixer.
25
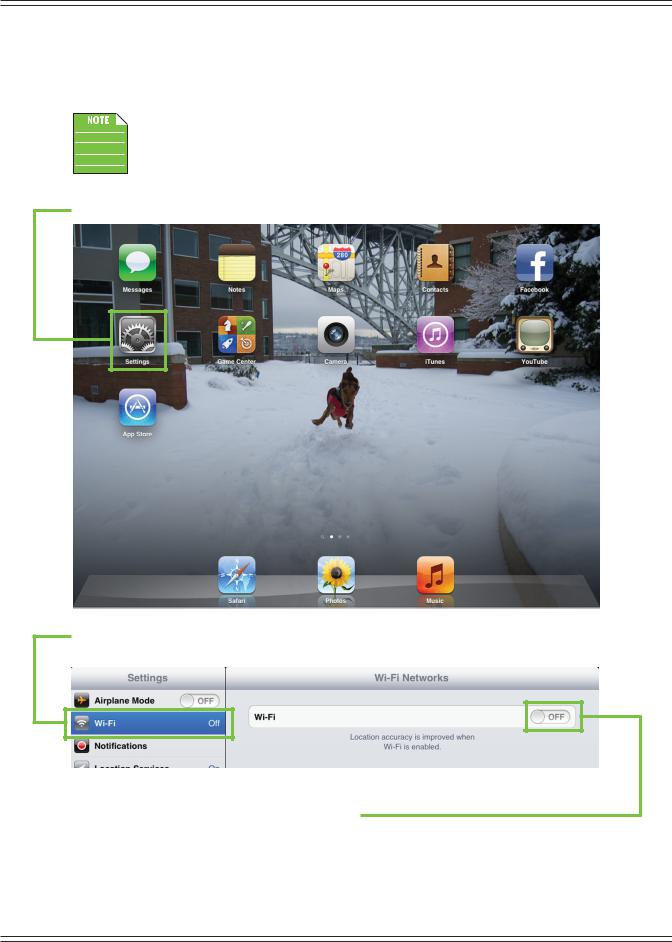
Mackie DL806 and DL1608 Reference Guide
Connect
"U UIJT QPJOU JO UJNF XFSF SFBEZ UP EJBM JO UIF TFUUJOHT PG UIF J1BE 4UBSU CZ UVSOJOH UIF J1BE PO
JG JUT OPU BMSFBEZ
:PV TIPVME IBWF UP GPMMPX UIFTF JOTUSVDUJPOT POMZ PODF GPS FBDI J1BE DPOOFDUFE UP UIF SPVUFS "GUFS UIBU UIFZ TIPVME DPOOFDU BVUPNBUJDBMMZ
5BQi4FUUJOHTwPOUIFJ1BE
4FUUJOHT MBOET ZPV IFSF 4FMFDU8J 'J CZ UPVDIJOH JU /PUJDF UIBU8J 'J JTi0òwBU UIJT QPJOU CVU XFSF HPJOH UP fix that.
Drag the Wi-Fi on/off slider right to the on position.
26

Mackie DL806 and DL1608 Reference Guide
$IFDL PVU UIF WJFX CFMPX 5IF J1BE JT TFBSDIJOH GPS BOE TFUUJOH VQ UIF DPOOFDUJPO UP UIF SPVUFS
*U TIPVME CF OPUFE IFSF UIBU CZ EFGBVMU NBOZ SPVUFST XJMM /05 CF QBTTXPSE QSPUFDUFE |
|
In the occurrence that yours has a pre-configured password from the factory, you should be able |
|
UP MPDBUF JU PO UIF CPUUPN PG UIF XJSFMFTT SPVUFS BOE UZQF JU JO UIF TQBDF QSPWJEFE PO UIF J1BE |
|
27

Mackie DL806 and DL1608 Reference Guide
$IFDL JU PVU ZPVSF HPPE UP HP 8JUI ZPVS BTTJTUBODF UIF J1BE GPVOE UIF SPVUFS BOE EJBMFE JO UIF
Wi-Fi connection!
/PX HP CBDL BOE MBVODI UIF .BTUFS 'BEFS BQQ *UT UIBU FBTZ
Router Settings
Default router settings are typically fine, but most Wi-Fi routers may be customized to ensure high |
|
|
QFSGPSNBODF BOE B TFDVSF OFUXPSL 8FMM PVUMJOF TPNF DPNNPO SPVUFS TFUUJOHT UP BEKVTU |
|
|
but since each brand is different, refer to its manual to learn how to adjust these settings. |
|
|
(1) SSID 44*% TUBOET GPS 4FSWJDF 4FU *EFOUJöDBUJPO $SFBUF B OBNF GPS UIF8J 'J OFUXPSL IFSF |
|
|
(2) Security — :PV XJMM OFFE UP TFMFDU B TFDVSJUZ NPEF BOE QBTTXPSE 8F TVHHFTU VTJOH |
|
|
81" <8J 'J 1SPUFDUFE "DDFTT> GPS TFDVSJUZ QVSQPTFT BOE B QBTTXPSE UIBU JT FBTZ GPS ZPV UP |
|
|
recall, but difficult for others to hack. |
|
|
|
This prevents strangers from joining your network and controlling the mixer, |
|
|
|
|
|
so pick a good password! |
|
|
|
|
(3)Band — /P XFSF OPU IFSF UP UBML BCPVU ZPVS GBWPSJUF SPDL CBOE 3BUIFS XF BSF IFSF UP DIPPTF
the Wi-Fi band. If you are in Wi-Fi mode 802.11n, you might be requested to choose a Wi-Fi band. Here, we prefer and strongly suggest 5GHz. However, 2.4GHz also works.
(4)Enable Auto Channel Selection1 — -PPL GPS B TFUUJOH OBNFEi"VUP $IBOOFM 4FMFDUJPOw PS TJNJMBS and enable it. The Wi-Fi channel with the least interference will be selected automatically.
This should set you up nicely with no issues at all, so feel free to exit out of settings at this point.
*G ZPV EFTJSF NPSF JOGPSNBUJPO SFGFS UP UIF5SPVCMFTIPPUJOH TFDUJPO JO "QQFOEJY " 4FSWJDF *OGPSNBUJPO on pages 142-143.
1 &OBCMF"VUP $IBOOFM4FMFDUJPOJTBOBEWBODFEPQUJPOUIBUJTVTVBMMZBVUPNBUJDBMMZFOBCMFE *GZPVTFFJU ensure that it is enabled.
28
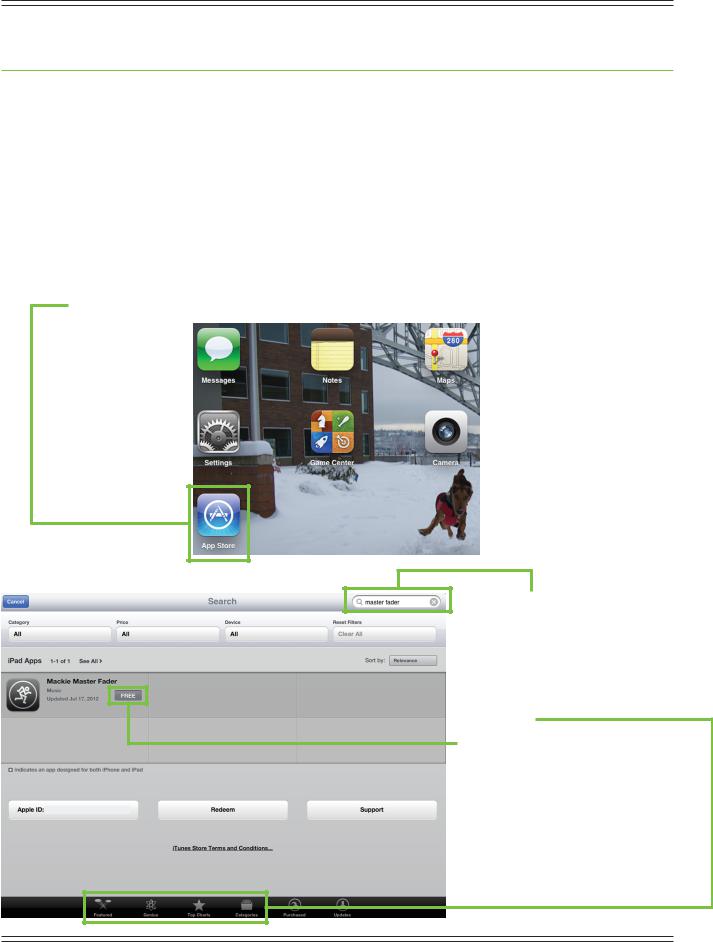
Mackie DL806 and DL1608 Reference Guide
Chapter 5: Mackie Master Fader Software
Introduction
"T NFOUJPOFE FBSMJFS UIF %- PS %- JT UIF EJHJUBM NJYFS BOE POF PS NPSF J04 EFWJDFT DPOUSPMT JU "MM %41 QSPDFTTJOH BOE SPVUJOH UBLFT QMBDF JO UIF NJYFS JUTFMG NFBOJOH JUT OPU KVTU BiEPDLw 5IF .BTUFS 'BEFS BQQ GPS J1BE JT XIFSF ZPViDPOUSPMwUIF NJY *G BO J1IPOF BOE PS J1PE UPVDI JT DPOOFDUFE XJSFMFTTMZ ZPV XJMM OFFE UP GPMMPX UIFTF TBNF JOTUSVDUJPOT BT MJTUFE IFSF CVU TVCTUJUVUFi.BTUFS 'BEFSwXJUIi.Z 'BEFSw
.PSF JOGPSNBUJPO BCPVU .Z 'BEFS JT PVUMJOFE JO $IBQUFS
Downloading and Installing the Master Fader App
5IFSF BSF B DPVQMF PG XBZT UP EPXOMPBE BOE JOTUBMM UIF .BTUFS 'BEFS BQQ 7JB J5VOFT PO .BD PS 1$ GPS FYBNQMF )PXFWFS UIF FBTJFTU BOE GBTUFTU XBZ UP EPXOMPBE BOE JOTUBMM JU JT EJSFDUMZ GSPN UIF J1BE :PVWF EPXOMPBEFE BQQT PO BO J1BE CFGPSF BOE JUT UIF TBNF NFUIPE UP EPXOMPBE UIJT POF BT XFMM )FSFT IPX
8JUI B HPPE JOUFSOFU DPOOFDUJPO WJB8J 'J ( PS -5& UVSO PO UIF J1BE BOE PQFO VQ UIF "QQ 4UPSF
5ZQFiNBTUFS GBEFSwJO UIF TFBSDI box located near the top-right corner of the screen followed by a carriage return.
The search box is available in i'FBUVSFEwi(FOJVTwi5PQ $IBSUTwBOE i$BUFHPSJFTw CVU /05i1VSDIBTFEw PSi6QEBUFTw
/PX UBQ UIF '3&& CVUUPO
29
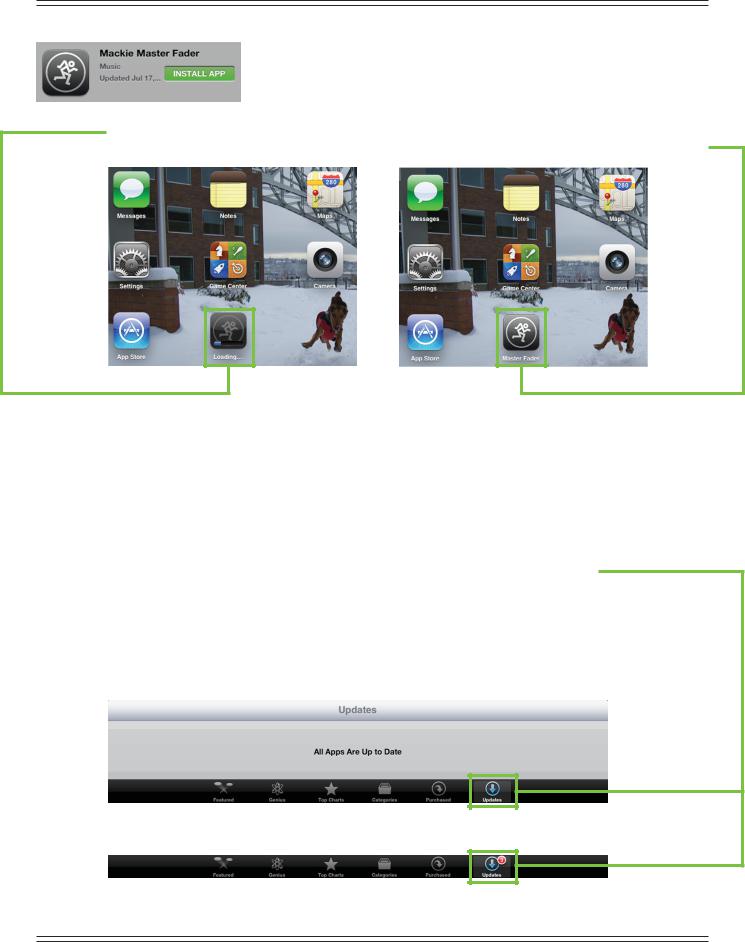
Mackie DL806 and DL1608 Reference Guide
5IJT UIFO UVSOT JOUP B HSFFO */45"-- "11 CVUUPO 5P JOTUBMM UIF .BTUFS 'BEFS BQQ UP BO J1BE UBQ UIF HSFFO */45"-- "11 CVUUPO BOE FOUFS ZPVS "QQMF *% QBTTXPSE when prompted.
The blue line underneath the Master Fader app icon shows the progress of the download.
Once the blue progress line disappears, the download is complete and the Master Fader app is ready for use.
The item located directly to the right of the Master Fader icon (and just below the camera) is another app
UIBU XFSF DVSSFOUMZ XPSLJOH PO JUT DBMMFEA"OHSZ %PHT "BBBI KVTU LJEEJOH *UT BDUVBMMZ %- 4FSJFT 1SPEVDU
.BOBHFS #FOT EPH o 3PDLZ o QMBZJOH JO UIF 4FBUUMF TOPX BOE QFPQMF UIPVHIU JU POMZ SBJOFE IFSF 4IFFTI
Updating the Master Fader App
*U JT QPTTJCMF UIBU UIF .BTUFS 'BEFS BQQ IBT BMSFBEZ CFFO EPXOMPBEFE BOE JOTUBMMFE *O UIJT DBTF ZPVSF probably HPPE UP HP )PXFWFS JU JT B HPPE JEFB UP HP UP UIF "QQ 4UPSF UP DIFDL GPS VQEBUFT :PV XJMM XBOU the latest and greatest version for the absolute best in functionality and versatility.
0ODF JO UIF "QQ 4UPSF UBQ UIF 6QEBUF CVUUPO MPDBUFE OFBS UIF CPUUPN SJHIU PG UIF J1BE
5IF öSTU TDSFFO TIPU CFMPX TIPXT BO J1BE XJUI BMM BQQT VQ UP EBUF 5IF TFDPOE TDSFFO TIPU CFMPX EJTQMBZT UISFF BQQT UIBU OFFE VQEBUJOH XIJDI NBZ PS NBZ OPU JODMVEF UIF .BTUFS 'BEFS BQQ 5BQQJOH UIF 6QEBUF button here will horizontally display the icon, name and description of changes of each app needing an
VQEBUF *G ZPV TFF .BTUFS 'BEFS MJTUFE UBQ UIF HSBZ 61%"5& CVUUPO PO UIF GBS SJHIU GPMMPXFE CZ UZQJOH JO ZPVS QBTTXPSE 0S CFUUFS ZFU UBQ UIF HSBZ 6QEBUF "MM CVUUPO JO UIF VQQFS SJHIU DPSOFS PG UIF TDSFFO 5IF VQEBUFT XJMM DPNNFODF %POU EP BOZUIJOH VOUJM UIF EPXOMPBET IBWF DPNQMFUFE
30
Loading...