

Page 1

Pearl Quick Start Guide
Introduction
The Pearl Camera is
a flexible platform to
support a variety of
infrared imaging applications. The standard
output is NTSC video.
The Pearl Camera product is suited for applications requiring high quality infrared imaging without the
added cost of precision radiometry.
The Pearl Control Software is designed to allow users to
control the Pearl OEM camera or camera core. Users can
adjust video settings, capture images, and use the software
to assist in calibration. Pearl Control software is provided
on a disc in the case and is shipped with the camera.
Pearl OEM Camera
The Pearl OEM Camera is a fully enclosed thermal imaging camera designed to operate with LumaSense
IR detectors with external connectors. The product is also
offered in an optimized midwave configuration for high
temperature and see-through flame applications.
Pearl Camera Core
The Pearl Camera Core includes a three-board electronics
stack with detector mounting assembly, but it does not
have an enclosure. The design is portable among programmable hardware manufacturers and can be integrated into new or existing designs.
Standard Configurations
Standard Pearl Core Conguration
Unpacking and Inspection
When unpacking and inspecting your system components, complete the following:
1. Upon receipt, inspect the containers in which the
instruments are packaged prior to opening to ensure
there is no obvious damage that may have occurred
during shipping. If there is reason to suspect that the
contents were damaged in shipping, immediately file
a claim with the carrier before contacting LumaSense.
2. Open the shipping containers and carefully remove
the instruments and accessories.
3. Check the contents against the enclosed packing list
and inspect for signs of visible damage. If any items
are missing or if there is visible damage to the instruments, contact Customer Care (Santa Clara, CA):
Email: support@lumasenseinc.com
Phone: +1 800 631 0176 or +1 408 727 1600
4. If everything is in order, save the packing material for
possible future use.
Standard OEM Camera Conguration
Connecting the Cameras
The Pearl cameras have connectors for power, video, and an
RS232 interface. Connections vary based on configuration.
Power & optional
video connection
RS232 connection
RS232/Data
connector
Video connection
Power & video
connection
Page 2
1. Establish the RS232 Connection
A three position receptacle is used for the RS232 connections for TXD, RXD, and Ground. The adapter supplied in
the Pearl OEM Camera Kit has a RS232 connector on one
end. Use a standard RS232 cable to connect between the
adapter and the host computer.
Camera Core
2. Establish the Power & Video Connection
A four position plug provides a connection for power and
video output. Connect the power lead to a power supply
capable of a voltage between 9 and 20 Volts. A DC power
with video adapter to 4 pin cable is provided in the Pearl
OEM Camera Kit.
Establish Communication with
the Camera
Once the software is launched, the program will attempt
to communicate with the connected camera.
Camera
Core
3. Establish Optional Video Connection
A second video connection is available on the Pearl OEM
camera using the BNC Jack on the back panel. Either connect
a video cable with the BNC-to-RCA adapter, which is provided
in the Pearl OEM Camera Kits, or use a BNC cable to connect
the Video-Out BNC Jack to a video input on a monitor.
Installing the Software
To install the Pearl Control Software on a personal computer:
1. Close all programs on your PC.
2. Insert the Pearl Control Software disc into your
CD-ROM drive, or insert the flash drive into an available USB port.
3. Open the disc or flash drive and copy the executable
PCS program on to the desktop. Double click the .exe
file to start the software.
Starting the Software
Once the software is successfully installed, a Pearl Control
Software icon should appear on your desktop.
Double-click the icon to start the Pearl Control software.
The program will attempt to communicate with the
camera.
Pearl Control Software looking for connected cameras
If the camera is found, the program will read from the
camera and load its settings on the screen. The program
and camera are now ready for use.
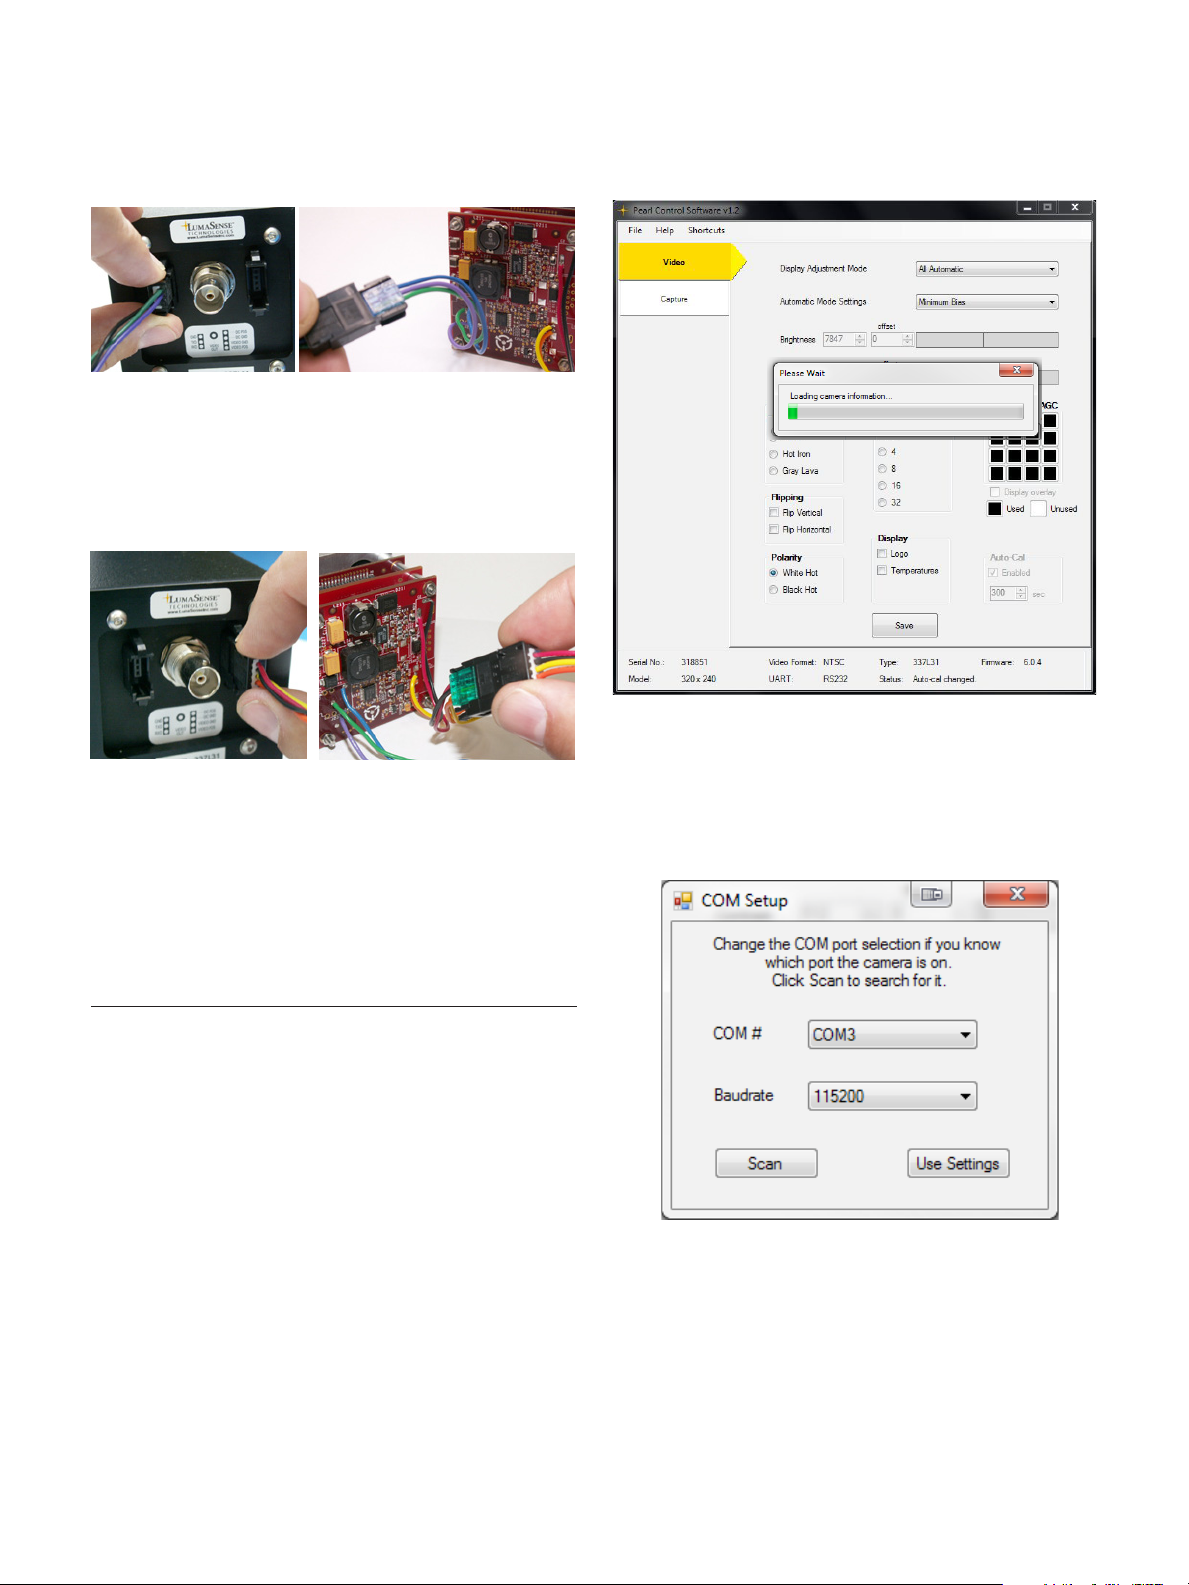
If the camera is not found, a COM connection window
will appear:
1. If known, select the COM port and baudrate for the
connected camera, click Use Settings. If settings are
unknown, click Scan and the program will search for
the camera.
2. Once the camera is found, the program will load the
camera settings.
3. The program is now ready for use.
Note: If the camera is unable to connect, please refer to
Chapter 5 Troubleshooting in the Pearl Control Software
Manual.
Page 3

Configuring Video Settings
The following settings and screenshot (top right) displays
some general settings for the video that should display a
high quality image.
Display Adjustment Mode: All Automatic
The Display Adjustment Mode allows you to configure
Brightness and Contrast automatically or manually.
Automatic Mode Settings: Minimum Bias
Note: Automation Mode Settings are only applicable
when the camera controls brightness and/or contrast.
Pearl Control Software - recommended settings
Color Map: Grayscale
The Pearl Control Software
includes four preset color maps
to choose from: grayscale,
saturn, hot iron, and gray lava.
Polarity: White Hot
The video polarity determines which values are used for
high and low temperatures. The Pearl Control Software
offers two options: white hot and black hot.
Frame Average: None
Frame averaging can help smooth out or remove motion
in the image. The values determine how many frames are
averaged together before displaying an image. Selecting
None turns off frame averaging.
Flipping: Both Unchecked
Flipping will flip the image along both the X and the Y
axis. This is useful if a lens has flipped the image or the
camera is mounted upside-down.
Regional AGC: Unselected
When the Regional AGC box is unchecked, the Automatic
Gain Control (AGC) uses the whole image to automatically change the brightness and the contrast. When the
Regional AGC box is checked, the AGC uses only the areas
in the image that are black. The white areas are ignored.
Capture Image
Single frames can be captured from the camera and
downloaded to the Pearl Control Software. In addition
to the live image, other types of images can be downloaded for diagnostic checks.
Note: The Capture tab is not available on all versions of
the Pearl Camera. Only versions 5.0.8 and newer support
this feature. This tab is disabled for older versions.
To capture an image:
1. Mark the desired Data Selection
2. Click Take Snapshot. The camera will take a snapshot
of the live image.
3. Click Download Data to retrieve the image from the
camera. This takes roughly 15 seconds to complete.
Note: You can change the Color Map for the image by
using the drop down menu.
Auto-Cal: Enabled, with a suggested time of
300 seconds (5 minutes)
Automatic calibration (Auto-Cal) is used to keep the
camera image quality looking good.
Note: This function is set to the suggested time. It can
only be changed when Advanced is selected and the
password is entered. See section on “Access to Calibration Tab.”
Page 4

Save Data
The Pearl Control Software allows you to save data to
your computer. The filename will be the camera number
followed by a unique timestamp. The file type is a PRN
file (used in MathCad), but can be changed to a plain text
file. The data is in a simple text format. Pixel values are
written with spaces in between each pixel, and a new line
is used for each row.
To save data to the default location:
1. After capturing an image, click Save.
2. The currently displayed image will save to the
defaulted specified location.
To save data to a new location:
1. Click Browse and navigate to the file location you
would like to save the image to.
2. Click OK.
3. Click Save to save the image to the new location.
Access the Calibrate Tab
A password is required to unlock and access the Calibrate
Tab and Reset Camera feature.
To access the Calibrate Tab:
1. Click Help on the Menu Bar.
2. Select Advanced.
3. Type in the password: engineer
4. Click OK or press enter.
5. The Calibrate Tab will appear below the Capture Tab
in the Action Bar.
Resetting the Camera
Unlocking the Calibrate tab will also unlock the “Reset
Camera” option in the Help menu. Reset Camera can be
used to reset the various features in the camera. You
may want to reset the camera if it is changed to an unusable state.
To reset the camera:
1. Click Help on the Menu Bar.
2. Select Reset Camera for the drop down menu.
3. Click Yes to reset the camera.
4. To complete the reset, turn the camera off. When the
camera is turned on again, it will reset its settings.
For complete instruction, refer to the Pearl manuals.
LumaSense Technologies Awakening Your 6th Sense
LumaSense Technologies Awakening Your 6th Sense
Americas and Australia
Sales & Service
Santa Clara, CA
Ph: +1 800 631 0176
Fax: +1 408 727 1677
info@lumasenseinc.com
the information in this publication at any time.
Europe, Middle East, Africa
Sales & Service
Frankfurt, Germany
Ph: +49 69 97373 0
Fax: +49 69 97373 167
India
Sales & Support Center
Mumbai, India
Ph: +91 22 67419203
Fax: +91 22 67419201
Pearl Software Quickstart-EN 512-0010-01 Rev. B 06/23/14
China
Sales & Support Center
Shanghai, China
Ph: +86 133 1182 7766
Fax: +86 21 5877 2383
www.lumasenseinc.com
©2014 LumaSense Technologies. All rights reserved.LumaSense Technologies, Inc., reserves the right to change
 Loading...