

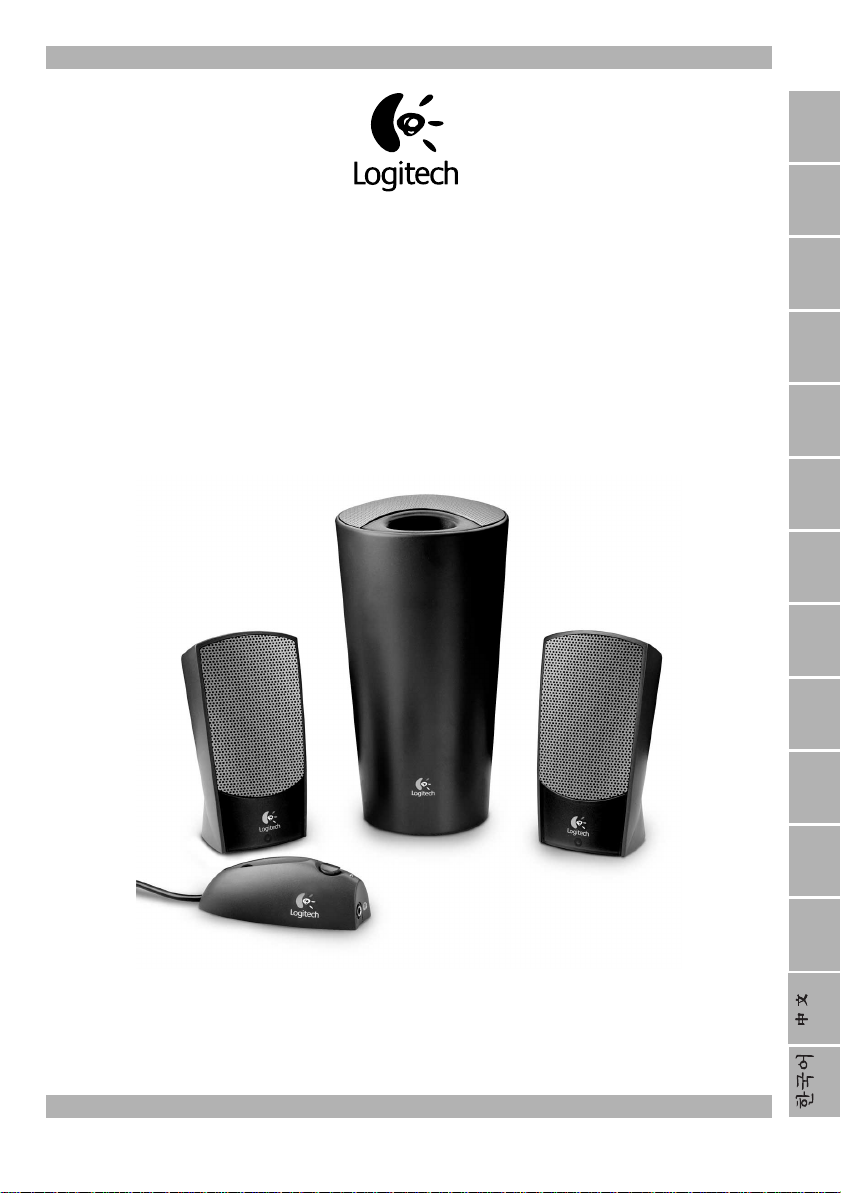
Logitech SOUNDMAN S-20 User Manual
®
SoundMan® S-20
User’s Guide
EnglishDeutschFrançaisItalianoEspañolPortuguêsNederlandsSvenskaDanskNorskSuomi
Ελληνικά


© 2000 Logitech. All Rights Reserved. Logitech, the Logitech logo, and other Logitech marks are owned by Logitech and
may be registered. All other trademarks are the property of their respective owners.
Logitech assumes no responsibility for any errors that may appear in this manual. Information contained herein is subject to change
without notice.
Part Number:
Limited Product Warranty.
from significant defects in material and workmanship for a period of two years from the date of purchase. Logitech’s hardware
warranty is nontransferable and is limited to the original purchaser. Product Remedies. Logitech’s entire liability and the Licensee’s
exclusive remedy for any breach of warranty, shall be, at Logitech’s option, either (a) return of the price paid or (b) repair or
replacement of the hardware, provided that the hardware is returned to the point of purchase, with a copy of the sales receipt.
Any replacement hardware will be warranted for the remainder of the original warranty period or 30 days, whichever is longer.
These remedies are void if failure of the hardware has resulted from accident, abuse, or misapplication.
LIMITATION OF LIABILITY.
LOGITECH EXPRESSLY DISCLAIMS ALL OTHER WARRANTIES, INCLUDING, BUT NOT LIMITED TO, THE IMPLIED WARRANTIES OF
MERCHANTABILITY AND FITNESS FOR A PARTICULAR PURPOSE AND NONINFRINGEMENT OF THIRD-PARTY RIGHTS WITH RESPECT
TO THE DOCUMENTATION AND HARDWARE. NO LOGITECH DEALER, AGENT, OR EMPLOYEE IS AUTHORIZED TO MAKE ANY
MODIFICATION, EXTENSION, OR ADDITION TO THIS WARRANTY. IN NO EVENT WILL LOGITECH OR ITS SUPPLIERS BE LIABLE FOR ANY
COSTS OF PROCUREMENT OF SUBSTITUTE PRODUCTS OR SERVICES, LOST PROFITS, LOSS OF INFORMATION OR DATA, OR ANY OTHER
SPECIAL, INDIRECT, CONSEQUENTIAL, OR INCIDENTAL DAMAGES ARISING IN ANY WAY OUT OF THE SALE OF, USE OF, OR INABILITY
TO USE ANY LOGITECH PRODUCT OR SERVICE, EVEN IF LOGITECH HAS BEEN ADVISED OF THE POSSIBILITY OF SUCH DAMAGES.
IN NO CASE SHALL LOGITECH’S LIABILITY EXCEED THE ACTUAL MONEY PAID FOR THE PRODUCTS AT ISSUE.
Because some jurisdictions do not allow the limitation of implied warranties or liability for incidental, consequential, special,
or indirect damages, the above limitation may not always apply. The above limitations will not apply in case of personal injury
where and to the extent that applicable law requires such liability.
FCC Compliance and Advisory Statement.
to the following two conditions: 1) this device may not cause harmful interference, and 2) this device must accept any interference
received, including interference that may cause undesired operation. This equipment has been tested and found to comply
with the limits for a Class B digital device, pursuant to Part 15 of the FCC Rules. These limits are designed to provide reasonable
protection against harmful interference in a residential installation. This equipment generates, uses, and can radiate radio
frequency energy and, if not installed or used in accordance with the instructions, may cause harmful interference to radio
communications. However, there is no guarantee that interference will not occur in a particular installation. If this equipment does
cause harmful interference to radio or television reception, which can be determined by turning the equipment off and on, the
user is encouraged to try to correct the interference by one or more of the following measures: 1) reorient or relocate the receiving
antenna; 2) increase the separation between the equipment and the receiver; 3) connect the equipment to an outlet on a circuit
different from that to which the receiver is connected; 4) consult the dealer or an experienced radio/TV technician for help.
Any changes or modifications not expressly approved by the party responsible for compliance could void the user's authority
to operate the equipment. Where shielded interface cables have been provided with the product or specified additional
components or accessories elsewhere defined to be used with the installation of the product, they must be used in order to ensure
compliance with FCC regulations.
Canadian DOC Statement.
apparatus specified in the interference-causing equipment standard entitled “Digital Apparatus,” ICES-003 of the Department
of Communications.
Cet appareil numérique respecte les limites bruits radioélectriques applicables aux appareils numériques de Classe B prescrites
dans la norme sur le matériel brouilleur: “Appareils Numériques,” NMB-003 édictée par le Ministère des Communications.
This device complies with RSS-210 of Industry and Science Canada. Operation is subject to the following two conditions:
1) this device may not cause interference, and 2) this device must accept any interference, including interference that may cause
undesired operation of the device.
622500-0911.B
Logitech warrants that any hardware products accompanying this documentation shall be free
THE WARRANTIES SET FORTH IN THIS AGREEMENT REPLACE ALL OTHER WARRANTIES.
This hardware device complies with Part 15 of the FCC Rules. Operation is subject
This digital device does not exceed the Class B limits for radio noise emissions from digital
1

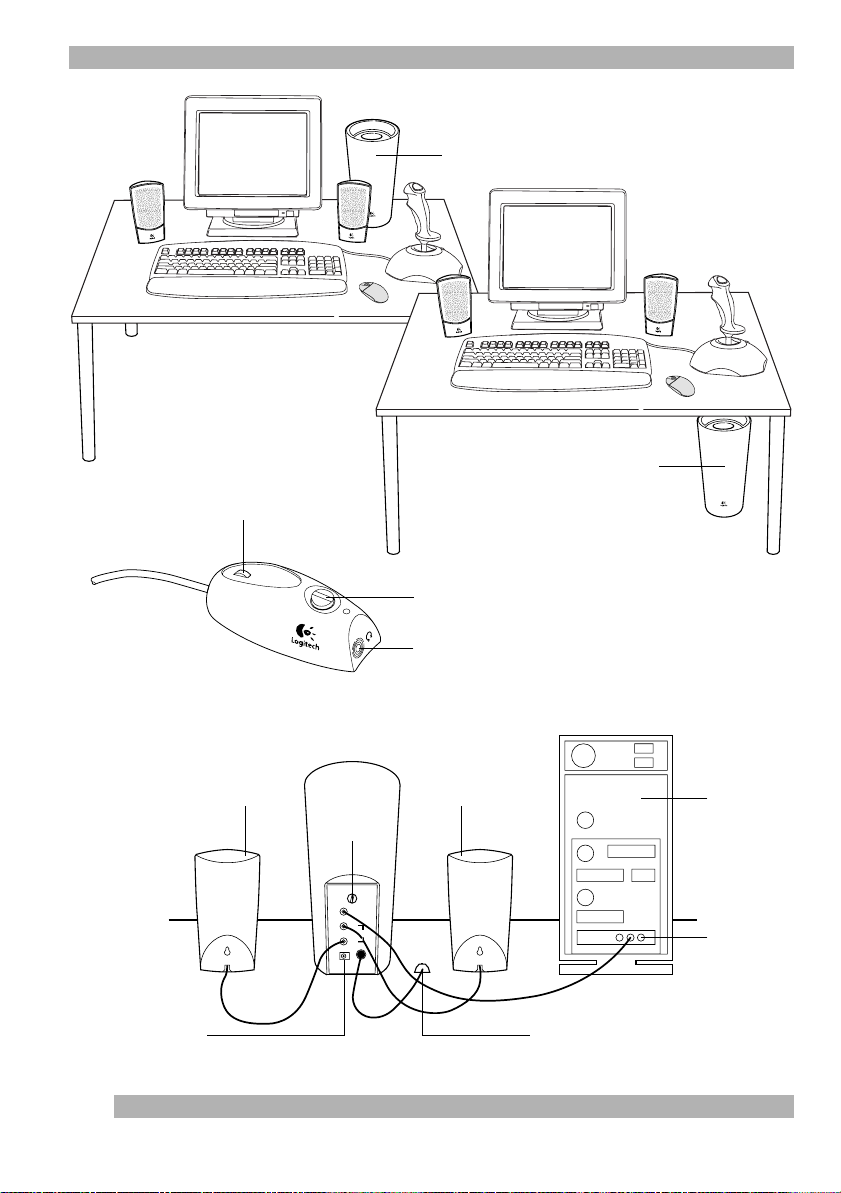
Volume control
SoundMan® S-20 – User’s Guide
Speaker placement
Subwoofer
Subwoofer
On/stand-by button
Remote control
Connecting speakers
and remote control
Right
speaker
DC jack
for power adapter
2
Subwoofer
Bass
control
Bass
_
+
Audio input
Left
To satellite
speakers
Right
Remote
DC 12V
Headphone jack
Left
speaker
Computer
Sound card
Remote control

SoundMan® S-20 – User’s Guide
Important Safety Precautions
CAUTION
Risk of electric shock! Do not open speakers or immerse them in any liquid!
IMPORTANT OPERATING INSTRUCTIONS
Read carefully!
•
Water and moisture
(e.g., bathtub or swimming pool), and do not immerse them in any
liquid or pour any liquid on them.
•
Heat
– Place the speakers away from all heat sources.
•
Ventilation
never push objects into speaker vents or slots because of fire
or electric shock hazards, and provide sufficient space around
the speakers for proper ventilation.
•
Location
– Place the speakers in a stable location so they will not fall
causing damage to the speakers or bodily harm.
– Do not use the speakers near water
– Do not block the openings in the speaker cabinets,
Placement
• The subwoofer and satellite speakers are magnetically shielded,
and can be placed next to the computer monitor without affecting
screen images.
• Put the subwoofer either on your desktop, as shown in the diagram,
or on the floor beneath your table top.
Connections
1.
Turn the volume control all the way down on the remote control unit.
2.
Connect the left speaker to the “
3.
Connect the right speaker to the “
subwoofer.
4.
Connect the remote control unit to “
Left
” connection on the subwoofer.
Right
” connection on the
Remote
” on the subwoofer.
Operation
Volume
• To increase the volume, rotate the volume control up on
the remote control unit. To decrease the volume, rotate the volume
control down.
• To increase the bass level of the subwoofer, rotate the bass control
knob clockwise. To decrease the bass level, rotate the bass control
knob counterclockwise.
Specifications
• Total power output: 20 watts RMS @ < 10% THD
Satellite power output: 4 watts RMS per channel
Subwoofer power output: 12 watts RMS
• System frequency response: 38 Hz – 20 kHz
• Crossover frequency: 190 Hz
• Signal-to-noise ratio: > 70 dB
• Input sensitivity: 130 mV max
• Input impedance > 10 k
• Signal input (audio source): 3.5 mm (1/8”) stereo jacks
• Signal output (headphones): 3.5 mm (1/8”) stereo jack
• Power supply: External power adapter
Ω
•
Connections
jack of the computer or of an audio device.
•
Cleaning
the electrical outlet before cleaning them with a damp cloth
•
Lightning
the speakers from the electrical outlet and turn off the computer.
•
Servicing
opening the speaker cabinets, which may expose you to dangerous
voltage or shock hazards. Refer all servicing to qualified service
personnel.
• The best stereo effect is usually obtained by placing the satellite
speakers at an equal distance from each other and the listener.
• For optimum performance, angle the satellite speakers slightly
toward the listening position.
5.
Connect the subwoofer to the computer.
6.
Connect the power adapter to the “DC” jack on the subwoofer,
then plug the power adapter into an electrical outlet.
7.
With the computer running and an audio source active, adjust
the volume control on the volume control unit. Also adjust the Bass
control on the subwoofer.
On/Stand-by
• Pressing this button on the remote control unit puts the speaker
system in suspend mode (LED off); pressing it again returns the
speaker system to normal operation (LED on).
Headphone jack
• When you use headphones, plug them into the headphone jack on
the remote control, as shown in the diagram. Your headphones will
mute the speaker system automatically.
• Speaker drivers:
Satellite (each) 57 mm diameter driver, magnetically shielded
Subwoofer: 75 mm diameter driver, magnetically shielded
• Dimensions (H x W x D):
Satellite (each) 152 x 76 x 76 mm
Subwoofer: 241 x 124 x 147 mm
• System weight: 3.1 Kg (including power adapter)
– Operate the speakers only from the audio line out
– Unplug the speakers from the computer and from
– For added protection during lightning storms, unplug
– Do not attempt to service the speakers yourself by
.
English
3

Lautstärkeregler
SoundMan S-20 – Benutzerhandbuch
Aufstellen der Lautsprecher
Subwoofer
Subwoofer
Ein-/Standby-Taste
Fernbedienung
Anschließen der Lautsprecher
und der Fernbedienung
Rechter
Lautsprecher
Gleichstromanschluss
für Netzgerät
4
Subwoofer
Tiefenregler
Bass
_
+
Audio input
Left
To satellite
speakers
Right
Remote
DC 12V
Kopfhörerbuchse
Linker
Lautsprecher
Computer
Soundkarte
Fernbedienung

SoundMan S-20 – Benutzerhandbuch
Wichtige Sicherheitsvorkehrungen
Vorsicht
Elektroschockgefahr! Öffnen Sie die Lautsprecher nicht, und vermeiden Sie den Kontakt
mit Flüssigkeiten!
Wichtige Hinweise zum Betrieb
Bitte aufmerksam lesen.
•
Wasser und Feuchtigkeit
in der Nähe von Wasser auf (z. B. Badewanne oder Schwimmbecken),
und vermeiden Sie den Kontakt mit Flüssigkeiten.
•
Wärme
– Stellen Sie die Lautsprecher nicht in der Nähe von
Wärmequellen auf.
•
Belüftung
– Verdecken Sie die Öffnungen der Lautsprechergehäuse
nicht, führen Sie keine Gegenstände in die Öffnungen ein,
und achten Sie darauf, dass zwischen den Lautsprechern und
anderen Geräten bzw. der Wand ein ausreichender Abstand besteht.
Aufstellung
• Der Subwoofer und die Lautsprecher sind magnetisch abgeschirmt
und können neben dem Monitor aufgestellt werden, ohne dass
das Monitorbild beeinträchtigt wird.
• Stellen Sie den Subwoofer entweder auf den Schreibtisch oder auf
den Boden darunter (siehe Abbildung).
Anschluss
1.
Drehen Sie den Lautstärkeregler an der Fernbedienung
ganz herunter.
2.
Schließen Sie den linken Lautsprecher an der mit
bezeichneten Buchse am Subwoofer an.
3.
Schließen Sie den rechten Lautsprecher an der mit
bezeichneten Buchse am Subwoofer an.
4.
Schließen Sie die Fernbedienung an der mit
(Fernbedienung) bezeichneten Buchse am Subwoofer an.
Bedienung
Lautstärke
• Drehen Sie zum Erhöhen oder Verringern der Lautstärke den Regler
an der Fernbedienung.
• Drehen Sie zum Anheben der Tiefen den Tiefenregler
am Subwoofer im Uhrzeigersinn. Zum Verringern der Tiefen
drehen Sie den Tiefenregler entgegen dem Uhrzeigersinn.
Technische Daten
• Gesamtleistung: 20 Watt effektiv bei < 10% Klirrfaktor
Lautsprecherleistung: 4 Watt effektiv pro Kanal
Subwoofer-Leistung: 12 Watt effektiv
• Frequenzbereich: 38 Hz - 20 kHz
• Schnittfrequenz: 190 Hz
• Störabstand: > 70 dB
• Eingangsempfindlichkeit: 130 mV max.
• Eingangsimpedanz > 10 k
• Signaleingang (Audioquelle): 3,5 mm Stereobuchsen
• Signalausgang (Kopfhörer): 3,5 mm Stereobuchse
– Stellen Sie die Lautsprecher nicht
Left
(Links)
Right
Remote
Ω
(Rechts)
•
Aufstellungsort
Unterlage stehen, um zu verhindern, dass sie herunterfallen und
dabei Personen oder das Gerät zu Schaden kommen.
•
Anschlüsse
Out-Buchse des Computers oder eines Audiogeräts an.
•
Reinigen
Sie den Netzstecker, bevor Sie sie mit einem feuchten Tuch reinigen.
•
Blitzschlag
ziehen Sie den Netzstecker, und schalten Sie den Computer aus.
•
Servicing Wartung
überlassen Sie dies einem Fachmann.
• Ein optimaler Stereoeffekt wird erzielt, wenn Sie die Lautsprecher
im gleichen Abstand zueinander und dem Zuhörer aufstellen.
• Drehen Sie die Lautsprecher leicht in Richtung der Hörposition.
5.
Schließen Sie den Subwoofer am Computer an.
6.
Schließen Sie das Netzgerät an der mit DC (–) bezeichneten Buchse
am Subwoofer an, und stecken Sie den Stecker in die Steckdose.
7.
Schalten Sie den Computer ein, starten Sie eine Audioquelle und
stellen Sie die gewünschte Lautstärke mit Hilfe des Lautstärkereglers
ein. Stellen Sie außerdem den Tiefenregler am Subwoofer ein.
Ein-/Standby
• Durch Drücken dieser Taste auf der Fernbedienung werden
die Lautsprecher in den Standby-Modus versetzt (LED aus);
soll der normale Betrieb wieder aufgenommen werden, drücken Sie
die Taste erneut (LED an).
Kopfhörerbuchse
• Wenn Sie einen Kopfhörer verwenden wollen, schließen Sie diesen
an der Kopfhörerbuchse der Fernbedienung an (siehe Abbildung).
Dadurch werden die Lautsprecher automatisch deaktiviert.
• Stromversorgung: Externes Netzgerät
• Lautsprechertreiber:
Lautsprechertreiber mit 57 mm Durchmesser,
magnetisch abgeschirmt
Subwoofer-Treiber mit 75 mm Durchmesser,
magnetisch abgeschirmt
• Abmessungen:
Lautsprecher: 152 x 76 x 76 mm
Subwoofer: 241 x 124 x 147 mm
• Gesamtgewicht: 3,1 kg (einschließlich Netzgerät)
– Die Lautsprecher müssen auf einer stabilen
– Schließen Sie die Lautsprecher nur an der Audio-Line
– Trennen Sie die Lautsprecher vom Computer, und ziehen
– Um die Lautsprecher bei einem Gewitter zu schützen,
– Warten Sie das Gerät nicht selbst, sondern
Deutsch
.
5
SoundMan S-20 - Guide de l'utilisateur
Réglage du volume
Emplacement des haut-parleurs
Subwoofer
Subwoofer
Bouton Marche/Veille
Télécommande
Connexion des haut-parleurs
et de la télécommande
Haut-parleur
droit
Prise CC
pour adaptateur
6
Subwoofer
Réglage
des graves
Bass
_
+
Audio input
Left
To satellite
speakers
Right
Remote
DC 12V
Prise pour casque
Haut-parleur
gauche
Ordinateur
Carte son
Télécommande

SoundMan S-20 - Guide de l'utilisateur
Instructions de sécurité importantes
ATTENTION
Risque d'électrocution! N'ouvrez pas les haut-parleurs et ne les immergez pas!
INSTRUCTIONS D'UTILISATION IMPORTANTES
A lire attentivement!
•
Eau et humidité
à proximité d'une source d'eau (par exemple près d'une baignoire
ou d'une piscine) et ne les mouillez pas.
•
Chaleur
•
Ventilation
Dû au risque d'électrocution ou d'incendie, n'introduisez jamais
d'objets dans les ouvertures ou les fentes des haut-parleurs, et laissez
un espace suffisant autour des haut-parleurs pour assurer
une ventilation correcte.
•
Emplacement
qu'ils soient stables et qu'ils ne tombent pas, ce qui risquerait de
les endommager ou de causer des dommages corporels.
Emplacement
• Le subwoofer et les haut-parleurs sont blindés contre
les interférences magnétiques et peuvent donc être placés à côté
du moniteur sans incidence sur l'affichage à l'écran.
• Placez le subwoofer soit sur votre bureau, comme indiqué sur
ce schéma, soit par terre, sous votre bureau.
Connexions
1.
Baissez au maximum le volume sur la télécommande.
2.
Connectez le haut-parleur gauche à la prise
du subwoofer.
3.
Connectez le haut-parleur droit à la prise
du subwoofer.
4.
Connectez la télécommande à la prise
du subwoofer.
Fonctionnement
Volume
• Pour augmenter le volume, faites tourner le bouton correspondant de
la télécommande vers l'avant. Pour baisser le volume, faites le tourner
vers l'arrière.
• Pour augmenter le niveau des graves du subwoofer, faites tourner le
bouton correspondant du subwoofer en sens horaire. Pour diminuer
le niveau des graves, faites tourner ce bouton en sens horaire inverse.
Spécifications techniques
• Puissance utile totale: 20 watts RMS @ < 10% THD
Puissance utile du haut-parleur: 4 watts RMS par canal
Puissance utile du subwoofer: 12 watts RMS
• Réponse en fréquence du système: 38 Hz – 20 kHz
• Fréquence de recouvrement: 190 Hz
• Rapport signal/bruit: >70 dB
• Sensibilité en entrée: 130 mV max
• Impédance en entrée > 10 k
• Entrée de signal (source audio): prises stéréo 3,5 mm
• Sortie de signal (casque): prise stéréo 3,5 mm
– N'utilisez pas les haut-parleurs
– Eloignez les haut-parleurs de toute source de chaleur.
– Ne bloquez pas les ouvertures des haut-parleurs.
– Placez les haut-parleurs de manière à ce
Left
(gauche)
Right
(droite)
Remote
(télécommande)
Ω
•
Connexions
de sortie audio de l'ordinateur ou d'un périphérique audio.
•
Nettoyage
la prise électrique avant de les nettoyer avec un chiffon humide
•
Foudre
– Pour une meilleure protection contre la foudre,
en cas d'orage, débranchez les haut-parleurs de la prise électrique
et mettez l'ordinateur hors tension.
•
Réparation
parleurs en ouvrant leur habitacle, faute de quoi vous risquez
de vous exposer à une tension élevée et au risque d'électrocution.
Les réparations doivent être effectuées par des techniciens qualifiés.
• Afin d'optimiser les performances stéréo, il est recommandé
de placer les haut-parleurs à égale distance de l'auditeur.
• Pour des performances optimales, orientez légèrement les hautparleurs vers l'auditeur.
5.
Connectez le subwoofer à l'ordinateur.
6.
Connectez l'adaptateur à la prise DC (CC) du subwoofer,
puis branchez l'adaptateur dans une prise murale.
7.
Réglez le volume sur la télécommande pendant que l'ordinateur
fonctionne et qu'une source audio est active. Réglez également
les graves sur le subwoofer.
Bouton Marche/Veille
• Si vous appuyez sur ce bouton de la télécommande, l'ensemble
des haut-parleurs est mis en veille (voyant éteint), si vous appuyez
de nouveau dessus, les haut-parleurs reprennent leur fonctionnement normal.
Prise pour casque
• Si vous utilisez un casque, branchez-le sur la prise de la télécommande prévue à cet effet, comme illustré dans le schéma. Le branchement du casque coupe immédiatement le son des haut-parleurs.
• Alimentation: Adaptateur externe
• Transducteurs des haut-parleurs:
Haut-parleurs équipés chacun d'un transducteur de 57 mm
de diamètre, blindés contre les interférences magnétiques
Subwoofer: transducteur de 75 mm de diamètre, blindé contre
les interférences magnétiques
• Dimensions (H x L x P):
Haut-parleurs (chacun) 152 x 76 x 76 mm
Subwoofer: 241 x 124 x 147 mm
• Poids de l'ensemble: 3,1 kg (adaptateur compris)
– Ne branchez les haut-parleurs que sur la prise
– Débranchez les haut-parleurs de l'ordinateur et de
– Ne tentez pas de réparer vous-même les haut-
Français
.
7

Controllo volume
SoundMan S-20 - Guida all'utilizzo
Posizione degli altoparlanti
Subwoofer
Subwoofer
Pulsante di accensione/
standby
Telecomando
Collegamento degli altoparlanti
e del telecomando
Subwoofer
Altoparlante
destro
Presa CC per l’adattatore
di alimentazione
8
Controllo
bassi
Bass
_
+
Audio input
Left
To satellite
speakers
Right
Remote
DC 12V
Presa per cuffie
Altoparlante
sinistro
Computer
Scheda audio
Telecomando

SoundMan S-20 - Guida all'utilizzo
Importante: istruzioni di sicurezza
ATTENZIONE
Rischio di scossa elettrica. Non aprire gli altoparlanti né immergerli in sostanze liquide.
IMPORTANTE: ISTRUZIONI DI FUNZIONAMENTO
Leggere attentamente
•
Acqua e umidità
di acqua (per esempio vasche da bagno e piscine), non immergerli
in liquidi né versarci sopra qualsiasi tipo di sostanza liquida.
•
Calore
•
Ventilazione
né forzare oggetti di alcun tipo attraverso i fori o le aperture
in quanto ciò può causare incendi o scosse elettriche; assicurarsi
inoltre che vi sia spazio a sufficienza intorno agli altoparlanti per
una ventilazione adeguata.
•
Posizione
evitare di ferirsi o danneggiare gli altoparlanti stessi se questi
dovessero cadere.
Collocazione
• Il subwoofer e gli altoparlanti satelliti sono schermati
magneticamente e possono essere sistemati accanto al monitor
del computer senza causare distorsioni delle immagini sullo schermo.
• Collocare il subwoofer sulla scrivania, come mostrato in figura oppure
sul pavimento sotto la scrivania.
Collegamenti
1.
Abbassare completamente il volume con il telecomando.
2.
Collegare l'altoparlante sinistro alla presa “
del subwoofer.
3.
Collegare l'altoparlante destro alla presa “
del subwoofer.
4.
Collegare il telecomando alla presa “
del subwoofer.
Funzionamento
Volume
• Per aumentare il volume, ruotare in avanti la manopola di regolazione
del telecomando. Per ridurre il volume, ruotare indietro la manopola
di regolazione.
• Per aumentare il livello dei bassi del subwoofer, ruotare in senso orario
la manopola di controllo dei bassi. Per diminuire il livello dei bassi,
ruotare in senso antiorario la manopola di controllo dei bassi.
Dati tecnici
• Potenza di uscita totale: 20 watt efficaci a < 10% distorsione
armonica totale
Potenza di uscita satelliti: 4 watt efficaci per canale
Potenza di uscita subwoofer: 12 watt efficaci
• Risposta di frequenza del sistema: 38 Hz – 20 kHz
• Frequenza di crossover: 190 Hz
• Rapporto segnale/rumore: > 70 db
• Sensibilità in ingresso: 130 mV max
• Impedenza in ingresso > 10 k
• Ingresso segnale (fonte audio): connettori stereo (3,5 mm)
• Uscita segnale (cuffie): spinotto stereo (3,5 mm)
– Non utilizzare gli altoparlanti in prossimità
– Tenere gli altoparlanti lontano da fonti di calore.
– Non ostruire le aperture situate negli altoparlanti
– Collocare gli altoparlanti in posizione stabile onde
Left
” (Sinistra)
Right
” (Destra)
Remote
” (Telecomando)
Ω
•
Collegamenti
linea audio del computer oppure di un dispositivo audio.
•
Pulizia
a muro prima di pulirli con un panno umido.
•
Fulmini
gli altoparlanti dalla presa a muro e spegnere il computer.
•
Manutenzione
l'apertura degli altoparlanti può esporre l'utente ad alta tensione
o al rischio di scosse elettriche. In caso si richieda assistenza,
contattare il personale qualificato.
• Per ottenere un effetto stereo ottimale, collocare gli altoparlanti
satelliti alla stessa distanza l'uno dall'altro e dalla posizione di ascolto.
• Per prestazioni ottimali collocare gli altoparlanti satelliti orientati
leggermente verso la posizione di ascolto.
5.
Collegare il subwoofer al computer.
6.
Collegare il cavo dell'adattatore di alimentazione alla presa “DC” (CC)
del subwoofer, quindi inserire l'adattatore nella presa a muro.
7.
Con il computer acceso e una fonte audio in funzione, regolare
il volume con la manopola di regolazione. Regolare anche il controllo
dei bassi del subwoofer.
Accensione/standby
• Premendo questo pulsante del telecomando gli altoparlanti entrano
in modalità sospensione (LED spento), premendolo di nuovo,
viene ripristinato il funzionamento (LED acceso).
Presa per cuffie
• Per utilizzare le cuffie è necessario collegarle alla presa per cuffie
del telecomando, come mostrato in figura. Inserendo le cuffie verrà
disattivata automaticamente la riproduzione audio dagli altoparlanti.
• Alimentatore: Adattatore di alimentazione esterno
• Trasduttori altoparlanti:
Satellite (ciascuno): trasduttore schermato magneticamente,
diametro 57 mm
Subwoofer: Trasduttore schermato magneticamente,
diametro 75 mm
• Dimensioni (h x l x b):
Satellite (ciascuno): 152 x 76 x 76 mm
Subwoofer: 241 x 124 x 147 mm
• Peso del sistema: 3,1 Kg (adattatore di alimentazione incluso)
– Collegare gli altoparlanti solo allo spinotto di uscita
– Scollegare gli altoparlanti dal computer e dalla presa
– Per maggiore protezione durante un temporale scollegare
– Non provare a riparare il prodotto in quanto
.
Italiano
9
 Loading...