

Page 1

Logitech® PTZ Pro Camera
Setup Guide
Page 2

Logitech PTZ Pro Camera
2
English. . . . . . . . . . . . . . . . . . . . . . . . . . . . . . . . . . . . . . . . . . 3
繁體中文 . . . . . . . . . . . . . . . . . . . . . . . . . . . . . . . . . . . . . . . . . 8
한국어 . . . . . . . . . . . . . . . . . . . . . . . . . . . . . . . . . . . . . . . . . . 13
Page 3

Logitech PTZ Pro Camera
English 3
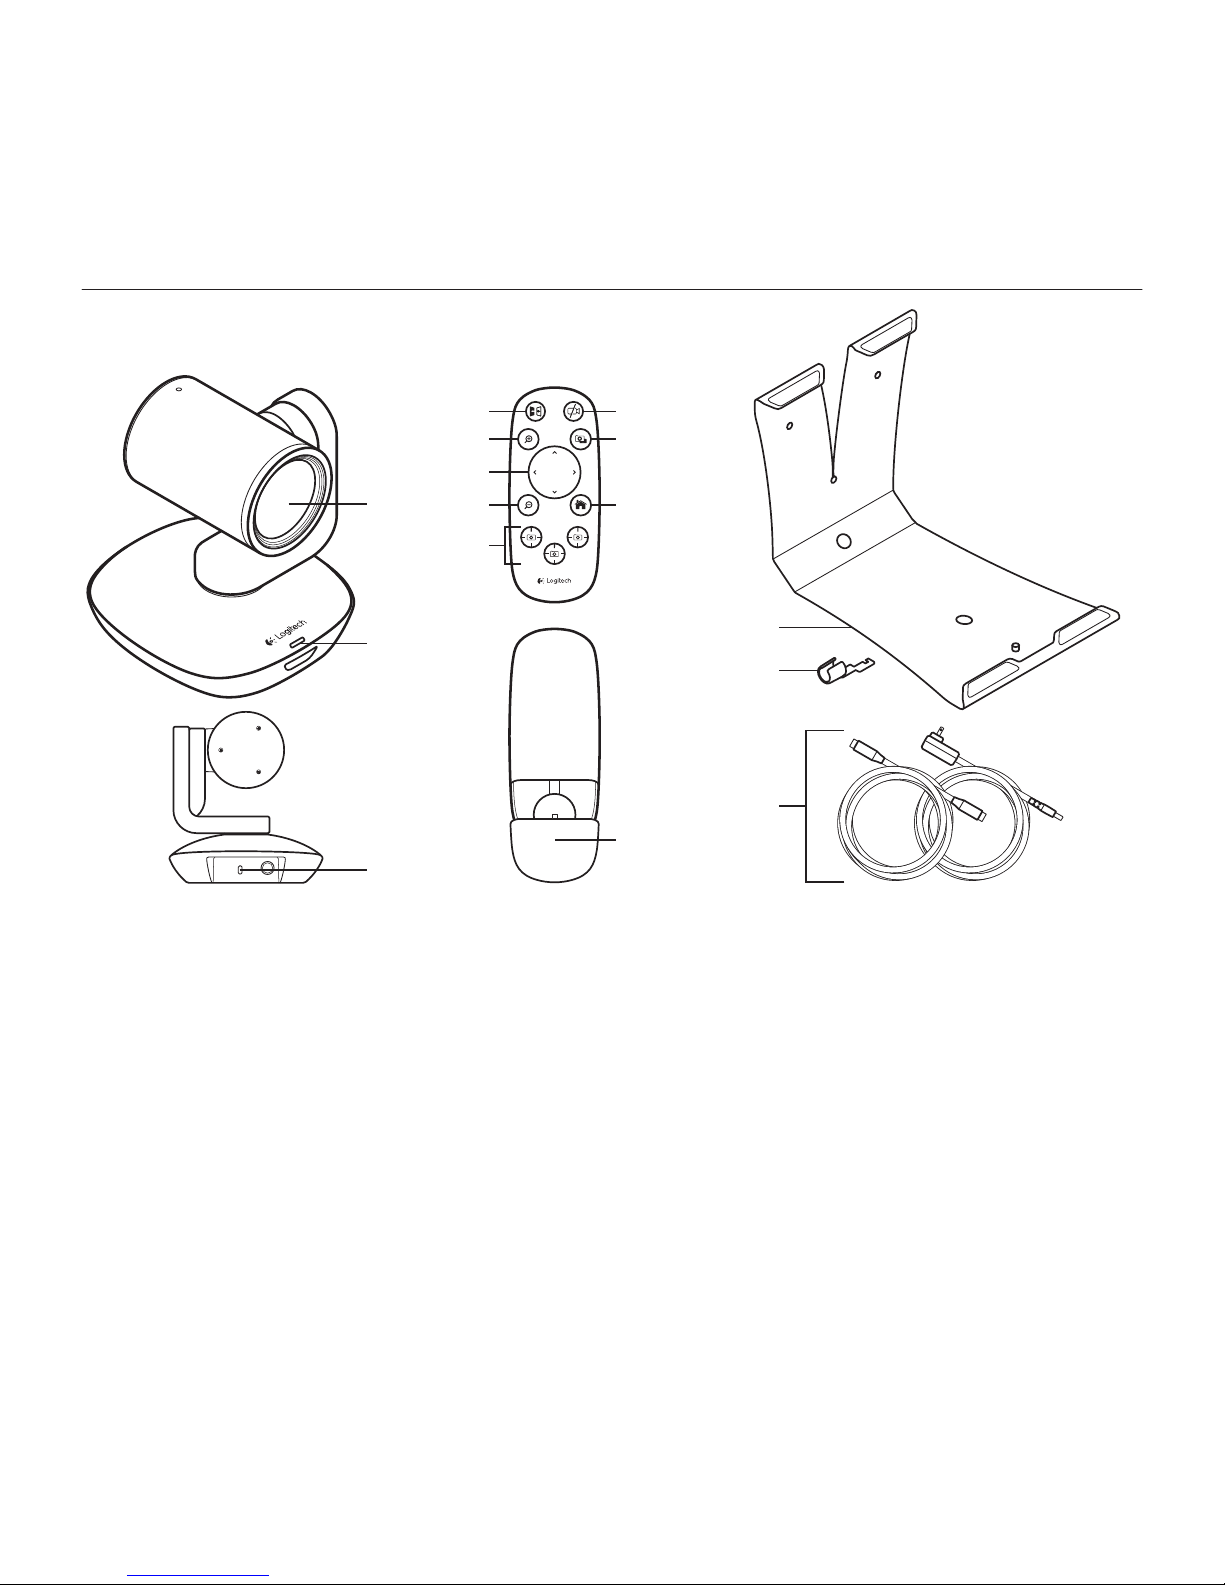
Know your product
Camera
1. 10X lossless zoom
2. Camera LED
3. Kensington®
Security Slot
Remote
4. Mirror
5. Zoom in
6. Pan and tilt
7. Zoom out
8. Camera presets
1, 2, and 3
9. Video mute
10. Far end control
11. Home
12. Remote
battery door
Accessories
13. Camera mount
14. Cable lock
15. Cables
5
6
8
7
13
14
15
10
2
3
1
4
9
11
12
Page 4

Logitech PTZ Pro Camera
4 English
Set up your product
1. Set up camera on table, or using mount
on table or wall.
2. Connect PTZ Pro camera
(refer to diagram above).
3. Attach cable lock before plugging
in cable to the camera port.
4. Connect to external power.
5. To start video from your PC or Mac
application, connect the USB cable to
your USB port.
6. The camera LED will flash to show
that connection is taking place,
and when completed, the camera head
will rotate.
7. If these activities do not take place,
try again and then consult
Troubleshooting or call technical support.
8. Start your video call from your
application. The LED on the camera
will alight when streaming.
a
b c
Page 5

Logitech PTZ Pro Camera
English 5
Visit Product Central
Discover your product’s full potential. Get valuable information and usage tips by browsing
easy-to-use FAQs. Find answers to product questions and get help setting up your product.
See if there’s software available for download that can enhance your product experience.
To enjoy all the benefits of your Logitech product, visit www.logitech.com/support/ptz and
take advantage of Logitech’s wide range of useful support services:
• Troubleshooting
• Diagnostics
• Firmware upgrades
• Support community
• Software downloads
• In-box documentation
• Warranty information
• Spare parts (if available)
Page 6

Logitech PTZ Pro Camera
6 English
Use your product
Video
• Starting the video: The video is controlled
by the application and will start once
the camera is selected and the video
is started in the application. An LED will
light when the video is streaming.
• Pan and tilt the camera using
the controls on the remote control.
Press once for incremental or press
and hold for continuous pan or tilt.
Caution: Do not manually rotate webcam
head. Doing so may damage unit.
• Zoom the camera up to 10X by pressing
the zoom button.
• Home: Select the Home button to return
the default, out-of-box home position.
• Camera Presets: You can set up to 3
Camera Preset positions. First, position
the camera using the remote control, and
then press and hold one of the Camera
Preset buttons for 3 seconds to save that
position. You may return to your defined
position at any time by pressing the
Preset button once.
Use Preset 1 as your own defined
“home” position. When the camera is
reconnected to the PC, it will return to
the position set in Preset 1. If no position
is set for Preset 1, the camera will return
to the default home position.
All three Presets are by default set to the
out-of-box home.
• Far end control: By selecting this key
and downloading the application from
www.logitech.com/support/ptz, you
may control the pan, tilt and zoom of
any Logitech ConferenceCam product
or C930e Webcam in supported
applications. Camera selection and pan,
tilt and zoom tools are also available from
the downloadable application for PC
as well as ability to disable this feature
locally. Please visit the download page
listed for more information.
Page 7

Logitech PTZ Pro Camera
English 7
Mounting your camera Changing the remote control battery
The PTZ Pro remote control runs on a Li-ion
CR2032 battery. Battery life will vary based
on usage.
Troubleshooting tips
Please visit www.logitech.com/support/ptz
for troubleshooting tips, information on
software tools and for a diagnostic tool to
help troubleshoot issues you may have with
your PTZ Pro.
x2
Page 8

Logitech PTZ Pro Camera
8 繁體中文
瞭解您的產品
攝影機
1. 10 倍無損變焦
2. 攝影機 LED 指
示燈
3. Kensington® 防盜
鎖插孔
遙控器
4. 鏡像
5. 放大
6. 平移和傾斜
7. 縮小
8. 攝影機預設設定
1、2、和 3
9. 視訊靜音
10. 遠端控制
11. 歸位
12. 遙控器電池蓋
配件
13. 攝影機底座
14. 纜線鎖
15. 連接線
5
6
8
7
13
14
15
10
2
3
1
4
9
11
12
Page 9

Logitech PTZ Pro Camera
繁體中文 9
設定您的產品
1. 將攝影機安裝在桌子上,或使用底座將
攝影機安裝在桌子或牆上。
2. 連接 PTZ Pro 攝影機(請參照上方的示
意圖)
3. 先安裝纜線鎖,然後將連接線插入到攝
影機埠。
4. 連接外部電源。
5. 若要使用 PC 或 Mac 應用程式啟動視訊,
請將 USB 連接線連接到 USB 埠。
6. 攝影機 LED 指示燈閃爍,表示正在進行
連線,連線成功後,攝影機頭會旋轉。
7. 若上述情況並未出現,請再試一次,如
果依然無效,請查看疑難排解技巧或致
電技術支援。
8. 從應用程式啟動視訊通話。串流播放
時,攝影機上的 LED 指示燈會亮起。
a
b c
Page 10

Logitech PTZ Pro Camera
10 繁體中文
造訪產品中心
全面發掘產品潛力。請瀏覽常見問答集,瞭解相關寶貴資訊和使用技巧。查詢有關產品問
題的答案並獲得關於產品安裝方面的協助說明。查看是否有可供供下載以提升產品體驗的
軟體。若要盡享羅技產品的所有優點,請造訪 www.logitech.com/support/ptz,充分利用
羅技體貼周到的支援服務:
• 疑難排解
• 診斷
• 韌體升級
• 支援社群
• 軟體下載
• 包裝盒內文件
• 保固資訊
• 備用零件(若有供應)
Page 11

Logitech PTZ Pro Camera
繁體中文 11
使用您的產品
視訊
• 啟動視訊:視訊由應用程式控制,選擇攝
影機後視訊即會在應用程式中啟動。視訊
串流播放時,LED 指示燈會亮起。
• 使用遙控器上的控制鍵可平移和傾斜攝影
機。按一下可進行增量調整,按住不放可
連續進行平移或傾斜調整。注意:請勿手
動旋轉網路攝影機。否則可能損壞裝置。
• 按下變焦按鈕,可使攝影機進行變焦,最
高可達 10 倍。
• 歸位:選擇「歸位」按鈕可回到出廠時預
設的歸位位置。
• 攝影機預先設定:您可以設定多達 3 個攝
影機預先設定位置。首先使用遙控器調整
攝影機調整至定位,然後按住一個攝影機
預先設定按鈕 3 秒鐘不放以儲存該位置。
之後您可隨時按一下攝影機的攝影機預
先設定按鈕,將攝影機恢復到您定義的
位置。
使用預先設定 1 作為您自己定義的「歸
位」位置。攝影機重新連接到 PC 後會恢
復到預先設定 1 所設定的位置。若預先設
定 1 沒有設定任何位置,攝影機會恢復到
預設的歸位位置。
所有 3 個預先設定預設都是設定為出廠歸
位位置。
• 遠端控制:選擇此按鍵並使用從
www.logitech.com/support/ptz下載的應
用程式,可從支援的應用程式遠端控制羅
技 ConferenceCam 產品或 C930e 網路攝
影機。PC 版本的下載應用程式也提供有攝
影機選擇和平移、傾斜、變焦等工具,以
及從本機停用該功能的能力。詳細資訊請
瀏覽上述的下載頁面。
Page 12

Logitech PTZ Pro Camera
12 繁體中文
安裝攝影機 更換遙控器電池
PTZ Pro 遙控器使用 CR2032 鋰電池。電池
壽命隨使用情況而異。
疑難排解技巧
請造訪 www.logitech.com/support/ptz,查
看疑難排解技巧、軟體工具資訊以及可協
助您解決使用 PTZ Pro 可能發生之任何問題
的診斷工具。
x2
Page 13
Logitech PTZ Pro Camera
한국어 13
제품 설명
카메라
1. 10배 무손실
확대/축소
2. 카메라 LED
3. 켄싱턴® 락 홀
리모컨
4. 미러
5. 확대
6. 상하이동 및
기울기
7. 축소
8. 카메라 사전
설정 1, 2, 3
9. 비디오 음소거
10. 파엔드 컨트롤
11. 홈
12. 리모컨 배터리
도어
액세서리
13. 카메라 마운트
14. 케이블 락
15. 케이블
5
6
8
7
13
14
15
10
2
3
1
4
9
11
12
Page 14

Logitech PTZ Pro Camera
14 한국어
제품 설정
1. 카메라를 테이블 또는 마운트를 사용하
여 벽에 설치합니다.
2. PTZ Pro 카메라를 연결합니다(위 다이어
그램 참조).
3. 카메라 포트에 케이블을 넣기 전에 케이
블 락을 연결합니다.
4. 외부 전원에 연결합니다.
5. PC 또는 Mac 응용 프로그램에서 비디오를
시작하려면 USB 포트에 USB 케이블을 연
결합니다.
6. 카메라 LED가 깜빡이며 연결이 되고 있
음을 나타내고, 완료되면 카메라 헤드가
회전합니다.
7. 이러한 작업이 수행되지 않으면, 다시 시
도한 후 문제 해결을 참조하거나 기술 지
원부에 전화하십시오.
8. 응용 프로그램에서 화상 통화를 시작합니
다. 스트리밍이 시작되면 카메라의 LED
가 켜집니다.
a
b c
Page 15

Logitech PTZ Pro Camera
한국어 15
Product Central 방문
제품의 전체 기능을 알아보십시오. 편리한 FAQ를 탐색하여 유용한 정보 및 사용 팁을 알아
보십시오. 제품 질문에 대한 답변을 찾고 제품 설정을 위한 도움을 받으십시오. 제품 환경을
개선할 수 있는 다운로드 가능한 소프트웨어가 있는지 알아보십시오. 로지텍 제품의 모든
이점을 활용하려면 www.logitech.com/support/ptz를 방문하고 로지텍의 광범위하고 유용
한 지원 서비스를 이용하십시오.
• 문제 해결
• 진단
• 펌웨어 업그레이드
• 지원 커뮤니티
• 소프트웨어 다운로드
• 제공 설명서
• 보증 정보
• 예비 부품(해당되는 경우)
Page 16

Logitech PTZ Pro Camera
16 한국어
제품 사용
비디오
• 비디오 시작: 비디오는 응용 프로그램으로
제어하며 카메라를 선택하면 시작되고 응
용 프로그램에서 비디오가 시작됩니다. 비
디오가 스트리밍되고 있는 경우 LED가 켜
집니다.
• 리모컨의 컨트롤을 사용하여 카메라를 상
하이동하고 기울입니다. 조정하려면 한 번
누르고, 계속 상하이동하거나 기울이려면
계속 누릅니다. 주의: 웹캠 헤드를 수동으
로 회전하지 마십시오. 그렇게 하면 장치
가 손상될 수 있습니다.
• 확대/축소 버튼을 눌러 10배까지 카메라
를 확대/축소합니다.
• 홈: 맨 처음의 기본 홈 위치로 돌아가려면
홈 버튼을 선택합니다.
• 카메라 사전 설정: 최대 3개의 카메라 사전
설정 위치를 설정할 수 있습니다. 먼저 리
모컨을 사용하여 카메라 위치를 설정한 다
음, 카메라 사전 설정 버튼 중 하나를 3초 동
안 눌러 해당 위치를 저장합니다. 사전 설
정 버튼을 한 번 누르면 언제든지 정의된 위
치로 돌아갈 수 있습니다.
사전 설정 1을 사용자가 정의한 “홈” 위치
로 사용합니다. 카메라가 PC에 다시 연결
되면 사전 설정 1에 지정된 위치로 돌아갑
니다. 사전 설정 1에 대해 지정된 위치가
없으면 카메라가 기본 홈 위치로 돌아갑
니다.
기본적으로 3개 사전 설정 모두 맨 처음의
홈으로 설정됩니다.
• 파엔드 컨트롤: 이 키를 선택하고
www.logitech.com/support/ptz에서 응용 프
로그램을 다운로드하면, 지원되는 응용 프
로그램에서 모든 로지텍 ConferenceCam 제
품 또는 C930e 웹캠의 상하이동, 기울기 및
확대/축소를 제어할 수 있습니다. 카메라
선택과 상하이동, 기울기 및 확대/축소 도
구는 다운로드 가능한 PC용 응용 프로그
램에서 사용할 수 있으며, 이 기능을 로컬
로 비활성화할 수도 있습니다. 자세한 내
용은 나열된 다운로드 페이지를 참조하십
시오.
Page 17

Logitech PTZ Pro Camera
한국어 17
카메라 장착 리모컨 배터리 바꾸기
PTZ Pro 리모컨은 리튬 이온 CR2032 배터
리로 실행됩니다. 배터리 수명은 사용법에
따라 달라집니다.
문제 해결 팁
문제 해결 팁, 소프트웨어 도구 정보 및 PTZ
Pro에서 발생할 수 있는 문제 해결에 도움이
되는 진단 도구는 www.logitech.com/support/
ptz를 참조하십시오.
x2
Page 18

Logitech PTZ Pro Camera
18
Page 19

Logitech PTZ Pro Camera
19
Page 20

© 2014 Logitech. All rights reserved. Logitech, the Logitech logo, and other Logitech marks are owned by Logitech
and may be registered. Microsoft, Windows Vista, Windows, and the Windows logo are trademarks of the Microsoft group
of companies. Bluetooth is a registered trademark of Bluetooth SIG, Inc. All other trademarks are the property of their
respective owners. Logitech assumes no responsibility for any errors that may appear in this manual. Information contained
herein is subject to change without notice.
620-006477.002
www.logitech.com
 Loading...