

Page 1
Setup Guide
Logitech® HD Pro Webcam C920
设置指南
罗技® 高清网络摄像头 Pro C920
Page 2

Logitech® HD Pro Webcam C920
Contents
English 3
简体中文 13
www.logitech.com/support 23
2
Page 3
Logitech® HD Pro Webcam C920
1
2
3
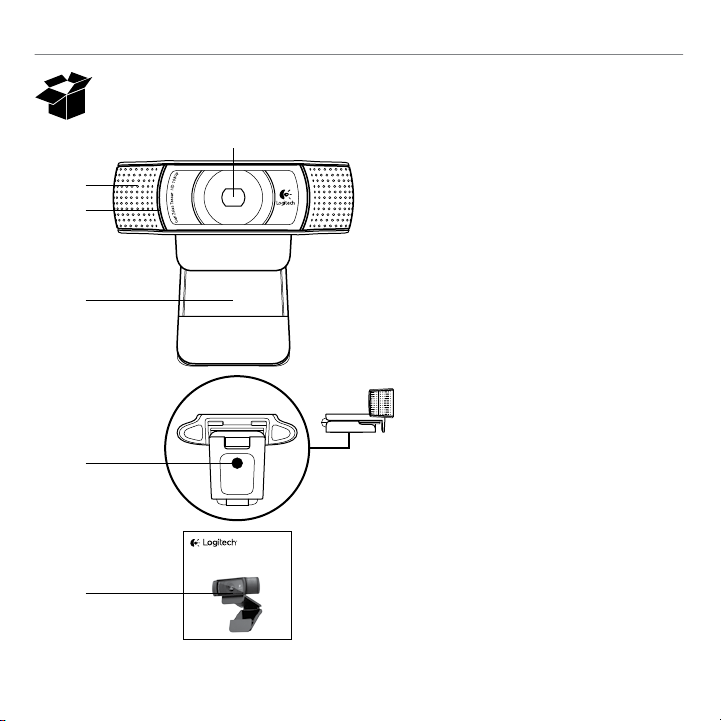
Features
1. Carl Zeiss® autofocus HD 1080p lens
2. Microphone
3. Activity light
4. Flexible clip/base
5. Tripod attachment
6. Product documentation
4
5
Setup Guide
Logitech® HD Pro Webcam C920
设置指南
罗技® 高清网络摄像头 Pro C920
6
English 3
Page 4
Logitech® HD Pro Webcam C920
1 2 3
Thank you for buying your C920!
Use this guide to set up your Logitech webcam
and to begin making video calls.
If you have questions before you start, please visit
the websites listed below to learn more about
Logitech webcams and video calling.
www.logitech.com/support
www.logitech.com/webcam_howto
www.logitech.com/whatisvid
www.logitech.com
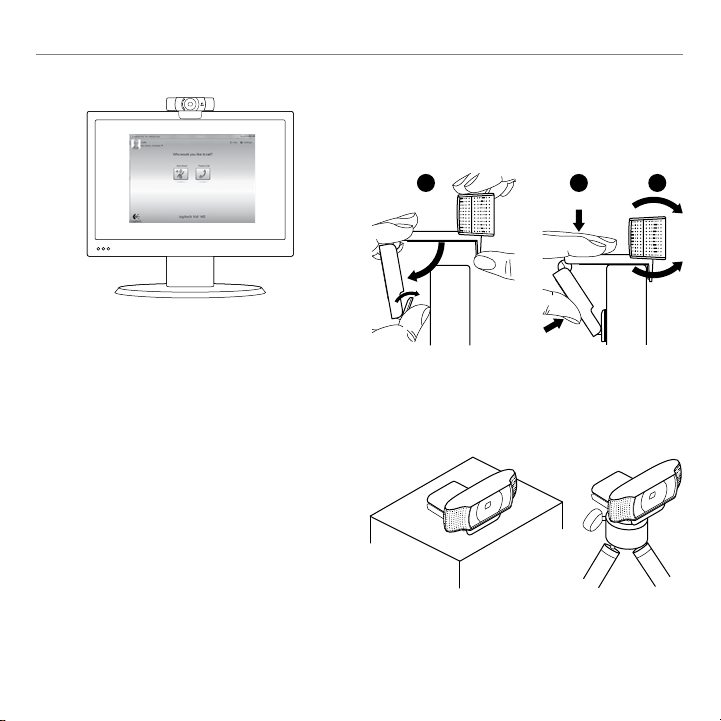
Setting up your webcam
1 Place your webcam
Designed for the way you like to make a video call,
place the Webcam C920 where you want it—on
a computer monitor, desktop, or tripod.
For placement on a monitor
Grasp the webcam as shown and open the flexible/
clip base with your other hand. Mount the webcam,
making sure the foot on the flexible/clip base is
flush with the back of your monitor.
4 English
Page 5

Logitech® HD Pro Webcam C920
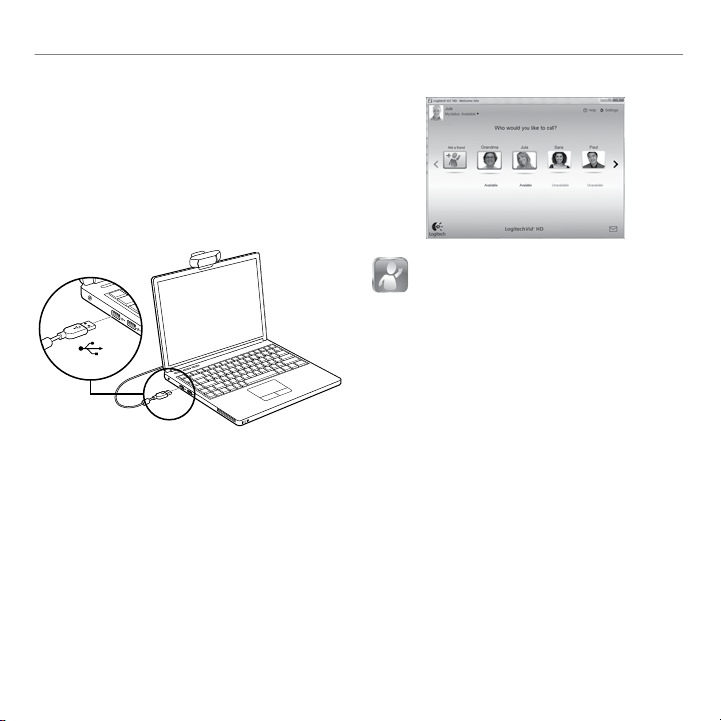
2 Install the software
To get started, you will need to download and
install the Logitech Webcam Software. Make sure
your computer has access to the internet.
For Windows XP, Windows Vista
or Window 7:
Visit www.logitech.com/LWS to download
your webcam software. Choose your operating
system and then follow the on-screen prompts
to download and install the software.
Connect your webcam when prompted.
USB
For Windows 7:
Plug your webcam into a USB port to automatically
download your software. Follow the on-screen
prompts to download and install your software.
Tip: After downloading, if the installation does not begin
automatically, locate the LWS file in the Download folder
on your computer. Double-click to begin the installation.
Getting started with video calling
Your webcam comes with Logitech
Vid™ HD
With Logitech Vid HD, video calling live over
the Internet takes only a few, easy steps:
• Install Logitech Vid HD
• Create an account
• Add a friend and make a video call
Learn more:
http://www.logitech.com/whatisvid
For a 1080p calling experience, download and
install Skype 5.7 from www.skype.com.
English 5
Page 6

Logitech® HD Pro Webcam C920
Setting up LogitechVidHD
1 Install Logitech Vid HD
Tip: If you prefer another video-calling application,
you will need to download and install third-party
software.
Learn more:
http://www.logitech.com/webcam_howto
2 Create an account
Follow the on-screen instructions to create
your Logitech Vid HD account and to set up
your webcam for video calling.
To make video calls with any application,
both you and the person you call must have:
• A webcam
• A computer with speakers and a microphone
(or a headset with a microphone; many Logitech
webcams have a built-in microphone)
• A broadband Internet connection
(e.g., DSL, T1, or cable)
• The same video-calling application
(e.g., Logitech Vid HD)
• Video calling accounts
6 English
Page 7
Logitech® HD Pro Webcam C920
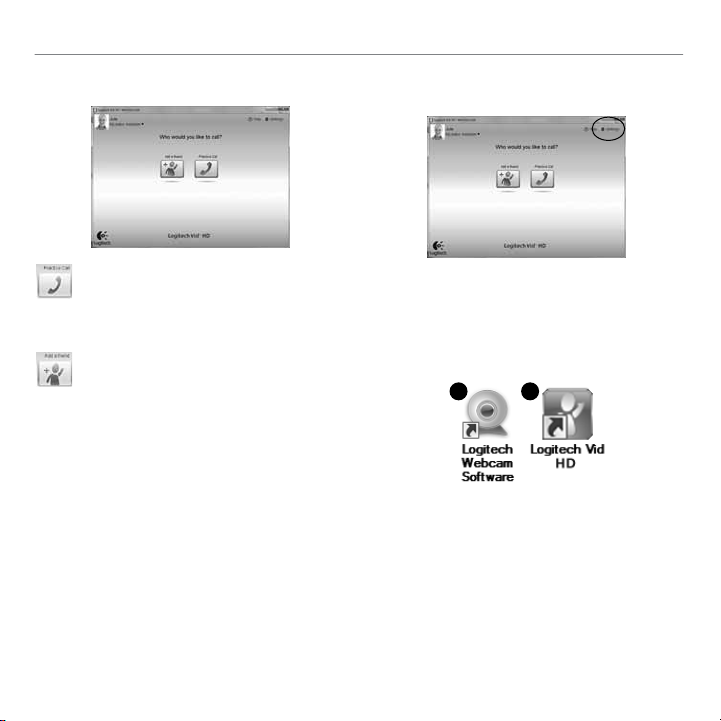
3 Add a friend or make a practice call
Click on the Practice Call tile to test
your settings.
Tip: The Practice Call tile is always available
on your Contact List so you can test
your settings.
To add a friend, click on the Add a Friend
tile and enter your friend’s e-mail when
prompted.
After your friend has accepted your invitation,
click on your friend’s picture to make a call.
Accessing account settings and
starting applications
Logitech automatically detects and adjusts the
best settings for your webcam. If you would like
to re-take your profile picture or update any of
your settings, click the Settings icon.
Double-click the icons on your desktop to launch
your applications.
1 2
1. Logitech Webcam Software
2. Logitech Vid HD
Tip: The Logitech Vid HD icon is only present
if you chose to install Logitech Vid HD. To learn
about third-party video calling, please visit:
www.logitech.com/webcam_howto
English 7
Page 8
Logitech® HD Pro Webcam C920
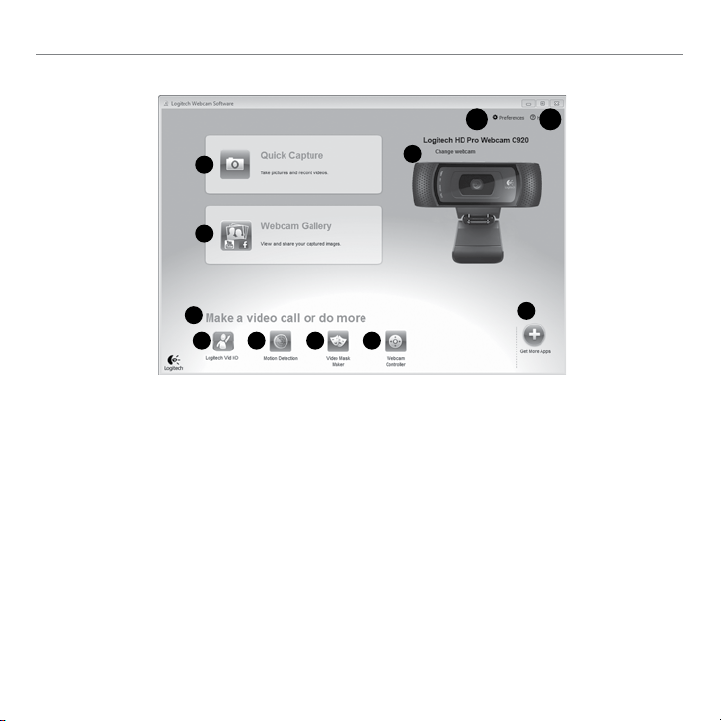
Navigating the Logitech Webcam Software
10 11
1
2
3
4 5 6 7
1. Capture pictures and videos
2. View captured images and share via e-mail,
Facebook,® or YouTube®. Registration may be
required.
3. An area for easy access to your installed
webcam related applications
4. Launch Logitech Vid HD (if installed)
5. Capture videos triggered by detected motion
6. Create your own custom video mask
(for webcams that support this feature)
8 English
9
8
7. Control your video eects and webcam while
on a video call
8. Download additional webcam applications
9. Change webcams (when you have more
than one)
10. Open Logitech Webcam Software settings
11. Open help dashboard (manuals and
how-to videos)
Page 9

Logitech® HD Pro Webcam C920
Capturing video and snapping
pictures
1
2
6 7
Quick Capture allows you to take photos or record
videos easily.
You have easy access to webcam controls
and settings as well as video eects to personalize
your images and recordings.
1. Preview window
2. Capture mode: photo/video
3. Capture button
4. Webcam controls
5. Video eects and fun filters
6. Photo thumbnails
7. Video thumbnails
8. Click a thumbnail to enter the gallery
3
4 5
8
Viewing and sharing using the
Gallery
3
4
5
6
7
2
1
Clicking on an image thumbnail in the gallery (1)
opens the video or photo in the review window (2).
• Attach a video or picture file to an e-mail (3)
• Edit a photo or splice together video (4)
• Upload a picture or video to Facebook (5)
• Upload a video to Twitter (6)
• Upload a video to YouTube (7)
You may also drag and drop a gallery image onto
one of the function tiles (items 3–7) to launch
an editing application or to attach or upload.
Registration may required for applications.
Additional software required for Twitter.
English 9
Page 10

Logitech® HD Pro Webcam C920
Using motion detection
• Set up your webcam to record video when
it detects movement.
• Adjust captured video duration and detection
sensitivity.
• Captured video is automatically saved to
your computer.
• View content in the Gallery or upload it
using the One-touch Upload window.
Personalizing videos and pictures
Your webcam oers Video Eects™, including
avatars, face accessories (mustache, glasses, hats,
etc.), fun filters, and video masks.
Want to create your own video mask? Simply open
the Video Mask Maker on the Main Menu and follow
the on-screen instructions.
Note that when you use video eects during
video recording, your webcam uses an MJPEG
compression format. MJPEG-compressed files
may take longer to upload than H.264 files.
10 English
Page 11

Fine tuning your webcam
duringavideo call
2
3
4
Logitech® HD Pro Webcam C920
6. Enjoy clear conversations without annoying
background noise.
1
7. Correct for poor lighting environments using
RightLight.
8. Choose between auto- or manual focus.
9. Adjust the advanced settings for your webcam.
Get more applications
foryourwebcam
5
6
7
8
9
1. Launch the webcam controller when on
a video call.
2. Hide your video image with a photo while
your webcam stays connected.
3. Use pan and tilt to find the best angle.
4. Zoom in or out to include/exclude
your surroundings.
5. Use Follow my face so you’re always in
the picture.
Download and install additional applications for
your webcam, like video calling, photo and video
editing, and other value-added programs.
English 11
Page 12

Logitech® HD Pro Webcam C920
Getting help
Click on the help icon to access a complete
user manual, or watch how-to videos
that show you how to get the most out
of your Logitech webcam and software.
Tip: If you are not sure about a feature, click
the help icon, and our manual will open to
the right place.
12 English
Page 13

罗技® HD Pro Webcam C920
1
2
3
功能
1. 卡尔·蔡司® 自动对焦 1080p
高清镜头
2. 麦克风
3. 活动指示灯
4. 可调式通用夹/底座
5. 三角架附件
6. 产品文档
4
5
c920
Getting started with
Logitech® HD Pro Webcam C920
6
简体中文 13
Page 14

罗技® HD Pro Webcam C920
感谢您购买 C920!
使用本指南设置网络摄像头,开始进行视频通话。
如果您在安装前仍有疑问,请访问下列网站以了解
更多有关罗技网络摄像头和视频通话的信息。
www.logitech.com/support
www.logitech.com/webcam_howto
www.logitech.com/whatisvid
www.logitech.com
设置网络摄像头
1 放置网络摄像头
网络摄像头 Webcam C920 让您可根据自己的
喜好进行视频通话,可以将它放置于电脑显示器、
桌面或三角架等任何位置。
1 2 3
放置于显示器上
如图所示,握住网络摄像头,并用另一只手打开可
调式/通用夹底座。装上网络摄像头,确保可调式/
通用夹底座的底部与显示器背面齐平。
14 简体中文
Page 15
罗技® HD Pro Webcam C920
2 安装软件
首先,需要下载并安装罗技网络摄像头软件。
确保您的计算机能够访问互联网。
对于 Windows XP、Windows Vista
或 Window 7:
请访问 www.logitech.com/LWS 下载网络摄
像头软件。 选择您的操作系统,然后按照屏幕上
的提示下载并安装软件。
根据提示,连接网络摄像头。
USB
对于 Windows 7:
将网络摄像头连接到 USB 端口以自动下载软件。
按照屏幕上的提示下载并安装软件。
提示:下载完毕后,如果软件无法自动开始安装,在计算机
的下载文件夹中找到 LWS 文件。双击文件进行手动安装。
开始进行视频通话
本网络摄像头带有 Logitech Vid™ HD
使用 Logitech Vid HD,只需一些简单步
骤就可通过 互联网实时进行视频通话:
• 安装 Logitech Vid HD
• 创建一个账户
• 添加好友并进行视频通话
要了解更多信息,请访问:
http://www.logitech.com/whatisvid
登录 www.skype.com 下载并安装 Skype 5.7,
即可畅享 1080p 通话体验。
简体中文 15
Page 16

罗技® HD Pro Webcam C920
设置 Logitech Vid HD
1 安装 Logitech Vid HD
提示:如果您喜欢其他的视频通话应用程序,
则需要下载和安装第三方软件。
要了解更多信息,请访问:
http://www.logitech.com/webcam_howto
2 创建账户
请按照屏幕上的指示创建您的 Logitech Vid HD
账户并为视频通话设置 网络摄像头。
要使用任何应用程序进行视频通话, 您 和与您通
话的人都必须具有:
• 一个网络摄像头
• 带有扬声器和 麦克风的电脑(或带有麦克风的
耳机,许多罗技网络摄像头均带有内置麦克风)
• 宽带互联网连接(例如 DSL、T1 或专线)
• 相同的视频通话应用程序
(例如 Logitech Vid HD)
• 视频通话账户
16 简体中文
Page 17

罗技® HD Pro Webcam C920
3 添加好友或进行通话练习
请单击“练习通话”窗口,对所做 设置进
行测试。
提示:此“练习通话”窗口始终会出现在联
系人列表之中,供您对所做设置进行测试。
要添加好友,请单击“添加一位联系人”
窗口,然后根据提示输入好友的电子邮件。
在朋友接受了您的邀请之后,单击您朋友的
图像即可进行通话。
进入账户设置并启动应用程序
罗技会自动检测并将网络摄像头调整为最佳设置。
如果您希望重新拍摄个人形象照片或更新任何
设置,请单击“设置”图标。
要启动应用程序,请双击桌面上的相应图标。
1 2
1. 罗技网络摄像头软件
2. Logitech Vid HD
提示:只有您选择安装了
Logitech Vid HD,Logitech Vid HD 的图标才
会出现。要了解有关第三方视频通话的更多信息,
请访问:
www.logitech.com/webcam_howto
简体中文 17
Page 18

罗技® HD Pro Webcam C920
罗技网络摄像头软件概览
10 11
1
2
3
4 5 6 7
1. 拍摄照片和视频
2. 查看拍摄的图像,通过电子邮件、Facebook
或 YouTube® 进行分享。可能需要注册。
3. 此区域用于轻松访问已安装的网络摄像头相
关应用程序
4. 启动 Logitech Vid HD(如果已安装)
5. 检测到动作后进行视频拍摄
6. 创建自己的视频面具
(适用于支持该功能的网络摄像头)
7. 在进行视频通话时控制视频特效和网络摄像头
18 简体中文
9
8
8. 下载其他网络摄像头应用程序
®
9. 更改网络摄像头(当您拥有不止一个时)
10. 打开罗技网络摄像头软件设置
11. 打开帮助面板(用户手册和
操作说明视频)
Page 19

罗技® HD Pro Webcam C920
拍摄视频和照片
1
2
6 7
“快速拍摄”让您可以轻松地拍摄照片或
录制视频。
您可轻松使用网络摄像头的控键,调整设置,
并更改视频特效,让图像和录制的视频更有个性。
1. 预览窗口
2. 拍摄模式:照片/视频
3. 拍摄按钮
4. 网络摄像头控键
5. 视频特效和 趣味滤镜
6. 照片缩略图
7. 视频缩略图
8. 单击缩略图以 进入图库
3
4 5
8
使用图库进行查看和分享
3
4
5
6
7
2
1
点击图库 (1) 中的图像缩略图可在预览窗口 (2)
中打开该视频或照片。
• 将视频或照片文件以附件形式添加至电子
邮件 (3)
• 编辑照片或拼接视频 (4)
• 上传照片或视频至 Facebook (5)
• 上传视频至 Twitter (6)
• 上传视频至 YouTube (7)
您也可以将图库图像拖放至其中一项功能的窗口上
(3-7 项)以启动编辑应用程序,添加附件或进行
上传。应用程序可能需要注册。Twitter 需要安装
附加软件。
简体中文 19
Page 20

罗技® HD Pro Webcam C920
使用运动检测
• 将网络摄像头设置为当其 检测到运动时开始录
制视频。
• 调整拍摄的视频时间长度和检测灵敏度。
• 拍摄的视频将自动储存至 电脑。
• 查看“图库”中的内容或使用“一键上传”
窗口将其上传。
让视频和照片更有个性
网络摄像头提供视频特效 (Video Effects™),
包括 虚拟人物、面部道具(胡子、眼镜、帽子
等等)、趣味 滤镜以及视频面具。
想要创建自己的视频面具吗?只需在主菜单中
打开 Video Mask Maker,然后按照屏幕上的
说明操作。
请注意,当您在视频录制中使用视频特效时,网络
摄像头将采用 MJPEG 压缩格式。 MJPEG 压缩
文件所需的上传时间可能长于 H.264 文件。
20 简体中文
Page 21

在视频通话中对网络摄像头
进行微调
2
3
4
罗技® HD Pro Webcam C920
6. 享受语音清晰的对话,免受背景噪声的干扰。
7. 使用 RightLight 针对较差的光照环境 进行
1
校正。
8. 选择自动对焦或手动对焦。
9. 调整网络摄像头的高级设置。
获取更多的网络摄像头应用程序
5
6
7
8
9
1. 在视频通话中启动网络摄像头 控制器。
2. 在网络摄像头处于连接状态时使用照片 隐藏视
频图像。
3. 上下左右移动,找到最佳视角。
4. 将镜头拉近或拉远以显示或隐藏 周围环境。
5. 使用面部跟踪确保您一直处于 画面之中。
为网络摄像头下载和安装其他的应用程序,像视频
通话、照片和视频编辑,以及其他增值程序。
简体中文 21
Page 22

罗技® HD Pro Webcam C920
获取帮助
请单击帮助图标查看完整版用户手册,或观
看如何让您充分享用罗技网络摄像头和软件
的操作说明视频。
提示:如果您不了解某一项功能,请单击帮助
图标,手册将打开至所需的地方。
22 简体中文
Page 23

Logitech® HD Pro Webcam C920
www.logitech.com/support
23
Page 24

www.logitech.com
© 2012 Logitech. All rights reserved. Logitech, the Logitech logo, and other Logitech marks are owned by Logitech and may
be registered. Microsoft, Windows, and the Windows logo are trademarks of the Microsoft group of companies. All other
trademarks are the property of their respective owners. Logitech assumes no responsibility for any errors that may appear
in this manual. Information contained herein is subject to change without notice.
© 2012 Logitech。著作权及其他知识产权声明:本产品及其包装与相关手册文件上所印载的「罗技」、
「Logitech」,以及其他由罗技公司创作或发明之图案、文字、软件,其上所存之知识产权或其他权利 (包含但不限于
商标权、著作权、专利权),皆属罗技公司所有并保留一切权利。凡未经合法授权而使用或复制上述罗技权利,将依法
追究。其他非罗技商标,仍由各该商标所有人拥有其权利。罗技对于本手册中可能出现的任何错误不承担任何责任。
本文中包含的信息如有更改,恕不事先通知。
620-003576.003
 Loading...