

Page 1
BRIO ULTRA HD PRO
BUSINESS WEBCAM
Complete Setup Guide | 设置指南 |
完整設定指南 | 설치 가이드 |
Panduan Pemasangan Lengkap
Page 2

CONTENTS
English . . . . . . . . . . . . . . . . .3
简体中文 . . . . . . . . . . . . . . . .9
繁體中文 . . . . . . . . . . . . . . . 15
한국어 . . . . . . . . . . . . . . . . 21
Indonesia . . . . . . . . . . . . . . . 27
Page 3

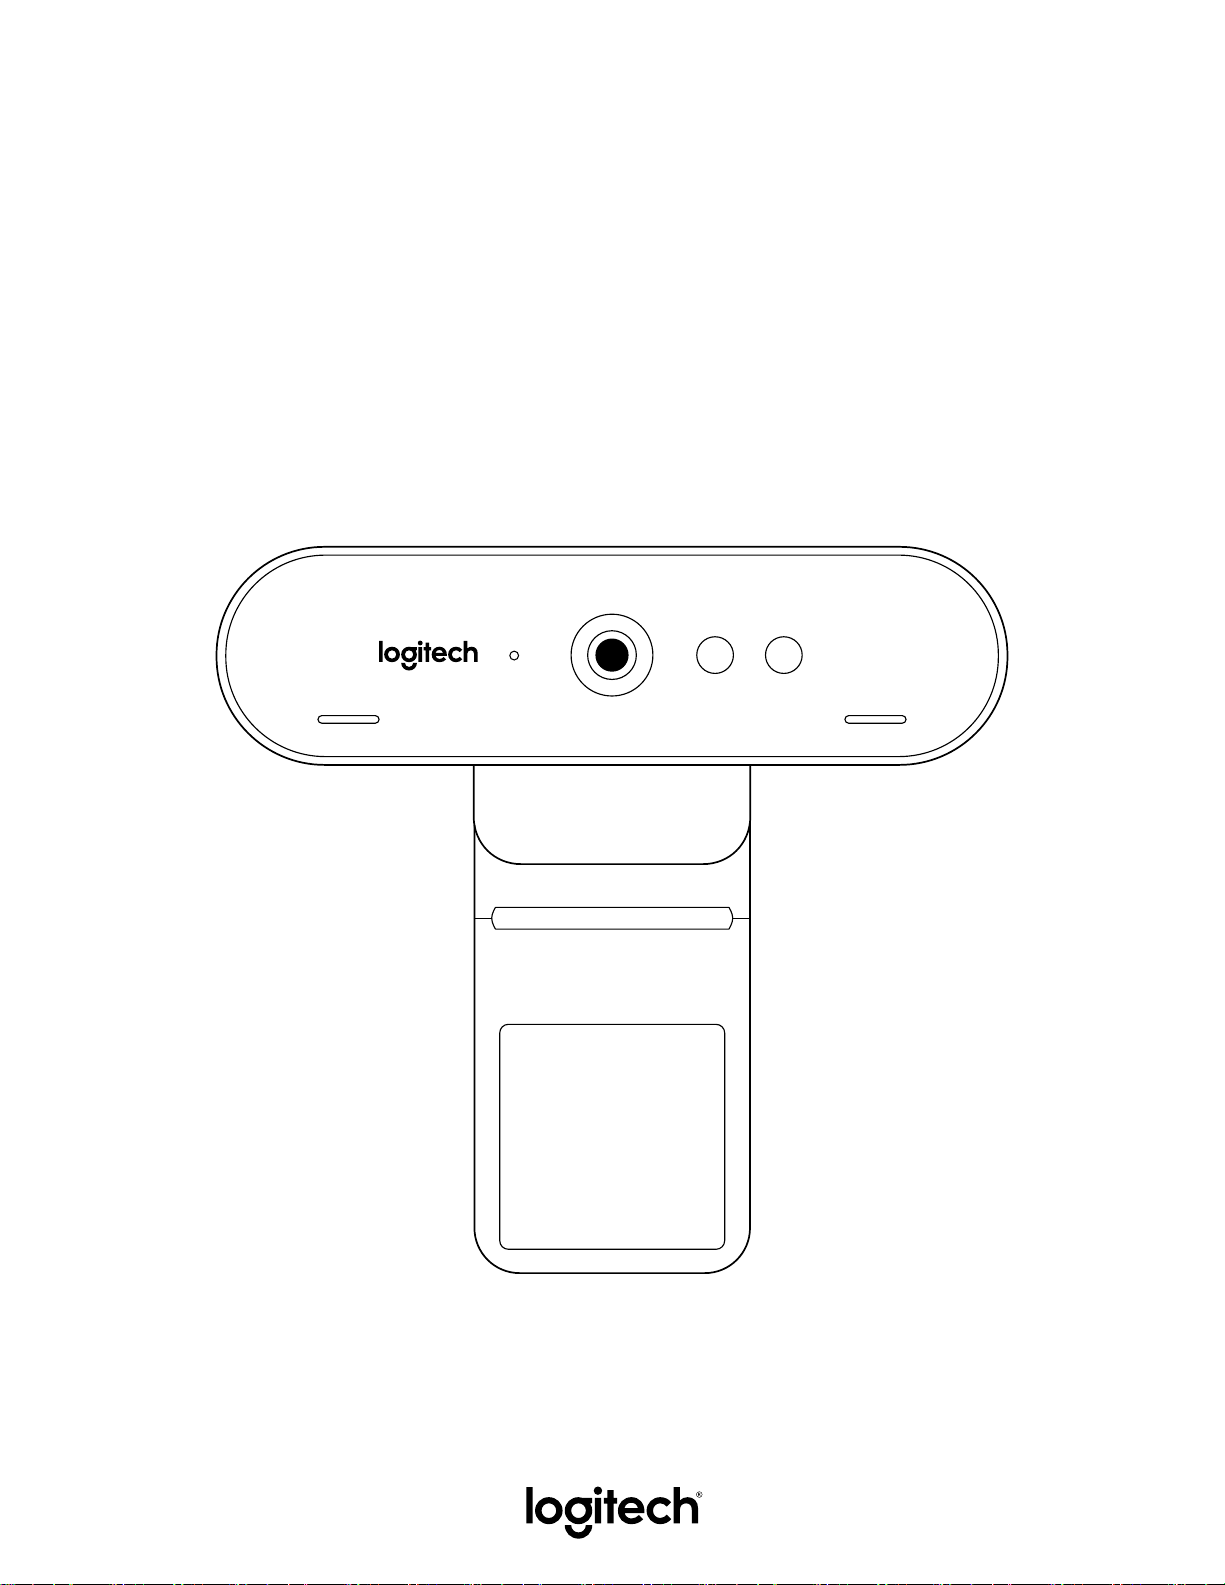
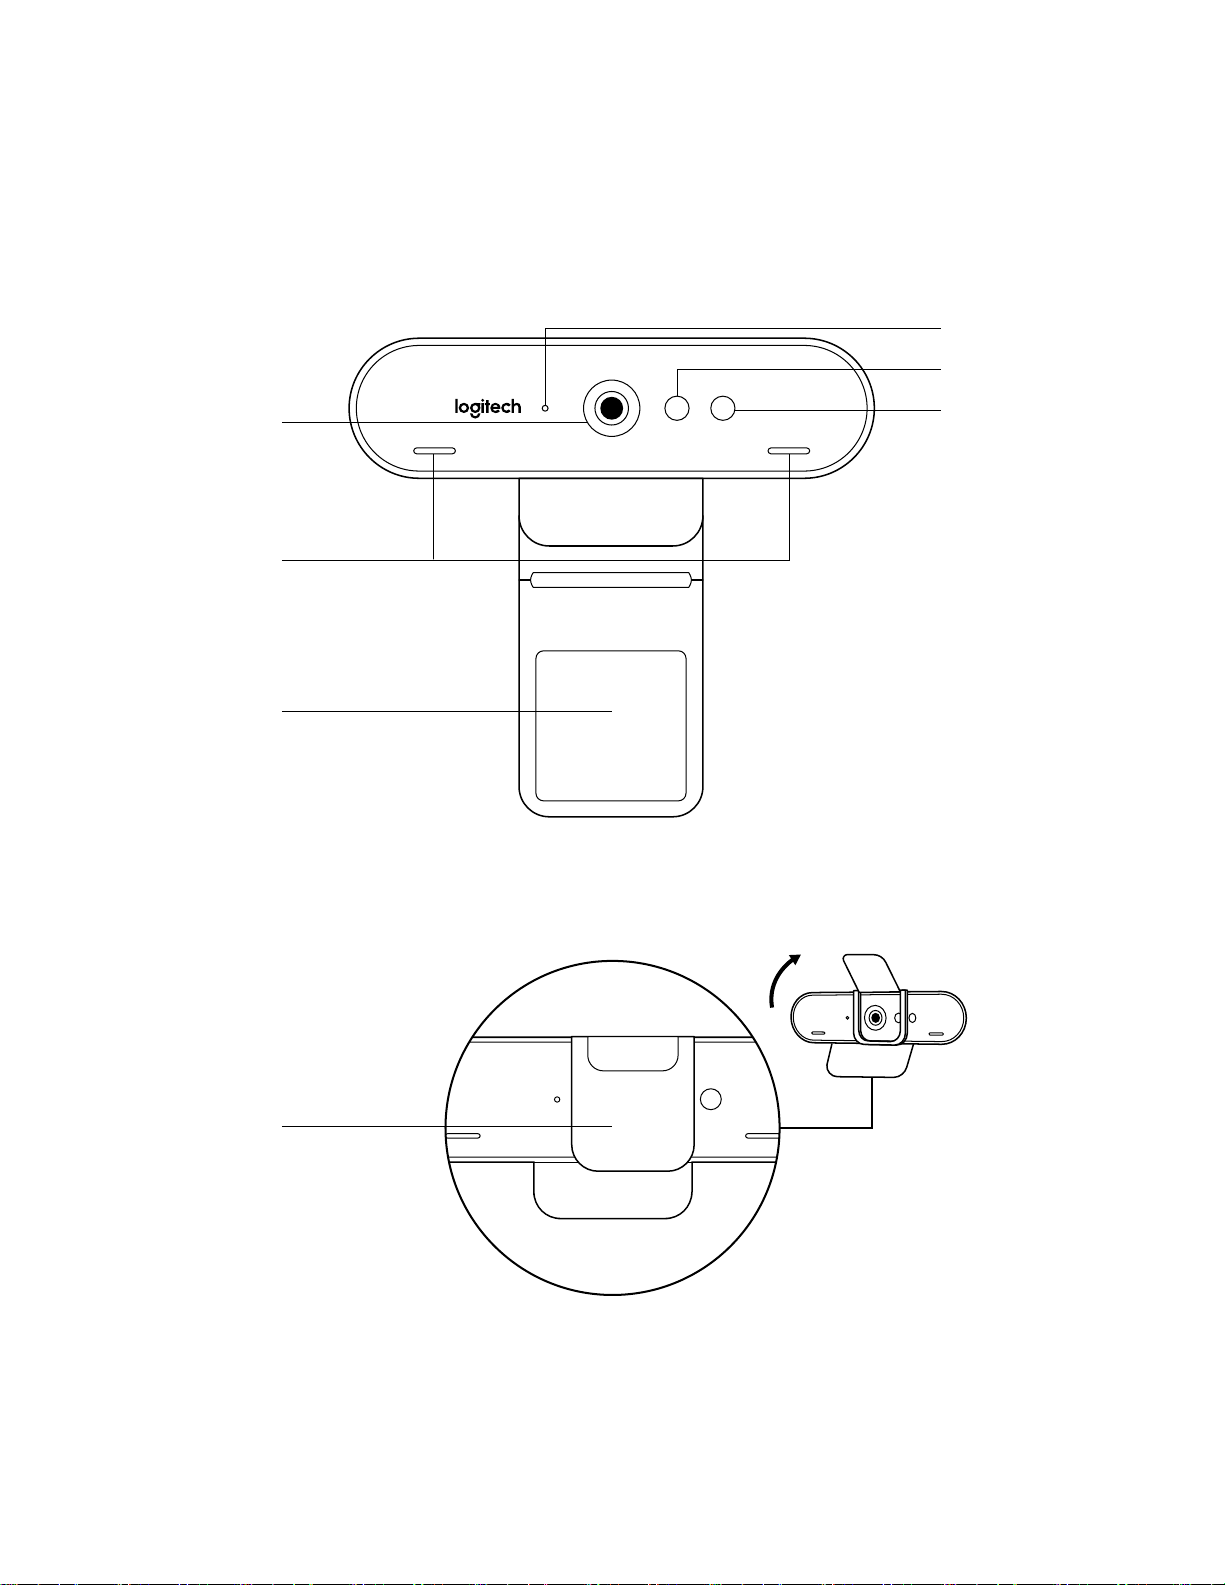
KNOW YOUR PRODUCT
LED activity light
IR sensor
Autofocus 4K
UltraHD lens
Dual microphone
Detachable
universal
mountingclip
IR LED
Attachable
privacy shutter
3 English
Page 4
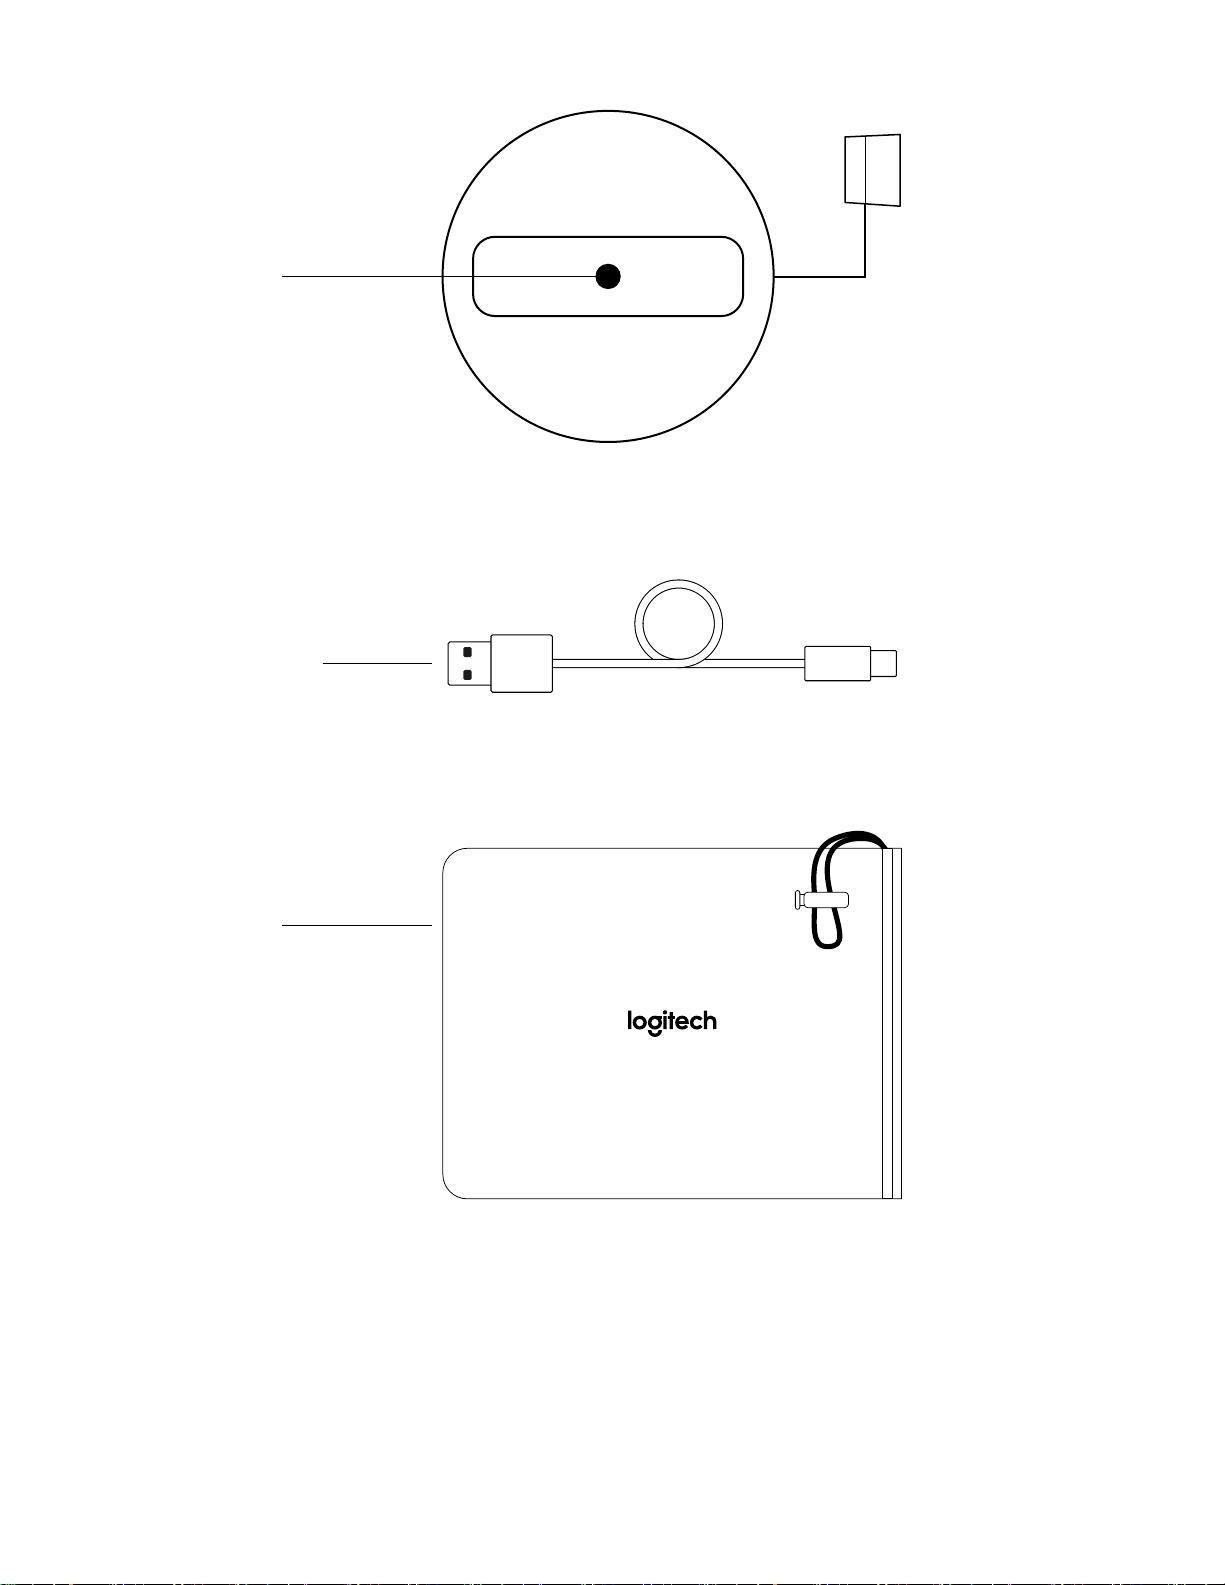
Tripod thread*
* Tripod not included
Detachable USB-A cable
(USB 2.0 or 3.0)
Type C compatible
Travel bag
4 English
Page 5
WHAT’S IN THE BOX
1 Webcam with detachable universal mounting clip
(onwebcam)
2 External privacy shutter
3 Carrying case
4 7.2 ft (2.2 m) USB-A to USB-C cable (USB 2.0 or 3.0)
5 User documentation
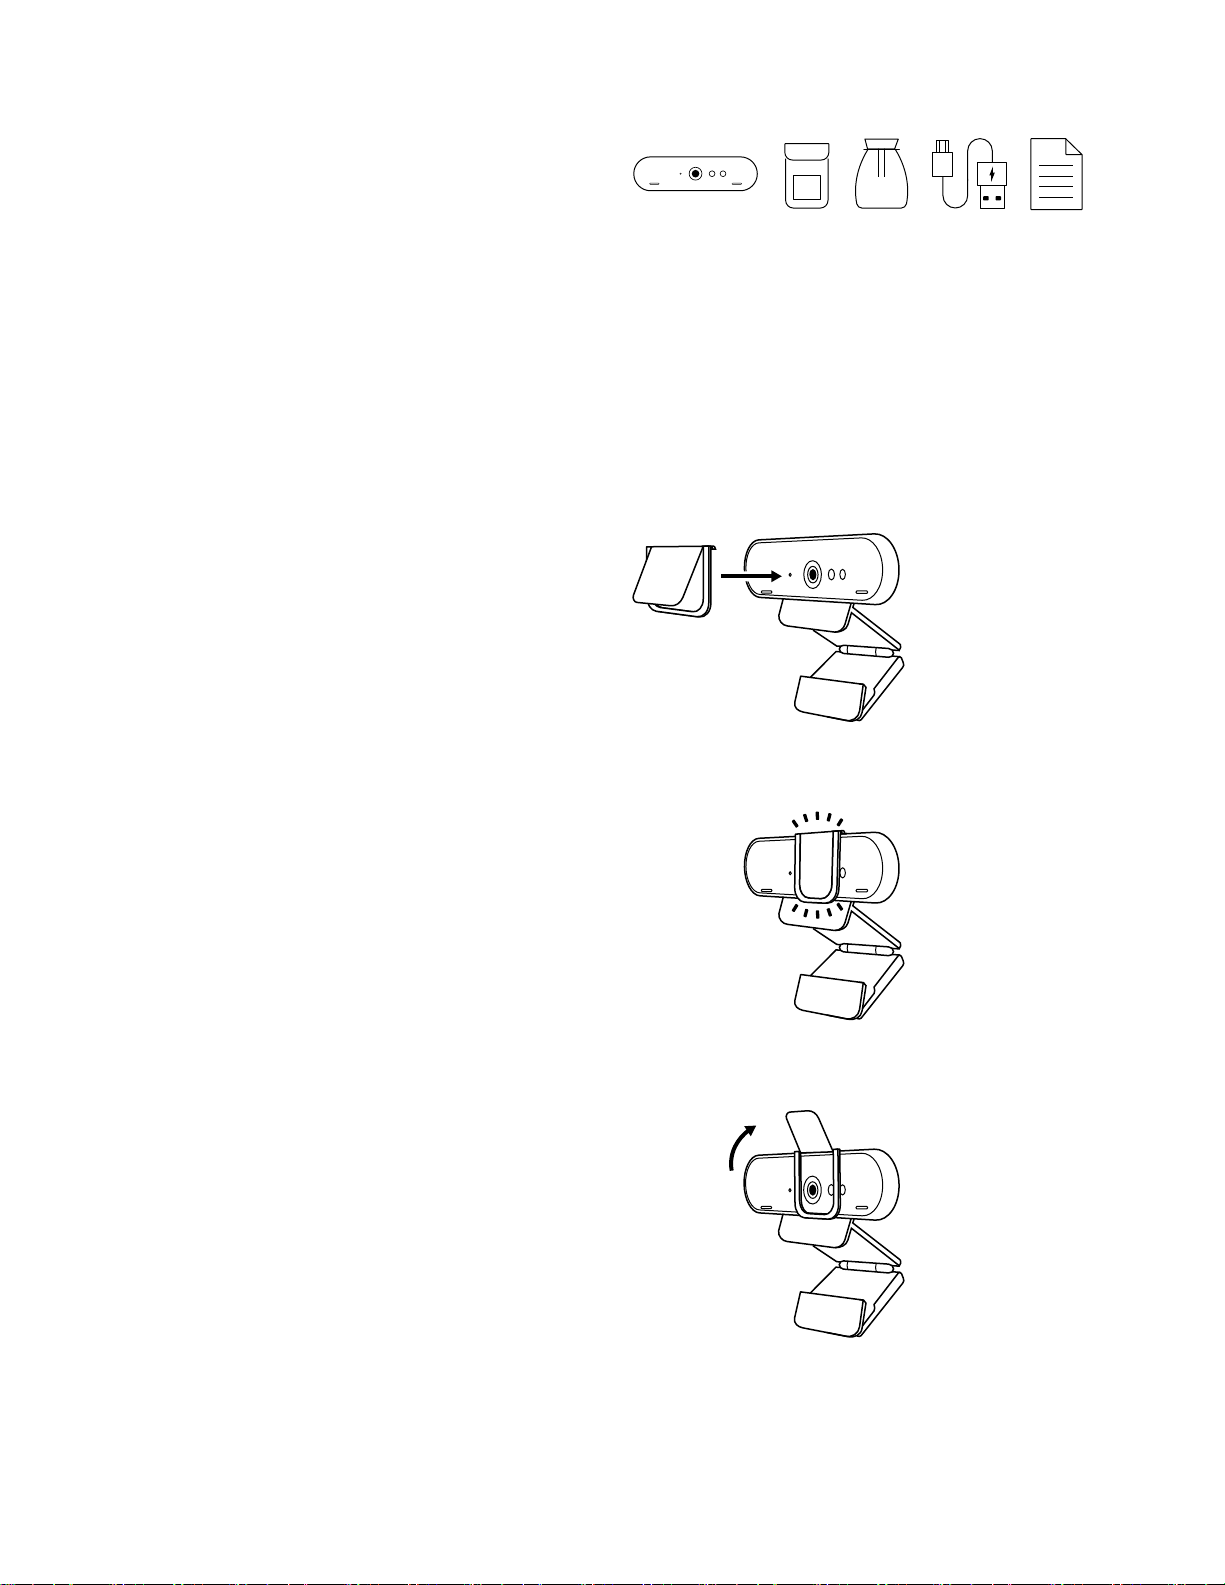
ATTACH THE PRIVACY SHUTTER
1 Attach the privacy shutter over the lens
onthewebcam as shown.
2 Snap it onto the front of the webcam,
directlyoverthe center.
3 Manually adjust the privacy shutter to open
orcloseas desired.
5 English
Page 6
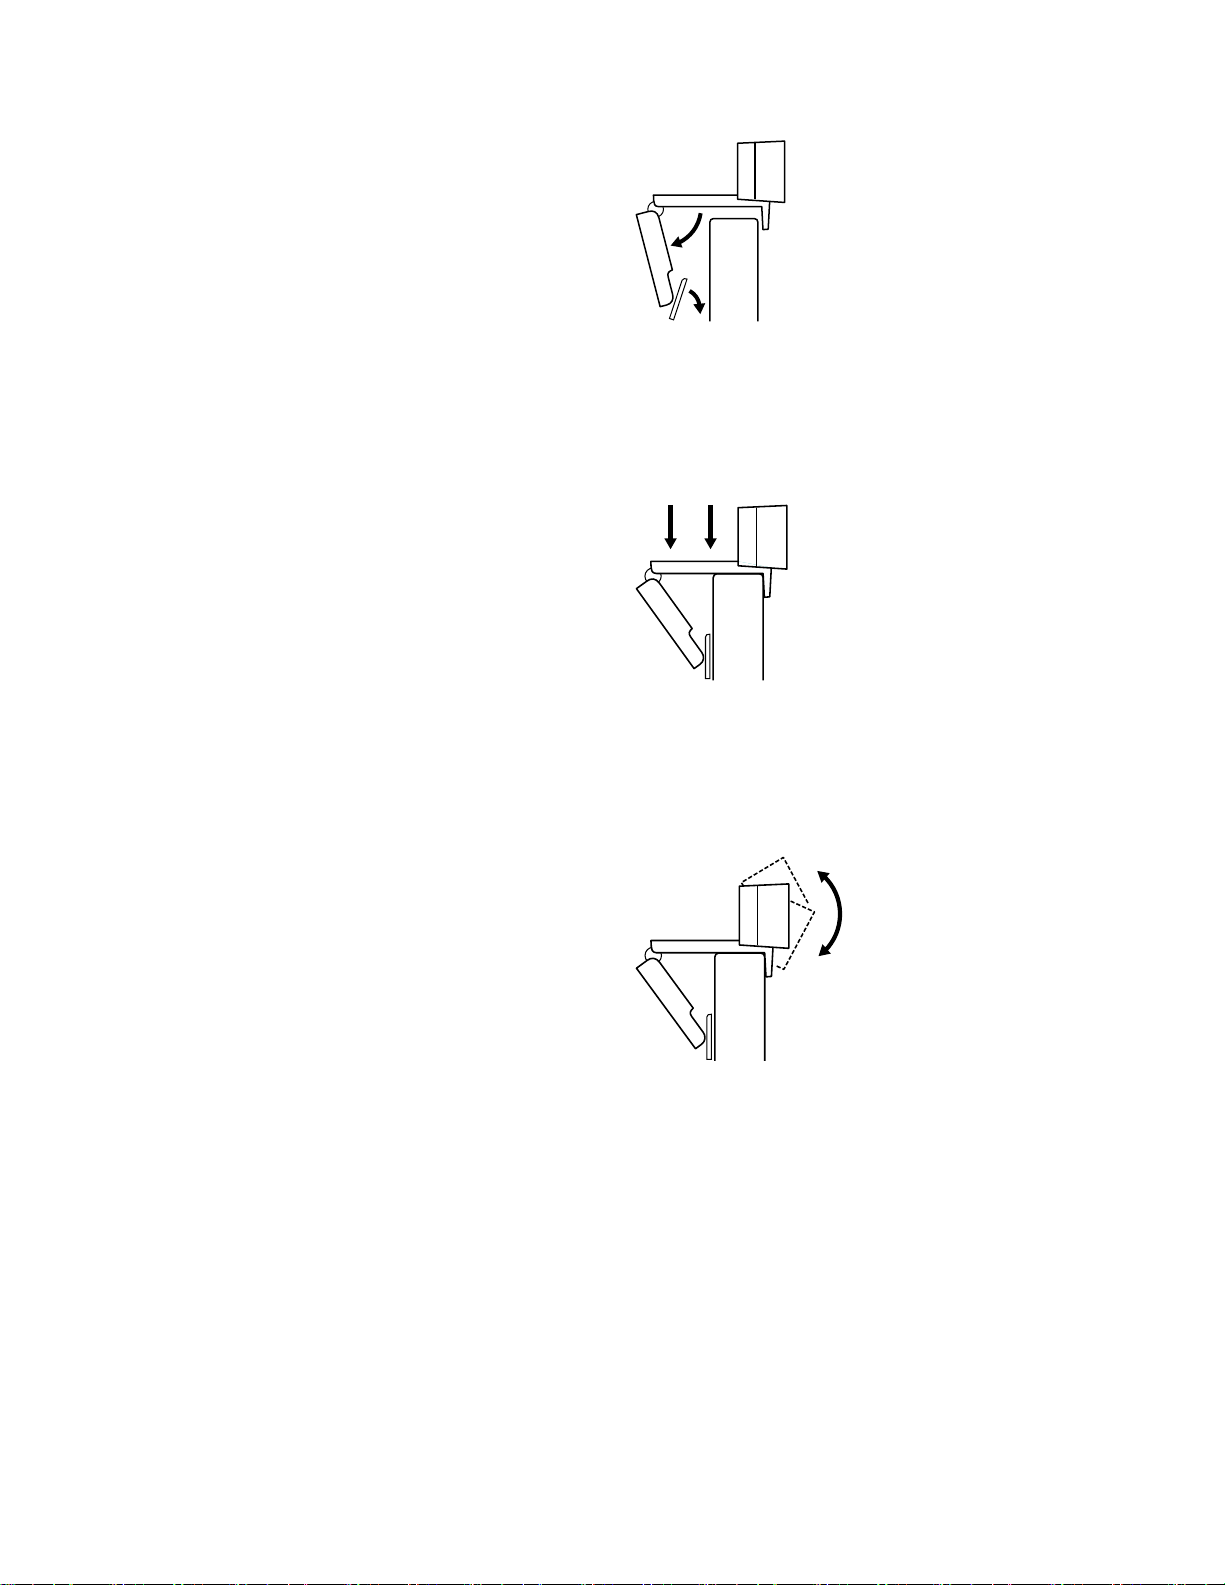
SETTING UP THE WEBCAM
For placement on a monitor
1 Place your webcam on a computer, laptop or monitor
at a position or angle you desire.
2 Adjust the webcam to make sure the foot on
theuniversal mounting clip is ush with the back
ofyour device.
3 Manually adjust the webcam up/down to the best
position to frame yourself.
6 English
Page 7

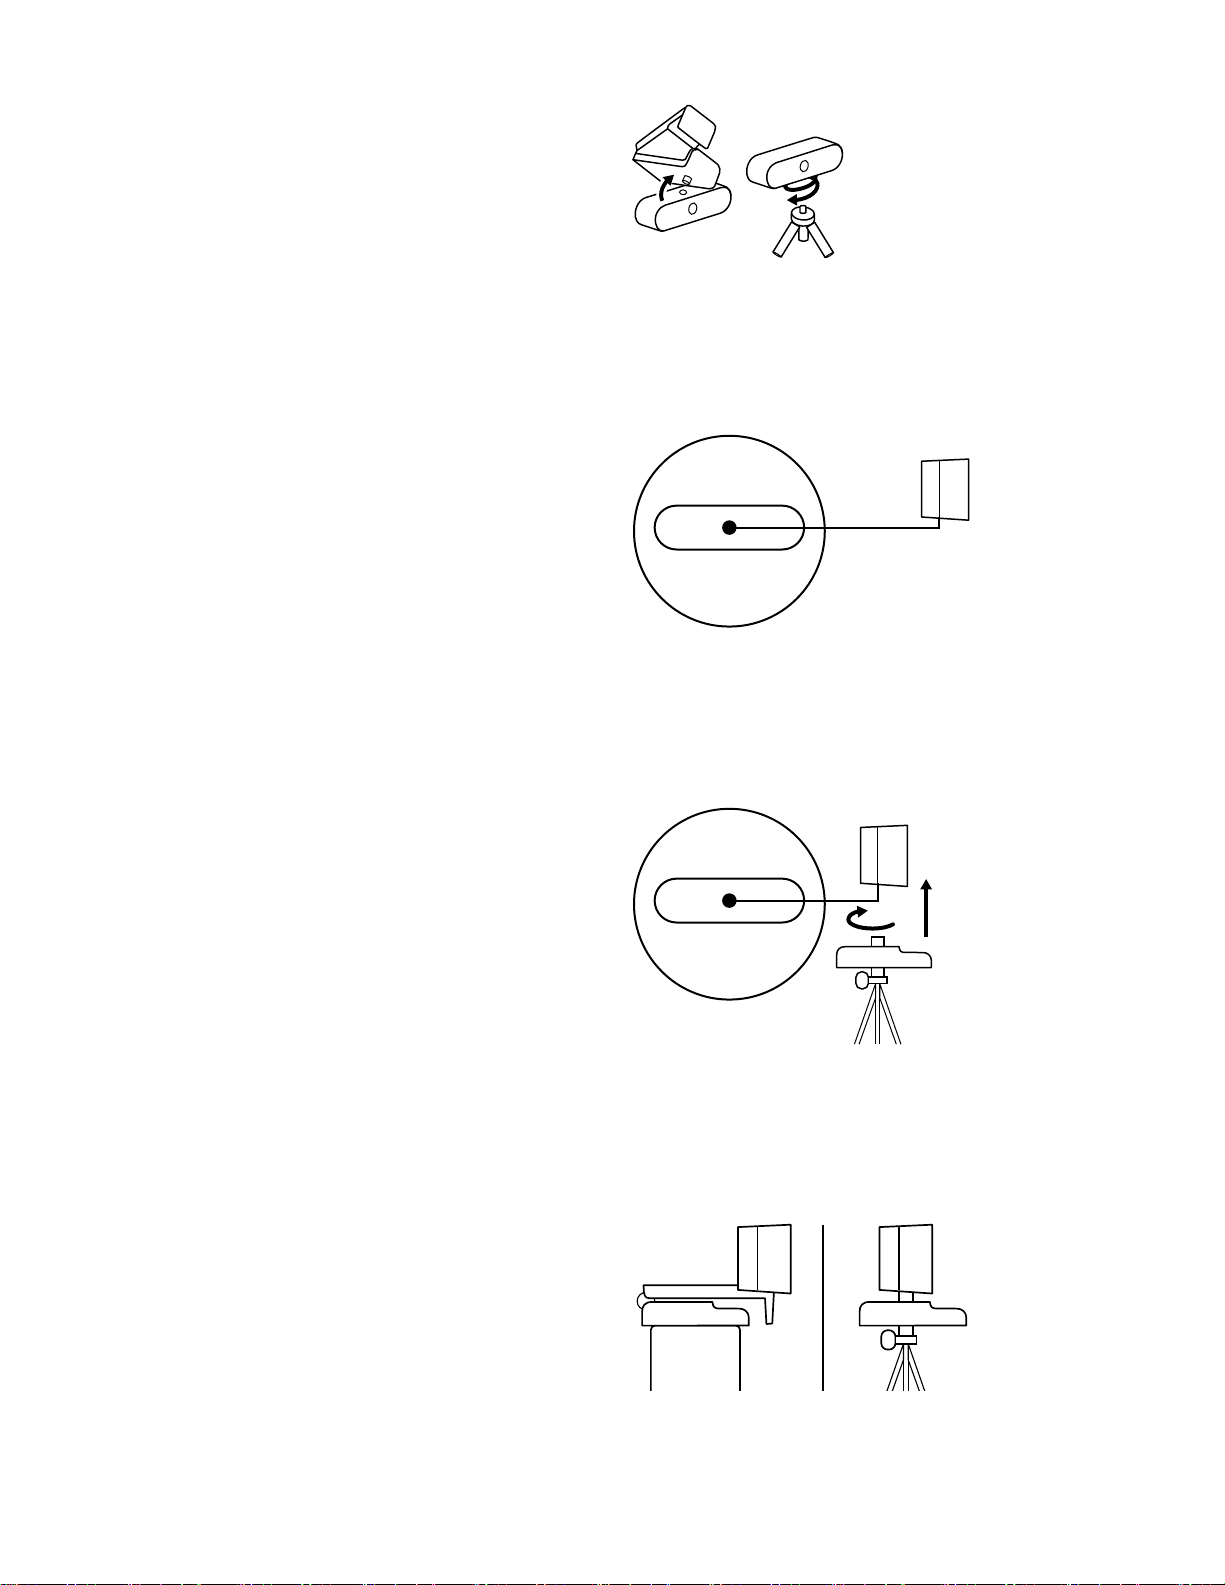
For placement on a tripod*
1 Remove the detachable universal mounting clip
fromthe webcam.
2 Locate the ¼ inch tripod thread on the bottom
ofthewebcam.
3 Secure the webcam on your tripod by twisting it
intothe ¼ inch thread.
4 Place your webcam with the tripod anywhere
youdesire to the best position to frame yourself.
* Tripod not included
7 English
Page 8
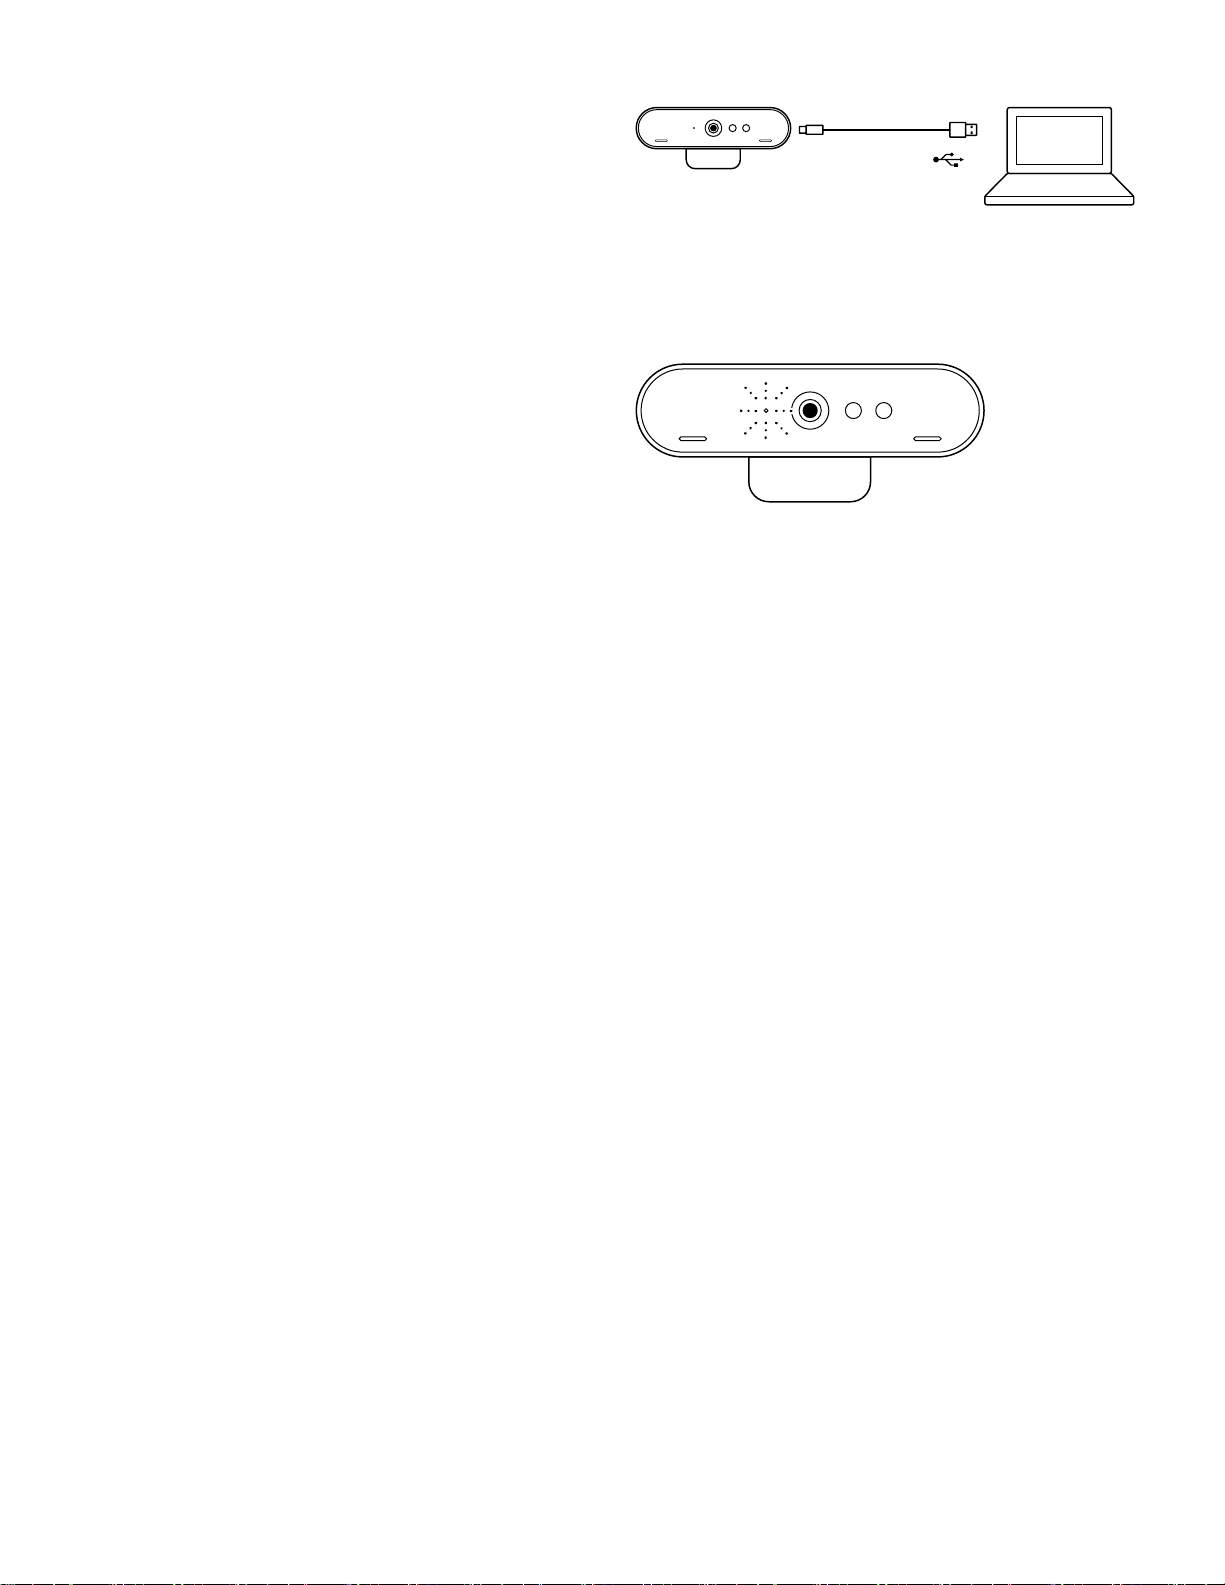
CONNECTING THE WEBCAM VIA USB-A
Plug the USB-C end into the webcam and the USB-A
connector into the USB-A port on your computer.
SUCCESSFUL CONNECTION
LED activity light will light up when the webcam
isinuseby an application.
DIMENSIONS
USB 2.0
USB 3.0
WEBCAM:
Height x Width x Depth:
1.06 in (27 mm) x 4.02 in (102 mm) x 1.04 in (27 mm)
Cable Length: 7.2 ft (2.2 m)
Weight: 2.22 oz (63 g)
ATTACHABLE MOUNTING CLIP:
Height x Width x Depth:
0.75 in (19 mm) x 1.42 in (36 mm) x 2.48 in (63 mm)
Weight: 1.55 oz (44 g)
www.logitech.com/support/brio
© 2020 Logitech. Logitech, Logi, 罗技 and the Logitech Logo are trademarks or registered
trademarks of Logitech Europe S.A. and/or its aliates in the U.S. and other countries.
Logitechassumes noresponsibility for any errors that may appear in thismanual.
Informationcontained herein issubject to change without notice.
Page 9
了解您的产品
LED 活动指示灯
IR 传感器
自动对焦 4K 超高清
镜头
双麦克风
可拆卸通用安装夹
IR LED
可拆卸
隐私镜头盖
9 简体中文
Page 10

三脚架安装螺纹*
*三脚架需另购
可拆卸 USB-A 线缆
(USB 2.0 或 3.0)
兼容 Type C
便携包
10 简体中文
Page 11

包装内容
1 网络摄像头,配可拆卸通用安装夹(随附于网络摄像头上)
2 外置隐私镜头盖
3 收纳盒
4 约 2.2 米 USB-A 至 USB-C 线缆(USB 2.0 或 3.0)
5 用户文档
安装隐私镜头盖
1 如下所示,将隐私镜头盖安装于网络摄像头镜头上。
2 将其卡在网络摄像头的中央正上方。
3 手动调整隐私镜头盖,根据需要打开或关闭。
11 简体中文
Page 12

设置网络摄像头
放置于显示器上
1 将网络摄像头以所需的位置或角度放置在电脑、笔记本
电脑或显示器上。
2 调节网络摄像头,确保通用安装夹支脚与显示器背面齐平。
3 手动将网络摄像头上/下调节至合适的构图位置。
12 简体中文
Page 13

放置于三脚架上*
1 从网络摄像头上卸下可拆卸的通用安装夹。
2 找到网络摄像头底部的 1/4 英寸三脚架安装螺纹。
3 将三脚架拧入 1/4 英寸安装螺纹,将网络摄像头固定于
三脚架上。
4 将网络摄像头和三脚架放置于您想要的合适位置以构图。
*三脚架需另购
13 简体中文
Page 14

通过 USB-A 连接网络摄像头
将 USB-C 端插入网络摄像头,并将 USB-A 接头插入电脑
的 USB-A 端口。
成功连接
当应用程序使用网络摄像头时,LED 活动指示灯将点亮。
规格
USB 2.0
USB 3.0
网络摄像头:
高 x 宽 x 深:
约 27 毫米 x 约 102 毫米 x 约 27 毫米
线缆长度:约 2.2 米
重量:约 63 克
可拆卸通用安装夹:
高 x 宽 x 深:
约 19 毫米 x 约 36 毫米 x 约 63 毫米
重量:约 44 克
www.logitech.com/support/brio
版权所有 ©2020 年罗技。罗技、Logi、Logitech 和罗技标志为 罗技欧洲公司 和/或其美国及其他国家/
地区附属公司的商标,并或已注册。罗技对于本手册中可能出现的任何错误不承担任何责任。本手册中
包含的信息如有更改,恕不事先通知。
Page 15

瞭解您的產品
LED 活動指示燈
IR 感應器
自動對焦 4K Ultra
HD 鏡頭
雙麥克風
可拆卸通用安裝夾具
IR LED 指示燈
可拆卸
隱私遮罩
15 English
Page 16

三腳架螺紋*
* 未隨附三腳架
可拆卸 USB-A 連接線
(USB 2.0 或 3.0)
相容於 Type C
攜行袋
16 English
Page 17

包裝內容
1 機身具有可拆卸通用安裝夾具的網路攝影機
2 外接隱私遮罩
3 攜帶盒
4 2.2 公尺 ( 7. 2 英呎) USB-A 轉 USB-C 連接線 (USB 2.0
或 3.0)
5 使用者文件
裝上隱私遮罩
1 在攝影機鏡頭上裝上隱私遮罩,如圖所示。
2 將其裝在網路攝影機前方正中間上方的位置。
3 在需要時手動調整隱私遮罩開啟或關閉。
17 English
Page 18

設定網路攝影機
放在螢幕上
1 將網路攝影機放到電腦、筆記型電腦或顯示器上您要的
位置或角度。
2 調整網路攝影機,確認通用安裝夾的腳架與您的裝置背
面齊平。
3 手動上/下調整網路攝影機,將其調整到對準您取景的最
佳位置。
18 English
Page 19

放在三腳架上*
1 從網路攝影機上取下可拆卸通用安裝夾具。
2 找到位於網路攝影機底部的 1/4 英吋三腳架安裝螺紋。
3 將三腳架轉入 ¼ 英吋螺紋中,使網路攝影機固定在三腳
架上。
4 將網路攝影機連同三腳架放在您想要的、能夠獲得最佳
自拍角度的任何位置。
* 未隨附三腳架
19 English
Page 20

透過 USB-A 連接網路攝影機
將 USB-C 端插入網路攝影機,並將 USB-A 接頭插入您電
腦的 USB-A 連接埠。
成功連接
LED 活動指示燈會在應用程式使用網路攝影機時亮起。
尺寸
USB 2.0
USB 3.0
網路攝影機:
高 x 寬 x 深:
27 公釐 (1.06 英吋) x 102 公釐 (4.02 英吋) x 27 公釐 (1.04 英吋)
連接線長度:2.2 公尺 (7. 2 英呎)
重量:63 公克 (2.22 盎司)
可拆卸安裝夾具:
高 x 寬 x 深:
19 公釐 (0.75 英吋) x 36 公釐 (1.42 英吋) x 63 公釐 (2.48 英吋)
重量:44 公克 (1.55 盎司)
www.logitech.com/support/brio
版權所有 © 2020 年羅技。羅技,Logi,Logitech和羅技標誌為 Logitech Europe S.A. 及/或其附屬公司
在美國和其他國家的商標或註冊商標。羅技對於本手冊中可能出現的任何錯誤不承擔任何責任。本手冊
中包含的資訊如有更改,恕不事前通知。
Page 21

제품 설명
LED 작동 표시등
IR 센서
오토 포커스 4K UHD
렌즈
듀얼 마이크
탈착식 범용 장착
클립
IR LED
부착식
프라이버시 셔터
21 한국어
Page 22

삼각대 나사*
* 삼각대 미포함
탈착식 USB-A 케이블
(USB 2.0 또는 3.0)
Type C 호환
휴대용 가방
22 한국어
Page 23

박스 내용물
1 탈착식 범용 장착 클립이 달린 웹캠(웹캠에 부착)
2 외부 프라이버시 셔터
3 휴대용 케이스
4 2.2m(7.2피트) USB-A to USB-C 케이블(USB 2.0 또는
3.0)
5 사용 설명서
프라이버시 셔터 장착
1 그림과 같이 렌즈 위에 프라이버시 셔터를 장착합니다.
2 웹캠의 전면, 중앙 위에 끼웁니다.
3 프라이버시 셔터를 수동으로 조절하여 원하는 대로
여닫습니다.
23 한국어
Page 24

웹캠 설정
모니터에 배치할 경우
1 컴퓨터 위, 노트북, 모니터 등 원하는 위치 및 각도에
웹캠을 거치합니다.
2 웹캠을 조절하여 거치할 장치의 후면과 범용 장착
클립의 발이 평행을 이루게 합니다.
3 웹캠을 위아래로 조절하여 최적의 촬영 위치를
찾습니다.
24 한국어
Page 25

삼각대에 배치할 경우*
1 웹캠에서 탈착식 범용 장착 클립을 제거합니다.
2 웹캠 하단에서 1/4인치 삼각대 나사를 찾습니다.
3 웹캠을 ¼인치 나사에 끼워 삼각대에 고정합니다.
4 삼각대에 장착된 웹캠을 배치하여 최적의 촬영 위치를
찾습니다.
* 삼각대 미포함
25 한국어
Page 26

USB-A로 웹캠 연결
USB-C의 끝을 웹캠에 연결하고 USB-A 커넥터를 컴퓨터
USB-A 포트에 연결합니다.
연결 성공
애플리케이션에서 웹캠을 사용하면 LED 작동 표시등에 불
이 들어옵니다.
규격
USB 2.0
USB 3.0
웹캠:
높이 x 너비 x 높이:
27mm(1.06인치)x102mm(4.02인치)x27mm(1.04인치)
케이블 길이: 2.2m(7.2피트)
무게: 63g(2.22oz)
부착식 장착 클립:
높이 x 너비 x 높이:
19mm(0.75인치)x36mm(1.42인치)x63mm(2.48인치)
무게: 44g(1.55oz)
www.logitech.com/support/brio
© 2020 Logitech, Logi, Logitech 로고는 미국과 기타 국가에서 로지텍 유럽 및/또는 그 계열사의 상표
또는 등록 상표입니다. Logitech은 이 설명서에 명시된 어떤 오류에 대해서도 책임지지 않습니다. 이
설명서에 있는 정보는 예고 없이 변경될 수 있습니다.
Page 27

MENGENAL PRODUK
Lampu aktivitas LED
Sensor IR (Infra Merah)
Lensa Autofocus
4K Ultra HD
Dual Mikrofon
Universal
mounting clip yang
dapat dilepaskan
LED IR (Infra Merah)
Shutter privasi
yang eksibel
27 Indonesia
Page 28

Ulir Tripod*
* Tripod tidak disertakan
Kabel USB-A yang dapat
dilepaskan
(USB 2.0 atau 3.0)
Kompatibel dengan
Type C
Tas perjalanan
28 Indonesia
Page 29

ISI KEMASAN
1 Webcam dengan universal mounting clip yang dapat
dilepaskan (pada webcam)
2 Shutter privasi eksternal
3 Tas webcam
4 Kabel USB-A ke USB-C (USB.2.0 atau 3.0) 7,2 kaki
(2,2 m)
5 Dokumentasi pengguna
MEMASANG SHUTTER PRIVASI
1 Pasangkan shutter privasi di depan lensa pada
webcam seperti yang ditunjukkan.
2 Pasangkan di bagian depan webcam, tepat di
tengah-tengah.
3 Secara manual sesuaikan shutter privasi untuk
membuka atau menutup sesuai yang diinginkan.
29 Indonesia
Page 30

MEMASANG WEBCAM
Untuk penempatan di atas layar
1 Letakkan webcam Anda di komputer, laptop, atau
layar pada posisi atau sudut yang Anda inginkan.
2 Sesuaikan webcam untuk memastikan kaki universal
mounting clip terpasang erat dengan bagian
belakang perangkat Anda.
3 Gerakkan webcam ke atas/ke bawah ke posisi terbaik
agar bisa menangkap diri Anda.
30 Indonesia
Page 31
Untuk penempatan di atas tripod*
1 Lepaskan universal mounting clip yang dapat
dilepaskan dari webcam
2 Cari ulir tripod 1/4 inci di bagian bawah webcam.
3 Pasangkan webcam di tripod Anda dengan
memutarnya pada ulir ¼ inci.
4 Letakkan webcam yang telah terpasang di tripod di
mana pun yang Anda inginkan agar mendapatkan
posisi terbaik untuk menyorot diri Anda.
* Tripod tidak disertakan
31 Indonesia
Page 32

MENGHUBUNGKAN WEBCAM VIA USB-A
Pasangkan ujung USB-C ke webcam dan konektor
USB-A ke port USB-A di komputer Anda.
KONEKSI BERHASIL
Lampu aktivitas LED akan menyala ketika webcam
digunakan oleh sebuah aplikasi.
DIMENSI
USB 2.0
USB 3.0
WEBCAM:
Tinggi x Lebar x Tebal:
1,06 inci (27 mm) x 4,02 inci (102 mm) x 1,04 inci (27 mm)
Panjang Kabel: 7,2 kaki (2,2 m)
Berat: 2,22 oz (63 g)
MOUNTING CLIP YANG FLEKSIBEL:
Tinggi x Lebar x Tebal:
0,75 inci (19 mm) x 1,42 inci (36 mm) x 2,48 inci (63 mm)
Berat: 1,55 oz (44 g)
www.logitech.com/support/brio
© 2020 Logitech, Logi, dan Logo Logitech adalah merek dagang atau merek dagang terdaftar
Logitech Europe S.A. dan/atau aliasinya di AS dan negara lainnya. Logitech tidak bertanggung
jawab atas setiap kesalahan yang terjadi akibat manual ini. Informasi di dalam manual ini dapat
berubah sewaktu-waktu tanpa pemberitahuan.
WEB-621-001907.002
 Loading...