

G935
Wireless 7.1 LIGHTSYNC
Gaming Headset
无线 7.1 LIGHTSYNC
游戏耳机麦克风
無線 7.1 聲道 LIGHTSYNC
遊戲耳機麥克風
무선 7.1 LIGHTSYNC
게이밍 헤드셋
User Manual
M/N: A-00079, A-00080

CONTENTS
English . . . . . . . . . . . . . . . . . . .3
简体中文 . . . . . . . . . . . . . . . . . 19
www.logitech.com/support/g935
繁體中文 . . . . . . . . . . . . . . . . . 35
한국어 . . . . . . . . . . . . . . . . . . 51
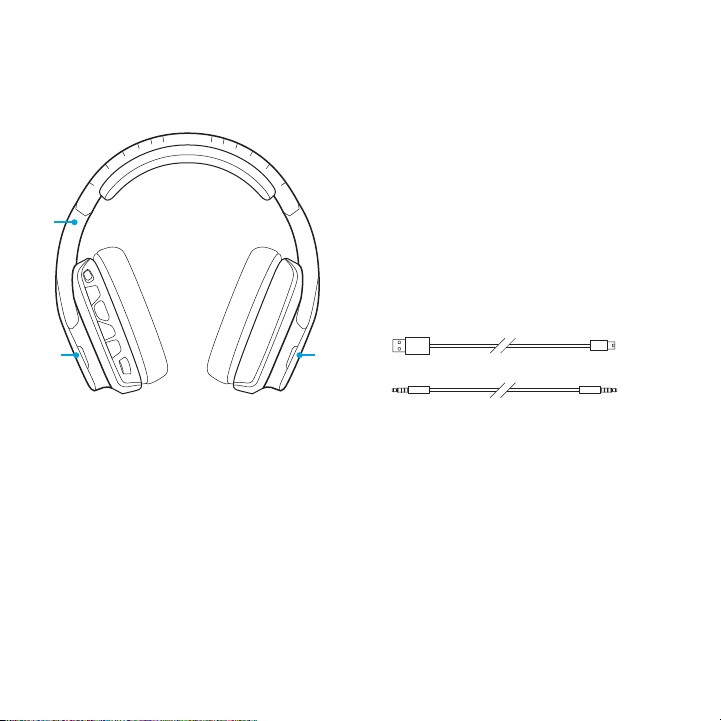
WHAT’S IN THE BOX
1
2 2
1. G935 Gaming Headset
2. Custom tags (L/R)
3
4
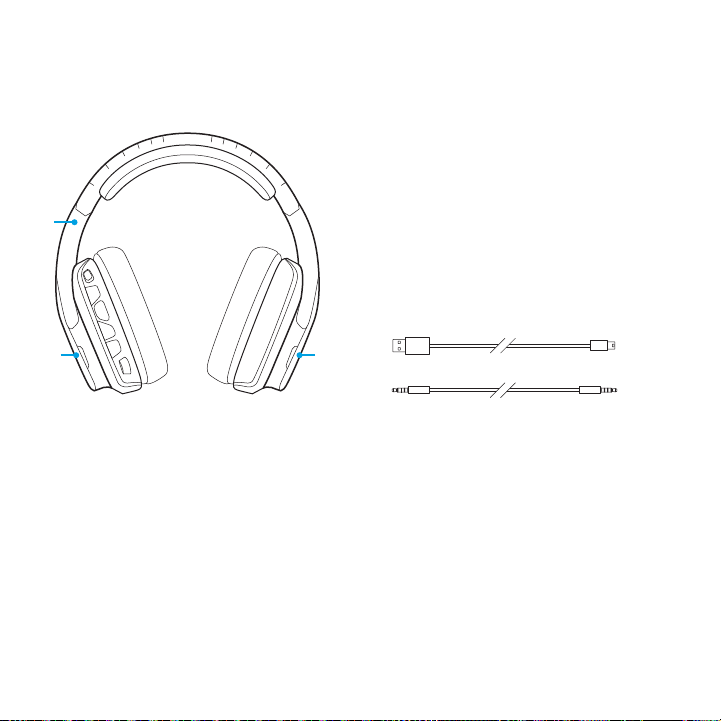
3. Charging cable (USB to Micro-USB, 2m)
4. 3.5mm cable (1.5m)
3 ENGLISH
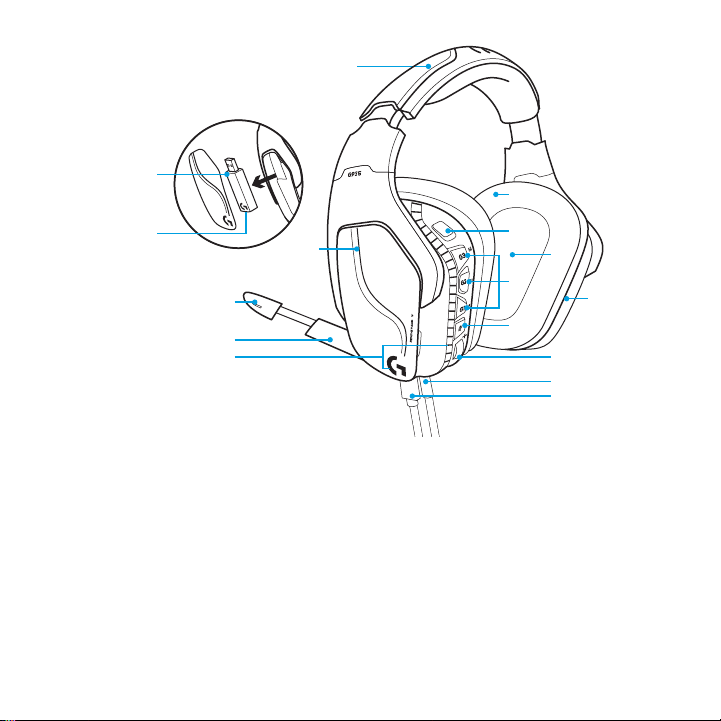
FEATURES
1
15
6
3.5mm
3
4
5
1. Adjustable padded leatherette
headband
2. Removable backlit custom tags
3. Boom mic mute indicator LED
4. Retractable boom microphone
Automatically mutes in “up” position
5. Lighting zones (G logo + light strip)
6. Wipeable leatherette earpads
7. Wireless On/O switch
8. Pro-G Audio Drivers
2
4 ENGLISH
7
8
9
11
10
12
13
14
9. Programmable buttons (G1/G2/G3)
10. Battery housed in earcup
11. Microphone Mute
12. Volume Wheel
13. 3.5mm
(mobile) connection
14. USB charging connection
15. USB Wireless Adapter
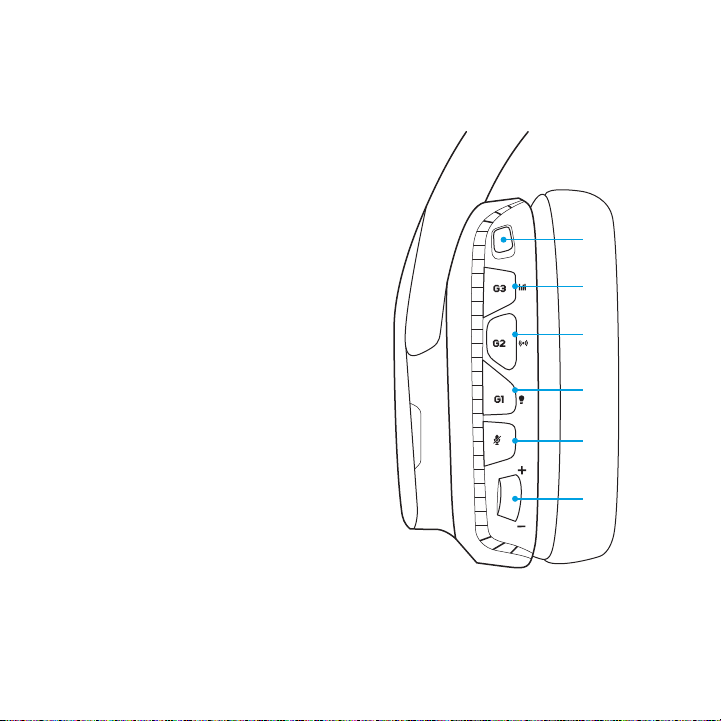
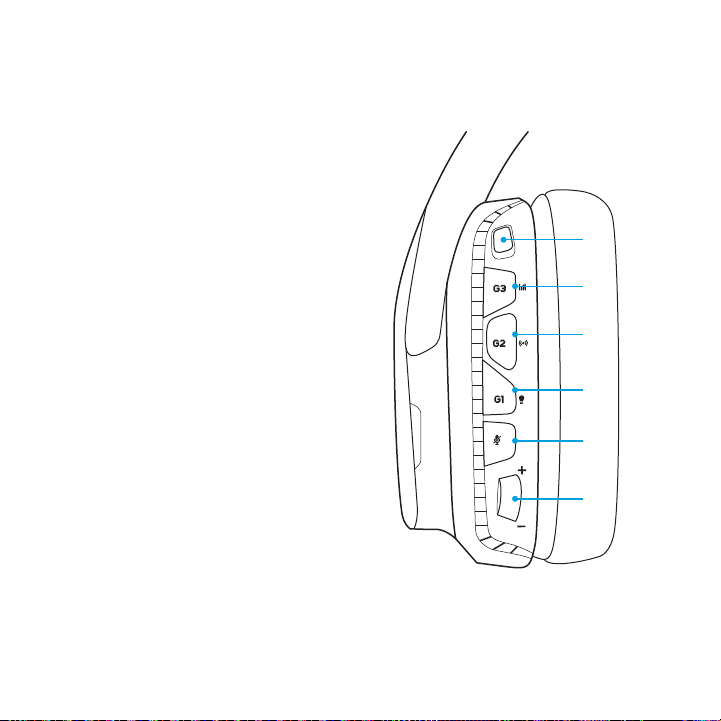
HEADSET BUTTON LAYOUT
1. Wireless On/O switch
2. G3 (programmable):
Default equalizer (EQ) cycle
• Will cycle through EQ settings
in Logitech G HUB software
3. G2 (programmable): Default surround
sound on/o
4. G1 (programmable): Lighting cycle
• Will cycle through lighting settings
in Logitech G HUB Software, including:
breathing, solid cyan, custom, and o
5. Microphone mute
6. Volume wheel
G1, G2, and G3 are programmable
using the Logitech G HUB Software
(in PC mode only):
www.logitech.com/support/g935
Note: Buttons and volume wheel only operate
in Wireless On mode. Some buttons and features
may require PC connection and Logitech G
HUB Software.
1
2
3
4
5
6
5 ENGLISH
BATTERY MANAGEMENT
G935 wireless headset is powered via
a battery housed in the right earcup.
When you are not using your G935 wireless
headset, plug it in via the USB port on the
bottom of the unit to charge. When fully
depleted, the battery takes approximately
3.5 hours to reach full charge on standard
USB output. For the optimal experience,
plug in your unit and allow it to charge fully
before rst use.
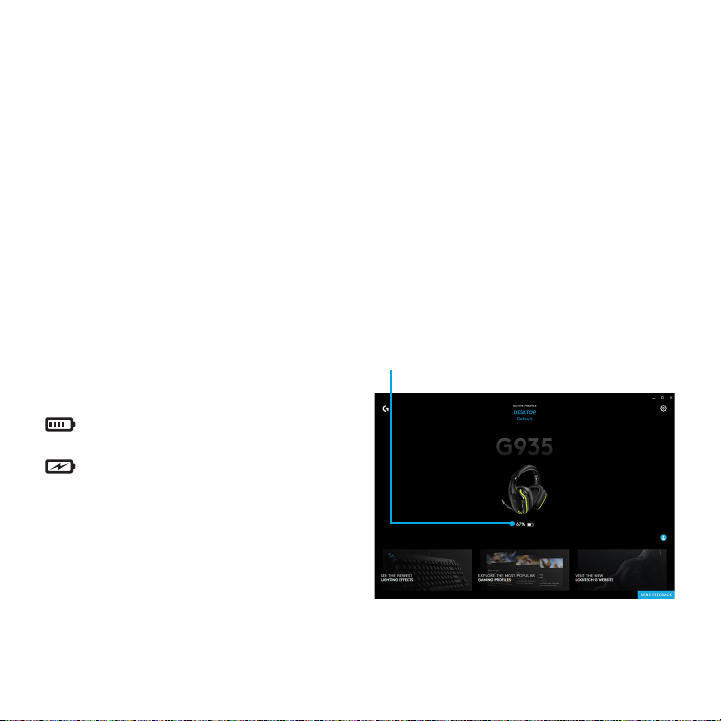
Logitech G HUB Software
The home screen in Logitech
G HUB Software has a battery charge
level indicator:
When using battery, this will indicate
charge level
This indicates the unit is charging
6 ENGLISH
Critical Battery Warning
G935 gaming headset will play a tone
at low charge. The headset’s lighting will
also dim when at low charge. At critical
charge level, the unit will play a tone and
lighting will turn o. Use USB charging
cable to plug in headset immediately
if you hear these tones to ensure
uninterrupted listening or gaming.
Charge indicator

IDLE SLEEP MODE ON/OFF TONES AND LIGHTS
G935 will go into sleep mode to conserve
battery power when it has not received
an audio signal in 15 minutes.
In idle sleep mode, the unit’s lighting will
change to the breathing mode, and it will
disconnect from the USB wireless adapter.
Your G935 will wake up from sleep mode
if you press a button on the headset.
After 30 minutes in sleep mode
your headset will fully power o in order
to conserve your battery. In order to wake
up your headset you will need to move the
power switch to the o position and then
back to the on position. If you plan to leave
your headset idle for an extended period
of time, turn o your headset and plug it
in via USB to charge.
7 ENGLISH
When your headset is turned on, it will play
a tone to indicate that your headset has
turned on. The lights will perform a power
on light cycle sequence, then switch to
the currently selected lighting.
When the unit is turned o, lights will
switch to blue and fade out while
it powers down.
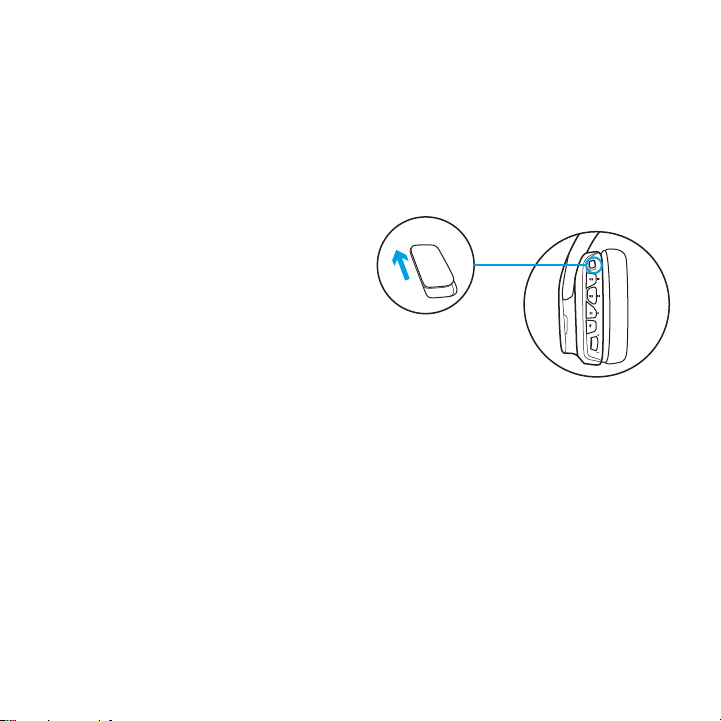
WIRELESS ON/OFF
G935 has two operation modes,
Wireless On, and Wireless O.
Wireless On
In Wireless On mode, most headset
features are available,1 including custom
sound proles, RGB lighting, microphone,
mic mute, wireless, and audio mixing.
When battery charge is low, lighting will
dim and low battery notication tone will
play. When battery charge level is critical,
lighting will turn o.
ON
Wireless range
2
Indoor: 15 meters
Battery life
3
No lighting: 12 hours
Default lighting: 8 hours
1 Some features may require Logitech G HUB Software.
2 Range may vary with environmental conditions.
3 Rechargeable bat teries have a limited number of charge cycles.
Battery life measured at 50% volume.
8 ENGLISH
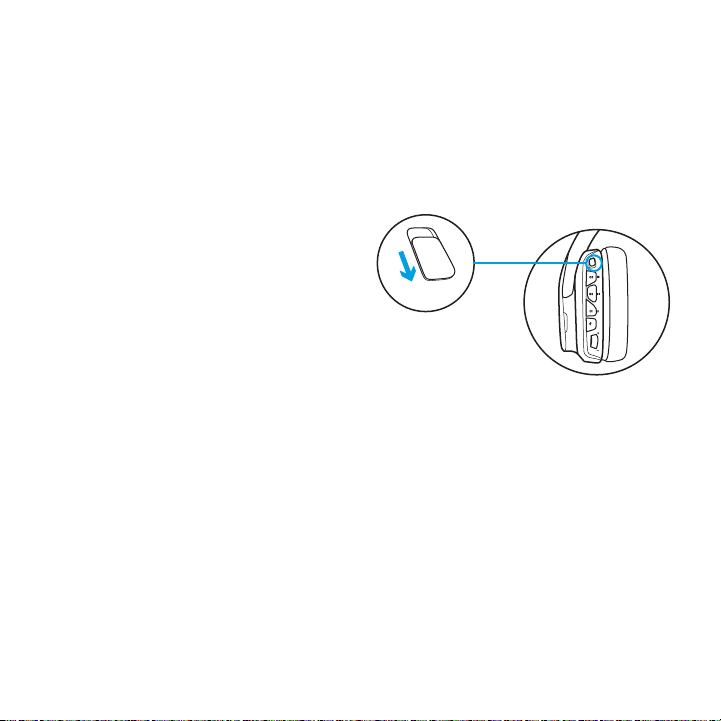
Wireless O (passive mode)
In Wireless O (passive mode),
your headset will operate in passive
unpowered mode. Your headset will play
audio from any device connected through
the 3.5mm input on the headset.
Features that require power,
including 7.1 surround sound,
custom sound proles, on-headset
buttons, volume wheel operation,
and button/ lighting customization
functions are not available in this mode.
Boom mic is not available for devices
connected through the on-headset 3.5mm
audio port in this mode.
This mode can be used to preserve
battery life.
9 ENGLISH
OFF
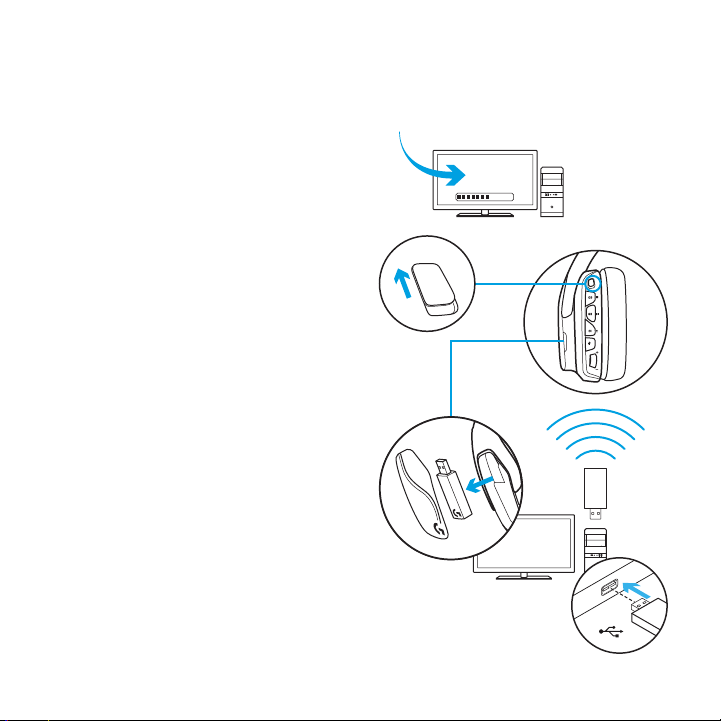
SETUP FOR PC PC MODE
1. Download and install Logitech G HUB:
www.logitech.com/support/g935
2. Set switch to Wireless On postition.
3. Connect USB Wireless Adapter to PC.
Headset will automatically connect.
Mixing audio sources
While connected via USB Wireless Adapter,
the G935 can also use the 3.5mm cable
to connect to another audio source
(ex. smartphone). Both audio sources
can be played simultaneously.
10 ENGLISH
1
2
ON
3
USB
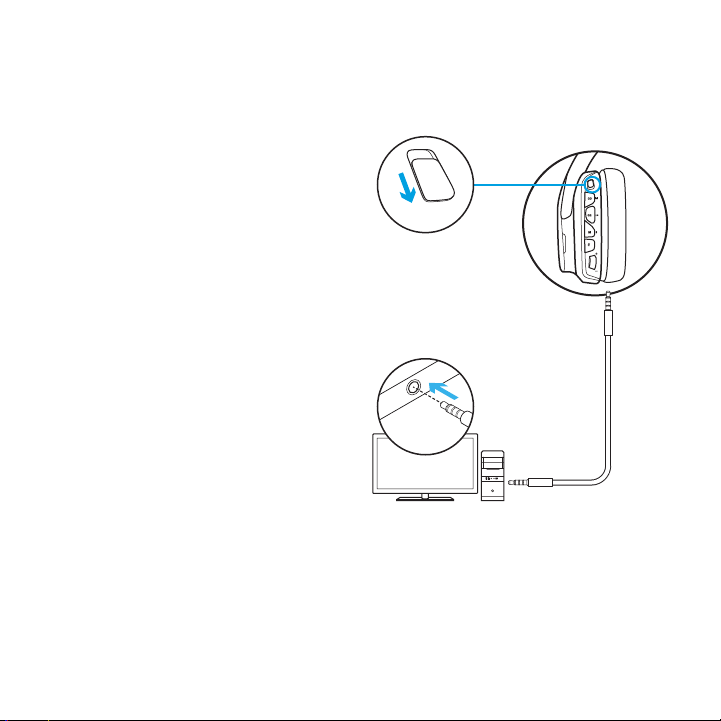
SETUP FOR PC 3.5MM CONNECTION
SETUP FOR PC
3.5MMCONNECTION
The G935 can also connect to audio
devices solely via 3.5mm cable.
1. Set switch to Wireless O mode
for passive audio mode, or set to
Wireless On mode for active audio mode
with additional features (see “Wireless
On/O” section).
2. Connect to PC using the 3.5mm cable
Some features, including 7.1 surround
sound, on-headset buttons, volume wheel
operation, and customization of lighting
and button functions are not available
without USB connection. Boom mic
is not available for 3.5mm device while
in Wireless O mode.
Some PCs may require a 3.5mm 4-pole to
mic/stereo splitter adapter (not included)
to use microphone features in this mode.
11 ENGLISH
1
OFF
2
3.5mm
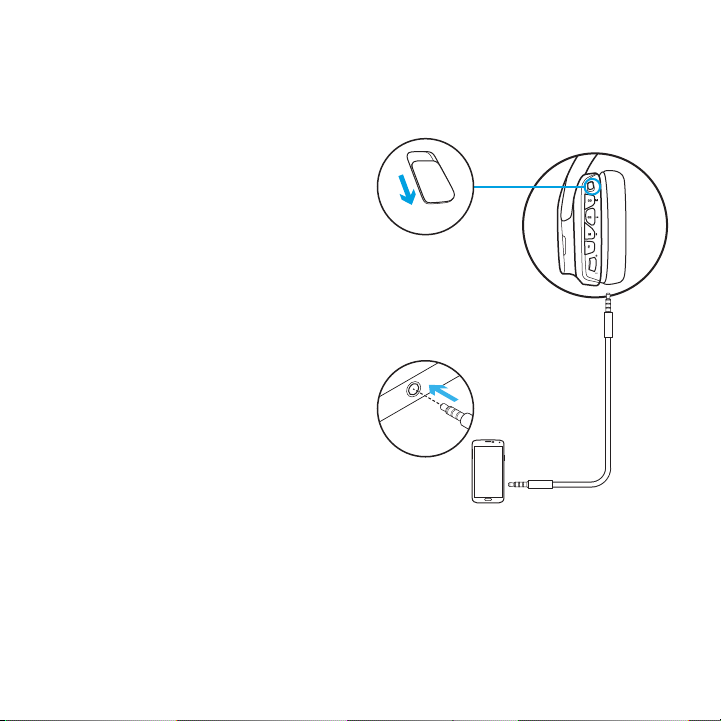
SETUP FOR MOBILE
1. Set switch to Wireless O mode
for passive audio mode, or set to
Wireless On mode for active audio mode
with additional features (see “Wireless
On/O” section).
2. Connect the headset to the mobile
device via the 3.5mm cable.
Boom microphone is only available
in Wireless On mode.
1
OFF
2
3.5mm
12 ENGLISH

SETUP FOR CONSOLE: XBOX ONE™, PS4™ OR SWITCH™
1. Set switch to Wireless O mode
for passive audio mode, or set to
Wireless On mode for active audio
mode with additional features
(see “Wireless On/O” section).
2. Connect the headset to the console
controller using the 3.5mm cable.
• Xbox One may require Xbox One
headset adapter (sold separately).
PlayStation setup (settings)
1. Connect headset
2. Open Settings
3. Select “Sound and Screen”
4. Select “Audio Output Settings”
5. Set “Output to Headphones”
to “All Audio”
Headset will not operate via USB
Wireless Mix Adapter on Xbox One.
Boom microphone is only available
in Wireless On mode.
1
OFF
2
3.5mm
13 ENGLISH

ALTERNATE SETUP FOR SONY PLAYSTATION® 4 & NINTENDO SWITCH™
Wireless operation
1. Set switch to Wireless On position.
2. Connect the headset to the console
using the USB Wireless Adapter.
Note: Some buttons and functions may not
operate when connected to the PlayStation 4.
Programming of lighting and buttons is not
possible on the PlayStation. 7.1 surround
sound is not available while connected
to PlayStation.
PlayStation setup (settings)
1. Plug in headset via USB or 3.5mm cables
2. Open Settings
3. Select “Sound and Screen”
4. Select “Audio Output Settings”
5. Set “Output to Headphones”
to “All Audio”
14 ENGLISH
Nintendo Switch setup (settings)
1. Set Switch to Wireless On position
2. Connect the USB Wireless Adapter into
the USB port inside the Switch TV Dock
3. Audio output will change
to your headset automatically
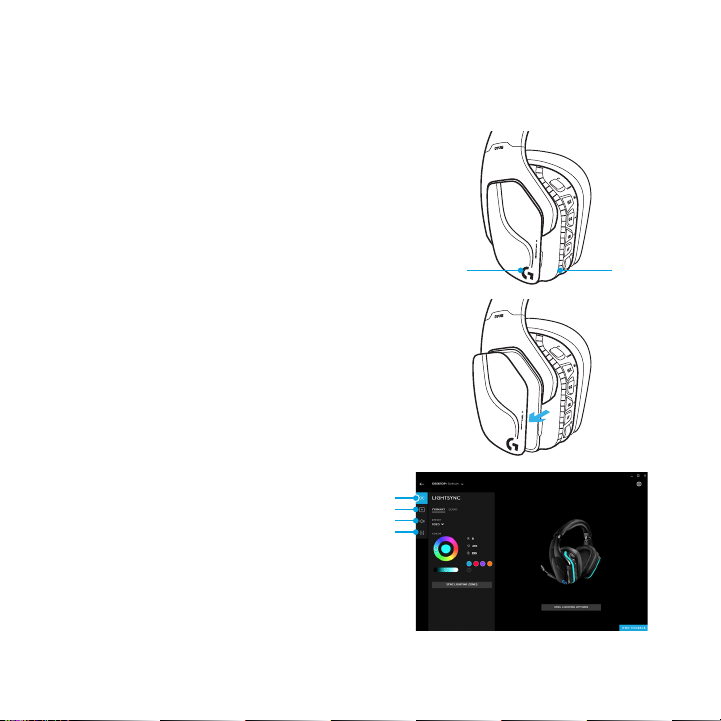
RGB LIGHTING ZONE CUSTOMIZATION
• Zone 1: G logo
• Zone 2: Lighting strip
Each lighting zone can be programmed
with the Logitech G HUB (PC mode only).
www.logitech.com/support/g935
TAG CUSTOMIZATION
The left and right custom tags can be
removed and replaced with custom tags.
LOGITECH G HUB SOFTWARE
G-key buttons, lighting, equalizer,
and surround sound prole programming
is possible through the Logitech
G HUB Software.
1. LIGHTSYNC Lighting
2. Assignments
3. Acoustics
4. Equalizer
15 ENGLISH
1 2
1
2
3
4
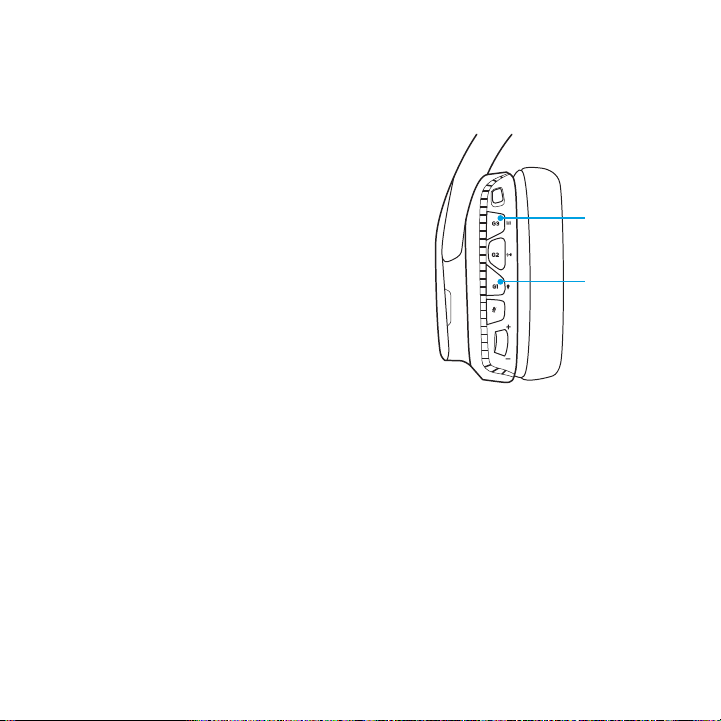
COLOR/EQUALIZER CYCLING
G1 and G3 buttons are pre-programmed
by default to cycle through lighting and
equalizer proles.
When the headset is connected to
a system with Logitech G HUB Software
running, it will cycle through all equalizer
or lighting options programmed into
Logitech G HUB Software.
When the headset is not connected
to a system with Logitech G HUB
Software running, it will cycle through
the custom lighting or equalizer proles
stored in the headset’s onboard memory.
These proles can be programmed
via Logitech G HUB Software
G3
G1
16 ENGLISH
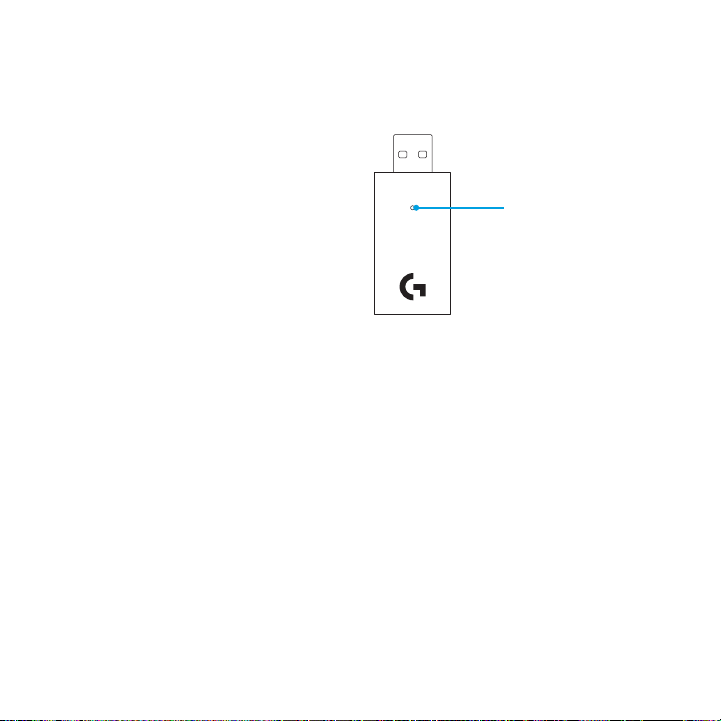
PAIRING INSTRUCTIONS
If your device becomes unpaired
or you receive a replacement USB
Wireless Adapter, follow these instructions
to pair your device with the USB
Wireless Adapter:
1. Plug in USB Wireless Adapter
2. Insert pin into reset port on adapter
to initiate pairing mode
3. Light on adapter will blink
4. Turn on headset
5. Hold “Microphone mute” button
for 15 seconds to initiate pairing mode
6. Headset G logo will blink green
to indicate pairing mode
7. Logo will turn to solid color and then
return to currently selected lighting
when paired
Adapter LED light
17 ENGLISH
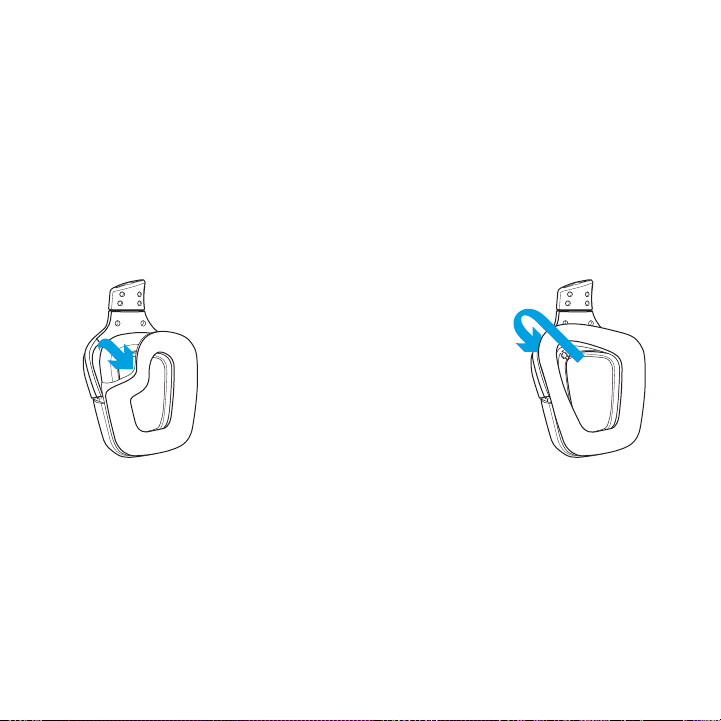
EARPAD CLEANING
1. Removal 2. Washing
a. Once removed,
the earpads can be
wiped clean with
a damp cloth. Do not
use detergent.
b. Press with soft towel
to dry, do not wring.
c. Allow to air dry before
reattaching.
18 ENGLISH
3. Replacement
包装内容
1
2 2
1. G935 游戏耳机麦克风
2. 自定义标签 (L/R)
3
4
3. 充电线(USB 至 Micro-USB,2 米)
4. 3.5 毫米线缆(1.5 米)
19 简体中文

特性
1
15
6
3.5mm
3
4
5
1. 可调节衬垫人造皮革头带
2. 可取下的自定义背光标签
3. 麦克风杆静音 LED 指示灯
4. 可伸缩的麦克风杆
在“向上”位置时自动静音
5. 发光区域(G 徽标 + 光带)
6. 可清洁人造皮革耳垫
7. 无线 On/O 开关
8. Pro-G 音频驱动单元
9. 可自定义按钮 (G1/G2/G3)
2
20 简体中文
7
9
11
10. 耳罩内置电池
11. 麦克风静音
12. 音量滚轮
13. 3.5 毫米(移动)连接
14. USB 充电连接
15. USB 无线适配器
8
10
12
13
14

耳机麦克风按钮布局
1. 无线 On/O 开关
2. G3(可自定义):
默认均衡器 (EQ) 循环
• 在罗技 G HUB 软件中循环切换
EQ 设置
3. G2(可自定义): 默认环绕声开启/关闭
4. G1(可自定义): 灯光循环切换
• 在罗技 G HUB 软件的设置中循环
切换,包括:呼吸效果、稳定蓝光、
自定义和关闭
5. 麦克风静音
6. 音量滚轮
G1、G2 和 G3 可使用罗技 G HUB 软件进行
自定义 (仅限 PC 模式):
www.logitech.com/support/g935
注意: 按钮和音量滚轮仅在无线模式开启时
有效。 一些按钮和功能仅在连接 PC 和使用罗技
G HUB 软件时可用。
1
2
3
4
5
6
21 简体中文

电池管理
G935 无线耳机麦克风由内置于右侧耳罩
的电池供电。 不使用 G935 无线耳机麦克
风时,可通过装置底部的 USB 端口将其
插入进行充电。 电量完全耗尽的情况下,
通过标准 USB 输出将其完全充满约需要
3.5 小时。 为达到理想效果,建议首次使用
前插入装置并将其充至满电量状态。
Logitech G HUB 软件
罗技
G HUB 游戏软件上的主屏幕会显示电池电
量指示器:
在电池供电时指示剩余电量
指示装置正在充电
22 简体中文
电量严重不足警告
G935 游戏耳机麦克风在低电量时会发出声
音警报。 低电量时耳机麦克风的灯光也会
变暗。 电量严重不足时,装置将发出声音
警报,同时关闭灯光。 当听到此类声音警
报时,应立即将 USB 充电线缆插入耳机麦
克风,以此确保聆听或游戏不会中断。
电量指示器

闲置睡眠模式 开关提示音和指示灯
如果 15 分钟内未接收到音频信号,G935 将
进入睡眠模式以节省电量。
在闲置睡眠模式,装置的灯光会变为呼吸
模式,与 USB 无线适配器的连接也会断开。
此时按下耳机麦克风的按钮,G935 会从睡
眠模式中唤醒。
为节约电量,耳机处于睡眠模式 30 分钟后
将完全关机。 此时若要唤醒耳机麦克风,
请先将开关拨至关闭位置,然后再拨动开关
来开机。 如果是长期闲置,应关闭耳机麦
克风电源并通过 USB 将其插入进行充电。
23 简体中文
开启耳机麦克风时会听到开启提示音。
指示灯先是循环闪烁,之后选定模式的指示
灯将亮起。
装置关闭时,指示灯将切换至蓝色,并随着
电源衰减变暗并消失。

无线开启/关闭
G935 有两个工作模式,无线开启和无线
关闭。
无线开启
在无线开启模式,大部分耳机麦克风
功能可用,1 包括自定义声音配置文
件、RGB 灯光、麦克风、麦克风静音、
无线和混音。 当电池电量变低时,灯光将
变暗,同时会听到低电量提示音。 当电池
电量严重不足时,灯光将关闭。
ON
无线范围
2
室内: 15 米
电池寿命
3
不发光: 12 小时
默认灯光设置: 8 小时
1 某些功能需要安装罗技 G HUB 软件。
2 范围依环境条件而异。
3 充电电池的循环充电次数有限。电池寿命是在音量为50%的情况
下测量。电池寿命依用户使用情况和计算条件而异。
24 简体中文

无线关闭(无源模式)
无线关闭(无源模式)时,耳机麦克风将在
无源条件下工作。 耳机麦克风将播放通过
3.5 毫米端口接入的任何设备上的音频。
此模式不支持需借助电源的功能,其中包括
7.1 环绕声、自定义声音配置文件、耳机麦
克风自带按钮、音量滚轮操作以及按钮/灯
光自定义功能。
在此模式下,设备无法通过耳机麦克风上的
3.5 毫米音频端口连接麦克风杆。
此模式可用于节省电池电量。
25 简体中文
OFF

PC 的设置(PC 模式)
1. 下载并安装罗技 G HUB 软件:
www.logitech.com/support/g935
2. 将开关拨至无线开启位置。
3. 将 USB 无线适配器连接至 PC。 耳机麦
克风将自动连接。
混合音频源
当通过 USB 无线适配器连接时,G935 也可
使用 3.5 毫米连接线与另一音频源(例如智
能手机)进行连接。 两个音频源可同时进
行播放。
26 简体中文
1
2
ON
3
USB

PC 的设置(3.5 毫米连接)
PC 的设置(3.5 毫米连接)
G935 也可通过 3.5 毫米连接线专门连接到
音频设备。
1. 将开关拨至无线关闭模式(无源音频
模式),或拨至具有更多功能的无线开启
模式(有源音频模式)(参见“无线开启/关
闭”部分)。
2. 使用 3.5 毫米连接线连接到 PC
未连接 USB 的情况下,某些功能无法
使用,包括 7.1 环绕声、耳机麦克风上
的按钮、音量滚轮操作以及自定义灯光和
按钮。 在无线关闭模式下,麦克风杆无法
用于 3.5 毫米设备。
某些 PC 需要使用 3.5 毫米 4 极麦克风/立体
声分流适配器(未随附),才可在此模式中
使用麦克风。
27 简体中文
1
OFF
2
3.5mm

移动设备的设置
1. 将开关拨至无线关闭模式(无源音频
模式),或拨至具有更多功能的无线开启
模式(有源音频模式)(参见“无线开启/关
闭”部分)。
2. 通过 3.5 毫米连接线将耳机麦克风连接到
移动设备。
麦克风杆仅在无线开启模式可用。
28 简体中文
1
OFF
2
3.5mm

游戏主机的设置: XBOX ONE™、PS4™ 或 SWITCH™
1. 将开关拨至无线关闭模式(无源音频
模式),或拨至具有更多功能的无线开启
模式(有源音频模式)(参见“无线开启/关
闭”部分)。
2. 使用 3.5 毫米连接线将耳机麦克风连接到
游戏机控制器。
• Xbox One 可能需要安装 Xbox One
耳机麦克风适配器(单独销售)。
PlayStation 设定(设置)
1. 连接耳机麦克风
2. 打开设置
3. 选择“声音和屏幕”
4. 选择“音频输出设置”
5. 将“输出至耳机”设置为“所有音频”
耳机麦克风无法在 Xbox One 上通过 USB
无线混音适配器进行操作。
麦克风杆仅在无线开启模式可用。
29 简体中文
1
OFF
2
3.5mm

SONY PLAYSTATION® 4 和 NINTENDO SWITCH™ 的备用设置
无线操作
1. 将开关拨至无线开启位置。
2. 使用 USB 无线适配器将耳机麦克风连接
到游戏机。
注意: 连接 PlayStation 4 时,某些按钮和功能
可能无法使用。 无法在 PlayStation 上使用灯
光和按钮编程功能。 连接 PlayStation 时无法
获得 7.1 环绕音效果。
PlayStation 设定(设置)
1. 通过 USB 或 3.5毫米连接线插入耳机麦
克风
2. 打开设置
3. 选择“声音和屏幕”
4. 选择“音频输出设置”
5. 将“输出至耳机”设置为“所有音频”
30 简体中文
Nintendo Switch 设置(设置)
1. 将开关拨至无线开启位置。
2. 将 USB 无线适配器连接至 Switch TV
扩展坞的 USB 端口
3. 音频输出将会自动切换为耳机麦克风

RGB 灯光区域定制
• 区域 1: G 徽标
• 区域 2: 灯光条
可以在罗技 G HUB 中对每个灯
光区域单独编程(仅 PC 模式)。
www.logitech.com/support/g935
自定义标签
左右自定义标签可取下进行自定义。
LOGITECH G HUB 软件
可通过罗技
G HUB 软件对 G 键按钮、背光、均衡器和
环绕声配置文件进行自定义。
1. LIGHTSYNC 灯光
2. 分配
3. 音效
4. 均衡器
31 简体中文
1 2
1
2
3
4

颜色/均衡器循环
G1 和 G3 按钮默认预设为在灯光和均衡器配
置文件间循环切换。
当耳机麦克风连接至运行罗技 G HUB 软件
的系统时,将会在所有在罗技 G HUB 软件
中预设过的均衡器或背光选项间循环切换。
当耳机麦克风未连接至运行罗技 G HUB 软
件的系统时,将会在耳机麦克风板载内存所
存储的自定义背光或均衡器配置文件间循环
切换。 可通过罗技 G HUB 软件对这些配置
文件进行编程
G3
G1
32 简体中文

配对说明
如果您的设备已解除配对或更换了 USB 无
线适配器,请按照以下说明将设备与 USB
无线适配器进行配对:
1. 插入 USB 无线适配器
2. 将针头插入适配器上的重设端口启动配
对模式
3. 适配器上的指示灯将闪烁
4. 开启耳机麦克风
5. 按住“麦克风静音”按钮 15 秒以启动配对
模式
6. 耳机麦克风的 G 徽标将闪烁绿灯,表示
配对模式启动
7. 配对完成后,徽标将变为稳定颜色,之后
返回至当前选定的灯光
适配器 LED 指示灯
33 简体中文

耳垫清洗
1. 拆卸 2. 清洗
a. 取下耳垫,便可使
b. 用软毛巾按压至干,
c. 使其自然风干,然后
3. 更换
用用湿布进行清洁。
请勿使用洗涤剂。
切勿拧绞。
再重新装上。
34 简体中文

包裝內容
1
2 2
1. G935 遊戲耳機麥克風
2. 自訂標籤 (左/右)
3
4
3. 充電連接線 (USB 轉 Micro-USB,2 公尺)
4. 3.5 公釐連接線 (1.5 公尺)
35 繁體中文

功能
1
15
6
3.5mm
3
4
5
1. 可調整式軟墊人造皮革頭帶
2. 可裝卸式背光自訂標籤
3. 耳機麥克風桿靜音 LED 指示燈
4. 可伸縮的耳機麥克風桿
在「上」位置時自動靜音
5. 燈光區域 (G 標誌 + 光帶)
6. 可擦拭人造皮革耳墊
7. 無線開啟/關閉開關
8. Pro-G 音訊單體
9. 可自訂按鈕 (G1/G2/G3)
2
36 繁體中文
10. 耳罩內置電池
11. 麥克風靜音
12. 音量滾輪
13. 3.5 公釐
(行動) 連線
14. USB 充電連線
15. USB 無線轉接器
7
8
9
11
10
12
13
14

耳機麥克風按鈕配置
1. 無線開啟/關閉開關
2. G3 (可自訂):
預設等化器 (EQ) 循環
• 在羅技遊戲軟體中可循環切換等化器
設定
3. G2 (可自訂): 預設為環繞音效開啟/關閉
4. G1 (可自訂): 燈光循環切換
• 在羅技 G HUB 軟體中可循環切換燈光
設定,包括:呼吸、穩定藍燈、自訂
以及關閉
5. 麥克風靜音
6. 音量滾輪
G1、G2 和 G3 可使用羅技 G HUB 軟體進行
自訂 (僅在 PC 模式下):
www.logitech.com/support/g935
注意: 按鈕與音量滾輪僅能在無線開啟模式
下有效。 某些按鈕與功能可能需要 PC 連線和安
裝羅技 G HUB 軟體。
1
2
3
4
5
6
37 繁體中文

電池管理
G935 無線耳機麥克風由安裝於右耳罩中的
電池提供電力。 不使用 G935 無線耳機麥克
風時,將充電線插入裝置底部的 USB 連接
埠即可充電。 電力耗盡時,使用標準 USB
輸出埠為電池充滿電量約需花費 3.5 小時。
為獲得最佳體驗,請在第一次使用裝置之前
先將其充滿電量。
羅技 G HUB 軟體
羅技
G HUB 軟體中的首頁畫面有電池電量指
示器。
使用電池時,這會指明電量。
這表示裝置正在充電。
38 繁體中文
電力嚴重不足警告
G935 在電力不足時會播放警示音。 電力
不足時,耳機麥克風的指示燈燈光也會變
的黯淡微弱。 在電力嚴重不足時,裝置會
播放警示音且指示燈會熄滅。 如果您聽到
警示音,請立即使用 USB 充電連接線插
入耳機麥克風充電,以確保聆聽和遊戲不
會中斷。
充電指示燈

閒置休眠模式 電源開啟/關閉提示音和指示燈
如果 15 分鐘內沒有接收到任何音訊
訊號,G935 會進入休眠模式以節省電力。
在閒置休眠模式中,裝置的指示燈會轉成
呼吸燈模式,也會中斷與 USB 無線轉接器
的連線。
如果按下耳機麥克風上的按鈕,G935 就會
從休眠模式中醒來。
休眠模式經過 30 之後,耳機麥克風會完全
關閉電源以節省電池電力。 若要喚醒耳機
麥克風,必須將電源開關切換到關閉位置,
然後再切回開啟位置。 如果您打算閒置耳
機麥克風以延長使用時間,請關閉耳機麥克
風電源,然後將其插入 USB 連接埠充電。
39 繁體中文
當您的耳機麥克風電源開啟時,其會發出提
示音告知您耳機麥克風已開啟電源。 指示
燈也會執行電源開啟燈光循環,然後切換到
目前選擇的燈光。
當裝置關閉電源時,燈光會切換為藍燈並隨
電源消失減弱熄滅。

無線開啟/關閉
G935 有兩種運作模式,無線開啟和無線
關閉。
無線開啟
在無線開啟模式中,可以使用大部分的耳機
麥克風功能,1 包括自訂音效設定檔、RGB
燈光、麥克風、麥克風靜音、無線功能、
和音訊混音。 電池電量不足時,燈光會變
的黯淡微弱,並播放電池電量不足警示音。
電池電量嚴重不足時,燈光會熄滅。
ON
無線範圍
2
室內: 15 公尺
電池壽命
3
無燈光: 12 小時
預設燈光: 8 小時
1 某些功能可能需要安裝羅技 G HUB 軟體。
2 範圍隨環境條件不同會有變化。
3 充電式電池的充電次數有一定限制。 電池壽命是在音量為 50%
時測量。
40 繁體中文

無線關閉 (被動模式)
在無線關閉模式 (被動模式) 中,耳機麥克
風會以被動未供電模式運作。 耳機麥克風
可播放來自任何透過耳機麥克風的 3.5 公釐
輸入埠連線之裝置的音訊。
需要電源的功能,包括 7.1 環繞音效、自訂
聲音設定檔、耳機麥克風按鈕、音量轉鈕
操作和按鈕/燈光自訂功能,在此模式中都
不能使用。
在此模式中,透過耳機麥克風的 3.5 公釐音
訊部連線的裝置不能使用麥克風桿。
可以使用此模式來節省電池電力。
41 繁體中文
OFF

PC 的設定 PC 模式
1. 請下載並安裝羅技 G HUB 軟體:
www.logitech.com/support/g935
2. 將選擇開關設定到無線開啟位置。
3. 將 USB 無線轉接器連線到 PC。 耳機麥
克風會自動連線。
混合音訊來源
當透過 USB 無線轉接器連線時,G935 也
可以使用 3.5 公釐連接線連接到其他音訊來
源 (例如智慧型手機)。 兩個音訊來源可以
同時播放。
42 繁體中文
1
2
ON
3
USB

PC 的設定 3.5 公釐連線
PC 的設定 3.5 公釐連線
G935 也可以使用 3.5 公釐連接線單獨連線
到音訊裝置。
1. 將選擇開關設定為無線關閉模式可使用被
動音訊模式,或是設定為無線開啟模式以
使用具有其他功能的主動音訊模式 (請參
閱「無線開啟/關閉」部分)。
2. 使用 3.5 公釐連接線連接到 PC
某些功能,包括 7.1 環繞音效、耳機麥克風
上的按鈕、音量滾輪操作、燈光和按鈕自
訂功能在沒有 USB 連線時無法使用。 在無
線關閉模式時,3.5 公釐裝置無法使用耳機
麥克風桿。
某些 PC 可能需要使用 3.5 公釐 4 極麥克風/
立體聲分流轉接器 (未隨附),才能在此模式
中使用麥克風功能。
43 繁體中文
1
OFF
2
3.5mm

行動裝置的設定
1. 將選擇開關設定為無線關閉模式可使用
被動音訊模式,或是設定為無線開啟模
式以使用具有其他功能的主動音訊模式
(請參閱「無線開啟/關閉」部分)。
2. 使用 3.5 公釐連接線,將耳機麥克風連
線到行動裝置。
耳機麥克風桿僅能在無線開啟模式
下使用。
1
OFF
2
3.5mm
44 繁體中文

遊戲主機的設定: XBOX ONE™、PS4™ 或 SWITCH™
1. 將選擇開關設定為無線關閉模式可使用
被動音訊模式,或是設定為無線開啟模
式以使用具有其他功能的主動音訊模式
(請參閱「無線開啟/關閉」部分)。
2. 使用 3.5 公釐連接線,將耳機麥克風連線
到遊戲主機控制器。
• Xbox One 可能需要 Xbox One 耳機麥
克風轉接器 (需另購)。
PlayStation 設定
1. 連線耳機麥克風。
2. 開啟「設定」
3. 選擇「音效和畫面」
4. 選擇「音訊輸出設定」
5. 將「輸出到耳機麥克風」設定為「所有
音訊」
在 Xbox One 上耳機麥克風無法透過 USB
無線混音轉接器運作。
耳機麥克風桿僅能在無線開啟模式下使用。
45 繁體中文
1
OFF
2
3.5mm

SONY PLAYSTATION® 4 和 NINTENDO SWITCH™ 的替代設定
無線操作
1. 將選擇開關設定到無線開啟位置。
2. 使用 USB 混音轉接器,將耳機麥克風連
線到遊戲主機。
注意: 連線到 PlayStation 4 時,某些按鈕和功
能可能無法使用。 在 PlayStation 上無法使用
燈光和按鈕自訂功能。 連線到 PlayStation 時
無法呈現 7.1 環繞音效效果。
PlayStation 設定
1. 使用 USB 或 3.5 公釐連接線插入耳機麥
克風
2. 開啟「設定」
3. 選擇「音效和畫面」
4. 選擇「音訊輸出設定」
5. 將「輸出到耳機麥克風」設定為「所有
音訊」
46 繁體中文
Nintendo Switch 設定 (設定)
1. 將選擇開關設定到無線開啟位置。
2. 將 USB 無線轉接器連接到 Switch 電視連
接座的 USB 連接埠
3. 音訊輸出會自動變更為您的耳機麥克風

RGB 燈光區域自訂
• 區域 1: G 標誌
• 區域 2: 燈光條
每個燈光區域都可使用羅技 G
HUB 軟體進行自訂 (僅 PC 模式)
。www.logitech.com/support/g935
標籤自訂
左右自訂標籤可以取下,並使用自訂標籤
更換。
羅技 G HUB 軟體
使用羅技 G HUB 軟體可自訂 G 功能鍵
按鈕、燈光、等化器和環繞音效設定檔。
1. LIGHTSYNC 燈光技術
2. 指派
3. 音響效果
4. 等化器
1
2
3
4
47 繁體中文
1 2

顏色/等化器循環
G1 和 G3 按鈕預設是預先設定為循環切換燈
光和等化器設定檔。
如果耳機麥克風連線到執行羅技
G HUB 軟體的系統,其會循環切換在羅技
G HUB 軟體中自訂的所有等化器或燈光
選項。
如果耳機麥克風未連線到執行羅技 G HUB
軟體的系統,其會循環切換儲存在耳機麥
克風內建記憶體中的自訂燈光或等化器設
定檔。 這些設定檔可透過羅技 G HUB 軟體
進行自訂。
G3
G1
48 繁體中文

配對說明
如果您的裝置變成尚未配對,或您收到 USB
無線轉接器的替換品,請遵循下列指示配對
您的裝置與 USB 無線轉接器:
1. 插入 USB 無線轉接器
2. 將細針插入轉接器的重設連接埠,以啟
動配對模式
3. 轉接器上的指示燈會開始閃爍
4. 開啟耳機麥克風電源
5. 按住「麥克風靜音」按鈕 15 秒不放,
直到配對模式啟動
6. 耳機麥克風的 G 標誌會閃爍綠燈,表示
配對模式已啟動。
7. 之後標誌會變成穩定亮起,然後在配對完
成後回復為選擇的燈光。
轉接器 LED 指示燈
49 繁體中文

耳罩清潔
1. 取下 2. 清洗
a. 取下之後,耳墊可以
b. 請使用軟毛巾擦乾,
c. 在重新裝回之前將其
3. 更換
使用濕布擦拭乾淨。
不要使用洗潔劑。
不要擰乾。
晾乾。
50 繁體中文

내용물
1
2 2
1. G935 게이밍 헤드셋
2. 커스텀 태그(L/R)
3
4
3. 충전 케이블(USB - 마이크로 USB, 2m)
4. 3.5mm 케이블(1.5m)
51 한국어

기능
1
15
6
3.5mm
3
4
5
1. 조절식 패딩처리된 가죽 헤드밴드
2. 탈착식 백라이트 커스텀 태그
3. 붐 마이크 음소거 표시등 LED
4. 접이식 붐 마이크
위로 올리면 자동 음소거
5. 조명 영역(G 로고 + 조명 스트립)
6. 세척 가능한 가죽 이어패드
7. 무선 켜기/끄기 스위치
8. Pro-G 오디오 드라이버
9. 프로그래밍 가능 버튼(G1/G2/G3)
2
52 한국어
7
9
11
10. 배터리(이어컵에 내장)
11. 마이크 음소거
12. 볼륨 휠
13. 3.5mm
(모바일) 연결
14. USB 충전 연결
15. USB 무선 어댑터
8
10
12
13
14
헤드셋 버튼 레이아웃
1. 무선 켜기/끄기 스위치
2. G3(프로그래밍 가능):
기본 이퀄라이저(EQ) 사이클
• 로지텍 G HUB 소프트웨어의 EQ
설정이 차례로 전환됩니다
3. G2(프로그래밍 가능): 기본 서라운드
사운드 켜기/끄기
4. G1(프로그래밍 가능): 조명 사이클
• 로지텍 G HUB 소프트웨어에서 브리딩,
솔리드 사이안, 커스텀, 끄기 등의 조명
설정이 차례로 전환됩니다.
5. 마이크 음소거
6. 볼륨 휠
로지텍 G HUB 소프트웨어를 사용하여 G1,
G2 및 G3 프로그래밍 가능
(PC 모드에서만):
www.logitech.com/support/g935
참고: 버튼과 볼륨 휠은 무선 켜기 모드에서만
작동합니다. 일부 버튼과 기능은 PC 연결과
로지텍 G HUB 소프트웨어가 필요할 수
있습니다.
1
2
3
4
5
6
53 한국어

배터리 관리
G935 무선 헤드셋은 오른쪽 이어컵에
내장된 배터리를 통해 전원이 공급됩니다.
G935 무선 헤드셋을 사용하지 않는 경우,
장치의 하단에 있는 USB 포트를 통해
연결해서 충전하십시오. 완전히 소진되었을
때 표준 USB 출력에서 배터리를 완충하는
데는 약 3시간 30분이 걸립니다. 최적의
경험을 위해서는 최초로 사용하기 전에
장치를 연결해서 완전히 충전하도록
하십시오.
로지텍 G HUB 소프트웨어
로지텍 G HUB 소프트웨어의 홈 화면에는
배터리 충전 레벨 표시기가 있습니다.
배터리를 사용 중일 때 충전 레벨을
나타냅니다.
장치가 충전 중임을 나타냅니다.
54 한국어
위험 배터리 경고
G935 게이밍 헤드셋은 충전량이 부족할
경우 신호음을 울립니다. 헤드셋의 조명
역시 충전량이 부족해지면 어두워집니다.
충전 레벨이 극히 낮아지면 장치에서
신호음이 울리고 조명이 꺼집니다. 음악
감상이나 게임이 중단되지 않게 하려면
신호음을 들은 즉시 USB 충전 케이블을
사용해 헤드셋을 연결하십시오.
충전 표시기

절전 모드 켜기/끄기 신호음 및 조명
15분 내에 오디오 신호가 수신되지 않으면
배터리 전원 보존을 위해 G935가 절전
모드로 설정됩니다.
절전모드에서는 장치의 조명이 브리딩
모드로 전환되고 USB 무선 어댑터의 연결이
끊깁니다.
헤드셋의 버튼을 누르면 G935가 절전
모드에서 해제됩니다.
절전 모드에서 30분이 지나면 배터리
절약을 위해 헤드셋의 전원이 완전히
꺼집니다. 헤드셋을 다시 켜려면 전원
스위치를 껐다가 다시 켜야 합니다.
헤드셋을 장시간 동안 절전 상태로 둘
경우, 헤드셋을 끄고 USB를 통해 연결해서
충전하도록 하십시오.
55 한국어
헤드셋이 켜지면 헤드셋의 전원이 켜졌음을
나타내는 신호음이 울립니다. 전원 켜기
사이클 순서대로 조명이 켜진 후 현재
선택한 조명으로 전환됩니다.
장치가 꺼지면 조명이 파란색으로 바뀌고
전원이 꺼지는 동안 점점 사라집니다.

무선 켜기/끄기
G935는 무선 켜기, 무선 끄기 등 두 가지의
작동 모드를 지원합니다.
무선 켜기
무선 켜기 모드에서는 맞춤형 사운드
프로파일, RGB 조명, 마이크, 마이크 음소거,
무선, 오디오 믹싱 등을 포함하여 대부분의
헤드셋 기능을 이용할 수 있습니다1. 배터리
충전량이 부족하면 조명이 어두워지고
배터리 부족 신호음이 울립니다. 배터리
충전량이 극히 낮아지면 조명이 꺼집니다.
ON
무선 범위
2
실내: 15미터
배터리 수명
3
조명 없음: 12시간
기본 조명: 8시간
1 일부 기능에는 로지텍 G HUB 소프트웨어가 필요합니다.
2 범위는 환경 조건에 따라 다를 수 있습니다.
3 충전식 배터리는 일정 횟수만 충전할 수 있습니다. 배터리 수명은
50% 볼륨에서 측정했습니다.
56 한국어

무선 끄기(패시브 모드)
무선 끄기(패시브 모드)에서는 헤드셋이
패시브 무동력 모드에서 작동합니다.
헤드셋의 3.5mm 입력을 통해 연결된 어떤
장치에서든 헤드셋이 오디오를 재생합니다.
7.1 서라운드 사운드, 맞춤형 사운드
프로파일, 헤드셋 버튼, 볼륨 휠 조작, 버튼/
조명 커스터마이징 기능을 포함하여 전력을
필요로 하는 기능은 이 모드에서 사용할 수
없습니다.
붐 마이크는 이 모드에서 3.5mm 오디오
잭을 통해 연결된 장치를 통해 사용할 수
없습니다.
이 모드는 배터리 수명을 보존하기 위해
사용할 수 있습니다.
57 한국어
OFF

PC용 설정PC 모드
1. 로지텍 G HUB 소프트웨어 다운로드 및
설치: www.logitech.com/support/g935
2. 스위치를 무선 켜기 상태로 설정합니다.
3. USB 무선 어댑터를 PC에 연결합니다.
헤드셋이 자동으로 연결됩니다.
오디오 소스 믹싱
USB 무선 어댑터를 통해 연결된 경우,
3.5mm 케이블을 사용해 G935을 다른
오디오 소스(예: 스마트폰)에 연결할 수도
있습니다. 두 오디오 소스에서 동시에
재생할 수 있습니다.
58 한국어
1
2
ON
3
USB

PC용 설정3.5MM 연결
PC용 설정3.5MM 연결
G935는 3.5mm 케이블을 통해 오디오
장치에 연결할 수도 있습니다.
1. 패시브 오디오 모드의 경우 스위치를
무선 끄기 모드로 설정하고, 추가 기능을
지원하는 액티브 오디오 모드의 경우
무선 켜기 모드로 설정하십시오("무선
켜기/끄기" 섹션 참조).
2. 3.5mm 케이블을 사용하여 PC에
연결합니다.
7.1 서라운드 사운드, 헤드셋 버튼, 볼륨 휠
조작, 조명과 버튼 기능의 커스터마이징을
포함한 일부 기능은 USB 연결 없이는
사용할 수 없습니다. 무선 끄기 모드 중에는
3.5mm 장치에 대해 붐 마이크를 사용할 수
없습니다.
일부 PC는 이 모드에서 마이크 기능을
사용하기 위해서는 3.5mm 4극 - 마이크/
스테레오 스플리터 어댑터(별매)가 필요할
수 있습니다.
59 한국어
1
OFF
2
3.5mm

모바일용 설정
1. 패시브 오디오 모드에서치를 무선 끄기
모드로 설정하고, 추가 기능을 지원하는
액티브 오디오 모드에서는 무선 켜기
모드로 설정하십시오("무선 켜기/끄기"
섹션 참조).
2. 3.5mm 케이블을 통해 헤드셋을 모바일
장치에 연결합니다.
붐 마이크는 무선 켜기 모드에서만
사용할 수 있습니다.
1
OFF
2
3.5mm
60 한국어

콘솔용 설정: XBOX ONE™, PS4™ 또는 SWITCH™
1. 패시브 오디오 모드의 경우 스위치를
무선 끄기 모드로 설정하고, 추가 기능을
지원하는 액티브 오디오 모드에서는
무선 켜기 모드로 설정하십시오("무선
켜기/끄기" 섹션 참조).
2. 3.5mm 케이블을 사용하여 헤드셋을
콘솔 컨트롤러에 연결합니다.
• Xbox One에는 Xbox One 헤드셋
어댑터(별매)가 필요할 수도 있습니다.
PlayStation 설정(세팅)
1. 헤드셋을 연결합니다.
2. Settings(설정)를 엽니다.
3. “Sound and Screen(사운드 및 화면)”을
선택합니다.
4. “Audio Output Settings(오디오 출력
설정)”를 선택합니다.
5. “Output to Headphones(헤드폰으로
출력)”를 “All Audio(모든 오디오)”로
설정합니다.
Xbox One에서는 헤드셋이 USB 무선 믹스
어댑터를 통해 작동하지 않습니다.
붐 마이크는 무선 켜기 모드에서만 사용할
수 있습니다.
1
OFF
2
3.5mm
61 한국어

SONY PLAYSTATION® 4 & NINTENDO SWITCH™용 대체 설정
무선 작동
1. 스위치를 무선 켜기 위치로 설정합니다.
2. USB 무선 어댑터를 사용하여 헤드셋을
콘솔에 연결합니다.
참고: PlayStation 4에 연결한 경우 일부 버튼과
기능이 작동하지 않을 수 있습니다. PlayStation
에서는 조명 및 버튼의 프로그래밍이
불가능합니다. PlayStation에 연결된 경우에는
7.1 서라운드 사운드를 사용할 수 없습니다.
PlayStation 설정(세팅)
1. USB 또는 3.5mm 케이블을 통해
헤드셋에 연결합니다.
2. Settings(설정)를 엽니다.
3. “Sound and Screen(사운드 및 화면)”을
선택합니다.
4. “Audio Output Settings(오디오 출력
설정)”를 선택합니다.
5. “Output to Headphones(헤드폰으로
출력)”를 “All Audio(모든 오디오)”로
설정합니다.
Nintendo Switch 설정(세팅)
1. 스위치를 무선 켜기 위치로 설정합니다.
2. USB 무선 어댑터를 Switch TV Dock
내부의 USB 포트에 연결합니다.
3. 오디오 출력이 헤드셋으로 자동
변경됩니다.
62 한국어

RGB 조명 영역 커스터마이징
• 영역 1: G 로고
• 영역 2: 조명 스트립
각 조명 영역은 로지텍 G HUB(PC 모드
전용)로 프로그래밍할 수 있습니다.
www.logitech.com/support/g935
태그 커스터마이징
좌측 및 우측 커스텀 태그를 제거하고
커스텀 태그로 대체할 수 있습니다.
로지텍 G HUB 소프트웨어
로지텍 G HUB 소프트웨어를 사용하여
G 키 버튼, 조명, 이퀄라이저 및 서라운드
사운드 프로파일 프로그래밍이 가능합니다.
1. LIGHTSYNC 조명
2. 할당
3. 음향
4. 이퀄라이저
63 한국어
1 2
1
2
3
4

컬러/이퀄라이저 사이클링
G1 및 G3 버튼은 기본적으로 조명과
이퀄라이저 프로파일을 차례로 표시하도록
사전 설정되어 있습니다.
로지텍 G HUB 소프트웨어가 실행 중인
상태로 헤드셋이 연결된 경우, 로지텍 G
HUB 소프트웨어로 프로그래밍된 모든
이퀄라이저 또는 조명 옵션이 차례로
순환됩니다.
로지텍 G HUB 소프트웨어가 실행
중인 시스템에 헤드셋이 연결되지 않은
경우, 헤드셋의 온보드 메모리에 저장된
사용자 지정 조명 또는 이퀄라이저
프로파일이 차례로 순환됩니다. 로지텍
G HUB 소프트웨어를 통해 프로파일을
프로그래밍할 수 있습니다.
G3
G1
64 한국어

페어링 안내
장치의 페어링이 끊기거나 교체용 USB 무선
어댑터를 받은 경우, 다음의 지침을 따라
장치를 USB 무선 어댑터와 페어링하십시오.
1. USB 무선 어댑터를 연결합니다.
2. 핀을 어댑터의 리셋(reset) 포트에 넣어
페어링 모드를 시작합니다.
3. 어댑터의 조명이 깜박입니다.
4. 헤드셋을 켭니다.
5. 15초 동안 “마이크 음소거” 버튼을 눌러
페어링 모드를 시작합니다.
6. 헤드셋의 G 로고가 녹색 불로 깜박이면서
페어링 모드가 시작되었음을 나타냅니다.
7. 페어링되면 로고가 단색으로 바뀌고 현재
선택한 조명으로 복귀됩니다.
어댑터 LED 표시등
65 한국어

이어패드 청소
1. 분리 2. 세척
a. 이어패드를 제거한
b. 부드러운 타월로
c. 다시 부착하기 전에
3. 교체
후에는 젖은 헝겊으로
닦을 수 있습니다.
세제를 사용하지
마십시오.
이어패드를 눌러
물기를 말리십시오.
비틀어 짜지 마십시오.
건조시키십시오.
66 한국어

© 2018 Logitech, Logi, 罗技 and the Logitech Logo
are trademarks or registered trademarks of Logitech
EuropeS.A. and/or its aliates in the U.S. and other
countries. All other trademarks are the property of
theirrespective owners. Logitech assumes no responsibility
for any errors that may appear in this manual.
Information contained herein is subject to change
withoutnotice.
版权所有 ©2018 年罗技。Logi 和罗技标志为 Logitech
Europe S.A. 和/或其美国及其他国家/地区附属公司的注册
商标。所有其它商标均是其各自所有者的财产。 罗技对于
本手册中可能出现的任何错误不承担任何责任。 本手册中
包含的信息如有更改,恕不事先通知。
WEB-621-001182.002
版權所有 © 2018 年羅技。羅技、Logi 和其他羅技商標均歸
羅技所有,並或已註冊 所有其他商標。均是其各自所有人
的財產。 羅技對於本手冊中可能出現的任何錯誤不承擔任
何責任。 本手冊中包含的資訊如有更改,恕不事前通知。
© 2018 Logitech, Logi, Logitech 로고는 미국와 기타
국가에서 로지텍 유럽 및/또는 그 계열사의 상표 또는
등록 상표입니다. 그 밖의 모든 상표는 해당 소유자의
자산입니다. 그 밖의 모든 상표는 해당 소유자의
자산입니다. Logitech은 이 설명서에 명시된 어떤 오류에
대해서도 책임지지 않습니다. 이 설명서에 있는 정보는
예고 없이 변경될 수 있습니다.
 Loading...