

Getting started with
Logitech
®
HD Webcam C310

®
HD Webcam C310
Logitech
Contents
English . . . . . . . . . . . . . . . . . . . . . . . . . . . . . . . . . . . . . 3
繁體中文 . . . . . . . . . . . . . . . . . . . . . . . . . . . . . . . . . . . . 12
简体中文 . . . . . . . . . . . . . . . . . . . . . . . . . . . . . . . . . . . . 21
한국어. . . . . . . . . . . . . . . . . . . . . . . . . . . . . . . . . . . . . 30
2

Logitech
®
HD Webcam C310
12
3
4
Thank you for buying a Logitech webcam!
Use this guide to set up and begin using your
Logitech webcam.
If you have questions before you start, or if you
just want to learn more about your Logitech webcam, please visit logitech.com/support.
English 3
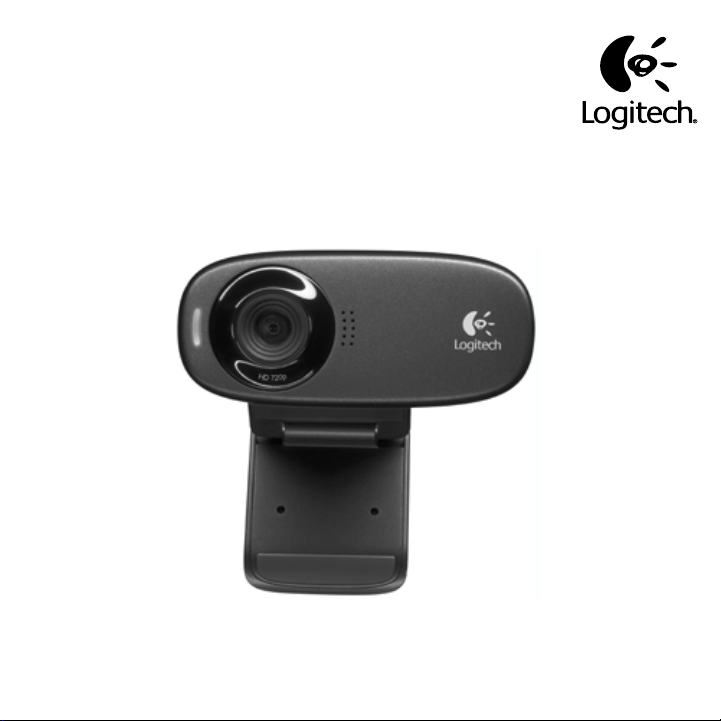
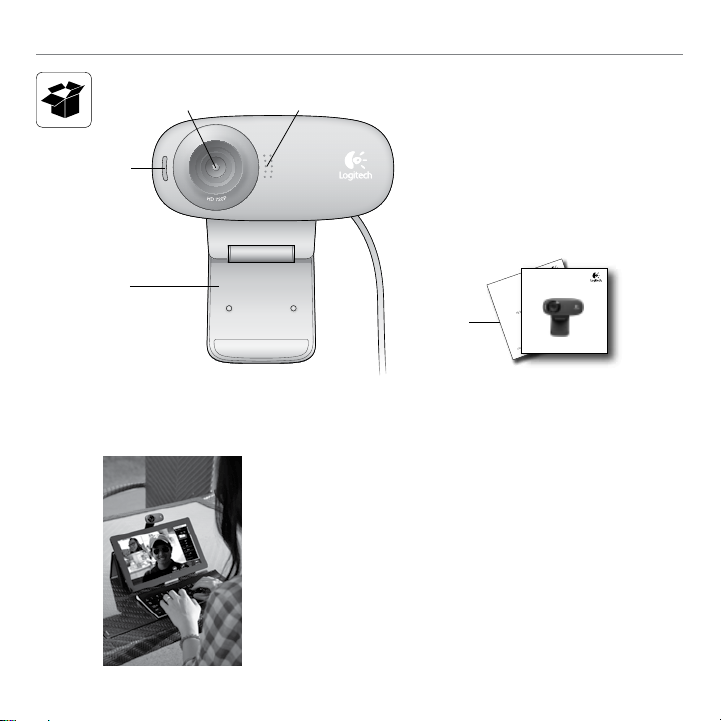
1. Microphone
2. Lens
3. Activity light
4. Flexible clip/base
5. Product documentation
Getting started with
HD
®
Logitech
Webcam C310
Important information
5
Safety, compliance, and warranty
Getting started with
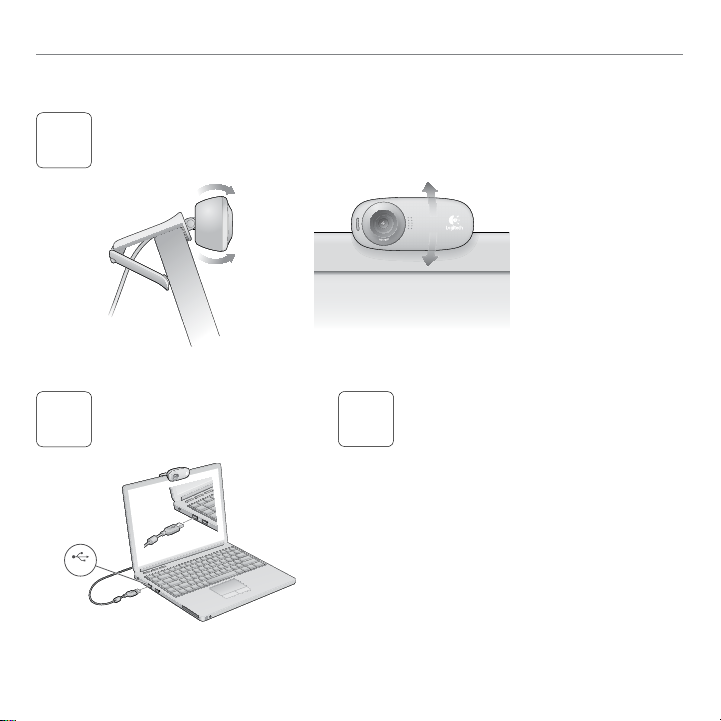
Setting up your webcam
Place your webcam
1
Connect your webcam
2
USB
4 English
Install software
3
If you’re using your webcam with Windows® 8, the
software required is downloaded automatically
when you connect your webcam for the first time,
and installed silently in the background.
Important: Make sure you’re connected to the
Internet, so the software can be downloaded.
If you’re using your webcam with Windows® 7 or
Windows Vista®, you must install the Logitech®
Webcam Software, available from:
logitech.com/downloads
Getting started with video calling
Your Logitech HD Webcam c310 provides HD 720p video calling.
To take advantage of video calling both you and the person you call must install
Skype™, or use a different video-calling application such as Yahoo!® Messenger,
Windows Live® Messenger or Gmail.
Learn more: skype.com
As well as a webcam and video calling application, both callers need:
•A computer with speakers (or a
headset) and a microphone; your
Logitech HD Webcam c310 has a
built-in microphone.
®
HD Webcam C310
Logitech
•A broadband Internet connection
(e.g., DSL, T1, or cable).
English 5
Getting started with
Using your webcam with Windows 8
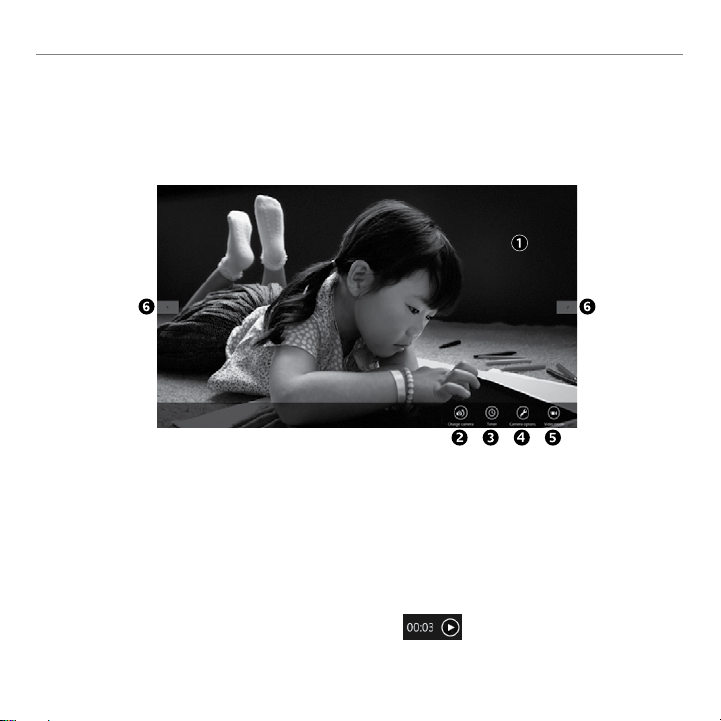
Use the Camera app, available from the Windows 8 Start screen, to operate and control your webcam.
Understanding the Camera app
1. Preview window. Click or tap to capture
photos or videos (depending on whether
Video Mode is selected).
2. Change webcams (when you have more
than one). The face of your Logitech
webcam illuminates when selected.
3. Adjust your camera settings.
4. Activate or deactivate the Timer feature.
When activated, there is a three second
countdown to capturing a photo or video.
6 English
5. Turn Video Mode on (to record videos) or
off (to take photos).
6. Click or tap on the arrows to scroll
through the photos and videos you have
captured.
Videos are denoted by a timer and play
button in the bottom right-hand corner:
®
HD Webcam C310
Logitech
Tip: The Camera app lets you use your webcam’s most popular features quickly and easily. If you
want to take advantage of the enhanced features your webcam offers, such as motion detection,
use the Logitech Webcam Software available from logitech.com/downloads.
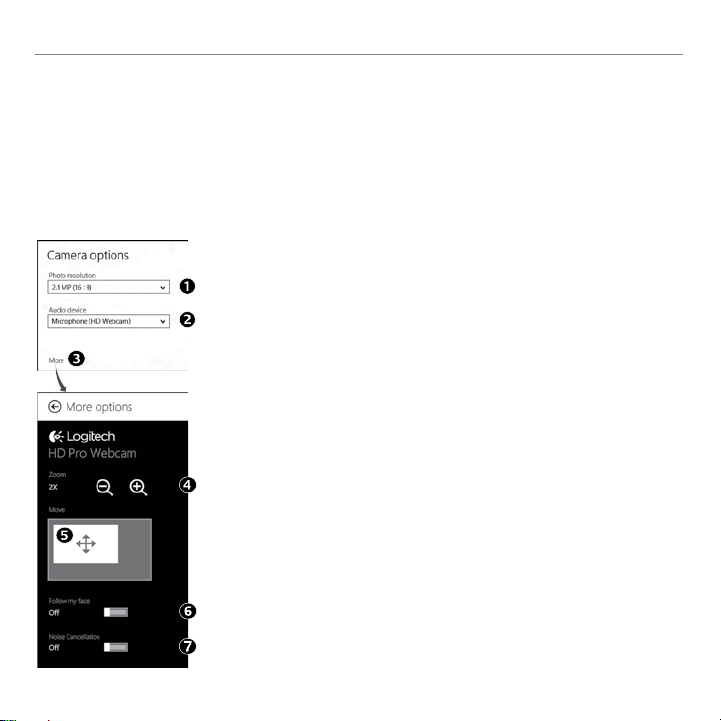
Adjusting your Camera settings
The Logitech software optimizes the settings for your environment automatically. To adjust any of
your settings choose Camera options. This is available from the Camera app (see the previous
page) and from within Metro apps that support webcams.
1. Choose your required resolution for photo capture, or
video capture when in Video Mode.
2. Choose the microphone you want to use to record
sound in your videos, if you have more than one
available.
3. Access More Options, to benefit from enhanced
features such as digital Zoom and Move.
If the More Options pane doesn’t show the Logitech
logo and offer enhanced options, it is likely that the
Logitech software didn’t install correctly when you first
connected your camera. To reinstall it, go to the Windows Store and look for Logitech Camera Controller.
4. Zoom in or out to include/exclude your surroundings.
5. Having zoomed in, drag the white box to pan (adjust
the focus area of your webcam).
6. Use Follow my face so you’re always in the picture.
7. Enjoy clear conversations without annoying background
noise.
Depending on the features available with your camera, you
can access further advanced settings by scrolling.
English 7
Getting started with
Sharing your photos and videos
You can share your photos and videos via e-mail, Twitter, Facebook®, YouTube®, or Microsoft SkyDrive®. Follow these steps:
1. In the Camera app, scroll to the photo or video you want to share.
2. Select Share in the Charms bar (or press - H):
3. Choose the media through which you want to share the photo or video.
8 English
®
HD Webcam C310
Logitech
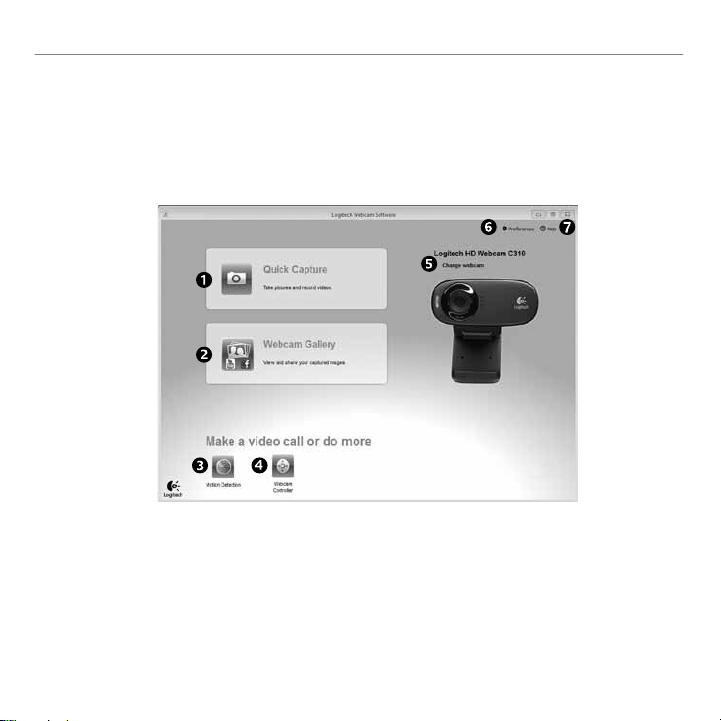
Using your webcam with Windows 7 and Windows Vista
The Logitech Webcam Software provides everything you need to use and control your webcam.
Launch the software from the Windows Start® menu, or by right-clicking on the camera icon in the
Windows taskbar.
Understanding the Logitech Webcam Software
1. Capture pictures and videos.
2. View captured images and share via
e-mail, Facebook, or YouTube.
3. Capture videos triggered by detected
motion.
4. Control your webcam while on a video
call.
5. Change webcams (when you have
more than one).
6. Open Logitech Webcam Software
settings.
7. Open help dashboard.
English 9
Getting started with
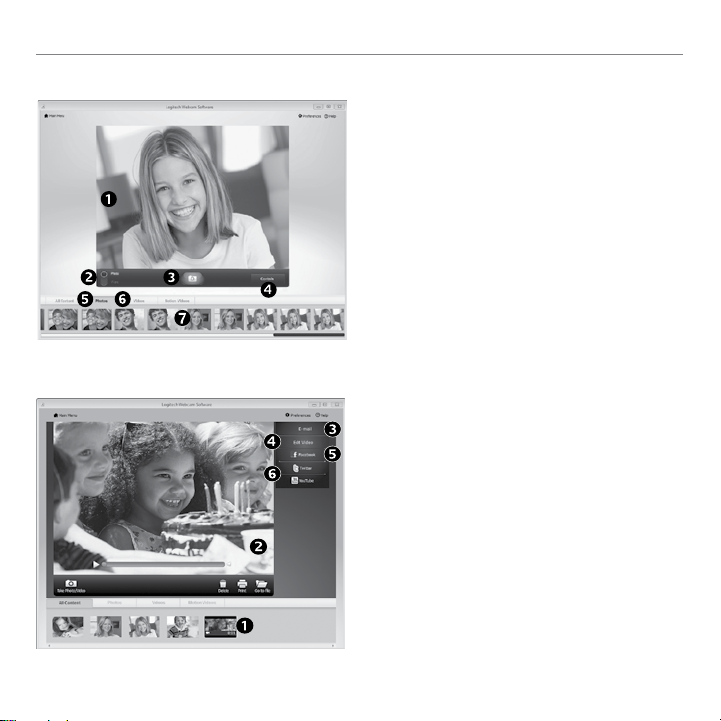
Capturing video and snapping pictures
The gallery: viewing and sharing
Quick Capture allows you to take photos and record videos easily.
You have quick access to webcam controls and
settings:
1. Preview window
2. Capture mode:
photo/video
3. Capture button
5. Photo thumbnails
6. Video thumbnails
7. Click a thumbnail
to enter the gallery
4. Webcam controls
Clicking on an image thumbnail in the webcam
gallery (1) opens the video or photo in the review
window (2). You can then:
•Attach the video or picture file to an e-mail (3)
•Edit the photo or splice together video (4)
•Upload the picture or video to Facebook (5)
•Upload the video to Twitter or YouTube (6)
You can also drag and drop a gallery image onto
one of the function tiles (items 3-6) to launch an
editing application or to attach or upload.
10 English
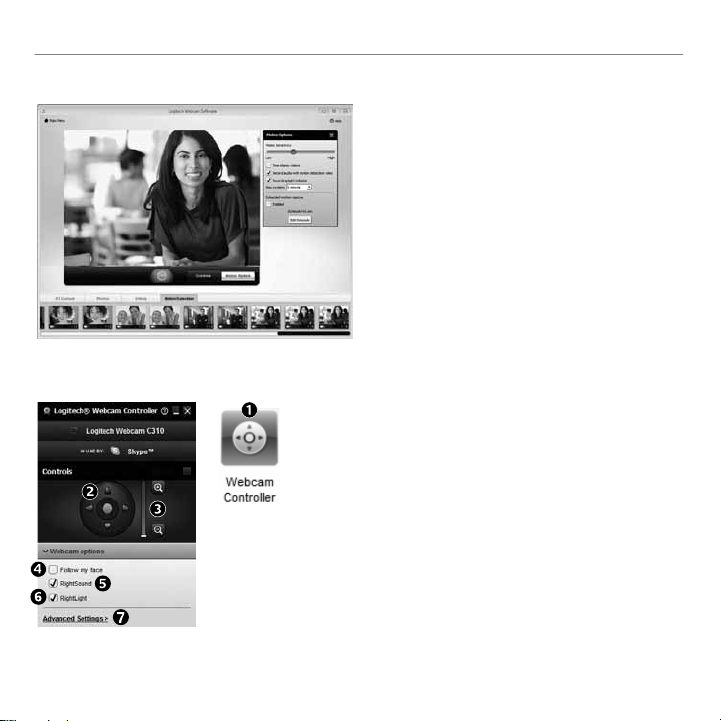
Using motion detection
Fine tuning your webcam during a video call
1. Launch the webcam controller when on a video call.
2. Use pan and tilt to find the best angle.
3. Zoom in or out to include/exclude your surroundings.
4. Use Follow my face so you’re always in the picture.
5. Enjoy clear conversations without annoying
background noise.
6. Correct for poor lighting environments using
RightLight.
7. Access advanced webcam settings.
®
HD Webcam C310
Logitech
•Set up your webcam to record video when
it detects movement.
•Adjust captured video duration and detection
sensitivity.
•Captured video is automatically saved
to your computer.
•View content in the Gallery or upload it using
the One-touch Upload window.
English 11
Getting started with
12
3
4
感謝您購買羅技的網路攝影機!
1. 麥克風
2. 鏡頭
3. 動作指示燈
4. 可調式腳架/底座
5. 產品文件
Getting started with
HD
®
Logitech
Webcam C310
Important information
5
Safety, compliance, and warranty
使用本指南可安裝並開始使用您的羅技網路攝
影機。
如在開始之前有任何問題,或是想要瞭解更多
關於羅技網路攝影機的資訊,請瀏覽 logitech.
com/support。
12 繁體中文

安裝網路攝影機
放置網路攝影機
1
Logitech® HD Webcam C310
連接您的網路攝影機
2
USB
安裝軟體
3
如果您是搭配 Windows® 8 使用網路攝影機,
當第一次連線您的網路攝影機時會自動下載必
要的軟體,並在背景自動安裝。
重要:請確認您已連線到網際網路,以便可以
下載軟體。
如果您是搭配 Windows® 7 或 Windows Vista®
使用網路攝影機,您必須安裝羅技® 網路攝影
機軟體,此軟體可從下列網址取得:
logitech.com/downloads
繁體中文 13

Getting started with
視訊通話快速入門
您的羅技 HD 網路攝影機 C310 可提供 HD 720p 視訊通話功能。
您與通話對象若要充分運用視訊通話的優點,則必須安裝 Skype™,或是使
用其他不同的視訊通話應用程式,例如 Yahoo!® Messenger、Windows Live®
Messenger 或 Gmail。
深入瞭解:skype.com
除了網路攝影機和視訊通話應用程式,通話雙方還需要:
•配備有音箱 (或是耳機麥克風) 與麥
克風的電腦;您的羅技 HD 網路攝
影機 C310 擁有內建麥克風。
•寬頻網際網路連線
(例如 DSL、T1 或 Cable)。
14 繁體中文

Logitech® HD Webcam C310
搭配 Windows 8 使用您的網路攝影機
使用位於 Windows 8 開始畫面的攝影機應用程式,可運作和控制您的網路攝影機。
瞭解攝影機應用程式
1. 預覽視窗。按一下或點按即可拍攝相片
或影片 (視是否已選取影片模式而定)。
2. 變更網路攝影機 (若您擁有一個以上的
網路攝影機)。當選取攝影機時,羅技
網路攝影機的正面會亮起。
3. 調整網路攝影機設定。
4. 啟用或停用計時器功能。啟用此功能
時,在倒數三秒後會拍攝相片或影片。
5. 開啟影片模式 (錄製影片) 或關閉影片
模式 (拍攝相片)。
6. 按一下或點按箭號即可捲動瀏覽所有已
拍攝的相片與影片。
影片會使用計時器標記,並且在右下角
有播放按鈕:
繁體中文 15

Getting started with
提醒:攝影機應用程式讓您可快速輕鬆地使用網路攝影機最常用的功能。如果您想要充分
發揮您網路攝影機的增強功能,例如動作偵測,請使用羅技網路攝影機軟體,此軟體可從
logitech.com/downloads 取得。
調整網路攝影機設定
羅技軟體會針對您的使用環境自動進行最佳化設定。若要調整任何設定,請選擇「攝影機選
項」。您可從攝影機應用程式 (參見上頁說明) 和支援網路攝影機的 Metro 應用程式中使用此
選項。
1. 選擇您拍攝相片所需的解析度,或是在影片模式中
錄製影片所需的解析度。
2. 選擇您要在影片中錄製聲音所要使用的麥克風 (如有
一個以上可用的麥克風時)。
3. 存取「更多選項」可以獲享增強功能的優勢,例如
「縮放」和「移動」。
如果「更多選項」窗格並未顯示羅技標誌和增強選
項,則可能是當您第一次連接到攝影機時羅技軟體
並未正確安裝。若要重新安裝軟體,請移至 Windows
商店並尋找「Logitech Camera Controller」(羅技攝影
機控制器)。
4. 放大或縮小以納入/去除周遭背景。
5. 當放大時,拖曳白色方塊可以平移 (調整攝影機的對
焦區域)。
6. 使用「臉部追蹤」功能讓您永遠位於相片範圍中。
7. 消除惱人的背景雜音,讓對話更清晰。
視您的攝影機上可使用的功能而定,進行捲動可以存
取更多進階設定。
16 繁體中文

Logitech® HD Webcam C310
分享您的相片與影片
您可以透過電子郵件、Twitter、Facebook®、YouTube® 或 Microsoft SkyDrive® 來分享您的相片
與影片。請遵循下列步驟:
1. 在攝影機應用程式中,捲動到您要分享的相片或影片。
2. 在 Charms 列中選取「分享」(或是按下
- H):
3. 選擇您分享相片與影片所要使用的媒體。
繁體中文 17

Getting started with
搭配 Windows 7 與 Windows Vista 使用網路攝影機
羅技網路攝影機軟體提供您使用與控制網路攝影機所需的全部功能。請從「Windows 開始®」
功能表,或是在 Windows 工作列上的攝影機圖示上按一下右鍵來啟動軟體。
瞭解羅技網路攝影機軟體
1. 拍攝相片和影片
2. 檢視拍攝的影像並透過電子郵
件、Facebook® 或 YouTube® 分享。
3. 偵測到動作時觸發影片拍攝。
4. 在進行視訊通話時控制網路攝
影機。
18 繁體中文
5. 變更網路攝影機 (若您擁有一個以上
的網路攝影機)。
6. 開啟「羅技網路攝影機軟體」
設定。
7. 開啟說明主控台。

錄製影片和拍攝相片
藝廊:檢視與共享
Logitech® HD Webcam C310
「快速拍攝」可讓您輕鬆拍攝相片或是錄製
影片。
您可以透過下列方式快速存取網路攝影機的
控制功能與設定:
1. 預覽視窗
2. 拍攝模式:相片/
影片
3. 拍攝按鈕
5. 相片縮圖
6. 影片縮圖
7. 按一下縮圖可進
入藝廊
4. 網路攝影機控制
功能
按一下網路攝影機藝廊 (1) 中的影像縮圖,可
在檢閱視窗 (2) 中開啟影片或相片。然後您可
以執行下列動作:
•將影片或相片檔案附加至電子郵件 (3)
•編輯相片或剪輯影片 (4)
•將相片或影片上傳至 Facebook (5)
•將影片上傳至 Twitter 或 YouTube (6)
您也可以將藝廊影像拖放至其中一個功能方
塊 (項目 3-6),以啟動編輯應用程式或是執行
附加或上傳操作。
繁體中文 19

Getting started with
使用動作偵測
進行視訊通話時微調網路攝影機
•設定網路攝影機在偵測到動作時執行
錄影。
•調整拍攝影片的長度和偵測靈敏度。
•拍攝的影片會自動儲存至電腦上。
•在「藝廊」中檢視內容,或是使用「單按
式上傳」視窗來上傳內容。
1. 進行視訊通話時啟動網路攝影機控制器。
2. 使用鏡頭位移功能尋找最佳角度。
3. 放大或縮小以納入/去除周遭背景。
4. 使用「臉部追蹤」功能讓您永遠位於相片範圍中。
5. 消除惱人的背景雜音,讓對話更清晰。
6. 使用 RightLight 修正照明不良的環境。
7. 存取進階網路攝影機設定。
20 繁體中文

Logitech® HD Webcam C310
3
4
感谢您购买罗技网络摄像头!
12
1. 麦克风
2. 镜头
3. 活动指示灯
4. 可调式通用夹/底座
5. 产品文档
Getting started with
HD
®
Logitech
Webcam C310
Important information
5
Safety, compliance, and warranty
使用本指南设置并开始使用罗技网络摄像头。
如果您在开始前有什么问题,或者您想了解
更多有关罗技网络摄像头的信息,请访问
logitech.com/support。
简体中文 21

Getting started with
设置网络摄像头
放置网络摄像头
1
连接网络摄像头
2
USB
22 简体中文
安装软件
3
如果您的操作系统为 Windows® 8,所需软件会
在第一次连接网络摄像头时自动下载,并在后
台静默安装。
重要提示:请确保已连接网络,以便下载
软件。
如果您的操作系统为 Windows® 7 或 Windows
Vista®,则必须手动安装罗技® 网络摄像头软
件,下载地址为:
logitech.com/downloads

开始进行视频通话
罗技高清网络摄像头 c310 为您提供 720p 高清视频通话。
要使用视频通话,您和您的通话对象必须都要安装 Skype™,或使用其他视频
通话应用程序,例如 Yahoo!® Messenger、Windows Live® Messenger 或 Gmail。
如欲了解更多信息,请访问 skype.com
要使用网络摄像头和视频通话,两名通话者都需要:
Logitech® HD Webcam C310
•一台装有扬声器(或耳机麦克风)
的电脑和一只麦克风;罗技高清
网络摄像头 c310 拥有一个内置麦
克风。
•宽带互联网连接
(例如 DSL、T1 或专线)。
简体中文 23

Getting started with
在 Windows 8 中使用网络摄像头
使用 Windows 8“开始”菜单中的摄像头应用程序运行和控制网络摄像头。
了解摄像头应用程序
1. 预览窗口。单击或轻点以拍摄照片或视
频(取决于是否选中“视频模式”)。
2. 更改网络摄像头(当您拥有不止一个
时)。罗技网络摄像头在被选中时前
部会亮起。
3. 调整摄像头设置。
4. 激活或取消“计时器”功能。激活之
后,拍摄照片或视频之前会有三秒钟
24 简体中文
的倒计时。
5. 打开(录制视频)或关闭(拍摄照
片)“视频模式”。
6. 单击或轻点箭头滚动所拍照片和视频。
视频录制由右下角的计时器和播放按
钮指示:

Logitech® HD Webcam C310
提示:摄像头应用程序可让您轻松快捷地使用网络摄像头最常用的功能。如果想要利用网络
摄像头提供的增强功能,比如动作检测,请从 logitech.com/downloads 上下载罗技网络摄
像头软件。
调整摄像头设置
罗技软件会根据您的环境自动优化设置。要调整设置,请选择“摄像头选项”。可在摄像头
应用程序(请参阅前一页)和支持网络摄像头的 Metro 应用程序中选择。
1. 选择拍摄图片和视频(处于“视频模式”中时)
的分辨率。
2. 如果有多个麦克风,请选择其中一个录制视频
声音。
3. 要享用数字缩放和移动等增强功能,请访问“更多
选项”。
如果“更多选项”窗格没有显示罗技标志和提供增
强功能选项,可能是由于首次连接摄像头时罗技
软件未能正确安装。要重新安装,请访问 Windows
Store 选择罗技摄像头控制器。
4. 将镜头拉近或拉远以显示或隐藏周围环境。
5. 拉近之后,拖动白色方框进行平移(调节网络摄像
头的对焦区域)。
6. 使用面部跟踪确保您一直处于画面之中。
7. 享受语音清晰的对话,免受背景噪声的干扰。
取决于摄像头的可用功能,您可以通过滚动访问高级
设置。
简体中文 25

Getting started with
分享现有照片和视频
您可以通过电子邮件、Twitter、Facebook®、YouTube® 或者 Microsoft SkyDrive® 分享照片和视
频。按下列步骤进行:
1. 在摄像头应用程序中滚动选择想要分享的照片或视频。
2. 在 Charm 工具栏中选择“分享”(或按
- H):
3. 选择分享照片或视频所用的媒体。
26 简体中文

Logitech® HD Webcam C310
在 Windows 7 和 Windows Vista 中使用网络摄像头
罗技网络摄像头为您提供使用和控制网络摄像头所需的一切功能。从 Windows“开始”®菜单
启动软件,或右键单击 Windows 工具栏中的摄像头图标。
了解罗技网络摄像头软件
1. 拍摄照片和视频。
2. 通过电子邮件、Facebook 或
YouTube 查看和分享拍摄的图片。
3. 通过检测到的动作触发视频拍摄。
4. 在视频通话时控制网络摄像头。
5. 更改网络摄像头(当您拥有不止一
个时)。
6. 打开罗技网络摄像头软件设置。
7. 打开帮助面板。
简体中文 27

Getting started with
拍摄视频和照片
“快速拍摄”让您可以轻松地拍摄照片和录
制视频。
网络摄像头设置快速、操作便捷:
图库:查看和分享
28 简体中文
1. 预览窗口
2. 拍摄模式:照片/
视频
3. 拍摄按钮
5. 照片缩略图
6. 视频缩略图
7. 单击缩略图以进
入图库
4. 网络摄像头控键
点击网络摄像头图库 (1) 中的图像缩略图可在
预览窗口 (2) 中打开该视频或照片。您可以执
行以下操作:
•将视频或照片文件以附件形式添加至电子
邮件 (3)
•编辑照片或拼接视频 (4)
•上传照片或视频至 Facebook (5)
•上传视频至 YouTube (6)
您也可以将图库图像拖放至其中一个功能磁
贴上(3-6 项)以启动编辑应用程序,添加附
件或进行上传。

使用运动检测
在视频通话中对网络摄像头进行微调
Logitech® HD Webcam C310
•将网络摄像头设置为当其检测到运动时开
始录制视频。
•调整拍摄的视频时间长度和检测灵敏度。
•拍摄的视频将自动储存至电脑。
•查看“图库”中的内容或使用“一键上
传”窗口将其上传。
1. 在视频通话中启动网络摄像头控制器。
2. 上下左右移动,找到最佳视角。
3. 将镜头拉近或拉远以显示或隐藏周围环境。
4. 使用面部跟踪确保您一直处于画面之中。
5. 享受语音清晰的对话,免受背景噪声的干扰。
6. 使用 RightLight 针对较差的光照环境进行校正。
7. 访问网络摄像头高级设置。
简体中文 29

Getting started with
12
3
4
로지텍 웹캠을 구입해 주셔서 감사합니다.
이 설명서를 참조하여 로지텍 웹캠을 설치하고
사용을 시작하십시오.
시작하기 전에 질문이 있는 경우나 로지텍 웹
캠에 대한 추가 정보를 보려면 logitech.com/
support를 참조하십시오.
1. 마이크
2. 렌즈
3. 작동 표시등
4. 플렉서블 클립/베이스
5. 제품 설명서
Getting started with
HD
®
Logitech
Webcam C310
Important information
5
Safety, compliance, and warranty
30 한국어

웹캠 설정
1
Logitech® HD Webcam C310
웹캠 거치하기
2
USB
웹캠 연결
소프트웨어 설치
3
Windows® 8에서 웹캠을 사용 중인 경우, 처음
으로 웹캠을 연결하면 필요한 소프트웨어가
자동으로 다운로드되고 백그라운드에서 자동
으로 설치됩니다.
중요: 소프트웨어를 다운로드할 수 있도록 인
터넷에 연결되어 있는지 확인하십시오.
Windows® 7 또는 Windows Vista®를 사용 중인
경우, 다음에서 로지텍 웹캠 소프트웨어를 다
운로드하여 설치해야 합니다.
logitech.com/downloads
한국어 31

Getting started with
화상 통화 시작하기
로지텍 HD 웹캠 c310은 HD 720p 화상 통화를 제공합니다.
사용자 및 사용자가 전화를 거는 상대방 모두 화상 통화를 이용하려면 Skype™
를 설치하거나 Yahoo!® Messenger, Windows Live® Messenger 또는 Gmail과 같은
다양한 화상 통화 응용 프로그램을 사용해야 합니다.
추가 정보: skype.com
웹캠 및 화상 통화 응용 프로그램뿐만 아니라 두 통화 이용자 모두 다음이 필
요합니다.
•스피커(또는 헤드셋) 및 마이크가
있는 컴퓨터. 로지텍 HD 웹캠 c310
에는 마이크가 내장되어 있습니다.
•광대역 인터넷 연결
(DSL, T1, 케이블 등)
32 한국어

Logitech® HD Webcam C310
Windows 8에서 웹캠 사용
Windows 8 시작 화면에서 제공되는 카메라 응용 프로그램을 사용하여 웹캠을 작동하거나 제어
합니다.
카메라 응용 프로그램 이해
1. 미리보기 창. 사진이나 비디오를 캡처
하려면 클릭하거나 터치합니다(비디오
모드 선택 여부에 따라).
2. 웹캠을 변경합니다(여러 개를 사용하는
경우). 선택한 경우 로지텍 웹캠의 정면
에 불이 들어옵니다.
3. 카메라 설정을 조정합니다.
4. 타이머 기능을 활성화하거나 비활성화
합니다. 활성화된 경우 사진이나 비디
오 캡처를 위한 3초 카운트다운이 실
행됩니다.
5. 비디오 모드를 켜거나(비디오 기록용)
끕니다(사진 촬영용).
6. 화살표를 클릭하거나 터치하여 캡처한
사진 및 비디오를 스크롤합니다.
비디오에는 오른쪽 모서리 하단에 타이
머 및 재생 버튼이 표시됩니다.
한국어 33

Getting started with
팁: 카메라 응용 프로그램을 통해 웹캠의 가장 인기 있는 기능을 빠르고 쉽게 사용할 수 있습
니다. 동작 감지 등 웹캠이 제공하는 고급 기능을 이용하려면 logitech.com/downloads에서
제공되는 로지텍 웹캠 소프트웨어를 사용하십시오.
카메라 설정 조정
로지텍 소프트웨어는 자동으로 사용자 환경의 설정을 최적화합니다. 설정을 조정하려면 카
메라 옵션을 선택하십시오. 카메라 옵션은 카메라 응용 프로그램(이전 페이지 참조) 및 웹캠
을 지원하는 Metro 응용 프로그램에서 사용할 수 있습니다.
1. 비디오 모드인 경우 사진 캡처 또는 비디오 캡처를 위해
필요한 해상도를 선택합니다.
2. 두 개 이상의 마이크를 사용할 수 있는 경우, 비디오에서
사운드를 녹음하는 데 사용하려는 마이크를 선택합니다.
3. More Options(추가 옵션)에 액세스하면 디지털 확대/축
소 및 이동과 같은 고급 기능을 이용할 수 있습니다.
More Options(추가 옵션) 창에 로지텍 로고가 표시되지
않고 고급 옵션을 제공하지 않는 경우, 카메라를 처음 연
결했을 때 로지텍 소프트웨어가 제대로 설치되지 않았을
수 있습니다. 다시 설치하려면 Windows 스토어로 이동하
여 로지텍 카메라 컨트롤러를 찾으십시오.
4. 확대 또는 축소하여 주변을 포함시키거나 제외시킵니다.
5. 확대한 경우 흰색 상자를 끌어 팬합니다(웹캠의 초점 영
역 조정).
6. Follow my face(얼굴 추적)를 사용하여 사진에 자신의 얼
굴이 항상 보이게 합니다.
7. 주변 소음 없이 깨끗한 품질로 대화할 수 있습니다.
카메라에서 사용 가능한 기능에 따라 스크롤하여 추가 고급
설정을 액세스할 수 있습니다.
34 한국어

Logitech® HD Webcam C310
사진 및 비디오 공유
이메일, Twitter, Facebook®, YouTube® 또는 Microsoft SkyDrive®를 통해 사진 및 비디오를 공유할
수 있습니다. 다음 단계를 따르십시오.
1. 카메라 응용 프로그램에서 공유하려는 사진 또는 비디오로 스크롤합니다.
2. Charm 표시줄에서 공유를 선택합니다(또는 - H 누르기).
3. 사진 또는 비디오를 공유하려는 미디어를 선택합니다.
한국어 35

Getting started with
Windows 7 및 Windows Vista에서 웹캠 사용
로지텍 웹캠 소프트웨어는 웹캠을 사용하고 제어하는 데 필요한 모든 사항을 제공합니다.
Windows 시작® 메뉴에서 또는 Windows 작업 표시줄의 카메라 아이콘을 마우스 오른쪽 버튼
으로 클릭하여 해당 소프트웨어를 실행합니다.
로지텍 웹캠 소프트웨어 이해
1. 사진 및 비디오를 캡처합니다.
2. 캡처한 이미지를 보고 이메일,
Facebook 또는 YouTube를 통해 공유
합니다.
3. 감지된 동작으로 트리거된 비디오
를 캡처합니다.
36 한국어
4. 화상 통화 중에 웹캠을 제어합니다.
5. 웹캠을 변경합니다(여러 개를 사용
하는 경우).
6. 로지텍 웹캠 소프트웨어 설정을 엽
니다.
7. 도움말 대시보드를 엽니다.

비디오 캡처 및 사진 촬영
갤러리: 보기 및 공유
Logitech® HD Webcam C310
빠른 캡처를 이용하면 간편하게 사진을 찍고 비
디오를 녹화할 수 있습니다.
웹캠 컨트롤 및 설정에 빠르게 액세스할 수 있
습니다.
1. 미리보기 창
2. 캡처 모드: 사진/
비디오
3. 캡처 버튼
4. 웹캠 컨트롤
5. 사진 썸네일
6. 비디오 썸네일
7. 썸네일을 클릭하면
갤러리가
표시됩니다.
웹캠 갤러리(1)의 이미지 썸네일을 클릭하면 다
시보기 창(2)에서 비디오나 사진이 열립니다. 그
러면 다음을 수행할 수 있습니다.
•이메일에 비디오나 사진 파일을 첨부합니다(3).
•사진을 편집하거나 비디오를 연결합니다(4).
•Facebook에 사진이나 비디오를 업로드합니
다(5).
•Twitter 또는 YouTube에 비디오를 업로드합니
다(6).
그 외에도 갤러리 이미지를 기능 타일 중 하나
(3-6 항목)에 끌어다 놓고 편집 응용 프로그램을
시작하거나 첨부 또는 업로드할 수 있습니다.
한국어 37

Getting started with
동작 감지 기능 이용
화상 통화 중 웹캠 미세 조정
•동작이 감지되면 비디오를 녹화하도록
웹캠을 설정합니다.
•캡처된 비디오 길이와 감도를 조정합니다.
•캡처된 비디오는 컴퓨터에 자동으로
저장됩니다.
•갤러리의 내용을 보거나 원터치 업로드
창을 이용해 업로드합니다.
1. 화상 통화 중 웹캠 컨트롤러를 시작합니다.
2. 좌우상하로 회전하여 최상의 각도를 찾습니다.
3. 확대 또는 축소하여 주변을 포함시키거나
제외시킵니다.
4. Follow my face(얼굴 추적)를 사용하여 사진에
자신의 얼굴이 항상 보이게 합니다.
5. 주변 소음 없이 깨끗한 품질로 대화할 수 있습니다.
6. RightLight를 사용하여 저조명 환경을 보정합니다.
7. 고급 웹캠 설정에 액세스합니다.
38 한국어

Logitech
®
HD Webcam C310
39

www.logitech.com
© 2012 Logitech. All rights reserved. Logitech, the Logitech logo, and other Logitech marks are owned
by Logitech and may be registered. All other trademarks are the property of their respective owners.
Logitech assumes no responsibility for any errors that may appear in this manual. Information contained
herein is subject to change without notice.
620-002973.005
 Loading...