


Logitech 961144-0403 - Quickcam Cordless Web Camera, Quickcam Cordless Setup
Setup
QuickCam
Cordless
®

© 2002 Logitech. All Rights Reserved. Logitech, the Logitech logo, and other Logitech marks are owned by Logitech and may be registered.
All other trademarks are the property of their respective owners. Logitech assumes no responsibility for any errors that may appear in this manual.
Information contained herein is subject to change without notice.
Part Number:
FCC Compliance and Advisory Statement.
two conditions: 1) this device may not cause harmful interference, and 2) this device must accept any interference received, including interference
that may cause undesired operation. This equipment has been tested and found to comply with the limits for a Class B digital device, pursuant
to Part 15 of the FCC Rules. These limits are designed to provide reasonable protection against harmful interference in a residential installation.
This equipment generates, uses, and can radiate radio frequency energy and, if not installed or used in accordance with the instructions, may cause
harmful interference to radio communications. However, there is no guarantee that interference will not occur in a particular installation.
If this equipment does cause harmful interference to radio or television reception, which can be determined by turning the equipment off and on,
the user is encouraged to try to correct the interference by one or more of the following measures: 1) reorient or relocate the receiving antenna;
2) increase the separation between the equipment and the receiver; 3) connect the equipment to an outlet on a circuit different from that to which
the receiver is connected; 4) consult the dealer or an experienced radio/TV technician for help. Any changes or modifications not expressly approved
by the party responsible for compliance could void the user's authority to operate the equipment. Where shielded interface cables have been
provided with the product or specified additional components or accessories elsewhere defined to be used with the installation of the product,
they must be used in order to ensure compliance with FCC regulations.
Canadian DOC Statement.
the interference-causing equipment standard entitled “Digital Apparatus,” ICES-003 of the Depar tment of Communications.
This device complies with RSS-210 of Industry and Science Canada. Operation is subject to the following two conditions: 1) this device may not
cause interference, and 2) this device must accept any interference, including interference that may cause undesired operation of the device.
© 2002 Logitech. Tous droits réservés. Logitech, le logo Logitech et les autres marques Logitech sont la propriété exclusive de Logitech et sont
susceptibles d’être des marques déposées. Toutes les autres marques sont la propriété exclusive de leurs détenteurs respectifs. Logitech décline
toute responsabilité en cas d'erreurs dans ce manuel. Les informations énoncées dans le présent document peuvent faire l’objet de modifications
sans avis préalable.
Déclaration FCC.
aux conditions suivantes: 1) l'équipement concerné ne doit pas causer d'interférences dangereuses, et 2) il doit accepter toute interférence reçue,
y compris les interférences risquant d'engendrer un fonctionnement indésirable. Cet équipement a été testé et déclaré conforme aux limitations
prévues dans le cadre de la catégorie B des appareils numériques défini par la section 15 du règlement de la FCC. Ces limitations sont stipulées aux
fins de garantir une protection raisonnable contre les interférences gênantes en installation résidentielle. Cet équipement génère, utilise et diffuse
des ondes radio, et s'il n'est pas installé ni utilisé en conformité avec les instructions dont il fait l'objet, peut causer des interférences gênantes avec
les communications radio. Cependant, nous ne pouvons vous garantir qu'une interférence ne se produira pas dans une installation particulière.
Si cet équipement produit des interférences graves lors de réceptions radio ou télévisées qui peuvent être détectées en allumant et en éteignant
l'équipement, vous êtes invités à les supprimer de plusieurs manières: 1) Réorienter ou déplacer l'antenne de réception; 2) Augmenter la distance
séparant l'équipement et le récepteur; 3) Connecter l'équipement à un circuit différent de celui auquel le récepteur est connecté; 4) Contacter votre
revendeur ou un technicien radio/TV qualifié. Toutes modifications ou tous changements effectués sans l'accord exprès de la partie responsable de
la conformité aux normes pourraient contraindre l'utilisateur à ne plus utiliser son équipement. Afin d'assurer la conformité avec les règlements FCC,
les câbles d'interface blindés fournis avec le produit doivent être utilisés, ainsi que tout autres composants ou accessoires également spécifiés,
lors de l'installation du produit.
Déclaration du Ministère des Communications Canadien.
d'interférences radio par des appareils numériques de catégorie B, telles que stipulées dans le cadre de la norme Appareils numériques ICES-003
édictée par le Ministère canadien de l’Industrie.
Cet équipement a été déclaré conforme à la norme RSS-210 édictée par le Ministère canadien des Sciences et de l'Industrie. Son fonctionnement
est soumis aux conditions suivantes: 1) l'équipement concerné ne doit pas causer d'interférences, et 2) il doit accepter toute interférence reçue, y
compris les interférences risquant d'engendrer un fonctionnement indésirable.
623021-0403
This hardware device complies with Part 15 of the FCC Rules. Operation is subject to the following
This digital device does not exceed the Class B limits for radio noise emissions from digital apparatus specified in
Cet équipement a été testé et déclaré conforme à la section 15 du règlement de la FCC. Son fonctionnement est soumis
Cet appareil numérique est conforme aux limitations concernant l'émission
ii

Contents
English . . . . . . . . . . . . . . . . . . . . . . . . . . . . . . . . . . . . . . . . . . . . . . . . . . . . . . . . . . . . . . 1
Español . . . . . . . . . . . . . . . . . . . . . . . . . . . . . . . . . . . . . . . . . . . . . . . . . . . . . . . . . . . . . 9
Français . . . . . . . . . . . . . . . . . . . . . . . . . . . . . . . . . . . . . . . . . . . . . . . . . . . . . . . . . . . . . 17
Português . . . . . . . . . . . . . . . . . . . . . . . . . . . . . . . . . . . . . . . . . . . . . . . . . . . . . . . . . . .25
iii

1
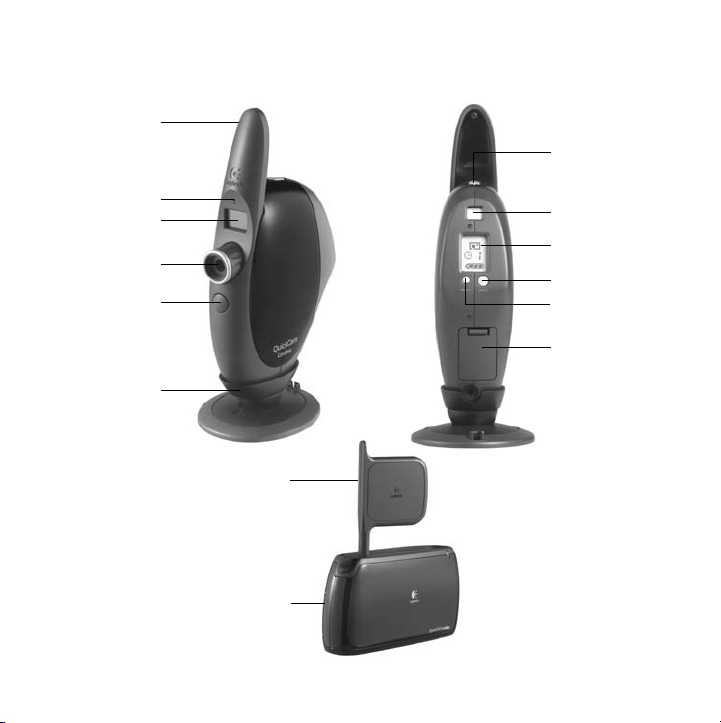
Camera antenna
Camera Features
Power button
Microphone
View finder
Lens
Shutter button
Camera stand
Receiver antenna
Receiver
View finder
Status display
Select button
Mode button
Battery
compartment
English
1
2
1.
2.
3.
4.
5.
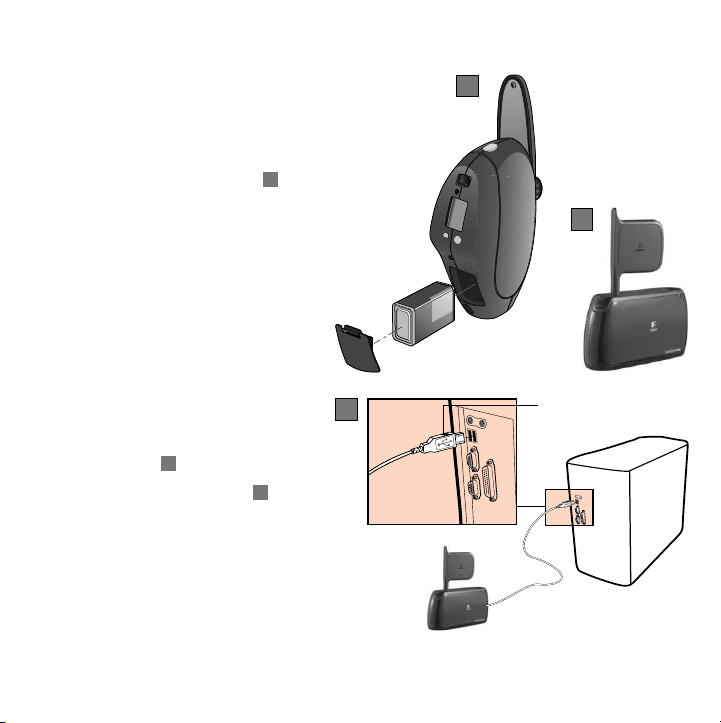
Set Up the Camera
Install software first.
Follow on-screen instructions.
Install batteries in camera .
Refer to the diagram inside
battery compartment.
Turn on camera. Press and hold
camera’s power button
for two seconds.
Note Power Save is on by
default. Camera turns
itself off after 10 minutes
of inactivity. Press Power
button to turn camera
back on.
Insert receiver cable into
USB port when prompted
by software .
Deploy receiver antenna .
A
b
a
A
a
c
b
A
c
USB connector
2
English
6.
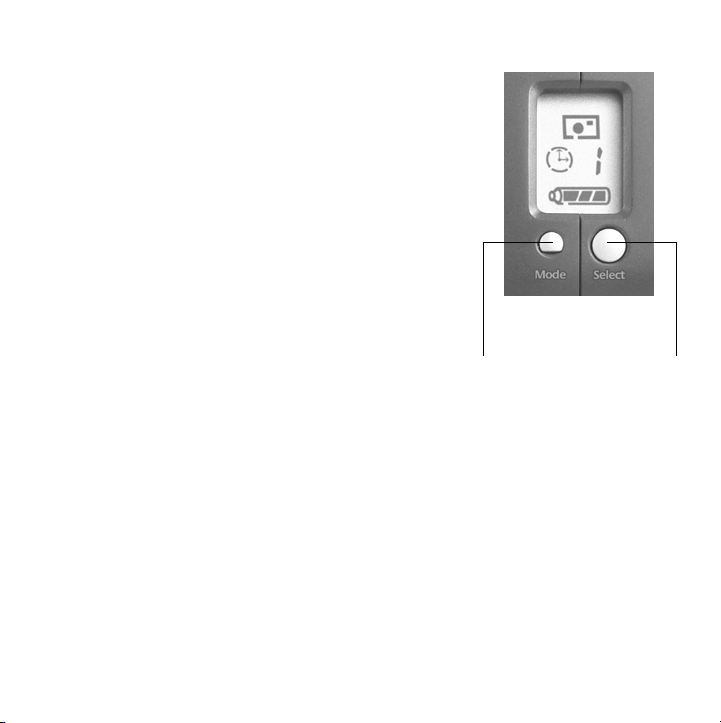
Mode
button
Select
button
Establish communication between camera and
receiver by selecting a channel:
• If the Preview Test Page displays a clear image
from the camera, simply continue. If not, select
the “Troubleshoot” button to select the channel.
To change the channel later in the software,
select Camera Settings under Preview Window,
and choose Cordless tab.
• Select the same channel that is indicated
on the camera.
Camera and software must
have same channel number.
• To change the channel on the camera,
use Mode button on camera to choose Channel
Indicator on Status Display.
• Use Select button to choose a channel,
1 through 4.
• Click OK. Installation is now complete.
English
3
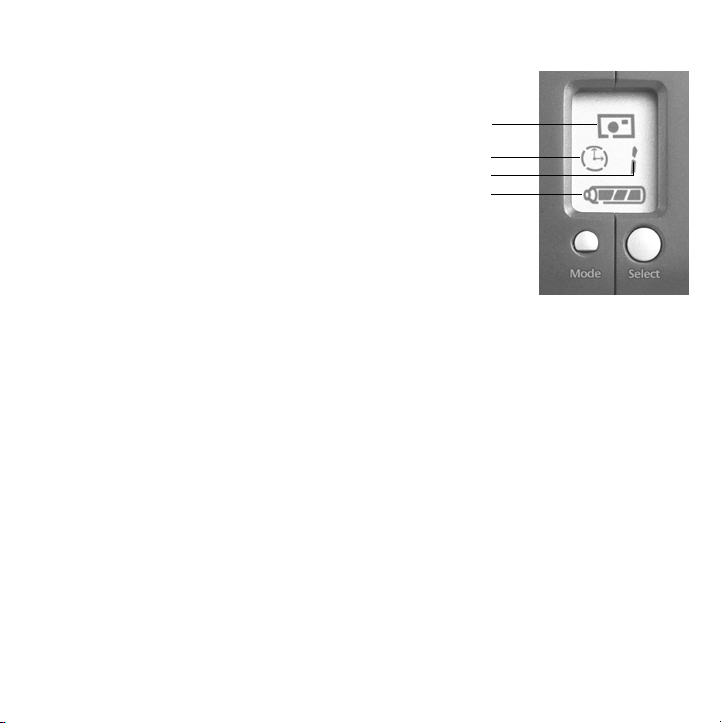
3
Status Display
1.
Camera modes
• Picture mode. Takes a single picture.
• Video mode. Captures video.
2.
Power save
• Enable (On by default.)
• Disable (when AC adapter is connected)
3.
Channel indicator (Select a channel, 1 through 4.)
4.
Battery level indicator
4
1.
2.
3.
4.
4
Selecting Camera Functions
Press the Mode button to choose camera function.
Camera function flashes when selected.
Press Select button to choose function.
Use Select button to select choices within function (e.g., Channel indicator, channels 1
through 4, or Power save, on or off).
English
1
2
3
4

5
Launching the Software
Click Start on Windows® Taskbar, and then select Programs\Logitech
\Logitech® ImageStudio™.
6
1.
2.
3.
4.
5.
7
Camera Ready.
Video Mode.
Picture Mode.
state (green LED blinks slowly).
Taking Pictures and Videos
Press and hold Power button (two seconds) to turn on camera.
Launch camera software.
Choose either Video Mode or Picture mode.
Use viewfinder to frame subject. No focusing required.
Take picture or video. Camera works within 75 feet (25 M) of receiver:
•
Picture mode.
•
Video mode.
Video displays in camera software. Press Shutter button to stop filming.
Status LED in View Finder
Green LED blinks quickly when recording video.
Press Shutter button. Image displays in camera software.
Press Shutter button to start filming.
Green LED blinks slowly.
Green LED stays on for one second, and then the camera returns to ready
®
English
5
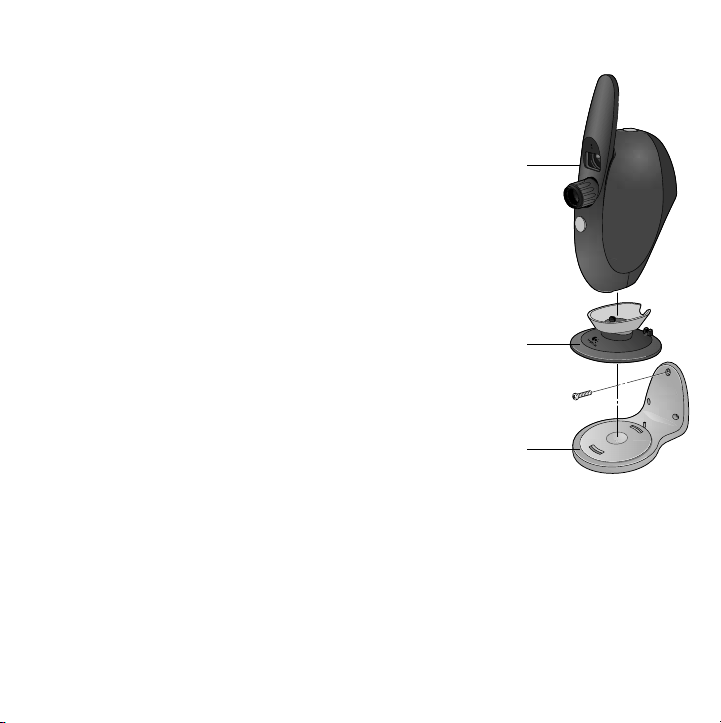
8
Use the wall-mounting bracket and hardware
to attach camera to wall to set up a monitoring
station.
1.
2.
3.
4.
5.
6.
Wall-Mounting the Camera
Find a suitable location for camera mounting.
Mark wall for drilling using holes in wall mount
as a guide.
Drill holes in wall where camera is to be installed.
Attach wall mount to wall using screws.
Attach camera stand to wall mount. Camera stand
snaps into place.
Attach camera to camera stand.
Camera
Camera
stand
Wall mount
6
English

9
Tips
Lighting.
of the picture area.
Optimize Reception.
quality. Place receiver as high as possible. Also, try different channels for the best reception.
Set channel in camera first, then software. See “Set Up the Camera” in this booklet
for details.
Wall-mounting the Camera.
camera to wall to set up a monitoring station. See “Wall-Mounting the Camera” in
this booklet to learn how. Wall-mounting works great with the Motion Detection feature
in the camera software.
A/C Adapter and Power Save.
station set-up, use the camera’s A/C adapter to save battery power. Power Save is shut off
automatically.
Camera Range.
communicates with the receiver using radio waves, which can penetrate walls and other
objects with no effect on reception.
Minimize Camera Shake.
mount for remote monitoring.
Software Updates.
the ImageStudio
Shoot pictures and videos with bright light sources behind the camera and out
Adjust receiver position and receiver antenna for the best picture
Use the wall-mounting bracket and hardware to attach
When wall-mounting the camera for a monitoring
Use the camera up to 75 feet (25 meters) from the receiver. The camera
Brace your arms when hand-holding the camera. Use the wall
To check for new software updates, click the Web Links button on
™
software taskbar, and then click “Software Updates.”
English
7

10
Access the How to Guide or online help to learn more about the camera and its software:
1.
From any activity within the software, click the Help button.
2.
On the Help menu, click either “How-to Guide” or “Contents and Index.” You can then
click the
• Contents tab to browse by category
• Index tab to search by keyword
• Search tab to search by any word
For additional information about Logitech® QuickCam® Web cameras, as well as other
Logitech® products, please visit
Learn More About the Camera
www.logitech.com
.
Warranty
This product comes with a limited two-year warranty. For more information,
please read the Product Warranty section found in the User’s Guide located on
the Logitech
Logitech camera products are intended to be used in a lawful manner. Certain uses
of digital PC camera products may be prohibited by local laws in some countries or states,
such as the surreptitious recording of audio and/or video communications for certain
purposes. If you have any question about whether a proposed use of your product is lawful,
you should consult a local legal authority before proceeding.
®
software CD.
8
English
 Loading...