


LectroCount LCR 600  Setup and Operation
LIQUID CONTROLS GROUP An IDEX Fluid & Metering Business |
Operation: EM150-11 |
|
|

table of contentS
IntroductIon |
|
Software License Agreement ............................. |
3 |
LectroCount LCR 600 Overview ......................... |
4 |
Instruments and Controls ................................... |
6 |
LectroCount LCR 600 Navigation ...................... |
11 |
Security .............................................................. |
18 |
Point-of-Sale Activation ...................................... |
20 |
Setup |
|
Setup Overview.................................................. |
22 |
General Setup .................................................... |
22 |
System Setup..................................................... |
24 |
Calibration Setup................................................ |
27 |
Point-of-sale (POS) Setup................................. |
36 |
Tax Categories .......................................................... |
37 |
Cash Discounting...................................................... |
38 |
Volume Discounting .................................................. |
39 |
Miscellaneous Charges............................................. |
40 |
Setup POS (Creating Products)................................ |
41 |
operatIon |
|
Operation Overview ........................................... |
44 |
Making a Delivery............................................... |
44 |
Delivery Screens ................................................ |
45 |
Preset Deliveries ................................................ |
46 |
Packing the Hose ............................................... |
47 |
Tickets ................................................................ |
48 |
dIagnoStIcS and troubleShootIng |
|
Diagnostics and Troubleshooting Overview ....... |
54 |
Error Messages.................................................. |
54 |
Diagnostics......................................................... |
56 |
Machine Status .................................................. |
57 |
Printer Status ..................................................... |
58 |
Delivery Status ................................................... |
59 |
Delivery Code..................................................... |
60 |
Diagnostic Ticket ................................................ |
62 |
Troubleshooting.................................................. |
63 |
LectroCount LCR 600 Inputs & Outputs............. |
66 |
publication updates and translations
The most current English versions of all Liquid Controls publications are available on our web site, www.lcmeter.com. It is the responsibility of the local distributor to provide the most current version of LC manuals, instructions, and specification sheets in the required language of the country, or the language of the end user to which the products are shipping. If there are questions about the language of any LC manuals, instructions, or specification sheets, please contact your local distributor.
2

SoftWare lIcenSe agreement
Read this license carefully. You agree that by using the itemized software package, you have agreed to the software license terms and conditions. This agreement constitutes complete and entire agreement between you and Liquid Controls with respect to this product.
1.Liquid Controls hereby grants to Licensee a non exclusive license to use SR60 and SR600POS (hereinafter referred to as “Licensed Software”)
2.Under the License granted herein, Licensee may use the itemized machine readable (executable code) copy of the Software, including any subsequent updates which may be provided. Licensee shall not, without Liquid Controls’ prior written consent, (a) rent, lease, lend, sublease or otherwise transfer the materials hereunder; (b) remove or obscure proprietary or copyright notices which may be set forth on the Licensed Software; or (c) alter, decompile, or disassemble the program.
3.One (1) copy of the Licensed Software, including any software distributed on disks may be made for backup purposes only. No other copies may be made or used without the written consent of Liquid Controls.
4.Title. No title to ownership of any Licensed Software is transferred to the Licensee.
5.Upgrades. License upgrades may become available for the Licensed Software. Any cost associated with such upgrades will solely be determined by Liquid Controls.
6.Warranty. Liquid Controls makes and licensee receives no warranty express or implied and there are expressly excluded all warranties of merchantability and fitness for a particular purpose.
license granted hereunder and require return of the Licensed Software if Licensee fails to comply with these license terms and conditions.
9. Licensee acknowledges that it has read this agreement, understands it, and agrees to be bound by its terms, and further agrees that this is the complete and exclusive statement of the agreement between Liquid Controls and Licensee, which supersedes and merges all prior
proposals, understandings, and all other agreements, oral or written, between the parties relating to this agreement.
This agreement may not be modified or altered except by written instrument duly executed by both parties.
10. This Agreement and performance hereunder shall be construed and interpreted under the laws of the State of Illinois.
11. If any provision of this agreement is invalid under any applicable statute or rule of law, it is to that extent to be deemed omitted.
12. Licensee may not assign or sublicense, without the prior written consent of Liquid Controls, its rights, duties, or obligations under this Agreement to any person or entity in whole or in part.
13. The waiver or failure of Liquid Controls to exercise in any respect any right provided herein shall not be deemed a waiver of any further right hereunder.
7.Limitation of Liability. Licensee shall have the sole responsibility for adequate protection and backup of its data in connection with the Licensed Software. In no event shall Liquid Controls be liable for (a) special, indirect or consequential damages; (b) any damages whatsoever resulting from loss of use, data, or profits, product, inaccurate input or work delays, or any direct
property damage arising out of or in connection with this agreement or the use or performance of the Licensed Software.
8.Termination. Liquid Controls may terminate this software
!WarnIng
•Before using this product, read and understand the instructions.
•Save these instructions for future reference.
•All work must be performed by qualified personnel trained in the proper application, installation, and maintenance of equipment and/or systems in accordance with all applicable codes and ordinances.
•Failure to follow the instructions set forth in this publication could result in property damage, personal injury, or death from fire and/or explosion, or other hazards that may be associated with this type of equipment.
3

IntroductIon - lcr 600 overvIeW
lectrocount lcr 600 overview
general InformatIon
This manual provides instructions for the initial setup, the calibration, and the operation of the LectroCount LCR 600. The Liquid Controls LectroCount LCR 600 is a microprocessor-based electronic meter register.
Its primary functions consists of configuring the meter system to the properties of the liquids to be measured, interfacing with the electronic components of the meter system components (and external components such as pumps, injectors, and shutdown devices), and performing Weights & Measures approved custody transfer actions.
The LCR 600 performs well in mobile and fixed installations. It can control a meter system as a standalone unit or used as a slave to a host controller such as a process controller or an in-cab data management system.
The LCR 600 is a self-contained unit. All operation, setup and configuration functions can be entered using the LCR 600’s red selector switch and the alphanumeric keypad. No lap pads, laptops, or other data entry devices are required.
A point-of-sale upgrade or POS is available for the LCR 600. The POS upgrade gives the LCR 600 the ability to print tickets with pricing, taxes, discounts, and miscellaneous charges at delivery sites.
baSIc functIonS
•Calibration (single and multipoint)
•Weights & Measures custody transfer
(product delivery and ticket generation)
•Metrological data collection
•Presetting by volume
•Multiple production selection
•Four delivery screens
•Security settings
•Air and vapor elimination (with proper accessories)
•Valve control (with proper accessories)
•Electronic temperature volume compensation
(ETVC) (with proper accessories)
poS upgrade functIonS
•Cash and volume discounting
•Multiple tax structures
•Priced and taxed tickets
•16 product calibrations
•100 product names
•Presetting by price
4

IntroductIon - lcr 600 InputS and outputS
lectrocount lcr 600 Inputs and outputs
The LCR 600 can communicate with a number of components on a Liquid Controls meter system. The following pages provide a brief description of the components, a drawing identifying these components on the meter system, and a list of the LCR 600 commands and fields that correspond to each component.
Internal pulSer
Typically, an internal pulser is mounted to the bottom of the LCR 600 housing. A small shaft extends from the bottom of the internal pulser through the LCR 600 housing where it attaches to a drive shaft. The drive shaft turns directly off of the rotors inside the Liquid
Controls meter. When the internal pulser shaft spins, the pulser manufactures a two channel quadrature pulse output. The LCR 600 uses the pulse output to calculate flow measurements. The number of pulses equal to a
unit of measurement is set during calibration and proving in the Pulse/Unit <k-Factor>: field.
temperature probe
The optional temperature probe, part of the Electronic Temperature Volume Compensation (ETVC) kit, monitors the temperature of the product being measured. Because the volume of many products expand and constrict considerably according to temperature fluctuations, the LCR 600 corrects the volume measurement to a base temperature (60º F for example).
prInter
Together, the LCR 600 and the Epson printer can print out four types of tickets (delivery, duplicate delivery, shift, and diagnostic). With the LCR 600 POS upgrade, delivery tickets can be configured to print completely priced tickets with complex tax and discount structures. The LCR 600 provides a “require ticket feature” to meet Weights & Measures standards and prevent unrecorded deliveries.
S1 SolenoId
When energized by the LCR 600, the S1 solenoidoperated valve opens the control valve on the outlet side of the meter, allowing product to flow through the valve.
When the S1 is deengergized, the control valve shuts off the product flow. The LCR 600 switches the S1 solenoid via the selector switch (RUN and STOP positions) and
during two stage preset deliveries (according to the S1 Close: value).
S2 SolenoId
The S2 solenoid-operated valve is used by two stage meter systems to provide a dwell flow for preset deliveries. Near the end of a two stage preset delivery, the LCR 600 de-energizes the S1 solenoid-operated valve to stop product flow. At the same time, the LCR
600 energizes the S2 solenoid to open a bypass pipe through which the remainder of the preset delivery
passes. The solenoids are switched at a preset
remaining volume or price determined by the value of the LCR 600 field S1 Close:.
S3 SolenoId
The S3 solenoid opens and close the vent ports of the meter system’s optical air (or vapor) eliminator. The LCR 600 energizes and de-energizes the S3 according to the optical sensor’s reading.
optIcal SenSor
An optical sensor detects the presence of liquid inside optical air (or vapor) eliminators. When the optical sensor does not detect liquid inside the optical air (or vapor) eliminator cavity, the LCR 600 de-energizes the S1 solenoid-operated valve and causes the control valve to close. At the same time, the optical sensor energizes the S3 solenoid-operated valve, opening the vent ports. As the air and vapor evacuates the cavity, the liquid level rises. When the level reaches the optical sensor, the sensor detects the liquid. The LCR 600 energizes the S1 solenoid, which opens the control valve, and deenergizes the S3 solenoid, sealing the vent ports.
∆P Transducer
The differential pressure transducer, common in aviation applications, monitors the differential pressure
(pressure drop) across a full flow fuel monitor/water coalescer. The highest differential pressure reached during the custody transfer is printed on the delivery ticket and displayed on the screen. If the differential pressure reaches a dangerous level, the LCR 600 can shut down the delivery. To set up a differential pressure shutdown value, a shutdown device (such as a valve or a dead-man) must be connected to the LCR 600, and
a differential pressure shutdown value must be entered into the dP Shutdown Value: field.
auxIlIary outputS
The LCR 600 provides three open drain transistor auxiliary outputs for different external devices such as
pump controls and additive injectors. Two of the outputs have settings that can be set in the Auxiliary 1 Output: (Off, On, On During Delivery, and Monitor
Flowrate) and Auxiliary 2 Output: (Off, On, On
During Delivery, and Flow Direction) fields. The LCR
600 also provides auxiliary output connections for the LectroCount Remote Display (other types of displays are usually compatible). Signals from these outputs duplicate the volume data sent to the LCR 600 display.
5

IntroductIon - lcr 600 InStrumentS and controlS
red Selector Switch
The LCR 600 red selector switch, located at the bottom left of the LectroCount LCR 600, has five positions. The selector switch’s primary purpose is to control everyday delivery and print functions. Functions include opening and closing the control valve in order to start and stop deliveries and prompting the printer to print delivery tickets and shift tickets.
thefIvepoSItIonSontheSelectorSWItch
Run - opens the control valve to begin a delivery Stop - closes the control valve to pause a delivery pRint - ends a delivery and prints a delivery ticket
Shift pRint - ends a shift, prints a shift ticket, and resets shift data in the LCR 600
Calibration position - allows access to calibration configuration settings.
Red Selector Switch
calIbratIon poSItIon
The red selector switch also provides a secure calibration position. When in the calibration position, the LCR 600 may be used to calibrate the meter and enter sensitive Weights & Measures data.
To turn the selector switch into the six o’clock calibration position, the LCR 600’s switchplate must be removed. To take off the switchplate, remove the four screws holding it in place. If the LCR 600 has been previously calibrated and approved by Weights & Measures, you will need to remove the lead seal and the wire threaded through the switchplate screws.
LCR 600
Selector Switch & Seal
Six O’clock Calibration Position
LCR 600 without Switchplate
6

IntroductIon - lcr 600 InStrumentS and controlS
alphanumeric Keypad
The alphanumeric keypad serves as a navigation and data entry tool for the LCR 600. The four larger buttons on the right side of the keypad are used primarily for navigating to fields on the display screen and navigating from one display screen to the next. The ten smaller buttons on the left side are used to enter numbers, characters, and text when changing the value of a field.
Text Buttons Navigation Buttons
LCR 600 Alphanumeric Keypad
display Screens
LCR 600 display screens can contain up to 16 fields. The values of most LCR 600 fields can be edited; however, some fields are shown for data monitoring and
informational purposes only and can not be edited, for example Temperature and Flow Rate.
SelectIng fIeldS
To select a field for editing, the LCR 600 display screens use a pointer that scrolls up and down along the left side of the screen. If the field is not editable, the pointer will skip over it.
|
|
|
|
|
|
|
|
|
|
|
|
|
|
|
|
|
|
|
|
|
|
|
|
Arrow Button to scroll the |
Arrow Button to scroll the |
||||
pointer up the left side of |
pointer down the left side of |
||||
the display |
|
the display |
|||
To select a field on a display screen:
1.Move the pointer on the far left of the display to the desired field using the and buttons.
2.Press the EntEr button to open a list box or a field edit box.
After a field is selected, the LCR 600 will bring up a list box or a field edit box, depending on the field, where the value of the field can be changed.
7

IntroductIon - lcr 600 InStrumentS and controlS
lISt box WIndoWS
Some LCR 600 fields only have a limited number of possible values. These fields use list box windows to display all of the possible values.
To select a value in a list box:
1.Move the pointer to your desired value using the and buttons.
2.Press the EntEr button to accept the value.
Calibration Type List Box
Press the PREV/ESC button to exit
any list box or field edit window with changing its value
fIeld edIt WIndoWS
Some LCR 600 fields require a specific alphanumeric entry. For these fields, the LCR 600 will open a small box at the bottom of the screen where text, numbers, and characters can be entered using the keypad.
To enter a value in a field edit box:
1.Enter text, numbers, or characters using the multitap functionality of the keypad’s 10 alphanumeric buttons.
2.Press the EntEr button to accept the value.
Calibration Name Field Edit Box
Calibration Screen
Pointer on the Calibration Type field
List Box Window after selecting
Calibration Type field
Throughout this manual, the type of edit box for
LCR 600 field is included with the field definition. fE - field Edit Box
LB - List Box
Field Edit Window after selecting
Calibration Name field
8

IntroductIon - lcr 600 InStrumentS and controlS
Alphanumeric Buttons
Press the button to backspace in a field edit window
Fn Button
Display Screen with Fn Box
Fn Box
multItap functIonalIty
While a field edit box is on the LCR 600 screen, the alphanumeric buttons and the down button can be used to enter characters in the field edit box. The character entered into the field edit box depends on the number of times the button is pressed successively, similar to text messaging on a cell phone.
fn box
The Fn command (on the up arrow button) provides a set of additional characters and commands that can be entered in a field edit box. The symbols on the left side of the Fn box are commands. The symbols on the right side are characters.
to activate an fn command or insert an fn character:
1.Tap the Fn button twice to bring up the Fn box.
2.Using the and buttons, move the highlighted cursor to the desired command or character
3.Press the EntEr button to accept the highlighted command or character.
fncommandS
Moves cursor to the farthest left positionMoves cursor one space to the left
Moves cursor one space to the right
Moves cursor to the farthest right position ↔ Insert toggle
↕Upper/Lower case toggle
∆ Deletes character above cursor
Deletes entire field
9

IntroductIon - lcr 600 InStrumentS and controlS
navIgatIng from Screen to Screen
The LCR 600 contains nine groups of screens: Delivery Setup, General Setup, System Setup, Calibration Setup,
Diagnostics, Security, Setup POS, Advanced Features, and Machine Status. Once a group of screens is
opened, you can rotate through the screens in the group using the Next/Previous Screen field at the bottom
of the screen.
Two additional screens, independent of the nine groups, are essential to operating and navigating the LCR 600, the Delivery Screen and the Configuration Menu.
The Delivery Screen is opened when the red selector switch is turned to the RUN position. Once the Delivery
Screen is open, the three Delivery Setup screens can be opened using the Next/Previous Screen field.
The Configuration Menu serves as a hub for opening the other eight groups of screens. It is included in the rotation of each group of screens. The Configuration
Menu also opens when the red selector switch is turned to the calibration position.
To move from one screen to another:
1.Move the pointer to the bottom line of the screen: Next/
Previous Screen
2.Press the nExt or the PrEv button to navigate to the next screen or the previous screen.
------------- or -------------
1.Move the pointer to any field in the Configuration Menu screen.
2.Press the EntEr button to open the screen.
Delivery Screen Pointer
on the Next/Previous Screen line in position for a screen change
Press NEXT/ENTER button while pointer is on the Next/Previous Screen line to navigate to the next screen
Press PREV/ESC button while pointer is on the Next/Previous Screen line to navigate to the previous screen
Delivery Screen fail-safe
In any LCR 600 screen, turning the selector switch to RUN will bring up the delivery screen and begin a delivery.
Configuration Menu
10
IntroductIon - lcr 600 navIgatIon
delivery Screens detailed Pump & Print • aviation • Volume & Preset
To navigate to the delivery screens:
1. Set the selector switch to RUN, and the delivery screen will appear and start a delivery. -or- While the selector switch is set to STOP, PRINT, or SHIFT PRINT navigate to the Configuration Menu.
2. Move the pointer to the Next/Previous Screen field and press the nExt or PrEv button.
11

IntroductIon - lcr 600 navIgatIon
poS delivery Screens detailed POs • aviation • Volume & Preset
To navigate to the POs delivery screens:
1. Set the selector switch to RUN, and the delivery screen will appear and start a delivery. -or- While the selector switch to STOP, PRINT, or SHIFT PRINT and navigate to the Configuration Menu.
2. Move the pointer to the Next/Previous Screen field and press the nExt or PrEv button.
12

IntroductIon - lcr 600 navIgatIon
general Setup Screens
System Setup Screens
13
IntroductIon - lcr 600 navIgatIon
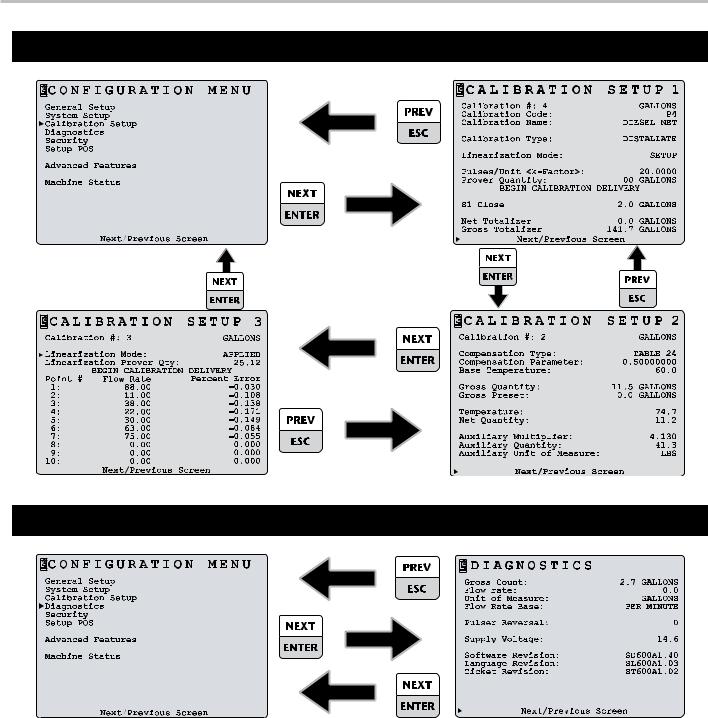
calibration Setup Screens
diagnostics Screen
14

IntroductIon - lcr 600 navIgatIon
Security Screen
Setup poS Screens
15

IntroductIon - lcr 600 navIgatIon
advanced features Screen
machine Status Screen
printer Status Screen
16

IntroductIon - lcr 600 navIgatIon
delivery Status Screen
delivery code Screen
17

IntroductIon - SecurIty
levels of Security
Many fields listed in the LCR 600 screens are accessible only while certain security levels are in place. The security levels provide the safeguards essential for Weights & Measures approval, and they give owners and operators a means of restricting drivers to certain functions. There are five levels of security on the LCR 600: Locked, Unlocked, Weights & Measures Calibration, Stop/Pause, and Factory.
locKed
An owner/office security setting that limits the access of drivers to a small number of delivery, system, and POS fields.
to lock the lcr 600
1.Select the Security screen from the Configuration Menu.
2.Move the pointer to User Key: field and press the EntEr button.
3.Enter an alphanumeric password in the field edit box and press the EntEr button
4.Move the pointer to the Security: field and press the EntEr button.
5.Move the pointer to Locked in the list box and press the EntEr button.
unlocKed
An owner/office security setting that allows drivers access to a large number delivery, system, and POS fields.
to unlock the lcr 600
1.Select the Security screen from the Configuration Menu.
2.Move the pointer to User Key: field and press the EntEr button.
3.Enter the same alphanumeric password that was
entered when the LCR 600 was locked. The value of the
Security: field will change to UNLOCKed.
WeIghtS & meaSureS calIbratIon
The Weights & Measures Calibration security setting allows access to all fields and functions necessary for Weights & Measures approval and the complete configuration of the LCR 600 for service.
to enter the Weights & measures calibration mode
1.Remove the faceplate around the red selector switch. If the LCR 600 was Weights & Measures approved beforehand, you will need to remove the lead seal and wire threaded through the switchplate screws.
Six O’clock Calibration Position
2.Turn the selector switch to the six o’clock position.
Stop/pauSe
During deliveries, there are certain fields that may be edited if the selector switch is turned to the STOP
(pause) position, for example, preset and miscellaneous charges fields. After editing a field, the delivery can be continued by turning the selector switch back to RUN.
Active Delivery Status
When a delivery is active LCR 600 fields are not editable.
factory
A security setting restricted to LC factory personnel.
Throughout this manual, the security levels that allow access to a each LCR 600 field is included with the field definition. The abbreviation for each security level is as follows:
l - locked u - unlocked
c - Weights & measures calibration p - Stop/pause
f - factory
18

IntroductIon - SecurIty
SecurIty |
|
date Format: (LB) |
c - u |
The format in which the date will be displayed and printed.
MM/DD/YY • DD/MM/YY
date: (fE) c - u
The date according to the selected date format. Enter two digits for the day or month, a backslash, two digits for the month or day, a backslash, and two digits for the year.
Calibration #: Display only
The number of times the calibration switch position has been used.
User Key: (fE) c - u - l
The owner/office password. The password is required to unlock the system in order to gain access to secured menu and data entry fields.
Security: (LB) c - u
Locks and unlocks the system. If the system is locked, access is restricted to Gross Preset, Net Preset, Product
Code, Product Code, and No-Flow Timer.
LOCKed • UNLOCKed
Factory Key: (fE) c - u - p - l
The pass key required for factory configurations.
Security clearance
l - locked u - unlocked
c - Weights & measures calibration p - Stop/pause
f - factory
field type
fE - field Edit Box LB - List Box
19

IntroductIon - poInt-of-Sale actIvatIon
activating the lcr 600 point-of-sale (poS)
If you ordered the LCR 600 with the POS upgrade, POS was activated in the Liquid Controls factory before shipment. However, the POS upgrade can also be added to a LCR 600 that was shipped without the POS upgrade.
To activate the POs upgrade:
1. Navigate to the Advanced Features screen.
2. Call the Liquid Controls inside sales department at 800- 458-5262 and ask for part number SR600POS.
3. Give the representative the values in the date:,
Calibration #:, and LCR Serial #: displayed on the Advanced Features screen. The representative will give you an activation key.
4.Move the pointer to Activate Point-Of-Sale and
enter the activation key.
20
 Loading...