

Page 1

Version 3.5
MiDi setup GuiDe for
toneport uX2, uX8 & KB37
Mac® OS X, Windows® XP® & Windows® Vista
®
Revision B - 01/02/2008
Page 2

taBle of Contents
TonePort Footswitch & Expression Pedals ............................................1•1
TonePort KB37 Controller Layout .........................................................2•1
MIDI Control Configuration ...................................................................3•1
Default MIDI Control Settings ...................................................................................... 3•1
Re-mapping Control Messages ....................................................................................... 3•2
MIDI Controller Message Types ................................................................................... 3•3
Assigning GearBox Functions to TonePort UX2/UX8/KB37 Controllers .................... 3•4
Controlling GearBox Functions via MIDI SysEx ..........................................................3•5
TonePort Controllers and Ableton Live™ - Line 6 Edition .... 4•1
Setting up MIDI Control Manually in Ableton Live 5 Line 6 Edition ......................... 4•2
TonePort Controllers and 3rd Party Applications ................................5•1
Propellerhead Reason™ .................................................................................................5•1
Apple GarageBand™ ...................................................................................................... 5•3
Apple Logic™ ................................................................................................................ 5•4
MOTU Digital Performer™ .......................................................................................... 5•5
Additional Online Resources ..................................................................6•1
Page 3
TonePort UX2, UX8 & KB37 Footswitch & Expression Pedals
toneport footswitCh & eXpression peDals
TonePort UX2, UX8 and KB37 devices all include special jacks for connecting footswitch pedals
which offer remote toggle switching of various functions. The two Footswitch jacks on the rear panel
of these TonePorts provide remote control of GearBox operations or functions within the included
Ableton Live Lite™ 5 and other audio software. Additionally, TonePort UX8 and KB37 each have an
Expression pedal jack. You can connect a pedal such as the Line 6 EX-1 Expression Pedal here and
assign it to remotely control one of the many GearBox parameters in real-time, such as wah, delay mix,
chorus rate, etc. Or, you can configure the expression pedal to operate a parameter in your recording
software!
Tip – You will want to first connect your footswitches & pedals to these TonePort jacks before
connecting the USB cable to your computer. If you already have a USB cable connecting TonePort to
your computer, exit any software that is using TonePort, mute your speakers, and then disconnect your
USB cable.
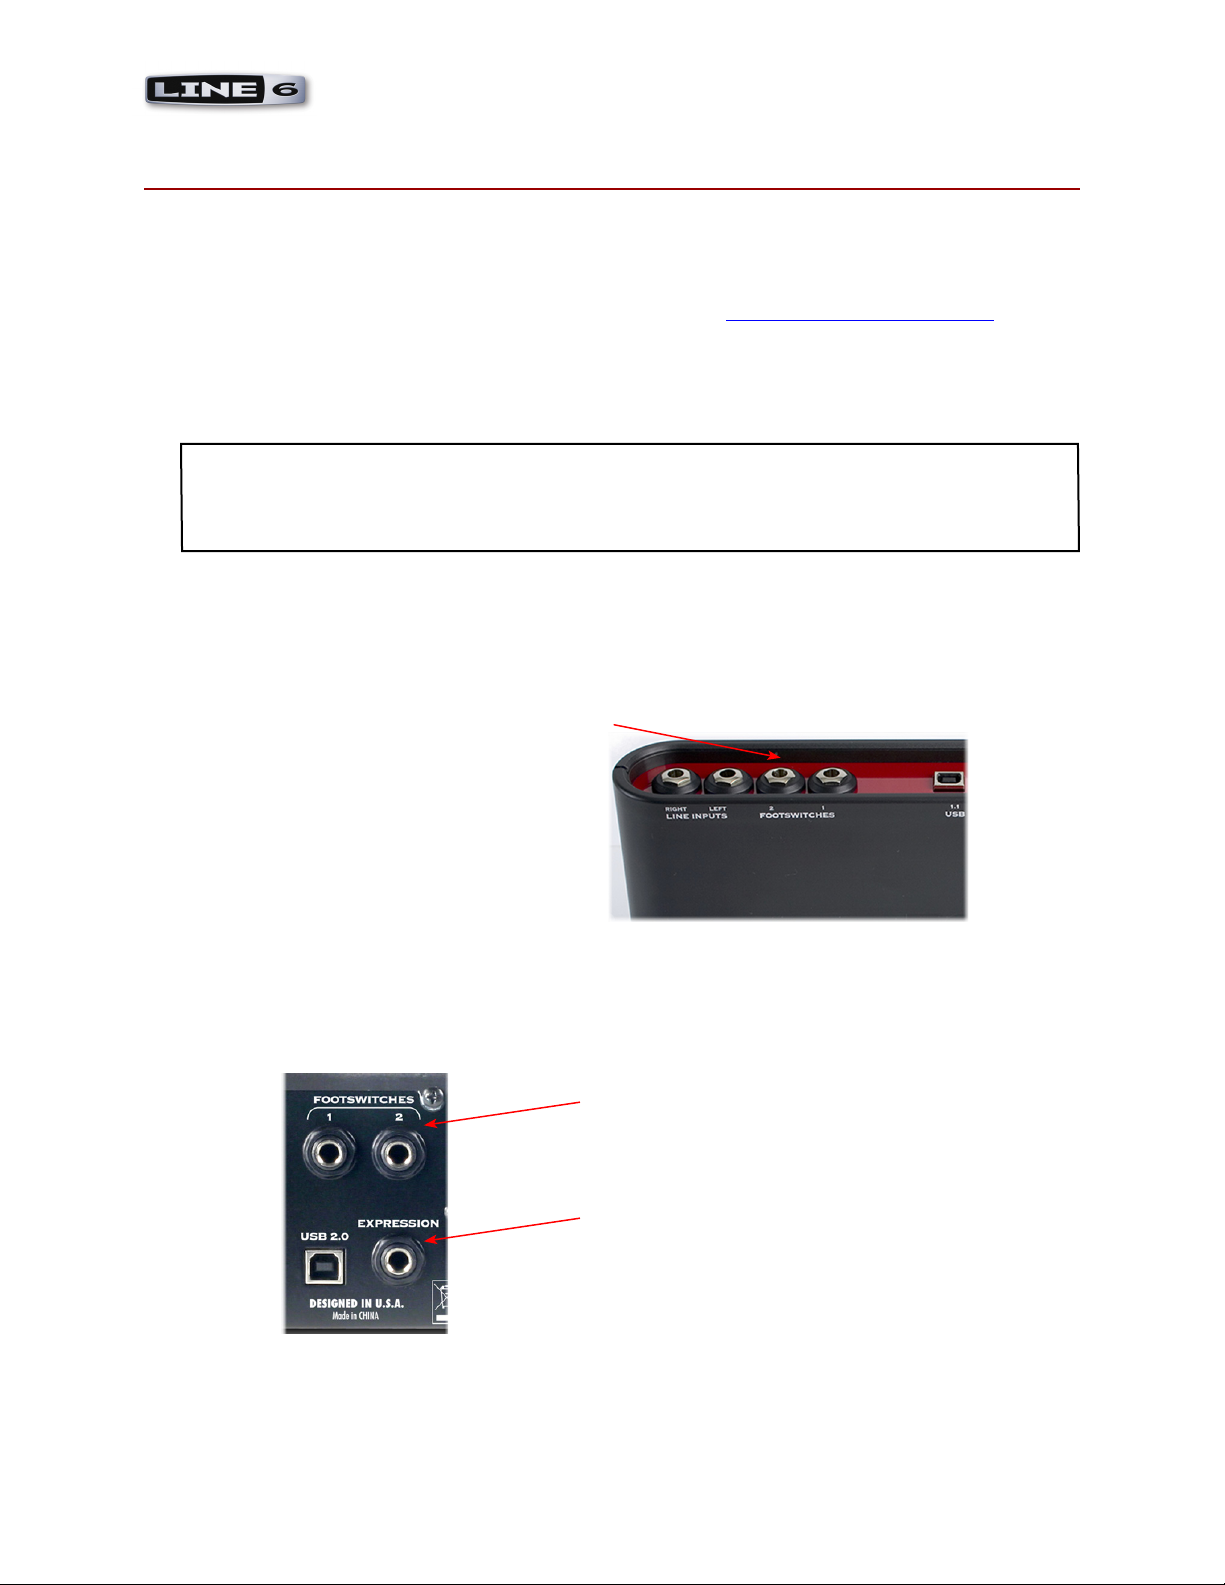
TonePort UX2
Connect up to two footswitch pedals
into these Footswitch 1 & 2 jacks
TonePort UX8
Connect up to two footswitch pedals
into these Footswitch 1 & 2 jacks
Connect an expression pedal to the
Expression jack
1•1
Page 4
TonePort UX2, UX8 & KB37 Footswitch & Expression Pedals
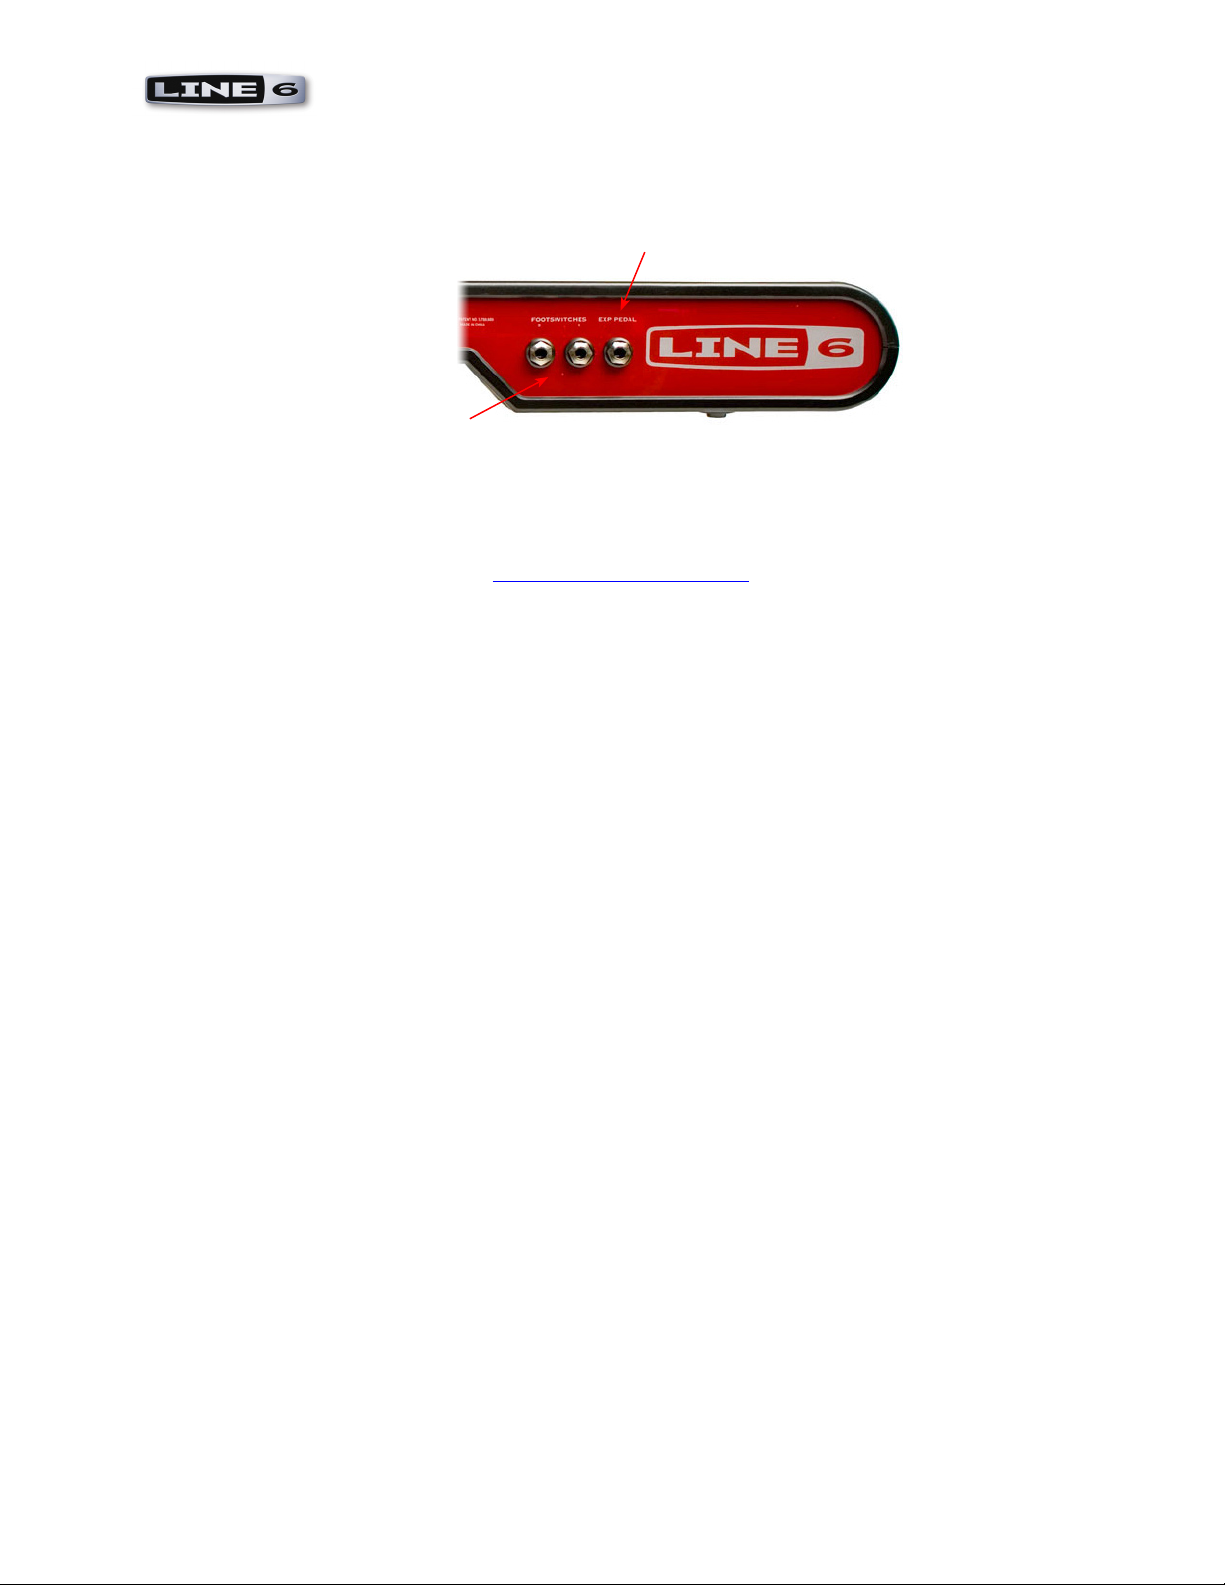
TonePort KB37
Connect an expression pedal
to the Expression jack
Connect up to two footswitch pedals
into these Footswitch 1 & 2 jacks
For information on how to map the footswitches and expression pedal to control GearBox or other
software parameters, please see the MIDI Control Configuration chapter.
1•2
Page 5
TonePort KB37 MIDI Controller Layout
toneport KB37 Controller layout
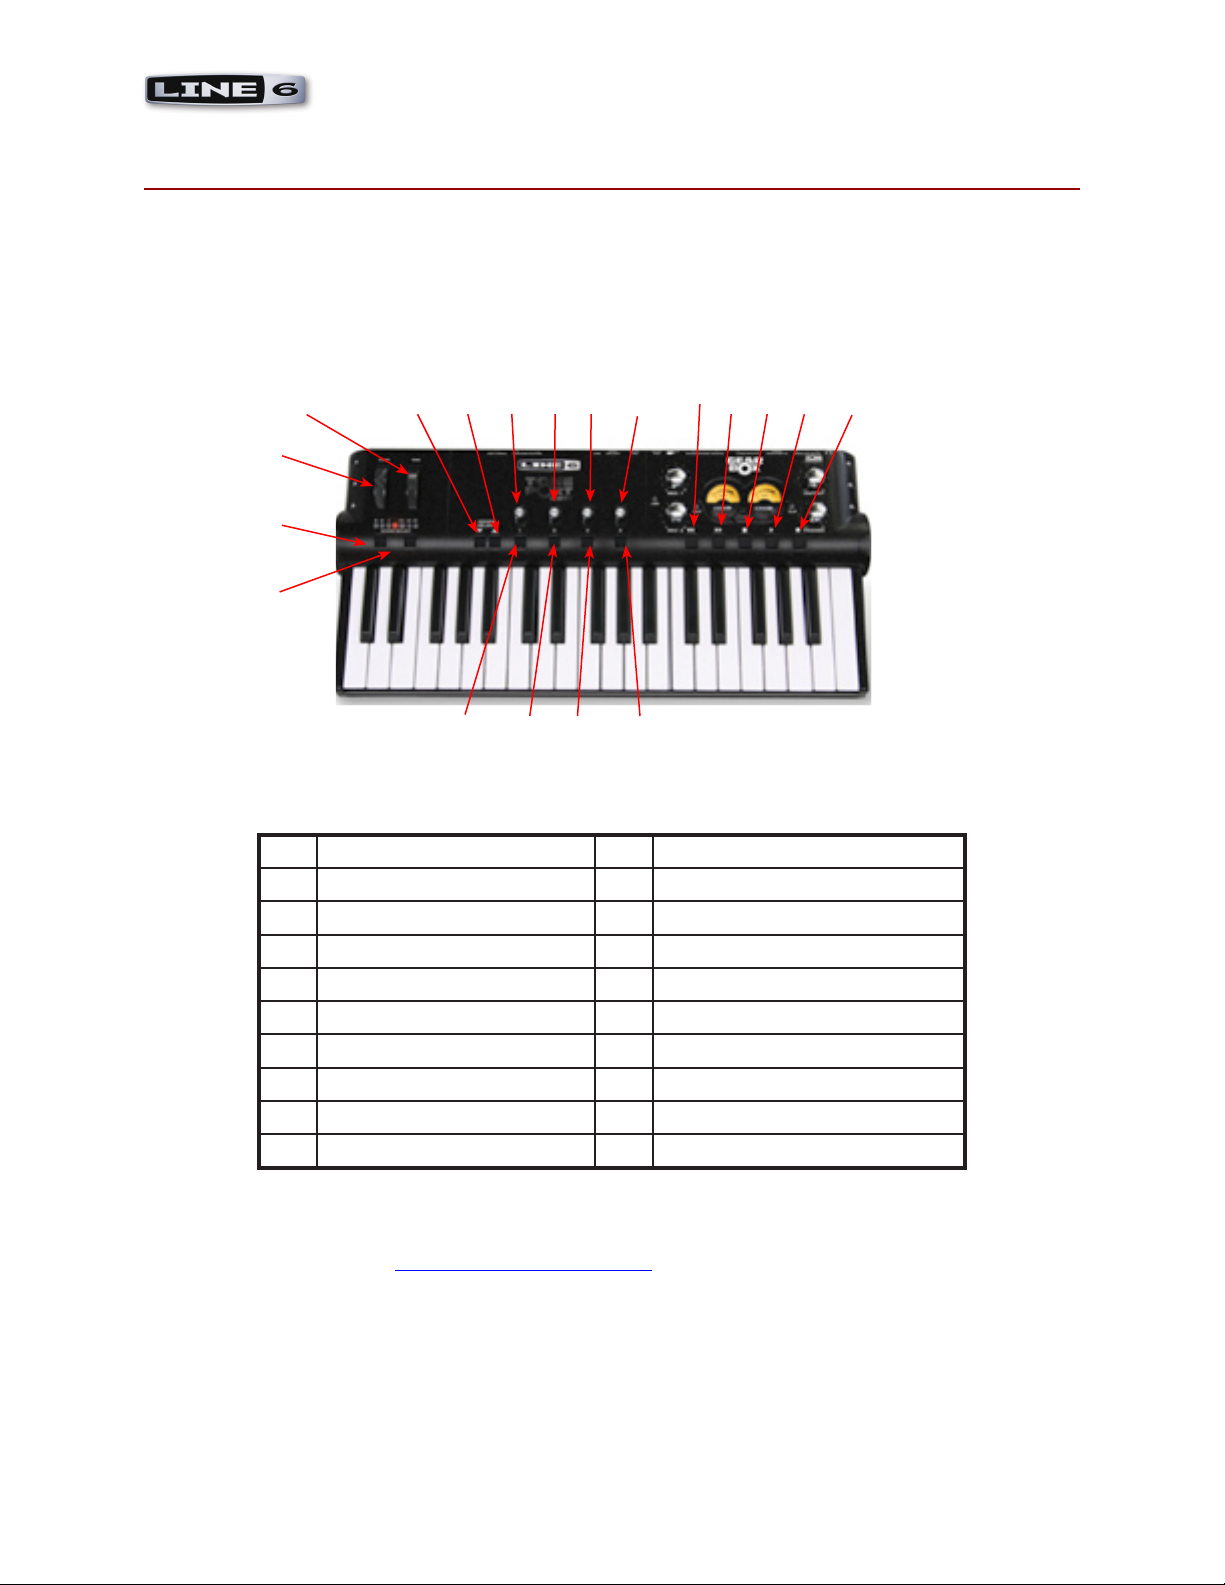
In addition to the Footswitch and Expression jacks on the back, TonePort KB37 offers a whole set of
knobs, switches and even transport buttons that can be used to control GearBox or parameters in your
other software. These knobs and buttons are referred to as MIDI Controllers since they send MIDI
events out the unit’s USB MIDI Out port, allowing remote control of parameters in real-time. These
KB37 knobs and buttons are named as follows:
4 5 6 7 8 9 10 11 12 13 14 15
3
2
1
16 17 18 19
1 Octave Up 11 Transport - Rewind
2 Octave Down 12 Transport - Forward
3 Pitch Bend Wheel 13 Transport - Stop
4 Modulation Wheel 14 Transport - Play
5 Sound Select (Previous) 15 Transport - Record
6 Sound Select (Next) 16 Button 1
7 Knob 1 17 Button 2
8 Knob 2 18 Button 3
9 Knob 3 19 Button 4
10 Knob 4
For information on how to map these MIDI Controllers to GearBox or other software parameters,
please see the following MIDI Control Configuration chapter.
2•1
Page 6

MIDI Control Configuration
MiDi Control ConfiGuration
Default MIDI Control Settings
TonePort UX2, UX8 & KB37 ship with a default set of MIDI Control Messages assigned to their
controllers as shown in the handy table below. Note that by default, TonePort sends out two different
sets of messages to control Gearbox and other MIDI software. You can optionally select to send out
only the GearBox data, or only the MIDI CC Control data by choosing the different Controller
Mapping presets in the Line 6 Audio-MIDI Devices dialog:
As you can also see in the Controller Mapping menu, there are several other presets for MIDI software
applications as well - see the following sections for details regarding these 3rd party applications.
Default MIDI Control Assignments
TonePort Model Controller Name GearBox Parameter MIDI Control Message
KB37 Modulation wheel Tweak
KB37 Sound Select (Previous) Next Tone Preset Patch increment -1
KB37 Sound Select (Next) Previous Tone Preset Patch increment +1
KB37 Knob 1 Amp – Drive CC 73 (Attack Time)
KB37 Knob 2 Amp – Bass CC 75 (Decay Time)
KB37 Knob 3 Amp – Middle CC 72 (Release Time)
KB37 Knob 4 Amp – Treble CC 91 (Effects 1 Depth)
KB37 Button 1 Stomp – toggle on/off CC 65 (Portamento)
KB37 Button 2 Mod – toggle on/off CC 127 (Poly On)
KB37 Button 3 Delay – toggle on/off CC 126 (Mono On)
KB37 Button 4 Reverb – toggle on/off CC 123 (All Notes Off)
3•1
Page 7

MIDI Control Configuration
TonePort Model Controller Name GearBox Parameter MIDI Control Message
KB37 Stop Stop MMC Pause
KB37 Play Play MMC Play/Stop
KB37 Record Loop MMC Record Punch
KB37 Rewind Rewind MMC Rewind
KB37 Forward Forward MMC Fast Forward
KB37, UX8 Expression Pedal Wah CC 11 (Expression)
KB37. UX8, UX2 Footswitch 1 Stomp CC 64 (Sustain)
KB37. UX8, UX2 Footswitch 2 Tuner MMC Record Punch
Re-mapping Control Messages
To re-map the functions of any of these TonePort controllers, connect your TonePort UX2/UX8/KB37
to your Windows® or Mac® computer’s USB port, launch the GearBox applications and go to Edit >
Preferences (Windows) or GearBox > Preferences (Mac) and follow these steps:
Select the MIDI/Control tab
Click here to display the Line 6
Audio-MIDI Control Panel
Click here to recall any
preset or the Default
Mapping
...Or, click here to launch
the MIDI Control Settings
dialog create a custom MIDI
mapping
3•2
Page 8

MIDI Control Configuration
The Switch/Controller column populates with all reassignable controllers for your device (TonePort KB37
shown here)
Name and save your custom
mapping as a preset
Choose which GearBox Control
function (if any) to assign to the
respective Controller
If you are using a UX8, the MIDI Control Settings dialog will list only the Footswitch 1, Footswitch 2
and Expression Pedal controllers. If using a UX2, the dialog will list only Footswitch 1 and Footswitch 2
controllers.
Choose the type of Control, which
CC/Action it will perform, and the
Switch Mode for each respective
controller
Click Apply, then OK
when done
MIDI Controller Message Types
TonePort UX2/UX8/KB37 allow you to configure controllers to send a variety of different MIDI message
formats (MIDI CC, MMC, Mackie/Logic Control), to remotely control functions within other audio
software. These options are accessed in the To MIDI Out column of the MIDI Control Settings dialog
(see above). Below are the types of MIDI messages you can send from TonePort’s controllers. Check
the documentation for your audio software for its MIDI remote control capabilities and instructions
for assigning functions.
MIDI CC (On/Off): Choosing this function allows selection of any CC from 0-127, listed by
•
number and the standard command association (for example, 007 Volume).
MIDI CC (Custom): For Footswitches and Buttons, this function allows a pair of CC’s and
•
3•3
Page 9

MIDI Control Configuration
values to be assigned so that the controller can trigger two different functions for each successive
push. (See the Footswitch 1 setup instructions in the following Ableton Live chapter for an
example).
MIDI Machine Control: This function offers a set of MMC commands listed by name. The
•
command is sent on push down of the pedal/button, and no command is sent on pedal up. When
the Fast Forward or Rewind commands are selected, the Switch Mode menu becomes available
and Momentary is a selectable option. This offers the ability to either toggle these functions
on/off, or to have them perform when the pedal is held down only.
Mackie/Logic Control: This function offers a limited set of commands that can be sent
•
conforming to the Mackie Control or Logic Control format. If the audio software supports these
popular controller devices, then it should also support these commands from TonePort*.
* Note – The Mackie Control protocol uses MIDI note events to activate specific functions. When using
the KB37 as a Mackie Control input device, MIDI note messages may trigger Mackie Control-related
functions within a given host application. In Ableton Live™ for example, D5 (MIDI note 74) toggles
between the Arrangement and Session views.
Assigning GearBox Functions to TonePort UX2/UX8/KB37 Controllers
In addition to controlling Ableton Live or other recording software, you can also have one or more
controllers affect GearBox functions, such as amp/effect parameters, increment through Presets, Mute
outputs, switch to the tuner, and more! This is all done in the Line 6 Driver MIDI Control Settings
Panel:
KB37 Controllers shown here mapped
to various GearBox functions
Clicking the drop-down menu reveals
all GearBox parameters assignable to
Knob 1
3•4
Page 10

MIDI Control Configuration
Dual-Tone GearBox Settings
Note that if you have selected one of the Dual-Tone settings in the GearBox Source Select menu, then
the controllers will affect the parameters for Tone 1 only. The Dual-Tone settings are the ones with
the “&” in their names.
Dual-Tone settings are the ones with
the “&” in their names
For example, if you are currently using Inst & Mic 1 as your Source, then TonePort UX2/KB37 will
only trigger the assigned functions for the Instrument tone, which is the “Tone 1” of this Source.
Controlling GearBox Functions via MIDI SysEx
Worth mention here is the fact that some GearBox functions are actually controlled via MIDI System
Exclusive (or “SysEx” as the hip MIDI folks like to call it). These GearBox functions include Monitor
and Send levels, Next/Previous Tone, GPO Track levels, etc. These can be controlled externally if you
have a MIDI device or software utility capable of sending MIDI SysEx.
For more information about MIDI SysEx and external control of GearBox, please see the MIDI
Continuous Controller Reference document, downloadable from the GearBox Online Help page.
Guitar Port Online Player Transport Control
In addition, the following MIDI events are recognized for the Guitar Port Online (GPO) Player
transport control. These 3 byte MIDI short messages (not SysEx) are based on the Mackie control
specification.
GPO Transport Function MIDI Message
Track Play 90 5E 7F
Track Stop 90 5D 7F
Track FWD Start 90 5C 7F
Track FWD Stop 90 5C 00
Track REW Start 90 5B 7F
Track REW Stop 90 5B 00
3•5
Page 11

TonePort Controllers and Ableton LiveTM - Line 6 Edition
toneport Controllers anD aBleton liVe™ - line 6 eDition
The Line 6 Audio-MIDI driver includes a MIDI Mapping preset that configures TonePort UX2/UX8/
KB37 controllers for Ableton Live 5 Line 6 Edition, so that anytime you start a new Live Session, it
will load with the following MIDI control settings:
Note – This MIDI Control functionality is also supported in the full Ableton Live versions 5 and later, and
the setup instructions are the same.
Footswitch 1: Play/Stop
Footswitch 2: Record Punch-In/Out
Metronome On/Off
Loop On/Off
Stop
All you need to do is choose your TonePort UX2/UX8/KB37 as an “active” controller device within the
Ableton Live software, and select the Ableton Live MIDI Preset in the Line 6 Driver. The following
steps show you how…
1. Select your TonePort as an active remote control device in Ableton Live 5
With TonePort UX2/UX8/KB37 connected to your computer’s USB port and the GearBox software
running, launch Ableton Live Lite 5 and go Options > Preferences (Windows) or Live > Preferences
(Mac).
Play
Global Record
Go to the MIDI/Sync tab
Click Track, Sync and Remote
buttons to On to make your TonePort
an active MIDI device/controller
4•1
Page 12

TonePort Controllers and Ableton LiveTM - Line 6 Edition
2. Once the above settings are made, go to the GearBox application Edit > Preferences > Hardware
> Driver Settings, and click the MIDI Tab.
Select the MIDI tab
Select the Ableton Live MIDI
Mapping Preset, and click Apply
Setting up MIDI Control Manually in Ableton Live 5 Line 6 Edition
As an example, we’ll show you how to set up the Start/Stop and Punch In/Out functions for the
TonePort UX2/UX8/KB37 footswitches manually. First, set up your TonePort as the active MIDI
device/controller as described above, then set/verify the MIDI settings shown below in the Line 6
Driver MIDI Control Settings Panel.
In Ableton Live Lite 5 Line 6 Edition, follow these steps…
In the upper right corner of the main window,
click on the MIDI button. It should light up
blue, indicating you have entered “Learn Mode”
Then go over to the Transport and click
on the Play button
Press Footswitch 1. The numbers 1/2
appear inside the Play Button
(MIDI CC 2)
Click on the Stop button then press
Footswitch 1 again. The numbers 1/3
appear (MIDI CC3)
4•2
Page 13

TonePort Controllers and Ableton LiveTM - Line 6 Edition
Now click on the Record button, then
press Footswitch 2. The numbers 1/6
appear, meaning MIDI CC 6 toggles
Record on/off
Click on the MIDI button when done, to exit
MIDI Learn Mode
You’re done! Using the same procedure, you can now re-map your TonePort Footswitches or Expression
Pedal to other Live functions. Likewise, you can use the Line 6 MIDI Control Settings Panel and
Live’s MIDI Learn Mode to map any of the additional TonePort KB37 controllers to remotely control
various operations in Ableton Live 5 Line 6 Edition. For more information on Live controls, please
refer to your Ableton Live’s help documentation.
4•3
Page 14

TonePort Controllers and 3rd Party Applications
toneport Controllers anD 3rD party appliCations
As covered in the MIDI Control Configuration chapter, you can choose the included mapping presets
or customize the mapping of your TonePort UX2/UX8/KB37 controllers to work with just about any
3rd party recording software. To follow are instructions for a few popular software titles. Check your
audio software’s user manual for more information regarding its specific MIDI Control capabilities.
Propellerhead Reason™
The Line 6 Audio-MIDI driver includes a MIDI Mapping preset that configures TonePort KB37 for
use with Reason. Due to Reason’s dynamic environment, the KB37 works with Reason’s Remote™
interface via a Remote codec for KB37, which is installed with GearBox 3.0.
IMPORTANT: Reason version 3.04 (or later) is required for the Remote codec, so be sure to install the
latest available Reason update (see http://www.propellerheads.se). Reason must also be installed before
installing GearBox in order for the TonePort KB37 codec to appear. Running the GearBox installer again
after installing Reason (or after running a Reason update installation) can fix this problem.
What is the Remote Codec?
The Remote codec performs the task of mapping KB37 MIDI messages to Reason-specific functions.
For example, the codec maps the KB37’s transport control to Reason’s transport functions.
But there are hundreds of knobs and buttons in Reason, and only a few controls on the KB37. To
manage all those Reason parameters, the Remote codec maps the knobs and buttons to various Reason
Device parameters, relative to the currently selected track. Therefore, a default map for the KB37’s
buttons and knobs exists for each device.
KB37 mapping variations
Because most Reason devices have more parameters than the KB37 has physical controls, we have
provided mapping variations for these devices.
When selecting a mapping variation, a new set of parameters will be configured for KB37 with a
selected Reason device. For example, the KB37’s “Sound Select” buttons are mapped to move up
and down across tracks. Variation 2 maps the buttons to the target device’s “patch up/patch down”
parameters.
To switch between mapping variations in Reason, you need to use the following keystrokes:
Mac
[Command] + [Option] + numerical keys [1] to [10].
[1] selects the default standard mapping
Windows
[Ctrl] + [Alt] + numerical keys [1] to [10]
[1] selects the default standard mapping
5•1
Page 15

TonePort Controllers and 3rd Party Applications
Tip - You can get an overview of which Reason parameters are assigned to a given mapping variation by
selecting “Remote Override Edit Mode” from Reason’s Options menu.
To use the KB37 with Reason’s Remote codec:
1. Select the “Reason 3” MIDI Mapping preset and click OK:
2. In Reason, open the “Control Surfaces and Keyboards” page in Reason’s Preferences dialog, click
‘Add’, then select “Line 6” from the Manufacturer list, and click OK:
Voila! You should see the KB37
picture appear in the Model box
5•2
Page 16

TonePort Controllers and 3rd Party Applications
Apple GarageBand™
TonePort KB37 works automatically with GarageBand to trigger notes and play the Software Instruments
within a GarageBand track - all that is needed for this is to connect the KB37 to your Mac’s USB port
and then launch GarageBand. When a Software Instrument track is selected, playing on the KB37
keyboard will trigger its notes, and the Pitch and Mod wheel will often each control a performance
parameter, depending on how the Software Instrument is written to utilize them.
Additionally, the Line 6 Audio-MIDI driver includes a MIDI Mapping preset that configures TonePort
KB37’s Knob 1 and Knob 2 to control the current GarageBand track’s Volume and Pan, respectively. To
load the GarageBand preset, launch GearBox and open the Preferences dialog from the GearBox menu,
then select the MIDI/Control tab. In the MIDI Mapping menu, select the GarageBand preset:
GarageBand uses its own specific protocol for controlling most of its other parameters, therefore, KB37
cannot access other GarageBand functions directly. However, there are 3rd party software utilities you
can install on your Mac® that will allow you to use the KB37 Transport buttons to control GarageBand’s
transport functions. For more information on this please check out our Online Support document,
cleverly titled Control Garageband with KB37.
5•3
Page 17

TonePort Controllers and 3rd Party Applications
Apple Logic™
TonePort KB37 can communicate with Logic version 7 or 8 to trigger Logic’s Transport functions.
The Listen to MMC Input must be enabled in Logic’s Preferences - this allows Logic to receive
MMC messages from KB37. Follow these steps to configure Logic:
1. With KB37 connected to your computer’s USB port, launch Logic and go to Preferences >
MIDI.
2. Select the Sync tab.
3. Click the MIDI Sync Project Settings… button at the bottom right of the Sync tab; this
launches the Song Settings dialog.
4. In the section labeled MIDI Machine Control (MMC), check the Listen to MMC Input
option.
Note that this is a per-Song option in Logic. To make this option global, you must modify your Logic
template file with this MMC setting.
5•4
Page 18

TonePort Controllers and 3rd Party Applications
MOTU Digital Performer™
TonePort KB37’s transport buttons can be mapped to control the transport within MOTU Digital
Performer 5. Here are the steps...
With TonePort KB37 connected to your computer’s USB port, launch GearBox and go to Preferences >
MIDI/Control tab. Press the Line 6 Audio-MIDI Devices button to launch the MIDI Control Settings
dialog. We’ll walk you through creating a preset in this dialog, and then configuring Digital Performer
to allow its transport to be controlled remotely by KB37...
1. Enter the settings as shown below for the Transport functions:
2. Type in a title (e.g. - “Digital Performer Transport”) in the field at the top right of the dialog and
click the button to save this as a preset
3. Click ‘Apply’ (if available), then ‘OK’ to dismiss the dialog
4. Open (or return focus to) Digital Performer
5. Type <Shift+L> or select the Setup menu, Commands item
6. Clear any existing MIDI note mappings found in this list to avoid unexpected events
7. Type ‘stop’ into the search string (top of the dialog window) and click ‘Search’ (dialog will scroll to
the appropriate section of the list)
8. Under Transport Commands, click the cell in the “Play” row, “MIDI EVENT” column
9. Press-and-hold the Play button on the KB37 and press <Enter> or <Return> before releasing the
KB37 button
10. Notice that the captured MIDI CC msg. is ‘#118|127’ (momentary down state)
11. Under the adjacent source field, select TonePort KB37 from the list
12. Repeat the same procedure for the remaining transport buttons; the Learn function should ensure
that the proper CCs are captured. Note: the <enter>-while-depressed part is crucial, as releasing the
KB37 button before accepting the captured message can cause it to ‘listen’ for a value of ‘0’ from the
assigned CC
13. Important: Scroll to the top of the Commands list and click the square box to the left of ‘Master
Master’ under the heading ‘MIDI Masters’, so it’s in a grey [active] state
You’re done - KB37 Transport buttons should now work with Digital Performer!
5•5
Page 19

aDDitional online resourCes
Hungry for more info? We’ve got plenty of helpful resources just a click away...
-Several additional Help documents covering MIDI CC references, computer recording, product
Release Notes and more are available here:
GearBox Online Help
-For technical support, choose from the many options listed on the Line 6 Support page:
Line 6 Support
-Official Line 6 hardware Product Manuals can be downloaded here:
Lie 6 Product Manuals
Additional Online Resources
6•1
 Loading...