

Page 1

Pilot’s Handbook
Manuel de pilotage
Pilotenhandbuch
Pilotenhandboek
Manual del Piloto
取扱説明書
See www.line6.com/manuals for Advance Guide
40-00-0246 Advanced Users Guide available @ www.line6.com/manuals Rev A
®
THH12
Page 2
Important Safety Instructions
WARNING : TO REDUCE THE RISK OF FIRE OR ELECTRIC SHOCK, DO NOT EXPOSE THE APPLIANCE TO RAIN OR MOISTURE.
WARNING : TO REDUCE THE RISK OF FIRE OR ELECTRIC SHOCK, DO NOT REMOVE SCREWS. NO USER-SERVICEABLE PARTS INSIDE.
REFER SERVICING TO QUALIFIED SERVICE PERSONNEL.
C A UTI O N
RISK OF ELECTRIC
SHOCK DO NOT OPEN
CERTIFICATION
THIS DEVICE COMPLIES WITH PART 15 OF THE FCC RULES. OPERATION IS SUBJECT TO THE FOLLOWING TWO CONDITIONS: (1) THIS DEVICE
MAY NOT CAUSE HARMFUL INTERFERENCE, AND (2) THIS DEVICE MUST ACCEPT ANY INTERFERENCE RECEIVED, INCLUDING INTERFERENCE
THAT MAY CAUSE UNDESIRED OPERATION.
Warning: Changes or modifications not expressly approved in writing by Line 6 may void the users authority to operate this equipment.
RF Exposure Statement: This transmitter must not be co-located or operated in conjunction with any other antenna or transmitter.
Note: This equipment has been tested and found to comply with the limits for a Class B digital device, pursuant to part 15 of the FCC Rules. These limits are designed to
provide reasonable protection against harmful interference in a residential installation. This equipment generates, uses and can radi-ate radio frequency energy and, if not
in-stalled and used in accordance with the instructions, may cause harmful interference to radio communications. However, there is no guarantee that interference will not
occur in a particular installation. If this equipment does cause harmful interference to radio or television reception, which can be determined by turning the equipment off
and on, the user is encouraged to try to correct the interference by one or more of the following measures:
- Reorient or relocate the receiving antenna.
- Increase the separation between the equipment and receiver.
- Connect the equipment into an outlet on a circuit different from that to which the receiver is connected.
- Consult the dealer or an experienced radio/TV technician for help.
This Class B digital apparatus complies with Canadian ICES-003.
Cet appareil numerique de la classe B est conforme a la norme NMB-003 du Canada.
The FCC compliance sticker is attached to the THH12 battery compartment.
Remove the THH12 base by unscrewing counter clockwise to see this compliance sticker.
N222
Page 3

You should read these Important Safety Instructions. Keep these instructions in a safe place
Before using your THH12, carefully read the applicable items of these operating instructions and the safety suggestions.
1. Obey all warnings in the THH12 manual.
2. Only use non-rechargeable alkaline batteries in the transmitter.
3. Do not perform service operations beyond those described in the THH12. Service is required when the apparatus has been damaged in any way, such as:
• liquid has been spilled or objects have fallen into the apparatus
• the unit has been exposed to rain or moisture
• the unit does not operate normally or changes in performance in a significant way
• the unit is dropped or the enclosure is damaged.
4. Do not place near heat sources, such as radiators, heat registers, or appliances which produce heat.
5. Guard against objects or liquids entering the device. Do not use or place unit near water.
6. Do not step on cords. Do not place items on top of cords so that they are pinched or leaned on. Pay particular attention to the cord at the plug end and the point where
it connects to the device.
7. Always switch transmitter off when not in use for extended periods of time for extended battery life.
8. Clean only with a damp cloth.
9. Only use attachments/accessories specified by the manufacturer.
10. Prolonged listening at high volume levels may cause irreparable hearing loss and/or damage. Always be sure to practice “safe listening.”
Page 4
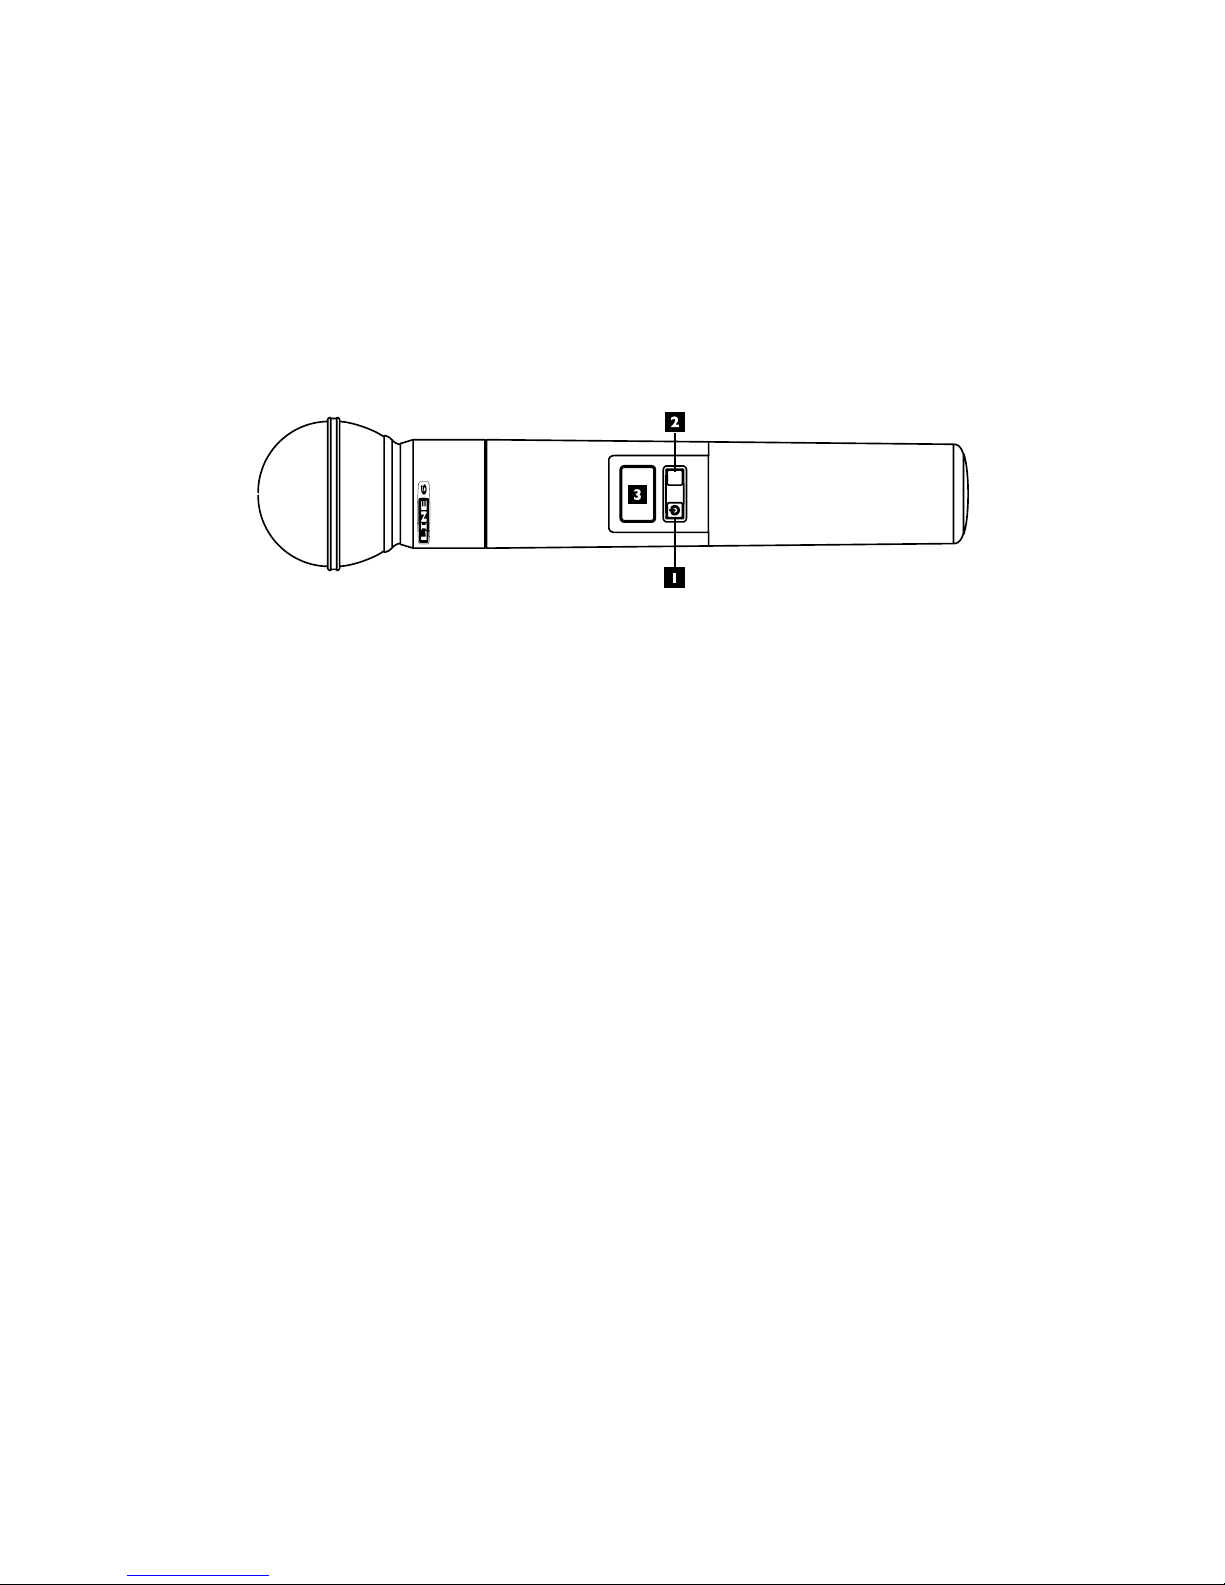
Basic OperatiOn
1. Power/Set Button - Power Function: Press once to turn the unit on. The LCD backlight will glow blue for 10 seconds then it will fade out automatically.
Press and hold 3 seconds to turn the unit off. Set Function: This is used for controlling the LCD interface. Use this button to put the transmitter in
different modes of operation and confirm selected values.
2. Select Button - This is used for controlling the LCD interface. Use to change parameter selections or control the mute on and mute off function.
3. LCD Panel - Whenever a button is first pushed, the LCD backlight will awaken by glowing blue. This allows you to view current transmitter
performance status and sets up the programming of operating channel, RF power level, mute and lockout modes.
HandHeld lcd interface
Operation - Edit Channel
Press Set once to power on transmitter or wake up the LCD (backlight should glow blue). Press Set one more time to put the transmitter in Channel
Select mode (“CH. #” will continuously blink). Press Select once to choose this mode (”CH.” will stay solid and the “#” will blink). Press Select
again to choose the desired channel. Once you’ve made your final selection, press Set once to put the transmitter on the new channel. LCD will
glow blue for 10 seconds and then fade off automatically.
Operation - Mute Mode
Press Set once to power on transmitter or wake up the LCD (backlight should glow blue). Press Set two times to put the transmitter in mute mode
(“MUTE” and “OFF” will continuously blink). Press Select once to choose this mode (”MUTE” will stay solid and the “OFF” will blink). Press Select
again to engage Mute mode (“ON” will now be displayed). Press Set to confirm Mute mode operation (LCD backlight will now glow red). While in
this mode, audio signal will be absent at the receiver’s output. Pressing the Select button during operation will toggle between Mute on and Mute
off. Every time Mute is on, the LCD backlight will continuously glow red. When Mute off is selected, the LCD backlight will turn off. To exit Mute
mode, Press Set once to enter menu mode. Press Select once to defeat this mode. Press Set once to deactivate Mute mode and return to standard
operation. LCD will glow blue for 10 seconds and then fade off automatically.
THH12
Page 5

Operation - Edit Transmitter RF Output Power
Press Set once to power on transmitter or wake up the LCD (backlight should glow blue). Press Set three times to put the transmitter in RF Power
edit mode (“TX PWR” and the current value will continuously blink). Press Select once to choose this mode (”TX PWR” will stay solid and the
current value will continuously blink). Press Select again to choose the desired power setting (HI or LOW). Press Set to confirm new power setting
(”TX PWR” and the new value will be displayed automatically in the Main View). LCD will glow blue for 10 seconds and then fade off automatically.
Operation - Assigning the Transmitter a Name
Press Set once to power on transmitter or wake up the LCD (backlight should glow blue). Press Set five times to put the transmitter in Name edit
mode (“Name” will continuously blink). Press Select once to choose this mode. Press Select again to choose the desired character. Press Set to move
to the next position and continue this process until you’ve completed entering in the desired name. After making your final character selection in
the fourth position, press Set to complete the naming process. The display will now show its new name in the Main View.
Operation - Engage Control Lock-out Function
Press Set once to power on transmitter or wake up the LCD (backlight should glow blue). Press Set four times to put the transmitter in Lock edit
mode (the lock symbol and the current value will continuously blink). Press Select once to choose this mode (the lock symbol will stay solid and the
current value will continuously blink). Press Select again to choose the desired state. Once you’ve made your final selection, press Set once to put
the transmitter in the new state. While in the locked state, no changes can be made to the transmitter. However, the transmitter can be powered
down by pressing the Power/Set button for 5 seconds.
Note: Engaging Lock mode will automatically exit Mute mode. A locked microphone cannot also be muted.
Disabling Lock Function: To regain control of a locked transmitter, press and hold both the Set and Select buttons for five seconds.
Page 6

preparing tHe HandHeld transmitter fOr Use
Battery Installation
Remove battery cover by turning counter-clockwise a mpartment by turning clockwise until secure.
AA BATTERY
NOTE: Do not over tighten.
Page 7

Page 8

この機器の使用周波数帯では、電子レンジ等の産業・科学・医療用機器のほか工場の製造ライン等で使用されている移動体識別用の構内無線
局(免許を要する無線局)及び特定小電力無
線局(免許を要しない無線局)並びにアマチュア無線局(免許を要する無線局)が運用されています。
1 この機器を使用する前に、近くで移動体識別用の構内無線局及び特定小電力無線局並びにアマチュア無線局が運用されていないことを確
認して下さい。
2 万一、この機器から移動体識別用の構内無線局に対して有害な電波干渉の事例が発生した場合には、速やかに使用周波数を変更するか又
は電波の発射を停止した上、下記連絡先にご連絡頂き、混信回避のための処置等(例えば、パーティションの設置など)についてご相談して下さ
い。
3 その他、この機器から移動体識別用の特定小電力無線局あるいはアマチュア無線局に対して有害な電波干渉の事例が発生した場合など何
かお困りのことが起きたときは、次の連絡先へお問い合わせ下さい。連絡先:
安全上のご注意
警告:火災や感電の原因になりますので本機を雨や水がかかるところには設置しないでください。
警告:火災や感電の原因になりますので分解・改造は厳禁。修理・調整は販売店にご依頼ください。
注 意
感電の恐れあり
キャビネットをあけるな
2.4 XX 8
Page 9

安全上のご注意を良くお読みください。この取扱説明書は大切に保管してください。
THH12を使用する前に以下の安全上の注意事項をよくお読みください。
1. 取扱説明書に記載されている警告は必ずお守りください。
2. 本機のトランスミッターは充電式でないアルカリ乾電池のみを使用してください。
3. 取扱説明書に書かれていること以外はしないでください。次のような場合には修理が必要です。
• 本機の内部に異物が入ったり、液体が入ったりしたとき
• 雨天や湿度の高いところで使用し、故障したとき
• 製品に異常や故障が生じたとき
• 本機が落下したりして損傷したとき
4. 本機を暖房機器の近く、発熱する機器の上など温度が極端に高くなるところには置かないでください。
5. 異物や液体が本機に入らないようにカバーをしてください。
6. 電源コードを踏んだり、重い物を置いたりしないでください。本機に接続する電源コードのプラグ先端は特に注意して取り扱ってください。
7. トランスミッターを使用しないときは電源をオフにして乾電池の消耗を防いでください。
8. お手入れは軽く湿った布を使ってください。
9. 弊社の指定する付属品/アクセサリーを使用してください。
10. 大音量や不快な音量で長時間使用すると難聴や聴力障害を起こすことがあります。 常に安全な音量で使用することを心がけてください。
Page 10

Basic OperatiOn
1. Power/Set Button - Power Function: Press once to turn the unit on. The LCD backlight will glow blue for 10 seconds then it will fade out automatically.
Press and hold 3 seconds to turn the unit off. Set Function: This is used for controlling the LCD interface. Use this button to put the transmitter in
different modes of operation and confirm selected values.
2. Select Button - This is used for controlling the LCD interface. Use to change parameter selections or control the mute on and mute off function.
3. LCD Panel - Whenever a button is first pushed, the LCD backlight will awaken by glowing blue. This allows you to view current transmitter
performance status and sets up the programming of operating channel, RF power level, mute and lockout modes.
HandHeld lcd interface
Operation - Edit Channel
Press Set once to power on transmitter or wake up the LCD (backlight should glow blue). Press Set one more time to put the transmitter in Channel
Select mode (“CH. #” will continuously blink). Press Select once to choose this mode (”CH.” will stay solid and the “#” will blink). Press Select
again to choose the desired channel. Once you’ve made your final selection, press Set once to put the transmitter on the new channel. LCD will
glow blue for 10 seconds and then fade off automatically.
Operation - Mute Mode
Press Set once to power on transmitter or wake up the LCD (backlight should glow blue). Press Set two times to put the transmitter in mute mode
(“MUTE” and “OFF” will continuously blink). Press Select once to choose this mode (”MUTE” will stay solid and the “OFF” will blink). Press Select
again to engage Mute mode (“ON” will now be displayed). Press Set to confirm Mute mode operation (LCD backlight will now glow red). While in
this mode, audio signal will be absent at the receiver’s output. Pressing the Select button during operation will toggle between Mute on and Mute
off. Every time Mute is on, the LCD backlight will continuously glow red. When Mute off is selected, the LCD backlight will turn off. To exit Mute
mode, Press Set once to enter menu mode. Press Select once to defeat this mode. Press Set once to deactivate Mute mode and return to standard
operation. LCD will glow blue for 10 seconds and then fade off automatically.
THH12
TRANSLATE - JAPAN
Page 11

Operation - Edit Transmitter RF Output Power
Press Set once to power on transmitter or wake up the LCD (backlight should glow blue). Press Set three times to put the transmitter in RF Power
edit mode (“TX PWR” and the current value will continuously blink). Press Select once to choose this mode (”TX PWR” will stay solid and the
current value will continuously blink). Press Select again to choose the desired power setting (HI or LOW). Press Set to confirm new power setting
(”TX PWR” and the new value will be displayed automatically in the Main View). LCD will glow blue for 10 seconds and then fade off automatically.
Operation - Assigning the Transmitter a Name
Press Set once to power on transmitter or wake up the LCD (backlight should glow blue). Press Set five times to put the transmitter in Name edit
mode (“Name” will continuously blink). Press Select once to choose this mode. Press Select again to choose the desired character. Press Set to move
to the next position and continue this process until you’ve completed entering in the desired name. After making your final character selection in
the fourth position, press Set to complete the naming process. The display will now show its new name in the Main View.
Operation - Engage Control Lock-out Function
Press Set once to power on transmitter or wake up the LCD (backlight should glow blue). Press Set four times to put the transmitter in Lock edit
mode (the lock symbol and the current value will continuously blink). Press Select once to choose this mode (the lock symbol will stay solid and the
current value will continuously blink). Press Select again to choose the desired state. Once you’ve made your final selection, press Set once to put
the transmitter in the new state. While in the locked state, no changes can be made to the transmitter. However, the transmitter can be powered
down by pressing the Power/Set button for 5 seconds.
Note: Engaging Lock mode will automatically exit Mute mode. A locked microphone cannot also be muted.
Disabling Lock Function: To regain control of a locked transmitter, press and hold both the Set and Select buttons for five seconds.
TRANSLATE - JAPAN
Page 12

preparing tHe HandHeld transmitter fOr Use
Battery Installation
Remove battery cover by turning counter-clockwise a mpartment by turning clockwise until secure.
AA BATTERY
NOTE: Do not over tighten.
TRANSLATE - JAPAN
Page 13

 Loading...