

Page 1
POD® HD PRO X
ADVANCED GUIDE
An in-depth exploration of the features & functionality of POD HD Pro X
Rev A Electrophonic Limited Edition ©2013 Line 6, Inc.
Page 2

Table of Contents
Overview ............................................................................................ 1•1
Home Views ....................................................................................................1•1
Tuner Mode......................................................................................................1•4
Tap Tempo .......................................................................................................1•5
Connections ....................................................................................................1•5
POD HD Pro X Edit Software .........................................................................1•6
System Setup ..................................................................................... 2•1
Accessing System Setup ...............................................................................2•1
Page 1, Setup:Utilities Options ......................................................................2•2
Page 2, Setup:Utilities Options ......................................................................2•3
Page 3, Setup: Input Options .........................................................................2•4
Page 4, Setup: Output Options ......................................................................2•8
Page 5, Setup: Digital Output Options ..........................................................2•9
Page 6, MIDI/Tempo Options ...................................................................... 2•10
Page 7, Setup: Variax Options .....................................................................2•11
Page 8, James Tyler Variax Tuning Options ................................................2•16
Page 9, Setup: L6 LINK Audio .....................................................................2•17
Page 10, Setup: L6 LINK Control .................................................................2•18
Features & Functionality..................................................................... 3•1
FX Blocks .........................................................................................................3•1
Mixer Block ......................................................................................................3•4
Moving FX Blocks ...........................................................................................3•5
FX & Amp Block FBV Footswitch Assignment .............................................3•7
Dynamic DSP ..................................................................................................3•8
Set Lists & Presets ............................................................................. 4•1
Working with Set Lists ....................................................................................4•1
Working with Presets ......................................................................................4•5
Saving Presets .................................................................................................4•6
Page 3

FX Edit Mode ...................................................................................... 5•1
Accessing FX Edit Mode ................................................................................5•1
Amp, Cab & Mic Models .................................................................... 6•1
Amp Model Positioning ..................................................................................6•1
Selecting Amp, Cab & Mic Models ................................................................6•3
Editing Amp Parameters .................................................................................6•6
Amp & Cab Edit Display .................................................................................6•7
Amp/Preamp Models ....................................................................................6•12
Cab Models ..................................................................................................6•15
FX Models .......................................................................................... 7•1
Dynamics Models ...........................................................................................7•1
Distortion Models ............................................................................................7•2
Modulation Models .........................................................................................7•3
Filter Models ....................................................................................................7•5
Pitch Models ....................................................................................................7•6
Preamp & EQ Models .....................................................................................7•9
Delay Models .................................................................................................7•10
Reverb Models ..............................................................................................7•12
Volume/Pan & Wah Models .......................................................................... 7•14
Looper Mode ...................................................................................... 8•1
Looper Controls & Performance View ...........................................................8•1
Looper Settings ...............................................................................................8•4
USB Audio .......................................................................................... 9•1
The Line 6 USB Audio Driver ..........................................................................9•1
The Line 6 Audio-MIDI Devices Panel ...........................................................9•3
Mac® - Line 6 Audio-MIDI Devices ...............................................................9•4
Windows® - Line 6 Audio-MIDI Devices.....................................................9•10
Page 4

Appendix A: Line 6 Monkey ................................................................ A•1
Launch Line 6 Monkey .................................................................................. A•1
Grab Those Updates ..................................................................................... A•2
Line 6 Variax Updates .................................................................................... A•4
Appendix B: FBV Foot Controllers ....................................................... B•1
FBV MkII & FBV Series Controllers ............................................................... B•1
Setup Options for FBV ................................................................................... B•2
FBV Controller Devices - Footswitch & Pedal Mapping ............................. B•5
FBV Shortboard MkII ..................................................................................... B•5
FBV Express MkII ........................................................................................... B•8
FBV Longboard ............................................................................................ B•10
FBV Shortboard ........................................................................................... B•13
Expression Pedal & Variax® Knob Controller Assignment ....................... B•16
Variax Knobs as Controllers ........................................................................ B•16
Amp & FX Block Footswitch Assignment .................................................. B•18
Set List Select ............................................................................................... B•22
Tap Tempo .................................................................................................... B•22
Tuner Mode................................................................................................... B•23
Appendix C: MIDI ............................................................................... C•1
Controlling POD HD Pro X Functions via MIDI ............................................C•2
Bank & Program Change Messages ............................................................ C•3
Using POD HD Pro X/FBV as a MIDI Controller ..........................................C•5
Line 6, POD, DT50, DT25, StageSource, Variax, James Tyler, Vetta, L6 LINK, CustomTone and Line 6 Monkey are
trademarks of Line 6, Inc. All other product names, trademarks and artists’ names are the property of their respective
owners, which are in no way associated or afliated with Line 6. Product names, images, and artists’ names are used
solely to identify the products whose tones and sounds were studied during the Line 6 sound model development for
this product. The use of these products, trademarks, images, and artists’ names does not imply any cooperation or
endorsement.
Copyright © 2013 Line 6, Inc.
Page 5
Overview
Overview
Welcome to the POD® HD Pro X Advanced Guide. This guide contains in-depth details
of the POD HD Pro X features and functionality. Please be sure to also read through
your POD HD Pro X Pilot’s Handbook for basic info on POD HD Pro X and this Guide
will take it from there! In this chapter, we’ll present an overview of the main screens and
features to get you started.
Please use Line 6 Monkey to check for and install the latest updates for your device - see
“Appendix A: Line 6 Monkey” on page A•1.
Home Views
The place to start is in one of the Home View screens. Press the VIEW button to
SAVE
S
E
E
T
R
S
P
rotate through the available Home Views. While in any of these Home View
screens, you can turn the PRESETS knob and call up a Preset in the current
HOLD FOR SYSTEM & I/O
VIEW
Setlist, or push the PRESETS knob to select from among other Set Lists!
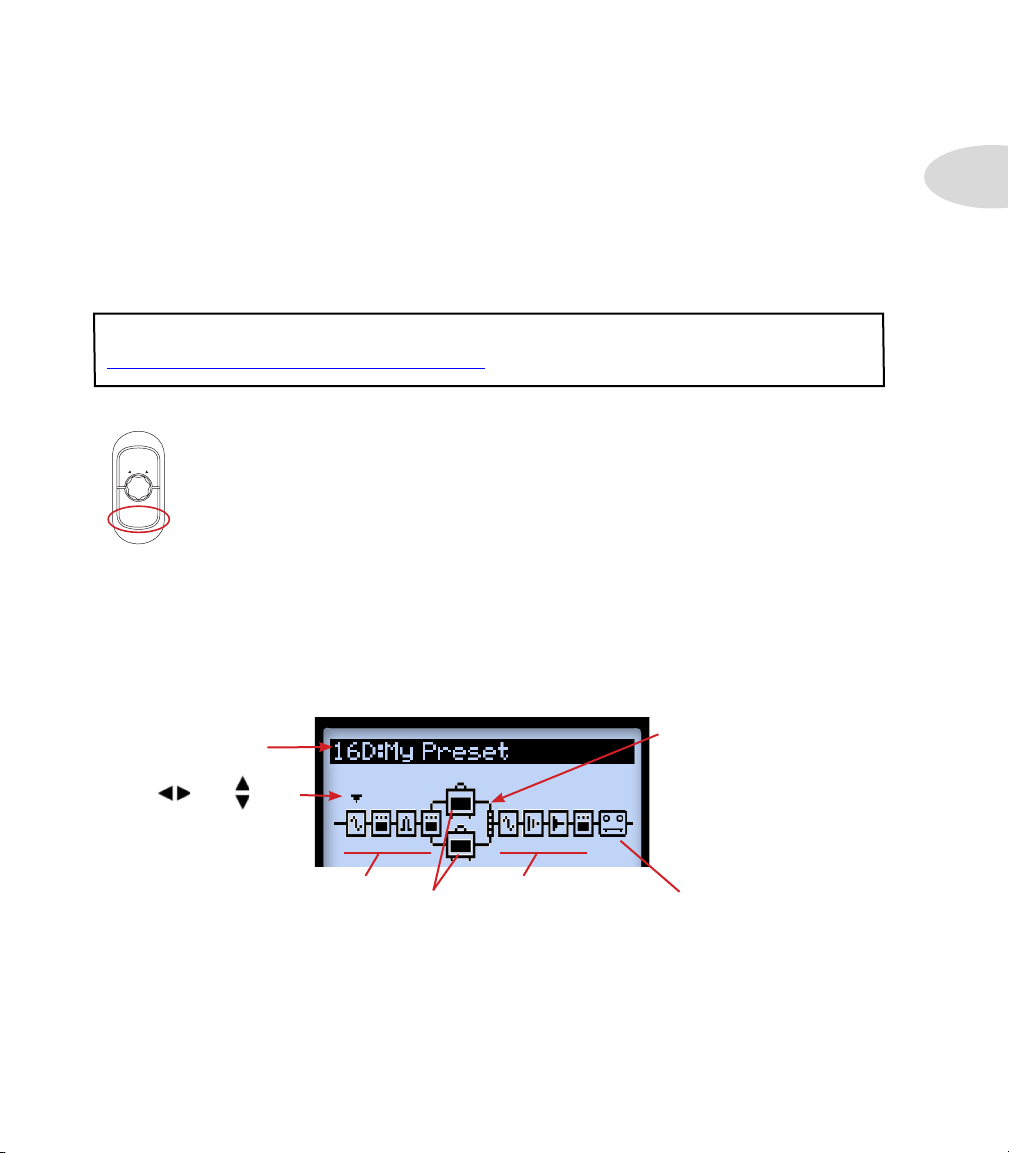
Signal Flow View
The Signal Flow View displays all Amp & FX “Blocks” and their ordering for the current
Preset. As you’ll see in several of the following chapters, this is the screen where you’ll
“select” the desired Block to perform other actions, such as choose a new Amp or FX
Model, edit its parameters, move its position, and more.
Currently loaded Preset
location and title
Use the and Nav.
Pad buttons to select the
desired Block
Parallel Paths A (upper)
and B (lower) with Mixer
Block
1•1
FX Blocks within
“Pre” position
Amp Blocks Looper
FX Blocks within
“Post” position
The items within the Signal Flow View
The signal ow architecture of each Preset is comprised of 3 main sections where Amp
& FX Blocks can be positioned: Pre, Post and parallel Paths A & B.
Page 6
Overview
1•2
At the bottom of the Signal Flow View screen, you’ll see up to four parameters that are
accessed using the Multi-function knobs 1-4.
Accessing parameters with the Multi-select Knobs
These parameters are specic to the currently selected Block and allow you to choose
new Models & edit parameters. Or, you can dive deeper using the Edit Mode and
access additional settings in other screens, as covered in the following chapters.
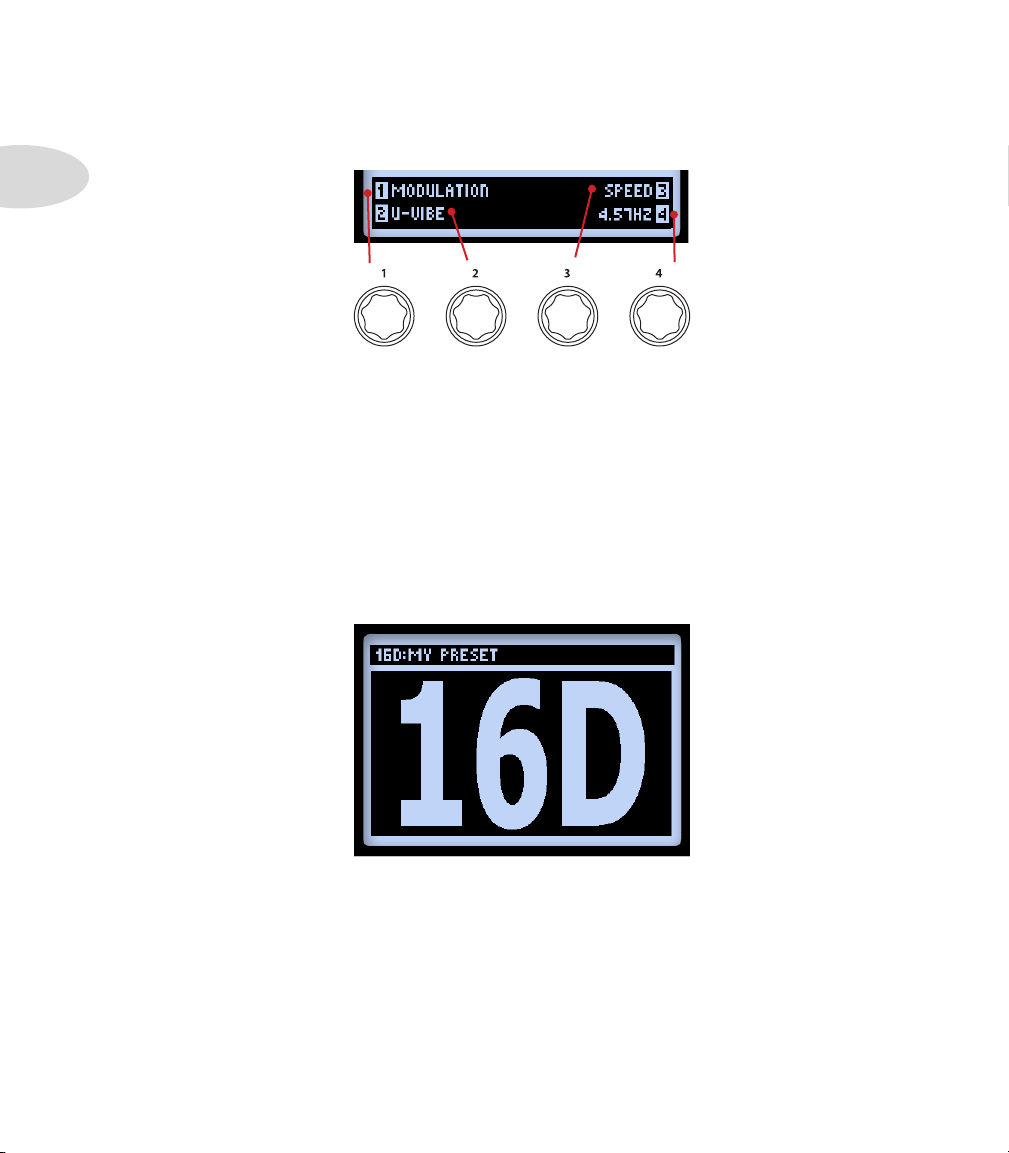
Big User View
This screen simply provides you with one BIG display of the currently loaded Preset
number - convenient for dark stages!
The Big User View
Page 7
Performance View
This screen displays the functions available for a Line 6 FBV™ Controller’s footswitch
functions, if an FBV is connected. This screen appears in three dierent variations,
depending on your device settings. The four options on the lower half of the screen
pertain to the FBV A, B, C & D footswitches.
You’ll see one of the following screens appear, dictated by the current POD HD Pro X
Setup - FS MODE setting - Also see “Page 1, Setup:Utilities Options” on page 2•2 for
details.
Overview
1•3
“FS 5-8” Mode“ABCD” Mode
When POD HD Pro X is in Looper Mode (Looper Mode is available when an FBV device
is connected), a 3rd variation of the screen displays the Looper functions that are
accessed by the FBV A, B, C & D footswitches. Also see “Looper Controls & Performance
View” on page 8•1.
The Performance View with Looper Mode active
Page 8
Overview
1•4
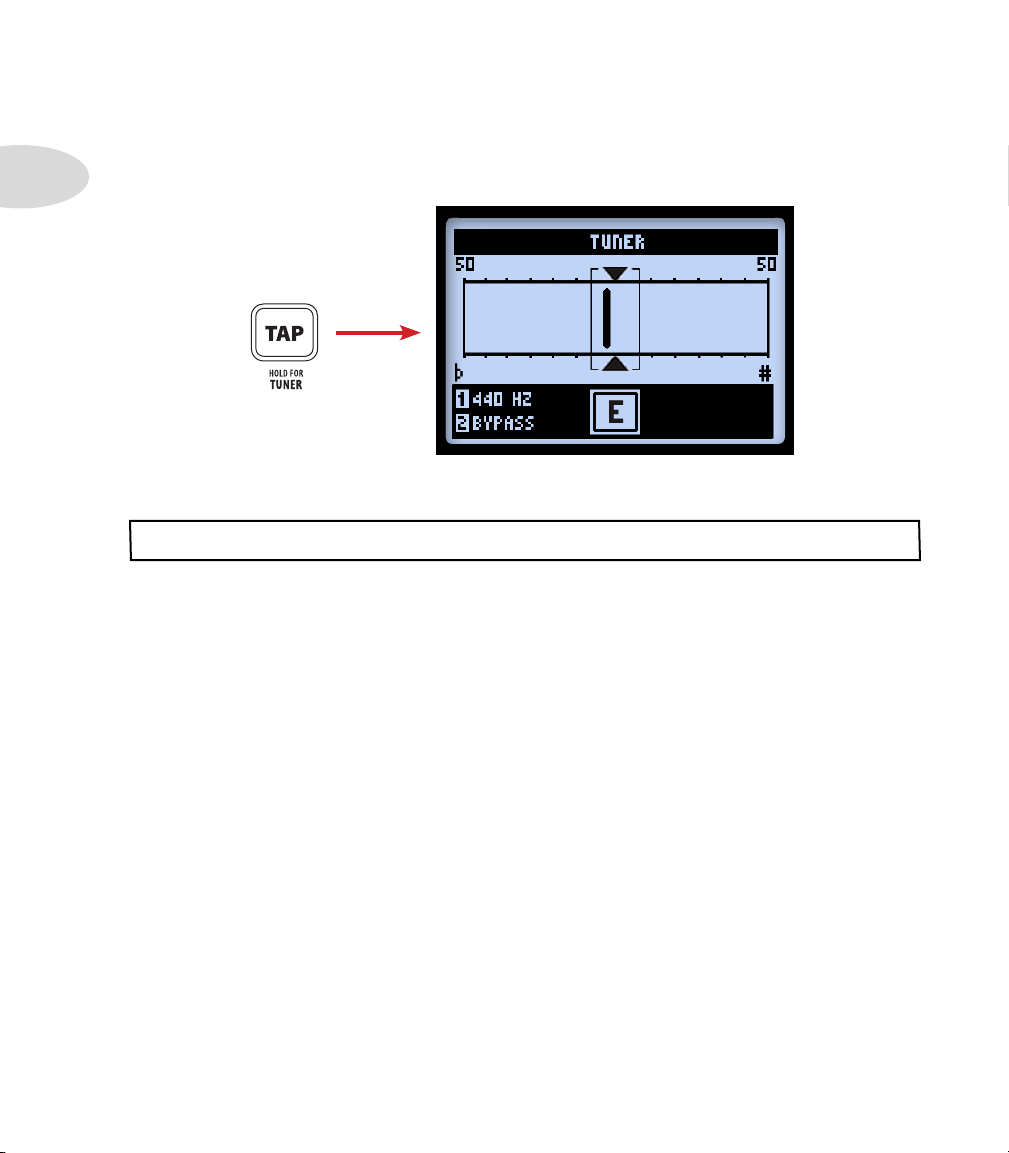
Tuner Mode
To enter Tuner mode, press and hold the TAP button. A few options are available,
adjusted using the Multi-function knobs.
The Tuner screen
Note that the Tuner receives a signal only from the POD HD Pro X Input 1 source.
Pluck an individual string on your guitar and you’ll see the name of the note displayed.
When the graphic bar is to the left of center, your string is at; when it is to the right,
your string is sharp. When the bar is within the center range, triangles will appear
above and below it, indicating your string is in tune.
• Reference (Knob 1): If you’d like to tune to a reference other than standard
440Hz, select from 425 to 455Hz.
• Audio (Knob 2): Select Mute to silence POD HD Pro X output while tuning, or
select Bypass to hear your guitar dry.
Press the TAP switch, or any other button, to exit Tuner Mode.
Page 9
Tap Tempo
Tap Tempo is the term we use to refer to the “System Tempo” value that is
accessed via the TAP button on your device. Tap rhythmically to set your
Tempo. Alternatively, you can set a numerical Tempo value within Setup (see
“Page 6, MIDI/Tempo Options” on page 2•10). This setting is saved per Preset.
You’ll see the TAP switch blink to indicate your current Tap Tempo BPM (if your Tap LED
option is set to “On” - see “Page 6, MIDI/Tempo Options” on page 2•10). Tempo-based
FX (Modulation, Filter & Delay FX) that oer a Tempo Sync parameter can optionally
be set to a note division of this Tap Tempo value.
Connections
Please refer to your POD HD Pro X Pilot’s Guide for descriptions of the Input & Output
connections. You’ll nd more details on their specic uses within the following chapters
as well!
Overview
1•5
Page 10

Overview
1•6
POD HD Pro X Edit Software
Be sure to visit line6.com/software to download the Line 6 POD® HD Pro X Edit
software - the free patch editor/librarian for Mac® and Windows® computers. Using
POD HD Pro X Edit and a USB connection you can easily create, audition, customize,
backup/restore and save an unlimited number of Tone Presets for your device.
The POD HD Pro X Edit application
Page 11
SyStem Setup
In this chapter, we’ll cover the options for conguring your POD® HD Pro X system
settings.
System Setup
Note that some System Setup options are “global” settings (they persist always, regardless
of the current Preset) while others are saved individually per Preset, as noted in the following
sections. You’ll want to be sure to save your Preset after changing settings of the latter type in
order to retain them. To restore all global settings to their factory default value, hold down the
Nav. Pad - left arrow button while powering on POD HD Pro X.
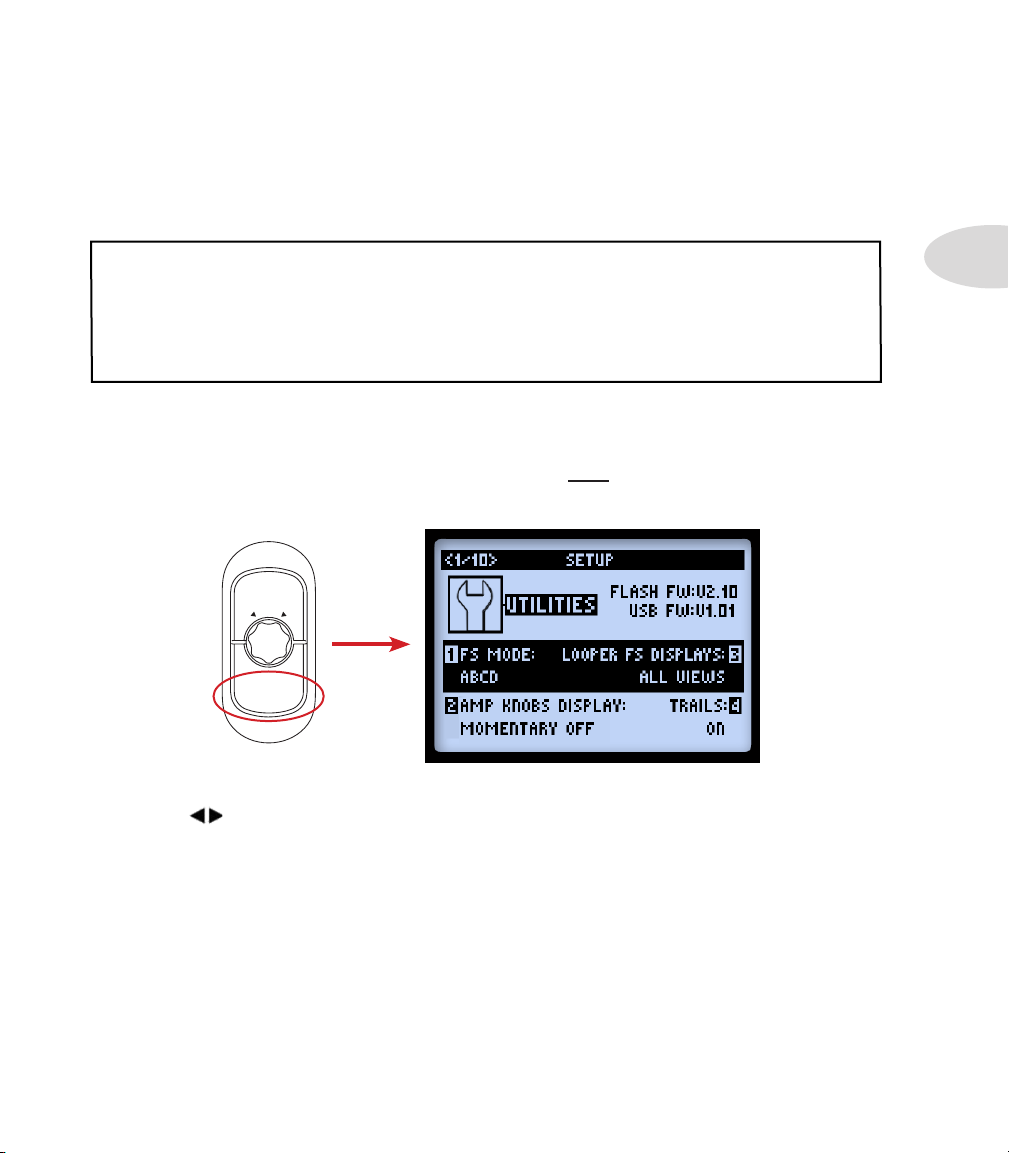
Accessing System Setup
To access the System Setup options, press and hold the VIEW button. Here you can
congure several device functions, Input & Output settings and more.
SAVE
S
E
E
T
R
S
P
HOLD FOR SYSTEM & I/O
VIEW
Use the Nav Pad buttons to navigate through the several Setup pages.
2•1
Page 12
System Setup
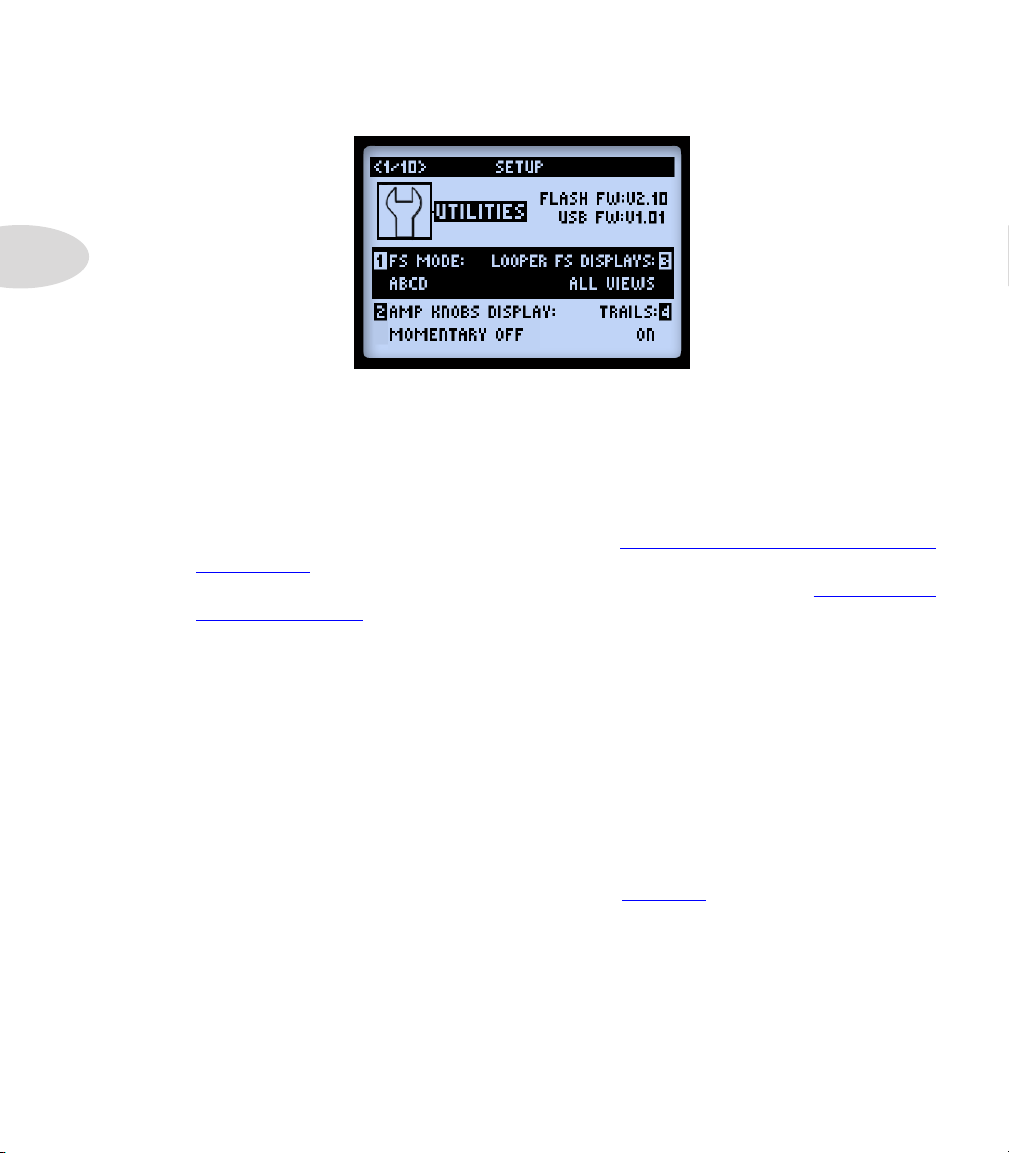
Page 1, Setup:Utilities Options
2•2
The top portion of the screen lists the Flash Memory and USB Firmware versions
currently installed on your POD HD Pro X device. The lower portion of the screen oers
four options, adjustable using the Multi-function Knobs 1 - 4.
• Footswitch Mode (Knob 1): This option applies to a connected Line 6 FBV
Controller’s A, B, C & D footswitches (also see “Appendix B: FBV Foot Controllers”
on page B•1). You’ll see your POD HD Pro X Performance View screen reect the
functions of these buttons according to the mode selected here (see “Performance
View” on page 1•3). This setting is global.
• In “ABCD” Mode: The A, B, C & D FBV footswitches recall the current Bank’s
Presets A-D.
• In “FS 5-8” Mode: The A, B, C & D FBV footswitches toggle the FS 5-8 assigned
Models On/O.
• Amp Knobs Display (Knob 2): When set to “On,” allows the LCD screen to
momentarily display the actual Amp Tone Knob values whenever adjusting any
physical amp knob. This setting is global.
• Looper FS Display (Knob 3): When Looper Mode is active (Looper Mode can
be accessed when an FBV device is connected), this option determines how
and when the Looper screen is displayed (see page 8•1). This setting is global.
• All Views: When Looper Mode is On, the Looper screen is always displayed.
• Performance View: When Looper Mode is On, displays the Looper screen, or
the other Performance View (Signal Flow or Big User) screens, by toggling the
VIEW button. This option can be useful for referencing your Presets or adjusting
Models while Looping.
Page 13
System Setup
• Trails (Knob 4): When set to “On,” allows the echo repeats and/or decay of Delay
and Reverb FX to continue when the Model is toggled O. With the Trails option
“O” the decay is muted instantly when toggling the Model O. This setting is
saved per Preset. (Note that this feature does not provide a “spillover” of the FX
decay when changing Presets.)
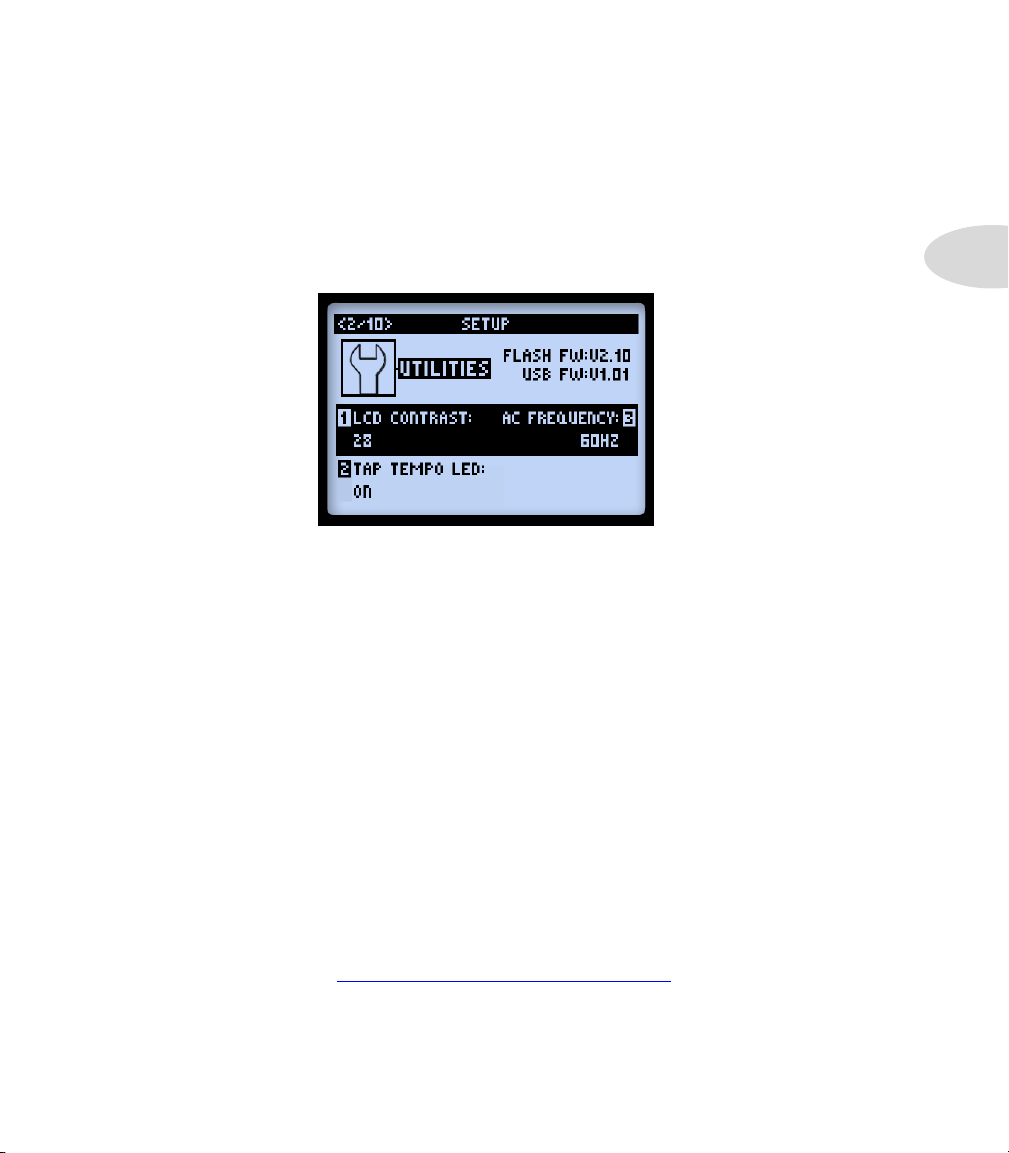
Page 2, Setup:Utilities Options
The options at the bottom of the screen are as follows - all are global settings.
• LCD Contrast (Knob 1): Adjusts the screen’s contrast.
• Tap Tempo LED (Knob 2): Choose “On” to have the LED light for the TAP button
(or connected FBV TAP footswitch) ash to indicate the current Tap Tempo value.
Choose “O” to have it remain unlit.
• AC Frequency (Knob 3): All HD Amp Models include simulation of AC hum,
typical of the AC Vacuum Tube Heater component - an important part of the
tonality of a tube amplier. Set the AC Rate to match that of the USA (60Hz) or UK
(50Hz) frequency for authenticity. (This setting may be subtle depending on the
current Amp Model settings, and may be more apparent when synchronizing this
setting with the AC rate of any tube amplier that POD HD Pro X may be plugged
into.)
2•3
• FBV Express (Knob 4): This option applies only to a connected Line 6 FBV
Controller. It should only be set to “On” specically for a FBV Express MkII model
device. Please see “Setup Options for FBV” on page B•2.
Page 14
System Setup
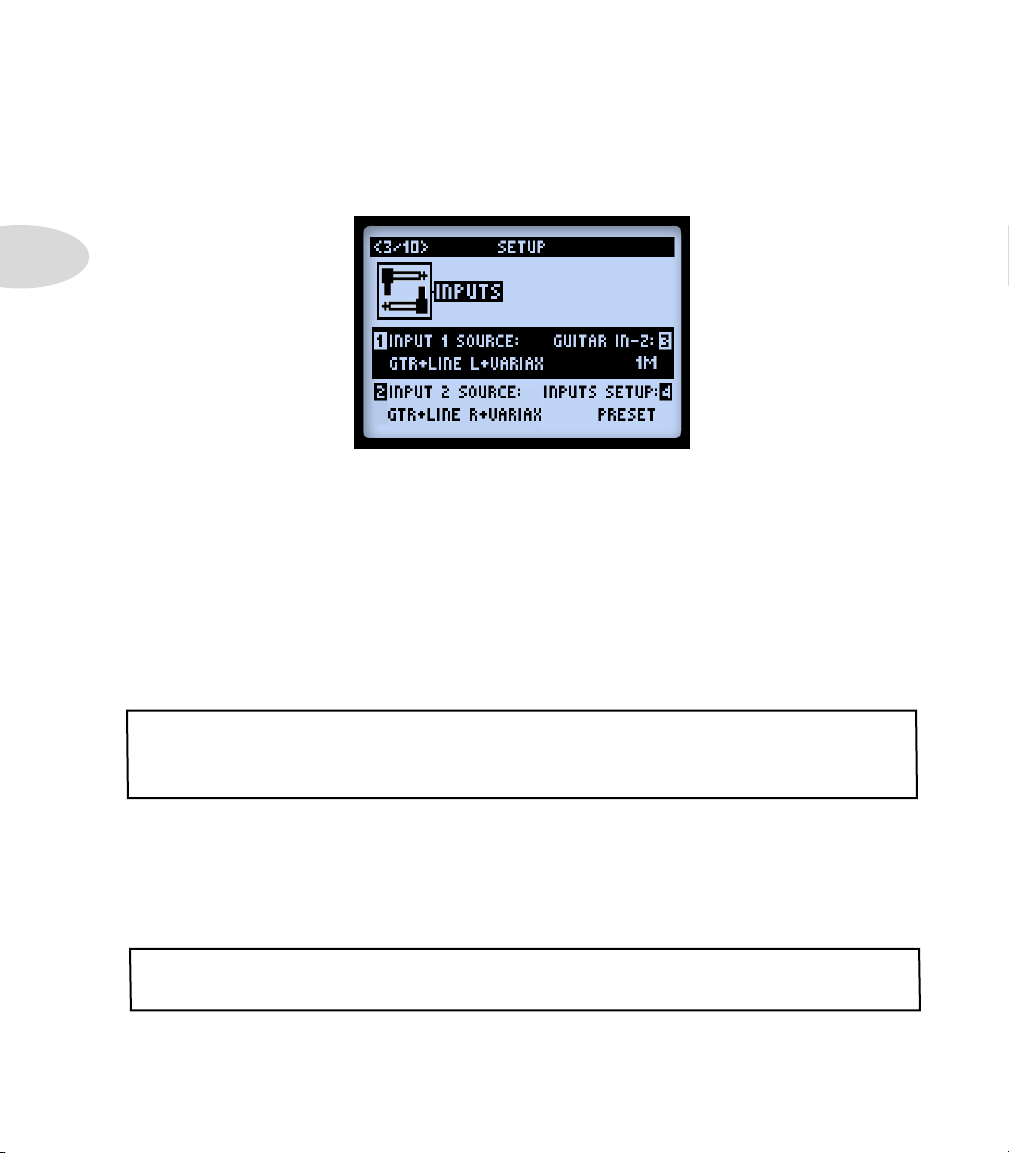
Page 3, Setup: Input Options
2•4
The Inputs Setup page allows you to select which of the device’s audio inputs are used
as the “source” – sort of like a built-in, programmable patchbay. There is also a control
which adjusts the Guitar input impedance.
• Input 1 and Input 2 Source (Knobs 1 & 2) - Select the physical input(s) that
you want to be the “source” which feeds into the signal path. Note that you can
choose dierent Sources to independently feed each signal path, or choose
Same to feed a common Source into both paths.
• The Variax and Variax Mag Input Source options are provided for Variax®
guitars when connected into the POD HD Pro X VARIAX Digital Input (VDI).
• With a James Tyler® Variax® (JTV), the “Variax” Input Source receives the
Model or Magnetic signal, depending on the JTV’s Model switch settings.* The
“Variax Mag” Input Source receives only the JTV’s Magnetic Pickup signal.
*Note: With a JTV in use, the “Variax” Input Source selection also recalls whether you were using
mags or models per preset, allowing you to pick up exactly where you left off – no need for
manual selection or input changes.
• If you own a rst-generation Variax instrument, it is recommended to choose
the Variax Input Source option. Please also refer to your Variax documentation.
• Guitar In-Z - Select the input impedance of the Guitar input. This feature aects
tone and feel because your guitar pickups are being loaded as they would be by
an eect pedal or a tube amplier.
Note: The Guitar In-Z setting affects the GUITAR IN input only. Please see the Impedance Ratings
table at the end of this section to reference the input impedance of each individual model.
• The Auto option dynamically sets the input impedance to match the input
impedance of the very rst Amp or FX model in your POD HD signal chain.
Page 15
• Or, you can manually select from a variety of impedance values from low to
high (22k, 32k, 70k, 90k, 136k, 230k, 1M, or 3.5M). A lower value will typically
result in some high frequency attenuation, lower gain and overall “softer” feel. A
higher value provides full frequency response, higher gain and overall “tighter”
feel.
• Inputs Setup - Determines whether the other 3 options in this Inputs screen are
applied per Preset, or globally.
• Preset - Recalling a preset will load the Input 1 Source, Input 2 Source and
Guitar In-Z parameter settings as last saved with the individual preset.
• Global - Once the “Global” option is selected here, the other three Input
options’ values on this Setup page (Input Sources 1 and 2, and Guitar In-Z) are
utilized globally, regardless of their values that are saved with each individual
preset. The Input values you choose on this Setup page are then retained
independently for the Inputs Setup - Global option. When you change the
Inputs Setup back to “Preset,” the Input options’ values saved with each
individual preset are once again utilized.
Note: Saving a preset while this option is set to “Global” will write the current global Inputs and
Guitar In-Z values to the individual, saved preset.
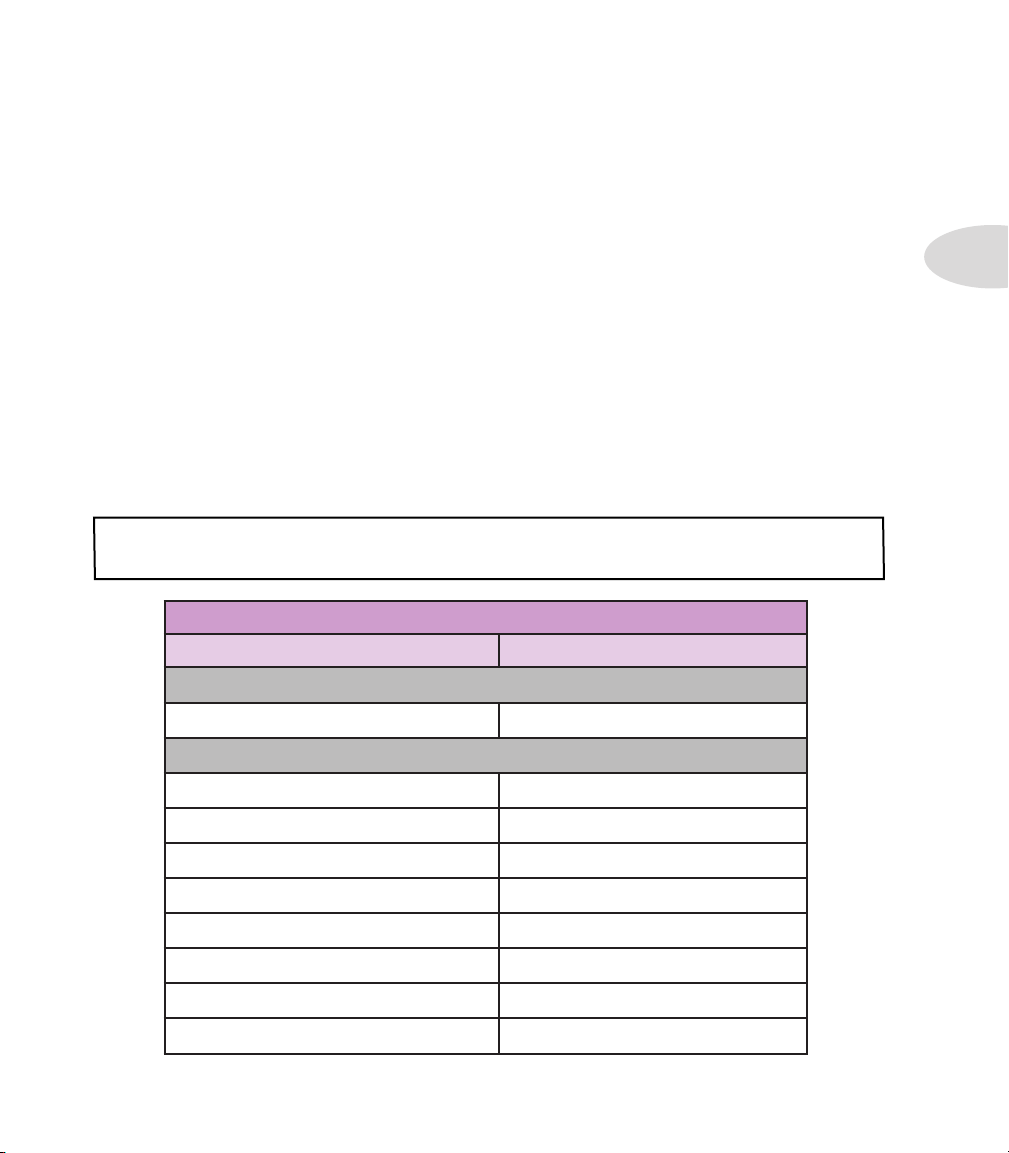
Amp & FX Model - Guitar Input Impedance Ratings
Model Guitar Input Impedance (Ohms)
System Setup
2•5
Amps & Preamps
All Amp & Preamp Models 1M
Distortion FX
Screamer 230k
Color Drive 136k
Buzz Saw 230k
Facial Fuzz 22k
Jumbo Fuzz 90k
Fuzz Pi 22k
Octave Fuzz 230k
All Other Distortion Models 1M
Page 16
System Setup
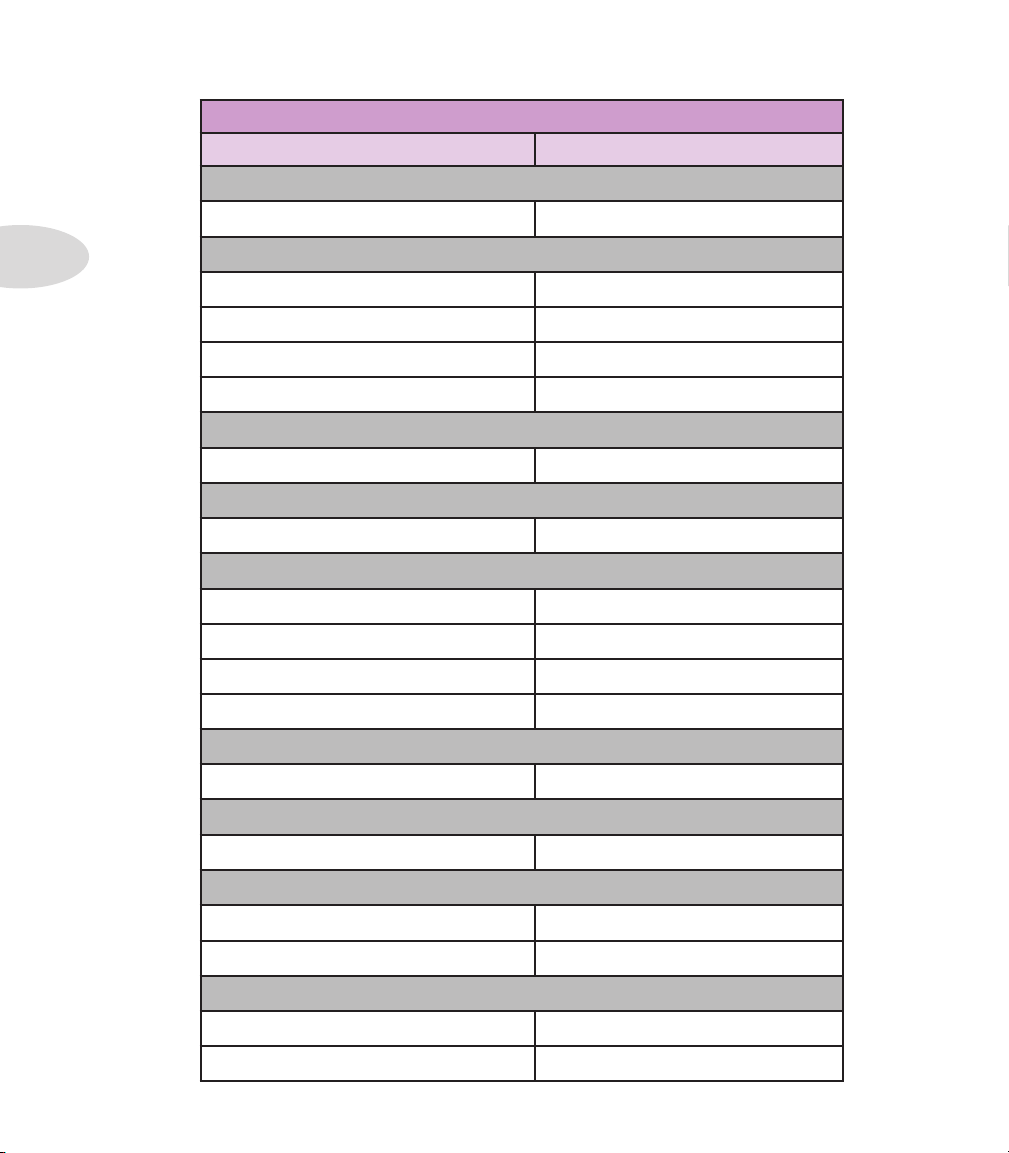
Amp & FX Model - Guitar Input Impedance Ratings
Model Guitar Input Impedance (Ohms)
Dynamics FX
All Dynamics Models 1M
2•6
Modulation FX
Dual Phaser 230k
U-Vibe 90k
Analog Choruis 22k
All Other Modulation Models 1M
Filter FX
All Filter Models 1M
Pitch FX
All Pitch Models 1M
Delay FX
Multi Head 22k
Analog Echo 230k
Analog w/Mod 90k
All Other Delay Models 1M
Preamp & EQ FX
All Preamp & EQ Models 1M
Reverb FX
All Reverb Models 1M
Wah FX
Weeper 90k
All Other Wah Models 1M
Volume & Pan FX & FX Loop
All Volume and Pan Models 1M
FX Loop 1M
Page 17

System Setup
About Source Input Signal Routing
It is important to note how POD HD Pro X actually routes Source Inputs 1 and 2 through
Amp & FX Blocks that are positioned “Pre” position. The following behaviors apply:
• In a conguration with no Amp or FX Blocks in Pre, Input 1 is fed only to Path A
and Input 2 only to Path B. Therefore, this is the best conguration if you want to
retain discrete Input Sources into Paths A & B.
• Placing an Amp Block or an active mono FX Model in Pre results in a “summing” of
Input Sources 1 & 2, feeding the same, combined signal into these Pre-positioned
Models, and thus into each Path A & B. You may need to adjust your instrument’s
volume level to avoid overloading your Pre-positioned Amp or FX Models.
• Placing a Stereo FX Model in Pre results in the left channel FX output being fed to
Path A and its right output to Path B.*
• The Mixer Block’s Volume and Pan options provide independent control for Path
A & B outputs before they are fed through any Blocks positioned “Post” the Mixer.
• By setting Input 2 to “Same,” this eectively routes your Input Source to both
stereo Paths A & B (which is how you can feed one guitar input into two Amp
Models and/or parallel FX, for example).
2•7
*Please also see “Model Types and Mono/Stereo Signal Routing” on page 3•5 for more
about how mono and stereo FX affect your signal chain.
Page 18
System Setup
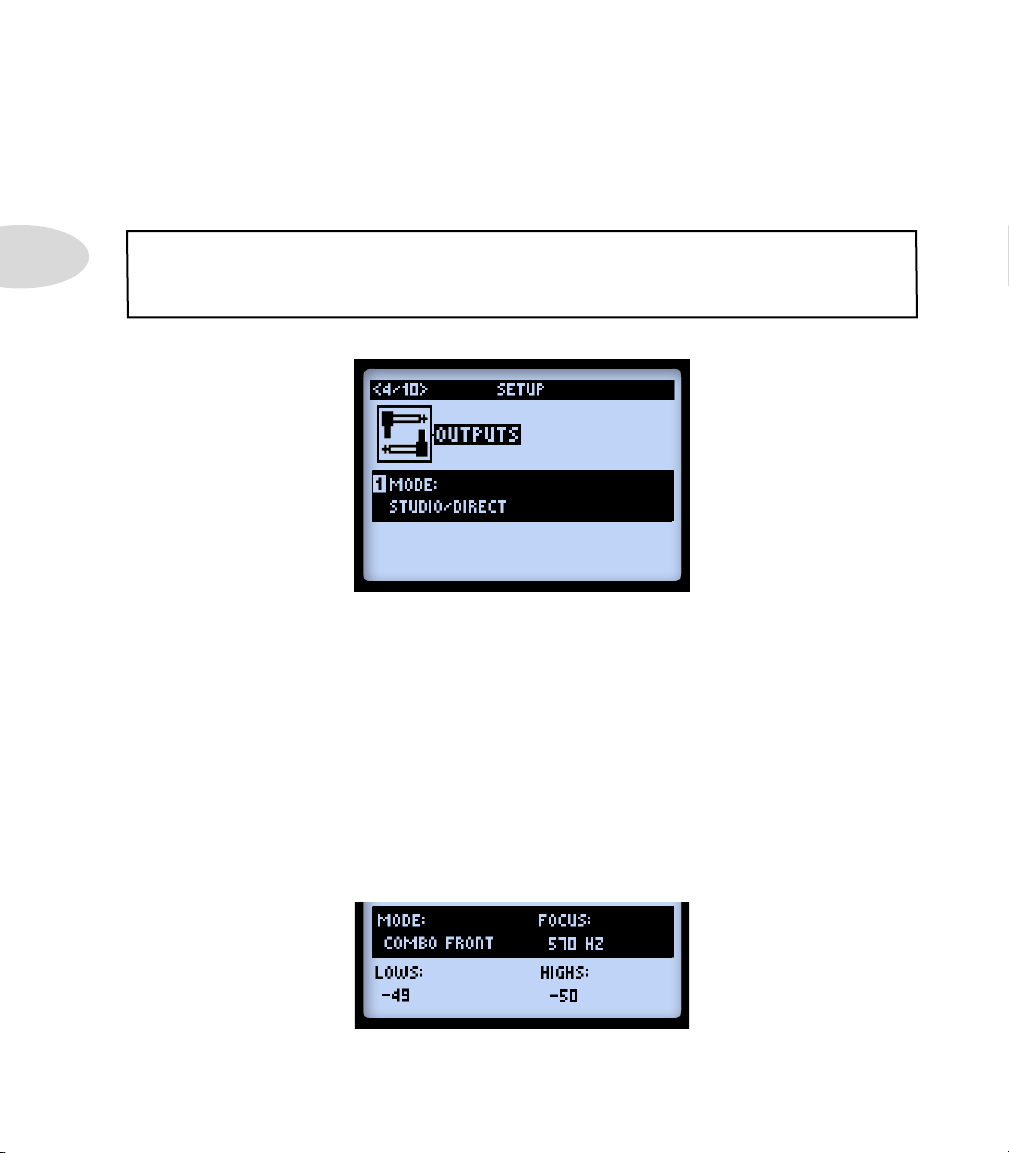
Page 4, Setup: Output Options
The Mode setting on this page allows you to congure the type of signal fed to your
POD HD Pro X outputs to optimize for direct recording versus connecting to an external
amplier.
2•8
Note that this Mode setting affects the signal fed to the POD HD Pro X Left & Right Balanced,
Unbalanced, Digital & Headphone outputs, as well as the signal fed to the USB Record Send &
L6 LINK™ output.
Knob 1 selects the Output Mode. This is a global setting.
• Studio/Direct: Typically the best option when connecting “Direct” to a mixing
console or recording device. This signal includes “Studio” Cab Models, Mic
Model and an “AIR” convolution to best emulate a mic’ed amp within a room.
• Combo and Stack settings: Optimizes your tone for connecting to an external
amplier. The signal includes “Live” Cab Models,with no Mic Model or “AIR”
convolution, with a special EQ curve added for each.
• Combo Front & Stack Front: For connecting into the front input of a typical
combo amp or amp head + external cab, respectively. When choosing either
of these Modes, you’ll see these additional options for further tone shaping:
Page 19

• Lows (Knob 2): Attenuates the low frequencies.
• Focus (Knob 3): Increases the overall midrange.
• Highs (Knob 4): Attenuates the high frequencies.
• Combo Power Amp & Stack Power Amp: For connecting to the power amp of
a combo or head amp.
TIP: When using the Combo or Stack options and connecting into a tube amplier, we also
recommend that you choose a Preamp Model from the Amp Model menu (rather than one of
the “Full” Amp Models). HD Preamp Models include no power amp emulation, making them
typically better suited for this connection. That said, there is no wrong choice! PODs have always
been about exibility... Check out all the possibilities and decide which Models work best for
your tone!
Page 5, Setup: Digital Output Options
System Setup
2•9
These options are strictly for conguring the signal fed to the 24-bit digital outputs (S/
PDIF or AES/EBU). All settings are global. When connecting to another digital device, it is
best to clock the external device to follow POD HD Pro X (with POD HD Pro X as the
“master” device) to maintain proper synchronization - please see your digital device’s
documentation for its digital clock features.
Note: The AES/EBU - L6 LINK output is an XLR jack that can be used for either type of connection
(also see “Page 9, Setup: L6 LINK Audio” on page 2•17). The AES/EBU options in this
screen apply only the AES/EBU output and do not affect the L6 LINK audio signal when
connected to a Line 6 DT Series amplier.
Page 20
System Setup
2•10
• Digital Output (Knob 1): Selects the type of output mode signal.
• Match Outputs: Uses the setting as congured on the Setup:Outputs screen
- see page 2•8.
• Dry Input: Your Source Input signal with no Amp, Cab, Mic, “E.R.” or FX
processing applied. (Handy for recording a dry signal in your DAW, to which
you can add a Plug-In or “re-amp” later!)
• Sample Rate (Knob 2): Selects the sample rate: 44.1kHz, 48kHz, 88.2kHz or
96kHz. When connecting to another device’s S/PDIF or AES/EBU input, always
be sure to set both units to utilize the same sample rate.
• Digital Level (Knob 3): Increases the amplitude of the S/PDIF or AES/EBU signal:
0 dB to +12 dB.
• Digital Format (Knob 4): Choose between settings for the S/PDIF or AES/EBU
digital outputs.
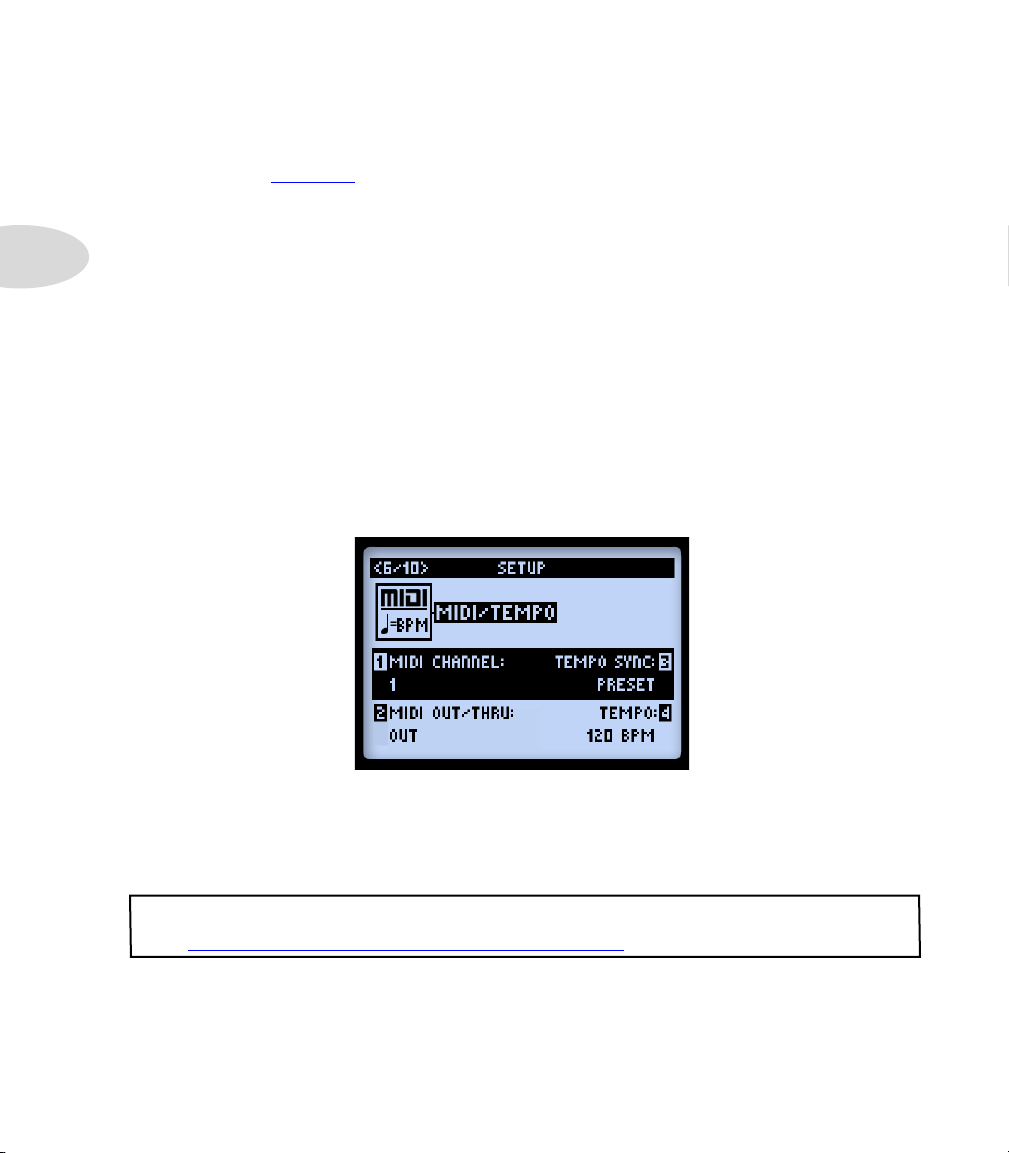
Page 6, MIDI/Tempo Options
• MIDI Channel (Knob 1): Sets the “System” MIDI Channel that POD HD Pro X
utilizes for both receiving and sending MIDI communication via the MIDI DIN
Input/Output. Choose any individual Channel 1 - 16, or “Omni” for all Channels.*
This is a global setting.
*Note: The MIDI Channel selected here also affects the MIDI Channel settings utilized by L6 LINK
- see “Page 10, Setup: L6 LINK Control” on page 2•18.
• MIDI Out/Thru (Knob 2): Allows the MIDI Out DIN to be switched between a
MIDI Output versus MIDI Output + Thru.
Page 21
System Setup
• Tempo Sync (Knob 3): The “Speed” or “Time” parameters of all tempo-based
FX (Modulation, Pitch & Delays) can optionally be set to a note value to follow
the (Knob 4) Tempo BPM value. This Tempo Sync option is a global setting that
allows you to choose whether the FX follow the Tap Tempo as a per-Preset value
or globally.
• Preset: Tempo settings are saved and recalled on a per Preset basis.
• Global: Tempo information stored within any Preset is ignored. When saving a
Preset while this option is set to “Global,” the current tempo value will be saved
with the Preset.
• Tempo (Knob 4): Enter in a specic “Tap Tempo” for your current Preset (as
opposed to pressing rhythmically on the TAP button). This value is saved individually
per Preset.
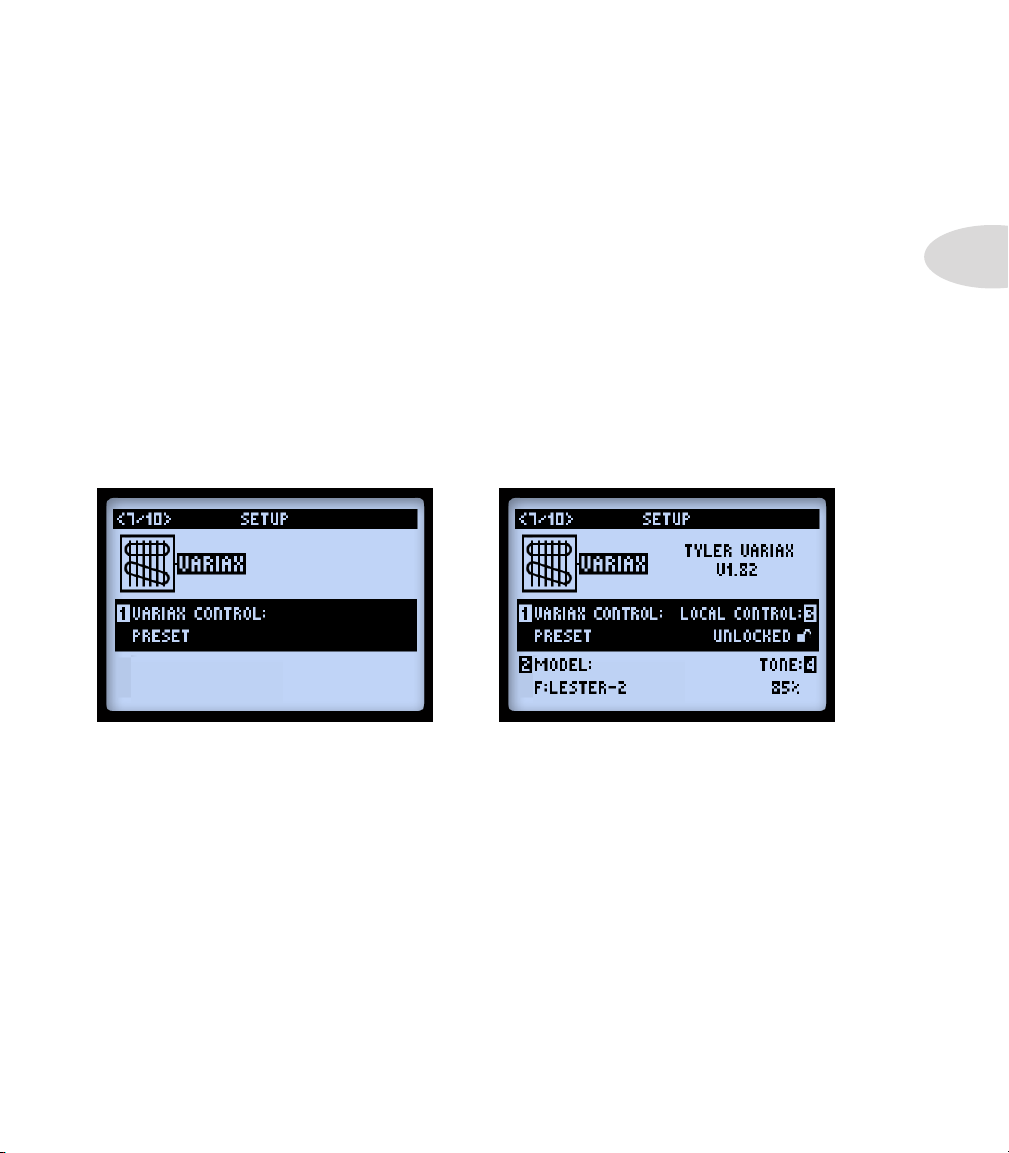
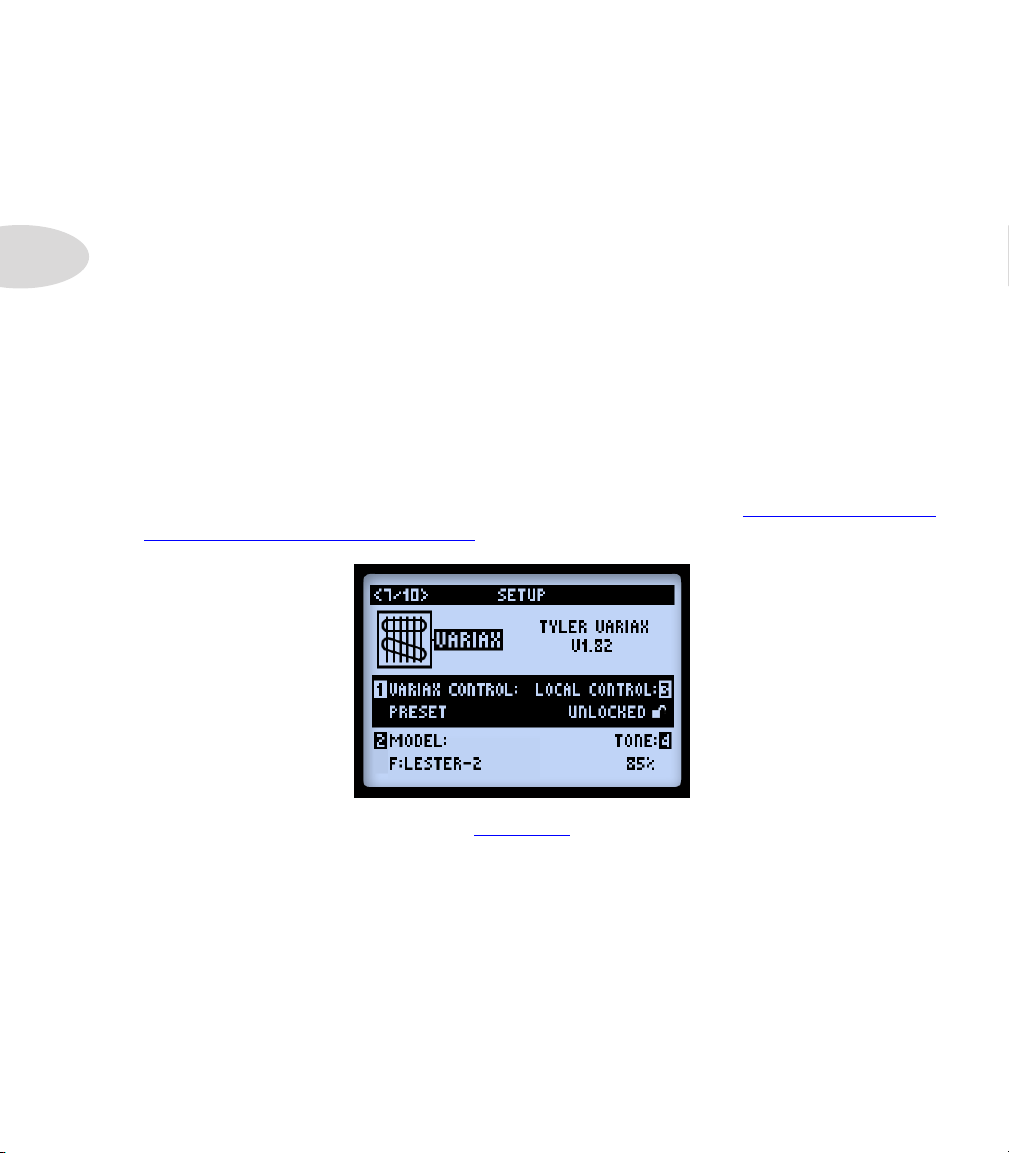
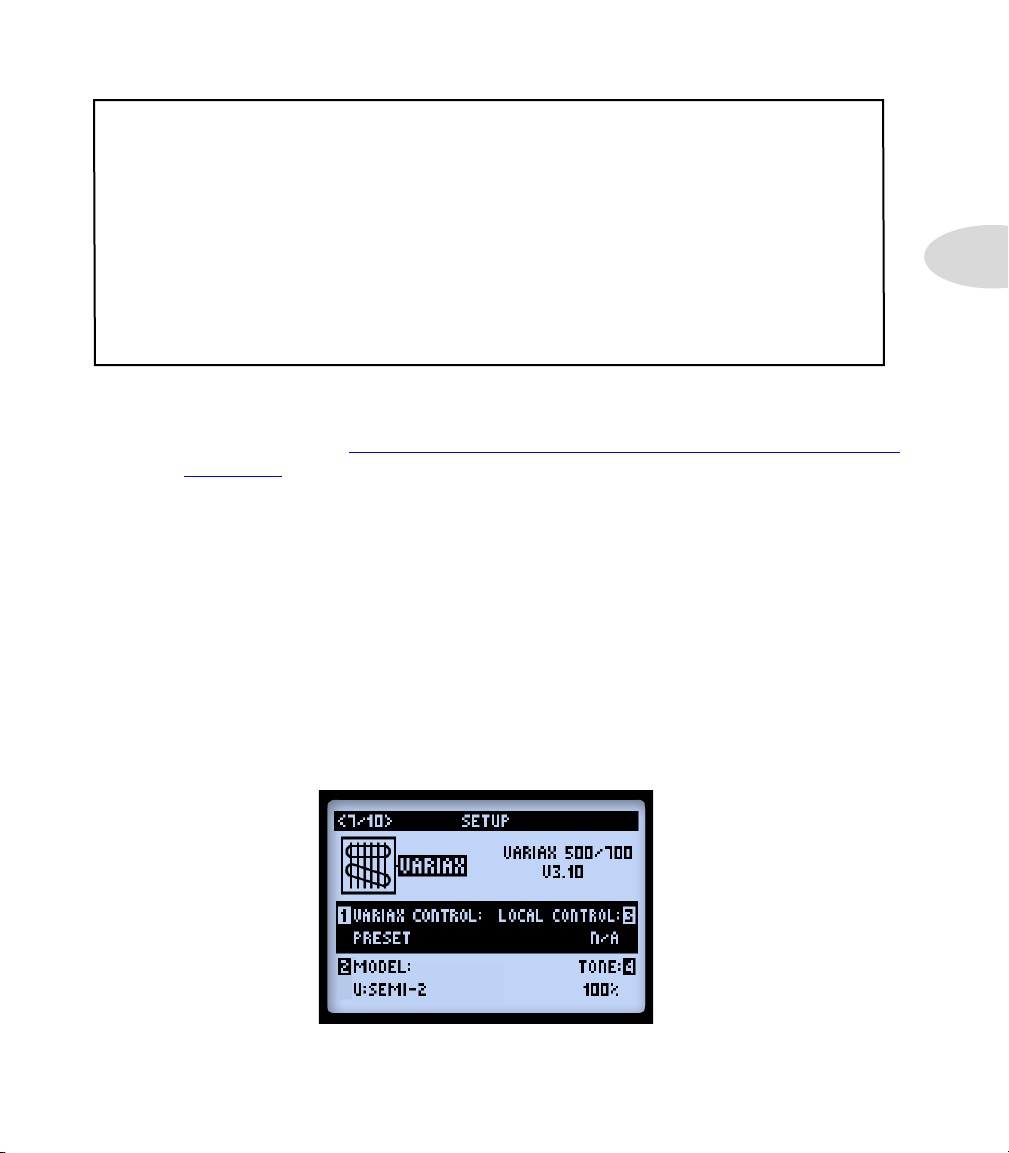
Page 7, Setup: Variax Options
Setup Page 7 - No Variax connected Setup Page 7 - James Tyler Variax connected
As illustrated above, Setup page 7 will display additional, model-specic options when
a Variax instrument is connected to the POD HD Pro X VARIAX (VDI) input. The specic
Variax family and rmware version are displayed at the top right of the screen when the
Variax is connected. Available options and behaviors displayed will dier depending
on the Variax type and model you have connected, as described in the following
sections. With any Variax connected to the VDI input, the Knob 1 option functionality
is as follows.
2•11
• Variax Control (Knob 1): Choose whether you want to assign all your Variax
settings on this Setup pg 7 screen on a per Preset basis or Globally.*
Page 22
System Setup
2•12
• When set to “Preset,” all the parameter settings shown on the Variax Setup
screens (Setup pages 7 & 8) are saved and recalled individually per POD HD
Pro X preset. You’ll see additional options in the screen when you have a Variax
connected and choose “Preset.”
• When set to “Global,” this provides complete manual control over all Variax
functions, regardless what Variax settings you may have saved within the POD
HD Pro X presets.
*Note: For a James Tyler Variax (JTV) this will also determine whether the guitar’s Mag/
Model switch selection (as heard through the “Variax” Input Source option) will be
recalled per Preset or Globally.
Also note that the Setup Pg 8 - JTV Tuning Options are not aected by this Variax
Control setting - the Tuning settings are saved per Preset.
James Tyler® Variax®
All James Tyler Variax Electric Guitars are supported. (Also see “Page 8, James Tyler
Variax Tuning Options” on page 2•16 for more options!)
• Variax Control (Knob 1): See page 2•11.
• Model (Knob 2): Selects the Variax Model & pickup position setting. Choose the
“Don’t Force” option if you prefer to not have the JTV local Model changed by the
Model value saved within the POD HD Pro X presets.
• Local Control (Knob 3): Determines whether the JTV Volume and Tone knobs,
and/or toggle switch are to remain active or be “locked.” When locked, the knob/
switch no longer controls the JTV guitar’s local functions for the Modeled output
of the guitar.*
James Tyler® is a registered trademark of James Tyler Guitars.
Page 23
*Note: When utilizing the Magnetic output mode on the JTV guitar, only the Volume knob is
“Locked” by any of the Local Control - Locked settings. For the Magnetic output, the Tone and
Pickup switch functions remain unlocked even when set to “Locked” via Knob 3. This feature
allows you to freely use the JTV Tone knob or Pickup selector switch when the JTV is in the
Magnetic pickup output mode, while keeping the Modeled settings still “locked” if you prefer
these Modeled settings to remain unchanged when you toggle back to Modeled output mode!
Also note that when any of these JTV controls are locked, changing the JTV guitar’s Model
Encoder knob automatically always resets all to unlocked.
• Setting the JTV Volume and/or Tone knobs to “Locked” can be desirable when
the knobs are assigned to remotely control any POD HD Pro X Amp or FX
parameters - see “Expression Pedal & Variax® Knob Controller Assignment” on
page B•18 for details.
• It can also be handy to “Lock” the JTV Pickup Toggle switch - for example,
when switching between Acoustic (Model) and Electric (Mag) tones, you can
lock the Acoustic Model controls so that tweaking knobs and switching pickups
when playing the Electric sound won’t aect the sound of the Acoustic when
you switch back.
• Tone (Knob 4): Allows the JTV Tone knob value to be saved with the current
preset, or applied Globally, per the Variax Control (Knob 1) setting.
System Setup
2•13
Variax Electric
All rst generation Variax Electric Guitars are supported.
Page 24
System Setup
2•14
• Variax Control (Knob 1): See page 2•11.
• Model (Knob 2): Selects the Variax Model & pickup position setting. Choose the
“Don’t Force” option if you prefer to not have the Variax guitar’s model changed
by the Model value saved within the POD HD Pro X presets.
• Local Control (Knob 3): This feature is not applicable for rst generation Variax
instruments, therefore, no options are available.
• Tone (Knob 4): Allows the Variax guitar’s Tone knob value to be saved with the
current preset, if desired.
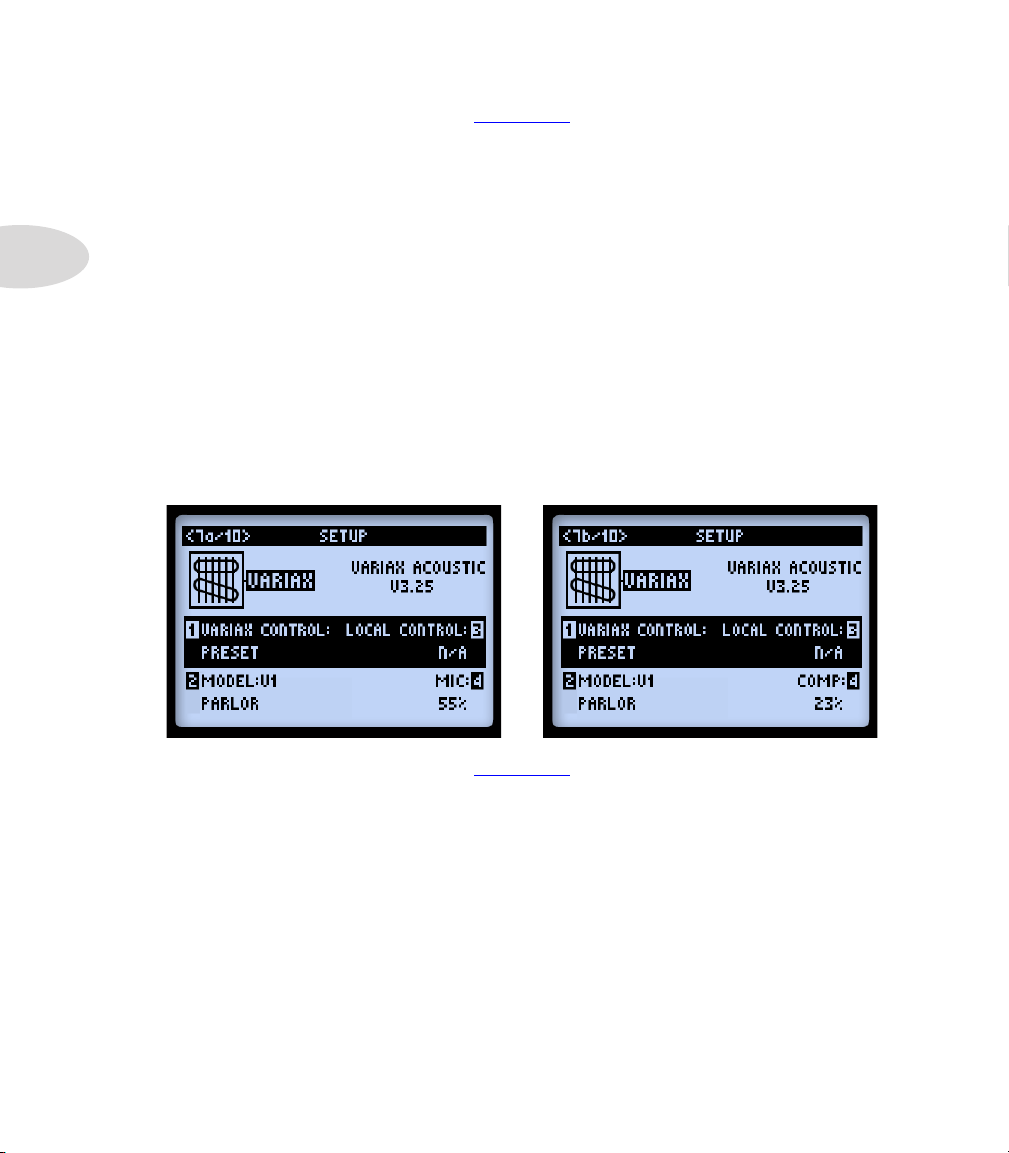
Variax Acoustic 700
For a Variax Acoustic Guitar, you’ll see two Setup pages, 7a and 7b, to accommodate
the additional controls. Multifunction Knobs 1, 2 & 3 are common controls, shown on
both Setup pages. Knob 4 is unique on each page.
• Variax Control (Knob 1): See page 2•11.
• Model (Knob 2 - pgs. 7a & b): Selects the Variax Acoustic Model. Choose the
“Don’t Force” option if you prefer to not have the JTV local Model changed by the
Model value saved within the POD HD Pro X presets.
• Local Control (Knob 3 - pgs. 7a & b): This feature is not applicable for Variax
Acoustic, therefore, no options are available.
• Mic Position (Knob 4 - pg 7a): Changing this value simulates changing the mic
position on the acoustic from closer to further from the soundhole.
• Comp (Knob 4 on pg 7b): Selects the amount of compression eect applied to
the Variax Acoustic tone.
Page 25
System Setup
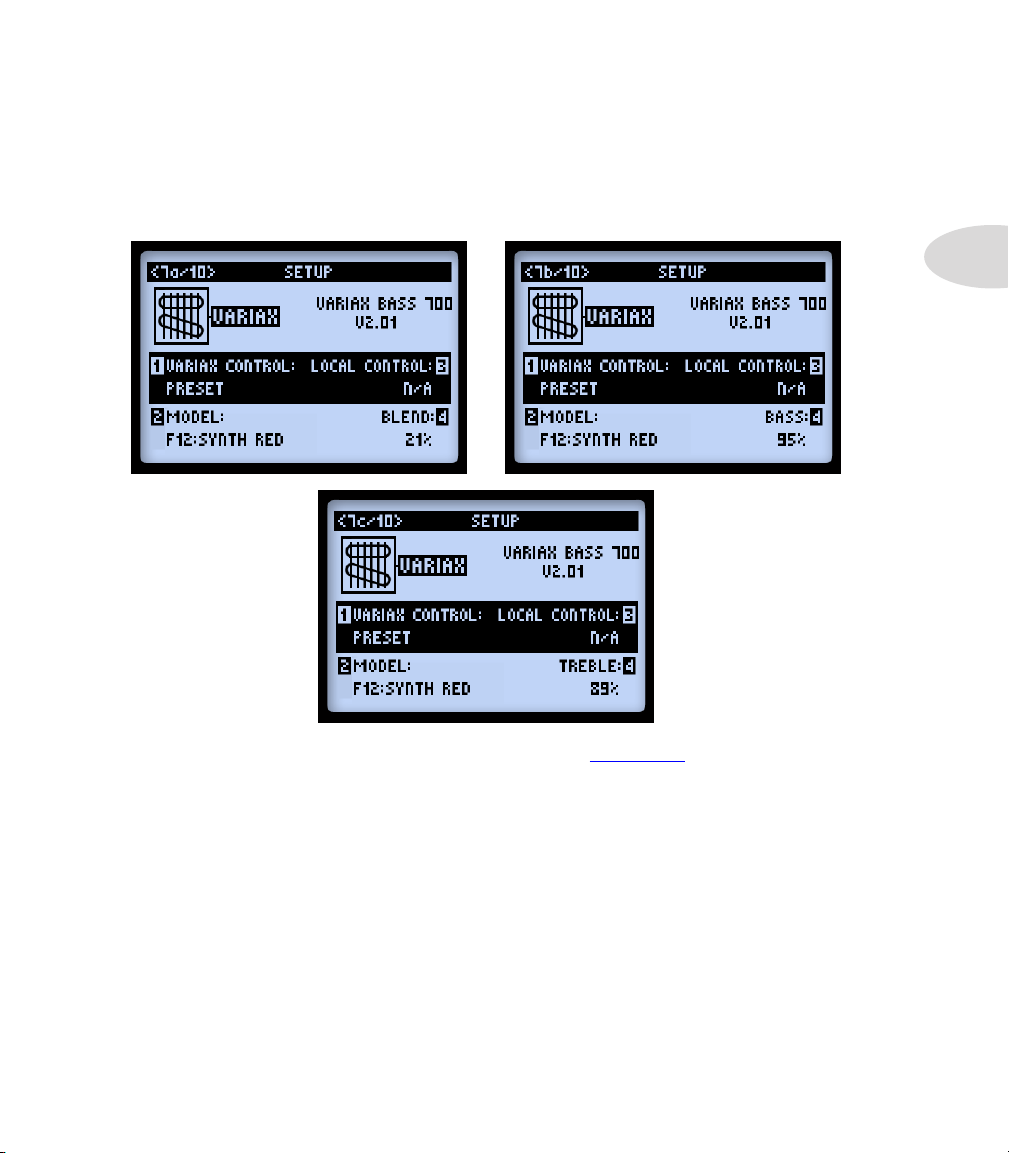
Variax Bass 700 & 705
For a Variax Bass, you’ll see three Setup pages, 7a, 7b & 7c to accommodate all the
controls on the Bass. Multifunction Knobs 1, 2 & 3 on all pages are common controls.
Knob 4 on each page is unique.
2•15
• Variax Control (Knob 1 - pgs. 7a, b & c): See page 2•11.
• Model (Knob 2 - pgs. 7a, b & c): Selects the Variax Bass Guitar Model. Choose
the “Don’t Force” option if you prefer to not have the Variax Bass Model changed
by the Model value saved within any POD HD Pro X preset.
• Blend (Knob 4 - pg. 7a): Adjust this controls the balance between a neck and
bridge pickup tone on the Bass.
• Bass (Knob 4 - pg. 7b): Adjusts the amount of bass frequencies.
• Treble (Knob 4 - pg. 7c): Adjusts the amount of treble frequencies.
Page 26
System Setup
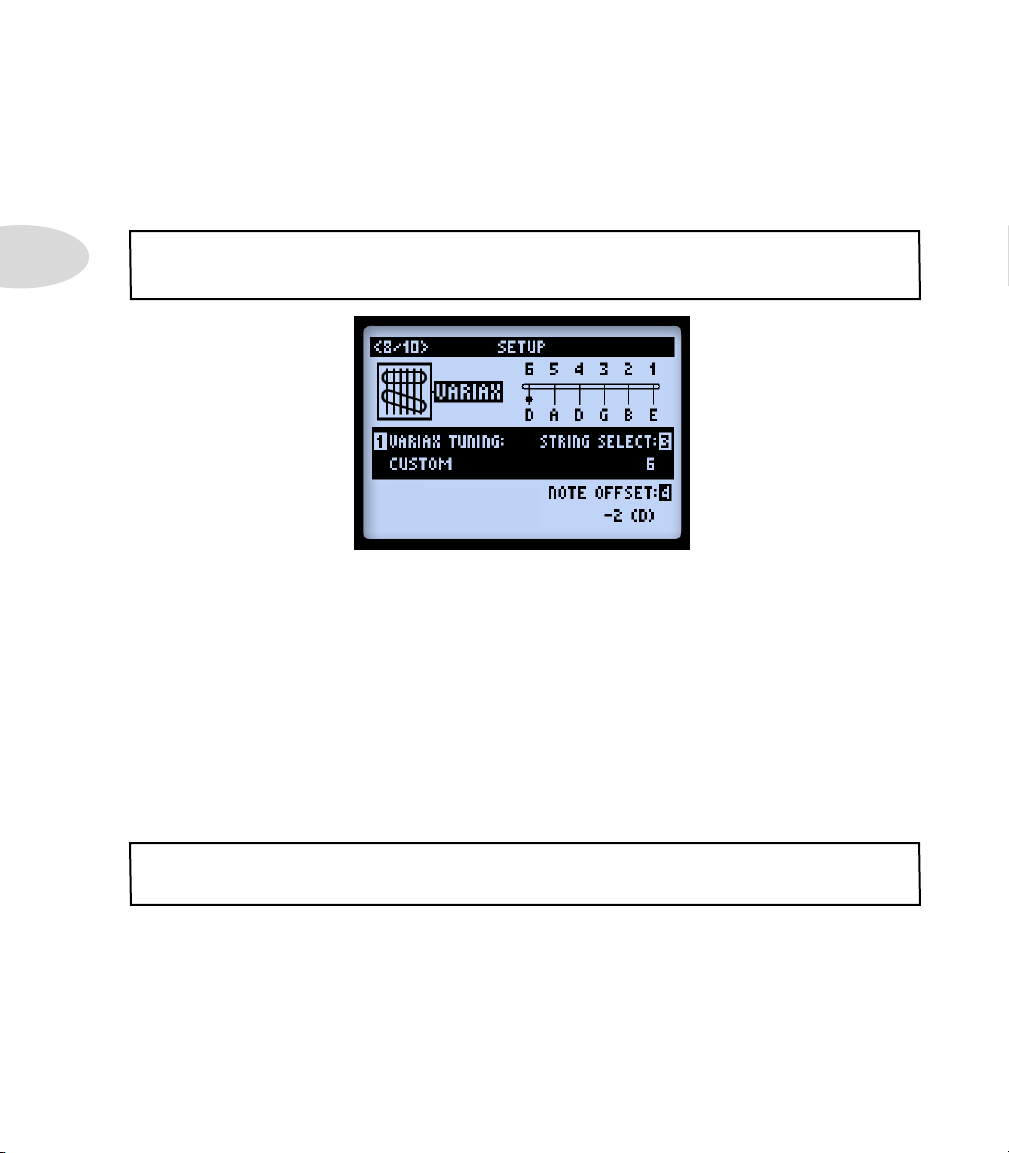
Page 8, James Tyler Variax Tuning Options
The Page 8 Setup screen oers Tuning options for James Tyler Variax guitars.* These
allow you to congure and edit alternate tunings for your connected JTV guitar, which
can be saved right along with any POD HD Pro X preset!
2•16
*Note: This tuning functionality is only available for James Tyler Variax family guitars. If no JTV (or
any rst-generation Variax) is connected, this screen offers no accessible options.
• Variax Tuning (Knob 1): Choose “Don’t Force” if you do not want the POD HD
Pro X preset to aect the local tuning on your JTV guitar. Choose “Custom” to
create a tuning of your own, which can be saved with the current preset.
• String Select (Knob 3): Select the desired guitar string, 1 though 6, for which you
want to change the pitch.
• Note Oset (Knob 4): Choose the amount of half-steps, positive or negative, for
which you want to raise or lower the pitch of the selected string. The resulting note
will then be displayed on the tuning graphic at the top of the screen. For example,
in the screenshot above, we’ve altered the low E string down two half-steps to a
D note.*
*Note: The offset value will always be accurate - the note labels displayed assume the guitar is
tuned to standard pitch (E, A, D, G, B, E), with the A using a 440Hz reference pitch.
Page 27
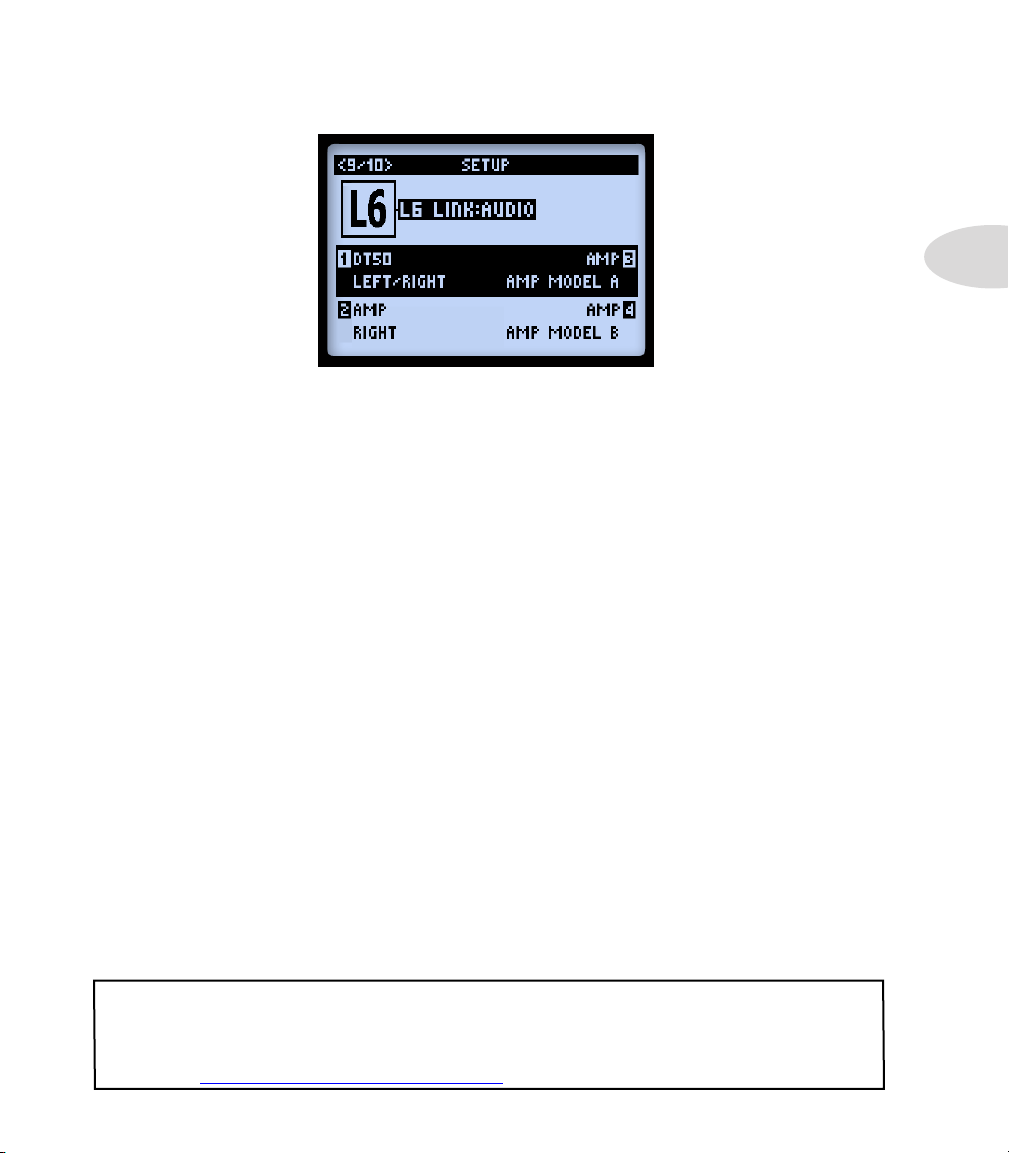
Page 9, Setup: L6 LINK Audio
These options congure the POD HD Pro X audio signal fed to up to four Line 6 DT
Series ampliers and/or StageSource™ speakers using the L6 Link connection. The
settings to each of the 4 Amps are saved per Preset. Whenever one or more DT amps/
StageSource speakers are connected to the POD HD Pro X - L6 LINK output, you’ll
see each identied on the screen, such as the “DT50” appears as connected in the #1
Amp position in the above screenshot (note that these are indicators labels only and
not stored per Preset).
1 - 4 Amp Options - Select the specic POD HD audio signal you want fed to each
L6 LINK-connected DT amp/StageSource speaker. Note that the L6 LINK audio signal
fed to each amp is mono.
System Setup
2•17
• Choose Left, Right or Left/Right (summed to mono) to send the main POD
HD output signal.
• Choose the output of one or two specic POD HD Amp Models - Amp Model
A, Amp Model B, or both Amp Model A/B.
• Choose Mute to silence any connected DT amp/StageSource speaker.
This is handy, for example, if you are L6 LINK-connected to both a DT amp
and StageSource speaker.* You can save some POD HD Presets with the
StageSource set to “Mute” to allow an electric guitar tone to be heard through
DT amp only - and other Presets with the DT amp set to “Mute” for an acoustic
tone to be heard from the StageSource speaker only. Even better, if you use a
Line 6 Variax guitar, these electric & acoustic guitar settings can be saved with
your POD HD Preset as well!
*Note: It is necessary to always place the StageSource speaker(s) last in the L6 LINK signal
chain (e.g. - POD HD Pro X > DT50 > StageSource L3). For more about using the L6 LINK
connection, DT Series amps & StageSource speakers, please see the additional documentation
available at http://line6.com/support/manuals/.
Page 28
System Setup
2•18
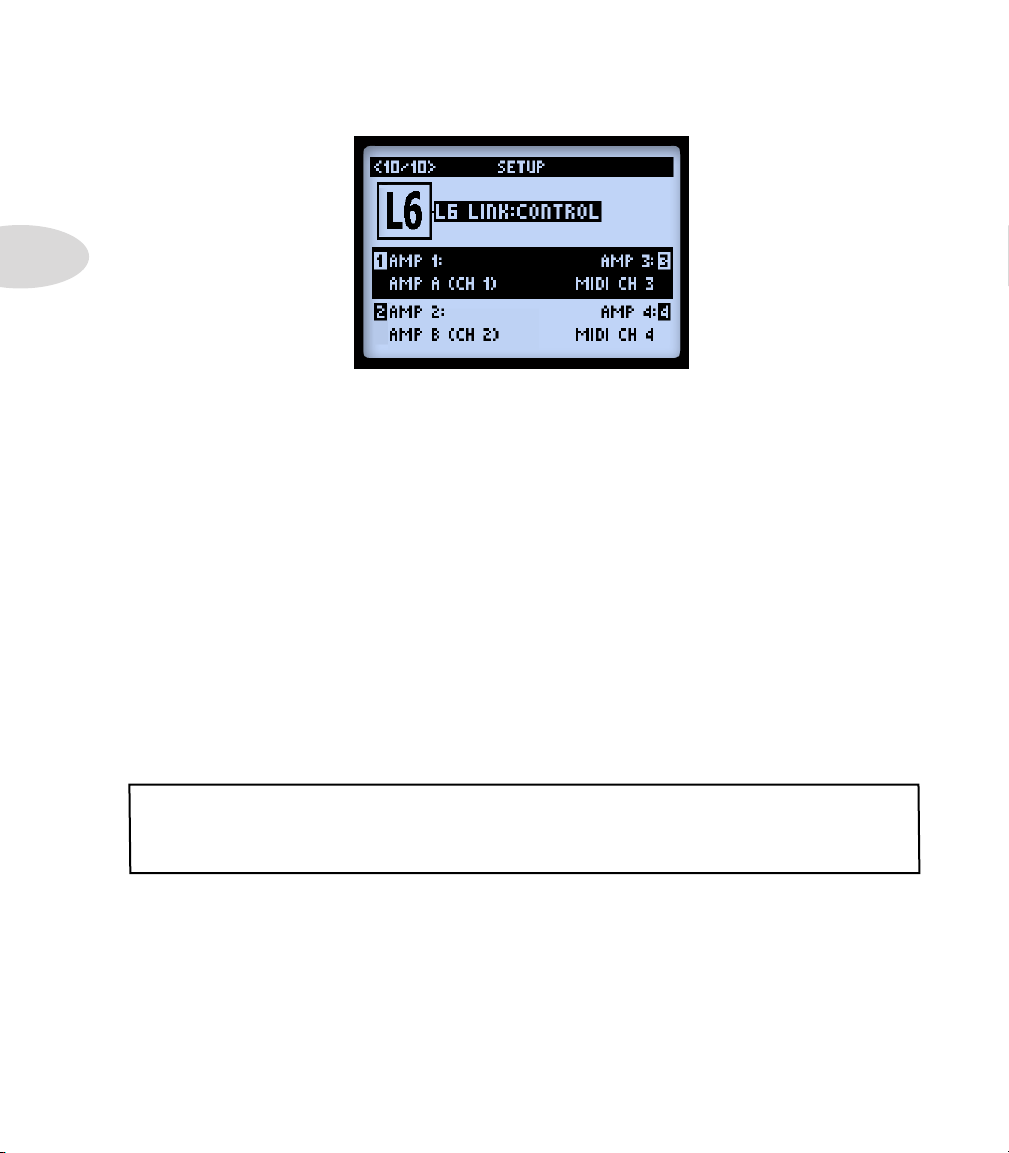
Page 10, Setup: L6 LINK Control
These options allow you to dictate how up to four connected Line 6 DT Series ampliers
each “follow” the POD HD Pro X Amp Models & settings.* Parameters 1 - 4 correspond
to L6 LINK connected DT ampliers 1 - 4, respectively.
• Each DT amplier can be set independently to follow either the current Preset’s
Amp Model A or Amp Model B.
• The DT amplier automatically congures its power amp Topology settings to
match the selected Amp Model A or B.
• The DT amp controls are also synced to the selected Amp Model A or B.
• Alternatively, you can select a MIDI Channel to set the DT amp’s MIDI
communication channel. This eectively sets the respective DT amp to utilize its
own internal Amp Model (rather than the POD HD Pro X Amp Model), and “syncs”
its front panel controls with other DT Series amps that are set to the same MIDI
Channel.
*Note: These L6 LINK Control settings are for DT Series ampliers only and ignored by any
connected Line 6 StageSource speakers. StageSource speakers do not respond to MIDI CC
messages.
Page 29
Features & Functionality
FeatureS & FunctiOnality
Ready to dive deeper? In this chapter, we’ll go into more detail on the major features &
functionality oered on POD® HD Pro X.
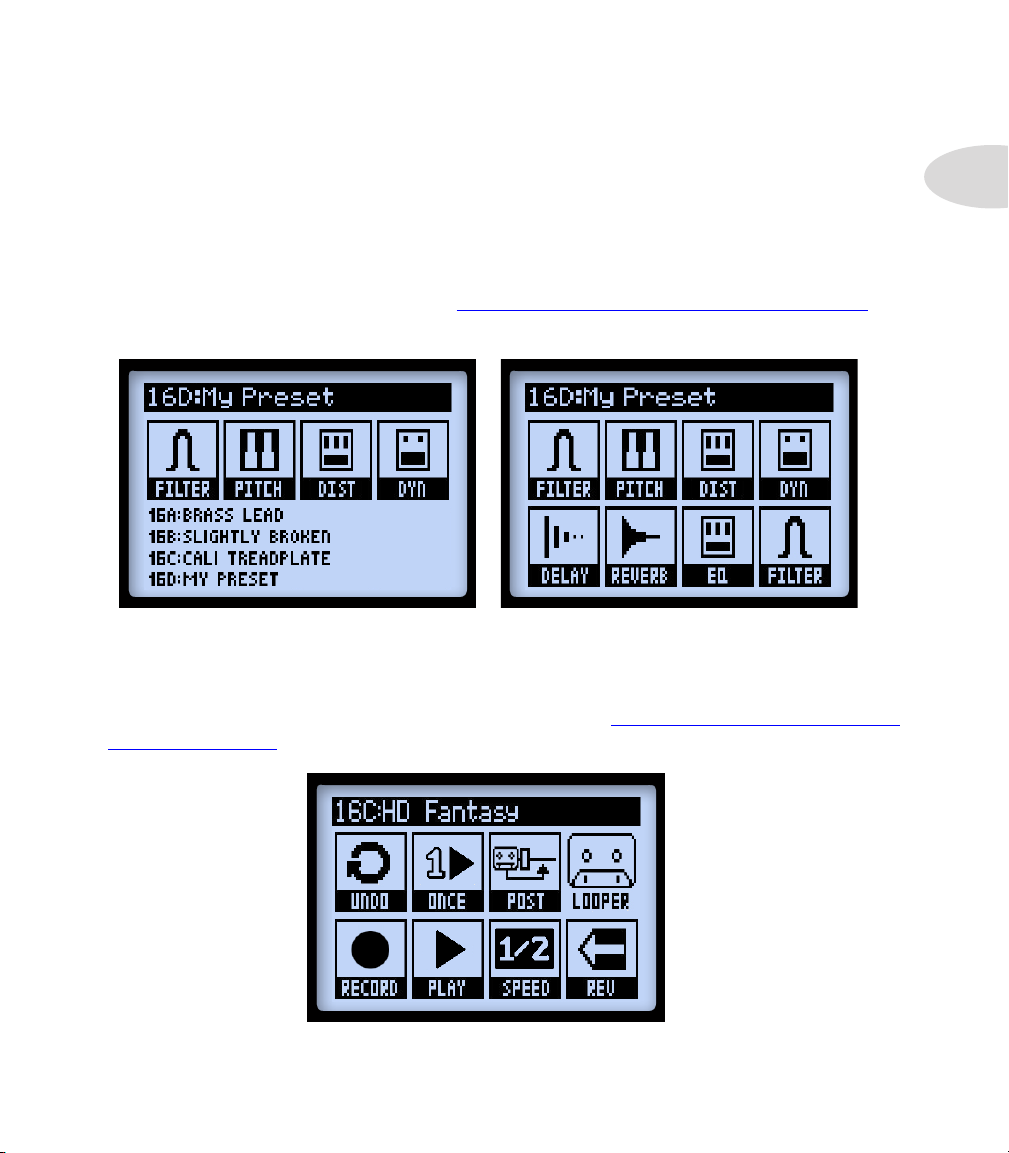
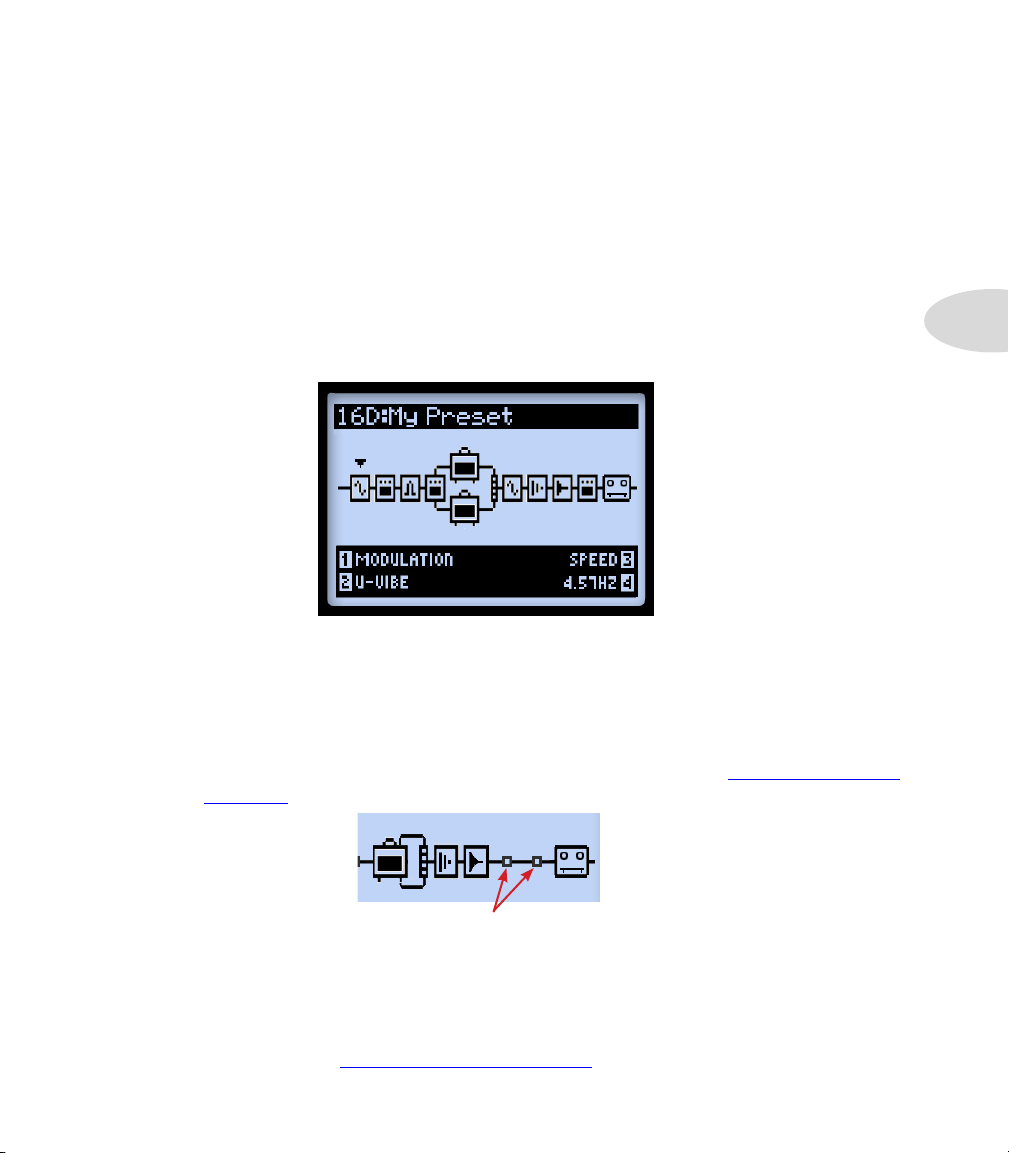
FX Blocks
For each Preset there is always a total of 8 FX Blocks, each capable of loading any FX
Model, (or the FX Loop - see next section). When in the Signal Flow View screen, select
any FX Block and you’ll see options at the bottom of the screen, adjustable using the
Multi-Function Knobs 1-4.
3•1
The Signal Flow View with an FX Block selected
• Model Type (Knob 1): Select from among the FX Model categories.
• To load no eect in the selected Block, choose “None.” You’ll see the Block
then appear “Null,” as shown below. A Null FX Block can still be moved and
loaded with a new Model at any time. Setting unneeded FX Blocks to None
is a great way to minimize your tone’s DSP usage (see “Dynamic DSP” on
page 3•7).
FX Blocks with the Model set to “None”
• FX Model (Knob 2): Choose the desired Model from the Model Type list.
• FX Parameters (Knob 3): Choose from up to 5 adjustable parameters.
Alternatively, double-press the ENTER button to access all the Model’s parameters
in one screen - see “FX Edit Mode” on page 5•1.
Page 30
Features & Functionality
• Parameter Value (Knob 4): Adjusts the value for the currently selected parameter.
Each FX Block also oers the following features:
• On/O: Toggle the FX Block “On” or “O” by pressing the ENTER button once.
When O, your signal ows through the FX Block unprocessed.
• Move FX Position: Each FX Block can be moved throughout the signal chain,
providing complete routing exibility. Place any FX Model before the Amp (“Pre”),
3•2
after the Amp (“Post”), or within one of the parallel Paths A & B - see “Amp Model
Positioning” on page 6•1 for details.
• Saved Per Preset: All FX Block positions, their loaded FX Models and all FX
parameter values within the tone are saved with each Preset.
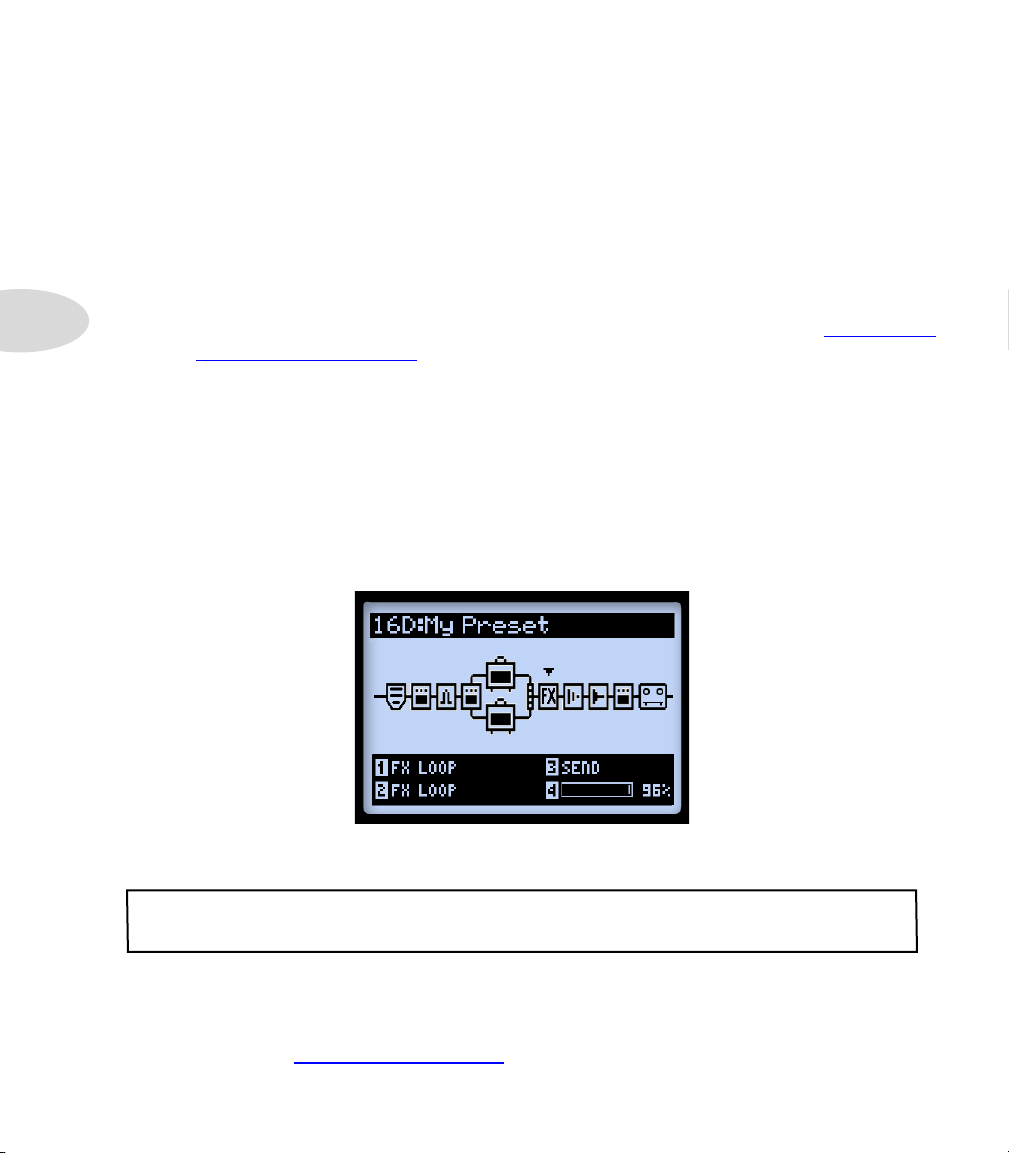
FX Loop
For any one of the 8 FX Blocks, you can load the FX Loop rather than an FX Model.
This allows you to position the POD HD Pro X hardware FX Loop anywhere you like
within the current signal path - even within one of the parallel Paths A or B!
The Signal Flow View with the FX Loop selected
Note that it is necessary to set one of the FX Blocks within your Preset to the “FX Loop” before
you’ll hear the signal fed through your SEND & RETURN device connections.
Access options for the FX Loop at the bottom of the Signal Flow View, or in the Edit
Mode screen. You can also toggle the FX Loop “On” or “O” by pressing the ENTER
button once. The FX Loop’s position and all its parameter values are saved per Preset.
Please also see “FX Loop” on page 5•4.
Page 31

Features & Functionality
Amp Blocks
A single Amp Block can be placed in the “Pre” or “Post” signal ow positions, or within
parallel “Path A.” Or, two Amps can be used if positioned within Paths A & B, as shown
below. Much like FX Blocks, Amp Blocks can be toggled On/O and include several
editable parameters. But there’s quite a bit more available for Amps as well, so please
refer to the dedicated chapter “Amp, Cab & Mic Models” on page 6•1 for details!
A Preset with two Amp Blocks
Mixer Block
The Mixer is permanently positioned at the end of the parallel Paths A & B and provides
individual Level and Pan controls for each Paths’ output before fed to the “Post”
position. When the Mixer is selected in the Signal Flow View, its four parameters are
available at the bottom of the screen, accessible using the Multi-function Knobs 1-4.
3•3
The Signal Flow View with the Mixer Block selected, showing its 4 parameters
Page 32

Features & Functionality
• Volume A (Knob 1): Controls the volume level of the Path A output. 0 dB is unity
gain.
• Volume B (Knob 2): Controls the volume level of the Path B output. 0 dB is unity
gain.
• Pan A (Knob 3): Adjusts the left/right stereo balance of the Path A output.
• Pan B (Knob 4): Adjusts the left/right stereo balance of the Path B output.
3•4
Moving FX Blocks
Any of the 8 FX Blocks can be moved throughout your tone’s signal ow, providing
tremendous routing exibility. To move any FX Block, start within the Signal Flow View
and select the FX Block to be moved. Press the MOVE button and you’ll see the selected
FX Block appear “raised” to indicate it is now moveable.
ENTER
AMP & FX ON / OFF
DBL PRESS TO ASSIGN CTL
MOVE
Pressing the Move button to reposition an FX Block
The FX Block can now be moved as follows:
• Use the Nav. Pad buttons to move the FX Block to the desired position.
• Move the FX Block into either Path A or B, and place it before or after an Amp
Model within the path. Use the Nav. Pad buttons to move the FX Block to
the opposite path. This allows you to run your eect in “parallel” and blend the
individual Path A & B outputs using the Mixer’s Level & Pan options!
• Once the FX Block is in the desired position, press the MOVE button again to drop
it into place.
• Amp Blocks can be moved into xed positions within the Pre or Post signal path
areas, or within the Paths A & B - see “Amp Model Positioning” on page 6•1.
• The Looper can also be selected and moved either to the start (“Pre”) or end
(“Post”) of the signal ow - see “Looper Mode” on page 8•1.
Page 33

Features & Functionality
Model Types and Mono/Stereo Signal Routing
It is important to note that some Models (all EQs, Wahs, Volume & FX Loop, and some
Modulations, Filters, Pitches & Delays) preserve a stereo output within the signal chain,
while others (all Dynamics, Distortions, all Amps & Preamps, and other various Models)
are mono FX and do not. The POD HD Pro X Inputs 1 & 2 are fed into the signal chain
as stereo (see “Page 3, Setup: Input Options” on page 2•4). Therefore, wherever a
mono FX or Amp Model is inserted, the Left & Right channels of this stereo signal is
“mono-ized” and heard as a two-channel mono signal at the Model’s output. To follow
are a few examples:
Ping Pong Delay
No mono-output FX or Amp follows Delay
• As shown above, if you place the Ping Pong Delay (a stereo-output FX Model)
after any other FX and/or Amp Models, you’ll hear its delay repeats bounce back
and forth between your Left and Right outputs.
3•5
Ping Pong Delay
A Distortion (mono) FX Model follows Delay
Ping Pong Delay
An Amp Model Follows Delay, within same Path
• If you place the Ping Pong Delay immediately before a mono FX Model (as shown
above, left) or Amp Model within the same Path (shown above, right), you’ll hear
its delays “mono-ized,” equally through both the Left and Right outputs.
Page 34

Features & Functionality
• The FX Loop is capable of stereo, just like any stereo-output FX Model, provided
that you utilize both stereo pairs of the SEND & RETURN jacks. If you use only the
Left SEND or RETURN jack, the FX Loop signal is summed to mono.
• The above rules also apply within each of the parallel Paths A and B, since these
are each stereo signal paths as well. The Mixer Block oers Pan controls to
independently adjust the stereo balance of each of these Paths before they are
fed into the rst “Post” FX (or Amp Block, if the Amp is placed here), immediately
following the Mixer.
3•6
• Please also see “Amp Model Positioning” on page 6•1 for additional signal ow
information.
FX & Amp Block FBV Footswitch Assignment
Any of the FX and Amp Blocks can also be congured with a “FS” (Footswitch)
assignment to utilize a connected Line 6 FBV™ Controller to remotely toggle the
Block’s Model On/O. For details, please see “Amp & FX Block Footswitch Assignment”
on page B•21.
It is worth noting here that, when the Setup - FS MODE option (see “Page 1, Setup:Utilities
Options” on page 2•2) is set to “FS 5-8,” your FBV device’s A, B, C & D footswitches
will trigger the FS 5-8 assigned Blocks. To create and edit FS assignments, select the
desired FX or Amp Block within the Signal Flow View, then hold the VIEW button. This
displays the FS ASSIGN screen. All assignments are saved per Preset.
The Footswitch Assign screen - use Knob 1 to create or edit a Block’s FS assignment
Page 35

Features & Functionality
Dynamic DSP
We’ve oered up a whole lot of sound possibilities in POD HD Pro X and it can take
some serious Digital Signal Processing (DSP) to run these goodies. Rather than limit
your creative potential with fewer Models or signal routing options, we chose to
implement a “Dynamic DSP” system, which dynamically assigns DSP resources to
accommodate your tone congurations. When creating a tone that utilizes several
heavy-hitting DSP Models, it is possible to surpass the amount of processing power
available. In these cases, you’ll see the DSP LIMIT REACHED indicator appear, and
the current Model is bypassed to allow your tone to remain active.
DSP Limit alert is
temporarily displayed
Currently selected
Model is automatically
bypassed, with DSP message shown here
Signal Flow View - displaying DSP Limit alert
3•7
In the above example, trying to change the Model for a 2nd Amp placed our tone over
the DSP limit. Therefore, the DSP LIMIT REACHED message is shown temporarily,
and the Amp B Model we selected is automatically bypassed, as indicated by the DSP
Over message. When the DSP Limit is reached, you have a few options to free up DSP
resources.
• Try using dierent Amp Models. Some of the HD Amp Models require more DSP
power than others, so try switching to a dierent Amp Model.
• Use only one Amp Model rather than two.
• Try toggling Amp and/or FX Models “O” or set the Block’s Model to “None,” (see
“FX Blocks” on page 3•1). Some FX types, such as Pitch Shifters and Reverbs,
utilize DSP more heavily.
Note: Setting an Amp or FX Block to “None” more substantially reduces the Block’s DSP usage
than toggling its Model to “Off.”
• Once you’re happy with your customized tone, save it so you can recall it later.
Page 36

Page 37

Set Lists & Presets
Set liStS & preSetS
This chapter covers all you need to know about working with Set Lists and Presets to
manage your POD® HD Pro X Tones.
Be sure to also check out the free Line 6 POD HD Pro X Edit software. It can be used to create,
customize & manage an unlimited library of POD HD Pro X Set Lists & Presets right on your
Mac® or Windows® computer! See “POD HD Pro X Edit Software” on page 1•6.
Working with Set Lists
POD HD Pro X stores 64 Presets within each of its 8 Set Lists. The big idea here is
that you can load any one of these Set Lists to then gain access to any of its Preset
locations - where you can save your complete settings to, or load a Preset from.
Accessing Set Lists
Push the PRESETS knob to display the Set Lists screen.
4•1
SAVE
S
E
E
T
R
S
P
HOLD FOR SYSTEM & I/O
VIEW
The Set Lists screen
DT Series Amp Owners... The “L6 LINK<->DT” Set List is lled with Presets specically designed
for use with POD HD Pro X connected to a DT Series amp utilizing the L6 LINK connection.
Also, the Presets within this Set List that include “LVM” within their titles are designed for use with
your DT Series amp set to its “Low Power Mode.”
Page 38

Set Lists & Presets
4•2
Load a Set List: Use the and Nav. Pad buttons, or turn the PRESETS
knob to select any Set List, then press the ENTER button. This immediately
loads the selected Set List, making all its Presets available. Note that your
previously loaded Preset is automatically closed, and the Preset of the same
Bank/Channel location number from the new Set List is loaded.
Rename a Set List: With the desired Set List selected, press the SAVE button
to display the Rename Set List screen.
SAVE
S
E
E
T
R
S
P
HOLD FOR SYSTEM & I/O
VIEW
To edit the Set List name, use Multi-function Knob 3 to select the desired
character, then use Knob 4 to edit the character. Once complete, press SAVE
again to commit your new name, and you’ll be returned to the Set Lists
screen. Or, just press PRESETS button to return to the Set Lists screen without
committing any name changes.
Page 39

Set Lists & Presets
ENTER
AMP & FX ON / OFF
Arranging Presets within Set Lists
While in the Set Lists screen, double-press the ENTER button to display the list of
Presets in the current Set List, where you can reference each Preset’s Bank/Channel
location, load a Preset, or rearrange the Presets into in any order you like.
The Set List - Presets screen
Load a Preset: Use the Nav. Pad buttons, or turn the PRESETS knob to select
any of the 64 locations, or use the Nav. Pad buttons to navigate through
the list one Bank at a time. Press the ENTER button to immediately load the
selected location’s Preset.
4•3
Move a Preset: Here is an example where we’ll move the “HIWAY 100” Preset
from location 2A to location 2C.
• Select location 2A for the “HIWAY 100” Preset, then press the MOVE button.
You’ll see the selected Preset appear “raised” to indicate it is now moveable:
DBL PRESS TO ASSIGN CTL
MOVE
Page 40

Set Lists & Presets
4•4
• Use the Nav. Pad buttons or PRESETS knob to select the 2C destination location.
Note that as you select a new Bank/Channel location, the resulting Preset order
is displayed on the screen. For our example, “HIWAY 100” is inserted into 2C,
resulting in the Presets from the original location (2A) to the destination (2C) to
move up one slot:
“Hiway 100” moved from 2A to 2C
• Once you’ve placed the Preset over the desired channel location, press the
MOVE button again to “drop” it into the slot.
• Repeat the above steps to rearrange any additional Presets as desired. To
commit all your changes, you must next press the PRESETS button - you’ll see
the “Saving” screen displayed to indicate this process.
The Set List Saving screen
Page 41

Set Lists & Presets
SAVE
HOLD FOR SYSTEM & I/O
VIEW
P
R
E
S
E
T
S
Working with Presets
Each of the 8 Set Lists within POD HD Pro X includes 64 Channel locations for holding
Presets. These Set Lists and Presets are all retained in your POD HD Pro X internal
memory. Each Preset includes all current FX & Amps in use, all their parameter settings,
their position within the signal ow, footswitch & pedal assignments, Mixer settings,
as well as input & output and other Setup options, as indicated throughout this Guide.
Accessing Presets
From any of the Home View screens, simply turn the PRESETS knob to increment
through the current Set List. The currently loaded Bank/Channel number and Preset
name are displayed at the top of the Home View screen. (Note that you’ll need to save
your current Preset before loading a dierent one if you wish to retain any changes
made!)
Turn the PRESETS knob to increment through Presets
Alternatively, you can access Presets that reside within any Set List from within the Set
List - Preset screen (see page 4•2).
4•5
Page 42

Set Lists & Presets
FBV™ Controller A, B, C & D Channel Footswitches
With the use of some Line 6 FBV Controller device models, you can utilize Bank Up
or Bank Down A, B, C, D footswitches to navigate POD HD Pro X Banks and Presets.
Please also see “Appendix B: FBV Foot Controllers” on page B•1.
4•6
• Press the FBV Bank Up or Bank Down footswitch and you’ll see the Queued
Bank screen displayed, with the current Bank/Channel ashing at the top:
The Queued Bank screen - the next Bank is queued
• Continue pressing the Bank Down or Bank Up FBV footswitch and you’ll see the
previous/next Bank’s A, B, C & D Channels & their Presets “queued,” as shown
above. Then press the A, B, C or D footswitch to load the respective Preset from
the queued Bank.
Saving Presets
To retain any customization you may have performed on your Preset, or if you want
to rename or move the current Preset, you can use the Save function. Whenever your
current Preset is in an “unsaved” state, you’ll see an asterisk appear in the Signal Flow
View.
Asterisk indicating Preset is in an unsaved state
Page 43

Set Lists & Presets
Remember to always save your Preset before calling up a different Preset to retain any changes
you may have made!
Press the SAVE button to display the Save Preset screen.
The Save Preset screen
Use the Multi-function Knobs 1-4 to choose your Save functions.
4•7
• Set List (Knob 1): Choose any one of the 8 Set Lists here in which you’d like to
save your Preset. By default, you’ll see your currently loaded Set List.
• Destination (Knob 2): Choose the specic Bank/Channel location within the
selected Set List to save your Preset. Note that this will permanently overwrite
the Preset within the destination location once you commit the save. Choose
a location that contains a “New Tone” to avoid overwriting customized Preset.
• Cursor & Character (Knobs 3 & 4): To rename your Preset, select a character
with Knob 3, then use Knob 4 to edit the selected character.
TIP! For speedy preset naming... The Nav. Disc buttons may be used to move the cursor left &
right. Pressing down clears the currently selected character. Pressing up cycles through the rst
character of Upper Case, Lower Case, Numeric, and blank.
Once you’ve completed the above settings, press the SAVE button to commit. Or, to
cancel the save, press the PRESETS knob or VIEW button.
Page 44

Page 45

FX edit mOde
Within this chapter, we’ll cover the Edit Mode for FX, which provides access to all
editable parameters for the FX models and the FX Loop. (For info on Amp Models, see
“Editing Amp Parameters” on page 6•6.) All changes made in the Edit Mode are saved
per Preset.
Accessing FX Edit Mode
First press the VIEW button to display the Signal Flow View screen, where you can
select the FX Block you wish to edit.
FX Edit Mode
SAVE
S
E
E
T
R
S
P
HOLD FOR SYSTEM & I/O
VIEW
The Signal Flow View - Modulation FX Block selected
Use the Nav. Pad buttons to select the Block you wish to edit. In our example
above, we’ve selected the rst Block, which currently has a Modulation Model loaded.
While in the Signal Flow View, you can edit a few options for the selected Block’s FX
Model using the Multi-select Knobs 1 - 4. However, by entering the Edit Mode screen,
you’ll have instant access to all parameters. Double-press the ENTER button to display
Edit Mode.
5•1
Page 46

FX Edit Mode
5•2
ENTER
AMP & FX ON / OFF
DBL PRESS TO ASSIGN CTL
MOVE
The FX Edit Mode - Modulation:U-Vibe FX Model loaded
Use the Multi-Function Knobs 1- 4 to access the respectively numbered options at the
bottom of the Edit Mode screen.
The Multi-Function Knobs
While the Edit Mode screen is displayed, these knobs access the following functions.
Knob 1 - Type
Select the type of FX Model you want to insert into this Block location. You’ll see the
selected Type displayed at the top of the screen, as well as a handy Model On/O
indicator at the right.
• None: Choose “None” to remove any FX Model from the Block.
• FX: Choose from the list of FX types.
• FX Loop: Not technically an FX Model, but the device’s FX Loop can be
inserted and its options edited much like one! See “FX Loop” on page 5•4.
Page 47

FX Edit Mode
Knob 2 - Model
Choose the specic Model for the current FX Type. You’ll see the selected FX Model
displayed at the top of the screen.
Knob 3 - Parameter
Use the Nav. Pad buttons to select from among the parameters that are displayed.
The “selected” parameter is indicated by the arrow at the left.
Knob 4 - Value
5•3
Set the value for the selected parameter.
As shown above, some parameters utilize numerical values, while others utilize a
graphical bar display.
TIP: Most FX and FX Loop parameters can optionally be assigned for FBV™ Expression Pedal
control! See “Expression Pedal & Variax® Knob Controller Assignment” on page B•18.
Page 48

FX Edit Mode
FX Loop
5•4
The FX Loop can be inserted into any one FX Block.
The FX Loop Edit Mode screen
Adjust the Parameter & Value settings the same as with any FX Model. These FX Loop
Edit Mode settings are saved per Preset.
• Send: Reduces the level fed out the FX Loop SEND output(s) to your external
devices.
Note: Use the LINE-STOMP switch on the back of POD® HD Pro X to choose between levels
for Rack FX versus Pedals. This Send parameter can then be used to further ne-tune the level
fed to your connected devices.
• Return: Adjusts the level of the signal received into the FX Loop RETURN
input(s).
• Mix: Blends the FX Loop signal that with the POD HD Pro X tone signal.
When set to 100%, the full POD HD Pro X signal is fed to the FX Loop
SEND outputs. When set to 0%, your input signal bypasses the FX Loop
completely, so that you’ll hear only your POD HD-processed signal. Be sure
to set the Mix to less than 100%, or toggle the FX Loop Block “O,” if
you do not have a complete connection between the device’s SEND &
RETURN jacks, or you’ll hear only silence from the output of POD HD Pro
X!
Page 49

Amp, Cab & Mic Models
amp, cab & mic mOdelS
This chapter provides details on selecting & editing the exemplary HD Guitar Amp
& Preamp Models, all of which have been newly developed by our amazing team of
sound engineers for POD® HD Pro X! Also covered here are details on Speaker Cabs,
Mic Models and putting Amp Models to use.
Amp Model Positioning
Each Preset includes the ability to run one or two Amp or Preamp Models. Much like
each FX Block, the Amp Block can be repositioned using the MOVE button (please see
“Moving FX Blocks” on page 3•4 ). Here we’ll cover the impact on your signal ow
when placing the Amp in dierent positions.
*Note: Looking for a Mic Preamp Model? You can nd the Vintage Pre Model located within
the “Preamps+EQ” category of any FX Block. Having this Preamp Model within the FX Blocks
(rather than in the Amp Blocks) allows you the exibility of using it with or without the Amp
models, and positioning it anywhere in the signal chain. See “Preamp & EQ Models” on page
for more info.
7•9
6•1
Amps Within Paths A & B
You’ll nd that a number of the Factory Presets already utilize this type of conguration.
When moving the single Amp Model into the parallel Paths A/B, a 2nd Amp B Block
is automatically created in Path B. In this conguration, the top amp is referred to as
Amp A and the other Amp B.
Amp A Amp B
Amp Models within Paths A & B
Behaviors for this conguration are:
• Each Amp Block can be individually set to a dierent Amp or Preamp Model,*
edited and enabled/disabled.
Page 50

Amp, Cab & Mic Models
*Note: Some Amp/Preamp Models utilize more DSP than others. You may nd it necessary to
bypass or remove some FX Models to enable two simultaneous Amps - see
on page 3•7
• The Amp Blocks cannot be moved within the A or B Paths. It is possible to
move any FX Blocks before or after the Amps within either Path, however.
• Specic behaviors apply for moving an Amp Block out of the parallel Paths
A/B:
• Select Amp A, push the MOVE button, then the Nav. Pad button. This removes
Amp B from the tone and moves Amp A to the Post position, where it is placed
directly after the Mixer (and before any “Post” FX).
• Select Amp A, push the MOVE button, then press the Nav. Pad button. This
removes Amp B from the tone and moves Amp A to the Pre position, where it
is placed just before the Path A/B split (and after any “Pre” FX).
• For the above actions, pressing MOVE when Amp B is selected has no function.
“Dynamic DSP”
for more info.
6•2
Amp Block in Pre or Post Positions
Only a single Amp Block can be used within either of these positions.
Amp A
Amp in “Pre” position (before Path A & B)
With the Amp in Pre, as shown above, the single amp feeds both Paths A & B. You can
always move FX into either Path A or B, in which case they’ll behave as “Post Amp”
FX, yet be in parallel, with each Path’s output controlled by the Mixer’s A & B Level and
Pan.
Note that when utilizing both Inputs 1 & 2 (or when using “SAME” for either of these Input
options) the two Input signals are combined to allow them to be fed into any Amp or mono FX
Model within the Pre position, which can result in a hot signal level. Reduce your instruments’
volume as needed to avoid overloading your Pre Models.
Page 51

Amp, Cab & Mic Models
Amp A
Amp in “Post” position (after Path A & B)
With the Amp in Post as shown above, the parallel Paths A & B are fed into the input
of the Amp.* You can still move FX into either Path A or B, in which case they’ll be in
parallel, with each Path’s output individually controlled by the Mixer’s A & B Level and
Pan options to allow you to custom blend them before they hit the Amp.
*Note: All Amps & Preamps behave as “mono” Models, which impact the stereo output of any
FX Models positioned before them within the signal ow. For more info, please see “Model
Types and Mono/Stereo Signal Routing” on page 3•5
.
Selecting Amp, Cab & Mic Models
Press the VIEW button to display the Signal Flow View and use the Nav. Pad to select
Amp A or Amp B.
The Signal Flow View - Amp B selected
Once an Amp Model is selected, you’ll see the 4 editable Amp options at the bottom
of the screen, accessible via the Multi-function knobs 1 - 4.
• Knob 1 - Selects the Amp or Preamp Model.
• Knob 2 - Selects the Cab Model.
6•3
Page 52

Amp, Cab & Mic Models
• Knob 3 - Selects the Mic Model.
• Knob 4 - When the current Preset includes two Amp models, this selects
which Amp (the Amp within Path A or B) is controlled by the Amp Tone
knobs.
As you change the Amp Model (Knob 1), you’ll also see that default Cab and Mic
models are automatically selected for each Amp or Preamp (see “About Default Amp
Settings” on page 6•5). But you can use Knobs 3 & 4 to select any Cab and/or Mic
you like. These settings are saved per Preset.
Attention Bass Players: Try the Flip Top Bass Amp Model for some thump! Note that this Model
loads with a matching 1x15 Flip Top speaker cab, as well as a full set of Mic Model options for
stellar bass tones. (And yes, you can indeed select any other Cab with the Flip Top Bass Amp
Model, or choose the Flip Top Cab with any Guitar Amp Model!) See the following sections for
details about these models.
Amp and Preamp Models
6•4
We’ve included a complete set of “Preamp” versions of each Amp as well. Choose
one of these to obtain the tone of just the preamp stage of the amp - recommended
when feeding your POD HD Pro X output into an external amplier, or when using the
L6 LINK™ connection.*
A Preamp Model is selected for Amp B
*Note that, whether an Amp or Preamp is selected, the additional application of Cab and Mic
Models is dependent upon the SETUP:OUTPUT settings. Please see “Page 4, Setup: Output
Options” on page 2•8
.
The overall volume levels among the dierent Preamp Models varies - this is normal.
The Preamp sections of each of the classic ampliers we modeled are indeed quite
dierent, and we’ve set the Preamps’ default values to best match the type of power
amp into which they are intended to feed. Tweak the DRIVE and VOLUME knobs to
optimize the level for your specic needs!
Page 53

Amp, Cab & Mic Models
Amp Block States
The Amp Blocks have 3 available states: On, O (bypassed) or Disabled (sometimes
referred to as a “Null” state for the Block).
Amp Block “On” Amp Block “Off” Amp Block “Disabled” (Null Block)
About Default Amp Settings
Whenever you change to a dierent Amp or Preamp Model, predetermined Cab &
Mic models are automatically loaded, as well as Amp Tone Knob settings, designed to
complement the Amp type. As noted throughout this chapter, you can certainly switch
to a dierent Cab and/or Mic Model - just be sure to save your Preset to retain these
changes.
6•5
Mic Models
To follow is a list of all Mic Models. Note that all Guitar Amp’s Cabs oer a selection
of 8 Mics, and the 1x15 Flip Top Bass Cab oers its own selection of 8 Mic Models.
Mic Model Descriptions
Mic Name Based On...*
Guitar Cab Mic Models
57 On Xs Shure® SM57 Dynamic, On Axis
57 O Xs Shure® SM57 Dynamic, O Axis
409 Dyn Sennheiser® MD 409 Dynamic
421 Dyn Sennheiser® MD 421 Dynamic
4038 Rbn Coles 4038 Ribbon
*
All product names used in this manual are trademarks of their respective owners, which are in no way associated or affiliated with Line 6. These trademarks of other manufacturers are used solely to identify the products of those manufacturers whose tones and sounds were studied
during Line 6’s sound model development. Shure® is a registered trademark of Shure Incorporated, Sennheiser® is a registered trademark of Sennheiser Electronic Corporation, Neumann® is a registered trademark of Georg Neumann GMBH, Royer® is a registered trademark
of Bulldog Audio, Inc. DBA Rover Labs. AKG® is a registered trademark of Harman International Industries, Incorporated. EV® is a registered trademark of Electro-Voice, Incorporated. Heil® is a registered trademark of Heil Sound Ltd.
Page 54

Amp, Cab & Mic Models
Mic Model Descriptions
Mic Name Based On...*
121 Rbn Royer® 121 Ribbon
67 Cond Neumann® U67 Condenser
87 Cond Neumann® U87 Condenser
Bass Cab Mic Models
57 On Xs Shure® SM57 Dynamic, On Axis
421 Dyn Sennheiser® MD 421 Dynamic
12 Dyn AKG® D12
112 Dyn AKG® D112
20 Dyn EV® RE20
7 Dyn Shure® SM7B
6•6
40 Dyn Heil® PR40
47 Cond Neumann® U47
Editing Amp Parameters
To toggle the selected Amp model On or Off
Press the ENTER - AMP ON/OFF button once. Toggling the Amp “O” results in
ENTER
AMP & FX ON / OFF
To adjust the Amp Tone
Turn any of the Amp Tone knobs to adjust the desired settings for the selected Amp.
*
All product names used in this manual are trademarks of their respective owners, which are in no way associated or affiliated with Line 6. These trademarks of other manufacturers are used solely to identify the products of those manufacturers whose tones and sounds were studied
during Line 6’s sound model development. Shure® is a registered trademark of Shure Incorporated, Sennheiser® is a registered trademark of Sennheiser Electronic Corporation, Neumann® is a registered trademark of Georg Neumann GMBH, Royer® is a registered trademark
of Bulldog Audio, Inc. DBA Rover Labs. AKG® is a registered trademark of Harman International Industries, Incorporated. EV® is a registered trademark of Electro-Voice, Incorporated. Heil® is a registered trademark of Heil Sound Ltd.
bypassing the Amp, Cab and Mic processing.
The Amp Tone knobs: DRIVE, VOLUME, BASS, MID, TREBLE and PRESENCE
Page 55

Amp, Cab & Mic Models
Whenever you adjust any of the Amp Tone knobs, you’ll see the “Momentary” AMP:
EDIT LCD screen temporarily displayed, showing the actual values of the Tone knobs
for both current Amp A & Amp B Models (depending on your Amp Knobs Display
setting, see “Page 1, Setup:Utilities Options” on page 2•2). Also see the next section
for more about the AMP: EDIT options.
Amp & Cab Edit Display
Double-press the ENTER button to access the Amp & Cab Edit screens. You’ll see up
to 5 pages of options here, allowing you to ne-tune Amp, Cab and Mic settings.* All
settings in these screens are saved per Preset.
*Note: When the selected Amp Model is a “full” Amp Model, you will see ve Amp Edit pages,
with pages 2 & 3 offering additional “deep-editing” power amp-related functions, and pages 4
& 5 offering deep-edit Cab functions, as described below. When the selected Amp Model is a
Preamp, you will see only three Amp Edit pages, which offer the same options as the Amp/Cab
Edit pages 1, 4 and 5 described below. Use the Nav. Disc left & right arrow buttons to access
all available pages.
Amp Edit - Page 1
6•7
ENTER
AMP & FX ON / OFF
DBL PRESS TO ASSIGN CTL
MOVE
Page 1 of the Amp:Edit Screen - both Amps are On
• With both Amp Models On: You’ll see the screen’s respective controls
update as you adjust the Amp Tone knobs, as shown above. Note that the
black “dots” around each knob indicate its last-saved value. You can also
still access the Amp, Cab & Mic Model and Amp A/B selections via the Multifunction Knobs 1-4 while this screen is displayed.
Page 56

Amp, Cab & Mic Models
• With an Amp Model O: You’ll see only a VOL knob, as shown above for
Amp A. This is a separate parameter strictly for the Amp Model’s Bypass
Volume. Use the VOLUME knob on your device to adjust this, and its value is
stored separately with the Preset for whenever the Amp Block is Bypassed.
Note that the VOLUME knob does not control the level at all for a “Null” Amp Block.
6•8
• Use the Multi-Function knobs 1 - 4 to adjust the options at the bottom of
the screen:
Page 1 of the Amp:Edit Screen - Amp A Bypassed
• Knob 1: Select the desired Amp or Preamp Model.
• Knob 2: Select the desired Cab Model (also see the Page 4 options).
• Knob 3: Select the desired Mic Model (also see the Page 4 options).
• Knob 4: Choose between adjusting controls for Amp A or Amp B. (This option
is available on all AMP EDIT screens.)
Page 57

Amp, Cab & Mic Models
Amp Edit - Page 2
Page 2 oers three options that aect the power amp characteristics of your Amp
Model.
Page 2 of the Amp:Edit Screen (not displayed for Preamp Models)
• Knob 1: Use this Master Volume to adjust the amount of power amp distortion.
This parameter is highly interactive with all other power amp parameters -
the lower the Master is set, the less eect the other controls will have.
• Knob 2: Setting the Sag to minimum oers a “tighter” responsiveness, and
turning clockwise provides more “touch” dynamics & sustain.
6•9
• Knob 3: Controls how much heater hum & AC ripple interacts with your tone.
At the maximum setting things get really freaky.
Amp Edit - Page 3
Page 3 oers two more options that aect the power amp characteristics.
Page 3 of the Amp:Edit Screen (not displayed for Preamp Models)
Page 58

Amp, Cab & Mic Models
• Knob 1: Changes the Bias of the power tubes. Set to minimum to achieve a
• Knob 2: The Bias Excursion determines how the power amp tubes’ voicing
• Knob 3: Has no function on this page.
Amp Edit - Page 4
Here you’ll nd Microphone and Speaker Cabinet options.
6•10
very “cold” Class AB biasing. At maximum the amp is operating in Class A.
reacts when they are pushed hard. Set low for a tighter feel. Set high for
more tube compression. This parameter is highly reactive with the DRIVE &
MASTER settings.
Page 4 of the AMP:EDIT Screen (appears as Page 2 for Preamp Models)
NOTE: If you selected “No Cab” for your Cab Model, these Mic and Early Reections settings
will perform no function since no Speaker, Mic or Early Reections processing is applied.
• Knob 1: Sets the amount of “early reections.” Higher values add more
reective room sound to your Amp tone.
• Knob 2: Applies low frequency attenuation - helpful to tighten up the low
end of your tone.
• Knob 3: Selects the Mic type (see the Mic Model table on page 6•5).
Press the HOME button, or double-press the ENTER button to exit the AMP:EDIT screen
when done. Be sure to save your Preset to retain customized Amp Model settings.
Page 59

Amp, Cab & Mic Models
Amp Edit - Page 5
Here you’ll nd even further “deep-editing” parameters for the Speaker Cab, allowing
you to surgically rene the the feel and frequency response to your personal taste.
• Knob 1: Adjusts the overall level of the modeled speaker Resonance, which
results in a more “lively,” brighter response on higher settings. Increasing the
Resonance Level will cause the overall volume to increase as well.
• Knob 2: Adjusts the low frequency level of the modeled speaker resonance.
Just as the name implies, increasing the value on this knob adds more low
end “Thump” to the Cab tone.
6•11
• Knob 3: Adjusts the Decay time of the modeled speaker resonance. This
control provides the feel of a “tighter” speaker cone at lower values and a
“looser” speaker at higher values.
Note: The above three Cab parameters are interactive - As the Resonance Level is decreased
so are the effects of the Thump and Decay parameters. Thump and Decay are applied to the
modeled speaker resonance, therefore, if the Resonance Level is set to a minimum, the effects
of Thump and Decay parameters will not be audible.
Resonance Level, Thump, and Decay controls will only be audible when the POD is in Studio/
Direct output mode.
Page 60

Amp, Cab & Mic Models
Amp/Preamp Models
To follow is a table showing the classic ampliers upon which all our HD Amp/Preamp
Models are based.* For more details, please also check out the POD HD Series Model
Gallery, available from http://line6.com/support/manuals/.
Amp/Preamp Model Based On...*
Amp Disabled When selected, no Amp Model is loaded
Blackface Double Normal ‘65 “Blackface” Fender® Twin Reverb®, Normal input
Blackface Double Vibrato ‘65 “Blackface” Fender® Twin Reverb®, Vibrato input
Hiway 100 Hiwatt® Custom 100
Super O ‘60s Supro® S6616
POD HD Amp/Preamp Models
channel
channel
6•12
Gibtone 185 Gibson® EH-185
Tweed B-Man Normal ‘59 Fender® Tweed Bassman®, Normal input channel
Tweed B-Man Bright ‘59 Fender® Tweed Bassman®, Bright input channel
Blackface ‘Lux Normal Fender® “Blackface” Deluxe Reverb®, Normal input
channel
Blackface ‘Lux Vibrato Fender® “Blackface” Deluxe Reverb®, Vibrato input
channel
Divide 9/15 Divided By 13 9/15
PhD Motorway Dr. Z® Route 66
Class A-15 ‘61 “Fawn” Vox® AC-15
Class A-30 TB Vox® AC-30 “Top Boost”
Brit J-45 Normal ‘65 Marshall® JTM-45 MkII, Normal input channel
Brit J-45 Bright ‘65 Marshall® JTM-45 MkII, Bright input channel
Plexi Lead 100 Normal ‘59 Marshall® “Plexi” Super Lead 100, Normal input
channel
Plexi Lead 100 Bright ‘59 Marshall® “Plexi” Super Lead 100, Bright input channel
* All product names are trademarks of their respective owners, which are in no way associated or affiliated with Line 6. These product names and descriptions are provided for the sole purpose of identifying the specific products that were studied during Line 6’s sound model
development. Fender®, Twin Reverb®, Bassman® and Deluxe Reverb® are registered trademarks of Fender Musical Instruments Corporation. Vox® is a registered trademark of Vox R&D Limited. Marshall® is a registered trademark of Marshall Amplification Plc. Dr. Z®
is a registered trademark of Dr. Z Amps, Inc. Mesa/Boogie® and Dual Rectifier® are registered trademarks of Mesa/Boogie, Ltd. Engl® is a registered trademark of Beate Ausflug and Edmund Engl. Hiwatt® is a registered trademark of Hiwatt Equipment Limited Company,.
UK. Gibson® is a registered trademark of Gibson Guitar Corp. Supro® is a registered trademark of Zinky Electronics. Soldano® is a registered trademark of Gremlin Inc. DBA Soldano Custom Amplilfication Corporation. Ampeg® and Portaflex® are registered trademarks
of St. Louis Music, Inc..
Page 61

Amp, Cab & Mic Models
POD HD Amp/Preamp Models
Amp/Preamp Model Based On...*
Brit P-75 Normal Park 75, Normal input channel
Brit P-75 Bright Park 75, Bright input channel
Brit J-800 Marshall® JCM-800
Bomber Uber 2002 Bogner Uberschall
Treadplate Mesa/Boogie® Dual Rectier®
Angel F-Ball Engl® Fireball 100
Line 6 Elektrik A face-melting Line 6 original
Solo 100 Clean ‘93 Soldano® SLO 100, Normal channel, “Clean” mode
Solo 100 Crunch ‘93 Soldano® SLO 100, Normal channel, “Crunch” mode
Solo 100 OD ‘93 Soldano® SLO 100, Overdrive channel
Line 6 Doom A Line 6 merging of a modded JCM800 preamp + Hiwatt®
power amp for maximum sludge
Line 6 Epic A Line 6 creation oering epic sustain and distortion at
nearly all playing levels
Flip Top Ampeg® B-15NF Portaex® bass guitar amp
* All product names are trademarks of their respective owners, which are in no way associated or affiliated with Line 6. These product names and descriptions are provided for the sole purpose of identifying the specific products that were studied during Line 6’s sound model
development. Fender®, Twin Reverb®, Bassman® and Deluxe Reverb® are registered trademarks of Fender Musical Instruments Corporation. Vox® is a registered trademark of Vox R&D Limited. Marshall® is a registered trademark of Marshall Amplification Plc. Dr. Z®
is a registered trademark of Dr. Z Amps, Inc. Mesa/Boogie® and Dual Rectifier® are registered trademarks of Mesa/Boogie, Ltd. Engl® is a registered trademark of Beate Ausflug and Edmund Engl. Hiwatt® is a registered trademark of Hiwatt Equipment Limited Company,.
UK. Gibson® is a registered trademark of Gibson Guitar Corp. Supro® is a registered trademark of Zinky Electronics. Soldano® is a registered trademark of Gremlin Inc. DBA Soldano Custom Amplilfication Corporation. Ampeg® and Portaflex® are registered trademarks
of St. Louis Music, Inc..
6•13
Page 62

Amp, Cab & Mic Models
Amp Control Labels
For some Amp Models, you’ll see slightly dierent labels for the Amp Tone knobs
displayed in the Amp:Edit screen. In the cases where the classic amps we’ve modeled
include special knob controls, we’ve emulated their behaviors accordingly. These are
listed as follows...
• Super O: The actual Supro® only has a Drive and a Tone knob, so we mapped
Tone to the MID knob and invented Bass, Treble, and Presence controls:
Super O Amp:Edit screen
6•14
• Divide 9/15: The Divided by 13 amp oers two interactive channels. The
DRIVE knob controls the “clean” channel, and the BASS knob is being used as
the Drive knob for the “dirty” channel. The MID & TREBLE knobs behave like
the amp’s Tone & Cut knobs.
Divide 9/15 Amp:Edit screen
• Class A-15 & Class A-30TB: Following the Vox® design, we’ve labeled the
MID knob as “Cut” for these two Amp Models - turning the knob counter-
clockwise reduces the high-end frequencies.
Class A-15 & Class A-30TB Amp:Edit screen
* All product names are trademarks of their respective owners, which are in no way associated or affiliated with Line 6. These product names and descriptions are provided for the sole purpose of identifying the specific products that were studied during Line 6’s sound model
development. Fender®, Twin Reverb®, Bassman® and Deluxe Reverb® are registered trademarks of Fender Musical Instruments Corporation. Vox® is a registered trademark of Vox R&D Limited. Marshall® is a registered trademark of Marshall Amplification Plc. Dr. Z® is
a registered trademark of Dr. Z Amps, Inc. Mesa/Boogie® and Dual Rectifier® are registered trademarks of Mesa/Boogie, Ltd. Engl® is a registered trademark of Beate Ausflug and Edmund Engl. Fane® is a trademark of Fane International. Gibson® is a registered trademark
of Gibson Guitar Corp. Supro® is a registered trademark of Zinky Electronics. Hiwatt® is a registered trademark of Hiwatt Equipment Limited Company, UK. Fane® is a trademark of Fane International. Ampeg® and Portaflex® are registered trademarks of St. Louis Music,
Inc. Celestion® is a registered trademark of Celestion International Ltd. Jensen® is a registered trademark of Jensen Loudspeakers and Audiovox Corporation.
Page 63

Amp, Cab & Mic Models
Cab Models
Here’s a table of the classic speaker cabinets upon which our Cab Models are based.*
POD HD Cab Models
Cab Model Based On...*
No Cab Choosing this option applies no Speaker, Mic or Early Reections
processing to your Amp Model.
212 Blackface
Double
Fender® “Blackface” Twin Reverb® combo cab, 2x12 inch Jensen®
speakers
412 Hiway Hiwatt® cabinet, 4x12 inch Fane® 12287 50 watt speakers
6x9 Super O Supro® S6616 combo cabinet, one “6x9” size speaker
112 Field Coil Gibson® EH-185 combo cabinet, 1x12 Field Coil Speaker
410 Tweed ‘59 Fender® Tweed Bassman® combo cabinet, 4x10 inch Jensen® alnico
speakers
112 BF ‘Lux Fender® “Blackface” Deluxe Reverb® combo cabinet , one 12 inch Oxford
12K5-6 speaker
112 Celest 12-H Divided By 13 9/15 combo cabinet, one 12 inch Celestion® G12H Heritage
(70th anniversary) speaker
212 PhD Ported Dr. Z®, Z Best cabinet, 2x12 inch Celestion® speakers (one G12H Heritage
and one Vintage 30)
112 Blue Bell ‘61 “Fawn” Vox® AC-15 combo cabinet, one 12 inch Celestion® Alnico Blue
speaker
212 Silver Bell Vox® AC-30 “Top Boost,” 2x12 inch Celestion® Alnico Silver Bell speakers
412 Greenback 25 Marshall® cabinet, 4x12 inch Celestion® G12M “Greenback” speakers
412 Blackback 30 Marshall® cab, 4x12 inch Celestion® Rola G12H30W “Blackback” speakers
412 Brit T-75 Marshall® cabinet, 4x12 inch Celestion® G12T75 speakers
6•15
412 Uber Bogner Uberschall cabinet, 4x12 inch Celestion® speakers (2 x G12T75 and
2 x Vintage 30 speakers)
412 Tread V-30 Mesa/Boogie® cabinet, 4x12 inch Celestion® Vintage 30 speakers
412 XXL V-30 Engl® Pro cabinet, 4x12 inch Celestion® Vintage 30 speakers
115 Flip Top Ampeg® Custom Design, CTS 15 inch speaker
* All product names are trademarks of their respective owners, which are in no way associated or affiliated with Line 6. These product names and descriptions are provided for the sole purpose of identifying the specific products that were studied during Line 6’s sound model
development. Fender®, Twin Reverb®, Bassman® and Deluxe Reverb® are registered trademarks of Fender Musical Instruments Corporation. Vox® is a registered trademark of Vox R&D Limited. Marshall® is a registered trademark of Marshall Amplification Plc. Dr. Z® is
a registered trademark of Dr. Z Amps, Inc. Mesa/Boogie® and Dual Rectifier® are registered trademarks of Mesa/Boogie, Ltd. Engl® is a registered trademark of Beate Ausflug and Edmund Engl. Fane® is a trademark of Fane International. Gibson® is a registered trademark
of Gibson Guitar Corp. Supro® is a registered trademark of Zinky Electronics. Hiwatt® is a registered trademark of Hiwatt Equipment Limited Company, UK. Fane® is a trademark of Fane International. Ampeg® and Portaflex® are registered trademarks of St. Louis Music,
Inc. Celestion® is a registered trademark of Celestion International Ltd. Jensen® is a registered trademark of Jensen Loudspeakers and Audiovox Corporation.
Page 64

Page 65

FX mOdelS
POD® HD Pro X includes a plethora of amazing FX Models, primarily from the popular
Line 6 M13 Stompbox Modeler! This chapter provides Reference Tables showing all
POD HD Pro X FX Models by category, as well as details on their parameters. FX
Model parameters are all accessible within the Edit Mode. Please see “FX Edit Mode”
on page 5•1 for details on Edit Mode features.
TIP: For more details about FX Models, please also check out the POD HD Model Gallery and
M13 Advanced Guide documents, available from http://line6.com/support/manuals/.
Dynamics Models
Dynamics FX Models - Parameter Reference Table
Model Parameters
Noise Gate Threshold Decay -- -- --
Hard Gate Open Threshold Close Threshold Hold Decay --
FX Models
Tube Comp Threshold Level -- -- --
Red Comp Sustain Level -- -- --
Blue Comp Sustain Level -- -- --
Blue Comp Treb Sustain Level -- -- --
Vetta Comp Sensitivity Level -- -- --
Vetta Juice Amount Level -- -- --
Boost Comp Drive Bass Comp Treble Output
Common Parameters
The following parameters are common to most Dynamics FX Models.
• Threshold: For compressor FX, lower values result in greater compression,
along with an automatic makeup gain stage dependent upon the Threshold
setting.
7•1
Page 66

FX Models
7•2
• Sustain: Some compressors include Sustain, which is much the same as
a Threshold control, but functions in reverse - higher settings add more
compression and thus more sustain and squishy goodness.
• Level: Adjusts the overall volume - higher settings typically oer an output
boost.
Distortion Models
Distortion Model - Parameter Reference Table
Model Parameters
Tube Drive Drive Bass Mid Treble Output
Screamer Drive Bass Tone Treble Output
Overdrive Drive Bass Mid Treble Output
Classic Dist Drive Bass Filter Treble Output
Heavy Dist Drive Bass Mid Treble Output
Color Drive Drive Bass Mid Treble Output
Buzz Saw Drive Bass Mid Treble Output
Facial Fuzz Drive Bass Mid Treble Output
Jumbo Fuzz Drive Bass Mid Treble Output
Fuzz Pi Drive Bass Mid Treble Output
Jet Fuzz Drive Fdbk Tone Speed Output
Line 6 Drive Drive Bass Mid Treble Output
Line 6 Distortion Drive Bass Mid Treble Output
Sub Octave Fuzz Drive Bass Sub Treble Output
Octave Fuzz Drive Bass Mid Treble Output
Common Parameters
The following parameters are common to most Distortion FX Models.
• Drive: Adjusts the amount of overdrive, distortion or fuzz.
Page 67

• Bass: Adjusts Bass EQ level
• Mid: Adjusts the Midrange EQ level.
• Treble: Adjusts Treble EQ level.
• Output: Adjusts the overall volume level - higher settings oer an output
boost.
Modulation Models
Modulation Models - Parameter Reference Table
Model Parameters
Pattern Tremolo Speed Step 1 Step 2 Step 3 Step 4
Panner Speed Depth Shape VolSens Mix
Bias Tremolo Speed Level Shape VolSens Mix
Opto Tremolo Speed Level Shape VolSens Mix
Script Phase Speed -- -- -- --
FX Models
Panned Phaser Speed Depth Pan Pan Spd Mix
Barberpole Phaser Speed -- Fdbk Mode Mix
Dual Phaser Speed Depth Fdbk LFO Shp Mix
U-Vibe Speed Depth Fdbk VolSens Mix
Phaser Speed Depth Fdbk Stages Mix
Pitch Vibrato Speed Depth Rise VolSens Mix
Dimension Sw1 Sw2 Sw3 Sw4 Mix
Analog Chorus Speed Depth Ch Vib Tone Mix
Tri Chorus Speed Depth Depth2 Depth3 Mix
Analog Flanger Speed Depth Fdbk Manual Mix
Jet Flanger Speed Depth Fdbk Manual Mix
AC Flanger Speed Width Regen Manual --
7•3
Page 68

FX Models
7•4
Modulation Models - Parameter Reference Table
Model Parameters
80A Flanger Speed Range Enhance Manual Even Odd
Frequency Shifter Freq Mode -- -- Mix
Ring Modulator Speed Depth Shape AM/FM Mix
Rotary Drum Speed Depth Tone Drive Mix
Rotary Drm/Hrn Speed Depth Horn Dep Drive Mix
Common Parameters
The following parameters are common to most Modulation FX Models.
• Speed: Adjusts the modulation/oscillation/tremolo speed for the eect, with
higher settings providing faster rates. Note that the Speed can be adjusted
to a Hz value or Note Division:
• Choosing a Hz value provides a specic modulation speed in cycles per
second.
• Choosing a Note Division value provides a time that is based on the current
Tap Tempo (see “Tap Tempo” on page 1•5).
• Depth: Adjusts the intensity of the modulation. Higher settings result in more
extreme pitch bending, wobble or throb, depending on the eect.
• Fdbk (Feedback): The amount of delayed signal that is fed back into the
eect. Higher settings can provide more dramatic textures.
• Mix: Sets the balance of the “Dry” and “Wet” signals. At 0% no eect is
added to your signal; at 100% you will hear the eected signal only. For
Chorus, Flanger & Phase FX, results are typically best with the Mix set
between 0 to 50%. For Vibrato, Tremolo and Rotary FX, try the Mix at 90 100%. Feel free to experiment!
Note that the Script Phase, Pattern Tremolo , AC Flanger & 80a Flanger do not offer a Mix
parameter. Their dry/wet balance is “xed” just like the classic pedals that inspired them!
Page 69

Filter Models
Filter Models - Parameter Reference Table
Model Parameters
Voice Box Speed Start End Auto Mix
V-Tron Start End Speed Mode Mix
Q Filter Freq Q Gain Type Mix
Vocoder Mic Input -- Decay Mix
Seeker Speed Freq Q Steps Mix
Obi Wah Speed Freq Q Type Mix
Tron Up Freq Q Range Type Mix
Tron Down Freq Q Range Type Mix
Throbber Speed Freq Q Wave Mix
Slow Filter Freq Q Speed Mode Mix
FX Models
Spin Cycle Speed Freq Q VolSens Mix
Comet Trails Speed Freq Q Gain Mix
Octisynth Speed Freq Q Depth Mix
Synth O Matic Freq Q Wave Pitch Mix
Attack Synth Freq Wave Speed Pitch Mix
Synth String Speed Freq Attack Pitch Mix
Growler Speed Freq Q Pitch Mix
Common Parameters
The following parameters are common to most Filter FX Models.
• Frequency: Selects the center frequency used by the eect.
• Q: Adjusts the frequency width of the lter in use.
• Speed: Adjusts the rate of the model’s modulation or oscillators, can be adjusted
to a Hz value or Note Division:
7•5
Page 70

FX Models
Pitch Models
• Choosing a Hz value provides a specic modulation speed in cycles per
second.
• Choosing a Note Division value provides a time that is based on the current
Tap Tempo (see “Tap Tempo” on page 1•5)
• Mix: Sets the balance of the “Dry” and “Wet” signals. At 0% no eect is added to
your signal; at 100% you will hear the eected signal only. For most Filter FX, try
the 100% setting to achieve the full weirdness factor.
Pitch Models - Parameter Reference Table
Model Parameters
Bass Octaver Tone Normal Octave -- --
Pitch Glide Pitch -- -- -- Mix
Smart Harmony Key Shift Scale -- Mix
Pitch FX Model Parameters
7•6
Since these FX are a bit more complex, we’ve provided examples of each Pitch FX
Model’s Edit Mode screen and parameter descriptions.
Bass Octaver
• Tone: The overall tone of the eect.
• Normal: Controls the volume of the dry signal.
• Octave: Controls the volume of the processed, octave signal.
Page 71

FX Models
Pitch Glide
This eect is best used by assigning a Line 6 FBV™ Pedal Controller to the Pitch
parameter to “wham” out some wild pitch-bending eects (see “Expression Pedal &
Variax® Knob Controller Assignment” on page B•18). However, you can set a specied
pitch to add a static harmony or octave unison note that follows your playing.
• Pitch: Manually lets you select the Pitch of the note that is heard in unison with
your input signal.
• Mix: Controls the balance of wet & dry signals. Set to 100% if you wish to hear
only the pitched signal, or somewhere near 50% to hear both your input signal
plus the pitched signal.
7•7
Smart Harmony
Select a Scale, Key and Shift value and our DSP algorithms will do the rest, producing
a perfect harmony note along with your guitar ris. The available parameters are as
follows:
Page 72

FX Models
7•8
• Key: Select the Key you’ll be playing in.
• Shift: Determines the interval value for the desired harmony note.
• Scale: Select the Scale you’d like to use (see the following instructions and table).
• Mix: Sets the balance or your dry signal + harmony notes.
The Smart Harmony eect automatically detects your guitar’s single-note pitch and
shifts it to match a user-selected Key and Scale. A choice of Keys is provided - Consult
the table below to achieve other scalic modes.
• Choose your Key on the left, then your mode on the top.
• The cell where the two connect is the Key to choose to get to the mode
you’d like. For example, for C - Lydian, the Scale you want is G Major.
Mode
Key Ionian Dorian Phrygian Lydian Mixolydian Aeolian Locrian
A
B
C
D
E
F
G
A Maj G Maj F Maj E Maj D Maj C Maj Bb Maj
B Maj A Maj G Maj Gb Maj E Maj D Maj C Maj
C Maj Bb Maj Ab Maj G Maj F Maj Eb Maj Db Maj
D Maj C Maj Bb Maj A Maj G Maj F Maj Eb Maj
E Maj D Maj C Maj B Maj A Maj G Maj F Maj
F Maj Eb Maj Db Maj C Maj Bb Maj Ab Maj Gb Maj
G Maj F Maj Eb Maj D Maj C Maj Bb Maj Ab Maj
Smart Harmony Model - Scale Reference Table
Page 73

Preamp & EQ Models
Preamp+EQ Models - Parameter Reference Table
Model Parameters
Graphic EQ 80Hz 220Hz 480Hz 1.1kHz 2.2kHz
Parametric EQ Lows Highs Freq Q Gain
Studio EQ Low Freq Low Gain Hi Freq Hi Gain Gain
4 Band Shift EQ Low Low Mid Hi Mid Hi Shift
Mid Focus EQ Hi Pass Freq Hi Pass Q Low Pass Freq Low Pass Q Gain
Vintage Pre Gain Output Phase Hi Pass Filter Lo Pass Filter
Common Parameters
The following parameters are common to EQ Models.
• Frequency (as well as Low, Mid, High): Selects the center frequency or range
for the particular EQ Band. (The Graphic EQ model includes “xed” Bands where
the gain is adjustable for each.)
• Q: Adjusts the frequency width or shape of the frequency band lter.
FX Models
7•9
• Gain: Adjust the output level of the particular Band. (The Gain parameters
accessed by Multi-function Knob #4 adjust the overall output level.)
Vintage Pre
This Model is a vintage-voiced, mono tube mic preamp based on* the Requisite®
Y7 vintage Tube Mic Preamp, excellent for use with your Mic source input, Variax
acoustic guitar models, or even in conjunction with Bass or Guitar Amps, anywhere in the signal path, to provide some nice tube warmth.
Page 74

FX Models
Delay Models
• Gain: Dial in the amount of input gain - higher levels will add some tube distortion.
• Output: Determines the nal output level, capable of a signicant signal boost.
• Phase: Choose 0 for normal, or 180 to reverse the phase. (It can sometimes
be necessary to reverse the phase of one mic’ed signal when combined with
another, to correct for a resulting “hollow,” out-of-phase sound.)
• HPF: A High Pass Filter to reduce bass frequencies. Increase this Hz value to
choose where the low frequency reduction begins.
• LPF: A Low Pass Filter to reduce treble frequencies. Decrease this KHz value to
choose where the high frequency reduction begins.
Delay Models - Parameter Reference Table
Model Parameters
Ping Pong Time Fdbk Oset Spread Mix
Dynamic Dly L Time L Fdbk R Time R Fdbk Mix
7•10
Stereo Delay Time Fdbk Thresh Ducking Mix
Digital Delay Time Fdbk Bass Treble Mix
Dig Dly W/Mod Time Fdbk ModSpd Depth Mix
Reverse Time Fdbk ModSpd Depth Mix
Lo Res Delay Time Fdbk Tone Res Mix
Tube Echo Time Fdbk Wow/Flt Drive Mix
Tube Echo Dry Time Fdbk Wow/Flt Drive Mix
Tape Echo Time Fdbk Bass Treble Mix
Tape Echo Dry Time Fdbk Bass Treble Mix
Sweep Echo Time Fdbk Swp Spd Swp Dep Mix
Sweep Echo Dry Time Fdbk Swp Spd Swp Dep Mix
Echo Platter Time Fdbk Wow/Flt Drive Mix
*
Requisite® is a registered trademark of Requisite Audio Engineering.
Page 75

Delay Models - Parameter Reference Table
Model Parameters
Echo Platter Dry Time Fdbk Wow/Flt Drive Mix
Analog W/Mod Time Fdbk ModSpd Depth Mix
Analog Echo Time Fdbk Bass Treble Mix
FX Models
Auto-Volume
Echo
Multi-Head Time Fdbk Heads 1-2 Heads 3-4 Mix
Time Fdbk ModDep Swell Mix
Common Parameters
The following parameters are common to most Delay FX Models.
• Time: Adjusts the delay/repeat time, with higher settings providing longer
delays. Time can be adjusted to a MS value or Note Division:
• Choosing a MS value provides a specic time in milliseconds.
• Choosing a Note Division value provides a time that is based on the current
Tap Tempo (see “Tap Tempo” on page 1•5).
• Fdbk (Feedback): Sets the number of delayed repeats.
• Depth: Some delays include modulation. These will typically include a Depth
parameter to adjust the intensity of the pitch modulation applied to the
repeats.
• ModSpd: Control the speed of the pitch modulation.
• Mix: Sets the balance of the “Dry” and “Wet” signals. At 0% no eect is
added to your signal; at 100% you will hear the delayed signal only.
7•11
Page 76

FX Models
Reverb Models
Reverb Models - Parameter Reference Table
Model Parameters
Plate Decay PreDelay Tone Mix
Room Decay PreDelay Tone Mix
Chamber Decay PreDelay Tone Mix
Hall Decay PreDelay Tone Mix
Echo Decay PreDelay Tone Mix
Tile Decay PreDelay Tone Mix
Cave Decay PreDelay Tone Mix
Ducking Decay PreDelay Tone Mix
Octo Decay PreDelay Tone Mix
Spring Decay PreDelay Tone Mix
7•12
‘63 Spring Decay PreDelay Tone Mix
Particle Verb Dwell Condition Gain Mix
Common Parameters
The following parameters are common to all Reverb Models, with the exception of the
Particle Verb Model, which we’ve described separately.
• Decay: Sets the length of time the reverb eect sustains.
• Predelay: Congures the time before the reverb eect is heard.
• Tone: Adjusts the overall Tone of the wet reverb signal. Higher settings
provide a brighter, more reective reverb quality.
• Mix: Sets the balance of the dry & wet signals, from 0% (dry signal only) to
100% (wet reverb signal only).
Page 77

FX Models
Particle Verb
A new kind of reverb eect which turns your chords into a lush modulated pad in
STABLE mode. CRITICAL mode is similar, but with a slight rise in pitch. In HAZARD
mode, all stops are removed. The parameters for this model dier from the other
Reverbs:
• Dwell: Essentially a decay parameter, which adjusts the length of time the
reverb tail lasts.
• Condition: Choose between STABLE, CRITICAL and HAZARD here for
some dierent reverb experiences!
• Gain: Sets overall output level of the eect.
7•13
Volume/Pan & Wah Models
The Volume/Pan and Wah sets of Models are primarily designed to be used with a Line 6
FBV™ Series Controller Expression Pedal. When you add any Wah or Volume Model
to your tone, the EXP 1 and EXP 2 Controllers are automatically assigned! Please see
“Expression Pedal & Variax® Knob Controller Assignment” on page B•18 for details.
Volume/Pan Models - Parameter Reference Table
Model Parameter
Volume Volume Level
Pan Pan L-R Balance
Page 78

FX Models
7•14
Volume
Volume: Adjusts the signal level. 100% is unity gain. This parameter can be accessed
via the Multi-function knob at any time. With a Line 6 FBV Pedal assigned to control
the Volume, you’ll see this Volume parameter visually adjust with the pedal as well.
Pan
• Pan: Adjusts the signal balance sent to the left and right stereo channels. 0%
sends full left, 50% sends equally left & right, and 100% sends full right.
The audible eect heard when using the Pan can dier quite a bit depending on the
position in your signal chain and what types of FX follow it. Here are a few examples:
Page 79

Before Path A & B split
Pan positioned before Path A & B split
When placed here, your guitar signal is panned left to Path A and right to Path
B. This can be a cool way to “blend” the sounds of two Amp models.
After Path A & B Mixer
FX Models
Pan positioned after Path A & B Mixer
In this position, the stereo left & right signals fed into the Pan is determined
by your Mixer Pan settings. The Pan eect then pans these signal to the left
and right main outputs. Obviously, you’ll only benet from using the Pan in this
post-Mixer position when utilizing both the left and right outputs from POD HD
Pro X.
Placing a Mono Output FX Model after the Pan
Mono FX Model (EQ) positioned after Pan
7•15
Page 80

FX Models
Wah Models
Just as with all stereo FX Models, when a mono FX Model is placed after
the Pan, the Pan Model’s output will become “mono-ized, as described in
“Model Types and Mono/Stereo Signal Routing” on page 3•5. Therefore, you’ll
typically want to avoid placing a mono FX Model later within the same signal
path as the Pan Model.
Wah Models - Parameter Reference Table
Model Parameters
Fassel Position Mix
Conductor Position Mix
Throaty Position Mix
Colorful Position Mix
Vetta Wah Position Mix
Chrome Position Mix
7•16
Chrome Custom Position Mix
Weeper Position Mix
Common Parameters
Each Wah oers the following two parameters:
• Position: This controls the “sweep” of the Wah. Any Wah Model is best used
with this parameter assigned to an FBV pedal, however, you can also access this
parameter with the Multi-function Knob to dial in a “parked” Wah tone.
• Mix: Sets the balance of the “Dry” and “Wet” signals. At 0% no Wah eect is
added to your signal; at 100% you will hear the Wah-eected signal only. Try
lowering the Mix to less than 100% for a more subtle eect!
Page 81

lOOper mOde
POD® HD Pro X includes a full-featured Looper Mode, which is accessible with
the connection of a Line 6 FBV™ Foot Controller. The Looper Mode oers up to 48
seconds of mono recording time (in Half-Speed Mode) or 24 seconds recording time
(in Normal Mode), as well as the ability to undo, record overdubs, playback Loops at
half speed, in reverse, and more! Footswitch assignments for Looper functions vary
among the supported Line 6 FBV Controller models - please see “Appendix B: FBV
Foot Controllers” on page B•1 for the details.
Looper Controls & Performance View
When Looper Mode is active, an additional Looper screen is available as one of the
Performance View displays of POD HD Pro X. This screen shows the behavior of
all Looper functions.* You can think of these as “this is what will happen when the
respective button is pressed” indicators. Press the VIEW button to show this screen
whenever you use the Looper. (Also see the Looper - Performance View options ,
“Page 1, Setup:Utilities Options” on page 2•2.)
Using the Looper
The Performance View, Looper screen
*Note: The “Pre/Post” Looper Block position option is accessible with most FBV Controller devices,
or the Looper Block can be moved like any FX Model Block within the Signal Flow View screen.
To follow are descriptions of the functions shown in the Looper screen.
8•1
Page 82

Using the Looper
PLAY ONCE - Pressing the FBV footswitch plays your recorded Loop (including overdubs,
if you’ve recorded any) for one cycle. Cool for triggering a pre-recorded phrase on
demand!
PRE/POST - The Looper Block can be moved to either a “Pre” or “Post” position within
the Signal Flow View, which dictates whether Amp & FX processing is added to your
guitar signal during the recording of your Loop, or only for the Loop’s playback.
UNDO - Use the Bank Up FBV footswitch to “undo” the last recorded overdub.
You can press this footswitch while actively in Overdub-Record mode, Loop
Playback mode, or while stopped and only the last recorded overdub is
erased. This function will not erase the originally recorded Loop.
• While playback is active, the Play/Stop icon appears as “STOP,” to
indicate that it can be pressed to stop playback immediately.
• PRE: Your guitar signal is recorded unprocessed (i.e. - the Loop is recorded
“pre” Amp & FX processing). When played back, the Loop audio is mixed
with incoming guitar to feed the current Preset’s Amp & FX processing. If you
change Presets or tone settings while set to PRE, you’ll hear them applied to
your Loop playback.
8•2
• When the Looper is set to PRE, the Pre/Post icon appears as “POST,”
to indicate that the Looper Block can be moved to the “POST” position.
• POST: Your guitar signal is recorded processed (i.e. - the Loop is recorded
“post” Amp & FX processing). When played back, the Loop audio is mixed
with incoming guitar AFTER the guitar signal has been processed through
the Amp and FX. This provides the ability select a new Preset which is
applied only on your guitar input, while the Loop plays back with the original
recorded Preset tone!
• When the Looper is set to POST, the Pre/Post icon appears as “PRE,”
to indicate that the Looper Block can be moved to the “PRE” position.
Note: If you record your Loop in POST mode and then switch to PRE for Loop playback,
this results in the current Amp+FX to be applied to the Loop playback (where the Loop was
already recorded with Amp+FX applied). Be aware that this can cause the Loop playback to be
signicantly louder!
Page 83

Using the Looper
RECORD/OVERDUB - To record a Loop, press the RECORD FBV footswitch and the Looper
will immediately start recording. You’ll see the Performance View display the following:
• The Record function shows “DUB IN.” Pressing the RECORD FBV
footswitch will immediately put you into Overdub-Record mode.
• If you press RECORD at this time, whatever you play will be recorded on
top of the original Loop recording, and you’ll see the Performance View
indicator show “DUB OUT.” Press the FBV footswitch again to stop
the overdub recording.
• The Play/Record function shows “STOP” to indicate that pressing
the PLAY/STOP FBV footswitch will stop playback & recording.
Note: Once you have a Loop recorded, you can layer an overdub on top of your current Loop
at any time. Simply play back the Loop and step on the REC/OVERDUB switch press the RECORD
FBV footswitch while the Loop is playing. Your new live guitar will be recorded on top of your
previously recorded Loop. You can repeat this step and layer as many overdubs as you like!
If you press RECORD while Loop playback is stopped, this will always record a new
Loop, and any previously recording will be discarded.
PLAY/STOP - Press the PLAY/STOP FBV footswitch to toggle Play/Stop for your recorded
Loop. If you are actively recording a Loop, press this switch to stop recording and set
your Loop “out” point. The button remains lit whenever playback is active.
• While playback is active, the Play/Stop icon appears as “STOP.”
1/2 SPEED - Press the 1/2 SPEED FBV footswitch to toggle the 1/2 Speed feature On/O.
Note that you can use the 1/2 Speed option for recording as well as playback. Specic behaviors
apply to each - please see “1/2 Speed Operation” on page 8•5.
8•3
Page 84

Using the Looper
REVERSE - Press the REVERSE FBV footswitch to toggle the Reverse Play feature On/O.
All Loop playback is backwards when on.
• When 1/2 Speed is active, the Speed icon appears as “FULL.”
• When 1/2 Speed is O, the Speed icon appears as “1/2.”
• When Reverse is active, the Reverse icon appears as “FWD.”
• When Reverse is O, the Reverse icon appears as “REV.”
8•4
Looper Settings
Press the VIEW button to display the Signal Flow View screen and select the Looper to
access several additional settings.
The Signal Flow View screen, Looper options
Page 85

• Playback (Knob 1) - Use Multi-function Knob 1 to adjust the Looper
playback volume. You may nd it useful to turn this down a bit so that your
live guitar can be slightly louder.
• Overdub (Knob 2) - Use Multi-function Knob 2 to determine the volume of
your loop in Overdub mode. For example, if your Overdub Level is set to
90%, each time your loop begins a new overdub its volume will be reduced
by 10%, sounding quieter and quieter with each overdub pass.
• Hi Cut (Knob 3) & Lo Cut (Knob 4) - Use Multi-function Knobs 3 & 4 to adjust
these EQ options, to reduce the treble and bass of your Loop playback. It
can be helpful to reduce these to optimize the “mix” of your Loop playback
with your live guitar. These controls reduce the High and Low frequencies
more as you raise their values.
1/2 Speed Operation
The Looper utilizes both the 1/2 Speed and Full Speed options for recording and
playback. These options directly aect the maximum Loop recording time.
POD HD Looper Record Time
Full Speed 24 Seconds maximum
Using the Looper
1/2 Speed 48 Seconds maximum
Specic behaviors apply, as follows:
• Full Speed: When set to Full Speed before recording, the Looper provides
up to 24 seconds max. recording time.
• Playback of the recorded Loop at the Full Speed setting is heard just as
recorded.
• If you change the setting to 1/2 Speed, your recorded Loop is played back at
half speed, as well as pitched one octave lower.
• 1/2 Speed: When set to 1/2 Speed before recording, the Looper provides
up to 48 seconds maximum recording time.
• Playback of the recorded Loop at the 1/2 Speed setting is heard just as
recorded.
• If you change the setting to Full Speed, your recorded Loop is played back at
double speed, as well as pitched one octave higher.
8•5
Page 86

Page 87

uSb audiO
In this chapter, we’ll cover the USB audio capabilities of POD® HD Pro X. With the
installation of the Line 6 USB audio driver, you can use POD HD Pro X as a high quality
audio interface for your Mac® or Windows® computer!
The Line 6 USB Audio Driver
Before you connect POD HD Pro X to your computer, it is recommended that you
download and install the free Line 6 POD HD Pro X Edit software. This installs the
necessary Line 6 USB Audio Driver, as well as the Line 6 Monkey update utility (also
see “Appendix A: Line 6 Monkey” on page A•1). The latest POD HD Pro X Edit installer,
as well as individual installers for the Driver & Line 6 Monkey, are also always available
from http://line6.com/software.
NOTE: The POD HD Pro X USB Device Driver requires Mac OS® X version 10.5 (Leopard®) or
later.
USB Audio
The Line 6 Software Downloads site - selecting the POD HD Pro X Edit software
Once installation is complete, just connect your device directly to a USB port on your
computer (not into a USB hub) and power on your POD HD Pro X. Note that POD HD
Pro X requires the use of a USB 2.0 port on your computer.
Also see the POD HD Pro X Edit Installer Guide and the POD HD Pro X Edit Pilot’s
, available from http://line6.com/support/manuals.
Guide
9•1
Page 88

USB Audio
Audio Routing
When using the POD HD Pro X USB connection, the audio driver manages several
tasks. The driver feeds the processed guitar signal out the USB Record Send to your
computer and receives playback audio from the computer. It also grabs the processed
guitar signal before routing it to the Record Send, to provide a low latency monitor
signal, and then mixes the monitor signal with the playback audio and feeds this
combined signal to your POD HD Pro X analog outputs.
Note that all USB audio is muted whenever a L6 LINK™ connection is active between POD HD
Pro X and a DT Series amplier.
Mix of monitor signal + playback
audio fed to analog outputs
Playback audio
from computer
9•2
Record Send audio to
computer
USB audio routing provided by the Line 6 USB audio driver
The POD HD Pro X Record Send
As shown above, the Record Send is the virtual “pipeline” that carries your POD HDprocessed, 24-bit digital signal across the USB connection, making it available to your
audio software as an input signal for recording.
The Record Send appears as an available audio input/recording device within your
audio software. Simply select this Send as the input for your audio track and you’ll
be able to record your POD HD Pro X signal. The level of the signal fed to the Send is
aected by your POD HD Pro X controls: Mixer block Volume A & B, Amp Model Drive
& Volume, FX Model Gain controls, Volume Pedal, etc., (but not the Master Volume
knob). For the best recording quality, watch the input meters provided in your software
and adjust your level to be at least halfway up, but never “clipping.”
Page 89

Note that the type of audio signal fed to the Record Sends is controlled by the Output Mode
setting found in the POD HD Pro X Setup:Outputs screen. For most USB recording
situations, you’ll likely want to set this to “Studio/Direct.” Please see “Page 4, Setup: Output
Options” on page 2•8
for more info.
The Line 6 Audio-MIDI Devices Panel
The Line 6 Audio-MIDI Devices utility is the place where you congure various audio
driver settings. The options in the Line 6 Audio-MIDI Devices dialog are slightly dierent
if you are on a Mac® versus a Windows® system. See the following descriptions that
match your setup: For Mac® see next section, or for Windows® see page 9•9.
Mac® - Line 6 Audio-MIDI Devices
Launch the Line 6 Audio-MIDI Devices utility from within the Mac® System
Preferences. This utility provides access to several driver options.
Line 6 Audio-MIDI Settings - Driver Options (Mac®)
2
1
4
3
USB Audio
6
9•3
5
7
The Line 6 Audio-MIDI Settings window - Driver page
Page 90

USB Audio
1
Device Selector: Select your POD HD Pro X here. If you have more than one
supported Line 6 audio device connected, each will be selectable in this list.
2
Driver Version: Displays the current device’s installed driver version number.
3
ESN: Displays the current device’s unique Electronic Serial Number.
4
Driver/Inputs & Recording Selector: Choose between displaying the two pages of
the Driver Options window. (Also see “Inputs & Recording Page” on page 9•5.)
5
Run Audio MIDI Setup: Mac® Core Audio interface driver settings are congured in
the Mac OS® X Audio MIDI Setup utility. This button launches this dialog for you (see
“Mac® - Line 6 Audio-MIDI Devices” on page 9•3).
6
Sample Rate Converter Active: You’ll see this indicator light up whenever the device
is operating at a sample rate other than its native 48kHz rate. In addition to 48kHz, POD
HD Pro X supports 44.1kHz, 88.2kHz and 96kHz rates by utilizing an internal sample
rate converter. Please check your specic software’s documentation for details on
conguring its audio sample rate.
7
USB Audio Streaming Buffer: Adjusts the buer size for the audio responsiveness
of the Input Monitoring signal. Basically, the default setting should be ne for most
systems, but if getting audio dropouts or working with large CPU demands on your
system, raise the slider a notch or two to the right until it alleviates the problem.
9•4
Page 91

Inputs & Recording Page
8
9
The Line 6 Audio-MIDI Settings window - Inputs & Recording page
USB Audio
8
Record Sends List: Displayed here are the Record Sends for the current Line 6
device that will be available to your audio software. For POD HD Pro X you’ll see the
one, stereo “1-2 Main Out” Record Send.
9
Hardware Monitor Level: This slider independently controls the volume of your
processed guitar tone output for monitoring (the signal fed to the device’s main
outputs). It does not aect the level of the signal fed to your computer via the Record
Send. This allows you to balance your guitar’s monitor level against the playback audio
from your computer, such as when recording in DAW software.
If using POD HD Pro X as the audio interface for recording into a DAW application, then your
DAW may also offer its own “software monitoring” function. You may want to use the DAW’s
software monitoring in some scenarios, such as if you want to hear your guitar signal processed
with plug-ins on the DAW track. When utilizing DAW software monitoring, you’ll want to set this
slider’s level to minimum to allow you to hear only the DAW software monitoring signal.
9•5
Page 92

USB Audio
Mac OS® X Audio MIDI Setup Utility
POD HD Pro X utilizes the Mac® Core Audio driver type, making it a compatible audio
interface for practically any Mac® audio/multimedia software. As with most Core
Audio devices, some settings are found in the Audio Devices page of the Mac® Audio
MIDI Setup dialog. Note that there are two screens of settings for this window: Input
and Output. You’ll see similar options in both these screens, but their settings pertain
to the selected device’s Input and Output drivers, respectively.
A
B
D
E
9•6
C
The Audio MIDI Setup utility, Input screen (Mac OS® X 10.6 and later*)
*Note: The Audio MIDI Setup utility window within Mac OS® X version 10.5 has a slightly different
layout, but offers the same options and functionality as described here.
Page 93

USB Audio
A
Input - Output Screen Selector Use these buttons to view the respective options
within this window.
B
Device List: Select your POD HD device in the list here to display its settings within
the window.
C
Default Audio Device Options: With your POD HD device selected in the Device
List, click on the little gear button here to congure POD HD to be the default input
and/or output audio device for your Mac® applications.* When you select any of these
options, you’ll see the respective icon appear to the right of POD HD in the above
Device List to indicate it is set as the default device for this action.
*Note that most DAW applications (such as GarageBand, Logic, Ableton Live, etc.) allow you to
select their audio input/output device within their own Preferences, independently of the settings
you make here.
• Use this device for sound input: Select this option if you want your Mac®
applications to use POD HD as the default input device for audio recording.
• Use this device for sound output: Select this option if you want your
Mac® applications to use POD HD as the default output device, such as for
iTunes® music playback.
• Play alerts and sound eects through this device: This option sets all
the system dings and beep alerts play through the selected device. You
probably do NOT want to select this, unless you like hearing these Mac®
alerts blaring at high volume along with your POD HD guitar and audio
playback for some reason!
D
Format: These options show you the Sample Rate* and Bit Depth at which POD
HD is operating for recording (when viewing the Input screen) and playback (when
viewing the Output screen). The Bit Depth for POD HD is xed at 24 bit.
*It is recommended that you do not use the Sample Rate selectors in this window to set your
sample rate when your audio software is running. Typically, your audio software will offer a sample
rate option within its own “Preferences” settings, which is where you should change the rate.
9•7
Page 94

USB Audio
E
Volume sliders: These sliders oer level adjustment for the selected device.
• When viewing the Audio Device - Input screen (as shown above) the sliders
control the level of the Record Send signal fed to your recording software.
These sliders can be used to ne tune your DAW software’s recording level.
Note that these sliders oer a max level of +18dB, which can apply a boost
to your input signal if needed.
• When viewing the Audio Device - Output screen (as shown in the following
screenshot) the sliders control the stereo level for your software’s audio
playback fed to POD HD. These sliders can be used to independently adjust
the USB playback audio versus your guitar input signal.
9•8
The Audio MIDI Setup utility, Output screen (Mac OS® X 10.6 and later)
Page 95

Windows® - Line 6 Audio-MIDI Devices
The following settings are the same for Windows® XP, Windows Vista® or Windows® 7, unless
otherwise noted.
Launch the Line 6 Audio-MIDI Devices from within the Windows® Control Panel. On
Windows® systems, POD HD Pro X oers both a DirectSound and ASIO® recording
driver for maximum compatibility with audio & multimedia software applications. It
is always recommended that you select the ASIO® audio driver within your audio
software, if supported, since this oers higher performance. When prompted for
ASIO® driver settings, this dialog is where you will make them.
USB Audio
1
4
65
7
8
The Line 6 Audio MIDI Devices - Driver tab (Windows® XP)
1
Device Selector - Select your POD HD Pro X here. If you have more than one
supported Line 6 audio device connected, each will be selectable in this list.
2
Driver Version - Displays the current device’s installed driver version number.
2
3
9•9
3
ESN - Displays the current device’s unique Electronic Serial Number.
Page 96

USB Audio
4
Driver/Inputs & Recording Selector - Choose between displaying the two tabs of the
Driver Options window. (Also see “Inputs & Recording Page” on page 9•13.)
5
Driver Operation (Windows® XP only) - These options are only applicable for when
an application utilizes the POD HD Pro X device via the Windows® DirectSound®
driver. They will be non-selectable when in use via the ASIO® driver.
• Driver operating at: Displays the actual Sample Rate & Bit Depth the driver
is operating at when in use by an audio application. If not in use, “inactive”
is displayed.
• Default Sample Rate & Bit Depth: Use this option to set the default sample
rate & bit depth that (non-ASIO®) applications will use when using POD HD
Pro X as the audio interface.
• Lock Driver Format: When checked, this forces the DirectSound® driver to
always operate at the Sample Rate and Bit Depth settings entered in the
two elds above (as opposed to following the sample rate requested by a
Windows® audio application).
9•10
Page 97

USB Audio
5
Driver Operation (Windows Vista® & Windows® 7)
On Windows® Vista & Windows® 7 you will see a Sound Control Panel button - click
this to launch the Windows® Sound panel. Within the Sound panel’s Playback and
Recording tabs you can designate POD HD Pro X as the “Default” audio device if you
want all your Windows® multimedia programs to utilize it as their sound card device.
POD HD Pro X selected as the Default Playback Device
You can also click on the Properties button in the Sound dialog to access the default
format settings for the POD HD Pro X Sample Rate and Bit Depth when used with
Windows® multimedia applications. (Note that if you are using an audio application
that is set to utilize the ASIO® driver for your Line 6 device, then ASIO® communicates
directly with the device, and these “default format” settings do not apply.)
9•11
Page 98

USB Audio
The Window Vista/7 Control Panel>Sounds>Properties - Advanced tab
6
ASIO® Driver Settings
• ASIO® Client: If you are running audio software that is using POD HD Pro X
as its ASIO® audio device, the name of the software will appear here.
• Buer Size: The ASIO® buer size in use, which will aect the
“responsiveness” and “latency” of the DAW software. The lower the setting,
the faster the response, but with the trade-o of higher processor usage and
the risk of audio dropouts. Raise the value if you are getting inconsistent
playback or recording in the audio software. 256 is generally a good setting
to start with.
9•12
• Bit Depth: The ASIO® bit depth in use. It is recommended to use 24-bit
here.
7
Sample Rate Converter Active - You’ll see this indicator light up whenever
the device is operating at a sample rate other than its native 48kHz rate. In addition
to 48kHz, POD HD Pro X supports 44.1kHz, 88.2kHz and 96kHz rates by utilizing an
internal sample rate converter.
8
USB Audio Streaming Buffer - This slider adjusts the buer size for the audio
responsiveness of the Input Monitoring signal. Basically, the default setting should
be ne for most systems, but if getting audio dropouts or working with large CPU
demands on your system, raise the slider a notch or two to the right until it alleviates
the problem.
Page 99

USB Audio
Inputs & Recording Page
9
10 11
The Line 6 Audio MIDI Devices - Inputs & Recording tab
9
Record Sends List: Displayed here are the Record Sends for the current Line 6
device that will be available to your audio software. For POD HD Pro X you’ll see the
one, stereo “1-2 Main Out” Record Send.
10
Hardware Monitor Level: This slider independently controls the volume of your
processed Source Input tone output for monitoring (the signal fed to the device’s main
outputs). It does not aect the level of the signal fed to your computer via the Record
Send. This allows you to balance your guitar’s monitor level against the playback audio
from your computer, such as when recording in DAW software.
Your DAW software may also offer its own “software monitoring” function. You may want to use
the DAW’s software monitoring in some scenarios, such as if you want to hear your guitar signal
processed with plug-ins on the DAW track. When utilizing DAW software monitoring, you’ll want
to set this Hardware Monitor slider to minimum to allow you to hear only the DAW software
monitoring signal.
11
Record Send Level: This slider independently controls the level of the POD signal
fed to your computer via the Record Send. This directly aects the signal level that is
recorded into your DAW tracks. Note that you can also check the +18dB checkbox
here if you need to boost the signal fed to your DAW.
9•13
Page 100

 Loading...