

Line 6 POD Farm Plug-In, POD Studio GX, POD Studio UX1, POD Studio UX2, POD Farm User Manual
...Page 1

Wi n d o W s
®
XP ® & Vi s t a
®
au d i o ti P s & oP t i m i z at i o n s
Improve the performance of your computer with
Line 6 POD® Farm & audio recording software
Page 2

Windows® XP® & Vista® - Audio Tips & Optimizations
ta b l e o f Co n t e n t s
Digital Audio and Your Computer ............................................................. 1
Windows® XP® Optimizations .................................................................1
Making System Tweaks in Windows® XP
Disable Your Onboard or Add-in Sound Card ....................................................................1
Turn Off Windows System Sounds .....................................................................................2
Disable Error Reporting .......................................................................................................3
Disable the Remote Assistance Option ..............................................................................3
Turn Automatic Updates Off .............................................................................................3
Processor Scheduling ...........................................................................................................3
Set Virtual Memory to a Fixed Size .....................................................................................4
Enable DMA Mode for All IDE Hard Disk Drives .............................................................4
Disable the Indexing Service ...............................................................................................5
Exit All Unnecessary Applications .....................................................................................5
Disable Startup Programs with the System Configuration Utility .....................................6
Internet and Network Connections ....................................................................................6
Disable Windows System Restore .......................................................................................6
Display & Power Settings ....................................................................................................6
Maintenance Tasks ..............................................................................................................8
® ................................................................................1
Windows® Vista® Optimizations ...............................................................1
Making System Tweaks in Vista ..........................................................................................1
Disable Your Onboard or Add-in Sound Card ....................................................................2
Turn Off Windows System Sounds .....................................................................................3
Turn Off Visual Effects ........................................................................................................4
Disable the Remote Assistance Option ..............................................................................5
Turn Automatic Updates Off .............................................................................................5
Processor Scheduling ...........................................................................................................5
Set Virtual Memory to a Fixed Size .....................................................................................5
Enable DMA Mode for All IDE Hard Disk Drives .............................................................6
Exit all Unnecessary Applications ......................................................................................7
Disable Startup Programs with the System Configuration Utility .....................................8
Internet and Network Connections ....................................................................................8
Display & Power Settings ....................................................................................................8
Maintenance & System Tools ...........................................................................................10
i
Page 3

Windows® XP® & Vista® - Audio Tips & Optimizations
Additional Resources ..................................................................................1
Helpful Computer Optimization Sites ................................................................................1
Line 6 Online Resources ......................................................................................................1
Line 6, POD, PODxt, POD X3, POD Farm, POD Farm Plug-In, TonePort, GearBox, GearBox Plug-In, Line
6 Monkey, ToneDirect Monitoring, GuitarPort, FBV, Variax, Line 6 Edit and Custom Tone are trademarks of
Line 6, Inc. All other product names, trademarks, and artists’ names are the property of their respective owners,
which are in no way associated or affiliated with Line 6.
© 2008 Line 6, Inc.
i i
Page 4

Digital Audio and Your Computer
di g i ta l au d i o a n d Y o u r Co m P u t e r
Modern Windows® PC’s are now quite powerful and more than capable of being used as powerful Digital
Audio Workstation (DAW). However, most are not typically configured for optimal performance for
the specific demands of digital audio right out of the box. The following tips are offered as suggested
optimizations you might try on your Windows® XP® or Vista® system to possibly improve the
performance with your Line 6 POD® Studio, TonePort®, POD®xt, POD® X3, POD® Farm software,
POD ® Farm Plug-In, as well as their use with other audio applications.
It is important to note that many of the default Windows settings do offer some advantages, conveniences,
and even security improvements for the general use of your computer. You should evaluate the tradeoff of the security and conveniences some of these services offer to your everyday computing work
before you go disabling all of them. It is also a good idea to always back up your system and data
before changing system settings, and to keep a written list of all settings you’ve changed and know
how to reset them back in case you encounter decreased performance issues.
Note - PC configurations can differ widely. The following tips are offered as suggestions only and Line 6
cannot be held responsible for problems caused to your system by applying settings changes. Please seek
the assistance of a qualified service technician if you are not familiar with these Windows operating system
settings. So we’ll say it once again - back up your system first before making changes!
Digital Audio Demands
A few basic understandings are helpful as you start working with digital audio hardware & software,
and the demands they make on your computer system. Here are a few helpful insights...
CPU Usage
This refers to the processing power that your computer uses to do lots of very complex math for such
things as applying all those cool effects and amp models to your sound. Once you start running other
audio applications and multiple Plug-Ins, this starts using more CPU cycles. It is best to run only the
applications and processes you need to get the most out of your computer’s finite amount of CPU
resources. And of course, the faster processor your computer has, the better. The newer Dual-Core and
Quad-Core processors offer even better performance than earlier processors since they are indeed like
having multiple CPUs all sharing the processing load!
Hard Disk Access
This is the “input/output” speed at which audio data can be written to your hard disk during recording,
and read from your hard disk during playback. You disc access capability directly affects how many
tracks you can record/play back in a Multitrack software project, for example. Recording digital audio
also uses a great deal of hard disk space, so it is a good idea to have lots of free Gigabytes available. The
speed of your hard disk itself is important here. It is best to have a hard disk with a 7200 RPM speed
or higher. Also, newer PC’s support the Serial ATA (SATA) interface for internal hard disks - if yours
does than you should purchase a SATA type hard disk rather than IDE since SATA is a bit faster. A
common practice among folks using their computer for audio work is to add a second hard disk and
use it strictly for storing and recording audio files, while the original drive is used primarily as your “C”
drive where Windows®, POD Farm, and all applications are installed.
1•1
Page 5

Digital Audio and Your Computer
Note that often laptops come standard with a 5400 RPM speed internal hard disk, which may not be
quite up to the task of more than simple multitrack audio recording projects. It is possible to purchase
an external hard disk, such as one with a USB 2 or Firewire interface, that is 7200 RPM or faster to
use as a secondary audio disk. External hard disk drives are also handy for back-ups as well (you are
backing up your data, right?)
RAM
(Random Access Memory) Many modern applications use lots of this type of memory, so the more
RAM you have, the better, up to the 3.2 GB maximum that Windows XP & Vista 32 bit operating
systems support. One of the big advantages of the Windows XP and Vista 64 bit systems is that these
support more than 3.2 GB of RAM. As RAM is getting cheaper all the time, and as hardware and
software support increases for 64 bit systems, these are quite likely to be the next big thing for DAW
systems.
If you are running a Multitrack recording application, effects plug-ins and soft-synths along with POD
Farm, then RAM will be used up quickly. So it a great investment to fill up those RAM slots with all
you can afford (but remember that it will not reduce these applications’ additional needs for CPU
processing). Be sure to check your PC or motherboard documentation to see specifically what type of
RAM it takes, and the capacity of RAM it will hold per RAM slot before you order the wrong type and
have to face the dreaded chore of trying to return electronics parts!
Hardware Conflicts
It is best to avoid connecting unnecessary peripheral hardware devices when working with audio on
your PC. Since POD Studio, TonePort, PODxt and POD X3 devices connect to your USB port, you
especially want to avoid any devices sharing the same USB bus. It can require advanced technical skills
to track down device conflicts, and this is beyond the scope of this document – consult a technician for
assistance if needed. But you can often avoid conflicts by simply not installing or disabling unneeded
devices. For example, adding devices such as document scanners, Bluetooth adapters, printers, a USB
coffee warmer, etc. can all raise the chances of conflicting with your audio device. Strive to keep your
audio PC lean and mean, at least while running your audio applications.
Cables
Note that digital connections, such as the S/PDIF outputs on POD Studio & TonePort UX2, UX8,
KB37, PODxt Pro and POD X3, require the use of a special 75-ohm coaxial cable to effectively transmit
digital signals without loss or interference. Be sure to get this cable type for any digital connections to/
from your Line 6 hardware. For all analog audio connections, get yourself some good quality shielded
instrument cables. Cheap cables often do not hold up well and can be a source of noise and tone loss if
not well constructed. It is a good idea to invest in a few good quality cables and keep them away from
cats and drummers. Before spending an entire day trying to figure out why you aren’t getting a signal
through your setup, check your cables!
With the above understandings, you can already see one common rule of thumb – more processing,
speed and memory is better! But you do not necessarily need to go upgrade your PC right now. If your
computer meets the recommended requirements then it is likely just fine to get going with your Line
6 hardware and POD Farm needs. To squeeze more out of your current system, take a look at the
following sections for plenty of tips and tweaks!
1•2
Page 6
Windows® XP® Optimizations
Wi n d o W s® XP® oP t i m i z at i o n s
To follow is a number of settings changes that have been proven to optimize Windows® XP® specifically
for better performance of audio software. It is worth mentioning once again... it is a really good idea to
do a complete backup of your system and data before making any of these system changes so that
you can restore your system to its previous state if any problems are encountered!
Making System Tweaks in Windows® XP
First a bit of information about accessing system settings in Windows...
®
Switch to the Classic Start Menu Mode
Within this document, instructions are provided assuming you have Windows® XP® set to use the
Classic Start Menu mode, which remains the preference of most computer geeks everywhere. To
switch to this mode, right-click on the Windows Start button and choose Properties > Start Menu
tab > Classic Start Menu option. While you are here, click on the Customize button, and then check
the box for Expand Control Panel. Click OK to close both dialogs.
The Windows Control Panel
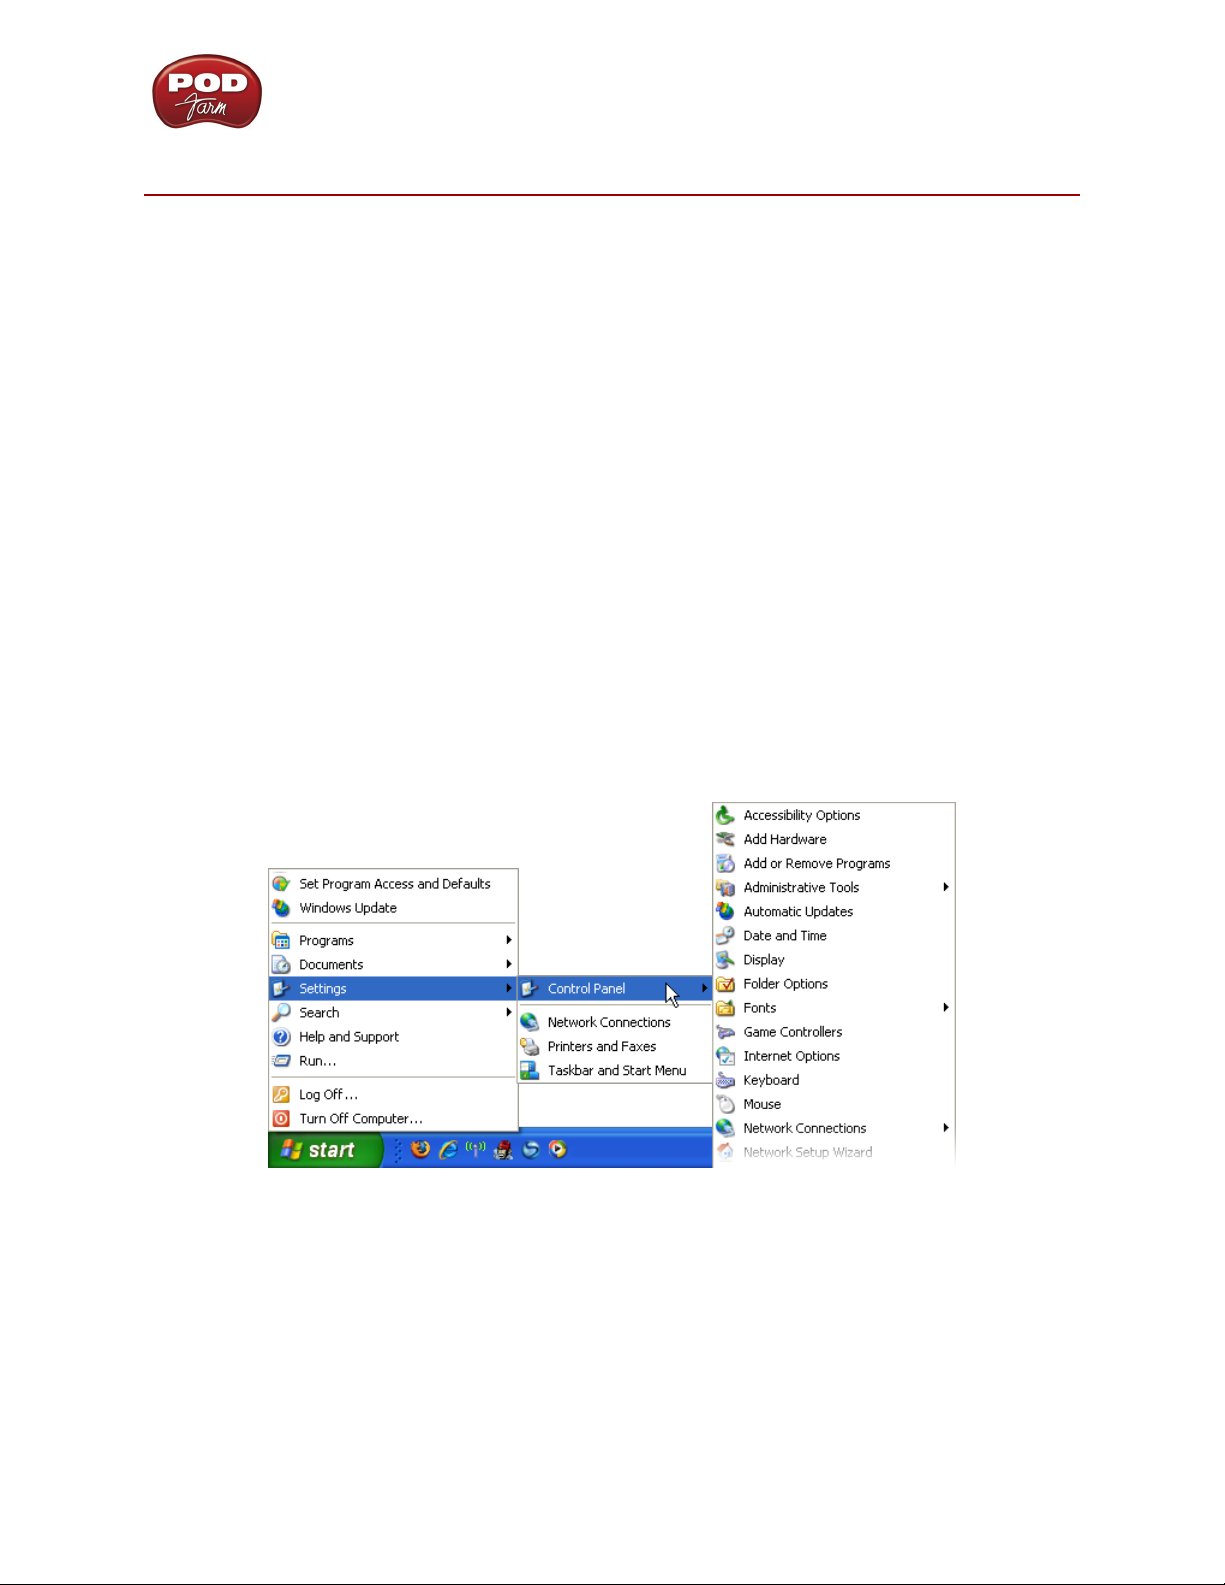
Many of the following settings are accessed in the Windows Control Panel, which you intelligently
just chose in the previous step to display as “Expanded” as a convenient sub-menu. Click on the Start
button and choose Settings to get to the expanded Control Panel sub-menu as needed:
Accessing the Windows Control Panel Menu
Disable Your Onboard or Add-in Sound Card
When using Line 6 POD Studio, TonePort, PODxt or POD X3 hardware as your sound card device
for recording and playback in audio applications, you may not need to have any other sound card
enabled. In some cases you may even encounter a hardware conflict with some “onboard” and/or addin sound cards such as SoundBlaster® Live! or OEM cards. The best solution is to simply disable any
unnecessary, additional sound card within Windows Device Manager.
2•1
Page 7
Windows® XP® Optimizations
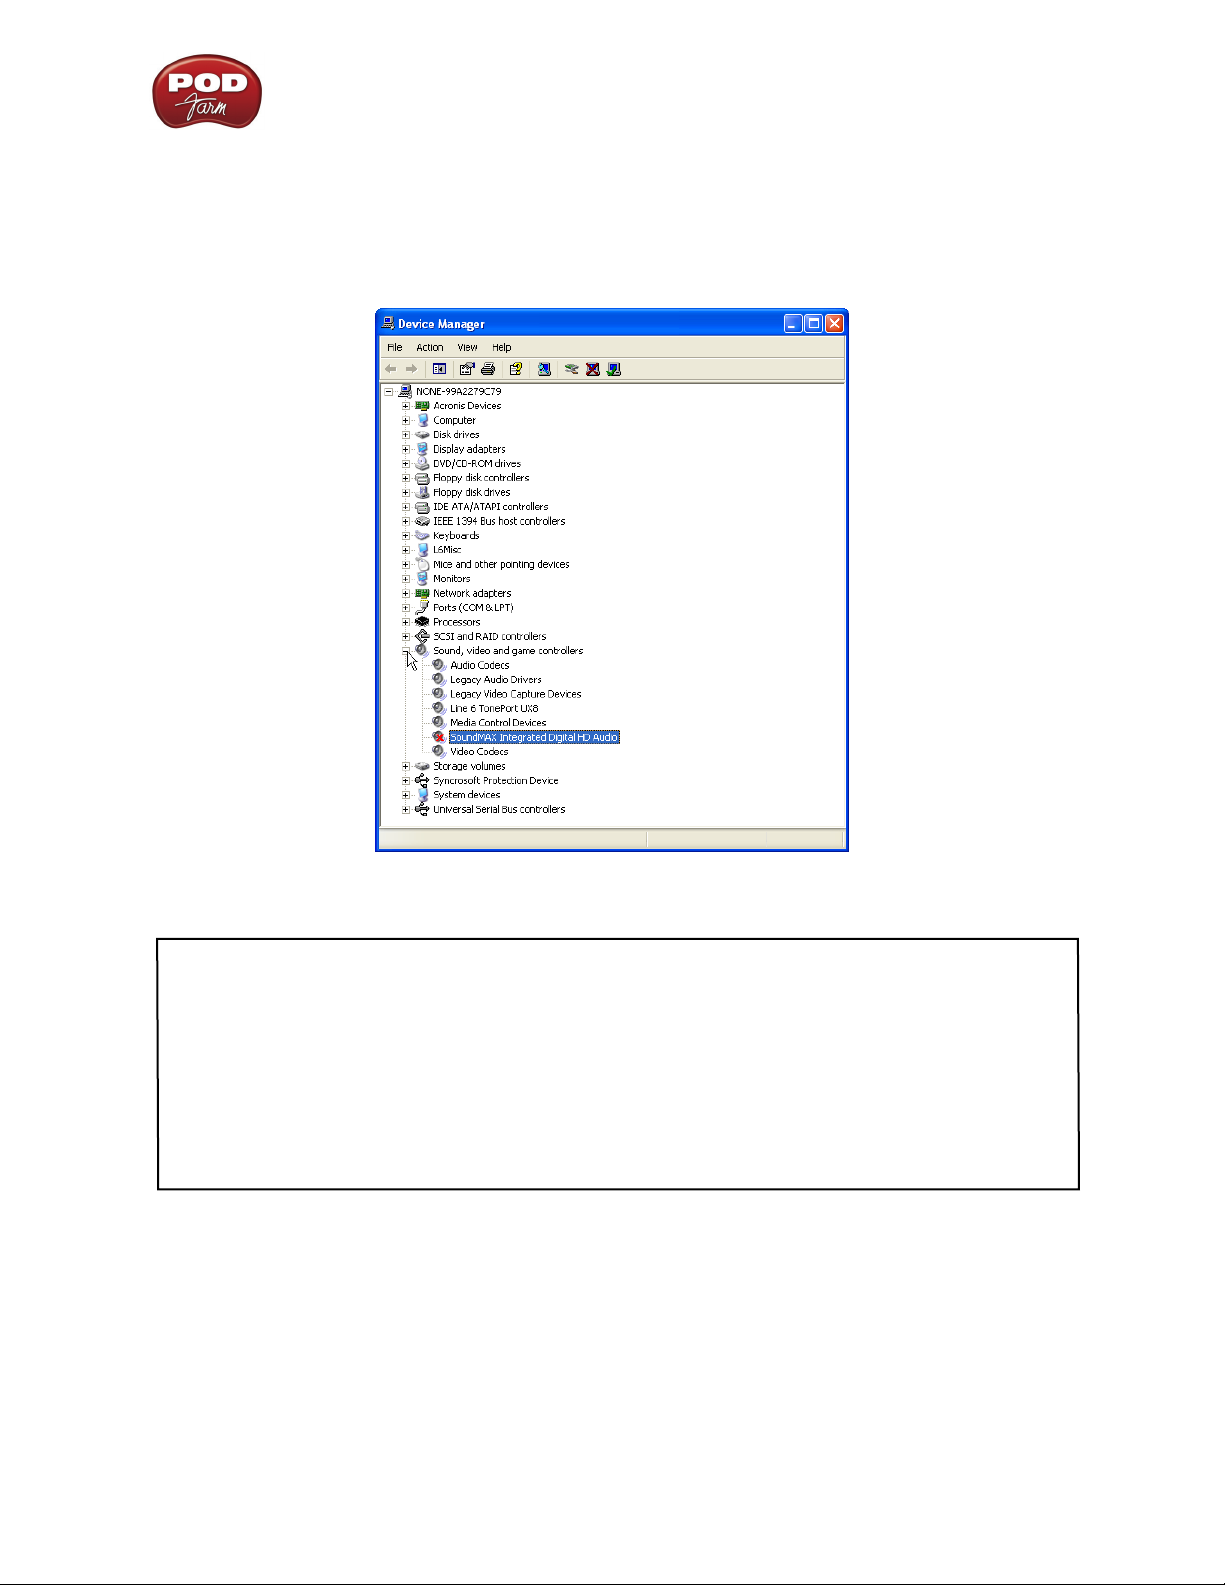
Go to Control Panel > System > Hardware tab > Device Manager button. Click the + symbol to the
left of Sound, video and game controllers to expand it. Now right-click on your onboard sound card
device, or other sound card device that is not in use, and choose Disable. Click Ye s when it prompts
you if you really want to disable the device. The device then appears in the list with a red “X” to show
it is disabled. You can come back to Device Manager any time, right click on the disabled device and
choose Enable to enable it again.
Windows Device Manager - OEM Sound Card (a SoundMax device) has been disabled
Note that if you disable another sound card, Windows will often then automatically assign your connected
Line 6 USB device as the Windows “default device” for all sound playback. This means that many audio
applications such as Windows Media Player, iTunes, or games, will route their sound to your Line 6
device, which may or may not be what you want. The audio capabilities of Line 6 USB hardware are likely
much higher quality than your on-board or add-on sound card, but Line 6 devices do not support some
features such as MIDI playback, 5.1 surround output, or accelerated 3D audio for games. If you need
these features, then it is best to set a sound card that does for the Windows default playback device, or
specifically for the applications with these requirements. You can, however, avoid Windows system sounds
playing through your Line 6 device independently of the Windows default playback device assignment – see
the next section.
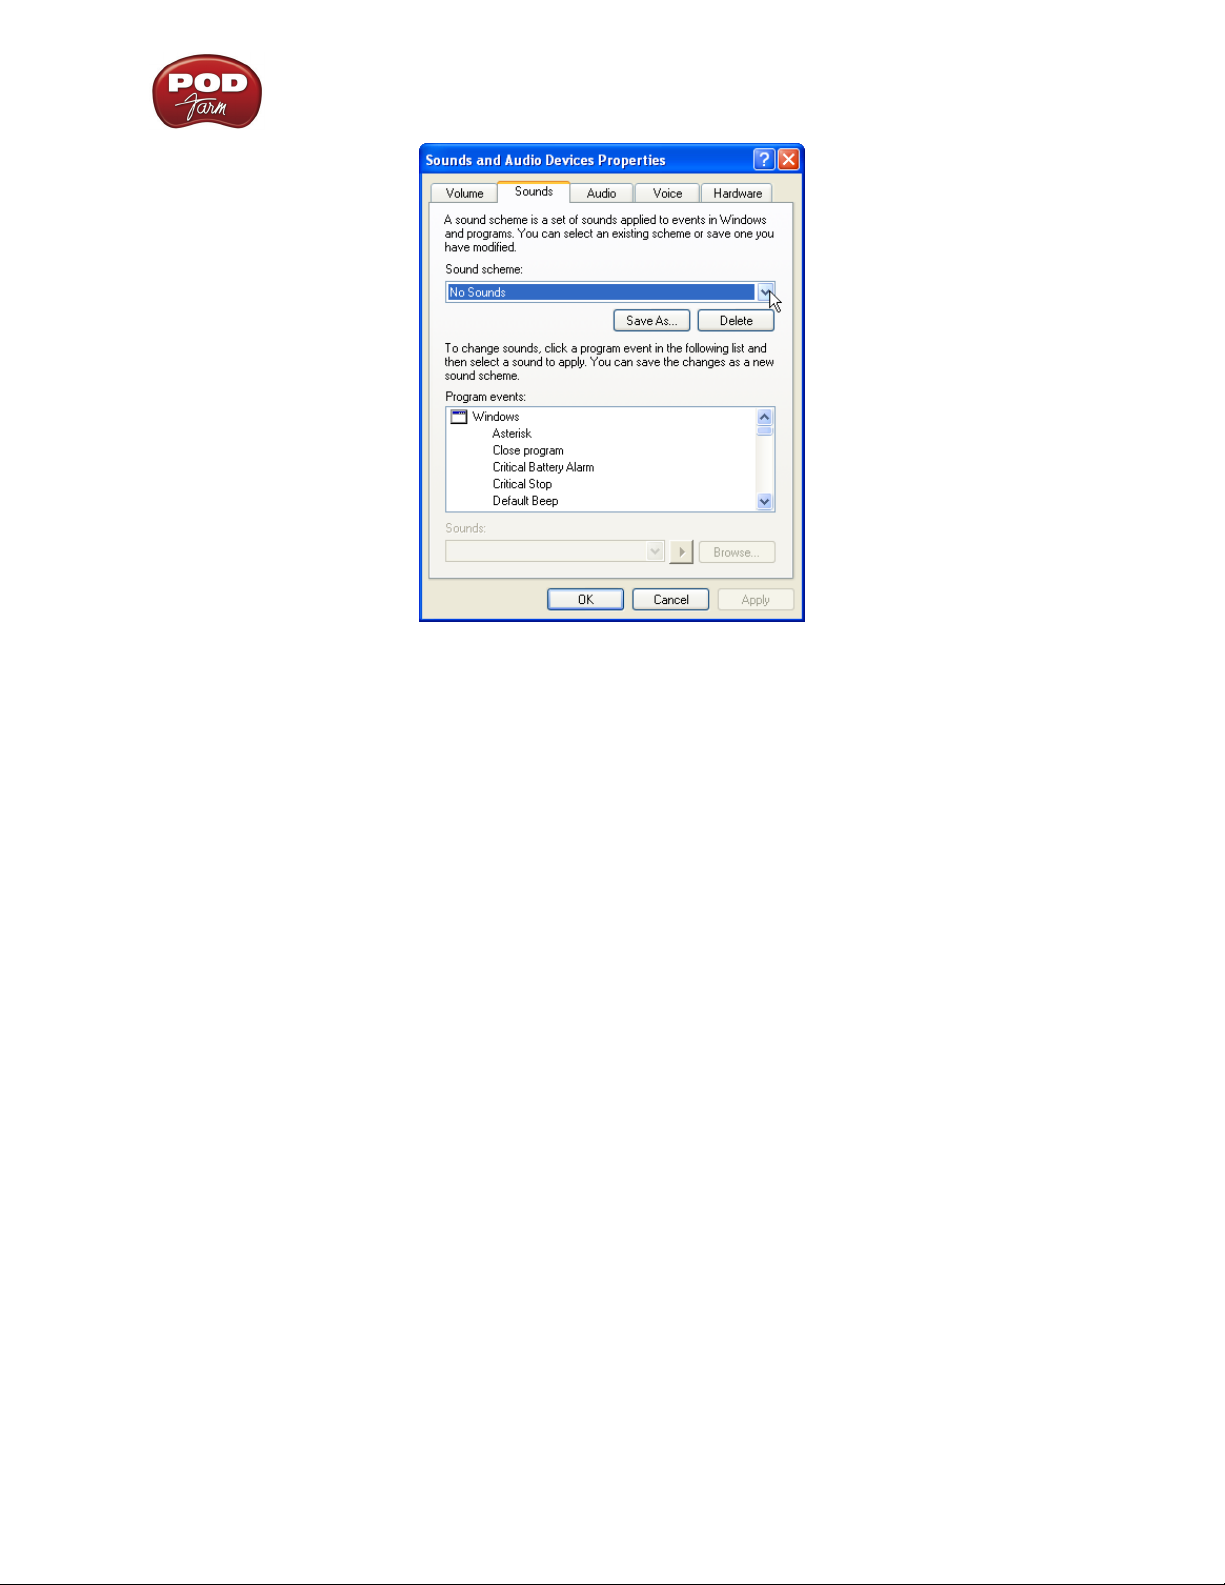
Turn Off Windows System Sounds
These little dings and beeps can be handy alerts, but not very pleasant to hear blaring at high volume,
especially if they are assigned to play through your POD Studio. To turn them off, go to Control Panel
> Sounds and Audio Devices > Sounds tab. Choose No Sounds as the Sound Scheme. Click OK to
exit the dialog. You can always come back here and turn the sounds back on if you really miss them.
2•2
Page 8
Windows® XP® Optimizations
The Sounds and Audio Devices Properties dialog - setting the No Sound scheme
Disable Error Reporting
Eliminate those pesky pop-up warnings by disabling this error reporting feature. Go to Control Panel
> System > Advanced Tab > Error Reporting and then click the Disable Error Reporting button.
Keep the checkbox checked for the But notify me if critical errors occur option.
Disable the Remote Assistance Option
Some technical support departments may ask you to keep this service active, but if this is not the case
for you, then you can disable it. Go to Control Panel > System > Remote Tab and uncheck the option
for Allow Remote Assistance invitations to be sent from this computer.
Turn Automatic Updates Off
Windows updates are actually highly recommended by Microsoft, and indeed many are for security
enhancements and offer critical fixes. But you may prefer to set the Automatic Updates feature off
and check manually at the Windows Update web site for your updates to avoid this service kicking in
while you are tending to audio processes. Go to Control Panel > System > Automatic Updates tab,
and select Turn Off Automatic Updates. If you do choose to turn this option off, then be sure to check
manually on the Microsoft Windows Update site for critical updates on a regular basis.
Processor Scheduling
Some audio applications recommend setting the Processor Scheduling setting to “Background
Services” rather than the XP default of “Programs”. Others claim it can be detrimental to processing,
so evaluate its advantages on your system. Go to Control Panel > System > Advanced Tab >
Performance Settings > Advanced Tab, and set the Processor Scheduling to Background Services.
2•3
Page 9

Windows® XP® Optimizations
Set Virtual Memory to a Fixed Size
Windows uses a section of your hard drive as a “paging file” for storing and retrieving immediate data
when your RAM is filled. It can help to make this file a fixed size rather than let Windows dynamically
resize it. Note that you’ll need to restart your computer after changing these settings. To make this
change, go to Control Panel > System > Advanced tab > Performance Settings button. Select the
Advanced tab and then click the Change button within the Virtual Memory section. Choose the
Custom size option and you can then type in new minimum and maximum values.
It is typically recommended to use a value that is 1.5 to 2 times the amount of your PC’s total RAM
and enter this same value in to BOTH fields so that it maintains a fixed file size. Click the Set button,
and then OK to close the dialog. Click OK for the alert and restart your computer for the changes to
take effect.
The Virtual Memory dialog - Custom paging file created on the C drive
Enable DMA Mode for All IDE Hard Disk Drives
Note - This tip is only for IDE type hard disks. The latest PCs often now come with Serial ATA (SATA)
interface controllers and hard disks for which this Device Manager setting change is not applicable.
Check to make sure the transfer mode for your IDE hard disk drive(s) is set to the DMA mode,
otherwise the disk access speed will be poor. Go to Control Panel > System > Hardware tab >
Device Manager button. Expand the entry labeled IDE ATA/ATAPI controllers. Right click on
the Primary IDE Channel item and select Properties and go to the Advanced Settings tab. Check
that the Transfer Mode options are set to DMA if available for all channels. Repeat this for all IDE
channel items beneath IDE ATA/ATAPI controllers.
2•4
Page 10

Checking the IDE Transfer Mode
Windows® XP® Optimizations
Disable the Indexing Service
Unless you are using the Windows Search function very often to find files on your computer, then this
service is yet another you might consider disabling. This service basically runs through and catalogs
items on your hard disks and makes the Windows Search function more efficient, but it can cause some
random “slow-downs” and high CPU usage when it kicks in. If you are using your PC mostly for audio
work and keep your projects well organized, then you’ll likely know where most things are all the time
anyway! To disable this service, go to the Control Panel and select Administrator Tools and then
Services. In the Name column of the Services dialog, find and double-click on the one titled Indexing
Service to launch its Properties. In the Startup type drop-down, choose Disabled. Click OK when
done.
You can of course come back to the Services at any time and set this back to Manual if you want to
allow the Indexing Service to be re-activated again.
Exit All Unnecessary Applications
This follows common sense – to free up more resources you should avoid running other programs as
much as possible when running POD Farm and/or audio applications. But many Windows programs
and utilities are often set to launch automatically when you start your system and you may not even
know it. One way to look for these is in the Windows Taskbar, but first you may need to change a
setting to see them all:
Right click on the Start button and select the Taskbar tab. Uncheck the Hide inactive icons
checkbox. You will now likely see several little icons on the Taskbar, at the lower right of your screen,
next to your clock. Most utility applications that start with Windows will display a little icon here.
You should know what it is you are accessing before shutting one of these off – usually hovering over
the icon for a moment will show a tooltip informing you what utility it is. If it is one you do not need,
often you can right click on the icon and choose Exit. The utility will again start next time you reboot
your machine. Or, for more advanced Windows XP users, you can try using the System Configuration
Utility (see next tip).
2•5
Page 11

Windows® XP® Optimizations
Disable Startup Programs with the System Configuration Utility
It is not recommended you use this utility unless you are familiar with the Windows XP operating
system – seek the help of a technician if needed. To access the System Configuration Utility, go to
Start > Run and type in msconfig, and then go to the Startup tab. All checked items here are set to
start running when you boot Windows. If some of these are not necessary, you can uncheck them. Note
that some of these will likely be important security utilities, such as Anti-Virus software, which you
probably never want to surf the Internet without. You will need to restart your computer for changes
in this dialog to take effect.
Tip - Sometimes the name or path displayed for each Startup item isn’t very telling as to what the application
actually is. You can often find out, as well as obtain some details that can help you decide if you should
uncheck it or not, by doing a Google Internet search using the .exe filename.
Internet and Network Connections
You’ll likely want your PC to be able to connect to the Internet or perhaps a network, but some
users find that having a connection active while using audio applications causes glitches or drop-outs,
especially if using a wireless connection or USB wireless network card. One thing you can try is to
disconnect from the Internet/network while using your audio applications if you find that it is causing
some interference. Likewise, during the times that you are not connected, you should not need to
have Internet/Networking utilities running, such as Windows Firewall, Anti-Virus and Anti-Spyware,
networking utilities, etc. It is not recommended that you exit these services while connected to the
Internet, since they are necessary security measures.
Disable Windows System Restore
This can be a helpful system tool to have running, since it regularly makes backups of important
Windows system files and drivers, and allows you to switch to the backed-up version in case of problems.
But this service comes at some costs - the use of a significant amount of disk space, CPU usage and
the disk access it needs when it kicks in. If you see no problems with it active, then leave it on. But
if you need to solve audio problems and want to try turning it off, then you can access it in Control
Panel > System > System Restore Tab. You can choose Turn off system restore for all partitions to
completely disable it. Or, if you have more than one hard disk partition, one compromise is to keep
active for only your C: partition, and disable all other partitions. Click on the OK button and restart
your computer for the setting to take effect.
Display & Power Settings
The following items are all accessed within the Windows Control Panel:
Turn off the Screen Saver
You likely do not want a screen saver kicking in during the middle of your perfect take when recording.
To turn this off, go to Control Panel > Display and select the Screen Saver tab and choose None for
the Screen Saver option.
2•6
Page 12

Windows® XP® Optimizations
Turn Off Visual Effects
By default, WinXP has numerous Visual Effects active. These do make the interface look pretty, but
also utilize resources. You can toggle many of these on/off individually, or one easy tweak is just to turn
all off within the Performance Options dialog. Go to the Control Panel > System > Advanced tab >
Settings button, and then choose the Visual Effects tab in the Performance Options dialog. Select
the Adjust for best performance option. Optionally, you can check only the individual display options
here to turn them on if you think some are sufficiently visually stimulating to not do without. Click
the OK button when done.
The Visual Effects settings - “Best performance” option selected
Remove Background Picture
Having a high resolution photo or rotating slide show will use some resources – setting this to a plain,
boring color will be a little less demanding, and maybe keep you focused on your music instead! To
change this, go to Control Panel > Display > Desktop Tab, and for the background picture select
None.
Turn Off Power Schemes
There is probably no reason for your audio PC components to ever need to power down when the
system is plugged in (although if you have a laptop, then this can conserve the battery). To avoid this
from happening, go to Control Panel > Power Options, and in the Power Schemes tab, set each
of the following items to Never within the Plugged In column; Monitor, Hard Discs, and System
Standby.
Turn Off Hibernation
There is likely no need for your audio PC to ever automatically go to “sleep” on you, and this ties up a
significant amount of hard disk space. To disable this feature, go to Control Panel > Power Options,
and in the Hibernation tab, uncheck the option for Enable Hibernation.
2•7
Page 13

Windows® XP® Optimizations
Maintenance Tasks
There are several recommended routine maintenance tasks you should perform to keep your system in
top form for audio work…
Backup Your Data
Yes, you have heard it before, but it is easy to keep putting off the chore of backing up all that audio
data. Invest in an external hard drive backup system or DVD burner drive if you can afford it. Losing
audio data can be costly and extremely negative to the creative process. There are also “drive imaging”
software applications you can buy that allow you to back up your entire computer’s contents – data,
programs and all – and completely restore your computer back to the last backed-up state in minutes
in case of failure.
Clean Up
Your PC accumulates lots of little temporary files and trash over time, so it’s a good thing to clean
house once in a while. Go to Start > Programs > Accessories > System Tools and choose the Disk
Cleanup utility for this. This can be run individually for each hard disk partition.
Defragment Your Hard Disks
An important practice to follow for audio is to regularly run a defragmenting application on all your
hard drive partitions, especially your audio partition, to allow more streamlined disk access. Many
3rd party companies produce defragmenting applications, but Windows XP already includes Disk
Defragmenter, which works pretty well (albeit a bit slower than 3rd party ones you can buy). To run
Disk Defragmenter, go to Start > Programs > System Tools. If you first click the Analyze button, it
will tell you if your disk needs to be defragmented.
Windows Disk Defragmenter
2•8
Page 14

Windows® Vista® Optimizations
Wi n d o W s® V i s t a® oP t i m i z at i o n s
To follow are a number of settings changes for optimizing Windows® Vista® specifically for improved
performance with audio software. It is worth mentioning once again... it is a really good idea to do a
complete backup of your system and data before making any of these system changes so that you
can restore your system to its previous state if any problems are encountered!
Making System Tweaks in Vista
First a bit of information about accessing system settings in Windows Vista...
Administrator Privileges
To be able to access many of the system settings, you’ll need to be logged in to Vista with a user account
that has full Administrator permissions. Please check your Windows Help if you need to learn about
User Accounts and permissions.
The Windows Control Panel
Many of the following settings we’ll be covering here are accessed in the Windows Control Panel.
You can access the Control Panel by clicking the Windows Start button - you’ll see that you can click
on Control Panel here to display the menu of all Control Panel items.
Accessing the Windows Control Panel menu from the Start button
User Account Control
The new User Account Control (UAC) feature in Vista is what keeps prompting you for permission
to do configure system settings and access some areas and programs. UAC is a security measure, but it
can also be really annoying when trying to do system tweaks, such as many of the ones listed in this
3•1
Page 15

Windows® Vista® Optimizations
document. Keep in mind, Microsoft implemented UAC to prevent tampering with important settings,
and you could expose some security vulnerabilities disabling it, but if you prefer to disable it you can
do so. It is also possible to enable UAC again, should you just want to disable it temporarily. Note that
you will have to reboot for this setting change to take effect.
Go to Control Panel > Administrative Tools and select the System Configuration utility from the
list of tools. Select the Continue button at the prompt (ironically, this prompt asking you to continue
is launched by the UAC service!) In the System Configuration dialog, select the Tools tab. Scroll
down and find the Disable UAC item - select it and then click the Launch button to execute the
command to disable it. If you are left with an open black-background command dialog, close it when
the command completes. Select OK in the System Config dialog to exit when done. Restart your
computer for the change to take effect.
Performance Information and Tools
The following instructions in this document take you to various settings dialogs in Vista to make the
necessary tweaks. But one handy dialog where you can alternatively get to lots of Vista settings is the
Performance Information and Tools, which you can select from the Control Panel menu. As it’s
name suggests, this dialog also displays performance ratings for your system, as well as some tips and
info on how to improve overall performance.
Disable Your Onboard or Add-in Sound Card
When using Line 6 USB hardware as your sound card device for recording and playback in the POD
Farm Standalone application and other audio applications, you may not need to have another sound
card enabled. In some cases you may even encounter a hardware conflict with some “onboard” and/
or add-in sound cards. The best solution is to simply disable any unnecessary, additional sound card
within Windows Device Manager.
Go to Control Panel > Device Manager. Click the + symbol to the left of Sound to expand it.
This should show your Line 6 USB device (if connected) as well as any other audio device currently
available on your computer. Now right-click on your onboard sound card device (often listed here as
High Definition Audio Device or other generic name), SoundMax®, or other sound card device that is
not in use, and choose Disable. Click Yes when it prompts you if you really want to disable the device.
The device will then appear in the list with a little downward arrow icon to show it is disabled. You
can come back to Device Manager any time, right click on the disabled device, and choose Enable to
enable it again.
3•2
Page 16

Windows® Vista® Optimizations
Windows Device Manager - Onboard sound card disabled
Note that if you disable another sound card, Windows will often then automatically assign your connected
device as the Windows “default device” for all sound playback. This means that many audio applications
such as Windows Media Player, iTunes, or games will route their sound to your Line 6 device, which may
or may not be what you want. The audio capabilities of POD Studio, TonePort, PODxt and POD X3 are
likely much higher quality than your on-board or add-on sound card, but Line 6 devices do not support
some features such as MIDI playback, 5.1 surround output, or accelerated 3D audio for games. If you need
these features, then it is best to set a sound card that does for the Windows default playback device, or
specifically for the applications with these requirements. You can, however, avoid Windows system sounds
playing through your Line 6 device independently of the Windows default playback device assignment – see
the next section.
Turn Off Windows System Sounds
These little dings and beeps can be handy alerts, but not very pleasant to hear blaring at high volume,
especially if they are assigned to play through your Line 6 device. To turn them off, go to Control Panel
> Sound > Sounds tab. Choose No Sounds as the Sound Scheme. You can also uncheck the Play
Windows Startup sound if you want to also disable it. Click OK to exit the dialog. You can always
come back here and turn the sounds back on if you really miss them.
3•3
Page 17

Windows® Vista® Optimizations
The Sound dialog - setting the Scheme to No Sounds
Turn Off Visual Effects
By default, Vista has numerous Visual Effects active. These do make the interface look pretty, but also
utilize resources. You can toggle many of these on/off individually, or one easy tweak is just to turn all
off. Go to Control Panel > System and choose Advanced system settings from the Tasks list. In the
Advanced tab, click on the top-most Settings button within the Performance section. In the Visual
Effects tab, select the Adjust for best performance option to turn of all Visual Effects. Alternatively,
you can keep only the individual Visual Effects checked that you want if you prefer to have things look
a bit prettier. Click the OK button to exit.
The Visual Effects settings
3•4
Page 18

Windows® Vista® Optimizations
Disable the Remote Assistance Option
Some technical support systems may ask you to keep this service active, but if this is not the case for
you, then you can disable it. Go to Control Panel > System and choose Remote settings from the
Tasks list. In the Remote tab, uncheck the option for Allow Remote Assistance invitations to be sent
from this computer. In the lower portion of the dialog, you can also choose Don’t allow connections
to this computer.
Turn Automatic Updates Off
Windows updates are actually highly recommended by Microsoft, and indeed many are for security
enhancements and offer critical fixes. But you may prefer to set the Automatic Updates feature off
and check manually at the Windows Update web site for your updates to avoid this service kicking
in while you are tending to audio processes. Go to Control Panel > Windows Update and choose
Change settings from the Tasks list. Select Never check for updates to turn this feature off. If you do
choose to turn this option off, then be sure to check manually on the Microsoft Windows Update site
for critical updates on a regular basis.
Note - Another option to consider is to simply disconnect from the Internet altogether when doing audio
recording work. This way you can leave Automatic Updates on the recommended “automatic” setting and
not worry about it trying to download or install updates while you are doing critical audio work.
Processor Scheduling
Some audio applications recommend setting the Processor Scheduling setting to “Background
Services” rather than the Vista default of “Programs”. Others claim it can be detrimental to
processing, so evaluate its advantages on your system. Go to Control Panel > System and choose
Advanced system settings from the Tasks list. In the Advanced Tab, click the Settings button in
the Performance section. In the Performance Options dialog’s Advanced tab, set the Processor
Scheduling to Background Services.
Set Virtual Memory to a Fixed Size
Windows uses a section of your hard drive as a “paging file” for storing and retrieving immediate data
when your RAM is filled. It can help to make this file a fixed size rather than let Windows dynamically
resize it. Note that changing this setting will require you to restart your computer. To make this change,
go to Control Panel > System and choose Advanced system settings from the Tasks list. In the
Advanced Tab, click the Settings button in the Performance section. In the Performance Options
dialog’s Advanced tab, click the Change button within the Virtual Memory section. Uncheck the
Automatically manage paging file size for all drives option, then choose Custom size. You can then
type in new Initial size and Maximum size values.
It is typically recommended to use a value that is 1.5 to 2 times the amount of your PC’s total RAM and
enter this same value in to BOTH fields so that it maintains a fixed file size. Click the Set button, and
then OK to close the dialog. Restart your computer when prompted for the changes to take effect.
3•5
Page 19

Windows® Vista® Optimizations
The Virtual Memory dialog - A Custom paging file created on the C drive
Enable DMA Mode for All IDE Hard Disk Drives
Note - This tip is only for IDE type hard disks. The latest PCs often now come with Serial ATA (SATA)
interface controllers and hard disks for which this Device Manager setting change is not applicable.
Check to make sure the transfer mode for your IDE hard disk drive(s) is set to the DMA mode,
otherwise the disk access speed will be poor. Go to Control Panel > Device Manager. Expand the
entry labeled IDE ATA/ATAPI controllers. Right click on the first ATA Channel item in the sub-
list and select Properties from the context menu. In the ATA Channel 0 Properties dialog, go to
the Advanced Settings tab. Make sure the Enable DMA box is checked. Click OK when done. Now
repeat the above steps by right-clicking on each ATA Channel 0 and each ATA Channel 1 item
within the IDE ATA /ATAPI controllers sub-list to make sure all are set to DMA mode. You may
need to restart your computer if you change any DMA settings for them to take effect.
3•6
Page 20

Checking the IDE Transfer Mode - DMA is enabled
Exit all Unnecessary Applications
Windows® Vista® Optimizations
This follows common sense – to free up more resources you should of course avoid running other
programs as much as possible when running POD Farm and your recording software. But many
Windows programs are often set to launch automatically when you start your system and you may not
even know it. One way to look for these is in the Windows Taskbar, but first you may need to change
a setting to see them:
Right click on the Start button and select Properties from the context menu. In the Taskbar and
Start menu Properties dialog, select the Notification Area tab. Uncheck the Hide inactive icons
checkbox.
Taskbar and Start Menu Properties - configuring the Taskbar to show the active program icons
You will now likely see several little icons on the Taskbar, at the lower right of your screen, next to
your clock. Most utility applications that start with Windows will display a little icon here. You should
know what it is you are accessing before shutting one of these off – usually hovering over the icon for a
moment will show a tooltip informing you what utility it is. If it is one you do not need, often you can
right click on the icon and choose Exit. The utility will again start next time you reboot your machine.
Or, for more advanced Windows users, you can try using the System Configuration utility (see next
tip).
3•7
Page 21

Windows® Vista® Optimizations
Disable Startup Programs with the System Configuration Utility
It is not recommended you use this utility unless you are familiar with the Windows® Vista® operating
system – seek the help of a technician if needed. To access the System Configuration Utility, click
on the Windows Start button and type in msconfig in the Search field. In the System Configuration
dialog, go to the Startup tab. All checked items here are set to start running when you boot Windows.
If some of these are not necessary, you can uncheck them. For example, the Windows Sidebar and
Welcome Center items are nice conveniences, but can be disabled here to free up some resources.
When you install new software applications and hardware, you’ll often see more items get added here
that will be checked and loaded automatically on Windows startup. Often these items can be disabled
as well.
Note that some of these startup items will likely be important security utilities, such as Anti-Virus
software, which you probably never want to surf the Internet without. You should probably keep these
items checked unless they are causing problems with playback or recording. You will need to restart
your computer for changes in this dialog to take effect.
Internet and Network Connections
You’ll likely want your PC to be able to connect to the Internet or perhaps a network, but some
users find that having a connection active while using audio applications causes glitches or drop-outs,
especially if using a wireless connection or USB wireless network card. One thing you can try is to
disconnect from the Internet/network while using your audio applications if you find that it is causing
some interference. Likewise, during the times that you are not connected, you should not need to
have Internet/Networking utilities running, such as Windows Firewall, Anti-Virus and Anti-Spyware,
networking utilities, etc. It is not recommended that you exit these services while connected to the
Internet, since they are necessary security measures.
Display & Power Settings
The following items are all accessed within the Control Panel:
Disable Aero
Aero is the name Microsoft has given to the new, slick “Glass Transparency” look of Vista’s display
Themes. It does make the Vista experience cool and visually interesting, but systems with slightly
older display hardware may struggle with or not run the transparency engine very well. To free up some
memory you can switch the transparency off, or switch to the Windows Classic theme. Sure, this will
make Vista look about as exciting as Windows XP, but its leaner and meaner if that’s your priority.
To switch off the transparency effect, go to • Control Panel > Personalization and select Window
Color and Appearance. Uncheck the Enable transparency box. Click OK when done.
To switch to the Windows Classic theme, go to • Control Panel > Personalization and select
Theme. In the theme drop-down box choose Windows Classic. Click OK when done.
Turn off the Screen Saver
You likely do not want a screen saver kicking in during the middle of your perfect take when recording.
To turn this off, go to Control Panel > Personalize and select Screen Saver. Choose None for the
Screen Saver option.
3•8
Page 22

Windows® Vista® Optimizations
Remove the Desktop Background Picture
Having a high resolution photo or rotating slide show will use some resources – setting this to a plain,
boring color will be a little less demanding, and maybe keep you focused on your music instead! To
change this, go to Control Panel > Personalization and choose Desktop Background. In the Picture
location menu, select Solid colors and then choose a color - click OK when done.
Power Options
There is probably no reason for your audio PC components to ever need to power down (although
if you have a laptop, then this can conserve the battery life). To configure your power options, go to
Control Panel > Power Options. Choose the High Performance plan, and then click on the Change
plan settings link below it.
The Power Options dialog - setting the High performance plan
In the Edit Plan Settings dialog, choose a time value or Never as preferred for the Turn off the display
option. Be sure the Put the computer to sleep option is set to Never, then click on the Change
advanced power settings link.
The Edit Plan Settings dialog
3•9
Page 23

Windows® Vista® Optimizations
Click on the + box at the left of the Hard Disk item to expand it, and then also expand the Turn off
hard disk after sub item. Click on Setting and enter a very high time value, such 999 minutes so that
your hard disks effectively never power off. You can also optionally expand other items and change
them if you like.
The Advanced Settings tab - Changing the Hard Disk power-down setting
When your changes are complete in the Advanced settings, click OK, which should take you back to
the Edit Plan Settings dialog. If you made changes here, click the Save changes button and then close
the dialog - if the Save button is not available, simply close the dialog.
Maintenance & System Tools
There are several recommended maintenance tasks you should perform regularly to keep your system
in top form for audio work…
Backup Your Data
Yes, you have heard it before, but it is easy to keep putting off the chore of backing up all that audio
data. Invest in a large external hard drive backup system if you can afford it. Losing audio data can be
far more costly and extremely negative to the creative process. There are also drive imaging software
applications you can buy that allow you to back up your entire computer’s contents – data, programs
and all – and restore back to the working state in minutes in case of failure.
Clean Up
You accumulate lots of little temporary files and trash over time, so it’s a good thing to clean house
once in a while. Click the Windows Start button. In the Search box, type in Disk Cleanup - in the
list of results above, double click on Disk Cleanup. When prompted with the Disk Cleanup Options,
choose Files from all users on this computer.
Choose the drive you wish to clean up and click OK. When you are presented with the options, check
all items you want to clear out. If you choose your C drive, you will typically see may options here. You
should at least clear the Recycle Bin, but may also want to check all others as well if yo are sure you
3•10
Page 24

Windows® Vista® Optimizations
don’t need to keep any of the files stored in them (click the View Files button to see what the specific
files are that will be cleared for each category). Repeat the process and run Disk cleanup on each of
your hard disk partitions.
Defragment Your Hard Disks
An important practice to follow for audio is to regularly run a defragmenting application on all your
hard drive partitions, especially your audio partition, to allow more streamlined disk access. Many
3rd party companies produce defragmenting applications, but Windows Vista already includes Disk
Defragmenter, which works pretty well (albeit a bit slower than 3rd party ones you can buy). To run
Disk Defragmenter, click the Windows Start button and in the Search box, type Disk Defragmenter
- in the list of results, double click on Disk Defragmenter to launch it.
Windows Disk Defragmenter
Disable Windows System Restore
Windows System Restore can be a helpful system tool to have running, since it regularly makes
backups of important Windows system files and drivers, and allows you to “roll back” to the previous
versions in case of problems. But this service comes at some costs - a significant amount of hard disk
space, CPU usage and the disk access it needs when the service kicks in. If you see no problems with
it active, then leave it on. But if you need to solve audio problems and want to try turning it off, then
you can access it by going to Control Panel > System and choosing System protection from the Tasks
list. In the System Protection tab you’ll see a checkbox for each hard disk partition on your system you can uncheck each partition to disable System Restore individually for each. One compromise is to
keep it active for only your C partition, and disable all other partitions. Click on the OK button and
restart your computer for the settings to take effect.
Disable the Indexing Service
The new Windows Indexing Service is indeed more capable in Vista and provides the user with
improved search capabilities. But once again this enhanced service comes at the cost of resources
you might prefer to keep available for your more demanding audio projects. If you don’t find yourself
relying all that much on the Windows Search, then you might try disabling the Indexing Service to
free up more resources.
Go to Control Panel > Indexing Options and select the Modify button. Select the Show all locations
button if it is available. Double-click Users in the Summary of selected locations pane, and then
uncheck the Users directory in the upper pane. Double click Start Menu in the Summary of selected
locations, and the uncheck Start Menu directory. Click the OK button when done.
3•11
Page 25

Additional Resources
ad d i t i o n a l re s o u r C e s
There are of course still many more things you can learn about Windows® XP® and Vista®, and upgrades
you can perform on your system if you care to spend some time doing some reading. Be sure to check
the site of the manufacturer of your audio software for some application–specific do’s and don’ts. If you
do some Internet searching you can find countless web sites dedicated to offering Windows and PC
tuning tips, as well as active user forums where you can argue endlessly about things like AMD® vs.
Intel® and Mac® vs. Windows®. Thankfully, there are some very helpful folks out there in cyberspace,
and you can learn from their wisdom and mistakes.
Helpful Computer Optimization Sites
To follow are some very good sites dedicated to computer optimization, software and hardware tips
- these are also mostly focused on using computers for audio-related tasks as well!
MusicXP - • http://www.musicxp.net/
TweakXP - • http://www.tweakxp.com/
Sound on Sound • Magazine - http://www.soundonsound.com/
Computer Music • Magazine - http://www.computermusic.co.uk/main.asp
Tom’s Hardware - • http://www.tomshardware.com/
Black Viper -• http://www.blackviper.com/
Line 6 Online Resources
Hungry for more info? We’ve got extensive Help documentation, User Forums and Product Manuals
for your Line 6 gear just a click away...
Several more Help documents covering computer recording, MIDI Control, product Release •
Notes and more are available here - POD Farm Online Help
For technical support, choose from the many options listed on the Line 6 Support page - • Line 6
Support
Official Line 6 hardware Product Manuals can be downloaded here - • Line 6 Product Manuals
4•1
 Loading...