

Line 6 POD Farm Plug-In, POD Studio GX, POD Studio UX1, POD Studio UX2, POD Farm Setup Guide
...Page 1

Re c o R d i n g Se t u p gu i d e
Using Line 6 Hardware & POD Farm with Popular Recording Applications
Page 2

Table of Contents
Getting Started ........................................................................................1•1
Installing Line 6 Audio Drivers and POD Farm Software ............................................. 1•1
About POD Farm ............................................................................................................ 1•1
Updating & Registering with Line 6 Monkey ................................................................ 1•1
Product Activation & Authorization ............................................................................. 1•3
About This Guide… ....................................................................................................... 1•5
Additional Online Resources ......................................................................................... 1•5
Audio Driver Configuration ....................................................................2•1
Line 6 Audio Driver Configuration ................................................................................ 2•1
Mac® Driver Settings ..................................................................................................... 2•1
Mac® OS X® System Preferences Settings .................................................................... 2•14
Configuration as an Aggregate Device (Mac® only) .................................................... 2•16
Windows® Driver Settings ........................................................................................... 2•21
Windows® Default Sound Device Settings ................................................................... 2•31
S/PDIF Digital Output from Line 6 Hardware to an External Device ......................... 2•35
POD Farm Plug-In ...................................................................................3•1
Activation & USB Hardware ......................................................................................... 3•2
Configuring POD Farm Plug-In in your Host Software ................................................. 3•2
Using the POD Farm VST or AU Plug-In - Ableton Live 7 ........................................ 3•3
POD Farm Plug-In Automation Parameter Table ........................................................ 3•14
POD Farm Standalone Operation .........................................................4•1
Choosing Your POD Farm Source Inputs ....................................................................... 4•1
Tone Pan and Volume Controls & Meters .................................................................... 4•3
Monitor Volume Control & Meters ............................................................................... 4•4
Mixer View ..................................................................................................................... 4•5
About Record Sends... .................................................................................................... 4•5
POD Farm Record Send Controls .................................................................................. 4•5
ToneDirect™ Monitoring .............................................................................................. 4•7
Mac® Audio Applications ........................................................................5•1
Windows® Audio Applications ................................................................6•1
Line 6, POD, PODxt, POD X3, POD Farm, POD Farm Plug-In, TonePort, GearBox, GearBox Plug-In, Line
6 Monkey, ToneDirect Monitoring, GuitarPort, FBV, Variax, Line 6 Edit and Custom Tone are trademarks of
Line 6, Inc. All other product names, trademarks, and artists’ names are the property of their respective owners,
which are in no way associated or affiliated with Line 6.
© 2008 Line 6, Inc.
i i
Page 3

POD Farm Recording Setup Guide - Getting Started
ge t t i n g St a R t e d
Before we dive right into the world of recording, here are some helpful tips about getting your Line 6
gear setup, as well as links to other related resources for you...
Installing Line 6 Audio Drivers and POD Farm Software
To use your Line 6 POD Studio, TonePort®, GuitarPort®, POD® X3 or POD®xt with your computer,
you’ll need to install the Line 6 USB audio driver for your device. A “driver” is a software component
that installs on a Mac® or Windows® computer that allows a hardware device to work with the
computer’s operating system. If your Line 6 hardware came included with a POD Farm software CD,
you can simply install POD Farm and it will automatically install the USB device drivers, Line 6
Monkey and POD Farm Standalone and Plug-In software for you. Otherwise, just go to the Line 6
Software Downloads page where you can always download the latest POD Farm installer for free. If you
need some help with the installation process, please check out the additional documentation found on
the POD Farm Online Help page.
Once you have POD Farm installed, it is highly recommended that you launch it with your Line 6 USB
hardware connected and it will sniff out your current hardware and software versions and offer to walk
you through an update if needed (see the following Line 6 Monkey section).
About POD Farm
Line 6 POD Farm is the Mac® and Windows® software companion or all Line 6 POD Studio, TonePort
and GuitarPort devices. With these devices, you can run POD Farm in “Standalone operation” which you can think of as an elaborate “user interface” allowing you to load, customize and save presets
of your Tones, fiddle about with amp & effects knobs and switches on your computer, and manage the
POD Farm signals and levels routed to your Digital Audio Workstation (DAW) software. POD Farm
Plug-In is included with all Studio POD devices, and also available for TonePort, GuitarPort, as well
as POD X3 and PODxt hardware!
POD Farm Plug-In
POD Farm Plug-In comes included with all POD Studio hardware, and is an optional Add-On software
component you can purchase for TonePort, GuitarPort, POD X3 and PODxt devices that allows POD
Farm to function as an audio effects processing Plug-In for all Mac® AU®/VST®/RTAS®, and Windows
VST®/RTAS® DAW host applications. This allows you apply legendary POD® amp, cabinet, mic and
effects Tones to any number of tracks within your recording software, utilize parameter automation,
and enjoy the benefits of non-destructive processing. We’ve covered this in detail in the chapter aptly
titled POD Farm Plug-In. Whether you own POD Farm Plug-In yet or not, you can use Line 6 Monkey
to get it all going in minutes on your Line 6 device - just read up on it in the following section.
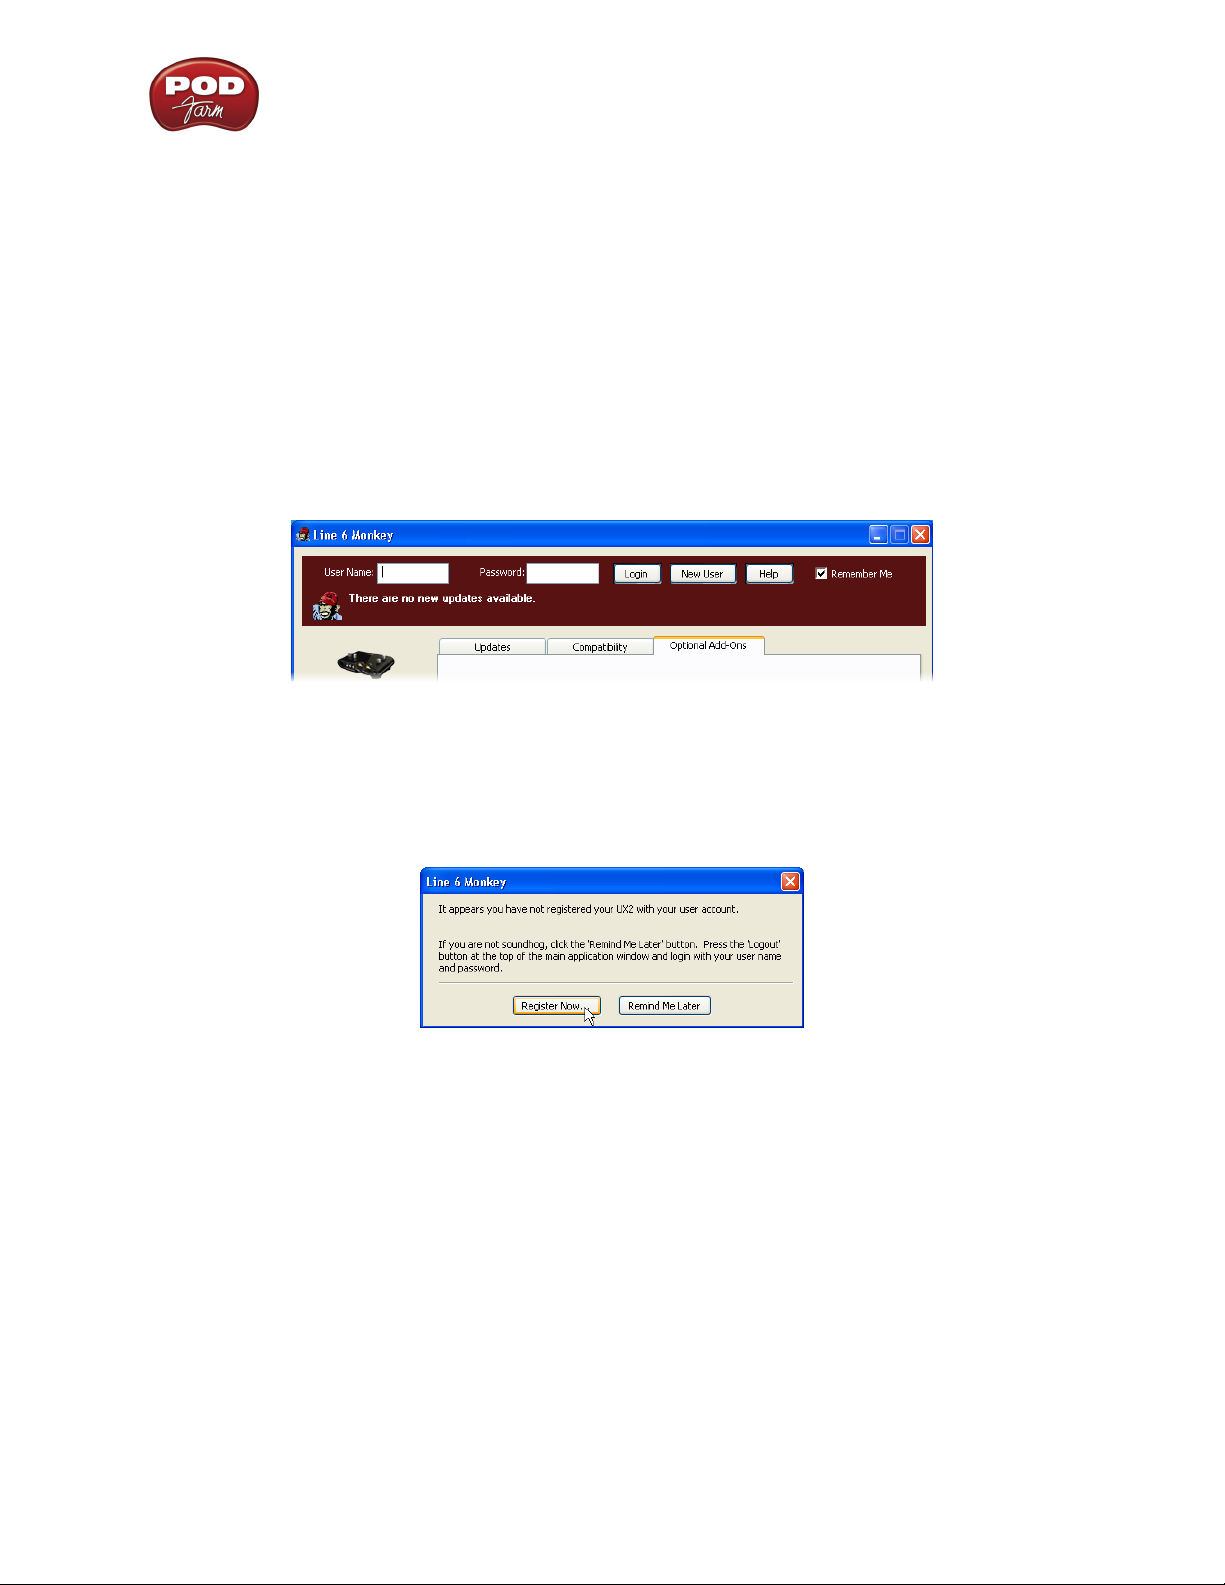
Updating & Registering with Line 6 Monkey
Line 6 Monkey is the intelligent updater utility automatically installed with the POD Farm application.
It is highly recommended that you run Line 6 Monkey at the end of your POD Farm installation, and
to do so often to be sure you have all the latest updates for all your Line 6 software and hardware
products. Registering your Line 6 hardware is also very important because it ensures that you’re dialed
in for warranty service and makes it possible for us to contact you if new software versions or other
cool enhancements are offered - cutting edge technology and such! So don’t put this off any longer.
1•1
Page 4
POD Farm Recording Setup Guide - Getting Started
Connect your Line 6 hardware to your computer and follow these steps to launch Line 6 Monkey...
On Mac•
On Windows•
®
, go to Applications - Line 6.
®
, go to the Start button menu - Programs - Line 6 - Tools.
Login Account
You’ll need to Login so that Line 6 Monkey can communicate with the online Line 6 Server and
provide you with exactly what you need. It’s just a few clicks, and it’s free!
If you have a Line 6 account, then type in your User Name and Password at the top of the •
Monkey dialog.
If you have not yet created an account, click the New User button and you’ll be walked right •
through the steps.
Register Your Hardware
If you have not already done so, you’ll be prompted to Register your connected Line 6 hardware. It’s a
painless process really, so click that Register Now button and fill in the blanks on the Web page. This
page will list all your registered Line 6 gear in one place.
Grab Those Updates
Go to the Updates tab in Line 6 Monkey. If you see any items where a newer, updated version is
available, then you should click on that item and let the little monkey fellow walk you through the
installation steps. This is the easiest way to stay current on the latest POD Farm software updates, as
well as drivers and firmware updates. You can also check the Optional Add-Ons* tab to see what other
goodies might be available for your specific Line 6 device here too!
1•2
Page 5

POD Farm Recording Setup Guide - Getting Started
*Note - Some Line 6 hardware models already include the POD Farm Plug-In, and/or other Add-Ons for
free! You’ll need to “activate” these items by running Line 6 Monkey - see the following section.
Purchasing POD Farm Plug-In
POD Farm Plug-In is of course already included with the new POD Studio hardware. But if you own a
Line 6 TonePort, GuitarPort, POD X3 or PODxt device, then you can purchase the POD Farm Plug-In
as an Add-On! Just click on the Optional Add-Ons tab in Line 6 Monkey, select POD Farm Plug-In,
then click on Purchase Add-Ons.
You will be taken to the Line 6 Store, where you can purchase a license for the plug-in. Follow the
instructions on the resulting page to receive your activation key. Or, just head on over to the Line 6
site any time and see what is “in Store” for you.
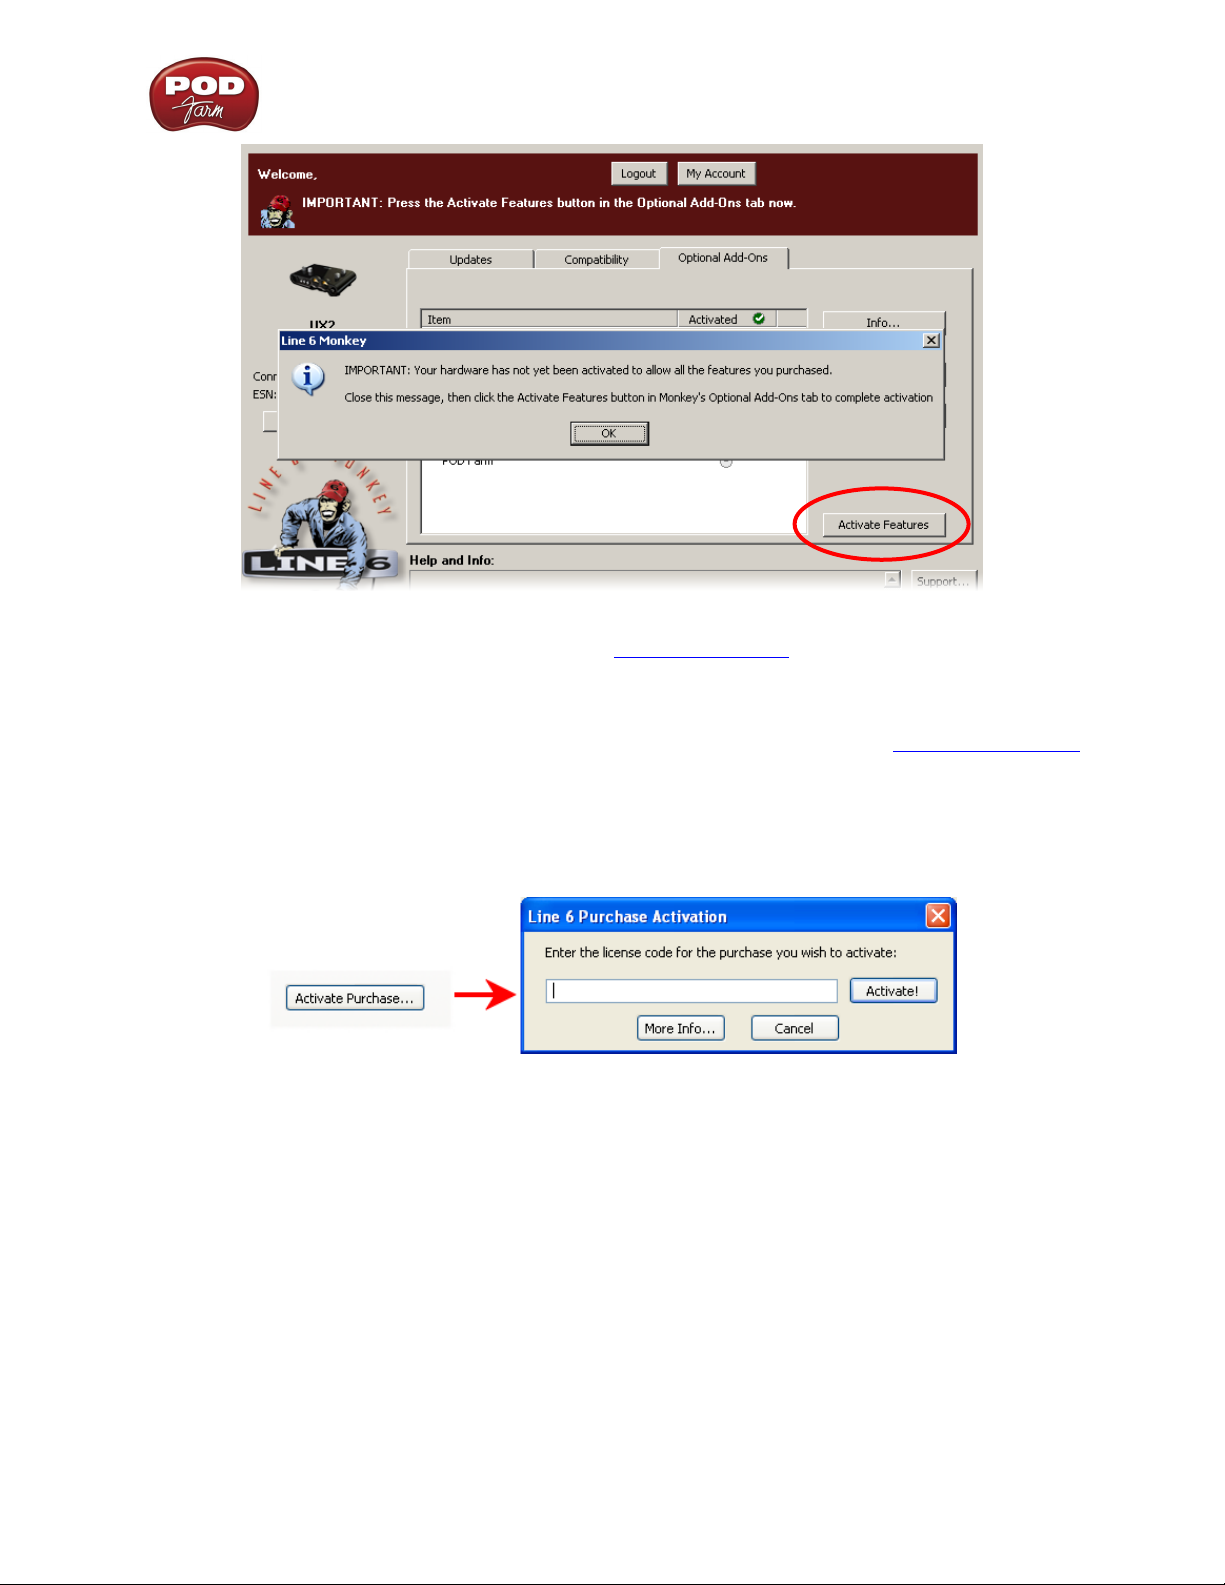
Product Activation & Authorization
Some features of POD Farm and your Line 6 hardware require “Activation” using Line 6 Monkey and
a live Internet connection. As mentioned above, POD Studio and some other Line 6 devices include
one or more Add-Ons already “installed” on the hardware device itself. When you connect your Line
6 device and launch Line 6 Monkey for the first time, if you are prompted to press the “Activate
Features” button, then go ahead and do so to activate the included Add-On(s).
1•3
Page 6
POD Farm Recording Setup Guide - Getting Started
If you’ve purchased additional Add-Ons from the Line 6 Online Store - these also need to be activated.
You will have received a License Key for each Add-On purchase. To activate purchased Add-ons,
launch Line 6 Monkey, go to the Optional Add-Ons tab, and then follow these steps...
You can find all Add-On license keys you’ve purchased by logging into the • Line 6 - My Account
online page, and looking in the License Keys page.
Copy the numerical License key code that appears on this page.•
Go back to the Line 6 Monkey screen and click on the • Activate Purchase button. A window
will pop up, prompting you to enter the activation key you just received.
Activation turns the Add-On features “on” in your POD Farm-compatible hardware, so they can •
operate in the POD Farm stand-alone application and/or POD Farm Plug-in.
When using your Line 6 USB hardware on a new computer for the first time, you may also see the
following message at the top of the Add-Ons tab - just click the Authorize button to finish configuring
your computer to use your new hardware and Add-Ons.
1•4
Page 7

POD Farm Recording Setup Guide - Getting Started
Just remember that for POD Farm Plug-in operation, your Line 6 hardware must always be connected
via USB (even if you’re using a 3rd-party interface). You don’t necessarily need to be using your Line
6 hardware as your active USB audio device - it just needs to be USB-connected (and powered on for
units that have a power switch).
About This Guide…
This guide is intended to provide basic setup information for Line 6 USB hardware and POD Farm
software with the most popular audio recording applications. The following sections provide setup
information for both Mac® and Windows® systems. Use the Table of Contents or the Acrobat® Reader®
Bookmarks to jump directly to the chapter and sections relevant to your setup.
Additional Online Resources
Hungry for more info? We’ve got plenty of helpful resources just a click away...
-Several more Help documents covering the latest POD Farm version:
POD Farm Online Help
-For technical support, choose from the many options listed on the Line 6 Support page:
Line 6 Support
-Join the Club! Registered Line 6 users are welcome join the All Access club, the place to get:
Free iTunes•
Free loops for GarageBand•
Free guitar lessons from LA session pros.•
Free chord and scale practice tools.•
Stay informed of contest and special offers.•
Access to discussion forums, software updates and more.•
All Access Club
®
and MP3 Jam Tracks.
®
, Acid®, Reason® and more.
1•5
Page 8

POD Farm Recording Setup Guide - Audio Driver Configuration
au d i o dR i v e R co n f i g u R a t i o n
Now that you have your Line 6 USB audio device driver installed, its time to take a look at the
settings and options for using your Line 6 gear in a computer recording setup! Note that there are some
different options available, depending on your specific type of Line 6 device, so be sure to check the
instructions describing your Line 6 hardware model.
Line 6 Audio Driver Configuration
In the world of modern recording, a computer setup for audio recording, editing, mixing, etc. is referred
to as a Digital Audio Workstation or “DAW”. A DAW typically consists of audio recording/editing
software, an audio interface (or sometimes called “sound card”) and some variety of effects plug-ins.
Your USB Line 6 device can, of course, fill the role of the audio interface since its high performance
audio drivers can deliver the performance and quality of the most demanding audio applications!
The audio interface driver is the key element of your audio hardware that you will see referred to by
software applications, control panels and know-it-all computer audio geeks, so it’s a good idea that you
learn a few things about your Line 6 device driver and its options. Things are a bit different on Mac®
versus Windows® systems, and there are some feature differences between the specific Line 6 devices,
so it is recommended that you refer to the POD Farm User Guide, as well as the product manual for
your specific device for the full info. To get you going, we’ll run through the main points here regarding
the audio driver and its settings.
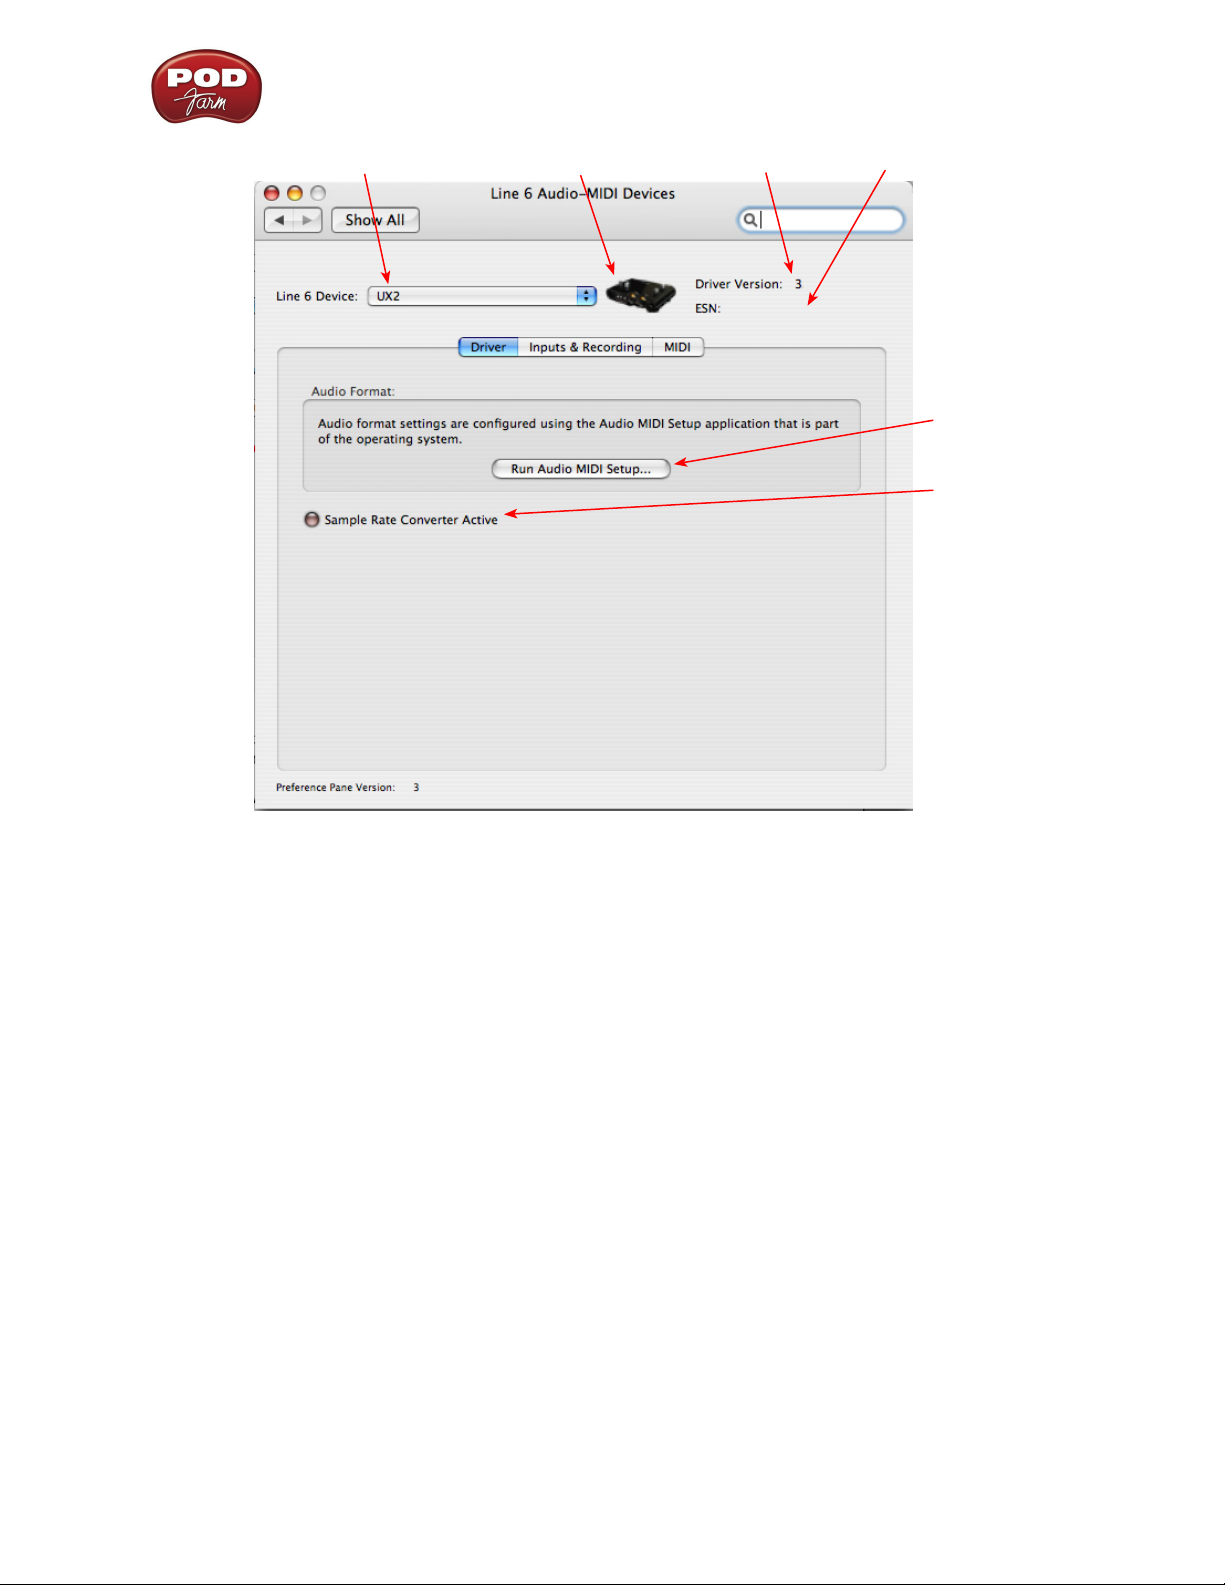
Mac® Driver Settings
You can launch the Line 6 Audio-MIDI Devices dialog from within the Mac® System Preferences, or
from the POD Farm Standalone application’s Preferences > Hardware tab. On Mac® systems, all Line
6 hardware utilizes the Mac® OS X® Core Audio driver format, which means that some of your Line 6
device settings will be in the OS X Audio-MIDI Setup dialog. You can get to this dialog from within
the Line 6 Audio-MIDI Devices dialog (or, from the Finder by going to Applications > Utilities > Audio-
MIDI Setup).
Line 6 Audio-MIDI Settings - Driver Tab
POD Studio, TonePort & GuitarPort devices – The following example shows UX2 as the selected
device, with the POD Farm Standalone software running. If you have the UX8 hardware, you’ll have
even more options, so be sure to also read up on the UX8 specific sections where noted.
POD X3 & PODxt devices - You’ll see some differences with a POD X3 or PODxt device selected – as
noted in the following description.
2•1
Page 9
POD Farm Recording Setup Guide - Audio Driver Configuration
1 2 3 4
5
6
1 – Line 6 Device selector: Allows selection of any supported Line 6 USB audio device that is
connected. Note that if you have more than one supported device connected, each will be selectable
in this list, regardless if it is in use by the POD Farm Standalone application or not. If your device is
not connected and powered on, it will not appear in this list.
2 – Selected Device Icon: An icon for the selected Line 6 Device appears here.
3 – Driver version: Displays the current device’s installed driver version number.
4 - ESN: Displays the current device’s unique Electronic Serial Number.
5 – Run Audio-MIDI Setup button: On Mac® systems, Core Audio sound card driver settings are
configured in the OS X® Audio-MIDI Settings utility. This button launches this dialog for you (see
following OS X Audio-MIDI Settings Dialog section).
6 – Sample Rate Converter Active indicator: POD Studio, TonePort and GuitarPort devices support
44.1 and 48 kHz sample rates natively, and support 88.2 and 96 kHz sample rates by way of an internal
sample rate converter.* This indicator lights up to show you when this converter is active, which can
be any time your audio software is requesting a different sample rate you’re your device “natively”
supports or is “fixed” at. Also see the Force Driver Format checkbox option.
*UX8 and POD X3 hardware supports 44.1, 48, 88.2 and 96 kHz sample rates natively.
2•2
Page 10
POD Farm Recording Setup Guide - Audio Driver Configuration
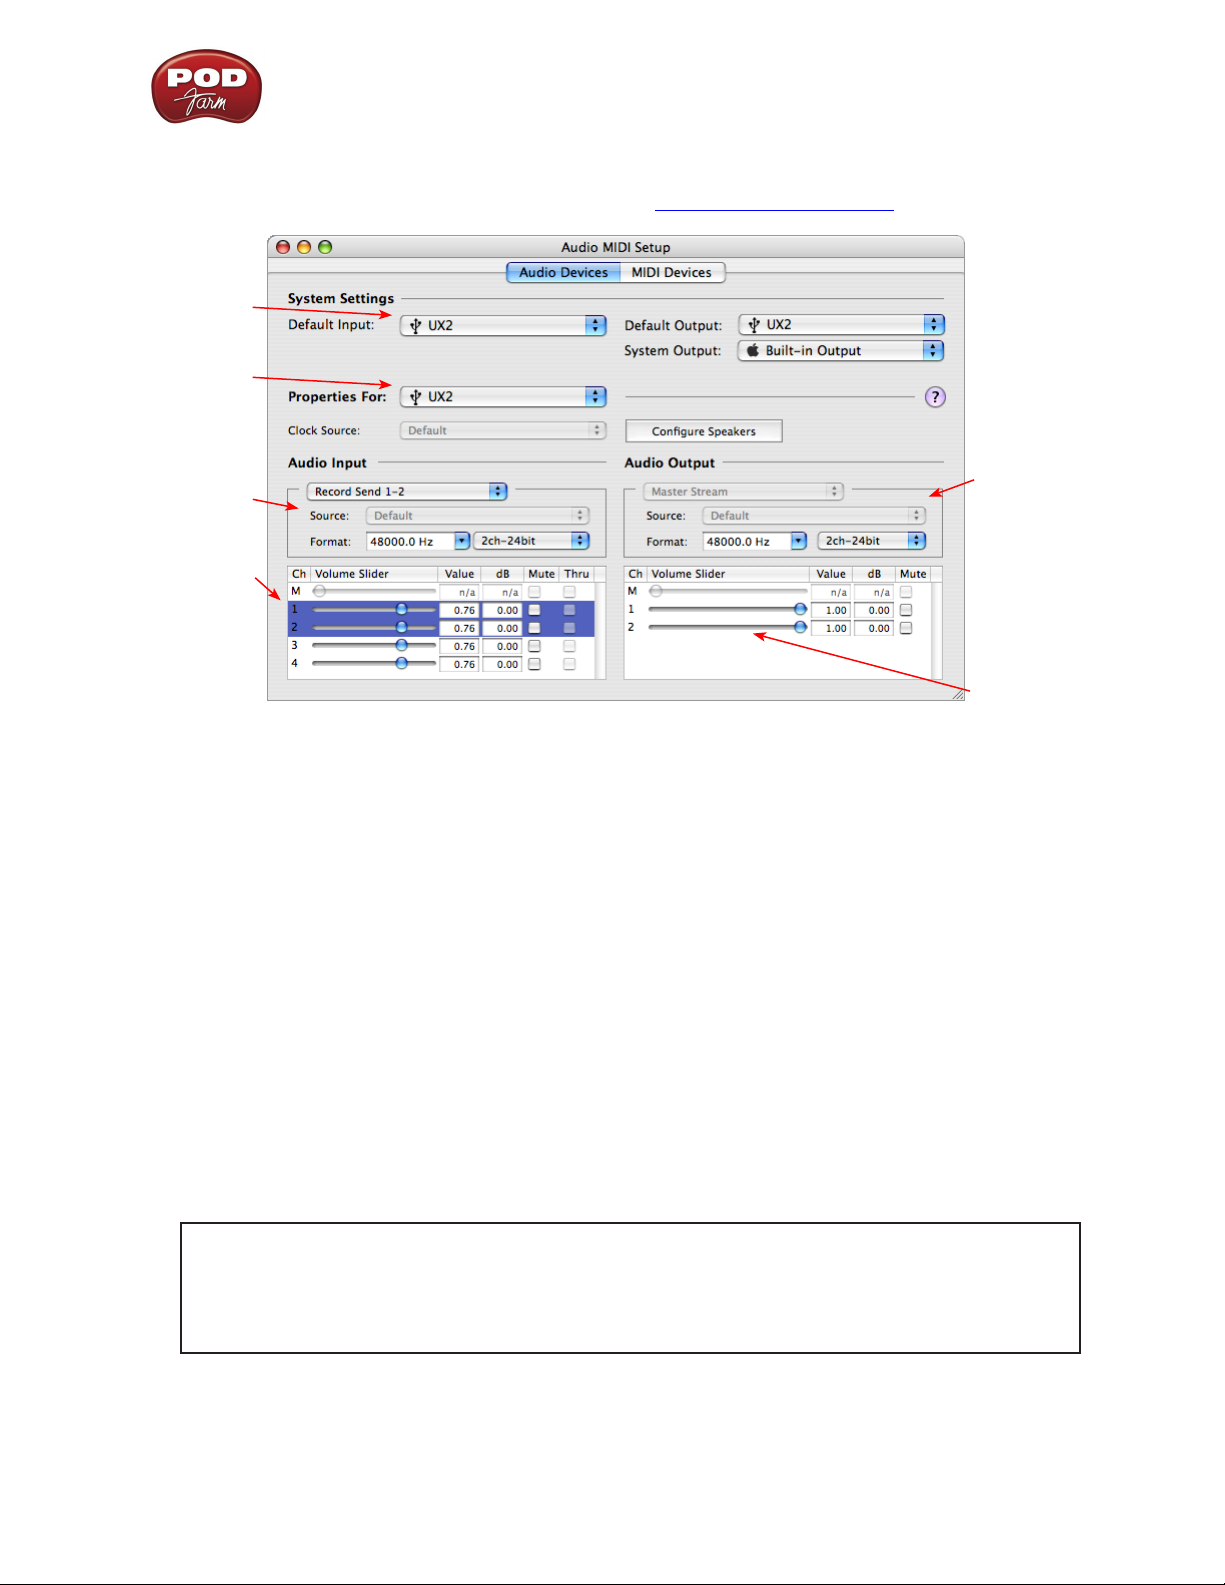
Mac® OS X® Audio-MIDI Setup Dialog
Note: For UX8, please see the following UX8 Audio-MIDI Settings section.
5a
5b
5c
5d
5e
5f
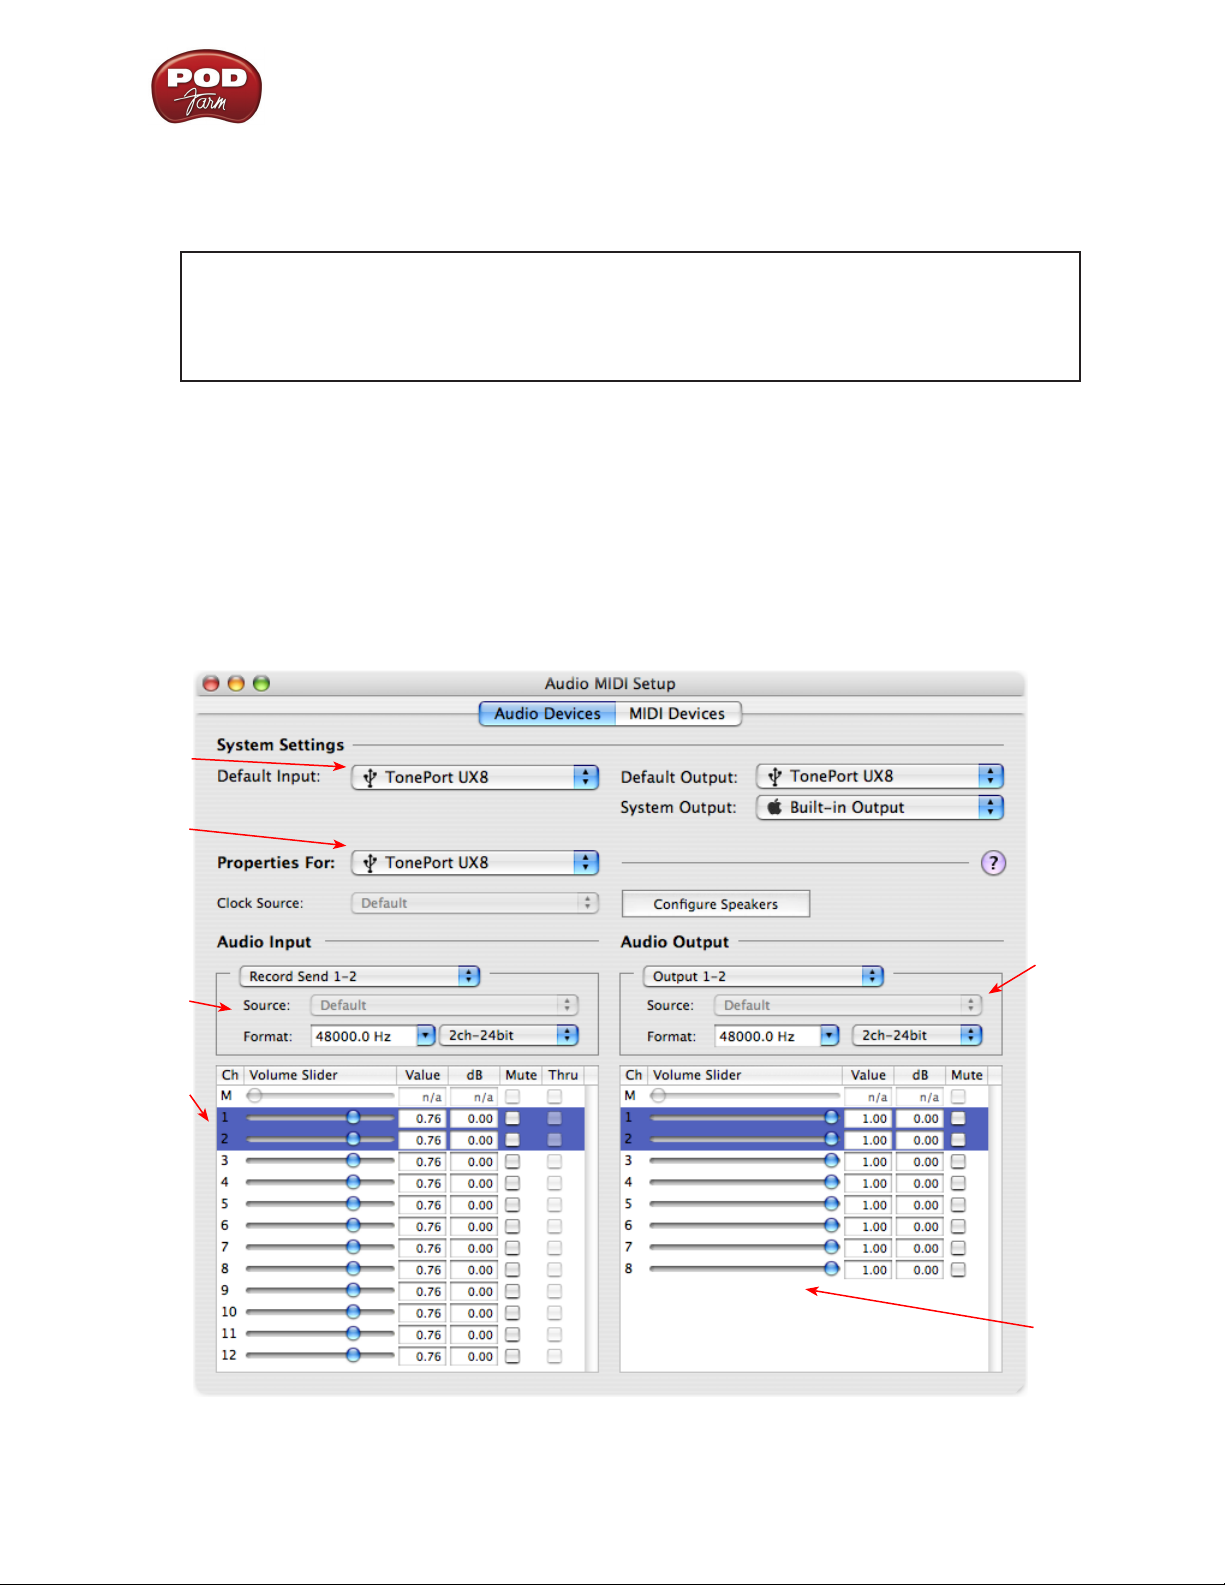
5a – System Settings:
The • Default Input and Default Output options allow you to choose the sound card you want
your audio applications to use by default. If you want this to be your Line 6 device, select it
here.
The • System Output option allows you to choose which sound card the Mac System Settings are
played through. You may NOT want to choose this to be your Line 6 device, since it can be rather
annoying to hear those dings, beeps or frogs croaking at blaring volumes in your headphones
or monitors when working in your audio application! Even better, you can turn these system
settings off completely in the System Preferences > Sounds dialog.
5b – Properties For: Choose your Line 6 device here to allow the Audio Input and Audio Output
options display its settings.
5c – Audio Input:
In the top selector, you will be able to choose any Record Send for your Line 6 device to view •
it’s format settings below.
The • Format selectors show you the Sample Rate* and Bit Depth that the Line 6 device is
operating at for recording. The Bit Depth for all Line 6 devices is fixed at 24 bit.
*It is recommended that you do not use the Sample Rate selector here in the Mac Audio-MIDI
Setup dialog to set your sample rate when your recording software is running. Typically, your
recording software will offer a Sample Rate option within its own “Preferences” or “Audio
Setup” settings. It is best to configure the Sample Rate within the recording software, and you
will see the device’s sample rate switch automatically to match it.
5d – Volume sliders (audio input):
These sliders are not functional with the Line 6 hardware - use the POD Farm Standalone - Mixer
View sliders for controlling the levels of Record Sends 1-2 & 3-4 that is fed to your DAW software.
2•3
Page 11
POD Farm Recording Setup Guide - Audio Driver Configuration
5e – Audio Output:
The • Format selectors show you the Sample Rate* and Bit Depth that the Line 6 device is
operating at for playback. The Bit Depth for all Line 6 devices is fixed at 24 bit.
*It is recommended that you do not use the Sample Rate selector in the Mac Audio-MIDI
Setup dialog to set your sample rate when your recording software is running. Typically, your
recording software will offer a Sample Rate option within its own “Preferences” or “Audio
Setup” settings. It is best to configure the Sample Rate within the recording software for your
project, and you will see the device’s sample rate switch automatically to match it.
5f – Volume sliders (audio output):
These sliders are not functional for Line 6 hardware - use the POD Farm Standalone Monitor Volume
controls (for your POD Farm Monitor level), the output controls in your DAW software (for its playback
levels) or the Volume knobs on your Line 6 hardware (for overall volume) to adjust output levels.
Mac® OS X® Audio-MIDI Settings Dialog (UX8 Only)
5a
5b
5c
5d
5e
5f
2•4
Page 12
POD Farm Recording Setup Guide - Audio Driver Configuration
5a – System Settings:
The • Default Input and Default Output options allow you to choose the sound card you want
your audio applications to use by default. If you want this to be your Line 6 device, select your
UX8 here.
The • System Output option allows you to choose which sound card the Mac System Settings are
played through. You may NOT want to choose this to be your Line 6 device, since it can be rather
annoying to hear those dings, beeps or frogs croaking at blaring volumes in your headphones
or monitors when working in your audio application! Even better, you can turn these system
settings off completely in the System Preferences > Sounds dialog.
5b – Properties For: Choose your UX8 here to allow the Audio Input and Audio Output options
display its settings.
5c – Audio Input:
In the top selector, you will be able to choose your Record Send for UX8 to view its Format •
settings below.
The • Format selectors show you the Sample Rate* and Bit Depth that the Line 6 device is
operating at for recording. The Bit Depth is fixed at 24 bit.
*It is recommended that you do not use the Sample Rate selector in the Mac Audio-MIDI
Setup dialog to set your sample rate when your recording software is running. Typically, your
recording software will offer a Sample Rate option within its own “Preferences” or “Audio
Setup” settings. It is best to configure the Sample Rate within the recording software, and you
will see the device’s sample rate switch automatically to match it.
5d – Volume sliders (audio input):
Sliders 1 - 12 are not functional with UX8 - use the POD Farm Standalone Mixer sliders for controlling
the levels of Record Sends 9-10 & 11-12 that are fed to your DAW software. For Sends 1 through 8,
use the Mic Trim knobs on the front of UX8, or use the output controls of any line device connected
to these UX8 inputs, to adjust your recording levels.
5e – Audio Output:
The • Format selectors show you the Sample Rate* and Bit Depth that UX8 is operating at for
playback. The Bit Depth for all Line 6 devices is fixed at 24 bit.
*It is recommended that you do not use the Sample Rate selector in the Mac Audio-MIDI
Setup dialog to set your sample rate when your recording software is running. Typically, your
recording software will offer a Sample Rate option within its own “Preferences” or “Audio
Setup” settings. It is best to configure the Sample Rate within the recording software, and you
will see the device’s sample rate switch automatically to match it.
5f – Volume sliders (audio output):
These sliders are not functional for Line 6 hardware - use the POD Farm Standalone Monitor Volume
controls (for your POD Farm Monitor level), the output volume controls in your DAW software (for
its playback levels) or the Volume knobs on your Line 6 hardware (for overall volume) to adjust output
levels.
2•5
Page 13
POD Farm Recording Setup Guide - Audio Driver Configuration
Line 6 Audio MIDI Settings Dialog - Inputs & Recording Tab
Note - If you are using a UX8 device, please skip to the UX8 Inputs & Recording Tab section.
1
2
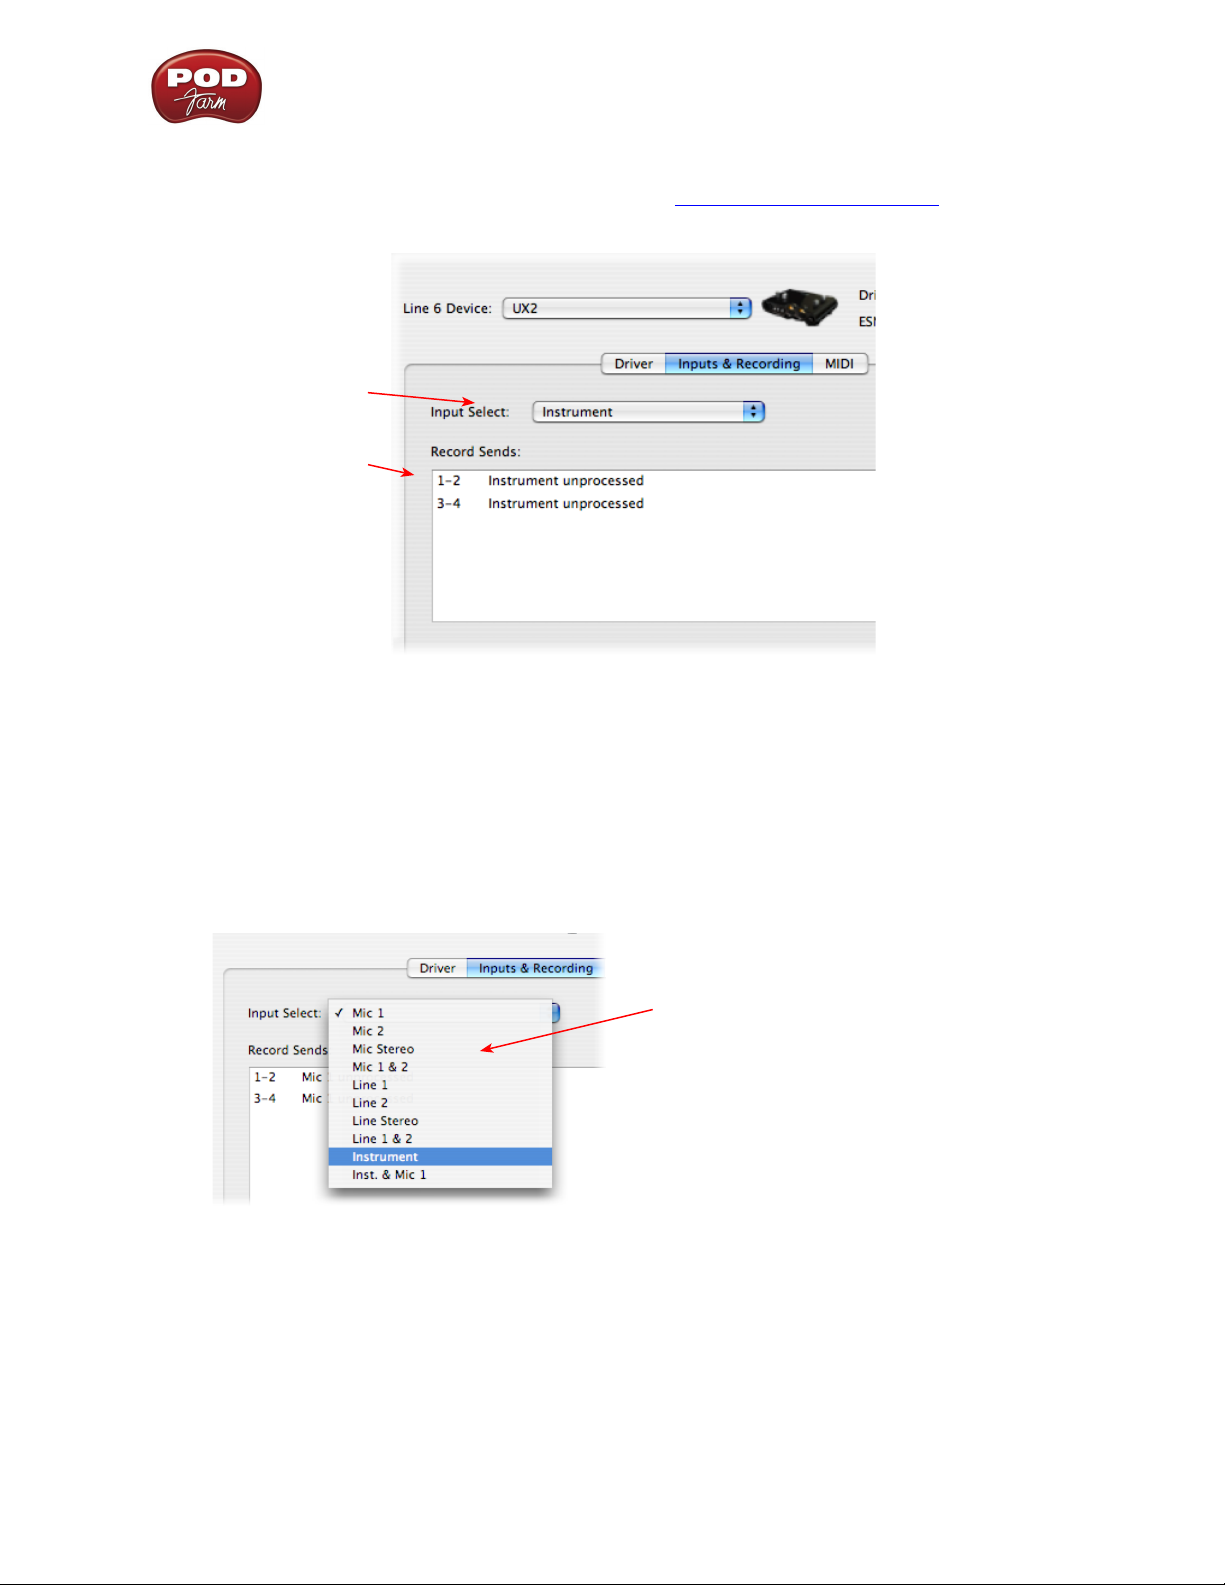
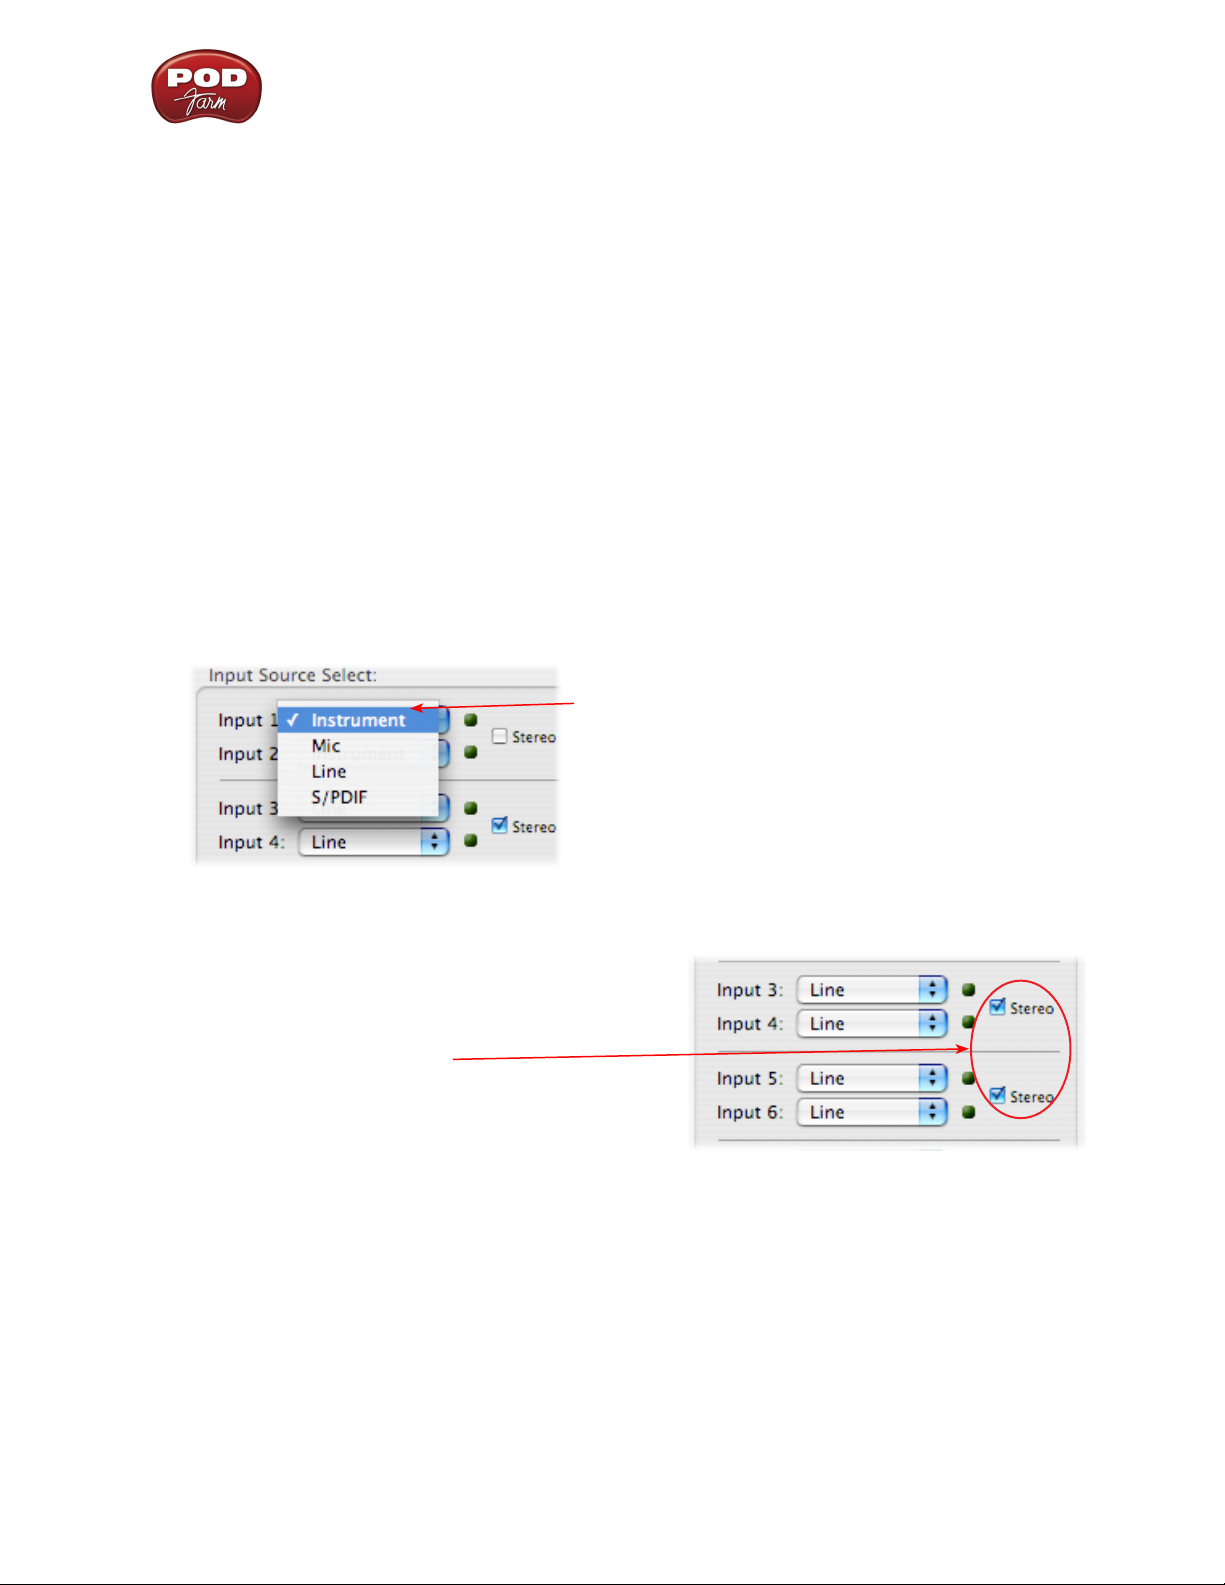
1 –Input Select Menu: This allows the user to select which physical input “source” is fed from the Line
6 USB hardware (Mic 1, Instrument, etc.). Note that this menu is ONLY selectable when the POD
Farm Standalone software is not in use by the Line 6 hardware. When POD Farm is in use, it remains
grayed out, but displays the current Source that is selected within POD Farm Standalone.
When POD Farm Standalone is not in use by the selected Line 6 device, this Input Source menu,
like the POD Farm Tone 1 Input Source menu, offers a list of input options. The options will differ
depending on the Line 6 device - UX2 displays the following:
When POD Farm Standalone is not
running, the Input Source Select menu
is available. As shown here, UX2 offers
several input Sources to choose from.
The selected Source is what gets routed
to the Device Sends.
GX, DI and GuitarPort devices are always “fixed” to only route their 1/4-inch input signals. With
one of these devices, this Input Source Select list offers only “Instrument” as the source.
POD X3 and PODxt devices are “fixed” to route their input signals. With one of these devices
there is no Source Select menu displayed in the dialog.
2 – Device Sends info box: One line for each Record Send appears here along with a general description
for each Send.
2•6
Page 14

POD Farm Recording Setup Guide - Audio Driver Configuration
POD Studio, TonePort & GuitarPort devices (except UX8) show two stereo Sends (1-2 and
3-4):
The Device Sends description shows the
Input Source, and informs you if that signal
is “processed” or not. Since POD Farm
Standalone is not running, the signals are
unprocessed.
POD X3 devices show a list of 5 Record Sends:
Note that the type of signal that is fed to each Send is configured on the POD X3’s on-board Outputs
settings screen. For example, Send 1-2 carries the same signal you hear on POD X3’s Main outputs,
which could be just Tone 1, or some combination of Tone 1 & 2. Your POD X3 Output screen options
allow you to mute, pan or swap Tone 1 and Tone 2, so these options also affect what is fed to the Sends.
Please refer to your POD X3 Pilot’s Handbook for details on the Output screen options and especially
to learn more about the unique POD X3 Dual Tone feature.
POD X3 also offers a Monitor Level slider in this tab as well. Use this to independently adjust your POD
X3 monitor signal while recording (independently of the Send signal level that is being recorded).
2•7
Page 15
POD Farm Recording Setup Guide - Audio Driver Configuration
PODxt devices show only one Record Send (Record 1-2).
The type of signal that is routed to the Record Send 1-2 is determined by the PODxt Signal Routing
option within the Audio Signal Routing menu at the left. PODxt also offers a Monitor Level slider in
this tab as well - you can use this to independently adjust your PODxt monitor signal while recording
(independently of the Send signal level that is being recorded).
Line 6 Audio MIDI Settings Dialog - Inputs & Recording Tab (UX8 Only)
1
2
3
4
2•8
5
Page 16
POD Farm Recording Setup Guide - Audio Driver Configuration
1 – Input Source Select: UX8 offers 8 individual input sources, each with its own selector where you
can choose which physical input is to be used for each. Input source options are as follows:
Input 1: Instrument 1 or XLR 1 or Line 1 or S/PDIF (L)
Input 2: Instrument 2 or XLR 2 or Line 2 or S/PDIF (R)
Input 3: XLR 3 or Line 3
Input 4: XLR 4 or Line 4
Input 5: XLR 5 or Line 5
Input 6: XLR 6 or Line 6
Input 7: XLR 7 or Line 7
Input 8: XLR 8 or Line 8
Using Inputs 1 & 2 with the POD Farm Standalone application
The POD Farm Standalone application works with the UX8 driver to provide ultra-low latency
via ToneDirect™ Monitoring for Inputs 1 & 2 of the UX8, which includes two high-Z Instrument
inputs, two XLR inputs, two Line level inputs and a stereo S/PDIF input. POD Farm’s ToneDirect
Monitoring is ideally suited for recording guitar and bass with amp and effects processing, providing
the instantaneous feel necessary for competent performance while tracking.
When POD Farm Standalone is not running,
the Input 1 & Input 2 selectors are available. As
shown here, UX8 offers several input Sources to
choose from. The selected Source is what gets
routed to the Record Send.
Stereo Paired Inputs
You can also link inputs into stereo pairs. This affects
hardware monitoring controls in the Outputs &
Monitoring tab (see below).
2 – Record Sends info box: This box displays the names of the UX8’s input sources as they appear in
Mac recording applications utilizing the UX8’s Core Audio driver, along with a description of what
each Send is carrying. UX8’s Input Sources 1 through 8 are mapped directly to the corresponding Send
number (i.e. - Inputs 1-2 are fed to Record Send 1-2). Sends 9-10 and 11-12 will carry a different signal
depending on if the POD Farm Standalone application is running...
If the POD Farm Standalone application is not currently running, then you’ll see the list appear as
follows:
2•9
Page 17
POD Farm Recording Setup Guide - Audio Driver Configuration
When POD Farm Standalone is not running, Sends
9-10 and 11-12 carry the Input 1 (dry, unprocessed)
signal
If the POD Farm Standalone application is currently running, then Sends 9-10 and 11-12 will carry
the type of signal defined within POD Farm’s Mixer view - Record Send Source menus (Processed,
Semi-Processed or Dry).
3 - Clock Source - Set your preferred UX8 clock source with this menu. Select S/PDIF to sync the
UX8 to an external S/PDIF clock source from another device’s digital output. If you are not connecting
anything into UX8’s digital S/PDIF input, then keep this set to Internal to use the UX8’s own clock.
4 - Hardware Meters Show - This selector allows you to choose what the VU meters on the front of
the UX8 are measuring. Note that these hardware meters function even if the POD Farm Standalone
software is not currently running.
5 - Restore Defaults - Click this button to restore all the tab’s settings to their original default
values.
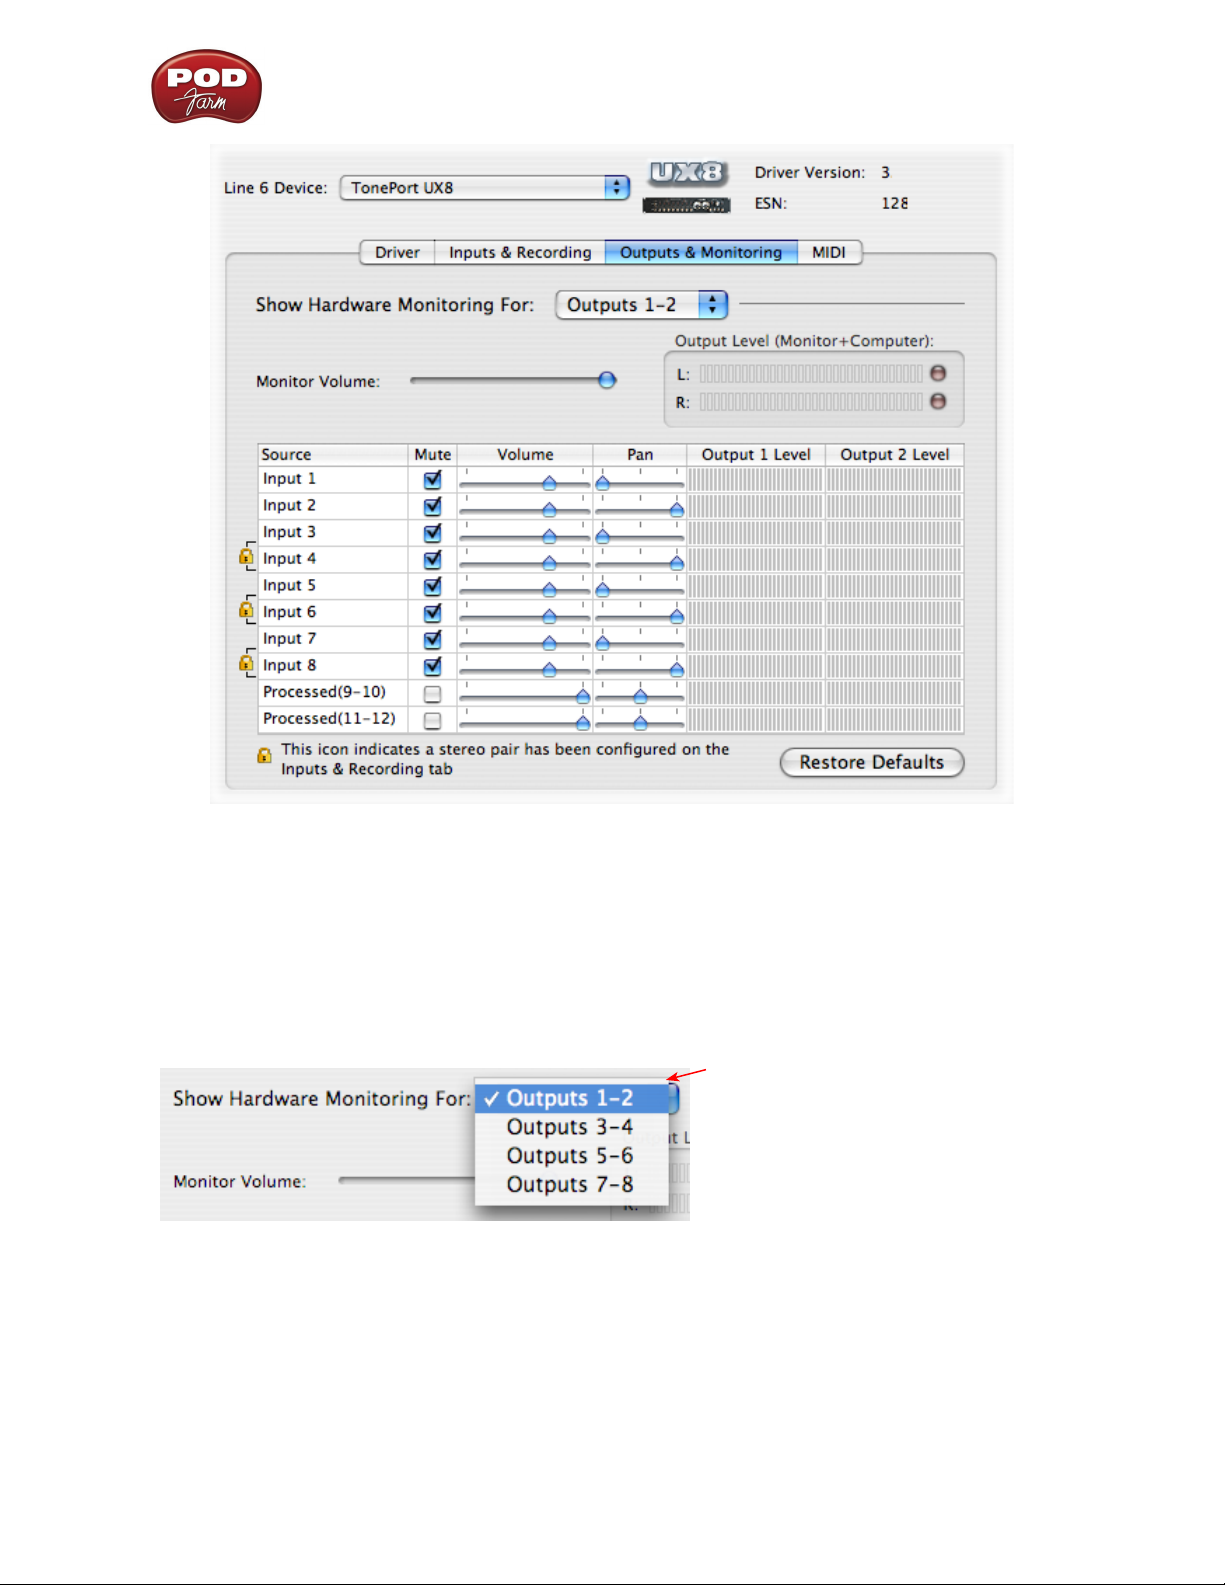
Line 6 Audio MIDI Settings Dialog - Outputs & Monitoring Tab (UX8 Only)
Important: Note that the Outputs & Monitoring tab provides control over monitoring levels,
specifically, what you hear coming out of the UX8 main outs & headphones. These controls do not
affect Send levels (the audio that streams into your recording software). In other words, volume and
pan levels here are purely analog, intended for monitoring live input levels (from instruments, mics,
etc.) and computer output levels, in order to facilitate the recording process.
2•10
Page 18
POD Farm Recording Setup Guide - Audio Driver Configuration
The Outputs & Monitoring tab provides control over hardware monitoring settings, including input
source volume, pan and mute states. You can specify different mix settings for each pair of UX8 outputs
if you like.
By default, the only sounds that come out of the UX8 are the computer’s output and POD Farm 9-10
signal (fully processed), all through Main Outs 1-2. You can directly monitor other UX8 inputs by unmuting (unchecking the Mute checkbox) the corresponding input source in this tab. UX8 provides
monitoring through the hardware with zero latency, which is ideal for tracking with multiple sources
simultaneously.
Use the drop-down menu at the top
to select the output pair for which you
want to mix. Each output pair can
have different mix settings.
Mix Controls
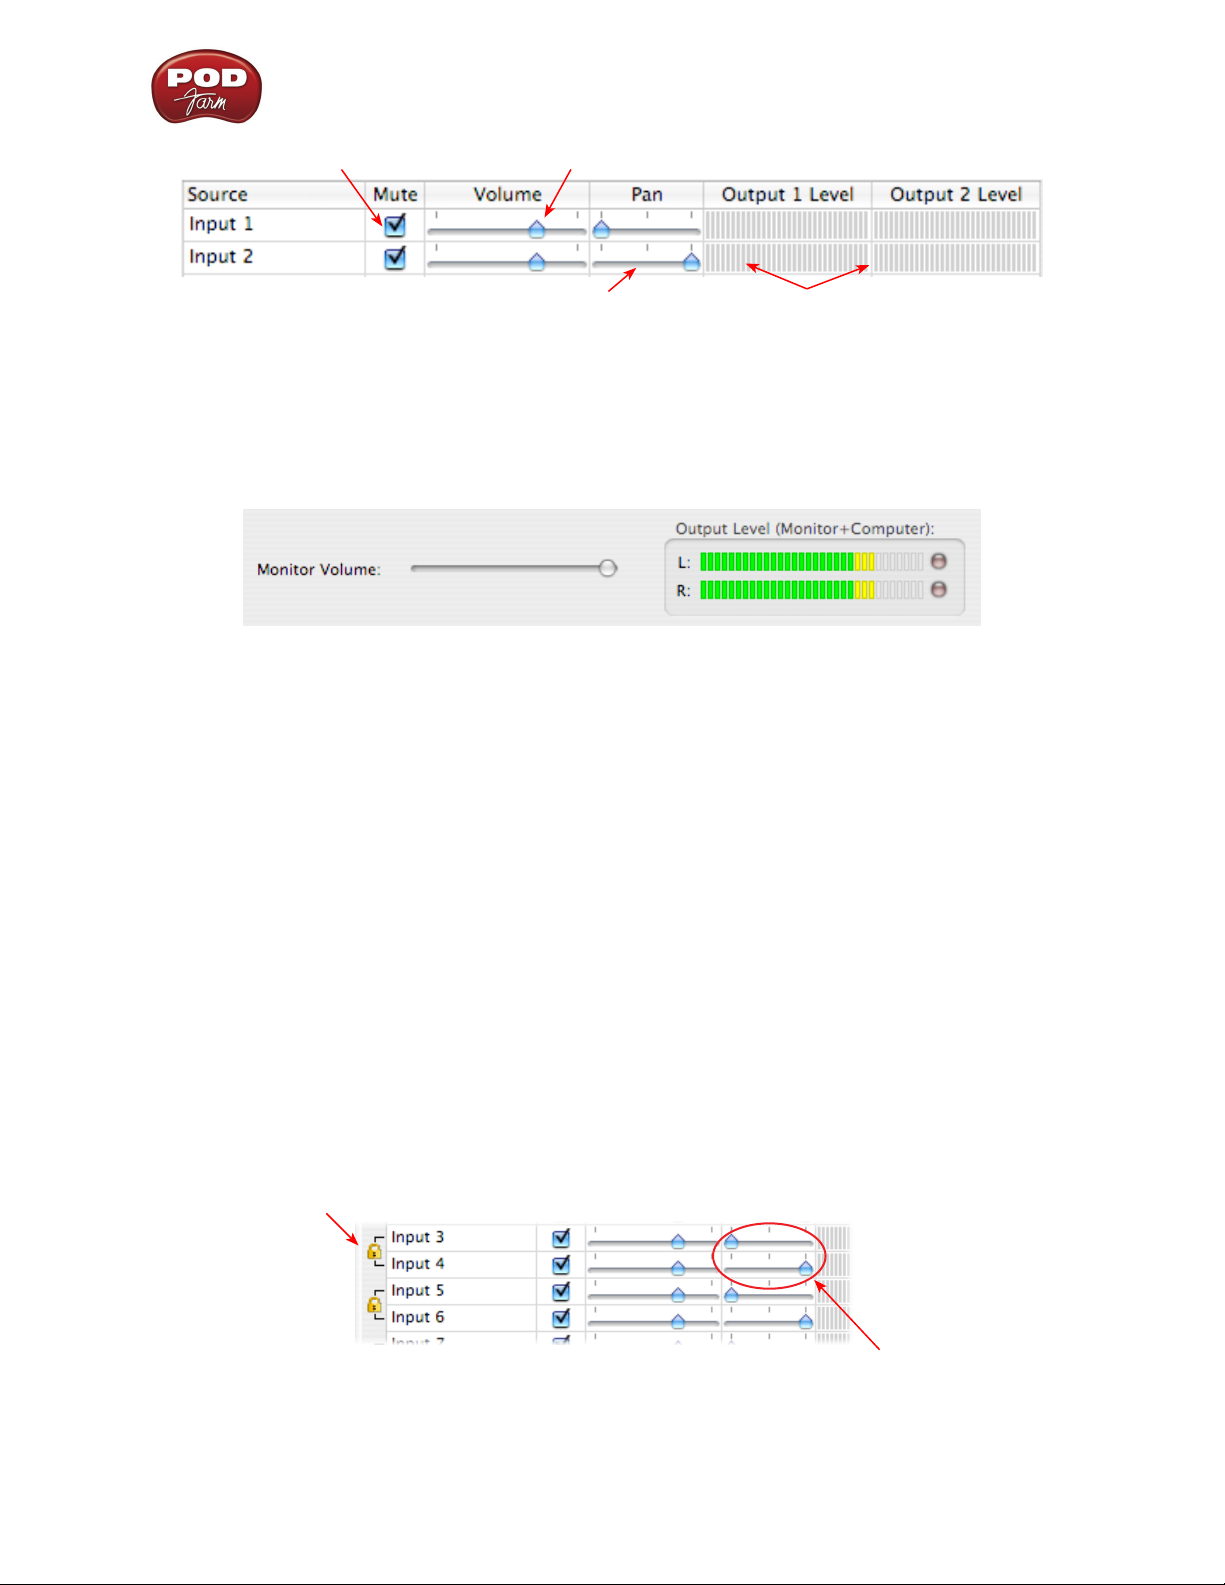
Inputs 1 - 12 offer the following controls:
2•11
Page 19
POD Farm Recording Setup Guide - Audio Driver Configuration
Mute (On/Off) Monitor Volume (-100dB to +6dB)
Monitor Pan (100% Left - 100% Right)* Stereo Monitor Meters
* -3dB panning law is applied to the pan control to maintain a constant monitoring level across the
panorama.
Main Monitor Volume
This slider controls the overall monitoring volume for the current output pair. What you hear is
displayed in the adjacent level meter and includes the combination of input sources and computergenerated signals, such as those assigned to the current output from within your recording software.
Note that computer-generated signals are unaffected by the volume slider. The level meter’s clip LED
graphics light up when the signal reaches 0 dB.
Main Mix vs. Talent Mix
The UX8’s two front panel headphone outputs mirror Outs 1-2 and 3-4 respectively. You can use the
monitor controls, for example, to create a “main mix (1-2)” that captures the overall image of the
recording project, while a separate “talent mix (3-4)” can be provided for the musician who is currently
adding a new part (you know, the guy asking for “more me” in his phones), and may need a click track
and an ample level of themselves above the rest of the mix. Additional output pairs 5-6 and 7-8 are
available for headphone mixers or sending to a mixer, other monitors, etc.
Stereo Pairs
When the “Stereo” checkbox is active in the Inputs & Recording tab for a pair of Inputs, the
representative Inputs in the Outputs and Monitoring tab will display them as “locked” as a stereo
pair.
The lock icon represents two sources linked as a stereo pair.
The Pan sliders for a “locked” stereo pair are automatically set to 100% Left and Right.
2•12
Page 20

POD Farm Recording Setup Guide - Audio Driver Configuration
Using tool tips
You can obtain precise value readings for output levels, volume sliders and pan sliders. Do this by
hovering the mouse cursor over the meter or slider you wish to read.
2•13
Page 21
POD Farm Recording Setup Guide - Audio Driver Configuration
Mac® OS X® System Preferences Settings
There are a few System Preferences that you should configure when using your Mac for audio recording.
Launch the Mac OS X System Preferences dialog to make the following settings.
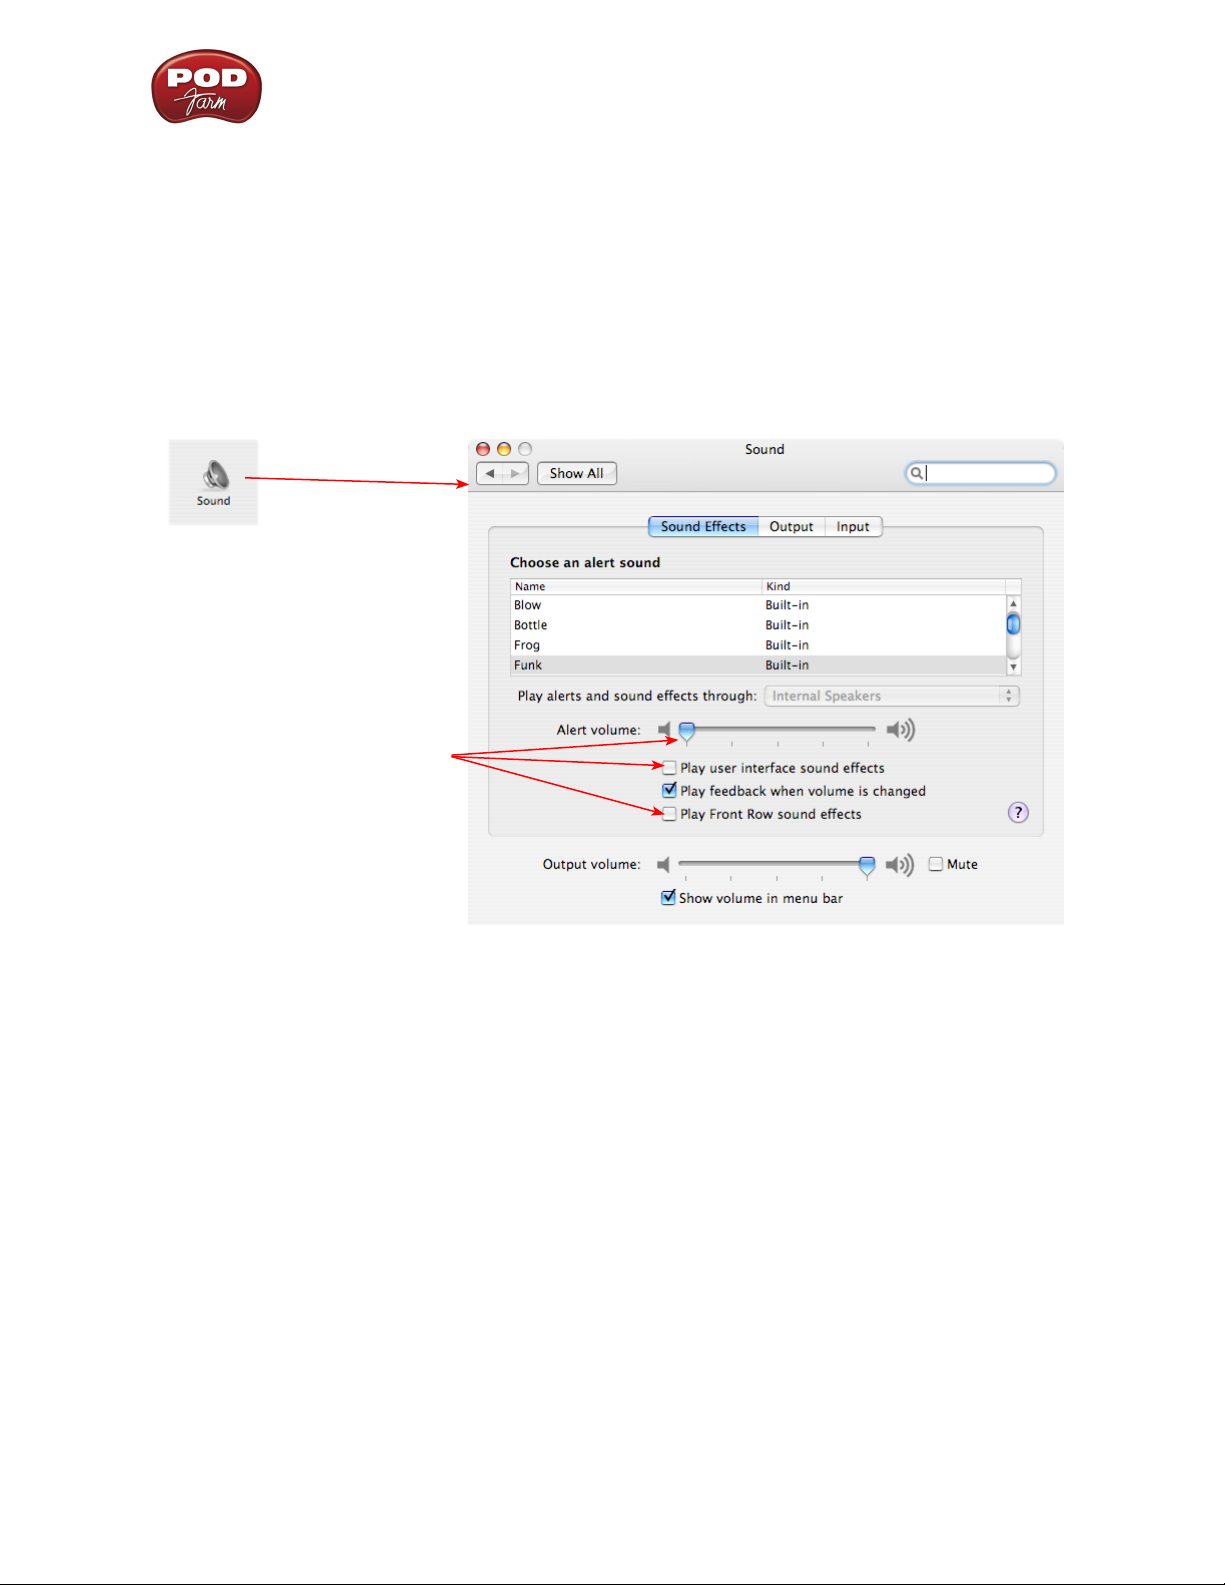
System Sounds and Alerts
When using your Line 6 USB hardware as your audio device, you likely will not want to hear these
system sounds, and you certainly don’t want to end up recording them by mistake! You can adjust the
volume independently for these system sounds and alerts by going to the Sound page.
Choose Sound in your Mac’s
System Preferences dialog
In the Sound Effects page, adjust
the Alert volume slider down,
and uncheck the Play user
interface sound effects and Play
user interface sound effects
checkboxes
2•14
Page 22
POD Farm Recording Setup Guide - Audio Driver Configuration
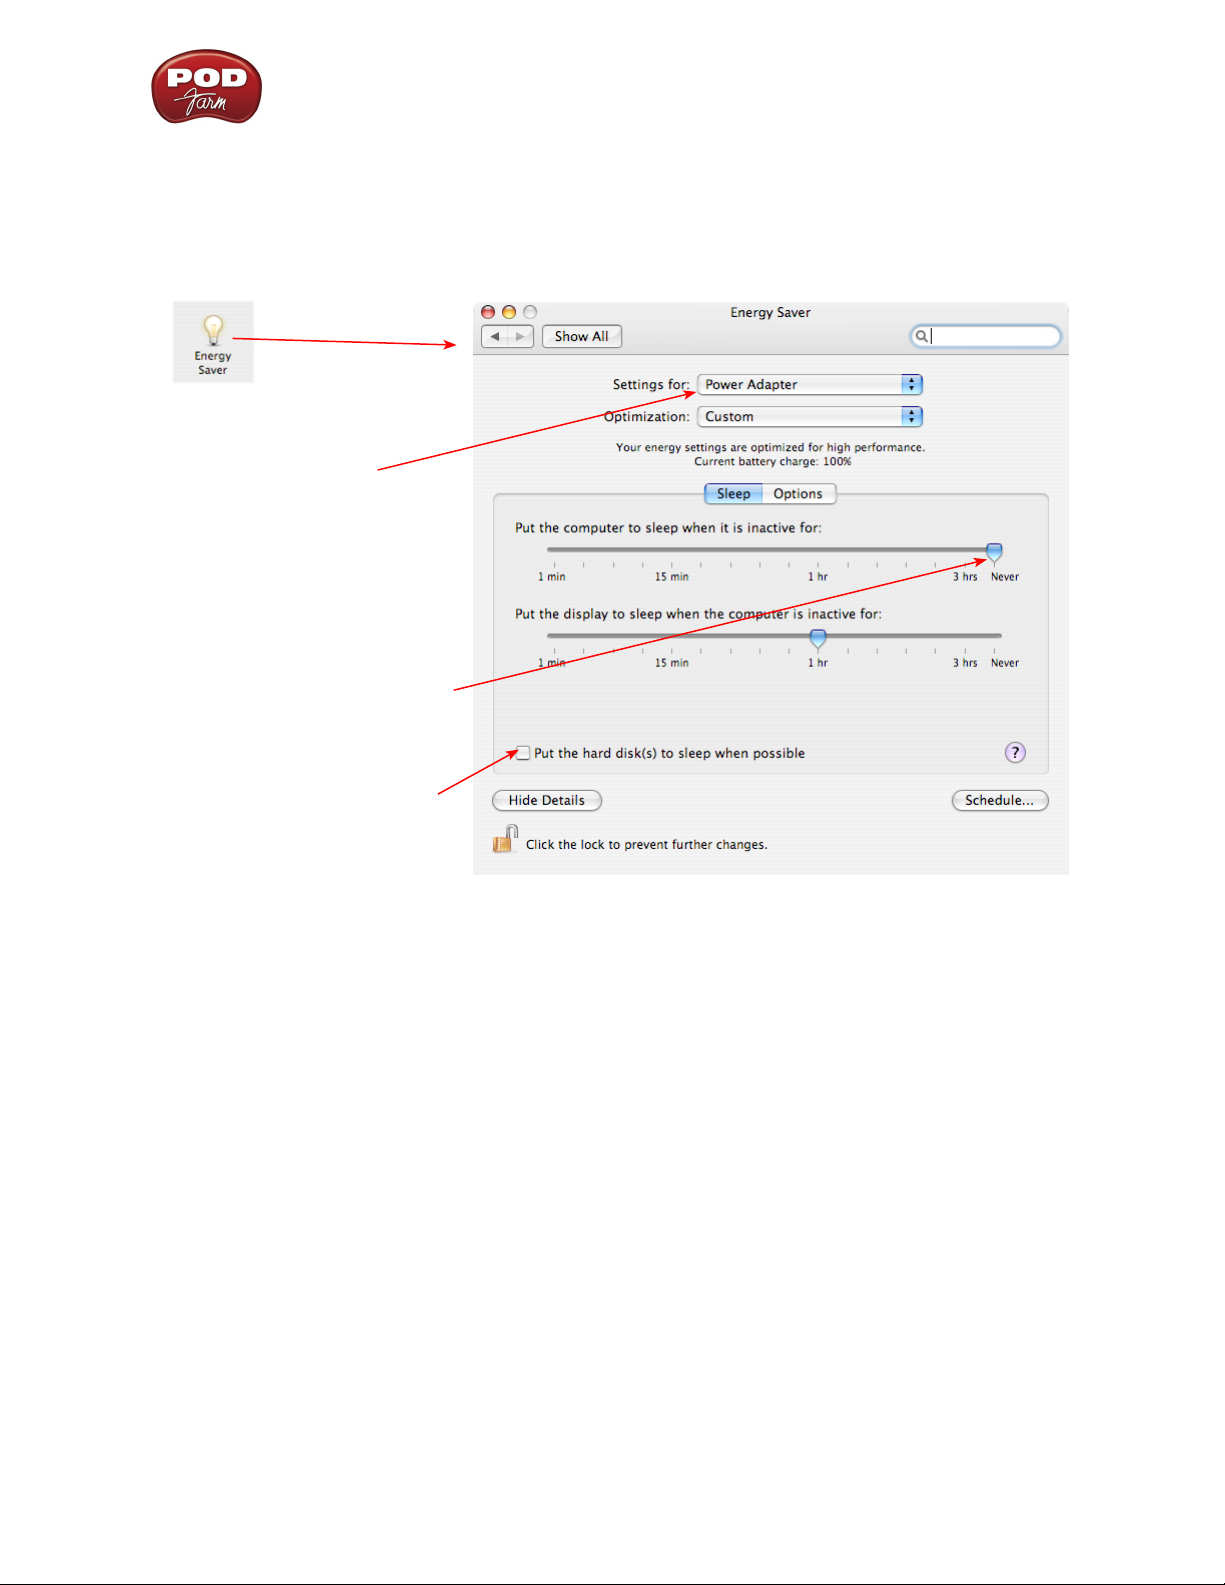
Energy Settings
It is also a good idea to configure your Energy settings so that critical computer components do not go
to “sleep” or run at less than full.
Choose Energy Saver in the
System Preferences dialog
Choose Power Adapter
You can also select Battery if you
have a laptop and repeat all the steps
in this section, but you may want
your settings to conserve battery
power - just keep these settings in
mind if recording when running on
battery power.
Set the top slider all the way to
Never so that the computer is not
allowed to enter “sleep” mode
Uncheck the box so that your
hard disk does not go to sleep
2•15
Page 23
POD Farm Recording Setup Guide - Audio Driver Configuration
Configuration as an Aggregate Device (Mac® only)
Combine your Line 6 POD Studio, TonePort, GuitarPort, POD X3 or PODxt with other Core Audio
devices using the Mac® OS X® Aggregate Device feature.
Note - The OS X Aggregate Devices functionality is not fully supported by Line 6 or most audio hardware
manufacturers since, of course, it is not feasible to test the great number of combinations of devices possible.
However, it is possible to combine one Line 6 USB device with another (non-Line 6) audio device for the
combined functionality as described here - your exact performance may vary with different hardware.
Starting in Mac® OS X® version 10.4.x (Tiger), this Mac features allows you to configure two or
more Core Audio sound card devices into one Aggregate Device. As the name suggests, this makes
it possible to combine multiple connected audio devices allowing audio applications to utilize all
inputs and outputs as one virtual Core Audio device. The Aggregate Device feature also provides the
ability to sync the devices, and resample, if needed, to allow them to work together with your audio
application. This can be quite useful if you have another Core Audio sound card and want to use your
Line 6 hardware along with it to provide additional inputs for recording, or additional outputs for
sending multiple playback or monitoring mixes.
In this section, we’ll be showing you how to create a simple Aggregate Device using your Line 6
hardware and your Mac’s Built-in Audio device Inputs and Outputs. The steps are similar for combining
Line 6 hardware with other models of audio devices, as long as they offer a Core Audio driver that
supports this OS X feature.
Be sure to connect the USB cable from your Line 6 hardware into your computer’s USB port, and then
proceed with the following steps…
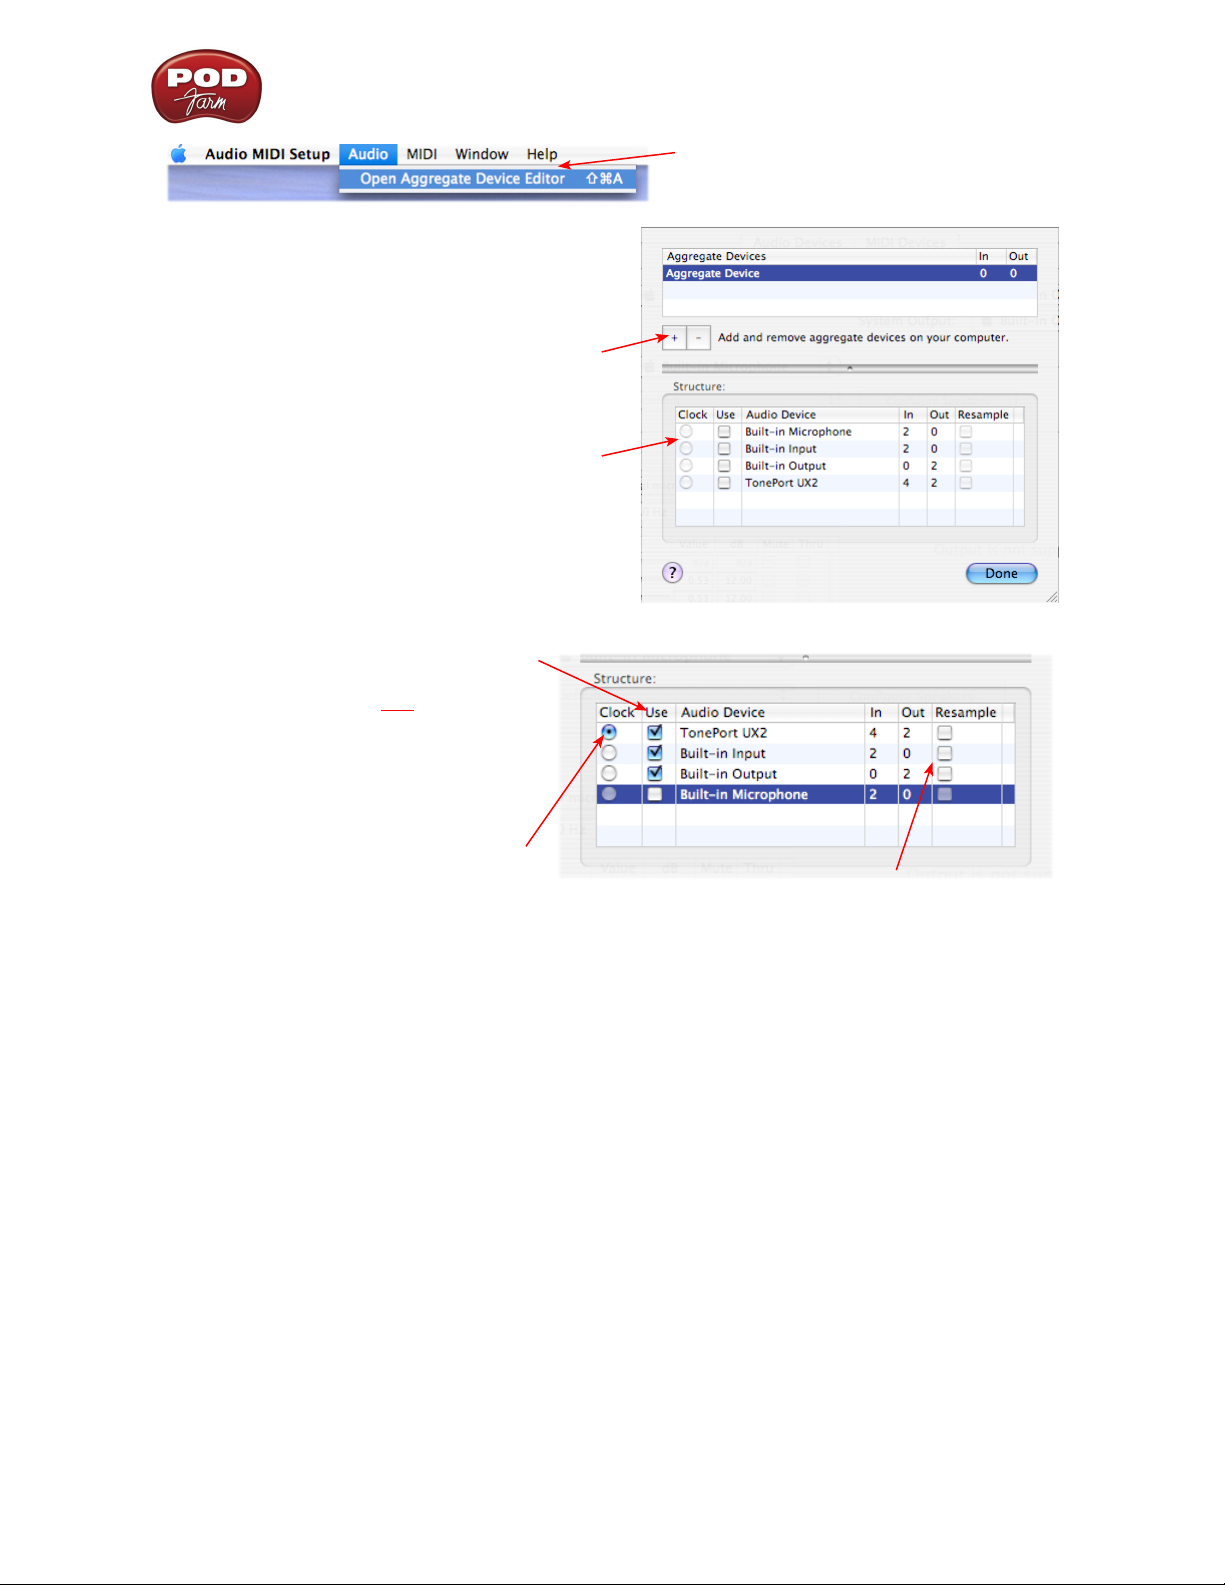
Creating an Aggregate Device
First, connect your Line 6 hardware to your Mac USB port (a USB 2.0 port is required for UX8 and
POD X3 devices, all other Line 6 devices can use a USB 1.1 or USB 2.0 port). All the required settings
you need to create an “Aggregate” device are made within the Aggregate Device Editor window,
which is found in the Mac Audio MIDI Setup dialog.
Go into the Mac System Preferences, select the Line 6 Audio-MIDI Devices (in the Other category),
and in the Driver tab of the Line 6 dialog, click on the Run Audio MIDI Setup button.
2•16
Page 24
POD Farm Recording Setup Guide - Audio Driver Configuration
Click on the “+” button to create a
new Aggregate Device - it will then
appear in the above pane
All detected Core Audio devices are
then listed in the Structure pane
Click on the Use boxes for all Audio
Devices to activate them. (Click your
Line 6 device’s Use box first to make it
the first device in the list). Check the
boxes for both the Built-in Input and
Output so they can be used for both
recording and playback.
Select Open Aggregate Device
Editor from the Audio menu
IMPORTANT! Always set your Line
6 hardware to be the assigned Clock
device
When creating an Aggregate Device, only one audio device can be designated as the “Clock”. This
means that the designated device acts as the “master” and all other devices follow its digital clock,
thus keeping all your audio in sync. Even though the Aggregate Device dialog allows you to set any
individual Audio Device as the Clock, be sure that your Line 6 hardware is set as the clock, as shown
above, to ensure proper sync.
*The Aggregate Device Resample function - When combining audio devices, the sample rates must
match to allow them to be used together. But if you run into sync problems when using some devices
together, or in the case where you need to choose a sample rate not commonly supported by all audio
devices, you can check the Resample checkbox for the device. This instructs the Aggregator to
automatically perform a sample rate conversion to allow the audio devices to sync.
Once above settings are made, click the Done button to return to the Audio MIDI Setup dialog…
Keep the Resample checkboxes
unchecked unless necessary *
2•17
Page 25
POD Farm Recording Setup Guide - Audio Driver Configuration
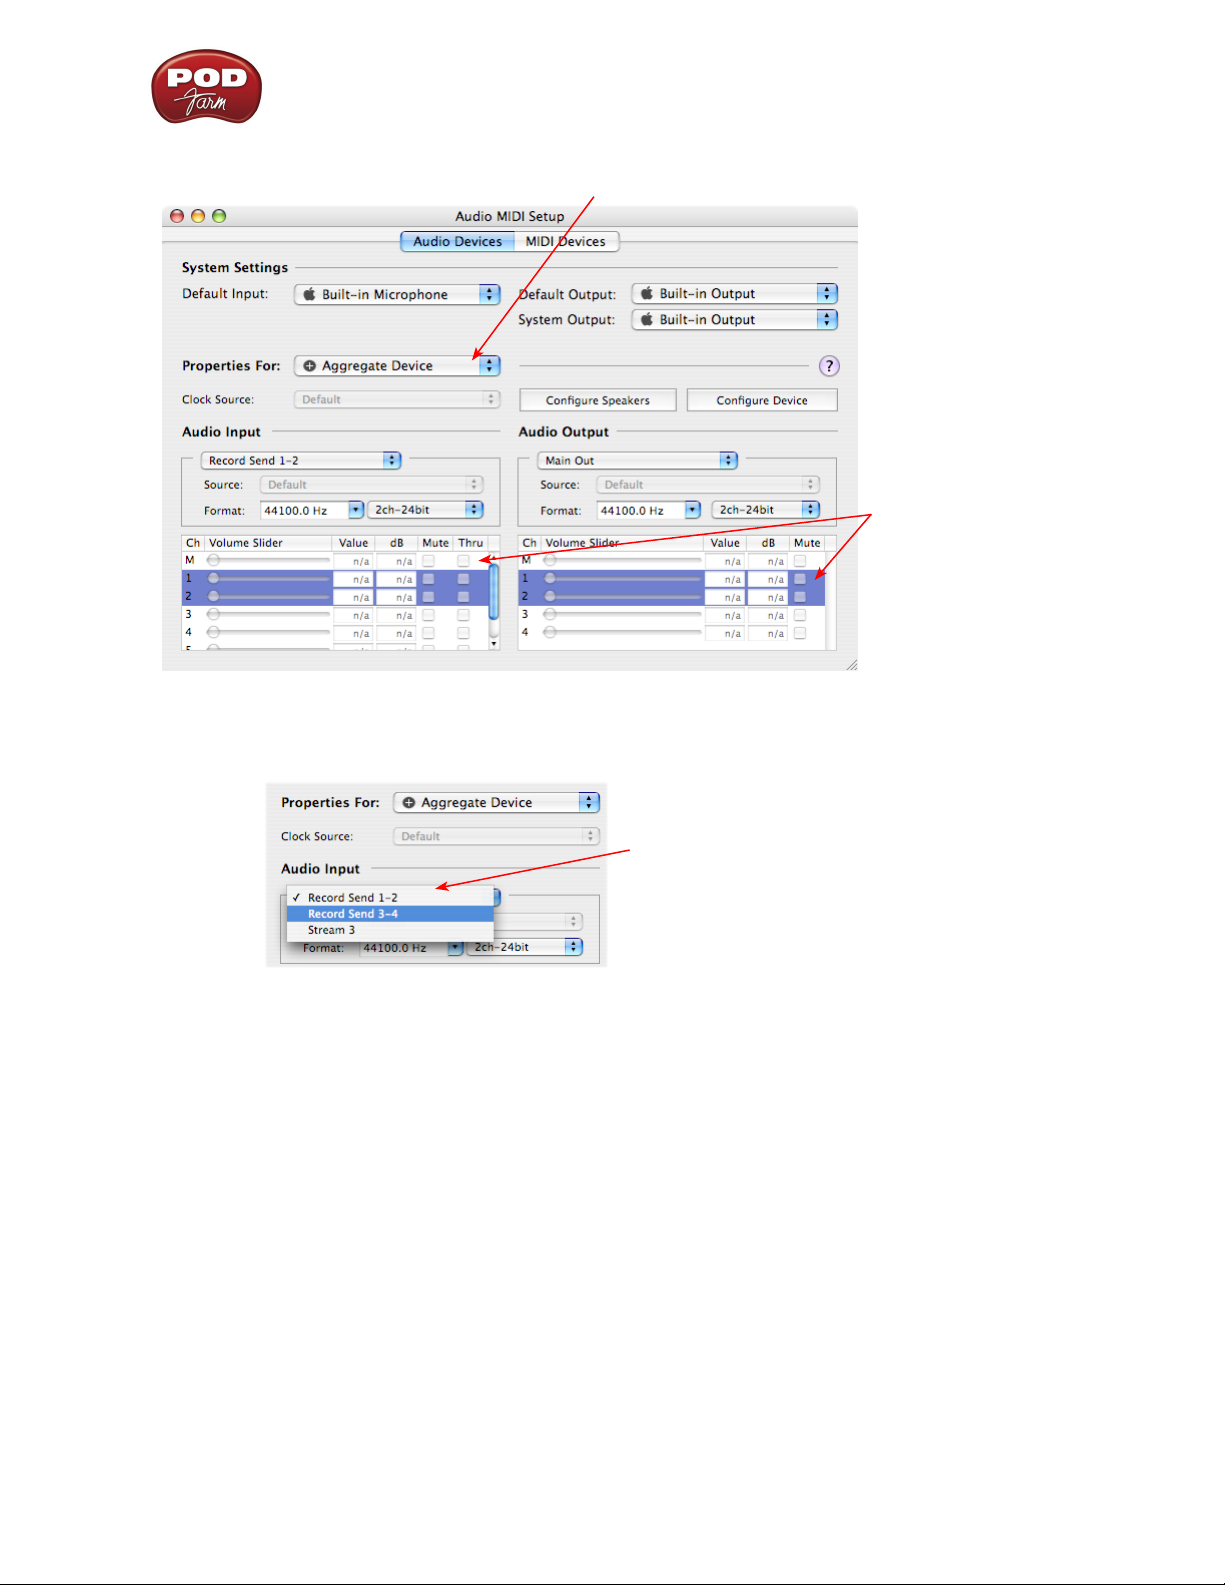
You are now able to choose this new “Aggregate Device” in the menus of the
System Settings. Choose your new Aggregate Device as the Properties For device
Now you will be able
to access settings for
all combined inputs
and outputs!
For the device we
created, this totals 6
Audio Inputs and 4
Audio Outputs.
The Audio Input and Audio Output sections each have a selector to allow you to choose each Stereo
device, and then make settings for each with the set of controls below.
You will now see all devices’ inputs
in the Audio Input selector.
Likewise, you will see all outputs in
the Audio Output selector
Note the order in which these Inputs and Outputs appear in the Audio-MIDI Setup dialog. In our
example, Line 6 device “Record Send” inputs are listed first because we made it the first device in the
Aggregate Device Editor dialog. The “Stream 3” input is from the Built-in Audio device, and appears
last. These input and output ports will also appear in this same order within your audio recording
software, but likely will not have any other identifying name other than their order number.
2•18
Page 26
POD Farm Recording Setup Guide - Audio Driver Configuration
Using an Aggregate Device with Audio Recording Software
Once an Aggregate Device is created on your Mac, you should then be able to access it in your
recording software. As an example, we’ll be showing you how it appears in the included Ableton Live
software…
Launch the Ableton Live software and open the Preferences dialog to configure the audio device.
Go to the Live menu
and choose Preferences
Go to the Audio tab
Choose CoreAudio as the driver type…
Then choose the Aggregate Device that
was just created for both the Input and
Output Audio Device. Note that this
appears along with the individual audio
devices in these menus as an additional
selectable device.
Set a Sample Rate – preferably this
should be one supported by all the audio
devices that make up your Aggregate
Device. Once all other settings are
complete, click the Input Config button
Just as with most Multitrack recording software, in Live you also need to
configure the individual inputs and outputs once a Multi-in/out device is
selected. Click on the Input Config button to access the Inputs.
By default, Live will usually have only the first
device enabled. Activate the desired devices
here to allow them be available as recording
inputs in the Live software. Note that each
additional active devices utilizes more CPU, so
only activate the ones you need!
Click OK when done
As noted earlier, you’ll need to refer to the order of the devices in the Audio MIDI Setup dialog to
know which are Line 6 hardware ins, and which are from the other device since Live does not show the
individual device names.
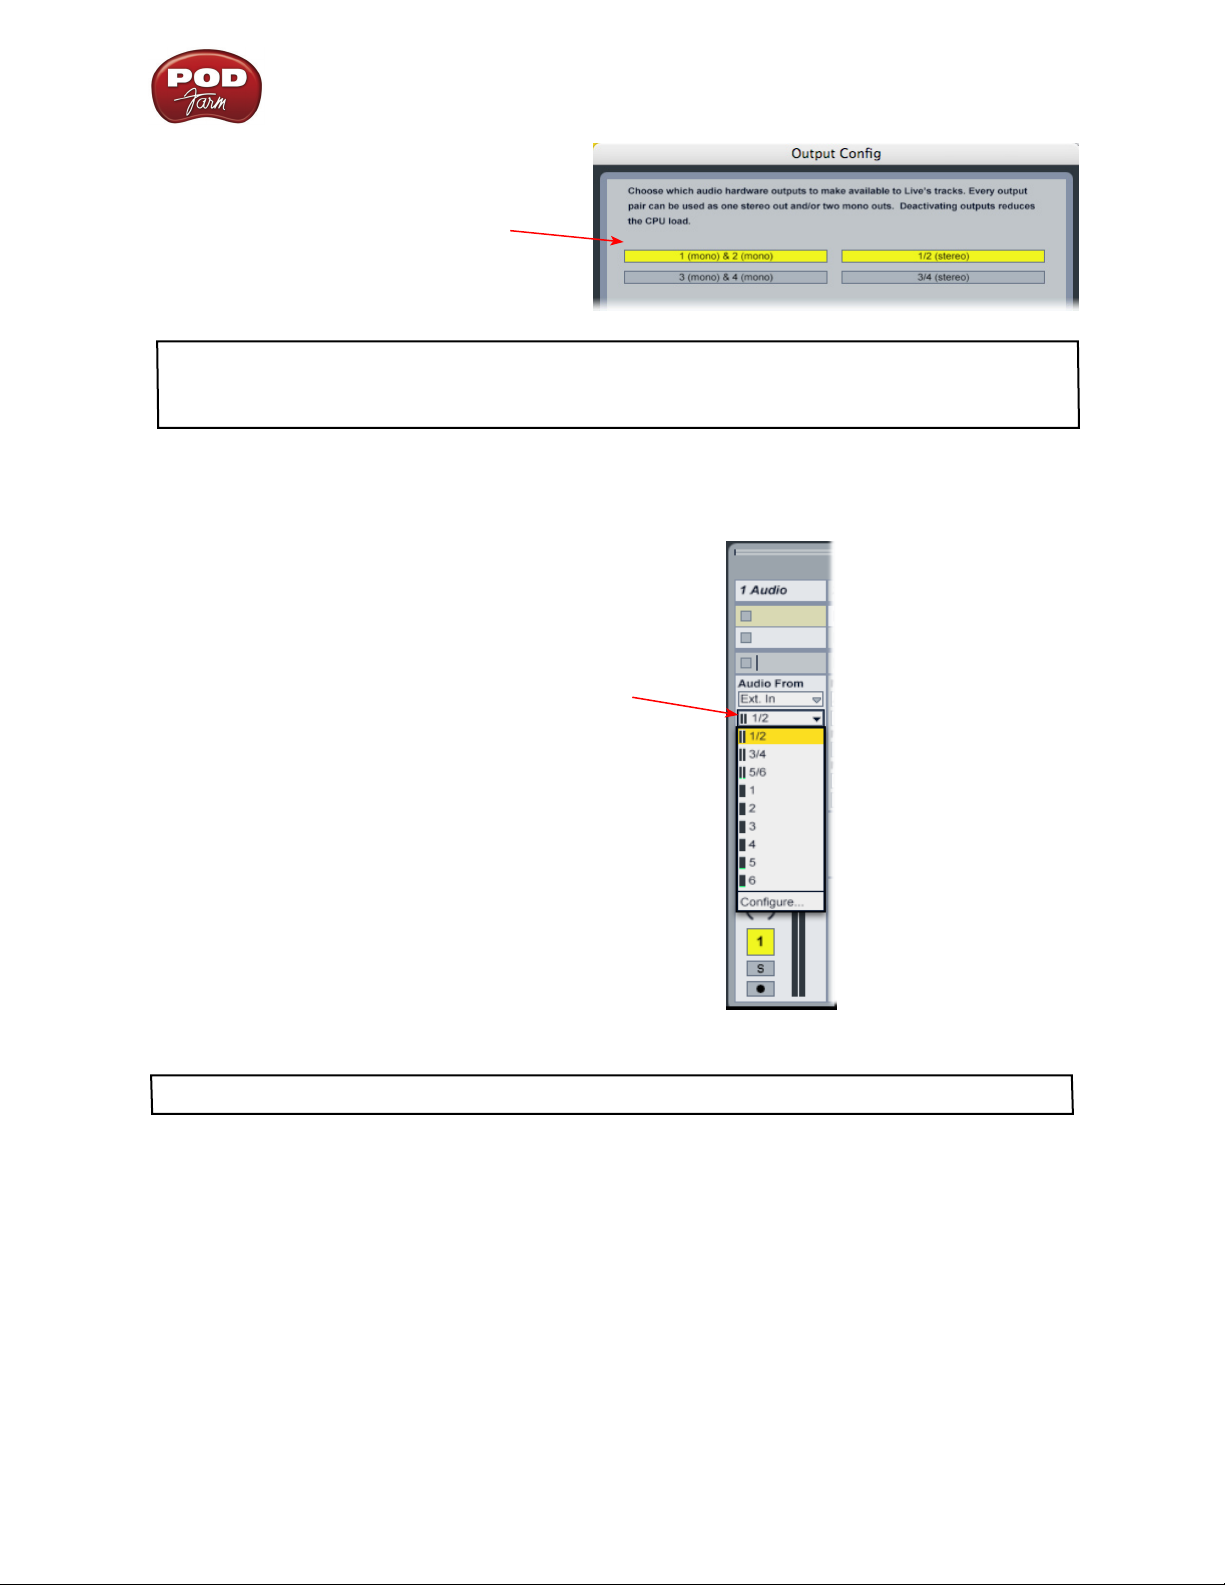
Next, click the Output Config button in the Live Preferences dialog to similarly activate multiple
outputs…
2•19
Page 27
POD Farm Recording Setup Guide - Audio Driver Configuration
Click on additional output devices to make
them available as playback outputs in Live if
desired.* Here again, activate only the ones you
need to avoid excess CPU usage.
Click OK when done
* Note - The Ableton Live Lite, Line 6 version has a restriction that allows only one stereo output to be
used at a time. To be able to choose two or more different output devices in a Live Set, you must switch
into Demo mode, or upgrade to a full version of Ableton Live
You can now continue to use Ableton Live and all inputs and outputs will appear within the audio
track menus, just as if all exist on one sound card!
All inputs appear in the Live
audio track input menu
For more information regarding the Aggregate Device feature, check your Mac® OS X documentation.
2•20
Page 28
POD Farm Recording Setup Guide - Audio Driver Configuration
Windows® Driver Settings
Be sure to first connect your Line 6 hardware directly to your computer’s USB port and then launch the
Line 6 Audio-MIDI Devices dialog from within the Windows® Control Panel (Start button > Settings
> Control Panel). This is the place where you can access the audio driver settings for your connected
device to see and configure things such as the current Sample Rate, Bit Depth, Buffer settings,
Record Sends, etc. For the Windows recording software applications covered in this document, it is
always recommended that you use the ASIO audio driver. When prompted for ASIO driver settings,
this is where you will make them. This dialog offers controls specifically for your connected Line 6
hardware.
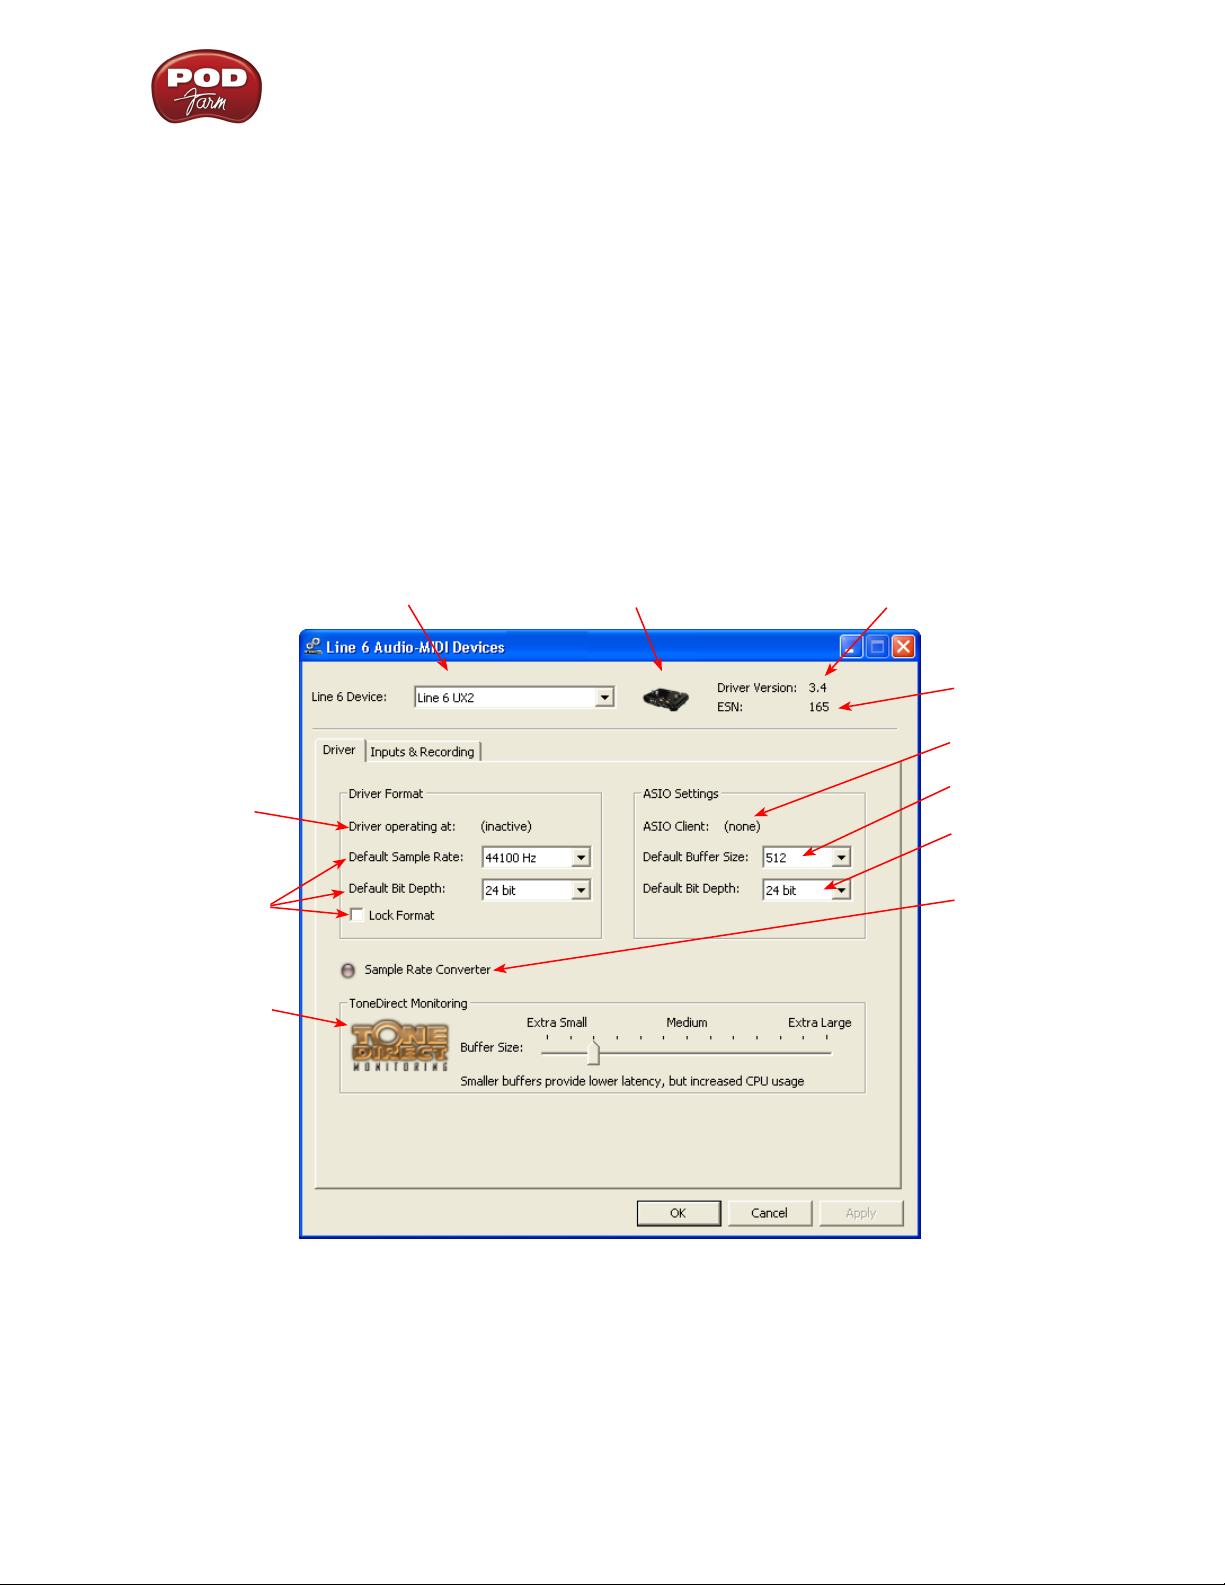
Line 6 Audio-MIDI Devices Dialog - Driver Tab
POD Studio, TonePort & GuitarPort - This example shows UX2 as the selected device, with POD
Farm running in Standalone mode. You’ll see some differences with a POD device selected, which are
noted in the following diagram - click on a number to go to its description. If you have a UX8 device,
you’ll have even more options, so be sure to also read up on the UX8 specific sections...
2 3
1
9
10
11
4
5
6
7
8
1 – Line 6 Device selector: Allows selection of any supported Line 6 USB audio device that is
connected. Note that if you have more than one supported device connected, each will be selectable
in this list, regardless if it is in use by the POD Farm Standalone application or not. If your device is
not connected and powered on, it will not appear in this list.
2 – Selected Device icon: An icon for the selected Line 6 Device appears here.
2•21
Page 29
POD Farm Recording Setup Guide - Audio Driver Configuration
3 – Driver version: Displays the current device’s installed driver version number.
4 – ESN: Displays the current device’s unique Electronic Serial Number.
5 – ASIO Client indicator: If you are running audio software that is using this Line 6 device as its
ASIO sound card, the name of the software will appear here. If not in use by an ASIO software, “none”
is displayed here, as shown in the above example.
6 – Buffer Size: The ASIO buffer size in use. Note this field is only active when in use by an ASIO
application. As your DAW software documentation will likely tell you, the ASIO Buffer Size will affect
the “responsiveness” and “latency” of the DAW software. The lower the setting, the faster the response,
but with the trade-off of higher processor usage and the risk of audio dropouts. Raise the value if you
are getting inconsistent playback or recording in the audio software. Basically, 512 is generally a good
average setting.*
*Note that POD Studio, TonePort and GuitarPort devices also offer ToneDirect™ Monitoring,
which is a separate audio path with its own Buffer setting. This allows you to keep the above
ASIO Buffer Size at a high “stable” value, yet still benefit from low latency monitoring of your
input signal while recording. Similarly, POD devices offer a USB audio buffer which provides
an independent, direct monitor signal with its own buffer adjustment as well.
7 – Bit Depth: The ASIO bit depth in use. Note this field is only active when in use by an ASIO
application. It is recommended to use the 24-bit option here as well as the 24-bit option within your
ASIO recording software. (If your ASIO audio software only supports or is set to 16-bit, then it is
recommended to set your Line 6 hardware’s Bit Depth setting here also to 16-bit to match).
8 – Sample Rate Converter Active indicator: POD Studio, TonePort & GuitarPort devices support
44.1 and 48 kHz sample rates natively, and also support 88.2 and 96 kHz sample rates by way of an
internal sample rate converter. This indicator lights up to show you when this converter is active,
which can be any time your ASIO software is requesting a different sample rate than what your device
“natively” supports. UX8 and POD X3 family devices support 44.1, 48, 88.2 and 96 kHz sample rates
natively.
9 – Driver Operation indicator:
POD Studio, TonePort & GuitarPort devices - Displays what sample rate and bit depth the current
device is operating at (or with no text if not in use).
10 – Lock Driver Format: When checked, this forces the Line 6 audio driver to operate at the Sample
Rate and Bit Depth settings entered in the two fields below (as opposed to following the sample rate
requested by a Windows audio application).
Note – This checkbox will remain grayed-out while the current Line 6 device is in use by the
POD Farm Standalone application and/or any 3rd party audio application. To access the Force
Driver Format feature, you will need to exit POD Farm, as well as any audio software that
might be using the currently selected Line 6 device as its audio device. This checkbox will then
be selectable.
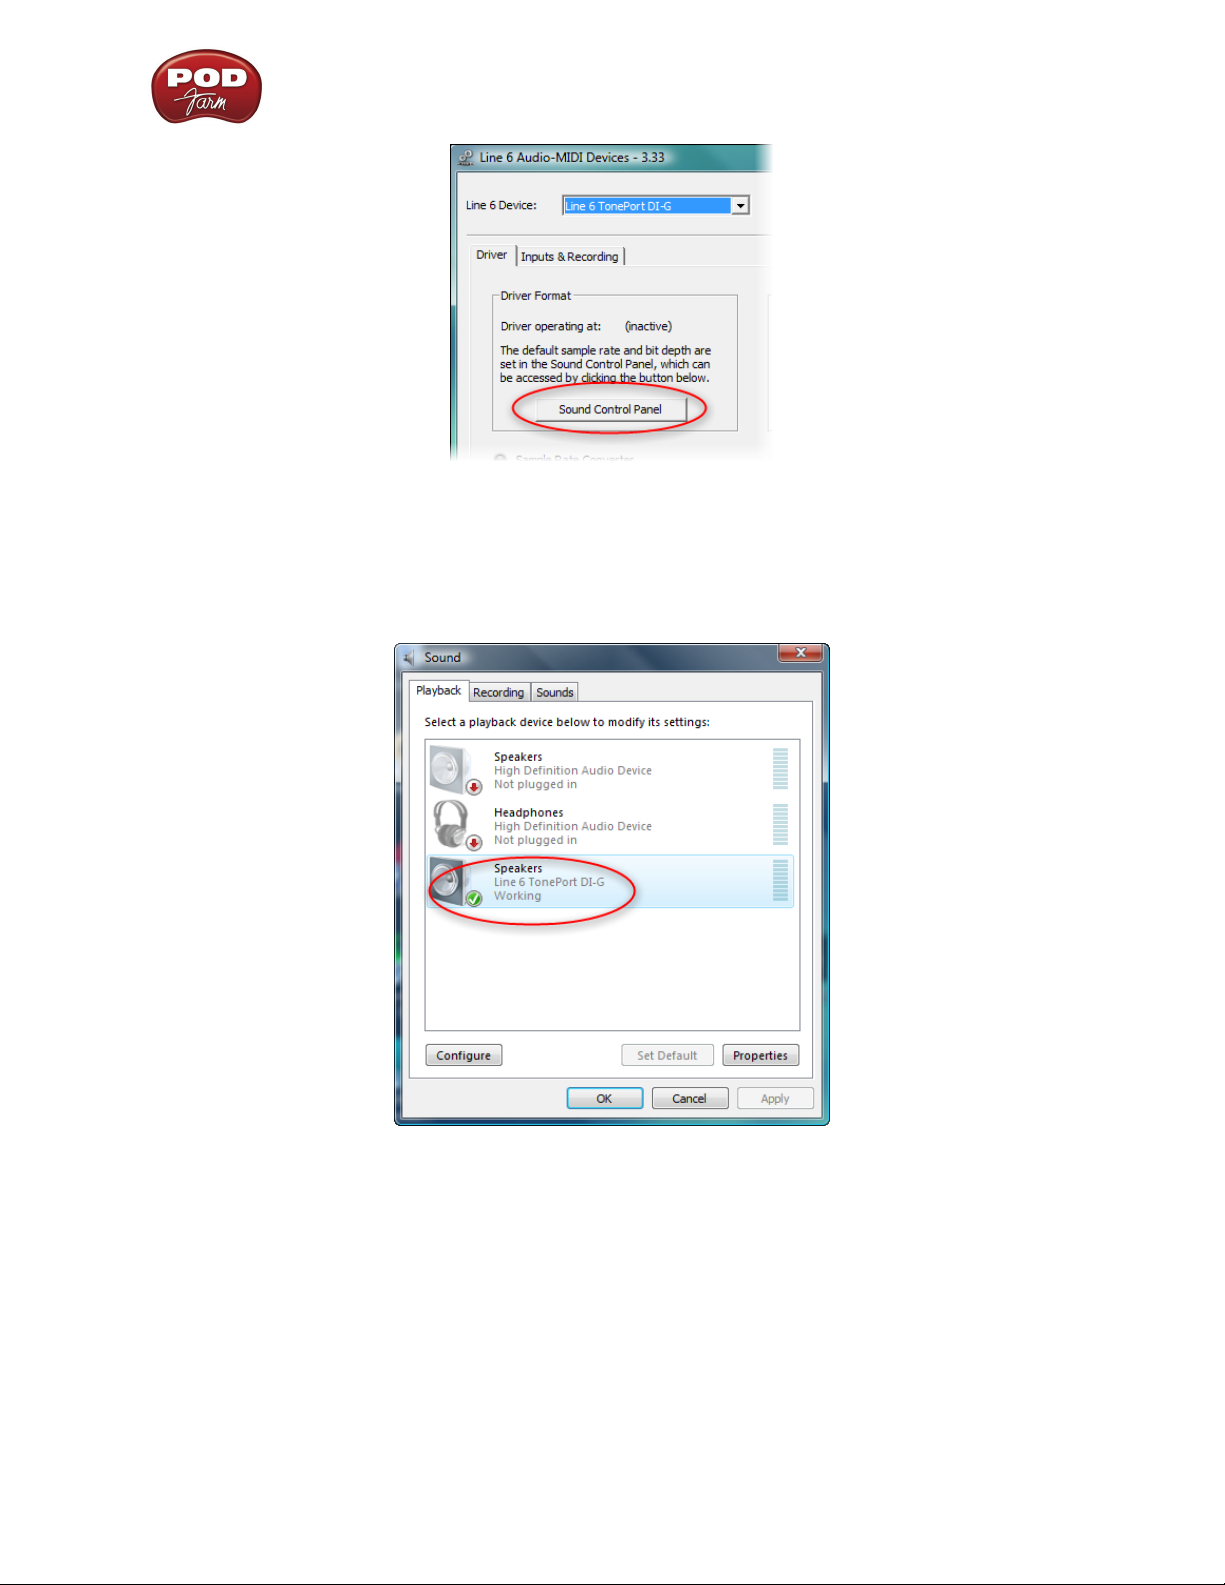
Windows Vista users... you won’t see these options in this portion of the dialog since these driver
format options are handled by Vista itself. You will instead see a Sound Control Panel button:
2•22
Page 30
POD Farm Recording Setup Guide - Audio Driver Configuration
Pressing this button (not surprisingly) launches the Vista Control Panel’s Sound dialog. Here in the
Playback tab you can designate your Line 6 USB device as the “Default” audio device if you want all
your Vista programs such as Win Media Player, Flash Player, iTunes, Internet video players, etc., to
send their playback to it. However, if you are going to set your Line 6 device as the default, it is a good
idea to also go to the Sounds tab and set it to the No Sounds sound scheme to avoid also getting blasts
of all those Vista system alerts, beeps and dings blaring through your monitors or headphones!
The Vista Sound Control Panel dialog - Playback tab
You can also click on the Properties button and access the default format setting for the Sample Rate
and Bit Depth for your Line 6 device when used with Vista audio applications. (Note that if you are
using an audio application that is set to utilize the ASIO driver for your Line 6 device, then ASIO
communicates directly with the device, and these Vista “default format” settings do not apply).
2•23
Page 31

POD Farm Recording Setup Guide - Audio Driver Configuration
The Vista Control Panel>Sounds>Properties - Advanced tab
11 – ToneDirect™ Monitoring/USB Audio Streaming Buffer Slider:
POD Studio, TonePort & GuitarPort devices - These devices offer the Line 6 exclusive ToneDirect™
Monitoring feature, which provides an ultra low latency audio signal path for you to hear your POD
Farm tone, even while recording. ToneDirect Monitoring has its own buffer to allow you to keep your
ASIO Buffer Size at a high value, for more solid performance and more efficiency with your ASIObased audio software. The default setting should be fine for most systems, but if getting audio dropouts
or working with large CPU demands on your system, raise the slider a notch or two to the right until
it alleviates the problem.
PODxt & POD X3 devices - These POD devices utilize a USB audio buffer (similar to ToneDirect™
Monitoring) which provides an independent, direct monitor signal with its own buffer adjustment.
When a PODxt or POD X3 device is selected as the Line 6 device in this dialog, the “USB Audio
Streaming” buffer slider is displayed. The default setting should be fine for most systems, but if getting
audio dropouts or working with large CPU demands on your system, raise the slider a notch or two to
the right until it alleviates the problem.
Line 6 Audio-MIDI Devices Dialog - Inputs & Recording Tab
Note - If you are using a UX8 device, please skip to the UX8 Inputs & Recording tab section.
Input Source Menu: This allows the user to select which physical input “source” is used on the Line 6
USB hardware (Mic 1, Instrument, etc.). Note that this menu is ONLY selectable when the POD Farm
Standalone software is not in use by the Line 6 hardware. When POD Farm is in use, it remains grayed
out, but displays the current Source that is selected within POD Farm Standalone.
When POD Farm Standalone is not in use by the selected Line 6 device, this Input Source menu, like
the POD Farm Tone 1 Input Source menu, offers a list of input options.
2•24
Page 32

POD Farm Recording Setup Guide - Audio Driver Configuration
GX, DI and GuitarPort are always “fixed” to only route their “instrument” 1 /4 input signal into
POD Farm Standalone.
PODxt & POD X3 devices do not offer an Input Source menu in this dialog.
UX8 has a larger set of options - see the next section for its Inputs & Recording tab.
Record Sends Info box: One line for each Record Send appears here along with a general description
for the signal each Send is carrying. Refer to your specific Line 6 device type in the following
descriptions.
Note that multiple Sends for your Line 6 device are only available when using the ASIO driver
in your recording software. If your recording software is configured to access the device via its
WDM or DirectSound driver, then only one Send will be available in the recording software
(Send 1-2).
POD Studio, TonePort & GuitarPort devices (except UX8) show the following Sends:
POD Studio, TonePort & GuitarPort devices show two stereo Sends (Record 1-2 and Record 3-4)
Single Tone Source (Mono/Stereo): When the POD Farm Standalone application is not •
running, Record Send 1-2 and 3-4 both carry the unprocessed signal. When running POD Farm
2•25
Page 33

POD Farm Recording Setup Guide - Audio Driver Configuration
Standalone, Record Send 1-2 and 3-4 carry the type of signal defined within POD Farm’s Mixer
View - Record Send Source menus (Processed, Semi-Processed or Dry).
POD X3 devices show a list of 5 Record Sends:
Note that the type of signal that is fed to each Send is configured on the POD X3’s on-board Outputs Studio/Direct Mix settings screen. To put it another way, Send 1-2 is fed the same “Studio/Direct Mix”
as your main outputs, which could be just Tone 1, or some combination of Tone 1 & 2, depending on
how you set the Studio/Direct mix controls. Please refer to your POD X3 Pilot’s Handbook for details
on the Output screen options and especially about POD X3’s unique Dual Tone operation.
POD X3 also offers a Monitor Level slider in this tab as well - you can use this to independently adjust
your POD X3 hardware monitor signal while recording (independently of the Send signal level that is
being recorded).
PODxt devices show only one Record Send (Record 1-2).
The type of signal that is routed to the Record Send 1-2 is determined by the PODxt Signal Routing
option within the Audio Signal Routing menu at the left. PODxt also offers a Monitor Level slider in
this tab as well - you can use this to independently adjust your PODxt monitor signal while recording
(independently of the Send signal level that is being recorded).
2•26
Page 34

POD Farm Recording Setup Guide - Audio Driver Configuration
NOTE: If using your Line 6 device with an audio recording software that is configured to use the device’s
WDM or DirectSound drivers, then only one Send will be available in the recording software (Send 1-2,
which will carry the combined Tone 1 and Tone 2 processed signals). You must configure your audio
software to access Line 6 hardware via its ASIO driver to utilize the additional, individual Record Sends.
Line 6 Audio-MIDI Devices - Inputs & Recording Tab (UX8 only)
The Inputs & Recording tab lets you select specific inputs for recording. Input Source options are as
follows:
Input 1: Instrument 1 or XLR 1 or Line 1 or S/PDIF (L)
Input 2: Instrument 2 or XLR 2 or Line 2 or S/PDIF (R)
Input 3: XLR 3 or Line 3
Input 4: XLR 4 or Line 4
Input 5: XLR 5 or Line 5
Input 6: XLR 6 or Line 6
Input 7: XLR 7 or Line 7
Input 8: XLR 8 or Line 8
2•27
Page 35

POD Farm Recording Setup Guide - Audio Driver Configuration
You can also link inputs into stereo pairs. This affects
hardware monitoring controls in the Outputs &
Monitoring tab (see below).
Using Inputs 1 & 2 with the POD Farm Standalone application
The POD Farm Standalone application works with the UX8 driver to provide ultra-low latency
via ToneDirect™ monitoring for Inputs 1 & 2 of the UX8, which includes two high-Z Instrument
inputs, two XLR inputs, two Line level inputs and stereo S/PDIF input. POD Farm’s ToneDirect™
Monitoring is ideally suited for recording guitar and bass with amp and effects processing, providing
the instantaneous feel necessary for competent performance while tracking.
ASIO Record Sends
This box displays the ASIO names of the UX8’s input sources as they appear in recording applications
utilizing the UX8’s ASIO driver, along with a description of what each Send is carrying. UX8’s Input
Sources 1 through 8 are mapped directly to the corresponding Send number (i.e. - Inputs 1-2 are fed
to Record Send 1-2). Sends 9-10 and 11-12 will carry a different signal depending on if the POD Farm
Standalone application is running...
If the POD Farm Standalone application is not currently running, then you’ll see the list appear as
follows:
When POD Farm Standalone is not running, Sends
9-10 and 11-12 carry the Input 1 (dry, unprocessed)
signal
If the POD Farm Standalone application is currently running, then Sends 9-10 and 11-12 will carry
the type of signal defined within POD Farm’s Mixer view - Record Send Source menus (Processed,
Semi-Processed or Dry).
Hardware Meters Show
Use this menu to select the input and output
levels you want the UX8’s hardware meters to
display.
2•28
Page 36

POD Farm Recording Setup Guide - Audio Driver Configuration
Clock Source
Set your preferred UX8 clock source with this menu.
Select S/PDIF to sync the UX8 to S/PDIF clock source
from another device’s digital output.
Line 6 Audio-MIDI Devices - Outputs & Monitoring Tab (UX8 only)
Important: Note that the Outputs & Monitoring tab provides control over the volume of whatever
you are inputting into UX8. These controls do not affect Record Send levels (the audio that streams
into your recording software), nor do they control the level of audio coming from your computer (such
as the playback level of your software’s session). In other words, volume and pan levels here are purely
analog, intended for monitoring live input levels (from instruments, mics, etc) to provide you with
independent level control over these items versus the playback levels of your audio software’s tracks.
You can specify different mix settings for each pair of UX8 outputs if you like. By default, the only
sounds that come out of the UX8 are the computer’s output and POD Farm Record Send 9-10 signal
(determined by the POD Farm Mixer View - Record Send settings), all through the physical Main
Outs 1-2. You can directly monitor other UX8 inputs by un-muting (uncheck the Mute checkbox)
the corresponding input source in this tab. Note that the Mute and volume controls here only act upon
inputs (your guitar, bass, mic etc., plugged into the UX8), and not audio coming from your computer
(such as the playback of your DAW software session). UX8 provides monitoring through the hardware
with zero latency, which is ideal for tracking with multiple sources simultaneously.
2•29
Page 37

POD Farm Recording Setup Guide - Audio Driver Configuration
Mix Controls
Inputs 1 - 12 offer the following controls:
Mute (On/Off) Monitor Volume (-100dB to +6dB)
Monitor Pan (100% Left - 100% Right)* Stereo Monitor Meters
Use the drop-down menu at the top to
select the output pair for which you want
to mix. Each output pair can have different
mix settings.
* -3dB panning law is applied to the pan control to maintain a constant monitoring level across the
panorama.
Main Monitor Volume
This slider controls the overall monitoring volume for the current output pair. What you hear is
displayed in the adjacent level meter and includes the combination of input sources and computergenerated signals, such as those assigned to the current output from within your DAW software. Note
that computer-generated signals (e.g. - the playback audio from your DAW software’s session) are
unaffected by the volume slider. The level meter’s clip LED graphics light up when the signal reaches
0 dB.
Main Mix vs. Talent Mix
UX8’s two front panel headphone outputs mirror Outs 1-2 and 3-4 respectively. You can use the
monitor controls, for example, to create a “main mix (1-2)” that captures the overall image of the
recording project, while a separate “talent mix (3-4)” can be provided for the musician who is currently
adding a new part, and may need a click track and an ample level of themselves above the rest of the
mix (you know, the guy asking for “more me” in his headphones). Additional output pairs 5-6 and 7-8
are available for headphone mixers or sending to an external tape deck, other monitors, or whatever
else you might want to send out a customized mix to.
2•30
Page 38

POD Farm Recording Setup Guide - Audio Driver Configuration
Stereo Pairs
When the “Stereo” checkbox is active in the Inputs & Recording tab for a pair of Inputs, the
representative Inputs in the Ouputs and Monitoring tab will display them as “locked” as a stereo pair.
The lock icon represents
two sources linked as a
stereo pair.
Using tool tips
You can obtain precise value readings for output levels, volume sliders and pan sliders. Do this by
hovering the mouse cursor over the meter or slider you wish to read.
The Pan sliders for a
“locked” stereo pair are
automatically set to
100% Left and Right.
Windows® Default Sound Device Settings
Windows® XP
dings, beeps and other system alerts. Additionally, many multimedia programs such as Windows®
Media Player® WinAmp®, iTunes® etc., will automatically set themselves to use the Windows “default
device” for audio playback as well. Your Line 6 device can be set to be this default device if you want
to utilize its high quality audio for playing your CD’s or DVD’s, for example. The following shows you
how to configure your Line 6 hardware as the default sound device in XP and Vista.
®
and Windows® Vista® make use of a sound card device to be able to play all those
Windows® XP® Default Sound Device
Click on your Windows Start button and go to Settings > Control Panel > Sounds and Audio
Devices > Audio tab. In the Sound Playback section, choose your Line 6 device as the Default
device. Do the same in the Sound Recording section if you also want to set your Line 6 device as the
default recording device.
2•31
Page 39

POD Farm Recording Setup Guide - Audio Driver Configuration
UX2 set as the Windows Default device for
Playback and Recording
If you have a Windows software that requires MIDI playback, then you can also
choose the GS Wavetable Device here,
which is a “software synthesizer” included in
Windows. Its output will also play through
the Default Playback Device.
Disable System Alert Sounds
It can actually be quite annoying to have all those Windows system alert sounds blaring at high volume
through your Line 6 device when you are trying to focus on more musical endeavors. Fortunately, you
can independently turn off these system sounds and still keep your Line 6 device as your Windows
default playback device. While still in the Sounds and Audio Devices dialog, go to the Sounds tab. For
the Sounds Scheme setting, choose No Sounds. Click OK to exit the dialog.
The Windows® Mixer
The Windows Mixer utility also defaults to controlling the Windows default device. This is not
necessarily a problem, but it is important to be aware of the fact that this means all the controls in the
Windows Mixer’s Wave and main Volume sections (Pan, vertical Level slider and Mute checkbox)
will affect your Line 6 device’s monitor output. Likewise, the Windows Mixer also controls the default
device’s Recording Pan/Level/Mute settings as well. You may want to just keep all these Windows
Mixer settings at “unity” settings so that they do not affect your Line 6 device’s monitor signal – that
is, keep the Pan set to center, the Level sliders to all the way up, and the Mute checkboxes off. Then
you can just use the Line 6 Audio-MIDI Settings dialog or POD Farm Standalone software controls to
adjust these Monitor functions.
Note - if you have one of the fancier computer keyboards or a laptop that include volume and mute buttons,
then they likely will adjust these same Windows Mixer controls.
To Launch the Windows Mixer, click on your Start button and go to Settings > Control Panel >
Sounds and Audio Devices > Volume tab. From the previous step, your Line 6 device should already
be set as the Default device (if not, set it in the Sounds tab). Click the Advanced button to launch
the Mixer...
2•32
Page 40

POD Farm Recording Setup Guide - Audio Driver Configuration
These Windows Mixer Volume and Wave controls
affect the Windows default device’s playback output
To access the Windows Mixer Recording controls, go to the Options menu > Properties and choose
the Recording option…
These Windows Mixer Volume and
Pan controls affect the Windows
default device’s Recording input
Surround Playback
POD Studio, TonePort*, GuitarPort, PODxt and POD X3’s playback capabilities are designed for
stereo. If you already have a sound card that provides surround sound via multiple speakers, this would
also be a feature that you would lose by making your Line 6 device your preferred audio device.
* Note that UX8 offers multiple physical outputs and can actually be configured for multi-channel surround
output playback! Please see the documentation for your audio application and configuring a multi-channel
sound card for Surround output.
Windows® Vista® Default Sound Device
Click on your Windows Start button and go to Control Panel > Sound > Playback tab. Choose
your Line 6 device here, and if it does not already have the green checkbox indicator, click on the
Set Default button to make it your default audio playback device. Go to the Recording tab and repeat
2•33
Page 41

POD Farm Recording Setup Guide - Audio Driver Configuration
these steps if you also want to set your Line 6 device as the default recording device.
UX2 set as the Windows Default device for Playback and Recording
Default Device Volume Adjustment
The default Playback and Recording devices each also have their own Volume control - to access these
controls, click on the Properties button while the Line 6 device is selected in the above Playback and
Recording tabs.
It is important to be aware of the fact that these Volume controls will affect your Line 6 device’s
monitor output and recording input level. You may want to just keep all these Windows Mixer settings
at “unity” settings so that they do not affect your Line 6 device’s output and input levels – that is, keep
the Level sliders to all the way up. Then you can just use the Line 6 Audio-MIDI Settings dialog or
POD Farm Standalone controls to adjust these Monitor functions.
Note - if you have one of the fancier computer keyboards or a laptop that include volume and mute buttons,
then they likely will adjust these same Windows Mixer controls.
2•34
Page 42

POD Farm Recording Setup Guide - Audio Driver Configuration
Disable System Alert Sounds
It can actually be quite annoying to have all those Windows system alert sounds blaring at high volume
through your Line 6 device when you are trying to focus on more musical endeavors. Fortunately, you
can independently turn off these system sounds and still keep your Line 6 device as your Windows
default playback device. While still in the Sound dialog, go to the Sounds tab. For the Sounds Scheme
setting, choose No Sounds. Click OK to exit the dialog.
Surround Playback
POD Studio, TonePort*, GuitarPort, PODxt and POD X3’s playback capabilities are designed for
stereo. If you already have a sound card that provides surround sound via multiple speakers, this would
also be a feature that you would lose by making your Line 6 device your default audio device.
* Note that UX8 offers multiple physical outputs and can actually be configured for multi-channel surround
output playback! Please see the documentation for your audio application and configuring a multi-channel
sound card for Surround output.
S/PDIF Digital Output from Line 6 Hardware to an External Device
UX2, UX8, KB37, POD X3 and PODxt Pro devices all include a S/PDIF digital output, which allows
you to connect to digital devices such as a DAT recorder, MiniDisc, sound card, or most any device
that offers a S/PDIF format digital input. POD X3 Pro and PODxt Pro also include AES/EBU digital
outs, which can be used to connect to hardware that offers this type of digital input as well. Connecting
digitally is the preferred method to connect to external devices that support it since this does not
require the added digital-to-analog-to-digital signal conversion process as required with using analog
outs.
One type of recording setup where you might use the S/PDIF output of your Line 6 hardware is with
a Digidesign® Pro Tools® or Pro Tools LE™ system. With any Pro Tools setup, your Line 6 hardware
would not be the assigned sound card for the Pro Tools software (since Digidesign requires proprietary
hardware), but you can still utilize it by connecting the Line 6 S/PDIF output into the S/PDIF input of
the Pro Tools hardware. Likewise, if you prefer to use a different sound card with other audio applications
and the unit includes a S/PDIF input, then you can still utilize your Line 6 device connected digitally.
This way you are simply routing the digital audio from your Line 6 gear right into Pro Tools or other
software with no signal degradation!
We’ve provided detailed steps specifically for connecting a Line 6 device’s S/PDIF output to a Digidesign
Mbox® 2 device in the Recording with DigiDesign Pro Tools chapters - try the links below to jump
to these chapters. The steps are very similar if you are connecting to the S/PDIF inputs of other
manufacturer’ sound card devices as well.
Mac - Digidesign Pro Tools LE chapter
Windows - Digidesign Pro Tool LE chapter
Considerations When Using S/PDIF or AES/EBU Output
Some digital devices may only support one sample rate (some DAT and video machines are fixed •
at 48 kHz, for example), so you will want to be sure to choose a sample rate supported by both
units.
2•35
Page 43

POD Farm Recording Setup Guide - Audio Driver Configuration
When POD Studio & TonePort UX2/UX8/KB37 and PODxt Pro are operating at their 96 kHz •
“compatible” sample rate mode, they send data out the S/PDIF outputs at 48 kHz. The S/PDIF
output is always sent as 24 bit.
Remember that if you are connecting your POD Studio, TonePort, POD X3 or PODxt Pro digital •
output to another sound card, you are not limited to the other sound card being on the same
computer. You can use your POD Studio, TonePort or GuitarPort + POD Farm in Standalone
operation on one computer as your “Tone Machine” - or POD X3/PODxt by itself - and then
send the fully baked Tone digitally to a completely different setup for recording!
For more specifics on digital input and output operation for TonePort, POD X3 or PODxt Pro •
please see the device’s User Manual.
2•36
Page 44

Using the POD Farm Plug-In
pod fa R m pl u g -in
POD Farm Plug-In is an amazing tool for computer recording since it allows you to non-destructively
apply entire POD Farm Single or Dual Tones on any of your recorded audio tracks, without needing to
commit the settings until your final mixdown. POD Farm Plug-In comes included with all Line 6 POD
Studio hardware, and is available as an Add-On purchase to all Line 6 TonePort, GuitarPort, POD X3
and PODxt devices. POD Farm Plug-In is compatible with VST®, AU® and RTAS® Plug-In formats
for use with all major Mac
in all the fun, you can grab POD Farm Plug-In now without even getting out of your chair! Just run
Line 6 Monkey with your Line 6 USB device connected and go to the Optional Add-Ons tab, or head
over to the Line 6 Online Store.
®
or Windows
®
recording software “host” applications. If you want to get
The POD Farm Plug-In User Interface
Using POD Farm Plug-In with your favorite Digital Audio Workstation (DAW) host software gives
you the freedom to change your Tone as often as needed and automate amp and effect settings with
surgical precision. If you have experience with DAW host applications such as Steinberg Cubase®,
Ableton Live™, or Digidesign Pro Tools LE™, then you have probably used audio effects Plug-Ins.
Using POD Farm Plug-In in your host is no different from using any other. Unlike most other Plug-Ins
however, POD Farm is not just a one-trick pony! It is really a full suite of amp, cab, mic and effects
models that you can apply as up to two complete, stereo POD Farm Tones on guitar, bass or vocals.
Or, you can apply individual POD Farm models or effects on any types of instruments, as many tracks
as you like, and even fully automate the parameters.
If you’re new to the world of recording software and Plug-Ins, read through the following tutorials in
this chapter for using POD Farm Plug-In in the Ableton Live DAW software. These should serve as
helpful examples on how to configure and use POD Farm Plug-In within most Mac® and Windows®
DAW host applications. We’ve also provided some tips for POD Farm Plug-In in the following software
chapters.
3•1
Page 45

Using the POD Farm Plug-In
Activation & USB Hardware
Before using POD Farm Plug-In, you’ll need to activate and/or authorize it to be used with your Line
6 USB hardware and on your computer. No worries, we’ve made this simple enough that even a
drummer can do it, using the Line 6 Monkey software installed with POD Farm. Please see the Getting
Started chapter.
Note: You do not necessarily need to use your Line 6 USB hardware as the assigned sound card for your
audio software to allow the use of POD Farm Plug-In, but your Line 6 device MUST be connected directly
to your computer’s USB port. You should always connect directly to one of your computer’s USB port and
not to a USB hub.
If your other audio recording software or hardware requires the use of an iLok® or other USB dongle
then it is no problem to have it connected to your computer at the same time. If possible, you might
try moving any USB dongle, mouse or keyboard to a USB hub to free up a direct computer USB port
for your Line 6 hardware.
Configuring POD Farm Plug-In in your Host Software
Accessing and utilizing POD Farm Plug-In from within your VST®, AU® or RTAS® is fairly straightforward, but there are a few little differences between some host applications, so it is a good idea to
read through the documentation that came with your host software first. To follow are a few helpful
pointers.
Where Can I Find the POD Farm Plug-In On My Computer?
If you followed the default installation of POD Farm, then all supported formats of the POD Farm
Plug-In were automatically installed on your computer, and into the default directories, as listed below.
If, by chance, you customized your installation by unchecking any of the POD Farm Plug-In formats,
then you’ll need to run the POD Farm installation again with them checked to allow them to be
installed. If you manually changed the directory for where the VST Plug-In was to be installed, then
you’ll need to know what that custom directory was that you specified.
Most DAW “host” applications scan and locate your POD Farm Plug-In automatically on launch. But
if you don’t see POD Farm in your host’s Plug-In menus, then you’ll need to configure your host’s PlugIn options to find it (such options are typically found in the host’s Preferences). Here is the default
install location for each of the POD Farm Plug-In formats...
On • Mac
®
Audio Units•
®
VST•
is installed to /Library/Audio/Plug-Ins/VST/Line 6
RTAS•
®
is installed in Library/Audio/Plug-Ins/ Components.
®
is installed to Library/Application Support/ Digidesign/Plug-Ins/Line 6.
On • Windows®
®
VST•
is installed to \Program Files\Line6\POD Farm\VST\Line 6
®
RTAS•
is installed to \Program Files\Common Files\Digidesign\DAE\Plug-Ins\Line 6.
3•2
Page 46

Using the POD Farm Plug-In
Using the POD Farm VST or AU Plug-In - Ableton Live 7
Once you have POD Farm Plug-In Add-On activated for your Line 6 hardware, you are ready to jump
right into a whole new level of POD Farm possibilities right within your Mac® or Windows
®
software!
If you are using a Mac, then POD Farm Plug-In is supported by any audio software that hosts the Mac®
Audio Units® (AU) or VST® Plug-In formats. Note that some hosts, (such as Ableton Live), support
both these formats, so you can simply use either with the same results. If you are using a Windows PC,
then POD Farm Plug-In is supported by any audio software that supports the VST® Plug-In format.
If using Digidesign® Pro Tools® software on either Mac or Windows, it utilizes the RTAS® Plug-In
format. (Please see the following Pro Tools Mac® and Windows® chapters for more info).
To follow we’ve provided a step-by-step guide for POD Farm Plug-In within Ableton Live 7. This
should provide a great example for how to insert, configure and automate parameters for POD Farm
Plug-In on most any Mac® AU/VST or Windows® VST host. The steps are the same on either Mac
or Windows, except where noted.
Note that for the following examples, we’re assuming you’ve performed the default POD Farm
installation, where the POD Farm Plug-In is installed into the default locations on your computer for
all formats (see the Where can I find the POD Farm Plug-In... section above).
Info View
First a handy tip... if you are new to Ableton Live then you might want to turn on the Info View panel.
This displays a brief description of the user interface element within Live that your mouse is currently
over. You can show/hide this panel by choosing it from Live’s View menu:
audio
Activating POD Farm Plug-In in Live
Launch Ableton Live and select the Plug-In Device Browser. If you don’t automatically see POD
Farm AU and/or VST Plug-Ins listed here, then you’ll probably see an Activate button, meaning you
need Live to “activate” all Plug-Ins on your system (this has nothing to do with Line 6’s “Plug-In
Activation” by the way, it is strictly a Live feature):
3•3
Page 47

Using the POD Farm Plug-In
Click on the button to
display the Plug-In Device
Browser
Clicking the Activate button will display the Preferences dialog with several options - we’ll be setting
the Plug-In Sources options. Note there are some differences if you are using Live on Mac versus
Windows for this step:
Click the Activate button
Mac - AU Plug-In Activation
Click the Use Audio Units
button so that it becomes “On”
Once Use Audio Units is enabled, Live will scan your Mac and display all found Plug-Ins in the Plug-
In Devices browser panel, including POD Farm within a Line 6 folder, like this:
3•4
Page 48

Using the POD Farm Plug-In
VST Plug-In Activation - Mac
Just like above for the AU Plug-In, if you do not already see the POD Farm VST-Plug-In in Live’s
Plug-In Browser, then go to the Live > Preferences > File Folder window again and turn the VST
feature on:
Click the Use VST Plug-
In System Folders so that it
becomes “On”
Note: POD Farm VST Plug-In is installed into the Mac “VST System Folder” by default. However, if you
customized the POD Farm installation and directed the VST Plug-In to a different folder, then you’ll need
to activate the “Use VST Custom folder” in this window, and click the Browse button to manually point
Live to the custom directory you chose.
Once the appropriate folder is selected, Live will scan it and display all found VST Plug-Ins, including
POD Farm, in the Plug-In Devices browser panel like this:
If POD Farm VST Plug-In does not appear in the browser, try clicking the Rescan button in the Live
> Preferences > File Folder window.
VST Plug-In Activation - Windows
The procedure for VST Plug-In Activation on Windows is much the same as on Mac, however, you’ll
need to manually point Live to the Line 6 directory (or your custom Plug-In install directory) so Live
can find it:
3•5
Page 49

Using the POD Farm Plug-In
Click the Use VST Custom Folder
button so that it becomes “On”, then
click Browse to choose the folder where
POD Farm Plug-In is installed....
Choose the Program Files\Line 6\POD
Farm\VST folder* and click OK
Once the appropriate folder is selected, Live will scan it and display all found Plug-Ins in the Plug-In
Devices browser panel like this:
If POD Farm VST Plug-In does not appear in the browser, try clicking the Rescan button in the Live
> Preferences > File Folder window.
Inserting POD Farm Plug-In on an Audio Track
Within your Live “Set”, we’ll now insert POD Farm Plug-In on an Audio Track...
3•6
Page 50

Using the POD Farm Plug-In
Click her to switch to
Live’s Arrangement View
Note that Live’s audio tracks are capable of being configured with Mono or Stereo inputs and outputs. It is up to you if you’d like to use the track for Mono or Stereo recording or for importing Mono
or Stereo audio clips. Unlike some other VST/AU Plug-Ins, there is no need to select a specific
“Mono” or “Stereo” POD Farm Plug-In version to match your audio track. In this example, we have
a Stereo audio clip in Audio Track 1, so let’s insert the POD Farm Plug-In.
On Mac you may have two choices here since Live supports both the POD Farm AU and VST PlugIn. It really does not matter if you’ve activated either (or both) for POD Farm Plug-In, so use whichever version you like.
Click on POD Farm Plug-In in the Plug-In Device Browser and
drag and drop it directly onto Audio Track 1
Or, alternatively, if you are in Live’s “Session View”, you can also drag the Plug-In from the Plug-In
Device Browser directly onto the desired vertical “track” strip to insert it that way.
Once inserted, you’ll see POD Farm’s Plug-In UI window is automatically launched, and a POD Farm
Plug-In “Device” panel is loaded in the lower pane of Live. Several of the controls in this Device panel
have to do with Plug-In parameter automation - see the following section for more about this.
Enable/Bypass the Plug-In
Click this button to show/hide
POD Farm Plug-In parameter
controls embedded in Live’s UI
(although you’ll likely find it
easier to use POD Farm Plug-In
UI window to tweak parameters)
Click this button to show/hide
the POD Farm UI window
This “X-Y” graphic display
allows you to control 2 Plug-In
parameters in real-time. The two
parameters are selected in the
menus below. More on this later
in the chapter.
3•7
Page 51

Using the POD Farm Plug-In
To remove POD Farm Plug-In from the Track, simply right
click (Windows) or Ctrl + click (Mac) directly on POD
Farm Plug-In’s title bar and choose Delete
Now go on and try a few presets and tweak settings all you like in the POD Farm Plug-In UI window!
Remember that it is a good idea to save your Plug-In settings as a Preset before removing the inserted
Plug-In so that you can recall the settings another time. For details on specific POD Farm features,
please refer to the POD Farm User Guide available on the POD Farm Online Help site.
Inserting POD Farm Plug-In on a Send Return
Each instance of any Plug-In you add in your Live Set of course utilizes CPU power. Therefore, if you
have the situation in your Live Set where you want to apply the same exact POD Farm Plug-In settings
to more than one audio track, it is a better practice to insert one instance of POD Farm Plug-In on
one of Live’s “Return” tracks and route the desired audio tracks’ Send outputs to it. Here is how to set
this up...
In Live’s Arrange View, drag and drop the POD Farm Plug-In
onto the A Return track
Once the Plug-In is loaded as an insert on
the Return track, you’ll see the track name is
automatically changed to “A POD Farm”
Configure POD Farm Plug-In with any combination of effects you like. For example, maybe you just
want to use the Stereo Delay and Reverb (with no Amp or Cab processing added) so that these effects
can be applied to several different tracks of recorded instruments.
Next, switch Live’s Session View where you can easily see and adjust the Send A levels from multiple
tracks. In this scenario, we’ve set the Send A controls for both audio tracks 1 and 2. The result is that
each of these tracks will have part of their output routed to the “A POD Farm” Return track, and
therefore, through the inserted POD Farm Plug-In.
3•8
Page 52

Using the POD Farm Plug-In
Tip: When using POD Farm Plug-In on Send Return like this, it is typically best to set each active Model’s
Mix knob to 100%. This way, the “Wet/Dry” mix can then be controlled by adjusting an audio track’s Send
A level control, to feed the desired amount of signal through the Plug-In to add more “Wet” to the mix.
Adjust the Send A
knob on each audio
track to determine
the level fed to the
A POD Farm Return
track
Adjust the Track
Volume for the
amount of “dry” track
signal
Adjust the Track Volume on the A POD Farm Return track to
determine how much “POD Farm-effected” audio you will hear
You can choose how much effect is applied for each audio track by how much you raise the Send A
level. Additionally, the main output of each audio track is still routed to the main stereo Out 1-2, so
you can adjust the vertical Track Volume slider for each audio track to also determine how much “dry”
track signal is also heard at the main output.
Note that it also possible to insert POD Farm Plug-In on the Master tack of your Live Set - just drag
POD Farm Plug-In onto the Master track to do so. This allows you to run all your audio tracks through
a common Plug-In effect, such as the POD Farm Compressor, Delay or Reverb! Ableton Live offers
a great deal more signal routing options, allowing you to be even more creative with the use of POD
Farm Plug-In and the mix of your Live Sets. Please go to the Live Help menu and choose Read the
Live Manual for more info.
Automating POD Farm Plug-In Parameters
Most DAW applications offer ways to “automate” the application’s mix parameters (track volume,
panning, etc.), as well as Plug-In effects’ parameters. With POD Farm Plug-In inserted on your audio
track, this means you can tweak any Amp or Effects settings and have all your adjustments “recorded”
via an adjustable envelope right on the track! Typically, you have an option to “draw” an envelope
directly on the track for any parameter, and also an option to record automation in real-time, where
you tweak Plug-In settings during playback and the envelope is drawn for you. Ableton Live can
automate any number of POD Farm Plug-In parameters using either of these methods, so we’ll show a
few handy examples. Other DAW applications function similarly, but there are usually some differences
in controls and terminology, so be sure to check the documentation for your DAW software regarding
parameter automation.
3•9
Page 53

Using the POD Farm Plug-In
Live’s Automation Envelopes and Draw Mode
For this example, let’s suppose you want to increase the POD Farm Analog Chorus effect’s Mix
parameter in a particular section of a stereo guitar track you’ve recorded in Live, such Audio Track 1
from bar 13 through 20…
First, insert POD Farm Plug-In directly on the audio track containing the audio clip, and configure
a Single Tone in POD Farm, adding the Analog Chorus effect from the Modulation category. Then
configure your Live track to see and manipulate this Modulation Mix parameter...
In the Arrangement View, click on
the track’s Device Chooser and select
the inserted POD Farm Plug-In
This now allows POD Farm Plug-In’s automatable parameters to be listed in the lower Control
Chooser selector. We’ll choose the Mix parameter for Tone 1’s Modulation effect.
Note - Within the Control Chooser list, you’ll see the abbreviated names of all available POD Farm
automatable parameters. There are two of each parameter in the list, preceded by a “1” or “2” which
indicates the corresponding parameter for Tone 1 versus Tone 2. In our example, we want to control a Mod
effect in Tone 1. For a complete list of parameters, please see the Automation Parameter Table.
Once a parameter is selected, a red envelope line appears
across the track - you can click and drag this line up/down to
adjust the selected parameter
Double click on the envelope line to create a
“breakpoint”. Here, breakpoints are added where we
want to start and end the parameter change. Note
that when the mouse cursor is over a breakpoint, the
parameter value at this position is displayed
Now you can add additional breakpoints and drag them
up/down to have the POD Farm Mod-Mix change over
time. Here, the results are that no Chorus effect is heard
until bar 13, then it goes to a 50% Mix, and gradually back
to no Chorus by the end of Bar 20
Click on the track’s Control
Chooser and select the 1 ModMix parameter
3•10
Page 54

Using the POD Farm Plug-In
Ableton Live also features a Draw Mode tool, which allows you to literally “draw” the parameter
envelope right over the track. You can select the Draw Mode tool from Live’s control bar at the top of
the window, then use it like a pencil to draw on the track.
Click on the Draw Mode tool
Then “draw” your parameter changes directly on the track
Turn off the Draw Mode tool and you can click any individual breakpoint and adjust it up/down to fine
tune your adjustments, as shown above. Now open the POD Farm Plug-In GUI and select the Analog
Chorus effect in Panel View and hit Rewind and Play in Live. You’ll see the Chorus Mix knob move
in response to this recorded automation, and you’ll hear the Mix change over time!
You can create any number of envelopes to display as many POD Farm Plug-In parameter envelopes
as desired. To display more parameters, click on the little “+ “ button at the bottom right of the track
header. This places the parameter envelope you just created in its own “lane”, expanded below the
waveform lane.
Now you can choose the POD Farm Plug-In again in the Device Chooser, and desired parameter in
the Control Chooser for a 2nd parameter envelope. Edit this additional parameter to taste.
As discussed in the previous section, you can utilize Live’s Sends to route a track’s signal to a Return
track that has POD Farm Plug-In inserted. Note that you also have the option within the Control
Chooser menu to show an envelope for each Send Return. If you choose the Return track where the
Plug-In is loaded, you can adjust it’s envelope to determine how much signal is fed to the Send, thus
determining how much POD Farm effect is added to the track’s playback mix.
The Live Mixer A-Return level parameter automation envelope adjusted on an Audio track
But wait... there’s more! If you take a look at the options for your Return track that has POD Farm
Plug-In inserted, you’ll see that you also have all the same options as for an Audio track when the PlugIn is inserted. Therefore, you can also use the Return track’s Control Chooser to show envelopes for
individual POD Farm Plug-In parameters and automate them too. Just think of the possibilities!
3•11
Page 55

Using the POD Farm Plug-In
Live’s Automation Recording
For this example, let’s suppose you want to add some Wah pedal effect to your recorded guitar track. A
great way to do this is to tweak and record your Wah Position knob moves while you are playing back
the track, so you can hear and record your Wah tweaks in real-time. First, load POD Farm Plug-In on
your audio track, and create a single Tone in POD Farm Plug-In that includes one of the Wah models.
Within the Live audio track’s header, use the Device Chooser and Control Chooser as in the previous
example - this time we’ll select the POD Farm 1 Wah-Pos parameter*.
* Note - It is not actually necessary to select POD Farm Plug-In or the specific parameter in Live’s
Chooser selectors, since when you go into the Record mode in the next steps, any POD Farm Plug-In
or Ableton Live track parameters’ adjustments will be recorded, whether the envelope on the track is
currently displayed or not. However, selecting the specific parameter in the track’s Chooser allows you to
see your adjustments being written to the track envelope in real-time.
You’ll want to have the POD Farm Plug-In GUI open, and with the Panel View showing the Wah
model so that you have access to the Wah knob for tweaking.
Next, click on Live’s Transport Record button to place it in “Record Ready” mode - note that you do
not want your audio track’s Record Arm button on since that will record audio into your track (and
possibly overwrite your current audio clip). When ready, press the transport Play button and start
tweaking the POD Farm Wah Position knob. You’ll hear the effect applied as the track plays, and
you’ll see your adjustments being “recorded” via the envelope on the track. Do not adjust any other
POD Farm or Live track parameters while in this Record mode, since any such settings changes will
be recorded as well. Hit your spacebar to stop Live when done. If you didn’t like what you just did, just
select Edit > Undo in Live before you do any other edits and try again.
3•12
Page 56

Using the POD Farm Plug-In
Click on the Transport’s Record button,
and then the Play button when ready...
Now start tweaking the Wah knob and
you’ll see your adjustments recorded on the
Live track
Once stopped, you’ll see the Device and Control Choosers show red dots to indicate the parameter
has been “edited”. Further, if you click on the Control Chooser to expand the menu, any POD Farm
parameter that has “edited” automation is shown here with a red dot. You can also now zoom in and
further adjust the individual “breakpoints” on the envelope, as in the earlier example, to fine tune your
automation.
Click and drag to adjust the
envelope’s breakpoints
Red dotes indicate the
parameter has been edited
Once done with your automation for the Wah parameter, it is a good idea to right-click (Windows)
or Ctrl-click (Mac) on the track and choose “Lock Envelopes” to prevent the envelope from being
overwritten. Or, you can leave envelopes “unlocked” and repeat the previous steps to record automation for any number of POD Farm Plug-In parameters. Note that you can also “expand” your automation tracks in Live to make it easier to work with several parameter envelopes on one audio track
- see the previous section.
Live’s Assignable X-Y Controller
One other unique feature for Ableton Live’s automation is the Assignable X-Y Control panel. You’ll
see this appear in the lower pane of the Live window for your inserted POD Farm Plug-In. Using this
panel, you can assign any two POD Farm Plug-In parameters to both the X and Y axes of the controller, then move the dot to tweak both parameters at the same time for some very interesting effects!
Ableton Live’s Assignable X-Y Control for POD Farm Plug-In
See the Live documentation and tutorials for the use of this control, as well as more on automation.
3•13
Page 57

Using the POD Farm Plug-In
POD Farm Plug-In Automation Parameter Table
In all host audio software, you’ll be able to access a menu of POD Farm Plug-In’s parameters so that you
can choose exactly which Amp and Effects models’ control(s) you want to automate. POD Farm Plug-In
presents its list of parameter names in abbreviated form in order to accommodate length limitations of
the host software. For example, “1 Wah-Pos” and “2 Wah-Pos” are the abbreviated names that appear
in the host automation menu for the Tone 1 Wah Position and the Tone 2 Wah Position parameters,
respectively. To follow is a table showing the abbreviated Parameter Command, as it appears in your
host software, and its functional Description. (Note that in your host software you’ll see two of each
command, preceded by a “1” or “2” designating Tone 1 versus Tone 2)...
Automation Parameter Command Descriptions
Parameter Command Description
Amp -Type Guitar/Bass Amp/Preamp - Model Select
Amp/Pre-1 Guitar/Bass Amp - Drive, Preamp - Parameter #1
Amp/Pre-2 Guitar/Bass Amp - Bass, Preamp - Parameter #2
Amp/Pre-3 Guitar Amp-Mid, Bass Amp-Low Mid, Mid, Preamp - Parameter #3
Amp/Pre-4 Guitar Amp-Treble, Bass Amp-Hi Mid, Mid, Preamp - Parameter 4
Amp/Pre-5 Guitar Amp - Presence, Bass Amp-Treble, Mid, Preamp - Parameter #4
Amp/Pre-Vol Guitar/Bass Amp/Preamp - Volume
Pre-6 Preamp - Parameter #6
Pre-7 Preamp - Parameter #7
Pre-8 Preamp - Parameter #8
Pre-9 Preamp - Parameter #9
Pre-10 Preamp - Parameter #10
Pre-11 Preamp - Parameter #11
BassAmp-DILvl Bass Amp-DI Level
BassAmp-DIDly Bass Amp-DI Delay
BassAmp-Xover Bass Amp FX Crossover
Cab-Type Guitar/Bass Amp - Cab Model Select
Mic-Type Guitar/Bass Amp - Mic Model Select
Cab-Room Guitar/Bass Amp - Room (Early Reflections)
Gate-On/Off Gate - Bypass On/Off
Gate-Thresh Gate Threshold
Gate-Decay Gate - Decay
Comp-On/Off Compressor - Bypass On/Off
Comp-Thresh Compressor - Threshold
Comp-Gain Compressor - Gain
EQ-On/Off EQ - Bypass On/Off
EQ-Freq1 EQ - Frequency #1
EQ-Gain1 EQ - Gain #1
EQ-Freq2 EQ - Frequency #2
3•14
Page 58

Using the POD Farm Plug-In
Automation Parameter Command Descriptions
Parameter Command Description
EQ-Gain2 EQ - Gain #2
EQ-Freq3 EQ - Frequency #3
EQ-Gain3 EQ - Gain #3
EQ-Freq4 EQ - Frequency #4
EQ-Gain4 EQ - Gain #4
Wah-Type Wah - Model Select
Wah-On/Off Wah - Bypass On/Off
Dst/Dyn/Flt-Type Stomp Category Effect (Distortion/Dynamics/Filter) - Model Select
Dst/Dyn/Flt-On/Off Stomp Category Effect (Distortion/Dynamics/Filter) - Bypass On/Off
Dst/Dyn/Flt-1 Stomp Category Effect (Distortion/Dynamics/Filter) - Parameter #1
Dst/Dyn/Flt-2 Stomp Category Effect (Distortion/Dynamics/Filter) - Parameter #2
Dst/Dyn/Flt-3 Stomp Category Effect (Distortion/Dynamics/Filter) - Parameter #3
Dst/Dyn/Flt-4 Stomp Category Effect (Distortion/Dynamics/Filter) - Parameter #4
Dst/Dyn/Flt-5 Stomp Category Effect (Distortion/Dynamics/Filter) - Parameter #5
Mod-Type Modulation Category Effect - Model Select
Mod-Enable Modulation Category Effect - Bypass On/Off
Mod-Pre/Post Modulation Category Effect - Pre/Post Position toggle
Mod-Speed Modulation Category Effect - Speed
Mod-Note Modulation Category Effect - Tempo Note Division
Mod-1 Modulation Category Effect - Parameter #1
Mod-2 Modulation Category Effect - Parameter #2
Mod-3 Modulation Category Effect - Parameter #3
Mod-4 Modulation Category Effect - Parameter #4
Mod-Mix Modulation Category Effect - Wet/Dry Mix
Dly-Type Delay Category Effect - Model Select
Dly-On/Off Delay Category Effect - Bypass On/Off
Dly-Pre/Post Delay Category Effect - Pre/Post Position toggle
Dly-Time Delay Category Effect - Delay Time
Dly-Note Delay Category Effect - Tempo Note Division
Dly-1 Delay Category Effect - Parameter #1
Dly-2 Delay Category Effect - Parameter #2
Dly-3 Delay Category Effect - Parameter #3
Dly-4 Delay Category Effect - Parameter #4
Dly-Mix Delay Category Effect - Wet/Dry Mix
Vrb-Type Reverb Category Effect - Model Select
Vrb-On/Off Reverb Category Effect - Bypass On/Off
3•15
Page 59

Using the POD Farm Plug-In
Automation Parameter Command Descriptions
Parameter Command Description
Vrb-Pre/Post Reverb Category Effect - Pre/Post Position
Vrb-1 Reverb Category Effect - Parameter #1
Vrb-2 Reverb Category Effect - Parameter #2
Vrb-3 Reverb Category Effect - Parameter #3
Vrb-Mix Reverb Category Effect - Wet/Dry Mix
Amp-On/Off Amp/Preamp - Bypass On/Off
Cab-On/Off Cabinet - Bypass On/Off
Dst/Dyn/Flt-6 Distortion/Dynamics/Filter Category Effect - Parameter #6
Dst/Dyn/Flt-Pre/Post Distortion/Dynamics/Filter Category Effect - Pre / Post Position
Sys-Tempo Plug-In “Master” System Tempo Value
Sys-Out Level Tone Output Knob
Sys-Out Balance Tone Pan Knob
3•16
Page 60

POD Farm Recording Setup Guide - POD Farm Standalone Operation
pod fa R m St a n d a l o n e op e R a t i o n
With any Line 6 POD Studio, TonePort or GuitarPort device as the connected hardware*, POD Farm
can be launched in “Standalone” operation - that is, as an individual application rather than a Plug-In
requiring a host application. This allows you to utilize your hardware as a “front end” Tone machine,
where you can process your input source, feed the signal to the Record Sends for your DAW software
application, as well as to all analog and digital hardware outputs. In Standalone operation, POD Farm
also offers the super low latency benefits of ToneDirect™ Monitoring, as well as a complete Mixer
View where you can independently control the signals fed to the Record Sends! The following sections
cover the settings within POD Farm when in Standalone operation for recording use.
POD Farm in Standalone Operation
* Note that POD Farm Standalone Operation is not available with POD X3 or PODxt family devices as the
connected hardware. Since these devices perform all their Tone processing magic inside the hardware itself,
their on-board controls are used to shape Tone settings and configure monitor and Record Send options.
Please refer to the Driver Settings sections for these devices and your Pilot’s Handbook for more info.
Choosing Your POD Farm Source Inputs
In POD Farm speak, the “Source” inputs are the physical inputs on your Line 6 hardware (Instrument,
Mic, Line In, etc.), which is where you connect your guitar, bass, mic or other line-level devices to feed
their signal into POD Farm, and thus into your DAW.
For Line 6 devices that offer a single input and single tone capability (GX, D.I. and GuitarPort •
4•1
Page 61

POD Farm Recording Setup Guide - POD Farm Standalone Operation
devices), this Instrument Input is the “fixed” Source.
For all other POD Studio & TonePort devices, there are multiple input capabilities and, therefore, •
you’ll see Source Select menus within POD Farm when in Standalone operation for each Tone
1 and Tone 2 in the Signal Flow View.
Input Source Select Menu Input Meter
POD Farm’s Input Source selectors are found at the top of the Signal Flow panel (Dual Tone configuration)
Unlike the POD Farm Plug-In interface, there is no Input Volume knob for the Standalone •
application - to adjust the input levels of your Sources, use your guitar’s volume knob, the Mic
Gain knobs on your Line 6 hardware, or the output controls on any source device that is feeding
into your Line 6 hardware.
Once you have your guitar, bass, mic, or line level item(s) plugged into your device, use the Source
Select menu(s) to choose which of these “sources” you want fed into POD Farm for each Tone path.
The Input Meter will measure the incoming signal from the selected Source. The Source menu options
within POD Farm differ slightly depending on whether you are configured for a Single versus Dual
Tone, and for your specific Line 6 device...
Single Tone Mode
When in Single Tone mode, you’ll see all Mono (Instrument, Mic 1, Line 2, etc.) and Stereo (Mic
Stereo, Line Stereo, etc.) Sources your device offers within the Source Select menu. For example, here
is the Source menu for a UX2 device, with POD Farm Standalone in Single Tone mode:
4•2
Page 62

POD Farm Recording Setup Guide - POD Farm Standalone Operation
For UX1 you’ll see fewer Sources, and for UX8 you’ll see several additional Sources, since UX8 offers
eight Mic inputs, as well as S/PDIF digital inputs.
Note that the Single Tone signal flow is always “Stereo” in POD Farm, therefore, even when a Mono
input Source is selected, it is split into two (“dual mono”) signals, allowing stereo effects models to be
applied and routed as Stereo to POD Farm’s Stereo Record Sends and hardware outputs.
Dual Tone Mode
When in Dual Tone mode, you’ll see all Mono Sources your device offers available within the Tone 1
Source Select menu.
The Tone 2 Source menu typically offers “Same as Tone 1”, with an additional, related Mono Source
input to that of Tone 1’s current Source*. For example with UX2, if Tone 1 has “Instrument” selected,
Tone 2 offers “Mic 1”. If Tone 2 has Mic 1, Tone 2 offers “Mic 2”, etc.
* Note that whenever an even numbered Mono Source is selected for Tone 1 (e.g. - Mic 2, Line 2, etc.)
Tone 2’s Source is automatically set to “Same as Tone 1” .
Just as with Single Tone mode, when in Dual Tone mode, each Tone’s signal flow is always “Stereo”,
therefore, the Mono input Source’s signal is split into “dual mono” signals within each Tone signal
path, allowing stereo effects models to be applied and routed as Stereo to POD Farm’s Stereo Record
Sends and hardware outputs.
In Dual Tone mode, this gives you two types of input scenario choices:
Choose two completely different input Sources - such as a guitar plugged into “Instrument” for •
Tone 1, and a vocal into “Mic 1” for Tone 2 - and then process each Tone separately. You can
of course independently process each Tone optimally for the guitar and vocal, and perform them
simultaneously while recording into separate tracks.
Choose a common input Source - such as a guitar plugged into “Instrument” for Tone 1, and •
“Same as Tone 1” for Tone 2’s input Source, and then creatively process each Tone with similar
or different amp & effects. You can get some really huge Stereo sounds this way by panning each
Tone opposite as well!
Tone Pan and Volume Controls & Meters
In the Signal Flow View (SFV), you’ll see this set of controls at the top right of each Tone’s Signal
Flow:
4•3
Page 63

POD Farm Recording Setup Guide - POD Farm Standalone Operation
Pan Knob Volume Knob Output Meter
These control the Pan and Volume level individually for each Tone 1 and Tone 2. Note these Pan and
Volume behaviors can be affected by the current Mixer View - Source settings:
Whenever POD Farm Standalone application is in Single Tone mode, regardless of the Mixer •
View - Source options selected for Record Sends 1-2 and 3-4, the Tone 1 Pan and Volume
controls affect only the Monitor signal, and not what is fed to the Record Sends.
When POD Farm Standalone application is in Dual Tone Mode, if the Mixer View - Source •
“Mix (Tone 1 & 2)” option is selected for either Record Send, then the Tone signal fed to that
Record Send is affected by the Tone’s Pan and Volume knobs (as well as by the Tone’s Mute
button). This behavior is provided automatically since it is likely that you’ll want to control
the Pan and Volume of the Tone 1/Tone 2 “Mix” so that it is recorded as you hear it on your
monitoring system. For example, panning Tone 1 and Tone 2 opposite can provide some spacious
and interesting sounds, so this allows you to record these Tones’ settings just as you hear them.
Monitor Volume Control & Meters
At the top right of the POD Farm Standalone window, you’ll see the Monitor Volume knob and
meters.
This Volume knob always affects only the overall “Monitor” signal level - that is, the processed sound
for the combined Tone 1 and Tone 2 signal flows heard from the Main Outs & Headphone Outs of
your Line 6 hardware. It is important to note that you can adjust this knob to independently control
the Monitor volume, without affecting the signal level fed to the Record Sends and thus not affecting
the signal you are recording into your DAW software. Use the meters to avoid clipping to ensure clean,
quality Monitor output. This Monitor signal path utilizes the unique Line 6 ToneDirect™ Monitoring
feature, which allows you to hear the Monitor signal at incredibly low latency. This is a tremendous
benefit for a DAW setup, since otherwise monitoring your input Source through your recording software
can add a greater “time lag” between when you pluck a note and when you hear it while trying to
record, making things feel a bit “un-natural” for performing. Please see the ToneDirect™ Monitoring
section later in this chapter for more info.
To control how your Tones are routed to your DAW recording software, you’ll want to head over to the
POD Farm Mixer View and configure the Record Sends options - read on...
4•4
Page 64

POD Farm Recording Setup Guide - POD Farm Standalone Operation
Mixer View
When POD Farm is running in Standalone operation, you’ll see there is a Mixer View button available
at the top left of the application - press this button to display the Mixer View, where you can control
the type and level of the signals fed to the Record Sends, as well as quickly access Preferences and
Audio Driver settings.
About Record Sends...
All Line 6 USB devices utilize “Record Sends” - you can think of these Record Sends as the virtual
“plumbing” for the different audio channels your device provides and makes available to audio software
on your computer for recording and playback. Once you’ve installed the Line 6 USB audio device
driver (which you did automatically when you installed POD Farm) and connected the USB cable,
these Record Sends are established on your computer and accessible within the Line 6 Audio-MIDI
Control Panel dialog. Note that these Sends carry audio back and forth regardless if you are using
POD Farm in Standalone operation or not. And, for POD X3 & PODxt devices (which do not utilize
Standalone operation) you can still access the device’s Record Sends within audio software on your
computer to utilize your device as a sound card for high quality audio recording and playback. For all
POD Studio, TonePort and GuitarPort devices, the Record Sends carry the “unprocessed” output of
whatever you’re plugging into your device, but if you launch POD Farm in Standalone operation, you
can process whatever signal you are inputting into your Line 6 device with all those luscious Tones!
For more about your Line 6 device’s Record Sends and their use when not running POD Farm in
Standalone operation, please see the previous Audio Driver Configuration chapter.
POD Farm Record Send Controls
The POD Farm Mixer View displays controls for two Record Sends. The outputs of both Tone 1 and
Tone 2 are routed to these Sends. Each Record Send carries a Stereo audio signal, which appears in your
audio recording software as an available Stereo (or two Mono) audio track input sources for recording.
The functionality of the Record Send 1-2 controls are the same for all POD Studio, TonePort &
GuitarPort devices, with a few differences as called out in the following descriptions.
4•5
Page 65

POD Farm Recording Setup Guide - POD Farm Standalone Operation
Device Send Name Source Menu
Mute Main
Outs
Send Level Meter Send Level Fader +18 dB Button
Device Send Name
The name of your specific Line 6 connected device (UX1, UX2, UX8, etc.) and Record Send number
are displayed here above each set of Send controls. These are the Record Sends of your device that
POD Farm is feeding its Record Send outputs to. For all Line 6 hardware, POD Farm will utilize Send
1-2 and Send 3-4, except when connected to UX8, in which case POD Farm utilizes UX8’s Send 9-10
and 11-12. (UX8 devices reserve their Record Sends 1 through 8 for their multiple Mic/Line inputs please see the Audio Driver Configuration chapter for details).
Audio Source Selection Menus
The Source menu allows you to choose specifically what type of signal is fed into each Record Send.
Note that the options in the Source menu differ depending on whether the POD Farm Standalone
application is currently running a Single Tone versus Dual Tone.
When POD Farm is in Single Tone mode, the Source menu options are • Processed, Semi-
Processed (Amp, Cab, Comp, EQ, and “Pre” positioned effects only), and Dry Inputs.
When POD Farm is in Dual Tone mode, the Source menu options are • Tone 1, Tone 2, Mix
(Tone 1 & 2)*, and Dry Inputs.
*Note that when either Send Source is set for “Mix Tone (1 & 2)”, that the Tone 1 & 2 Mute, Pan and
Volume controls within the Signal Flow View affect the Tone levels fed to that Send. For all other Send
Source options, the Tone Pan and Volume knobs affect only the Monitor signal.
Send Level Controls
Use the • Level Slider to adjust the level of the signal fed to the Record Send. This is how you
adjust the level of the signal that gets recorded into your audio software.
Use the • Level Meter to gauge your levels. The red clip indicator will light up if your level is too
high - clipping should always be avoided in order to produce good quality recordings!
Use the• +18 dB button if your signal is not hot enough. When this button is lit, an 18 dB “boost”
is applied to the Record Send signal. Watch the meters and adjust the Level Slider for a nice,
hot signal.
4•6
Page 66

POD Farm Recording Setup Guide - POD Farm Standalone Operation
Preferences and Driver Console Buttons
The • Preferences button provides shortcut access to the POD Farm Preferences dialog, where
you can configure various POD Farm applications settings. See the following Preferences section
for details.
The• Driver Console button provides shortcut access to the Driver Console (Line 6 Audio-MIDI
Devices) dialog, where you can configure ASIO, WDM (Windows®) or Core Audio (Mac®)
audio driver settings. For everything about audio drivers & settings you always wanted to know
but were afraid to ask, please check out the Audio Driver Configuration chapter.
ToneDirect™ Monitoring
A unique feature of Line 6 POD Studio, TonePort and GuitarPort hardware with POD Farm
in Standalone operation is ToneDirect™ Monitoring, which is a separate audio path that allows
you to monitor the incoming signal with the lowest possible latency, for uncompromised feel and
responsiveness when recording or jamming.
Another benefit of using ToneDirect™ Monitoring while recording is that it allows you to set the
audio buffer size in your DAW software at a large value for efficient use of your computer, yet still enjoy
extreme low latency monitoring while recording. On Windows® systems, the ToneDirect™ audio path
has its own buffer adjustment while on Mac®, no adjustments are needed.
ToneDirect™ Monitoring buffer size slider (Windows®)
POD Studio, TonePort & GuitarPort devices - The Line 6 ToneDirect™ Monitoring audio path has
its own buffer to allow you to keep your ASIO Buffer Size at a high value, for more solid performance
and more efficient performance of your ASIO software. Access the ToneDirect Monitoring buffer
within the Line 6 Audio-MIDI devices dialog (just click the Driver Console button in the POD Farm
Mixer View, or from the Windows® Control Panel). The initial default is one tick to the right of “Extra
Small” as shown. Raise this slider if you are getting any dropouts in your monitor signal.
POD X3 & PODxt devices - These devices do not utilize POD Farm in Standalone operation, but
4•7
Page 67

POD Farm Recording Setup Guide - POD Farm Standalone Operation
they do offer utilize a USB audio buffer (rather than ToneDirect™ Monitoring) which provides an
independent, direct monitor signal with its own buffer adjustment. When a POD X3 or PODxt is
selected as the Line 6 device in this dialog, a POD-specific “USB Audio Streaming” buffer slider is
displayed:
ToneDirect™ Monitoring while recording with POD Farm Plug-in
ToneDirect™ is a feature of the POD Farm application when run in Standalone mode, not the POD
Farm Plug-in, so in order for you to enjoy the feel and responsiveness provided by ToneDirect™,
you’ll need to run POD Farm in Standalone operation alongside your DAW software that hosts the
POD Farm Plug-in. Keep in mind that these applications run independently of each other, so any
Tone settings you make in the POD Farm’s Standalone mode will have to be matched in the Plug-in
to provide the same results. You can achieve this by making your settings in POD Farm Standalone,
saving the Tone as a Tone Preset to your computer’s Tones folder, and then recalling that preset later
within the POD Farm Plug-in. Follow these steps to set up POD Farm and your DAW application:
Connect the recording source to your Line 6 hardware•
Launch POD Farm in Standalone mode, and monitor the POD Farm processed signal thru your •
hardware’s Line Outputs. These outputs supply the ToneDirect™ Monitoring magic.
In the POD Farm Mixer View, configure one set of Record Sends to carry an unprocessed signal. •
Choose this Record Send as the input for the DAW track you’re recording into.
Disable your audio software’s Input Monitoring for the track you’re recording into.•
Load POD Farm Plug-In on the recorded DAW audio track and dial in your desired Tone!•
ToneDirect™ Monitoring & your Line 6 hardware as the preferred audio interface
If you choose your Line 6 hardware as the input/output device for your DAW setup, such as to jam along
with iTunes® and have all audio played out your Line 6 hardware, you get the benefits of ToneDirect™
Monitoring automatically when running POD Farm in Standalone operation.
POD X3/PODxt users: All Tone processing is performed internally on the POD device, saving CPU
resources for recording & mixing tasks!
Using other Line 6 Hardware devices with another audio interface
If you have a non-Line 6 audio interface you’d like to use for your DAW recording/playback, you’ll
need to purchase a guitar/signal splitter hardware box, which will afford you the unprocessed dry
output needed to feed your guitar input into both your Line 6 hardware and DAW audio interface
simultaneously.
Connect your guitar to the splitter input.•
Connect Output A from the splitter to your DAW audio interface - this provides an unprocessed •
4•8
Page 68

POD Farm Recording Setup Guide - POD Farm Standalone Operation
guitar signal to record into your DAW audio track.
Choose this channel as the audio track input in your DAW software, and disable input monitoring •
for that track.
Connect Output B from the splitter to your Line 6 Hardware, and connect the processed Analog •
Outs of your Line 6 hardware to your monitoring system. The idea here is that you’ll want to
hear both the Line 6 hardware processed output along with the DAW playback through your
monitor system.
Launch the POD Farm in Standalone mode and monitor the POD Farm processed signal thru •
your Line 6 hardware’s Outputs. These outputs supply the ToneDirect™ Monitoring magic, so
you’ll hear the processed signal with extremely low latency, while simultaneously recording an
unprocessed version of your performance into the DAW audio track.
Load POD Farm Plug-In on the recorded DAW audio track and dial in your desired Tone! •
Please check out the additional documentation on the POD Farm Online Help page for tips on
computer setup and recording!
Using a TonePort DI, POD X3 or PODxt Pro with another audio interface
If you are using TonePort DI, POD X3 Pro, or PODxt PRO, and want to utilize these devices’
“unprocessed” analog outputs to feed into another sound card device (such as a Digidesign Mbox® to
allow recording into Pro Tools® utilizing the POD Farm RTAS Plug-In) you’ll be able to monitor your
signal with ToneDirect™ by following these steps:
Connect the signal source (guitar, mic, etc.) to the input of your Line 6 Hardware.•
Connect the unprocessed, dry analog output of TonePort DI/POD X3 Pro/PODxt PRO to the •
analog input on your DAW’s audio interface.
Configure a new audio track in your DAW software to record from this same audio interface •
input.
Disable Input Monitoring in your recording application, for the track you’re recording into.•
Connect the processed Analog Outs or Main Outs of your Line 6 hardware to your monitoring •
system. The idea here is that you’ll want to hear both the Line 6 hardware processed output along
with the DAW playback through your monitor system.
Launch POD Farm in Standalone mode and monitor the recorded signal thru the Analog •
Outputs of your Line 6 Hardware to get the benefits of ToneDirect™ Monitoring for your input
signal.
Record your track - note you just recorded a “naked”, unprocessed signal into this audio track. •
Insert POD Farm Plug-In on the audio track and dial in the desired Tone Preset.
Mac® Users: There’s yet another option for you!
The Mac® Core Audio® driver architecture features the ability to combine the inputs from 2 separate
audio interfaces into one “aggregate device”. You may be able to take advantage of this Mac OS X
feature with you Line 6 device with another sound card. Please see the Creating an Aggregate Device
section in the Hardware chapter for how to configure this type of setup on your Mac®, then follow
these steps:
Combine your DAW audio interface and your Line 6 hardware into one aggregate audio device.•
4•9
Page 69

POD Farm Recording Setup Guide - POD Farm Standalone Operation
Connect the recording source (guitar, mic, etc.) into your Line 6 hardware•
Disable Input Monitoring for the DAW track you’re recording into.•
Launch POD Farm in Standalone mode and, in the Mixer View, make sure that your Line 6 •
hardware is sending an unprocessed signal out one of your Record Sends. Choose this Record
Send signal as the input for the DAW audio track you’re recording into.
Monitor POD Farm processed signal thru your hardware’s Line Outputs. These outputs supply •
the ToneDirect™ Monitoring magic.
Load POD Farm Plug-In on the recorded DAW audio track and dial in your desired Tone! •
For more information about features offered in POD Farm’s Standalone operation mode, please check out
the additional documentation found on the POD Farm Online Help site.
4•10
Page 70

Mac Audio Applications
ma c® au d i o ap p l i c a t i o n S
The following chapters cover the setup of Line 6 POD Studio, TonePort, GuitarPort, POD X3 or
PODxt as the USB audio device, as well as optionally using POD Farm Plug-In and/or POD Farm in
Standalone operation, with several popular Mac® audio applications.
Use the following links to jump to the chapter that covers your specific application...
Ableton Live
Apple GarageBand
®
®
Apple Logic® Pro
Digidesign® Pro Tools® LE
MOTU Digital Performer
Propellerhead Reason
®
®
Sonoma WireWorks RiffWorks® T4
Steinberg Cubase
®
Windows® Audio Applications
5•1
Page 71

Ableton Live 7 Setup - Mac
ab l e t o n li v e® 7 Se t u p
For this chapter, we’ll show how to configure Ableton Live® version 7.0.1 to work with Line 6 POD
Studio, TonePort, GuitarPort, POD X3 or PODxt as the USB audio device, as well as optionally using
POD Farm Plug-In and/or POD Farm in Standalone operation on your Mac® computer. The steps are
very similar for the setup of other Live versions as well, including the Ableton Live Lite versions.
Choose Your Line 6 Gear Configuration
Before you record your first track in any DAW software, you have a few options to consider with your
Line 6 hardware & POD Farm gear! You should decide if you want to record a “dry” signal into the
audio track, such as if you want to utilize POD Farm Plug-In to “non-destructively” apply your POD
Farm Tone onto the recorded track. Or, if you prefer to record a “processed” signal, where the POD
Farm Amp/Preamp and Effects are already applied and recorded permanently on the track. We’ll cover
the steps to record either of these ways, but first it is helpful to understand the options with your
particular Line 6 gear...
POD Studio, TonePort, GuitarPort devices
Using POD Farm in Standalone operation• - Plug a Mic or Instrument directly into your device
and launch POD Farm in Standalone operation. Use the Mixer View - Record Send Source
options to choose the type of signal fed to your Record Sends. Also see the POD Farm Standalone
chapter for more about the Mixer View.
Processed• - Feeds the same fully processed Tone you hear to the Record Send.
Dry Input• - Feeds a completely unprocessed signal to the Record Send, even though you can
listen to the fully Processed Tone from POD Farm Standalone’s ToneDirect™ Monitoring
output.
Semi-Processed• - Feeds a signal processed with only effects that are positioned “Pre” within
the POD Farm Standalone Signal Flow for the Tone (all active models positioned left of the
Amp/Preamp).
Without using POD Farm in Standalone operation• - Plug a Mic or Instrument directly into
your device and configure the Line 6 Audio-MIDI Settings dialog to feed your “dry” input
source to your device’s Record Sends. See the Audio Driver chapter for more about this. Note
that when using this option, you won’t have the benefit of POD Farm ToneDirect™ Monitoring
when not running POD Farm in Standalone mode, so you’ll need to enable your DAW software’s
monitoring feature on the audio track (more on this in the next section).
POD X3 devices - Plug a Mic or Instrument into your POD X3 and configure the options within
X3’s onboard Outputs - Studio/Direct Mix settings screen to determine what type of signal is fed
to the X3’s Record Sends. You can also use the Monitor Volume slider in the Line 6 Audio-MIDI
Settings dialog to control your Monitor level - see the Audio Driver chapter for more about this.
Please also refer to your POD X3 Pilot’s Handbook for details on X3’s Output screen options.
PODxt devices - Plug a Mic or Instrument directly into your PODxt device and configure the
options within the Line 6 Audio-MIDI Settings dialog for the type of signal (Processed or Dry) that
is fed to the Record Sends. You can also use the Monitor Volume slider in the Line 6 Audio-MIDI
Settings dialog to control your Monitor level. See the Audio Driver chapter for more about this.
Please also refer to your PODxt Pilot’s Handbook for details about output options.
5•2
Page 72

Ableton Live 7 Setup - Mac
Monitoring through the DAW software - If you are using POD Studio/TonePort/GuitarPort hardware
and not running POD Farm in Standalone operation, then you’ll need to use the DAW software’s own
monitoring feature to hear your input signal routed through the DAW software’s audio track, as called
out in the following steps. This also means you’ll hear the input signal effected with any Plug-Ins, such
as if you have POD Farm Plug-In inserted on the same audio track. You may need to set your DAW
software’s buffer size fairly low to minimize the “latency” (the time between when you pluck a note
on your guitar to the time you actually hear it after feeding through your DAW software and out your
speakers). We’ll cover all these steps here...
Configuring Live to Use the Line 6 Core Audio Driver
Be sure to connect the USB cable from your Line 6 device into your computer’s USB port, and then
proceed with the following steps...
Launch the Ableton Live Preferences dialog:
Go to the Live menu
and choose Preferences
Go to the Audio tab
Choose CoreAudio as the driver type…
Then choose your Line 6 device for both
the Input and Output Audio Device. In
this example, we’ll choose our connected
UX2
Set a Sample Rate – 44,100 is a good
choice here, or you can use 48,000,
88,200 or 96,000 Hz if your Project
requires a higher sample rate
Just as with most Multitrack recording software, in Live you also need to
configure the individual inputs and outputs once a Multi-in/out device is
selected. Click on the Input Config button to access the Inputs.
Activate Inputs:
Here you can “activate” all the inputs from your
Line 6 hardware that you want to be accessible
for any audio track as a track input for recording
Click OK when done
5•3
Page 73

Ableton Live 7 Setup - Mac
You’ll want at least the 1 (mono) & 2 (mono) and the 1/2 (stereo) inputs activated. Each additional
activated input utilizes more CPU, so only activate the ones you need!
Note that you’ll see a different number of inputs listed in the Input Config dialog depending on
the specific Line 6 device you are using. Typically these enumerated inputs correspond to the Line 6
device’s Sends of the same number (i.e. - Live’s input “1/2 (stereo)” is the UX2 Record Send 3-4).
More about this when we get to the part about setting up your audio track.
POD Studio, TonePort & GuitarPort devices (except UX8): You will see 4 Mono inputs and 2
Stereo inputs, as pictured above.
UX8: You’ll see 12 Mono inputs and 6 Stereo inputs.
UX8’s driver offers multiple Inputs and Sends with many flexible options for routing and monitoring.
Please reference the Mac Driver Settings section of the Audio Driver chapter for more details
POD X3 devices: You’ll see 8 Mono inputs and 4 Stereo inputs.
POD X3 offers several onboard options for the type of signal that is assigned to each Send. For more info
about POD X3 Sends, please reference the Mac Driver Settings section of the Audio Driver chapter, and
your POD X3 Pilot’s Handbook.
PODxt devices: You’ll see 2 Mono inputs and 1 Stereo input.
PODxt offers onboard options, as well as options within the Line 6 Audio-MIDI Settings dialog for the
type of signal that is assigned to the Record Send. For more info about the PODxt Send, please reference
the Mac Driver Settings section of the Audio Driver chapter, and your PODxt Pilot’s Handbook.
Activate Outputs:
To access the outputs, click the Output Config button back in the Live Preferences > Audio tab. This
will show you all outputs available for your selected Line 6 Output Device.
For all Line 6 devices (except UX8), the Core Audio driver offers Output 1/2, therefore, the dialog will
show its two mono and 1 stereo output options, and they will automatically be selected.
UX8: You’ll see 8 mono and 4 stereo outputs. For most Live projects, you likely only need to enable
the Output 1/2 mono and stereo options and assign all track playback to one common output.
5•4
Page 74

Ableton Live 7 Setup - Mac
Note - The Ableton Live Lite versions allow only one stereo output to be used at a time. To be able to
choose two or more different output devices in a Live Set, you must switch into Demo mode, or upgrade
to a full version of Ableton Live.
Configure Record Options...
Back in the Live Preferences dialog, now select the Record options...
For File Type you can
select AIFF or WAV ,
whichever format you
prefer your recorded
audio files to be created
as.
Select the Record
Warp Launch tab
For Bit Depth, select 24
Bit
Configuring an Audio Track for Recording
Now that your Line 6 hardware is set up, you are ready to start working in a Live Set! Create a new
Live Set (or open an existing one) and insert a new audio track to record into...
Choose Insert Audio Track from
Live’s Insert menu
In the following example, we’ve inserted two audio tracks, assigned their outputs to the “Master” track,
and assigned the Master Output to the stereo Main 1/2 output of our Line 6 device (UX2). For Audio
Track inputs, note that you can select from the mono or stereo inputs of your Line 6 device, which you
“activated” in the previous steps. If you choose a stereo input, a stereo audio file will be recorded into
the track, and likewise, if you choose a singular mono input, a mono file will be recorded.
5•5
Page 75

Ableton Live 7 Setup - Mac
To configure your Audio
tracks...
Choose Ext. In for the Input
Type
Then choose the stereo or
mono input you want to
record from
Set your Audio tracks’ Output
to Master
Note that here we’ve chosen
to record from UX2’s Send
1-2 for track 1, and Send 1 for
track 2
Choose the Arrangement
View
(Alternatively, you can access all these same settings
in the Session View if you
prefer)
Click the I-O toggle button to display the Input/
Output settings for the
tracks
On the Master track, choose the
stereo Out 1/2 of your Line 6 device
for both the Cue Out and Master
Out
* Note that the Master Track offers two Output selectors. The top selector is to set a “Cue Out”, which
allows you to route a separate output for playback of browser clips and previews. If you have a UX8 device,
then you can set this Cue Out to a different stereo output to allow you to listen to previews on a completely
separate headphone or speaker out. Please see Live’s documentation regarding the Cue Out feature. For all
other Line 6 hardware, set both Master Outs to the same Out 1/2.
Set Input Monitoring Options...
As mentioned in the previous Choose your Line 6 Gear Configuration section, you’ll want to keep
Live’s Monitor function to “off” if you are utilizing POD Farm in Standalone operation, or if using
POD X3 or PODxt for their Monitoring capabilities.
Click the audio track’s Monitor Off
button
If you are using POD Studio/TonePort/GuitarPort and not running POD Farm in Standalone operation,
then you’ll want to turn Live’s Monitor feature to “Auto” on this track to hear your input signal
through the Live software. You’ll likely also want to insert POD Farm Plug-In on this audio track now
and dial in a Tone to hear applied to your input signal while recording. See Live’s documentation for
more about it’s Monitor options.
5•6
Page 76

Ableton Live 7 Setup - Mac
Arm Your Track & Set Your Levels...
Click the Arm button to arm the audio track for recording
Note that you’ll see the meters measure your input recording
level once the track is armed
The type of signal coming into the Live audio track, and how you adjust its input level, depends upon
the configuration of Line 6 gear you’ve selected, as covered at the start of this chapter.
If you are using POD Studio/TonePort/GuitarPort hardware and not running POD Farm in •
Standalone operation, then you’ll need to use your guitar’s volume knob, the hardware’s Mic
Gain knob, or the volume on the external device plugged into any Line In.
If you are using POD X3/PODxt hardware, adjust your levels using the onboard Output controls •
for what is routed to the Record Send you’ve selected for the audio track’s inputs.
If you are using POD Farm in Standalone operation, use POD Farm’s Mixer View. Here you can •
choose the type of signal fed to either Record Send and adjust the levels independently of the
signal you hear coming from the ToneDirect™ Monitoring signal!
Choose the type of “Source” signal that is fed to
each Send (Processed, Dry or Semi-Processed)*
Adjust the Record Send Level
If the Record Send output is still very low,
even after turning up the Amp & Effects
Models’ volumes, activate the +18 boost
POD Farm Standalone Mixer - Record Send controls
* Note that you’ll have different options for POD Farm’s Record Send Sources depending on if you
currently have a Single or Dual Tone running. Please see the Mixer View section of the POD Farm
Standalone chapter for more info.
5•7
Page 77

Start Recording!
Once your record level is set, click on Live’s transport Record button to put it
into Record Mode, then press Play and start riffing!
Ableton Live 7 Setup - Mac
Insert POD Farm Plug-In
If you want to insert POD Farm Plug-In on your track, simply drag and drop! For more info, please see
the Using POD Farm Plug-In section in the Plug-In chapter.
Click on POD Farm Plug-In in the Plug-In Device Browser and
drag and drop it directly onto Audio Track 1
5•8
Page 78

Apple GarageBand ‘08 Setup - Mac
ap p l e ga R a g e ba n d® ‘08 Se t u p
For this chapter, we’ll show how to configure Apple GarageBand® ‘08 to work with Line 6 POD
Studio, TonePort, GuitarPort, POD X3 or PODxt as the USB audio device, as well as optionally using
POD Farm Plug-In and/or POD Farm in Standalone operation on your Mac® computer. The steps are
very similar for the setup of other GarageBand versions as well.
Choose Your Line 6 Gear Configuration
Before you record your first track in any DAW software, you have a few options to consider with your
Line 6 hardware & POD Farm gear! You should decide if you want to record a “dry” signal into the
audio track, such as if you want to utilize POD Farm Plug-In to “non-destructively” apply your POD
Farm Tone onto the recorded track. Or, if you prefer to record a “processed” signal, where the POD
Farm Amp/Preamp and Effects are already applied and recorded permanently on the track. We’ll cover
the steps to record either of these ways, but first it is helpful to understand the options with your
particular Line 6 gear...
POD Studio, TonePort, GuitarPort devices
Using POD Farm in Standalone operation• - Plug a Mic or Instrument directly into your device
and launch POD Farm in Standalone operation. Use the Mixer View - Record Send Source
options to choose the type of signal fed to your Record Sends. Also see the POD Farm Standalone
chapter for more about the Mixer View.
Processed• - Feeds the same fully processed Tone you hear to the Record Send.
Dry Input• - Feeds a completely unprocessed signal to the Record Send, even though you can
listen to the fully Processed Tone from POD Farm Standalone’s ToneDirect™ Monitoring
output.
Semi-Processed• - Feeds a signal processed with only effects that are positioned “Pre” within
the POD Farm Standalone Signal Flow for the Tone (all active models positioned left of the
Amp/Preamp).
Without using POD Farm in Standalone operation• - Plug a Mic or Instrument directly into
your device and configure the Line 6 Audio-MIDI Settings dialog to feed your “dry” input
source to your device’s Record Sends. See the Audio Driver chapter for more about this. Note
that when using this option, you won’t have the benefit of POD Farm ToneDirect™ Monitoring
when not running POD Farm in Standalone mode, so you’ll need to enable your DAW software’s
monitoring feature on the audio track (more on this in the next section).
POD X3 devices - Plug a Mic or Instrument into your POD X3 and configure the options within
X3’s onboard Outputs - Studio/Direct Mix settings screen to determine what type of signal is fed
to the X3’s Record Sends. You can also use the Monitor Volume slider in the Line 6 Audio-MIDI
Settings dialog to control your Monitor level - see the Audio Driver chapter for more about this.
Please also refer to your POD X3 Pilot’s Handbook for details on X3’s Output screen options.
PODxt devices - Plug a Mic or Instrument directly into your PODxt device and configure the
options within the Line 6 Audio-MIDI Settings dialog for the type of signal (Processed or Dry) that
is fed to the Record Sends. You can also use the Monitor Volume slider in the Line 6 Audio-MIDI
Settings dialog to control your Monitor level. See the Audio Driver chapter for more about this.
Please also refer to your PODxt Pilot’s Handbook for details about output options.
5•9
Page 79

Apple GarageBand ‘08 Setup - Mac
Monitoring through the DAW software - If you are using POD Studio/TonePort/GuitarPort hardware
and not running POD Farm in Standalone operation, then you’ll need to use the DAW software’s own
monitoring feature to hear your input signal routed through the DAW software’s audio track, as called
out in the following steps. This also means you’ll hear the input signal effected with any Plug-Ins, such
as if you have POD Farm Plug-In inserted on the same audio track. You may need to set your DAW
software’s buffer size fairly low to minimize the “latency” (the time between when you pluck a note
on your guitar to the time you actually hear it after feeding through your DAW software and out your
speakers). We’ll cover all these steps here...
Configure Your Mac® to Use Your Line 6 Hardware
If you have not already done so, the first step is to go to the Mac System Preferences and select the Line
6 Audio-MIDI Devices dialog to access the Audio Driver settings. If needed, please reference the Mac
Driver Settings section of the Audio Driver chapter.
Configuring GarageBand to Use the Line 6 Core Audio Driver
Be sure to connect the USB cable from your Line 6 device into your computer’s USB port, and then
proceed with the following steps...
Launch GarageBand and choose Preferences from the menu:
Select Audio/MIDI
Select your Line 6 device for both the Audio
Output and Audio Input.
Set the Optimize for option to Minimum
delay for the best performance. If your session
is large and you start getting audio drop-outs,
come back here and choose the Maximum...
option
Note that after changing the Audio Input
and Output options you may be prompted if
you want to change the audio driver - click
Yes for this prompt
5•10
Page 80

Apple GarageBand ‘08 Setup - Mac
Configuring an Audio Track for Recording
Now that your Line 6 hardware is set up, you are ready to start working in a new project!
Open or create a new GarageBand song project…
Select New Track from the GarageBand
Track menu
Select Real Instrument Track, and click Create
You should now see a new audio track (or “Basic Track” as GarageBand calls it), added to your project.
Click on the track header to make sure it is the selected track, and you’ll see the properties for this new
track at the right, in the Track Info panel...
For the Input Source, you’ll see all the available
Mono and Stereo Inputs for your Line 6 device choose the one you want to record from.
Leave Monitor set to off
(See below about Monitor options)
Adjust the Recording Level slider to around 75% - this will affect the amplitude of the signal
being fed into the GarageBand Track, but it is best to keep it at this moderate setting and use your
Line 6 hardware and/or POD Farm Mixer Record Send controls to adjust your recording level
Keep the Automatic Level Control unchecked
5•11
Page 81

Apple GarageBand ‘08 Setup - Mac
Monitor Options
As mentioned in the previous Choose your Line 6 Gear Configuration section, you’ll want to keep
GarageBand’s Monitor function to “off” if you are utilizing POD Farm in Standalone operation, or if
using POD X3 or PODxt for their Monitoring capabilities.
If you are using POD Studio/TonePort/GuitarPort an not running POD Farm in Standalone operation,
then you’ll want to check the box for GarageBand’s Monitor feature for the audio track to hear your
input signal through the GarageBand software. You’ll likely also want to insert POD Farm Plug-In
on this audio track now and dial in a Tone to hear applied to your input signal while recording. See
GarageBand’s documentation for more about its Monitor options.
About Input Source Options...
In the GarageBand Input Source menu, you will see slightly different input sources depending on your
specific Line 6 device:
POD Studio, TonePort (except UX8) & GuitarPort: You’ll see options similar to this...
The individual Mono 1 thru 4 options receive input from the hardware’s respective Record •
Sends 1 thru 4, and record a mono file.
The Stereo 1/2 and Stereo 3/4 options receive input from the hardware’s respective Record •
Sends 1-2 and 3-4, and record a stereo file.
Note that if you have POD Farm running in Standalone operation, the type of signal fed into Record Sends
1-2 and 3-4 is determined by the Source options you select in POD Farm’s Mixer View.
TonePort UX8: You’ll see the following options:
The Mono Input 1 thru 8 options receive input from the hardware’s respective Record Sends 1 •
thru 8.
5•12
Page 82

Apple GarageBand ‘08 Setup - Mac
The individual Mono 9 thru 12 options receive input from POD Farm’s Record Sends 9 thru 12*, •
and record a mono file (when POD Farm is running in Standalone operation).
The Stereo 1/2 thru Stereo 7/8 options receive input from UX8’s respective Record Sends 1-2 •
thru 7-8, and record a stereo file.
The Stereo 9/10 and Stereo 11/12 options receive input from the respective POD Farm’s Record •
Sends 9-10 and 11-12*, and record a stereo file (when POD Farm is running in Standalone
operation).
* Note that the type of signal fed into Record Sends 9-10 and 11-12 is determined by the Source options
you select in POD Farm’s Mixer View. UX8’s driver also offers multiple Inputs and Sends with many
flexible options for routing and monitoring. Please reference the Mac Driver Settings section of the Audio
Driver chapter for more info.
POD X3 devices: You’ll see the following options:
The individual Mono 1 thru 8 options receive input from the respective POD X3 Record Sends •
1 thru 8, and record a mono file.
The Stereo 1/2 thru Stereo 7/8 options receive input from the respective POD X3 Record Sends •
1-2 thru 7-8, and record a stereo file.
POD X3 offers onboard options for the type of signal that is fed to Record Sends 1-2 within its onboard
Output screen options, while Record Sends 3-8 all carry Dry input signals. See the Mac Driver Settings
section of the Audio Driver chapter, and your POD X3 Pilot’s Handbook.
PODxt devices: You’ll see the following options:
The individual Mono 1 and 2 options receive input from the respective PODxt Record Sends 1 •
and 2, and record a mono file.
The Stereo 1/2 option receives input from the respective PODxt Record Send 1-2, and records •
a stereo file.
PODxt offers options for the type of signal fed to the Record Sends within the Line 6 Audio-MIDI Settings
dialog. See the Mac Driver Settings section of the Audio Driver chapter, and your Pilot’s Handbook.
5•13
Page 83

Apple GarageBand ‘08 Setup - Mac
GarageBand Track Effects and POD Farm Plug-In
Within the lower portion of the Track Info panel, GarageBand offers a number of optional track
effects, and some are typically on by default on a new Audio Track. You probably want to toggle them
off if you are recording a Processed signal from POD Farm’s Standalone Mixer, or from a POD device.
If you are recording a Dry signal into the audio track, then you might want to use some of these effects
to non-destructively process the playback of your recorded track. If you want to insert POD Farm PlugIn on the audio track, you can click on any of the 4 pop-up menus here and choose the POD Farm
Plug-In. As mentioned in the Monitoring options section above, if you have GarageBand’s Monitor
option active, then you’ll also hear your input source with any of these effects applied to it as it is fed
through the GarageBand software.
To get to the track effects, click on the Details twirl-down arrow in the Track Info panel:
The “built-in” track effects can
be enabled/disabled via the
checkboxes.
To insert POD Farm Plug-In (or
any other AU Plug-In installed on
your system) select it in one of the
effect pop-up menus.
Arm Your Track and Set Your Recording Levels
Click here and type in name for your
track
Press the Arm button to prepare your
track for recording
The type of signal coming into your GarageBand track, and how you adjust its input level, depends
upon the configuration of Line 6 gear you’ve selected, as covered at the start of this chapter.
If you are using POD Studio/TonePort/GuitarPort hardware and not running POD Farm in •
Standalone operation, then you’ll need to use your guitar’s volume knob, the hardware’s Mic
Gain knob, or the volume on the external device plugged into any Line In.
If you are using POD X3/PODxt hardware, adjust your levels using the onboard Output controls •
for what is routed to the Record Send you’ve selected for the audio track’s inputs.
If you are using POD Farm in Standalone operation, use POD Farm’s Mixer View. Here you can •
choose the type of signal fed to either Record Send and adjust the levels independently of the
signal you hear coming from the ToneDirect™ Monitoring signal!
Note that the track meters measure the input
signal once the track is armed
5•14
Page 84

Apple GarageBand ‘08 Setup - Mac
Choose the type of “Source” signal that is fed to
each Send (Processed, Dry or Semi-Processed)*
Adjust the Record Send Level
If the Record Send output is still very low,
even after turning up the Amp & Effects
Models’ volumes, activate the +18 boost
POD Farm Standalone Mixer - Record Send controls
* Note that you’ll have different options for POD Farm’s Record Send Sources depending on if you
currently have a Single or Dual Tone running. Please see the Mixer View section of the POD Farm
Standalone chapter for more info.
Start Recording!
Click on the transport Record button and start recording!
5•15
Page 85

Apple Logic Pro 8 - Mac
ap p l e lo g i c® pR o 8 Se t u p
For this chapter, we’ll show how to configure Apple Logic® Pro 8 to work with Line 6 POD Studio,
TonePort, GuitarPort, POD X3 or PODxt as the USB audio device, as well as optionally using POD
Farm Plug-In and/or POD Farm in Standalone operation on your Mac® computer. The steps are very
similar for the setup of Apple Logic® 8 Express, as well as other recent Logic versions.
Choose Your Line 6 Gear Configuration
Before you record your first track in any DAW software, you have a few options to consider with your
Line 6 hardware & POD Farm gear! You should decide if you want to record a “dry” signal into the
audio track, such as if you want to utilize POD Farm Plug-In to “non-destructively” apply your POD
Farm Tone onto the recorded track. Or, if you prefer to record a “processed” signal, where the POD
Farm Amp/Preamp and Effects are already applied and recorded permanently on the track. We’ll cover
the steps to record either of these ways, but first it is helpful to understand the options with your
particular Line 6 gear...
POD Studio, TonePort, GuitarPort devices
Using POD Farm in Standalone operation• - Plug a Mic or Instrument directly into your device
and launch POD Farm in Standalone operation. Use the Mixer View - Record Send Source
options to choose the type of signal fed to your Record Sends. Also see the POD Farm Standalone
chapter for more about the Mixer View.
Processed• - Feeds the same fully processed Tone you hear to the Record Send.
Dry Input• - Feeds a completely unprocessed signal to the Record Send, even though you can
listen to the fully Processed Tone from POD Farm Standalone’s ToneDirect™ Monitoring
output.
Semi-Processed• - Feeds a signal processed with only effects that are positioned “Pre” within
the POD Farm Standalone Signal Flow for the Tone (all active models positioned left of the
Amp/Preamp).
Without using POD Farm in Standalone operation• - Plug a Mic or Instrument directly into
your device and configure the Line 6 Audio-MIDI Settings dialog to feed your “dry” input
source to your device’s Record Sends. See the Audio Driver chapter for more about this. Note
that when using this option, you won’t have the benefit of POD Farm ToneDirect™ Monitoring
when not running POD Farm in Standalone mode, so you’ll need to enable your DAW software’s
monitoring feature on the audio track (more on this in the next section).
POD X3 devices - Plug a Mic or Instrument into your POD X3 and configure the options within
X3’s onboard Outputs - Studio/Direct Mix settings screen to determine what type of signal is fed
to the X3’s Record Sends. You can also use the Monitor Volume slider in the Line 6 Audio-MIDI
Settings dialog to control your Monitor level - see the Audio Driver chapter for more about this.
Please also refer to your POD X3 Pilot’s Handbook for details on X3’s Output screen options.
PODxt devices - Plug a Mic or Instrument directly into your PODxt device and configure the
options within the Line 6 Audio-MIDI Settings dialog for the type of signal (Processed or Dry) that
is fed to the Record Sends. You can also use the Monitor Volume slider in the Line 6 Audio-MIDI
Settings dialog to control your Monitor level. See the Audio Driver chapter for more about this.
Please also refer to your PODxt Pilot’s Handbook for details about output options.
5•16
Page 86

Apple Logic Pro 8 - Mac
Monitoring through the DAW software - If you are using POD Studio/TonePort/GuitarPort hardware
and not running POD Farm in Standalone operation, then you’ll need to use the DAW software’s own
monitoring feature to hear your input signal routed through the DAW software’s audio track, as called
out in the following steps. This also means you’ll hear the input signal effected with any Plug-Ins, such
as if you have POD Farm Plug-In inserted on the same audio track. You may need to set your DAW
software’s buffer size fairly low to minimize the “latency” (the time between when you pluck a note
on your guitar to the time you actually hear it after feeding through your DAW software and out your
speakers). We’ll cover all these steps here...
Configuring Logic Pro to Use the Line 6 Core Audio Driver
Launch the Logic Pro application. If a project opens, go to Logic’s File menu and select Close Project
to exit it.
Open the Logic Preferences...
Go to the Logic Pro menu and
choose Audio...
Click on the Core Audio tab
Check the Enable box
Select your Line 6 device
Set the I/O Buffer Size to 256*.
If you encounter audio drop-outs
in your Logic Pro Projects, come
back here and raise this to a slightly
higher value
Check the box for 24 Bit Recording
Click Apply Changes when done
* As mentioned above, if you are not to be running POD Farm in Standalone operation, and instead
utilizing Logic’s software monitoring feature, then you may want to set the I/O buffer size here to the
lowest value that still offers playback & recording stability with your project. This will minimize latency.
5•17
Page 87

Apple Logic Pro 8 - Mac
Create & Configure a New Project
Go to the File menu and select New...
In the New... dialog, choose
Empty Project
Typically, Logic will immediately prompt you with the New Track dialog, where you can create one or
more audio tracks, and designate the track’s input and output.
Type in the number of tracks and type to be created we’ll just add one audio track...
Choose Mono or Stereo for the track Format
For the Input options, you’ll be able to select either
an individual mono input or stereo input, depending
on your Format selection*
The Audio tracks’ Output Routing should default
to your Line 6 device’s Output 1-2 (see below
regarding UX8’s Output options)
Keep Input Monitoring and Record Enable
unchecked. (We’ll cover more on Monitoring
options in a later section).
*When the Mono Format is chosen, you’ll see one mono Input option for each Send channel that your
Line 6 device offers. Likewise, if the Stereo Format is chosen, you’ll see one stereo Input option for
each Stereo Send your hardware offers. Since we’re using a Line 6 UX2 device, the track Input options
appear like this...
Stereo Inputs
You’ll have a different number of track Input and Output options available depending on your specific
Line 6 device:
Mono Inputs
POD Studio, TonePort & GuitarPort devices (except UX8): You will see 4 Mono Inputs and 2
Stereo Inputs, as pictured above.
The individual Mono Inputs 1 thru 4 receive input from the hardware’s respective Record Sends •
5•18
Page 88

Apple Logic Pro 8 - Mac
1 thru 4, and record a mono file.
The Stereo Inputs 1-2 and 3-4 receive input from the hardware’s respective Record Sends 1-2 •
and 3-4, and record a stereo file.
Note that if you have POD Farm running in Standalone operation, the type of signal fed into Record Sends
1-2 and 3-4 is determined by the Source options you select in POD Farm’s Mixer View.
UX8: You’ll see 12 Mono inputs and 6 Stereo inputs.
The individual Mono Inputs 9 thru 12 receive input from POD Farm’s Record Sends 9 thru 12*, •
and record a mono file (when POD Farm is running in Standalone operation).
The Stereo Inputs 1/2 thru 7/8 receive input from UX8’s respective Record Sends 1-2 thru 7-8, •
and record a stereo file.
The Stereo Inputs 9/10 and 11/12 receive input from the respective POD Farm’s Record Sends 9-10 •
and 11-12*, and record a stereo file (when POD Farm is running in Standalone operation).
* Note that the type of signal fed into Record Sends 9-10 and 11-12 is determined by the Source options
you select in POD Farm’s Mixer View. UX8’s driver also offers multiple Inputs and Sends with many
flexible options for routing and monitoring. Please reference the Mac Driver Settings section of the Audio
Driver chapter for more info.
POD X3 devices: You’ll see 8 Mono inputs and 4 Stereo inputs.
The individual Mono Inputs 1 thru 8 receive input from the respective POD X3 Record Sends 1 •
thru 8, and record a mono file.
The Stereo Inputs 1/2 thru 7/8 receive input from the respective POD X3 Record Sends 1-2 thru •
7-8, and record a stereo file.
POD X3 offers onboard options for the type of signal that is fed to Record Sends 1-2 within its onboard
Output screen options, while Record Sends 3-8 all carry Dry input signals. See the Mac Driver Settings
section of the Audio Driver chapter, and your POD X3 Pilot’s Handbook.
PODxt devices: You’ll see 2 Mono inputs and 1 Stereo input.
The individual Mono 1 and 2 options receive input from the respective PODxt Record Sends 1 •
and 2, and record a mono file.
The Stereo 1/2 option receives input from the respective PODxt Record Send 1-2, and records •
a stereo file.
PODxt offers options for the type of signal fed to the Record Sends within the Line 6 Audio-MIDI Settings
dialog. See the Mac Driver Settings section of the Audio Driver chapter, and your Pilot’s Handbook.
5•19
Page 89

Next, we need to select a sample rate for our Project...
44,100 Hz is a good choice for your Sample
Rate, or you can choose 48,000, 88,200
or 96,000 Hz if your project specifically
requires one of these higher rates
Apple Logic Pro 8 - Mac
Select the Project Settings > Audio dialog
from the File menu
Now that the Project is all configured, it’s a good time to Save It! Go to File > Save and type in a name
and choose a directory to Save to.
Configuring an Audio Track for Recording
A few more quick settings to cover for the audio track...
Set Input Monitoring Options and Get Armed and Ready...
As mentioned in the previous Choose your Line 6 Gear Configuration section, you’ll want to keep
Logic’s Input Monitor function “off” on the audio track if you are utilizing POD Farm in Standalone
operation, or if using POD X3 or PODxt for their Monitoring capabilities. This way, your input is not
also fed through the Logic software.
5•20
Page 90

Apple Logic Pro 8 - Mac
Keep the audio track’s Input Monitor button
set to OFF
Click the Record Ready button to ON
Note that once the track is in Record Ready
mode, you’ll be able to see the input signal
in both the track header or to the left in the
“Inspector”. You can use this to reference
your record levels coming from your Line 6
device
If you are using POD Studio/TonePort/GuitarPort an not running POD Farm in Standalone operation,
then you’ll want to turn the Logic track’s Input Monitor button “ON” to hear your input signal through
the Logic software. You’ll likely also want to insert POD Farm Plug-In on this audio track now and dial
in a Tone to hear applied to your input signal while recording. See the Logic Pro documentation for
more about it’s Input Monitor options.
Set Your Recording Levels
Be sure to set your record levels before you start recording. The signal coming into the Logic track, and
how you adjust its level, depends upon the configuration of Line 6 gear you’ve selected, as covered at
the start of this chapter.
If you are using POD Studio/TonePort/GuitarPort hardware and not running POD Farm in •
Standalone operation, then you’ll need to use your guitar’s volume knob, the hardware’s Mic
Gain knob, or the volume on the external device plugged into any Line In.
If you are using POD X3/PODxt hardware, adjust your levels using the onboard Output controls •
for what is routed to the Record Send you’ve selected for the audio track’s inputs.
If you are using POD Farm in Standalone operation, use POD Farm’s Mixer View. Note that here •
you can choose the type of signal fed to either Record Send and adjust the levels independently
of the signal you hear coming from the ToneDirect™ Monitoring signal!
5•21
Page 91

Apple Logic Pro 8 - Mac
Choose the type of “Source” signal that is fed to
each Send (Processed, Dry or Semi-Processed)*
Adjust the Record Send Level
If the Record Send output is still very low,
even after turning up the Amp & Effects
Models’ volumes, activate the +18 boost
POD Farm Standalone Mixer - Record Send controls
* Note that you’ll have different options for POD Farm’s Record Send Sources depending on if you
currently have a Single or Dual Tone running. Please see the Mixer View section of the POD Farm
Standalone chapter for more info.
Start Recording!
Once your record level is set, click on the transport Record button and start riffing!
Insert POD Farm Plug-In
Logic Pro supports the AU Plug-In format, and if you installed the POD Farm AU Plug-In type during
your POD Farm installation, it should automatically appear in Logic’s Insert menus. To insert POD
Farm Plug-In on your audio track, in the Logic Inspector panel with your audio track selected (or in
5•22
Page 92

Apple Logic Pro 8 - Mac
the Logic Mixer panel), click on one of the Insert slots and choose POD Farm Plug-In from the list of
effects. Note that if your audio track is Stereo, you’ll see a Stereo POD Farm Plug-In. If your track is
Mono, you’ll have the option of choosing either “Mono” or “Mono-Stereo” for the Plug-In. You’ll want
to choose the option that best matches your audio track’s signal routing in Logic. Also note that if you
are using any stereo effects within your POD Farm Plug-In Tones, if you choose the “Mono” option
then the stereo output of these effect models will be “folded down” to mono.
Click one of the Insert selectors in
the Inspector panel for your audio
track and select POD Farm Plug-In
from the list of effects.
In this example, we’re inserting the
Plug-In on the stereo audio track 1,
therefore, the POD Farm Plug-In
option is “Stereo”.
In this example, we’re inserting the
Plug-In on the mono audio track 2,
therefore, the POD Farm Plug-In
options are “Mono” or “Mono >
Stereo”.
For more info, please see the POD Farm Plug-In chapter and your Logic Pro documentation.
5•23
Page 93

Digidesign Pro Tools LE 7 Setup - Mac
di g i d e S i g n® pR o to o l S® le™ 7 Se t u p
Digidesign® has designed Pro Tools® software so it can only be used with a Digidesign or M-Audio
audio interface; you cannot use your Line 6 hardware as the primary audio interface for a Pro Tools
system. But you can still utilize the RTAS® POD Farm Plug-In in any Pro Tools setup! Additionally
you can also connect the outputs of your Line 6 device to a Digidesign (or M-Audio) interface’s inputs
to record your processed POD Farm or POD processed tones directly into Pro Tools. UX2, UX8, KB37,
POD X3 and PODxt PRO even let you do this with a direct, digital connection.
For this document, we’ll be showing how to connect to the Digidesign® Mbox® 2 unit with Pro Tools
LE™ 7.3.1. These steps are similar for connecting to the Digi 002® or other Digidesign and M-Audio
hardware as well. There are two methods described here – Recording from a Line 6 USB device’s
analog outputs or digital S/PDIF outputs.
Note - If you want to record a “dry”, unprocessed input signal into Pro Tools, and use POD Farm Plug-In on
the Pro Tools audio track, then you can simply plug your instrument or Mic directly into your Digidesign/
M-Audio hardware and monitor your input signal through the Pro Tools software. Please read through the
Pro Tools section within the POD Farm Plug-In chapter for details on this type of configuration. You will
need your Line 6 hardware connected for POD Farm Plug-In to be authorized to run on the computer.
Recording from Your Line 6 Hardware’s Analog Outputs
In this setup example, we’ll show how to connect a Line 6 (POD Studio or TonePort) UX2 to a
Digidesign Mbox 2 unit, and then use POD Farm in Standalone operation to dial in Tones and choose
what type of signal to feed into the Pro Tools audio track (Processed or Dry). This allows us to take
advantage of POD Farm’s ToneDirect Monitoring for super low latency. These steps are much the same
for any Line 6 POD Studio, TonePort or GuitarPort device.
®
If you are using a POD X3 or PODxt device it is not necessary to connect your POD to a computer
via USB at all for this type of analog connection since Tones can be by called up & edited, and output
levels configured completely on your POD device! (If you are to be using POD Farm Plug-In, you will
need your Line 6 hardware connected to the USB port for POD Farm Plug-In to be authorized to run
on the computer).
Be sure to connect the USB cable from UX2 into your computer’s USB port, and then proceed with
the following steps…
Connect the Analog Outputs* from your Line 6 hardware to the Digidesign Mbox 2:
Using two ¼” to ¼” shielded TS or
TRS audio cables, plug each into the
Analog Outs of your device
Connect a USB cable to your
device & computer’s USB port
5•24
Page 94

Digidesign Pro Tools LE 7 Setup - Mac
*Note - If you are using a GuitarPort device, the Analog Outs are the RCA style jacks labelled “L” and
“R”. If using a UX8, you should connect to the “Out 1” and “Out 2” jacks on the back.
Plug the other end of the left audio cable into the Mbox Input 1 input, and the right audio cable into
the Mbox Source 2 input.
Connect a USB cable to your
Mbox 2 & computer’s USB port
From your Line 6 device’s Right Analog
Out (or “Out 2”), connect to the Mbox 2
Input 2 - Line input
From your Line 6 device’s Left Analog Out
(or “Out 1”), connect to the Mbox 2 Input
1 - Line input
Use the Mbox 2 Mon Outputs to hear playback of all Pro Tools LE audio. The Line 6 Hardware output
audio will be mixed with the Pro Tools LE audio as well. Therefore, if you are using headphones, you’ll
want to plug them into the Mbox 2 headphone jack to hear everything:
If you want to use headphones for
monitoring, plug them in to the
Mbox 2 Headphone Out
From the Mbox Mon Out jacks, connect to the
Left and Right inputs for your powered speakers
or monitoring system
POD Farm Standalone Operation
Launch POD Farm in Standalone operation, connect your guitar, Mic or other instrument, and then
dial in the Tone you want recorded in Pro Tools. Note that since you’ll be recording the signal from
the Analog Outputs of your hardware, both the Tone’s Pan & Volume knobs in the Signal Flow View
as well as the main Output Volume knob will affect your output signal.
5•25
Page 95

Digidesign Pro Tools LE 7 Setup - Mac
Use the Main Output Level and Tone 1 & 2 Pan and Volume knobs
to control the output level fed into the Pro Tools hardware
Please also see the POD Farm Standalone Operation chapter for details on specific controls. It is
important to note here, however, that the POD Farm Mixer View only adjusts audio fed to the Record
Sends, and you are feeding your POD Farm output into Pro Tools via the Line 6 hardware’s Analog
Outs. Therefore, you won’t be utilizing the Record Sends (nor the Mixer View) for this type of setup.
POD X3 & PODxt Devices
If you are using POD X3, you’ll want to check out POD X3’s Output screen options in your POD X3
Pilot’s Handbook - In particular, the Reference: Configuration & Setup chapter covers the options
for choosing your inputs (Mic, Line, Instrument, or multiple input sources) as well as things such as
a Tone Blend versus Tone Pair tone setting, panning tones and effects, etc. Basically, this is the point
where you’ll want to have your instrument or mic plugged into POD X3 and have your Tone sounding
the way you want it to be recorded from X3’s 1/4 inch Analog Outputs. You’ll also want to be sure the
panning and levels of the tones and effects feeding to the POD X3 Left and Right analog outs are the
way you want each to be recorded into your Pro Tools track(s).
If you are using PODxt, you’ll want to select the Studio Direct Mode within PODxt’s Output Mode
screen since you’ll be feeding the signal from your Analog Outputs into the Pro Tools hardware. See
your PODxt Pilot’s Handbook for information about these output settings.
Create a New Pro Tools LE Session
Once you have your Line 6 hardware and/or POD Farm configured, then the next step is to launch Pro
Tools LE and set up a Session for recording...
5•26
Page 96

Type in a title for the
Session and choose where
to save it
Choose the Sample Rate
and Bit Depth - 44.1 kHz
and 24 Bit are good
choices unless you have
specific needs for your
project
File Type - BWF (.WAV)
is a good choice here since
this file type is compatible
with both Mac and Windows
Digidesign Pro Tools LE 7 Setup - Mac
To start a new Session in Pro Tools LE,
choose New Session from the File menu
For I/O Settings, Stereo
Mix is best
Create and Configure a New Audio Track
Next you’ll need to create at least one new audio track in the session to record into. You can of course
also create more audio tracks if you want to import existing audio files into this session...
In the Track menu, select New...
Choose how many
Tracks to create
Choose Mono or Stereo* for
your audio track format
Choose Audio Track for
the Track type
Choose Samples
5•27
...Then click Create
Page 97

Digidesign Pro Tools LE 7 Setup - Mac
*You’ll need to decide before creating each recording track here if you want to record the output from
your Line 6 hardware as Mono or Stereo. Mono will of course only record one of your Line 6 device’s
(Left or Right) outputs, and you’ll choose which once the track is created. If you have stereo effects
active on your POD Farm or POD tone, then you’ll probably want to choose Stereo to record both
channels into a stereo track.
At the top left of the Edit Window, click the
View selector and enable the I/O View
On the new audio track, click on the Input Selector and
choose the Mbox Interface input source. Since we created
a Stereo track here, we’ll select the In 1-2 (Stereo) to
record from the Mbox Mic/Line (analog) inputs
Or… if you created a mono audio track, you’ll have the option for the track input to choose either In
1 (Mono) to capture the LEFT signal, or In 2 (Mono) to capture the RIGHT signal:
Click the R button to arm the audio track
for recording
The track meters will now measure the
Line 6 Device’s signal level
*Muting the track during recording disables the Pro Tools LE software monitoring feature, which
allows your Line 6 hardware analog signal to be monitored with the lowest latency possible. Adjust
the Mbox MIX knob to balance the Pro Tools session audio playback with the input audio (see your
Mbox documentation for details). Once you are done recording, un-mute the track so you can hear
playback.
Click the M button to
mute the track while
recording*
5•28
Page 98

Digidesign Pro Tools LE 7 Setup - Mac
Note to Digi 002 users… When using the Digi 002 hardware with Pro Tools LE, an additional Low
Latency Monitoring option is available within Pro Tools LE Operations menu. You can alternatively keep
your track un-muted and activate this option to hear your input monitoring signal when recording (see
your Digi 002/Pro Tools LE documentation for more on this feature).
Set your Recording Levels - As shown above, once your audio track is armed, you can use the track’s
meters to gauge your recording levels. Note that the levels coming into the track are affected by your
POD Farm Standalone software Tone and Main volume knobs or POD Tone Output levels. Also, the
main Output or Master Volume knob on your Line 6 hardware unit affects the signal level going out
the Analog Outs, and thus the input level into Pro Tools. Finally, the Mbox unit includes level knobs
for Inputs 1 & 2 to adjust the incoming signal level. The best practice is to set all of these controls to
roughly half way to start, and then adjust each of them slightly to achieve the optimum level. You want
to avoid setting any one control very high or very low to avoid excess noise or degrading the signal
quality.
Be sure the input switches are set so that the green
Mic light is illuminated for both Inputs 1 & 2
(since we’re plugging into these Mic/Line inputs)
Keep both the Mono and 48V
(phantom power) switches off
Start Recording...
Use the Input 1 & 2 knobs to adjust
the recording levels
Click the transport Record
button to place Pro Tools LE into
record mode, then press the Play
button to start recording!
5•29
Page 99

Digidesign Pro Tools LE 7 Setup - Mac
Recording from Your Line 6 Hardware’s S/PDIF Outputs
POD Studio/TonePort UX2, UX8, POD X3 and PODxt Live units all include S/PDIF outputs, therefore
you can optionally connect these outputs to your Digidesign hardware to record digitally into Pro Tools
or Pro Tools LE! In this setup example, we’ll show how to connect a Line 6 UX2 to a Digidesign Mbox
2 unit, and we’ll call out where different steps might be necessary for the other Line 6 devices.
For more information regarding using your Line 6 device’s S/PDIF connections, please also see the
section S/PDIF Digital Output from Line 6 Hardware to an External Device in the Audio Driver
chapter. The Pilot’s Handbook that came with your Line 6 device includes more useful information
as well.
Connect Your Hardware...
Using a 75-Ohm, coaxial S/PDIF cable, plug
one end into the S/PDIF Digital Out of
your Line 6 device
Plug the other end of the S/PDIF
cable into the Mbox S/PDIF In
If you want to use headphones for
monitoring, plug them in to the
Mbox 2 Headphone Out
From the Mbox Mon Out jacks, connect
to the Left and Right inputs for your
powered speakers or monitoring system
You will still use the Mbox Mon Out jacks (or Headphone Output) to hear playback of all Pro Tools LE
audio. The Line 6 Hardware audio will be mixed with the Pro Tools LE audio if you use the Pro Tools
software monitoring function. See the later section regarding monitoring for more on this.
5•30
Page 100

Digidesign Pro Tools LE 7 Setup - Mac
UX2, UX8 & KB37 Configuration
When connecting two hardware devices digitally, it is necessary that both units are set to operate at the
same sample rate. For POD Studio and TonePort devices, this is configured in the Line 6 Audio-MIDI
Settings dialog. Note that you will need to have your Line 6 device connected to your computer’s USB
port, but you must not have the POD Farm Standalone application running - this is necessary to
change sample rate settings. To get to this dialog, go to the Mac System Preferences and launch the
Line 6 Audio-MIDI Devices. In the dialog, go to the Driver tab:
Choose your Line 6
Device...
Then set the preferred
sample rate for the
Format. Mbox 2
supports 44100 or
48000 Hz - we’ll use
44100 Hz for this
example
5•31
 Loading...