

Line6 HX Effects 2.50 OWNER’S MANUAL

2.50 OWNER’S MANUAL
40-00-0399 - A (For use with HX Eects Firmware 2.50) ©2018 Line 6, Inc.
0•1

Contents
Welcome 4
Common Terminology 4
Updating your HX Eects Device's Firmware 4
Top Panel 5
Rear Panel 7
Quick Start 8
Hooking It All Up 8
Stomp Mode 10
Bypassing an Eect 10
Bypassing All Eects 10
Choosing an Eect 11
Editing Eects 11
Hands-Free Editing (Pedal Edit) 12
Swapping Footswitches 13
Copying/Pasting an Eect 13
Clearing an Eect 13
Customizing a Footswitch 13
Preset Mode 14
Saving/Naming a Preset 14
TAP Tempo 15
Tuner 15
Effects 16
Impulse Response (IR) 21
Send/Return 21
Looper 22
U.S. Registered Trademarks 24
Snapshots 25
Using Snapshots 25
Copying/Pasting a Snapshot 26
Swapping Snapshots 26
Renaming a Snapshot 26
Saving Snapshots 27
Determining Snapshot Edit Behavior 27
Signal Flow 28
Moving Blocks in Signal Flow View 28
Bypassing Blocks in Signal Flow View 29
Editing Blocks in Signal Flow View 29
Assigning Switches in Signal Flow View 29
Parallel Path Routing 30
Setting Path B's Output 30
Conguring Split Block Options 31
Dynamic DSP 31
Block Order and Stereo Imaging 32
Controller Assign 33
Assigning a Controller 33
Clearing a Block's Controller Assignment(s) 34
Clearing All Controller Assignments 34
Command Center 35
Assigning a Command 35
Copying and Pasting a Command 37
Copying and Pasting All Commands 37
Clearing a Command 37
Clearing All Commands 37
Global Settings 38
Setting Proper Levels 38
Resetting All Global Settings 38
Global Settings > Ins/Outs 39
Global Settings > Preferences 39
Global Settings > Switches 40
Global Settings > Pedals 40
Global Settings > MIDI/Tempo 41
Global Settings > Displays 41
MIDI 42
Preset Recall via MIDI 42
Snapshot Recall via MIDI 43
Block Bypass via MIDI 43
Parameter Control via MIDI 43
MIDI CC 43
2

©2018 Line 6, Inc. All rights reserved.
Please Note: Line 6, Helix, M13, M9, and M5 are trademarks of Line 6, Inc. registered in the U.S. and other countries. HX Eects, DT25, DT50, DL4, DM4, MM4 and FM4, are trade-
marks of Line 6, Inc. Apple, Mac, iPad and iPhone are trademarks of Apple, Inc. registered in the U.S. and other countries. Apple is not responsible for the operation of this device
or its compliance with safety and regulatory standards. Windows is a registered trademark of Microsoft Corporation in the United States and/or other countries.
3
Welcome
"I hate reading manuals!"
Us too. We're not overly fond of writing them either, especially when so few people
read them. What if we were to make a handful of super-short videos that get you up
and running with your HX Eects™ device in less than ten minutes, and you promise
to not jump online and complain about having to read a manual? Agreed? Go here:
line6.com/meet-hx-eects
Block
Model
Preset
Controller
Send/
Return
IR
Blocks are objects that represent various elements of your tone, such
as individual eects, volume pedals, loopers, signal splits and merges,
and Impulse Responses. Each preset can run up to nine simultaneous
blocks, DSP permitting.
Each processing block can accommodate one model. The HX Eects
hardware includes over 100 HX (Helix™) eects models, plus dozens
of Legacy eects models from Line 6 DL4™, DM4™, MM4™, FM4™,
M13®, M9®, and M5® multieects devices.
A preset is a collection of blocks. It consists of all eects, snapshots,
footswitch assignments, controller assignments, and Command
Center messages.
Controllers are used to adjust various parameters in real time. For example, the expression pedal can be used to control a wah, or the mod
wheel on your MIDI keyboard can be used to control delay feedback
and reverb depth.
Sends and Returns are used to insert your favorite stompboxes anywhere in the signal ow or for connecting to your guitar amp via "4-
Cable Method". The HX Eects device has two mono sends and re-
turns, which can be paired for stereo operation.
IRs (Impulse Responses) are mathematical functions representing the
sonic measurements of audio systems. The HX Eects hardware can store
up to 128 custom or third-party IRs at a time. See "Impulse Response (IR)"
"M'eh. Manuals are okay, I suppose."
All right (deep breath)... Thank you for purchasing the Line 6 HX Eects device, one of
the most powerful and exible audio processors ever created. We hope it helps drive
your search for tonal bliss and spawns years of creativity, both on stage and in the
studio.
Although the HX Eects unit may appear deep (and it is), it's designed to be used in
two ways—one, like any ol' pedalboard where you choose your stompbox and turn
the knobs, and two, like a highly editable and congurable eects workstation.
Although you’re likely anxious to rip open the plastic and plug in, wait! At the very
least, check out the HX Eects Cheat Sheet that came in the box, and keep it handy.
Then read the "Quick Start" chapter of this manual and we’ll have you up and shredding in no time. Be sure to also visit line6.com/videos where we're always adding new
video tutorials covering the latest Line 6 gear!
Common Terminology
While reading this manual, you may encounter several unfamiliar terms. It’s important
to know what they mean. Be careful—we might toss a pop quiz your way.
Updating your HX Effects Device's Firmware
Line 6 is continually improving HX family products. Updating your HX Eects device's
rmware will ensure you always have the newest eects models and features.
IMPORTANT! This manual assumes you've updated your HX Eects device to
at least version 2.50.
If you are using a Windows® computer - You'll need to rst download and
install the Line 6 HX Effects Device Driver, available from line6.com/software.
No driver installation is necessary for Mac computers.
1. Download and install the latest version of the Line 6
Updater application from line6.com/software.
2. Connect your HX Eects hardware to your computer via USB
and power the device on.
3. Launch the Line 6 Updater application, log into your Line 6
account and follow the prompts to install the latest available
rmware version.
4
Top Panel
EFFECTS
1 2 3
TAP
TUNER
MODE
EDIT / EXIT
ACTIONSAVE
21 6
3
4
9
10
9
11
8
8
5
7
5
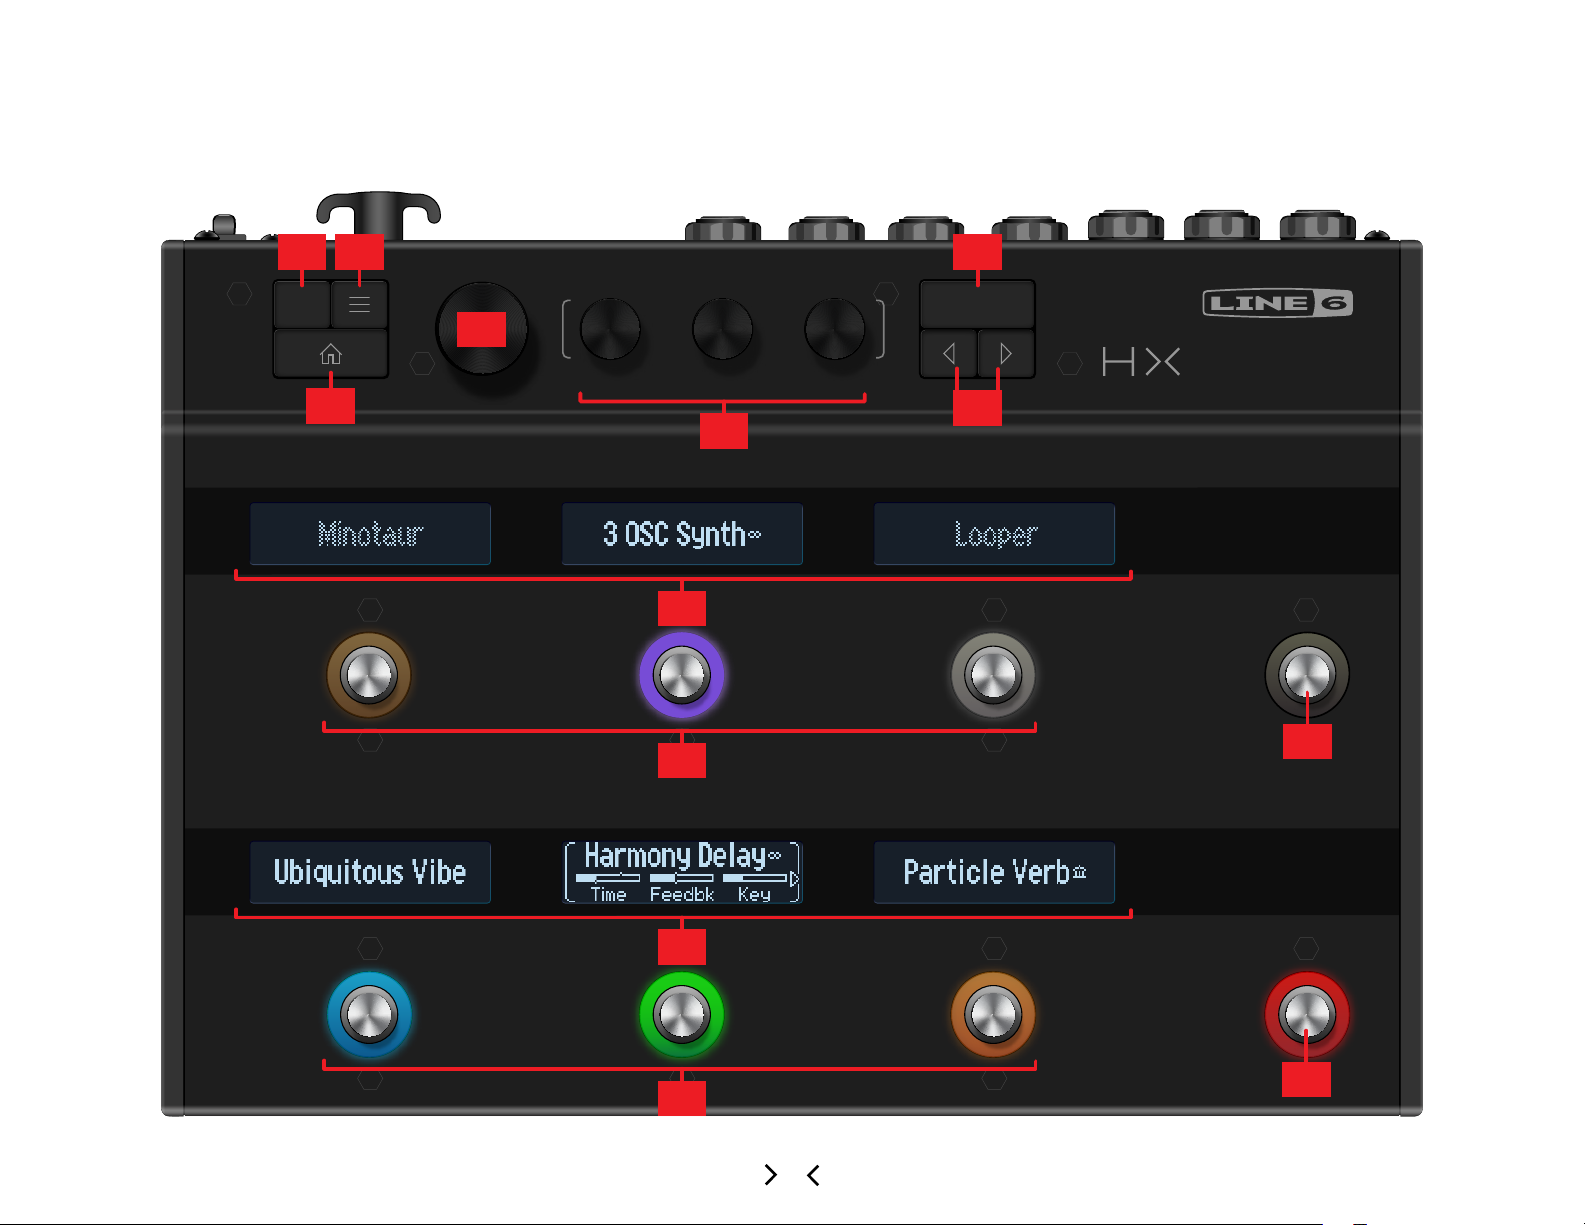
1. SAVE Press this button to open the Save menu for renaming and saving chang-
es to a preset. Press twice to quick save. See "Saving/Naming a Preset"
2. Press this button to dive deeper into the HX Eects device, and you'll nd
Signal Flow, Controller Assign, Command Center, and Global Settings menus.
3. If you ever get lost, press this button to return home.
4. BIG KNOB From Stomp footswitch mode, turn this knob to change the se-
lected block's eect. Press the Big Knob to open the model list. See "Choosing
an Eect" From Preset footswitch mode, turn the Big Knob to select presets. See
"Preset Mode"
5. Knobs 1-3 Turn one of the three smaller knobs to adjust parameters for the
selected LCD (the one anked in white brackets); press the knob to reset the
parameter's value.
SHORTCUT: For most time-based parameters such as delay time or modulation speed, press the knob to toggle between setting the value in ms or Hz
and note divisions (1/4-note, dotted 1/8-note, etc.).
9. Footswitches 1-6 These capacitive, touch-sensitive footswitches have col-
ored LED rings that tell you the current state of the eect or item. While in Stomp
mode, briey touch (but don't press) a footswitch to quickly select the assigned
eect. Touch the switch repeatedly to cycle through multiple assigned items. See
"Stomp Mode"
SHORTCUT: While in Stomp footswitch mode, touch (but don’t press) a
footswitch for one second to spill all of its parameters across multiple scribble strips.
SHORTCUT: While in Stomp footswitch mode, touch and hold (but don’t
press) two switches to swap all assignments between them (including any
custom scribble strip names and LED colors).
10. MODE/EDIT/EXIT Switch Press MODE to toggle between Stomp and Pre-
set footswitch modes. Hold MODE for one second to engage Pedal Edit mode,
which lets you edit eects with your feet, allowing your hands can stay on the
guitar where they belong. See "Hands-Free Editing (Pedal Edit)" Press MODE/
EDIT/EXIT to exit Looper or Pedal Edit mode. See "Looper"
SHORTCUT: Controllers can be assigned to most parameters. Press and
hold a parameter’s knob to quickly jump to the "Controller Assign" page for
that parameter.
6. ACTION Press this button to open the action panel for the selected block or
menu. From Stomp footswitch mode, the action panel lets you copy/paste/clear
eects and customize the footswitch's label and LED color. Other menus may
have unique action panels. For example, the Global Settings action panel lets you
reset all global settings at once.
7. / If the selected model or item has more than one page of parameters, ar-
rows appear in the lower left and/or right corner of its LCD. Press or to view
more parameters. In the model list, press to open the folder or to close the
folder and go back one level.
8. Scribble Strips Each of the six LCD scribble strips displays the name of its
assigned eect or item, so there are never any surprises during a show. You can
custom label scribble strips. See "Customizing a Footswitch". (And don't forget to
remove the protective lm covering these strips on your new HX Eects device!)
NOTE: If a particular footswitch has more than one block or item assigned,
the scribble strip may read “MULTIPLE (X)," where X is the number of assignments. See "Assigning Switches in Signal Flow View"
11. TAP/TUNER Switch Press TAP two or more times to set the BPM (beats per
minute) of any tempo-based eects such as delay or modulation. Press TAP once
to restart any LFO-based modulation eects. Hold TAP for one second to open
Tuner view. See "Tuner"
SHORTCUT: Touch (but don’t press) TAP to briey display the tempo panel.
This lets you quickly ne-tune the current tempo without navigating to the
Global Settings menu.
6
Rear Panel
12 13 14 15 16 17
18
PEDAL /EXT AMP SEND RETURN
1
2
-1-
L/MONO RIGHT L/MONO RIGHT
-2-
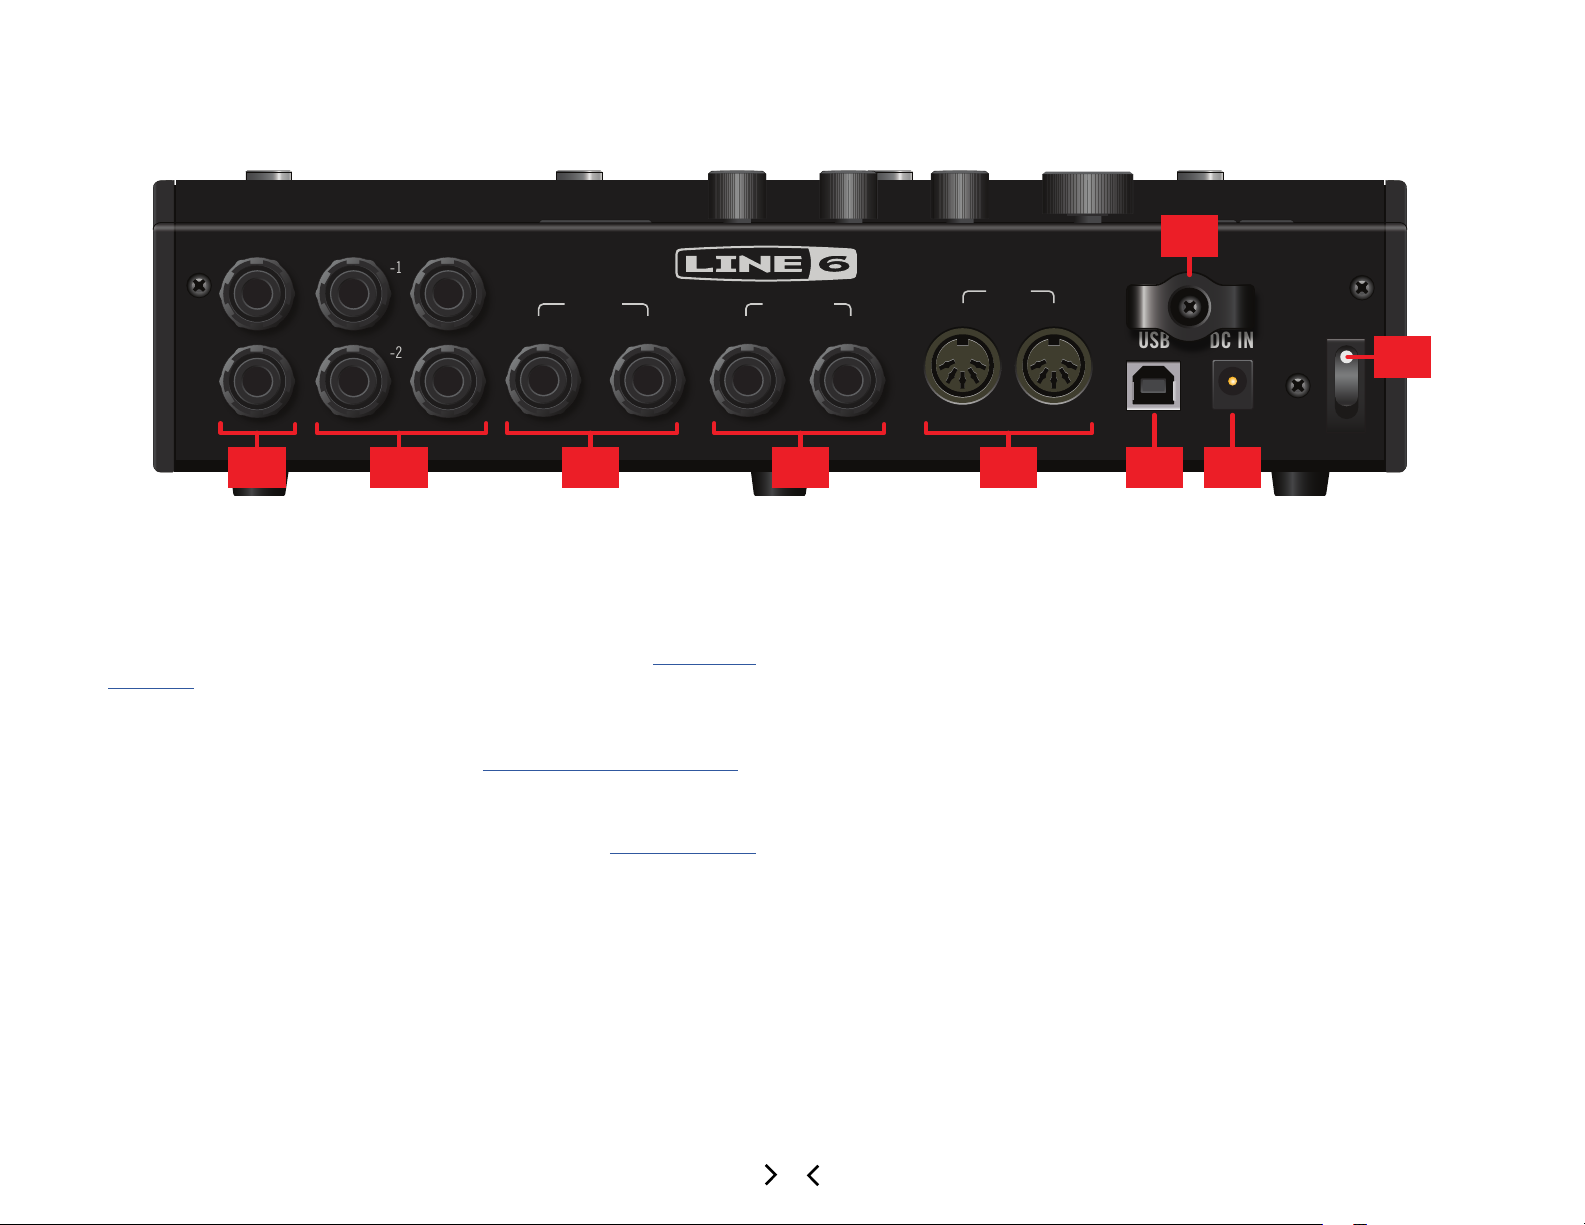
12. PEDAL/EXT AMP 1-2 Two expression pedals can be connected to the HX
Eects device and assigned to adjust a wide variety of parameters. By default,
EXP 1 is automatically assigned to control and bypass Wah/Pitch Wham type
blocks, and EXP 2 is automatically assigned to control Volume blocks, making
them ready for use with your connected expression pedal(s). See "Assigning a
Controller"
Alternatively, either jack can be connected to your traditional guitar amp to switch
its channels or turn its reverb on and o. Use a TRS cable for dual operation
(A=tip, B=ring). To set this jack's function. See "Global Settings > Preferences"
13. SENDS/RETURNS 1-2 These 1/4” ins and outs can be used as FX loops for
inserting external stompboxes between specic blocks in the HX Eects device
or as inputs and outputs for running 4-Cable Method rigs. See "4-Cable Method"
14. INPUT L/MONO, RIGHT Connect your guitar, bass guitar, or mono pedals
to the L/MONO input. Connect stereo pedals, keyboards, synths, or modelers to
both the L/MONO and RIGHT inputs.
19
OUTPUTINPUT
MIDI
OUT/THRUIN
POWER
USB DC IN
20
16. MIDI IN, OUT/THRU Connect the HX Eects hardware to your MIDI gear for
sending and receiving program changes, continuous controllers, and other MIDI
messages. (Note that MIDI communication is optionally also sent and/or received
via USB.)
17. USB Connect the HX Eects device to your Mac or Windows computer for
preset management and IR loading via the HX Edit application, updating to the
latest rmware, receiving MIDI control messages, and sending remote Command
Center messages to control various software. Use of a USB 2.0 or 3.0 port is required - Do not use an external USB hub.
18. DC In Line 6 recommends using only the supplied DC-3G power supply.
19. Cable Tie Wind the DC-3G's cable through one or both hooks to keep drunk
punters from stopping the show.
20. POWER switch It’s alive!
15. OUTPUT L/MONO, RIGHT Use unbalanced 1/4" TS cables to connect to
your guitar amp or other pedals. When connecting to a mono pedal or single amp,
connect only the L/MONO 1/4" jack.
7
Quick Start
GUITAR IN
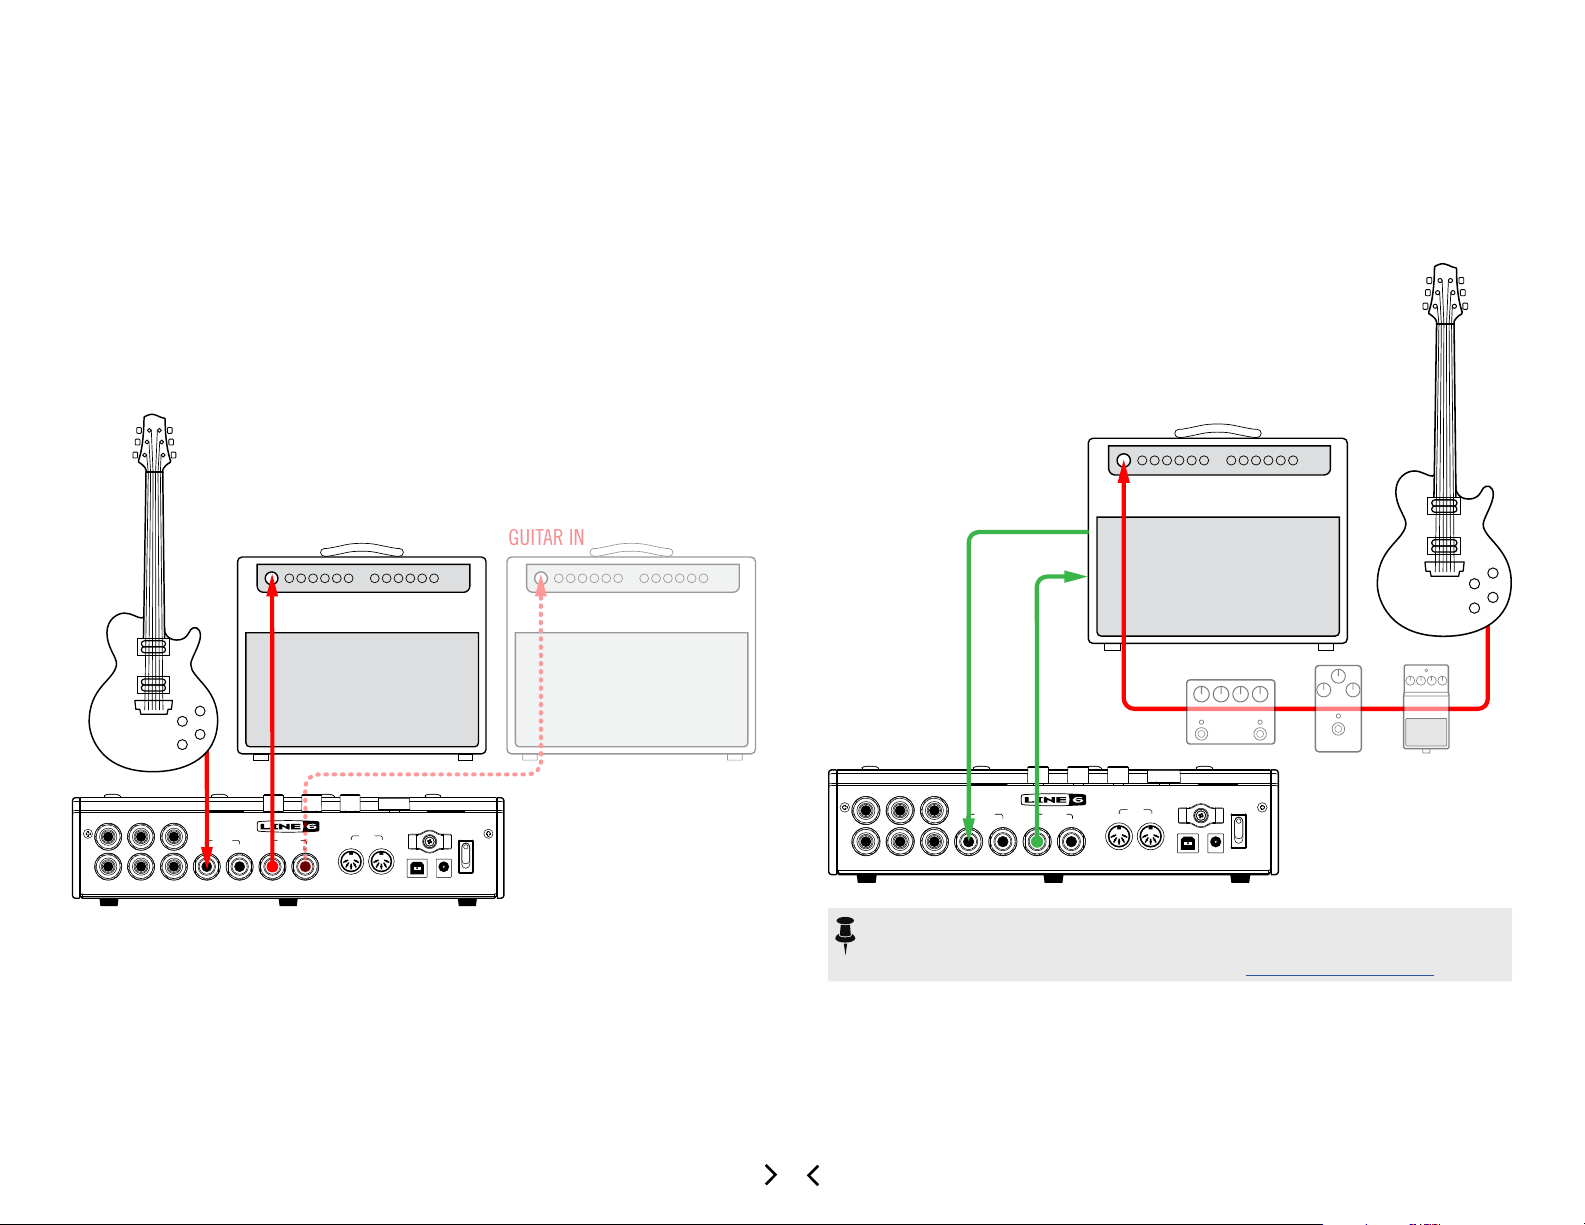
Hooking It All Up
HX Effects as a Traditional Pedalboard (Pre Effects)
Most people will use the HX Eects unit as a traditional eects "pedalboard," straight
into their amp. The HX Eects device can optionally feed a second amp for stereo
operation.
GUITAR IN
HX Effects in your Amp's Effects Loop (Post Effects)
Some guitarists prefer to place time-based eects such as delay and reverb (sometimes called "post" eects) between the preamp and power amp sections of their
amp. If your amp has an eects loop, the HX Eects device can accommodate these
setups with ease, with or without additional pedals (such as overdrive, fuzz, and compression) before the amp.
GUITAR IN
FX SEND
FX RETURN
PEDAL /EXT AMP SEND RETURN
1
2
-1-
-2-
L/MONO RIGHT L/MONO RIGHT
OUTPUTINPUT
PEDAL /EXT AMP SEND RETURN
1
MIDI
OUT/THRUIN
POWER
USB DC IN
2
-1-
L/MONO RIGHT L/MONO RIGHT
-2-
OUTPUTINPUT
MIDI
OUT/THRUIN
POWER
USB DC IN
NOTE: The eects loops on most ampliers run at instrument level. If your amp's
eects loop happens to run at line level, you should set the inputs and outputs of
your HX Eects device to line level as well. See "Setting Proper Levels"
8
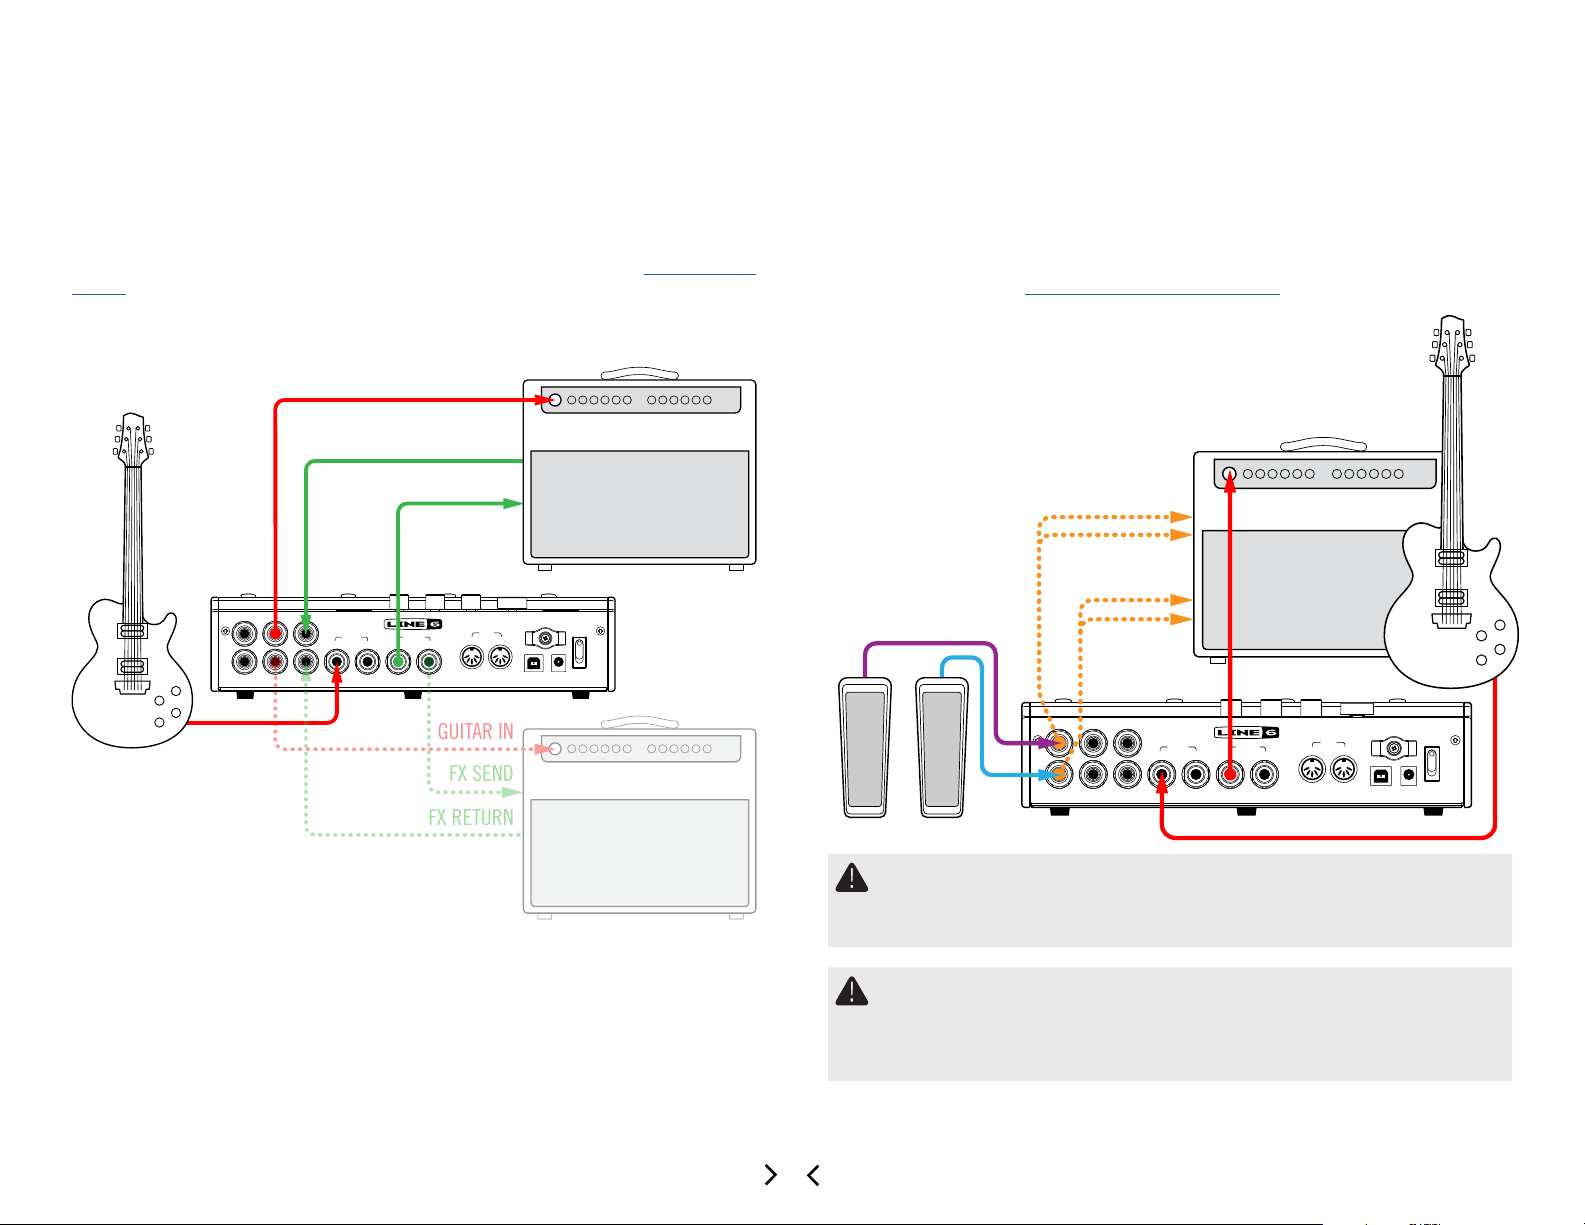
4-Cable Method
FX SEND
FX RETURN
GUITAR IN
Of course, the most exible way to hook things up is with some eects (typically
drives, wahs, and compressors) before your amp's preamp and others (the aforementioned delays and reverbs) in its eects loop. This is commonly called 4-Cable Method
and, fortunately, your HX Eects device can do this too.
Look for the included factory presets titled with "4CM" to use as your starting template, or you can build your own by adding an FX Loop block (see "Choosing an
Eect").
Oh, and if you have two amps, your HX Eects hardware can even do 7-Cable Method
in stereo.
GUITAR IN
Expression Pedals and/or External Amp Control
By default, the two PEDAL jacks are set up to accommodate an expression pedal
each, with PEDAL 1 automatically assigned to any Wah or Pitch Wham type blocks
and PEDAL 2 automatically assigned to any Volume Pedal blocks. Alternatively, you
can choose one or both PEDAL jacks to act as dual (A=Tip, B=Ring) amp control outputs for changing the channels of your amp or turning its reverb on and o.*
To determine whether each PEDAL jack functions as an expression pedal input or dual
amp control output, see "Global Settings > Preferences"
PEDAL /EXT AMP SEND RETURN
-1-
1
-2-
2
L/MONO RIGHT L/MONO RIGHT
OUTPUTINPUT
FX SEND
FX RETURN
MIDI
OUT/THRUIN
USB DC IN
POWER
GUITAR IN
CHANNEL SWITCH
REVERB ON/OFF
EXP
PEDAL 1
(WAH)
EXP
PEDAL 2
(VOLUME)
PEDAL /EXT AMP SEND RETURN
1
2
*IMPORTANT! Connect EXT AMP 1/2 only to ampliers that utilize "short-tosleeve" footswitch inputs. Connecting to any other sort of input could cause
permanent damage to both your amp and HX Eects hardware! If you're not
sure if your amp has short-to-sleeve inputs, contact the manufacturer.
IMPORTANT! Your ability to control external amp channel and/or reverb switching with the HX Eects device has been tested with many popular amps and
heads. Unfortunately this does not guarantee compatibility with all products.
Note that, depending on the circuitry of the channel switching jack in the guitar
amp used, the EXT Amp function may not operate as expected.
-1-
L/MONO RIGHT L/MONO RIGHT
-2-
OUTPUTINPUT
MIDI
OUT/THRUIN
USB DC IN
POWER
9
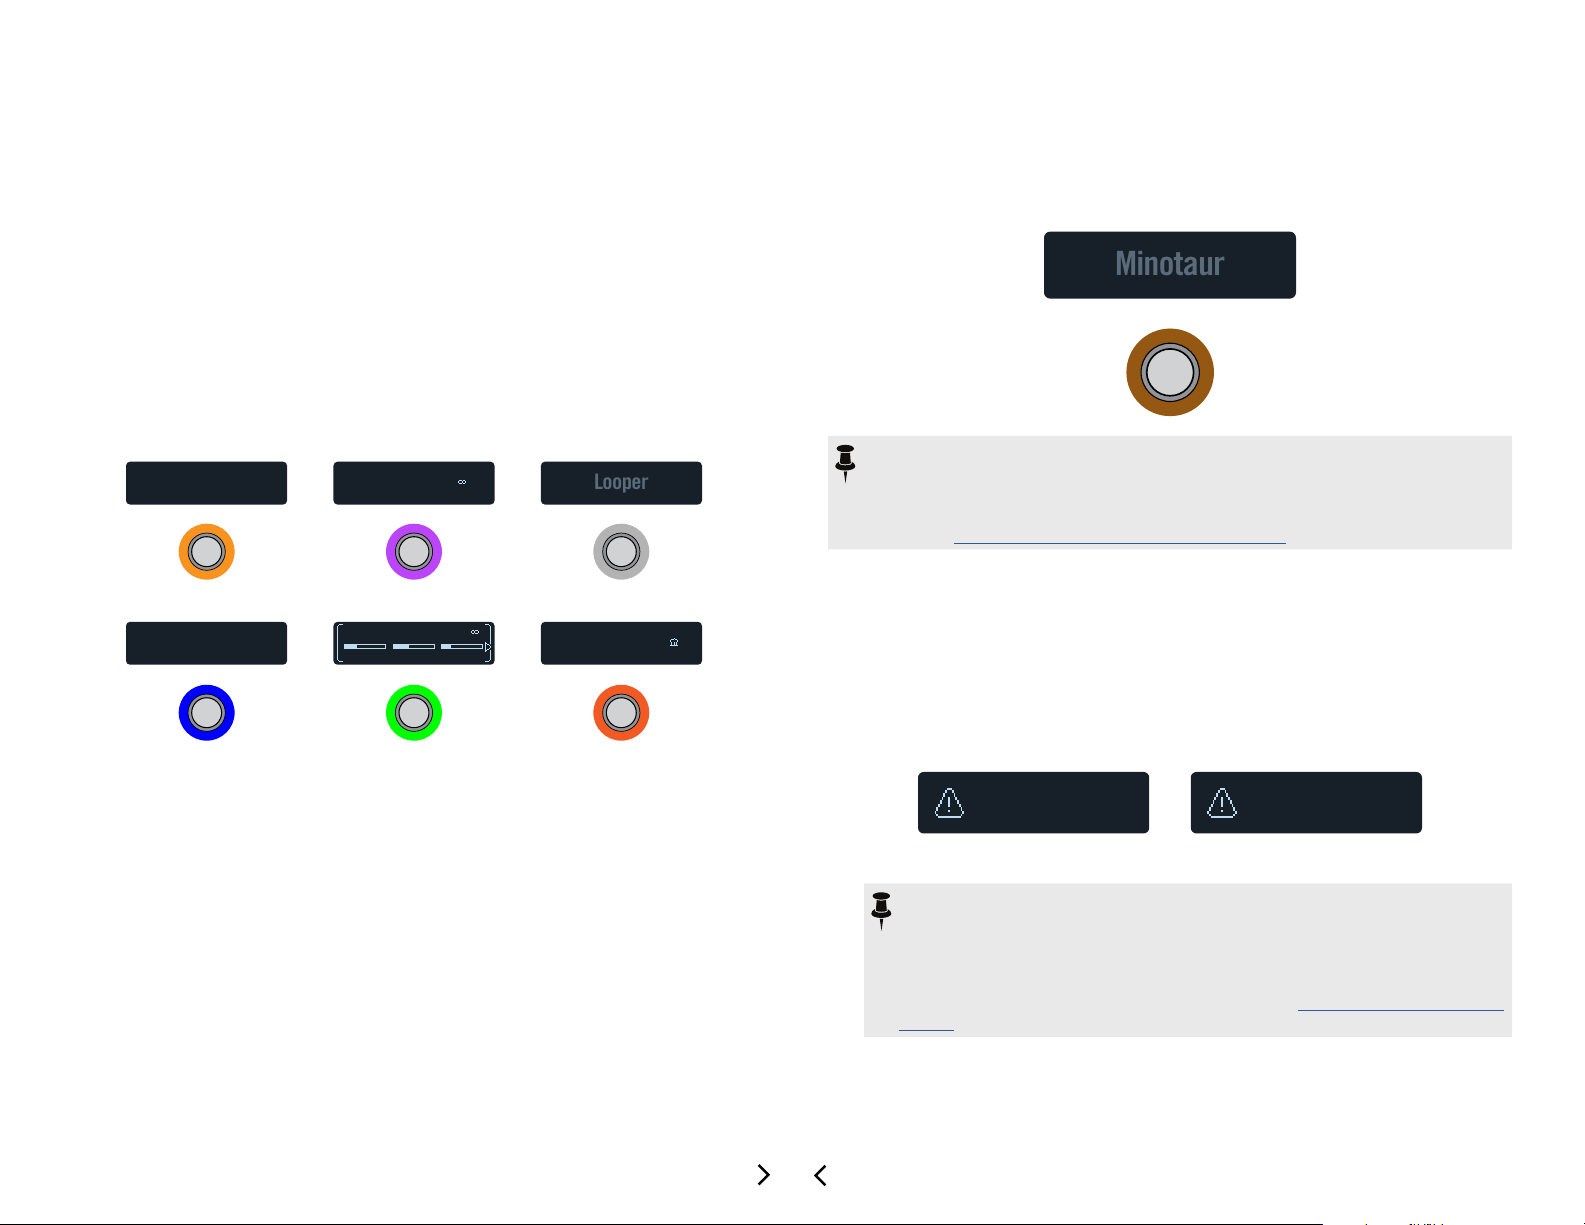
Stomp Mode
Looper
Minotaur
DSP BYPASS
ANALOG BYPASS
Bypassing an Effect
Stomp mode is where you'll spend most of your time, as it most closely resembles the
feel and behavior of a traditional pedalboard.
While in Stomp mode, footswitches 1-6 can each do a number of things:
• Toggle one or more eects on and o
• Toggle between two values of one or more parameters
• Generate a MIDI message or switch channels on an external amp
• All of the above, even simultaneously
If not already there, press MODE to select Stomp mode.
Footswitches 1-6 display any assigned eects, parameter names, Command Center
messages, and/or custom labels:
Minotaur
Ubiquitous Vibe
3 OSC Synth
Harmony Delay
Feedbk KeyTime
Particle Verb
Press the assigned switch.
Bypassed eects display grayed out text and a dim LED ring:
NOTE: Although most people will assign one eect per footswitch, the HX Effects hardware lets you turn multiple eects on and o simultaneously—or even
toggle between two or more eects—with a single footswitch. Assigning more
than one eect to the same footswitch is accomplished from the Signal Flow
menu. See "Assigning Switches in Signal Flow View"
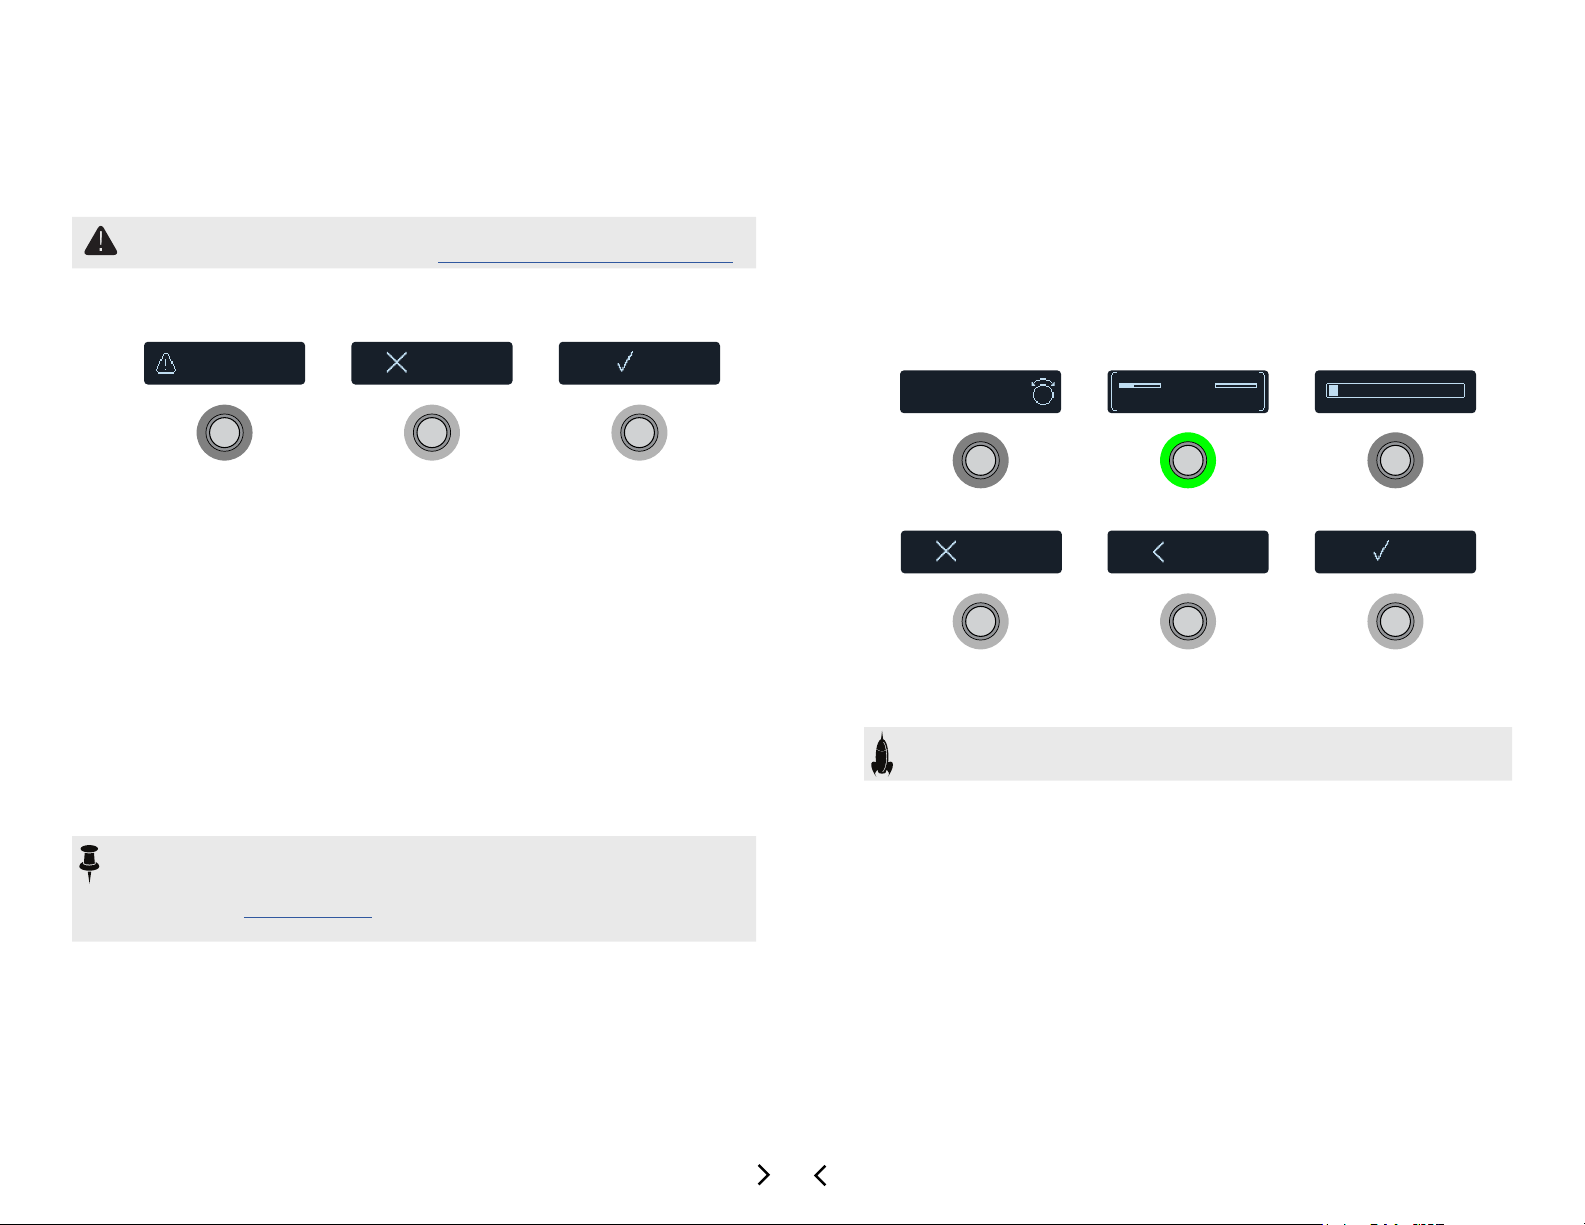
Bypassing All Effects
1. Press MODE and TAP simultaneously.
While the HX Eects device is completely bypassed, a warning dialog slowly
jumps across all six scribble strips:
DSP bypass!
Press MODE + TAP
NOTE: There are two types of All Bypass for the HX Eects device: Analog
bypass (sometimes called "true bypass"), where mechanically switching
relays route your signal directly from the inputs to the outputs with no processing or A/D/A conversion, and DSP bypass, where any delay echoes and
reverb tails decay naturally. By default, the HX Eects hardware is set for
Analog bypass, but this behavior can be set from "Global Settings > Prefer-
ences"
2. Press MODE and TAP simultaneously again.
The HX Eects device returns to normal operation.
10
Analog bypass!
Press MODE + TAP

Choosing an Effect
SUBCATEGORYCATEGORY MODEL
STEREOMONO LEGACY
Harmony Delay
Editing Effects
To change an existing effect, briefly touch its footswitch and then
turn the Big Knob.
To add an effect to an empty footswitch, briefly touch the switch
and then turn the Big Knob.
Selecting eects within the same category—say, changing a Simple Delay to a Reverse Delay—can be very quick. However, as the HX Eects device has almost 200
models to choose from, using this method to change a mono distortion (beginning of
the list) into a stereo looper (end of the list) is very slow. Instead, you should open the
model list:
1. From Stomp mode, press the Big Knob to open the model list:
DLY
Eects categories include one or more subcategories. Eects in the "Mono" and
"Stereo" subcategories are HX (Helix) models. Eects in the "Legacy" subcategory are taken from classic Line 6 pedals, including M13, M9, M5, DL4, MM4,
FM4, and DM4.
NOTE: Stomp switches with stereo or legacy models display small identier
icons to the right of the model name:
EQ
Modulation
Delay
DLY DLY
Mono
Stereo
Legacy
Transistor Tape
Cosmos Echo
Bucket Brigade
Particle VerbUbiquitous VibeUbiquitous Vibe
1. To select an eect for editing, briey touch its footswitch.
The rst three parameters appear and the scribble strip displays white brackets,
indicating its parameters are controlled by the knobs:
Feedbk KeyTime
2. Turn Knobs 1-3.
SAVE
1 2 3
Minotaur Ubiquitous Vibe
While adjusting parameters, their values briey appear on the scribble strip:
Harmony Delay
Feedbk KeyTime
50% A750ms
Feedbk KeyTime
ACTION
Turn the Big Knob to select items in a list.
Press the Big Knob (or ) to view a category or subcategory’s contents.
Press to go back one level.
IMPORTANT! If certain items don't appear within the model list, this
means the HX Eects device cannot accommodate that category, subcategory, or model. For example, if you've already added three reverbs
and a pitchshifter, you may not be able to add another pitchshifter.
2. Using the Big Knob, , and , select the desired category, subcategory, and model.
3. To close the model list, press .
If an eect or other item has more than three parameters, arrows appear to the
right and/or left of the value bars (see above).
SHORTCUT: For most time-based parameters such as delay time or modulation speed, press the knob to toggle between setting the value in ms or Hz
and note divisions (1/4-note, dotted 1/8-note, etc.).
3. Press or to access more parameters (if available).
11
TIP: Touch a stomp switch for one second to spill all parameters across
multiple scribble strip LCDs to view them more easily:
50% A750ms
Feedbk KeyTime
50% 0.0dBMajor
Mix LevelScale
10.0 Left50+2
V1 Lvl V1 PanV1Shft
2. Press the switch of the eect you want to edit.
The block's rst page of parameters appear on footswitches 1-3:
23%
Dwell
Stable
Conditn
52%
Mix
10.0 Right50+4
V2 Lvl V2 PanV2Shft
Touch the desired footswitch to select its parameters and then turn
knobs 1-3 to adjust them. If a block has more than 18 parameters,
press to access more parameters. When nished, touch a switch for
one second (or press ) to exit.
66% 10.033%
V2 Scal RootV1 Scal
Off OffCenter
Low Cut Hi CutRtPan
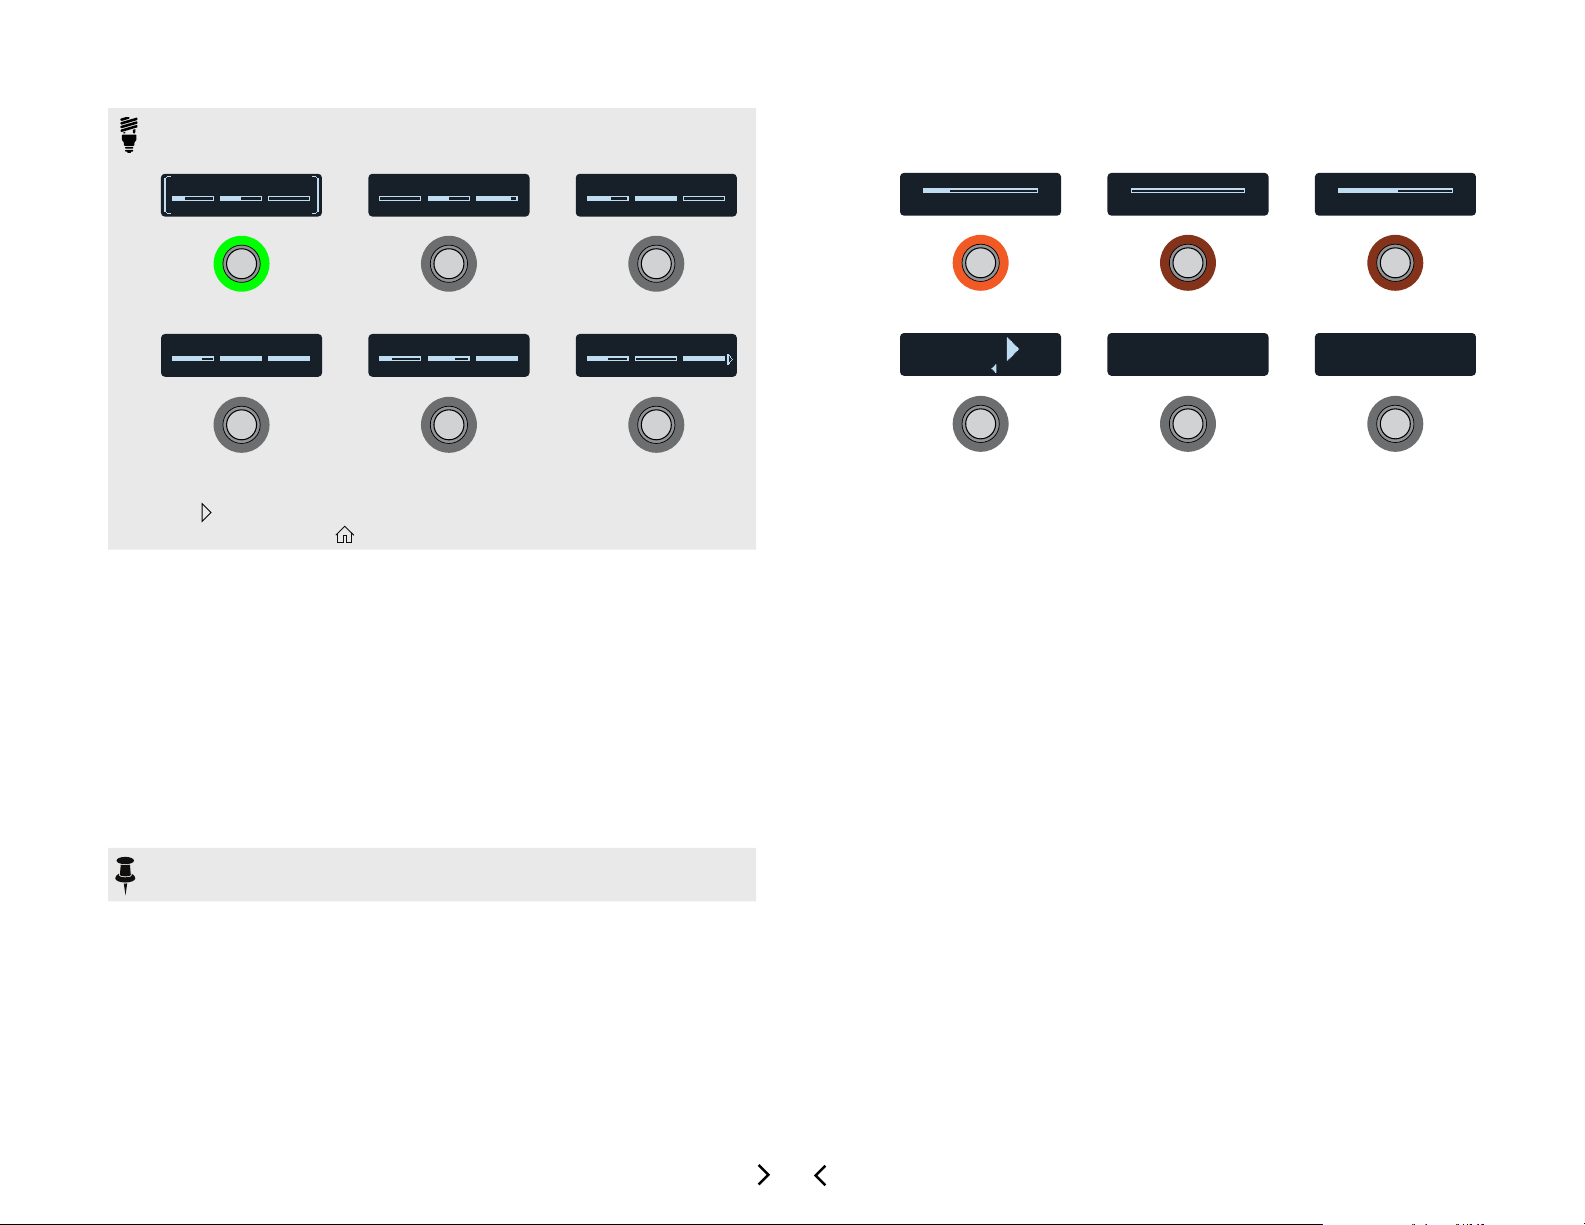
Hands-Free Editing (Pedal Edit)
Eects can be edited without taking your hands o the guitar. If you hate having to
reach down and twist knobs, Pedal Edit mode will be your new best friend. Although
Pedal Edit is not intended to replace proper controller assignment, in a pinch, it can
also be used to tweak one parameter at a time during a performance.
1. Hold MODE (EDIT) for two seconds.
The preset's processing blocks appear on the footswitches, ashing. If the preset
has more than six blocks, FS3 displays "MORE..." Press FS3 (MORE...) to view
more blocks.
NOTE: Selecting a block in Pedal Edit mode may not correspond to any
footswitch assignment it may have.
PAGE
HOLD TO PAGE
If the eect has more than one page of parameters, press FS4 (PAGE >) until you
nd the parameter. To go back one page, press and hold FS4.
VALUE
–
VALUE
+
3. Press the footswitch displaying the parameter you want to adjust.
Press and hold a Time or Speed switch to toggle between setting the value in ms
or Hz and note divisions (1/4-note, dotted 1/8-note, etc.).
Press and hold any other parameter switch to reset its value to default.
4. Use a connected expression pedal to adjust the parameter's
value.
For ne adjustment, press FS5 (VALUE–) and FS6 (VALUE+). Hold FS5 (VALUE–) or FS6 (VALUE+) for faster adjustments.
5. When nished, press MODE (EXIT).
If you want to save any changes made to the preset, hold MODE (EXIT) for two
seconds.
12
Swapping Footswitches
Custom Label
Customizing a Footswitch
If you want to change the location of Stomp mode footswitches, you can quickly swap
two footswitches.
IMPORTANT! Swapping footswitch locations does not aect the actual order
of eects. To reorder your eects, see "Moving Blocks in Signal Flow View"
1. Touch any two Stomp mode footswitches until the following
options appear:
Swap footswitches
1 and 2?
OKCANCEL
2. Press the OK switch.
Copying/Pasting an Effect
Eects can be copied and then pasted onto another switch either in the same preset
or an entirely dierent preset.
1. Touch the stomp switch you want to copy and press ACTION.
Action switches appear around the selected eect.
2. Press the COPY BLOCK switch.
3. Touch a switch you wish to paste the block onto—even in a
dierent preset—and press ACTION.
4. Press the PASTE BLOCK switch.
NOTE: There may be situations where a block cannot be pasted into the selected
location. For example, the preset may already include the maximum 9 eects
blocks, or may not have enough DSP horsepower to add another of the specic
model type (see "Dynamic DSP"). In such case, the PASTE BLOCK switch will
be grayed out.
If you want to customize the text label displayed on a scribble strip, or change the
footswitch's LED color, follow these steps.
1. Touch the stomp switch you want to customize and press
ACTION.
Action switches appear around the selected eect.
2. Press the CUSTOMIZE switch.
The customize screens appear:
Turn Big Knob to
move cursor
Turn the Big Knob to move the cursor.
Turn Knob 1 (Character) to change the selected character.
SHORTCUT: Press Knob 1 (Character) to cycle through upper case, lower
case, 0, and [SPACE].
Press the DELETE switch to delete the selected character and shift all following characters to the left.
Delete all characters to remove the custom label, after which the footswitch
label displays its normal assignment.
C
Character
DELETE
Auto
Switch
LED
Cosmos Echo
OKCANCEL
3. Turn Knob 3 (Switch LED) to select the desired color for the
footswitch's LED ring (or turn it o).
Normally, you should leave this set to "Auto."
Clearing an Effect
1. Touch the stomp switch you want to clear and press ACTION.
Action switches appear around the selected eect.
2. Press the CLEAR BLOCK switch.
4. When nished, press the OK switch.
13
Preset Mode
01C
01D
BANK
Saving/Naming a Preset
Adding and editing eects is all well and good, but at that point, why not just get a
bunch of separate pedals? One of the main advantages of boxes like the HX Eects
unit is the ability to store many dierent "pedalboards"—each with potentially dierent eects, congurations, and settings—and recall them all with a single footswitch
press. These pedalboards are saved as presets.
The HX Eects device stores up to 32 banks of four presets (A, B, C, and D) for a total
of 128 presets.
If not already there, press MODE to select Preset mode.
Footswitches 1-6 are used for navigating banks and presets:
Edge of Breakup
01B
Ambient Drones
BANK
Galloping Echoes
01A
Bit o’ Drive
1. Press BANK or BANK to choose the desired bank.
The banks’ presets ash, indicating they’re ready to load.
2. Press one of the four preset switches to load the preset.
NOTE: The HX Eects device can be set to automatically return to Stomp mode
after pressing a preset switch. See "Global Settings > Switches"
SHORTCUT: To quickly save any changes to the current preset, just press SAVE
twice.
1. Press SAVE to open the Save Preset screens:
Turn Big Knob to
move cursor
B
Character
01A
Destination
DELETE
Turn the Big Knob to move the cursor.
Turn Knob 1 (Character) to change the selected character.
SHORTCUT: Press Knob 1 (Character) to cycle through A, a, 0, and [SPACE].
Press the DELETE switch to delete the selected character and shift all following characters to the left.
Save Preset
Bit o Drive
01A Bit o Drive
SAVECANCEL
2. Turn Knob 3 (Destination) to choose the preset location you
wish to overwrite.
Any of the 128 presets can be overwritten.
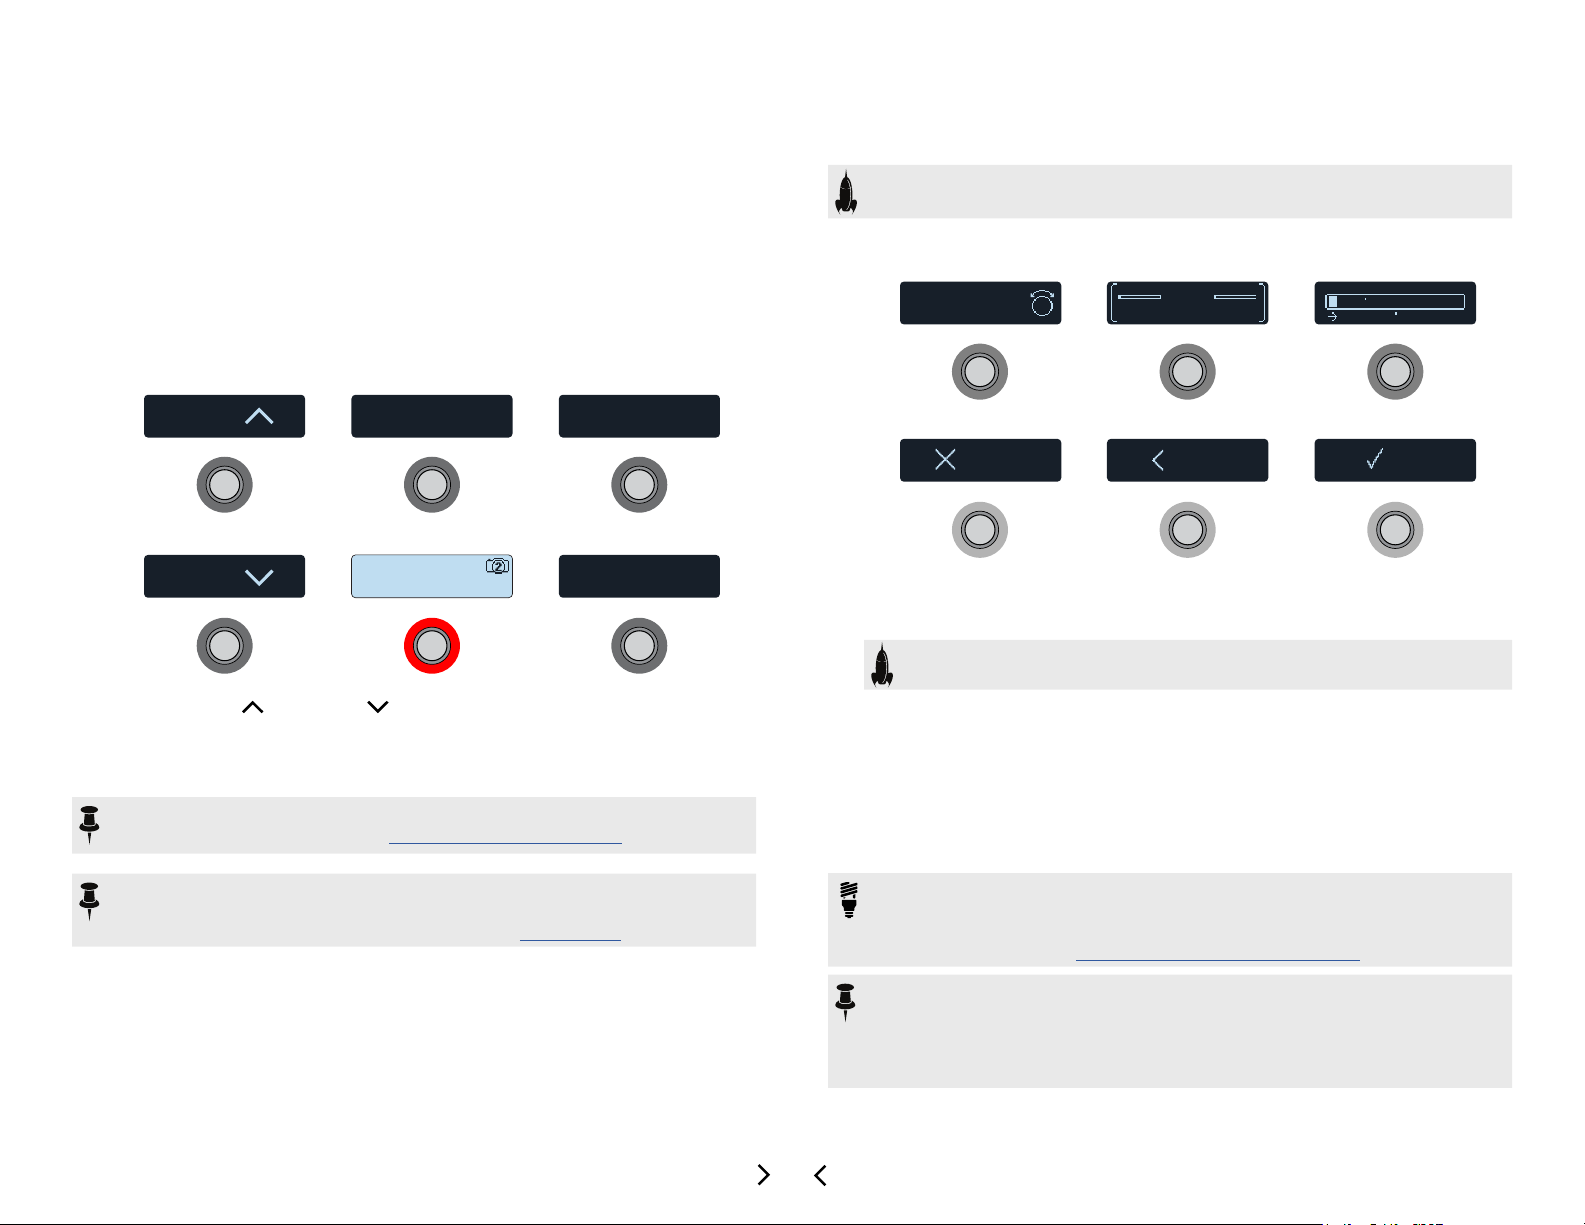
3. When nished, press the SAVE switch.
NOTE: The current preset switch displays a small camera icon in the upper right
corner. The number indicates the current snapshot. Snapshots oer a whole additional level of capabilities within each preset! See "Snapshots"
Alternatively, when in Preset mode, turn the Big Knob to select a
preset.
TIP: You can use the HX Edit application to Export any presets from your HX
Eects hardware - this is a great way to save unlimited backup copies of all your
custom presets to your computer! Please see the current HX Edit Pilot's Guide
for details, available from https://line6.com/support/manuals/
NOTE: HX Eects-exported preset les are not able to be imported and used
with Helix family devices (Helix Floor, Helix Rack and Helix LT) nor with the Helix
Native plug-in software. Likewise, preset and setlist les exported from Helix
family devices or Helix Native plug-in are not able to be imported and used on
HX Eects devices.
14
 Loading...