

Page 1
®
PILOT'S GUIDE
A guide to the features and functionality of the Line 6 Helix Native plug-in
Rev. H (v1.71) www.line6.com/manuals © 2018 Yamaha Guitar Group, Inc. All rights reserved.
Page 2

Contents
Welcome to Helix Native Plug-in 3
Requirements and Installation 3
Purchasing the Software License 5
Authorizing your Computer 5
Workflow 7
About Plug-ins 7
What’s in it for Me? 7
Marketplace 7
Quick Start 8
Live Input Monitoring Through Helix Native Plug-in 10
Optimizing the Input Level 10
GUI Overview 11
Customizing the Helix Native Plug-in Window 11
My Account Menu 11
Preset Compatibility with Helix Devices 12
HX Edit Application 12
Input & Output Block Settings 12
Send, Return, FX Loop & Looper Blocks 13
Impulse Responses 13
Hardware Controller Assignments 13
Computer Processing Management 14
Presets Panel 15
Helix Native Factory Presets 15
Premium Marketplace Presets 15
Loading Presets 16
Importing and Exporting Helix Preset Files 16
Renaming, Reordering, Copying and Pasting Presets 17
Importing and Exporting Setlists 17
Importing and Exporting Helix Bundles 18
Impulses Panel 19
What are Impulse Responses? 19
Importing and Exporting Impulse Responses 19
Copying, Pasting, Renaming & Clearing IRs 20
Working in the Plug-in Editor 21
Navigating with the Next/Previous Preset Buttons 21
Using the Preset File Menu 22
Editing the Tempo 22
Working with Snapshots 24
The Snapshots Menu 24
Snapshots > Block Bypass 24
Snapshots > Parameter Control 25
The Signal Flow Window 27
Master Input & Output Level Controls 27
Adding, Clearing & Bypassing Blocks 27
Cutting, Copying & Pasting Blocks 28
Drag and Drop Blocks 29
Block Order and Stereo Imaging 29
Moving Blocks & Arranging the Signal Flow 29
Signal Routing Examples 30
The Edit Tab 33
Selecting Models 33
Availability of Models within the Model Browser 33
Editing Model Parameters 34
Note Sync 34
Editing Input, Output, Split & Merge Blocks 35
Editing Send, Return, FX Loop & Looper Blocks 35
The Automation/Controller Assign Tab 36
About Plug-in Parameter Automation 36
Controller Assignment for Automation 36
Editing Options for an Existing Automation Controller
Assignment 38
Removing or Replacing an Existing Automation
Controller Assignment 39
MIDI Bypass & Controller Assignment 41
Global Reserved MIDI CCs 42
Preferences 44
The Preferences Window 44
Marketplace & Account Options 46
Marketplace 46
The My Account Menu Options 47
Account Sign In / Sign Out 47
Authorize / Deauthorize your Computer 48
Model Lists 49
Eects Models 49
Amp Models 54
Speaker Cabinet Models 56
Microphone Models 57
Additional Resources 59
Page 3

© 2018 Yamaha Guitar Group, Inc. All rights reserved.
Line 6, the Line 6 logo, Helix, HX Stomp, HX Eects, M13, M9, M5, DL4, DM4, MM4, FM4, Ampeg, SVT, and Portaex are trademarks or registered trademarks of Yamaha Guitar Group,
Inc. in the U.S. and/or other jurisdictions. Apple, Mac, OS X, macOS, and Logic Pro are trademarks of Apple, Inc., registered in the U.S. and other countries. Windows is a registered
trademark of Microsoft Corporation in the United States and/or other countries. Cubase and VST are registered trademarks of Steinberg Media Technologies GmbH. Avid and Pro
Tools are registered trademarks of Avid Technology, Inc.
Page 4
Welcome to Helix Native Plug-in
Thank you for purchasing the Line 6® Helix® Native software, one of the most powerful
and exible native multi-processing audio plug-ins ever created. Not just for guitarists,
the Helix Native plug-in is also ideal for producers and engineers, sound designers,
lm/TV/game composers, electronic musicians, and anyone else seeking to craft new
and exciting sounds and special eects. This guide covers the features & functionality
of Helix Native plug-in v1.71.
The Helix Native plug-in truly is the same set of astounding amps, cabs & eects as
included within the ground-breaking Line 6 Helix® hardware multi-eects units, and
shares the same simple user interface and workow as the Line 6 HX Edit editor appli-
cation for Helix family devices.* Due to this design, all presets you create in Helix Native
plug-in are compatible and transferable to Helix hardware units via the HX Edit application, so you can take your presets from studio to the stage—and back again! We hope
it helps drive your search for tonal bliss and spawns years of creativity.
Requirements and Installation
Ready to jump in? The latest Helix Native installer for Mac & Windows® computers can
be downloaded anytime from line6.com/software. Once installed, a free 15-day trial is
available, allowing you to fully try the software on your system. After 15 days, you are
required to purchase and authorize the Helix Native plug-in to continue using it on your
system. Please check the requirements below to make sure your computer and DAW
software meet the minimum requirements.
System Requirements
To follow are the requirements to install and use the Helix Native software on your DAW
computer system. Note that Helix Native is a 64-bit plug-in and, therefore, requires that
your host DAW application supports 64-bit plug-ins.
Mac Computers:
• Mac OS X 10.10 and 10.11, and macOS 10.12 and later
• 64-bit AAX Native, Audio Units (AU), VST
• Supported sample rates: 44.1kHz, 48kHz, 88.2kHz, and 96kHz
Windows Computers:
• Windows 7 SP1, Windows 8.1, and Windows 10 (64-bit versions only)
• 64-bit AAX Native, VST (VST2 or VST3) host DAW software
• Supported sample rates: 44.1kHz, 48kHz, 88.2kHz, and 96kHz
Minimum Hardware Requirements
• Dual-Core 2.0GHz processor or faster
• 4GB of RAM
• 100MB of free disk space
• Internet connection required for license authorization, use of trial version, and
for the initial license synchronization of Marketplace premium assets. (The use
of premium presets and Impulse Responses purchased from Marketplace requires Helix Native version 1.70, or later)
®
(VST2 or VST3) host DAW software
The Helix Native plug-in
*NOTE: Presets are not compatible between the Line 6 HX devices (HX Stomp™
and HX Eects™) and Helix Native plug-in - please see “Preset Compatibility with
Helix Devices” on page 12.
3
Page 5

Installing the Helix Native Plug-in
The rst step is to sign in to your Line 6 User Account. If you don't already have
one, just go ahead and create one now at line6.com/account - it's free! Then
follow the steps below.
NOTE: An Internet connection is required for the computer on which you want to
install and run the Helix Native trial version, as well as for license authorization &
deauthorization. License authorization on your computer is required for the use of
Helix Native plug-in and for the import & export of purchased Marketplace premium assets. See page 5.
NOTE: The use of premium presets and IRs from the Line 6 Marketplace requires
Helix Native version 1.70 (or later). Once Helix Native 1.70 has been installed, it is
necessary to uninstall Helix Native before installing any earlier Helix Native version
(see “Removing Helix Native Plug-in” on page 6).
1. Once signed in, you can head directly to the Line 6 Online Store and purchase
your Helix Native license (see “Purchasing the Software License” on page 5),
or proceed to the next step to install the Helix Native software on your computer
and optionally choose the 15-day free trial.
2. Proceed to the line6.com/software page and download the Helix Native installer
for your Mac or Windows system.
*NOTE: If your host DAW application supports VST3, it is recommended that
you do not also install the older VST2 format (VST2 is not selected by default).
The VST2 format is oered for users that have host DAW applications that do
not yet support VST3 plug-ins.
On Windows installation, if you do choose to install VST2, you'll be prompted
to enter a custom install location. Please take note of the VST2 install location
you choose since your host DAW may require that you manually dene this
VST2 directory within its Preferences to allow its VST2 scan to nd it.
4. Once the installation is complete, simply launch your host DAW application and
it will typically scan and nd the Line 6 Helix Native plug-in and list it within its
audio plug-in insert menus.
5. Insert the Helix Native plug-in on a track in your DAW project (see “Quick Start”
on page 8 for help, if needed). You'll initially see the license authorization
screen.
• If You Have Already Purchased a Helix Native License - You'll be prompted
to authorize the computer for this license - please skip ahead to “Authorizing
your Computer” on page 5.
• If You Have Not Yet Purchased a Helix Native License - You can either
choose to purchase now (see next section), or start a 15-day free trial. Once the
trial expires, it is necessary to purchase and then authorize the computer with
which you will be using Helix Native, or the plug-in will no longer be functional.
The Line 6 website's software downloads page
3. Once the download completes, exit your host DAW and all other applications,
then run the installer and follow its steps to complete the installation. If desired,
you can customize the installation to install only the format(s) you require (AAX,
AU, VST3 or VST2) for your particular host DAW application.*
Mac - Custom install options
(click the Customize button to access options)
Windows - Custom install options
Helix Native plug-in's purchase & trial mode options
NOTE: Once you've started the free trial version, you'll see your remaining trial
time displayed at the bottom right of the plug-in window.
Trial status indicator
You can purchase a Helix Native license online at any time during or after your trial
period by simply clicking on this trial status indicator, or going directly to the Line
6 Online Store at https://shop.line6.com/.
4
Page 6
Purchasing the Software License
The Helix Native license is available for purchase from the Line 6 Store.* Just add Helix
Native to your shopping cart, checkout, and the license will be immediately deposited
into your Line 6 User Account. Alternatively, you can rst download and install the Helix
Native software and then choose to purchase or run it as a free trial rst (see “Install-
ing the Helix Native Plug-in” on page 4). Once you've purchased the Helix Native
license, you then use the plug-in's Authorization screen to authorize your computer to
run Helix Native, as covered in the following section.
*NOTE: By the time you read this, Helix Native may also be available from other
music retailers. If purchased from one of these vendors, your purchased Helix
Native license will be automatically deposited into your Line 6 account as part of
the process.
NOTE: If you are the registered owner of a Line 6 Helix, Helix Rack, Helix LT
device, or POD Farm software, you may qualify for a substantial discount on the
purchase of Helix Native! Please see the purchase options on the Line 6 Store.
Authorizing your Computer
Before you can use Helix Native, your computer on which you will be running the plugin must be authorized for your purchased Helix Native license. Authorization is accomplished within the plug-in's built-in Authorization screen, via an Internet connection
directly from your DAW computer. Once you've installed the Helix Native software,
launch your host DAW application, insert an instance of the Helix Native plug-in on a
track and launch the plug-in window. (Please see “Quick Start” on page 8 for help
on how to insert Helix Native plug-in within a host DAW.)
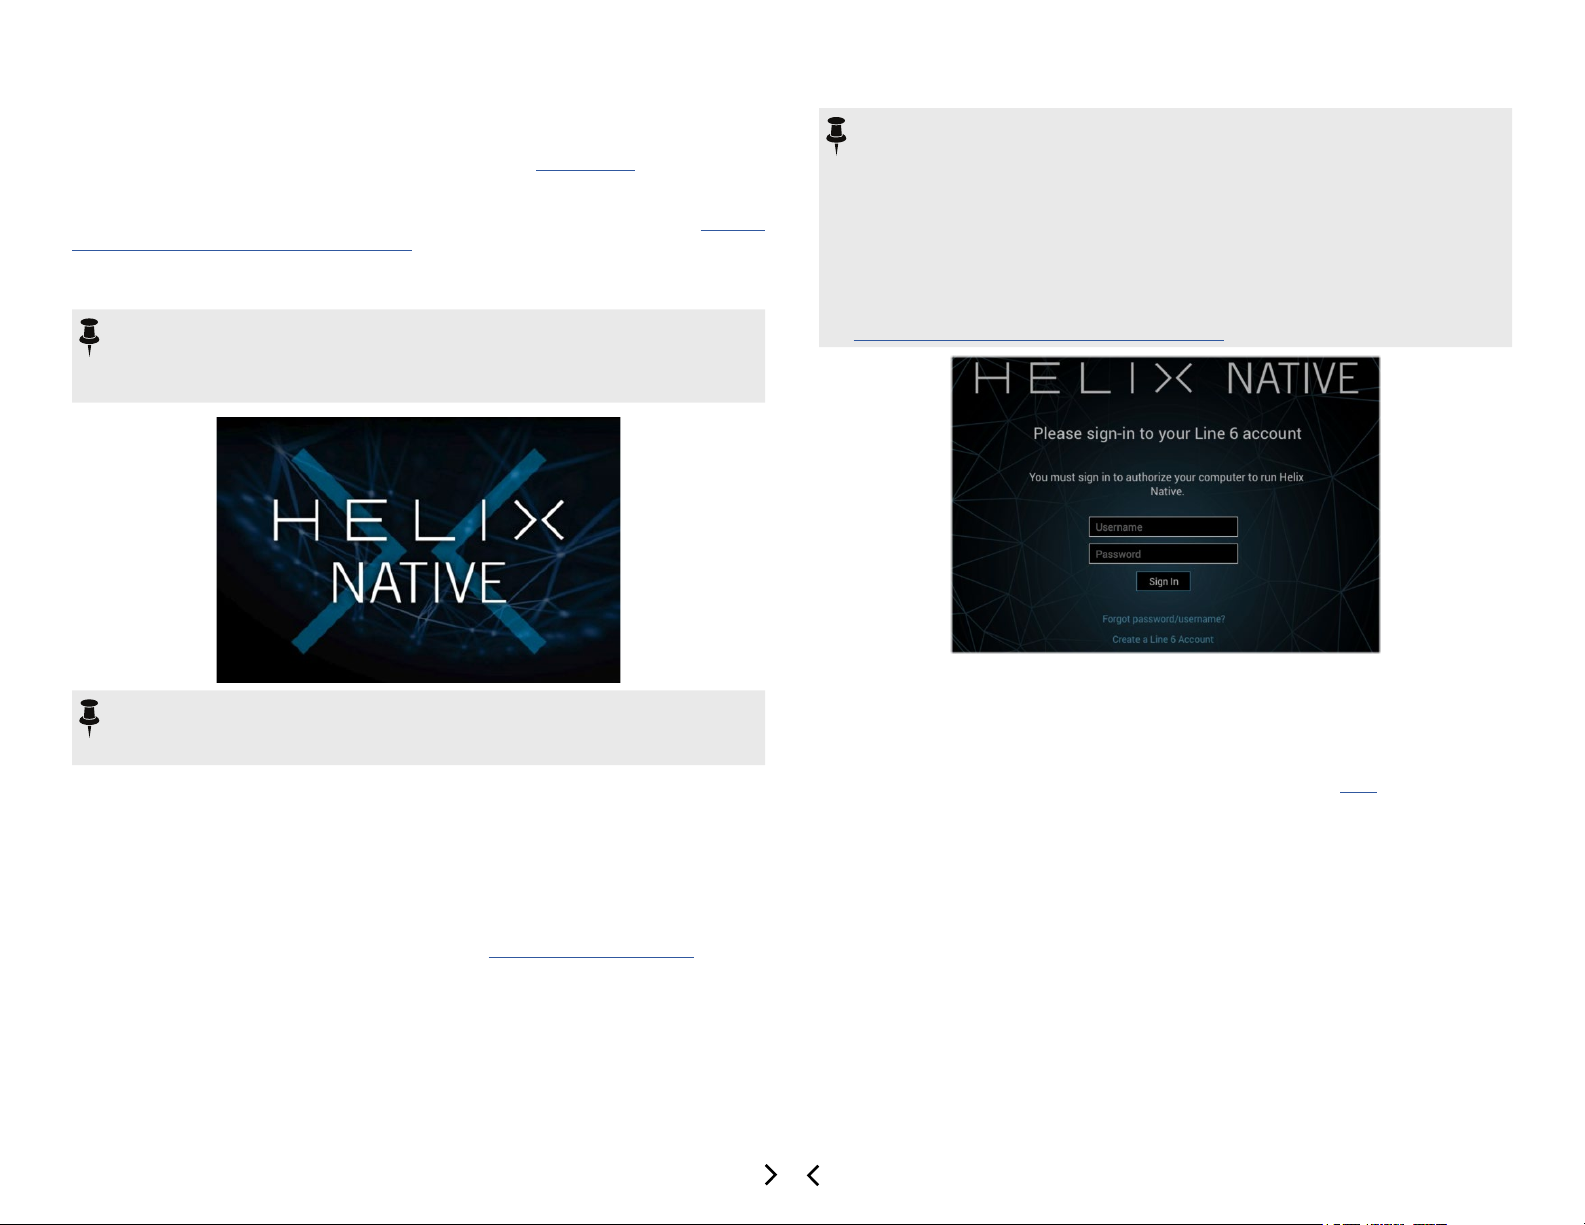
1. Sign in - Once launched, the Helix Native Authorization screen is displayed,
prompting you to sign in using your Line 6 User Account username and password.
(Note that your username is typically the name you created when creating the account and not your email address!)
NOTE: Once a Helix Native license is purchased and your computer is success-
fully authorized, you will no longer be prompted to sign in on each use. Being
actively signed in is then only necessary to deauthorize and authorize your computer, and for the initial synchronization of licenses for newly purchased Marketplace assets.
Your computer must be in the “authorized” state to be able to import and export
and utilize any premium assets purchased from the online Marketplace for use
within Helix Native. If you plan on purchasing Marketplace premium assets, it is
easiest just to remain signed in and authorized within Helix Native - this allows all
your assets fully functional, and their licenses to remain synced. Please also see
“Marketplace & Account Options” on page 46.
The initial Helix Native Authorization - Sign In Screen
• If You Have an Existing Line 6 Account but Forgot Your Login - Click the
Forgot password/username? option and follow the steps to reset your login
credentials.
• If You Don't Yet Have a Line 6 Account - Click the Create a Line 6 Account
link to create one. Or you can do that right now by going here - it's free!
2. Enter your username and password and click Sign In to proceed.
• If You Have Already Purchased a Helix Native License with this Line 6
Account - Upon signing in, select the Authorize Computer option and you
should see conrmation that your computer is now successfully authorized.*
You can now start using Helix Native!
• If You Have Not Yet Purchased a Helix Native License - You'll be informed
that no license was found on your Line 6 account, and you'll have the option to
buy it now, or start a free trial.
5
Page 7

Selecting Deauthorize Computer from the My Account menu
*NOTE: Line 6 permits you to have your purchased or trial mode Helix Native
license authorized on a maximum of 4 of your own computers concurrently. To
move the license to a dierent computer, it is necessary to deauthorize on at least
one of these systems to free up an authorization to be used on another computer.
For further assistance, please contact Line 6 Support.
Helix Native plug-in's purchase & trial mode options
*NOTE: Be sure to Sign In using the same Line 6 Account you used when making
the Helix Native license purchase!
• To Purchase a Helix Native License - Click the Buy Helix Native button and
follow the steps on the secure Line 6 Online Store. Once complete, a Helix
Native license will be deposited into your Line 6 account. Your purchased
license will be found and Helix Native plug-in will authorize on your computer.
• To Use Helix Native in Trial Mode - Click the Start Free Trial button and
you'll be able to use the Helix Native plug-in without restriction on this computer for 15 days (an active Internet connection is required for the Trial Mode).
You may be prompted to sign in for each session when using Helix Native in
trial mode. After the trial period expires, Helix Native will no longer be functional
unless you choose to purchase the Helix Native license.
NOTE: Once you've started the free trial version, you'll see your trial time
remaining at the bottom right of the plug-in window. Click directly on this
indicator if you wish to purchase your Helix Native license.
Deauthorizing - Moving to Another Computer
Once you have purchased the plug-in license and authorized your computer (or if using
the free trial version), if you wish to run Helix Native plug-on a dierent computer, it may
be necessary that you rst deauthorize your current computer.*
To deauthorize, click on the My Account menu at the lower left of the plug-in window to
Sign In to your Line 6 account, then choose Deauthorize Computer from this menu.
(Also see page 48).
Removing Helix Native Plug-in
Should you ever desire to remove Helix Native from your computer system, rst quit
your host DAW application, then follow the instructions below.
NOTE: Before removing Helix Native, it is highly recommended to export your
presets (see “Importing and Exporting Helix Preset Files”) and IRs (see “Import-
ing and Exporting Impulse Responses”) to make sure you have backups of them.
Mac
To uninstall each plug-in format, move the following files to the Trash:
• AU plug-in: /Library/Audio/Plug-Ins/Components/Helix Native.component
• VST2 plug-in: /Library/Audio/Plug-Ins/VST/Line 6/Helix Native.vst
• VST3 plug-in: /Library/Audio/Plug-Ins/VST/Line 6/Helix Native.vst3
• AAX plug-in: /Library/Application Support/Avid/Audio/Plug-Ins/Line 6/Helix
Native.aaxplugin (or, you can optionally drag the Helix Native.aaxplugin le
into the /Plug-Ins (Unused) folder)
Windows
To uninstall all plug-in formats:
• Choose Start > Control Panel (or, on Windows 10, choose Settings)
• Click Programs and Features (or, on Windows 10, choose System > Apps &
Features)
• Select Line 6 Helix Native Uninstaller from the list of installed applications
• Click Uninstall and follow the on-screen instructions to remove Helix Native
IMPORTANT! After removing Helix Native version 1.70 (or later), if you plan on
installing a Helix Native version earlier than 1.70, you will need to clear your
Preset and IR Libraries by using the Clear Preset Library and Clear IR Library
options within the Preferences window of the next-installed Helix Native plug-in
(see page 44).
6
Page 8
Workflow
This guide contains details of the Helix Native plug-in's features and functionality. All
behaviors are the same on Mac and Windows (and for all plug-in formats - AAX, AU,
VST3 & VST2) unless otherwise noted. For the most part, the many host DAW applications on the market work very similarly in respect to how you insert and utilize eects
plug-ins. However, each host may have some unique features and settings you'll want
to take advantage of, so be sure to read through your host DAW application's user
documentation as well.
About Plug-ins
There are many types of “plug-ins” in the world of software. Plug-ins are relatively small
applications that can only run when loaded inside a compatible “host” software application, extending the capabilities of the host. In the world of DAW (Digital Audio Workstation) applications, audio plug-ins provide signal processing for your audio tracks
and/or live audio input.
A helpful analogy for audio plug-ins is to think of them as eects pedals. Eects pedals
change the tone of your instrument before the signal reaches your amplier. As with
pedals, rack eects units, or any other conventional piece of outboard gear, plug-ins
provide familiar knobs, sliders & buttons for tweaking their parameters. Plug-ins process your track signal similarly, but since they run in real-time in your DAW host software, they are non-destructive, allowing you to continue tweaking their settings all the
way up until you do your nal DAW project mix-down!
What’s in it for Me?
Helix Native is much more than a one-trick audio processing plug-in. It allows you to
combine a multitude of amps, speaker cabs and eects in practically any signal routing
fashion you can imagine. Its integrated preset librarian and IR manager also allow you
to easily customize, backup and manage your built-in library of tones. All is managed
within its simple, but powerful, user interface. Also note that Helix Native is not just
for guitar! The many included amp, preamp, delay, modulation, reverb, compressor,
distortion and other eects can be utilized on any types of recordings, for traditional or
other-worldly results.
If you own a Line 6 Helix® multi-eects device, then you eectively already know how to
use Helix Native plug-in! Helix Native utilizes a similar user interface as the current Line
6 HX Edit* editor application, therefore, tone creation and preset management tasks are
essentially the same. In fact, you can import Helix hardware-created presets and use
them within Helix Native - and vice-versa!
*NOTE: HX Edit is the newest editor application for Helix family devices that are
running rmware v2.20 or later, and it replaces the previous Helix application,
which is the recommended editor application to be used for Helix family devices
running rmware earlier than v2.20. For best performance, and to take advantage
of all the newest features & functionality, it is recommended that you always use
the latest available version of both the HX Edit application and Helix device rmware. Please also see “Preset Compatibility with Helix Devices” on page 12.
For those new to the Helix products family, although Helix Native plug-in may appear
complex at rst glance, it is designed in such a way that once you learn a few basic
concepts, you'll be able to construct both simple and complex tones at nearly the
speed of thought, with very little deep diving required. It's a great idea to try the included Factory & Template presets as a starting point, which you can customize as desired
to start building your own Helix tone collection.
NOTE: For even more details about individual Helix family models and capabili-
ties, please also read through the Helix hardware and software Owner's Manuals
- available from line6.com/support/manuals.
Marketplace
Now open for business is the new Marketplace online shop, where you'll nd 3rd-party
add-on assets that even further enhance the functionality of your Helix Native plug-in
(and Helix device, if you own one). Available now are professionally crafted presets and
IRs that can be instantly purchased and added to your Helix Native libraries. An Internet
connection is required for the computer where you'll be using Helix Native to initially
sync and authorize the licenses for the use of Marketplace premium assets. Please see
“Marketplace & Account Options” on page 46.
7
Page 9
Quick Start
OK, we know you're eager to jump right in and give Helix Native a try on your tracks!
To follow are steps for adding an instance of Helix Native plug-in within a host DAW
application's audio track to get you up and running.
You will nd Helix Native within your host DAW application's plug-in insert menus along
with all other audio eects plug-ins. The initial steps in any host DAW application are
as follows.
1. Create a Session or Project at a supported sample rate (44.1kHz, 48kHz, 88.2kHz
or 96kHz)
2. Create at least one audio track. Depending on your host DAW application, it
may oer options for “mono” or “stereo” type audio tracks, or just one common
audio track type that can record or import mono or stereo audio, depending
upon the hardware input type you choose for the track. Either way, Helix Native
plug-in can be added into the eects insert of your audio track.
3. Either record some unprocessed “dry” electric guitar into the audio track, or
import an existing recorded audio le into the track so you have something for
playback.
4. Now you can proceed to insert an instance of Helix Native on this track by selecting it from the host DAW track's eects insert menu. To follow we've provided examples on several popular host DAW applications.
2. In the Eects menu, choose Helix Native. Note that Cubase oers both mono
and stereo track types - you can simply choose the Helix Native plug-in and it
will conform to your Cubase track's input & output routing conguration.
3. You will then see the Helix Native plug-in appear in the Eects Insert window. Be
sure to turn your monitoring system to a low level, then double-click a factory
preset from the plug-in's Presets tab and hit Play to hear the results.
Cockos Reaper
Reaper is a full-featured host DAW available for both Mac and PC.
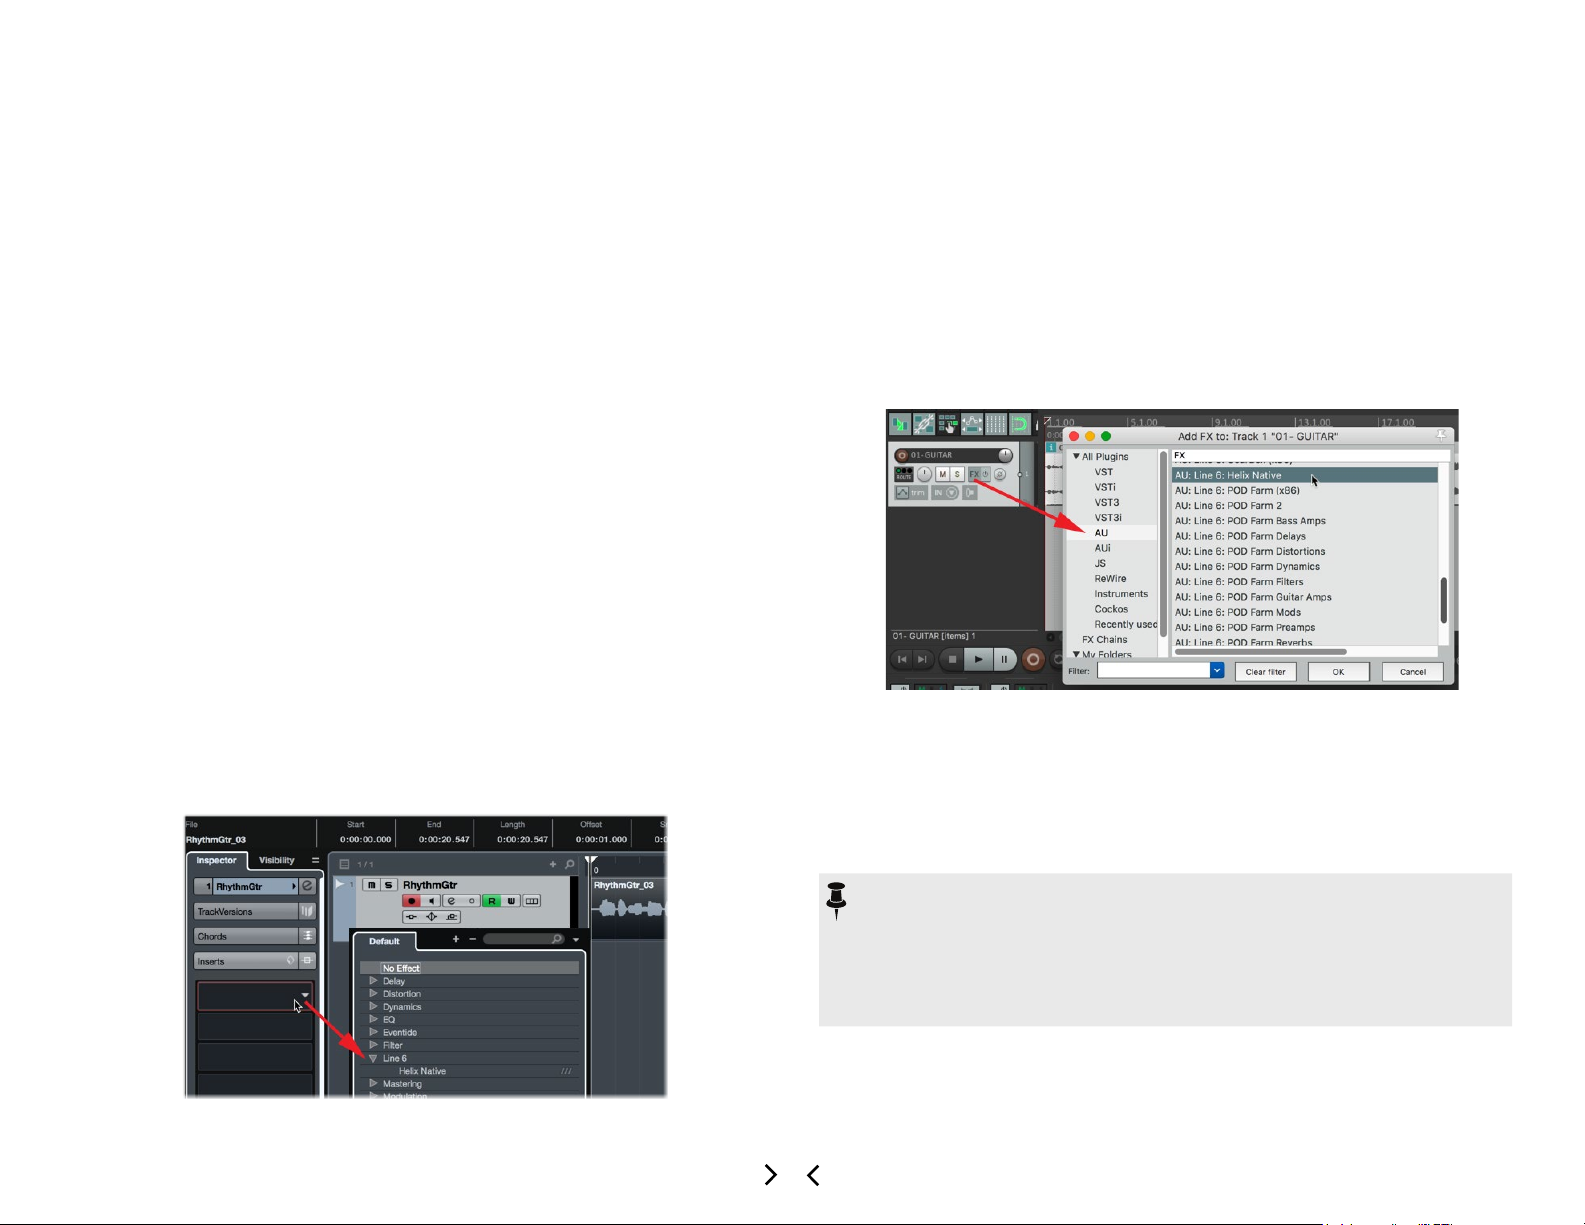
1. Select your audio track within your Reaper project. Within the track header at
the left (or within the Reaper Mixer window's channel strip for this track), click
on the FX track eects insert menu button.
Steinberg Cubase
The Cubase application is oered for both for Mac & PC. It supports the VST3 plug-in
format.
1. Select your audio track within the Cubase project. Within the track's Inspector
at the left of the track (or within the Cubase Mixer window's channel strip for this
track), click on one of the slot's menus in the Inserts section.
®
Inserting Helix Native plug-in on a Cubase Pro 9 audio track
Inserting Helix Native plug-in on a Reaper 5 audio track
2. In the FX window, choose the plug-in format type. On Mac, Reaper supports
both the AU (Audio Units) and VST3 plug-in formats, so you can choose either.
On PC, choose VST3. Select Line 6: Helix Native and click OK.
3. You will then see the Helix Native plug-in appear in the FX window. Be sure to
turn your monitoring system to a low level, then double click a Factory preset
from the plug-in's Presets tab and hit Play to hear the results.
NOTE: Some Mac host DAW applications allow you to use instances of plug-ins
of dierent format types (for example, in Reaper you can insert both VST and
AU type instances of Helix Native within the same project simultaneously). For
some actions, such as changes within the Helix Native Preset or IR Libraries and
Preference options, changed settings will not take eect immediately across
currently open Helix Native plug-in instances of dierent format types until you
close and re-open the plug-in windows.
8
Page 10
Apple Logic Pro
Logic Pro is an extremely popular host DAW for Mac. It supports the Apple Audio Units
(AU) plug-in format.
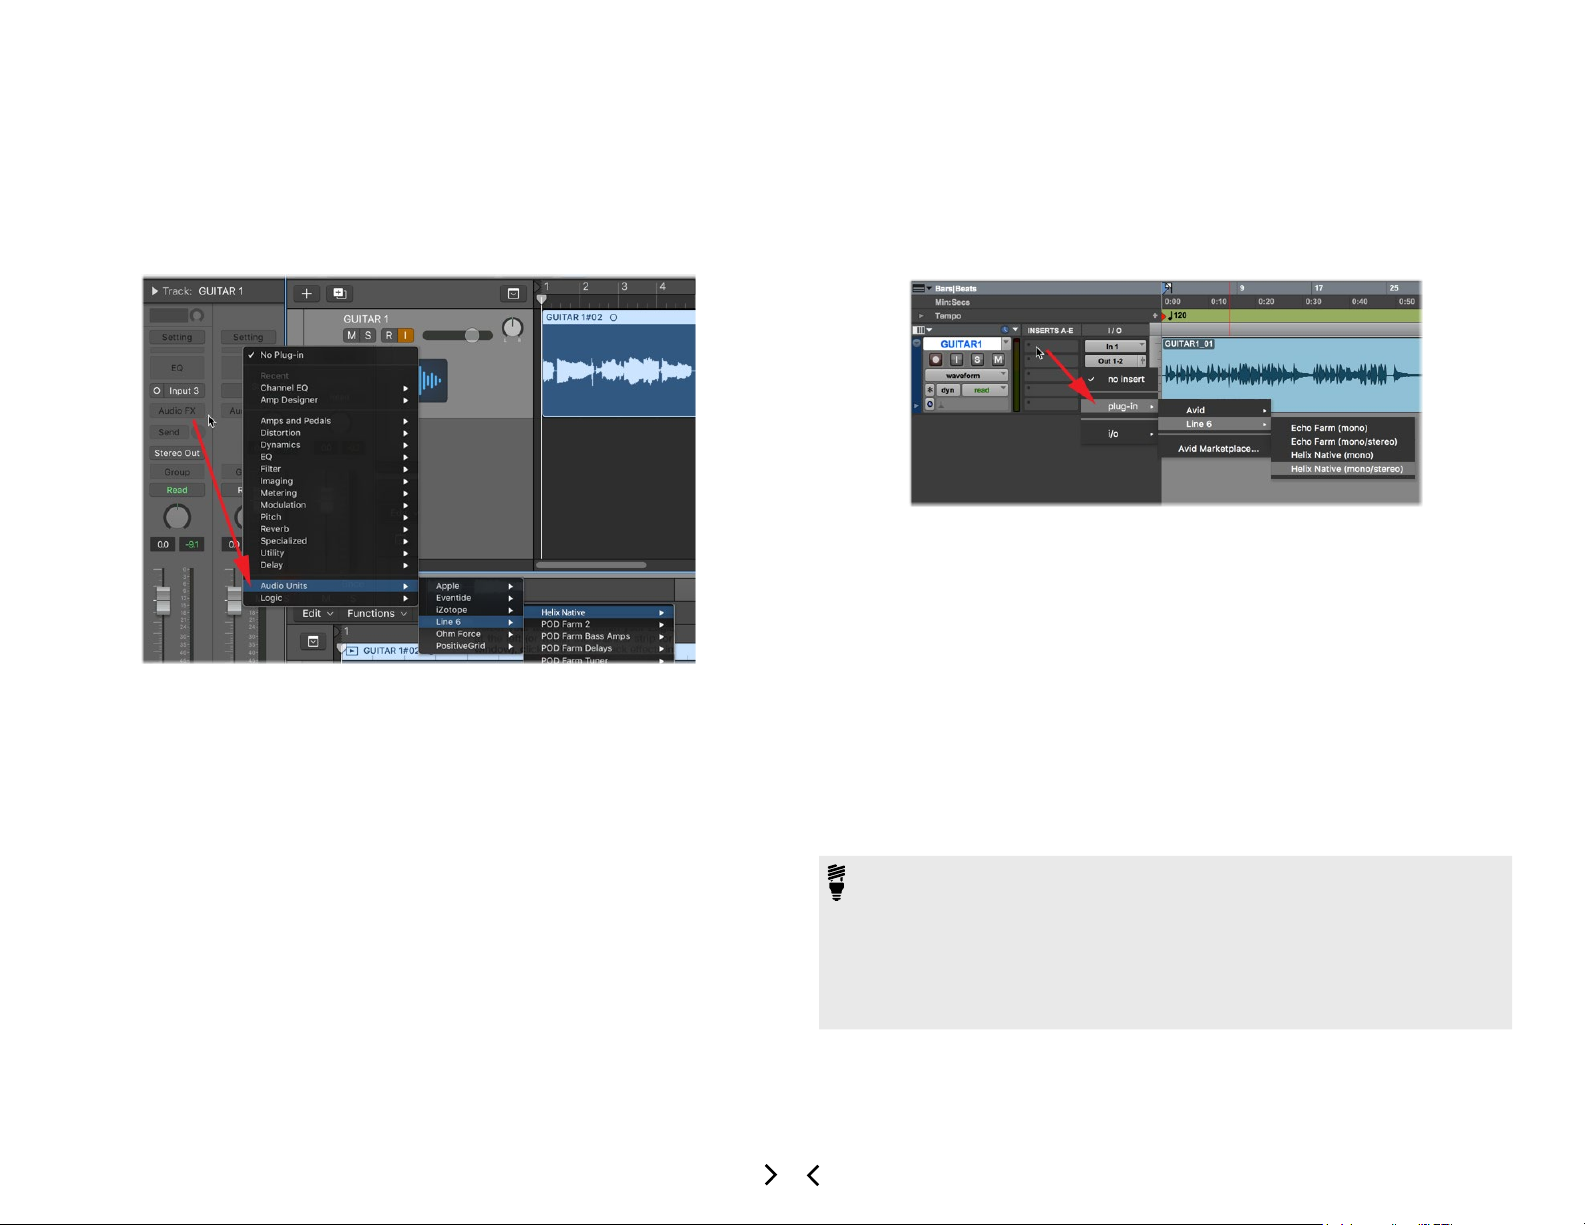
1. Select your audio track within the Logic Pro project. Within the track's Inspector channel strip (or within the Logic Pro Mixer window's channel strip for this
track), click on the Audio FX track eects insert menu.
Inserting Helix Native plug-in on a Logic Pro X audio track
2. In the FX window, choose the Audio Units (AU) plug-in format type and select
Line 6 > Helix Native. Note that Logic Pro oers both mono and stereo track
types, therefore, you'll have dierent sub-options depending on your track's
type:
• If inserting on a mono track - You'll have the option to choose either Mono
(the plug-in's output is summed to mono) or Mono->Stereo (the plug-in's
output is stereo).
• If inserting on a stereo track - It is recommended to select the Stereo option
here, which provides stereo in/out processing. The Dual Mono option inserts
two mono instances of the plug-in (each accessed via the L and R buttons at
the top of the plug-in window). Each mono instance processes the left and
right audio channels of the stereo track discretely, but this can quickly utilize
a great deal of CPU power, so we don't recommend using it.
3. You will then see Helix Native appear within the plug-in window. Be sure to turn
your monitoring system to a low level, then double click a Factory preset from
the plug-in's Presets tab and hit Play to hear the results.
®
Avid
The Pro Tools host DAW application for is available for Mac & Windows. It supports the
Avid AAX plug-in format.
1. Select your audio track within your Pro Tools project. Within the track header at
2. In the plug-in menu, choose Helix Native. Note that Pro Tools oers both mono
3. You will then see the Helix Native plug-in appear in the Eects Insert window. Be
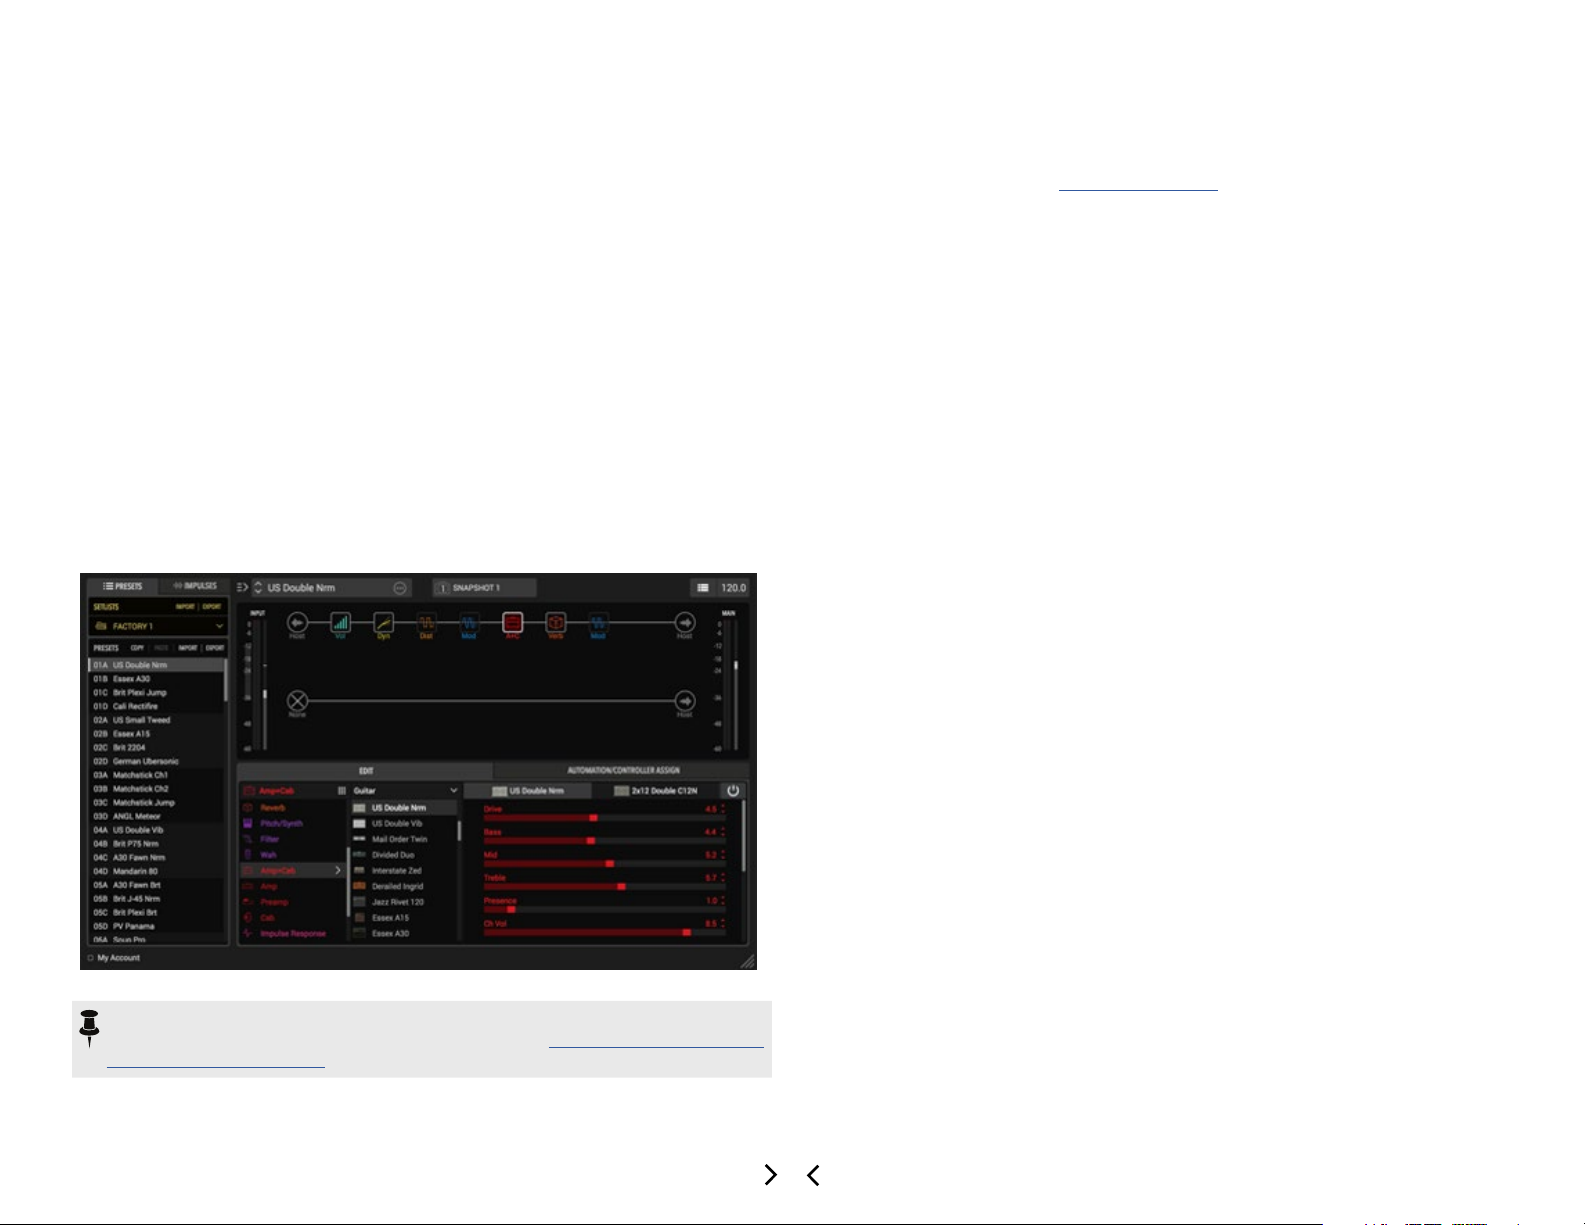
Once you insert an instance of Helix Native and load a preset, the preset's contents are
displayed within the Signal Flow Window, with model menus, parameters and automation control options available within the tabs of the Inspector Window.
Pro Tools
the left of the track (or within the Pro Tools Mixer window's channel strip for this
track), click on one of the slot's menus in the Inserts section.
Inserting Helix Native plug-in on a Pro Tools mono audio track
and stereo track types, therefore, you'll have dierent sub-options depending
on your track's type:
• If inserting on a mono track (as shown above) - You'll have the option to
choose either mono (the plug-in's output is summed to mono) or mono/
stereo (the plug-in's output is stereo, assuming the track is routed to a stereo
output).
• If inserting on a stereo track - Only a stereo option is oered here, which
provides stereo in/out processing. (Note that Pro Tools does oer a dual
mono option for some plug-ins, but this is not supported by Helix Native
plug-in.)
sure to turn your monitoring system to a low level, then double-click a Factory
preset from the plug-in's Presets tab and hit Play to hear the results.
TIP: Most host DAWs also allow you to insert plug-ins on Send, Bus or Aux track
types. Host DAWs dier slightly in their naming and features of these track types,
but their main purpose is to allow you to insert a single instance of your plug-in
and then route the output of any number of audio tracks into it to process them
using the same eect. This is the preferred way of processing multiple tracks
since, obviously, one instance of your plug-in utilizes less CPU power as compared to inserting individual instances on each audio track! Please refer to your
host DAW's documentation for details.
®
9
Page 11

This allows you to load & customize any of the provided Factory presets, create your
own presets, congure automation controller assignments, manage presets & Impulse
Responses, as well as backup all your tones to your computer. Even better, all your
saved creations can be transferred between Helix Native plug-in and the HX Edit application, allowing them to also be used on a Helix hardware device as well (see “Preset
Compatibility with Helix Devices” on page 12 for details).
Live Input Monitoring Through Helix Native Plug-in
Another great benet of audio eects plug-ins is the ability to monitor your input signal
through the plug-in inserted on the track. This allows you to dial in the desired tone,
such as a customized set of amp, cab & eects within the instance of Helix Native, and
then hear your guitar (or other track input signal) processed by it in real-time. Once you
hit record, only your “dry” D.I. guitar signal is actually recorded into the track, which
provides the huge benet of being able to completely change the plug-in settings at any
time, right up until you do a nal mix-down of the DAW project!
Live Input Monitoring is a function of your host DAW application, and is typically ac-
complished by the following steps. Each host DAW is slightly dierent, so be sure to
consult your DAW application's documentation for details.
1. Congure your audio track's input options to receive input from whatever physi-
cal input your guitar (or desired instrument) is plugged into.
2. Insert Helix Native on the track, as described in the previous section.
3. Set the track's Record Arm button to “on” so that the track receives audio input.
4. Activate the track's “Input Monitoring” feature - this is typically a button found
near the Record Arm button. This feature allows the live track input to be fed
through the DAW track and all plug-ins inserted on the track.
About Latency
Since this input signal is being fed round-trip - into your audio interface, through the
DAW software and back out your audio interface's outputs - it is subject to some
amount of “latency.” Latency is the time between when you pluck a note on your guitar
and hear the resulting audio output through your monitoring system. Latency is a function of your audio interface, host DAW software and the recording capabilities of your
computer system. You can generally get the lowest latency by reducing your buer size
options for your audio interface driver within in your host DAW software's Preferences
- please see your DAW software’s documentation for details.
Optimizing the Input Level
The level of the input signal entering the Helix Native plug-in can aect the overall gain
and saturation of your tones, therefore, it is essential to “gain stage” accordingly. It is
important to note that most Helix Native Amp & Eect models are designed to receive
“Instrument” level input signals, much like plugging an electric guitar directly into the
same type of amp or eects pedal we modeled them after. To follow are several tips for
achieving the optimal signal level.
NOTE: Please also see “Master Input & Output Level Controls” on page 27.
• For the most accurate results when recording “dry” electric guitar (or bass), we
recommend that you use an audio interface with a “Hi-Z” or “Instrument” input.
• For monitoring your input signal level (or the playback level of any clips within
your track), reference the Master Input Level meter within the plug-in.
Record Arm Input Monitor
An audio track in Cubase congured with Record Arm & Input Monitoring active
NOTE: When utilizing your DAW track's “Input Monitoring” feature, you'll want to
be sure to disable any “Direct Monitoring” signal on your audio interface (many
interfaces oer an optional function that routes your input signal directly to its
outputs, without going through the DAW software). This way you'll hear only the
input signal fed through the Helix Native plug-in. See your audio interface's documentation for details.
5. Now when you strum your guitar, you should hear your signal through the track
with the Helix Native processing applied. You can hit the Record button and try
a pass at recording your performance. Upon playback you can then experiment
with tweaking the Helix Native settings even further!
10
Optimal Input
Range Indicator
Multi-color
Input Meter
The Master Input Level controls
• The Optimal Input Range Indicator provides a guideline for where you should
keep your input level, between -36 dB to -12 dB.
• The Multi-color Input Meter also provides guidance - basically, strive for keep-
ing your input level in the green and yellow, and avoid the blue (signal is too low)
and red (signal is too high).
Master Input
Level Slider
Page 12
• If your audio interface oers input level adjustment, it is typically best to adjust
it there to keep the recording level entering the plug-in within this optimal range.
If needed, you can adjust the plug-in Master Input Level Slider to ne-tune the
level. The Master Input and Output Level sliders are global per plug-in instance
and, therefore, their values are not saved per preset.
• Guitars with active pickups may have a hotter output than traditional passive
pickups. If your guitar utilizes active or especially high output pickups, set your
audio interface or preamp's input “pad” to on, if available.
• Clipping, as indicated when the red Clip Indicator lights up, should always be
avoided on both the plug-in's input and output meters.
Clip Indicator
The Input meter showing a clipped input level
GUI Overview
The Helix Native plug-in has a very simple, easy-to-use interface which functions as
both a Librarian for your Helix Preset and Impulse Response les and as an Editor to
create and customize your tones.
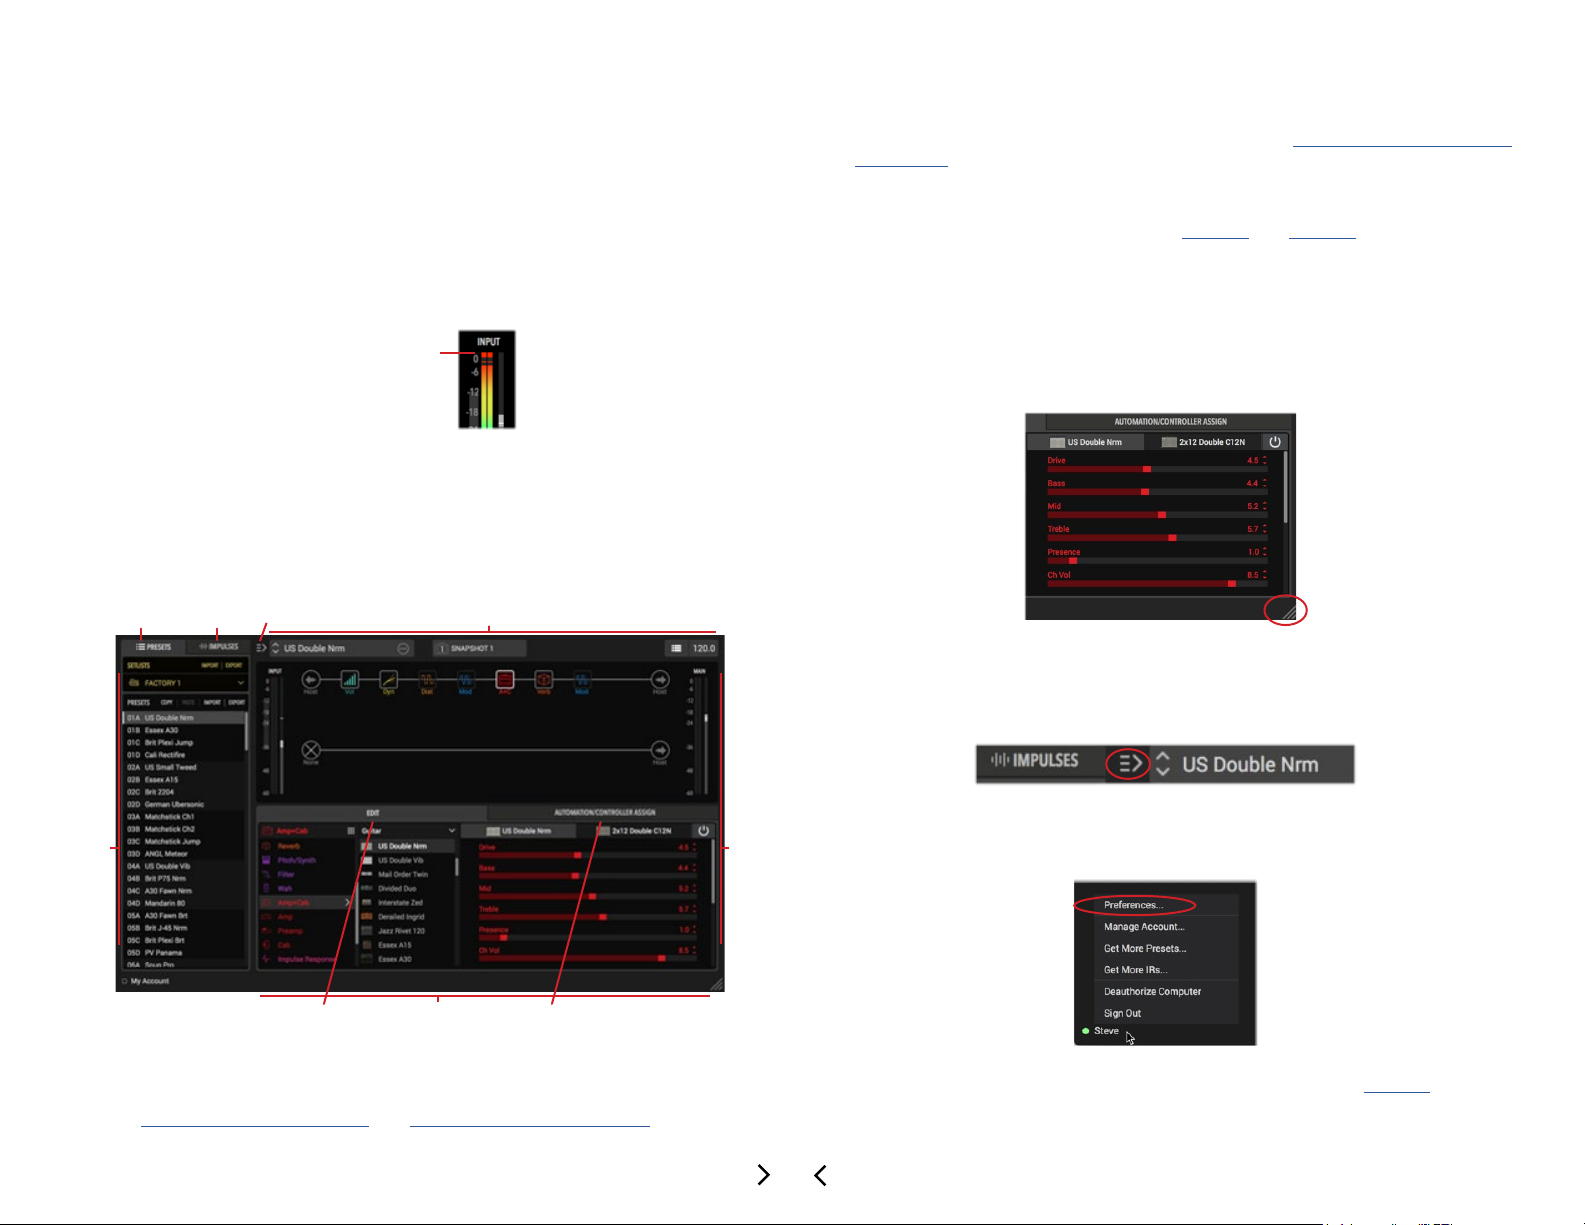
Presets
Tab
Impulses
Tab
Show/Hide
Librarian
Signal Flow
Window
The Signal Flow Window - Where you can add and move amps & eects blocks,
and customize your complete signal path routing - see “The Signal Flow Window”
on page 27.
The Inspector Window - Where you can choose from the huge selection of models, edit their parameters, and create and manage parameter automation control
- see the Inspector Window chapters on page 33 and page 36.
Customizing the Helix Native Plug-in Window
Resize the Plug-in Window - The plug-in's window is resizable to allow you adjust
the window size that best suits your screen and workow. Simply click and drag
using the “grab handle” at the bottom right of the plug-in window to reduce or increase the window size independently for any instance of the Helix Native.
Drag the “grab handle” on the bottom right of the plug-in window for resizing
Show or Hide the Librarian Panel - It is also possible to show or hide the Presets/
Impulses Librarian panel independently for each instance of the plug-in, by clicking
on the toggle button at the top left of the Signal Flow window.
LIBRARIAN
Edit
Tab
Navigation within the plug-in's user interface is divided into three main windows:
The Librarian Window - For managing presets and impulse response (IR) les -
see “Presets Panel” on page 15 and “Impulses Panel” on page 19.
Inspector
Window
Automation/Controller
Assign Tab
EDITOR
11
The Librarian Panel's Show/Hide Button
My Account Menu
At the bottom left of the plug-in window, click on the “My Account” menu to access the
plug-in Preferences, Marketplace and account options - please see page 44.
Page 13
Preset Compatibility with Helix Devices
Helix preset, setlist and bundle les are compatible and transferable between the Helix
Native and Helix family devices (Helix, Helix Rack and Helix LT).* Presets, setlists and
bundles are imported to, and exported from, these Helix hardware devices on your
computer by the use of the HX Edit editor/librarian software. This compatibility is the
foundation of the Line 6 “Studio to Stage” concept, allowing you to load and transfer
your tones between Helix Native plug-in and Helix hardware!
*NOTE: Presets and setlists exported from Line 6 HX type (HX Stomp or HX
Eects) devices are not compatible with the Helix Native plug-in or Helix devices.
Likewise, presets and setlists exported from Helix Native or Helix devices are not
able to be imported into HX type devices. However, it is possible to Copy and Paste
or drag and drop individual blocks, along with their current settings, between HX Edit
with an HX device and Helix Native. See the following “Block Copy and Paste” section.
HX Edit Application
Line 6 HX Edit is the editor/librarian software for use with Helix hardware devices that
are running rmware version 2.20 or later. For best performance, it is recommended to
use the latest version of both the HX Edit application and Helix rmware. If you own a
Helix that is still running a rmware earlier than v2.20, you'll need to update the Helix
device's rmware to the v2.20 rmware or later, or use the previous Helix application
with your Helix device.
For optimal preset compatibility between Helix Native plug-in and Helix hardware, you
should always be sure to use matching versions of the Helix Native, Helix rmware, and
the HX Edit (or Helix) application. The easiest (and recommended) way to be sure your
presets are compatible is to update to all the latest versions available for Helix Native,
Helix rmware and HX Edit. All Line 6 software is available for download from line6.com/
software.
HX Edit Backup Files
The HX Edit application includes a feature that creates Helix Backup (.hxb) les that can
be utilized to restore a Helix device's presets, IRs and global settings. Helix Native does
not currently include this feature and, therefore, does not support creating or opening
HX Edit Helix Backup les.
TIP: If you own a Helix device, be sure to check the “Helix compatible” version
number (found in the Helix Native Preferences' About box - see page 45) to
determine the recommended Helix rmware version you should use for maximum
preset compatibility.
Presets, setlists and bundles can simply be imported into the Helix Native or the HX
Edit app using their Import functions, as covered in the following sections. It is also
possible to drag and drop presets directly between the applications' Preset panels.
Once imported into the HX Edit application, presets are immediately loaded onto your
connected Helix device, replacing the presets within the device's internal memory.
When importing presets into the Helix Native Presets Library, they are then available for
all instances of the plug-in.
NOTE: As with all plug-ins, the specic settings you last used within your existing
plug-in instances are retained as part of your host DAW project and not aected
unless you manually load a dierent preset into the plug-in's Signal Flow. Instanc-
es of the Helix Native plug-in that already exist in previous host DAW projects will
also reference the current plug-in Presets Library lists when you load the DAW
project again.
Due to the obvious dierences of Helix hardware devices having numerous physical
inputs and outputs, there are some settings, block type & controller support variances
when sharing presets between the Helix Native and Helix hardware. These dierences
are detailed in the following sections.
Block Copy and Paste
Using the Copy and Paste Block commands, you can copy/paste any individual block
between presets within any instance of Helix Native, as well as between Helix Native
and HX Edit (with any Helix or HX type device connected). It is also possible to drag
and drop any processing block to move it within the current preset, or to copy it into
any other Helix Native plug-in or HX Edit device window. Restrictions apply when copying and pasting some block types, depending on the Helix hardware in use and the
paste destination - please see “Cutting, Copying & Pasting Blocks” on page 28.
Marketplace Assets
All premium presets and IRs purchased from the online Line 6 Marketplace that are offered for Helix (Floor, Rack and LT) devices are fully compatible with Helix Native plug-in
(version Helix Native 1.70 and later is required). Please see “Marketplace & Account
Options” on page 46.
Input & Output Block Settings
When Importing a Helix Hardware-exported Preset into Helix Native - All Input and
Output blocks currently set to physical Inputs and Outputs (other than “None”) will default to the “Host” setting within the plug-in.
When Importing a Helix Native-exported Preset into Helix Hardware - All Input and
Output blocks currently set to “Host” will default to the “Multi” setting within the Helix
hardware. Any Input block set to “None” will remain as set to “None” within the hardware.
12
Page 14
Send, Return, FX Loop & Looper Blocks
When Importing a Helix Hardware-exported Preset into Helix Native - These block
types are only functional within Helix hardware and, therefore, their parameters are not
editable. These blocks have no routing functionality within Helix Native.
NOTE: If an existing Send, Return or FX Loop block is toggled as “active” via its
Bypass switch, it can reduce or fully mute the path's audio signal, depending on
the block's Mix or Dry Thru parameter settings. To ensure these block types are
not aecting the plug-in's signal path, simply toggle the block to bypassed.
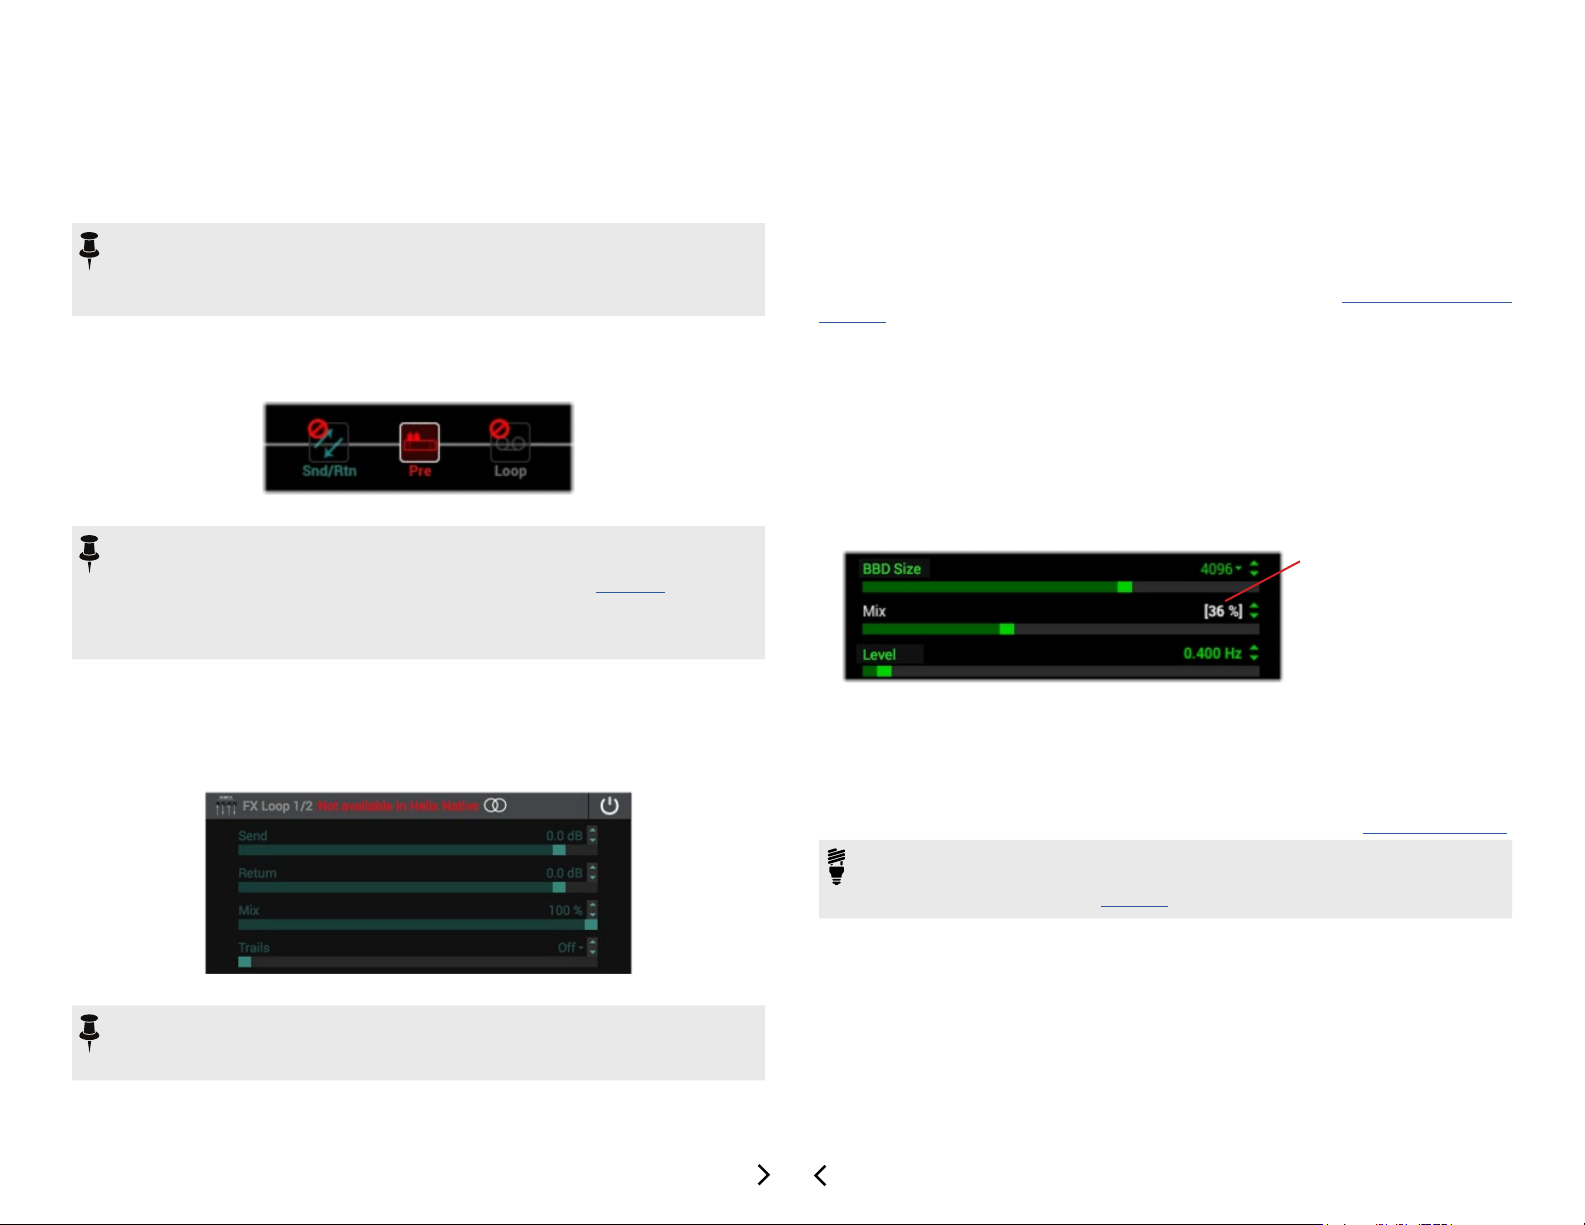
If you load a preset that happens to include any of these types of blocks, you'll see
them appear within the Signal Flow with an indicator to remind you they are “unsupported” within the plug-in.*
An FX Loop (Snd/Rtn) and Looper (Loop) block within a Helix hardware-exported preset
*NOTE: Within the Preferences - General window, you can enable the option for
Helix Native to automatically strip out all unsupported block types from presets
whenever importing Helix presets, setlists or bundles (see page 44). However,
regardless of this Preference setting, it is still possible to Paste one of these unsupported blocks into Helix Native from the HX Edit app, if it remains as the most
recently copied item in your clipboard.
Impulse Responses
Impulse Response (IR) les are able to be utilized within IR blocks of Helix Native just
as they are within Helix devices. You can simply import IRs using the Impulses panel to
build your Library of IRs that are available to Helix Native. Helix hardware retains its own
separate IR Library (managed by using the HX Edit application).
If you are to be sharing Helix presets between Helix Native and Helix devices, it is a
good idea to build and maintain your IR Libraries similarly on each to allow the same IR
les to be utilized for your presets that include them. Please see “Impulses Panel” on
page 19 for details.
Hardware Controller Assignments
Helix Floor, Rack & LT devices and the HX Edit editor application oer the ability to
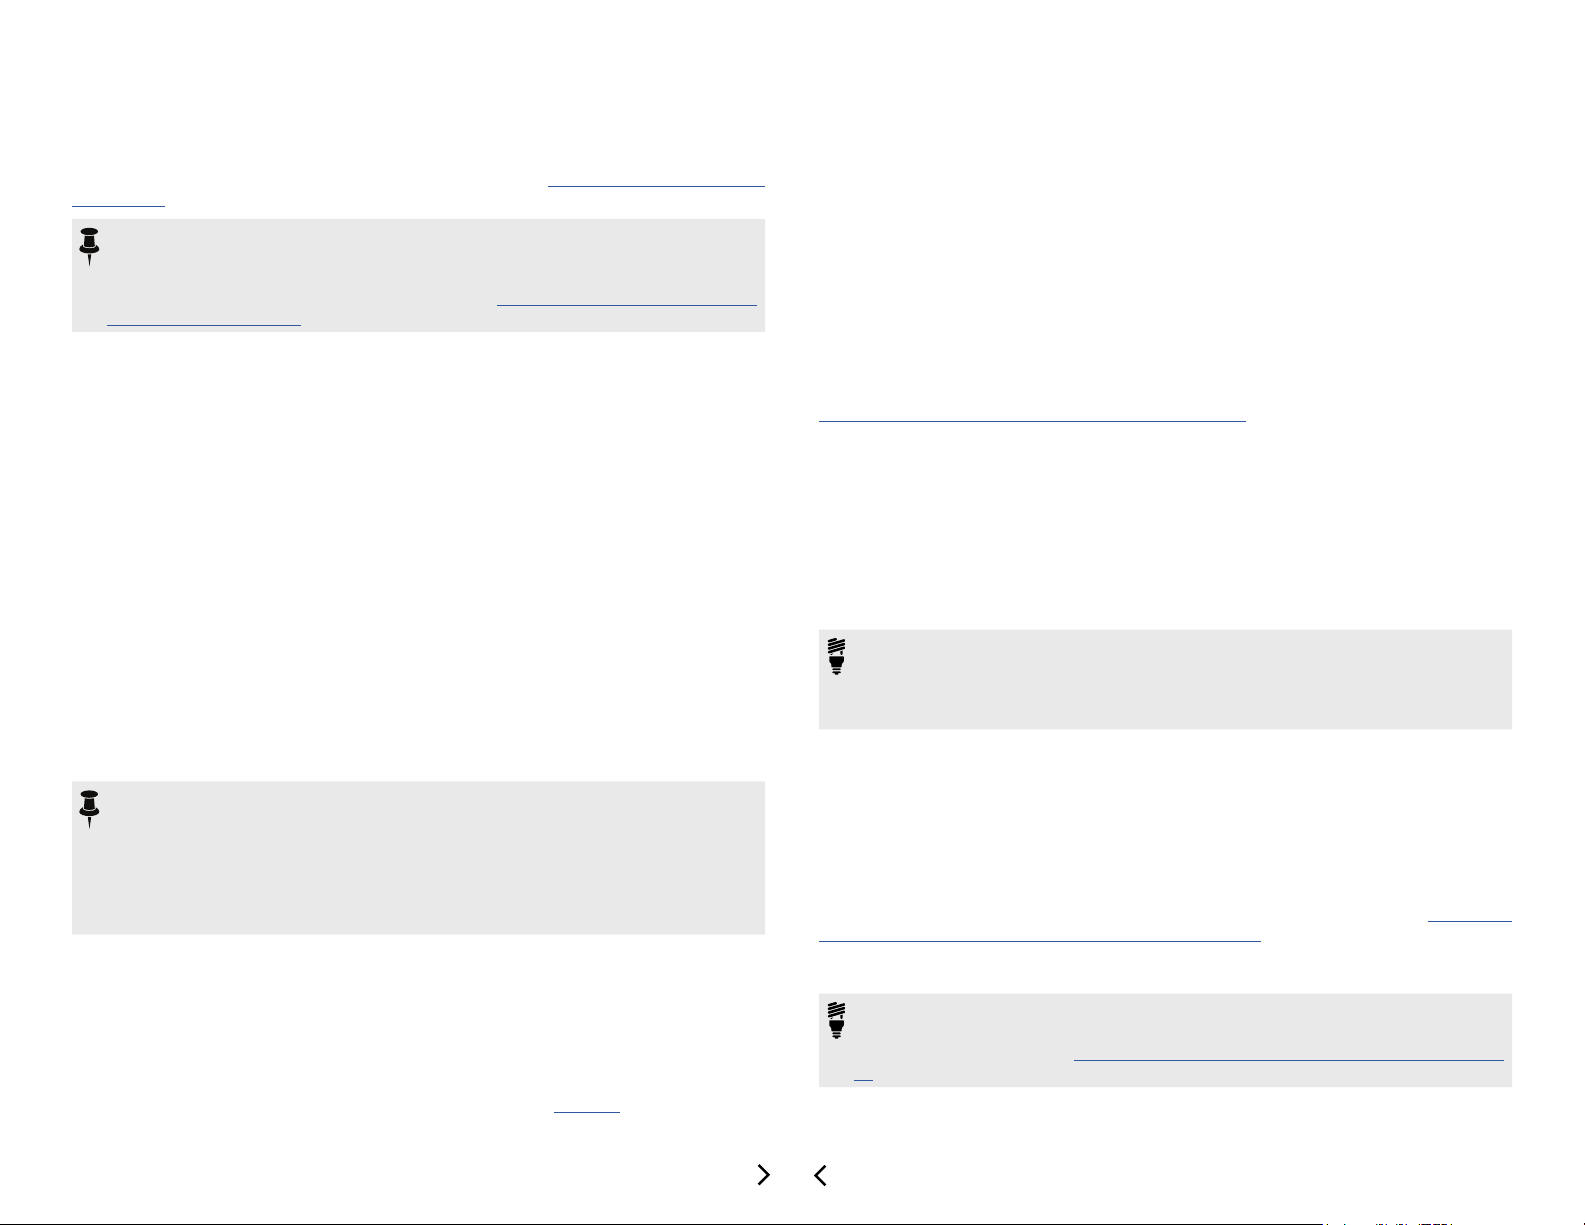
create several types of “controller assignments” to provide remote control of Helix parameters via Helix footswitches, expression pedals and external MIDI gear. These controller assignments are saved and retained within Helix hardware-exported presets. If
you happen to open a preset within Helix Native that includes them, you'll see these
controller assignments represented by their parameter values displayed in white and in
brackets.
Helix hardware
assignment indicator
When you select one of these unsupported blocks within the Signal Flow, you'll see a
reminder within the Edit tab to alert you it is non-functional, and see that its parameters
are not editable (dimmed). However, these blocks and their original settings remain fully
functional if and when the preset is exported from Helix Native and imported back into
HX Edit.
An “unsupported” block's parameters within the Helix Native Edit tab
NOTE: Note that it is not possible to add Send, Return, FX Loop or Looper type
blocks to your tone from the Helix Native model menu - the Send/Return and
Looper menu categories of the Edit tab's Model Browser remain non-selectable.
Indicator that a parameter includes a controller assignment
Helix hardware controller assignments oer no functionality within Helix Native plug-in,
and any parameter itself that includes an assignment remains adjustable and functional
within Helix Native. MIDI controller assignments created within HX Edit are supported
and functional within Helix Native. These controller assignments also continue to be
retained in the preset, even once exported from Helix Native, allowing them to still function if imported back into a Helix device again. Please see the Helix Owner's Manuals.
TIP: Note that, within Helix Native, you can utilize your host DAW application parameter automation functionality to control the bypass of blocks and parameter
values in real-time! Please see page 36.
Snapshots & Snapshot Assignments
Snapshots & snapshot assignments created and saved within a Helix device's preset
are compatible when the preset is loaded in the Helix Native plug-in, and vice-versa.
However, there are a few specic functions that can exist within Helix hardware-created
presets that Helix Native does not support, as described below.
• Helix hardware Command Center message data (see previous section).
• Line 6 Variax instrument tunings and other Variax parameter settings.
13
Page 15
These types of data within snapshots are essentially ignored by Helix Native, with all
other supported Snapshot settings recalled just as on Helix hardware. Both supported
and non-supported snapshot data are retained within your Helix Native-exported presets when loaded on Helix hardware again. Please also see “Working with Snapshots”
on page 24.
NOTE: The current Snapshot, along with all its settings, can be copied and pasted
using the Copy Snapshot and Paste Snapshot commands either within the current Helix Native preset or within the current HX Edit preset, but not between the
Helix Native plug-in HX Edit app and. Also see “Copying, Pasting & Renaming
Snapshots” on page 26.
Bypass Assignments
A common practice within Helix devices is to congure “bypass assignments” where
the bypass parameter of blocks are then toggled O/On via the device's footswitch-
es, or optionally by expression pedals or external MIDI commands. Currently, MIDI
bypass assignments are supported in Helix Native (see next section), but not other
types of bypass assignments that can be created within Helix hardware. If you happen
to change the bypass state of block that includes a Helix hardware bypass assignment
and export the preset, you will overwrite the saved state of the assignment when the
preset is imported back into a Helix device.
Controller Assignments
Helix device users can create “controller assignments” to map the control of parameters
(such as a wah or volume, a delay's Mix parameter, etc.) to a Helix expression pedal,
footswitch, or external MIDI controller device. Currently, MIDI In controller assignments
are supported in Helix Native plug-in (see next section), but not other types of controller
assignments that can be created within Helix hardware.* If you edit a parameter that
includes a Helix hardware controller assignment, and then export the preset from Helix
Native, your last-used parameter value is the same value the parameter will default to
upon import within a Helix device.
*NOTE: When importing a preset into Helix Native which includes HX Edit-saved
hardware controller assignments, you'll see the assigned parameter sliders within
Helix Native display their values in white brackets indicating the assignments.
Even though these hardware controller assignments are not supported within
Helix Native, they are preserved with the preset (as well as with the respective,
individual blocks for copy/paste). Therefore, these assignments will still be intact
if you import the preset back into HX Edit.
MIDI In Bypass & Controller Assignments
Helix device users can create MIDI In bypass assignments to remotely toggle the bypass
of most block types, and create MIDI In controller assignments to remotely control most
Helix parameters, via external MIDI controller devices or MIDI software. These MIDI In
assignments are also supported by Helix Native. Likewise, MIDI In bypass and controller assignments created in Helix Native presets are also supported when the preset is
imported into Helix devices via the HX Edit application. See page 41.
Command Center Assignments
The Command Center in Helix devices provides the ability to assign the transmission
of MIDI/CV/Amp switching and other commands to Helix hardware switches and expression pedals. Helix Native does not support the transmission of these types of commands and, therefore, essentially just ignores any Command Center assignments that
may exist within an imported Helix preset. Existing Command Center data is retained
when exporting a preset from Helix Native.
Automation Controller Assignments
Since parameter automation is a functionality specic to DAW hosts and software plug-
ins, all automation controller assignments saved within a Helix Native-exported preset
will be ignored when the preset is loaded on Helix hardware devices. However, these
assignments are retained if and when the preset is exported from a Helix device. See
“Controller Assignment for Automation” on page 36.
Customized Hardware Footswitch Labels and LED
Colors
Helix devices include the ability to customize the labels displayed on their “scribble
strips” (on Helix oor and Helix Control devices) and on-screen footswitch labels (on
Helix LT devices), as well as to customize the color displayed for their footswitch LED
lights. This data is stored within a Helix hardware-exported preset, but is not utilized by
the plug-in, nor altered when importing or exporting the preset with Helix Native.
TIP: Remember, you can create an unlimited collection of backups of your presets,
setlists and bundles from both Helix Native plug-in and the HX Edit application
using their Export functions. It is good advice to follow the golden rule, “backup
early and often” so that you always have copies of your favorite Helix tones!
Computer Processing Management
In order to maintain preset compatibility with Helix family devices, Helix Native incorporates similar processing management as the DSP management system utilized on
Helix hardware. That is, Path 1 and Path 2 within an instance of the plug-in each have
a maximum computer processing limit. Once this limit is approached on either path,
the Edit tab's Model Browser options become dimmed if the specic models require an
amount of processing power that would surpass maximum limit. (Please see “Availabil-
ity of Models within the Model Browser” on page 33.) This way, any preset created
and exported from the Helix Native is ensured to be able to be imported and utilized on
Helix hardware devices.
TIP: Note that if you just can't manage to cram in all the eects you want in an
instance of the Helix Native plug-in, you can always insert an additional instance of
the plug-in! Please also see “Tips to Optimize Processing Power Usage” on page
32.
14
Page 16
Presets Panel
The Librarian's Presets Panel provides functionality for loading, importing & exporting Helix presets & setlists to manage the plug-in's Presets Library. The contents of the
Presets Library is stored commonly for Helix Native, and changes you make to this
Library aect what presets appear within all instances of the Helix Native plug-in on
the computer.
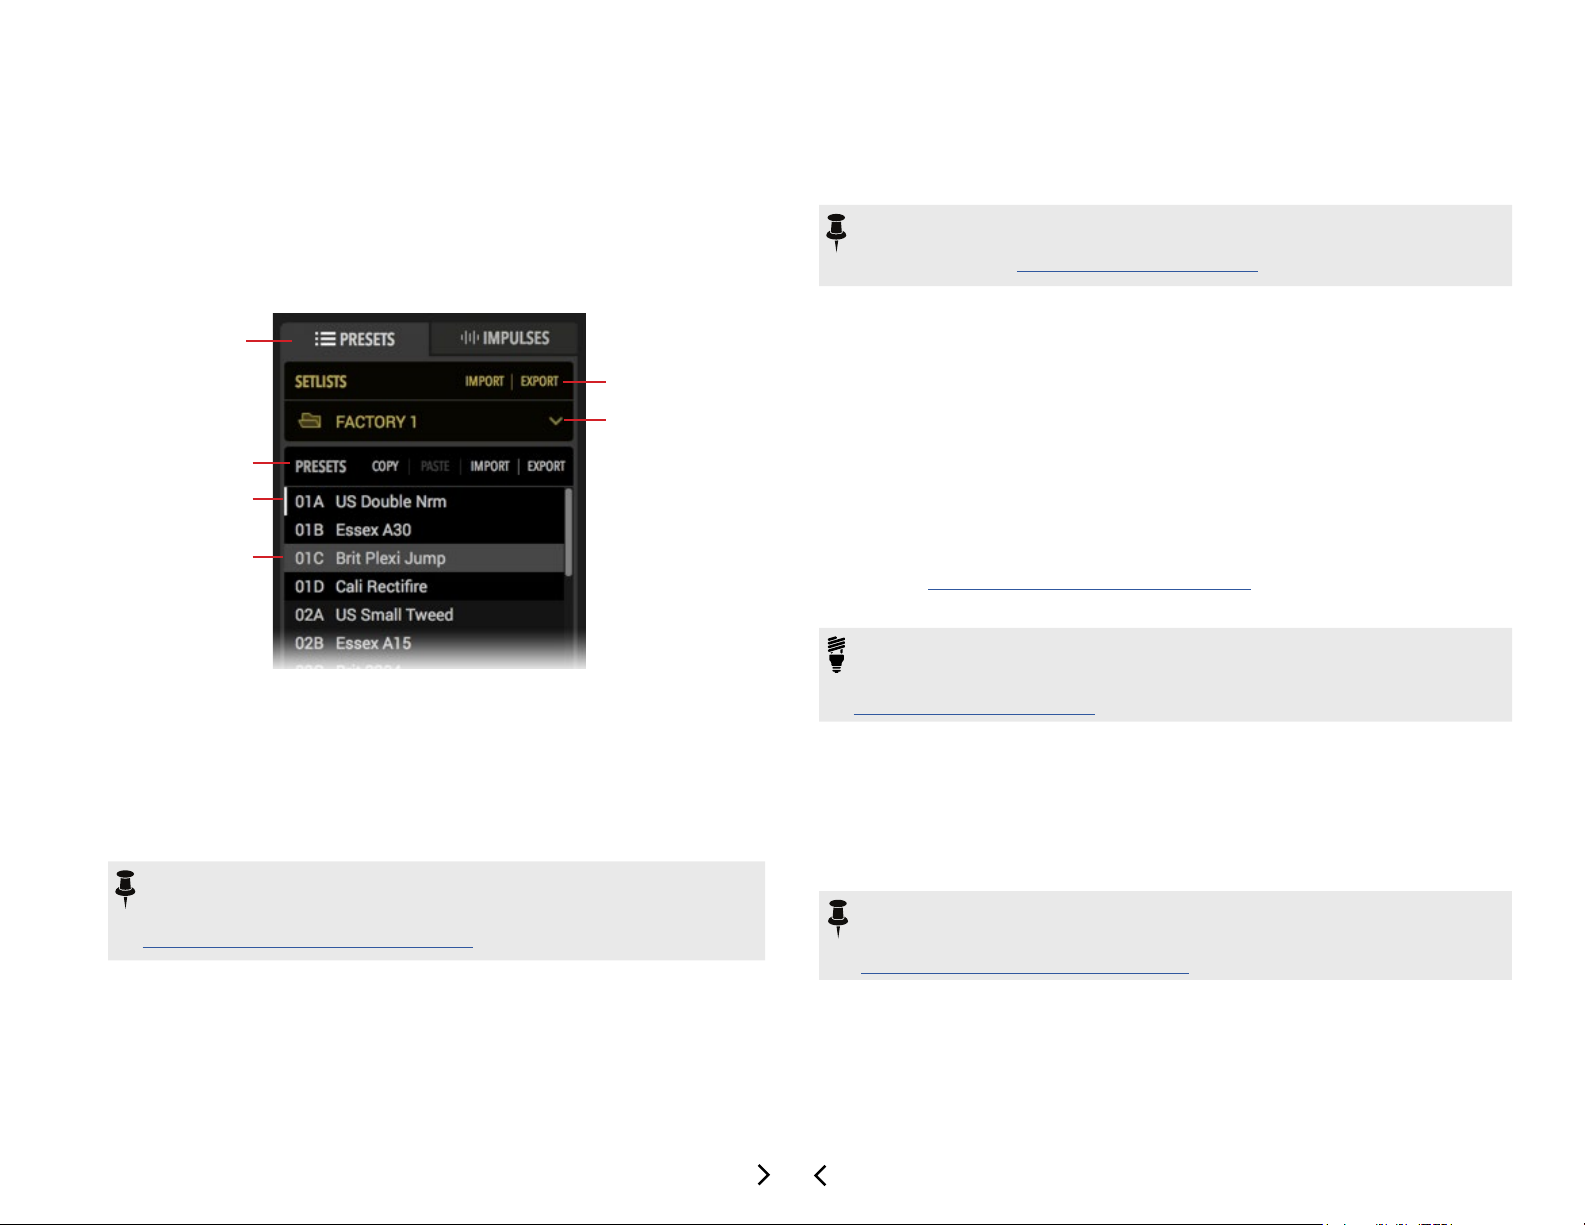
Setlist Commands - Click on any command in this row to perform the selected
action on the current Setlist.
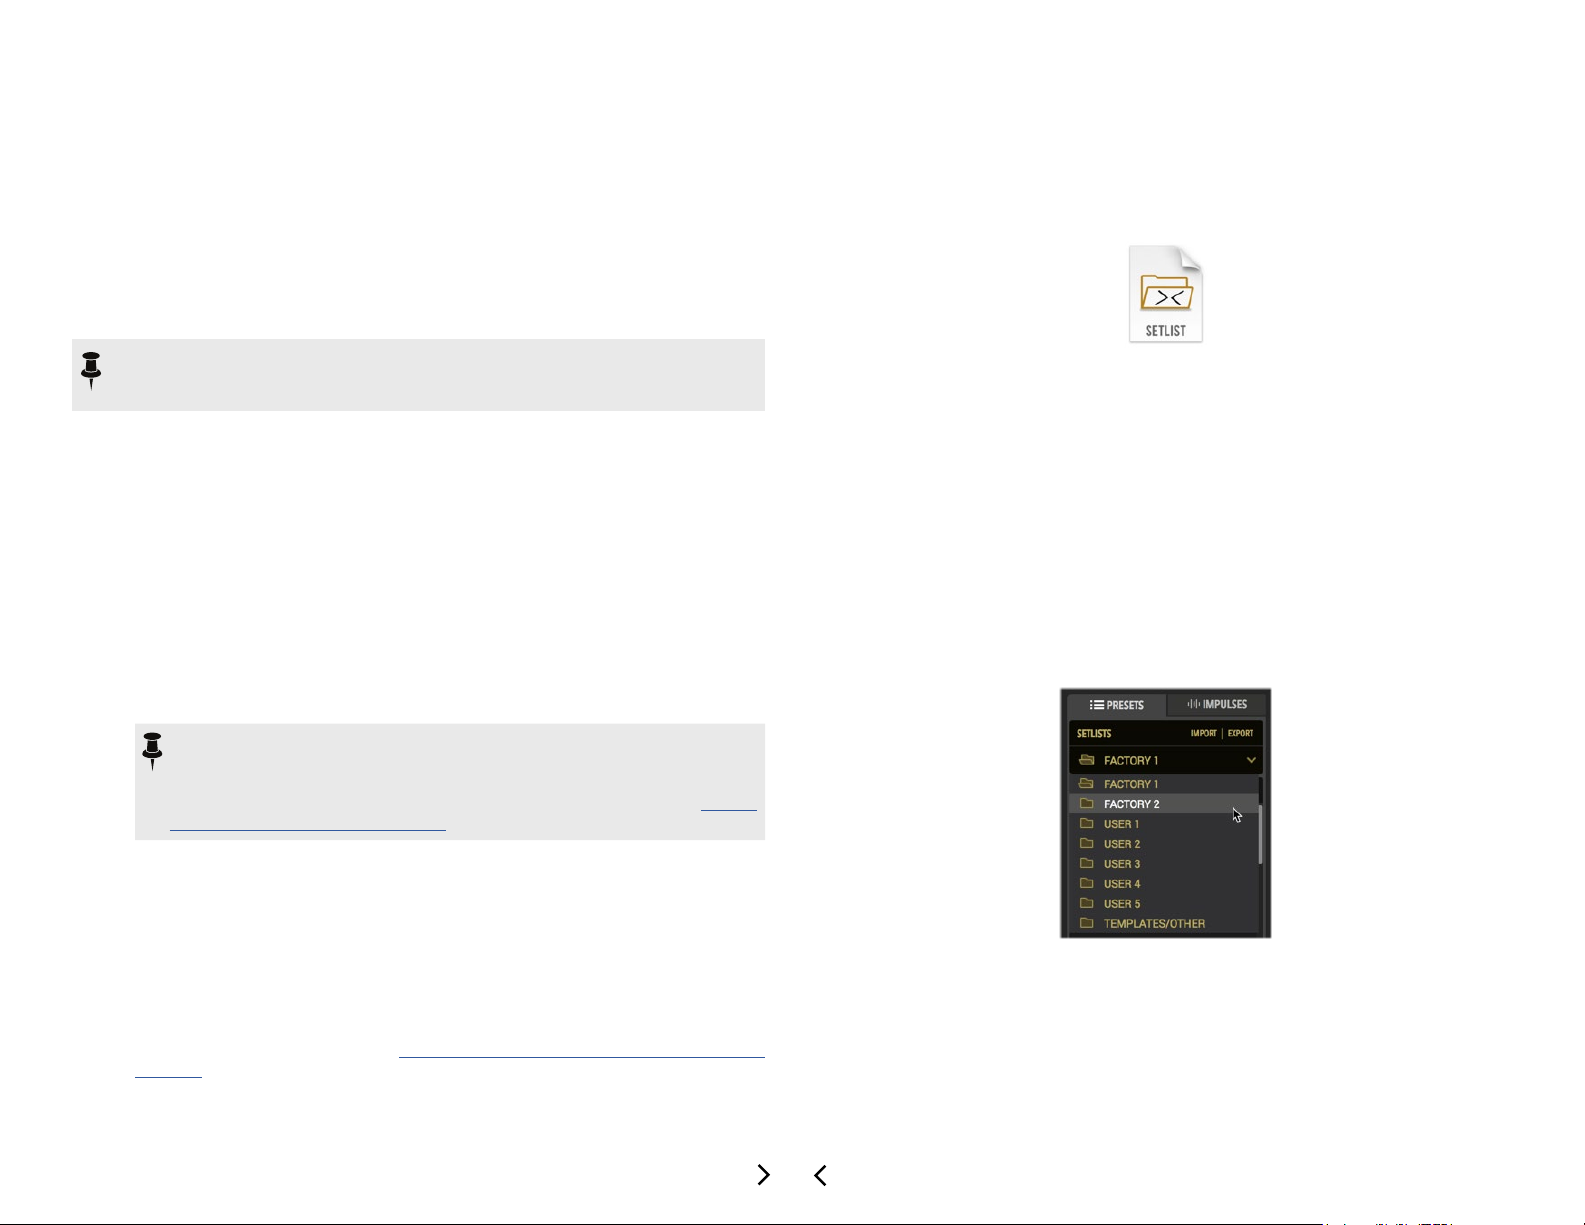
Setlist Menu - Click here to display one of the 8 Setlists of the Presets Library.
right-click directly on the current Setlist's name here to rename it.
NOTE: It is also possible to import and export all setlists, including all your presets
and their last-saved settings by using the Bundle options found in the Preferences
window. Please see “General Screen” on page 44.
Presets Tab
Setlist Commands
Setlist Menu
Preset Commands
Last Loaded Preset
Selected Preset
The Presets panel
Presets Tab - Click on this tab to display and place focus on the Presets panel.
Preset Commands - Click on any command in this row to perform its action on
the currently selected Preset(s).
Last Loaded Preset - When you double-click on any preset in the panel, it loads
it into the Signal Flow as the current tone in use by the plug-in. The white vertical
line at the left of the preset slot indicates that this is the last preset that was loaded.
NOTE: It is important to note that, once a preset is loaded as the current tone,
changes to the current tone does not aect the preset within the Presets Library panel unless you specically Save the tone to the Preset Library - see
“Using the Preset File Menu” on page 22.
Selected Preset - Click once on any preset in the panel to select it, and you'll see
it appear highlighted, as shown above. The selected preset is the one that is acted
upon when choosing any Preset Command. Note that when you load a preset, it
remains the selected preset until you click on any other preset within the panel. It is
also possible to select multiple presets to perform actions on them simultaneously,
as covered in the following sections.
Helix Native Factory Presets
The very rst time you insert an instance of the Helix Native plug-in after installation,
you'll see a pop-up notice informing you that the set of Factory Presets will be auto-
matically imported. You'll then see the rst two setlists, titled FACTORY 1 and FACTO-
RY 2, and the last setlist, titled TEMPLATES/OTHER, all of which become populated
with numerous Factory Presets to provide an easy start for your own sonic creations!
Most presets within the FACTORY 1 & 2 setlists are intended for guitar, and you'll also
see quite a few intended for bass (cleverly titled starting with “BAS”). If you're wanting
to utilize Helix Native for processing vocals, or for discrete left/right channel input and
output eects for a stereo Aux or Bus track within your DAW project, look in the TEMPLATES/OTHER setlist for the “VOX” and “AUX” titled presets. Please also be sure to
read through “The Signal Flow Window” on page 27 to see the many capabilities for
mono, stereo, serial and parallel signal routing.
TIP: If you want a clean start, we've also provided the options Clear Preset Li-
brary (to clear out all data from all your plug-in's current Library presets) and Restore Factory Setlists (to restore the original Helix Native Factory Setlists) - see
“General Screen” on page 44.
Premium Marketplace Presets
If you've purchased and downloaded premium presets from the Marketplace online
shop, you must initially have Helix Native signed in, and your computer authorized,
to allow the import or export of these presets (as well as for import and export of any
setlists or bundles that include premium presets).*
NOTE: The authorization required for your Helix Native license also covers the use
of any Marketplace premium assets on this computer - both within Helix Native (version 1.70, or later) and the Line 6 HX Edit (version 2.70, or later) application. Please
see “Authorizing your Computer” on page 5.
15
Page 17
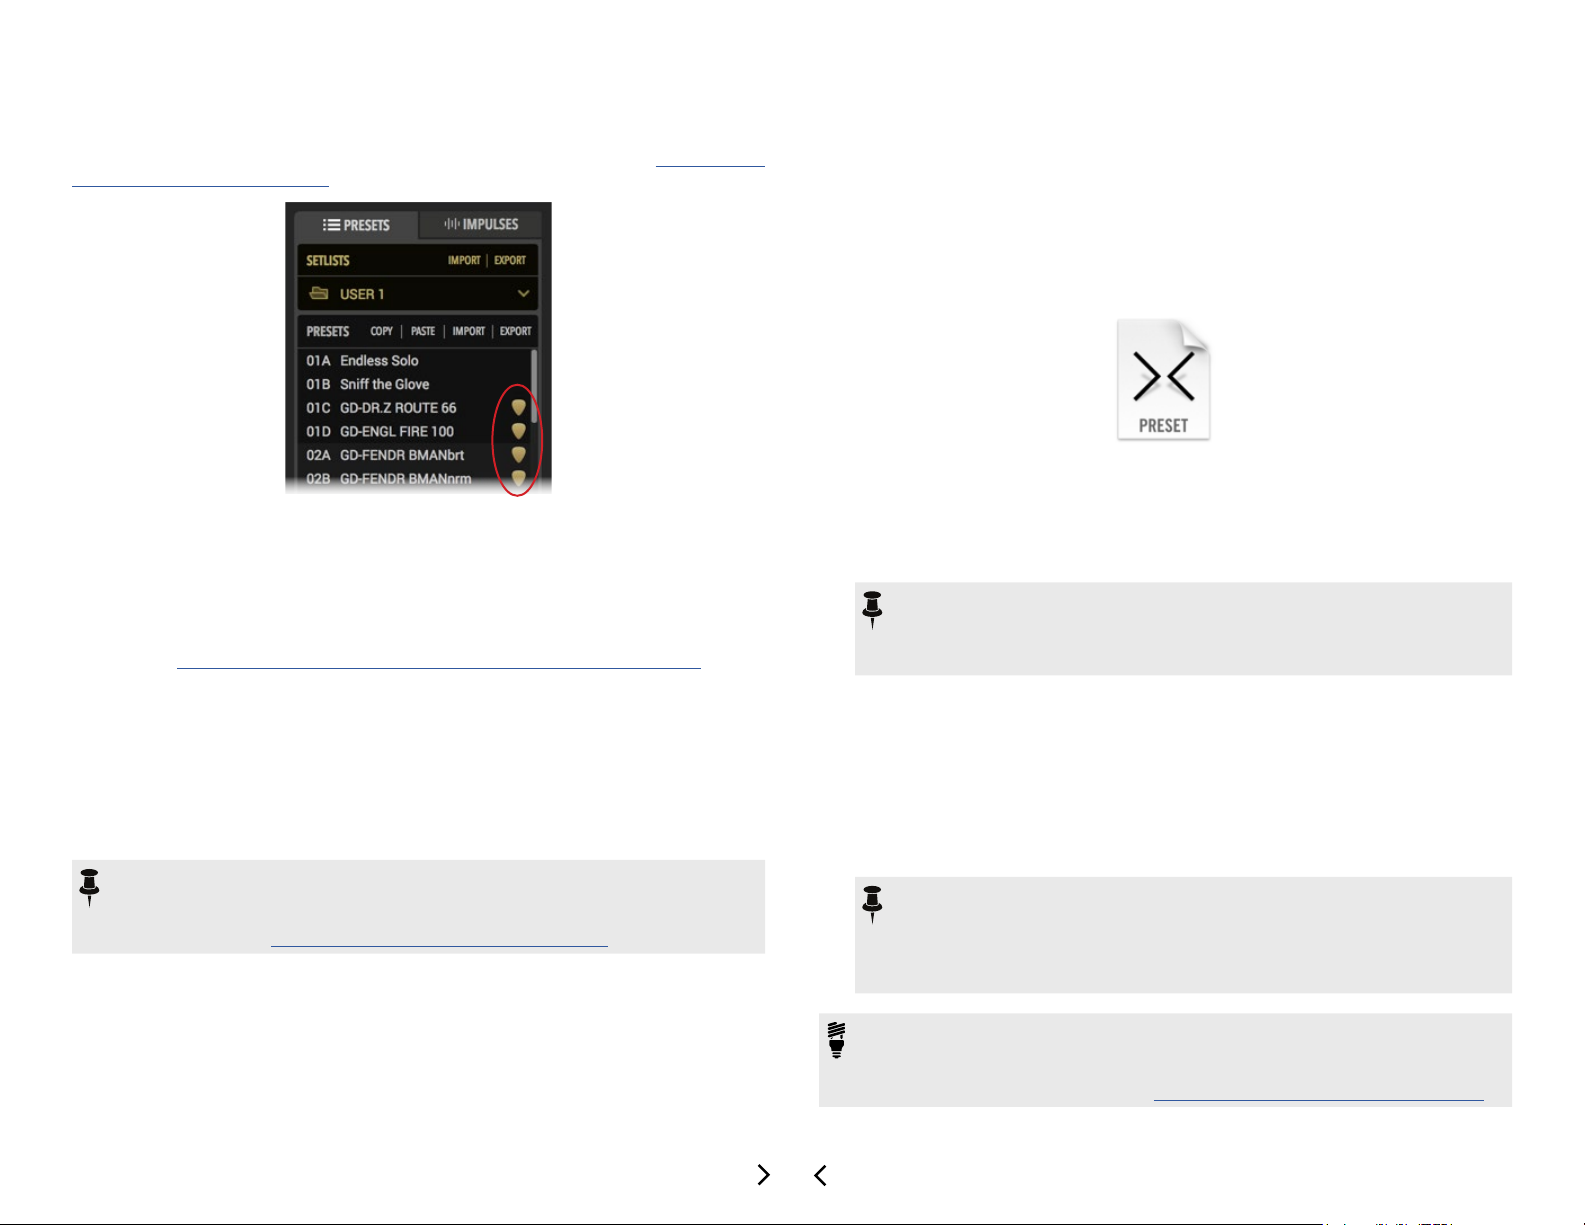
Premium Marketplace presets are otherwise able to be utilized just like any other Helix
presets. When imported, these premium Marketplace presets are indicated by a golden
guitar pick “badge” to their right within the Presets panel. Please also see “Marketplace
& Account Options” on page 46.
Premium Marketplace presets are indicated with a golden guitar pick badge
Loading Presets
Double-click on the desired preset from the Presets panel list to load it into the Signal
Flow window as the current tone, with all blocks' parameters accessible within the Edit
tab. You can also use the Next/Previous preset buttons at the top of the Signal Flow
window (see “Navigating with the Next/Previous Preset Buttons” on page 21).
Alternatively, if you wish to load a preset that exists as a saved Helix preset (.hlx) le on
your computer, you can do one of the following:
• Use the preset Import command button and select the desired preset from
your computer to import it into the plug-in's Preset Library, then double-click
the imported preset within the Presets list to load it as the current tone.
• Use the Open from Disk option from the menu at the top of the Signal Flow
window. This loads the preset directly into the plug-in's Signal Flow as the current tone (without importing it into the Preset Library).
NOTE: Use the Save To Disk or Save To Library command within the le menu
at the top of the signal ow if you wish to retain any changes you've made to the
current tone to create it as a preset that can be utilized by other Helix Native instances. Please see “Using the Preset File Menu” on page 22.
The Default Preset
Whatever preset resides within location 01A of the rst Setlist becomes the designated Default Preset. You'll see that this preset is the one automatically loaded into the
Signal Flow every time you create a new instance of the plug-in. This allows you to set
any preset you like as the Default Preset for Helix Native - by simply importing or saving
it to this Preset Library location!
All settings that you customize and save to this library Default Preset are recalled when
loaded, including automation assignments, routing conguration, block bypass states,
etc.
Importing and Exporting Helix Preset Files
Helix presets are able to be exported from the Presets Library to be copied and saved
to your computer as individual (.hlx) les, allowing you to create a limitless collection of
tones that can be imported back into your Presets Library at any time.
To Import a Helix Preset File - Click once to select the desired preset location
within the Presets panel and click the Import preset command.* A brief dialog will
warn you that importing will overwrite any preset information in the selected
Library location. Click Yes to continue. A system window will display a le brows-
er for selecting the preset you wish to import. The imported preset will then remain
available within the built-in Presets Library for all instances of the plug-in.
NOTE: Importing a preset into the Preset Library does not also automatically
load the preset into the Signal Flow of the plug-in. If you wish to load the imported preset as the current tone, double-click on the preset within the library
location.
To Export a Helix Preset - Click once to select the desired preset within the Presets panel, then click the preset Export command. This creates a copy of the preset from the Helix Native plug-in's Presets Library and saves it to your computer as
a Helix preset (.hlx) le. The familiar Mac or Windows computer's Save As window
is presented, in which you can edit the lename and choose a destination folder.
By default, all .hlx les are exported to:
• Mac - /Documents/Line 6/Tones/Helix folder
• PC - \My Documents\Line 6\Tones\Helix folder
*NOTE: Clicking once on a preset within the Presets panel selects the Library
preset, not to be confused with loading the preset into the Signal Flow as the
current tone (double-clicking on a preset loads the preset). The preset that
is selected (highlighted) within the Presets panel allows you to then execute
commands upon it (Export, Reorder, Copy, etc. - see next section).
TIP: Using the Preset panel's Export command makes a copy of the selected library
preset in its last-saved state and saves it to your hard drive. If you wish to save the
tone currently in use within the plug-in's Signal Flow, with all edited settings intact,
use the File menu - Save options (see “Using the Preset File Menu” on page 22).
16
Page 18
Renaming, Reordering, Copying and Pasting Presets
These functions allow you to customize your presets within the Presets panel. Choose
Rename, Copy or Paste from the row of Preset command buttons and it will act upon
the selected (highlighted) preset location. Or, optionally right-click on an individual
preset location within the panel to open a context menu with these same commands.
For most commands, it is also possible to multi-select a number of presets by using
Shift+click to select a contiguous set of presets, or Cmd+click (Mac) or Ctrl+click (Windows) to select a non-contiguous set.
Importing and Exporting Setlists
The Presets panel allows you to Export to save a copy of the currently loaded setlist, in-
cluding all its presets, to a Helix setlist le (.hls). This is very handy for making a backup
of all presets within a setlist, so that a group of presets can easily be imported back into
the plug-in's Library in a single action.
NOTE: Copy and Paste of presets and IRs between Helix Native and HX Edit is not
currently supported. However, you can use drag and drop for these actions! See
the next section.
Drag and Drop Presets
Drag and drop any preset (or multi-selected presets) directly to or from the plug-in's
Presets panel to perform the following actions.
• Export - Drag any preset from the plug-in's Presets panel into any folder on
your computer to export a copy of the .hlx Helix preset le and save it there.
• Import - Drag any saved .hlx Helix preset le from your computer's hard drive
and drop it directly into a slot within the plug-in's Presets panel to import it into
the Presets Library. (Note that this does not automatically load the preset as the
current tone in the plug-in - Double-click the preset slot you imported into to
load the preset.)
• Load - Drag any saved .hlx Helix preset le from your computer's hard drive
and drop it within the plug-in's Signal Flow window to load it.
NOTE: This “Load” action loads the preset as the one used within this
instance of the plug-in, but it does not import the preset into the plug-in's
Presets Library. Optionally, you can add this loaded preset by using the
File > Save to Library option within the Signal Flow window - see “Using
the Preset File Menu” on page 22.
• Reorder - Drag any preset up or down and drop it into another location within
the Presets panel to reorder the presets within the current setlist. When the
preset is dropped in the new location, the surrounding presets are shifted
upward or downward accordingly.
• Transfer to or from Helix Hardware (for Helix/HX Edit application owners) -
With a Helix device connected, you can drag a preset directly from Helix Native
plug-in's Presets panel and drop directly into the Presets panel of the HX Edit
application to import the preset into your Helix device. Likewise, you can drag
a preset from the HX Edit app into Helix Native to import your device's library
presets into the plug-in (also see “Preset Compatibility with Helix Devices” on
page 12).
To Import a Setlist - Click Import Setlist. This will prompt you to ensure that you
wish to replace the currently selected setlist and its presets within the plug-in's
Presets Library. Continue through the “Open” window to select the setlist you wish
to import.
To Export a Setlist - Click the Export Setlist command to save a copy the current
setlist as a Helix setlist le on your hard drive. By default, setlists are exported to:
• Mac - /Documents/Line 6/Tones/Helix/Setlists folder
• PC - \My Documents\Line 6\Tones\Helix\Setlists folder
Changing Setlists
To change the active setlist shown within the Presets panel, click on the Setlist menu
and choose from among the 8 setlists stored within the plug-in's Library. The currentlyselected setlist will be indicated with an “open folder” icon in the menu.
Choosing a new setlist from the setlist menu
17
Page 19
Renaming Setlists
To rename the current setlist, right-click on the current setlist's name within the Setlist
menu and enter your new title.
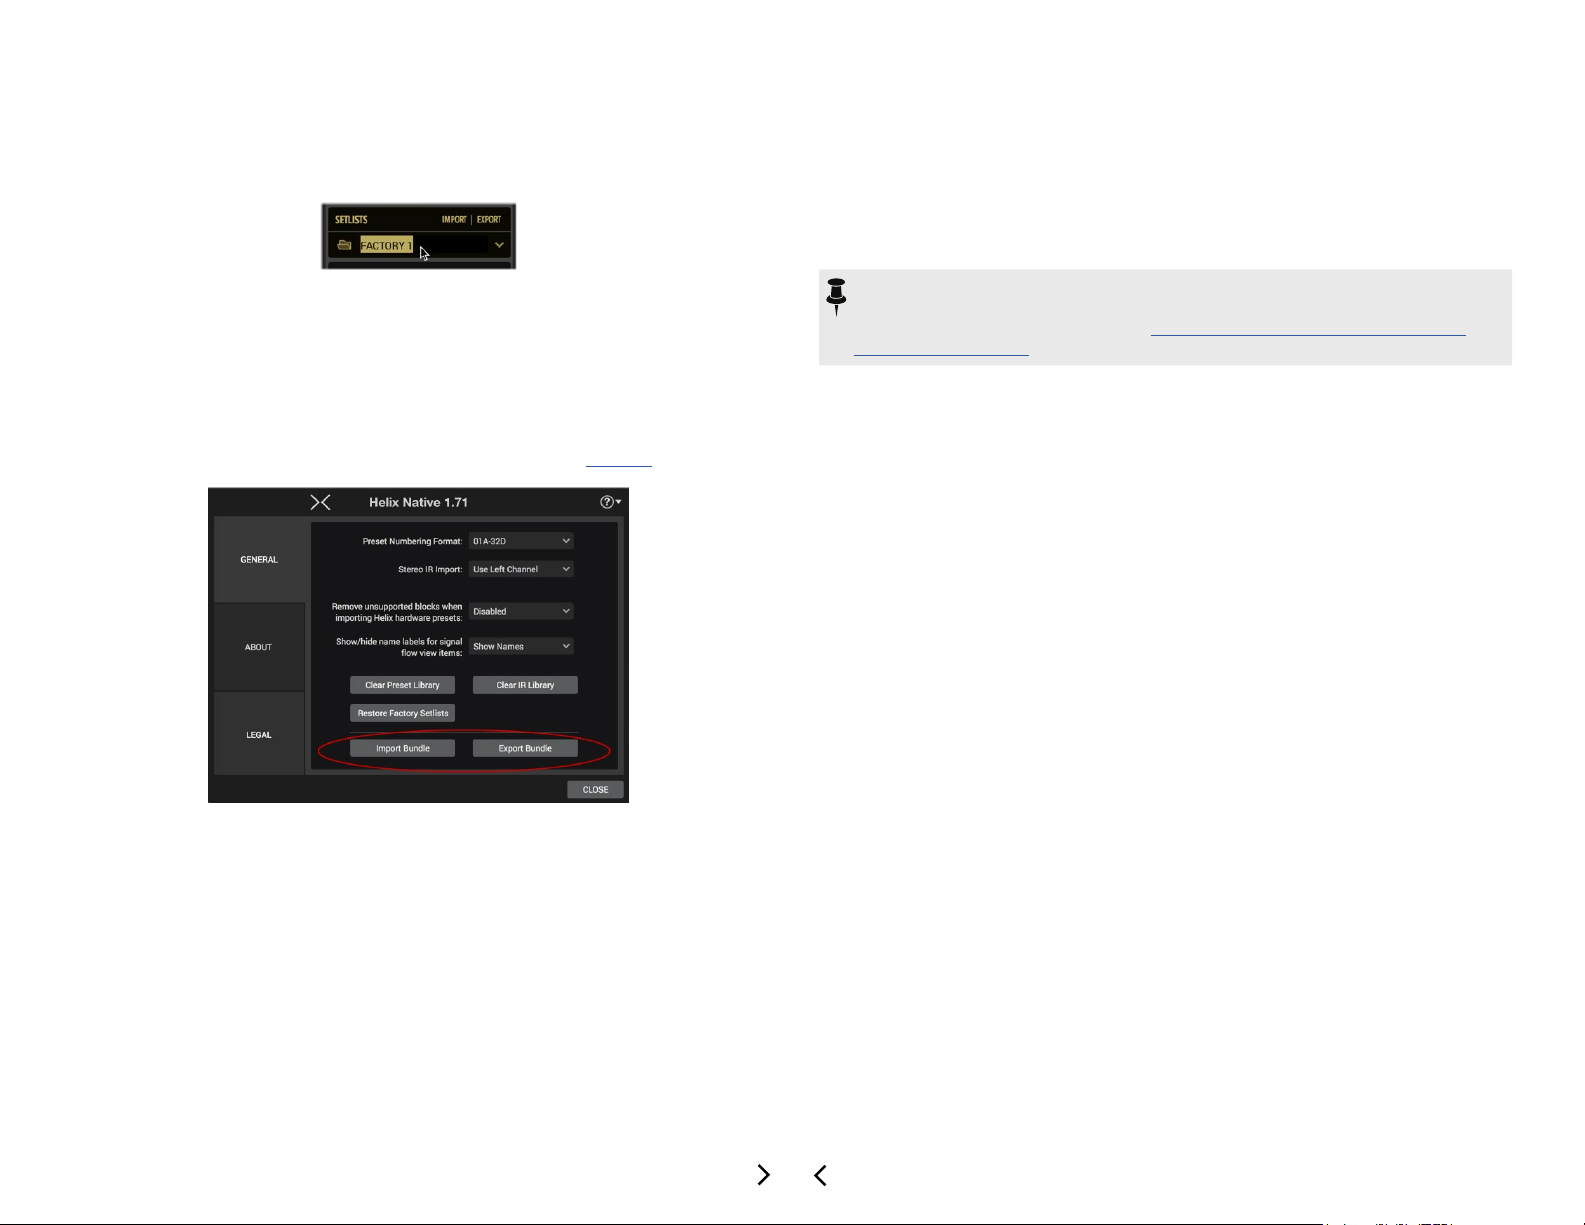
To Export a Bundle - Click the Export Bundle button found in the Preferences
> General window to create a copy of the plug-in's complete Presets Library as
a Helix bundle (.hlb) le, stored on your computer. By default, all bundle les are
exported to:
• Mac - /Documents/Line 6/Tones/Helix/Bundles folder
• PC - \My Documents\Line 6\Tones\Helix\Bundles folder
Renaming the current setlist
Importing and Exporting Helix Bundles
A Helix bundle le (.hlb) includes all 8 setlists that make up the plug-in's current Library,
including all presets and saved settings, all wrapped up in a single, tidy package. This
makes it easy to store a backup of your complete Presets Library - and easily restore
your Helix Native Library by importing the bundle. The options for importing and exporting a Bundle are found within the Preferences window (also see page 44).
Use the buttons in the Preferences window for Importing and Exporting Helix Bundles
To Import a Bundle - Click the Import Bundle button found in the Preferences
> General window. This will prompt you to ensure that you wish to replace all
setlists and presets within your Presets Library with those from the selected
bundle le. Continue through the “Open” window to select the bundle you wish to
import.
NOTE: Bundle les do not contain any of the Impulse Response (IR) les that
you may have imported into the Impulses Library. You can separately export IRs
from within the Impulses Panel - see “Importing and Exporting Impulse Re-
sponses” on page 19.
18
Page 20

Impulses Panel
The Librarian's Impulses Panel provides a list of up to 128 Impulse Response les
(along with their respective index numbers), which are available to all instances of the
Helix Native plug-in. Initially, this Impulses panel is empty, awaiting you to import Im-
pulse Response les. Once imported, Helix Native presets will access the IRs displayed
within the Impulses panel by their index number only. Impulse Response les them-
selves are not directly associated with presets.
Impulses Tab
IR Commands
Selected IR
IR Index Numbers
The Impulses panel
Impulses Tab - Click on this tab to display the Impulses panel.
IR Commands - Click on any command in this row to perform its action on the
currently selected IR(s).
IR Index Number - Each IR slot includes an Index Number at its left. This index is
what is referenced by an IR block within a Helix preset, allowing the block to utilize
whatever actual IR le is imported into this IR Library slot.
Selected IR - Click once on any IR in the panel to select it, and you'll see it appear
highlighted, as shown above. The selected IR is the one that is acted upon when
choosing any available IR Command.
What are Impulse Responses?
Impulse Responses (or “IRs”) that can be used in Helix Native are audio les that are
the result of capturing the sound of a test tone (frequency sweep) through a guitar or
bass amp speaker cabinet, which has been de-convolved with the original tone signal. This
represents the frequency response of the cabinet itself and can be used to simulate the way it
alters the sound. This is similar to a convolution reverb, but with a much shorter decay.
You can add an IR block to your preset as an alternative to using one of the Cab blocks
to provide speaker cabinet simulation along with an Amp block. Several companies
now oer large selections of professionally recorded IRs that can be used in Helix Native,
or you can even do some research on how to record and create your own.*
You can also nd some IRs that were created using this convolution process to capture
the properties of acoustic guitar bodies, guitar pickups and other items. These IRs can
be used in the Helix Native or Helix & HX devices' IR blocks, to allow even deeper tone
sculpting!
*TIP: Helix IRs are now available for purchase from the online Marketplace, which
you can access directly right from inside Helix Native plug-in (version 1.70, and
later). Please see “Marketplace & Account Options” on page 46.
IR Formats and Restrictions
Once imported, les are automatically conformed to the Helix-compatible IR properties
(48kHz, 16-bit, Mono, 2048 or 1024 samples). For Helix Native plug-in, as well as for
Helix devices, the following IR le types are supported.
• Helix Impulse Response (.hir) - This is the proprietary Line 6 IR le format.
All IRs purchased through the Marketplace are of this le type. Please also see
“Marketplace & Account Options” on page 46.
• WAV (.wav) - Most IR producers and vendors typically oer IRs within the .wav
format. It is possible to import a mono or stereo .wav le IR, regardless of its
bit depth, length, or sample rate frequency. Once imported into Helix Native or
Helix hardware, les are automatically conformed to the Helix-compatible IR
properties (48kHz, 16-bit, Mono, 2048 or 1024 samples). Please be careful to
import only .wav les that were created specically for use as IRs, not just any
audio .wav le, or you may experience unexpected sonic results.
Helix Device Users: If you plan on utilizing your Helix Native presets in both Helix
Native plug-in and your Helix hardware, the best practice to import the same exact
IR les into both, and in the same IR list order. This allows all IR blocks to reference
and load the same indexed IR les for all presets that use them. Please also see “Preset
Compatibility with Helix Devices” on page 12.
Importing and Exporting Impulse Responses
To Import an IR - Click once to select the desired index location within the Impulses
panel and then select the Import command button at the top of the Impulses list. Con-
tinue through the File-Open window to select the desired IR le. If you select multiple IR
les, they will all be imported into contiguous index locations.
Premium Marketplace IRs
If you've purchased and downloaded premium IRs from the Line 6 Marketplace online
shop, you must initially have Helix Native signed in, and your computer authorized to
allow the Import or Export and license synchronization for these IRs.*
*NOTE: The authorization required for your Helix Native license also covers the use
of any Marketplace premium assets on this computer - both within Helix Native and
the Line 6 HX Edit application. Please see “Authorizing your Computer” on page
5 and “Marketplace & Account Options” on page 46.
19
Page 21

When premium Marketplace IRs (.hir les) are imported, they are indicated by a guitar
pick “badge” to their right within the Impulses panel.
Premium Marketplace IRs are indicated with a guitar pick badge
To Export an IR - Select the desired IR(s) within the Impulses panel and click the
Export command to display the Save As dialog.* By default, IRs are exported to:
• Mac
• PC - \My Documents\Line 6\Tones\Helix\IRs folder
You may also drag & drop to and from the Impulses panel to import and export IRs - see
the following section.
- /Documents/Line 6/Tones/Helix/IRs folder
TIP: Exporting your complete list of IRs is a nice way to keep a backup of them
all in one place on your computer. It is helpful to rename your exported IR les to
include their stored index ID number at the start of the title (001 through 128, as
shown in the image at the start of this chapter) to easily identify what IR slots they
should be imported back into.
Copying, Pasting, Renaming & Clearing IRs
These functions can be performed by clicking the command buttons above the Impulses index list and will act upon the selected (highlighted) IR. You can also right-click
on any IR slot to choose these options from the context menu.
Drag and Drop IRs
There are several drag and drop options that allow you to import and export single or
multiple IR les between your computer’s hard drive directories and Helix Native, as
listed below.
• Import - Drag one or more IR (.hir or .wav) les from your computer's hard drive
folder directly into the Impulses panel. When multiple les are being dragged in,
they are imported in sequence, starting with the selected IR index slot.
• Export -Select one or more IR index locations in the Impulses panel and drag
directly to your computer to export the IR les to the selected hard drive folder.
• Copy - It is also possible to drag and drop IRs within the Impulses list view to
create a copy of the IR in a new index location.*
*NOTE: There are intentionally no options to move or reorder IRs in a
single operation, thereby reducing the risk of unintentionally breaking the
link between IRs and the Helix presets that may be referencing them. Use
the Copy and Clear functions to rearrange IR within the Impulses list as
needed.
• Transfer To/From Helix Hardware (For Helix/HX Edit application owners)
With a Helix device connected, drop an IR from the Helix Native plug-in's Impulses panel directly into the Impulses panel of the HX Edit application. It is also
possible to drag an IR from HX Edit into the Impulses panel of Helix Native to
import a copy of the same IR le.
Loading an IR in an IR Block
When you insert an IR block within your preset's Signal Flow, it initially defaults to
referencing the #1 IR index location (if you have not yet imported any IR le into the
referenced index location, the “empty” IR block has no eect on the signal).
To choose which IR index is referenced by the IR block, select the IR block within the
Signal Flow, then, in the Edit tab, use the IR Select parameter slider (or its menu at the
right) to select the IR index number (1-128) that includes the desired IR.
TIP: We've also provided a handy Clear IR Library option, to clear out all IRs
from the plug-in's current IR Library in one click - see “General Screen” on page
44.
Choosing an IR by its Library index number within the Edit tab
You can use the other IR block parameter sliders in the Edit tab to further shape the IR's
tone and level - see “Editing Model Parameters” on page 34.
20
Page 22

Working in the Plug-in Editor
To the right of the Librarian panels is the Editor UI of the plug-in, which consists of a top row of options, the Signal Flow and Inspector windows, oering a multitude of options for
adding & conguring processing blocks, signal routing & parameter automation congurations. See the following sections for details on using these user interface elements.
Preset NameNext/Previous Preset Preset File Menu Snapshots Menu Tempo Controls
Show/Hide
Librarian Button
Signal Flow Window
Edit & Automation/Controller
Assign Tabs
Inspector Window
Navigating with the Next/Previous Preset Buttons
These buttons provide an easy way to increment forward and backward within the current plug-in Library setlist, instantly selecting and loading the next/previous preset into
the Signal Flow window. If you wish to have these buttons navigate through a dierent
setlist, choose the desired setlist from the Setlist menu at the top of the Presets panel.
Naming the Preset
The Preset Name eld displays the name of the most recently loaded Helix preset.
Double-click on the text here to optionally rename the preset.
NOTE: When you edit the preset title or make any other changes to the preset's
settings after initially loading it, be sure to use the Save to Library or Save to
Disk options found within the Preset File menu (see next section) if you wish
to retain your changes within a preset that can be utilized by other Helix Native
instances!
21
Page 23

Using the Preset File Menu
To the right of the Preset Name eld is the File menu which includes options for the
current tone.
Preset File Menu Button
• Open From Disk - Allows you to load a saved preset from your collections
of Helix preset (.hlx) les saved on your computer. This diers from using the
Import command found within the Presets panel in that it loads the preset
directly into the Signal Flow without also importing the preset into the plugin's Presets panel library. If you edit this loaded preset and wish to save your
changes, use the Save options, as described below.
• Save To Disk - Exports the currently loaded tone to your computer, oering
you the option for your specic save location. By default, presets are saved as
.hlx les to:
• Mac - /Documents/Line 6/Tones/Helix folder
• PC - \My Documents\Line 6\Tones\Helix folder
• Save To Library - Allows you to choose any preset location within your Presets
panel to save the preset into the plug-in's internal Presets Library.
NOTE: Most host DAW applications also oer their own feature for saving and
loading plug-in presets. The options for this feature are typically found in the
header of the host's plug-in window in which your plug-in instance appears.
This type of feature creates these presets as les on your computer disk and are
not managed by the Helix Native Presets Library. If you open a preset from the
host DAW preset location, it will load within the Helix Native Signal Flow - use
the above described Save To Library command if you'd like to have the preset
added to your Helix Native Presets Library panel.
Current Snapshot
Indicator (1 - 8)
The Snapshots Menu
• ToCongureandEditaSnapshot - Click on the Snapshots Menu and select
the snapshot index number you wish to edit, then congure all desired options
for your current tone's block bypass states, tempo and snapshot controller-assigned parameters' values. Your changes are stored automatically for the current snapshot index number. Be sure to Save your tone to permanently retain
your snapshot settings with the preset.
• To Load a Snapshot - Simply choose the desired snapshot index number from
the menu and all the settings congured for the snapshot are recalled instantly.
TIP: Snapshots can also be loaded in real-time via your DAW host's plug-in parameter automation functionality - see “Automating Snapshot Changes” on page
40.
Snapshot Menu
Editing the Tempo
There are a few options available for conguring the tempo that is utilized by the plug-
in, accessible from the controls at the top of the Signal Flow window. Any of the current
tone’s eects blocks that are set to note division values (a Note Sync option is available
for most delay and modulation eects within the Edit tab - see page 34) will follow
this tempo value.
Tempo Select Menu
The Tempo controls
Numerical Tempo Field
& Tap Tempo Button
Configuring and Loading Snapshots
The Snapshots Menu allows you to load and edit the 8 snapshots available within each
preset, providing instant recall of up to 64 assigned parameter value changes, block
bypass states and more, in one click.
NOTE: To follow is a quick description to get you going, but the snapshots
feature is a big enough topic that we've dedicated an entire chapter to it - please
see “Working with Snapshots” on page 24.
How the Tempo Value is Recalled
Use the Tempo Select Menu to select how the tempo value is utilized and recalled.
• Per Snapshot - The tempo value will be stored and recalled individually with
each snapshot (see “Working with Snapshots” on page 24 for details).
• Per Preset - The tempo value will be stored and recalled individually with this
preset.
• Sync to Host - The tempo value follows the timeline tempo of the host DAW
project for any preset loaded within the plug-in instance. Note that even if your
DAW project has timeline tempo changes automated, Helix Native will follow
when using this setting!
22
Page 24

Entering a Tempo Value
To the right of the Tempo Select Menu is a combined Numerical Tempo Field and Tap
Tempo Button. When you have selected the Per Snapshot or Per Preset tempo modes
in the menu, you can enter a tempo here in two ways:
• Right-click to type in your desired numerical tempo value.
• Click rhythmically to “tap” in your preferred tempo.
Show or Hide the Librarian Panel
Click the button at the top left of the Signal Flow window to either display or collapse
the Presets & Impulses Librarian Panel. Also see “Customizing the Helix Native Plug-in
Window” on page 11.
The Librarian Panel's Show/Hide Button
23
Page 25

Working with Snapshots
Within Helix hardware devices and within the Helix Native plug-in, it is possible to create
& customize up to 8 “snapshots” within a preset. Snapshots can store a set of options
(a block’s bypass state, snapshot-assigned parameter values, and tempo settings), and
then recall them without the brief lag time and audible signal drop-out typically associated with changing presets.
Congure up to 8 snapshots with your desired settings for the current tone within Helix
Native, and then recall any snapshot from the Snapshots menu, via your DAW host’s
parameter automation or via external MIDI control (MIDI CC 69, values 0-7). Snapshots
created and exported from Helix devices (via the HX Edit application) are also supported within Helix Native, and vice-versa. This all presents some extremely powerful
mix capabilities in your DAW, with the ability to instantly recall and change numerous
Helix Native parameter settings in real-time!
TIP: Don't worry - you actually don't need to utilize or even understand anything
about snapshots if you don't want to right now! You can completely ignore them
and edit your presets without accessing them at all. But if you want to explore the
possibilities, please keep reading this chapter.
Similar to the snapshots feature in some high-end digital mixers, each Helix Native
snapshot stores and recalls the state of certain elements within the current preset,
including:
• Block Bypass—The bypass (on/o) state of all processing blocks, indepen-
dent of any footswitch assignments - see “Snapshots > Block Bypass”
• Parameter Control—The value of any parameter assigned to a snapshot con-
troller (up to 64 per preset) - see “Snapshots > Parameter Control”
• Tempo—The current system tempo, if the Tempo Select is set to Per Snap-
shot. (By default, it’s set to Per Preset.) See “Editing the Tempo” on page
22.
Depending on how you congure them, snapshots can act as 8 variations of the same
tone, eight drastically dierent tones, or any combination thereof—all within the same
preset.
Current Snapshot
Indicator
The Snapshots Menu
Snapshots Menu
Snapshots > Block Bypass
Snapshots automatically store the current bypass (on/o) state for all processing
blocks. Therefore, all block bypass states are recalled when jumping from snapshot to
snapshot, and appear as you last left them.
For example, here's a scenario where you might congure and name snapshots to
toggle the desired blocks on/o for each section of your song.
Snapshot 1—INTRO could have Distortion 1, Amp 1, Cab, Mod 1, and Delay 1 on:
Snapshot 2—VERSE could have Dynamics, Distortion 2, Filter, Amp 2, Cab, IR, Delay
2, and Reverb on:
Snapshot 3—BRIDGE could have Dynamics, Amp 2, IR, EQ, Mod 2, and Delay 2 on:
Snapshot 4—CHORUS could have everything on:
And Snapshot 5—INTERLUDE could just be Amp 1 and the IR:
The Snapshots Menu
Snapshots are accessed via the Snapshots menu at the top of the Helix Native plug-in
main window. The index number displayed within the little camera icon within the Snapshots Menu tells you which of the preset’s 8 snapshots is currently loaded. Click the
menu to select and load a dierent snapshot. Ctrl+click / right-click directly within the
menu to rename the current snapshot as desired. Also see “Configuring and Loading
Snapshots” on page 22.
Note that all snapshots in a particular preset share the same models; you cannot, for
example, add a US Deluxe Amp block in Snapshot 1 and switch its model to Essex
A30 in Snapshot 2. However, (if the current Helix Native instance has not reached its
maximum processing limit), you can load both amp blocks into the same preset and
snapshots can enable neither, one, or both of them.
24
Page 26

Snapshots > Parameter Control
In addition, parameters can be set to jump to specic values with each snapshot.
Here’s an example where seven parameters' values (out of a possible 64) are updated
instantly with each snapshot:
Snapshot
1 INTRO
2 VERSE
3 BRIDGE
4 CHORUS
5 INTERLUDE
6 SOLO
7 BREAKDOWN
8 OUTRO
In the table above, we see that when changing from Snapshot 2—VERSE to Snapshot
3—BRIDGE:
• The Amp block’s Gain increases from 4.5 to 5.2
• The Delay block’s Mix increases from 35% to 43%
• The Split block routes your guitar from Path A to Path B
• The Pitch block’s Interval lowers from +5 to +3 semitones
• The IR changes from index #27 to #103
• The Volume block’s Level increases from 0.0dB to +0.8dB
If you want a parameter to be automatically updated with each snapshot, the parameter
must rst be assigned to a Snapshots Controller, as covered in the next section.
Amp
Gain
Delay
Mix
4.5 35% Path A 100 0 #27 -7.2dB
4.5 35% Path A 100 +5 #27 0.0dB
5.2 43% Path B 100 +3 #103 +0.8dB
4.5 50% Path B 100 0 #103 +1.5dB
3.9 8% Even Split +5 #27 0.0dB
8.7 72% Path B 100 +12 #103 +2.6dB
2.0 46% Path B 47 -12 #12 0.0dB
4.5 35% Path A 100 0 #41 -3.6dB
Split A/B Pitch
IR
Select
Volume
Level
Assigning a parameter to the Snapshots Controller
As covered in the preceding Snapshots > Block Bypass section, the Bypass state of
any block is automatically stored and recalled per snapshot. However, for other parameter types, it is necessary to rst create a Snapshots Assignment to allow the parameter’s value to be stored and edited per snapshot.
Assigning the Drive parameter to the Snapshots controller
3. You’ll see the parameter’s value appear in white and in brackets to indicate the
Snapshots controller assignment.
4. Now you can simply load any Snapshot and set this Drive slider to the desired
value - the value is independently stored and recalled with each Snapshot.
Each preset can have up to 64 controller assignments, including parameters controlled by Snapshots. Remember to save your tone if you want your assignments
to be permanently stored with the preset!
5. All existing Snapshots Assignments appear within the Automation/Controller
Assign tab’s Assignment List.
If desired, you can right-click on the assignment here and choose Clear Assignment to remove it.
Once a Snapshots Assignment is created, any changes to the value of the assigned parameter is instantly stored with the current snapshot. These stored
values are recalled when jumping from snapshot to snapshot, and appear as
you last left them per snapshot.
1. Within the Signal Flow window, select the block which includes the parameter
you wish to control via snapshots. For this example, we’ll choose the Litigator
Amp+Cab block so we can control the amp’s Drive parameter.
2. In the Edit tab, right-click on the Amp’s Drive parameter and choose the Snapshots option.
25
Page 27

Copying, Pasting & Renaming Snapshots
You can Copy & Paste all snapshot settings from one snapshot to another within the
current tone as a time-saver for when you want to just change a few settings. You
can optionally Rename your snapshots to help you remember the intended purpose of
each. These snapshot commands are available via right-click on the Snapshots Menu.
To Copy & Paste a Snapshot - Select and load the snapshot you wish to copy
and select Copy from the Snapshots right-click menu. Then load the snapshot you
wish to overwrite and choose Paste to paste the clipboard contents, replacing the
currently loaded snapshot.
To Rename a Snapshot - Right-click on the currently loaded snapshot from the
Snapshots Menu and select Rename. Type in your new name, then press Enter/
Return on your keyboard.
Tips for Creative Snapshot Use
• As in the preceding examples, congure a dedicated snapshot for each section
of your song - Snapshot 1 for the Intro, Snapshot 2 for Verse 1, Snapshot 3 for
the Chorus, and so on. Then use your host DAW's parameter automation to
load the snapshots in real-time!
• Worried that further tweaking might make your tone worse, not better? Snap-
shots are a great way to compare minor changes between tones without losing
your settings.
• Turn any Delay or Reverb block's Trails parameter to “On” for seamless spill-
over between snapshots.
• Set dierent keys in Harmony Delay blocks or intervals in Pitch blocks per
snapshot.
• Having diculty maintaining consistent volume levels throughout a song? Set
the Output block's Level parameter per snapshot.
• Recall snapshots via an external MIDI controller device or software using the
dedicated MIDI CC 69 - see “Global Reserved MIDI CCs” on page 42.
• Rename your snapshots uniquely within a preset to dene their purpose - see
the previous section.
NOTE: All snapshots assignments and settings are retained within the current
tone's preset until another preset is loaded within the plug-in. If you wish to
permanently retain all your snapshot assignments and settings with the preset,
be sure to use the File Menu options to Save your tone to the Preset Library or
to Disk. The snapshot that is in use when you save your preset is the one that is
recalled when the preset is loaded again.
26
Page 28

The Signal Flow Window
The Signal Flow Window displays the plug-in's inputs and outputs, levels and all your
processing elements, all laid out in the actual ow in which your DAW audio signal is
routed through it. When you click on any input, output or processing block and select it
here, you can then access the block's model & parameter options within the Edit tab,
or its automation options within the Automation/Controller Assign tab below.
Path 1A
Master Input
Level
Path 2A
Split BlockSelected Block
Bypassed Block
The Signal Flow Window
Active Block
Path 1B
Show/Hide Block Labels Option
If you prefer a cleaner look within the plug-in's Signal Flow window, you can “hide” the
descriptive text labels that appear below each block using the Show/Hide option within
the Preferences > General window (see page 44). When set to hide the labels, you'll
only see a block's label appear when hovering your mouse over the block.
Block label option set to Show Block label option set to Hide
Merge Mixer Block
Master Output
Level
Adjusting Levels - Just as with all sliders in Helix Native, the Master Input & Out-
put Level sliders can be adjusted in several ways:
• Click on any slider's “handle” and drag to the desired value.
• Click on the desired range location within a slider's path and it will jump to the
clicked value.
• While hovering your mouse cursor over the slider's path, use your mouse wheel
to adjust it.
• Double-click anywhere on the slider area and enter a precise numerical value.
Clipping, as indicated by the Clip Indicator at the top of the meter lighting up red,
should always be avoided for both the plug-in's input and output.*
*TIP: Conguring your input levels into Helix Native is important for achieving the optimal sound from most Amp & Eect blocks. Please see “Optimiz-
ing the Input Level” on page 10 for details.
If the plug-in's Output meter is showing very low or high levels, it is best to adjust
the blocks that may be cutting or boosting the signal too heavily (Dynamics, Distor-
tions and Amp blocks, for example, all oer Gain or Volume parameters). However,
you can always use this Master Output Level slider to optimize the plug-in's nal
output level.
Reset to Default Level - Cmd+click (Mac) or Ctrl+click (PC) directly on the Input
or Output slider to reset to the default (unity gain) value.
Peak Level Display - The numerical, real-time peak level value is displayed at the
top of each slider whenever you are adjusting the slider, and whenever you hover
your mouse cursor over the slider path.
Adding, Clearing & Bypassing Blocks
To Add a Block to Your Tone - Hover your mouse cursor over the desired location
on any path and you'll see an empty block location appear to indicate that a processing block can be added there. Once you click and select the empty location,
choose any type of block from the Edit tab's Model Browser. Please see “Select-
ing Models” on page 33 for more info.
NOTE: The Show/Hide Labels function aects all Helix Native plug-instances
globally. (However, you may need to close any other currently open plug-in instance's window and re-open it again before a change in this setting is applied.)
Master Input & Output Level Controls
At the left and right of the Signal Flow are the Master Input & Output level sliders,
along with real-time level meters. These level sliders' values are not saved per preset
and, therefore, oer independent control over levels entering and exiting the plug-in. To
follow are several tips for using these controls.
Selecting a location in the Signal Flow for a new block
To Clear any Existing Processing Block - Select the desired block and choose
Clear from the (right-click) context menu, or click the “X” button that appears when
hovering your mouse cursor over a block.
When hovering over a block, you'll see its Bypass and Clear buttons appear
27
Page 29

Clear All Blocks - Select the desired block and select Clear All Blocks from the
context menu to remove all processing blocks from the signal ow. (Input & Output
block settings remain unchanged.)
To Bypass or Enable any Existing Processing Block - There are a several ways
to bypass or enable a block:
• Whenever you hover your mouse cursor over a block type that oers bypass,
you'll see a click-able Bypass/Enable button appear (as shown above).
• Select the desired block and select Bypass or Enable from the block's
(Ctrl+click or right-click) context menu.
• Click the Bypass/Enable button oered in the Edit tab - see “Editing Model
Parameters” on page 34.
Cutting, Copying & Pasting Blocks
It is possible to Cut, Copy or Paste any individual processing (Amp, Cab, IR, or FX) block
within Helix Native. To access these commands, click on the desired block within the
Signal Flow to select it, then right-click or Ctrl-click to display the context menu.
Block context menu
TIP: You can also use Copy/Paste, or drag and drop, to copy a block between separate Helix Native plug-in instances, or HX Edit device windows, as covered below.
Use Cut or Copy for a block, and then use one of the Paste commands within any Helix
Native plug-in instance or within the HX Edit application, as follows:
• Into any path within the same or a dierent instance of the Helix Native plug-in,
and within any preset.
• Into any path within the HX Edit app, and within any preset.
Block Copy / Paste is allowed for all block types (Amp, Eects, Mix, Input and Output
blocks), with some restrictions.* This provides great exibility in re-creating tones between Helix Native, HX Edit, and even dierent Helix and HX devices.
*NOTE: Some restrictions apply for Copy/Paste of blocks, depending on the DSP
capacity and features of the particular device in use. For example, just as any Helix
Native or device preset will prevent adding some block or model types as the DSP
limit is reached, the same DSP limit rules apply for Copy/Paste. Therefore, Copy and
Paste observes these Block rules as well. Physical inputs & outputs dier between Helix
Native and Helix/HX devices, therefore, the copying of Mix, Input and Output blocks and
their settings may not be allowed, as covered throughout this chapter.
Cut - Clears the block from the Signal Flow and copies the block and its current
parameter settings to the clipboard.*
Copy - Copies the block and its current parameter settings to the clipboard.
NOTE: When copying a block with existing HX Edit hardware-based assignments, the assignments will not be retained if the destination device does not
include or support the specic controller type (e.g., if copying a block with an
EXP 3 controller assignment from a Helix Floor to an HX Stomp device, the assignment is not shown or supported, since HX Stomp includes no EXP 3).
Paste - Pastes the most recently cut/copied block into the currently selected block
location within the Signal Flow. If you select an existing processing block, this will
replace the existing block and its settings.
• Paste Block After / Paste Block Before - If you select an existing process-
ing block, you can alternatively choose either of these commands to paste the
block in your preferred location.
• Mix type blocks - Copy & paste are also available for an Input, Output, Split
and Merge type block as well, where its parameter settings can be copied &
pasted into a location with the same block type.
• When copying a block within the same window, or between separate Helix
Native (and/or HX Edit) windows, existing Snapshot assignments are copied
with the block, but Automation and footswitch-based Bypass assignments are
not.
• When copying a block from HX Edit to Helix Native, it may not appear that
its hardware-based controller assignments are retained, since the Helix Native
does not support them, and does not list them in its Assignments tab. But if you
copy the same block back into an HX Edit window again, you'll see its original
assignments are indeed still intact.
NOTE: When using the Cut command for a block that includes Automation
(Knob or Switch) Controller assignments, the assignments are included in the
settings data when copied to the clipboard and included the rst time the
block is pasted into a new location within Helix Native. When using the Copy
command, no existing Automation Controller data is copied to the clipboard..
28
Page 30

Drag and Drop Blocks
You can also use “drag and drop” to Copy/Paste a block within the current preset, as
well as between separate Helix Native and/or HX Edit windows, as follows.
• Within the current window's signal ow, drag and drop of a block between Path
1 and Path 2 copies the block to the opposite path. (This diers from dragging
a block within the same or parallel path, which moves the block.)
• Between separate Helix Native instances and/or HX Edit windows - Drag and
drop copies the block, to any path.
• Drag and drop can be used to copy any processing type blocks (Amps, Cabs,
IRs, FX).
• Since performing a drag and drop of a block between separate windows is
essentially the same as a Copy/Paste Block operation, the same rules and behaviors apply - please see the preceding section.
NOTE: When dragging a block, if you try to drop it on top of an existing block, you'll
see the existing block shift left or right to place your dragged block before or after
it. Unlike when using the Copy and Paste commands, it is not supported to replace
an existing block via drag and drop.
Keep the following in mind when building tones:
• All Amp+Cab, Amp, Preamp, single Cab and IR blocks are mono, so any stereo
signal sent into these will be collapsed to mono. As such, it’s a good idea to
add only mono eects blocks before amps and preamps to conserve computer
processing resources.
• Adding a mono eects block will collapse any preceding stereo blocks' signal
on the same path to mono.
• The Helix Native plug-in's signal ow always allows the use of mono or stereo
type processing blocks, regardless the type of track on which it is inserted.
This allows you to utilize any existing preset and create complex routings within
the plug-in Signal Flow (see the routing examples later in this chapter). When
inserted on a mono output track, the output at the end of the Helix Native signal
chain is summed to mono.
• If you’re using Helix Native on an audio track with mono input and output, there
is no need to use stereo models at all (except, of course, for models that are
only oered as stereo).
• Stereo models use twice as much processing resources as mono models,
therefore, its a good idea to only utilize stereo models when stereo processing
is desired.
Block Order and Stereo Imaging
Helix Native is a stereo plug-in, with each signal ow path carrying two channels of
audio. When Helix Native plug-in is inserted on a stereo DAW track and fed a stereo
input (or playback of a stereo clip), the left and right audio is processed discretely in
stereo within each path, wherever stereo blocks are used within the path. When the
track is fed a mono source, the mono signal is split and fed equally to the left and right
channels within the path. Whenever a mono block is added within a path (such as an
Amp or mono Eects model), both channels of audio are combined and sent out of the
block as mono.
Most of the Helix eects models have both mono and stereo versions. A stereo block
displays after its model name in the inspector. The stereo imaging—or how wide
your tone appears with stereo monitor speakers or headphones—is highly dependent
on the type of blocks you add and in what order.
Legacy eects models vary in behavior, just as on the classic Line 6 eects from where
these models originated.
• Legacy Distortion, Dynamics & Pitch/Synth eects are mono.
• Legacy Modulation & Delay eects vary in that some are mono, some stereo,
and some mono-in/stereo-out, where adjusting the eect's Mix parameter can
narrow the stereo image that is fed into them. It is best to experiment with
these eects and tweak the Mix parameter to achieve the desired stereo output
results.
• Legacy Filter and Reverb eects are stereo.
Moving Blocks & Arranging the Signal Flow
To arrange blocks within a signal path, in addition to using Cut/Copy/Paste (see previous section), you can also click and drag any block left or right within the same path,
or its split, parallel path to move it to the desired location. While dragging you'll see an
empty block location appear to indicate where you can drop your block, and existing
blocks will move to accommodate it. Each path can hold a maximum of 8 blocks.
Dragging a Delay block - an available empty block location appears while dragging
To follow are a number of pointers for arranging the signal ow in dierent ways.
Split Paths - Drag a block down from the main signal path (Path 1A or Path 2A) and
you'll see a parallel, split path (Path B) appear, with both a Split and Merge block
created at each end. To remove the split path, clear or move all blocks out of the
parallel path. Alternatively, you can right-click on the Split or Merge blocks and use
the Create Input/Output or Restore Split/Merge commands instead of dragging.
TIP: Drag and drop an Amp & Eects block between Split Paths 1A and
1B, or between Split Paths 2A and 2B to move the block, or drag a block
between main Paths 1 and 2 to copy it there (see preceding Drag and Drop
section). You can also use a block's Cut, Copy and Paste commands to arrange your blocks between any Paths.
29
Page 31

Split and Merge Blocks - When a Split block is selected in the Signal Flow, you
can choose from among 3 types of Split blocks and adjust its balance options using the parameter sliders that appear in the Edit tab below.
Input & Output Blocks - A path's Input and Output blocks cannot be moved, but
when you select one of these blocks, you'll see options within the Edit panel below
- please see “Editing Input, Output, Split & Merge Blocks” on page 35.
Signal Routing Examples
To follow are a few more routing possibilities you can try within the Signal Flow. Also be
sure to try some of the factory presets we've provided within the TEMPLATES setlist for
even more congurations.
1 into 2
Drag a split path's Merge block down to Path B. The Merge block shifts right and
a duplicate Output block is created:
In this example, the input signal is split to stereo Paths A and B, each with its own
Output block. You can now use Path A and B's Output block options to independently pan each left/right as desired.
Parallel Paths
If you start with a split path, you can convert it into two individual, stereo parallel
paths, each with its own Input and Output block.
1. Drag the Split block down to Path B (or right-click on the Split block and
choose Create Input). The Split block shifts left and a duplicate Input block
is created.
2. Drag the Merge block down to Path B (or right-click on the Merge block and
choose Create Output). The Merge block shifts right and a duplicate Output
block is created.
Inactive Merge blockInactive Split block
Once converted to Input & Output blocks, the Split and Merge blocks become inactive - you can drag the Split and Merge blocks up to the Path A above (or right-click
on the Split or block and choose Restore Split or Restore Merge) to revert back to
a Split Path conguration.
30
Page 32

Discrete Stereo Processing with Amps
As mentioned in “Block Order and Stereo Imaging” on page 29, each path within
the plug-in is capable of processing discrete left & right audio input on a stereo
Audio, Aux or Bus track, provided you're utilizing all stereo blocks on the plug-in's
signal paths. But if you're wanting to utilize any Amp or Preamp blocks (which are all
mono-output blocks), it is necessary to split the path to allow the left & right audio
channels to be processed discretely.
Start with the AUX: DiscreteDuo preset provided within the factory TEMPLATES
setlist. This preset already has all necessary routing congured for discrete stereo
using an amp on each path. To follow are the key settings for this signal ow.
1. A Split Y type block is used with its Balance A & B parameters panned hard
left and right.
2. The Merge block's Pan A & B parameters are set hard left and right, respec-
tively, to also keep the two channels' audio discretely separate.
3. The Path 1 Output block is fed to Path 2A, allowing additional stereo eects
blocks to be applied.
Path 1B (with mono blocks)
Merge blockSplit Y block Path 1A (with mono blocks)
Super Serial
A serial path has eight processing block locations. If that’s not enough, you can use
parallel Path B to create an extended “super serial” path conguration.
1. Drag the Merge block down to Path 1B. A duplicate Output block is created.
2. Drag the Split block all the way to the right, past the last processing block
on path 1A.
3. Select the Output block on path 1A and turn Knob 2 (Level) all the way down.
That way, you’re only hearing Output 1B.
In the illustration above, our signal is processed by the eight blocks on Path 1A and
processed further by Delay block (or whatever blocks you wish to add) on Path 1B.
Of course, if this still isn’t enough, you could always duplicate the above signal ow
routing on Path 2 and then route Path 1B’s output block to Path 2A for one gigantic
serial tone with up to 32 block locations (plug-in processing limit permitting - See
“Computer Processing Management” on page 14):
Path 2A (with stereo blocks)
In this conguration, Path 1A of the split path will process only the left signal,
and the Path 1B will process only the right signal, allowing you to add mono
blocks on each of these parallel paths accordingly.
By placing stereo blocks on Path 2, it will still retain the left/right channel
separation, allowing you to use common eects to save some resources.
31
Page 33

Tips to Optimize Processing Power Usage
• Some block types, such as Amps, Cabs, IRs, and Pitch Shifters, use much
more of your computer's processing power than others. Not surprisingly, the
Amp+Cab block uses the most. EQ, Dynamics and Volume/Pan blocks use
relatively little.
• Some models may require more processing power than others of the same
category. This is especially true with Amp models.
• If you run out of processing power on Path 1, route it to Path 2 for more horse-
power (see “Computer Processing Management” on page 14). If creating
tones with two or more amps and more than a handful of eects, use both paths.
• Instead of a parallel path with two Amp+Cab blocks or two separate Amps and
Cabs, try adding a single Amp block followed by a single Cab > Dual block, or
two individual Cab or IR blocks, as in the preceding “1 into 2” example (mixing
two dierent Cabs can provide some substantial variations).
• The stereo version of an eects block will use roughly twice as much process-
ing power as a mono version of the same block. Likewise, the dual version of a
cab block will use roughly twice as much processing power as the single version. Therefore, you likely won't want to use stereo versions of blocks in routing
congurations where they don't actually provide a stereo output (see “Block
Order and Stereo Imaging” on page 29).
• Some model categories have “Simple” blocks, which utilize less processing
power than others.
• The “Legacy” type models often utilize less processing resources than other
models of the same eect type.
32
Page 34

The Edit Tab
The Inspector window's Edit tab provides access to all models via its multi-level Model
Browser, where you can choose from numerous categories of models to make up your
tone. This panel also displays all available parameters for the block that is currently
selected within the Signal Flow window, providing easy access for editing. Be sure
to check out the “Model Lists” chapter for the full array of models and what they are
based on.
For block categories that oer it, you'll see a Sub-Category menu at the top of the
Model List, where you can choose to see Mono, Stereo or Legacy type models. Amp
categories oer Guitar & Bass sub-categories, and for Cabs you'll see Single & Dual sub-
category options.
Once you click on any model in the Model List it is instantly active and loaded into the
selected Signal Flow location. (You can click on models here to preview them in realtime as your DAW track is playing.) When a model is selected, its editable parameters
appear at the right of the Edit panel. If you want to remove an existing block, select it
within the Signal Flow and choose the None category's Empty Block option. Or alternatively, right-click on the block within the Signal Flow and choose the Clear command.
Selecting Models
As mentioned in the previous chapter (page 27), add models to your current preset
by selecting the desired empty location on any path within the Signal Flow window and
then choose your specic model from the Model Browser. You can also select any existing block within the Signal Flow and change its model this way. (Also note that if you
select an Input, Output, Split & Merge block, the Model Browser can also oer options
for these block types.)
List/Grid View Toggle
Category List
Choose the type of block rst in the Category List at the left and you'll see all of its
available models appear in the Model List. Note that, once you've selected a Category,
you can toggle List/Grid View Toggle button to change between a list or grid display
of the category's models.
Sub-Category Menu
Model List/Grid
The Edit tab's Model Browser
Parameter Sliders
Availability of Models within the Model Browser
There are cases where some model types are displayed as “dimmed” and not selectable within the Model Browser. There are limits for how many of some types of models
can be inserted within a path and/or within a preset, as described below.
Dimmed
models
Unavailable models appear dimmed within the Model Browser
Amp+Cab, Amp, or Preamp blocks
Cab blocks (includes Amp+Cab
blocks)
Impulse Response blocks
Send/Return & Looper blocks
Additionally, as per the computer processing management functionality of Helix Native
(see page 14), when the current tone approaches its allowable processor usage limit,
some models may not be selectable if adding them would result in the tone exceeding
the limit. To free up more resources for the current preset, try removing some models, or
swapping out models with similar mono or “simple” versions within the same category.
Any combination, up to four within a preset
(up to two per path)
Up to four (two per path; Cab > Dual blocks
are considered two)
Up to four 1024-point IRs (two per path) or
two 2048-point IRs (one per path)
Send, Return, FX Loop and Looper type
blocks remain “disabled” since they are only
functional in Helix hardware and, thus, cannot
be added from within the Helix Native Model
Browser (see page 13 for details).
Model List view
Model Grid view
33
Page 35

Editing Model Parameters
Once added to your tone, simply click on any block within the Signal Flow to select it
and you'll see the model category and type highlighted in the Model Browser, with its
parameter sliders available at the right of the Edit tab.
Edit TabModel Browser Selected Model Stereo Indicator Bypass/Enable
Parameters
The Inspector Window - Edit Tab
Selected Model, Stereo Indicator- At the top of the parameter pane you'll see
the name of the selected model. If the selected model is stereo, the indicator
appears to the right of its name, as pictured above.
Bypass/Enable - For all block types that support it, the Bypass/Enable button at
the top right allows you to manually toggle the block's processing on or o. Note
that you'll see all the block's parameter sliders become “dimmed” to indicate the
bypassed state. Alternatively, hover over the block and use right-click or Ctrl+click
to choose the bypass/enable options from the context menu - see “Adding, Clear-
ing & Bypassing Blocks” on page 27.
Adjusting Parameter Sliders - There are several ways to adjust slider values:
• Click on any slider's “handle” and drag to the desired value.
• Click on the desired range location within a slider's path and it will jump to the
clicked value.
• While hovering your mouse cursor over any slider's path, use your mouse wheel
to adjust it. (Note that hovering over the scroll bar at the right also allows you
to use the mouse wheel to scroll vertically when there are more parameters.)
• Click the up/down arrow buttons at the right for incremental adjustments. If a
down arrow is displayed at the right, click on it to expand a menu of selectable
options.
Resetting Sliders - If you're not happy with your slider adjustment, use Cmd+click
(Mac) or Ctrl+click (PC) on a slider to reset it to its initial default value.
Type in a Precise Value - Double-click anywhere on a slider's path, or on its value,
to manually type in a precise numerical value.
ConguringaParameterforHostDAWAutomation - Right-click on a slider to
display the menu of Automation Controllers, which allow the host DAW application
to access the parameter for its automation features - see “The Automation/Con-
troller Assign Tab” on page 36 for details.
Accessing All Parameters - Note that some model types, such as amps and
complex eects, may have more sliders and controls than you can see all at once
in the Edit tab. Click and drag the vertical scroll bar at the right to access all parameters (or use your mouse wheel when hovering your mouse cursor over the vertical
scroll bar). You can also resize the entire plug-in window as desired by dragging its
bottom right corner.
Note Sync
Most modulation and delay eects models oer a Note Sync option, allowing the mod-
ulation rate or delay repeat time to follow the plug-in's main tempo value. For models
that oer it, you can click the Note Sync button within the Edit tab to toggle the feature
on/o. When active (the Note Sync button is lit), the parameter will change to oer note
division values, as shown below.
Note value options Tempo Sync (active)
A Delay block's Delay Time parameter congured for Note Sync
Set the plug-in's main Tempo Controls at the top right of the plug-in window to Host
Sync mode for the individual, active Note Sync parameters to follow your host project's
timeline tempo (also see “Editing the Tempo” on page 22).
Setting the plug-in to Host Sync tempo mode
Otherwise, when the main Tempo Controls option is set to Per Preset or Per Snapshot, the parameters' Note Sync follows the editable tempo value that is displayed in
the numerical tempo eld at the top right of the plug-in.
34
Page 36

Editing Input, Output, Split & Merge Blocks
Just as with Amp & Eects blocks, you can click on these block types within any Signal
Flow path and access their options in the Edit tab.
Input Block Options - The Input block for any path (except Path 1A) is able to
be set to receive input from the Host or None. If you have congured the Output
block of a preceding path to feed into the current path, then you may wish to set
the current path's Input block to None so that it does not also receive input audio
from your Host DAW track. All Host Input blocks include a built-in Noise Gate, and
you'll nd the Gate's On/O and parameter sliders here as well.
Output Block Options - Path 1's Output block oers options to feed the path's
output to Host, or into any existing Input block of Path 2. (If you've created a sepa-
rate Path 1B, its output block oers these options as well).*
Path 2's Output block is always routed to Host.
All Output blocks oer Pan and Level sliders within the Edit Tab.
*TIP: See page 29 for info about creating dierent possible path routing
congurations using these Output block options.
Split Block Options - If your preset includes a Split path, click directly on the point
of the main path where the signal divides to select the Split block and you'll see op-
tions for choosing dierent Split block types and their parameters. Note that there
is also a Bypass switch for Split blocks which, when bypassed, results in the block
feeding an equal signal to each parallel path.
Merge Block Options - If your preset includes a Split path, click directly on the
point of the main path where the signal returns to select the Merge block and you'll
see several mixer options for blending the two paths' signals.
Editing Send, Return, FX Loop & Looper Blocks
These block types are supported only by Helix hardware devices, therefore, you'll only
see them within Helix Native when importing a Helix preset that was exported from
a Helix device. When included within a Helix Native tone, they are displayed with a
slashed circle icon on the block to indicate this “unsupported” state.* However, you
can still move & clear these blocks within the Signal Flow, and edit the parameters of
these blocks within the Edit tab. Your edits are retained within your exported presets for
use on Helix devices - see “Preset Compatibility with Helix Devices” on page 12.
*NOTE: If an existing Send, Return or FX Loop block is toggled as “active” via its
Bypass switch, it can reduce or fully mute the path's audio signal, depending on
the block's Mix or Dry Thru parameter settings. To ensure these block types are
not aecting the plug-in's signal path, simply toggle the block as bypassed.
35
Page 37

The Automation/Controller Assign Tab
The Inspector window's Automation/Controller Assign tabbed panel is where you
can create, edit and reference all your automation controller assignments for the current
plug-in instance. This panel oers two sections - the Assignment List at the left where
all current assignments are shown, and the Inspector at the right where you can create
new automation assignments and access additional options for existing assignments.
Column HeadersAssignment List Selected Block
Target Parameter Menu
Controller Assignment for Automation
Since Helix Native can potentially include numerous parameters (depending on how
many Amp & Eects blocks you add within your tone), Helix Native utilizes a set of assignable controllers that allow you to map whichever sliders and switches you desire
to automate. To follow are what will appear as “automatable” Helix Native parameters
within your host DAW application's plug-in automation menus.
• Knob 1-16 Controllers - Allow you to assign “variable” type controls - for ex-
ample, the Mix slider of a delay, or the Drive slider of an amp.
• Switch 1-16 Controllers - Allow you to assign “O/On” switches, such as the
bypass switch for any block.
• Snapshot Index Controller - Allows you to automate the loading of any of the
current tone's 8 Snapshots.
• Additional “Fixed” Controllers - These Helix Native global parameters are al-
ready mapped and require no automation controller assignment: Master Input
Level, Master Output Level, and Master Bypass. (Note that some host DAW
applications also oer their own “xed controllers” within their automation
menus that are also usable with Helix Native plug-in, such as a Wet/Dry Balance or their own plug-in Bypass.)
Selected Assignment Min/Max Range
Parameters
The Automation/Controller Assign tab
Automation Controller
Menu
About Plug-in Parameter Automation
Helix Native supports your host DAW application's features to read, write and edit parameter automation, where the DAW can control the plug-in's parameter values over
time using editable track envelopes. Helix Native takes this concept even further and
not only allows for practically any block's parameters to be automated, but also allows
automating the loading of any of the current preset's Snapshots, which eectively provides simultaneous switching of numerous Helix Native parameters in one action!
Most DAWs additionally allow you to record parameter automation in real-time, where
you enter an automation “write” mode and changes to the selected plug-in parameters
are recorded and displayed on the track as adjustable envelopes. This allows all these
parameter changes to be played back (using the host's track “read” mode option) and
incorporated into your project’s mix-down.
Host DAW applications typically allow you to access the list of automatable parameters
for a plug-in by way of an automation parameter menu, specic to the audio or aux
track where you have inserted the plug-in. Each host DAW software oers parameter
automation options slightly dierently, so it is recommended that you consult your host
software’s documentation for its specic instructions and parameter automation capa-
bilities.
Creating an Automation Controller Assignment
Before you’ll be able to utilize your DAW host’s track automation for a Helix Native pa-
rameter, it is necessary to rst assign the desired parameter to an automation “Knob”
or “Switch” controller. This is performed as follows.
Automating a Variable (Slider) Parameter:
1. Click on the block within the signal ow that contains the model and parameter
that you wish to automate. For this example, we'll create a controller assignment
to automate the Mix slider of the Simple Delay model.
2. In the Automation/Controller Assign tab, you'll see that the Simple Delay block
name is displayed at the top, indicating that it is the selected block. Click on the
Target Parameter menu to see all of the Simple Delay's parameters - select the
Mix parameter.
Selecting a Delay's Mix as the target parameter for automation assignment
36
Page 38

3. Once a target parameter is selected, click on the Automation Controller menu
and select the “Knob” controller to which you want to assign your selected target parameter. We will select Knob 1. (You can optionally assign a slider to one
of the Switch automation controllers to allow the parameter to be automated
strictly between two dened values - see the Tip at the end of this example.)
Selecting a Knob automation controller for a target parameter
5. Now access your host DAW app track's automation parameter menu and select
the Helix Native - Knob 1 to congure it for host automation.
6. You should be able to see an envelope line for the “Knob 1” parameter for the
track (your host app may require that you toggle an option to display it). Adding
edit points and adjusting this envelope will now directly adjust the assigned Mix
slider of the Simple Delay.
TIP: As an alternative to steps 2 & 3, you can right-click directly on the
Simple Delay's Mix slider within the Edit tab, choose Automation Assign and
the desired Knob controller from the menu.
Creating an automation assignment from a slider's context menu in the Edit tab
Also note that only one parameter can be assigned to any one Knob automation controller at a time - choosing a controller with an existing assignment
(as indicated by a dot to its left within the Automation Controller menu) will
replace the existing assignment. Or, you can choose None to remove an
existing assignment.
4. Once the assignment is created, you'll see it appear in the Assignments List at
the left. When selected in this list, you can edit its assignment settings at the
right of the tab - see “Editing Options for an Existing Automation Controller As-
signment” on page 38. You'll also see an automation assignment Knob indi-
cator (or Switch indicator, depending on which type of assignment you created)
displayed for the parameter's slider within the Edit tab, which includes the Knob
number to which it is now assigned:
An automation assignment indicator for “Knob 1” appears at the left of the assigned slider
Cubase Pro with Helix Native “Knob 1” automated on an audio track
You can repeat these steps, choosing other “Knob” controllers, to create additional automation assignments for the Simple Delay (or any other selected block
within the Signal Flow), if you wish to automate more parameters for this Helix
Native plug-in instance.
TIP: Alternatively, in step 3 you can choose one of the Switch 1-16 auto-
mation controllers, which congures the parameter to be automated strictly
between two specic values. You can dene the two values within the Au-
tomation/Controller Assign tab using the assignment's Min Mix & Max Mix
value options - see “Editing Options for an Existing Automation Controller
Assignment” on page 38.
As shown in the example above, a variable Mix parameter slider is assigned
to a Switch automation controller, with its Min and Max Mix values set for
20% and 50% - these are the two specic values to which the host track
automation will be toggled between.
TIP: Click on the little knob automation assignment indicator at the left of
the slider to jump to the Automation/Controller tab, where the assignment is
selected and it editable options displayed.
37
Page 39

Automating an Off/On Switch Parameter:
The Switch 1-16 automation controllers are for parameters that oer only a two option
switch. Most commonly this would be a block's Bypass O/On, but you can automate
other switch parameters in the same way, such as the Speed - Fast/Slow switch of a
rotary speaker model. For the following example, we'll congure the Bypass of a Simple
EQ block.
1. Add a Simple EQ block to your Signal Flow and click on it to select the block.
2. In the Automation/Controller Assign tab, you'll see that the Simple EQ block
name is displayed at the top, indicating that it is the selected block. Click on the
Target Parameter menu to see all of the EQ's parameters - select the Bypass
parameter.
Selecting Bypass as the target parameter for automation assignment
3. Once the Bypass target parameter is selected, click on the Automation Con-
troller menu that appears and select the Switch controller to which you want to
assign your selected target parameter. We will select Switch 1.
Selecting a Switch automation controller for a target parameter
TIP: As an alternative to steps 2 & 3 for assigning block Bypass, you can
right-click or Ctrl-click directly on the EQ block within the Signal Flow and
choose the desired Switch controller from the Automation Bypass menu.
4. Once the assignment is created, you'll see it appear in the Assignments List
at the left. When you select an existing assignment in this list, you can edit its
settings at the right of the tab - see “Editing Options for an Existing Automation
Controller Assignment” on page 38.
5. Now access your host DAW app track's automation parameter menu and select
the Helix Native - Switch 1 parameter to congure it for host automation.
6. You should be able to see a “Switch 1” parameter envelope line for the track
(your host app may require that you toggle an option to display it). Adding edit
points and adjusting this envelope will now directly toggle the bypass state of
the assigned Simple EQ block. Note that, since this is a “switch” type parameter,
its track envelope will only create edit points as “o” (0% value) or “on” (100%
value).
Reaper 5 with Helix Native “Switch 1” automated on an audio track
You can repeat these steps, choosing other “Switch” controllers, to create additional automation assignments for the Simple EQ (or any other selected block
within the Signal Flow), if you wish to automate more parameters for this Helix
Native plug-in instance.
TIP: You can also utilize a Switch automation controller for an automation assignment to a “variable” Helix Native parameter, such as any model's slider
parameter, allowing you to dene two specic parameter values to toggle
between when automating the Switch's “O/On” states - see “Automating a
Variable (Slider) Parameter:” on page 36.
Also note that only one parameter can be assigned to any one Switch automation controller at a time - choosing a controller with an existing assignment (as indicated by a dot to its left within the Automation Bypass menu)
will replace the existing assignment. Or, you can choose None to remove an
existing assignment.
Editing Options for an Existing Automation Controller Assignment
Once you've created one or more Automation Controller assignments, they are displayed in the Assignment List at the left of the Automation/Controller Assign tab. This
list makes it easy to reference all your automated parameters and edit their available
options. The Assignment List includes 3 columns:
• Block - Displays the name of the parent block which includes the assigned
parameter.
• Parameter - Displays the name of the assigned parameter.
• Source - Displays the automation controller source (Knob 1-16 or Switch 1-16)
to which the parameter is assigned.
38
Page 40

TIP: Note that you can click on these column titles at the top of the list to sort the
list by Block, Parameter or Source, ascending or descending.
When you click on any assignment within the list, you'll see the assignment's editable
options appear at the right of the Automation/Controller Assign tab. Most variable type
parameters oer Minimum Value / Maximum Value sliders which allow you to custom-
ize the automated values.
If the Automation Assignment Source is a Knob Controller - The Min & Max
values dene the range for which the parameter can be adjusted, allowing you to
limit the range, if desired. For example, if you want an amp's Drive parameter to
automate strictly between the value range of 3.0 to 7.5, set these sliders accordingly, as shown below.
An Amp - Drive “Knob” automation assignment with its Min & Max (range) values dened
Removing or Replacing an Existing Automation Controller Assignment
To Remove an Existing Automation Controller Assignment - Select the assignment within the Assignment List and choose the None option from the Automation
Assignment menu.
Select None to remove an existing assignment
To Replace an Existing Automation Controller Assignment - Select the existing
assignment within the Assignments List and choose a dierent Knob or Switch
controller from the Automation Controller menu. This removes the existing controller and applies the newly selected Knob or Switch automation controller to the
parameter.* You can then choose this newly assigned Knob or Switch controller
from your DAW track's parameter automation menu to automate it.
NOTE: For Automation assignments, (unlike with MIDI assignments) the Min and
Max values cannot be inverted.
If the Automation Assignment Source is a Switch Controller - The Min & Max
values dene the “O” and “On” values to which the parameter can set, allowing
you automate switching between these values. For example, if you want an amp's
Drive parameter to automate strictly to either 4.0 or 8.5, set these sliders accordingly, as shown in the following image.
An Amp - Drive “Switch” automation assignment with its Min & Max (O/On) values dened
TIP: Some DAW hosts also oer additional on-screen controls to provide easy
access to track and plug-in parameters, such as the “Smart Controls” in Logic
Pro or the “Quick Controls” in Cubase Pro. Typically these types of DAW controls
can be set to the Helix Native Knob 1-16 or Switch 1-16 Automation Controllers,
for which you'd want to follow the preceding steps to assign your preferred Helix
Native parameter to the respective Automation Controller.
*NOTE: In the case where you have written automation for an existing Helix
Native assignment and performed the above replace action, the automation envelope in your DAW track will be left “orphaned,” since the Knob or
Switch automation controller it was congured to automate no longer references any actual Helix Native parameter. If you assign another parameter to
this automated Knob or Switch controller, the track automation envelope will
then control the newly assigned parameter - or, you may wish to delete the
unused automation envelope from your host project.
To Re-assign an Existing Automation Controller Assignment to a New Parameter - If you choose a new, unassigned block parameter in the Automation
menu, and then select a Knob or Switch from the Controller menu that is currently
assigned to another parameter, this removes the controller assignment from the
existing parameter and assigns it to the newly selected parameter. (Any Knob or
Switch automation controller can only be assigned to one parameter at a time.)
Automation Assignment Preservation when Changing
Models
You may wonder, once you've congured one or more parameters of a particular Amp or
FX block with automation assignments, what happens to these assignments if you want
to then change the model for this block? For just this situation, Helix Native incorporates an automatic “preservation” for automation assignments, which can intelligently
re-assign the automation assignments when the new model oers similar parameters.
39
Page 41

For assignments to be preserved, the assigned parameters of the newly selected model
need to be similar in type and in scale. For example, if you've congured the Drive slider
of the Amp+Cab model to be automated by the Knob 1 automation controller, you can
then select most any other Amp+Cab, Amp or Preamp model for the block and the
Knob 1 controller will automatically re-assign itself to the Drive slider of the new model.
Likewise, if you have a Delay's Mix parameter automated, the Mix parameter assignment will typically be preserved for the Mix parameter of most any other type of FX
model that includes a Mix slider.
For the cases where automation assignments cannot be preserved automatically, (e.g.,
when a block's model is changed to one with a very dierent set of parameters) any
existing track envelope with written or edited automation will be left in an “orphaned”
state on your DAW track. But you can manually re-assign the automation controller, as
covered in the previous section.
Automating Snapshot Changes
As covered on page 24, the Snapshot feature allows you to store a number of settings, such as block bypass, parameter values, tempo values and more, and then recall
all Snapshot-assigned settings simply by loading the respective Snapshot via the plug-
in's Snapshots menu. For even more exibility, Helix Native also allows you to automate
the loading of Snapshots 1-8 in real-time using your host DAW application's automa-
tion features! Use the following steps to congure a Snapshot automation assignment.
1. Access your host DAW app track's automation parameter menu and select the
Helix Native - Snapshot Index option.
Selecting the Snapshot Index automation option in a Logic Pro track's automation menu
2. You should be able to see a “Snapshot Index” automation envelope line added
for the track (your host app may require that you toggle an option to display it).
Adding edit points and adjusting this envelope allows you to choose the Snap-
shot 1-8 that you wish to be loaded over the specied time duration.
Writing Parameter Automation
Most host DAW apps also provide several “Read/Write” modes for parameter automa-
tion, which typically appear as a set of options on the track (O, Read, Write, Latch,
Touch, etc.).
The track automation Read & Write mode options in Pro Tools
When set to Read (typically the default), the track will actively “play back” the automa-
tion envelope settings on the track, and when set to O it will ignore the automation
envelope.
When one of the Write options is set as active on the track, you can then play the
track and manually adjust any Helix Native switch or slider within the plug-in's Edit tab
that includes an automation controller assignment, and your moves are recorded to
the track in real-time. Also, since the Helix Native Snapshots feature has a dedicated
automation parameter (Snapshot Index), the loading of snapshots via the Snapshots
menu can also be “written” using your host's Write features. Typically you'll see the
parameter's envelope in the track edited with the adjustments that you have written,
and you can manually drag individual edit points to edit the envelope further as desired
once playback is stopped.
Note that once a parameter is assigned to a controller and automated by the above
methods, it is no longer then possible to manually make adjustments directly to the
parameter's slider or switch within the Helix Native plug-in window, since it then responds only to the written automation envelope values. To edit the settings, either edit
the automation envelope, or utilize one of the host's automation Write modes to make
the desired parameter value changes.
The editable Snapshot Index envelope line displayed on the Logic track
Feel free to continue to add, edit or remove the specic items you have included
within each of your 8 Snapshots. This automation feature simply loads whichever Snapshot you set it to load, allowing you to continue to customize Snapshots'
contents as desired.
40
Page 42

MIDI Bypass & Controller Assignment
Most parameters and functions within Helix Native can also be controlled remotely
via external MIDI control devices or MIDI software applications. For most Helix Native
parameters, this is accomplished by creating a MIDI CC Bypass or MIDI In Controller
assignment, as shown in the following steps. (Note that several MIDI CCs are reserved
or pre-assigned to Helix Native global functions - see “Global Reserved MIDI CCs” on
page 42).
TIP: If you happen to own a Helix device, it makes an excellent MIDI Controller
device for your DAW! Check out the “Command Center” chapter within your
Helix Owner's Manual for details on how to congure the Helix to transmit a
variety of MIDI control messages.
NOTE: You may need to congure your DAW host application to receive MIDI
Control input from your external MIDI controller device or software. These settings are typically found within the DAW application's Preferences. Additionally,
it is often necessary to congure your DAW host track routing to so that the
external MIDI Controller data is fed directly to your current Helix Native plug-in
instance. This often requires the use of a MIDI or Instrument track to receive the
MIDI input and then send it to the audio track on which the Helix Native plug-in
inserted. Please see your application's documentation for details.
Creating a MIDI Bypass Assignment
For any block type that includes a Bypass parameter, a MIDI Bypass Assignment can
be created to allow the block's Bypass to be toggled via MIDI CC.
1. Click on the desired block within the plug-in's Signal Flow to select it. For this
example, we've selected a Compulsive Drive Distortion block.
2. Go to the plug-in's Automation/Controller Assign tab. If not already selected,
choose the Compulsive Drive's Bypass from the parameter menu at the top
right of the tab.
3. Click on the menu beneath and choose MIDI In as your assignment type. (If the
Bypass parameter already includes an existing assignment, choose None from
the menu to remove it, then choose MIDI In.)
4. Use the MIDI In slider to congure the MIDI CC number to which the block's
Bypass parameter will respond - we've select CC 13. Be sure to also congure
your external MIDI device to transmit this same MIDI CC number.
Once congured as above, when a MIDI CC Toggle message (CC 13 with two
alternating values, where one is 0-63, and the other 64-127) is sent to the plug-
in, it will switch the block's Bypass parameter.
5. To remove a MIDI Bypass assignment, right-click or Ctrl-click on the assignment
within the Assignments List at the left and choose the Clear option.
Feel free to continue to add, edit or remove MIDI Bypass assignments for additional blocks as desired. Be sure to Save your tone to retain these assignments
within the preset.
6. Alternatively, you can right-click or Ctrl-Click directly on the desired Amp, Ef-
fects or Mix block within the plug-in's Signal Flow and select MIDI Bypass >
MIDI In to create the MIDI Bypass assignment. Follow step 4 to then congure
the MIDI CC for your assignment.
Creating a MIDI Bypass assignment within the Signal Flow
Creating a MIDI Controller Assignment
Practically any parameter within Helix Native can be controlled remotely via a MIDI
controller device or MIDI software. This can be congured by creating a MIDI Control
Assignment to allow the parameter to be controlled via MIDI CC. For this example, we'll
select the Vetta Wah to be controlled via a MIDI expression pedal.
1. Click on the Wah block within the plug-in's Signal Flow window to select it,
2. Within the plug-in's Edit tab, right-click or Ctrl-click directly on the Wah's Posi-
tion slider and choose Controller Assign > MIDI CC to create a MIDI Controller
assignment for the parameter.
Conguring the MIDI In CC number for a MIDI Bypass Assignment
Creating a MIDI Controller assignment for a parameter
3. Go to the plug-in's Automation/Controller Assign tab and you'll see your newlycreated Wah MIDI Controller assignment in the list at the left. Click on this assignment to select it.
41
Page 43

4. Choose the desired MIDI CC number using the MIDI In slider in the right pane -
we've selected CC 10. Be sure to also congure your external MIDI expression
pedal to transmit this same MIDI CC number
Creating a MIDI Controller assignment for a Wah
5. If desired, you can adjust the Min & Max Position parameters to limit the range
of a MIDI CC-assigned parameter. Note that it is possible to make the Min value
larger than the Max value, if you want to invert the behavior of the parameter.
Once congured as above, when a MIDI CC 10 message (with values of 0-127)
is sent to the plug-in, it will control the Wah block's Position parameter.
6. To remove a MIDI Controller assignment, right-click or Ctrl-click on the assignment within the Assignments List and choose the Clear option.
Feel free to continue to add, edit or remove MIDI Controller assignments for
additional parameters as desired. Be sure to Save your tone to retain these as-
signments within the preset.
Global Reserved MIDI CCs
Helix Native has reserved specic MIDI CC messages which are not available within
the Helix Native menus for creating MIDI Bypass and Control Assignments. As shown
in the following table, most of these reserved MIDI CCs are for features that are only
functional on Helix hardware, but are reserved within Helix Native to provide preset
compatibility with Helix devices.
GLOBAL RESERVED MIDI CCs
MIDI CC# Value Function
0
1
2
32
49
50
51
52
53
54
55
56
57
58
59
60
61
62
63
65
66
67
64
68
Reserved for use with Helix hardware assignments
42
Page 44

GLOBAL RESERVED MIDI CCs
MIDI CC# Value Function
0-7 Snapshot 1-8 select
69
70
71
72
73
74
75
76
128
0-63: Oh;
64-127: Nooo
Reserved for future use
Helix Native achieves self-awareness and starts poking
fun of that face you make during the solo
43
Page 45

Preferences
The My Account menu at the bottom left of the Helix Native plug-in window provides
access to the menu to open the Preferences window, as well as to several options for
Marketplace and managing your Line 6 account options.
NOTE: For details on the additional commands within this menu, please see the
following chapter - “Marketplace & Account Options” on page 46.
The Preferences Window
Select Preferences from the menu to launch the Preferences window, which includes
three selectable screens to edit plug-in settings and reference version and legal info.
General Screen
The General settings screen oers options for the plug-in's Preset and IR Libraries.
These settings are global and aect current and future instances of the plug-in.
Preset Numbering Format - The presets within the Librarian's Presets Panel can
be numbered as bank numbers & letters (as 01A-32D) or sequentially (as 000-127)
within each Setlist, depending on which is more convenient for you.
Stereo IR Import - When a stereo .wav IR le is imported by Helix Native, it is
converted to mono. This preference lets you choose whether to take the left or
right channel of the source IR le, or to sum both channels to mono. The default is
to import the left channel.
Remove Unsupported Blocks on Import - Presets exported from Helix hardware
can potentially include Send, Return, FX Loop and/or Looper type blocks, all of
which are unsupported block types within Helix Native plug-in (see page 13).
Enabling this option automatically strips out these block types from presets whenever importing Helix Presets, Setlists or Bundles into Helix Native.
Show/Hide Block Name Labels - If you prefer to have the Signal Flow window
not show labels beneath each block, you can choose Hide Names here (see page
27).
Clear & Restore Library Options
This group of buttons within the window oer quick and easy ways to clear out or restore the contents of the Librarian's panels.
IMPORTANT! Be sure to backup your presets and impulses using the Export
options within the Librarian panels or Preferences window before using these
Clear and Restore features, since Librarian presets and impulses will be permanently deleted or overwritten, as indicated below.
The Helix Native Preferences window - General screen
Help Options
At the top right of the Preferences window, click the ? menu button and you can choose
Online Help to visit the line6.com Helix Native plug-in support site, or select Pilot's
Guide to launch the PDF you are now reading.
• Clear Preset Library - Instantly removes all presets in all setlists. This replaces
all with empty “new” presets, providing a clean library to create and import
presets as desired.
• Restore Factory Setlists - Clears only Setlists 1, 2 & 8 and replaces them with
the Factory Setlists 1, 2 & 8 included with the currently installed version of Helix
Native.* All of your presets within any other Setlists remain unaected.
*TIP: Note that when a new version of Helix Native is released, it may include
some new Factory Presets. If you already have a previous version of Helix
Native installed and install the newer version, you'll need to perform the Restore Factory Setlists function to get these new Factory Presets within your
plug-in's Presets Library.
• Clear IR Library - Instantly removes all IRs from the Impulses Library list. Use
the Impulses panel's Import feature to import IR les from your computer's hard
drive in whatever order you like.
44
Page 46

• Import & Export Bundle - A Bundle is a le containing the complete set of all
setlists and presets. These buttons allow you to Import a Helix Bundle le from
your hard drive, or create and save all the Helix Native Library's setlists and pre-
sets in their currently-saved state as a Bundle le to your hard drive. As noted
above, this is a great way to easily save a backup of all your Library presets and
restore them at any time. Please see “Importing and Exporting Helix Bundles”
on page 18 for details.
About Box
The About box screen provides full version information for the installed Helix Native
plug-in.
The Helix Native About box screen
Note that the “Helix 2.xx Compatible” version number informs you which Helix device
rmware version is recommended if you are to be sharing presets between Helix Native
plug-in and your Helix device. Please also see “Preset Compatibility with Helix De-
vices” on page 12.
Legal Information
The Legal screen displays all the necessary trademark, copyright and other legal required statements for the Helix Native software.
45
Page 47

Marketplace & Account Options
Marketplace
Now open for business is the Line 6 Marketplace online store, where you'll nd 3rd-party,
premium add-on assets that even further enhance the functionality of Helix Native, as well
as Helix hardware! As of this writing, professionally crafted presets and IRs are available
- check back often on Marketplace for product news and announcements. As covered
within this chapter, you're only a few clicks away from using new Marketplace assets on
your system, right from the My Account menu in Helix Native.
NOTE: Helix Native version 1.70 (or later) is required for the full functionality of Market-
place premium presets and IRs.
To download your purchased assets, click on the Manage Account command
within the plug-in's My Account menu (or go directly to https://line6.com/ac-
count/), sign in to your account, and select Helix Marketplace from the Hardware
& Software section at the left.
Each Marketplace purchase is downloadable as a “zip” le that you'll need to “unzip”
on your local hard drive once downloaded.
Licenses for your purchased assets are automatically added to your Line 6 account, and “synced” the next time you use an instance of Helix Native, as long as
your are actively signed in to your Line 6 account from the My Account menu (see
“Account Sign In / Sign Out” on page 47).
Import and Utilize Your Marketplace Assets
Once you've signed in and authorized your computer for use with Helix Native, your
computer is also authorized for your premium Marketplace assets - your presets and
IRs can then be imported and used just like any other presets and IRs.
Once imported, premium Marketplace presets (individual .hlx preset les, or setlist or
bundles les that include them) and/or premium Impulse Responses (.hir les), appear
with a golden guitar pick “badge” at their right in the plug-in's librarian lists. (Also see
page 16 and page 19 for more about importing presets and IRs.)
Get Your Marketplace Assets
Access the Line 6 Marketplace website by choosing the Get More Presets and Get
More IRs, commands within the My Account menu at the bottom left of the Helix
Native plug-in window (or go directly to https://line6.com/marketplace/) and sign in to
your Line 6 account.* When browsing the Marketplace site, simply choose the desired
packs of presets or IRs, add them to your cart, and check out.
*NOTE: Be sure to sign in to the same Line 6 user account with which you purchased
your Helix Native license so that your Marketplace licenses are deposited into the same
account!
Once your purchase is complete, your downloadable Marketplace assets are deposited
into your Line 6 account, which include your personal license that allows you to import
them on your authorized computer system.
The golden guitar pick badges indicate premium Marketplace Presets and IRs
46
Page 48

The My Account Menu Options
At the bottom left of the Helix Native plug-in window, you'll see the My Account menu
and account status indicator. Initially, before you've signed in to your Line 6 online account and/or authorized your computer for Marketplace premium assets, you'll see this
menu displayed with the My Account label.
The My Account menu (not signed in or authorized)
Clicking on the My Account menu at the bottom left of the Helix Native plug-in window
displays options for accessing the Preferences window (see page 44), signing in &
managing your Line 6 account, as well as for accessing Marketplace.*
*NOTE: Once you've completed the computer authorization, it is not required that your
computer have an active Internet connection, nor do you need to be signed in or autho-
rized at all for the Helix Native plug-in itself to be functional. But signing in is necessary
to authorize (or deauthorize) your computer to allow the use of Helix Native, including the
import and export of premium assets purchased from the online Marketplace.
Account Sign In / Sign Out
Signing in to your Line 6 account from within the Helix Native My Account menu (see
above) is necessary to be able to perform the following online processes.
• To Authorize or Deauthorize your Computer - Once you've purchased the
Helix Native license, it is necessary to Authorize your computer to run it (as
covered in the next section).
• For Authorizing Marketplace Purchases to your Computer - Whenever you
make a new purchase of premium add-ons from Marketplace, you'll need to be
signed in to allow Helix Native to initially “sync” with your Line 6 account and
authorize the licenses for your newly purchased goodies.
Once your computer is Authorized, you don't otherwise need to be actively signed in, or
even have an active Internet connection, to utilize Helix Native plug-in or Marketplace
add-ons.* We recommend that you simply remain signed in, as this does not hinder the
performance of Helix Native and ensures your licenses are always synced.
*NOTE: You must be actively signed in at all times if using the Helix Native plug-
in in the 15-day Trial Mode. You must also be signed in for the initial import of
any new Marketplace assets, to allow license synchronization - see “License
Synchronization” on page 48.
If you are not currently signed in, choose Sign In from the My Account menu and enter
your Line 6 account user name and password in the Sign In pop-up window. If you have
forgotten your sign in credentials or have not already created a Line 6 account, choose
the Forgot my password/username or Create a Line 6 account option within the
window. If you are already signed in and wish to sign out, choose the Sign Out option
from the My Account menu.
The Sign In pop-up window
Computer Authorization Status Indicator
Once you've signed in and authorized your computer, you'll see the My Account menu
label display a green dot and your rst name (derived from your Line 6 account), indicating the status of your account sign in and computer authorization (more details about
authorization in the following section). When signed out, the menu button displays the
“My Account” label, with no colored authorization indicator.
Signed out with computer authorizedSigned in with computer authorized
Once you've authorized your computer, you can optionally sign out, and your computer
remains in the authorized state, allowing you to continue to perform import, export, copy
and backup actions with your Marketplace premium assets, even if your Internet connection is not currently active.
Note that you will need an Internet connection to be able to sign in again to access the
Deauthorize and Authorize options from the menu, as well as to initially synchronize with
your online Line 6 account after making any new Marketplace purchase (see “License Syn-
chronization”).
47
Page 49

Authorize / Deauthorize your Computer
Authorizing your computer allows your purchased (or Trial version) Helix Native license
to be run on the computer. It also allows you to utilize premium add-on assets purchased
from the Marketplace within Helix Native plug-in.
Helix Hardware Owners: This activation & deactivation within Helix Native
globally activates/deactivates your computer for the import, export and use of
Marketplace premium assets with the HX Edit application as well - please see
the latest HX Edit Pilot's Guide for details.
It is permitted to authorize a maximum of 4 of your computers concurrently. If you've
already authorized 4 computers, you can deauthorize one computer to free up one of
these license authorizations - see “Authorizing your Computer” on page 5 for details.
To Deauthorize your computer, rst make sure you are signed in to your Line 6 acct (as
covered in the previous section) then complete the following.
If you have purchased & authorized Helix Native - Click on the Deauthorize
Computer option. The online deauthorization completes momentarily. Helix Na-
tive remains installed and selectable within your host DAW app, but the plug-in
windows displays only its authorization screen, and will not process audio while
deauthorized.
If you are using the 15-day Trial version of Helix Native plug-in - When signed
in, you'll see your time remaining for the trial at the bottom of the plug-in window. At any time during your 15-day trial, or once the trial has expired, you can
click this time remaining indicator to purchase your software license. Click Yes
when prompted to do so and you'll be taken to the Line 6 Online Store to make
your purchase and be up and running Helix Native plug-in in minutes!
Deauthorizing the Trial License from your Computer - You would likely only
want to deauthorize in the event that you want to continue the Helix Native plug-
in 15-day trial on a dierent computer that you own (assuming you have time remaining in your trial). To continue your trial on a dierent computer, install Helix
Native plug-in on the other computer and choose the Trial version.
Manage Account
Choose this menu option to be taken to the Line 6 My Account page (https://line6.
com/account/), where you can view and update your Line 6 user account - view and
manage add-ons and Marketplace purchases, register Line 6 gear, update your personal information, and more.
License Synchronization
Whenever you make a purchase from Marketplace, a license for each product you purchase is deposited into your online Line 6 account. For Helix Native to access your new
licenses and eectively “unlock” your purchased assets, it needs to perform a “sync”
process with your Line 6 account. You must have an active Internet connection and
be signed in within Helix Native on your next use of the plug-in after your purchase
for this license synchronization to occur.
When you're signed in, this brief sync takes place automatically in Helix Native the next
time you insert a plug-in instance, or if already inserted, when you next click on the
plug-in window. (Note that it may take up to 5 minutes before a sync occurs for an existing instance of the plug-in.) Once the license sync has completed, an active Internet
connection is not required for the use of these Marketplace purchased assets.
48
Page 50

Model Lists
To follow are the lists of all Eect, Amp, Speaker Cabinet & Microphone models included in Helix Native, as well as the original gear they are based on.* Models, in many
cases, include some unique parameters, typically based on the controls found on the
original gear we modeled. However, you will also nd a set of options that are common
to model category types, as described in the sections that follow.
TIP: Most model parameters are able to be congured for automation control by your
host DAW software - see “The Automation/Controller Assign Tab” on page 36.
Effects Models
Helix Native includes all the eects models found within the award-winning Line 6 Helix
guitar processors. In addition, selected eects from the classic Line 6 DL4™, DM4™,
MM4™, and FM4™ stompboxes as well as M13®, M9®, and M5® processors are also
included, which are referred to as “Legacy” models.
The following Eects models are found within each of the Helix Native plug-in's respective block category menus (Distortion, Dynamics, EQ, etc.). Once you've selected an ef-
fects category in the plug-in's Model Browser menu, you'll see up to three eects sub-
categories: Mono, Stereo and Legacy. Mono models process in mono, as you'd expect,
collapsing the stereo output of any block preceding it to mono. Stereo models process
the signal as discrete stereo-in, stereo-out. Legacy type models, just as on earlier Line
6 devices, are a mixed bag and can be either mono, stereo or mono-in/stereo-out. See
“Block Order and Stereo Imaging” on page 29 for more info.
Distortion Models
Model Subcategories Based On*
Kinky Boost
Deranged Master
Minotaur
Teemah!
Compulsive Drive
Valve Driver
Top Secret OD
Scream 808
Hedgehog D9
Mono, Stereo Xotic® EP Booster
Mono, Stereo Dallas Rangemaster Treble Booster
Mono, Stereo Klon® Centaur
Mono, Stereo Paul Cochrane Timmy® Overdrive
Mono, Stereo Fulltone® OCD
Mono, Stereo Chandler Tube Driver
Mono, Stereo DOD® OD-250
Mono, Stereo Ibanez® TS808 Tube Screamer
Mono, Stereo MAXON® SD9 Sonic Distortion
®
Distortion Models
Model Subcategories Based On*
Stupor OD
Deez One Vintage
Deez One Mod
Vermin Dist
KWB
Arbitrator Fuzz
Triangle Fuzz
Industrial Fuzz
Tycoctavia Fuzz
Thrifter Fuzz
Wringer Fuzz
Megaphone
Bitcrusher
Obsidian 7000
Clawthorn Drive
Tube Drive
Screamer
Overdrive
Classic Dist
Heavy Dist
Colordrive
Buzz Saw
Facial Fuzz
Jumbo Fuzz
Fuzz Pi
Jet Fuzz
L6 Drive
L6 Distortion
Sub Oct Fuzz
Octave Fuzz
Mono, Stereo BOSS® SD-1 Overdrive
Mono, Stereo BOSS® DS-1 Distortion (Made-in-Japan)
Mono, Stereo BOSS® DS-1 Distortion (Keeley modded)
Mono, Stereo Pro Co RAT
Mono, Stereo Benadrian Kowloon Walled Bunny Distortion
Mono, Stereo Arbiter® FuzzFace
Mono, Stereo Electro-Harmonix® Big Mu Pi
Mono, Stereo Z.Vex Fuzz Factory
Mono, Stereo Tycobrahe® Octavia
Mono, Stereo Line 6 Original
Mono, Stereo Garbage's modded BOSS® FZ-2
Mono, Stereo Megaphone
Mono, Stereo Line 6 Original
Mono, Stereo Darkglass® Electronics Microtubes® B7K Ultra
Mono, Stereo Wounded Paw Battering Ram
Legacy Chandler Tube Driver
Legacy Ibanez® Tube Screamer
Legacy DOD® Overdrive/Preamp 250
Legacy ProCo RAT
Legacy BOSS® Metal Zone
Legacy Colorsound® Overdriver
Legacy Maestro® Fuzz Tone
Legacy Arbiter® Fuzz Face
Legacy Vox® Tone Bender
Legacy Electro-Harmonix® Big Mu Pi
Legacy Roland® Jet Phaser
Legacy Colorsound® Overdriver (modded)
Legacy Line 6 Original
Legacy PAiA Roctave Divider
Legacy Tycobrahe® Octavia
®
®
®
®
®
*See “U.S. Registered Trademarks” on page 58. All product names used in this document are trademarks of their respective owners and neither Yamaha Guitar Group nor Line 6 are associated or aliated with them.
These trademarks appear solely to identify products whose tones and sounds were studied by Line 6 during sound model development.
49
Page 51

Dynamics Models
Modulation Models
Model Subcategories Based On*
Deluxe Comp
Red Squeeze
Kinky Comp
LA Studio Comp
3-Band Comp
Noise Gate
Hard Gate
Autoswell
Tube Comp
Red Comp
Blue Comp
Blue Comp Treb
Vetta Comp
Vetta Juice
Boost Comp
Mono, Stereo Line 6 Original
Mono, Stereo MXR® Dyna Comp
Mono, Stereo Xotic® SP Compressor
Mono, Stereo Teletronix® LA-2A
Mono, Stereo Line 6 Original
Mono, Stereo Line 6 Original
Mono, Stereo Line 6 Original
Mono, Stereo Line 6 Original
Legacy Teletronix® LA-2A
Legacy MXR® Dyna Comp
Legacy BOSS® CS-1
Legacy BOSS® CS-1 (Treble switch on)
Legacy Line 6 Original
Legacy Line 6 Original
Legacy MXR® Micro Amp
EQ Models
Model Subcategories Based On*
Simple EQ
Low and High Cut
Parametric
10 Band Graphic
Cali Q Graphic
Mono, Stereo Line 6 Original
Mono, Stereo Line 6 Original
Mono, Stereo Line 6 Original
Mono, Stereo MXR® 10-Band Graphic EQ
Mono, Stereo MESA/Boogie® Mark IV Graphic EQ
Modulation Models
Model Subcategories Based On*
Optical Trem
60s Bias Trem
Tremolo/Autopan
Harmonic Tremolo
Mono, Stereo Fender® optical tremolo circuit
Mono, Stereo Vox® AC-15 Tremolo
Mono, Stereo BOSS® PN-2
Mono, Stereo Line 6 Original
Model Subcategories Based On*
Bleat Chop Trem
Script Mod Phase
Ubiquitous Vibe
®
®
Deluxe Phaser
Gray Flanger
Harmonic Flanger
Courtesan Flange
Dynamix Flanger
Chorus
70s Chorus
PlastiChorus
Trinity Chorus
Bubble Vibrato
Vibe Rotary
122 Rotary
145 Rotary
Double Take
AM Ring Mod
Pitch Ring Mod
Pattern Tremolo
Panner
Bias Tremolo
Opto Tremolo
Script Phase
Panned Phaser
Barberpole
Dual Phaser
U-Vibe
Phaser
Mono, Stereo Lightfoot Labs Goatkeeper
Mono, Stereo MXR® Phase 90
Mono, Stereo Shin-ei Uni-Vibe
Mono, Stereo Line 6 Original
Mono, Stereo MXR® 117 Flanger
Mono, Stereo A/DA Flanger
Mono, Stereo Electro-Harmonix® Deluxe EM
Mono, Stereo Line 6 Original
Mono, Stereo Line 6 Original
Mono, Stereo BOSS® CE-1
Mono, Stereo Modded Arion SCH-Z chorus
Stereo Dytronics® Tri-Stereo Chorus
Mono, Stereo BOSS® VB-2 Vibrato
Stereo Fender® Vibratone
Stereo Leslie® 122
Stereo Leslie® 145
Mono, Stereo Line 6 Original
Mono, Stereo Line 6 Original
Stereo Line 6 Original
Legacy Line 6 Original
Legacy Line 6 Original
Legacy 1960 Vox® AC-15 Tremolo
Legacy 1964 Fender® Deluxe Reverb
Legacy MXR® Phase 90 (script logo version)
Legacy Ibanez® Flying Pan
Legacy Line 6 Original
Legacy Mu-Tron® Bi-Phase
Legacy Shin-ei Uni-Vibe
Legacy MXR® Phase 90
®
®
®
*See “U.S. Registered Trademarks” on page 58. All product names used in this document are trademarks of their respective owners and neither Yamaha Guitar Group nor Line 6 are associated or aliated with them.
These trademarks appear solely to identify products whose tones and sounds were studied by Line 6 during sound model development.
50
Page 52

Modulation Models
Delay Models
Model Subcategories Based On*
Pitch Vibrato
Dimension
Analog Chorus
Tri Chorus
Analog Flanger
Jet Flanger
AC Flanger
80A Flanger
Frequency Shift
Ring Modulator
Rotary Drum
Rotary Drum/Horn
Legacy BOSS® VB-2
Legacy Roland® Dimension D
Legacy BOSS® CE-1
Legacy Dytronics® Tri-Stereo Chorus
Legacy MXR® Flanger
Legacy A/DA Flanger
Legacy MXR® Flanger
Legacy A/DA Flanger
Legacy Line 6 Original
Legacy Line 6 Original
Legacy Fender® Vibratone
Legacy Leslie® 145
Delay Models
Model Subcategories Based On*
Simple Delay
Mod/Chorus Echo
Dual Delay
Multitap 4
Multitap 6
Ping Pong
Sweep Echo
Ducked Delay
Reverse Delay
Vintage Digital
Vintage Swell
Pitch Echo
Transistor Tape
Cosmos Echo
Mono, Stereo Line 6 Original
Mono, Stereo Line 6 Original
Stereo Line 6 Original
Stereo Line 6 Original
Stereo Line 6 Original
Stereo Line 6 Original
Mono, Stereo Line 6 Original
Mono, Stereo TC Electronic® 2290
Mono, Stereo Line 6 Original
Mono, Stereo Line 6 Original
Mono, Stereo Line 6 Original
Mono, Stereo Line 6 Original
Mono, Stereo Maestro® Echoplex EP-3
Mono, Stereo Roland® RE-201 Space Echo
Model Subcategories Based On*
Harmony Delay
Bucket Brigade
Adriatic Delay
Adriatic Swell
Elephant Man
Multi Pass
Ping Pong
Dynamic
Stereo
Digital
Dig w/Mod
Reverse
Lo Res
Tube Echo
Tape Echo
Sweep Echo
Echo Platter
Analog Echo
Analog w/Mod
Auto-Volume Echo
Multi-Head
Stereo Line 6 Original
Mono, Stereo BOSS® DM-2
Mono, Stereo BOSS® DM-2 w/ Adrian Mod
Mono, Stereo Line 6 Original
Mono, Stereo Electro-Harmonix® Deluxe Memory Man
Mono, Stereo Line 6 Original
Legacy Line 6 Original
Legacy TC Electronic® 2290
Legacy Line 6 Original
Legacy Line 6 Original
Legacy Line 6 Original
Legacy Line 6 Original
Legacy Line 6 Original
Legacy Maestro® Echoplex EP-1
Legacy Maestro® Echoplex EP-3
Legacy Line 6 Original
Legacy Binson® EchoRec
Legacy BOSS® DM-2
Legacy Electro-Harmonix® Deluxe Memory Man
Legacy Line 6 Original
Legacy Roland® RE-101 Space Echo
Reverb Models
Model Subcategory Based On*
Glitz
Ganymede
Searchlights
Plateaux
Double Tank
Mono, Stereo Line 6 Original
Mono, Stereo Line 6 Original
Mono, Stereo Line 6 Original
Mono, Stereo Line 6 Original
Mono, Stereo Line 6 Original
®
*See “U.S. Registered Trademarks” on page 58. All product names used in this document are trademarks of their respective owners and neither Yamaha Guitar Group nor Line 6 are associated or aliated with them.
These trademarks appear solely to identify products whose tones and sounds were studied by Line 6 during sound model development.
51
Page 53

Reverb Models
Filter Models
Model Subcategory Based On*
Plate
Room
Chamber
Hall
Echo
Tile
Cave
Ducking
Octo
'63 Spring
Spring
Particle Verb
Legacy Line 6 Original
Legacy Line 6 Original
Legacy Line 6 Original
Legacy Line 6 Original
Legacy Line 6 Original
Legacy Line 6 Original
Legacy Line 6 Original
Legacy Line 6 Original
Legacy Line 6 Original
Legacy Line 6 Original
Legacy Line 6 Original
Legacy Line 6 Original
Pitch/Synth Models
Model Subcategories Based On*
Pitch Wham
Twin Harmony
Simple Pitch
Dual Pitch
3 OSC Synth
3 Note Generator
4 OSC Generator
Bass Octaver
Smart Harmony
Octi Synth
Synth O Matic
Attack Synth
Synth String
Growler
Mono, Stereo Digitech® Whammy
Mono, Stereo Eventide® H3000
Mono, Stereo Line 6 Original
Mono, Stereo Line 6 Original
Stereo Line 6 Original
Mono, Stereo Line 6 Original
Mono, Stereo Line 6 Original
Legacy EBS® OctaBass
Legacy Eventide® H3000
Legacy Line 6 Original
Legacy Line 6 Original
Legacy Korg® X911 Guitar Synth
Legacy Roland® GR700 Guitar Synth
Legacy Line 6 Original
Model Subcategories Based On*
Mutant Filter
Mystery Filter
Autolter
Voice Box
V Tron
Q Filter
Seeker
Obi Wah
Tron Up
Tron Down
Throbber
Slow Filter
Spin Cycle
Comet Trails
®
Mono, Stereo Musitronics® Mu-Tron® III
Mono, Stereo Korg® A3
Mono, Stereo Line 6 Original
Legacy Line 6 Original
Legacy Musitronics® Mu-Tron® III
Legacy Line 6 Original
Legacy Z Vex Seek Wah
Legacy Oberheim® voltage-controlled S&H lter
Legacy Musitronics® Mu-Tron® III (up position)
Legacy Musitronics® Mu-Tron® III (down position)
Legacy Electrix® Filter Factory
Legacy Line 6 Original
Legacy Craig Anderton's Wah/Anti-Wah
Legacy Line 6 Original
Wah Models
Model Subcategories Based On*
UK Wah 846
Teardrop 310
Fassel
Weeper
Chrome
Chrome Custom
Throaty
Vetta Wah
Colorful
Conductor
Mono, Stereo Vox® V846
Mono, Stereo Dunlop® Cry Baby® Fasel model 310
Mono, Stereo Dunlop® Cry Baby® Super
Mono, Stereo Arbiter® Cry Baby
Mono, Stereo Vox® V847
Mono, Stereo Modded Vox® V847
Mono, Stereo RMC® Real McCoy 1
Mono, Stereo Line 6 Original
Mono, Stereo Colorsound® Wah-fuzz
Mono, Stereo Maestro® Boomerang
®
*See “U.S. Registered Trademarks” on page 58. All product names used in this document are trademarks of their respective owners and neither Yamaha Guitar Group nor Line 6 are associated or aliated with them.
These trademarks appear solely to identify products whose tones and sounds were studied by Line 6 during sound model development.
52
Page 54

Volume/Pan Models
Model Subcategories Based On*
Volume Pedal
Gain
Pan
Stereo Width
Mono, Stereo Line 6 Original
Mono, Stereo Line 6 Original
Stereo Line 6 Original
Stereo Line 6 Original
Common FX Settings
Parameter Description
Drive
Bass
Mid
Treble
Speed
Rate
Time
Depth
Feedback
Decay
Predelay
Adjusts the amount of overdrive, distortion, or fuzz.
Adjusts the bass level.
Adjusts the midrange level.
Adjusts the treble level.
Adjusts the speed of the eect, with higher settings providing faster
rates. Activate the model's Note Sync parameter to toggle between Hz and note values. Choosing a Hz value provides a specic
modulation speed in cycles per second; choosing a note value provides a time based on the current tempo. Not all Speed parameters
can be synced to note values, as they may be non-linear and highly
interactive.
Adjusts the rate of the eect, with higher settings providing faster
rates. Activate the model's Note Sync parameter to toggle between Hz and note values. Not all Rate parameters can be synced to
note values, as they may be non-linear and highly interactive.
Adjusts the delay/repeat time, with higher settings providing longer
delays. Activate the model's Note Sync parameter to toggle be-
tween Hz and note values. Choosing a ms value provides a specic
time in milliseconds; choosing a note division value provides a time
based on the current tempo. With a note division value, this parameter’s value is retained when changing models.
Adjusts the intensity of the modulation. Higher settings result in more
extreme pitch bending, wobble, or throb, depending on the eect.
Adjusts the amount of delayed signal fed back into the eect. Higher
settings can provide more dramatic textures.
Sets the length of time the reverb eect sustains.
Determines the time before the reverb eect is heard.
Parameter Description
On stereo delays, the Scale oers control over the left & right channel
repeats proportionately. The left channel repeats following the Time
Scale
Spread
Headroom
Low Cut
High Cut
Mix
Level
Trails
value and the right channel will repeat at a time that is the percentage
of the left time. For example, if a delay's Time is set for 1 second and
the Scale set to 75%, the left channel will repeat at 1 second and the
right at 750 milliseconds (ms).
Spread diers slightly among stereo delay eects. For most delays,
it adjusts how widely the repeats bounce left and right. With the Ping
Pong Delay, for example, 0 is in the middle (mono), and 10 is full left to
right panning for the repeats.
For modulated stereo delays, Spread aects the LFOs’ (low frequency
oscillators) stereo modulation behavior. At 0 the LFOs are in sync. At
10, the two LFOs are 180 degrees out of sync, so that when one side
is modulating up, the other side is modulating down.
Some mod and delay pedals' internal signal paths exhibit a bit of grit,
especially when placed after a high-gain amp block. Negative values
increase the perceived amount of grit; positive values clean things up
a bit. At 0dB, the model behaves like the original pedal.
Filters a portion of the block’s bass and/or treble frequencies, which
can help remove rumble and/or high-end harshness.
Blends the eected “wet” signal vs. the “dry” signal passed through
the block. When set to 0%, the path bypasses the eect completely.
When set to 100%, the entire path is fed through the eect, and no
dry thru signal is heard.
Adjusts the overall output level of the eects block. Be careful not to
boost this parameter too high on multiple blocks, as digital clipping
could occur. You should typically leave this at 0.0dB for most blocks.
Where the original pedal's level or volume knob behavior doesn't
really apply to dB values, 0.0-10 may be used.
Trails O: Any delay repeats or reverb decays are instantly muted
when the block is bypassed.
Trails On: Any delay repeats or reverb decays continue to decay natu-
rally when the block is bypassed or a dierent snapshot is selected.
53
Page 55

Amp Models
The following guitar & bass amp models are found within the Helix Native Amp+Cab,
Amp and Preamp block category menus. Note that you'll also see Guitar and Bass
subcategories for the Amp+Cab & Amp categories, and Guitar, Bass and Mic subcategories for the Preamp category.
• Amp+Cab blocks include an Amp plus a matched Cab model. You can change
out the Cab for sonic variation (see the list of “Speaker Cabinet Models” on
page 56 ).
• Amp blocks are identical to Amp+Cab blocks, except they contain no matched
Cab model. Using an Amp block is the best choice if you want to use an IR
block. Or try using a few IR or Cab blocks in a parallel Split Path for even more
variation.
• Preamp versions of each amp model are also included, which provide the tone
of just the preamp stage of the amp. Preamp blocks require less computer processing than a full Amp block.
Amp Models
Model Subcategory Based On*
WhoWatt 100
Soup Pro
Stone Age 185
Voltage Queen
Tweed Blues Nrm
Tweed Blues Brt
US Small Tweed
US Deluxe Nrm
US Deluxe Vib
US Double Nrm
US Double Vib
Mail Order Twin
Divided Duo
Interstate Zed
Derailed Ingrid
Jazz Rivet 120
Essex A15
Guitar Hiwatt® DR-103 Brill
Guitar Supro® S6616
Guitar Gibson® EH-185
Guitar Victoria Vintage Queen
Guitar Fender® Bassman® (normal channel)
Guitar Fender® Bassman® (bright channel)
Guitar Fender® Champ
Guitar Fender® Deluxe Reverb® (normal channel)
Guitar Fender® Deluxe Reverb® (vibrato channel)
Guitar Fender® Twin Reverb® (normal channel)
Guitar Fender® Twin Reverb® (vibrato channel)
Guitar Silvertone® 1484
Guitar ÷13 JRT 9/15
Guitar Dr Z® Route 66
Guitar Trainwreck® Circuits Express
Guitar Roland® JC-120 Jazz Chorus
Guitar Vox® AC-15
®
Amp Models
Model Subcategory Based On*
Essex A30
A30 Fawn Nrm
A30 Fawn Brt
Matchstick Ch1
Matchstick Ch2
Matchstick Jump
Mandarin 80
Brit J45 Nrm
Brit J45 Brt
Brit Trem Nrm
Brit Trem Brt
Brit Trem Jump
Brit Plexi Nrm
Brit Plexi Brt
Brit Plexi Jump
Brit P75 Nrm
Brit P75 Brt
Brit 2204
Placater Clean
Placater Dirty
Cartographer
German Mahadeva
German Ubersonic
Cali Texas Ch1
Cali Texas Ch2
Cali IV Rhythm 1
Cali IV Rhythm 2
Cali IV Lead
Guitar Vox® AC-30 with top boost
Guitar Vox® AC-30 Fawn (normal channel)
Guitar Vox® AC-30 Fawn (bright channel)
Guitar Matchless® DC30 (channel 1)
Guitar Matchless® DC30 (channel 2)
Guitar Matchless® DC30 (jumped)
Guitar Orange® OR80
Guitar Marshall® JTM-45 (normal channel)
Guitar Marshall® JTM-45 (bright channel)
Guitar Marshall® JTM-50 (normal channel)
Guitar Marshall® JTM-50 (bright channel)
Guitar Marshall® JTM-50 (jumped)
Guitar Marshall® Super Lead 100 (normal channel)
Guitar Marshall® Super Lead 100 (bright channel)
Guitar Marshall® Super Lead 100 (jumped)
Guitar Park® 75 (normal channel)
Guitar Park® 75 (bright channel)
Guitar Marshall® JCM-800
Guitar Friedman BE-100 (clean channel)
Guitar Friedman BE-100 (BE/HBE channel)
Guitar Ben Adrian Cartographer
Guitar Bogner® Shiva
Guitar Bogner® Überschall
Guitar MESA/Boogie® Lone Star (clean channel)
Guitar MESA/Boogie® Lone Star (drive channel)
Guitar MESA/Boogie® Mark IV (channel I)
Guitar MESA/Boogie® Mark IV (channel II)
Guitar MESA/Boogie® Mark IV (lead channel)
®
*See “U.S. Registered Trademarks” on page 58. All product names used in this document are trademarks of their respective owners and neither Yamaha Guitar Group nor Line 6 are associated or aliated with them.
These trademarks appear solely to identify products whose tones and sounds were studied by Line 6 during sound model development.
54
Page 56

Amp Models
Amp Models
Model Subcategory Based On*
CaliRectire
Archetype Clean
Archetype Lead
ANGL Meteor
Solo Lead Clean
Solo Lead Crunch
Solo Lead OD
PV Panama
Line 6 Elektrik
Line 6 Doom
Line 6 Epic
Line 6 2204 Mod
Line 6 Fatality
Line 6 Litigator
Line 6 Badonk
Tuck n' Go
SV Beast Nrm
SV Beast Brt
Woody Blue
Agua 51
Cali Bass
Cali 400 Ch1
Cali 400 Ch2
G Cougar 800
Guitar MESA/Boogie® Dual Rectier
Guitar Paul Reed Smith® Archon® (clean channel)
Guitar Paul Reed Smith® Archon® (lead channel)
Guitar ENGL® Fireball 100
Guitar Soldano SLO-100 (clean channel)
Guitar Soldano SLO-100 (crunch channel)
Guitar Soldano SLO-100 (overdrive channel)
Guitar Peavey® 5150
Guitar Line 6 Original
Guitar Line 6 Original
Guitar Line 6 Original
Guitar Line 6 Original
Guitar Line 6 Original
Guitar Line 6 Original
Guitar Line 6 Original
Bass Ampeg® B-15NF Portaex
Bass Ampeg® SVT® (normal channel)
Bass Ampeg® SVT® (bright channel)
Bass Acoustic® 360
Bass Aguilar® DB51
Bass MESA/Boogie® M9 Carbine
Bass MESA/Boogie® Bass 400+ (channel 1)
Bass MESA/Boogie® Bass 400+ (channel 2)
Bass Gallien-Krueger® GK 800RB
Model Subcategory Based On*
®
Del Sol 300
Busy One Ch1
Busy One Ch2
Busy One Jump
Studio Tube Pre
Bass Sunn® Coliseum 300
Bass Pearce BC-1 preamp (channel 1)
Bass Pearce BC-1 preamp (channel 2)
Bass Pearce BC-1 preamp (jumped)
Preamp > Mic Requisite Y7 mic preamp
Common Amp Settings
®
®
Parameter Description
Adjusts the amount of power amp distortion. This parameter is highly
Master
Sag
Hum
Ripple
Bias
Bias X
interactive with all other power amp parameters—the lower the Master
is set, the less eect the other controls will have.
Lower Sag values oer a “tighter” responsiveness for metal and djent
playing; higher values provide more touch dynamics & sustain for
blues and classic rock ris.
Controls how much heater hum and AC ripple interacts with your tone.
At higher settings, things get freaky.
Changes the Bias of the power tubes. Lower values achieve a “colder”
Class AB biasing. At maximum, the amp is operating in Class A.
Determines how the power amp tubes' voicing reacts when pushed
hard. Set low for a tighter feel. Set high for more tube compression.
This parameter is highly reactive with the Drive and Master settings.
*See “U.S. Registered Trademarks” on page 58. All product names used in this document are trademarks of their respective owners and neither Yamaha Guitar Group nor Line 6 are associated or aliated with them.
These trademarks appear solely to identify products whose tones and sounds were studied by Line 6 during sound model development.
55
Page 57

Speaker Cabinet Models
The following Cab models are available within the Amp+Cab and Cab block category
menus. All Cab models also include your choice of Mic model type used on the Cab,
as well as several Mic settings (see the list of “Microphone Models” on page 57).
There are two subcategories of Cab blocks—Single and Dual. Not surprisingly, Dual
Cabs require twice as much processor usage as single Cabs. When you select a Dual
Cab within the Model menu, you'll see two model tabs, allowing you to select the spe-
cic cab and settings for each. Dual Cab blocks are stereo, with the two cabs panned
hard left and right.
Cab Models
Model Subcategories Based On*
Soup Pro Ellipse
1x8 Small Tweed
1x12 Field Coil
1x12 US Deluxe
1x12 Celest 12H
1x12 Blue Bell
1x12 Lead 80
1x12 Cali IV
1x12 Cali Ext
2x12 Double C12N
2x12 Mail C12Q
2x12 Interstate
2x12 Jazz Rivet
2x12 Silver Bell
2x12 Blue Bell
2x12 Match H30
2x12 Match G25
4x10 Tweed P10R
Single, Dual 1 x 6x9" Supro® S6616
Single, Dual 1x8" Fender® Champ
Single, Dual 1x12" Gibson® EH185
Single, Dual 1x12" Fender® Deluxe Oxford
Single, Dual 1x12" ÷13 JRT 9/15 G12 H30
Single, Dual 1x12" Vox® AC-15 Blue
Single, Dual 1x12" Bogner® Shiva CL80
Single, Dual 1x12" MESA/Boogie® Mk IV
Single, Dual 1x12" MESA/Boogie® EVM12L
Single, Dual 2x12" Fender® Twin C12N
Single, Dual 2x12" Silvertone® 1484
Single, Dual 2x12" Dr Z® Z Best V30
Single, Dual 2x12" Roland® JC-120
Single, Dual 2x12" Vox® AC-30TB Silver
Single, Dual 2x12" Vox® AC-30 Fawn Blue
Single, Dual 1x12" Matchless® DC-30 G12H30
Single, Dual 1x12" Matchless® DC-30 Greenback 25
Single, Dual 4x10" Fender® Bassman® P10R
Cab Models
Model Subcategories Based On*
4x12 WhoWatt 100
4x12 Mandarin EM
4x12 Greenback25
4x12 Greenback20
4x12 Blackback30
4x12 1960 T75
4x12 Uber V30
4x12 Uber T75
4x12 Cali V30
4x12 XXL V30
4x12 SoloLead EM
1x12 Del Sol
1x15 Tuck n' Go
1x18 Del Sol
1x18 Woody Blue
2x15 Brute
4x10 Rhino
6x10 Cali Power
8x10 SV Beast
Single, Dual 4x12" Hiwatt® AP Fane
Single, Dual 4x12" Orange® Eminence
Single, Dual 4x12" Marshall® Basketweave G12 M25
Single, Dual 4x12" Marshall® Basketweave G12 M20
Single, Dual 4x12" Park® 75 G12 H30
Single, Dual 4x12" Marshall® 1960 AT75
Single, Dual 4x12" Bogner® Uberkab V30
Single, Dual 4x12" Bogner® Uberkab T75
Single, Dual 4x12" MESA/Boogie® 4FB V30
Single, Dual 4x12" ENGL® XXL V30
Single, Dual 4x12" Soldano
Single, Dual 1x12" Sunn® Coliseum
Single, Dual 1x15" Ampeg® B-15
Single, Dual 1x18" Sunn® Coliseum
Single, Dual 1x18" Acoustic® 360
Single, Dual 2x15" MESA/Boogie® 2x15 EV
Single, Dual 4x10" Ampeg® SVT® 410HLF
Single, Dual 6x10" MESA/Boogie® Power House
Single, Dual 8x10" Ampeg® SVT
®
®
*See “U.S. Registered Trademarks” on page 58. All product names used in this document are trademarks of their respective owners and neither Yamaha Guitar Group nor Line 6 are associated or aliated with them.
These trademarks appear solely to identify products whose tones and sounds were studied by Line 6 during sound model development.
56
Page 58

Microphone Models
Model Based On*
57 Dynamic
409 Dynamic
421 Dynamic
30 Dynamic
20 Dynamic
121 Ribbon
160 Ribbon
4038 Ribbon
414 Cond
84 Cond
67 Cond
87 Cond
47 Cond
112 Dynamic
12 Dynamic
7 Dynamic
Shure® SM57
Sennheiser® MD 409
Sennheiser® MD 421-U
Heil Sound® PR 30
Electro-Voice® RE20
Royer® R-121
Beyerdynamic® M 160
Coles 4038
AKG® C414 TLII
Neumann® KM84
Neumann® U67
Neumann® U87
Neumann® U47
AKG® D112
AKG® D12
Shure® SM7
Mic Models
Cab & Mic Settings
Knob Parameter Description
1 Mic
2 Distance
3 Low Cut
4 High Cut
5 EarlyRec
6 Level
*See “U.S. Registered Trademarks” on page 58. All product names used in this document are trademarks of their respective owners and neither Yamaha Guitar Group nor Line 6 are associated or aliated with them.
These trademarks appear solely to identify products whose tones and sounds were studied by Line 6 during sound model development.
Selects one of the 16 available mic models.
Sets the distance (1 inch to 12 inches) between the mic and
the speaker grille.
Filters a portion of the cab's bass and/or treble frequencies,
which can help remove rumble and/or high-end harshness.
Sets the amount of “early reections.” Higher values add more
reective room sound to your Amp tone.
Adjusts the overall output level of the Cab.
57
Page 59

U.S. Registered Trademarks
All product names used in this document are trademarks of their respective owners and neither Yamaha Guitar Group nor Line 6 are associated or aliated with them. These trademarks appear solely to identify products whose tones and sounds were studied by Line 6 during sound model development.
5150 is a registered trademark of ELVH Inc.
Acoustic is a registered trademark of GTRC Services, Inc.
Aguilar is a registered trademark David Boonshoft.
AKG, DOD and Whammy are registered trademarks of Harman International Industries, Inc.
Arbiter is a registered trademark of Sound City Amplication LLC.
Binson, Dytronics, LA-2A and Teletronix are registered trademarks of Universal Audio, Inc.
Beyerdynamic is a registered trademark of Beyer Dynamic GmbH & Co. KG.
Bogner and Überschall are registered trademarks of Bogner Amplication.
BOSS and Roland are registered trademarks of Roland Corporation U.S.
Colorsound is a registered trademark of Sola Sound Limited Corporation, UK.
Cry Baby, Dunlop, Fuzz Face, MXR and Uni-Vibe are registered trademarks of Dunlop Man-
ufacturing, Inc.
Darkglass and Microtubes are registered trademarks of Darkglass Electronics, TMI Douglas
Castro.
Digitech is a registered trademark of DOD Electronics Corporation.
Dr. Z is a registered trademark of Dr. Z Amps, Inc.
EBS is a registered trademark according of EBS Holding.
EchoRec is a registered trademark of Nicholas Harris.
Electro-Harmonix and Big Mu Pi are registered trademarks of New Sensor Corp.
Electro-Voice is a registered trademark of Bosch Security Systems, Inc.
Engl is a registered trademark of Beate Ausug and Edmund Engl.
Eventide is a registered trademark of Eventide Inc.
Fane is a trademark of Fane International Ltd.
Fender, Twin Reverb, Bassman, Champ, Deluxe Reverb and Sunn are registered trade-
marks of Fender Musical Instruments Corp.
Fulltone is a registered trademark of Fulltone Musical Products, Inc.
Gallien-Krueger is a registered trademark of Gallien Technology, Inc.
Gibson and Maestro are registered trademarks of Gibson Guitar Corp.
Heil Sound is a registered trademark of Heil Sound Ltd.
Hiwatt is a registered trademark of Simon Giles and Justin Harrison.
Ibanez is a registered trademark of Hoshino, Inc.
Klon is a registered trademark of Klon, LLC.
Korg is a registered trademark of Korg, Inc.
Leslie is a registered trademark of Suzuki Musical Instrument Manufacturing Co. Ltd.
Lone Star is a registered trademark of Randall C. Smith.
Marshall is a registered trademark of Marshall Amplication Plc.
Matchless is a registered trademark of Matchless, LLC.
MAXON is a registered trademark of Nisshin Onpa Co., Ltd.
Mesa/Boogie and Rectier are registered trademarks of Mesa/Boogie, Ltd.
Musitronics is a registered trademark of Mark S. Simonsen.
Mu-Tron is a registered trademark of Henry Zajac.
Neumann is a registered trademark of Georg Neumann GmbH.
Orange is a registered trademark of Orange Brand Services Limited.
Park is a registered trademark of AMP RX LLC.
Paul Reed Smith and Archon are registered trademarks of Paul Reed Smith Guitars, LP.
Peavey is a registered trademark of Peavey Electronics Corporation.
RMC is a registered trademark of Richard McClish.
Royer is a registered trademark of Bulldog Audio, Inc. DBA Rover Labs.
Sennheiser is a registered trademark of Sennheiser Electronic GmbH & Co. KG.
Shure is a registered trademark of Shure Inc.
Silvertone is a registered trademark of Samick Music Corporation.
Supro is a registered trademark of Absara Audio LLC.
TC Electronic is a registered trademark of MUSIC Group IP Ltd.
Timmy is a registered trademark of Paul Cochrane AKA PAULCAUDIO.
Trainwreck is a registered trademark of of Scott Alan Fischer and Mona Fischer.
Tube Screamer is a registered trademark of Hoshino Gakki Co. Ltd.
Tycobrahe is a registered trademark of Kurt Stier.
Vox is a registered trademark of Vox R&D Limited.
Xotic is a registered trademark of Prosound Communications, Inc.
58
Page 60

Additional Resources
Looking for more info? We’ve got plenty of online resources, just a click away.
• Download additional Help documentation covering Helix family devices and soft-
ware from the Line 6 website at Line 6 Product Manuals
• Check out the Line 6 Support page for access to helpful tips, videos, discussion
forums, or to contact Line 6 Technical Support
• Stay up to date with the latest updated version of Helix Native and all your other
Line 6 applications, available from the Line 6 Software Downloads page
• Looking for some professionally crafted presets and Impulse Responses for your
Helix device or Helix Native plug-in? Check out the new Marketplace, and be
sure to check back often for news and product announcements
• Visit the Line 6 CustomTone site where you can share your Helix presets with the
world, and download free presets created by Line 6 and other users just like you
• Can’t get enough Line 6 Gear & accessories? Head on over to the Line 6 Store
59
Page 61

®
 Loading...