

Page 1

Pilot’s Guide
Manuel de pilotage
Pilotenhandbuch
Pilotenhandboek
Manual del Piloto
40-00-0300 Electrophonic Limited Edition available @ www.line6.com Rev D
Page 2

Page 3

All product names referred to in this manual
are trademarks of their respective owners,
which are in no way associated or affiliated
with Line 6. These trademarks of other
manufacturers are used solely to identify
the products of those manufacturers whose
tones and sounds were studied during Line
6’s sound model development.
Page 4
You should read these Important Safety Instructions.
Keep these instructions in a safe place.
Before using your LowDown, carefully read the applicable items of these operating instructions and the safety suggestions.
1. Obey all warnings on the amp and in the LowDown Manual.
2. Connect only to AC power outlets rated 100-120V or 200-240V 47-63Hz (depending on voltage range of the unit; refer to back panel).
3. Do not perform service operations beyond those described in the LowDown Manual. Service is required when the apparatus has been
damaged in any way, such as:
• power-supply cord or plug is damaged
• liquid has been spilled or objects have fallen into the apparatus
• the unit has been exposed to rain or moisture
• the unit does not operate normally or changes in performance in a significant way
• the unit is dropped or the enclosure is damaged.
4. The bottom of the metal chassis can get hot during operation. Do not touch during operation or shortly after.
5. Do not place near heat sources, such as radiators, heat registers, or appliances which produce heat. Keep the rear of the unit at least
three inches from walls or other items that might block heat radiation.
6. Do not block any of the ventilation openings or use in an enclosed space.
7. Guard against objects or liquids entering the enclosure. Do not use or place unit near water.
8. Do not step on power cords. Do not place items on top of power cords so that they are pinched or leaned on. Pay particular attention
to the cord at the plug end and the point where it connects to the amp.
9. Unplug the amp when not in use for extended periods of time. Unplug the amp during lightning storms.
10. Clean only with a damp cloth.
11. Do not defeat the safety purpose of the grounding type plug. A grounding type plug has two blades and a third grounding prong.
The third prong is provided for your safety. When the provided plug does not fit into your outlet, consult an electrician for replacement
of the obsolete outlet.
12. Only use attachments/accessories specified by the manufacturer.
13. Prolonged listening at high volume levels may cause irreparable hearing loss and/or damage. Always be sure to practice “safe listening.”
Page 5

Line 6, LowDown, POD, A.I.R, Floorboard, FBV, FBV Shortboard, FBV4 and FBV2 are trademarks
of Line 6, Inc. All other product names, trademarks, and artists’ names are the property of their
respective owners, which are in no way associated or affiliated with Line 6. Product names, images,
and artists’ names are used solely to identify the products whose tones and sounds were studied
during Line 6’s sound model development for this product. The use of these products, trademarks,
images, and artists’ names does not imply any cooperation or endorsement.
CAUTION: This equipment has been tested and found to comply with the limits for a Class B digital device pursuant to
Part 15 of FCC Rules. Operation is subject to the following two conditions: (1) This device may not cause harmful interference,
and (2) this device must accept any interference received, including interference that may cause undesired operation.
WARNING: To reduce the risk of fire or electric shock, do
not expose this appliance to rain or moisture.
CAUTION: To reduce the risk of fire or electric shock, do
not remove screws. No user-serviceable parts inside. Refer
servicing to qualified service personnel.
Low Down Pilot’s Guide © 2008, Line 6, Inc.
The exclamation point within a triangle means
“caution!” Please read the information next to
all caution signs.
The lightning symbol within a triangle means
“electrical caution!” It indicates the presence of
information about operating voltage and
potential risks of electrical shock.
This symbol within a triangle means “caution!
hot surface!” It is placed in areas that may become
to hot to touch when device is in operation.
Page 6

9
10
1
2
1. Passive & Active Input - Start by using the
passive input. If your bass’s output distorts the input
section, switch to the active input. You are clipping
the input when the TUNER/CLIP (see 11) button
lights up. (A “passive” instrument has no built-in
preamp and does not use a battery. Active Input - An
“active” bass utilizes a battery operated preamp.)
2. Amp Models - Spin this knob to select one of
5 groovealicious Amp Models or Synth Bass. All the
LowDown controls will automatically dial in to sound
great with that Amp Model, so you can just play!
3. Drive - Like the volume or gain knob on other
amps; controls how much “dirt” you get in your sound.
4. Tone Controls – Bass, Low Mid, Hi Mid and
Treble controls are customized for each Amp Model
to give you optimal tonal control.
3
4
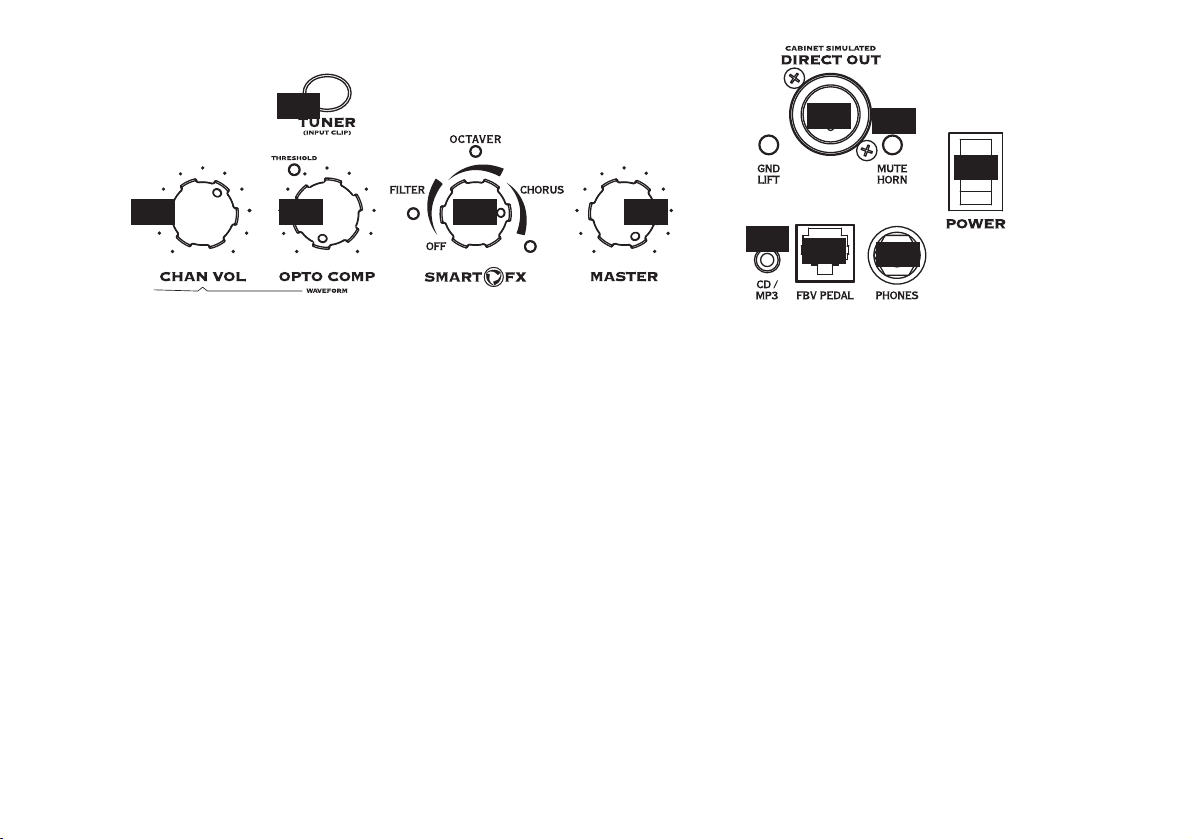
5. Channel Volume - Without affecting your tone,
this control helps you balance the volumes of different
amp-and-effect setups that you store in your LowDown’s
channel memories (see 10). Start with it at 2 o’clock
then adjust the Drive and Tone Controls to get the
sound you want, and then use Channel Volume to
make your presets even in volume.
6. Opto Comp - Turn clockwise to even out your
playing dynamics (more compression). Watch for the
Threshold light, and set the knob so that it comes on
just at the point where you play with your typical
intensity.
7. Smart FX - Spin this knob to get great FX, fast
and easy: This knob selects Envelope Filter, Octaver,
or Chorus, with a range of settings – from subtle to
overpowering – for each effect. The LED shows the
active effect.
Page 7
11
5 6 7 8
14
12
15
13
17
16
8. Master Volume - You can choose the overall
volume of the amplifier, without affecting your tone.
9. Deep - Selecting Deep will kick in a special tone
shaping eq that will dial in the model for supreme
fatness.
10. Channel Memories - Four programmable
channels come pre-loaded with great factory presets
but can be used to save your own custom settings.
11. Tuner/Clip button - engages the built in tuner.
(Watch the Amp Model LED’s to see what note you’re
tuning.)
NOTE: The following controls are on the rear
of some units.
12. XLR Direct Out - This gives the sound man a
simulation of a mic'd cabinet that is model specific. To
the left of the input is a ground lift.
13. Mute Horn - (LD175, LD300 Pro and LD400
Pro only) Mutes the horn for those of you who are
adverse to high frequencies.
14. CD/MP3 - Plug in any audio source and it feeds
directly into the LowDown speaker or headphones so
you can jam with your favorite music or a drum machine.
Use the input devices output control to adjust it’s
volume.
15. Foot Control - Plug in an FBV Shortboard, FBV
Express or FBV2 foot switch to access some very exciting
functions to be explained later in this manual. See the
“Using Your Feet” for more information.
16. Headphone - Listen with headphones to your
LowDown mixed with what ever you would like to
input into the CD/MP3 jack.
17. Power - on or off. The amp sounds better on.
Page 8

Additional outputs of the HD400, LD400 Pro & HD750.
PRE
OUT
UNBALANCED
18
EXTENSION
SPEAKER
OUTPUT
MINIMUM 8 OHM LOAD
19
18. Preamp Out - Plug in here to send your sound
to an external bass amp or power amp without a
simulation of a mic'd cabinet. (HD400 & HD750 only)
19. Extension Speaker Output (LD400Pro only)
Only use an 8 Ohm Speaker cabinet when using the
Extension Speaker Output.
20. Speaker Outs (HD400 & HD750 only) -
Only use a 4 Ohm speaker cabinet when running in
mono. Only use 8 Ohm speaker cabinets when feeding
a pair. Warning! Do not plug two 4 Ohm cabinets
into either the HD400 or HD750 as it can result in
damage to the amplifier.
PARALLEL SPEAKER OUTPUTS
MINIMUM 4 OHM OUTPUT AT 400 WATTS
CONNECT
8 Ohm pair
20
OR
4 Ohm single
ONLY
Using Neutrik Speakon Output Connections
The LD400 Pro, HD400 & HD750 all feature Neutrik
Speakon NL4 series high current twist-lock speaker
output connections. These are used instead of standard
1/4-inch unbalanced speaker jacks to provide superior
and safe coupling characteristics with professional grade
bass guitar cabinets like the Line 6 LowDown 410
cabinet.
Pins 1+ and 1- are used so that a standard two conductor
Speakon-to-Speakon cable can be used, or a two
conductor Speakon-to-1/4-inch adapter.
Warning! If a Speakon-to-1/4-inch adaptor must be
used, we recommend that the power amp be OFF when
plugging the amplifier to a standard 1/4-inch cabinet
input jack to prevent any risk of shock.
Warning! Do not use a Speakon Cable labeled
“BRIDGE MODE” with the HD400 or HD750. This
can cause damage to the amp.
Page 9

Here’s the LowDown...
Thanks for choosing the Line 6 LowDown. We’re
excited to welcome you to the Line 6 community.
We’ve spent tons of time dialing in your new amp with
artists and technicians to deliver a fabulous range of
critical bass tones. The LowDown was inspired by some
classic bass amps that shaped the tone of rock and roll
such as the Ampeg® SVT®, Ampeg® B-15, or the
Marshall® Super Bass–amps that deliver tone that will
rearrange your insides. These were, and still are, the
standard for professional bass players the world over.
Unfortunately, many of them are incredibly heavy and
can very quickly empty your checking account or max
out your credit card, so most of us working stiffs have
gravitated to one of many fine affordable portable amps
with fairly generic tone. Until now….
With LowDown we have worked hard to bring to you,
for the first time, serious stadium bass rig tone in a
reliable/affordable combo and pro heads with plenty
of power for any venue. We have spent countless hours
modeling the best of the best and faithfully reproducing
them on the very amp you’re probably sitting on or
fondly staring at right now. Whether you are looking
for that mind bending funk tone or that classic rock
tone heard round the world, Line 6’s LowDown brings
it to you. The endless search for the perfect versatile
and reliable amp has come to an end…. now let’s get
started!
All product names are trademarks of their respective owners, which are in no way associated or affiliated with Line 6. These product names, descriptions
and images are provided for the sole purpose of identifying the specific products that were studied during Line 6’s sound model development. AMPEG®
is a trademark of St. Louis Music, Inc. MARSHALL® is a trademark of Marshall Amplification Plc.
Page 10

Some sage advice…
Here are a couple bits of wisdom that will hopefully
make your LowDown experience a happy and
productive one. Before you position your amp in your
rehearsal space or venue, consider a couple of things:
• Getting closer to a wall will increase the amount of
perceived low end from your amp, and for an added
bonus, get in a corner for even more pronounced low
end. (Or move away from the walls if your tone is too
boomy!)
• What sounds like great tone on stage doesn’t always
translate to the audience in the rest of the room. After
you set up and get your tone, it is a good idea to walk
20 feet out into the room, if your cord will allow, and
listen to what your amp sounds like. Adjust your tone
to achieve the compromise of what you need to hear
on stage, and what sounds good in the room. Happiness
will abound!
• If you purchased the LowDown 150 with the 12”
speaker and kick back design, note that the perceived
tone will be change when the amp is tilted back. When
you tilt it back and use it as your monitor you lose a
bit of low end but gain volume and clarity. This is
good when you are in a small club/church
environment. If you are in the garage jamming with
friends or a medium size club you may want to keep
the amp in an upright position to fill the room with
your sound.
Page 11

Amp Model Details
Just as a great artist has many colors to paint with, you
to will be able to paint your music in many colors,
thanks to the wide range of tone available in the
LowDown. Each of these models when selected
automatically dials up a great useable default sound
that you can then change to your liking and save into
a preset using the channel memories the front panel
or with an FBV foot controller.
Some helpful hints
We have given you model specific tone controls. They
react as the actual amp would in a given situation. For
instance turning the treble up all the way is a very
different experience on each model. We would suggest
that you pull up an amp and start with these controls
at 12 o’clock and the drive down, then decide what
you want to hear from there.
If you want more low end, ask yourself if you want
more round thick low end or do you want punchy low
end. This will help you determine if you should add
Bass or Low Mid to your sound. Sometimes adding
Low Mid gives you the bottom you want with a
punchier sound. The same goes for the high end, are
you looking for clarity for your note or a percussive
attack? If you want clarity many times Hi Mid will
give that to you without adding the percussive attack.
Drive
This control is used to overdrive the preamp in order
to get various distorted sounds. In the fully counter
clockwise position is the cleanest least distorted sound
and as you turn it clockwise you bring in distortion.
Adjust to your taste.
Tone Controls
Bass, Low Mid, Hi Mid and Treble controls are
customized for each Amp Model to give you optimal
tonal control. These controls will help you to shape
the tone you hear in your head.
Opto Comp - The compressor control adjusts the
threshold of the compressor. The farther the control
is rotated clockwise, the more dramatic the compression
becomes which brings a more even dynamic to your
sound. When completely in the counter-clockwise
position, the compressor circuit is off. As you turn the
knob clockwise, the threshold at which the compressor
kicks in is lowered. The LED to the left of this control
will light when the compressor hits –5db of gain
reduction, which is a very good place to start.
Page 12

Amp Model Descriptions
Clean
This model is all about clean, funk and fusion bass
tone. It’ll give you all the warm lows and punchy highs
you need. This sound was crafted during our studies
of the Eden Traveler.
R & B
This Amp Model is a tribute to those late 60’s and
early 70’s clean fat bass tones. It is the kind of tone
you here on most Motown recordings, as played by a
pioneering young James Jamerson. This Amp Model
draws on our analysis of a 1968 B-15 Flip Top.
Rock
This sound was crafted during our studies of the ’74
Ampeg SVT. This workhorse has appeared on
innumerable recordings and arena stages worldwide.
And now all the tone of the 300 lbs behemoth 8X10
and head is available in your versatile, reliable and
much lighter head or combo!
Brit
’68 Marshall Super Bass. Enough said. The Super Bass
covers the kind of overdriven bass sound brought to
us by late ‘60’s British rock pioneers such as Cream
and The Who as well as ‘70’s giants Yes and Rush.
Grind
As the name would suggest, this is for you modern
rock lovers, Alice in Chains, Mudvayne and Rage
against the Machine. This model is based on a distorted
SansAmp PSA-1 into an SVT with direct clean bass
signal mixed in for that angry, clear and punchy
aggression that takes your sound to DEFCON 1.
Synth
Remember the Gap Band or the Dazz Band? How bout
Marilyn Manson or NIN? They all incorporate Synth
Bass into their music and now you can too with this
synth that we based on the classic synths of the 70’s.
See the following page for a breakdown on Synth
controls.
All product names are trademarks of their respective owners, which are in no way associated or affiliated with Line 6. These product names, descriptions
and images are provided for the sole purpose of identifying the specific products that were studied during Line 6’s sound model development. AMPEG®
and Sansamp® are trademarks of St. Louis Music, Inc. MARSHALL is a trademark of Marshall Amplification Plc.
Page 13

About the Synth:
Selecting the Synth re-works the amp controls to give
you Analog Synth control over the Bass Synth. Here’s
what happens:
Drive
Adds post filter distortion. Start with this knob at 10
o’clock for a little dirt.
Waveform (Opto Comp)
A number of Waveforms are offered on this knob:
Cutoff (Bass)
Filter Frequency Cutoff. Start with this at 10 o’clock
for deeper synth tones.
Resonance (Low Mid)
As you turn this knob clockwise you bring in resonance,
think laser sounds.
Envelope (High Mid)
Filter Envelope Depth. The Filter Envelope is triggered
every time you play a new and clear note. The
Envelope amount controls how much the filter will
open each time you play a note.
Attack/Decay (Treble)
Filter Envelope Rate. Controls the speed of the Filter
envelope from fast to slow. Start with this control at
9 o’clock for typical Synth bass sounds.
OPTO COMP
WAVEFORM
The waveforms are split into 2 parts. Part 1 goes from
sawtooth to triangle. Part 2 square wave to square
wave with lots of pulse width modulation. Start at 9
o’clock for a fat tone.
Deep
Adds a octave down triangle wave for even fatter
Synth bass tone.
Note: Each of the Low Down Smart Effects unlock
even more hidden features and tonal secrets buried in
the Bass Synth. Do take some time to dial around to
uncover the tonal riches within!
Page 14

Smart FX:
The Smart FX knob gives you a trio of the most popular
and usable bass effects known to man:
Envelope filter
Modeled after a Electro-Harmonix Q-Tron, this is the
baddest envelope filter on the planet. You have heard
this on your favorite P-Funk and Red Hot Chili Pepper
recordings. An envelope filter is a wah-wah type effect
that is controlled by the dynamics of your bass note
instead of being controlled by your feet.
Octaver
Modeled after the EBS OctaBass, this effect produces
a single note one octave below the pitch of the played
note, adding a powerful new vibe to your sound.
Chorus
Modeled after the much loved T.C. Electronic®
Chorus, this is the most transparent, smooth and
expressive chorus for bass ever built. Using it does not
reduce your low end. It is especially beautiful on fretless
bass.
For each of these effects you can choose anything from
a subtle hint of change to total tone-bending sounds.
While turning the knob, LowDown adjusts all the
individual controls of the modeled effect to
automatically give you a complete range of sounds,
without having to mess with multiple knobs and
switches. (We figured you would appreciate making
music instead.)
All product names are trademarks of their respective owners, which are in no way associated or affiliated with Line 6. These product names, descriptions
and images are provided for the sole purpose of identifying the specific products that were studied during Line 6’s sound model development. T.C. Electronic®
is a registered trademark of T.C. Electronic A/S Corp. EBS® is a registered trademark of EBS. ELECTRO-HARMONIX® is a trademark of New Sensor
Corp.
Page 15

Channel Memories:
CAUTION!! Pressing one of these buttons could result
in a tonal assault of epic proportions, proceed with
caution. In all seriousness though, we have preloaded
these four buttons with very popular and usable presets.
But you can also store your own presets here as well.
You can always get the factory presets back so don’t
worry, change them to your hearts content.
Saving
To store your own “snapshot” of all knob positions
(except Master Volume), press and hold one of these
four buttons for two seconds. The LED flashes twice
when the save is complete. To copy from one channel
to another, press the button for the channel you want
to copy from; now press and hold the button of the
new channel location until the LED flashes twice. But
wait, there’s more! If you would like to access more
than four presets, buy an FBV Shortboard and you can
access 36 custom delicious tones or store 36 of your
own.
When LowDown is operating in Manual Mode, all of
the controls are active and the sound of the amp is
determined by the current knob settings. Just like a
regular amplifier.
Tuner Mode
Press the Tuner button and you get an instant digital
tuner. The volume is muted during tuning. Press any
button to exit Tuner Mode.
The Amp Model LEDs correspond to the following
strings on the bass guitar:
Clean = B string
R & B = E string
Rock = A string
Brit = D string
Grind = G string
Synth = C string
Manual Mode: What You See Is What You Get
Press A, B, C or D to recall one of the 4 Channel
Memories, press that button again and the channel
light will go out and you will be in “manual mode.”
When you are in manual mode none of the Channel
Memory buttons are lit.
The Channel memory LEDs will indicate when the
string you are playing is in tune. Channel B and C
should both light GREEN when the string is in tune.
If channel A or B LED is lit AMBER then the sting
is flat. If channel C or D LED is lit AMBER then the
string is sharp.
Page 16

XLR Direct Output
This is your Direct Out for recording or sending your
sound to a house sound system when you’re playing
live. This output utilizes Line 6’s exclusive A.I.R.
processing which has made Line 6 products like POD
the undisputed standard for recording direct. The level
of this output is set via Channel Volume and has a
ground lift switch to lift the ground if your direct out
is causing a buzz in the sound/recording system you are
connected to. A bit of advice, many pro sound engineers
here at Line 6 have made the direct out experience
from this amp a beautiful one. Many sound engineers
prefer to take a Pre Amplifier Direct Signal via a Direct
Box. This is the de facto technique for getting basic
bass tone in the house PA. When playing a gig in a
club, ask the sound guy to consider using your direct
out for amp and cabinet tone - they will not be
disappointed!
Important
When using the direct out, there can be a ‘pop’ on the
output on power up or power down. We recommend
that you either disconnect the direct out or mute
whatever the direct out is connected to before powering
your LowDown on or off.
Mute Horn
Use this to bypass the horn on the LD175, LD300 Pro
or LD400 Pro amps. Why would you want to bypass
the horn you ask? Well, the horn has become a hotly
disputed feature on modern bass amps. There are two
schools of thought – Some go for the old school rock
bass tone, with lots of sustain and a little distortion.
Turns out that adding a horn to this kind of tone just
makes it sound fizzy and cheap, so most Rock players
prefer cabs without horns, or at least with the horn
off. The second school of thought is the more modern
jazz/funk/fusion/metal, (essentially everyone else) kind
of player. They appreciate the articulation a horn can
add to their tone, it emphasizes the attack of your tone,
and makes for great R&B/slap tone! TIP: The
LowDown knows where you’ve got the horn switch
set, so we’ve done our work to make sure the Brit and
Rock models don’t get fizzy even when the horn is
engaged.
CD/MP3
Connect a CD player, MP3 player, drum machine or
other device here, and you’ll hear it from LowDown
speaker or headphone output. Very handy for jamming
along! Use the output volume control on the connected
device to set its level.
Page 17

Phones
Connect your stereo headphones here to listen to your
bass and/or your favorite CD and jam along for working
on your favorite licks. Plugging in headphones disables
your speaker output.
FBV foot controllers come with an included RJ-45
cable. Connect this cable between the LowDown and
the side of the FBV. If you ever need a replacement
cable, look for a Category 5, 10 Base-T or RJ-45 cable
with male connectors on both ends. These can be
found at almost any computer supply retailer.
Factory Reset of all Presets
You can reset all 36 of your LowDown programmable
channels to their factory-programmed states by holding
down the Channel A button as you turn on the power.
Warning: This will erase ALL custom sounds you might
have created. Ask yourself, “Do I really want to do
this?” If your answer is yes, then go for it!
Using Your Feet
The FBV Shortboard includes all the controls needed
to make your LowDown experience the best possible.
Also available are the FBV Express for channel
switching and Vol/Wah control and FBV2 for channel
scroll. Note that the Line 6 Floor Board and FB4 foot
controllers will not work with LowDown.
NOTE: Do not use a “cross-over” CAT-5 cable, as it
may send voltage to unintended locations of your FBV
controller and damage the unit.
FBV2
1. Functions as a two button channel scroll foot switch.
This foot switch allows you to scroll through the 4
channels (the A,B,C & D buttons) of your LowDown.
Page 18

FBV Express
1. Channel A, B, C & D: Select from the four Channel
Memories. Manual mode: Press and hold lit channel.
2. FBV Pedal: Press the pedal forward to click the
toe-switch, turning the pedal from Volume to Wah.
The Wah is modeled after a vintage Tycobrahe
ParaPedal Wah. You can use it as a wah that sounds
like a foot controlled envelope filter or park it at a
desired sound for some Sub Dub sounds.
3. Wah and Volume Lights: These light to show
that a pedal is ready to control Wah or Volume.
Using your FBV Express Tuner
FLAT SHARPIN TUNE
UNTIL DISPLAY SHOWS
PRESS & HOLD
DONE TUNING?
PRESS ANY OF THE A,B,C OR D FOOTSWITCHES
All product names are trademarks of their respective owners, which are in no way associated or affiliated with Line 6. These product names, descriptions
and images are provided for the sole purpose of identifying the specific products that were studied during Line 6’s sound model development.
NOTE
FLAT
Page 19

Page 20

FBV Shortboard
1. Channel A, B, C & D: Select from the four Channel
Memories
2. Bank Up - Bank Down: The FBV Shortboard
gives you 9 banks of 4 channels each. Bank 1 is the
same 4 memories you get from the LowDown front
panel A,B,C, and D buttons when no FBV is connected.
Also, the LowDown front panel A,B,C, and D buttons
are the 4 presets from the currently selected bank on
Shortboard.
3. Stomp/Mod/Delay/Reverb: You guessed it! These
switch the LowDown effects on and off as if they were
stomp boxes on a pedal board. We have included
stickers to re-label your Shortboard.
STOMP turns the Smart FX on and off.
MOD turns the compressor on and off.
DELAY turns the Deep switch on and off.
REVERB does nothing; it is just there for you to
stomp on, if you want to, so the crowd will think you
are cool.
4. Tap/Tuner: LowDown does not use a delay so this
is just to kick in the tuner. Hold this switch until you
see the tuner on the pedal’s display. Press it again to
exit tuner mode.
5. Wah and Volume Lights: These light to show
that a pedal is ready to control Wah or Volume. Note:
Pressing the pedal fully forward to click the toe-switch
selects its control between Wah or Volume. If a separate
expression pedal is connected to the rear panel 1/4inch jack, the pedal controls Wah only, with the toe
switch toggling the Wah on/off.
6. External Pedal Jack: You can connect an
expression pedal (such as the Line 6 EX-1) to the
Shortboard’s rear panel 1/4-inch jack, and the
connected pedal will control Volume.
7. FBV Pedal: Press the pedal forward to click the
toe-switch, turning the pedal from Volume to Wah.
The Wah is modeled after a vintage Tycobrahe
ParaPedal Wah.
All product names are trademarks of their respective owners, which are in no way associated or affiliated with Line 6. These product names, descriptions
and images are provided for the sole purpose of identifying the specific products that were studied during Line 6’s sound model development.
Page 21

Saving with FBV Shortboard
To prepare for saving, it’s a good idea to browse through
the various factory-stored preset sounds to decide
which you can do without. Make a note of their Bank
number and Channel letter so you can save your own
sounds there instead.
Save
Step and hold on the FX LOOP switch until “NAME
EDIT” is displayed. The Shortboard’s STOMP and
MOD switches then select one of the characters of
the channel name so you can edit it. The DELAY and
REVERB switches choose from the available letters,
numbers and symbols. The Bank Up and Bank Down
switches then pick a Bank you’d like to save within.
Complete the Save
Press the A, B, C or D switch to store to that Channel
Memory in the selected Bank. The display will show
“SAVING”. Congratulations, you’re all done!
Page 22

 Loading...