

Page 1

The RiffWorks software that is part of the GuitarPort RiffTracker recording
package includes built-in Help. To view it, click the HELP button in the
RiffWorks software. The Help will then display in your browser software
(generally that will be Internet Explorer). The Help includes several movies
that quickly show you how to use the software.
This document was created by converting that Help to an Acrobat document.
Because it was converted from the HTML files, some formatting is imperfect.
For the best experience we recommend accessing the help from the
RiffWorks help button, but if you are unable to do that, this document should
provide you with the same information.
For more information on GuitarPort RiffTracker and the RiffWorks software,
please visit www.line6.com/rifftracker
Page 2
Overview GuitarPort Recording Effects Mixing Advanced Techniques REX/ReWire RW Settings
Index Activation System Requirements Support
OVERVIEW Here's a movie that gives you an introductory overview of the RiffWorks and GuitarPort software.
Learn about the main components of RiffWorks, and see the basic of setting up the InstantDrummer, adjusting
GuitarPort tone, recording Riffs, building a Song and Mixing.
If you installed from CD, click here to watch the Overview Movie from your hard disk.
Click here to watch the Overview Movie from our server. (right click to download and watch later)
GUITARPORT Thanks to the GuitarPort software, your complete stomp box, amp and effects rig is always at the
ready. There's even a Tuner, Tone Locker and Online Tone Library. Learn about them in this movie.
If you installed from CD, click here to watch the GuitarPort Movie from your hard disk.
Click here to watch GuitarPort movie from Line 6 server. (right click to download and watch later)
When in the GuitarPort window, also notice that its bottom Info Bar shows info as you point your mouse at GuitarPort controls.
You can also quit Rifforks and run the GuitarPort software on its own to see more detailed GuitarPort help, and to access the
full features of GuitarPort, including the optional GuitarPort Online service with online tracks and tab, a large lesson collection
and more. You cannot access GuitarPort Online while operating GuitarPort in combination with RiffWorks.
RECORDING Learn more about recording riffs and manipulating layers. Covers using Junt to set the tempo and
start recording, copying Layers and Riffs, recording with Auto-Mute, and selecting a Lead-in.
Page 3
If you installed from CD, click here to watch the Recording Movie from your hard disk.
Click here to watch Recording Movie from Line 6 server. (right click to download and watch later)
EFFECTS The Effects built into RiffWorks let you easily enhance the sound of your layers after recording so you
can perfect your mix. From subtle tweaks to dramatic changes, these effects let you do it easily and get great
results. Click the link below to learn all about them!
Learn more about the RiffWorks effects
MIXING Ready to save a mix of your Song for burning to CD, emailing to a friend, or posting on the Internet?
This movie shows you how to get it done.
If you installed from CD, click here to watch the Mixing Movie from your hard disk.
Click here to watch Mixing Movie from Line 6 server. (right click to download and watch later)
ADVANCED TECHNIQUES Watch this movie to learn about Auto-Mute, Mix-to-Riff, Lead-in Riffs and other
techniques that will make you a RiffWorks power user.
If you installed from CD, click here to watch the Advanced Techniques Movie from your hard disk.
Page 4
Click here to watch Advance Techniques Movie from Line 6 server. (right click to download and watch later)
REX/REWIRE If you've got REX files or ReWire software like Propellerheads Reason or Ableton Live, you'll want
to know all about the ways you can use them with RiffWorks. Click below to learn more!
Using the REX Player and ReWire
RWSETTINGS is a separate tool for tweaking advanced settings. You can find it in the Start Menu under
Sonoma Wire Works/RiffWorks/RWSettings. It can change your resolution from the default size and change the
disk that RiffWorks uses for recording. The DEFAULTS button basically resets the application to it's factory
settings including all the "Don't show me again" boxes you may have checked in RiffWorks' dialog boxes. It will
also show this help documentation on the first launch again. But don't worry, it won't forget anything that
you've activated. Any changes you make with RWSettings will only take effect the next time you launch
RiffWorks.
INDEX An alphabetical index to the contents of the various tutorials. The links will take you to the movie or
documentation that will show you how to use each feature.
● 4x4 - effects
● Attaq - effects
● Auto-Mute - recording
● Burn - mixing
● CD - mixing
● Create - recording
● Duplicate - recording
● Export - advanced techniques
● FXEdit - recording
● GuitarPort - guitarport
● Import - advanced techniques
● Input Effects - effects
● InstantDrummer - overview
● Junt - recording
● Layers - recording
● Lead-in - recording
● Metronome - recording
● MixToRiff - mixing
● MP3 - mixing
● Mute - recording
● New - overview
● NoEqual - effects
● Ogg Vorbis - mixing
● Open - overview
● Presets - effects
● Resolutions - rwsettings
● REX - rex/rewire
● ReWire - rex/rewire
● Riff List - overview
● Riff Recorder - overview
● Save - overview
● Scratch Disk - rwsettings
● Song - overview
● Solo - recording
● Stamina - effects
● SuperTanker - effects
● Tempest - effects
Page 5

● Temp Files - rwsettings
● Tempo Sync - effects
● TripWire - effects
● Tone - guitarport
● Tone Locker - guitarport
● Tuner - guitarport
● WAV - mixing
ACTIVATION After purchase, the RiffWorks software and add-on InstantDrummer Session must be activated
before you can begin using them. Activation requires an Internet connection, plus a Line 6 GuitarPort, PODxt,
PODxt Pro or PODxt Live connected to your computer via USB.
● To activate or purchase RiffWorks, click the ACTIVATE button that appears at the top left of the
RiffWorks window.
● To activate or purchase InstantDrummer Sessions, choose Get More Drummers from the Session
menu in the InstantDrummer panel.
● Adding GuitarPort RiffTracker operation to a GuitarPort or PODxt? Purchase a License Key for GuitarPort
RiffTracker or InstantDrummer Sessions from www.line6.com/store, then Activate them as described at
www.line6.com/store/activate.html.
SYSTEM REQUIREMENTS System Requirements for GuitarPort RiffTracker
● PIII 1GHz (P4 or equivalent 1.8GHz or faster recommended)
● At least 384MB of RAM (512MB RAM recommended)
● 1GB of disk space free for installation
● 2GB or more free recommended for recording
● One available USB port (port must provide power; you cannot connect GuitarPort to a USB hub that does
not provide power)
● Activation requires an internet connection
● Appropriate beverages.
SUPPORT Customer Service Before contacting the Line 6 Customer Service team, please take the time to look
through this documentation to see if it can answer your questions. Additional helpful information is on the
Support page of the Line 6 web site
www.line6.com/support, including the searchable Knowledgebase FAQTRAQ
system which is often the fastest and easiest way to get answers. If you need to talk to a member of the Line 6
Customer Service team by phone, take notes before calling to ensure that you remember everything you want
to ask about. In the USA or Canada, you can contact Line 6 at (818) 575-3600, 8AM to 5PM Monday through
Friday (Pacific Time). Outside the USA and Canada, please contact your distributor directly to arrange service.
The list of Line 6 distributors is available on the Internet at
www.line6.com/dealers.html . To obtain factory
service for your GuitarPort hardware: If you live in the United States, call 818-575-3600 (or you can log an
incident in our support Knowledgebase FAQTRAQ system available at
www.line6.com/support) and we will help
you find the best way to get your unit repaired, whether it be returning the unit to Line 6 or finding an
Authorized Service Center.Ê If you live in Europe, contact Line 6 U.K. at: Line 6 Europe Rugby, Warwickshire
United Kingdom Butlers House, Clifton Road 44 (0) 178 882 1600 euroinfo@line6.com. If you live outside of
these areas contact your local distributor.Ê If you do not know whom your distributor is, either call us at 818575-3600 or there is a distributor locator at
www.line6.com/dealers.html.
Portions Copyright 2004, Line 6, Inc.
Portions Copyright 2004, Sonoma Wire Works
RIFFWORKS HELP
Page 6
EFFECTS Attaq TripWire Tempest 4x4 SuperTanker Stamina NoEqual Presets
Sonoma Wire Works brings you seven killer effects to help you create awesome tone. The user interfaces are
designed with familiar knobs and buttons to make using them straight forward, The effect algorithms were
passionately designed for maximum sound quality, then carefully optimized for maximum performance so you
don't run out of CPU before you run out of ideas!
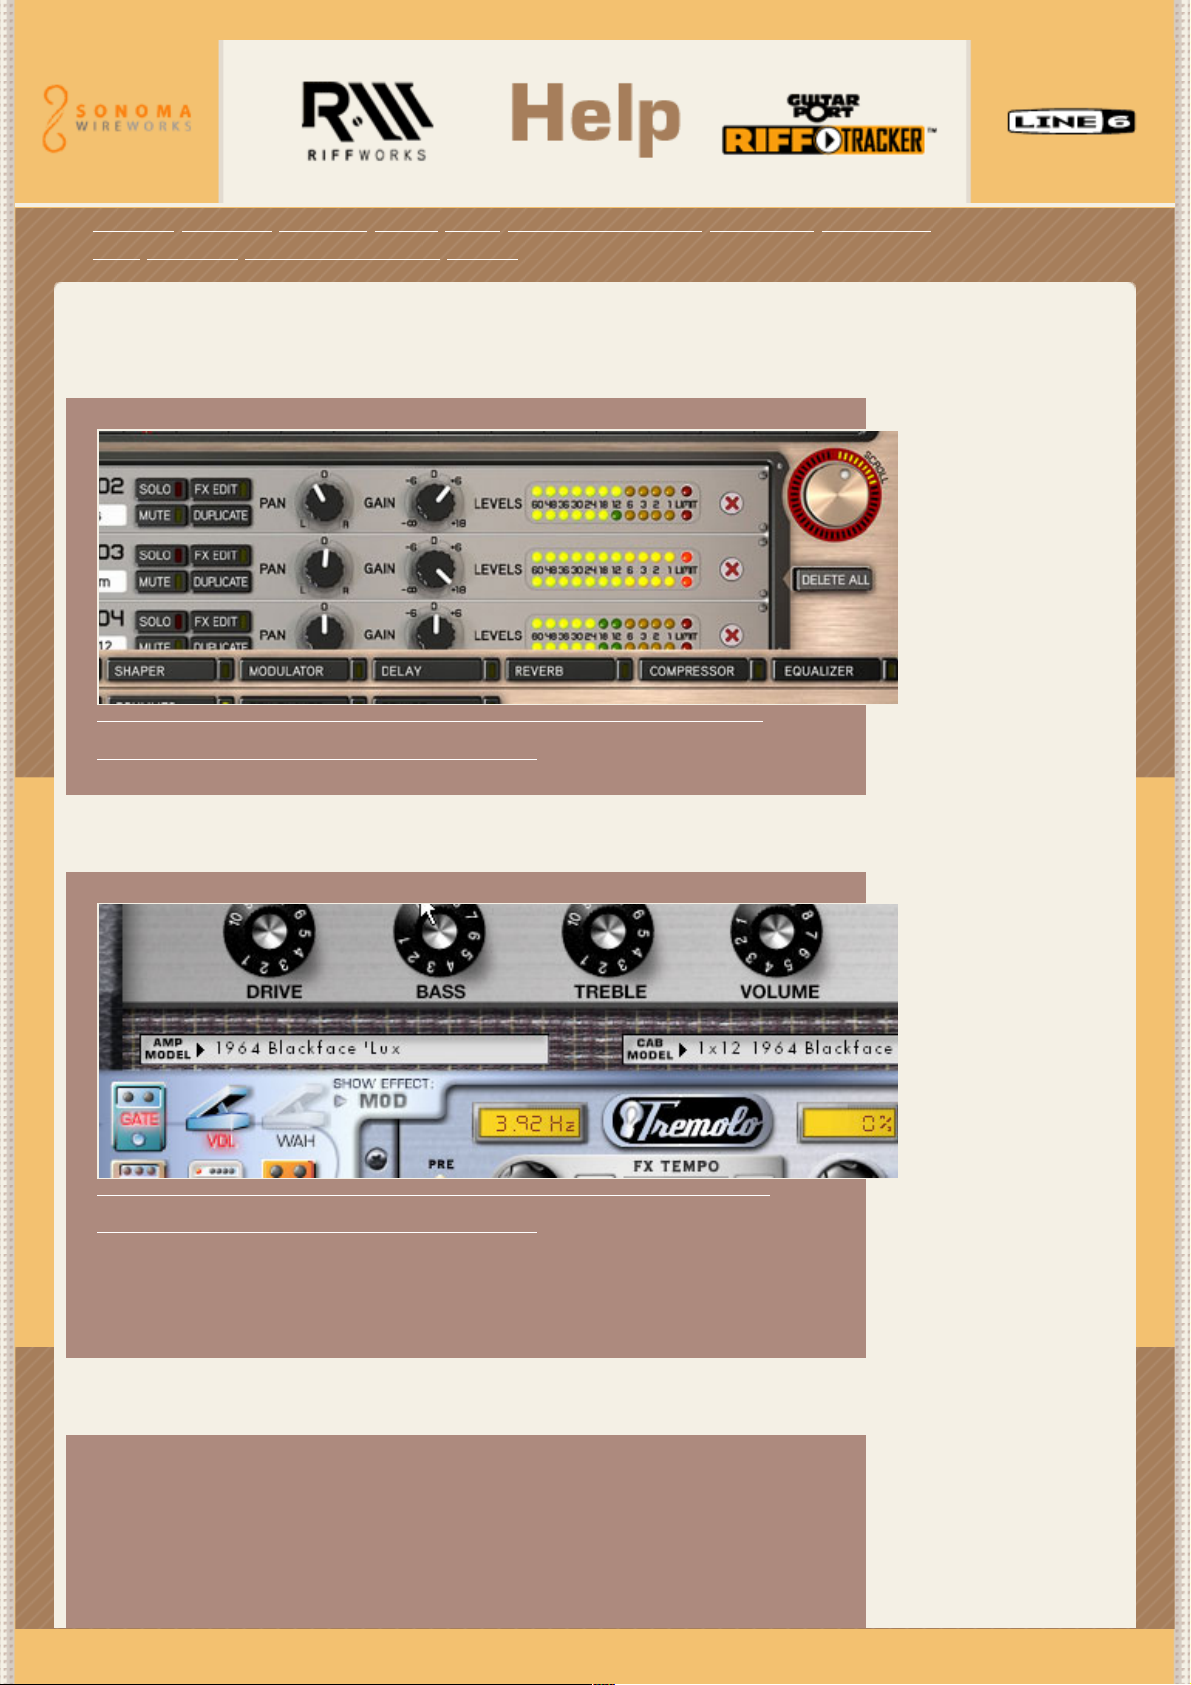
To use the Effects:
● Select a Layer to edit by pressing FXEDIT button on that layer.
● Click on one of the effects buttons or the SHOW button to show the effects panel.
● Turn on an effect by pressing the small POWER button to the right of the effect button
The small POWER button next to the effects buttons enables the effect for that Layer. Don't forget to turn it on
before you start turning knobs. An effect is on when the light is on.
The Effects
INPUT button enables live monitoring of your guitar through the RiffWorks Effects. Effects Input is
off by default because it can add significant latency to your guitar signal. When Effect Input is enabled, the
FXEDIT button next to the AUTO-MUTE button above the layers is enabled. This allows you to edit the Effects
settings of the live guitar signal. When recording, each Layer is created with all the Effect settings copied from
the input, so that it sounds just like it did when you were recording it. These Effects are not applied
permanently to the recording, so you can use FXEDIT on the Layer and change them later.
ATTAQ is the ultimate Auto-wah filter effect. With Manual, Envelope or Sequence modes you can create wah
effects from subtle to wild based on picking strength or a pattern.
TRIPWIRE is a three-band compressor and distortion that can be used for everything from traditional low-mid-
more...
high eq to advanced frequency dependent compression and expansion, to insane pitch shifted distortion.
more...
TEMPEST is eight modulation effects in one unit. With selectable wave shapes and full control over range, depth
and tempo-syncable speed, it's extremely flexible without being overly complex.
more...
Page 7
4X4 is more than your average multi-tap delay. It actually uses 4 discreet delay lines with separate control over
tempo-syncable delay time. With the adjustable feedback damping, you go from warm tape-echo sounds to
bright digital delay sparkle.
more...
SUPERTANKER reverb comes with spring and plate style reverbs and allows you to adjust the size and damping
of the reverb.
STAMINA is an optical style compressor that is perfect for tightening up a peformance or getting radical
pumping effects.
more...
more...
NOEQUAL has traditional british eq controls which are great for dialing in silky smooth frequency changes,
without harsh peaky artifacts.
PRESETSAll of the effects share a common preset panel. more...
more...
Page 8

Portions Copyright 2004, Line 6, Inc.
Portions Copyright 2004, Sonoma Wire Works
RIFFWORKS HELP
Page 9

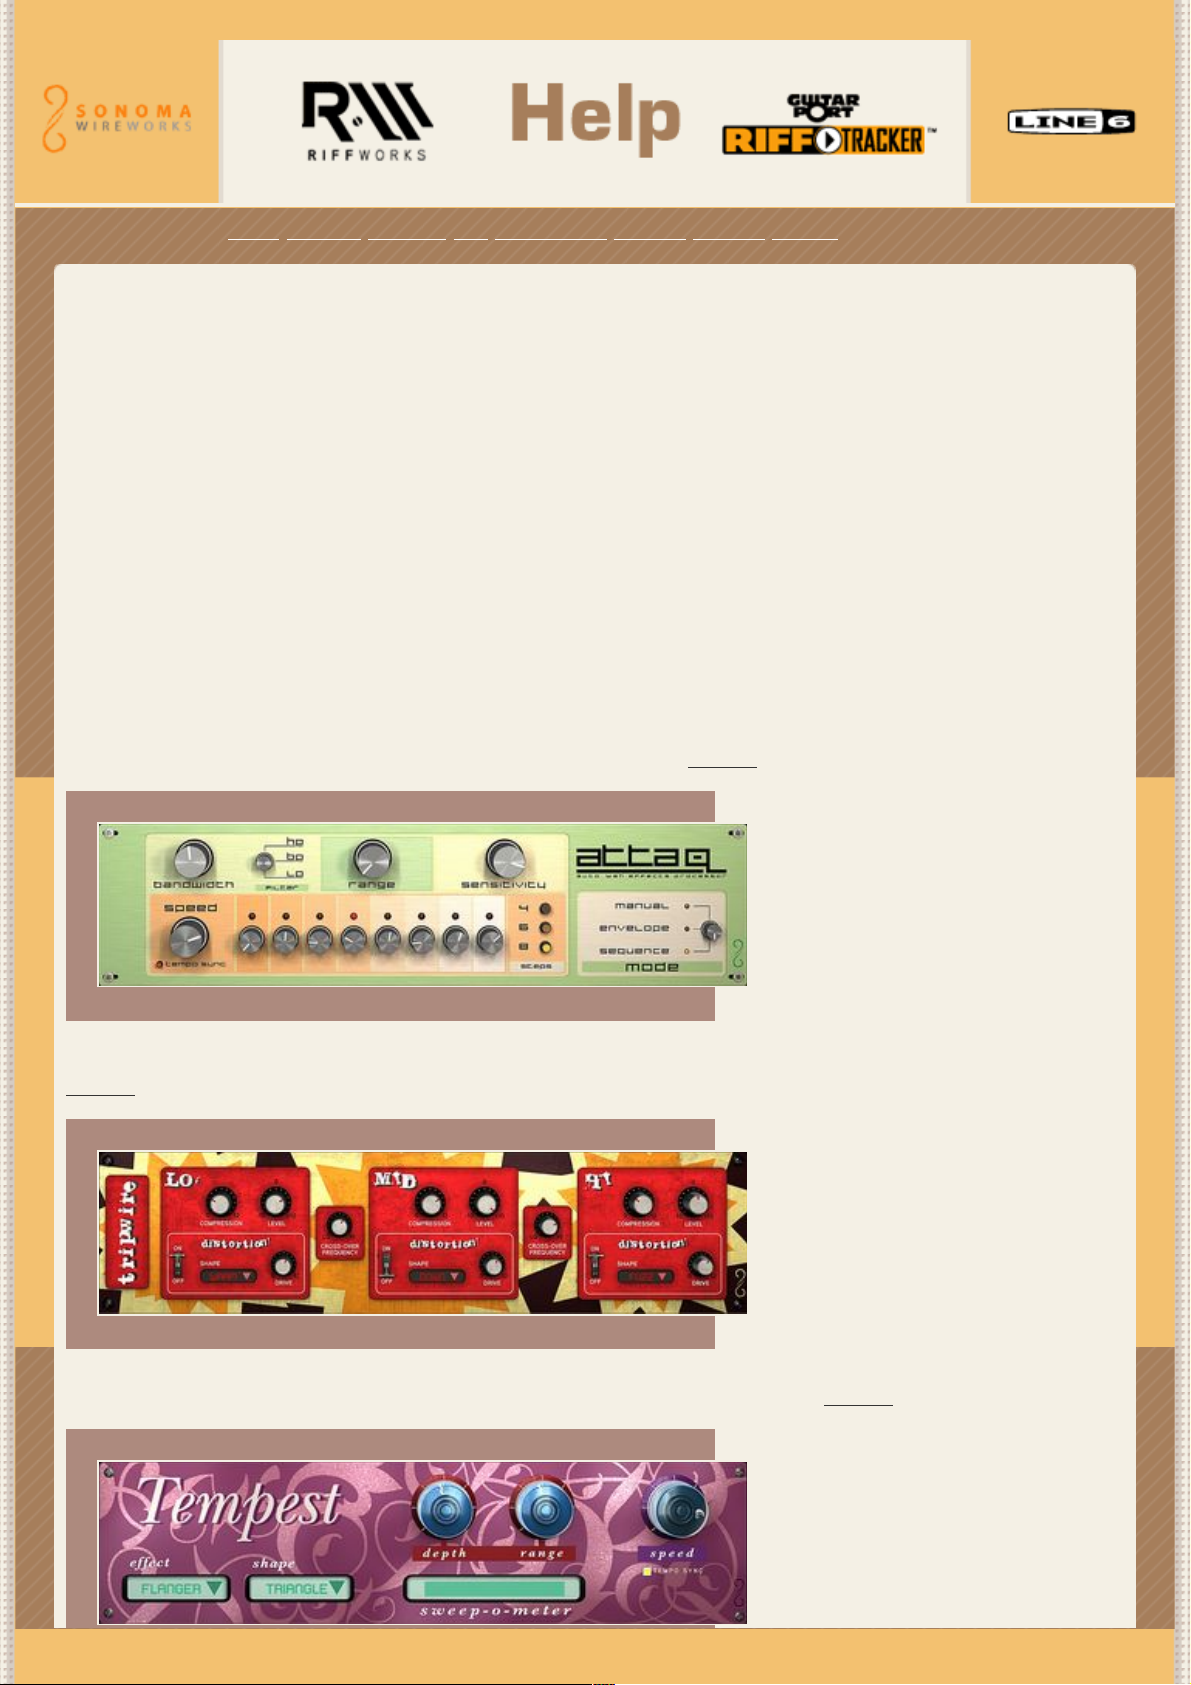
ATTAQ
Attaq is the ultimate Auto-wah filter effect. You can create a classic, fixed wah tone; a responsive envelope
wah; and even a custom tempo-synched wah sequence. Attaq is all of the best wah effects in one!
Attaq's colorful interface helps group controls for the different modes.
MODES There are three different ways to use Attaq, each with some different controls. These modes are called
MANUAL, ENVELOPE and SEQUENCE. The MANUAL mode doesn't change while you play. It is like leaving your
wah pedal in one position to bring out a great constant tone. This effect can be dramatic. The ENVELOPE mode
behaves like a classic envelope wah stomp box. As you play harder the wah morphs into a completely different
tone. Try playing softly with an occasional hard note that you want to emphasize. The wah opens up on that
note to give you great touch sensitive tone. The SEQUENCE mode is certainly the most unique. In this mode,
you can actually change the tone of the wah with the beat of the music. You can get everything from smoothly
varying tone over several measures to fast synchopated beats rupturing out of your guitar chords. This is by far
the most configurable mode. Now that you understand that Attaq is really 3 different wah effects, lets get into
how to control the tone for each one.
MANUAL MODE Set the MODE control to MANUAL. Now, turn the RANGE knob. The RANGE knob is equivalent to
your wah pedal position. Turn it up to open up the sound and turn it down to close it off. Unlike a standard wah
pedal, there's still a lot of tweaking you can do. Try increasing the BANDWIDTH knob to sharpen up the tone.
You can change it from subtle to downright gnarly just by playing with this knob. You can also change the style
of wah using the FILTER knob. The three filter choices are Lowpass (LP), Bandpass (BP), and Highpass (HP).
What do these mean? Lowpass lets all the lower frequencies through like a classic wah pedal. Listen [add preset
name]. Bandpass actually cuts out the low and high frequencies, only allowing a small band of frequencies
through. You can use this to accentuate a particular ranges of notes. Listen [add preset name]. Highpass
actually cuts out all the low frequencies leaving only the nasaly highs. You can get some crazy sounds out of
this filter. Listen [add preset name]. The SENSITIVITY and orange SEQUENCE controls have no impact with this
mode.
ENVELOPE MODE Set the MODE control to ENVELOPE. The RANGE, BANDWIDTH, and FILTER controls behave
like the MANUAL mode, but an extra knob completely changes the tone and feeling of this effect. The
ENVELOPE mode listens to how hard you play and changes its position accordingly. Play soft and it will sound
like you have your wah pedal all the way closed, but snap a hard note and hear those filters open up. RANGE
controls the filter position when you are playing soft, but the SENSITIVITY knob controls the position when you
are playing hard. You can play with RANGE and SENSITIVIY to control where and how much that wah filter is
going to open up for your style of playing. If it sounds like your filter is always wide open, turn down the
SENSITIVITY until you get that nice touch sensitive tone. If the effect doesn't sound too different from what you
had in the MANUAL mode, try turning up the sensitivity to get it to open up wide when you play a hard note.
Listen [add preset name]. The orange SEQUENCE controls have no impact with this mode.
SEQUENCE MODE Set the MODE control to SEQUENCE. The RANGE, BANDWIDTH, and FILTER controls behave
the same as the above modes. Instead of using sensitivity to control the position of the wah, you can use eight
step sequencer knobs that step in time with your riff. The sequence controls are all in the orange section of
Attaq. The STEPS buttons set the number of distinct steps you want to use in the sequence. You can select 4,
6, or 8 depending on how complex you want the sequence to be. The 8 smaller SEQUENCE knobs to the left are
used to set up the wah position for that moment in time. The light above each knob shows you the current wah
position as it cycles. For example, if you want to open up the wah a little more at that point in time, turn up the
corresponding knob. Strum a chord and listen to your sequence go by. Listen [add preset name]. The
SEQUENCE knobs are relative to your RANGE and control. You can completely change the tone of your
sequence without having to change every knob. If you like the sequence, but want it to be higher, just increase
the RANGE control. Listen [add preset name]. The SPEED control changes the pace at which the sequencer
runs. Turn the knob up to speed up your sequence. Listen [add preset name]. Below the SPEED knob is a
TEMPOSYNC button. This allows you to sync the speed of your sequence to the tempo of your Riff using beat
quantities like quarter, eighth, or sixteenth notes.
Page 10

Portions Copyright 2004, Line 6, Inc.
Portions Copyright 2004, Sonoma Wire Works
RIFFWORKS HELP
Page 11

TRIPWIRE
TripWire is a complete multiband compressor/distortion effect. The tone you can get out of this unit is almost
limitless.
Simple EQ: In its most basic form, you can use TripWire as a basic 3 band EQ similar to the classic bass/mid/
treble EQ effects. But even in this, TripWire is very configurable because you can set the width of the different
bands. Turn all 3 COMPRESSION knobs down (to the left) to turn off any band compression. Also make sure
that the 3 DISTORTION switches are turned off.
Now you can just use the 3 LEVEL knobs to control the amount of Lo, Mid, and Hi signal you want just like
you're used to. Where this gets really cool is that you can change the frequencies at which the EQ bands
transition by using the 2 CROSSOVER FREQUENCY knobs. The left one controls the Lo to Mid point and the right
one controls the Mid to Hi point.
For example, lets say I want to add a little mid scoop to my bass layer. I can reduce the level of the midrange
by turning down the MID LEVEL knob. This will scoop out the mids, but maybe it is taking too much of the
upper bass with it. I can get that range back by turning up the LO to MID (left) crossover knob. The ability to
control the crossover points of the 3 band EQ is simple and extremely powerful to shape your tone just the way
you want. Listen.
Multiband Compression: You are already familiar with the 3 band nature of TripWire, but now we'll throw in the
first twist. If you are new to compression, here's a quick and dirty introduction. If you turn up the
COMPRESSION on a specific band, it will decrease the volume of the peaks and leave the quieter sections alone.
You can essentially smash the dynamic range of the signal by turning up the compression and adjusting the
band levels to what sounds good. This is useful in a lot of situations. It can make your guitar have more
perceived sustain. It can smooth out your vocals. It can warm up your guitar. Compression is a very useful
effect in making great sounding recordings. Usually, compression is applied to the entire signal, but with
TripWire you can set different amounts of compression for the different bands of a signal.
So how would you use this? Well, lets take a guitar sample, Listen, and try to smooth and warm up the overall
tone without using the level as an EQ. Now we will turn up the LO COMPRESSION to smooth out the huge
transient peaks in the low frequencies. When we take out the dynamics in this range, we can create an almost
constant bass level in the layer which will have an overall warmer tone to it. If we just turned up the low level
control those bass transients will pop and thump when you hit the strings hard. The Compression tames those
transients which allowed us to bring the overall bass level up without the downsides. Listen.
Multiband Distortion: This is where things get crazy. We can take our complete tone modifying effect with EQ
and Compression and add different distortions to each band. You turn on the distortion by flipping the
DISTORTION switch to the ON position for the band you want to distort. You then select the type of distortion
you want to apply to that band using the SHAPE popup. Finally, you can decide how much distortion you want
to add with the DRIVE knob.
There are several shapes in the menu. FUZZ is a basic distortion like you would find in a stomp box. The others
are unique because they actually change the pitch of your signal. When using this on one band you create a
harmonized signal of what you are actually playing and the pitch shifted version. DOWN shifts the signal an
octave down. Listen. DD shifts the signal two octaves down and can sound completely outrageous with the right
notes. UP shifts up an octave which sounds good on just about everything when well balanced with the other
bands. The others are pretty trippy because they shift your notes by a 3RD, 4TH, or 5TH. Try soloing with one
of these set on the MID band. Listen.
Check out some of the factory presets for TripWire to get a glimpse of what is possible. It is a complete "design
your own pedal" kind of effect with full harmonizers, distortion, compression, and EQ. This one is a lot of fun...
Page 12

Portions Copyright 2004, Line 6, Inc.
Portions Copyright 2004, Sonoma Wire Works
RIFFWORKS HELP
Page 13

TEMPEST
Tempest is our modulation powerhouse. You can choose one of 9 classic effects including PHASER, TREMOLO,
FLANGER, CHORUS, VIBRATO, AUTOPAN, LPFILTER (lo-pass), BPFILTER (band-pass), and HPFILTER (highpass). Not only do you get all these effects but you also get to control the modulation SHAPE with 5 available
shapes! This is like having 45 different modulation effects in one.
You can completely change the style of the effect based on the SHAPE of the oscillator you choose. You can
choose classic shapes like SINE or TRIANGLE, but you can also choose wierd shapes like SQUARE, SAWTOOTH,
and even RANDOM if you like experimenting. Check out the Sweep'o'Meter to see the differences between the
oscillators. In combination with the 9 different effects, this a design your own modulation effect.
All of these effects share three more controls to allow you to modify the sound, DEPTH, RANGE, and SPEED.
The exact meaning of these controls can vary from effect to effect, but there are some general uses. DEPTH
tends to control how pronounced the effect is, while RANGE controls the width or range of modulation. SPEED is
the rate at which the modulation effect oscillates. There is also a TEMPO SYNC button to sync the speed up with
the tempo of the Riff. Like other tempo syncable effects, you can get some great rhythm in your tone.
Tempest is another deep effect from Sonoma Wire Works. Check out the factory presets and then go wild with
all the different combinations.
Portions Copyright 2004, Line 6, Inc.
Portions Copyright 2004, Sonoma Wire Works
RIFFWORKS HELP
Page 14

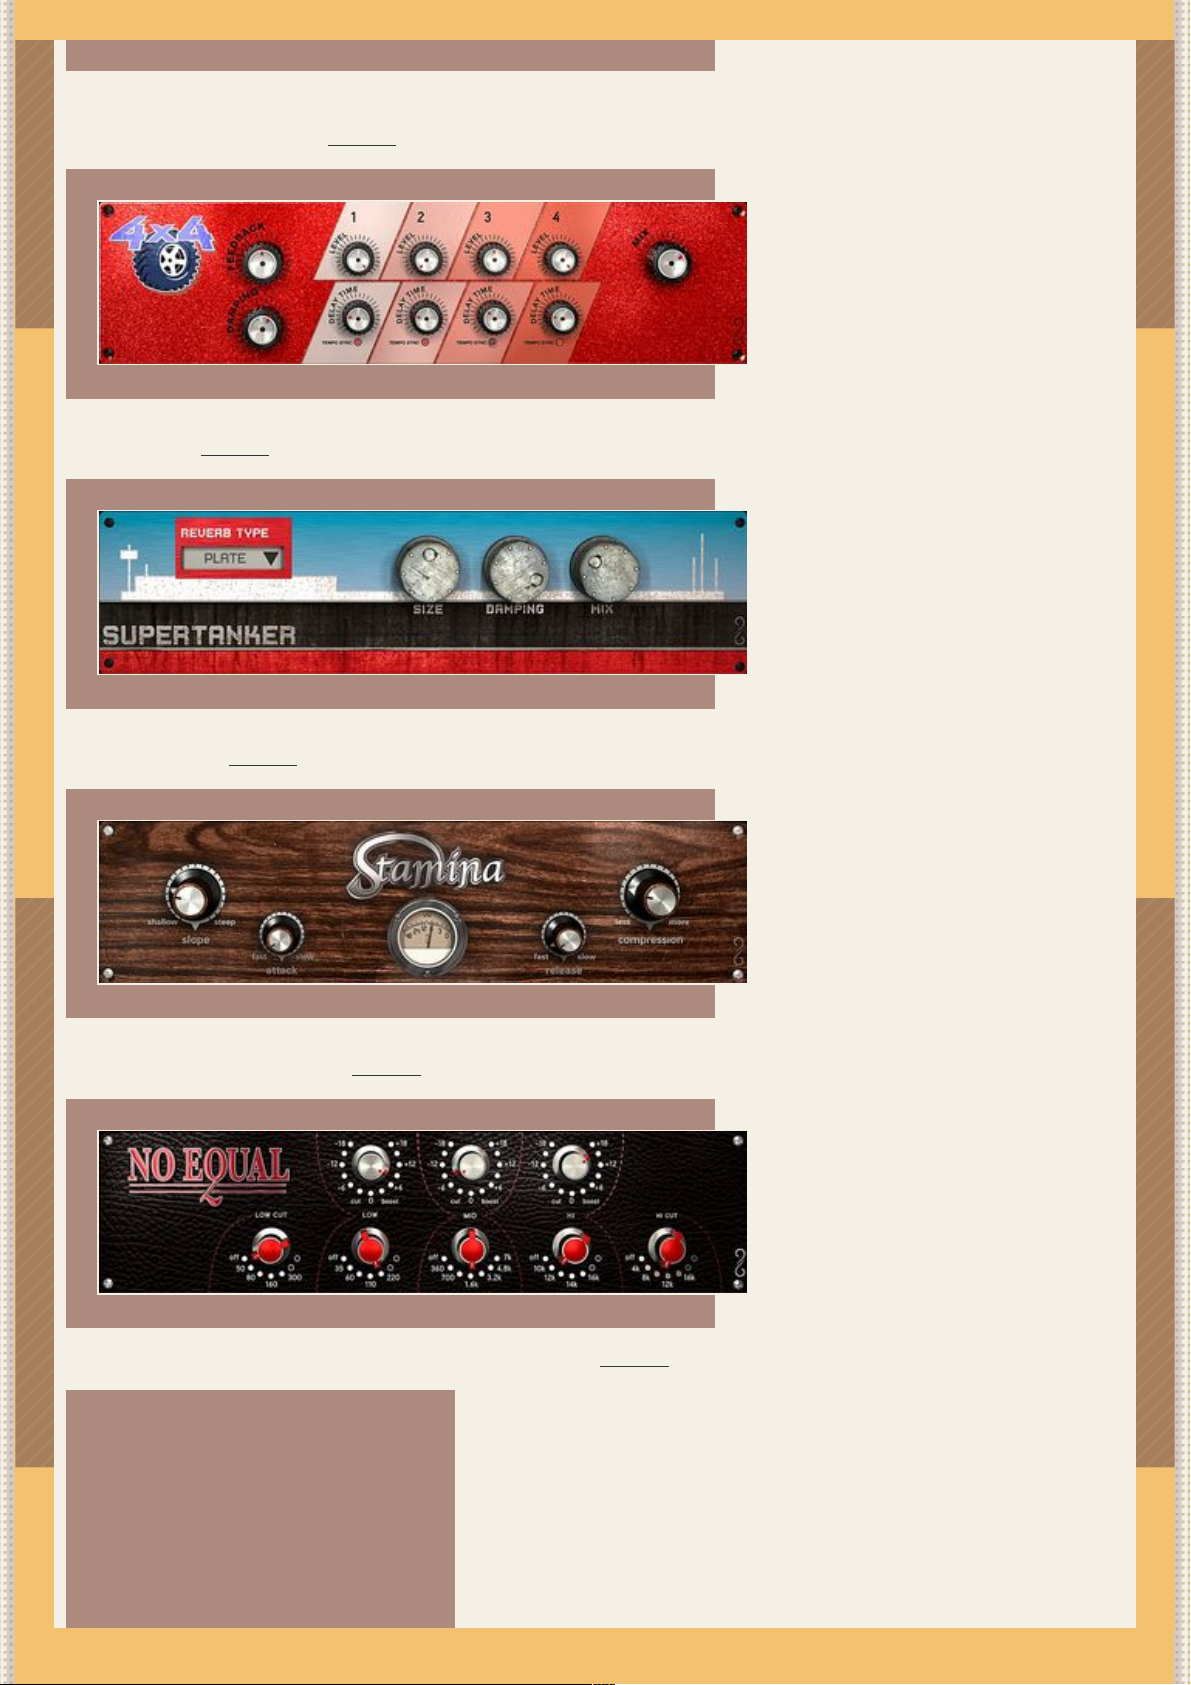
4x4
4x4 is a multi-tap delay effect. This is not your dad's delay. It is something completely new and different. There
are 4 different taps. A tap is a specific delay time that you want to mix back into your orginal signal. Most delay
pedals only have 1 tap that you set the delay for. We have 4 with different delay times and levels. And these
aren't just 4 taps, it is more like having 4 different delay pedals which feedback into themselves and the others.
It can get crazy very quick with this kind of effect.
Feedback, Damping, and Mix: There are two knobs on the left which control FEEDBACK and DAMPING.
FEEDBACK controls how much of the delayed signal gets added with the input and sent back into the delay. For
example, if you just junt your strings, you will hear a repeating delayed junt which decays over time. How fast
this decays is controlled by the FEEDBACK knob. Turn it down and you will only hear one delayed copy of the
signal. Turn it up and it will take a really long time to decay. DAMPING controls the amount of high frequency
reduction each time the signal goes back through the delay. You can hear the signal get darker with every fed
back delay. Listen. There is also a MIX knob on the right which controls how much of the orginal signal you're
hearing with respect to the crazy delayed signal. Turn it up for all delayed signal, turn it down to reduce the
volume of the delays.
Delay Taps: The center section of the 4x4 panel has four different knob sections with different colors. Each one
of those colors represents a different delay tap. Each tap has a LEVEL and DELAY TIME knob. The LEVEL knob
controls the volume of this specific tap. If you want to turn off this tap, just turn the LEVEL all the way down
and you won't hear it anymore. In fact, this is a good way to start. Add the taps one at a time until you get the
desired sound you are looking for. The DELAY TIME knob controls the length of the delay for that tap. You can
set it just like any delay stomp box, or you can select the TEMPO SYNC button to make the delay some fraction
of the song tempo. Tempo synced delay is pretty cool since you can create rythmic delays. Listen.
Different Taps, Different sound: Now we need to talk about the differences between the taps. 4x4 was designed
as a stereo effect with different delay taps going to different channels (left and right). The left two taps (1 and
2) affect the Left channel and the right two (3 and 4) affect the right channel. This means that you can turn all
the taps off except 1 and you will only hear the delay in the left channel. Turn on 4 and you will hear it in both
channels, but you can set the delay in each channel to different times. So, if taps 1 and 4 are the Left and Right
delay taps, respectively, what are 2 and 3? Taps 2 and 3 were designed to be ping pong style delay taps.
Whereas taps 1 and 4 feedback into themselves keeping each delay in its starting channel, taps 2 and 3
feedback into the opposite channel. Woah! Turn off all the taps for now by setting all the LEVELS to 0. Now,
turn up the LEVEL of tap 3. You should hear the first delay come in the right channel and then the second delay
come in the left channel and continue to ping back and forth between the right and left channels. Now try
changing the DELAY TIME of tap 2 to be something different than tap 3 and notice that when the signal pings
over to the left it is delayed by a different amount. Listen. Tap 2 behaves the same exact way but it starts with
the left channel. These two taps are like having two delay pedals, one going out to each channel, that feedback
into each other instead of themselves. This can get crazy very quick. Play with some of the factory presets to
get the hang of this.
Portions Copyright 2004, Line 6, Inc.
Portions Copyright 2004, Sonoma Wire Works
RIFFWORKS HELP
Page 15

SUPERTANKER
SuperTanker is a slightly metallic and very dense sounding reverb reminisient of plate reverbs.
There are 5 different reverb tones which are selectable from the REVERB TYPE popup menu. The different types
are SWEET, SHINY, DIRTY, DARK and WHIP. The SWEET tone was designed as a nice smooth reverb that won't
cover up your original signal . SHINY has a strong upper midrange response which makes it a fairly bright
reverb. DIRTY is a special effect as you can hear it distorting and adding strange artifacts to the signal. DARK is
exactly what you'd expect, a very warm reverb tone . And finally WHIP has an obvious delay before the reverb
tail. Nice and funky .
Size and Mix: SIZE and MIX are the two dominant controls in Super Tanker. SIZE controls the length of the
reverb tail. Increase the SIZE to create a long reverb tail for guitar lead and some vocals. Turn it down, to get a
more subtle effect. MIX is the ratio of dry to wet signals. It you like the length of the tail, but think it's a little
too loud, try turning down the MIX knob. You can also turn MIX all the way up to hear only reverb.
Damping: The DAMPING control allows you to change the tone of the reverb through the tail. Turn up DAMPING
to decay the high frequencies faster. Tweak it to create your own sound.
Portions Copyright 2004, Line 6, Inc.
Portions Copyright 2004, Sonoma Wire Works
RIFFWORKS HELP
Page 16

STAMINA
Stamina is a classic compressor with automatic make-up gain. It compresses dynamics and can lengthen
sustain of just about any recording. Compression is a very popular effect in recording because it gives you a
more constant volume in your recording.
Compression turns down the volume of the loud parts while leaving the softer parts alone. For instance, say you
were singing and had a great take, but the dynamics are a little inconsistent. You can use Stamina to even out
the dynamics of your vocals in a fairly subtle way. Make-up gain turns up the signal after it's been compressed
so that it doesn't end up being quieter than the original. Stamina provides this automatically so that you don't
have to adjust the level in order to even out the dynamics.
ATTACK and RELEASE are controls that adjust how fast the compressor can control the dynamics. Use small
attack and medium release times for cleaner compression, or change them at will to get the effect you are
looking for. With low ATTACK and RELEASE times you can start to get pumping and breathing effects which can
be fun in the right layer.
SLOPE controls how abruptly the compressor deals with the loud parts of the signal. How compression really
works is that it turns down the volume when the signal goes above a certain loudness. How much it turns it
down is controlled by the slope. If you want to very subtly control the dynamics, you can use a smaller SLOPE
to less aggresively control the peaks. Or you can crank up the SLOPE to just smash the signal down to a
constant level.
COMPRESSION is really the major control in Stamina. It sets the volume that you want to start to control the
peak level. It is really the loudness threshold that I mentioned above. Turn it up to start controlling the
dynamics at a lower threshold.
Like all effects of this sort, you need to use Stamina in moderation to retain some liveliness in your recording.
Radio mixes tend to overcompress music to make sure it is always at the same level, but many feel that this
takes some of the life and reality of the music away. Remember, at all times the meter in the middle of
Stamina will show you just how much you are compressing the signal. There are plenty of sources that describe
how much compression is desirable for specific types of recordings.
Portions Copyright 2004, Line 6, Inc.
Portions Copyright 2004, Sonoma Wire Works
RIFFWORKS HELP
Page 17

NOEQUAL
No Equal is a British style EQ which allows you to make frequency adjustments to your signal. There are 5
bands to this EQ, separated with stitching, which control different parts of the frequency spectrum.
The 5 bands all have a red frequency control which sets the range where the EQ is working, but the 3 middle
bands also have silver gain knobs which allow you to select how much you want to boost or cut the signal
around those frequencies. So, why only 3 gain knobs and not one for each band? All of the 5 EQ bands are
designed to do different things within different regions of the audio spectrum.
To use the 3 bands with BOOST/CUT knobs effectively, first turn the BOOST/CUT knob all the way up (+18 on
the right is all the way up). Then adjust the red frequency knob until you hear the sound that you want to add
or remove. Finally adjust the BOOST/CUT knob back down to taste.
LOW CUT is a filter which gently removes the frequencies below the setting on the knob. Just set the frequency
knob to the desired frequency to turn it on. This band doesn't have a gain knob because it is designed to
remove as much as possible below the set frequency.
LOW is a shelving filter which allows you to boost or cut all frequencies below the selected frequency. This band
is designed to give you precise control over your bass response.
MID is a peaking filter which cuts or boosts content in the crucial mid-range frequency band. This is probably
the most often used band as you can add presence or create holes for other instruments.
HIGH is a shelving filter which can boost or cut frequencies above the set frequency. You can use this band to
add high end sparkle, or just take a little edge off.
HIGH CUT is a filter which can be used to reduce high frequency noise or distortion.
Portions Copyright 2004, Line 6, Inc.
Portions Copyright 2004, Sonoma Wire Works
RIFFWORKS HELP
Page 18

PRESETS
Presets save the settings of all effects that are powered on together allowing you to easily create and store
complete tones.
● To load a preset click on the SELECT... popup menu and choose a preset.
❍ If you want to load a preset not in the Effect Preset folder, press the LOAD button and navigate
the location of the preset file.
● The name of the preset you just selected is shown in the LAST SELECTION display.
● If you edit it and don't like it, just click the RELOAD button to go back to the saved version.
● If you edit it and want to save your changes, press the SAVE button.
● If you save in the Effect Presets folder, it will show up in the preset menu.
❍ You can save presets anywhere you like.
❍ To quickly save a preset for quick access without naming it, press the STORE A or STORE B
buttons.
❍ Then to load those presets, just press the LOAD A or LOAD B buttons.
RIFFWORKS HELP
Portions Copyright 2004, Line 6, Inc.
Portions Copyright 2004, Sonoma Wire Works
Page 19

REX/REWIRE
REXPLAYER can play back up to four rex files simultaneously. REX is a Propellerhead technology that plays back
tempo changable files.
REWIRE can synchronize upto 4 ReWire synth appliation with RiffWorks. ReWire is a Propellerhead technology
that allows applications to share audio and synchronization information.
more...
more...
Portions Copyright 2004, Line 6, Inc.
Portions Copyright 2004, Sonoma Wire Works
RIFFWORKS HELP
Page 20

REXPLAYER
A four channel REX file player that allows loading of REX files (.rex or .rx2) files. Like all backups, the REX
Player is configurable for each riff. The file locations are saved with your Song or Riff, but not the REX files
themselves. If you move the files after loading them and saving, you will have to find them again the next time
you load the song.
● LOAD opens a dialog so you can load REX files from anywhere on your computer.
● Once the file is loaded, you can control the GAIN and PAN settings.
● CLEAR unloads the current REX file.
Portions Copyright 2004, Line 6, Inc.
Portions Copyright 2004, Sonoma Wire Works
RIFFWORKS HELP
Page 21

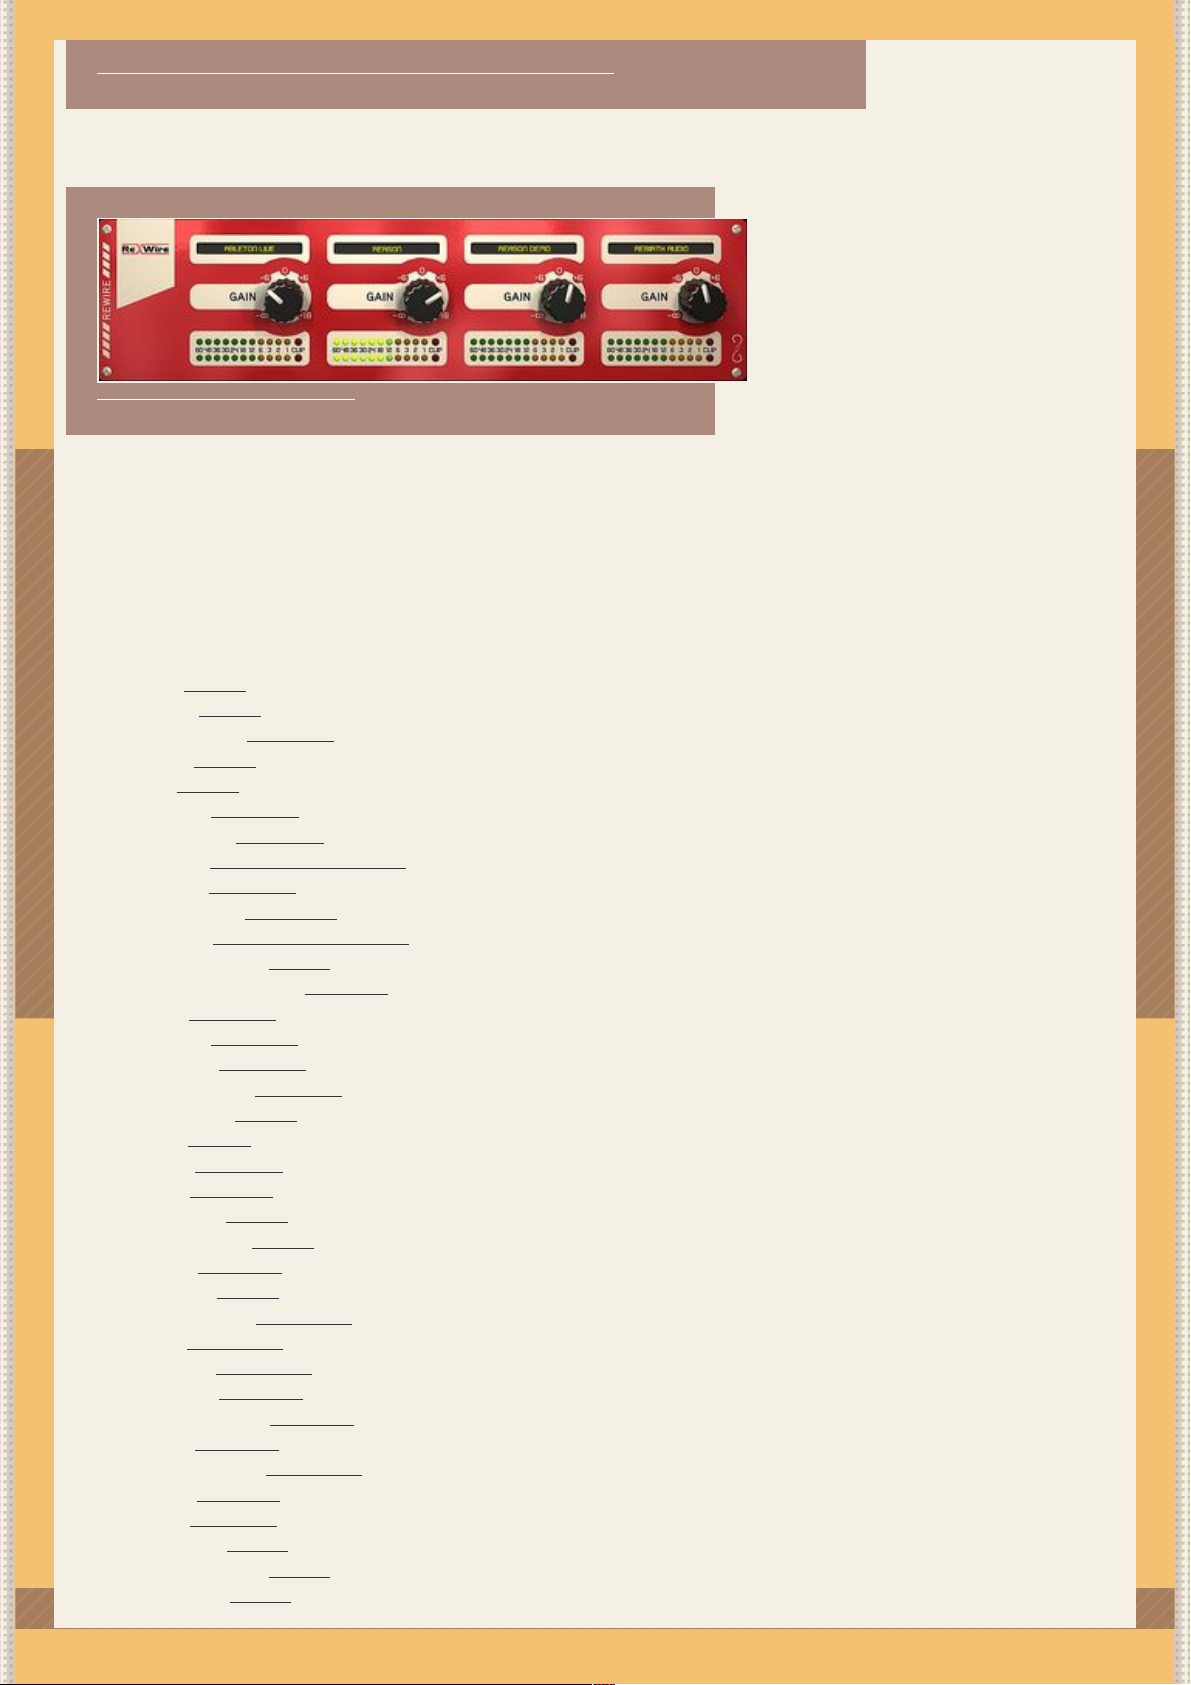
REWIRE
A four channel mixer for the input of ReWire synth applications into RiffWorks. The loop points in ReWire
applications will be remembered with each Riff you create. You will be able to move them around, but not
change the length of the loop. The length will be locked to the length of the current Riff. The transport in the
ReWire applications will control the Riff Recorder transport only. When you play using the Song transport, each
Riff will cause the ReWire applications to jump to the recalled loop points.
● Launch RiffWorks first to make other ReWire applications like Reason work in Synth Mode.
● Then launch your ReWire application.
● Connection and configuration is all automatic.
● You must quit all other ReWire applications before quitting RiffWorks.
Portions Copyright 2004, Line 6, Inc.
Portions Copyright 2004, Sonoma Wire Works
RIFFWORKS HELP
 Loading...