

Page 1

Welcome to the GuitarPort. This manual is
designed to act as a guide to help you through
the installation process. It will provide a road
map of what to expect and a glossary of terms
that are relevant to GuitarPort and its Windows requirements.
Please note that your GuitarPort installation
CD only carries English language software. If
you are required to install a new version of
Direct X, Internet Explorer or Windows
Media Player then you may wish to acquire
your native language version from your
regional Microsoft website.
3
Page 2

Line 6–
GuitarPort
4
Page 3

Contents
C
ONTENTS
Installation. . . . . . . . . . . . . . . . . . . . . . . . . . . . . . . . . . . 9
Quit Other Applications . . . . . . . . . . . . . . . . . . . . . . . . . . 10
Restart Before Re-Installing. . . . . . . . . . . . . . . . . . . . . . . . 10
Don’t Connect The GuitarPort Hardware Yet . . . . . . . . 10
Insert the GuitarPort CD . . . . . . . . . . . . . . . . . . . . . . . . . 10
License Agreement . . . . . . . . . . . . . . . . . . . . . . . . . . . . . . 12
Choose Destination. . . . . . . . . . . . . . . . . . . . . . . . . . . . . . 13
The Requirements . . . . . . . . . . . . . . . . . . . . . . . . . . . . . . . 15
USB Cable . . . . . . . . . . . . . . . . . . . . . . . . . . . . . . . . . . . . . 24
Soundcard Connection . . . . . . . . . . . . . . . . . . . . . . . . . . . 25
Audio Output. . . . . . . . . . . . . . . . . . . . . . . . . . . . . . . . . . . 26
Completing The Installation . . . . . . . . . . . . . . . . . . . . . . . 28
Tutorial . . . . . . . . . . . . . . . . . . . . . . . . . . . . . . . . . . . . 31
Using the Amps . . . . . . . . . . . . . . . . . . . . . . . . . . . . . . . . . 31
Setting The Volume. . . . . . . . . . . . . . . . . . . . . . . . . . . . . . 32
Help . . . . . . . . . . . . . . . . . . . . . . . . . . . . . . . . . . . . . . . . . . 32
Using the Effects . . . . . . . . . . . . . . . . . . . . . . . . . . . . . . . . 33
Jamming Along a Track . . . . . . . . . . . . . . . . . . . . . . . . . . . 33
Learning . . . . . . . . . . . . . . . . . . . . . . . . . . . . . . . . . . . . . . . 34
5
Page 4

Line 6–
GuitarPort
The ‘How Tos’. . . . . . . . . . . . . . . . . . . . . . . . . . . . . . . 35
Adjust the volume balance between
your guitar and the Track . . . . . . . . . . . . . . . . . . . . . . . . . 35
Avoid running out of hard disk space . . . . . . . . . . . . . . . . 35
Change the factory Preset Tones . . . . . . . . . . . . . . . . . . . 36
Check your GuitarPort's version . . . . . . . . . . . . . . . . . . . 36
Connect to the Internet . . . . . . . . . . . . . . . . . . . . . . . . . . 37
Create and save a Tone. . . . . . . . . . . . . . . . . . . . . . . . . . . 37
Delete a Tone . . . . . . . . . . . . . . . . . . . . . . . . . . . . . . . . . . 39
Disable Download Accelerators . . . . . . . . . . . . . . . . . . . . 39
Find FAQs . . . . . . . . . . . . . . . . . . . . . . . . . . . . . . . . . . . . . 39
Find GuitarPort’s Tone & Track files on your hard disk . 39
Find out which Operating System version you
are running. . . . . . . . . . . . . . . . . . . . . . . . . . . . . . . . . . . . . 40
Fine-tune GuitarPort's software knobs and
Model or Tone menus. . . . . . . . . . . . . . . . . . . . . . . . . . . . 40
Initialize a Tone . . . . . . . . . . . . . . . . . . . . . . . . . . . . . . . . . 40
Join GuitarPort Online. . . . . . . . . . . . . . . . . . . . . . . . . . . . 41
Load an MP3, WAV or AIFF File. . . . . . . . . . . . . . . . . . . . 41
Load a Track from an Audio CD. . . . . . . . . . . . . . . . . . . . 41
Load a Track file from GuitarPort Online. . . . . . . . . . . . . 42
Load a Track file from your hard disk. . . . . . . . . . . . . . . . 42
Prevent GuitarPort from automatically disconnecting
from the Internet. . . . . . . . . . . . . . . . . . . . . . . . . . . . . . . . 42
Preventing GuitarPort from trying to
connect to the Internet . . . . . . . . . . . . . . . . . . . . . . . . . . . 43
Record GuitarPort's output to other programs. . . . . . . . 43
Reduce latency. . . . . . . . . . . . . . . . . . . . . . . . . . . . . . . . . . 45
Register GuitarPort . . . . . . . . . . . . . . . . . . . . . . . . . . . . . . 45
Resize the GuitarPort program window. . . . . . . . . . . . . . 46
Right-click. . . . . . . . . . . . . . . . . . . . . . . . . . . . . . . . . . . . . . 46
Rip a CD with GuitarPort . . . . . . . . . . . . . . . . . . . . . . . . . 47
Select your Preferred Audio Device . . . . . . . . . . . . . . . . . 47
Set the Loop start and end points. . . . . . . . . . . . . . . . . . . 47
Set Preferences for GuitarPort's access to the Internet. . 48
Share your Tones with other GuitarPort users . . . . . . . . 48
Show an effect's controls without turning on an effect . . 48
6
Page 5

Contents
Show/hide the browser. . . . . . . . . . . . . . . . . . . . . . . . . . . 49
Show/hide effect stompbox icons and control panel . . . . 49
Show/hide the Track sections display . . . . . . . . . . . . . . . . 50
Turn GuitarPort's software knobs . . . . . . . . . . . . . . . . . . 50
Uninstall GuitarPort. . . . . . . . . . . . . . . . . . . . . . . . . . . . . . 50
The ‘What Is?’ . . . . . . . . . . . . . . . . . . . . . . . . . . . . . . . 51
[!] Button . . . . . . . . . . . . . . . . . . . . . . . . . . . . . . . . . . . . . . 51
Warning Triangle. . . . . . . . . . . . . . . . . . . . . . . . . . . . . . . . 51
Amp, Cab and Effect Models. . . . . . . . . . . . . . . . . . . . . . . 52
Amps and Cabinets Modeled for GuitarPort . . . . . . . . . . 53
Cabinets. . . . . . . . . . . . . . . . . . . . . . . . . . . . . . . . . . . . . . . 59
Amp Panel and Amp/Cab Controls. . . . . . . . . . . . . . . . . . 60
Audio Stream Reliability Slider . . . . . . . . . . . . . . . . . . . . . 61
AUTO-SELECT Button . . . . . . . . . . . . . . . . . . . . . . . . . . . 61
Browser . . . . . . . . . . . . . . . . . . . . . . . . . . . . . . . . . . . . . . . 62
BYPASS Button . . . . . . . . . . . . . . . . . . . . . . . . . . . . . . . . . 63
Chorus. . . . . . . . . . . . . . . . . . . . . . . . . . . . . . . . . . . . . . . . 63
Collapse/Expand Button . . . . . . . . . . . . . . . . . . . . . . . . . . 63
COMPARE Button. . . . . . . . . . . . . . . . . . . . . . . . . . . . . . . 64
Compressor (Comp). . . . . . . . . . . . . . . . . . . . . . . . . . . . . 64
Delay . . . . . . . . . . . . . . . . . . . . . . . . . . . . . . . . . . . . . . . . . 65
Windows Device Manager . . . . . . . . . . . . . . . . . . . . . . . . 65
Effects. . . . . . . . . . . . . . . . . . . . . . . . . . . . . . . . . . . . . . . . . 65
Flanger . . . . . . . . . . . . . . . . . . . . . . . . . . . . . . . . . . . . . . . . 66
GUITAR PAN . . . . . . . . . . . . . . . . . . . . . . . . . . . . . . . . . . 67
GuitarPort Online . . . . . . . . . . . . . . . . . . . . . . . . . . . . . . . 67
HALF SPEED Button . . . . . . . . . . . . . . . . . . . . . . . . . . . . . 68
Hot Keys are available in GuitarPort . . . . . . . . . . . . . . . . 69
Hum Reducer. . . . . . . . . . . . . . . . . . . . . . . . . . . . . . . . . . . 69
Info Bar. . . . . . . . . . . . . . . . . . . . . . . . . . . . . . . . . . . . . . . . 70
Loaded (Track) Menu . . . . . . . . . . . . . . . . . . . . . . . . . . . . 70
LOOP Button. . . . . . . . . . . . . . . . . . . . . . . . . . . . . . . . . . . 70
Modulation (MOD) . . . . . . . . . . . . . . . . . . . . . . . . . . . . . . 71
MUTE GUITAR Button . . . . . . . . . . . . . . . . . . . . . . . . . . . 71
Noise Gate. . . . . . . . . . . . . . . . . . . . . . . . . . . . . . . . . . . . . 71
Preferred Audio Device . . . . . . . . . . . . . . . . . . . . . . . . . . 72
7
Page 6

Line 6–
GuitarPort
Reference control in the Tuner. . . . . . . . . . . . . . . . . . . . . 72
Reverb-Block (Hall) . . . . . . . . . . . . . . . . . . . . . . . . . . . . . . 73
Room Reverb. . . . . . . . . . . . . . . . . . . . . . . . . . . . . . . . . . . 73
Rotary Speaker. . . . . . . . . . . . . . . . . . . . . . . . . . . . . . . . . . 73
Soundcard. . . . . . . . . . . . . . . . . . . . . . . . . . . . . . . . . . . . . . 74
Spring Reverb. . . . . . . . . . . . . . . . . . . . . . . . . . . . . . . . . . . 74
T’s shown in some tracks . . . . . . . . . . . . . . . . . . . . . . . . . 74
Technical Terms. . . . . . . . . . . . . . . . . . . . . . . . . . . . . . . . . 75
Tone. . . . . . . . . . . . . . . . . . . . . . . . . . . . . . . . . . . . . . . . . . 76
Tone Locker. . . . . . . . . . . . . . . . . . . . . . . . . . . . . . . . . . . . 76
Track . . . . . . . . . . . . . . . . . . . . . . . . . . . . . . . . . . . . . . . . . 78
TRACK LEVEL. . . . . . . . . . . . . . . . . . . . . . . . . . . . . . . . . . 79
Track Sections Display. . . . . . . . . . . . . . . . . . . . . . . . . . . . 79
Transfer Manager. . . . . . . . . . . . . . . . . . . . . . . . . . . . . . . . 80
Tremolo . . . . . . . . . . . . . . . . . . . . . . . . . . . . . . . . . . . . . . . 80
USB Hub. . . . . . . . . . . . . . . . . . . . . . . . . . . . . . . . . . . . . . . 81
Glossary. . . . . . . . . . . . . . . . . . . . . . . . . . . . . . . . . . . . 83
USB-definition, limitations . . . . . . . . . . . . . . . . . . . . . . . . . 85
Other terms. . . . . . . . . . . . . . . . . . . . . . . . . . . . . . . . . . . . 85
Internet connection: speed, type, broadband, dial up. . . . 87
Start up disk . . . . . . . . . . . . . . . . . . . . . . . . . . . . . . . . . . . . 88
8
Page 7

I
NSTALLATION
This chapter is designed to act as a guide to
help you through the installation process. It
also describes the requirements for your computer and Windows.
Please note that your GuitarPort installation
CD only carries English language software. If
you are required to install a new version of
Direct X, Internet Explorer or Windows
Media Player then you may wish to acquire
your native language version from your
regional Microsoft website.
This manual will also provide a road map of
what to expect and a glossary of terms that are
relevant to GuitarPort (page 83).
Okay, here we go!
9
Page 8

Line 6–
GuitarPort
Quit Other Applications
It is strongly recommended that you exit all
other Windows programs
GuitarPort installation program (which is
called SETUP.EXE on the GuitarPort CDROM), especially sound-related applications.
before
running the
Restart Before Re-Installing
If you need to re-install GuitarPort, you should
restart your machine just before you run the
GuitarPort installer program to re-install.
This insures that Windows has not retained a
running version of the GuitarPort driver in
memory, which can cause conflicts when reinstalling.
Also, just like when you're installing
GuitarPort for the first time, you should exit all
other Windows programs before running the
GuitarPort installation program.
Don’t Connect The GuitarPort Hardware Yet
The first step to installing your new GuitarPort
is to make sure that the GuitarPort hardware IS
NOT
connected.
You will connect the supplied USB cable to
your new hardware later in the installation
process. Leaving it unconnected now prevents
Windows from producing confusing messages
during the first parts of the installation.
Insert the GuitarPort CD
The second step is to insert the GuitarPort CD
in your CD-ROM drive. The GuitarPort
Installer will usually start automatically.
If it doesn't, go to "My Computer" on your
desktop and double click on the icon for your
CD drive. This should generally bring up the
screen below.
If that doesn't work (meaning you have your
machine configured not to run auto-run files),
then browse the CD and double click on the
GPInstall.exe
program to get you going.
10
Page 9
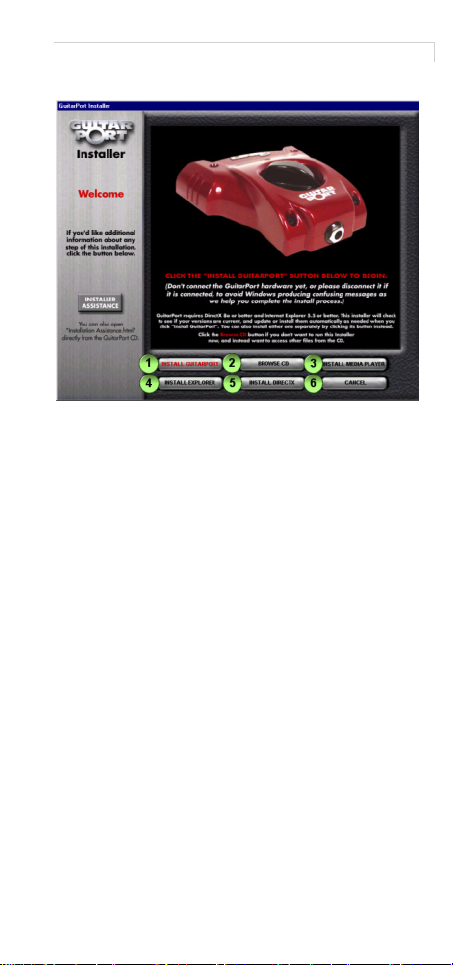
Insert the GuitarPort CD
When the installer starts, you will see a page
similar to the following:
❍
Clicking the
will launch your preferred browser program (like
Internet Explorer) and display this document that
you are reading now.
INSTALLER ASSISTANCE
button
The other buttons on the screen above have
been numbered for convenience, and perform
the following actions:
[1] INSTALL GUITAR PORT–
This is probably
the button you want. It will install GuitarPort
and its drivers. If you are lacking any of the
other required software (Internet Explorer,
DirectX, etc.) you will be prompted to install it,
if you wish. Also read the note on page 3.
[2] BROWSE CD–
Exits the install and opens a
window allowing you to look around on the
CD, checking out the contents. All of the
installs are available independently on the CD,
along with things like Tracks, utilities, and the
source for
AKRip
, the LGPL’d CD-Ripping
DLL we use.
[3] INSTALL MEDIA PLAYER–
This button
installs the Microsoft Windows Media Player
7.1 onto your system. You may also get the latest version from here:
http://windowsmedia.com/download.
11
Page 10
Line 6–
GuitarPort
[4] INSTALL EXPLORER–
This button installs
Microsoft Internet Explorer 6.0 onto your system. You may also get the latest version from
here:
http://www.microsoft.com/windows/ie/default.asp
[5] INSTALL DIRECT X–
This button installs
Microsoft DirectX 8a onto your system. You
may also get the latest version from
www.microsoft.com/directx
[6] CANCEL–
Exits the installation application
.
http://
immediately.
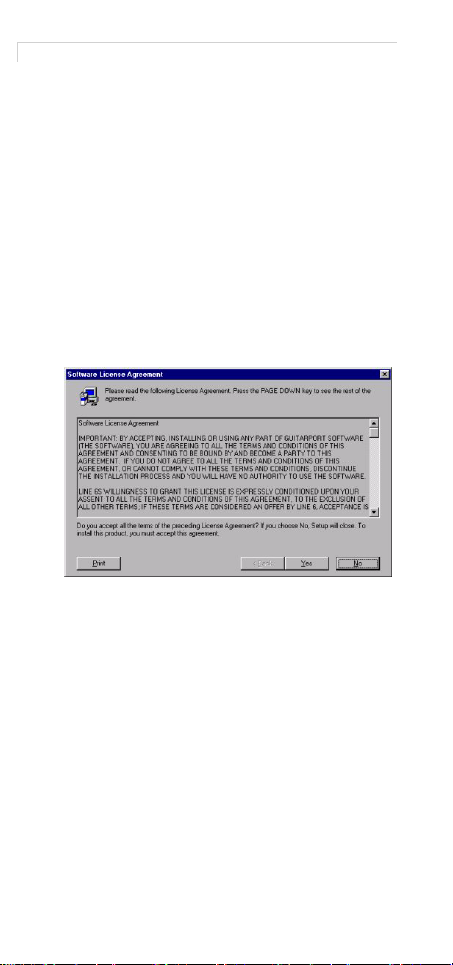
License Agreement
The installer will present you with a license
agreement that you will need to agree to in
order to install and use your GuitarPort:
After carefully reading the license, click the
[Yes] button if you agree to the terms of this
license, and the Installer will give you a chance
to decide where to install GuitarPort.
❍
If you do not agree with the license, you cannot
install GuitarPort.
12
Page 11
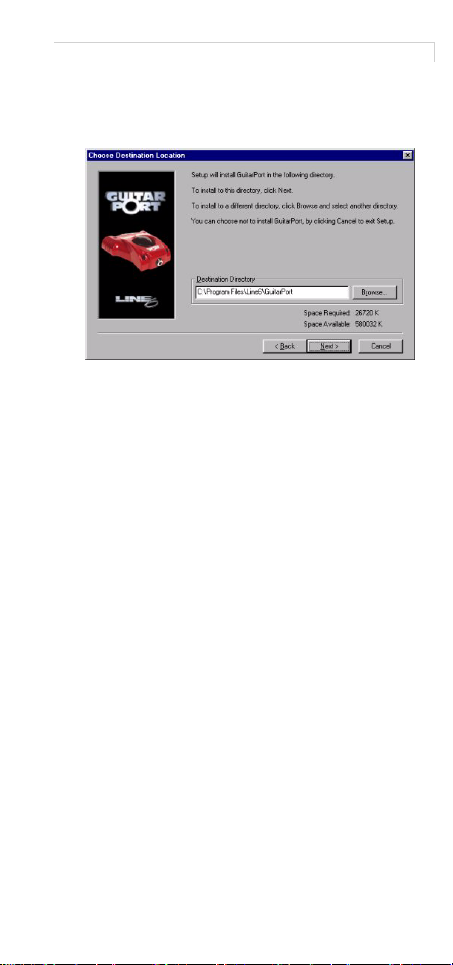
Choose Destination
Choose Destination
If you'd like to install in the standard default
location, just click the [Next] button. If you'd
like to choose another location, click [Browse]:
Is Your System Ready for GuitarPort?
The installer will check to see if you have a
GuitarPort-compatible version of Internet
Explorer installed. If not, an installation program for Explorer will run. You will have to
restart your computer after this installation,
and then run the GuitarPort installer again.
The GuitarPort installer will then check to see if
you have a GuitarPort-compatible version of
DirectX installed. If not, an installation program for DirectX will run, and you will again
have to restart your computer after this installation.
❍
Be sure to also read the note on page 3.
Finally, the GuitarPort installer will also check
to see if you have Windows Media Player 7.1 or
better installed. If not, an installation program
for it will be run if you wish.
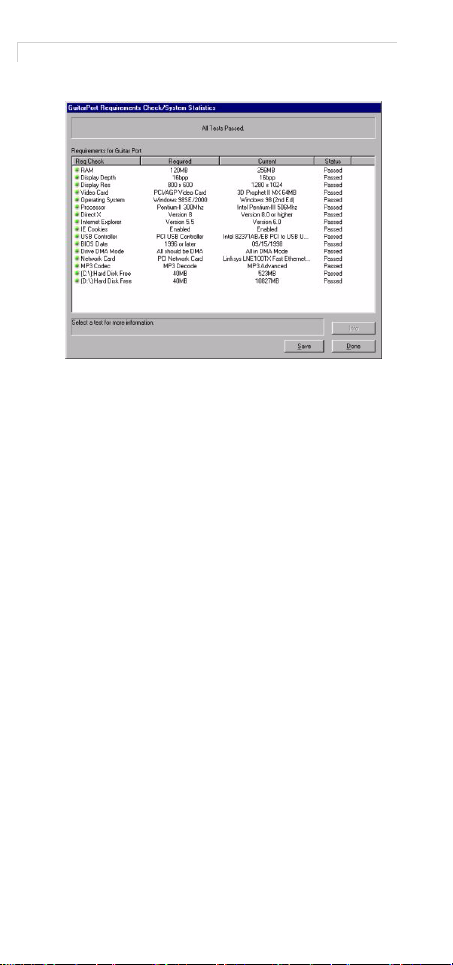
Run the GuitarPort installer again, and it will
test to see if other key components of your system are GuitarPort-ready. If any part of your
system fails the compatibility check, you will
see the GuitarPort Requirements Check/System Statistics display.
13
Page 12
Line 6–
GuitarPort
It is very important that you read the information below about any tests that fail:
Terms and Definitions and Compatible Systems List
For terms that you are not familiar with, please
check their definitions in the glossary
(page 83). For the latest compatible software
list, compatible systems list and troubleshooting tips, see our
[
www.line6.com
FAQTRAQ
].
site at
It is imperative that you pass all items on the
requirements check, otherwise GuitarPort will
not work correctly. Some of the tests, if failed,
include an option to update your system's software configuration to meet the requirements.
Some of the tests are hardware related and will
(unfortunately) be showstoppers if your system does not pass. To have GuitarPort try to fix
a failed test, highlight the test by clicking on it
once with your mouse, and then press the [Fix]
button that will appear at the bottom of the
screen.
Save The Requirements Check Results
It is also highly recommended that you Save
this page, by clicking the [Save] button. This
can come in handy later if you need to contact
the Line 6 Customer Support, and we have
questions about your system configuration.
14
Page 13
The Requirements
The Requirements
So, what ARE all those tests? Glad you asked:
Memory
Required: 128 MB
This is a basic hardware requirement. If you're
RAM is lower than 128MB, you may experience slow-downs and/or poor sound quality.
If you need assistance determining what kind
of RAM your system requires or upgrading
your system's RAM, please contact your PC
manufacturer.
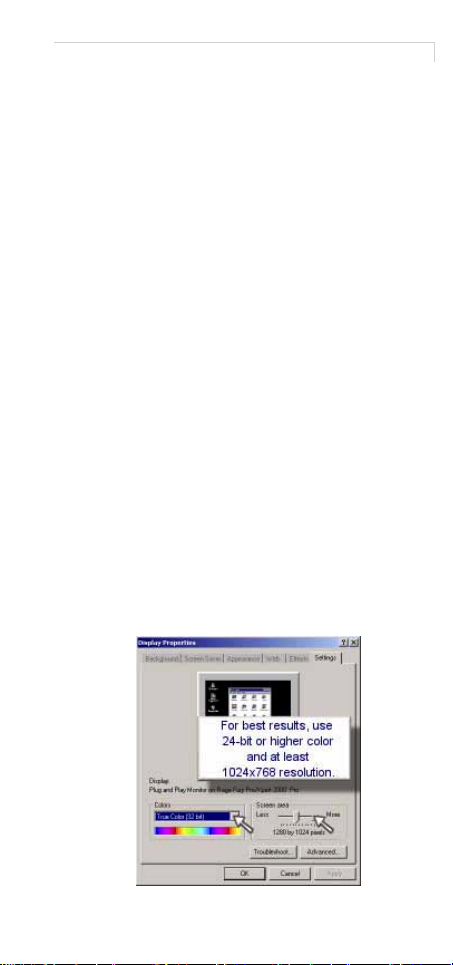
Video settings
Recommended: 1024x768 (or higher) with 24bit color.
GuitarPort is useable with a display of 800x600
pixels and 256 (8-bit) colors. It will look best,
however, in a larger resolution such as
1024x768 with 24-bit color or higher enabled.
To change your display settings:
1)
Press the [Start] button on the Taskbar, and select
[Settings]→ [Control Panel].
2)
Double click on the [Display] icon in the Control
Panel.
3)
Select the [Settings] tab in the Display Properties
dialog.
4)
Under the [Colors] pull-down menu, choose “24-bit”
or “32-bit”.
5)
Under the “Screen Area” label, select “1024x768” or
better.
15
Page 14

Line 6–
GuitarPort
6)
Hit [OK].
7)
You may have to reboot depending on your Windows
setup.
Video display adapter
Recommended: 32MB AGP card
GuitarPort will run best if your video display
adapter is an AGP card. PCI cards will generally work okay. We do not recommend using
an ISA video card.
We recommend using a videocard with at least
32MB RAM, although it is not required.
Operating System
Required: Windows 98SE, Windows ME, or
Windows 2000.
GuitarPort runs under Windows 98 Second
Edition (98SE), Windows ME, and Windows
2000.
If your computer currently is running an oper-
ating system that is not compatible with
GuitarPort, you will need to upgrade to a compatible operating system to use GuitarPort.
Please note that GuitarPort does
with Windows XP as of this writing (check
Line 6's Website
tion on XP support).
Also, if your computer has Windows 98
installed but is failing this test, it is because you
do not appear to have a valid install of Windows 98 Second Edition, AKA Windows 98SE.
The SE upgrade is available via various computer retailers to bring your computer up to
date GuitarPort will not run properly under
Windows 98 First Edition due to inadequate
USB and audio support in that operating system. Windows NT 4.0 and Windows 95 are also
not supported.
http://www.line6.com
NOT
work
for informa-
Processor
Required: Pentium-II 400Mhz or Better
You will need a processor at least as fast as a
400 MHz Pentium-II processor. Other processors supported are the AMD Athlon and AMD
Duron.
16
Page 15
The Requirements
AMD's K6 series and Cyrix's 6x86 series of processors typically do not perform well running
GuitarPort. If you need assistance determining
what kind of processor your system has or
upgrading your system's processor, please contact your PC manufacturer.
DirectX
Required: Microsoft DirectX 8a or above
GuitarPort requires Microsoft's DirectX version
8a or above. You will find DirectX 8a on the
GuitarPort Installation CD-ROM, or you can
download the latest version from Microsoft:
http://www.microsoft.com/directx
Internet Explorer
Required: Internet Explorer 5.5 or above
GuitarPort requires Internet Explorer version
5.5 or above. You will find Internet Explorer 6.0
on the GuitarPort Installation CD-ROM, or you
can download the latest version from
Microsoft:
www.microsoft.com/windows/ie/default.asp
Cookies
Required: Cookies must be allowed for Line 6
Windows' Internet settings must be configured
to accept cookies from Line 6's web sites to use
the online features of GuitarPort. By default,
this should be configured in a way that will
work. However, if you reconfigure your security and privacy settings, you will need to do it
in one of the two ways described below.
For either method, you can reach the Internet
Security and Privacy configuration through
GuitarPort by selecting
Edit
menu and choosing the
Preferences
from the
Advanced
button
on the Internet preferences tab.
17
Page 16

Line 6–
GuitarPort
Method 1
:
If you want high security, but wish to allow
other sites to use cookies, then you can set the
“Privacy” setting to
Method 2
:
High
.
If you do not wish to allow other sites to use
cookies, you may set your “Privacy” setting to
Block All Cookies
go to the
Security
. However, you then need to
tab and add
http://*.line6.net
a trusted site.
as
Additional information regarding your privacy
and security settings is available at:
http://www.microsoft.com/windows/ie/using/howto/
privacy/config.asp
18
Page 17
The Requirements
Internet Connection
Required: An Internet connection is required to
use GuitarPort-Online features
You must be connected to the Internet to use
the GuitarPort Online features. These include
downloadable Tracks, custom Tones for
GuitarPort, insight from today's leading artists,
and more!
If you use a proxy, you will need to configure
GuitarPort to use it. If you aren't sure if you use
a proxy, ask your ISP or Network Administrator.
Internet Configuration For LAN/DSL/Cable
Connections
1)
Make sure your ethernet cable or DSL/Cable modem
is connected and activated.
2)
If you use a DSL/Cable modem, you must connect to
the Internet outside of GuitarPort.
Please contact your ISP if you have difficulty
connecting to the Internet.
3)
If you use a proxy, continue with step 4. Otherwise,
you're done!
4)
To configure Windows' Internet settings for your
proxy, first open the Internet
selecting
Preferences
GuitarPort and choosing the
the
Internet preferences
Settings
from the
Advanced
tab.
Edit
dialog by
menu in
button on
5)
Now select the
Settings
You will need to enter the Proxy Server's name
and the port to use as a proxy. If you do not
know this information, contact your ISP or system administrator.
Connections
.
tab, and click on
LAN
19
Page 18
Line 6–
GuitarPort
Internet Configuration For Dialup Modems
1)
Make sure your modem is connected and powered
on (if external).
2)
If you haven't configured a Dial-Up networking connection for your system, you may do so.
Click on the Windows [Start] button, then
select [Programs] → [Accessories] → [Communications] → [Network & Dialup Connections].
Click on "Make a new connection" and enter in
the requested information. If you have questions, please contact your ISP.
3)
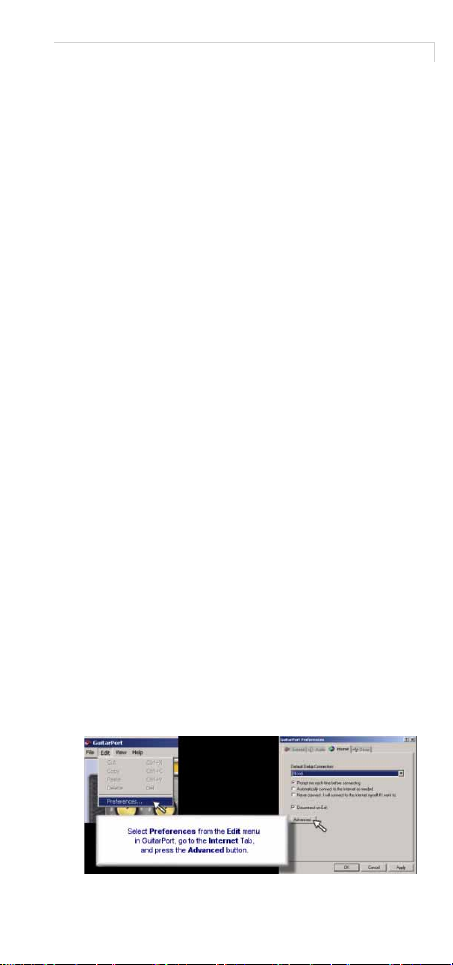
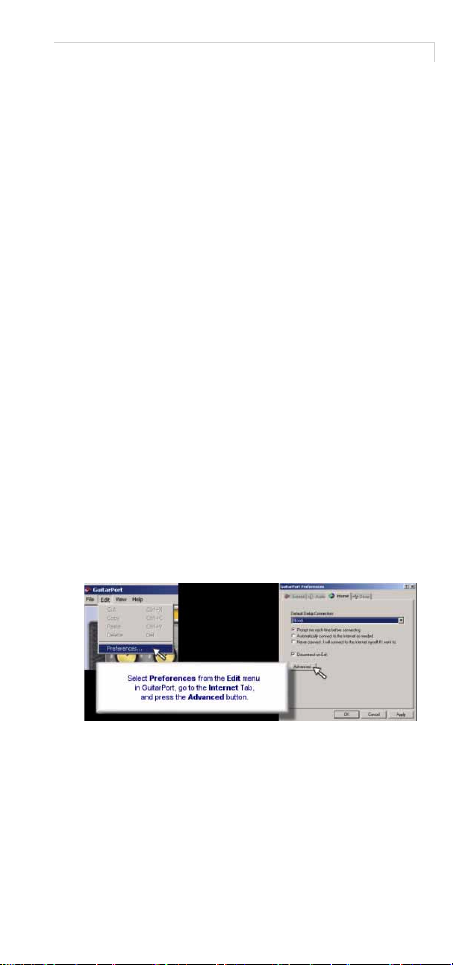
Once a Dial-Up connection is configured for your system, you can configure GuitarPort to automatically
make use of it if you wish by going to the
ences
menu (accessible from the
Prefer-
Edit
menu at the
top of GuitarPort).
GuitarPort may be set to automatically connect,
prompt when it requires a connection, or never
prompt. If you choose "Never Prompt", you
will need to connect manually when you wish
to use the GuitarPort Online features.
4)
If you use a proxy,
continue with step 5.
Otherwise, you're
done!
5)
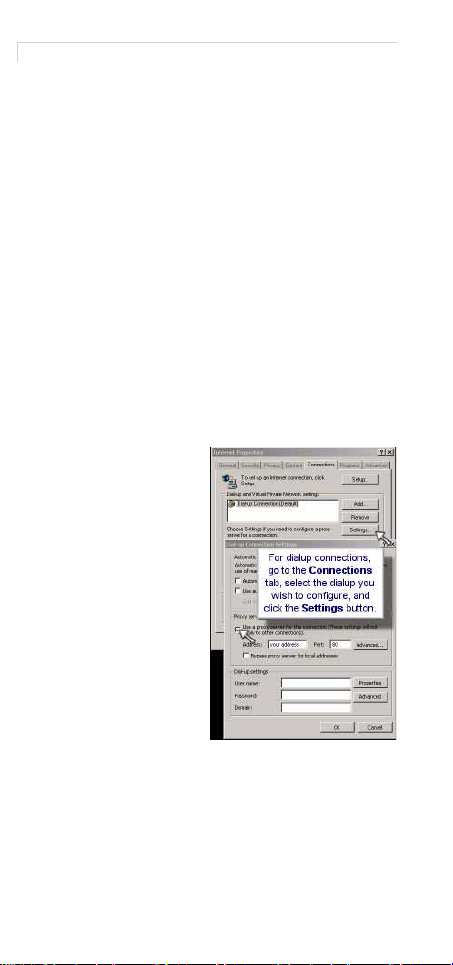
To configure Windows' Internet settings for your proxy:
• first open the
Internet Settings
dialog by select-
Preferences
ing
from the
menu in
GuitarPort and
choosing the
Advanced
ton on the
net preferences
• Now go the
dialup connection you wish to use.
• Click on the
lup list.
• Enter the proxy server's name and port. If
you do not have this information, please
contact your ISP or system administrator.
Edit
but-
Inter-
tab (see previous image).
Connections
Settings
tab and select the
button next to the dia-
20
Page 19

The Requirements
Internet Configuration For AOL Users
Currently, GuitarPort does not support automatic connections using AOL. You should connect to AOL using the AOL software before
you try accessing the net with GuitarPort.
USB
Required: A USB Port
A USB port is required for use of GuitarPort.
Generally, the USB ports will be built into your
computer's motherboard.
Some older PC's that were built in the early
days of USB have errors in their USB implementations. In most cases, you can buy a fairly
inexpensive add-on USB board from one of
several different vendors that will solve the
problems caused by these out-of-spec implementations. Make sure to get one that plugs
into your PCI bus, NOT ISA!
ports may cause slow/unstable performance.
ISA-based USB
BIOS
Recommended: 1996 or later
Your computer's BIOS should be fairly recent.
We recommend checking with your PC manufacturer and getting the latest revision of the
BIOS for your motherboard. Many earlier
BIOS's implementations of USB were flawed.
DMA Drive Access
Recommended: All IDE/ATAPI Drives should
be in DMA mode
By default, Windows often configures IDE
Hard Drives and IDE/ATAPI CD-ROM's to
use PIO (Programmed Input/Output) mode.
Unfortunately, this mode is slow and very processor-intensive, and can interfere with
GuitarPort's audio stream (as well as slowing
your computer down anyway).
It is preferable to configure your Hard Drives
and CD-ROM's to use DMA (Direct Memory
Access) mode. This offers better performance
with less CPU usage. You should check your
drives' users manuals prior to changing this
setting to make sure they support DMA mode.
21
Page 20
Line 6–
GuitarPort
Some older drives that do not support DMA
mode properly and may corrupt data if you
attempt to use DMA mode.
To configure your drives to use DMA mode
under Windows 2000:
1)Click on the [Start] button, and select [Settings]
→
[Control Panel].
2)Double-Click the [System] icon.
3)Select the [Hardware] tab, and press the [Device
Manager] button.
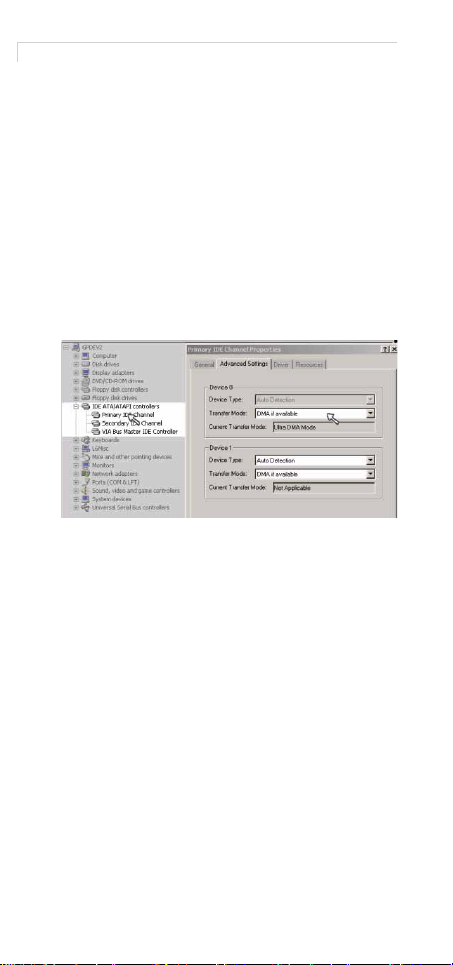
4)Select the [IDE ATA/ATAPI controllers] tree and
open it.
5)Check each IDE channel to make sure the “Transfer
Mode” is set to “DMA” if available.
6)You must reboot your machine if you make changes
to these settings.
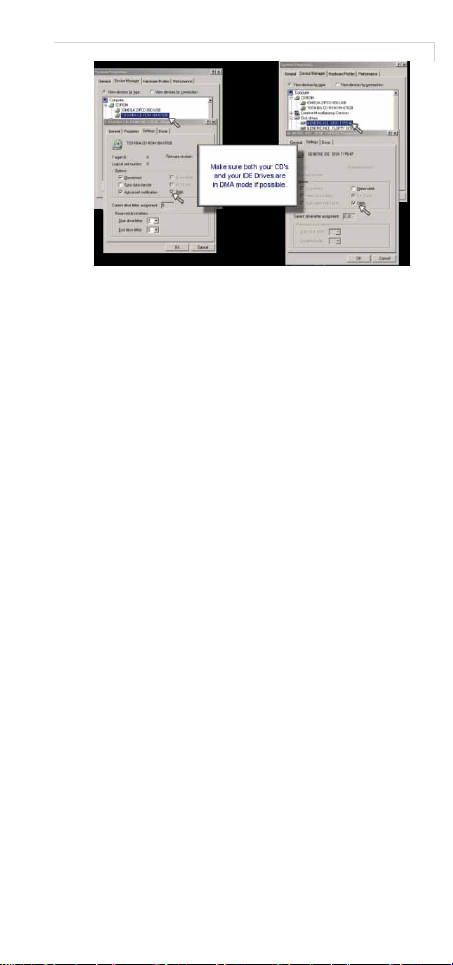
To configure your drives to use DMA mode
under Windows 98/ME:
1)Click on the [Start] button, and select [Settings]
→
[Control Panel].
2)Double-Click the [System] icon.
3)Select the [Device Manager] tab.
4)Select each IDE drive or CD-ROM drive and hit
[Properties].
22
Page 21
The Requirements
5)Go to the [Settings] tab on the device and ensure that
the “DMA” box is checked.
6)You must reboot your machine if you make changes
to these settings.
Network Adapter
Recommended: Non-ISA Network Adapter
If you use an Ethernet adapter to connect to a
network, we recommend using a non-ISA
board. ISA boards operate at lower bus speeds,
and can slow down your computer - this can
sometimes cause "clicks" in the audio.
MP3 Codec
Required: MP3 Decode codec or better
GuitarPort requires the codec to decode MP3
streams. It is installed with GuitarPort (and
several other sound-oriented packages). The
valid types are "Decode", "Advanced" and
"Professional" - all of these will work with
GuitarPort.
If you do not have a codec installed, then you
have not installed, or need to reinstall, Windows Media Player. You may also get the latest
version at:
http://windowsmedia.com/download
Hard Disk
Recommended: At least 50MB free on any
drive used for audio
If you want to download Tracks, rip songs
from a CD, or save any kind of digital audio,
you should make sure to use a drive with at
least 50MB free on it to avoid running out of
23
Page 22
Line 6–GuitarPort
space. As a point of reference, high quality stereo audio takes up a little over 10MB/minute
of audio.
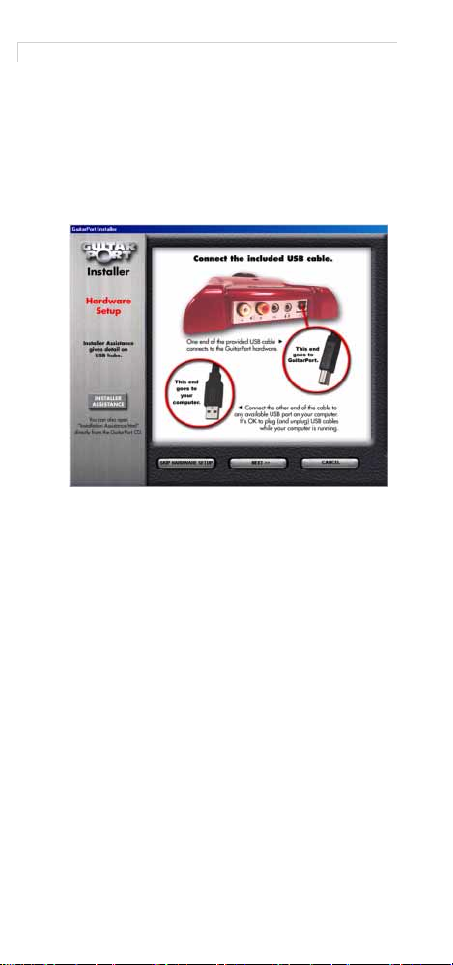
USB Cable
The first step in installing your hardware is to
connect the included USB cable between the
GuitarPort hardware and your computer or
USB hub.
Follow the instructions and connect the USB
port on the back of the GuitarPort to the USB
port on your computer. Computers sometimes
have their USB port on the back and sometimes
on the front. If there are connections on the
front and the back, they should both work.
USB Hub
You may need a USB hub to provide enough
USB connections from your computer to your
printer and other peripherals along with your
GuitarPort. If you do, connect the hub as
described in the hub's instruction manual.
The hub must be powered via a separate
power cable connecting it to a power outlet.
Some USB hubs can operate without a separate
power cable, drawing a small amount of power
directly from the computer via the USB connection. However, the hub will not supply enough
power to the GuitarPort in this configuration.
Once you've got GuitarPort hooked up to USB,
you're ready for...
24
Page 23
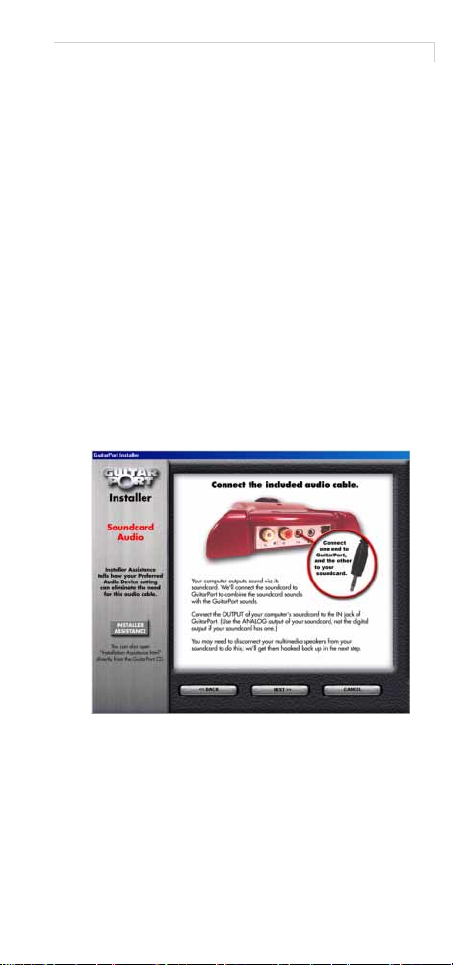
Soundcard Connection
Soundcard Connection
The next step is to connect the output of your
soundcard to feed through GuitarPort. This is
the simplest way to get the audio that
GuitarPort doesn't produce – like your system
sounds and the audio from other programs –
still feeding out of your setup along with
GuitarPort.
You also have the option to make GuitarPort
your Preferred Audio Device, meaning that
your system sounds and other audio will be
fed directly to GuitarPort by your computer,
instead of being routed to the sound card. In
this case, hooking up the audio cable from your
sound card to the GuitarPort hardware is
unnecessary, but then it's very important that
you read the detail under “Preferred Audio
Device” on p. 87.
The installer tells you just what to do to get the
included Stereo Mini Cable connected between
your sound card and the GuitarPort hardware:
As the installer shows, you may need to disconnect your speakers (if you have some) to
make this connection. We will get them hooked
back up in the next step.
25
Page 24

Line 6–GuitarPort
Audio Output
In order to hear the great sound that your
GuitarPort produces, you'll need to hook up
the audio outputs. GuitarPort has two sets to
choose from, depending on your needs:
Multimedia Speakers
If your computer setup includes separate multimedia speakers, you probably disconnected
them in the last step. You'll now want to connect them to the GuitarPort output with the
headphone icon.
Some speakers use a separate power supply
that connects them to a power outlet, and some
get power directly from the computer's soundcard. The speakers that get their power from
the soundcard will generally work with
GuitarPort, but you will probably find that
they are not as loud as you would like them to
be. You will probably want to get a new set of
separately powered speakers, or use headphones.
Headphones
GuitarPort should work with any headphones
that have a "mini" eighth-inch jack. If you have
headphones with the larger quarter-inch jack,
you'll need to get an adapter to use them with
GuitarPort.
26
Page 25

Audio Output
Stereo System
If you'd like to hook your GuitarPort into your
stereo system, you'll probably want to use the
Dual RCA (also sometimes called "phono")
connectors, labeled “L” and “R” for Left and
Right. The connectors carry the same audio signal as the output with the headphone icon, and
the level of all the outputs is controlled by the
knob on the GuitarPort hardware.
Music Studio Equipment
GuitarPort's Dual RCA outputs are line level,
appropriate for interfacing with any music studio equipment you might have, like a mixer or
a recorder. You can connect the GuitarPort L
and R outputs to a stereo input channel on
your mixer or recorder. Or you can connect
them to two separate mono inputs, in which
case you should be sure to pan the two hard
left and right on your music equipment to hear
the GuitarPort in stereo. If your mixer or other
audio equipment has trim/gain controls, be
sure to consult the equipment's owner's manual to be sure that you are setting the levels
properly for the best sound. You'll want to
make this adjustment once you've got the
GuitarPort software working and passing
sound.
Please note that GuitarPort is designed to be
heard through full range speakers, such as
powered monitors. You won't get good results
listening to GuitarPort through the limited
range speakers of a guitar amp.
27
Page 26
Line 6–GuitarPort
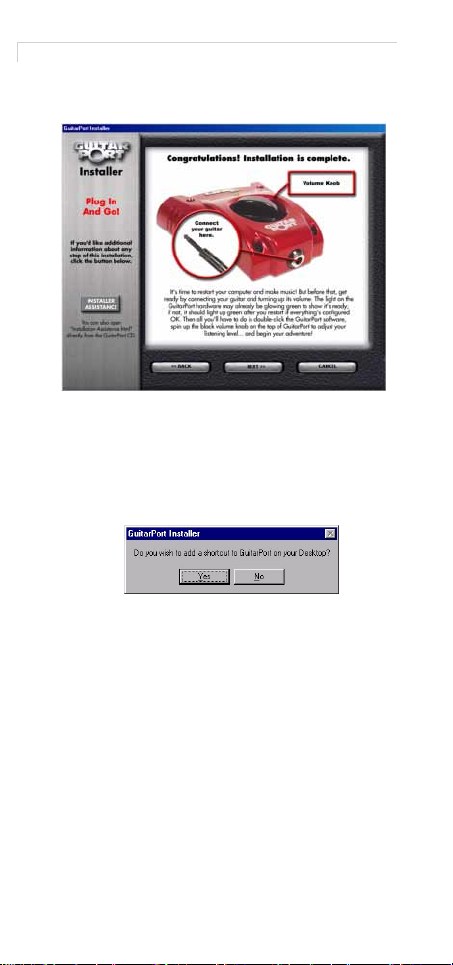
Completing The Installation
This is the final step of the hardware installation. Plug in and get ready for takeoff:
Shortcut
The Installer can automatically place a shortcut
to GuitarPort right on your computer's desktop
to make it easy for you to locate GuitarPort
when you want to use it - just answer [Yes] if
you want one to:
28
Page 27

Completing The Installation
Restart
The last step is to restart your computer. After
you do so, GuitarPort's light should come on
green. If it doesn't, try unplugging and replugging the USB cable to make sure you've got
both ends properly connected to the computer
and the GuitarPort hardware:
29
Page 28

Line 6–GuitarPort
30
Page 29

TUTORIAL
Using the Amps
Select A Tone
Click the Tone menu at
the top left of the
GuitarPort window to
select the Preset tones.
You can save your own
Tones from the File
menu.
Select Amp and Cab
Under Amp Based On
and Cab Based On on the
“Amp” (see here right),
click the Model menu to
select Amp and Cab models.
Adjusting Your Amp
To turn the amp knobs, press
your mouse over the knob and
drag in an up/down motion.
If it doesn't, go to [My Computer]
on your desktop and double click
on the icon for your CD drive.
This should generally bring up
Using the Amps
31
Page 30

Line 6–GuitarPort
the screen above. If that doesn't work (meaning
you have your machine configured not to run
auto-run files), then browse the CD and double
click on the GPInstall.exe program to get you
going.
Setting The Volume
Make sure your GuitarPort is
connected to your speakers or
headphones, and turn up the
knob.
The MASTER VOLUME knob
at the top right of the GuitarPort
window sets your overall volume. To turn the MASTER
VOLUME knob, press your
mouse over the knob and drag
in an up/down motion. Double
click to auto set to 0.
If you want to adjust the volume
of the track, use the TRACK
LEVEL slider.
Help
If you are not hearing sound after
Setting The Volume and hitting
play, click the Help tab above the
transport buttons.
As you move the mouse around,
notice the text displayed in the info
bar at the bottom of the GuitarPort
window. Here is an example:
32
Page 31

Using the Effects
Using the Effects
Effect On/Off
The near the effects collapses /
expands the display.
Left-click the Stompboxes to turn
them on/off.
Effect On Effect Off
Editing An Effect
Right-click a Stompbox to display its control panel without
affecting on/off. You can also
left-click the "Show Effect"
selector.
Turn the knobs and
click the control
switches to adjust the
displayed effect.
The Modulation and
Reverb effect have a
Model menu to select
different effects.
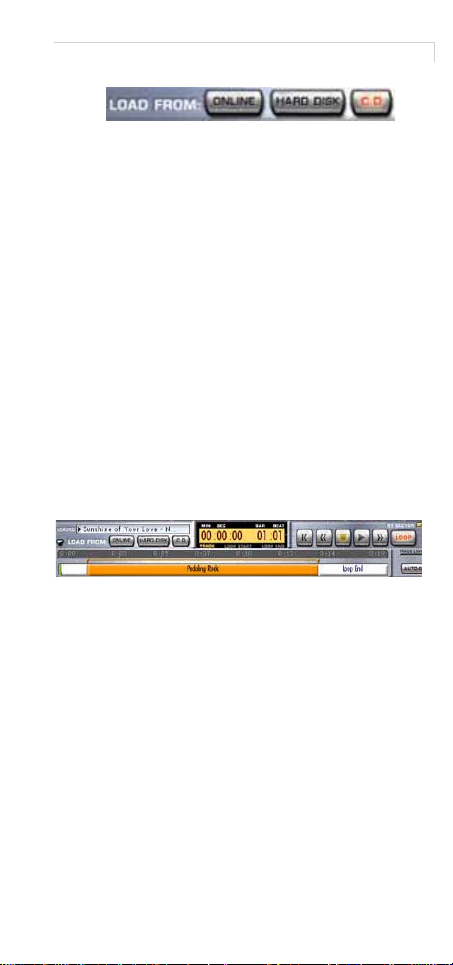
Jamming Along a Track
Loading A Track
You can jam along with GuitarPort files, MP3s,
WAV files, or audio from an audio CD.
The Loaded menu shows the name of the current track. Click it for the list of recently played
tracks.
33
Page 32

Line 6–GuitarPort
To load a file from the Web (with a GuitarPort
Online membership), your Hard Disk, or Audio
CD, click the labeled buttons.
Learning
Half Speed
GuitarPort can help you learn your
favorite songs by slowing the track
to half speed without changing the
pitch. Click the HALF SPEED button and GuitarPort will prepare the half speed
file.
Loop
Click the LOOP button to loop all or
part of a track.
With loop on, drag the orange
arrows to select the section you would like to
loop.
34
Page 33

Adjust the volume balance between your guitar and the Track
THE ‘HOW TOS’
1. Adjust the volume balance between
your guitar and the Track
Use the TRACK LEVEL slider under the
Tracks tab of GuitarPort's Browser (page 62) to
set the level for the current Track, and use the
Volume knob on the amp panel to set the level
of your guitar.
❍ If your guitar is still too quiet versus your Track,
see Guitar too quiet in our FAQTRAQ page
www.line6.com
[
❍ For Track Level problems, see Track Level issues
in our FAQTRAQ page [
❍ If you're getting distortion or clipping as you try to
make these adjustments, see Noise and Distortion
issues in our FAQTRAQ page [
2. Avoid running out of hard disk space
By default, GuitarPort will notify you when
you have less than 100MB of free hard disk
space. You can adjust this notification:
].
www.line6.com
].
www.line6.com
].
This warning icon will show at the bottom right of the GuitarPort application
window if your hard disk space runs low
(or some other aspect of your computer's
setup appears likely to cause problems
with GuitarPort).
35
Page 34

Line 6–GuitarPort
1) From GuitarPort's Edit menu, select Preferences.
2) Click the General tab if it's not already selected.
3) Click the Help question mark at the top of the dialog
box and click an item for details.
4) Choose the maximum amount of hard disk space
you'd like GuitarPort to use.
GuitarPort maintains a cache file on your hard
disk for Tracks (page 78) that you have recently
loaded but not yet saved. For instance, when
you download a Track from GuitarPort Online
([20], p. 67), or load audio from a CD as a
GuitarPort Track, GuitarPort stores this information in this cache. You can force GuitarPort
to clear this cache by clicking the Clean Audio
Cache button under the Audio tab of
GuitarPort's Preferences.
❍ If you'd like to try to find and delete old files you
no longer need on your computer, and thereby free
up disk space for GuitarPort, you may want to try
Windows' Disk Cleanup utility: From the Windows [Start] menu, select [Programs] → [Accessories] → [System Tools] → [Disk Cleanup].
3. Change the factory Preset Tones
If you want to tweak one of the factory Preset
Tones ([39], p. 76), all you have to do is:
1) Select a Tone from the Preset Folder in the Tones
menu.
2) Make the changes you want ([6], p. 37) to the Amp
and Cab Controls, Effects, and Noise Gate
([29], p. 71).
3) From the File menu, select Save Tone to update the
Preset Tone with your changes.
4) If you want to save your new Tone without replacing
the Preset Tone, choose Save Tone As instead.
❍ If you want to delete factory tones rather than
replace them, you can do that via the Tone Locker
(The ‘What Is?’, [40], p. 76).
4. Check your GuitarPort's version
From GuitarPort's Help menu, select About
GuitarPort.
36
Page 35

Connect to the Internet
5. Connect to the Internet
You need an Internet connection to use the
GuitarPort Online features (The ‘What Is?’, [20],
p. 67) of GuitarPort. If you do not already have
an Internet connection, you will need to contact
an ISP (Internet Service Provider) and purchase
an Internet access plan from them. We recommend a "broadband" connection such as DSL,
ISDN or cable modem for use with GuitarPort
Online. LAN (Local Area Network) connections such as many businesses have also should
work well with GuitarPort Online (you can tell
the boss you're doing "research"!). You can also
use a "dial-up" connection, but these are generally slower and downloading Tracks
([41], p. 78) from GuitarPort Online will take
some time over a dial-up connection.
See “Installation” on p. 9 if you need to locate
an ISP (Internet Service Provider) or need help
configuring your Internet connection.
6. Create and save a Tone
You can create and save your own Tones
(page 76). A Tone includes your Amp, Cab and
Effect Model selections (page 52), the settings
of all the amp and effect controls, and the settings for the Noise Gate (page 71) and the GUITAR PAN control (page 67).
The yellow Tone menu at the top left of the
GuitarPort program's window shows which
Tone is currently selected and will include the
new Tones you save.
If the Tone name is shown in italics in the Tone
menu, it indicates that the Tone has been
altered versus the saved version of the Tone. If
the Tone name is shown without italics, it indicates that the Tone has NOT been altered versus the saved version of the Tone. Once you've
altered a Tone, if you want to keep that altered
version you'll need to decide whether you
want to save it with the Save Tone or Save Tone
As options, described below.
37
Page 36

Line 6–GuitarPort
Create a Tone–
click and hold your mouse in the AMP
MODEL and CAB MODEL menus, then drag
the mouse down and release the mouse button
to select amp and cabinet models.
Use your mouse to turn the onscreen amp
knobs and dial up your basic amp sound
([35], p. 50). You can also click on the effects to
turn them on and off and select their controls
for display so you can dial them in.
Save Tone–
GuitarPort's File menu, your current settings
will replace the Tone whose name was shown
in italics in the Tone Menu. The old version of
the Tone will be erased and replaced by this
new Tone, which will now be available from
the Tone menu whenever you want it.
Save Tone As–
GuitarPort's File menu, your current settings
will be stored as a brand new Tone. The Tone
whose name was shown in italics in the Tone
Menu will not be affected. The new Tone you
create will be added to the Tone menu so you
can call it up again in the future whenever you
want it. To Save As:
To create your own Tone, just
If you select Save Tone from
If you select Save Tone As from
1) From GuitarPort's File menu, select Save Tone As.
You'll be able to name your Tone and save descriptive
information that can be helpful when organizing and
accessing your Tones from your Tone Locker
([40], p. 76).
2) If you've set up folders for your Tones in the Tone
Locker, you can use the Browse button at the top of
the Save Tone As dialog box to select the folder
where you want to store the Tone.
3) You don't need to use the Browse button if you'd
like GuitarPort to just save the Tone so that it will be
available from the Preset Tones in the Tone menu.
4) Click on the Save button to finish saving your new
Tone.
38
Page 37

Delete a Tone
7. Delete a Tone
GuitarPort's Tone Locker lets you access and
organize your Tones, as well as delete them.
See [40], p. 76 for details.
GuitarPort stores Tones on your hard disk at
Program Files/Line6/GuitarPort/Tones/
You can leave GuitarPort and use Windows
Explorer to access the Tones folder directly if
you prefer not to use the Tone Locker. Note
that Tones and Tone folders must be stored in
the GuitarPort Tones folder in order to be
available from GuitarPort's Tones menu.
.
/
8. Disable Download Accelerators
Please see the troubleshooting topic for Download Errors – Download Accelerators on our
FAQTRAQ page [
www.line6.com
].
9. Find FAQs
For the latest Frequently Asked Questions and
up-to-the-minute support information, click
the FAQTRAQ link in the navigation bar to the
left of the GuitarPort window.
10. Find GuitarPort’s Tone & Track files on your
hard disk
GuitarPort stores Tones and Tracks as files on
your hard disk, in the GuitarPort folder:
1) Double-click the [My Computer] icon on your Windows desktop.
2) Double-click [Drive C:], then [Program Files], then
[Line6], then
3) Double-click the Tones or Tracks folders.
Tones must be stored in GuitarPort's Tones
folder to appear in the Tone menu at the top
left of the GuitarPort window. You can organize your Tones without leaving GuitarPort by
using the Tone Locker (page 76) which is available from the Tones tab (page 62) of
GuitarPort's Browser.
❍ Tracks can be stored anywhere on your hard disk,
and can be opened from GuitarPort's File menu
Open command or via the LOAD FROM HARD
DISK button available from the Tracks tab of
GuitarPort's Browser.
[
GuitarPort
].
39
Page 38

Line 6–GuitarPort
11.Find out which Operating System version you
are running
From your Windows desktop:
1) Click the [Start] button.
2) If [Control Panel] is available, select it. If
not, select [Settings]
→
[Control Panel].
3) Double-click on [System].
4) Your OS version is listed under the [General] tab.
12. Fine-tune GuitarPort's software knobs and
Model or Tone menus
You can fine-tune the setting of most of
GuitarPort's onscreen knobs as well as the
Model and Tone menus.
For knobs:
1) Click the left button of your mouse anywhere on the
knob or other control.
2) Your keyboard's [
←
] and [→] keys will jump big
steps, and its [↑] and [↓] keys fine-tune.
3) You can also use your number keypad's [
/
] and [∗]
keys for big jumps and its [+] and [–] keys to finetune.
❍ For Model and Tone menus, your keyboard's [↑]
and [↓] keys select items in the menu once you've
clicked on the menu to select it.
13. Initialize a Tone
Select Basic Tone from the Tone menu at the
top left of the GuitarPort program's window to
call up a Tone we've included as a basic starting place for use when you're creating your
own Tones (hence the name "Basic Tone").
All the effects have basic sounds programmed
so they're ready to go if you turn them on. This
Tone is, of course, completely customizable by
you, so you can turn it into whatever you want.
Saving the Basic Tone–
ations to this basic Tone, you can then choose
Save Tone from GuitarPort's File menu if
you'd like to have your changes replace the
Basic Tone. Or...
Save As–
Choose Save Tone As from
GuitarPort's File menu if you'd like to leave the
Basic Tone as it was, and save the new setting
Once you've made alter-
40
Page 39

Join GuitarPort Online
you've created as a new Tone. You'll then be
given a dialog to name the Tone, and provide
additional information to categorize the Tone if
you like.
14. Join GuitarPort Online
If you're not already a member of GuitarPort
Online (page 67), click the GuitarPort Online
tab of GuitarPort's Browser (page 62) to
become a member or take a tour to see what
GuitarPort Online is all about.
15. Load an MP3, WAV or AIFF File
Click the LOAD FROM HARD DISK button
under the Tracks tab of the Browser to load an
MP3, WAV or AIFF file from your hard disk to
use as a GuitarPort Track.
❍ The recently used Tracks are also available from
the Track Loaded menu under the Tracks tab of
GuitarPort's Browser.
16. Load a Track from an Audio CD
GuitarPort can load audio from a standard
Audio CD.
1) Click on the Tracks tab of GuitarPort's Browser
(page 62).
2) Insert an Audio CD (you can disable auto-launch of
WinAmp or other CD player programs). For details,
see our FAQTRAQ page at
3) Click the LOAD FROM CD button and select the
Track you want to rip.
4) Click the Open button, and give the Track a name.
GuitarPort will convert the Track to GuitarPort
format and store it on your hard disk temporarily (page 35).
If you decide that you'd like to keep the Track
around permanently, select Save Track As…
from the File menu, name it, and GuitarPort
will store it in your Tracks folder.
www.line6.com
.
41
Page 40

Line 6–GuitarPort
17. Load a Track file from GuitarPort Online
Click the LOAD FROM WEB button under the
Tracks tab of the Browser (page 62) to load a
Track from GuitarPort Online (page 67).
❍ The recently used Tracks are also available from
the Track Loaded menu under the Tracks tab of
GuitarPort's Browser.
18. Load a Track file from your hard disk
Click the LOAD FROM HARD DISK button
under the Tracks tab of the Browser (page 62)
to load a GuitarPort Track file that you have
saved to your hard disk.
❍ The recently used Tracks are also available from
the Track Loaded menu under the Tracks tab of
GuitarPort's Browser.
19. Prevent GuitarPort from automatically disconnecting from the Internet
If you are using a dial-up Internet connection,
GuitarPort defaults to automatically disconnecting from the Internet when you exit
GuitarPort. You can disable this automatic disconnect via GuitarPort's Preferences:
1) From GuitarPort's Edit menu, select Preferences.
2) Click the Internet tab.
3) Click the Help question mark at the top of the dialog
box and click an item for details.
4) Uncheck the Disconnect On Exit option.
42
Page 41

Preventing GuitarPort from trying to connect to the Internet
20.Preventing GuitarPort from trying to
connect to the Internet
By default, GuitarPort will attempt to automatically connect to the Internet as needed to
access GuitarPort Online. Please note that if
you use AOL to access the Internet, GuitarPort
cannot auto-connect and you will need to initiate an Internet connection manually. You can
disable GuitarPort's automatic attempt to connect to the Internet via GuitarPort's Prefer-
ences:
1) From GuitarPort's Edit menu, select Preferences.
2) Click the Internet tab.
3) Click the Help question mark at the top of the dialog
box and click an item for details.
4) Choose Never connect to prevent auto-connection.
21. Record GuitarPort's output to other
programs
You can record GuitarPort's analog output by
connecting its L and R output connectors to the
inputs of your recording system.
GuitarPort can also be recorded by routing its
digital signal within the computer directly to a
recording program. GuitarPort uses the Windows DirectSound and MME (Multi-Media
Extensions) software to do this. Be sure to
setup your system and your recording software and audio to use one of these when you
want to use GuitarPort for recording in this
way.
BUT FIRST–
www.line6.com for up to the minute information
on using GuitarPort with recording programs
and audio systems. Recording programs and
audio hardware are constantly being introduced and updated, so it's important that you
check FAQTRAQ for the latest information on
whatever software and hardware you intend to
use with GuitarPort.
When you want to record GuitarPort using
DirectSound or MME, the important rules to
remember are:
1) Always start your recording program FIRST.
Please visit FAQTRAQ at
43
Page 42

Line 6–GuitarPort
2) With some recording programs, you must select
GuitarPort as the input to a track, and activate MONITORING of the track in the recording program (so
you are listening to the GuitarPort input for the
track).
3) Start the GuitarPort program.
In Step (1) and (2), the recording program is
automatically configuring GuitarPort's driver
to match the recording program's settings for
sample rate and bit depth.
This is important to insure optimal recorded
sound quality. Some programs require the step
(2), because they don't address drivers until
you actually start recording or monitoring
audio.
If you want to check to see if everything is
going as it should, perform the steps, check
your recording program's bit/rate settings, and
then confirm that GuitarPort is running at the
right bit/rate settings in the Audio tab of
GuitarPort's DriverCon program (also see our
FAQTRAQ page at
GuitarPort's default is to use the standard bit/
rate settings of audio CDs: 16 bit and 44.1 kHz
sample rate. If you have chosen a different bit/
rate setting in your recording program, you
should see that GuitarPort is using it once you
folow the steps above and then look at the bit/
rate settings in DriverCon.
If there is a mismatch of sample rate or bit
depth, Windows and GuitarPort will attempt
to adjust the sample rate and bit depth of audio
between GuitarPort and the other program on
the fly. While this generally works OK, it will
degrade your sound quality versus what you
would get with properly matched sample rates
and bit depths.
If you get an error in your recording program
saying that it cannot address the GuitarPort
driver with its current settings, you probably
forgot to start your recording program (and
monitor a GuitarPort input with some programs) as described above. Quit both programs, and start over by starting the recording
program first as described above.
www.line6.com
).
44
Page 43

Reduce latency
Note that only the guitar signal is sent from
GuitarPort to other programs. The track you
are playing in GuitarPort will NOT be sent to
other programs, and cannot be recorded into
those other programs. This restriction on rerecording GuitarPort's Tracks is required in
order for Line 6 to protect the copyrights of the
musicians and other copyright owners that
have licensed music for use in GuitarPort.
22. Reduce latency
It takes a small amount of time for the signal
from your guitar to feed into your computer,
get processed by GuitarPort, and feed out
again for you to hear. This time is called latency.
We've chosen a latency setting in GuitarPort's
Preferences that works well on most machines
to give you very low latency as well as reliable
performance. If you have a fast machine and
want even lower latency, you can adjust this
Preference, BUT if you set this too low for your
machine, you will hear some audio 'ticks' and
'dropouts' as GuitarPort is processing audio.
To adjust the latency preference for GuitarPort:
1) From
GuitarPort
's Edit menu, select Preferences.
2) Click the Driver tab.
3) Click the Help question mark at the top of the dialog
box and click an item for details.
4) Move the Audio Stream Reliability slider
(page 61) left to reduce latency.
5) Once you've moved the slider, try playing a Track in
GuitarPort. If you hear clicks and pops, your machine
cannot handle the lower latency you've selected.
Return to the Preferences and move the Audio
Stream Reliability slider to the right.
❍ You can also use the DriverCon program for more
detail on the configuration of GuitarPort and how
it is affecting performance.
23. Register GuitarPort
When you first run GuitarPort, you'll be
prompted to register online. If you have Internet access, just fill out this form and then click
the Submit Registration button.
❍ If you don't have an internet connection available,
click the option to print out a registration form to
mail or fax to Line 6.
45
Page 44

Line 6–GuitarPort
24. Resize the GuitarPort program window.
The width of the GuitarPort window cannot be
changed.
The height can be increased to take as much
space as you have available on your computer's
display, but cannot be made smaller than a
minimum height.
When the GuitarPort program's window is not
maximized, you can click and hold the top or
bottom edge of the GuitarPort window and
drag to make it taller or shorter. You can also
click the maximizing icon at the top right edge
of the GuitarPort program window's title bar to
maximize the vertical size of the GuitarPort
window.
The Collapse/Expand button works in conjunction with the show/hide arrows for the Effects
(page 49), Browser (page 49) and Track
(page 50) sections display to allow you to
show/hide portions of the GuitarPort controls
and maximize the space available for
GuitarPort's Browser to display information.
Like most Windows programs, GuitarPort can
be maximized. When maximized, GuitarPort
will take the full space available on your computer's display from top to bottom.
You can maximize the GuitarPort window by
clicking the maximize button at the top right
edge of the window. It's the little square icon to
the left of the [×] box for closing the window. It
shows a single box when GuitarPort is maximized, or two boxes stacked on top of each
other when not maximized.
25. Right-click
The mouse that you use with your computer
has (at least) two buttons, one on the left and
one on the right. The left button is normally
used when selecting items. Click and hold the
RIGHT button when we tell you to RIGHTCLICK in these help instructions to access certain functions of GuitarPort and Windows.
46
Page 45
Rip a CD with GuitarPort
26. Rip a CD with GuitarPort
GuitarPort can rip audio from a CD, meaning
that it loads the audio from the CD into a computer file. To rip from CD, click the LOAD
FROM CD button under the Tracks tab of
GuitarPort's Browser (page 62) and GuitarPort
will convert the CD audio into the GuitarPort
Track format (page 41).
27. Select your Preferred Audio Device
See “Installation” on p. 9 to learn about your
Preferred Audio Device settings, including the
Preferred Playback Device and Preferred
Recording Device, and how to set these for use
with GuitarPort.
28. Set the Loop start and end points
When the Loop (page 70) is on for the Track
loaded in the Tracks tab of GuitarPort's
Browser (page 62), you'll be able to see and set
the Loop's start and end points (using the two
arrows) in the Track Sections Display:
1) Click the LOOP button to light it red if it's not lit
already.
2) The looped portion of the Track is shown in orange.
3) Light the BY SECTIONS button if you want the
loop points to "snap" to the sections.
4) Click, hold and drag the orange arrow at either end of
the loop to set the start/end.
5) There are also Hot Keys (page 69) for setting Loop
start, end and on/off.
If you choose Save Track from GuitarPort's
File menu and save the Track to your hard
disk, the Loop points will be saved with the
track.
47
Page 46

Line 6–GuitarPort
29. Set Preferences for GuitarPort's access to
the Internet
You can tell GuitarPort what Internet connection to use and whether or not you want
GuitarPort to automatically connect to and disconnect from the Internet ([19], p. 42 and
[20], p. 43) as needed to access GuitarPort
Online.
1) From GuitarPort's Edit menu, select Preferences.
2) Click the Internet tab.
3) Click the Help question mark at the top of the dialog
box and click an item for details.
30. Share your Tones with other GuitarPort
users
If you are a GuitarPort Online member
(page 67), you can put Tones you want to share
in the Public folder of your Tone Locker
(page 76). From there, any other GuitarPort
Online member can access them and experience your Tone-creation genius!
❍ You can also, of course, share Tones that are stored
on your local hard disk by emailing them as individual file attachments to your friends who also
have GuitarPort.
31. Show an effect's controls without turning on
an effect
If you want to see an effect's controls
without turning it on, RIGHT-CLICK
(page 46) on the stompbox icon for
the effect.
❍ If the stompbox icons for the effects are not cur-
rently shown, click the right-pointing dark bluegray arrow graphic to the left of the row of
effects to display the stompbox icons as well as the
controls for the selected effect.
48
Page 47

Show/hide the browser
32.Show/hide the browser
The bottom portion of the GuitarPort window,
where this Help and other items are shown, is
called the Browser (page 62).
Click the dark blue-gray arrow at the top left
side of the Browser, to the left of the BACK/
FWD arrow buttons, to show/hide
GuitarPort's Browser. There are also separate
show/hide arrows for the Track sections display (see above), and the Effects (see below).
You can click the Collapse/
Expand button at the top of the
GuitarPort program's window to switch
between a collapsed and expanded setup for
the program, alternatively showing or hiding
the Effects, Tracks display, and/or Browser.
33. Show/hide effect stompbox icons and control
panel
As described in another section (page 65), you
can click the dark blue-gray arrow graphic
at the left side of the effects area to show/hide
the effect stompboxes and control panel. There
are also separate arrows for the Browser
(page 62), as well for the Track sections display
(see above).
❍ It can be handy to collapse the effect section and/or
the Track sections display when you want to have
more space available in GuitarPort's Browser to
view the tablature or lead sheet for a Track, or
other Browser contents.
❍ You can click the Collapse/Expand button at the
top of the GuitarPort program's window to switch
between a collapsed and expanded setup for the
program, alternatively showing or hiding the
Effects, Track sections display, and/or Browser.
49
Page 48

Line 6–GuitarPort
34.Show/hide the Track sections display
When you've selected the Tracks tab of
GuitarPort's Browser (page 62), you'll see a display like the one above. You can click the dark
blue-gray arrow graphic to the left of the Home
button to show/hide the bottom portion of this
display.
❍ There are also separate show/hide arrows for the
Effects and the Browser.
You can click the Collapse/
Expand button at the top of the
GuitarPort program's window to switch
between a collapsed and expanded setup for
the program, alternatively showing or hiding
the Effects, Track sections display, and/or
Browser.
35. Turn GuitarPort's software knobs
To turn any of GuitarPort's onscreen
knobs:
1) Click the left button of your mouse anywhere on the knob or other control.
2) While continuing to hold the mouse button, drag the mouse up and down.
Do not drag your mouse in a circular turning
motion.
❍ Also check out the details on fine-tuning knob and
other settings on page 40.
❍ You can double-click the Master Volume knob to
set it to the default "0" setting. The other knobs are
not double-clickable.
36. Uninstall GuitarPort
When you run the GuitarPort Installer, an
Uninstaller is also created. To use it to uninstall
GuitarPort:
Click the [Start] menu in Windows, and select
[Programs] → [GuitarPort] → [Remove
GuitarPort].
50
Page 49

THE ‘WHAT IS?’
1. [!] Button
The [!] Button shown next to the
Master Volume knob indicates
Master Volume Issues.
❍ For more information, see the Mas-
ter Volume Issues in our page
FAQTRAQ at [
2. Warning Triangle
This warning icon will show at the bottom right of the GuitarPort application
window if some aspect of your computer's setup appears to be incompatible with GuitarPort, or your hard disk space
runs low (page 35). Click it to show
GuitarPort's System Statistics window (also
available from GuitarPort's View menu),
which will give you more detail and help you
fix problems when possible.
❍ For information on the small [!] Button that is
sometimes displayed to the right of the Master Volume knob, see the previous section.
www.line6.com
].
[!] Button
51
Page 50

Line 6–GuitarPort
3. Amp, Cab and Effect Models
Line 6 pioneered the use of modeling technology for guitarists with the world's first modeling guitar amp. Since then, all Line 6's products
have included Models developed through
extensive, meticulous studies of guitar equipment heralded for its classic tone qualities.
To create a Model, we first locate an absolute
mint version of a particular piece of equipment,
with that special sound quality that makes it a
truly remarkable guitar sound machine. We
lock ourselves away in the Line 6 labs and
sound studios to study this piece of classic
equipment in exhaustive detail. We play guitars through it, listen to it, measure, write software, and then play and listen some more as
we carefully craft a software Model that captures the signature qualities of the equipment
being studied.
The resulting Model is designed to emulate the
controls and sound qualities of the original
equipment studied, including the beloved
quirks and unruly qualities that made the original equipment classic in the first place.
Each model is painstakingly perfected until it
becomes an organic, living thing with guitar
tone pumping through its veins. And when
they're finally ready, we unleash these software Models in revolutionary new products
like GuitarPort.
Of course, as we're studying all that classic
equipment, we’re bound to come up with an
idea or two for something that classic equipment can't do. When we do, you end up with
something like the Line 6 Insane Amp Model—
with as much paint-peeling high gain as a distortion box, but the well defined, love-to-playit quality of a truly world class guitar amplifier.
The particular Models that power GuitarPort
were each originally developed for Line 6's
revolutionary POD, which has now transformed the way that guitar is recorded in the
world's greatest studios, for countless platinum
recordings. Each one represents a particular
amplifier, cabinet or type of effect that has
become a standard in the guitar world.
52
Page 51

Amps and Cabinets Modeled for GuitarPort
Together, they deliver a range of sound that
allows you and GuitarPort to achieve the signature sounds of countless classic recordings.
❍ To learn more about the particular gear that was
studied for GuitarPort, read the information under
the Artists & Gear tab of GuitarPort's Browser
page 62).
4. Amps and Cabinets Modeled for GuitarPort
As you may know (or have guessed by now),
we're tone fanatics here at Line 6. Once we've
set our sights on creating a software emulation
of a particular kind of amp, we go to great
lengths to be sure that we've gotten our hands
on the very best example of this amp that we
can find to study. We will (and have) scoured
the globe in search of just the right specimen—
that one, very particular amplifier that has the
magic.
In fact, we pride ourselves on hand selecting
each and every one of the amps and speaker
cabinets that we studied to create the software
models in GuitarPort and all of Line 6's other
products.
So, now that you know what's in store, let's
take a tour of the amp models that live inside
GuitarPort, and the original equipment that
helped to make them possible.
'53 Wide Panel ‘Lux
Modeled after a 1953 "wide panel" Fender
Tweed Deluxe, this Amp Model will snarl with
the best of them.
The original amp had only a single tone control, essentially a Treble roll off. We set up
GuitarPort's Treble knob to give you this Treble roll off when using this Amp Model.
'59 Tweed B-man Classic
The classic '59 Fender Bassman 4x10 combo
was the amp that started it all—instant rock
and roll tone. Originally a bass guitar amp, the
Bassman became a Blues staple for 6-string guitarists. It has the fat bottom end you'd expect
● The amplifier names listed here are all trademarks of their respective owners,
which are in no way associated or affiliated with Line 6. These trademarks of other
manufacturers are used solely to identify the specific amplifiers that were studied
during Line 6's sound model development.
53
Page 52

Line 6–GuitarPort
from a bass amp but also has the Fender twang
on the top. Incidentally, when Jim Marshall
built his first amps with Ken Bran they were
heavily influenced by the early Bassman.
One of the interesting things about the
Bassman is just how interactive the Mid and
Treble controls are. The Mid control isn't a
bandpass, as in most tone control setups.
Instead, it's almost like a second treble control.
The two are additive, so if you're running the
Mid knob higher than halfway up with this
model, you'll find that the Treble control might
give you more bright than you really want. On
the other hand, when you turn the Mid knob
down, you'll probably want to boost the Treble.
Try a Drive setting of about 4 or 5—it's guaranteed to dredge up the best R&B licks you know.
'64 Black Panel 'Lux Reverb
Modeled after a 1964 Fender "black panel"
Deluxe
The Holy Grail for many blues, country, and
"roots" players has been a blackface Fender
Deluxe Reverb. After listening to quite a few
candidates back when we were seeking the
ultimate Deluxe Reverb to model during our
development of Flextone and POD, we stumbled upon an extremely cool '64 Deluxe. We
still haven't found one better.
Most players love a Deluxe when it's turned up
to about 7 for a nice gritty sound that cleans up
when you back off your guitar's volume knob
just a little. Notice how the tone control
response changes as this Amp Model's Drive is
changed: clean settings are crisp and present,
while more driven settings will mellow the
high end. This is typical of what you get from a
Deluxe and is nicely captured here. Tweaked
up right, this tone will cut through and sing.
● The amplifier names listed here are all trademarks of their respective owners,
which are in no way associated or affiliated with Line 6. These trademarks of other
manufacturers are used solely to identify the specific amplifiers that were studied
54
during Line 6's sound model development.
Page 53

Amps and Cabinets Modeled for GuitarPort
'67 Brit Class A-30 Top Boost
Modeled after a 1967 Vox AC30 Top Boost
Music was changing in the early '60s and gui-
tarists were asking for more brilliance & twang.
So the Jennings Company, makers of Vox
amps, decided to add Treble and Bass controls
(and an extra 12AX7 gain stage, incidentally) in
addition to the Treble Cut knob it already had
(which in actuality was a sliding bandpass filter that always seemed like it was working
backwards); this additional circuit became
known as Top Boost.
The AC 30 with Top Boost was the amp made
famous by many British invasion bands. Much
of the unique character of the Vox sound can be
attributed to the fact that Class A amps overdrive in a very different way than Class AB.
Brian May of Queen, Mike Campbell of Tom
Petty's Heartbreakers, and The Edge of U2
have all used classic AC 30s to make their
music.
Although usually played fairly clean, a
cranked AC 30 has a great saturated lead tone,
a la Brian May on the early Queen albums.
'68 Brit 50 Watt Plexi
Modeled after a 1968 Marshall 50 Watt Plexi
Tremolo
Modeled after the infamous Marshall 'Plexi'—
coveted by tone connoisseurs the world over.
By the time this amp was built (ca. 1968), Marshall had completely changed the circuitry
away from the Fender 6L6 power tube heritage
and moved to an EL34 tube. Another major
tone difference was due to the necessary output & power supply transformer changes. (See,
we told you we spent some time looking into
all this stuff.) All this mucking about added up
to create a tone forever linked with Rock Guitar.
Amps of this era didn't have any sort of master
volume control, so to get this sound you'd have
to crank your Plexi to max—just the thing to
● The amplifier names listed here are all trademarks of their respective owners,
which are in no way associated or affiliated with Line 6. These trademarks of other
manufacturers are used solely to identify the specific amplifiers that were studied
during Line 6's sound model development.
55
Page 54

Line 6–GuitarPort
help you really make friends with the neighbors. To get a crunch sound out of a Plexi, you
would likely crank the input volume and tone
controls (to 10!). You'll find that, in keeping
with our "make-it-sound-a-whole-lot-like-theoriginal" concept, GuitarPort's model is set up
to do pretty darned near the same thing.
'87 Brit 100 Watt J-800
Modeled after a 1987 Marshall JCM800
Select this Amp Model to conjure up tones of
the coveted JCM 800, one of Marshall's most
universally-acclaimed modern amps.
This updated version of the Plexi continued
Marshall's heritage with added gain and edge
for a new generation of rock guitarists. One of
the biggest differences here is that the tone controls are located after the preamp tubes.
Incidentally, some versions of JCM 800's get
their distortion by clipping a diode. The amp
we modeled uses a tube for distortion.
The JCM 800 is, of course, the metal sound
Marshall made famous. And although not
many people play Marshalls clean, it is a great
tone, so you should also be sure to check out
this model with a low Drive setting. Of course,
you can always pump up the drive and rage…
'87 Jazz 120
Modeled after a 1987 Roland Jazz Chorus
This Amp Model is modeled after the classic
Roland JC-120. This transistor amp was known
for a strident clean sound and built-in stereo
chorus.
When using the Jazz Clean Amp Model, try
cranking up the Treble for a shimmering clean
sound that'll cut through just about any mix.
It's also perfect for that 80's "new wave" sound.
Alternatively, try backing off on the Treble and
turn up the Bass and Middle for a darker jazz
tone. It'll give you an essentially flat response,
providing a balanced tone across the fret board
for jazz chord melodies or single-line phrasing.
● The amplifier names listed here are all trademarks of their respective owners,
which are in no way associated or affiliated with Line 6. These trademarks of other
manufacturers are used solely to identify the specific amplifiers that were studied
56
during Line 6's sound model development.
Page 55

Amps and Cabinets Modeled for GuitarPort
‘94 California Rectified
This Amp Model is based on a 3 Channel Mesa
Boogie Dual Rectifier Solo Head.
The Dual Rectifier was part of Boogie's more
modern, high gain approach for that "big hair"
sound. In contrast to the earlier Boogies, the
Dual Rectifier's tone controls have more influence at high gain settings, so you can scoop the
mids and increase the bottom end.
Boogie amplifiers often have a number of different inputs and switches available, and
which you use and how you set them affects
the particular sound you get out of these amps.
For those of you into the nitty gritty detail: we
used Channel 3 on the Modern setting for this
one with the rear switches set to Bold and Tube
Rectifier, respectively.
Classic Fuzz
Modeled after a 1960s Arbiter Fuzz Face
Although not technically an amp, we felt that
the unique tonal qualities of the classic 1960's
Arbiter Fuzz Face earned it a place among the
amps modeled to create GuitarPort's Amp
Models. This fuzz box used broad frequency
transistor-based clipping. The result is a buzzing kind of distortion that has become popular
again with the alternative and grunge set.
Jimi Hendrix was among the first guitarists to
popularize the Fuzz Face in the States, but our
model is considerably dirtier than the tones
found on "Are You Experienced." Try playing
"Satisfaction" by the Stones, or the lead from
"American Woman" by The Guess Who.
Liberal use of the Bass, Middle, and Treble controls will let you go beyond the tones that the
Fuzz Face could deliver, enabling you to discover your own unique recipe for those elusive
fuzz tones in your head.
● The amplifier names listed here are all trademarks of their respective owners,
which are in no way associated or affiliated with Line 6. These trademarks of other
manufacturers are used solely to identify the specific amplifiers that were studied
during Line 6's sound model development.
57
Page 56

Line 6–GuitarPort
Just a note: when recording Purple Haze, Jimi
didn't even use an amp—he just went straight
from a Fuzz Face to an Orange power amp to a
4x12 cabinet. Which is the same sort of tone
you find here…
Line 6 Insane
Imagine running your Soldano SLO-100 as a
preamp for your Boogie Dual Rectifier, and
you've got a pretty good picture of just how
much sheer gain is involved in Line 6 Insane.
It's entirely possible to get completely out of
control with this one, and we heartily encourage you to do just that.
58
Page 57

Amps and Cabinets Modeled for GuitarPort
5. Cabinets
While we're not going to bore you with complete descriptions of each cabinet that's modeled in GuitarPort ("...and with the change
from 12 ply Finnish Spruce to 13 ply Baltic
Birch in October of 1973, the resonant frequency of this cabinet dropped to 113.7Hz"),
here's a list of all the speaker cabinets that were
modeled for GuitarPort:
1x12: 1953 Fender Tweed Wide Panel Deluxe
1x12: 1964 Fender Deluxe Reverb
2x12: 1998 Line 6 Custom
2x12: 1987 Roland Jazz Chorus 120
2x12: 1967 Vox AC-30 Top Boost
4x10: 1959 Fender Bassman
4x12: 1998 Line 6 Cabinet
4x12: 1968 Marshall “Basket Weave” Cabinet
with Celestion Greenbacks
4x12: 1978 Marshall Cabinet with Celestion
G-75’s
4x12: 1996 Marshall Cabinet with Celestion
Vintage 30’s
4x12: 1998 Line 6 Custom
● The amplifier names listed here are all trademarks of their respective owners,
which are in no way associated or affiliated with Line 6. These trademarks of other
manufacturers are used solely to identify the specific amplifiers that were studied
during Line 6's sound model development.
59
Page 58

Line 6–GuitarPort
6. Amp Panel and Amp/Cab Controls
The Amp Panel includes the following controls:
Amp Model–
Click the Amp Model menu, and
drag down while holding your mouse button
to select one of GuitarPort's Amp Models
(page 53).
Cab Model–
Click the Cab Model menu, and
drag down while holding your mouse button
to select one of GuitarPort's Cab Models
(page 59).
Drive–
All of GuitarPort's Amp Models include
a DRIVE knob. Turn this up for more "dirt",
and turn it down to clean up your sound.
❍ The use of the software knobs is described on
page 50.
The particular drive character and range for
each Amp Model is different, emulating the
drive character of the original amplifier that
was modeled for GuitarPort.
Other Knobs and Switches
Each Amp Model will have a different set of
tone knobs and other controls, emulating the
controls of the original amplifier that was modeled for GuitarPort.
Point your mouse at any of these controls and
look in the Info Bar (page 70) at the bottom of
the GuitarPort window to see a description of
the control and its use, then give it a spin and
try it out!
❍ The selection of Amp, Cab and Effect Models, as
well as the setting of all the amp and effect controls
and the Noise Gate (page 71) are saved when you
save a Tone (see page 37 and 76). Selecting a Tone
from the Tone menu at the top left of the
GuitarPort window will set all these controls to
match the settings that were saved for that Tone.
60
Page 59

Audio Stream Reliability Slider
7. Audio Stream Reliability Slider
The Audio Stream Reliability Slider in the
Audio section of GuitarPort's Preferences sets
the size of GuitarPort's audio processing
buffer.
This buffer holds a small amount of audio data
about to be processed by GuitarPort, and is set
by default to be small enough to minimize
latency, but large enough to operate without
problems on most GuitarPort compatible computers.
❍ Be sure to read the cautions on page 45 before
adjusting this Preference. If you set this too low for
your machine, you will hear some audio 'ticks' and
'dropouts' as GuitarPort is processing audio.
8. AUTO-SELECT Button
This button is available in the Tracks tab of
GuitarPort's Browsers (page 62). It can be used
with Tracks available from GuitarPort Online
(page 67) to automatically load up a recommended Tone custom-made to match the Track
(“Track”, page 78).
It is also used (for
selected Tracks) to
enable automatic Tone
Changes (page 74) for a Track.
❍ If a Track does not have any Tones embedded in it
for auto-selection, the AUTO-SELECT Button will
be grayed out.
The AUTO-SELECT Button includes three
options:
Off–
Disables automatic Tone selection for this
track.
Single Coil–
coil pickups, or OK for all pickups.
Selects a Tone optimized for single
61
Page 60

Line 6–GuitarPort
Humbucker–
Selects a Tone optimized for hum-
bucker pickups, or OK for all pickups.
❍ If you really like a particular a Tone that you've
found embedded in a Track, and you want to have
this Tone available to use without the Track as
well, all you have to do is load the Tone from the
Track, and then Save it from GuitarPort's File
menu.
9. Browser
A Browser is a program that understands
HTML, Javascript, image files, sound files and
other data, and can display them to you to provide an interactive visual and sound experience.
❍ Internet Explorer is the browser made by
Microsoft, and used on most Windows computers
to browse the Internet.
An enhanced browser is built into the bottom
portion of the GuitarPort window. It hosts
Internet Explorer to display text, images and
sound from GuitarPort Online, and also
includes a variety of custom guitar tools that
are an important part of the GuitarPort experience (page 67).
Click the tabs along the top of GuitarPort's
browser to access various GuitarPort features:
GuitarPort Online–
detailed information on artists and gear.
Artists & Gear–
detailed information on artists and gear.
Tracks–
GuitarPort's advanced jam tools and the
GuitarPort Online Track Library.
Tones–
The GuitarPort Online Tone Library and
the Tone Locker ([40], p. 76).
Tuner–
Every guitarist needs a tuner, right?
Help–
You're looking at this one right now.
There are three controls to the left of the
Browser tabs:
GuitarPort Online pages with
GuitarPort Online pages with
62
Page 61

BYPASS Button
Show/Hide Browser – The dark blue-gray
arrow shows/hides the browser ([32], p. 50).
BACK – Click the BACK button to step back
through the items that the browser has displayed. If you have switched tabs as you've
selected items for display in the browser, the
tabs will automatically change to show the
right information as you click BACK.
FWD – After clicking the BACK button, you
can click the FWD button to step forward again
through the items that the browser has displayed.
❍ The button will replaced by an outline if you have
not used the BACK button yet, or you have forwarded to the last item displayed by the Browser.
10. BYPASS Button
Press the BYPASS button at the
top of the GuitarPort window to
hear what your guitar sounds like without
GuitarPort's Amp Model and Effect processing.
Big difference, huh?)
11. Chorus
Chorus is one of the four Model options available for GuitarPort's Modulation (Mod) Effect
(MOD, [17], p. 65).
Chorus is generally used to give a "lush" or
"swimmy" sound to guitar. Andy Summers of
the Police, for instance, made chorus an important part of his signature sound.
❍ For details on each of the Chorus controls, move
your mouse over the control and look in the Info
Bar ([24], p. 70) at the bottom of the GuitarPort window.
12. Collapse/Expand Button
You can click the Collapse/
Expand button at the top of the
GuitarPort program's window to switch
between a collapsed and expanded setup for
the program.
The Collapse/Expand button works in conjunction with the arrow for the Effects ([33],
p. 51), Browser and Track Sections Display.
63
Page 62

Line 6–GuitarPort
13. COMPARE Button
The COMPARE button lets you
compare your current guitar processing settings in GuitarPort to the settings
saved ([39], p. 76) in the Tone that is currently
shown in the Tone menu at the top left of the
GuitarPort program's window. You may find
this handy when you have edited a Tone and
are now wondering whether your new settings
are better than the version you had saved previously.
Click the COMPARE button and GuitarPort
will "gray out" its controls to indicate they can't
be altered in this state. The grayed control will
be set to match the saved setting for the currently selected Tone.
Click the button again and GuitarPort will
ungray the controls and reset them to the settings they had before you compared.
❍ If the COMPARE button does not seem to be work-
ing, check the Tone menu at the top left of the
GuitarPort program's window to see if the Tone
name is shown in italics. If it's not, you haven't
changed the Tone versus its saved setting, so there
is no difference between the compare and noncompare states.
14. Compressor (Comp)
The Compressor, sometimes abbreviated
Comp, is one of the four simultaneous
GuitarPort Effects. Compressors even out signals by reducing the volume of the loudest
sounds to better match the volume of quieter
sounds.
You can use subtle compression to make your
playing sound more even, or drastic compression for dramatically increased sustain and a
very consistent level.
❍ For details on each of the Compressor controls,
move your mouse over the control and look in the
Info Bar ([24], p. 70) at the bottom of the GuitarPort
window.
64
Page 63

15. Delay
Delay is one of the four simultaneous
GuitarPort Effects. It creates a delayed echo of
your guitar. A short delay time and low feedback setting will give you a classic "slapback"
delay.
Longer delay times give you a distinctly separate echo, and higher feedback settings increase
the number of echoes.
❍ For details on each of the Delay controls, move
your mouse over the control and look in the Info
Bar ([24], p. 70) at the bottom of the GuitarPort window.
16. Windows Device Manager
To learn about the Windows Device Manager
and viewing the settings for your computer's
hardware, please see “Installation” on p. 9.
17. Effects
GuitarPort includes four simultaneous Effects
for processing your guitar: Compressor (Comp,
[14], p. 64), Delay ([15], p. 65), Modulation
(Mod, [27], p. 71), and Reverb (Verb, [32],
p. 73).
❍ When you select a Tone from GuitarPort's Tone
Menu ([39], p. 76), all the Effects will be set to
match the settings saved for that Tone, including
the on/off state of each of the Effects.
❍ Saving a Tone ([6], p. 37) will save all the effect set-
tings with the Tone.
Delay
The Effects can be viewed in a Collapsed or
Expanded view:
Collapsed Effects View
When you first install GuitarPort, it will display the Effects in this simplified, Collapsed
view. You can click the switch to the left of any
of the four effect names to turn that effect on
(name shows in red, like "Modulation" above)
or off.
Click the right-pointing blue gray arrow on
the left to switch to the expanded view and
more detailed effect control described below.
65
Page 64

Line 6–GuitarPort
Expanded Effects View
Each stompbox icon represents one of the
effects. Clicking on a stompbox turns that effect
on (it is shown in color like "MOD" above) or
off (shown outlined like COMP, DELAY and
VERB).
Clicking on an effect to turn it on will also
cause its controls to be displayed in the effects
Control Panel, which is the area on the right
where the switch, knobs and Model pop-up
menu are shown for the Mod Effect, Rotary
Speaker.
You may also select a particular effect for display in the Control Panel by selecting it from
the SHOW EFFECT selector at the top left corner of the effects Control Panel, or by rightclicking ([25], p. 48) on a stompbox.
❍ Remember that as you move your mouse over any
effect control, you'll get a description and tips on
using the control in the Info Bar ([24], p. 70) at the
bottom of the GuitarPort window.
You can click on any switches ([35], p. 52) in the
Control Panel, or turn any knobs, to adjust the
selected effect. The Modulation and Reverb effects
include a Model menu for selecting which Model
you'd like to use for the effect.
❍ The cable graphics connecting the effects show
GuitarPort's signal flow: the Compressor is applied
"pre," before the amp/cab processing, then the
amp/cab processing occurs, followed by Delay,
then Modulation, then Reverb processing.
18. Flanger
Flanger is one of the four Model options available for GuitarPort's Modulation (MOD) Effect.
Flanger is most famously known as the "jetplane" whoosh effect of several classic 70s
recordings
It can also be used to give a "swooshy" or
"swept" sound to guitar, or just to create a "bigger" sound. Eddie Van Halen, for instance,
66
Page 65

used flanger effects as an important part of his
signature sound on many classic Van Halen
recordings, including "Ain't Talkin' 'Bout Love"
and much of the Van Halen I album.
❍ For details on each of the Flanger controls, move
your mouse over the control and look in the Info
Bar ([24], p. 70) at the bottom of the GuitarPort window.
19. GUITAR PAN
When the Effects Section is
not hidden ([33], p. 51), the
GUITAR PAN slider is
shown on the right side of the GuitarPort program's window, a little way below the Master
Volume knob.
The slider sets the left-right stereo placement of
your guitar sound in your speakers, headphones and the signal GuitarPort sends out to
other programs on your computer for recording.
Move it left to move your guitar sound left, or
move it right to move your guitar sound right.
Double-click to re-set the slider and center your
guitar sound.
❍ The setting of the GUITAR PAN slider is saved
with a Track. When you load a Track from
GuitarPort Online, it will set the GUITAR PAN to
give your guitar the right stereo placement for this
Track. When you save Tracks on your computer's
hard drive, the setting you choose for the GUITAR
PAN is saved with them.
20. GuitarPort Online
If you are not already a
member of GuitarPort
Online, click the GuitarPort Online tab of
GuitarPort's Browsers ([9], p. 62) to take a tour
of GuitarPort Online.
GUITAR PAN
67
Page 66

Line 6–GuitarPort
21.HALF SPEED Button
This button is available in the Tracks tab of
GuitarPort's Browser ([9], p. 62). When it's lit
red, GuitarPort will play back the currently
loaded Track at half speed without changing
pitch.
This can be very handy when you are trying to
learn a guitar part. Slow the track to half speed
for careful study, then switch back to normal
speed once you're ready to put what you've
learned into action.
To use the HALF SPEED Button:
1) Click the button to light it red.
2) Wait for GuitarPort to create a half speed version of
the Track.
3) Use the Track controls, including the LOOP, as normal.
4) Click the HALF SPEED button again to return to normal playback speed.
68
Page 67

Hum Reducer
22.Hot Keys are available in GuitarPort
You can type on your computer's keyboard to
activate various GuitarPort functions:
General Functions:
About GuitarPort . . . . . ALT + [/] or ALT + [?]
Open File . . . . . . . . . . . . . . . . . . . . . . . . CTRL + 0
Transfer Manager ([44], p. 80). . . . . . . CTRL + T
View Help . . . . . . . . . . . . . . . . . . . . . . . . . . . . . F1
Track Functions ([41], p. 78):
Loop On/Off . . . . . . . . . . . . . . . . . . . . . . . . . . . F4
Play/Stop. . . . . . . . . . . . . . . . . . . . . . . . . . . . . . F5
Return To Track Start . . . . . . . . . . . . . . . . . . . . F6
Rewind . . . . . . . . . . . . . . . . . . . . . . . . . . . . . . . . F7
Fast Forward . . . . . . . . . . . . . . . . . . . . . . . . . . . F8
Previous Section . . . . . . . . . . . . . . . . . . . . . . . . F9
Next Section. . . . . . . . . . . . . . . . . . . . . . . . . . . F10
Set Loop Start . . . . . . . . . . . . . . . . . . . . . . . . . F11
Set Loop End . . . . . . . . . . . . . . . . . . . . . . . . . . F12
Browser Functions ([9], p. 62):
Home . . . . . . . . . . . . . . . . . . . . . . . . . . CTRL + H
Back. . . . . . . . . . . . . . . . . . . . . . . . . . . . . ALT + ←
Forward . . . . . . . . . . . . . . . . . . . . . . . . . ALT + →
Refresh . . . . . . . . . . . . . . . . . . . . . . . . . . CTRL + R
Stop Browser Load . . . . . . . . . . . . . . . .CTRL + Z
23. Hum Reducer
The Hum Reducer reduces
the noise that your guitar puts
out, including noise that is caused by electrical
interference from your computer display and
other sources that are picked up by your guitar's pickups.
❍ The Hum Reducer will not completely eliminate
hum, but it is usually able to reduce it considerably.
To use the Hum Reducer:
To use the HUM REDUCER:
1) Click the HUM REDUCER button to light it up red,
then
2) Click the Learn button, then
3) Follow the other directions onscreen in the Hum
Reducer window.
69
Page 68

Line 6–GuitarPort
It's important to position yourself and your
guitar in your normal playing position in relationship to your computer display, etc. when
the Hum Reducer is learning the pattern of the
noise that it will reduce.
When you change positions relative to the
monitor, change guitars or pickups, or add
other possible sources of interference (turning
on a nearby television, say), the character of the
interference that your guitar is receiving and
transmitting will change, and you should press
the Learn button again to have the Hum
Reducer relearn this new hum pattern.
24. Info Bar
The Info Bar is the area at the very bottom of
the GuitarPort window.
Point your mouse (you don't have to click the
mouse button) at something in the GuitarPort
program and look at the Info Bar to see a
description of the thing you're pointing at as
well as brief instructions on how to use it.
❍ For some controls, the current setting of the control
is shown (in parentheses) at the end of the Info Bar
text.
25. Loaded (Track) Menu
The Loaded Track
Menu in the Tracks
tab of GuitarPort's Browsers ([9], p. 62) shows
the name of the currently loaded track.
Click your mouse button on the menu and drag
down to select from up to 10 of the Tracks ([2],
p. 35) that you loaded before the currently
loaded one.
26. LOOP Button
When the LOOP Button is on for the Track
loaded in the Tracks tab of GuitarPort's
Browser, the Track will repeatedly play from
the Loop's start to end.
❍ The loop is shown and set in the Track Sections
Display (see [28], p. 49 and [43], p. 79).
70
Page 69

Modulation (MOD)
27. Modulation (MOD)
Modulation, sometimes abbreviated MOD is
one of the four simultaneous Effects ([17],
p. 65) available in GuitarPort. The Modulation
effect can use one of four different Models:
([11], p. 63), Flanger ([18], p. 66), Rotary
Speaker ([34], p. 73) and Tremolo ([45], p. 80).
28. MUTE GUITAR Button
Click the MUTE GUITAR
button to have GuitarPort
silence the guitar output that
you hear coming out of the GuitarPort hardware.
❍ This can come in handy when you want to listen to
a Track in GuitarPort or spend some time seeing
what's new on GuitarPort Online without playing
your guitar, so you don't hear your guitar buzzing
away as it sits idle.
❍ The signal that GuitarPort sends to other programs
([21], p. 44) on your computer is not effected by the
MUTE GUITAR button. In fact, you'll want to use
this button if you plan to monitor your guitar
through your recording program as you record
GuitarPort’s output to another program.
29. Noise Gate
GuitarPort's Noise Gate is
designed to reduce the
noise that your guitar
makes when you are not playing. You can
think of it as a gate that opens to let your guitar
sound through when you play, and closes
when you stop playing to shut out the noise
you would otherwise hear after you stop playing.
The Noise Gate works by detecting the input
level to GuitarPort from your guitar. When the
input level is below the gate's "threshold," the
gate will close and cut off the signal from your
guitar. When the input level is above the
threshold, the gate will open to let your guitar
signal through.
The idea is to set the threshold (which is what
the NOISE GATE slider is adjusting) low
enough so that it doesn't cut off the signal as
71
Page 70

Line 6–GuitarPort
you are playing or a note is sustaining, but
high enough so that the background noise from
your guitar doesn't keep the gate open.
You'll need to select the Noise Gate setting that
works best with the Amp Model you've chosen
as well as the guitar(s) and pickups you happen to be using with GuitarPort. (The Hum
Reducer eliminates noise in another way.)
❍ GuitarPort’s Hum Reducer ([23], p. 69) eliminates
noise in another way.
The Noise Gate is off when its slider is fully
left. Move the slider to the right, and the gate
will be armed, gating more aggressively as you
move the slider farther to the right. The light
next to the slider shows you what the noise
gate is doing:
Light is Off–
The slider is fully left and the gate is
off.
Green Light–
The gate is armed, but your guitar
is loud enough to keep the gate open.
Yellow Light–
Your guitar's level has dipped low
enough for the gate to begin to close.
Red Light–
❍ The setting of the Noise Gate is saved as part of a
The gate has fully closed.
Tone ([39], p. 76).
30. Preferred Audio Device
See “Soundcard Connection” on p. 25 to learn
about your Preferred Audio Device settings,
including the Preferred Playback Device and
Preferred Recording Device, and how to set
these for use with GuitarPort.
31. Reference control in the Tuner
This control is available in the Tuner tab of
GuitarPort's Browser ([9], p. 62)It tells the
Tuner what to tune to.
440Hz is the standard reference value for A,
and is generally used for tuning reference. All
the Tracks available from GuitarPort Online
use the standard 440Hz reference.
72
Page 71

Reverb-Block (Hall)
So, unless you have a particular need to adjust
the Tuner's reference (and tune your guitar to
match something other than GuitarPort
Tracks), you probably want to stick with the
standard 440Hz setting for this control.
32. Reverb-Block (Hall)
Reverb, sometimes abbreviated Verb, is one of
the four simultaneous GuitarPort Effects ([17],
p. 65). The Reverb effect can use one of two
Models: Room (see below) or Spring ([36],
p. 74).
33. Room Reverb
The Room Reverb is one of the two Model
options available for GuitarPort's Reverb
(Verb) Effect.
Choose this Model for the Reverb when you
want a polished, modern studio sound. It simulates the sound of your amped guitar echoing
in a room, and can be set to subtly enhance the
size and polish of your tone, or make it sound
like you're playing in a large, resonant chamber.
❍ For details on each of the Room Reverb controls,
move your mouse over the control and look in the
Info Bar ([24], p. 70) at the bottom of the GuitarPort
window.
34. Rotary Speaker
A Rotary Speaker is one of those things that
makes you go, "Gee whiz!" when you first hear
about it: a speaker is mounted on a rotating
motor, and spun around as sound plays
through it.
Classic rotary speakers were studied to create
the Rotary Speaker Model option available for
GuitarPort's Modulation (Mod) Effect.
The rotary speaker was originally developed
for organ players, but guitar players soon put it
to use as well. Stevie Ray Vaughn and The
Beatles were both heavy users of rotary
speaker effects for guitar.
❍ For details on each of the Rotary Speaker controls,
move your mouse over the control and look in the
Info Bar ([24], p. 70) at the bottom of the GuitarPort
window.
73
Page 72

Line 6–GuitarPort
35. Soundcard
The soundcard is the piece of hardware in your
computer that plays back and receives sound
into the computer for recording or other uses.
The instructions for the standard hardware
setup in the GuitarPort Installer program
instruct you to connect your soundcard's output to GuitarPort IN connector to combine the
sounds output by your soundcard with the
ones that GuitarPort creates.
See “Soundcard Connection” on p. 25 to learn
how you can set GuitarPort to act as your Preferred Audio Device instead of your soundcard, eliminating the need for this cable.
36. Spring Reverb
The Spring Reverb is one of the two Model
options available for GuitarPort's Reverb
(Verb) Effect ([32], p. 73).
Choose this Model for the Reverb when you
want the kind of classic sound created by
spring reverb tanks built into guitar amps, or
used for studio processing on classic recordings.
This is the place to come, for instance, when
you're looking for that signature Surf Music
sound of splattering reverb.
❍ For details on each of the Spring Reverb controls,
move your mouse over the control and look in the
Info Bar ([24], p. 70) at the bottom of the GuitarPort
window.
37. T’s shown in some tracks
The small 'T's shown at the bottom of some
Tracks are the Tone Changes ([41], p. 78)
included in some Tracks available from
GuitarPort Online ([20], p. 67).
Only selected tracks will include Tone
Changes. You'll most likely see these included
in Tracks where the guitarist used significantly
different equipment or settings to achieve a
variety of sounds on the recording. When these
74
Page 73

Technical Terms
Tracks are created, Line 6 creates multiple
GuitarPort Tones that deliver the required
range of sounds.
These Tones are then embedded into the Track
along with Tone Changes that trigger the right
Tone to load at the right time. Wherever a Tone
Change occurs, a tiny T is shown along the bottom of the Track Sections Display.
❍ When Tone Changes are available, you need to
turn on the AUTO-SELECT Button ([8], p. 61) to
activate them. Or set the AUTO-SELECT Button to
OFF if you prefer not to use the Tone Changes.
38. Technical Terms
The following terms refer to items included in
GuitarPort's System Statistics window, which
you can select from GuitarPort's View menu.
You can click on an item in the System Statistics window and then click the button labeled
Info or Fix It near the bottom of the window
for more details and assistance.
You can also learn more about any of the following technical terms by clicking its name,
then on the Info or Fix It button.
AGP (page 16 and 90)
ATAPI (page 22)
BIOS (page 22)
Bit Depth (page 89)
Codec (page 24 and 87)
Cookies (page 17)
DirectX (page 17 and 90)
DMA Mode (page 22 and 88)
Default Dialup Connection (page 20)
Device Manager (page 88)
Driver (page 92)
IDE (page 22)
ISA (page 16, 21 and 24)
LAN (page 19)
PIO Mode (page 22 and 88)
Sample Rate (page 44 and 89)
75
Page 74

Line 6–GuitarPort
39.Tone
A Tone is a saved setting for all of the controls
that affect the sound of GuitarPort's guitar processing.
Tones stored on your computer are accessed
from the Tones menu at the top left of the
GuitarPort window.
A Basic Tone ([13], p. 41) and a folder of Preset
Tones is available in this menu. The menu also
has a User folder ready to store any new Tones
that you create and save ([6], p. 37).
GuitarPort Online gives you access to a vast
library of Tones designed to deliver the signature sounds of classic guitar recordings as well
as top guitarists. This growing library includes
Tones matched to all the Tracks available from
GuitarPort Online, and is searchable by guitarist, band, and song name to make it easy to get
exactly the Tone you're looking for.
❍ Tones can be organized and deleted from the Tone
Locker (see below).
40. Tone Locker
GuitarPort's Tone Locker lets you access and
organize your Tones. Click the Tones tab of
GuitarPort's Browser ([9], p. 62), then click on
the Tone Locker button to access the Tone
Locker:
Point with your mouse at an element in the
Tone Locker and look at the Info Bar at the bottom of the GuitarPort window for information
on that element.
When you first install GuitarPort, you'll have
the following Local Tone Locker items:
1) The Basic Tone supplied as a starting point for creating your own Tones ([6], p. 37).
76
Page 75

Tone Locker
2) The Preset folder containing a selection of factory-
programmed Tones.
3) The User folder containing Tones you save from the
File menu ([6], p. 37).
If you're a member of GuitarPort Online ([20],
p. 67), you'll have the following Online Tone
Locker items:
4) The Public folder. Tones in this folder are visible to
other members of GuitarPort Online.
5) The Private folder. Tones in this folder are only visi-
ble to you. Copy Tones here if you want to keep
them private, while being able to access them from
another Internet-connected computer that you use
with GuitarPort.
Navigating Folders
You can double-click a folder in the Tone
Locker to open it. The folder selectors at the top
of the Local and Online panels let you move
from the folder you are in to the enclosing
folder(s).
Use the DELETE SELECTION button to delete
one or more Tones in the Tone Locker:
1) Highlight a Tone in the Tone Locker by clicking its
name in the Local or Online panel.
You can SHIFT-click multiple Tones to select
several at once to be deleted.
The DELETE button will be dimmed if no
Tones are currently selected.
2) Click the DELETE button to
delete the highlighted Tone(s).
Use the Tone Locker's COPY ® button to copy
one or more Tones or folders from Local to
Online:
3) Open your Private or Public folder on the right so
that the name of the folder is shown in the folder
selector at the top of the Online panel.
4) Highlight a Tone or folder by clicking its name in the
Local panel on the left.
You can SHIFT-click multiple Tones to select
several at once to be deleted.
The COPY ® button will be dimmed if no Local
Tones or folders are currently selected, or the
Public or Private folder is not open in the
Online panel on the right.
77
Page 76

Line 6–GuitarPort
5) Click the COPY ® button to make a copy of the
highlighted Tone(s) or folder(s) in the Online folder.
Use the Tone Locker's √ COPY button to copy
one or more Tones or folders from Online to
Local:
6) Open your Private or Public
folder on the right so that the
name of the folder is shown in the folder selector at
the top of the Online panel.
7) In the Local panel, open the folder that you'd like the
Tone(s) or folder(s) copied to.
8) Highlight a Tone or folder in the Online folder by
clicking its name.
You can SHIFT-click multiple Tones to select
several at once to be deleted.
The √ COPY button will be dimmed if no
Online Tones or folders are currently selected.
9) Click the √ COPY button to make a copy of the
highlighted Tone(s) or folder(s) in the Local folder.
GuitarPort stores Tones on your hard drive at
/Program Files/Line6/GuitarPort/Tones. You can
leave GuitarPort and use Windows Explorer to
access the Tones folder directly if you prefer
not to use the Tone Locker.
Note that Tones and Tone folders must be
stored in the GuitarPort Tones folder in order
to be available from GuitarPort's Tones menu.
41. Track
A Track is a file that contains audio and other
information that is understood by GuitarPort.
Tracks can be loaded from GuitarPort Online
([20], p. 67), hard disk ([18], p. 43), CD ([26],
p. 48), or the Loaded Track Menu ([25], p. 70).
Tracks created in the special Line 6 Track format can contain a great deal of other content in
addition to audio, including information on the
artists that originally recorded a song, artists
that recorded the Line 6 version, tablature, lead
sheets, a Track Sections Display ([43], p. 79),
loop points ([26], p. 70), Tones matched ([39],
p. 76) and Auto-Selected ([8], p. 61) for the
Track, and more.
78
Page 77

TRACK LEVEL
❍ A growing library of Tracks in the special Line 6
format are available via GuitarPort Online, searchable by guitarist, band and song name. When you
store a Line 6 format Track on your hard disk, its
name will end in ".l6s".
❍ GuitarPort can load MP3, WAV and AIFF audio
files or a track from a standard Audio CD for you
to use as a Track in GuitarPort. If you save the file
from GuitarPort, it will be saved in the special
Line 6 format so that your settings for the Track
Level, Guitar Pan and Loop Points will be saved
with it.
42. TRACK LEVEL
The TRACK LEVEL
slider is available
under the Tracks tab
of GuitarPort's Browser. It sets the playback
level for any Track that you load into
GuitarPort, and its setting is saved with a Track
if you save the Track to your hard disk.
The light to the right of the slider glows green
to show the current level of the Track as the
Track is playing, and flashes red if the Track
"clips" because it is turned up too loud.
❍ If you are having trouble with clipping or other
issues, see the Track Level Issues on our
FAQTRAQ page (
www.line6.com
).
43. Track Sections Display
When you've selected the Tracks tab of
GuitarPort's Browser ([9], p. 62), you'll see a
Track Sections Display – it's the bottom portion
of the image shown above.
❍ You can click the dark blue-gray arrow graphic to
the left of the Home button ([34], p. 51) to show/
hide the Track Sections Display. Try hiding the
Track Sections Display (as well as the Effects, [33],
p. 51) when you want to have more room in the
Browser to see tablature, a lead sheet, or other
Track contents.
Tracks imported from Audio CD or MP3, WAV
and AIFF files will show a single section for the
entire Track. Tracks provided by Line 6 will
show multiple sections.
79
Page 78

Line 6–GuitarPort
Clicking the [>>] (Fast Forward) and [<<]
(Rewind) buttons will jump you to the next/
previous section boundary in the Track.
❍ If you click and hold the buttons, the play point
will move smoothly forward or back instead of
jumping by sections.
Some Tracks will also have Auto-Selected
Tones shown here ([8], p. 61).
When you've got the Loop on, the loop start
and stop points will be shown and set here
also.
44. Transfer Manager
The Transfer Manager shows
the status of in progress, completed, and aborted transfers
of data between your computer and GuitarPort
Online ([20], p. 67).
The current transfer activity is shown at the
bottom right of the GuitarPort program's window.
You can click here to open the Transfer Man-
ager window to see the details of in progress
and completed transfers.
❍ Please note that Download Accelerators are incom-
patible with GuitarPort Online and will cause
transfer errors. If you are having difficulties with
incomplete downloads, visit our FAQTRAQ page
www.line6.com
(
).
45. Tremolo
Tremolo is one of the four Model options available for GuitarPort's Modulation (MOD) Effect.
It is also available as part of the amp controls
for GuitarPort Amp Models based on amplifiers that had built-in tremolo circuitry.
Tremolo gives your guitar a pulsing sound. It
works by turning the volume of your guitar
sound down and back up again repeatedly, at
the speed set for the tremolo.
GuitarPort's tremolo is stereo, and can vary the
left and right volume together (select Pumpy),
in opposition (Panny), or half-offset (Squishy).
❍ For details on each of the Tremolo controls, move
your mouse over the control and look in the Info
Bar ([24], p. 70) at the bottom of the GuitarPort window.
80
Page 79

46. USB Hub
For information on USB hubs and requirements for using one with GuitarPort, see “USB
Hub” on p. 24.
USB Hub
81
Page 80

Line 6–GuitarPort
82
Page 81

GLOSSARY
Audio Formats – MP3, AIFF, WAV, Audio CD–
Audio on computers can be recorded (or
encoded) in several different formats. Full
bandwidth, uncompressed formats like WAV
or AIFF give the best sounding results, but take
up the most room—as much as 10MB per
minute. Compressed formats like MP3, Windows Media, Real Audio, or Line 6's .l6s format
take up a lot less room, at a small cost in audio
quality.
GuitarPort supports WAV, AIFF, MP3 and
standard CD audio files, as well as our own
format.
Bit Depth–
refers to how many bits are used per sample in
digital audio. As an example, standard CDs use
a bit depth of 16 and a sample rate of 44.1 kHz,
or 44,100 times per second. The more bits used,
the better the dynamic range of the signal.
GuitarPort is capable of 32 bits of internal resolution. While the audio you get out of you computer is almost always converted to 16 bit, 44.1
kHz for output, GuitarPort's use of higher resolution for its internal audio guarantees the best
possible audio quality for its output.
Also known as resolution, bit depth
.l6s
83
Page 82

Line 6–GuitarPort
Codec–
Shorthand for “Coder/Decoder”. A
hardware or software device that converts
audio or video from one format to another. For
example, in the dark ages of computers (6 or 7
years ago) you usually saw separate analog to
digital (A/D) and digital to analog (D/A)converters. Today, both conversions are done in
the same computer chip.
Device Manager–
A utility in Windows that
allows the user to view and modify hardware
settings. Device drivers can be installed or
upgraded and problems with the devices can
be discovered here as well.
The easiest way to get to the Device Manager,
is to right click on the [My Computer] icon on
your desktop and go to the [Properties]. You
will see a tab named [Device Manager].
Kernel–
Windows core component that is
responsible for managing Windows resources
and running applications.
PIO/DMA–
PIO (Programmed Input/Output) is
a method of transferring information from an
attached device in which all data must pass
through the processor first. Since the processor
must perform several tasks for each transfer,
this method is usually slower than DMA.
With PIO, devices that transfer large amounts
of data can sometimes monopolize the processor and impede the performance of GuitarPort.
This is why GuitarPort must be used with
DMA.
DMA (Direct Memory Access) is a method of
transferring information directly from an
attached device (such as a disk drive) to the
computer's memory, without passing the information through the processor. The processor is
then freed from any involvement with the data
transfer, thus speeding up the computer's overall performance.
Sample Rate–
Digital audio is produced using a
series of 1s and 0s. The sample rate is the
amount of times per second that the system is
looking at the analog audio to create the digital
audio. For CD audio it is 44.1 kHz, or 44,100
times per second.
84
Page 83

USB-definition, limitations
Streaming–
from the Internet is known as streaming.
GuitarPort uses streaming to provide you with
previews of the tracks in the online library so
you can check them out before you decide
which to download.
Windows Registry–
configuration information about the machine.
This includes system setting as well as individual user settings.
Receiving audio or video in real time
The registry is used to store
USB-definition, limitations
Definition–
A technology used to connect peripheral
devices to a computer. Each USB channel will
support up to 127 devices and has a total transfer rate (or bandwidth) of up to 12 MBps.
Limitations–
USB devices hooked up to a single USB controller. This limitation is based on both power
and bandwidth usage.
Cable length–
length for GuitarPort is 2 meters, or approximately 7 feet. If you need to run a longer cable
you'll need either a powered USB hub or a USB
repeater.
Hub–
(or single jack) to be multiplexed out to many
available connections.
Acronym for “Universal Serial Bus”.
You can have a limited amount of
The maximum allowable USB cable
A USB hub allows a single channel of USB
Other terms
AGP–
Accelerated Graphics Port. A dedicated
expansion port for video cards that provide a
high-speed interface between the CPU and
main memory.
Browser–
This is the program that allows you to
view information over the Internet. The two
main browsers are Internet Explorer and
Netscape Navigator.
CD ripping–
from a Redbook CDROM and storing it in a
computer playable file.
The process of extracting audio data
85
Page 84

Line 6–GuitarPort
CPU (speed and type)–
computer or processor usually expressed in
MHz (megahertz). The faster the speed the
faster your computer. This is assuming that the
rest of the devices can keep up with the processor, like the hard drives.
There are different manufacturers that make
processors. The main contenders are Intel and
AMD.
Direct X–
timedia capabilities on your computer. DirectX
provides better playback of different types of
multimedia and manages 3-D graphics better
than console computers.
DirectX is a utility that enhances mul-
Display depth–
ber of bits used to represent the color of a pixel
displayed on the monitor.
Driver–
A small program that allows a computer
to communicate with and control a device.
Basically a program that tells Windows how to
use a device. All of your devices, like your CDROM drive will have a driver. Sometimes Windows has stock drivers and sometimes there
are drivers supplied with the device (that is the
CD that you got with your new CD-R drive).
Explorer–
A link to Microsoft site to get IE 5.5.
Hard drive space–
space on your hard drive. GuitarPort requires a
minimum of 50MB of space. Uncompressed
digital audio requires 10MB per minute for a
stereo track (like a WAV ripped from a CD), so,
if you going to rip a lot of CDs to WAV or AIFF
files, figure 35MB per 3.5 minute song or about
420MB for an average 12 song CD.
IRQ–
An IRQ is basically a signal sent by a
peripheral device such as a keyboard, an I/O
port or one of the system's disk drives, to the
processor telling it that an event has taken
place that requires the processor's attention.
The processor will then interrupt the task it is
currently performing and execute the new
instruction provided by the IRQ. When the
new instructions have been completed, the processor returns to its prior task.
The internal speed of a
Display depth refers to the num-
The amount of available free
86
Page 85

Internet connection: speed, type, broadband, dial up
MME–
MME (MultiMedia Extensions) is a stan-
dard way for applications to play audio.
OS–
Operating System. The software responsible for allocating system resources, including
memory, processor time, disk space and
peripheral devices such as printers, modems
and the monitor.
All application programs use the OS to gain
access to these system resources, as they are
needed. The OS is the first program loaded into
the computer as it boots and it remains in
memory at all times thereafter. Also known as
“Windows”.
Preferred Audio Device–
“Sound and Multimedia Properties”. A utility
in Windows that allows the user to view and
modify audio settings. Users can select their
sound playback and record devices as well as
their MIDI playback device.
Proxy–
The “Line 6 Device Proxy” is a Line 6
provided device driver and a necessary component of the GuitarPort system.
RAM–
Random Access Memory. The main system memory in a computer used for the operating system and applications.
Sound card–
provides sound output.
WDM–
opers to write one driver that is compatible
across all Microsoft® Windows® operating
systems.
A plug-in card for a computer that
WDM is a technology that allows devel-
Sometimes called
Internet connection: speed, type, broadband,
dial up
The Internet is the global TCP/IP network that
is used in business and at home as a means of
information transfer.
Connection–
must have an ISP or Internet Service provider.
This provider allows a portal to the Internet
and provides an e-mail address and e-mail service.
To connect to the Internet, you
87
Page 86

Line 6–GuitarPort
Speed–
The speed at which you connect to the
Internet depends on the type of connection that
you have. There are different types of Internet
connections, including dial up service, DSL,
Cable modem and ISDN. The last of these are
usually referred to as broad band connections
due the increased speed of these connection
types.
Start up disk
The Windows start up disk allows you to boot
your system with minimal functionality. This is
imperative if you are installing an OS on a new
system or if your system will not come up
booting from your hard drive. To create a Start
Up Disk (HIGHLY RECOMMENDED) for
Windows 98:
s Click on [Start] → [Settings]
s Double click on the [Add/Remove program] icon.
There is a tab called [Start Up Disk].
In Windows 2000:
s Click on [Start]→ [Settings]→ [Control Panel]→ [Sys-
→
[Advanced].
tem]
s Click on [Start up and Recovery].
→
[
Control Panel].
88
 Loading...