

Page 1
Ve r s i o n 3.7 Us e r GU i d e
Getting Started With Your Hardware
GX UX1 UX2 KB37 DI UX8
POD X3
POD X3
Live
POD X3
Pro
GearBox Basics
GearBox Plug-In
GearBox with POD X3
Online Resources
PODxt
Stand-Alone Application
Windows® 64-Bit Support
PODxt
Live
PODxt
Pro
Guitar
Port
Recording & More
Step by Step Recording Setups,
Installation, Troubleshooting and more
Store
Model
Packs &
Plug-In
Support
Online
Support
Pages
Page 2

Table of Contents
Start Here ................................................................................................1•1
About Line 6 Hardware & Software ..............................................................................1•1
Before You Get Started ................................................................................................... 1•1
System Requirements and Installation ........................................................................... 1•1
Windows® 64 Bit Support ....................................................................................1•1
Updating & Registering with Line 6 Monkey ................................................................ 1•1
Activation ....................................................................................................................... 1•2
Transferring Activations ................................................................................................. 1•2
Using Your Line 6 Hardware ...................................................................2•1
TonePort UX1 ................................................................................................................. 2•1
TonePort UX2 ................................................................................................................. 2•3
TonePort UX8 ................................................................................................................. 2•6
TonePort KB37 ............................................................................................................. 2•11
TonePort DI .................................................................................................................. 2•13
TonePort GX ................................................................................................................. 2•15
GuitarPort ..................................................................................................................... 2•16
POD X3 ......................................................................................................................... 2•17
POD X3 Live ................................................................................................................ 2•19
POD X3 Pro .................................................................................................................. 2•21
PODxt Live ................................................................................................................... 2•27
PODxt PRO .................................................................................................................. 2•28
PODxt - Audio Signal Routing & Re-Amping ............................................................ 2•30
Routing Audio From Your Line 6 Hardware to an External Device ............................ 2•31
Sound Cards & Sound Issues ........................................................................................ 2•34
Line 6 Driver Panel & Recording ............................................................3•1
Audio Routing ................................................................................................................ 3•1
The Line 6 Audio-MIDI Devices Dialog ....................................................................... 3•2
Windows® - Line 6 Audio-MIDI Devices Dialog ........................................................... 3•2
Mac® - Line 6 Audio-MIDI Devices Dialog ................................................................. 3•13
Important Things to Know for Recording .................................................................... 3•26
GearBox Stand-Alone Application .........................................................4•1
Overview ......................................................................................................................... 4•1
GearBox with TonePort and GuitarPort ........................................................................ 4•6
Pre/Post Record Send .....................................................................................................4•7
Monitoring a GearBox-processed Tone While Recording “Dry” ................................... 4•7
Dual-Tone Operation (TonePort UX1/UX2/UX8/KB37) ............................................. 4•8
ii
Page 3

MIDI Control ................................................................................................................. 4•9
GearBox with PODxt ................................................................................................... 4•14
PODxt MIDI Control ................................................................................................... 4•15
GearBox Stand-Alone Application - POD X3 .......................................5•1
GearBox Controls and Operation with POD X3 ........................................................... 5•1
Saving & Opening POD X3 Tones Within GearBox .................................................... 5•9
The POD X3 Hardware Memory Window ................................................................... 5•13
Variax Options (POD X3 Live/Pro) ............................................................................. 5•20
POD X3 Live & Pro MIDI Control .............................................................................. 5•22
GearBox How To... ....................................................................................6•1
GearBox Plug-In .......................................................................................7•1
Windows
A Quickie Plug-In Primer ............................................................................................... 7•1
Obtaining the GearBox Plug-In ..................................................................................... 7•2
GearBox Plug-In Controls and Operation ..................................................................... 7•5
Where Can I Find the GearBox Plug-In On My Computer? ......................................... 7•6
®
64 Bit Support ............................................................................................... 7•1
Model Gallery ...........................................................................................8•1
Guitar Amp & Cab Models ............................................................................................ 8•3
Bass Amp & Cab Models.............................................................................................. 8•11
Preamp Models ............................................................................................................. 8•13
Effects ............................................................................................................................ 8•15
Model List ..................................................................................................................... 8•24
Troubleshooting .......................................................................................9•1
What Is… ............................................................................................... 10•1
Online Help & Support ........................................................................ 11•1
Line 6, POD, PODxt, POD X3, TonePort, GearBox, GearBox Plug-In, Line 6 Monkey, ToneDirect Monitoring, GuitarPort, FBV, Variax, Line 6 Edit and Custom Tone are trademarks of Line 6, Inc. All other product
names, trademarks, and artists’ names are the property of their respective owners, which are in no way associated
or affiliated with Line 6.
© 2008 Line 6, Inc.
iii
Page 4

Line 6 GearBox 3.7 – Start Here
St a r t He r e
About Line 6 Hardware & Software
Before You Get Started
OK, you’ve got your guitar, a computer and a head full of songs and cool licks, so how do you get
this all going? You’re just a few steps away from turning your computer into a serious tone, jamming
and recording machine. First, here is some valuable information to ensure you have all the latest and
greatest updates….
System Requirements and Installation
GearBox 3.7 is compatible with Mac® OS X® 10.4 (Tiger) and 10.5 (Leopard) as well as Windows® XP®
SP2 (and later) and Windows® Vista® (32 Bit and 64 Bit) systems*. If you need to check the specific
system requirements or need some assistance with installing GearBox on your computer, please refer
to the additional documents for GearBox version 3.7 located on the GearBox - User Manuals page of
the Line 6 web site. We’re committed to continually improving the Line 6 software and drivers, so it
is highly recommended that you always check to see if an even newer version of GearBox is available
for your system! We’ve made it even simple enough for a drummer to find the latest updates, optional
add-ons and other software products using our nifty Line 6 Monkey updater software - read all about it
a few lines down in the Line 6 Monkey section.
*Note to Mac® OS X® Leopard and Windows® Vista® users... GearBox, GearBox Plug-In, Line 6
Monkey and Line 6 USB audio drivers are designed to be compatible with these newer Operating
Systems, but support testing is ongoing. Please refer to the dedicated Line 6 Public Beta forums for
Leopard and Vista for the latest news and known issues.
Windows® 64 Bit Support
If you have a 64 bit Windows PC, then no worries! GearBox 3.7 and the included Line 6 USB hardware
drivers do indeed support Windows® XP® x64 and Windows® Vista® 64-Bit systems. Note that GearBox
3.7 (as well as the GearBox Plug-in) still runs as a 32 bit application, but has been made compatible to
run on these Windows 64 bit operating systems. If you need to check the specific system requirements
or need some assistance with installing GearBox on your computer, please refer to the additional
documents for GearBox version 3.7 located on the GearBox - User Manuals page of the Line 6 web
site.
Updating & Registering with Line 6 Monkey
Line 6 Monkey is the intelligent updater utility that is automatically installed with your GearBox
application. You are prompted to run Line 6 Monkey at the end of your GearBox installation, but it’s a
great idea to do this often so you can be sure you have all the latest updates for all your Line 6 software
and hardware products. Registering your Line 6 hardware is also very important because it ensures
that you’re dialed in for warranty service and makes it possible for us to contact you if new software
versions or other cool enhancements are offered - cutting edge technology and such! So don’t put this
off any longer. Connect your Line 6 hardware to your computer and follow these steps to launch Line
6 Monkey...
1•1
Page 5

Line 6 GearBox 3.7 – Start Here
On Mac•
On Windows•
On Windows•
®
, go to Applications - Line 6.
® XP®
, go to Start button - Programs - Line 6 - Tools.
®
Vista®, go to Start button - All Programs - Line 6 - Tools.
Login Account
You’ll need to Login so that Line 6 Monkey can communicate with the online Line 6 Server and
provide you with exactly what you need. It’s just a few clicks, and it’s free!
If you have a Line 6 account, then type in your User Name and Password at the top of the •
Monkey dialog.
If you have not yet created an account, click the New User button and you’ll be walked right •
through the steps.
Register Your Hardware
If you have not already done so, you’ll be prompted to Register your connected Line 6 hardware. It’s a
painless process really, so click that Register Now button and fill in the blanks on the Web page. This
page will list all your registered Line 6 gear in one place.
Grab Those Updates
Go to the Updates and Add-Ons tab in Line 6 Monkey. If you see any items where a newer, updated
version is available, then you should click on that item and let the little monkey fellow walk you
through the installation steps. This is the easiest way to stay current on the latest GearBox software
updates, as well as drivers and firmware updates. You’ll also see some optional Add-Ons available for
your specific Line 6 device here too!
Activation
Some features of GearBox require “activation” using Line 6 Monkey and your Internet connection.
Activation turns these features on in your GearBox-compatible hardware, so they can operate in the
GearBox stand-alone application and Plug-in. Get the skinny on Line 6 Monkey here.
Detailed information on activating GearBox Plug-In can be found in the GearBox Plug-In chapter.
Model Packs that you purchase from www.line6.com/store also need to be activated. You’ll find
instructions on just how to do that here.
You may also transfer your activations to another computer with or without internet access. The next
section describes the process in detail.
Transferring Activations
So you just upgraded your computer to the latest and greatest (this week anyway…) model, and want
to move GearBox and your Add-Ons to your new system? In this section, we’ll explain how to make
the transfer process as easy as A-B-C, whether the new computer can connect to the Internet or not.
1•2
Page 6

Line 6 GearBox 3.7 – Start Here
The destination computer has an Internet connection
This is the easiest scenario: Download and install the GearBox application (always available at line6.
com/software). This will also install the necessary drivers for your hardware and the Line 6 Monkey
application.
GearBox Plug-in doesn’t work!!! Where are my Model Packs??? Relax – Your Add-Ons (Model
Packs, Plug-in, etc…) are tied-in to your hardware’s, built-in Electronic Serial Number (ESN), but also
need to be authorized with each new computer you’ll be using GearBox on. In other words, they work
but just haven’t been enabled on the new computer yet.
Launch Line 6 Monkey. The Monkey utility will connect to the server and scan your hardware for any
activated Add-ons, and if it finds any, will display the following message in red text:
Just click Authorize, and Monkey will enable the use of your activated Add-On(s) on the new
computer system.
The destination computer lacks an Internet connection
So you just got the call from Mr. Big Time Producer for a session at so-and-so’s studio, and you want
to bring all this great Line 6 tone along for tracking – but their computer does not connect to the
Internet. You can still move your GearBox activation to their recording environment by following
these steps:
Prerequisite - This may seem obvious but we’ll mention it anyway: Your hardware and all GearBox
software and Add-ons must already be activated and authorized on your own computer (meaning,
an Internet connection is required and has been used for the initial activation of your GearBox
assets).
1•3
Page 7

Line 6 GearBox 3.7 – Start Here
On your computer:
Locate and copy all • .aet files to removable media (burn to a CD, copy to a Flash drive, etc…).
In Windows® environments, these files can be found in the C:\Document_and_Settings\
(username)\Application Data\Line 6\GuitarPort folder; on Mac®, look in /Users/(username)/
Library/Application Support/Line 6/GuitarPort.
Copy the GearBox installer to removable media, since the destination computer will not be able •
to download it.
On the destination computer:
Install the GearBox software. •
Copy the • .aet files from your removable media into the correct folder (described above). You
may have to create this folder manually if it isn’t present on your destination computer.
You’re done! You should now be able to launch the GearBox application with all Add-Ons enabled.
Just remember that for GearBox Plug-in operation, your Line 6 hardware must always be connected
via USB (even if you’re using a 3rd-party interface). You don’t necessarily need to be using your Line
6 hardware as your active USB audio device - it just needs to be USB-connected (and powered on for
units that have a power switch).
1•4
Page 8

Line 6 GearBox 3.7 – Using Your Line 6 Hardware
US i n g Y o U r Li n e 6 Ha r d w a r e
The GearBox 3.7 software is designed to work with all Line 6 TonePort, GuitarPort, POD X3, and
PODxt hardware. Your Line 6 device, since it connects to your computer via USB and utilizes the
high-performance Line 6 Audio & MIDI drivers, is easily configured to work as your computer’s sound
card. This means that you can access all your Tones coming out of GearBox directly from most any
audio recording application, all at the highest quality! But you are, of course, not just limited to
using your Line 6 hardware with your computer. The outputs provided on the back of your device
additionally allow you to feed your GearBox signal to external tape machines, DAT recorders, PA
systems, or whatever else will accept an analog line level signal. Additionally, TonePort UX2, UX8,
POD X3, POD X3 Live and PODxt Pro devices include a digital S/PDIF output to allow you to make
these connections digitally!
There are some differences in the setup and functionality between the supported Line 6 devices,
so be sure to look for the instructions in the following sections for your specific device. Primarily,
TonePort and GuitarPort devices function quite similarly since all the Digital Signal Processing (DSP)
is performed on your computer when using these units. POD X3 & PODxt devices do all their DSP
magic inside the POD hardware itself. Using the GearBox software is pretty similar for all these devices
once you have everything setup. You can use the handy links here to jump directly to the section on
your Line 6 device...
TonePort UX1
TonePort UX2
TonePort UX8
TonePort KB37
TonePort UX1
Connect a microphone
TonePort DI
TonePort GX
GuitarPort
Connect your electric guitar or bass
POD X3
POD X3 Live
POD X3 Pro
Connect your stereo headphones
PODxt
PODxt Live
PODxt Pro
Mic - To input a signal from a microphone, connect it here using an XLR cable. This inputs the
microphone signal into GearBox where you can choose your tone, and then route the processed signal
both to your audio software and out the TonePort outputs.
Guitar/Bass - To input your electric guitar or bass, plug it in here using a standard 1/4-inch TS
instrument cable. This inputs the instrument’s signal into GearBox where you can then choose your
tone and route the processed signal both to your audio software and out the TonePort outputs.
2•1
Page 9

Line 6 GearBox 3.7 – Using Your Line 6 Hardware
Phones - If you want to listen to the audio from TonePort using stereo headphones, then plug them
into this 1/4-inch stereo jack. This headphone jack outputs the same signal fed to the Analog Outs on
the rear panel of TonePort; the audio from your audio software on the computer, as well as anything
plugged into any TonePort input.
Connect any line level input
source for monitoring to the Stereo
Connect a USB cable from here to
your computer’s USB port.*
Monitor In
Connect any line level input
source that you want to record
Connect the Analog Outs to your
audio monitors
into the Line Inputs
*Note - Be sure to always power off or mute your speakers or monitoring setup before connecting and
disconnecting the USB cable between TonePort and your computer, as well as before booting up or shutting
down your computer if TonePort is already connected. The best practice is to always power on your
speakers last, and power them off first when connected to other audio gear to avoid a “pop”.
Line Inputs - To record the signal from a line level source, such as a keyboard, your stereo receiver,
the line out from a mixing console, etc., connect them to these Left and Right ins using 1/4-inch TS
audio cables.
Monitor In - If you want to hear the signal from a line level source along with all the other audio
coming from your computer, but do not want this audio recorded, then plug the source in here. Note
that this is a stereo jack, so you should use a stereo, 1/4-inch TRS audio cable for this connection.
USB - This, of course, is where you connect the supplied USB cable to TonePort, with the other
end going to your computer’s USB port. Note that you should always connect to a separate USB
controller channel from other USB audio or MIDI interfaces to provide TonePort with the full USB
bandwidth. TonePort also gets its power from this USB connection, so it should not be plugged into a
non-powered USB hub, or operated on the same USB controller channel with un-powered devices. It
is also recommended to connect directly into a USB port on your computer and not into a USB hub.
Analog Outs - These Left and Right unbalanced jacks output all the audio from TonePort; the audio
from your audio software on the computer, and anything plugged into any TonePort input. These
are what you want to connect to your powered speakers or monitoring system for a recording setup.
Use 1/4-inch TS cables to connect directly to powered speakers, mixer or power amp setup. Note
that you can also use the headphone jack on the front of TonePort if you want to use headphones for
monitoring.
2•2
Page 10
Line 6 GearBox 3.7 – Using Your Line 6 Hardware
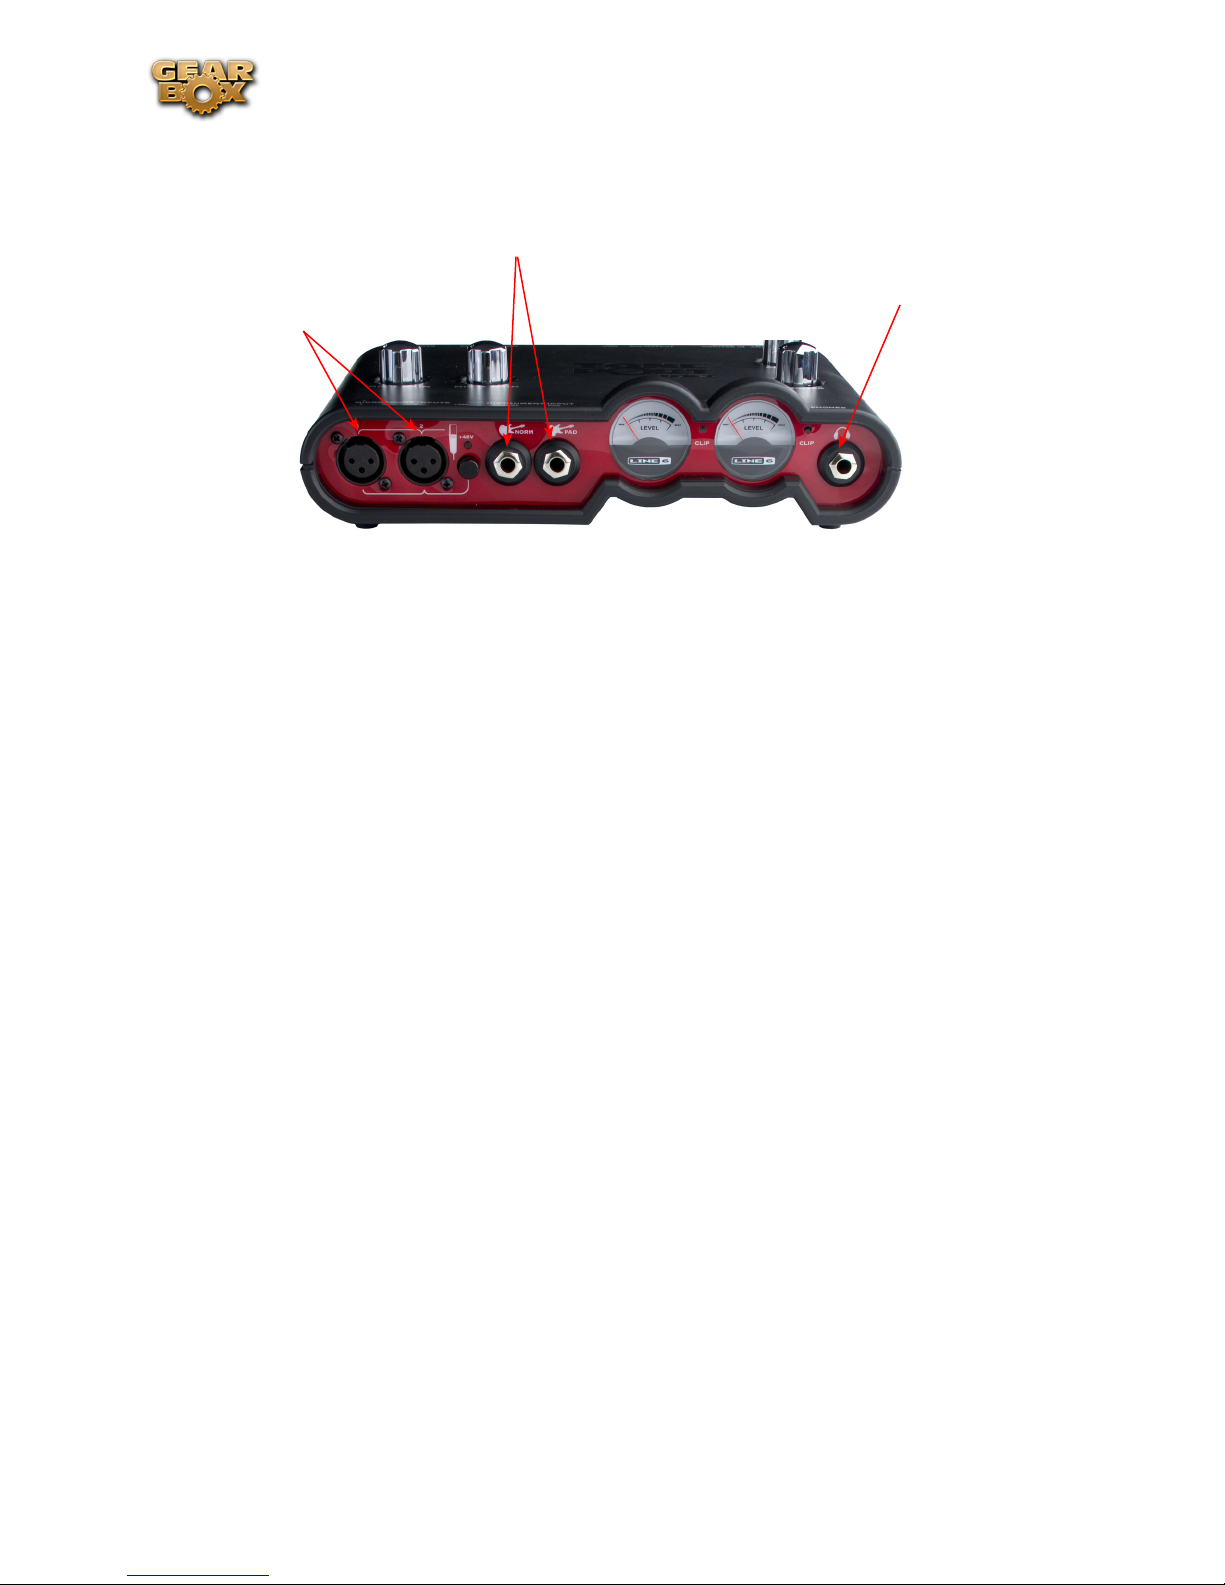
TonePort UX2
Connect your electric Guitar or Bass
Connect your stereo
Connect up to two
Microphones
Microphone Inputs - You can receive input from one or two mics at the same time using these ins.
There is also a +48V Phantom Power switch that you should toggle to “on” if your mic requires
phantom power (most condenser type mics do, but check the documentation for your mic if you are
not sure). Connect each mic using an XLR cable. This inputs each microphone signal independently
into GearBox where you can choose your tone, and then route the processed signal both to your audio
software and out the TonePort outputs.
Headphones
Guitar/Bass Inputs -To input your electric guitar or bass, plug it into one of these inputs. Either of
these routes the instrument’s signal into GearBox where you can choose your tone and route the
processed signal both to your audio software and out the TonePort outputs.
Norm• – This input is for a standard instrument level output. Plug your guitar/bass into here using
a standard 1/4-inch TS instrument cable.
Pad • - This input is designed for high output level basses and guitars, especially those with active
pickups. Plug your high output instrument into here using a standard 1/4-inch TS instrument
cable.
Headphone - If you want to listen to the audio from TonePort using stereo headphones, then plug
them into this 1/4-inch stereo jack. This Headphone jack outputs the same signal fed to the Analog
Outs on the rear panel of TonePort; the audio from your audio software on the computer, as well as
anything plugged into any TonePort input.
2•3
Page 11

Connect your USB cable
from your computer’s USB
port
Connect up to two standard toggle or momentary
pedal switches into the Footswitches jacks for
remote control of GearBox and audio application
functions
Connect any line level
input source that you want
to record into the Line
Inputs
Line 6 GearBox 3.7 – Using Your Line 6 Hardware
*
Connect to the S/PDIF input of an
external device to send TonePort’s
output digitally
Connect any line level input
source for monitoring to the
Stereo Monitor In
Connect the Analog
Outs to your audio
monitors
*Note - Be sure to always power off or mute your speakers or monitoring setup before connecting and
disconnecting the USB cable between TonePort and your computer, as well as before booting up or shutting
down your computer if TonePort is already connected. The best practice is to always power on your
speakers last, and power them off first when connected to other audio gear to avoid a “pop”.
Line Inputs - If you want to record the signal from a line level source, such as a keyboard, your stereo
receiver, the line out from a mixing console, etc., connect them to these Left and Right ins using 1/4inch TS audio cables.
Footswitches - If you want to use one or two on/off toggle or momentary footswitches to remotely
control functions in the GearBox software, you can plug the 1/4-inch footswitch plugs into these 1
and 2 jacks. To configure each Footswitch, go to the GearBox Preferences. For TonePort UX1, UX2,
and KB37, you can also use these footswitches to trigger recording and playback commands within the
included Ableton Live® Lite software!
USB - This, of course, is where you connect the supplied USB cable to TonePort, with the other
end going to your computer’s USB port. Note that you should always connect to a separate USB
controller channel from other USB audio or MIDI interfaces to provide TonePort with the full USB
bandwidth. TonePort also gets its power from this USB connection, so it should not be plugged into a
non-powered USB hub, or operated on the same USB controller channel with un-powered devices. It
is also recommended to connect directly into a USB port on your computer and not into a USB hub.
S/PDIF Digital Out - To send the output of TonePort to an external device digitally, connect a 75Ohm coaxial cable into this RCA jack and then into the S/PDIF digital input on the external device.
This is the best choice for connecting to digital recording devices, such as a DAT recorder. This S/
PDIF output sends the same audio as is sent to TonePort’s Analog Outs* (with the exception that any
audio coming into the TonePort’s Monitor In jack is not routed to the S/PDIF output). The digital
signal is always sent at 24-bit resolution.
2•4
Page 12

Line 6 GearBox 3.7 – Using Your Line 6 Hardware
*Note that when using TonePort and the GuitarPort Online membership service with GearBox, the
GuitarPort Online playback audio is never routed to this S/PDIF output. This is necessary to comply with
artist copyright requirements that Line 6 follows for the GuitarPort Online Tracks and artist content.
Monitor In - If you want to hear the signal from a line level source mixed with all the other audio
coming from your computer, but do not want this audio recorded, then plug the source in here. Note
that this is a stereo jack, so you should use a stereo 1/4-inch TRS audio cable for this connection.
Analog Outs - These Left and Right balanced jacks output all the audio from TonePort; the audio from
your audio software on the computer, and anything plugged into any TonePort input. So, these are
what you want to connect to your monitoring system when using TonePort as your computer’s sound
card. Use either 1/4-inch TS or TRS cables to connect directly to your powered speakers, mixer or
power amp setup. Note that you can also use the headphone jack on the front of TonePort if you want
to use headphones for monitoring.
2•5
Page 13

Line 6 GearBox 3.7 – Using Your Line 6 Hardware
TonePort UX8
The TonePort UX8 is a multichannel recording interface designed for professional use, offering plenty
of headroom, a wide dynamic range and an exceedingly low noise floor. Designed with high quality
electrical components and a rugged exterior, the UX8 is built to provide many years of reliability.
Included with the UX8 is the GearBox Plug-In, providing all your tracks with same POD quality tone
trusted by scores of platinum-selling musicians and recording engineers. In addition, the GearBox
standalone application provides a virtual front end for professional tone processing.
Rear Panel Features
Balanced Outputs
TonePort UX8 provides 8 balanced analog outputs (4 stereo pairs). For the cleanest audio signal, use
1/4-inch TRS cables to connect directly to your powered speakers, mixer or power amp setup.
Note that you can use each output pair to provide different monitor mixes for musicians during a
tracking session. You can set the input mix levels for each output pair using the Line 6 Audio-MIDI
Devices application.
S/PDIF Digital Audio
To send or receive S/PDIF, connect a 75-Ohm coaxial cable to the UX8’s RCA jack and the external
S/PDIF device. This is the best choice for connecting to digital recording devices, such as a DAT
recorder. This S/PDIF output sends the same audio as Main Outs 1-2*. The digital signal is always sent
at 24 bit.
2•6
Page 14
Line 6 GearBox 3.7 – Using Your Line 6 Hardware
*Note that when using TonePort and the GuitarPort Online membership service within GearBox, the
GuitarPort Online playback audio is never routed to this S/PDIF output. This is necessary to comply with
artist copyright requirements that Line 6 follows for the GuitarPort Online Tracks and artist content.
To sync to an external S/PDIF device, set the UX8 to sync to S/PDIF in the Line 6 Audio-MIDI
Devices application.
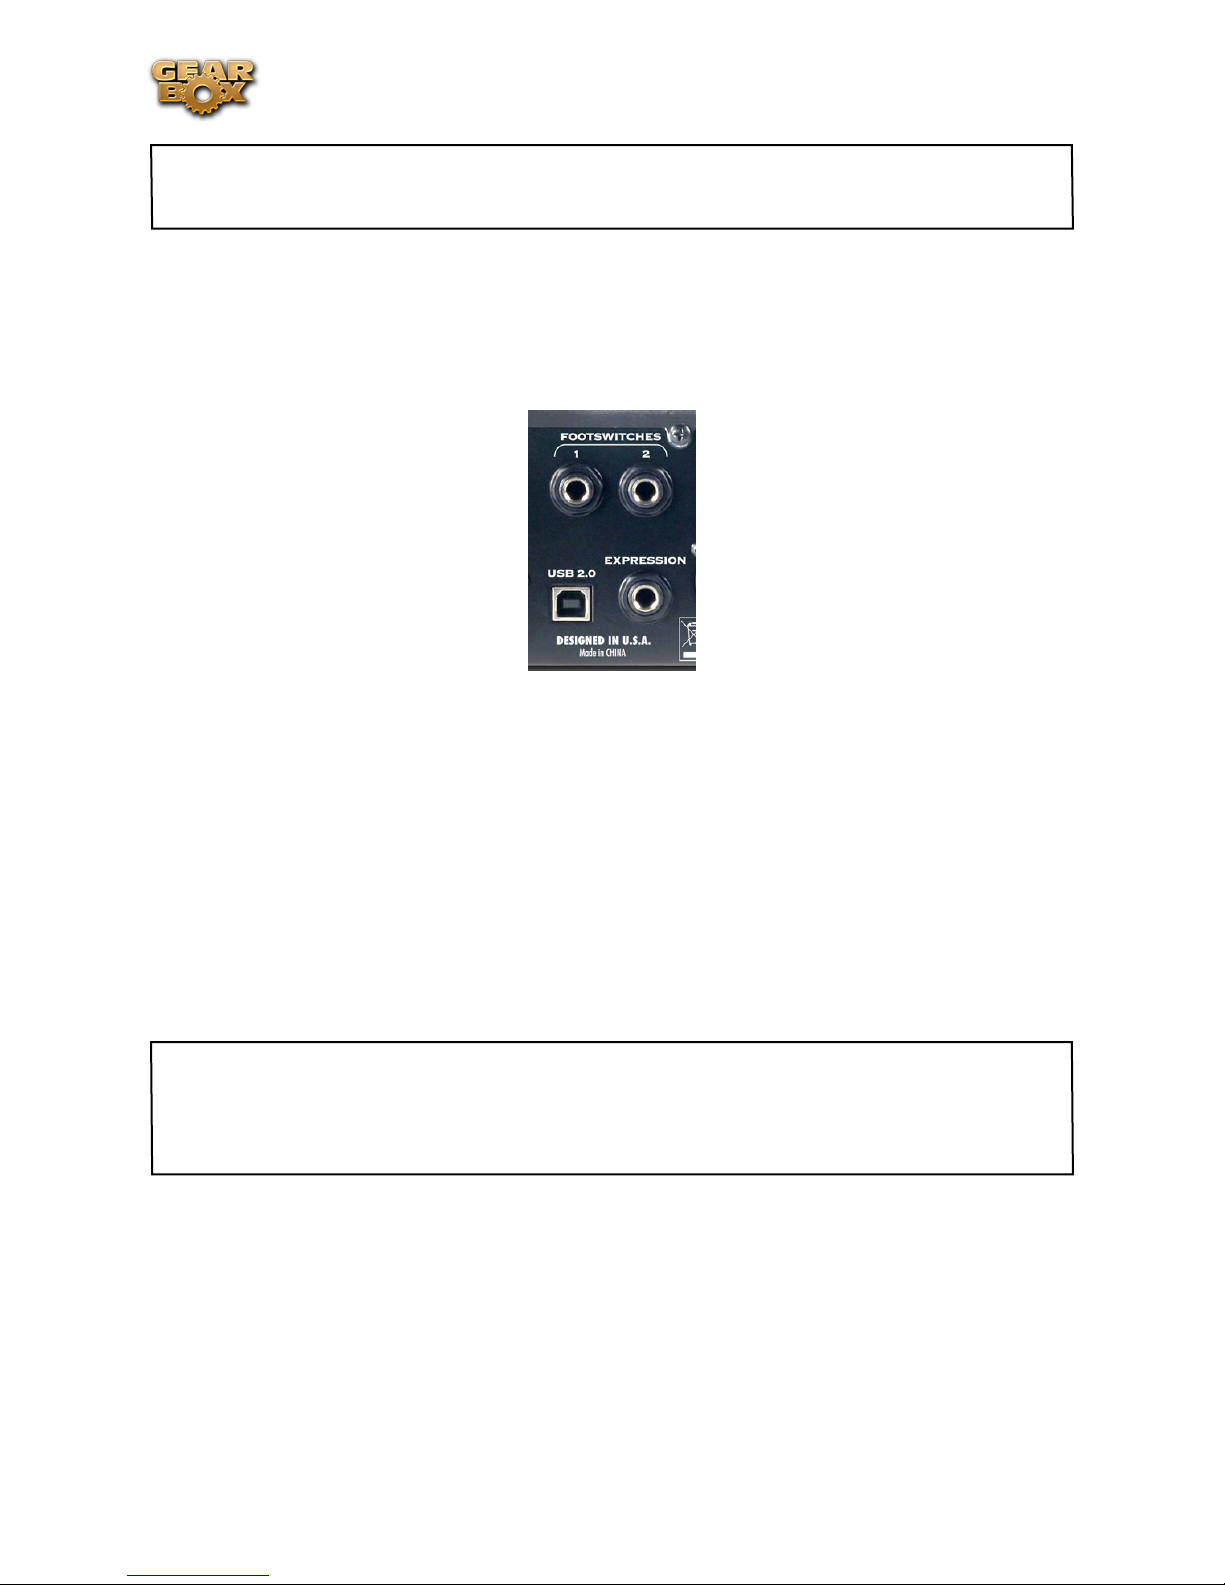
Footswitch and Expression Pedal Jacks
You can use up to 2 on/off toggle or momentary footswitches, and 1 expression pedal to remotely
control functions in the GearBox software, such as stomp effects or wah level. You can also configure
footswitches and the expression pedal to send MIDI commands, which can be useful for controlling
your recording software’s transport. To configure footswitch and expression assignments, go to the Line
6 Audio-MIDI Devices application, MIDI tab.
USB 2.0
This, of course, is where you connect the supplied USB cable to TonePort, with the other end going
to one of your computer’s USB 2.0 ports. Note that you should always connect to a separate USB
controller channel from other USB audio or MIDI interfaces to provide TonePort with the full USB
bandwidth. It is also recommended to connect directly into a USB 2.0 port on your computer and not
into a USB hub.
Note - Be sure to always power off or mute your speakers or monitoring setup before connecting/
disconnecting the USB cable between TonePort and your computer, powering your TonePort on/off, as
well as before booting up or shutting down your computer if TonePort is already connected. The best
practice is to always power on your speakers last, and power them off first when connected to other audio
gear to avoid a “pop”.
2•7
Page 15

Line 6 GearBox 3.7 – Using Your Line 6 Hardware
Line Level and XLR Inputs
8 unbalanced line level inputs are available for recording line level sources, such as a keyboard, stereo
receiver, the line out from a mixing console, etc. Connect to line level inputs using 1/4-inch TS audio
cables.
8 XLR preamp inputs are provided for balanced and mic input sources. +48v Phantom Power switches
are located on the front panel for mics requiring phantom power (most condenser type mics do, but
check the documentation for your mic if you are not sure). Connect to these inputs using XLR
cables.
Front Panel Features
Guitar/Bass Inputs
High-Z instrument inputs for guitar and bass are conveniently located on the front panel, providing
convenient access for fast instrument switching.
-20 dB pad switches provide attenuation for hot levels, typically for instruments with onboard preamps
or active pickups.
The TonePort UX8’s instrument inputs work directly with the GearBox standalone application to
provide ToneDirect™ Monitoring, which provides a fully processed signal with ultra-low latency,
critical for tracking with the desired sound.
Note that the processed signal from GearBox will show up in your recording application as additional
sends to analog inputs 1 – 8. You can simultaneously record the direct, unprocessed signal (i.e. Input
1-2) for later processing using the included GearBox Plug-In.
For more information on using the GearBox standalone application, see GearBox (Full Program). For
more information on using the GearBox Plug-In, see GearBox Plug-in.
2•8
Page 16

Line 6 GearBox 3.7 – Using Your Line 6 Hardware
Microphone Input Controls
Rear panel XLR input levels are controlled by a row of Trim knobs on the front panel. Use these inputs
for microphones or balanced input signals with a gain range of 0 dB to 45 dB.
Each XLR input has a -20 dB pad switch, which can be used to provide more headroom for high output
microphones. A 75 Hz cutoff switch is also provided, useful for eliminating low frequency rumble from
microphone sources.
Two +48v phantom power switches are provided for powered mics, such as condenser mics. Phantom
power is distributed via two XLR input banks, permitting the option to run dynamic mics in a nonpowered bank.
Signal and Clip LEDs
Signal and Clip LEDs exist for each input. The signal LED lights up when signal activity is present,
glowing brighter as the signal level increases. When the input level reaches the 0 dBfs, the clip LED
lights up momentarily.
VU Meter and Clip Display
The TonePort UX8 provides a stereo pair of large VU meters on the front panel. By default, these
meters display Inputs 1-2 levels. Using the Inputs & Recording Tab of the Line 6 Audio-MIDI Devices
application, you can assign the hardware meters to display input and output levels of any stereo pair or
GearBox send. The clip LEDs light up when the signal reaches 0 dBfs.
Main Output Level Controls
2•9
Page 17

Line 6 GearBox 3.7 – Using Your Line 6 Hardware
Main Outputs 1-2 are controlled by a main volume knob and main mute button. The volume knob
is an analog level control and does not affect any level being sent to your computer. When Mute is
engaged, as solid amber LED illuminates, blinking about once every 2 seconds.
Note that these controls operate on main outputs 1-2 only (headphone and S/PDIF levels are not
affected). Outputs 3 – 8 are software controlled.
Headphone Output Controls
Headphone outputs 1-2 and 3-4 provide duplicate stereo outputs or Main Outs 1-2 and 3-4 respectively,
providing discrete control over output levels sent over the headphone jacks. Note that headphone
output levels are controlled independently of the Main volume control.
Power Button
When the power button is engaged*, the TonePort UX8’s main LEDs will illuminate. TonePort UX8
is not USB powered and receives no power from the computer.
*Note - Be sure to always power off or mute your speakers or monitoring setup before powering your
TonePort on/off, as well as before booting up or shutting down your computer if TonePort is already
connected. The best practice is to always power on your speakers last, and power them off first when
connected to other audio gear to avoid a “pop”.
LED status indicators
The Main Mute and Main Clip LEDs provide secondary functions in their ability to indicate the
connection status of USB and S/PDIF, as follows:
No USB connection - The main clip LEDs alternate steadily between left and right, about once •
every second. The USB cable may be unplugged or the UX8 driver may not be installed on your
computer.
No S/PDIF clock sync - • The Mute LED blinks 3 times rapidly about once every second
when the clock mode set to S/PDIF, and no external clock is present.
2•10
Page 18

TonePort KB37
Connect any line
level input source for
monitoring to the
Stereo Monitor In
Line 6 GearBox 3.7 – Using Your Line 6 Hardware
Connect any line level input
source that you want to
record into the Line Inputs
Connect your electric
Guitar or Bass
Connect up to two standard toggle
or momentary pedal switches into
the Footswitches jacks for remote
control of GearBox and audio
application
Connect
your stereo
Headphones
Connect the Analog Outs
to your audio monitors
Connect up to two
Microphones
Connect to the S/PDIF input
of an external device to send
Connect your USB cable
from your computer’s USB
port.*
Expression Pedal
here for control of
MIDI parameters
TonePort’s output digitally
Microphone Inputs - You can receive input from one or two mics at the same time using these ins.
There is also a +48V Phantom Power switch that you should toggle to “on” if your mic requires
phantom power (most condenser type mics do, but check the documentation for your mic if you are
not sure). Connect each mic using an XLR cable. This inputs each microphone signal independently
into GearBox where you can choose your tone, and then route the processed signal both to your audio
software and out the TonePort outputs.
Guitar/Bass Input -To connect your electric guitar or bass, plug it into this input. This connection
routes the instrument’s signal into GearBox where you can choose your tone and route the processed
signal both to your audio software and out the TonePort outputs. This input also features a Pad switch;
engage this switch when using a guitar/bass with high-output or active pickups, to avoid overdriving
the input.
Headphones - If you want to listen to the audio from TonePort using stereo headphones, then plug
them into this 1/4-inch stereo jack. This Headphone jack outputs the same signal fed to the Analog
Outs on the rear panel of TonePort; the audio from your audio software on the computer, as well as
anything plugged into any TonePort input.
Connect an
Line Inputs - if you want to record the signal from a line level source, such as a keyboard, your stereo
receiver, the line out from a mixing console, etc., connect them to these Left and Right ins using 1/4inch TS audio cables.
Footswitches - if you want to use one or two on/off toggle or momentary footswitches to remotely
control functions in the GearBox software, you can plug the 1/4-inch footswitch plugs into these
1 and 2 jacks. To configure each Footswitch, go to the GearBox Preferences. You can also use these
footswitches to trigger recording and playback commands within the included Ableton Live Lite 5
software!
2•11
Page 19

Line 6 GearBox 3.7 – Using Your Line 6 Hardware
Expression Pedal - Connect a 1/4-inch TS expression pedal to control Volume, Wah or any other
MIDI CC parameter in GearBox or your recording application. To configure the expression pedal, go
to the GearBox preferences .
USB - This, of course, is where you connect the supplied USB cable to TonePort, with the other end
going to your computer’s USB 1.1 or 2.0 port. Note that you should always connect to a separate USB
controller channel from other USB audio or MIDI interfaces to provide TonePort with the full USB
bandwidth. TonePort also gets its power from this USB connection, so it should not be plugged into a
non-powered USB hub, or operated on the same USB controller channel with un-powered devices. It
is also recommended to connect directly into a USB port on your computer and not into a USB hub.
*Note - be sure to always power off or mute your speakers or monitoring setup before connecting and
disconnecting the USB cable between TonePort and your computer, as well as before booting up or shutting
down your computer if TonePort is already connected. The best practice is to always power on your
speakers last, and power them off first when connected to other audio gear to avoid a “pop”.
S/PDIF Digital Out - To send the output of TonePort to an external device digitally, connect a 75-
Ohm coaxial cable into this RCA jack and then into the S/PDIF digital input on the external device.
This is the best choice for connecting to digital recording devices, such as a DAT recorder. This S/
PDIF output sends the same audio as is sent to TonePort’s Analog Outs* (with the exception that any
audio coming into the TonePort’s Monitor In jack is not routed to the S/PDIF output). The digital
signal is always sent at 24-bit resolution.
*Note that when using TonePort and the GuitarPort Online membership service with GearBox, the
GuitarPort Online playback audio is never routed to this S/PDIF output. This is necessary to comply with
artist copyright requirements that Line 6 follows for the GuitarPort Online Tracks and artist content.
Monitor In - If you want to hear the signal from a line level source mixed with all the other audio
coming from your computer, but do not want this audio recorded, then plug the source in here. Note
that this is a stereo jack, so you should use a stereo 1/4-inch TRS audio cable for this connection.
Analog Outs - These Left and Right balanced jacks output all the audio from TonePort; the audio from
your audio software on the computer, and anything plugged into any TonePort input. So, these are
what you want to connect to your monitoring system when using TonePort as your computer’s sound
card. Use either 1/4-inch TS or TRS cables to connect directly to your powered speakers, mixer or
power amp setup. Note that you can also use the headphone jack on the front of TonePort if you want
to use headphones for monitoring.
2•12
Page 20

Line 6 GearBox 3.7 – Using Your Line 6 Hardware
TonePort DI
Connect your electric Guitar
or Bass
Guitar/Bass - To input your electric guitar or bass, plug it in here using a standard 1/4-inch TS
instrument cable. This input also features a Pad switch; engage this switch when using a guitar/bass
with high-output or active pickups, to avoid overdriving the input.
Connect to your 3rd-party audio
Connect your stereo
Headphones
Connect a USB cable from
here to your computer*
interface for recording with GearBox
plug-in
Analog Line Outs – connect
to your powered speakers or
mixer
USB - This, of course, is where you connect the supplied USB cable to TonePort, with the other end
going to your computer’s USB 1.1 or 2.0 port. Note that you should always connect to a separate USB
controller channel from other USB audio or MIDI interfaces to provide TonePort with the full USB
bandwidth. TonePort also gets its power from this USB connection, so it should not be plugged into a
non-powered USB hub, or operated on the same USB controller channel with un-powered devices. It
is also recommended to connect directly into a USB port on your computer and not into a USB hub.
*Note - be sure to always power off or mute your speakers or monitoring setup before connecting and
disconnecting the USB cable between TonePort and your computer, as well as before booting up or shutting
down your computer if TonePort is already connected. The best practice is to always power on your
speakers last, and power them off first when connected to other audio gear to avoid a “pop”.
2•13
Page 21

Line 6 GearBox 3.7 – Using Your Line 6 Hardware
Phones - If you want to listen to the audio from TonePort using stereo headphones, then plug them
into this 1/4-inch stereo jack. This headphone jack outputs the same signal fed to the Analog Outs on
the rear panel of TonePort; the audio from your audio software on the computer, as well as anything
plugged into any TonePort input.
D.I. Out - This connection lets you record an unprocessed signal to your track, to which you can
apply the GearBox Plug-In. If you use a 3rd-party audio interface, connect the D.I. to one of its analog
inputs, and route that input to the track you’re recording into. For more information on using the
GearBox Plug-In, see the GearBox Plug-in Chapter.
Analog Outputs - When using TonePort DI as an audio interface for your recording application,
these outputs carry the Master stereo mix from your recording project. If you ‘re using a 3rd-party
Audio Interface, these outputs supply the ToneDirect™ magic to your interface or mixer, when using
the GearBox application alongside the plug-in. See the ToneDirect™ Monitoring section for more
details.
2•14
Page 22

Line 6 GearBox 3.7 – Using Your Line 6 Hardware
TonePort GX
Connect your electric Guitar
or Bass
Guitar/Bass - To input your electric guitar or bass, plug it in here using a standard 1/4-inch TS
instrument cable.
Connect your stereo
Headphones/Line Out Cable
Connect USB cable from here
to your computer*
USB - This, of course, is where you connect the supplied USB cable to TonePort GX, with the other
end going to your computer’s USB 1.1 or 2.0 port. Note that you should always connect to a separate
USB controller channel from other USB audio or MIDI interfaces to provide TonePort GX with the
full USB bandwidth. TonePort GX also gets its power from this USB connection, so it should not be
plugged into a non-powered USB hub, or operated on the same USB controller channel with unpowered devices. It is also recommended to connect directly into a USB port on your computer and
not into a USB hub.
*Note - be sure to always power off or mute your speakers or monitoring setup before connecting and
disconnecting the USB cable between TonePort and your computer, as well as before booting up or shutting
down your computer if TonePort is already connected. The best practice is to always power on your
speakers last, and power them off first when connected to other audio gear to avoid a “pop”.
Line Out/Phones - When connecting TonePort GX as an audio interface for your recording application,
this output carries the Master stereo mix from your recording project. If you ‘re using a 3rd-party
Audio Interface, these outputs supply the ToneDirect™ magic to your interface or mixer, when using
the GearBox application alongside the plug-in. See the ToneDirect™ Monitoring section for more
details.
If you want to listen to the audio directly from TonePort GX using stereo headphones, you can also
plug them into this 1/8-inch stereo jack. This line out/headphone jack outputs the same signal fed to
the Analog Outs on the rear panel of TonePort; the audio from your audio software on the computer,
as well as anything plugged into any TonePort input.
2•15
Page 23

Line 6 GearBox 3.7 – Using Your Line 6 Hardware
GuitarPort
Instrument input - your electric guitar or bass, plug it into this input using a standard 1/4-inch TS
instrument cable. This inputs the signal into GearBox where you can choose your Tone and route the
processed signal both to your audio software and out the GuitarPort outputs.
Analog Line Outs – connect to your
Connect your stereo headphones
powered speakers or mixer
Monitor In – connect a line level, stereo
output (from your stereo, MP3 player,
Connect USB cable from here to your
computer
etc).
Analog Line Outs - These Left and Right RCA jacks output all audio signals; the audio from your
audio software on the computer, and anything plugged into any the Instrument or Monitor inputs.
So, these are what you want to connect to your monitoring system when using GuitarPort as your
computer’s sound card. Use shielded RCA to RCA tipped cables to connect directly to your powered
speakers, mixer or power amp setup. Note that you can also use the headphone jack on GuitarPort if
you want to use headphones for monitoring.
Headphones - If you want to listen to the audio using stereo headphones, then plug them into this
1/8-inch stereo jack. This Headphone jack outputs the same signal fed to the Analog Line Outs; the
audio from your audio software on the computer, as well as anything plugged into the Instrument or
Line inputs.
Monitor In - If you want to hear the signal from a line level source mixed with all the other audio
coming from your computer, but do not want this audio recorded, then plug the source in here. Note
that this is a stereo jack, so you should use a stereo 1/8-inch tipped stereo audio cable for this connection.
You’ll hear any audio coming into this jack via the Analog Line Outs and Phones, but it won’t go to
GuitarPort’s Record Send 1-2.
USB - This is where you connect the supplied USB cable to GuitarPort, with the other end going
to your computer’s USB 1.1 or 2.0 port. Note that you should always connect to a separate USB
controller channel from other USB audio or MIDI interfaces to provide GuitarPort with the full USB
bandwidth. GuitarPort also gets its power from this USB connection, so it should not be plugged into a
non-powered USB hub, or operated on the same USB controller channel with un-powered devices. It
is also recommended to connect directly into a USB port on your computer and not into a USB hub.
2•16
Page 24

POD X3
Line 6 GearBox 3.7 – Using Your Line 6 Hardware
USB 2.0 - Connect
to your computer*
Left & Right Analog Outputs
– Connect to your powered
speakers or mixer
Phones - Connect your
stereo Headphones
S/PDIF Out - Connect
to other S/PDIF devices
Input 2 - Connect
your microphone
Input 1 - Connect
your guitar or bass
Input 1 (Instrument) – Connect your guitar or bass here using a standard 1/4-inch TS instrument
cable. POD X3 itself contains the processing power that turns your naked input signal into that roaring
guitar Tone, which is then fed to the “Direct/Studio Mix” and out the Analog Left & Right Outputs
and S/PDIF digital output. This signal is also fed to POD X3’s Record Sends digitally to your computer
across the USB 2.0 connection. When you are connected via USB to your computer, you can also
launch GearBox and use it to alternatively load Tones stored on your hard disc, edit them on your
screen, and make adjustments for output and Record Send levels. POD X3 is, of course, also capable of
applying two Tones on your Input 1. Just dial up one of the tone presets in the “Blends” folder of POD
X3 and you’ll have two complete Tones applied to your Input 1 signal! Or, go the POD X3’s Inputs
screen to choose what you want Tone 1 and Tone 2 applied to.
Input 2 (Mic) & Trim knob – Connect a microphone here using a standard XLR cable. You can use
the little “Trim” knob to adjust the mic signal coming into POD X3, much like you would on a mixer
console. Just like with Input 1, POD X3 itself applies preamp and effects models to your mic input,
which is then fed out the Analog Left & Right Outputs and S/PDIF digital output. This signal is also
fed out the X3’s Record Sends digitally to your computer across the USB 2.0 connection. When you
are connected via USB to your computer, you can also launch GearBox and use it to alternatively
load Tones stored on your hard disc, edit them on your screen, and make adjustments for output and
Record Send levels. POD X3 is, of course, also capable of applying a Dual-Tone, such as independently
slathering a guitar Tone on Input 1, and a mic preamp and effects on Input 2 simultaneously! Just go
to the “Pairs” folder of your POD X3 to call up some of these pre-baked guitar/mic Dual-Tones! Or, go
the POD X3’s Inputs screen to choose what you want Tone 1 and Tone 2 applied to.
Phones - If you want to listen to the audio using stereo headphones, then plug them into this 1/4-inch
stereo jack. This Headphone jack outputs the same signal fed to the Analog Line Outs; the audio from
your audio software on the computer, as well as anything plugged into Inputs 1 &2.
Left & Right Outputs - These Left and Right ¼-inch jacks output all audio signals; the audio from
your audio software on the computer, and anything plugged into any Inputs 1 & 2. So, these are what
you want to connect to your monitoring system when using POD X3 as your computer’s sound card.
Use shielded ¼-inch tipped cables to connect directly to your powered speakers, mixer or power amp
setup. Note that you can also use the Phones jack if you want to use headphones for monitoring.
2•17
Page 25

Line 6 GearBox 3.7 – Using Your Line 6 Hardware
USB 2.0 - This is where you connect the supplied USB cable to POD X3, with the other end going
to your computer’s USB 2.0 port. Of course, your POD is capable of processing your Tones all by itself,
but you’ll need to connect the USB cable to your computer to use it with GearBox, and to use POD X3
as your sound card device. Note that you should always connect to a separate USB controller channel
from other USB audio or MIDI interfaces to provide POD X3 with the full USB bandwidth. It is also
recommended to connect directly into a USB port on your computer and not into a USB hub.
*Note - be sure to always power off or mute your speakers or monitoring setup before connecting/
disconnecting the USB cable and powering on/off POD X3, as well as before booting up or shutting down
your computer if POD X3 is already connected. The best practice is to always power on your speakers last,
and power them off first when connected to other audio gear to avoid a “pop”.
S/PDIF Digital Output - To send output from POD X3 to another device digitally, connect from this
S/PDIF Dig Out to the S/PDIF in on your other device. Connecting digitally is the best choice for
routing to external digital recording devices, such as a DAT recorder. The S/PDIF output sends out
the Tone(s) according to your device settings - these options are found on the POD X3 device itself
by pressing the “Outputs” button (these digital I/O options are not accessible in GearBox). The digital
signal is always sent at 24-bit resolution. For more information on using these digital connections,
please see your POD X3 Pilot’s Handbook, or check out the GearBox Recording Setup Guide available for
download on the GearBox - User Manuals page of the Line 6 web site.
*Note that when using POD X3 with GearBox, the GuitarPort Online playback audio is never routed to
this S/PDIF output. This is necessary to comply with artist copyright requirements that Line 6 follows for
the GuitarPort Online Tracks and artist content.
2•18
Page 26

POD X3 Live
Left & Right Direct Outs
Use as a D.I. for recording or
to the house mixer/P.A.
Left & Right Live Outs
Connect to your powered
speakers or mixer
Line 6 GearBox 3.7 – Using Your Line 6 Hardware
S/PDIF Out - Connect
to other S/PDIF devices
Aux In - Connect a 2nd
instrument
USB 2.0 - Connect
to your computer*
Guitar in - Connect
your guitar or bass
CD/MP3 In - Connect
an audio player
Phones - Connect your
stereo Headphones
Mic In & Trim - Connect
a Mic & adjust trim level
Variax In - Connect your
Variax Guitar here
Guitar In – Connect your guitar or bass here using a standard 1/4-inch TS instrument cable. POD X3
Live itself contains the processing power that turns your naked input signal into that roaring guitar
Tone, which is then fed to the “Direct/Studio Mix”, out the Analog Left & Right Outputs and S/PDIF
digital output. This signal is also fed out the Record Sends digitally to your computer across the USB
2.0 connection. When connected via USB to your computer, you can also launch GearBox and use it
to alternatively load Tones stored on your hard disc, edit them on your screen, and make adjustments
for output and Record Send levels. POD X3 is also capable of applying two Tones on your Input 1 - Just
dial up one of the tone presets in the “Blends” folder of POD X3 and you’ll have two complete Tones
applied to your Input 1 signal! Or, go the POD X3’s Inputs screen to choose what you want Tone 1 and
Tone 2 applied to.
CD/MP3 Input – Connect a CD player, MP3 player, drum machine or other audio device into this
stereo 1/8-inch jack and you’ll hear it at POD X3 Live’s Phones, Direct Out, and Live Out so you can
jam along. Note that the audio coming into this input is not routed to the Record Sends, so it won’t
be recorded.
Phones - If you want to listen to the audio using stereo headphones, then plug them into this 1/4-inch
stereo jack. This Headphone jack outputs the same signal fed to the Analog Line Outs; the audio from
your audio software on the computer, as well as anything plugged into the Guitar, Mic, Aux, Variax or
CD/MP3 inputs.
Microphone Input & Trim knob – Connect a microphone here using a standard XLR cable. You can
use the little “Trim” knob to adjust the mic signal coming into POD X3, much like you would on a
mixer console. Just like with Input 1, POD X3 itself applies preamp and effects models to your mic
input, which is then fed out the Analog Left & Right Outputs and S/PDIF digital output. This signal
is also fed out the Record Sends digitally to your computer across the USB 2.0 connection. When you
are connected via USB to your computer, you can also launch GearBox and use it to alternatively load
Tones stored on your hard disc, edit them on your screen, and make adjustments for output and Record
Send levels. POD X3 is also capable of applying a Dual Tone, such as independently slathering a guitar
Tone on Input 1, and a mic preamp and effects on Input 2 simultaneously! Just go to the “Pairs” folder
of your POD X3 to call up some of these pre-baked guitar/mic Dual Tones! Or, go the POD X3’s Inputs
screen to choose what you want Tone 1 and Tone 2 applied to.
2•19
Page 27

Line 6 GearBox 3.7 – Using Your Line 6 Hardware
Variax In - Got yourself a Line 6 Variax guitar? Plug it in here for a direct digital audio connection
between the guitar and POD X3 Live. The POD X3 Live Inputs screen is where you assign whether
this input feeds Tone 1, Tone 2 or both.
Left & Right Live Outs - The unbalanced 1/4-inch connectors here get your POD X3 Live’s sound to
a guitar amplifier, recorder, mixer or PA system. Go to POD X3 Live’s Output screen to configure these
outputs for Studio or Live use. In Studio Mode, they’re ready to plug into a recorder with unbalanced
–10 dBV inputs. In Live Mode, they don’t have speaker simulation, and are ready for connection to
an on-stage power amp. Whichever you choose, the front panel Master Volume knob determines how
much signal you’ll get at these jacks. You can use either jack as a mono output.
Left & Right Direct Outs - These balanced XLR connectors always provide studio-quality sound with
speaker/microphone/room simulation ideal for direct recording and as a direct send to the house mixer
or PA when playing live. Go to POD X3 Live’s System page to disable the Master Volume control for
these outputs, so you can independently make on-stage adjustments to the 1/4-inch “Live” outputs
feeding an amp without affecting the levels sent to the house sound mixer or PA.
Aux Input – This mono, unbalanced 1/4-inch input can be used for a second guitar or just about any
other instrument. Go to POD X3 Live’s Inputs screen to assign whether this input feeds Tone 1, Tone
2 or both.
S/PDIF Digital Output - To send output from POD X3 to another device digitally, connect from this
S/PDIF Dig Out to the S/PDIF in on your other device. Connecting digitally is the best choice for
routing to external digital recording devices, such as a DAT recorder. The S/PDIF output sends out
the Tone(s) according to your device settings - these options are found on the POD X3 device itself
by pressing the “Outputs” button (these digital I/O options are not accessible in GearBox). The digital
signal is always sent at 24-bit resolution. For more information on using these digital connections,
please see your POD X3 Pilot’s Handbook, or check out the GearBox Recording Setup Guide available for
download on the GearBox - User Manuals page of the Line 6 web site.
*Note that when using POD X3 Live with GearBox, the GuitarPort Online playback audio is never routed
to this S/PDIF output. This is necessary to comply with artist copyright requirements that Line 6 follows
for the GuitarPort Online Tracks and artist content.
USB 2.0 - This is where you connect the supplied USB cable to POD X3 Live, with the other end
going to your computer’s USB 2.0 port. Of course, your POD X3 Live is capable of processing your
Tones all by itself, but you’ll need to connect the USB cable to your computer to use it with GearBox,
and to use POD X3 Live as your sound card device. Note that you should always connect to a separate
USB 2.0 controller channel from other USB audio or MIDI interfaces to provide POD X3 Live with
the full USB bandwidth. It is also recommended to connect directly into a USB 2.0 port on your
computer and not into a USB hub.
*Note - be sure to always power off or mute your speakers or monitoring setup before connecting/
disconnecting the USB cable and powering on/off POD X3, as well as before booting up or shutting down
your computer if POD X3 is already connected. The best practice is to always power on your speakers last,
and power them off first when connected to other audio gear to avoid a “pop”.
2•20
Page 28

Line 6 GearBox 3.7 – Using Your Line 6 Hardware
POD X3 Pro
Guitar and Mic Input Channel Strips
POD X3 Pro offers two sets of inputs on the front left of the unit. Think of these as two identical sets of
inputs, for which you can use the options on the POD X3 Pro’s Inputs page whether these inputs feed
Tone 1, Tone 2 or both. There are lots of possibilities here, since not only can you assign these inputs
independently, but you can also do things such as apply two different tones at once on a single input,
choose how to pan them, record them into your audio software, etc! For details about Single versus
Dual Tone and other signal routing options, please refer to your POD X3 Pilot’s Handbook. We also
cover how to access related options within GearBox in the GearBox with POD X3 chapter as well.
Signal Present and Clip
Indicator lights
Mic Input Trim knob
Phantom Power switch
Mic Input Low Cut Filter and
Pad switches
Guitar In Pad switch
Mic Input - Connect your
Microphone
Guitar Input - Connect your
guitar or bass
POD X3 Pro’s Input Channel Strips
Guitar Input – Connect up to two guitars or basses here in the 1/4-inch 1 and 2 inputs using standard
TS instrument cables. POD X3 Pro itself contains the processing power that turns your naked input
signal into that roaring guitar Tone, which is then fed to the “Direct/Studio Mix”, out the Analog Left
& Right Live Outputs and AES/EBU & S/PDIF digital outputs. This signal is also fed out the Record
Sends digitally to your computer across the USB 2.0 connection. When you are connected via USB to
your computer, you can also launch GearBox and use it to alternatively load Tones stored on your hard
disc, edit them on your screen, and make adjustments for output and Record Send levels. POD X3 is
also capable of applying two Tones on your Input 1 - Just dial up one of the tone presets in the “Blends”
folder of POD X3 and you’ll have two complete Tones applied to your channel strip 1 input signal! Or,
go the POD X3’s Inputs screen to choose exactly what you want Tone 1 and Tone 2 applied to.
Guitar Input Pad Switch – This little button can be engaged to tame hotter signals at the Guitar In
jack, such as if your guitar or bass has high output active pickups or an on-board preamp.
Input Signal Present and Clip Indicator Lights – The green “Signal Present” indicator lights when
either a guitar or mic input signal is detected. The red “Clip” indicator lights up if input clipping is
detected at the Channel Strip Mic or Guitar Inputs. To avoid clipping (and you really should always
avoid clipping), engage the Mic Pad or Guitar Pad switch or turn down the Mic Trim knob. You might
also try adjusting the output level of the device that’s feeding into these inputs.
Microphone Input – Connect up to two microphones into the channel strip 1 and 2 XLR inputs using
standard XLR mic cables. POD X3 itself applies preamp and effects models to your mic input, which
is then fed out the Analog Left & Right Live Outputs, Direct/Studio XLR Outputs, and AES/EBU &
2•21
Page 29

Line 6 GearBox 3.7 – Using Your Line 6 Hardware
S/PDIF digital outputs. This signal is also fed out the Record Sends digitally to your computer across
the USB 2.0 connection. When you are connected via USB to your computer, you can also launch
GearBox and use it to alternatively load Tones stored on your hard disc, edit them on your screen,
and make adjustments for output and Record Send levels. POD X3 is also capable of applying a Dual
Tone, such as independently applying different set of guitar amps, bass amps, mic preamps and effects
to whatever you are inputting into channel strips 1 & 2! Just go the POD X3’s Inputs screen to choose
what you want Tone 1 and Tone 2 applied to.
Mic Input Trim knob – You can use the little “Trim” knob at the top of the channel strip to adjust the
respective mic input signal level, just like you would on a traditional mixing console’s channel strip.
Note that you can also engage the Mic In Pad switch if the input is too high. The Signal Present and
Clip lights will help with setting your input level.
Mic Input Low Cut Filter and Pad Switches – Engage the Low Cut Filter for the Mic Input to cut off
all frequencies 75Hz and below - useful for eliminating rumble from mic sources. If you are plugging in
a Mic with a hot signal level, engage this pad to attenuate the channel strip’s Mic Input by -20dB.
Phantom Power Switch – Pushing in this button activates 48V Phantom Power for both Channel
Strip Mic Inputs. An LED will light when Phantom Power is activated.
Phones Output
Phones Output - If you want to listen to the audio using stereo headphones, then plug them into
this 1/4-inch stereo jack. This Phones jack outputs the same signal fed to the Analog Line Outs; the
audio from your audio software on the computer, as well as anything plugged into the Guitar, Mic,
Aux, Variax, digital or Line inputs. The volume is set by the Master Volume knob. Any time you use
headphones, it important to be sure the Master Volume knob is not set at a ridiculous level first!
Rear Panel Connections
Look around back of your X3 Pro for more ins & outs...
2•22
Page 30

Line 6 GearBox 3.7 – Using Your Line 6 Hardware
AES/EBU In & Out - Connect
digitally to other AES/EBU devices
S/PDIF In & Out - Connect
digitally to other S/PDIF devices
FBV Pedal In - Connect
a Line 6 FBV controller
MIDI In & Out/Thru Connect to external MIDI
Variax In - Connect
your Variax Guitar
USB 2.0 - Connect
to your computer*
hardware
AES/EBU Digital Input & Output - To record digitally from another digital device, connect it’s
AES/EBU output to this Input. The AES/EBU In always receives 24-bit audio. To send output from
POD X3 to another device digitally, connect from this AES/EBU Output to the AES/EBU In on your
other device. Connecting digitally is the best choice for routing to external digital recording devices,
such as a DAT recorder, digital video player, digital mixing board, etc. The AES/EBU output sends out
the Tone(s) according to your device settings - these options are found on the POD X3 device itself
by pressing the “Outputs” button (these digital I/O options are not accessible in GearBox). The digital
signal is always sent at 24-bit resolution. For more information on using these digital connections,
please see your POD X3 Pilot’s Handbook, or check out the GearBox Recording Setup Guide available for
download on the GearBox - User Manuals page of the Line 6 web site.
S/PDIF Digital Input & Output - To record digitally from another digital device, connect it’s S/PDIF
output to this S/PDIF Input. The S/PDIF In always receives 24-bit audio. To send output from POD X3
to another device digitally, connect from this S/PDIF Output to the S/PDIF in on your other device.
the S/PDIF Out jack sends out 24-bit digital versions of the Direct Out signals. The System setup
screen lets you choose the sample rate and adjust the level. Connecting digitally is the best choice for
routing to and from external digital recording devices, such as a DAT recorder, digital video player,
digital mixing board, etc. For more information on using these digital connections, please see your
POD X3 Pilot’s Handbook, or check out the GearBox Recording Setup Guide available for download on
the GearBox - User Manuals page of the Line 6 web site.
*Note that when using POD X3 Pro with GearBox, the GuitarPort Online playback audio is never routed
to the AES/EBU or S/PDIF outputs. This is necessary to comply with artist copyright requirements that
Line 6 follows for the GuitarPort Online Tracks and artist content.
FBV Pedal Input – Connect an optional Line 6 FBV Series foot controller here, including the FBV,
FBV Shortboard, and FBV Express. The System page lets you set it all up. Note that POD X3 Pro
doesn’t support the older Line 6 Floor Board or FBV2.
MIDI In & Out/Thru - Connect your POD X3 Pro to your MIDI equipment to send and receive
Program Change Messages for selecting Presets or for communicating with other MIDI hardware &
software. POD X3 Pro’s MIDI Out connects to another device’s MIDI In; the X3’s MIDI In goes
2•23
Page 31

Line 6 GearBox 3.7 – Using Your Line 6 Hardware
to another device’s MIDI Out. Use standard 5-pin MIDI cables for these connections. For more
information, please see your POD X3 Pilot’s Handbook, or check out the more comprehensive MIDI
documentation available for download on the GearBox - User Manuals page of the Line 6 web site.
Variax In - Got yourself a Line 6 Variax guitar or bass? Plug it in here for a direct digital audio
connection between the guitar and POD X3 Pro. The POD X3 Inputs screen is where you assign
whether this input feeds Tone 1, Tone 2 or both. See your POD X3 Pilot’s Handbook for more info.
Be sure to keep the protective plastic cap on this connection when it’s not connected to a Variax, so you
won’t damage it by mistakenly inserting a 1/4-inch guitar cable or other connection. When you are ready
to connect a Variax, use only Line 6 supplied Variax-compatible cables – not standard Ethernet or other
cables – to avoid damage to the jack. You can learn more about the Variax family of guitars, each one giving
you the sound of an entire guitar collection in one instrument, at www.line6.com/variax.
USB 2.0 - This is where you connect the supplied USB cable to POD X3 Pro, with the other end going
to your computer’s USB 2.0 port. Of course, your POD X3 is capable of processing your Tones all by
itself, but you’ll need to connect the USB cable to your computer to use it with GearBox, and to use
POD X3 Pro as your sound card device. Note that you should always connect to a separate USB 2.0
controller channel from other USB audio or MIDI interfaces to provide POD X3 with the full USB
bandwidth. It is also recommended to connect directly into a USB 2.0 port on your computer and not
into a USB hub.
Be sure to always power off or mute your speakers or monitoring setup before connecting/disconnecting
the USB cable and powering on/off POD X3, as well as before booting up or shutting down your computer
if POD X3 is already connected. The best practice is to always power on your speakers last, and power
them off first when connected to other audio gear to avoid a “pop”.
Output Level Switch
Optimize the Studio/
Direct Outs level for Mic
vs. Line
Studio/Direct Outputs
Connect here to route your
fuly processed tones to
external gear.
Ground Lift Switch
Toggle the ground on/off
Unprocessed Outputs
Use as a dry out to D.I.
to your recording gear
Line Inputs - Connect
the stereo audio feed
from another device
Stereo FX Loop Send & Return Jacks
Left & Right Live Outputs
Connect to your powered
speakers or mixer
Output Level Switch
- Optimize your Live Outs
level for feeding an amp vs.
line level devices
2•24
Page 32

Line 6 GearBox 3.7 – Using Your Line 6 Hardware
Studio/Direct Outputs – These balanced XLR outs carry your tone complete with speaker/microphone/
room simulation, perfect in the studio for pro-quality sound or as a direct send to a house mixer or PA
when playing live.
Output Level Switch – Use this to toggle the level of the Studio/Direct Outputs to best match the
hardware inputs you are plugging into - Mic or Line level.
Ground Lift Switch – This switch lets you lift the grounds of POD X3 Pro’s XLR Studio/Direct Outs.
You can set this to “LIFT” if you get an audible hum caused by a ground loop when connecting to other
grounded equipment. Otherwise, best to keep this set to “GND”.
Unprocessed Outputs – These unbalanced 1/4-inch connectors give you an unprocessed guitar signal,
tapped directly off of your POD X3 Pro’s guitar input. This is perfect for recording a “naked” guitar,
allowing you to later re-amp or use plug-ins to process your recorded guitar track.
Line Inputs – These two unbalanced 1/4-inch inputs can be used for a second guitar, another instrument,
line outs from other audio devices, etc. The Inputs page on POD X3 Pro is where you assign whether
these inputs feed Tone 1, Tone 2 or both.
Left & Right Live Outs – The unbalanced 1/4-inch connectors here get your POD X3 Pro’s sound to
a guitar amplifier, recorder, mixer or PA system. Go to POD X3 Pro’s Output screen to configure these
outputs for Studio or Live use. In Studio Mode, they’re ready to plug into a recorder with unbalanced
–10 dBV inputs. In Live Mode, they don’t have speaker simulation, and are ready for connection to
an on-stage power amp. Whichever you choose, the front panel Master Volume knob determines how
much signal you’ll get at these jacks. You can use either jack as a mono output. The POD X3 System
page has options allowing you to disable the Master Volume control for these outputs, so you can
make on-stage adjustments to the 1/4-inch outputs feeding an amp without affecting the Direct/Studio
Output levels sent to the house sound mixer or PA.
Output Level Switch – This switch allows you to set the level of the Left & right Live Outs to AMP
or LINE level.
Effects Loop – The Effects Loop provides two jacks for stereo FX Send and two for stereo FX Return,
operating at approximately 19.5 Volts peak-to-peak, making it optimal for line level devices. The loop
can also be used with most stomp boxes by adjusting the send and return levels. Use the Left Return
jack for mono return. The loop can run pre or post Amp Model, and if nothing is connected to it, POD
X3 Pro is smart enough to disable the loop so you still get sound.
2•25
Page 33

PODxt
Line 6 GearBox 3.7 – Using Your Line 6 Hardware
Phones - Connect your
stereo Headphones
Instrument Input Connect your guitar or bass
Instrument Input – Connect your electric guitar or bass here using a standard 1/4-inch TS instrument
cable. PODxt itself contains the processing power that turns your naked input signal into that roaring
guitar Tone, which is then fed out the Analog Line Outs, as well as fed to the Record Send 1-2 digitally
to your computer across the USB connection. When you are connected via USB to your computer, you
can also launch GearBox and use it to alternatively load Tones stored on your hard disc, edit them on
your screen, and make adjustments for output and Record Send levels.
Phones - If you want to listen to the audio using stereo headphones, then plug them into this 1/4-inch
stereo jack. This Headphone jack outputs the same signal fed to the Analog Line Outs; the audio from
your audio software on the computer, as well as anything plugged into the Instrument input.
Analog Line Outs
– connect to your powered
speakers or mixer
USB - Connect to
your computer
Analog Line Outs - These Left and Right ¼-inch jacks output all audio signals; the audio from your
audio software on the computer, and anything plugged into any the Instrument input. So, these are
what you want to connect to your monitoring system when using PODxt as your computer’s sound
card. Use shielded ¼-inch tipped cables to connect directly to your powered speakers, mixer or power
amp setup. Note that you can also use the Phones jack on PODxt if you want to use headphones for
monitoring.
USB - This is where you connect the supplied USB cable to PODxt, with the other end going to your
computer’s USB 1.1 or 2.0 port. Of course, your PODxt is capable of processing your guitar Tone all by
itself, but you’ll need to connect the USB cable to your computer to use it with GearBox, and to use
PODxt as your sound card device. Note that you should always connect to a separate USB controller
channel from other USB audio or MIDI interfaces to provide PODxt with the full USB bandwidth. It
is also recommended to connect directly into a USB port on your computer and not into a USB hub.
*Note - Be sure to always power off or mute your speakers or monitoring setup before connecting/
disconnecting the USB cable and powering on/off PODxt, as well as before booting up or shutting down
your computer if PODxt is already connected. The best practice is to always power on your speakers last,
and power them off first when connected to other audio gear to avoid a “pop”.
2•26
Page 34

PODxt Live
Line 6 GearBox 3.7 – Using Your Line 6 Hardware
Instrument Input - Connect
your guitar or bass
Aux Input – (Monitor in)
connect a line level, stereo
Phones - Connect your
stereo Headphones
Analog Line Outs – connect to
your powered speakers or mixer
USB - Connect to
your computer
output (from your stereo, MP3
player, etc)
Instrument Input – Connect your electric guitar or bass here using a standard 1/4-inch TS instrument
cable. PODxt Live itself contains the processing power that turns your naked input signal into that
roaring guitar Tone, which is then fed out the Analog Line Outs, as well as fed to the Record Send
1-2 digitally to your computer across the USB connection. When you are connected via USB to your
computer, you can also launch GearBox and use it to alternatively load Tones stored on your hard disc,
edit them on your screen, and make adjustments for output and Record Send levels.
Analog Line Outs - These Left and Right ¼-inch jacks output all audio signals; the audio from your
audio software on the computer, and anything plugged into any the Instrument and Aux inputs.
So, these are what you want to connect to your monitoring system when using PODxt Live as your
computer’s sound card. Use shielded ¼-inch tipped cables to connect directly to your powered speakers,
mixer or power amp setup. Note that you can also use the Phones jack on PODxt Live if you want to
use headphones for monitoring.
Aux In (Monitor In) - If you want to hear the signal from a line level source mixed with all the other
audio coming from your computer, but do not want this audio recorded, then plug the source in here.
Note that this is a stereo jack, so you should use a stereo 1/8-inch tipped stereo audio cable for this
connection. You’ll hear any audio coming into this jack via the Analog Line Outs and Phones, but it
won’t go to PODxt Live’s Record Send 1-2.
Phones - If you want to listen to the audio using stereo headphones, then plug them into this 1/4-inch
stereo jack. This Headphone jack outputs the same signal fed to the Analog Line Outs; the audio
from your audio software on the computer, as well as anything plugged into the Instrument and Aux
inputs.
USB - This is where you connect the supplied USB cable to PODxt Live, with the other end going to
your computer’s USB 1.1 or 2.0 port. Of course, your PODxt Live is capable of processing your guitar
Tone all by itself, but you’ll need to connect the USB cable to your computer to use it with GearBox,
and to use PODxt Live as your sound card device. Note that you should always connect to a separate
USB controller channel from other USB audio or MIDI interfaces to provide PODxt Live with the full
USB bandwidth. It is also recommended to connect directly into a USB port on your computer and
not into a USB hub.
2•27
Page 35

PODxt PRO
Line 6 GearBox 3.7 – Using Your Line 6 Hardware
Phones - Connect
your stereo
Headphones
Instrument Input Connect your guitar
or bass
Instrument input – Connect your electric guitar or bass here using a standard 1/4-inch TS instrument
cable. PODxt Pro itself contains the processing power that turns your naked input signal into that
roaring guitar Tone, which is then fed out the Analog and Digital Outs, as well as fed to the Record
Send 1-2 digitally to your computer across the USB connection. When you are connected via USB to
your computer, you can also launch GearBox and use it to alternatively load Tones stored on your hard
disc, edit them on your screen, and make adjustments for output and Record Send levels.
Phones - If you want to listen to the audio using stereo headphones, then plug them into this 1/4-inch
stereo jack. This Headphone jack outputs the same signal fed to the Analog Line Outs; the audio from
your audio software on the computer, as well as anything plugged into the Instrument input.
Connect any Line-Level
source you want to
record to the Line Input
Unprocessed Instrument Out- When
using GearBox Plug-in, connect to
3rd-party audio recording interface
USB - Connect to
your computer
Analog Line Outs, Use either Unbalanced
(¼ -inch) jacks or Balanced (XLR) jacks to
connect to your powered speakers or mixer
Line Input - if you want to record the signal from a line level source, such as a keyboard, your receiver,
the line out from a mixing console, etc…, connect it to this input using a 1/4-inch TS audio cable.
Unprocessed Guitar Out - This connection allows you to send an unprocessed signal to your recording
application, while monitoring the fully processed signal thru the main Outputs. Very handy if you’re
using a 3rd party recording interface with your recording application and the GearBox plug-in. For
more info, go to the ToneDirect™ Monitoring section of this Guide.
Note: Your PODxt Pro can also send an unprocessed signal thru its USB connector, as explained
here.
Digital Input and Output – use the AES/EBU
or S/PDIF type connections to connect to other
digital gear that uses one of these formats
2•28
Page 36

Line 6 GearBox 3.7 – Using Your Line 6 Hardware
Unbalanced and Balanced Analog Line Outs - The Left and Right Unbalanced ¼-inch jacks and the
Balanced XLR jacks output all audio signals; the audio from your audio software on the computer, and
anything plugged into any the Instrument inputs (and effects loop, if you are using it). So, these are
what you want to connect to your monitoring system when using PODxt Live as your computer’s sound
card. Use shielded ¼-inch tipped or XLR tipped cables to connect directly to your powered speakers,
mixer or power amp setup. Note that you can also use the Phones jack on PODxt Pro if you want to
use headphones for monitoring.
USB - This is where you connect the supplied USB cable to PODxt Pro, with the other end going to
your computer’s USB 1.1 or 2.0 port. Of course, your PODxt Pro is capable of processing your guitar
Tone all by itself, but you’ll need to connect the USB cable to your computer to use it with GearBox,
and to use PODxt Pro as your sound card device. Note that you should always connect to a separate
USB controller channel from other USB audio or MIDI interfaces to provide PODxt Pro with the full
USB bandwidth. It is also recommended to connect directly into a USB port on your computer and
not into a USB hub.
Note - Be sure to always power off or mute your speakers or monitoring setup before connecting/
disconnecting the USB cable and powering on/off PODxt Pro, as well as before booting up or shutting
down your computer if PODxt Pro is already connected. The best practice is to always power on your
speakers last, and power them off first when connected to other audio gear to avoid a “pop”.
AES/EBU and S/PDIF Digital connections - To connect to another digital audio device with your
PODxt Pro, use the pair of these digital jacks that matches the format of your other device (AES/EBU
or S/PDIF). Connecting digitally is the best choice for routing to external digital recording devices,
such as a DAT recorder. These digital outputs send the same audio as is sent to PODxt Pro’s Analog
Outs. The digital signal is always sent at 24-bit resolution. All settings for configuring the PODxt Pro’s
digital in/out options are found on the PODxt Pro device itself by pressing the “I/O Dig Select” button
on the front panel (these digital I/O options are not accessible in GearBox). For more information on
using these digital connections, please see your PODxt Pro Pilot’s Handbook.
Note that when using PODxt Pro with GearBox, the GuitarPort Online playback audio is never routed to
the AES/EBU or S/PDIF outputs. This is necessary to comply with artist copyright requirements that Line
6 follows for the GuitarPort Online Tracks and artist content.
2•29
Page 37

Line 6 GearBox 3.7 – Using Your Line 6 Hardware
PODxt - Audio Signal Routing & Re-Amping
Re-Amping is the fancy, schmancy name for recording a dry, unaltered instrument signal to be processed
later during mixing - this gives you the greatest flexibility to make later tone tweaks, since you don’t
have to commit a particular sound to the track(s). This is, of course, the way that plug-ins work, so it’s
something that all plug-ins, including GearBox Plug-in, provide. If you don’t have plug-ins but do have
PODxt, there’s another kind of re-amping available.
PODxt, PODxt Pro and PODxt Live provide an additional set of driver options for recording where
the signal fed to Record Send 1-2 can be set to “processed” or “unprocessed” independently from
what you are hearing as your monitor signal from the PODxt device. Access the PODxt Audio Signal
Routing options by clicking the Advanced button in the Line 6 Audio-MIDI Devices control panel...
Select the signal to be
routed to the Record
Sends here.
The text in the Record
Sends panel describes the
signal now being carried
on he Record Sends
This slider sets the
level of the re-amped
signal sent to PODxt for
monitoring
In the PODxt Signal Routing selector you can choose one of four routing modes for the signals that
run inside PODxt, and to Record Send 1-2:
Send Processed Guitar• - This is the normal mode of operation: PODxt-processed sound is sent
to your computer via Record Send 1-2 so it can be recorded in your audio software. PODxt gets
its input from the guitar plugged into its INPUT jack, and you can listen to PODxt-processed
guitar sound as well as sound coming from your computer via PODxt’s LEFT OUTPUT, RIGHT
OUTPUT and PHONES jacks.
Send Clean Guitar• - This mode sends unprocessed guitar to your to Record Send 1-2, while you
listen to PODxt-processed guitar and software playback coming out of your PODxt. You can use
this to record an unprocessed guitar signal in your audio software for later re-amping, while hearing
your PODxt-processed guitar signal without latency being added by your recording program. You
can then choose USB Signal Routing modes 3 and 4 when you’re ready to playback that track
and re-amp it through your PODxt. You may also want to record a copy of your PODxt-processed
sound from the analog outputs of your PODxt when you are making your digital recording of the
clean guitar, so you have the processed version for reference when re-amping. This track is also
handy for punch-ins, since you can listen to it during punch-ins to hear the processed version of
the part of the previously recorded track that you want to keep.
Send Clean Guitar Re-Amp Playback• - This mode sends un-processed guitar to your recording
software, feeds the signal from your computer into PODxt’s processing, and lets you hear the
PODxt-processed computer sound at PODxt’s outputs. You can use this to run an unprocessed
guitar track that you recorded using USB Signal Routing mode 2 into your PODxt for re-amping,
2•30
Page 38

Line 6 GearBox 3.7 – Using Your Line 6 Hardware
allowing you to listen to or record the PODxt-processed result via PODxt’s analog outputs. You
can also use this mode during initial recording, so that unprocessed guitar can be recorded to a
track, and the output of that track can be sent by the recording program to PODxt at the same
time. This lets you punch-in on the track while you’re recording, and hear PODxt processing of
the already recorded part of the track as well as the new portion that you’re recording during the
punch-in. Your recording software will add some latency to the guitar signal that it is monitoring
back through to PODxt. You can generally get the lowest latency by reducing your buffer size in
the recording software, but lower buffer settings will utilize more of your computer’s processing,
so you may not be able to run as many tracks or effects in your recording software when you do
this. See your recording software’s instructions for details.
Send Re-Amp Playback• - This mode is designed to receive unprocessed guitar from your recording
program, and send processed guitar back to the recording program for recording. You can use this
to run an unprocessed guitar track that you recorded using USB Signal Routing mode 2 into your
PODxt for re-amping, so you can digitally record the PODxt-processed signal back to another
track in the recording program.
Note – it is not a supported practice to “hot swap” your Line 6 device (unplug the USB cable and plug
it into a different USB device) while it is in use by GearBox or any other audio software. In fact, this
just isn’t a good idea to do with any USB audio devices, since it can result in a loud pop, loss of sync
and possibly crash or corrupt your current audio software project.
Routing Audio From Your Line 6 Hardware to an External Device
In addition to the ability to route digital audio directly within your computer, you may instead want to
route your GearBox or POD signal into another sound card on the same or separate computer. Better
yet, with all the great tones you can now create for your mics & instruments, there is no need to limit
them to the inside of a computer! You may also want to send the signal to external hardware such as
an analog or tape Multitrack unit, a DAT or video tape recorder, or even to an amplifier or P.A. system
for live performance. To follow are instructions for these different types of setups.
Connecting analog outputs to an external device
You can route your GearBox Tone to just about any type of external device simply by connecting the
Analog Outs from the back of your GuitarPort, TonePort or POD directly into the external device’s
line level, analog inputs. This allows you to amplify or record your GearBox signal using any external
device that accepts analog line level inputs.
Connect your TonePort,
GuitarPort or POD Analog
Outs to the analog inputs on
any external audio device
2•31
Page 39

Line 6 GearBox 3.7 – Using Your Line 6 Hardware
Routing analog outputs to another sound card
If you want to use GearBox and your Line 6 device in a computer recording setup where a sound card
already exists, then you might find it useful to connect your Analog Outs into the analog inputs of the
existing sound card. More information can be found in the Sound Card and Sound Issues section of
this guide.
Connecting the Digital Output to an external digital device
TonePort UX2, UX8, KB37, POD X3, POD X3 Live and PODxt Pro also include digital outputs,
which allow you to connect to digital devices such as a DAT recorder, Minidisk, another sound card,
or most any device that offers a S/PDIF (or AES/EBU for PODxt Pro) format digital input. Please refer
to your hardware’s User Guide, or check out the GearBox Recording Setup Guide available for download
on the GearBox - User Manuals page of the Line 6 web site.
ToneDirect™ Monitoring
A unique feature of your Line 6 hardware is ToneDirect™ Monitoring, which is a separate audio path
that allows you to monitor the incoming signal with the lowest possible latency, for uncompromised
feel and responsiveness when recording or jamming.
Plus, this lets you to set the audio buffer size in your recording application at a large value for efficient
use of your computer, yet still enjoy extreme low latency monitoring while recording. On Windows
systems, the ToneDirect™ audio path has its own buffer adjustment while on Mac, no adjustments are
needed.
ToneDirect™ Monitoring buffer size slider (Windows®)
TonePort & GuitarPort devices - The Line 6 ToneDirect™ Monitoring audio path has its own buffer
to allow you to keep your ASIO Buffer Size at a high value, for more solid performance and more
efficient performance of your ASIO software. The initial default is one tick to the right of “Extra
Small” as shown. Raise this slider if you are getting any dropouts in your monitor signal.
POD X3 & PODxt devices - These devices utilize a USB audio buffer (rather than ToneDirect™
Monitoring) which provides an independent, direct monitor signal with its own buffer adjustment.
When a POD X3 or PODxt is selected as the Line 6 device in this dialog, a POD-specific “USB Audio
Streaming” buffer slider is displayed:
2•32
Page 40

Line 6 GearBox 3.7 – Using Your Line 6 Hardware
ToneDirect™ and your Line 6 Hardware as the preferred Audio Interface/Sound
Card
If you choose your Line 6 hardware as the preferred sound card for your audio setup, you get the benefits
of ToneDirect™ monitoring automatically when running the GearBox application for tone control.
This is standard operation when GearBox is acting as a tone front end for recording or jamming.
POD X3/PODxt users: All Tone processing is performed internally on the POD device, saving CPU
resources for recording & mixing tasks!
ToneDirect™ Monitoring while recording with GearBox Plug-in
ToneDirect™ is a feature of the GearBox full application, not the GearBox Plug-in, so in order for
you to enjoy the feel and responsiveness provided by ToneDirect™, you’ll need to run the “standalone” GearBox application alongside the GearBox Plug-in. Keep in mind that these 2 applications
run independently of each other, so any tone settings you make in the GearBox application will have
to be matched in the Plug-in to provide the same results. You can achieve this by making your settings
in the GearBox application, saving the Tone as a Tone Preset to your computer’s Tones folder, and then
recalling that preset later within the GearBox Plug-in. For more information, please see the GearBox
Plug-in chapter.
Using a 3rd-party Audio Interface with TonePort DI or PODxt Pro
If you use the GearBox Plug-in with a TonePort DI or a PODxt PRO, you’ll be able to monitor your
signal with ToneDirect by following these steps (illustrated on the graphic at the beginning of this
Guide):
Connect the signal source to the input of your Line 6 Hardware.•
Connect the unprocessed dry output of the TonePort DI / PODxt PRO to your Audio Interface. •
This will be the source you’re running the plug-in on.
Disable Input Monitoring in your recording application, for the track you’re recording into.•
Connect the processed Analog Outs to your Audio Interface, or alternatively, to a mixer (if you •
don’t want to connect them to the recording interface, or if your interface does not support input
monitoring)
Launch the GearBox application and monitor the recorded signal thru the Analog Outputs of •
your Line 6 Hardware, to get the benefits of ToneDirect™ monitoring
Using a 3rd-party Audio Interface with other Line 6 Hardware
If you have a non-Line 6 audio interface you’d like to use for computer recording/playback, you’ll need
to purchase a guitar/signal splitter, which will afford you the unprocessed dry output needed to feed
your Audio Interface.
Connect your recording source to the splitter input.•
Connect Output A from the splitter to your audio interface. This will be the source to run the •
GearBox plug-in on.
Choose this channel as the track input in your recording application, and disable input monitoring •
for that track.
2•33
Page 41

Line 6 GearBox 3.7 – Using Your Line 6 Hardware
Connect Output B from the splitter to your Line 6 Hardware, the outputs of which will be •
connected to your audio interface, or a mixer (if you don’t want to connect to your audio
interface, or if your interface does not support input monitoring).
Launch the GearBox application, and monitor the GearBox processed signal thru your hardware’s •
Line Outputs. These outputs supply the ToneDirect™ Monitoring magic.
Please check out the GearBox Recording Setup Guide available for download on the GearBox - User
Manuals page of the Line 6 web site for more about this type of setup.
Mac® Users: There’s yet another option for you!
The Mac Core Audio driver architecture features the ability to combine the inputs from 2 separate
audio interfaces into one “aggregate device”. You may be able to take advantage of this Mac OS X
feature with you Line 6 device with another sound card - for more info on this, please refer to the
GearBox Recording Setup Guide available on the GearBox - User Manuals page . Perform the following
steps:
Combine your Audio Interface and your Line 6 hardware into one aggregate device.•
Connect the recording source to your Line 6 hardware•
Make sure that your hardware is sending an unprocessed signal thru USB. Choose this signal as •
the input for the track you’re recording into. This track will receive the GearBox plug-in.
Disable Input Monitoring for the track you’re recording into.•
Launch the GearBox application, and monitor the GearBox processed signal thru your hardware’s •
Line Outputs. These outputs supply the ToneDirect™ Monitoring magic.
Using Line 6 Hardware as your Audio Interface
In order to enjoy the benefits of ToneDirect™ Monitoring, perform the following steps:
Connect the recording source to your Line 6 hardware•
Launch the GearBox application, and monitor the GearBox processed signal thru your hardware’s •
Line Outputs. These outputs supply the ToneDirect™ Monitoring magic.
Route the unprocessed signal to your recording application. Choose this signal as the input for •
the track you’re recording into. This track will receive the GearBox plug-in.
Disable your audio software’s Input Monitoring for the track you’re recording into.•
Sound Cards & Sound Issues
One of the many unique features of your Line 6 Hardware is its ability to function as a computer
sound card. You can choose to make your hardware the preferred sound card for your computer, or
alternatively keep your current “Built-In” sound card the default device for playing system sounds,
etc…, and connect your hardware to it so you can hear GearBox tone thru your computer’s sound
card.
2•34
Page 42
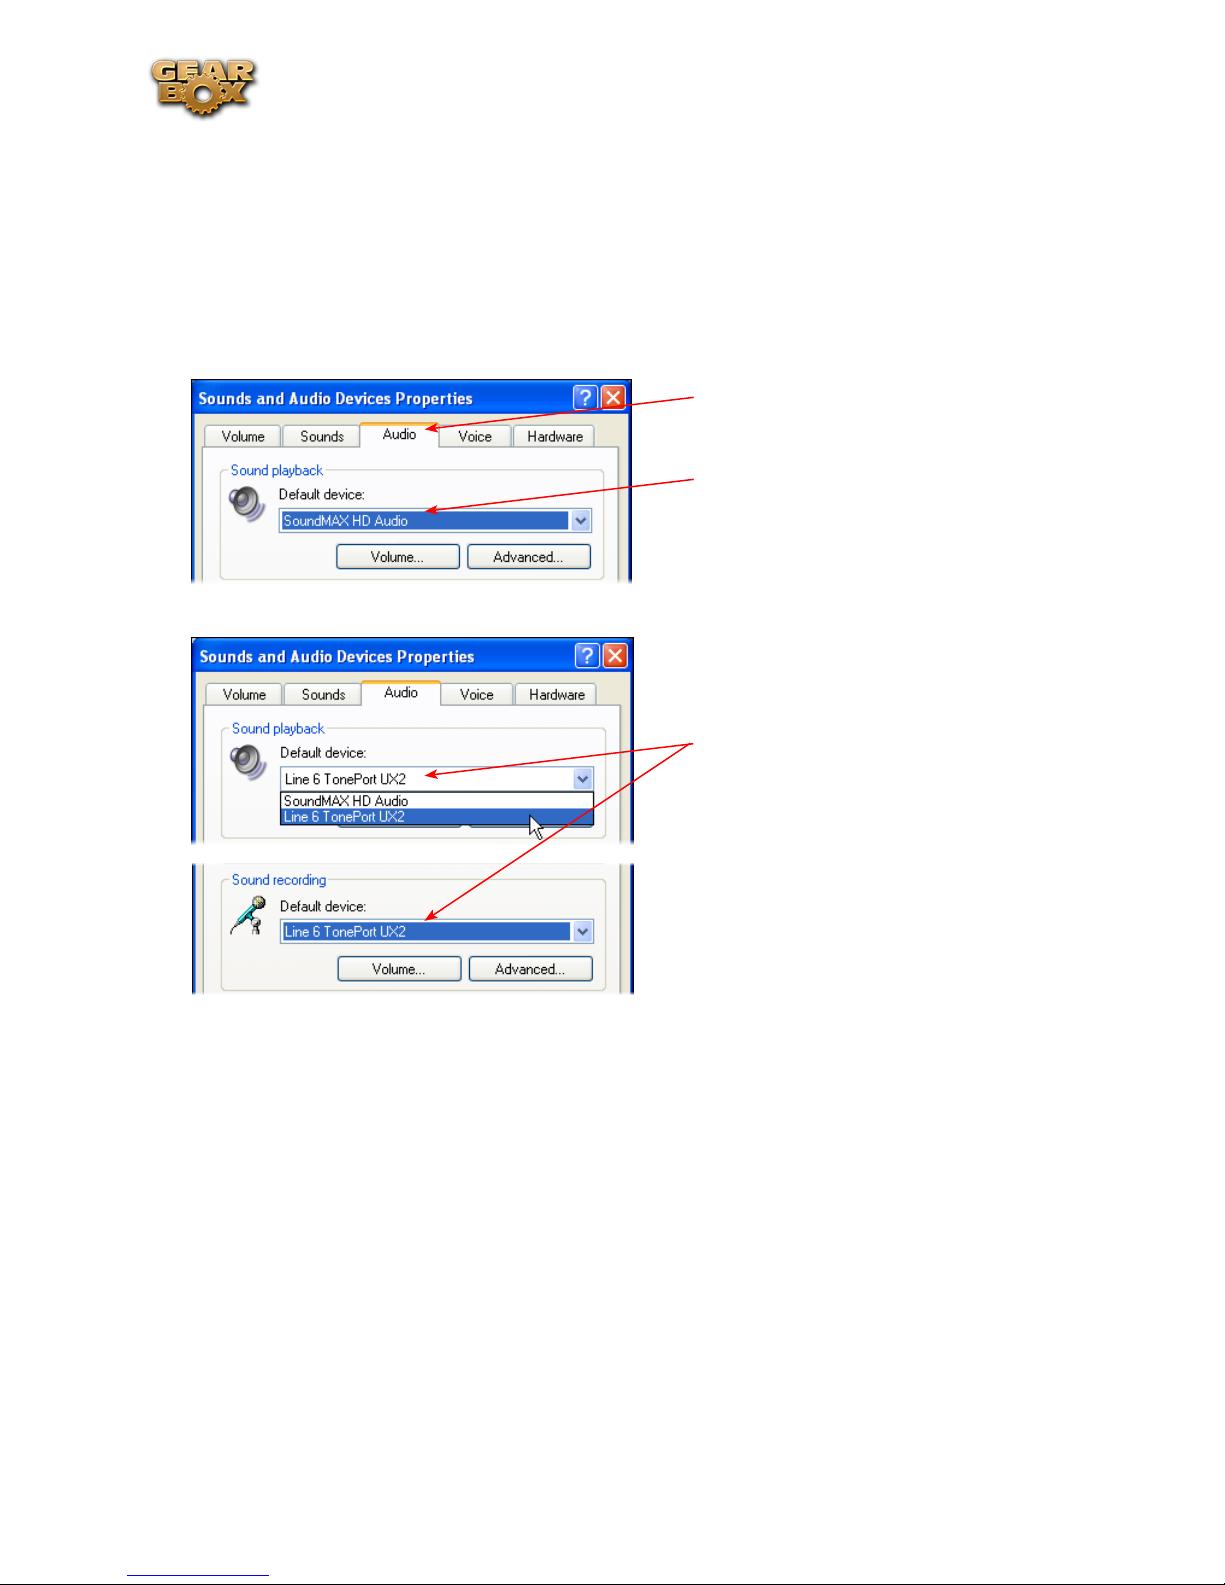
Line 6 GearBox 3.7 – Using Your Line 6 Hardware
Choosing your Line 6 Hardware as the Preferred Audio Device
Setting up your Line 6 Hardware as the preferred Audio device means that all system sounds, as well as
the audio output of your mp3 player and other audio applications will be routed thru your hardware.
Windows® XP
®
Go to the Windows XP Control Panel, and select Sounds and Audio Devices.
Click on the Audio Tab
All your sound devices appear here
Select your Line 6 Hardware as the
default audio device for Playback
and Recording
Click Apply when done
2•35
Page 43

Line 6 GearBox 3.7 – Using Your Line 6 Hardware
Windows® Vista
®
Go to the Vista Control Panel, and select Sound.
In the Playback tab...
Select your Line 6 hardware if it
shows the green checkmark then it
is currently the default device for
playback. If not, then click the Set
Default button.
If yo want to set your Line 6 hardware as the default recording Device,
then repeat these steps in the
Recording tab.
®
Mac
Go to your computer’s System Preferences, and click on Line 6 Audio-MIDI Devices
Click on the Audio Devices Tab
All your sound devices appear in the
drop down menus
Select your Line 6 Hardware as the
default audio device for Input and
Output
Close the window when done.
Connecting Line 6 Hardware to your Preferred Audio Device
If you want to use GearBox and your Line 6 device in a computer recording setup where a sound card
already exists, then you might find it useful to connect your Analog Outs into the analog inputs of the
existing sound card. This allows you to use the existing sound card with your recording application to
also receive additional discrete inputs directly from other sources at the same time, if this is your desired
setup. When your Line 6 device is connected to another sound card this way, then you will want to be
sure your recording software is set to use the other sound card as its input device for recording. In this
configuration, since your Line 6 device is not in use by an audio application as a sound card, its Analog
Out signal is what is being recorded, and therefore, levels are controlled by the GearBox Monitor level
and hardware Output knob.
2•36
Page 44

GuitarPort users
TonePort users
Line 6 GearBox 3.7 – Using Your Line 6 Hardware
Connect a 1/8-inch stereo cord to
the Headphone Out, or use the
Stereo RCA Line outputs with an
adapter.
Connect the other end to the Line
Input of your sound card.
Connect the mono 1/4-inch
Analog Line Outputs (if you have a
UX8 then you probably want to use
Outs 1 &2). Or, connect a 1/4-inch
stereo cord to the Headphone Out
POD X3/PODxt users
Connect the mono 1/4inch Analog Left & Right
Outputs. Or, connect a
1/4-inch stereo cord to the
Headphone Out
Use an adapter if needed to
connect to the Line Input of
your sound card.
Use an adapter if needed to connect
to the Line Input of your sound
card.
2•37
Page 45

Line 6 GearBox 3.7 – Driver Panel & Recording
Li n e 6 dr i v e r Pa n e L & re c o r d i n g
So, just how does all that huge amount of Tone get routed around between your Line 6 gear, computer
and recording software you ask? All this is performed by the audio driver - a software component
installed with GearBox that allows the audio to be routed to the right place. This section provides an
overview of the different driver types and where you can tweak a few settings to work best with your
particular computer setup.
For more instructions about setting up GearBox and your Line 6 hardware for recording with specific
audio recording programs, please check out the Recording Setup Guide documentation found on the
GearBox User Manuals page.
Windows® 64-bit users... The installation of GearBox version 3.7 also installs Windows® XP® and
Vista® 64 bit compatible audio drivers for your Line 6 hardware. The Windows® features described
here in this chapter are the same for 32 bit or 64 bit Windows® systems.
Audio Routing
TonePort and GuitarPort - As shown in the following basic diagram, sources that are input into
the Line 6 hardware are handled by the audio driver, which manages applying the GearBox Tone
processing to your signal, feeding the processed audio out the Record Sends to your audio software,
gathering playback audio from your audio software and then routing the audio back to the Line 6
hardware’s outputs and to your monitoring system. The driver also grabs the GearBox processed signal
before routing it to the Record Sends and hands this off to Tone Direct Monitoring immediately, to
provide a low latency monitor signal, which is then routed to the Line 6 hardware and mixed with the
rest of your audio and fed to your monitoring system.
POD X3/PODxt - As shown in the following basic diagram, sources that are input into POD devices
are fully processed right on the POD hardware, and the GearBox software acts as a computer Graphical
User Interface (GUI) for the processing running on POD. The POD-processed audio is then handled
by the audio driver, which manages feeding the audio out to the USB Record Send(s) to your audio
software, gathering playback audio from the audio software, and then routing the mixed audio back to
the POD’s outputs and to your monitoring system. POD also grabs its processed signal before routing
3•1
Page 46

Line 6 GearBox 3.7 – Driver Panel & Recording
it to the Record Sends its internal Monitoring system immediately, to provide a low latency monitor
signal, and then mixes it with the rest of your audio to your monitoring system.
The Line 6 Audio-MIDI Devices Dialog
Since your Line 6 device includes our high-performance audio driver, it can act as a USB sound card
for just about any audio software that might be installed on your Mac® or Windows® computer. This
dialog is the place where you can access the audio driver settings for your connected device to see and
configure things such as the current Sample Rate, Bit Depth, Buffer settings, Record Sends, etc. One
thing to note here is that this dialog offers controls specifically for your Line 6 hardware. The GearBox
software is independent of these settings, however, you’ll see information regarding your Record Sends
here which may change depending on whether GearBox is currently running or not. For TonePort and
GuitarPort devices, you can think of the GearBox software like a giant rack of gear – if it is not running
and configured to use your TonePort/GuitarPort hardware, your guitar signal will still be heard, but will
be “naked”, without all those lovely amp & effects sounds. For POD X3 & PODxt devices, since your
Tone is always running on the POD itself, you’ll hear whatever your POD’s Tone and audio routing
settings are set to deliver, and GearBox can be running or not to control the Tones you want to hear.
There, aren’t you feeling smarter already?
The options in the Line 6 Audio-MIDI Devices dialog are slightly different if you are on a Windows®
versus a Mac® system, and also slightly different depending on which Line 6 hardware you are using.
Just check out the descriptions that match your setup in the following sections…
Windows® - Line 6 Audio-MIDI Devices Dialog
You can launch the Line 6 Audio-MIDI Devices dialog from within the Windows® XP® or Vista®
Control Panel (Start button > Settings > Control Panel), or from the GearBox Help > Hardware & Driver
Settings.
Driver Tab - Windows
TonePort & GuitarPort - This example shows TonePort UX2 as the selected device, with the GearBox
software running. You’ll see some differences with a POD device selected, which are noted in the
following diagram - click on a number to go to its description. If you have the TonePort UX8, you’ll
3•2
Page 47

Line 6 GearBox 3.7 – Driver Panel & Recording
have even more options, so be sure to also read up on the UX8 specific sections...
2 3
1
9
4
5
6
7
10
8
1 – Line 6 Device selector: Allows selection of any supported Line 6 USB audio device that is
connected. Note that if you have more than one supported device connected, each will be selectable
in this list, regardless if it is in use by the GearBox application or not. If your device is not connected
and powered on, it will not appear in this list.
2 – Selected Device icon: An icon for the selected Line 6 Device appears here.
3 – Driver version: Displays the current device’s installed driver version number.
4 – ESN: Displays the current device’s unique Electronic Serial Number.
5 – ASIO Client indicator: If you are running audio software that is using this Line 6 device as its
ASIO sound card, the name of the software will appear here. If not in use by an ASIO software, “none”
is displayed here as shown.
6 – Buffer Size: The ASIO buffer size in use. Note this field is only active when in use by an ASIO
application. As your audio software documentation will likely tell you, the ASIO Buffer Size will
affect the “responsiveness” and “latency” of the audio. The lower the setting, the faster the response,
but with the trade-off of higher processor usage and the risk of audio dropouts. Raise the value if you
are getting inconsistent playback or recording in the audio software. Basically, 512 is generally a good
average setting.*
3•3
Page 48

Line 6 GearBox 3.7 – Driver Panel & Recording
*Note that TonePort and GuitarPort devices also offer ToneDirect™ Monitoring, which is a
separate audio path with its own Buffer setting. This allows you to keep the above ASIO Buffer Size
at a “safer”, higher value, yet still benefit from low latency monitoring of your input signal while
recording. Similarly, POD devices offer a USB audio buffer which provides an independent, direct
monitor signal with its own buffer adjustment as well. More info on ToneDirect monitoring can be
found in this section.
7 – Bit Depth: The ASIO bit depth in use. Note this field is only active when in use by an ASIO
application. It is recommended to use the 24-bit option here as well as the 24-bit option within your
ASIO recording software. (If your ASIO audio software only supports or is set to 16-bit, then it is
recommended to set your Line 6 hardware’s Bit Depth setting here also to 16-bit to match).
8 – Sample Rate Converter Active indicator: TonePort & GuitarPort devices support 44.1 and 48 kHz
sample rates natively, and also support 88.2 and 96 kHz sample rates by way of an internal sample rate
converter. This indicator lights up to show you when this converter is active, which can be any time
your ASIO software is requesting a different sample rate than what your device “natively” supports.
TonePort UX8 supports 44.1, 48, 88.2 and 96 kHz sample rates natively, meaning that these sample
rates are not converted.
9 – Driver Operation indicator:
TonePort & GuitarPort devices - Displays what sample rate and bit depth the current device is
operating at (or with no text if not in use).
10 – Lock Driver Format: When checked, this forces the Line 6 audio driver to operate at the Sample
Rate and Bit Depth settings entered in the two fields below (as opposed to following the sample rate
requested by a Windows audio application).
Note – This checkbox will remain grayed-out while the current Line 6 device is in use by the
GearBox application and/or any 3rd party audio application. To access the Force Driver Format
feature, you will need to exit GearBox as well as any audio software that might be using the currently
selected Line 6 device as its audio device. This checkbox will then be selectable.
Windows Vista users... you won’t see these options in this portion of the dialog since these driver
format options are handled by Vista itself. You will instead see a Sound Control Panel button:
Pressing this button will (not surprisingly) launch the Vista Control Panel’s Sound dialog. Here in the
Playback tab you can designate your Line 6 USB device as the “Default” audio device if you want all
your Vista programs such as Win Media Player, Flash Player, iTunes, Internet video players, etc., to
send their playback to it. However, if you are going to set your Line 6 device as the default, it is a good
3•4
Page 49

Line 6 GearBox 3.7 – Driver Panel & Recording
idea to also go to the Sounds tab and set it to the No Sounds sound scheme to avoid also getting blasts
of all those Vista system alerts, beeps and dings blaring through your monitors or headphones!
The Vista Sound Control Panel dialog - Playback tab
You can also click on the Properties button and access the default format setting for the Sample Rate
and Bit Depth for your Line 6 device when used with Vista audio applications. (Note that if you are
using an audio application that is set to utilize the ASIO driver for your Line 6 device, then ASIO
communicates directly with the device, and these Vista “default format” settings do not apply).
The Vista Control Panel>Sounds>Properties - Advanced tab
Inputs & Recording Tab - Windows
Input Source Select: This is a mirrored control for the Source Select within the GearBox application
where it allows the user to select which physical input is used on the device. Note that this control is
ONLY selectable when the GearBox software is not in use by the current device. When GearBox is in
use, it remains grayed out, but displays the current Source that is selected within GearBox.
When GearBox is not in use by the selected Line 6 device, this Input Source Select, like the Source
Select in the GearBox application, offers a list of input options.
3•5
Page 50

Line 6 GearBox 3.7 – Driver Panel & Recording
TonePort GX, DI, GuitarPort and PODxt devices are always “fixed” to only route their “instrument”
1 /4 input signal into GearBox. When a GuitarPort or PODxt is the selected device, this Input
Source Select list offers only “Instrument” as the source.
PODxt & POD X3 devices do not offer an Input Source menu in this dialog.
TonePort UX8 has a larger set of options - see the next section for its Inputs & Recording tab.
Device Sends Info box: One line for each GearBox Record Send appears here along with a general
description for signal each Send is carrying. Refer to your specific Line 6 device type in the following
descriptions.
Note that multiple Sends for your Line 6 device are only available when using the ASIO driver in
your recording software. If your recording software is configured to access the device via its WDM or
DirectSound driver, then only one Send will be available in the recording software (Send 1-2).
TonePort & GuitarPort devices (except UX8) show the following Sends:
TonePort devices show two stereo Sends (Record 1-2 and Record 3-4)
Single Tone Source (Mono/Stereo): When the GearBox application is not running, Record 1-2 •
and 3-4 both carry the unprocessed signal. When running GearBox, Record 1-2 will carry the
fully GearBox-processed signal. For Record 3-4, you can choose between a signal with no post-
3•6
Page 51

Line 6 GearBox 3.7 – Driver Panel & Recording
effects, and a fully unprocessed signal.
Dual-Tone Source*: If you’ve selected one of the dual input configurations from the input menu, •
Record 3-4 will always carry the signal from the second audio source. When GearBox is running,
these sends will carry the Tone 2 signal of a Dual-Tone configuration.
*Note: TonePort DI, GX and GuitarPort devices can only run in Single-Tone configuration.
POD X3 devices show a list of 5 Record Sends:
Note that the type of signal that is fed to each Send is configured on the POD X3’s on-board Outputs
- Studio/Direct Mix settings screen. Or, if GearBox is running, the Studio/Direct Mix Pan sliders and
Mute buttons for Tone 1 and Tone 2 as well as the Send volume knob all affect the signal fed to Send
1-2. To put it another way, Send 1-2 is fed the same “Studio/Direct Mix” as your main outputs, which
could be just a Tone 1, or some combination of Tone 1 & 2, depending on how you set the Studio/
Direct mix controls. Please refer to your POD X3 Pilot’s Handbook for details on the Output screen
options and especially about POD X3’s unique Dual Tone operation.
POD X3 also offers a Monitor Level slider in this tab as well - you can use this to independently adjust
your POD X3 hardware monitor signal while recording (independently of the Send signal level that is
being recorded).
3•7
Page 52

Line 6 GearBox 3.7 – Driver Panel & Recording
PODxt devices show only one Record Send (Record 1-2).
The type of signal that is routed to the Record Send 1-2 is determined by the PODxt Signal Routing
option within the Audio Signal Routing menu at the left. Note that this Audio Signal Routing
determines this signal type regardless if GearBox is running or not. (See the PODxt Audio Signal
Routing section for more about the options in this menu). PODxt also offers a Monitor Level slider in
this tab as well - you can use this to independently adjust your PODxt monitor signal while recording
(independently of the Send signal level that is being recorded).
Inputs & Recording Tab (TonePort UX8 only - Windows)
3•8
Page 53

Line 6 GearBox 3.7 – Driver Panel & Recording
The Inputs & Recording tab lets you select specific inputs for recording. Input source options are as
follows:
Input 1: Instrument 1 or XLR 1 or Line 1 or S/PDIF (L)
Input 2: Instrument 2 or XLR 2 or Line 2 or S/PDIF (R)
Input 3: XLR 3 or Line 3
Input 4: XLR 4 or Line 4
Input 5: XLR 5 or Line 5
Input 6: XLR 6 or Line 6
Input 7: XLR 7 or Line 7
Input 8: XLR 8 or Line 8
You can also link inputs into stereo pairs. This affects
hardware monitoring controls in the Outputs &
Monitoring tab (see below).
Using Inputs 1 & 2 with the GearBox standalone application
The GearBox standalone application works with the TonePort UX8 driver to provide ultra-low latency
via ToneDirect™ monitoring for Inputs 1 & 2 of the UX8, which includes two high-Z Instrument
inputs, two XLR inputs, two Line level inputs and stereo S/PDIF input. GearBox’s ToneDirect™
Monitoring is ideally suited for recording guitar and bass with amp and effects processing, providing
the instantaneous feel necessary for competent performance while tracking.
ASIO Record Sends
This box displays the ASIO names of the UX8’s input sources as they appear in recording applications
utilizing the UX8’s ASIO driver.
Sends 9-10 and 11-12 represent processed and semiprocessed signals respectively, from the GearBox
standalone application. If GearBox is not running,
Sends 9-10 and 11-12 carry the signal from Input 1.
See the GearBox Standalone Application chapter for details on using the GearBox sends with the
TonePort UX8.
3•9
Page 54
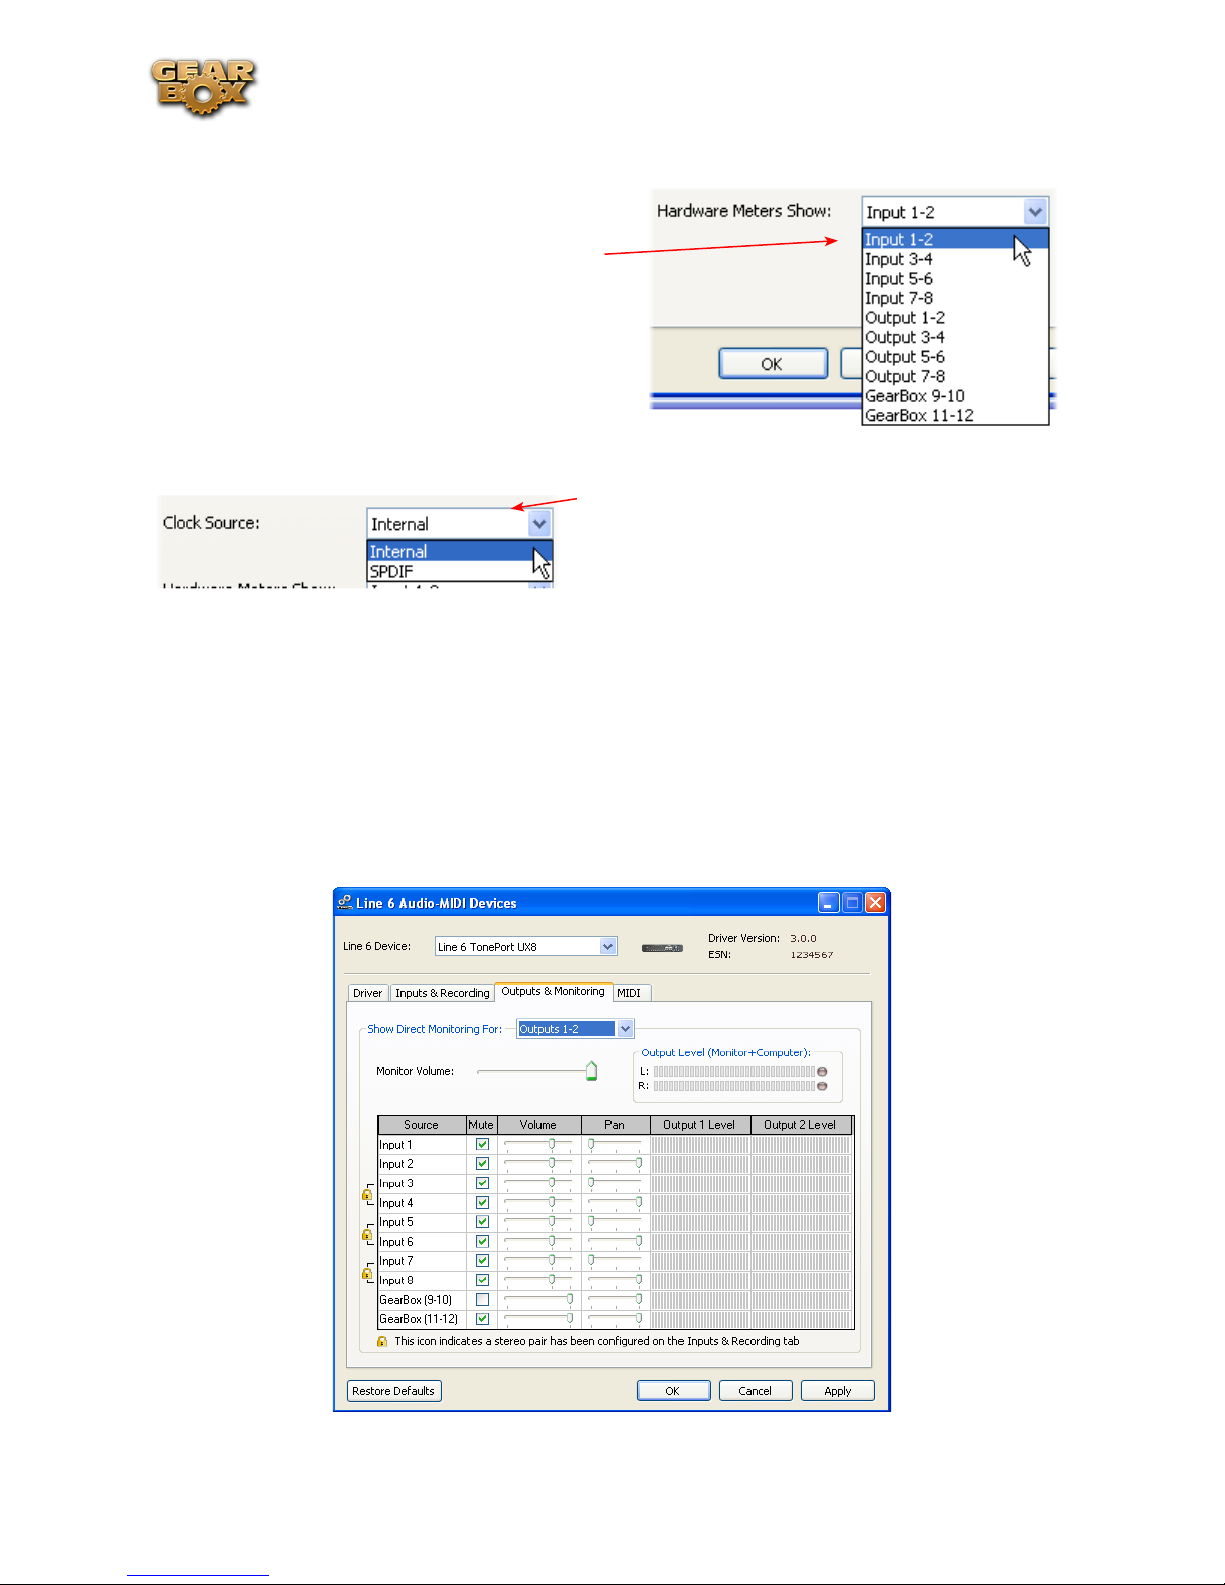
Hardware Meters Show
Use this menu to select the input and output
levels you want the UX8’s hardware meters to
display.
Clock Source
Line 6 GearBox 3.7 – Driver Panel & Recording
Set your preferred TonePort UX8 clock source with
this menu. Select S/PDIF to sync the UX8 to S/PDIF
clock source from another device’s digital output.
Outputs & Monitoring Tab (TonePort UX8 Only - Windows)
Important: Note that the Outputs & Monitoring tab provides control over the volume of whatever
you are inputting into UX8. These controls do not affect Send levels (the audio that streams into
your recording software), nor do they control the level of audio coming from your computer (such as
the playback level of your software’s session). In other words, volume and pan levels here are purely
analog, intended for monitoring live input levels (from instruments, mics, etc) to provide you with
independent level control over these items versus the playback levels of your audio software’s tracks.
3•10
Page 55

Line 6 GearBox 3.7 – Driver Panel & Recording
You can specify different mix settings for each pair of UX8 outputs if you like. By default, the only
sounds that come out of the UX8 are the computer’s output and GearBox 9-10 signal (fully processed),
all through the physical Main Outs 1-2. You can directly monitor other UX8 inputs by unmuting
(uncheck the Mute checkbox for) the corresponding input source in this tab. Note that the Mute and
volume controls here only act upon inputs (your guitar, bass, mic etc., plugged into the UX8), and
not audio coming from your computer (such as the playback of your audio software session). The UX8
provides monitoring through the hardware with zero latency, which is ideal for tracking with multiple
sources simultaneously.
Use the drop-down menu at the top to
select the output pair for which you want
to mix. Each output pair can have different
mix settings.
Mix Controls
Inputs 1 - 8 offer the following controls:
Mute (On/Off) Monitor Volume (-100dB to +6dB)
Monitor Pan (100% Left - 100% Right)* Stereo Monitor Meters
* -3dB panning law is applied to the pan control to maintain a constant monitoring level across the
panorama.
Mix Controls for Inputs 9 - 12:
GearBox monitoring controls behave identically to Inputs 1- 8, with the exception of the Volume
Level. GearBox Sends provide a max monitoring level of 0 dB, whereas the other inputs max at +6
dB, in order to match the 0 dB maximum monitoring level provided by the GearBox standalone
application.
Main Monitor Volume
This slider controls the overall monitoring volume for the current output pair. What you hear is
3•11
Page 56

Line 6 GearBox 3.7 – Driver Panel & Recording
displayed in the adjacent level meter and includes the combination of input sources and computergenerated signals, such as those assigned to the current output from within your recording software.
Note that computer-generated signals (e.g. - the playback audio from your audio software’s session) are
unaffected by the volume slider. The level meter’s clip LED graphics light up when the signal reaches
0 dB.
Main Mix vs. Talent Mix
The UX8’s two front panel headphone outputs mirror Outs 1-2 and 3-4 respectively. You can use the
monitor controls, for example, to create a “main mix (1-2)” that captures the overall image of the
recording project, while a separate “talent mix (3-4)” can be provided for the musician who is currently
adding a new part, and may need a click track and an ample level of themselves above the rest of the
mix (you know, the guy asking for “more me” in his headphones). Additional output pairs 5-6 and 7-8
are available for headphone mixers or sending to an external tape deck, other monitors, or whatever
else you might want to send out a customized mix to.
Stereo Pairs
When the “Stereo” checkbox is active in the Inputs & Recording tab for a pair of Inputs, the
representative Inputs in the Ouputs and Monitoring tab will display them as “locked” as a stereo pair.
The lock icon represents
two sources linked as a
stereo pair.
The Pan sliders for a
“locked” stereo pair are
automatically set to
100% Left and Right.
Using tool tips
You can obtain precise value readings for output levels, volume sliders and pan sliders. Do this by
hovering the mouse cursor over the meter or slider you wish to read.
3•12
Page 57

Line 6 GearBox 3.7 – Driver Panel & Recording
Mac® - Line 6 Audio-MIDI Devices Dialog
You can launch the Line 6 Audio-MIDI Devices dialog from within the Mac® System Preferences,
or from the GearBox Preferences > Hardware tab. On Mac® systems, all Line 6 hardware utilizes the
Mac® OS X® Core Audio driver format, which means that some of your Line 6 device settings will be
in the OS X Audio-MIDI Setup dialog. You can get to this dialog from within the Line 6 Audio-MIDI
Devices dialog (or, from the Finder by going to Applications > Utilities > Audio-MIDI Setup).
Line 6 Audio-MIDI Settings - Driver Tab
TonePort & GuitarPort devices – The following example shows TonePort UX2 as the selected device,
with the GearBox software running. If you have the TonePort UX8, you’ll have even more options,
so be sure to also read up on the UX8 specific sections...
POD X3 & PODxt devices - You’ll see some differences with a POD device selected – as noted in the
following descriptions…
1 2 3 4
5
6
1 – Line 6 Device selector: Allows selection of any supported Line 6 USB audio device that is
connected. Note that if you have more than one supported device connected, each will be selectable
in this list, regardless if it is in use by the GearBox application or not. If your device is not connected
and powered on, it will not appear in this list.
2 – Selected Device Icon: An icon for the selected Line 6 Device appears here.
3 – Driver version: Displays the current device’s installed driver version number.
3•13
Page 58

Line 6 GearBox 3.7 – Driver Panel & Recording
4 - ESN: Displays the current device’s unique Electronic Serial Number.
5 – Run Audio-MIDI Setup button: On Mac® systems, Core Audio sound card driver settings are
configured in the OS X® Audio-MIDI Settings utility. This button launches this dialog for you (see
following OS X Audio-MIDI Settings Dialog section).
6 – Sample Rate Converter Active indicator: TonePort and GuitarPort devices support 44.1 and 48
kHz sample rates natively, and support 88.2 and 96 kHz sample rates by way of an internal sample rate
converter.* This indicator lights up to show you when this converter is active, which can be any time
your audio software is requesting a different sample rate you’re your device “natively” supports or is
“fixed” at. Also see the Force Driver Format checkbox option. See the description for the Mac Audio-
MIDI Setup dialog for more about Sample Rates.
*TonePort UX8 supports 44.1, 48, 88.2 and 96 kHz sample rates natively, meaning that these sample
rates are not converted.
Note that TonePort ToneDirect™ Monitoring, which is a separate audio path than what the Mac®
Core Audio system routes to your audio software. ToneDirect Monitoring allows your GearBox
processed monitor signal to function with very low latency. There are no adjustments necessary for
these monitoring systems. More information on ToneDirect can be found in the next section.
Mac® OS X® Audio-MIDI Setup Dialog
Note: For TonePort UX8, please see the following UX8 Audio-MIDI Settings section.
5a
5b
5c
5d
5e
5f
5a – System Settings:
The • Default Input and Default Output options allow you to choose the sound card you want
your audio applications to use by default. If you want this to be your Line 6 device, select it
here.
3•14
Page 59

Line 6 GearBox 3.7 – Driver Panel & Recording
The • System Output option allows you to choose which sound card the Mac System Settings are
played through. You may NOT want to choose this to be your Line 6 device, since it can be rather
annoying to hear those dings, beeps or frogs croaking at blaring volumes in your headphones
or monitors when working in your audio application! Even better, you can turn these system
settings off completely in the System Preferences > Sounds dialog.
5b – Properties For: Choose your Line 6 device here to allow the Audio Input and Audio Output
options display its settings.
5c – Audio Input:
In the top selector, you will be able to choose your Record Send for your Line 6 device to view •
it’s format settings below.
The • Format selectors show you the Sample Rate* and Bit Depth that the Line 6 device will is
operating at for recording. The Bit Depth for all Line 6 devices is fixed at 24 bit.
*It is recommended that you do not use the Sample Rate selector here in the Mac Audio-MIDI Setup
dialog to set your sample rate when your recording software is running. Typically, your recording
software will offer a Sample Rate option within its own “Preferences” or “Audio Setup” settings. It is
best to configure the Sample Rate within the recording software, and you will see the device’s sample
rate switch automatically to match it.
5d – Volume sliders (audio input):
These sliders are not functional with Line 6 hardware - use the GearBox Record Send knob and/or
the Tone’s Volume controls instead of using these sliders to set your Record Send levels for Line 6
devices.
5e – Audio Output:
The • Format selectors show you the Sample Rate* and Bit Depth that the Line 6 device will is
operating at for playback. The Bit Depth for all Line 6 devices is fixed at 24 bit.
*It is recommended that you do not use the Sample Rate selector in the Mac Audio-MIDI Setup
dialog to set your sample rate when your recording software is running. Typically, your recording
software will offer a Sample Rate option within its own “Preferences” or “Audio Setup” settings. It
is best to configure the Sample Rate within the recording software for your project, and you will see
the device’s sample rate switch automatically to match it.
5f – Volume sliders (audio output):
These sliders are not functional for Line 6 hardware - use the GearBox Out To Monitor controls (or
the Volume knobs on your Line 6 hardware) instead of these sliders to adjust output levels.
3•15
Page 60

Line 6 GearBox 3.7 – Driver Panel & Recording
Mac® OS X® Audio-MIDI Settings Dialog (TonePort UX8 Only)
5a
5b
5c
5d
5e
5f
5a – System Settings:
The • Default Input and Default Output options allow you to choose the sound card you want
your audio applications to use by default. If you want this to be your Line 6 device, select your
UX8 here.
The • System Output option allows you to choose which sound card the Mac System Settings are
played through. You may NOT want to choose this to be your Line 6 device, since it can be rather
annoying to hear those dings, beeps or frogs croaking at blaring volumes in your headphones
or monitors when working in your audio application! Even better, you can turn these system
settings off completely in the System Preferences > Sounds dialog.
5b – Properties For: Choose your TonePort UX8 here to allow the Audio Input and Audio Output
options display its settings.
5c – Audio Input:
In the top selector, you will be able to choose your Record Send for the TonePort UX8 to view •
its Format settings below.
The • Format selectors show you the Sample Rate* and Bit Depth that the Line 6 device will is
operating at for recording. The Bit Depth is fixed at 24 bit.
3•16
Page 61

Line 6 GearBox 3.7 – Driver Panel & Recording
*It is recommended that you do not use the Sample Rate selector in the Mac Audio-MIDI Setup
dialog to set your sample rate when your recording software is running. Typically, your recording
software will offer a Sample Rate option within its own “Preferences” or “Audio Setup” settings. It is
best to configure the Sample Rate within the recording software, and you will see the device’s sample
rate switch automatically to match it.
5d – Volume sliders (audio input):
These sliders 1 - 12 are not functional with UX8 - use the GearBox Record Send knob and/or Tone
volume instead of using these sliders to set your Record Send levels for Line 6 devices.
5e – Audio Output:
The • Format selectors show you the Sample Rate* and Bit Depth that the TonePort UX8 is
operating at for playback. The Bit Depth for all Line 6 devices is fixed at 24 bit.
*It is recommended that you do not use the Sample Rate selector in the Mac Audio-MIDI Setup
dialog to set your sample rate when your recording software is running. Typically, your recording
software will offer a Sample Rate option within its own “Preferences” or “Audio Setup” settings. It is
best to configure the Sample Rate within the recording software, and you will see the device’s sample
rate switch automatically to match it.
5f – Volume sliders (audio output):
These sliders are not functional for Line 6 hardware - use the GearBox Out To Monitor controls (or
the Volume knobs on your Line 6 hardware) instead of these sliders to adjust output levels.
3•17
Page 62

Line 6 GearBox 3.7 – Driver Panel & Recording
Line 6 Audio MIDI Settings Dialog - Inputs & Recording Tab
1
2
1 – Input Source Select: This is a mirrored control for the Source Select within the GearBox application
where it allows you to select which physical input is used on the device. Note that this control is ONLY
selectable when the GearBox software is not in use by the current device. When GearBox is in use, this
selector remains grayed out, but displays the current Source that is selected within GearBox.
When GearBox is not launched, this Input Source Select, like the Source Select in the GearBox
application, offers a list of input options. The options will differ depending on the Line 6 device.
TonePort UX2 displays the following:
When GearBox is not in use,
the Input Source Select menu is
available. As shown here, TonePort
devices offer several input Sources
to choose from. The selected
Source is what gets routed to the
Device Sends.
3•18
Page 63

Line 6 GearBox 3.7 – Driver Panel & Recording
TonePort GX, DI and GuitarPort devices are always “fixed” to only route their 1/4-inch input
signals into GearBox. With one of these devices, this Input Source Select list offers only “Instrument”
as the source.
POD X3 and PODxt devices are “fixed” to route their input signals into GearBox. With one of
these devices there is no Source Select menu displayed in the dialog.
2 – Device Sends info box: One line for each GearBox Record Send appears here along with a general
description for each Send.
TonePort & GuitarPort devices (except UX8) show two stereo Sends (1-2 and 3-4):
The Device Sends Description then shows
the input Source, and informs you if that
signal is “processed” or not. Since GearBox
is not running, the signal is unprocessed.
Single Tone Source (Mono/Stereo): When the GearBox application is not running, Record •
Sends 1-2 and 3-4 both carry the unprocessed signal. When running GearBox, Record Send 1-2
will carry the fully GearBox-processed signal. For Record Send 3-4, you can choose between a
signal with no post-effects, and a fully unprocessed signal.
Dual-Tone Source: If you’ve selected one of the dual input configurations from the input menu, •
Record Send 3-4 will always carry the signal from the second audio source. When GearBox is
running, these sends will carry the Tone 2 signal of a Dual-Tone configuration. See the TonePort
Dual-Tone Operation section for more about this.
Note: TonePort GX, DI and GuitarPort can only run in Single-Tone configuration.
POD X3 devices show a list of 5 Record Sends:
Note that the type of signal that is fed to each Send is configured on the POD X3’s on-board Outputs
settings screen - if GearBox is running, the Send 1-2 Pan slider and Mute buttons for Tone 1 and
3•19
Page 64

Line 6 GearBox 3.7 – Driver Panel & Recording
Tone 2, as well as the Send volume knob also affect the signals fed to Send 1-2. For example, Send
1-2 carries the same signal you hear on POD X3’s Main outputs, which could be just Tone 1, or some
combination of Tone 1 & 2. Your POD X3 Output screen options allow you to mute, pan or swap Tone
1 and Tone 2, so these options, of course, also affect what is fed to the Sends. Please refer to your POD
X3 Pilot’s Handbook for details on the Output screen options and especially to learn more about the
unique POD X3 Dual Tone feature.
POD X3 also offers a Monitor Level slider in this tab as well - you can use this to independently adjust
your POD X3 monitor signal while recording (independently of the Send signal level that is being
recorded).
PODxt devices show only one Record Send (Record 1-2).
The type of signal that is routed to the Record Send 1-2 is determined by the PODxt Signal Routing
option within the Audio Signal Routing menu at the left. Note that this Audio Signal Routing
determines this signal type regardless if GearBox is running or not. (See the PODxt Audio Signal
Routing section for more about the options in this menu). PODxt also offers a Monitor Level slider in
this tab as well - you can use this to independently adjust your PODxt monitor signal while recording
(independently of the Send signal level that is being recorded).
3•20
Page 65

Line 6 GearBox 3.7 – Driver Panel & Recording
Line 6 Audio MIDI Settings Dialog - Inputs & Recording Tab (TonePort UX8 Only)
1
2
3
4
5
1 – Input Source Select: TonePort UX8 offers 8 individual input sources, each with its own selector
where you can choose which physical input is to be used for each. Input source options are as follows:
Input 1: Instrument 1 or XLR 1 or Line 1 or S/PDIF (L)
Input 2: Instrument 2 or XLR 2 or Line 2 or S/PDIF (R)
Input 3: XLR 3 or Line 3
Input 4: XLR 4 or Line 4
Input 5: XLR 5 or Line 5
Input 6: XLR 6 or Line 6
Input 7: XLR 7 or Line 7
Input 8: XLR 8 or Line 8
Using Inputs 1 & 2 with the GearBox standalone application
The GearBox standalone application works with the TonePort UX8 driver to provide ultra-low latency
via ToneDirect™ monitoring for Inputs 1 & 2 of the UX8, which includes two high-Z Instrument
inputs, two XLR inputs, two Line level inputs and stereo S/PDIF input. GearBox’s ToneDirect
Monitoring is ideally suited for recording guitar and bass with amp and effects processing, providing
3•21
Page 66

Line 6 GearBox 3.7 – Driver Panel & Recording
the instantaneous feel necessary for competent performance while tracking.
When GearBox is not in use, the Input 1 & input
2 selectors are available. As shown here, TonePort
UX8 offers several input Sources to choose from.
The selected Source is what gets routed to the
Device Send.
Stereo Paired Inputs
You can also link inputs into stereo pairs. This affects
hardware monitoring controls in the Outputs &
Monitoring tab (see below).
2 – Device Sends info box: One line for each GearBox Record Send appears here along with a general
description for each Send.
On UX8, Send 9-10 carries the GearBox processed signal, so you can select this Send as the
track input in your audio software to record the
full GearBox Tone. Send 11-12 carries the “semiprocessed” Tone, which can vary depending on
what GearBox effects you select as either “Pre” or
“Post” the Send 11-12. All other Sends carry an
unprocessed signal of whatever is plugged into the
respective Input jack on the UX8 hardware.
3 - Restore Defaults - click this button to restore all this tabs settings to their original default values.
4 - Clock Source - Set your preferred TonePort UX8 clock source with this menu. Select S/PDIF to
sync the UX8 to an external S/PDIF clock source from another device’s digital output. If you are not
connecting anything into UX8’s digital S/PDIF input, then keep this set to Internal to use the UX8’s
own clock.
5 - Hardware Meters Show - This selector allows you to choose what the VU meters on the front of
the UX8 are measuring. Note that these hardware meters function even if the GearBox software is not
currently running.
3•22
Page 67

Line 6 GearBox 3.7 – Driver Panel & Recording
Outputs & Monitoring Tab (TonePort UX8 Only - Mac)
Important: Note that the Outputs & Monitoring tab provides control over monitoring levels,
specifically, what you hear coming out of the UX8. These controls do not affect Send levels, the
audio that streams into your recording software. In other words, volume and pan levels here are purely
analog, intended for monitoring live input levels (from instruments, mics, etc) and computer output
levels, in order to facilitate the recording process.
The Outputs & Monitoring tab provides control over hardware monitoring settings, including input
source volume, pan and mute states. You can specify different mix settings for each pair of UX8 outputs
if you like.
3•23
Page 68

Line 6 GearBox 3.7 – Driver Panel & Recording
By default, the only sounds that come out of the UX8 are the computer’s output and GearBox 9-10
signal (fully processed), all through Main Outs 1-2. You can directly monitor other UX8 inputs by
unmuting (unchecking the Mute checkbox for) the corresponding input source in this tab. The UX8
provides monitoring through the hardware with zero latency, which is ideal for tracking with multiple
sources simultaneously.
Use the drop-down menu at the top
to select the output pair for which you
want to mix. Each output pair can
have different mix settings.
Mix Controls
Inputs 1 - 8 offer the following controls:
Mute (On/Off) Monitor Volume (-100dB to +6dB)
Monitor Pan (100% Left - 100% Right)* Stereo Monitor Meters
* -3dB panning law is applied to the pan control to maintain a constant monitoring level across the
panorama.
Mix Controls for Inputs 9 - 12:
GearBox monitoring controls behave identically to Inputs 1- 8, with the exception of the Volume
Level. GearBox Sends provide a max monitoring level of 0 dB, whereas the other inputs max at +6
dB, in order to match the 0 dB maximum monitoring level provided by the GearBox standalone
application.
Main Monitor Volume
This slider controls the overall monitoring volume for the current output pair. What you hear is
displayed in the adjacent level meter and includes the combination of input sources and computergenerated signals, such as those assigned to the current output from within your recording software.
Note that computer-generated signals are unaffected by the volume slider. The level meter’s clip LED
graphics light up when the signal reaches 0 dB.
3•24
Page 69

Line 6 GearBox 3.7 – Driver Panel & Recording
Main Mix vs. Talent Mix
The UX8’s two front panel headphone outputs mirror Outs 1-2 and 3-4 respectively. You can use the
monitor controls, for example, to create a “main mix (1-2)” that captures the overall image of the
recording project, while a separate “talent mix (3-4)” can be provided for the musician who is currently
adding a new part (you know, the guy asking for “more me” in his phones), and may need a click track
and an ample level of themselves above the rest of the mix. Additional output pairs 5-6 and 7-8 are
available for headphone mixers or sending to a mixer, other monitors, etc.
Stereo Pairs
When the “Stereo” checkbox is active in the Inputs & Recording tab for a pair of Inputs, the
representative Inputs in the Ouputs and Monitoring tab will display them as “locked” as a stereo pair.
The lock icon represents two sources linked as a stereo pair.
The Pan sliders for a “locked” stereo pair are automatically set to 100% Left and Right.
Using tool tips
You can obtain precise value readings for output levels, volume sliders and pan sliders. Do this by
hovering the mouse cursor over the meter or slider you wish to read.
3•25
Page 70

Line 6 GearBox 3.7 – Driver Panel & Recording
Important Things to Know for Recording
This section will give you some pointers for using your Line 6 Hardware for recording, to help you get
your brain wrapped around all that complex computer stuff your geeky friends talk about at parties.
We’ve got even more info, including setup tips for specific audio programs and system tweaking tips in
our GearBox Recording Setup Guide – its available free on the line6.com GearBox User Manuals page!
Sample Rate and Bit Depth
When you select a Sample Rate in your audio recording software, your Line 6 hardware’s audio driver
will automatically match the sample rate setting. It is important to manually match the Bit Depth
settings between your audio recording software and Line 6 audio driver as well. Here are a few things
to check:
Configure your recording program’s sample rate settings, and then confirm that your Line 6 •
hardware is running at the correct settings in the Line 6 Audio-MIDI Devices dialog (Windows)
or in the Audio-MIDI Setup dialog (on Mac). It is best to always change the sample rate settings
in your audio software. In most audio software you’ll want to make this setting as a Global setting
or as a per project setting, and always before you start a new project for it to use a new sample
rate.
Typically, you can choose the 44,100 sample rate in your audio software for most projects. But if •
you have special requirements for your session, then you can alternatively choose 48,000, 88,200
or 96,000 Hz in your audio software and your Line 6 device will support any of these rates.
For the Bit Depth on Windows systems, it is typically best choose the 24-bit option in your •
Windows audio software and to manually select 24-bit in the Line 6 Audio-MIDI Devices dialog
if your Windows audio software supports this rate - most all audio recording software does these
days. If your Windows audio software is set to 16-bit operation, then it is best to match this
setting and choose the 16-bit option in the Line 6 Audio-MIDI Settings dialog.
For the Bit Depth on Mac systems, it is recommended you choose 24-bit in your recording •
software for all projects. As you’ll see in the Mac Audio-MIDI Setup dialog, 24-bit is the fixed
setting for both Audio Input and Output for all Line 6 devices.
GuitarPort Tracks Can’t Be Recorded
Attention GuitarPort Online members… Your guitar and/or other input signals (except for Monitor
In) from your Line 6 device are the only signals routed to the Record Sends and made available to
recording software. Tracks played via the GearBox program’s internal Player are not fed to the Record
Sends, cannot be recorded to other programs, and not fed to the S/PDIF or AES/EBU digital outputs
(for Line 6 devices that include digital outputs). This restriction on the Player audio routing is required
in order for Line 6 to protect the copyrights of the musicians and other copyright owners that have
licensed music for use in GuitarPort Online.
3•26
Page 71

Line 6 GearBox 3.7 – GearBox Stand-Alone Application
ge a r Bo x St a n d -aL o n e aP P L i c a t i o n
This chapter offers a tour of the GearBox interface when in use with a Line 6 TonePort, GuitarPort or
PODxt family device in use.
POD X3, POD X3 Live & POD X3 Pro owners - please skip to the following GearBox with POD
X3 chapter for the full GearBox Stand-Alone Application information with your device.
Note that the GearBox interface includes different options depending on your specific Line 6 hardware.
In this chapter, we’ll describe the GearBox interface with a TonePort UX2 connected - features are
very similar for all TonePort, GuitarPort & PODxt units, and we’ve called out where things differ for
each specific device type. If you are using a PODxt, PODxt Live & PODxt Pro device, please also be
sure to check out the GearBox with PODxt section for additional, PODxt-specific GearBox controls.
Overview
The GearBox software is free for every owner of the Line 6 TonePort, GuitarPort, POD X3 and PODxt
recording and modeling interfaces and is your new Tone Control Central! It gives you visual control,
makes it easy to create, edit and save your Tones, includes plenty of great presets, and connects you
directly to our exclusive online Tone Library of thousands of professionally programmed Tones.
GearBox can run alongside your favorite recording software, letting you easily control every detail of
your sound right from your computer during recording, and our additional GearBox - User Manuals
documentation includes step-by-step instruction for using GearBox with some of the most popular
Windows® and Mac® recording software to help make your computer recording experience a great one.
GearBox even connects you to GuitarPort Online, our exclusive online world for guitarists who want
to play along with the latest and greatest tracks, lessons and licks, covering the greatest guitarists of all
time. Combine that with Line 6 Monkey, our world class driver software technology, Add-Ons such as
Model Packs and the GearBox Plug-In to expand your Tone arsenal, and it all adds up to be the world’s
most advanced tone system for guitarists. We call the whole shooting match The GearBox Platform.
4•1
Page 72

Line 6 GearBox 3.7 – GearBox Stand-Alone Application
GearBox Controls and Operation
1 2 3 4 5 6 7 8 9 10
23
22
21
20
19 18 17
All descriptions that follow are the same for Windows® or Mac®, unless otherwise noted.
1 – Source Select menu:
TonePort UX1, UX2, UX8, KB37 – Here is where you choose which physical input(s) you want
to use for the GearBox Tone path. Note that TonePort devices also offer a Dual-Tone Source option.
See the next Dual-Tone section for more about this.
11
12
13
14
15
16
TonePort DI, GX, GuitarPort, PODxt – No Source Select is shown since these units offer only
one input.
2 - Show/Hide button: Clicking this button collapses or expands the viewable height of the Amp and
Effects controls. It’s useful to collapse these controls if you want to maximize the size of only the lower
Browser window.
3 - Tone Menu: Click here to choose from all saved Tones – when you create and save your own
masterpiece Tones, they’ll appear here too.
4 - Amp Model menu: Choose from all available Amp Models available for your connected device.
Remember, you can add more models with optional Model Packs from the Line 6 store!
5 - Cab Model menu: Choose from a huge assortment of speaker cabinets. We’ve pre-chosen cabs to
match up with your selected amp, but you can choose the Cab here independently - a different cab can
make a huge difference on the sound, so try a few different ones!
4•2
Page 73

Line 6 GearBox 3.7 – GearBox Stand-Alone Application
6 - Tone Options menu: Click this button to do an “A/B” Compare of your settings vs. preset settings,
view or edit the Tone Info, Save the Tone, or Save As to do a copy of the current Tone.
7 - Monitor controls:
Monitor Volume –• the level of whatever input signal you are feeding into GearBox (e.g. - your
guitar) – this is independent of the level routed to your Record Send 1-2 as well as the “playback”
level of audio software that is routing its output to your Line 6 device.
Monitor/Clip light –• will light up green to indicate your signal, and gets yellow and then red as
the level increases. Red means your signal is too hot (in which case you should turn down your
input source and/or Monitor vol.)
Mute button –• Mutes the monitor signal only.
Note – GearBox will not display this Mute button when PODxt is the source device.
Pan slider –• Pans your source input left or right. This affects the signal that is routed to BOTH
your Record Send 1-2 and the Monitor path. Double click on the slider to set it to dead center.
For TonePort devices – When using a single Tone Source, these control the Record Send 1-2
Monitor signal path. Send 3-4 has its own set of Monitor controls (accessible in the effects panel
when you click the Send 3-4 icon). If you are in a Dual-Tone Source mode, these controls will affect
the current, visible Tone only.
For TonePort UX8 only – Note that GearBox’s record sends are labeled “9-10” and “11-12”.
8 - Out To Hardware controls:
TonePort & GuitarPort –
Volume knob –• controls the level of audio routed out the analog Line Outs (and headphone out)
of your device. This will affect both your Monitor signal AND the playback signal coming into
your Line 6 device from your audio software. It does NOT affect the level of your signal going to
the Record Send 1-2.
Output Indicator/Clip light –• will light up green to indicate your signal, and gets yellow and
then red as the level increases. Red means your signal is too hot and you should reduce all
individual levels and/or the Volume knob.
Mute Line Out button –• Mutes all signals routed to the Line Outs only (and not your headphone
out), but does not affect the signal routed to the Record Sends. This is very useful when recording
with a Mic since it stops your mic signal from coming out your speakers (to avoid feedback) but
still lets your hear it and everything else through your headphones.
Note – GearBox will not display this set of Out To Hardware controls when PODxt is the source
device.
4•3
Page 74

Line 6 GearBox 3.7 – GearBox Stand-Alone Application
For TonePort/GuitarPort devices – These controls affect the Monitor and playback signal paths for
both Record Sends 1-2 and 3-4, or both Tones when using a Dual-Tone Source.
For TonePort UX8 only – Note that GearBox’s record sends are labeled “9-10” and “11-12”.
9 - Bypass button:
TonePort – will bypass all amp and effects processing for the currently displayed Tone. Just your
“naked”, unprocessed signal will be heard as well as routed to your Record Sends when bypassed.
GuitarPort – will bypass all amp and effects processing. Just your “naked”, unprocessed signal will
be heard as well as routed to your Record Sends when bypassed.
PODxt – will bypass only the amp
10 - Tuner button: Toggles the display of the Guitar Tuner.
11&12 - Effects Show/Hide and On/Off toggles:
Clicking on the top portion of each of the little “stomp box” icons in this row will toggle the •
lower Effects Panel to display that effect’s controls. You can do this independently of switching
the effect itself On/Off. Note that you can use your left or right mouse button to do this.
Clicking the bottom portion of the stomp box will toggle the effect On and Off. •
13 - GearBox Record Send and VU Meters:
TonePort & GuitarPort – These show the signal level of the GearBox-processed audio that is
sent to your recording software. For UX8, this send is labeled Send 9-10. For other TonePorts, it’s
labeled Send 1-2. This send represents the fully-processed GearBox audio signal. To record exactly
what you hear, select this send as your audio input, within your recording application. If the little
clip indicator at the bottom of each meter lights red, turn down the RECORD knob and/or turn
off the +18 button, because you are clipping your audio, which can cause harsh, bad sound for your
recording.
These indicators will light up red when
the signal is clipping.
Note – GearBox will not display VU Meters when a PODxt is the source device.
14 - Record Send 1-2 controls:
Record knob –• controls the level of your GearBox processed Tone that is routed to Record Send
1-2. this will ultimately control the record level into your audio software for any track receiving
this Send 1-2 signal.
4•4
Page 75

Line 6 GearBox 3.7 – GearBox Stand-Alone Application
+18 button –• Boosts the level of the Record Send – useful if your GearBox signal is a weak one
and you need more level to get a good record level.
Mono button –• sums the GearBox stereo Tone to a Mono signal for Record Send 1-2 (the same
mono signal is fed to both Send 1 and 2 channels). Useful if you want to record from Send 1 or
2 and ensure it is not one side of a stereo signal.
Note – GearBox will not display the Mono button when a PODxt is the source device.
15 - USB device connection indicator:
TonePort & GuitarPort – This little USB plug icon appears flashing if GearBox does not find a
supported Line 6 USB device connected to the computer.
PODxt – When GearBox is set to use a PODxt source device, a little red PODxt icon is displayed.
If the PODxt device is disconnected or powered off, the icon appears with a question mark.
16 - CPU meter: Shows how much of your computer’s processing power is currently being utilized. If it
reaches the red then you may experience audible dropouts and therefore need to reduce other processes
running, or bypass some GearBox effects.
17 - Effects Control display: This panel displays the controls for the selected effect (see # 11 & 12
and #18 for how to choose to show an effect’s controls). For TonePort this can also show the Record
Send 3-4 controls.
18 - Effect menu: Offers selection for which effect’s controls are shown in the Effects Control display
area.
19 - Info Bar: Text appears in this bar relating to what your mouse cursor is currently hovering over.
This is a very handy source of tips while using GearBox – remember to look here for info while clicking
around!
20 - Browser controls: All button in this row control things that appear in the Browser panel below.
We’ll go into more detail on the browser section separately, which includes the GuitarPort Online
functionality, Player, Tone Locker, and more!
21 - Hardware Meters Show menu:
TonePort UX2/KB37 only – allows selection for what signal the VU meters on the TonePort UX2
device will measure.
4•5
Page 76

Line 6 GearBox 3.7 – GearBox Stand-Alone Application
22 - Show/Hide Effects display button: Click this button to collapse or expand the area which shows
the Effects Control display and Record Send 1-2 controls.
For TonePort UX8 only – Note that UX8 hardware meters are configured in the Line 6 AudioMIDI Devices application, Inputs & Recording tab.
23 - Hum Reducer feature:
TonePort & GuitarPort – Use this feature to eliminate that annoying hum that guitars sometime
have, especially when in front of computer monitors. Click the Hum Reducer button to walk
through the use of this feature:
Note 1 – GearBox will not display the Hum Reducer options when a PODxt is the source device.
Note 2 – The Hum Reducer is for Instrument Input 1 only. Hum Reducer is not available for Mic, Line
or Digital input.
GearBox with TonePort and GuitarPort
Using GearBox with a TonePort or GuitarPort device gives you access to multiple Record Sends, and
with a TonePort UX1/UX2/UX8/KB37, you get Dual-Tone operation, bringing out the most out of
4•6
Page 77
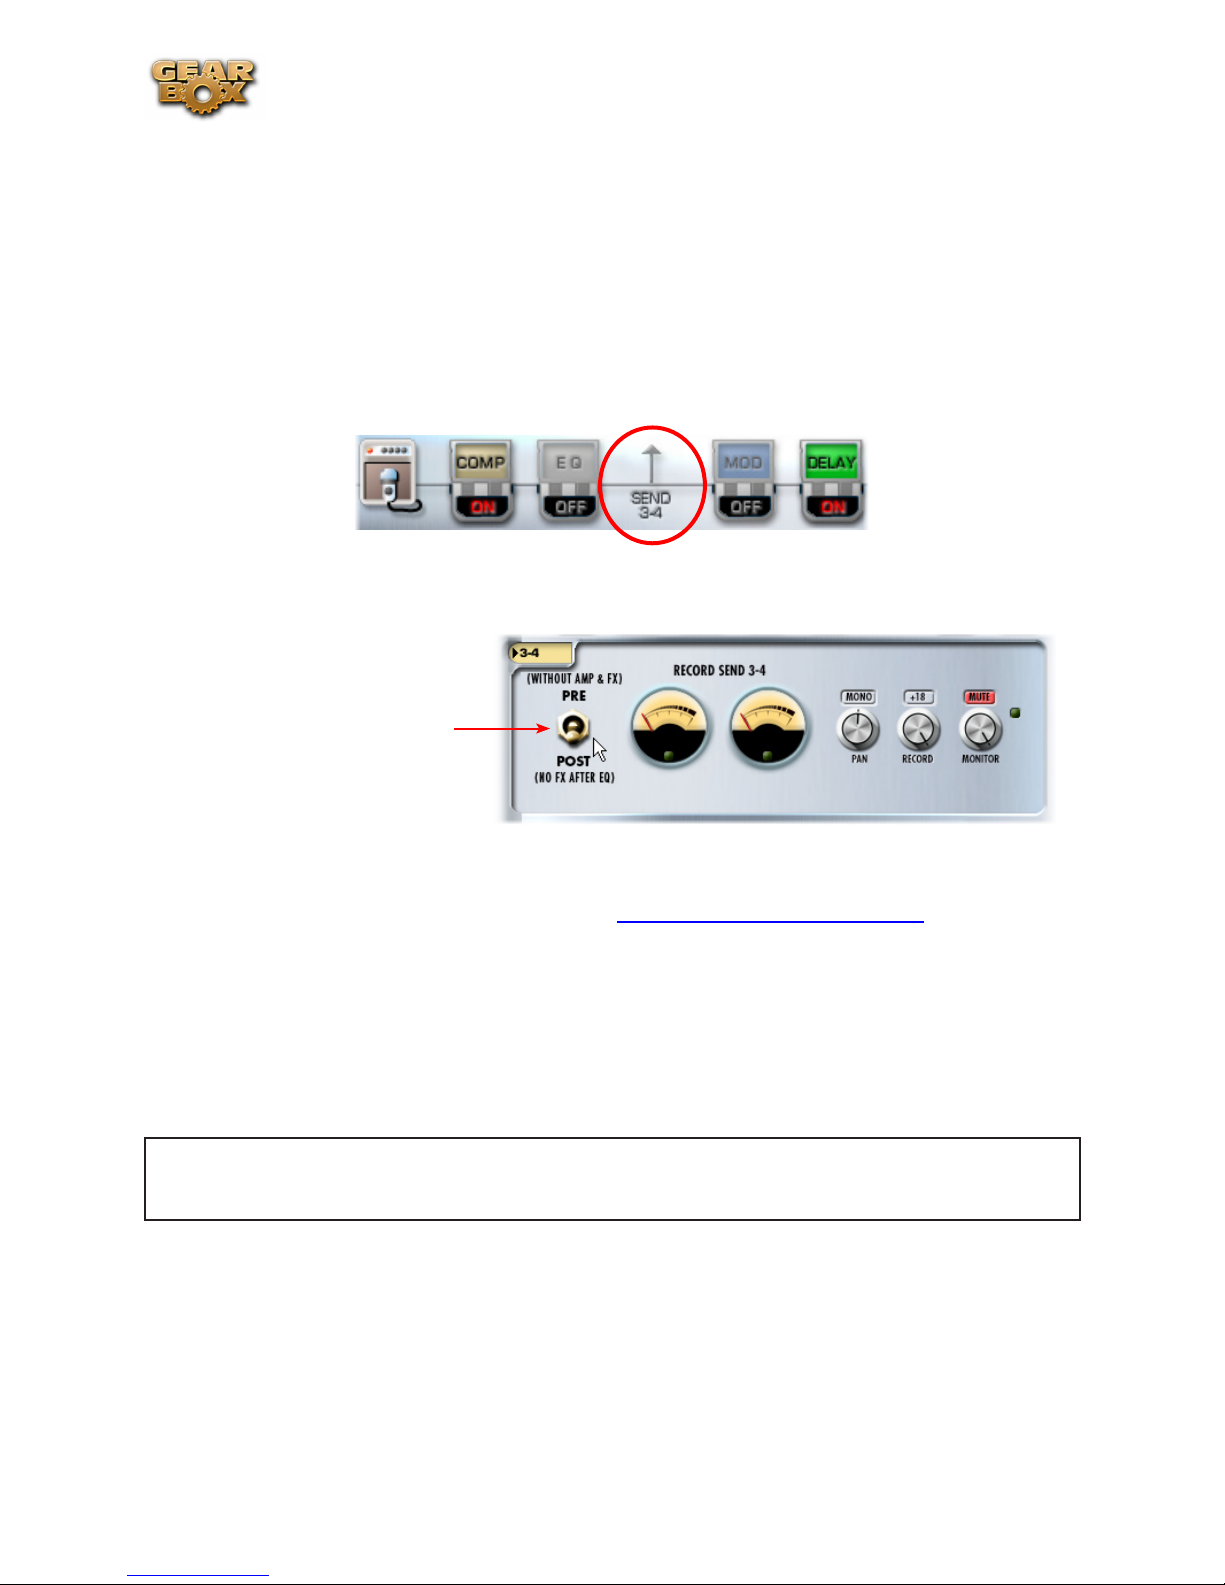
Line 6 GearBox 3.7 – GearBox Stand-Alone Application
GearBox!
Note: TonePort DI, GX and GuitarPort can only run in Single-Tone configuration.
Pre/Post Record Send
GearBox displays an additional Record Send for TonePort and GuitarPort devices, which provides
several useful signal routing functions. When you have a single input Source chosen in the Source
Select menu, you’ll see the Send 3-4 icon (labeled Send 11-12 for UX8) in the row of the Effects
icons.
Click on this Send icon to show its controls in the panel below.
Select PRE to route an
unprocessed signal to Send 3-4.
Select POST to route a semiprocessed signal to Send 3-4
(see below).
Record Send 3-4 has its own dedicated set of controls and meters that are equivalent in function to
the Send 1-2 controls of the same name (see the GearBox Controls and Operations section)*. When
using an audio recording software configured to use the ASIO driver (on Windows®) or Core Audio
driver (on Mac®), it is possible to select the GearBox Send 1-2 or Send 3-4 independently for your
track inputs for recording.
Please note that the pre/post setting of Record Send 3-4 is not saved within the Tone Preset.
*For TonePort UX8 only – With a UX8, Record Send 9-10 is the primary GearBox-processed Send,
and Record Send 11-12 is the pre/post switchable Send.
Note – if your audio application is configured to use the WDM/DirectSound driver (on Windows®), you
will only be able to access Send 1-2 in the recording software, and it will carry both GearBox Send 1-2
and 3-4 signal paths, pre-mixed into Send 1-2.
Monitoring a GearBox-processed Tone While Recording “Dry”
With GearBox Send 3-4, you can send a dry, unprocessed signal to your favorite recording application,
while monitoring a fully GearBox-processed tone thru your hardware’s outputs*. The Send’s Pre/Post
switch gives you a couple of options:
4•7
Page 78
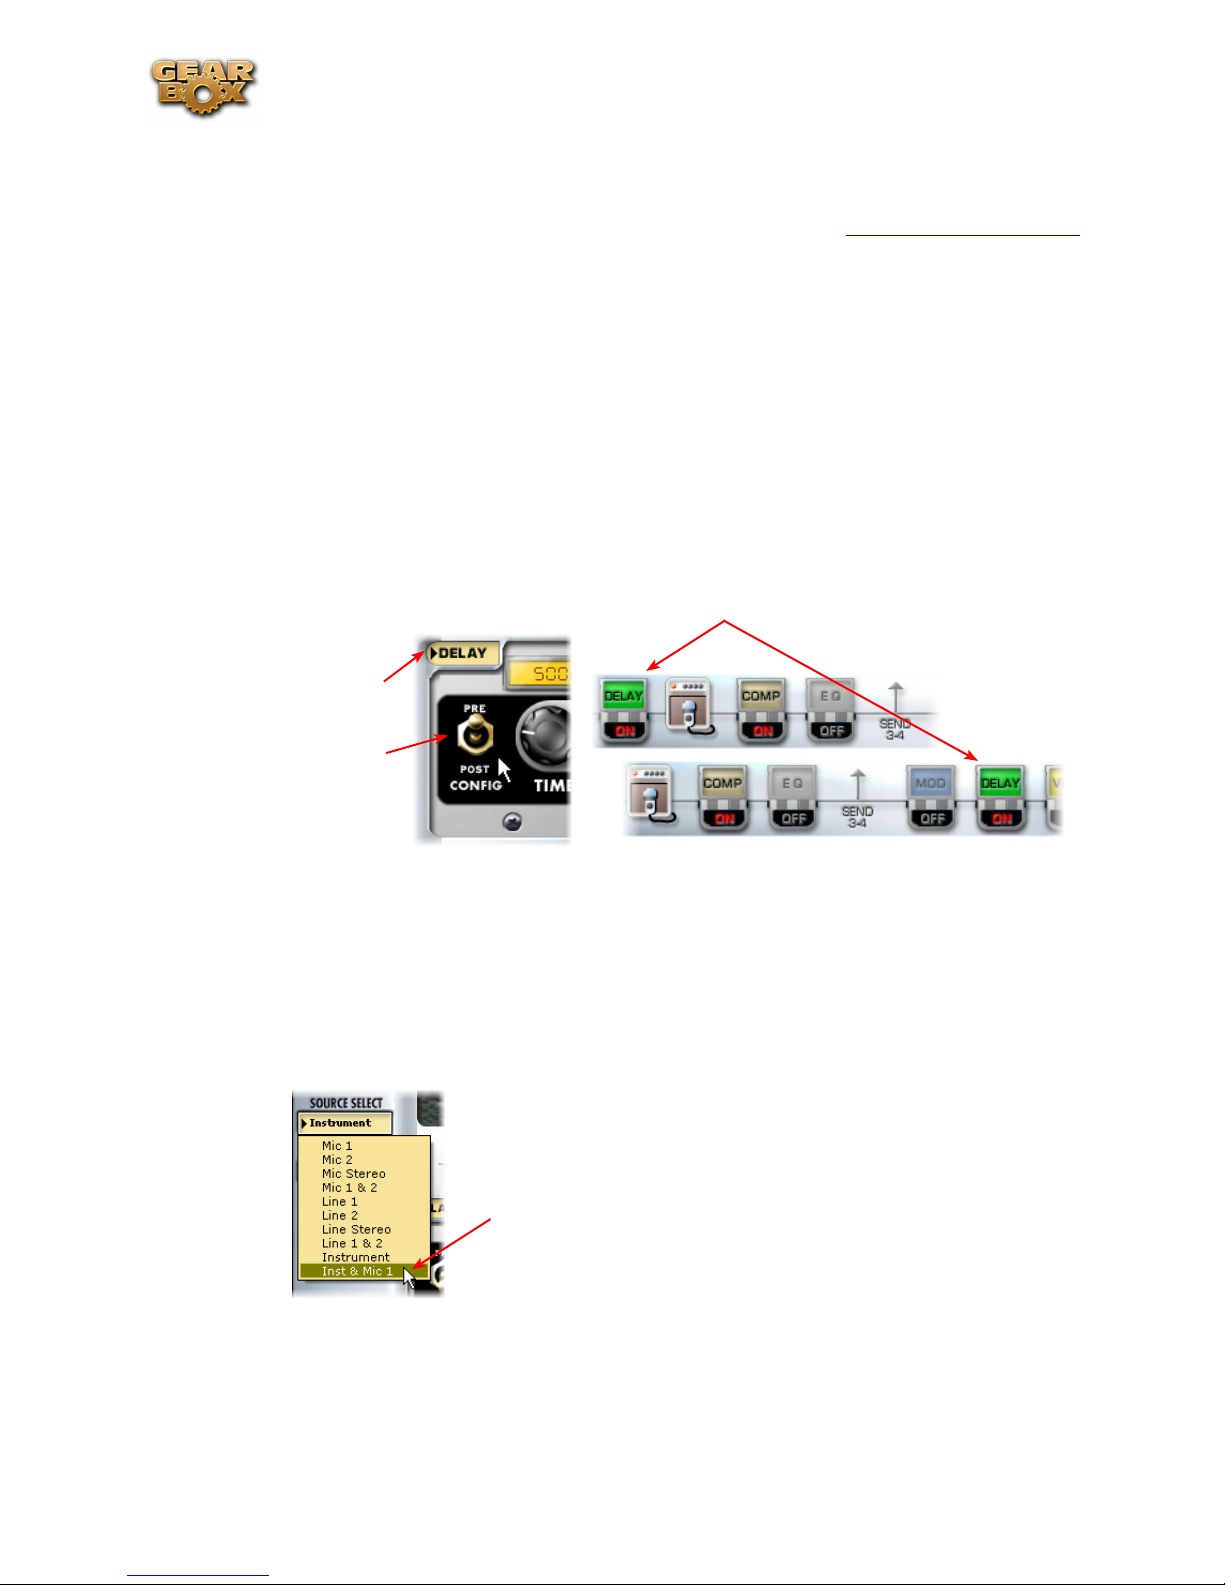
Line 6 GearBox 3.7 – GearBox Stand-Alone Application
In the • PRE position, Send 3-4 taps into the audio path before any processing is applied to the
input source, routing a totally dry signal thru the USB port. This is useful when using plug-ins,
including the GearBox Plug-in, since you can record a pass with a no-compromise, great feeling
tone, without committing any tone shaping to the track (see the ToneDirect™ Monitoring
section for more info).
In the • POST position, Send 3-4 taps into the audio path right after the EQ, and before any post-
effects are applied. With this setting, you can apply some amp or mic preamp modeling to your
signal before routing it to Send 3-4.
In the POST scenario, you can designate the Modulation, Delay and Reverb FX to be either before
or after Send 3-4 to determine if that effect is processed on the Send 3-4 signal or not. For example,
if you set the Delay and a Reverb effects both to “Post”, then they are only processed on the signal
sent to Send 1-2, and Send 3-4 is tapping the signal just before these effects. This makes it possible
to monitor Send 1-2 and hear these effects, but then choose Send 3-4 in your audio application and
actually record the signal without them.
*For TonePort UX8 only – Note that GearBox’s pre/post record send is labeled “11-12”.
The selected effect’s icon moves to the left or right of
the Send 3-4 icon depending on the effect’s Pre/Post
setting
Click on an effect
to display its control
display in the Effects
panel
Use the Pre/Post toggle
switch
Dual-Tone Operation (TonePort UX1/UX2/UX8/KB37)
These TonePort devices are unique in that they give you not one, but two independent Tone paths!
This feature allows you to process two completely independent Tones for two separate inputs at the
same time, such as your guitar plus a microphone, and allows your recording software to record each
in its own separate track.
The “Dual-Tone” inputs are the ones in the
Source Select menu that have the “&” symbol in
the names (e.g. Inst. & Mic 1).
When choosing one of the Dual-Tone input Sources, this displays two distinct Tones within GearBox,
allowing you to tweak each source with its own independent Tone settings. When in this Dual-Tone
mode, GearBox automatically routes Tone 1 to Record Send 1-2, and Tone 2 to Record Send 3-4,
which allows your recording software to record each into separate tracks.
4•8
Page 79
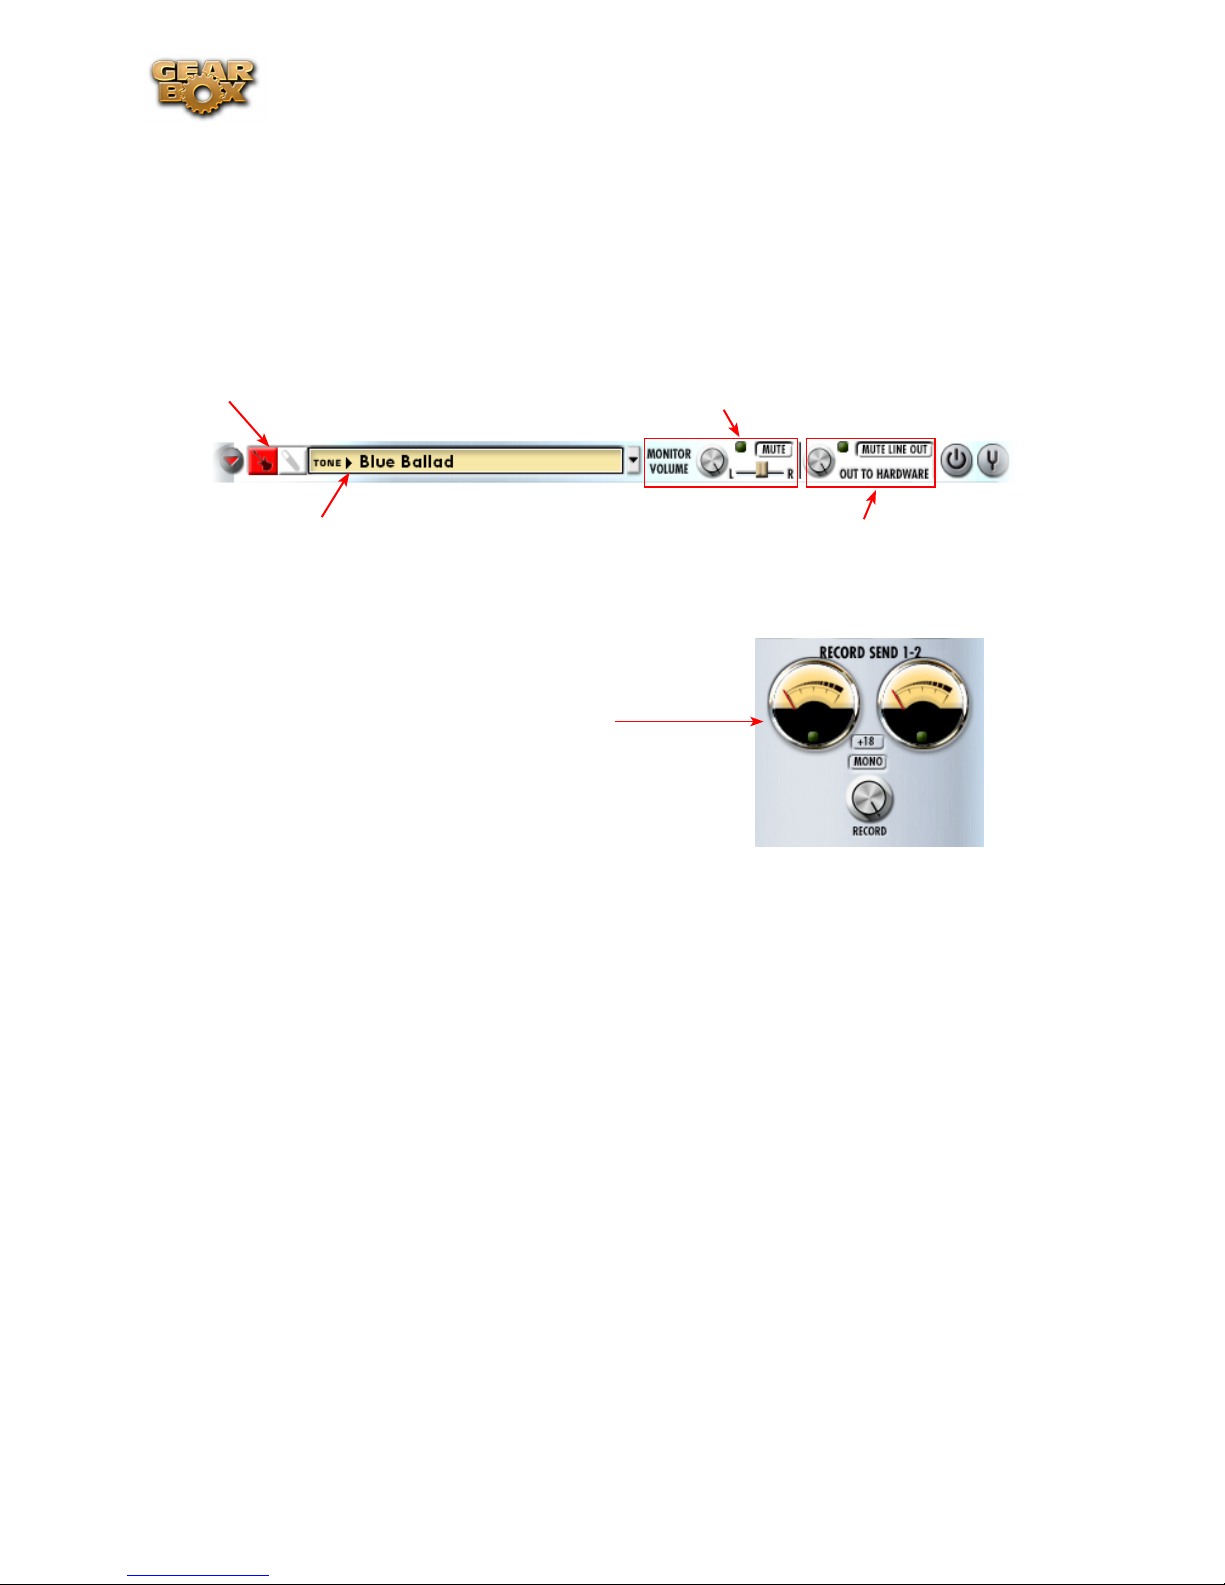
Line 6 GearBox 3.7 – GearBox Stand-Alone Application
For TonePort UX8 only – Tone 1 and Tone 2 route to Record Send 9-10 and Record Send 11-12
respectively.
In Dual -Tone mode, the Tone 1 & Tone 2 toggle buttons appear at the top left to allow you to show
the Amp and FX configuration for the respective Tone path. Note that these other controls across
the top of the dialog automatically adjust the currently displayed Tone’s settings. For example, here
the “Inst. & Mic1” Source is selected, and the “Instrument” Source’s Tone path is selected. Several
controls at the top now affect only the Instrument Tone. To adjust the Mic 1 Tone settings, you switch
the Tone 1, 2 toggle button, and then adjust the controls independently.
Tone 1, 2 toggle buttons
Monitor controls affect the currently displayed
Source’s Tone
Selects a Tone preset for current Source’s Tone
Out To Hardware controls affect BOTH Tones
Note that the Send meters and control automatically change when toggling between Tone 1 and Tone
2 Sources as well.
The Send 1-2 controls are shown for Tone 1, and
Send 3-4 controls are shown for Tone 2
Operating GearBox in Dual-Tone mode can require some major processing power from your computer
(not surprisingly, twice as much as a single Tone!) Each effect that is powered “on” will use some
processing power – effects that are “off” do not use processing power.
Note that the Hum Reducer is for Instrument Input 1 only. Hum Reducer is not available for Mic, Line
or Digital input.
MIDI Control
When using GearBox with TonePort and GuitarPort devices, GearBox offers options for remote control
of its parameters. You can connect a 3rd party MIDI controller device to a MIDI port on your computer
and set GearBox to receive MIDI Continuous Controller (CC) data from it.
GearBox is also capable of sending out MIDI CC data for the adjustment of the onscreen GearBox
knobs and switches.
4•9
Page 80

Line 6 GearBox 3.7 – GearBox Stand-Alone Application
To send out MIDI CC data from the
adjustment of GearBox onscreen knobs &
switches, check this box.
To control GearBox features (such as Wah
or Volume) from a 3rd party hardware
MIDI controller device or software, choose
the MIDI Port that your controller unit is
connected to. GearBox will then receive
MIDI CC data on MIDI Channel 1.
TonePort UX2/UX8/KB37 Controllers
TonePort UX2, UX8 and KB37 include footswitch jacks on the hardware to provide remote control
of GearBox parameters, such as Wah and Stomp On/Off. You can assign these controls to any
available GearBox parameter or MIDI function from the MIDI tab of the Line 6 Audio-MIDI Devices
application.
TonePort devices have the following jacks:
UX2 2 footswitch jacks
UX8 2 footswitch jacks
1 Expression pedal jack
KB37 2 footswitch jacks
1 Expression pedal jack
KB37 Controllers
Additionally, the TonePort KB37 features a number of knobs, wheels and buttons which can be
configured to control more GearBox and 3rd-party application functions. KB37 ships with a default set
of functions assigned to its controllers, which you can re-configure in the Line 6 Audio-MIDI Devices
control panel.
4•10
Page 81
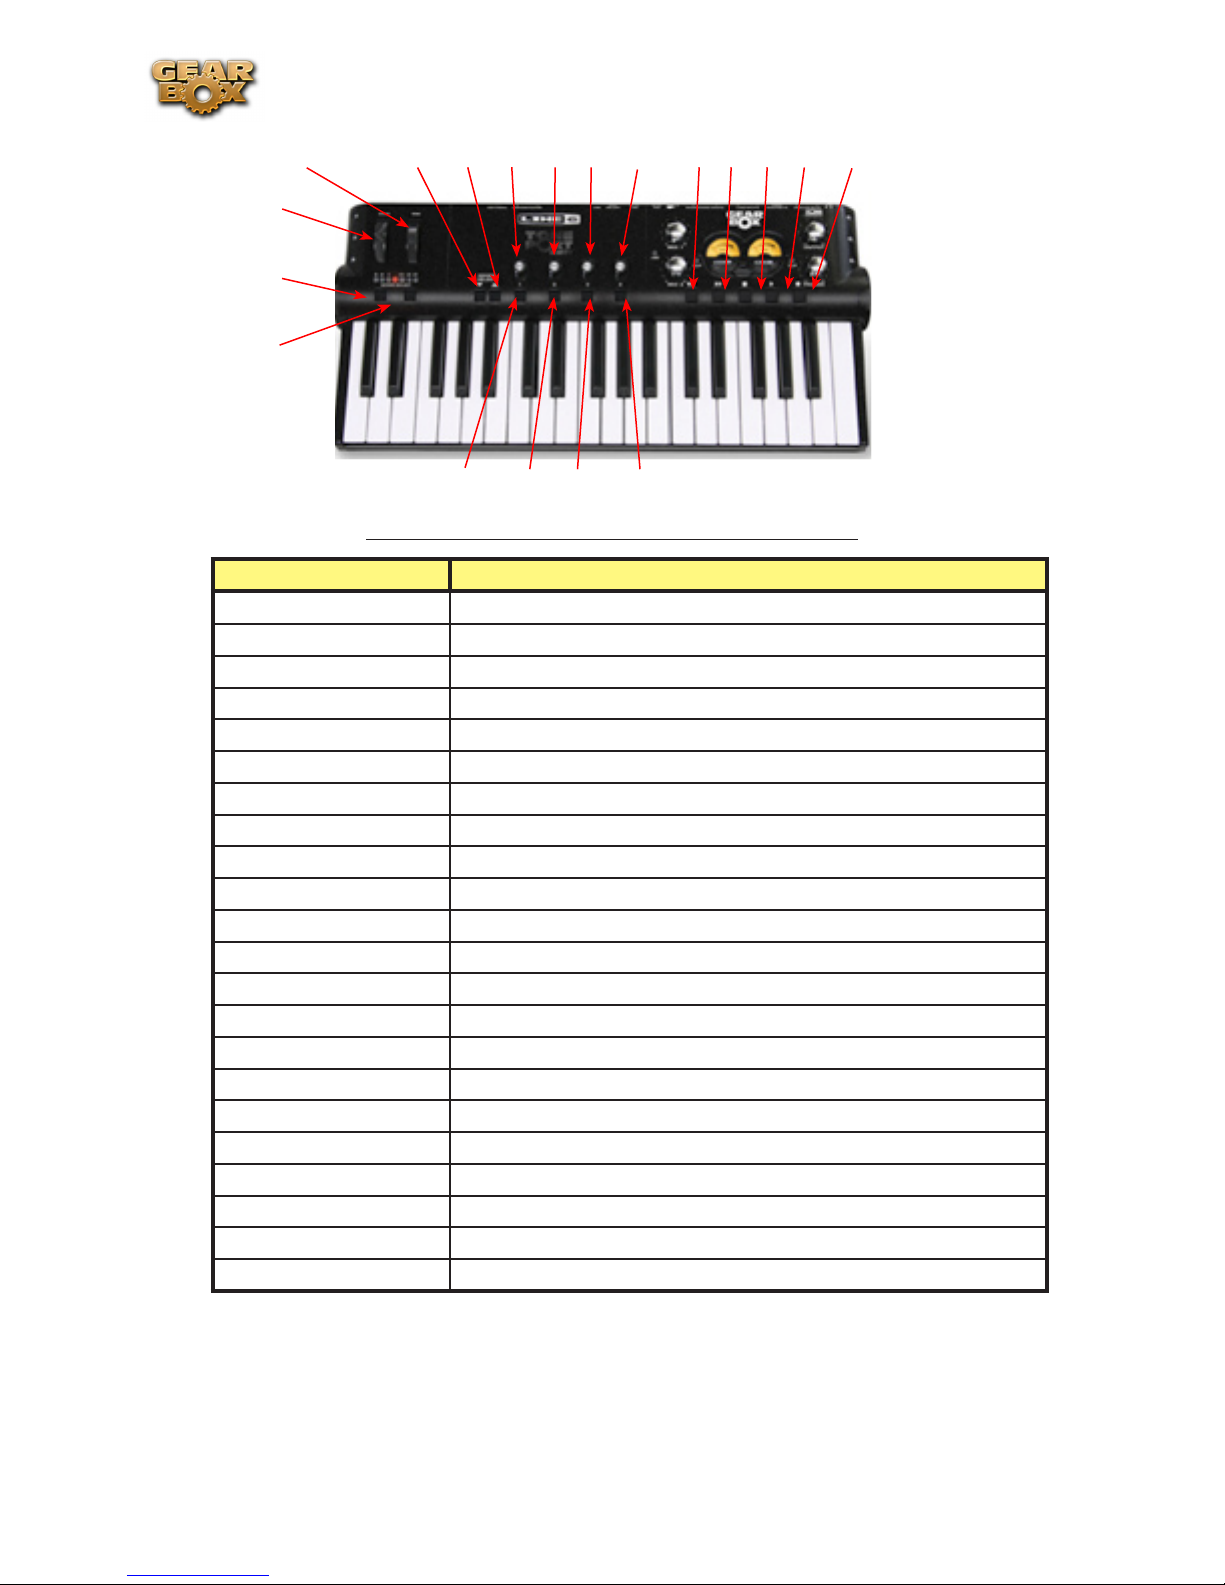
Line 6 GearBox 3.7 – GearBox Stand-Alone Application
4 5 6 7 8 9 10 11 12 13 14 15
3
2
1
16 17 18 19
KB37 default messages for non-GearBox applications
Controller Default MIDI/Control Message
1 - Octave up None (internally shifts note numbers +1 octave; Not Re-assignable)
2 - Octave down None (internally shifts note numbers -1 octave; Not Re-assignable)
3 - Pitch Wheel Pitch Wheel (Not Re-Assignable)
4 - Mod Wheel CC 1 (Modulation Wheel)
5 - Program increment +1
6 - Program decrement - 1
7 - Knob 1 CC 73 (Attack Time)
8 - Knob 2 CC 75 (Decay Time)
9 - Knob 3 CC 72 (Release Time)
10 - Knob 4 CC 91 (Effects | Depth)
11 - Rewind MMC Rewind
12 - Forward MMC Fast Forward
13 - Stop MMC Pause
14 - Play MMC Play/Stop
15 - Record MMC Record/Punch
16 - Button 1 CC 65 (Portamento)
17 - Button 2 CC 127 (Poly On)
18 - Button 3 CC 126 (Mono On)
19 - Button 4 CC 123 (All Notes Off)
Expresion Pedal CC 11 (Expression)
Footswitch 1 (Sustain) CC 64 (Sustain)
Footswitch 2 MMC Record Punch
To re-map the functions of any of these controllers, go to Edit>Preferences and follow these steps:
4•11
Page 82
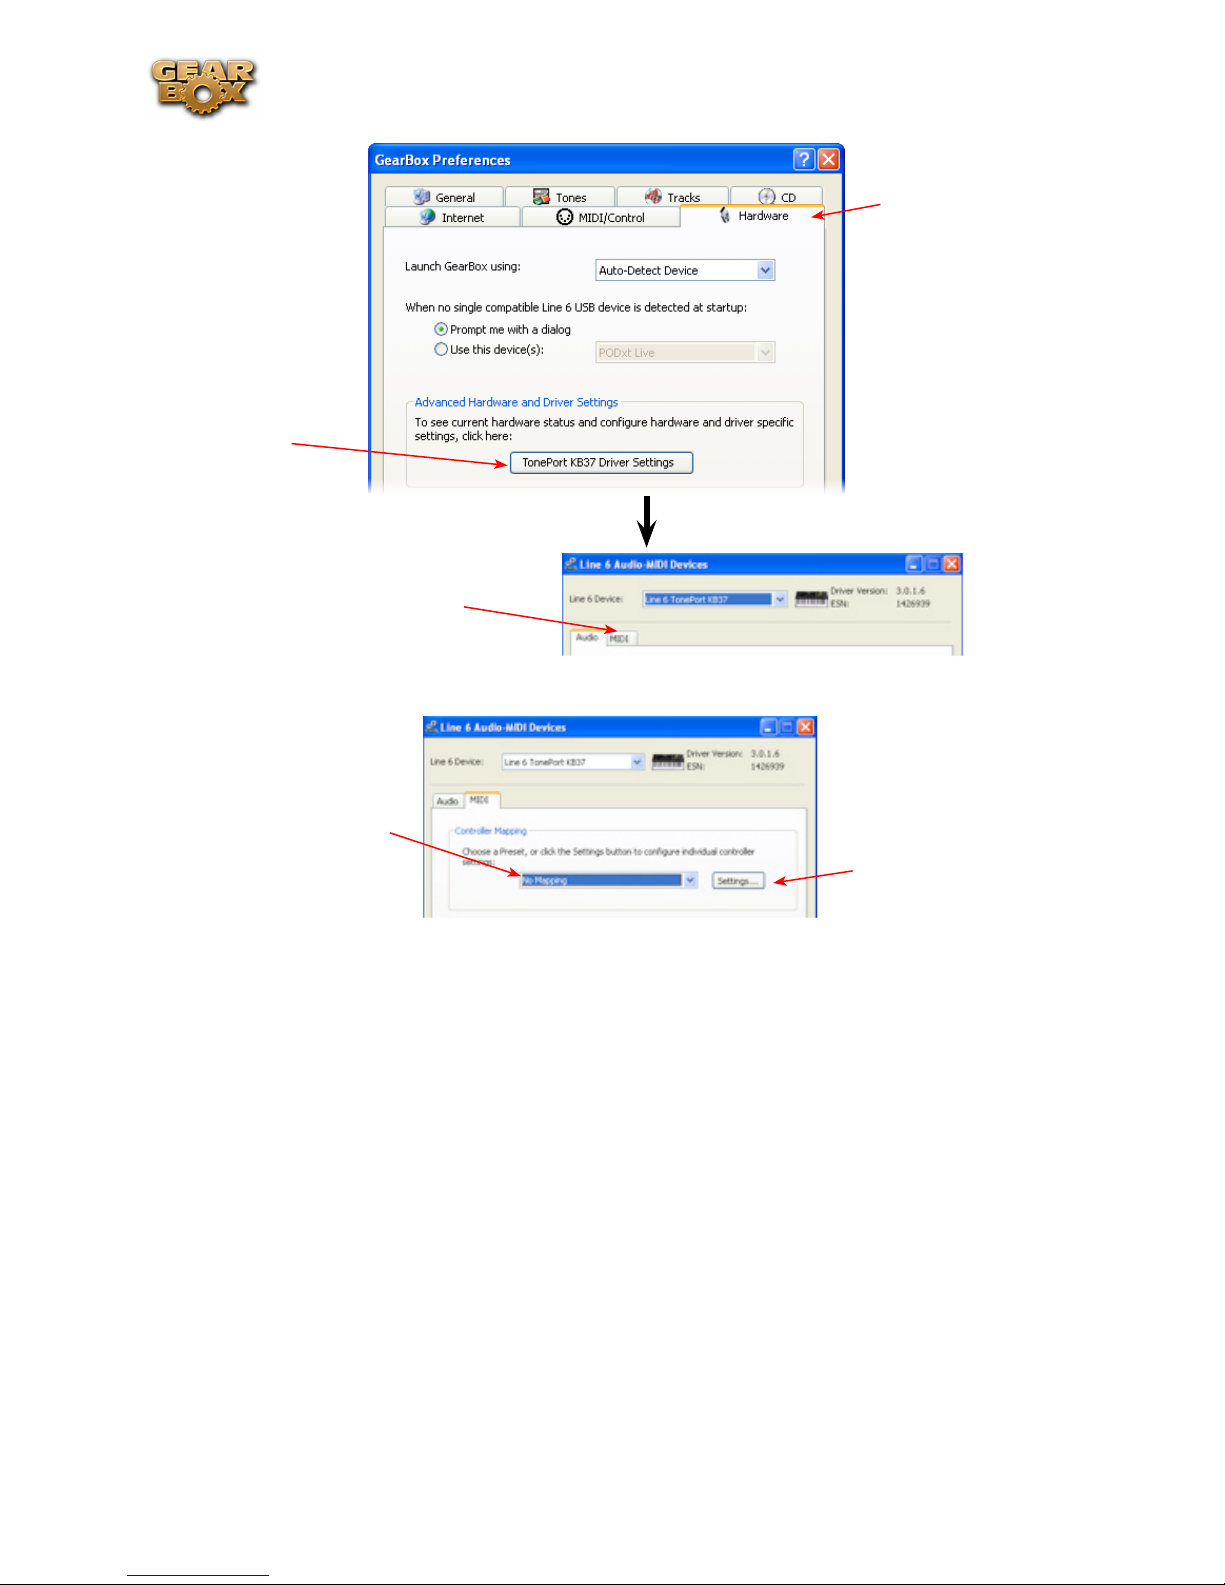
Click here to display
the Line 6 Audio-
MIDI Device
control panel
Select the MIDI tab
Line 6 GearBox 3.7 – GearBox Stand-Alone Application
Select the Hardware
tab
Click here to recall
any Preset or Default
Mappings
...Or click here to
create a Custom MIDI
Mapping
4•12
Page 83

Line 6 GearBox 3.7 – GearBox Stand-Alone Application
This column populates with all re-assignable controllers
for your device (TonePort KB37 shown here)
Name and Save your Custom
Mapping as a Preset
Choose which GearBox function
(if any) to assign to controllers
Choose the Type of Control, which
Click Apply, then OK
when done
CC/Action it will perform, and the
Switch Mode for your controllers
Note - For a complete list of GearBox MIDI parameter assignments, and more help on Footswitch/
Controller setup, please check out the additional MIDI documentation at GearBox - User Manuals.
4•13
Page 84

Line 6 GearBox 3.7 – GearBox Stand-Alone Application
GearBox with PODxt
One fundamental difference between PODxt versus TonePort & GuitarPort devices is that PODxt
units have their own onboard DSP processing and Memory. You can think of GearBox as a computer
“user interface” for what is running on your PODxt device. Because of this hardware architecture, you’ll
see a few differences here for GearBox controls with PODxt as compared to TonePort or GuitarPort
devices. It also means that the processing horsepower used to apply all those juicy amp, cab and effects
models to your Tone don’t need to run on your computer’s processor, which should give you a bit more
reserve processing power for other things, like recording software and more complex sessions.
When using PODxt, PODxt Pro or PODxt Live hardware with GearBox, the GearBox interface offers
a fixed set of Tone options. The Instrument input is “fixed” as the GearBox input source, and the input
signal is routed to the Record Send 1-2. Please refer back to the GearBox Controls and Operation
section for description of the common interface features. To follow are some details on the items
specific to using GearBox with PODxt devices.
GearBox Controls and Operation - PODxt
The GearBox interface offers controls for a single Tone path when PODxt is in use. Click on a number
to go to its description…
1 2 3 4 5 6
7 8
1 - Source Device indicator: A PODxt, PODxt Live or PODxt Pro* icon appears here to indicate
which type of device is now in use by GearBox as the Source device.
2 - Tone menu: Select from your set of GearBox Tones folder to load one on your PODxt. Note
that you can also select a preset directly on your PODxt hardware and all its settings will appear in
GearBox. You can also use the Tone Locker in the GearBox Browser panel to access items stored in
your PODxt Memory.
3 - Monitor Volume knob: Adjusts the monitoring level of your Tone - this is independent of the
4•14
Page 85

Line 6 GearBox 3.7 – GearBox Stand-Alone Application
level routed to your Record Send 1-2 as well as the “playback” level of audio software that is routing
its output back to your PODxt.
4 - Pan slider: Pans your source input left or right. This affects the signal that is routed to BOTH your
Record Send 1-2 and the Monitor path. Double click on the slider to set it to dead center.
5 - Amp bypass: Bypasses the current Amp model so that you’ll hear your guitar with no amp processing
(yawn), but you’ll still hear any effects that are powered on. Note that this bypassed signal is also what
is routed to Record Send 1-2.
Note: The Amp Bypass control is an exclusive feature of PODxt devices. Any PODxt tone saved
with the amp bypassed will load in a TonePort or GuitarPort device with the amp active.
6 - Tuner button: Toggles the display of the Guitar Tuner.
7, 8 - Record Send 1-2 controls:
Record knob• - controls the level of your PODxt Tone that is routed to Record Send 1-2. This
will ultimately control the record level into your audio software for any track receiving this Send
1-2 signal.
Note that for PODxt devices, there is also further control over what type of signal is fed to
Record Send 1-2 within the Audio Signal Routing dialog. Get to this from the Line 6 AudioMIDI Devices control panel – read more about it in this section.
+18 button• - Boosts the level of the Record Send – useful if your signal is a weak one and you
need more level to get a good record level.
PODxt MIDI Control
For PODxt, PODxt Pro and PODxt Live - MIDI control options are found on the device itself - you
can connect MIDI cables directly to your PODxt and then dial up the MIDI settings on the PODxt’s
display panel. Please refer to your PODxt Pilot’s Handbook for all the details on MIDI control.
Using PODxt’s MIDI control features, you can remotely control most parameters on your PODxt
device and hear them in real time. Likewise, PODxt can transmit MIDI CC data back out its MIDI
Out when you adjust its knobs and switches. This interaction all takes place between PODxt and your
MIDI device, without GearBox needing to be involved at all. When your PODxt is also connected
to your computer and you are using it with GearBox, you will see the respective onscreen GearBox
controls also automatically adjust when you are controlling PODxt remotely. Again, just think of
GearBox as a computer “user interface” for what is running on your PODxt hardware.
4•15
Page 86

Line 6 GearBox 3.7 – GearBox with POD X3
ge a r Bo x St a n d -aL o n e aP P L i c a t i o n - Pod x3
POD X3, POD X3 Live and POD X3 Pro are the newest additions to the Line 6 USB device family,
and X3 is the most powerful POD model yet! POD X3 devices are capable of processing two completely
independent Tones and, therefore, offer many options within GearBox 3.7 for signal routing, Dual
Tone presets, Pedal Control, Hardware Memory management and more. One fundamental difference
between POD X3 devices as compared to TonePort & GuitarPort hardware is that POD X3 units have
their own onboard DSP processing and memory. You can think of the GearBox software as an elaborate
computer “user interface” for what is running on your POD X3 device, thus allowing you to twiddle
knobs and buttons on your computer and remotely control your POD X3 easily. With POD X3, the
processing used to apply all those juicy amp, cab and effects models to your Tone doesn’t need to run
on your computer’s processor, which leaves you with more reserve processing power for other things,
like running recording software and more complex sessions. Just as with all other Line 6 USB devices,
with POD X3 and GearBox you have access to Add-Ons such as GuitarPort Online and the GearBox
Plug-In, as well as access to the free online Tone Library and high performance audio drivers for
recording directly into your favorite Mac® and Windows® audio recording applications! POD X3 Live
& Pro additionally include a switchable Effects Loop and direct input for the Line 6 Variax Modeling
Guitar - both of which can be accessed in GearBox. So read on to experience the power of POD X3
and GearBox, if you think you can handle it...
GearBox Controls and Operation with POD X3
As mentioned earlier, it is easiest to think of GearBox as a User Interface for all the features that
already exist on your POD X3. To follow is a tour of the GearBox interface - note that you can find
even more detail about each of the POD X3 functions in your POD X3 Pilot’s Handbook. Click on a
number to go to its description...
1 2 3 4 5 6 7 8 9
19
10
11
12
18 17 16 15 14
13
5•1
Page 87

Line 6 GearBox 3.7 – GearBox with POD X3
1 – Input Tone 1 & Tone 2 menus: Here is where you choose which physical inputs you want fed
to each Tone 1 and Tone 2. Note that POD X3 Live and Pro offer additional options in their Input
menus since these units includes Line 6 Variax inputs and other physical inputs. To route your physical
hardware inputs to Tone 1 and Tone 2 using these menus, follow the for your POD X3 device:
Tone 1 menu – pick an input to get routed to Tone 1.
For POD X3, you can choose Guitar or Microphone.•
For POD X3 Live, you can also choose Aux, Variax, Guitar + Aux, Guitar + Variax, or Guitar •
+ Variax + Aux.
For POD X3 Pro, your choices are Gtr 1, Mic 1, Line 1, Variax, Gtr 1+Gtr 2, Gtr1+Variax, Gtr •
1+Gtr 2+Variax, Gtr 2, Line 2, Mic 2, Guitar Stereo, Mic Stereo, Line Stereo, Digital Left,
Digital Right and Digital Stereo.
Tone 2 menu – pick an input to get routed to Tone 2.
For POD X3, you can choose Same as Tone 1, Guitar, or Microphone.•
For POD X3 Live, you can also choose Aux, Variax, Guitar + Aux, Guitar + Variax, or Guitar •
+ Variax + Aux.
For POD X3 Pro, your choices include all of the Tone 1 input assignment choices listed above, •
plus Same as Tone 1. Your Tone 2 input choices are restricted, however, depending on the input
you’ve selected for Tone 1. For example, when a Stereo setting is selected for Tone 1 input, Tone
2 will automatically be set to Locked For Stereo. In this mode, no other input selection will be
available for Tone 2.
Analog Input Restriction: POD X3 Pro does not allow simultaneous input from more than one analog
input per Channel Strip. For example, if Gtr 1 is selected as input for Tone 1, no combination of a
Tone 1 analog input such as Gtr 1, Mic 1, Line 1, Gtr 1+Gtr 2, Gtr 1+Variax or Gtr 1+Gtr 2+Variax
will be available for Tone 2. Digital (POD X3 Pro only) – select either S/PDIF or AES/EBU for digital
input.
Digital Input Restriction: Only one digital input can be active at once. For example, if Variax is
selected as an input, AES/EBU and S/PDIF will not be available. For Variax (POD X3 Live and POD
X3 Pro only) – you have two choices which you need to choose from on the POD X3 Live/Pro’s onboard Input screen:
Enable Global Control• – the X3 Live or Pro will control your Variax, and the lower half of the
LCD will display its currently selected Model and other parameters.
Disable Global Control • – when global control is disabled, your Variax will be heard but it won’t
respond to patch changes. The lower half of the LCD will be blank.
2 - Show/Hide buttons: There are three of these little arrow buttons in the GearBox main window,
and they all function to show/hide larger display panels. It’s useful to be able to sometimes hide the
display panels individually...
Clicking the top show/hide button collapses or shows/hides both the Amp and Effects controls. •
It’s useful to collapse these controls if you want to maximize the size of only the lower Browser
panel.
The middle button shows/hides only the Effects block edit display.•
The lower button shows/hides the Browser panel - this is the state shown in the main GearBox •
window screenshot above.
5•2
Page 88

Line 6 GearBox 3.7 – GearBox with POD X3
3 - Tone 1 & 2 buttons: The function of these “1” and “2’ buttons is different, depending if you are
currently in Single Tone versus Dual Tone mode (see #9 regarding toggling Dual Tone on/off):
When in Single Tone mode• - If only a single Tone is active (the Dual Tone button is “off”), then
the Tone 1 and Tone 2 buttons will toggle between the Tone settings loaded in each. Note that
the Tone you are looking at is the only Tone that is “On” and therefore the only Tone you will
hear.
When in Dual Tone mode• - If both Tones are active (the Dual Tone button is “on”), this toggles
the display to show the Tone 1 settings versus Tone 2 settings. Both Tones remain independent
and both Tones remain “On” so you’ll continue to hear both Tones (unless, of course, you’ve set
a Mute switch to silence either Tone - see #11 about the Mute switches).
Note that you’ll see your POD X3 on-board Home screen also change to show the respective Tone 1
or 2 settings when you switch these GearBox Tone 1 & 2 buttons.
4 - Tone Menu: Click here to choose from all saved Tone file presets on your computer – when you
create and save your own masterpiece Tones, they’ll appear here too. By default, these Tone presets
(.l6t files) are stored in Documents/Line6/Tones/GearBox/User (Mac) and My Documents\Line 6\
Tones\GearBox\User (Windows).
5 - Amp Model menu: Choose from all available Amp, Bass Amp or Preamp Models.
6 - Amp edit display: This area shows the editable interface for the selected Amp model (see #5).
7 - Cab Model menu: Choose from a huge assortment of guitar or bass speaker cabinets - or choose
“No Cabinet” to eliminate the speaker Cab & Mic Model from your Tone. We’ve pre-chosen cabs to
match up with your selected amp, but you can choose the Cab here independently - a different cab can
make a huge difference on the sound, so try a few different ones!
8 - Dual Tone toggle: Click this “on” to activate both Tone 1 and Tone 2 (or, what we cleverly refer to
as “Dual Tone” mode). Pressing this button is the same function as holding down the TONE 2 (Hold
For Dual) Button/Footswitch on POD X3/POD X3 Live. When the Dual Tone button is off, only one
Tone is on. (See #3 about toggling between Tone 1 & 2 to access their settings).
The Dual Tone button appears lit when active
Process two completely independent Tones for two separate inputs at the same time, such as •
your guitar plus a microphone. We like to refer to this Dual Tone configuration as a Tone “Pair”
- or...
Use two completely independent Tones on a single input. This is like running through two amp •
rigs at once! We call this a tone “Blend”.
Note: For more info about the POD X3 Dual Tone concept, please check out your POD X3 Pilot’s
Handbook.
9 - Tone 1-2 Volume Trim knob: This knob is the same functionality as the Volume Trim at the lower
right of the Home Page of POD X3. It offers you an additional +/- 12 dB volume adjustment that affects
BOTH Tone 1 & 2. This allows you to keep your Tone 1 and Tone 2 volume settings proportionately
the same, yet adjust the overall level up or down a bit if needed.
10 - Effects Block Show/Hide and On/Off toggles: The icons in this row allow you to either show
the edit displays or enable/disable each of the Amp and Effects processing blocks, depending on where
5•3
Page 89

Line 6 GearBox 3.7 – GearBox with POD X3
you click...
Click here to show the effect’s edit display
Click here to enable/disable the effect
Clicking on the top portion• of each of the little amp or “stomp box” icons in this row will toggle
the lower Effects Panel to display that effect block’s controls. You can do this independently of
switching the effect itself On/Off. Note that you can use your left or right mouse button to do
this.
Clicking the bottom portion• of the icon will toggle the effect On and Off.
Amp Enable Disable• - Clicking anywhere on the Amp icon toggles the Amp & Cab blocks
between enabled/disabled. Note that with the Amp & Cab disabled, the Volume knob is still
adjustable to allow you to set your (dry) signal level. Hey, sometimes naked is good!
With Amp & Cab in the disabled state, the Volume is still adjustable
Amp & Cab Enable/Disable toggle
TIP - You can also independently choose “No Amp” in the Amp Model menu or “No Cabinet” in
the Cab Model menu if you want only one or the other applied to your Tone.
Variax (POD X3 Live & Pro only)• - Clicking on the Variax icon displays the Variax settings
panel below. You can choose the Variax Model and Variax Type, as well as adjust the Tone for
your connected Variax - or, you can choose “Don’t Control” in the Variax Model menu to
prevent the onboard guitar settings from being changed by the Tone preset. These settings can
then be saved with your Tone presets so that you can recall both your Variax + full Tone settings
later. Please refer to the following Variax Options section for more info. Note that the Variax
icon does not include an “On/Off” switch - your connected Variax signal is automatically “on”
whenever you select Variax as one of your Tone 1 or Tone 2 Inputs (see item #1 above). *
*Note - To allow your connected Variax to be controlled by these GearBox Variax panel settings,
you’ll need to set the Variax Global Control option to “Enable” - this option is in the POD X3 Live/
Pro’s Input screen. Please also see the following Variax Options section for more info.
5•4
Page 90

Line 6 GearBox 3.7 – GearBox with POD X3
FX Loop (POD X3 Live & Pro only) •
Click on the top portion of the icon
to display the FX Loop settings
Click on the lower portion of the
icon to toggle the Loop on/off
With a POD X3 Live or Pro device in use, you’ll see options available for configuring the FX Loop
settings (the equivalent of the controls found on the POD X3 Live/Pro’s “FX Loop” edit screen). The
FX Loop provides a mono send and stereo return, which are able to be used with stomp boxes or line
level devices. Different hardware effects can require different input levels, or can change the signal
level before it comes back into the Return jack, so you can use the Send & Return level controls here
to keep the levels consistent. Toggle the Loop Pre or Post to be placed before or after the Amp in the
signal chain, and adjust the Mix to blend the Effects Loop signal in with your Tone 1 signal. Note that
these Effects Loop settings are saved with each Tone Preset.
11 - Studio/Direct Mix/Send 1-2 controls: The Studio/Direct Mix features of POD X3’s second
OUTPUTS screen are presented here for easy access in GearBox, as well as controls for adjusting
your hardware Monitoring level. The POD X3 headphone and Send 1-2 outputs are always fed the
“Studio/Direct Mix” - note this means that as you Pan or Mute Tone 1 or 2 , this also affects what is
getting recorded in the Left/Right channels in your recording software. For POD X3 Live & Pro, this
Studio/Direct Mix is also fed to its XLR Direct Outs. The 1/4-inch outputs can get this mix, too, when
desired (see the next section on the 1/4-inch output options)
Pan Tone 1 independently Left
or Right
Mute/Un-Mute Tone 1
(Un-Muted)
Pan Tone 2 independently Left
or Right
Mute/Un-Mute Tone 2
(Un-Muted)
Set the Monitor level
Note - The POD X3 hardware’s Amp/Bass Amp/Preamp Volume & Drive knobs and the Tone 1-2
Vol Trim knob will affect the level of the Studio/Direct Mix signal that is fed to Record Send 1-2,
so you can use these to adjust the levels that feed into your audio recording software. Some effects
(Comp, Distortion, Fuzz, etc.) can also affect the Tone levels, and thus your Record Send levels. You
can use the Monitor knob to balance the signal you are hearing (see below).
Pan L-R sliders• - Allow you to independently pan each Tone left or right within the stereo field
of the Studio/Direct Mix.
Tone 1 and Tone 2 buttons• - These buttons correspond to the MUTE features provides by POD
X3. When lit, the Tone is Muted - such as the Tone 2 button is shown here...
5•5
Page 91

Line 6 GearBox 3.7 – GearBox with POD X3
Monitor knob• - Attenuates the overall level of the Studio/Direct Mix heard via POD X3 (i.e.
USB Hardware Monitoring). This affects the Monitor level of both Tones 1 & 2. (Note that
this knob does not affect what is fed to Sends 1 & 2 and, therefore, will not affect the recording
levels in your audio software). Use this knob to balance out how loud your instrument is versus
playback audio tracks from your computer, without affecting your recording level.
12 - 1/4-Inch Output options: Choose from three “Studio/Direct Mix” Modes (for direct connections
to a mixer, recorder, PA, or headphones) or four “Live” Modes (for feeding a guitar amp, without
speaker/mic/room simulation, and with a set of controls for on/mute and pan for Tone 1 and Tone 2
that is independent from the Studio/Direct Mix settings).
1/4 Inch Outputs menu
Studio Modes:
Match Studio/Direct • – the 1/4-inch jacks output the same Studio/Direct Mode Mix as is set on
the GearBox Studio Direct Mix controls above.
Studio/Direct Tone 1• – the 1/4-inch jacks output Tone 1 only, panned center, with Studio Mode
processing.
Studio/Direct Tone 2• – the 1/4-inch jacks output Tone 2 only, panned center, with Studio Mode
processing.
Live Modes:
Combo Front• – use this to jack into the instrument input of a combo guitar amp.
Combo Power Amp• – use this to jack into the power amp input of a combo guitar amp.
Stack Front• – use this to jack into the instrument input of a guitar amp head with separate cab.
Stack Power Amp• – use this to jack into the power amp input (or the effect loop “return” jack,
if your amp has one) of a guitar amp head with separate cab.
Live Mode Tone Mute & Pan controls - When any of the above Live Mode options are selected,
you’ll see an additional set of controls appear here. The Tone buttons and Pan sliders allow you to
Mute and Pan each Tone individually as it is fed out the 1/4 Inch Outputs of your POD X3 (or the
Live Out jacks of a POD X3 Live or Pro). Note that these Mute and Pan settings are independent of
what is fed to the Studio/Direct Mix, allowing you to feed a different signal to your amp while the
Studio/Direct Mix is fed to your Record Sends (and to the XLR Direct Outs of a POD X3 Live)...
5•6
Page 92

Line 6 GearBox 3.7 – GearBox with POD X3
Pan Tone 1 independently to
the Left or Right out jack
Mute/Un-Mute Tone 1
(Un-Muted)
1/4 Inch Out controls are displayed when one of the Live modes is selected
Pan Tone 2 independently to
the Left or Right out jack
Mute/Un-Mute Tone 2
(Un-Muted)
Note - For POD X3 Live and Pro units’ Digital outputs... there are options for the type of signal fed
to the AES/EBU and S/PDIF outputs as well on the POD X3’s Outputs screen.
13 - Browser controls: Use the buttons in this row to choose what is to appear in the Browser panel
below. For details about each of these items - GPO, Player, Metronome, Tonelocker &Tone Library
- please visit the What Is... chapter. Note that if you are not using any of the Browser items, you can
click on the little flip up/down button at the left of this row to hide the browser panel completely and
keep the GearBox overall window size nice and compact.
14 - CPU meter: Shows how much of your computer’s processing power is currently being utilized.
If it reaches the red then you may experience audible dropouts and therefore need to reduce other
computer processes running.
15 - USB device connection indicator: If the POD X3 device is disconnected or powered off, the little
USB plug icon blinks here to indicate that the USB connection is not active.
16 - Info Bar: Text appears in this bar relating to what your mouse cursor is currently hovering over.
This is a very handy source of tips while using GearBox – remember to look here for info while mousing
around!
17 - Effect Model menu: Several of the Effects Blocks will show a menu here where you can choose
the specific Effect Model within the selected category. When you choose a Model from the list, the
Effects Block edit display (see next item description) will change to show its controls.
18 - Effects edit display: This panel displays the controls for the selected effect block (see #10 for
how to choose to show an effect block’s edit display, and #17 above for how to choose a specific effect
model).
19 - Pedal Control options: The Pedal Control selectors here are for the wah/volume/tweak pedal
built-in to POD X3 Live, and the pedals on Line 6 FBV Series foot controllers that can be used with
POD X3 or POD X3 Pro. This set of controls is only visible when the Effect edit display is shown - see
#2 Show/Hide buttons. (Note that these settings are the equivalent of the Pedal options in the System
screen of your POD X3/X3 Live/X3 Pro).
Note - The Pedal Control options and behaviors described here are for POD X3/X3 Live/X3 Pro
with USB firmware version 1.01 and Flash Memory version 1.11.1b (or later). If you have earlier
versions then your options may differ slightly. It is highly recommended you use Line 6 Monkey to
get all the latest updates!
5•7
Page 93

Line 6 GearBox 3.7 – GearBox with POD X3
Pedal Control
Pedal Assignment for Tone 1 & Tone 2
Tweak parameter assignment for
Pedal 1 & Pedal 2
Tone 1 COMP button assign (POD X3 Live)
Tone 1 FX LOOP button assign (POD X3)
Tone 2 COMP button assign (POD X3 Live)
Tone 2 FX LOOP button assign (POD X3)
POD X3 Live Pedal Control Options
Pedal Control – Choose here to have the pedal affect either Tone 1, Tone 2 or Both.
Pedal Assignment – Choose what set of features you want the pedal(s) to control specifically for
each Tone 1 and Tone 2. The pedal built-in a POD X3 Live and FBV foot controllers is pedal “1”,
and the optional external pedal that you can connect to it is pedal “2”. (On the large FBV unit
with two on-board pedals, the left pedal is Pedal “1” and the right is Pedal “2”). Note that you can
independently set your Pedal Assignments in the top “1” slot to control Tone 1 effects, and in the
“2” slot to control Tone 2 effects (or you can set them the same). The selectable options in each of
these two slots are:
1=W/V|2=Vol• – Pedal 1 controls Wah with the toe switch controlling Wah on/off. When
the Wah is “off” then Pedal 1 controls Volume. Pedal 2, if present, controls Volume.
1=Twk|2=Vol• – Pedal 1 controls whatever is assigned in the Tweak selector below. Pedal
2, if present, controls Volume.
1=W/V|2=Tw• – Pedal 1 controls Wah with the toe switch controlling Wah on/off. When
the Wah is “off” then Pedal 1 controls Volume. Pedal 2, if present, controls Tweak, assigned
in the selector below.
Pedal 1 & 2 Tweak – If you’ve assigned Pedal 1 and/or Pedal 2 to control “Tweak” (in either of
the above Pedal Assignment selectors), this is where you pick the effect parameter that will be
controlled. The list of available settings is too long to list here - click the menus and see what you
find!
Tone 1 & Tone 2 Footswitch Assign - In these slots you can choose which Tone 1 and Tone 2
effect blocks are toggled on/off by the (POD X3 Live) COMP button or (FBV foot controller with
POD X3/X3 Pro) “FX LOOP” button.
For POD X3 Live:• These settings determine what feature the on-board COMP (BOOST)
footswitch will control for each Tone 1 and Tone 2. The options are Compressor, Amp, FX
Loop and Reverb.
For POD X3/X3 Pro: • This setting determines what feature the FX LOOP footswitch on
a FBV will control. The options are Compressor, Amp or Dual (equivalent to the POD X3
“TONE 2/Hold For Dual button”).
5•8
Page 94

Line 6 GearBox 3.7 – GearBox with POD X3
Saving & Opening POD X3 Tones Within GearBox
With the powerful new Dual Tone abilities of the mighty POD X3 family devices, we’ve also added
some File menu options in GearBox. The File menu commands allow you to not only Save & Open
Tone 1 or Tone 2 individually, but also to Save & Open Dual Tone Presets!
Saving Tones
When you use any of the Save & Save As commands from the GearBox File menu, this creates a Line
6 Tone file (.l6t) that is stored to your computer. By default, these .l6t files are saved to the following
directories:
Mac -• Documents\Line6\Tones\GearBox\User folder
Windows -• My Documents/Line 6/ Tones/Gearbox/User folder
If you want to change the directory where your Tone files are saved, you can do so in the GearBox
Preferences > Tones tab, where you can define your preferred “Tones Root Folder”.
TIP - When you do a Save of a Dual Tone file, by default the title contains the names of both the
current Tone 1 name “+” Tone 2 name that make up the Dual Tone - this makes it easy for you to
pick out the Dual Tone type files when browsing your computer’s Tone directory!
Please refer to the following File menu command descriptions for specifics on the Save commands, and
also the Hardware Memory Window section for even more ways to Save and backup your Tones!
File Menu Commands
File > Dual Tone
A Dual Tone preset is a snapshot of all settings in both Tone 1 and Tone 2 in GearBox.
Open... - Launches the File > Open dialog allowing you to select any GearBox Dual Tone or Single
Tone preset file from your computer hard disk.
Choosing a Dual Tone file• loads all the settings of both Tone 1 and Tone 2 stored in the preset
into the Edit Buffer. By default Dual Tone files are saved with two Tone names in their title to
make it easy to see which .l6t files on your computer are of the Dual Tone type.
Choosing a Single Tone file• loads the data from the preset into both Tone 1 and Tone 2 in
GearBox, fully replacing the data previously each of these Tone slots. The “Dual Tone” function
is not automatically activated, since Tone 1 and Tone 2 are identical settings, but you can
5•9
Page 95

Line 6 GearBox 3.7 – GearBox with POD X3
activate the Dual Tone function and tweak either Tone to make them a bit different if you want
to experiment.
Save As... - Launches the Save As dialog where you can edit the name, enter descriptive information,
and Browse to where to save the Dual Tone preset. Clicking the Save button in the dialog saves the
current Tone 1 & 2 edit buffer settings as a Dual Tone preset file (.l6t) on your computer. You’ll see
that we’ve already titled the POD X3 Dual Tone presets to include both individual Tone names with
a “+” between them - it is recommended to keep the Name in this format (as well as to follow this
naming format when creating your own, new Dual Tone file presets) to easily see the file contains
a Dual Tone...
Note - When you use the File > Dual Tone > Save As... command, this always creates a specific
Dual Tone preset file (even if only one Tone is “on”), which can only be opened with GearBox when
running with POD X3/X3 LiveX3 Pro devices. If you want to Save Single Tone preset files that can
be opened in GearBox with other Line 6 hardware, you can use the Tone 1 or Tone 2 Save & Save
As commands, or the POD X3 Hardware Memory window.
Tone Info... - Launches a Tone Info dialog where you can enter, edit & reference specifics about
this Dual Tone file preset.
5•10
Page 96

Line 6 GearBox 3.7 – GearBox with POD X3
Note - For even more control over your Dual Tones, be sure to also check out the following section
on the new POD X3 Hardware Memory Window.
File > Tone 1
Open... - Launches the File > Open dialog allowing you to select any GearBox Dual Tone or Single
Tone preset file from your computer’s hard disk.
Choosing a Single Tone file• loads the data from the preset only into Tone 1, fully replacing the
data previously in the Tone 1 edit buffer, and leaving Tone 2 as is.
Choosing a Dual Tone file• loads only the Tone 1 data from the preset, fully replacing the data
previously in the Tone 1 edit buffer, and Tone 2 is left as is.
Save As... - Launches the Save As dialog where you can name and then choose where to save the
current Tone 1 edit buffer settings as a Single Tone preset anywhere on your computer’s hard disk.
Note that a Single Tone preset can be opened by GearBox with any Line 6 USB hardware (unlike
Dual Tone presets which can only be opened by GearBox with POD X3).
Replace Track Tone With Current Tone - Saves the current edit buffer settings for Tone 1 as a
single Tone to the Track currently loaded in the Player. This allows you to recall a specific Tone with
any audio file or GuitarPort Online track so you can jam again later with them in the Player using
the same Tone settings, pretty handy!
5•11
Page 97

Line 6 GearBox 3.7 – GearBox with POD X3
File > Tone 2
Open... - Launches the File > Open dialog allowing you to select any GearBox Dual Tone or Single
Tone preset file from your computer’s hard disk.
Choosing a Single Tone file• loads the data from the preset, fully replacing the data previously in
the edit buffer, putting the data into only Tone 2, and Tone 1 is left as is.
Choosing a Dual Tone file• loads only the Tone 1 data from the preset, fully replacing only the
data previously in the Tone 2 edit buffer, and Tone 1 is left as is.
Save As... - Launches the Save As dialog where you can name and then choose where to save the
current Tone 2 edit buffer settings as a Single Tone preset anywhere on your computer’s hard disk.
Note that a Single Tone preset can be opened by GearBox with any Line 6 USB hardware (unlike
Dual Tone presets which can only be opened with GearBox with POD X3).
Opening Tones from the Online Tone Library
A world of custom-created Tones await you in the Online Tone Library! These Tones were crafted to
match the classic sounds of some of the greatest songs and guitarists ever for our GuitarPort Online
(GPO) service. But you don’t need to be a GPO Member to use this Online Library - all you need is an
Internet connection. Just click the Tone Library button and the GearBox Browser panel will fill with
a list of Tones for your perusal - search for you favorite Band or Guitarist and press the LOAD button
to nab the Tone.
The Online Tone Library
Note that the Tone presets in the Library are Single Tone preset types, therefore a Tone Library Tone
will always load into Tone 1 in GearBox, and leave any settings in Tone 2 undisturbed. You can tweak
the Tone just like any other once it is loaded, and save it to your computer using the File menu options
(see the previous section). A Tone loaded from the Tone Library is actually only loaded into the edit
5•12
Page 98

Line 6 GearBox 3.7 – GearBox with POD X3
buffer and not immediately written to the on-board POD X3 hardware memory - to do this you can use
the GearBox Hardware Memory window’s “Put” function.
Tone Translations - Opening Tones Created with Non-POD X3 Devices
You are certainly not limited to opening only Tone preset files that were created by others using
different Line 6 hardware such as from the Online Tone Library as described above, GuitarPort
Online or the Line 6 Custom Tone site. Since there are some fundamental differences between Line 6
hardware, some Tone elements may be slightly different or “translated” to work on your X3 device. A
few guidelines are as follows:
POD X3 supports opening Tone presets files created with...•
Any GearBox-connected Line 6 hardware -This includes all TonePort, GuitarPort, PODxt •
and, of course, POD X3 devices.
Any POD 2.0 device. Some models may be translated upon loading these Tone presets into •
your POD X3.
When loading into POD X3 a Tone preset created with PODxt that includes a Bass Amp model, •
the Bass Amp D.I. and Blend parameters will be removed. When a Tone preset that includes
a Bass Amp model is loaded on PODxt, these parameters will be set to default values (Blend
Volume and Delay set to Off/Minimum).
Dual Tone preset files created with POD X3 can only be opened by POD X3 family devices. •
POD X3-created Single Tone files can be opened in GearBox with any TonePort, GuitarPort or
PODxt device connected. Note that if the other device does not have the all optional Add-On
Model Packs then some of the amp and/or effects models might be substituted. (See the Model
List for each device’s standard Model Set).
All Tone preset files created with non-POD X3 devices will be • Single Tone types and typically
loaded into Tone 1 when using a Load button (such as from the Online Tone library). If you load
the file from your computer’s hard disk using the GearBox File > Open commands, the behaviors
will be as described in the previous File Menu Commands section.
POD X3 does not support loading Tone preset files that were created with any Bass PODxt device, •
Vetta or Flextone amplifier. Likewise, these products do not support loading Tones created by
POD X3.
The POD X3 Hardware Memory Window
GearBox also offers a new Hardware Memory window specifically for POD X3 family devices which
displays a local, in-memory, copy of the entire User Bank of Tones from your connected POD X3. This
window is the place for referencing and managing exactly what individual Tone presets are stored in
each User Bank of your POD X3 hardware, as well as for creating and restoring backup “Bundles” of
your POD X3’s Tones! The Hardware Memory window provides a nice, large screen where you can
see the contents of each User Bank location, and copy or move Tones between Tone slots, or even
drag and drop Tone presets to and from your computer! You can launch/close the Hardware Memory
window from within the GearBox View menu.
Upon launch of the GearBox application, the Hardware Memory is opened and its “Get All” function
is automatically performed. This loads all the data from your POD X3 User Folder into the respective
Banks and Channels into your computer’s local memory, displaying them in the window. From this
point when working with the Hardware Memory window, the data you see listed in each Bank in
the window are what you are actually working with in your computer’s local memory (or in the “edit
5•13
Page 99

Line 6 GearBox 3.7 – GearBox with POD X3
buffer” as it’s sometimes referred to in Line 6 documentation). The key to syncing the data shown in
this window with the actual data stored within your POD X3 device’s on-board memory is to use the
“Get” and “Put” functions, as you’ll see described in this section.
Get and Put buttons - see below
Bundle File buttons -
for the functions of each
to load or save a Bundle file (.l6b)
Banks view toggle - switch to
display Banks 1-16 or 17-32
User Bank - each displays the contents of
your POD X3’s on-board memory User Bank
of the same number
Banks Toggle
The Hardware Memory window displays either User Banks 1 thru 16 or 17 thru 32 - use these buttons
to toggle between which you want to access. (Also see the following Drag and Drop Options section
about how you to drag items between the Bank pages).
About User Banks
The contents of each of the 32 User Bank locations are displayed in grid fashion. Within each Bank
are 4 Channels (labeled A, B, C & D). Each Channel in POD X3 holds two Tones - this means each
Channel is capable of storing either a Single Tone (only Tone 1 or Tone 2 active) or Dual Tone (Tone
1 + Tone 2 active) preset. The structure of the Bank is like this:
A Bank, a Channel, or individual Tone in this local representation can be edited in this window. To
edit the Tone parameters for any preset, you can double-click directly on the Channel number (e.g.
- directly on “2A” ) to load it into the GearBox “Editor”, and then choose between Tone 1 and Tone
2 within GearBox to access either Tone’s settings.
Making Selections
Before covering how to start moving Tones around, it’s helpful to know all your options for selecting
5•14
Page 100

Line 6 GearBox 3.7 – GearBox with POD X3
items within the Hardware Memory window. It is possible to select a Bank, a Channel or a Tone. It is
also possible to select multiple Banks, multiple Channels or multiple Tones so that you can drag and
drop just the ones you want. To follow are some tips for making selections...
Selecting a Bank - Clicking in the “Bank Area” of a bank will select the entire Bank.
Click within this area to
select a Bank. All Tone slots’
backgrounds darken to indicate
the Bank is selected
Selecting a Channel - Clicking on the Channel letter (A, B, C or D) will select the entire Channel
memory. Double-clicking on the Channel will load the entire Channel into the GearBox editor (and
therefore what you will hear applied to whatever you have plugged into your POD X3).
Click within this area to select
one Channel - the Tone slot
backgrounds darken when selected
Selecting an individual Tone - An individual Tone within a Channel is selected by clicking once
directly on the individual Tone name. Double-clicking directly on a Tone will highlight the Tone’s
title so that you can edit the name.
Click within this area to select
only one Tone - the Tone slot
background darkens when selected
Double click directly on the text
name of the Tone to highlight-select
it so that you can edit the title
Selecting multiple items - Holding down Command (Mac) or Ctrl (Windows) while clicking will add
an individual item to the current selection. Holding down Shift (Mac and Windows) allows you to
select multiple contiguous items. For example, holding Command/Ctrl and clicking on channel 1A
and then 2B will select these two Channels only. Holding Shift and clicking on them will select these
two Channels and all Channels in between. Only selections of the same type will be allowed to be
appended - for example, if you have selected one Channel, you can hold Command/Ctrl and click on
any other Channel and it will also be selected, but you cannot add a Bank or individual Tone using
this action since a Channel is the initial type of item selected. As you select multiple items, each will
become shaded to indicate they are selected. If you have multiple items selected, you can hold down
Command/Ctrl and click any one item if you wish to de-select just that item.
5•15
 Loading...