


 Loading...
OWNER’S MANUAL
Network
Camera
Please read this manual carefully before operating your set and retain it for future reference.
MODELS
LNV7260R
LNV5460R
LNU7260R
LNU5460R
*MFL69716701* |
1610 (V1.0) |

Contents |
|
Introduction....................................................................................... |
3 |
Features Chart.................................................................................................... |
3 |
Operation and settings..................................................................... |
4 |
Before using the system................................................................................ |
4 |
Recommended PC Requirements............................................................. |
4 |
Accessing the LG IP device........................................................................... |
5 |
LG Smart Web Viewer Overview............................................................... |
6 |
Live View......................................................................................................................... |
6 |
System Settings...................................................................................................... |
8 |
Playback................................................................................................................. |
9 |
Search recording files......................................................................................... |
9 |
Download recording files................................................................................ |
9 |
Playback.......................................................................................................................... |
9 |
Recording snapshot............................................................................................. |
9 |
Video clip........................................................................................................................ |
9 |
Four screen play.................................................................................................. |
10 |
Full screen................................................................................................................. |
10 |
Switch mode........................................................................................................... |
10 |
Log searching.................................................................................................... |
11 |
Configuring the LG Network Camera Device................................... |
12 |
Accessing the Configuration menu.................................................. |
12 |
Configuration.................................................................................................... |
12 |
Configuration menu overview............................................................... |
12 |
Audio video set..................................................................................................... |
13 |
Camera set............................................................................................................... |
15 |
VCA.................................................................................................................................. |
17 |
OSD.................................................................................................................................. |
21 |
Storage Management................................................................................... |
21 |
Network Management................................................................................. |
23 |
User management............................................................................................ |
25 |
Alarm Management........................................................................................ |
26 |
Mask Alarm.............................................................................................................. |
27 |
PTZ Management.............................................................................................. |
27 |
Advance Set............................................................................................................ |
28 |
Reference......................................................................................... |
30 |
Troubleshooting............................................................................................... |
30 |
Open Source Software Notice Information...................................... |
32 |
Specifications................................................................................................... |
33 |
2

Introduction
The LG Network Camera is designed to use on an Ethernet network and must be assigned an IP address to make it accessible.
This manual contains instructions on how to install and manage the LG Network Camera in your networking environment. Some knowledge of networking environments would be beneficial to the reader.
Note that design and specification of this unit may change from the manual as quality and improvement without prior notice. Should you require any technical assistance, please contact authorized service center.
Features Chart
This table shows the differences between the models.
Item |
RS-485 |
Zoom |
Focus |
External Day/Night |
|
|
|
|
|
LNV7260R |
Yes |
Yes |
Auto Focus |
Yes |
|
|
|
|
|
LNV5460R |
Yes |
Yes |
Auto Focus |
Yes |
|
|
|
|
|
LNU7260R |
Yes |
Yes |
Auto Focus |
Yes |
|
|
|
|
|
LNU5460R |
Yes |
Yes |
Auto Focus |
Yes |
|
|
|
|
|
Introduction |
3 |

Operation and settings
Before using the system
•LG IP device recommended to use in the closed network for network security.
•Before using the LG IP device make sure the connections are correct and verify whether proper power supply is used.
•Check the connections of the LG IP device for the correct conditions.
•Check that the LG IP device is(are) connected to the network and that power is supplied.
•Once the connections are made you need to install the LG client program to the PC from which you want to access the device. The LG Smart Web Viewer program is automatically installed when you connect the LG IP device.
The LVi510 and the LG Smart Web Viewer program are the network program of the LG Video Server and the LG IP cameras.
•To view streaming video in Internet Explorer, set your browser to allow ActiveX controls. If you find this message “Click here to
download the plug in, close all explorers during the installaion.”, Click the blue bar and install LG Smart Web Viewer Program on your computer. Please set your browser zoom level to 100 %.
•The Layouts and the Live view pages may differ with different OS (Operating Systems) and Web Browsers.
•Care needs to be taken not to run any other applications when the Client Program is running as it may cause memory shortage.
•When you set on 60 fps in mobile applications, may be degraded the frame rate depending on mobile performance.
Recommended PC Requirements
The LG IP device can be used with most standard operating systems and browsers.
Items |
Requirements |
|
|
|
|
Operating System |
Windows XP Professional, |
|
Windows 7 or above |
||
|
||
|
|
|
CPU |
Intel i7 or above |
|
|
|
|
Web Browser |
IE9 or above |
|
|
|
|
DirectX |
10.X or above |
|
|
|
|
Memory |
4 GB or above |
|
|
|
|
Graphics Card |
512 MB or above |
|
|
|
|
Hard Disk |
250 GB or above |
|
|
|
|
Resolution |
1920 x 1280 or above |
|
|
|
Note:
For Windows 7, please download & install ‘DirectX End-User Runtime Web Installer’. “http://www.microsoft.com/en-us/download/details.aspx?id=35”
4 |
Operation and settings |

Accessing the LG IP device
You can access the LG IP device by following the below steps.
1. Install LVi510 Program
It recommended to use LVi510 surely. Otherwise, it is required to install the IP Utility
[Package>Tools>LG IP Utility Installer] to search the IP addresses of LG IP devices.
2. Discover the LG IP device using the IP Utility
The IP Utility can automatically discover and display LG IP devices on your network.
The IP Utility shows the MAC address, IP address, Model name and so on.
Note:
The computer running the IP Utility must be on the same network segment (physical subnet) as the LG IP device.
2.1Run the IP Utility program.
2.2Click the [Search] button or select the [Search] option in the
Device search menu.
After a few seconds the found LG IP devices gets displayed in the IP Utility window.
3.Logging in to the LG Smart Web Viewer
3.1Run the IP Utility and find the LG IP devices.
3.2When the LG IP devices appear in the IP Utility window, double-click IP address or right click on the same IP address and select “Connect to Web Page” to start the LG Smart Web Viewer. When accessing the LG Smart Web Viewer, the window for login will be shown. Select the language in dropdown list on right top of the window.
3.3Enter the user name and password. (Note that the default administrator user name and password are “admin”.)
Note:
Default password must be changed for security after initial connection.
Note:
•You can also access the LG Smart Web Viewer as shown below.
3.1Start your Web browser.
3.2Enter the IP address of the LG IP device in the address bar of the browse.
3.3Enter the user name and password set by the administrator.
•Check the browser cookies settings to use the [Remember my credentials].
•If LG Smart Web Viewer is required to be updated, it needs more time to display according to the network conditions.
•If you connect the LG Smart Web Viewer for the first time, the Security Warning window is displayed to install the LG Smart Web Viewer program. You must install the LG Smart Web Viewer program for using the LG IP device.
•If your computer or network is protected by a proxy or firewall, the proxy or firewall settings can prevent the LG Smart Web Viewer program. Change the proxy or firewall settings to activate the LG Smart Web Viewer program.
•Please use IE browser of windows and make sure the version above 9.0. Do not use any other browser except Firefox, Google.
Operation and settings |
5 |

LG Smart Web Viewer Overview
Live View
Item |
Description |
|
|
|
Preview the first stream video (Default display). |
|
Note: |
|
You can set the stream configurations independently. This would facilitate the user to set the live view at user’s comfort. |
|
|
|
Previews the second stream video. |
|
|
|
Previews the third stream video. |
|
|
|
Fixed proportion of video images according to the resolution of the IPC. |
Original Aspect Ratio |
|
|
|
|
Displays video images to fit windows. |
Fit window |
|
|
Click this button, video is recorded automatically. To stop the recording, click this button again during the recording. |
|
Default save path is: |
Local record |
D:\NetVideoBrowser\ RecordFiles |
|
|
|
Click this button, current image is saved automatically to JPEG format on your computer. |
|
Default save path is: |
Snapshot |
D:\NetVideoBrowser\ CapturePics |
|
|
|
Click this button to start intercom. To stop intercom, click this button again. |
Talkback |
|
|
|
6 |
Operation and settings |

Adjust audio volume of the speaker on the computer. Click the speaker icon to switch the sound on or off.
Open Audio
When you want to switch the sound off, click this speaker icon.
Set mute
Click this button to enter the full screen. Double click the screen or press [Esc] button of keyboard to quit.
Full screen
Operation and settings |
7 |
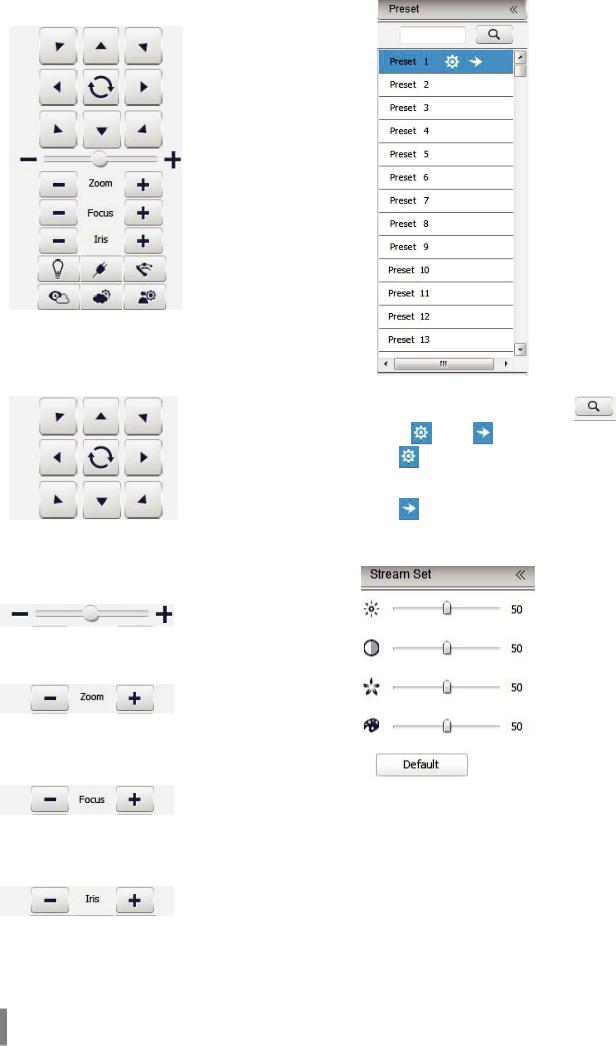
System Settings
PTZ Control
Note:
This function only support camera with RS-485.
PTZ Control
>> It shows eight buttons to control the direction. Click button to enable auto scan function.
Speed
>> Adjust speed by moving adjustment bar. It range from 0 to 100.
Zoom
>> Enable to zoom in or zoom out, including optical and digital zoom.
Focus
>> Focus on the object manually according to how far it is when the auto focus does not work precisely.
Iris
>> Manually start or shut down iris.
PTZ Position
1. |
Enter the preset number and click search |
button. |
||
2. |
Select |
[Set] or |
[Call] on the preset position you want. |
|
|
>> |
[Set] |
|
|
|
Set the preset and add preset position. It is supported add |
|||
|
multiple presets. |
|
|
|
|
>> |
[Call] |
|
|
|
Call the preset and make speed dome at preset position. |
|||
Stream Set
1.Click [Stream Set] and open parameter set interface.
2.Drag the adjustment bar to set a brightness, contrast, color saturation.
Note:
•Clik the [Default] button to turn to the default settings.
•It needs restart after revise parameter.
8 |
Operation and settings |

Playback
Search recording files
1.Double click date in the calendar to search files.
2.Select [Record] or [Picture] in [FileType].
3.Check the [Remote] box to select record type.
4.Select targeted file type in [RecType].
Download recording files
>> Check targeted files to download.
-- Click to download recording files.
-- Click to download files into FTP server.
-- Click to preview download status, and pause or delete when you need.
Note:
Download Management only support Local Download.
Playback
>> Double click searched recording files for playback. |
|
||||
>> |
Click |
to select local recording files. |
|
||
>> |
Click |
to play the playback. When you click |
, It will |
||
|
change into |
pause icon. |
|
|
|
>> |
Click |
to fast move forwarder in speed of |
|
||
|
2X, 4X, 6X and 8X. |
|
|
||
>> |
Click |
to move forwarder slowly in speed of 1/2X,1/4X,1/6X |
|||
|
and 1/8X. |
|
|
|
|
>> |
Click |
to play frame by frame. |
|
||
>> |
Click |
to mute and click |
once again to cancel mute. |
||
>> |
Click |
to stop. |
|
|
|
Recording snapshot
Click  to capture the picture when playback the video. Default storage path is D:\NetVideoBrowser\ PlaybackPics.
Video clip
Click  to cut a clip of video when playback the video. Click once to start and click again to finish.
Default storage path is D:\NetVideoBrowser\ PlaybackFiles.
Operation and settings |
9 |

Four screen play
Click to playback in 4 screen at the same time which can play separately for each screen. Once you select one screen and open the recording files you want.
Note:
Click to back to the single screen.
Full screen
Double click the screen or click button to enter full screen status. To quit full screen mode, double click on screen or enter the [Esc].
Switch mode
Click  to playback switch mode.
10 |
Operation and settings |
Log searching
Click [Log] to enter the page.
>> Channel No. : Select channel which you want to search. >> Log Type : Select log type which of you want to search. >> Start Time : Select start date and time.
>> End Time : Select end date and time.
•Query : Make a list of log at the presetting time.
•When there are many pages, you can click [First Page], [Pre Page], [Next Page], [Last Page] to check the log or [Jump To] the target page.
•Export Current Page: Click [Export Current Page] to export log of current page to your computer. It is saved in D:\NetVideoBrowser.
•Export All Page: Click [Export All Page] to export all the pages query to your computer. It is saved in D:\NetVideoBrowser.
Operation and settings |
11 |

Configuring the LG Network Camera Device
The features and options of the LG IP camera are configured through the [Configuration] menu.
Only administrator-level users have permission to access the [Configuration] menu.
Accessing the Configuration menu
Click the [Configuration] button to display the LG Smart Web Viewer configuration window.
Warning:
The [Configuration] setup should be made by qualified service personnel or system installers.
Configuration
Configuration menu overview
The following table shows the list of menu items.
The configuration images are different from each model.
Main Menu |
Sub Menu |
Note |
|
Stream Set |
|
Audio Video Set |
Audio Set |
|
Key Region |
|
|
|
|
|
|
Image Parameter |
|
|
Image Set |
|
Camera Set |
Schedule |
|
|
D/N Set |
|
|
Alarm Info |
|
VCA |
Create Rule |
|
VCA Schedule |
|
|
|
|
|
|
Advanced |
For Technician |
|
OSD |
|
OSD |
LOGO |
|
|
Privacy Mask |
|
|
Record Policy |
|
|
Pre-Alarm Recording |
|
Storage |
Storage Set |
|
Management |
Snapshot Set |
|
|
Disk Management |
|
|
Net Storage |
|
|
TCP/IP Set |
|
Network Management |
Registration Center |
|
Network Service |
|
|
|
|
|
|
IP Filter |
|
User Management |
User Management |
|
|
Alarm Input |
|
|
Alarm Output |
|
Alarm |
Motion Alarm |
|
Management |
Mask Alarm |
|
|
Email Alarm |
|
|
Alarm Server |
Not support |
PTZ Management |
Serial Port Set |
RS-485 |
|
File Locations |
|
Advance Set |
System Set |
|
System Maintenance |
|
|
|
|
|
|
Access Platform |
|
12 |
Operation and settings |
Loading...