


PORTABLE AIR
CONDITIONER
USER’ S GUIDE & INSTALLATION INSTRUCTIONS
Please retain this ownerʼs manual for future reference.
Read and follow all safety rules and instructions before using this product.
ACONDICIONADOR
DE AIRE PORTÁTIL
GUÍ A DE USUARIO E
INSTRUCCIONES DE INSTALACIÓN
Guarde este manual de usuario para referencia futura. Lea y siga todas las reglas e instrucciones de seguridad antes de utilizar este producto.
Model/Modelo
To contact LG Electronics, 24 hours a day, 7 days a week:
1-800-243-0000 (US)
Or visit us on the Web at: us.lge.com
Para comunicarse con LG Electronics, 24 horas al día, 7 días a la semana:
1-800-243-0000
O visítenos en la Web en: us.lge.com
English
Español
LP1010SNR
INTRODUCTION
. . . . . . . . . . . . . . . . . . . .
 . . . . . . . . . . . . . . . . . . . . . . . . . .
PARTS AND FEATURES
Key Parts and Components . . . . . . . . . . . . . . . . . . . 6
Control Panel and Remote . . . . . . . . . . . . . . . . . . . . 7
HOW TO USE
Before Using Your Air Conditioner . . . . . . . . . . . . 8, 9
Using the Controls . . . . . . . . . . . . . . . . . . . . . . . . . . 10
INSTALLATION INSTRUCTIONS
Seletion of Installation Location. . . . . . . . . . . . . . . . 11
Attaching the Hose and Diffuser . . . . . . . . . . . . . . . 12 Preparing for Installation . . . . . . . . . . . . . . . . . . . . . 13
Window Vent Panel and Extensions . . . . . . . . . . . . 14 Installation in Vertical Sliding Windows . . . . . . . 15, 16 Installation in Casement Windows . . . . . . . . . . 17, 18
CARE AND CLEANING |
|
Cleaning the Case . . . . . . . . . . . . . . . . . . . . . . . |
. . . 19 |
Cleaning the Air Filter . . . . . . . . . . . . . . . . . . . . |
. . . 19 |
Water Drainage . . . . . . . . . . . . . . . . . . . . . . . . . |
. . . |
Storing the Air Conditioner . . . . . . . . . . . . . . . . |
. . . |
Defrost Operation . . . . . . . . . . . . . . . |
|
TROUBLESHOOTING |
|
Before Calling for Service. . . . . . . . . . . . . . . . . |
22,23 |
WARRANTY |
|
Product Registration Information . . . . . . . . . . . |
. . 24 |
THANK YOU!
Congratulations on your purchase and welcome to the LG family. Your new LG Air Conditioner combines high-efficiency operation with portable convenience.
By following the operating and care instructions in this manual, your air conditioner will provide you with many years of reliable service.

IMPORTANT SAFETY INSTRUCTIONS
READ ALL INSTRUCTIONS BEFORE USE
 Your safety and the safety of others is very important.
We have provided many important safety messages in this manual and on your appliance. Always read and obey all safety messages.
This is the safety alert symbol.
This symbol alerts you to potential hazards that can kill or hurt you and others.
All safety messages will follow the safety alert symbol and either the word “WARNING” or “CAUTION”. These words mean:
 WARNING This symbol indicates the possibility of death or serious injury.
 CAUTION This symbol indicates the possibility of injury or damage to property.
 BASIC SAFETY PRECAUTIONS
 WARNING To reduce the risk of fire, electric shock, or injury
to persons when using this appliance, follow basic precautions, including the following:
•Do not attempt to repair or replace any part of your air conditioner unless it is specifically
recommended in this manual. All other services should be referred to a qualified technician.
•If the power cord becomes worn or damaged, the cord should only be replaced by a qualified service technician using genuine replacement parts.
•The air conditioner should be plugged into its own grounded 15A, 60 Hz., 120 VAC circuit.
•Do not plug other appliances into the same outlet; it can overload the circuit and cause a fire or electric shock.
•Do not remove the round grounding prong from the plug. It can result in the risk of electric shock.
•This air conditioner is not designed for use by young children. Young children should be supervised to ensure that they do not play with or climb on the air conditioner.
•Be sure all packaging materials are removed from the air conditioner before use. It can result in personal injury.
•Do not disassemble or modify the air conditioner or the power cord. It can result in the risk of electric shock or fire.
•Do not place the power cord or air conditioner near a heater, radiator, or other heat source. It can result in the risk of electric shock or fire.
•Do not use this or any appliance near flammable gases or liquids or other combustibles, such as gasoline, benzene, thinner, etc. It can result in the risk of electric shock or fire.
•Make sure the power cord is plugged firmly and completely into the outlet. It can result in the risk of electric shock or fire.
•Do not start or stop operation by plugging in or unplugging the power cord. It can result in the risk of electric shock.
•If the air conditioner is making unusual sounds or is emitting smoke or an unusual odor, unplug it immediately. It can result in the risk of electric shock or fire.
•Do not use if the electrical socket is loose or damaged. It can result in the risk of electric shock or fire.
•Do not operate with wet hands or in a damp environment. It can result in the risk of electric shock.
•Do not use this or any electrical appliance if you smell gas. It can result in the risk of fire or explosion.
•Turn off and unplug the air conditioner before cleaning to avoid the risk of electric shock.
•Do not clean the unit with water. Water can enter the unit and damage the insulation, creating a shock hazard. If water enters the unit, unplug it immediately and contact Customer Service. It can result in the risk of electric shock.
•Use two or more people to lift and install the unit. Failure to do so can cause back injury or other injuries.
English
3

IMPORTANT SAFETY INSTRUCTIONS
READ ALL INSTRUCTIONS BEFORE USE
 BASIC SAFETY PRECAUTIONS
 CAUTION To reduce the risk of fire, electric shock, or injury to persons when using this appliance, follow basic precautions, including the following:
•To avoid possible cuts, avoid contacting the metal parts of the air conditioner when removing or reinstalling the filter. It can result in the risk of personal injury.
•Do not block the air inlet or outlet of the air conditioner. Reduced air flow will result in poor performance and could damage the unit.
•Always grasp the plug when plugging in or unplugging the air conditioner. Never unplug by pulling on the cord. It can result in result in the risk of electrical shock and damage.
•Always turn off and unplug the air conditioner when it will not be used for extended period of time. This conserves energy and reduces the chance of accidents.
•Secure the wheels with blocks to prevent the air conditioner from rolling on smooth floors.
•Install the air conditioner on a sturdy, level floor capable of supporting up to 110 lbs (50 kg). Installation on a weak or unlevel floor can result in result in the risk of property damage and personal injury.
•Make sure the air conditioner is the correct size for the area you wish to cool. Using an air conditioner that is the wrong size can waste energy and damage the air conditioner.
•Close all doors and windows to the room for most efficient operation.
•To prevent damage to the surface finish, use only a soft cloth to clean the air conditioner. Do not use wax, thinner, or a strong detergent.
•To prevent spills and property damage, be sure to drain the air conditioner properly.
•To prevent the coils from freezing, do not operate the air conditioner if the room temperature is below 18°C (65°F).
•Do not position the air conditioner so that pets or house plants are exposed to the direct air flow. It can result in the risk of injury to pets or house plants.
•This air conditioner is designed for normal household use. Do not use for cooling pets, foods, precision machinery, or art objects.
•Do not drink the water from the drain pan. Dispose of it properly outdoors or down the drain.
•Do not operate air conditioner without the filter securely in place. Operation without the filter could damage the unit.
•Clean the filter every two weeks, or more often if needed.
 ELECTRICAL SAFETY
 WARNING
Electrical Shock Hazard
Failure to follow these instructions can result in death, fire, or electrical shock.
•This unit must be properly grounded.
•Do not, under any circumstances, cut or remove the ground prong.
•If you do not have a properly grounded outlet, or if there is any doubt that the outlet is not properly grounded, a qualified electrician should check the outlet and circuit, and, if necessary, install a properly grounded outlet.
•This air conditioner must be plugged into a grounded 60 Hz, 120 VAC outlet protected by a 15 amp time delay fuse or circuit breaker.
•This air conditioner must be installed in accordance with national wiring codes.
•Do not alter or modify the plug or cord of this air conditioner. If the power cord becomes worn or damaged, the cord should only be replaced by a qualified service technician using genuine replacement parts.
•Do not use an extension cord.
4

IMPORTANT SAFETY INSTRUCTIONS
READ ALL INSTRUCTIONS BEFORE USE
 ELECTRICAL SAFETY
INTEGRATED CIRCUIT BREAKER
For additional safety, the power cord
Reset features an integrated
circuit breaker. Test Test and reset buttons are
provided on the plug case.
The circuit breaker should be tested periodically by pressing the TEST
button does not cause the circuit breaker to trip, or if the RESET button will not stay engaged, unplug the air conditioner immediately and contact your LG service technician.
Due to potential safety hazards, the use of an adapter plug is strongly discouraged.
For temporary connections, use only a UL-listed adapter. Ensure that the large slot in the adapter is aligned with the large slot in the outlet.
To prevent damage to the adapter’s ground terminal, hold the adapter in place while plugging in or unplugging the air conditioner.
•Attaching the adapter ground terminal to the wall receptacle cover screw does not ground the appliance unless the cover screw is metal and not insulated, and the wall receptacle is grounded through the house wiring.
PREFERRED
GROUNDING METHOD
Ensure proper ground exists before use.
TEMPORARY GROUNDING
METHOD
(Use of adapter plugs not permitted in Canada)
Ensure proper ground exists before use.
•Frequent connection and disconnection can damage the ground terminal on the adapter. Never use a broken or damaged adapter.
SAVE THESE INSTRUCTIONS
English
5
PARTS AND FEATURES
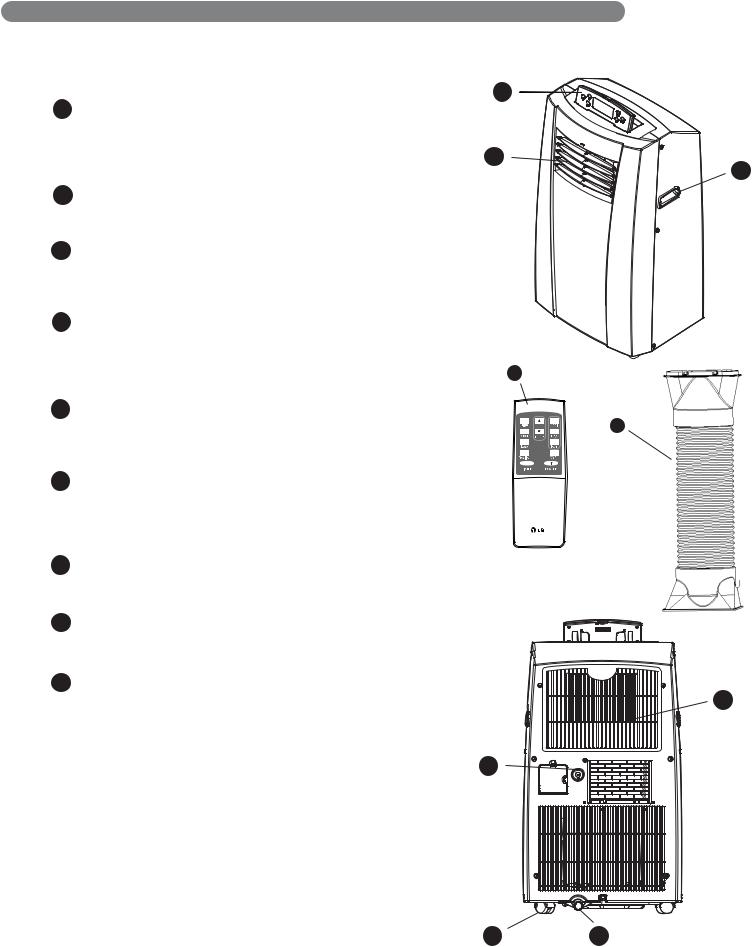
 KEY PART AND COMPONTS
1 CONTROL PANEL AND DISPLAY
Easy-to-read digital display shows the set temperature and indicator lights show the operating mode. Simple push buttons make changing settings quick and easy.
2 AIR DISCHARGE
Distribute air more evenly through the room.
3 INTEGRATED HANDLES
Integrated handles provide a convenient grip when lifting the air conditioner.
4 INFRARED REMOTE CONTROL
The remote control allows you to adjust the temperature and operate most functions of the air conditioner from across the room.
5 SWIVELING CASTERS
Swiveling casters allow you to move the air conditioner easily on most floor surfaces.
6 BOTTOM DRAIN PORT
Used when water is full or free of using long time.
Before moving the unit, drain the internal water collection tank completely by using bottom drain port.
7 FILTER
Filter cover clips in place for easy access to the air filter.
8 UPPER DRAIN PORT
Used when Continuous Drainage or in dry mode.
9 FLEXIBLE VENTING HOSE
Use the diffuser and hose to connect the air conditioner to the window installation kit to vent exhaust air outside.
Check all the accessories included in the package and please refer to the installation instructions for their usage.
1
2
3
4
9
7
8
6 |
5 |
6 |
|
PARTS AND FEATURES
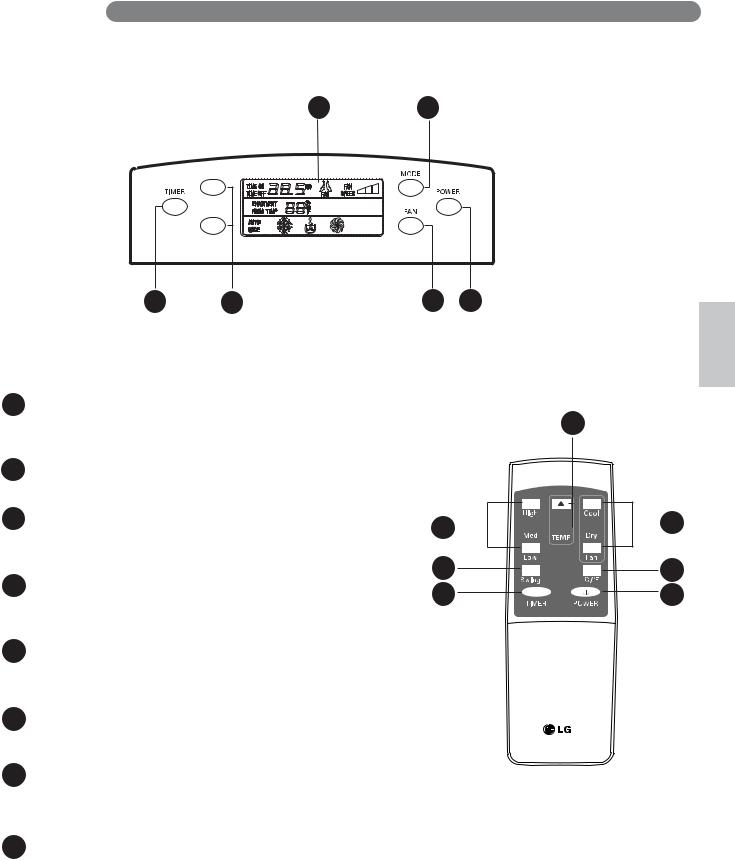
 CONTROL PANEL AND REMOTE
6 2
UP
DOWN
4 |
5 |
3 |
1 |
Operation of functions is the same when using the remote or the control panel, unless otherwise stated.
For detailed instruction on each function,see the following pages.
1 POWER
Operation begins when this button is pressed and stops when you press the button again
2 MODE
Press this button to select COOL, DRY, FAN mode
3 FAN SPEED
Adjusts the circulation fan speed between HIGH, MID, LOW fan speed.
4 TIMER
Press this button to set TIMER ON, TIMER OFF or NO TIME
5 UP & DOWN
Press these buttons to set room temperature or time when in Time On/Off mode.
6LCD Display
Display different signals accordingly.
7AUTO SWING
5
3 


 2
2
7 |
|
8 |
4 |
8 |
1 |
|
11 |
|
This button can automatically control the air flow direction
8 CELSIUS AND FAHRENHEIT EXCHANGE BUTTON
NOTE
English
To vary from Fahrenheit to Celsius, press both UP and DOWN button
7

HOW TO USE
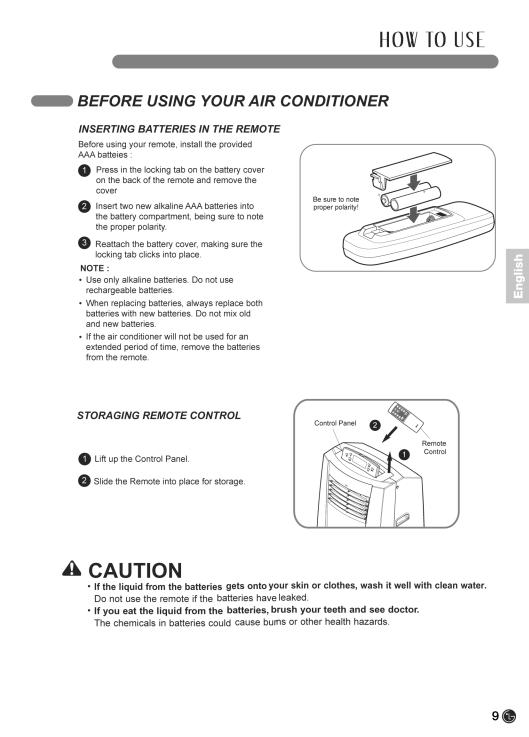
 BEFORE USING YOUR AIR CONDITIONER
PREPARING FOR OPERATION
Refer to the Installation Instructions included in this manual before using the air conditioner.
Once the air conditioner has been properly assembled and installed:
1Plug the power cord into its own dedicated properly grounded outlet.Do not plug ot her appliances into the same outlet;
it could overload the outlet and create a fire hazard.
2Make sure the air conditioner and cord is positioned where it does not create a tripping hazard and will receive adequate ventilation. Do not place it directly next to furniture or objects that could block the vent openings.
3Make sure that any items that could be blown over or damaged by the airflow from the fan are out of the airflow path.
UNPACKING THE AIR CONDITIONER
Remove and store packing materials for reuse.
Remove any shipping tape before using the air conditioner. If the tape leaves behind any adhesive, rub a small amount of liquid dish soap onto it and wipe with a damp cloth. Do NOT use sharp instruments, alcohol, thinners, or abrasive cleaners to remove adhesive. They could damage the finish.
IMPORTANT:
•Do not remain in the direct airflow from the air conditioner for extended periods of time.
•To prevent damage or injury to pets and plants, make sure they are not exposed to direct airflow from the air conditioner.
•When used at the same time as stoves, fireplaces, and other combustion devices, make sure there is a sufficient flow of fresh air into the room. Do not use in tightly enclosed spaces with these types of devices.
•This air conditioner is intended for household use as a consumer comfort appliance. Do not use it as a precision climate control system, or for purposes such as cooling precision equipment, food, pets, plants, artwork, etc. Such items could be damaged.
•Do not bend the hose downward when window installation kit is not applied. It may cause failure of air conditioner or performance deterioration.

INSTALLATION INSTRUCTIONS
 SELECTION OF INSTALLATION LOCATION
1 Install the unit on a flat and dry place. |
|
2 For best performance,allow at least 50cm |
50cm |
of air space on all sides of the unit for |
|
good air circulation.
50cm
English
 WARNING
The length of the exhaust pipe is specially designed according to the specification of this product. Do not replace or prolong it with your own private hose as this could cause mal-function.
11

INSTALLATION INSTRUCTIONS
 ATTACHING THE HOSE AND DIFFUSER
NOTE: The air conditioner is shipped with the hose installed. The hose may be removed for cleaning and storage, if necessary. Simply reverse the steps below to remove.
Insert the large adapter end of the hose into the hole on the back of the air conditioner.
12
INSTALLATION INSTRUCTIONS
 PREPARING FOR INSTALLATION
 WARNING The air conditioner is heavy! Use two or more people to lift and install the unit! Failure to do so could result in back injury or other injuries.
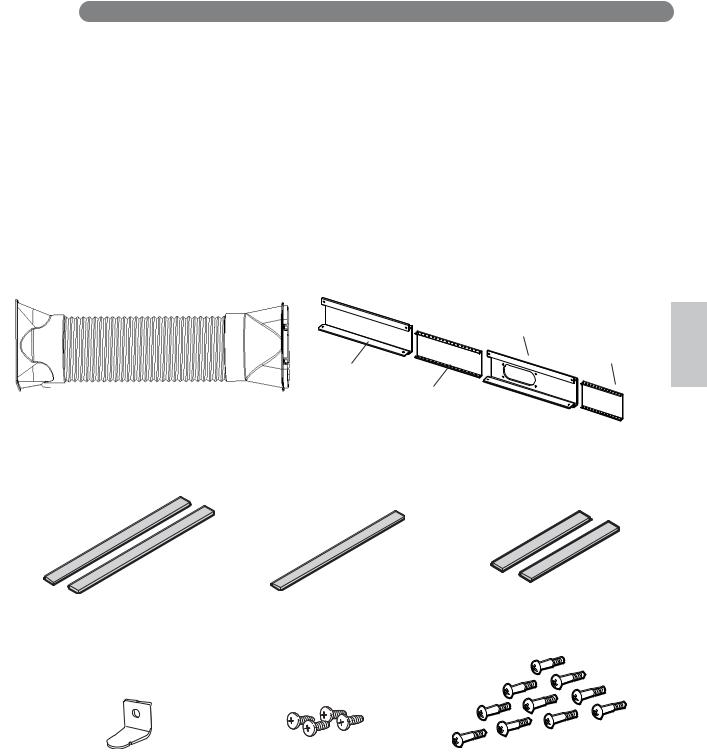
EXHAUST COMPONENTS
The following components are used for window venting.
Not all components are used for every installation.
Vent Panel |
Small |
|
Extension |
|
Panel |
|
Extension |
|
|
Vent Panel |
|
|
Large |
|
|
Extension |
|
Flexible Venting Hose |
Panel |
Window Installation Kit |
|
||
|
|
(includes 2 Window Vent |
|
|
Panel and 2 Extension |
|
|
Panels) |
2 Type A Foam Seals |
1 Type B Foam Seal |
2 Type C Foam Seals |
(adhesive) |
(non-adhesive) |
(Adhesive type-Shorter) |
Security Bracket |
4 Type A Screws |
10 Type B Screws |
English
13

I N S TA L L AT I O N I N S T RU C T I O N S
 WINDOW VENT PANEL AND EXTENSIONS
The window installation kit allows you to install the air conditioner in most vertical-sliding windows 18" to 48" wide, or casement-style windows from 18" to 48" high.
18"
Vent
Vent
Panel
 Panel
Panel
18"
For an 18 window opening, use the window vent panel by itself.
Small extension panel 
181⁄4" −24"
Vent  Panel
Panel
Vent
Panel
Small extension panel
181⁄4" −24"
For window openings from 181⁄4" to 24", use the window vent panel and the small extension panel.
|
Large extension |
|
panel |
Large |
24" −29" |
Vent |
|
extension |
Panel |
panel |
|
|
Large extension |
|
panel |
Large |
29" −36" |
Vent |
|
extension |
Panel |
panel |
|
Vent |
Vent |
Small |
Panel |
Panel |
|
|
|
extension |
|
|
panel |
|
|
Small |
24" −29" |
29" −36" |
extension |
panel |
For window openings from 24" to 29", use the window vent panel and the large extension panel.
For window openings from 29" to 36", use the window vent panel and both extension panels.
|
Extension vent |
Large |
|
|
panel |
|
|
Extension vent |
36" −48" |
extension |
|
panel |
|||
panel |
Large |
|
Vent |
|
|
||
|
extension |
|
Panel |
|
panel |
|
|
|
Vent |
|
Small |
|
Panel |
|
|
|
|
extension |
|
|
|
|
|
|
|
Small |
panel |
|
|
|
|
|
|
extension |
|
36" −48" |
|
panel |
|
|
|
|
|
For window openings from 36″ to 48″, use both vent panels and both extension panels.
14

I N S TA L L AT I O N I N S T R U C T I O N S
 INSTALLATION IN VERTICAL SLIDING WINDOWS
NOTE: The window installation kit can be used with vertical sliding windows between 18" and 48" wide.
Foam seal C
(Adhesive type-shorter)
Foam seal A (Adhesive type)
1Cut the foam seal A(adhesive type) & C(adhesive type-shorter) to the proper length, and attach it to the window sash and frame.
Extension panel (if required)
Vent
Panel
2Insert the vent panel assembly, including extension panels, if needed, into the window opening. Extend the extension panels, if used.
English
Foam seal B (Non-adhesive type)
Type B screws
3Carefully lower the window. Secure the vent panel in place with 4 type B screws, plus one screw for each extension:
Vent panel only: 4 type B screws
Vent panel and |
|
one extension: |
5 type B screws |
Vent panel and |
|
two extensions: |
6 type B screws |
Two vent panels and
two extensions: 9 type B screws
4Cut the foam seal B(Non-adhesive type) to the window width. Stuff the foam seal B between the glass and the window to prevent air and insects from getting into the room.
15
 Loading...