


FB163-A0P_ENG_HZ_2813 2/13/09 12:44 PM Page 1
FB163-A0P_ENG_HZ_2813
ENGLISH
Model: FB163
FB163-A/D/X0P
FBS163V

FB163-A0P_ENG_HZ_2813 2/13/09 12:44 PM Page 2
Safety Precaution
CAUTION
RISK OF ELECTRIC SHOCK
DO NOT OPEN
CAUTION: TO REDUCE THE RISK OF ELECTRIC SHOCK DO NOT REMOVE COVER (OR BACK) NO USER-SERVICEABLE PARTS INSIDE REFER SERVICING TO QUALIFIED SERVICE PERSONNEL.
This lightning flash with arrowhead symbol within an equilateral triangle is intended to alert the user to the presence of uninsulated dangerous voltage within the product’s enclosure that may be of sufficient magnitude to constitute a risk of electric shock to persons.
The exclamation point within an equilateral triangle is intended to alert the user to the presence of important operating and maintenance (servicing) instructions in the literature accompanying the product.
WARNING: TO PREVENT FIRE OR ELECTRIC SHOCK HAZARD, DO NOT EXPOSE THIS PRODUCT TO RAIN OR MOISTURE.
WARNING: Do not install this equipment in a confined space such as a book case or similar unit.
CAUTION: Do not block any ventilation openings. Install in accordance with the manufacturer's instructions.
Slots and openings in the cabinet are provided for ventilation and to ensure reliable operation of the product and to protect it from over heating. The openings should be never be blocked by placing the product on a bed, sofa, rug or other similar surface.
This product should not be placed in a built-in installation such as a bookcase or rack unless proper ventilation is provided or the manufacturer's instruction has been adhered to.
CAUTION: This product employs a Laser System.
To ensure proper use of this product, please read this owner’s manual carefully and retain it for future reference. Should the unit require maintenance, contact an authorized service center.
Use of controls, adjustments or the performance of procedures other than those specified herein may result in hazardous radiation exposure.
To prevent direct exposure to laser beam, do not try to open the enclosure. Visible laser radiation when open. DO NOT STARE INTO BEAM.
CAUTION: The apparatus should not be exposed to water (dripping or splashing) and no objects filled with liquids, such as vases, should be placed on the apparatus.
CAUTION concerning the Power Cord
Most appliances recommend they be placed upon a dedicated circuit; That is, a single outlet circuit which powers only that appliance and has no additional outlets or branch circuits. Check the specification page of this owner's manual to be certain.
Do not overload wall outlets. Overloaded wall outlets, loose or damaged wall outlets, extension cords, frayed power cords, or damaged or cracked wire insulation are dangerous. Any of these conditions could result in electric shock or fire. Periodically examine the cord of your appliance, and if its appearance indicates damage or deterioration, unplug it, discontinue use of the appliance, and have the cord replaced with an exact replacement part by an authorized service center.
Protect the power cord from physical or mechanical abuse, such as being twisted, kinked, pinched, closed in a door, or walked upon. Pay particular attention to plugs, wall outlets, and the point where the cord exits the appliance.
To disconnect power from the mains, pull out the mains cord plug. When installing the product, ensure that the plug is easily accessible.
2 DVD Micro Hi-Fi System ] USER GUIDE

FB163-A0P_ENG_HZ_2813 2/13/09 12:44 PM Page 3
Types of Playable Discs
Type |
Logo |
DVD-VIDEO: Discs such as movies that can be purchased or rented.
DVD-R: Video mode and finalized only
DVD-RW: Video mode and finalized only
DVD+R: Video mode only
Supports the double layer disc also
DVD+RW: Video mode only
Audio CD:
In addition, this unit can play a DVD±R/RW and CD-R or CD-RW that contains audio titles, MP3, WMA, JPEG files.
Depending on the conditions of the recording equipment or the CD-R/RW (or DVD±R/RW) disc itself, some CD-R/RW (or DVD±R/RW) discs may not be played on the unit due to the recording quality or physical condition of the disc, or the characteristics of the recording device and authoring software. The disc will not play if it has not been correctly finalized. Player does not support these kinds of discs.
Dolby”, “Pro Logic”, and the double-D symbol are trademarks of Dolby Laboratories.
Manufactured under license from Dolby Laboratories.
About the  Symbol Display
“  ” may appear on your TV display during operation and indicates that the function explained in this owner’s manual is not available on that specific DVD video disc.
Regional code
This unit has a regional code printed on the rear of the unit. This unit can play only DVD discs labeled same as the rear of the unit or “ALL”.
•Most DVD discs have a globe with one or more numbers in it clearly visible on the cover. This number must match your unit’s regional code or the disc cannot play.
•If you try to play a DVD with a different regional code from your player, the message “Check Regional Code” appears on the TV screen.
Copyrights
It is forbidden by law to copy, broadcast, show, broadcast via cable, play in public, or rent copyrighted material without permission. This product features the copy protection function developed by Macrovision. Copy protection signals are recorded on some discs. When recording and playing the pictures of these discs picture noise will appear. This product incorporates copyright protection technology that is protected by method claims of certain U.S. patents and other intellectual property rights owned by Macrovision Corporation and other rights owners. Use of this copyright protection technology must be authorized by Macrovision Corporation, and is intended for home and other limited viewing uses only unless otherwise authorized by Macrovision Corporation. Reverse engineering or disassembly is prohibited.
CONSUMERS SHOULD NOTE THAT NOT ALL HIGH DEFINITION TELEVISION SETS ARE FULLY COMPATIBLE WITH THIS PRODUCT AND MAY CAUSE ARTIFACTS TO BE DISPLAYED IN THE PICTURE. IN CASE OF 525 OR 625 PROGRESSIVE SCAN PICTURE PROBLEMS, IT IS RECOMMENDED THAT THE USER SWITCH THE CONNECTION TO THE ‘STANDARD DEFINITION’ OUTPUT. IF THERE ARE QUESTIONS REGARDING OUR TV SET COMPATIBILITY WITH THIS MODEL 525p AND 625p UNIT, PLEASE CONTACT OUR CUSTOMER SERVICE CENTER.
DVD Micro Hi-Fi System ] USER GUIDE |
3 |
FB163-A0P_ENG_HZ_2813 2/13/09 12:44 PM Page 4
Welcome to your new DVD Micro Hi-Fi System
Contents
Safety Precaution . . . . . . . . . . . . . . . . . . . .2 Types of Playable Discs . . . . . . . . . . . . . . .3 Setting up . . . . . . . . . . . . . . . . . . . . . . . . . .5 Main Unit . . . . . . . . . . . . . . . . . . . . . . . . . . .6 Hooking up the unit -I . . . . . . . . . . . . . . . . .7 Hooking up the unit -II (Optional) . . . . . . . .8 Remote control . . . . . . . . . . . . . . . . . . . . . .9 OSD Initial language setting (Optional) . .10 Initial Setting the Area Code (Optional) . .10 Adjust the settings . . . . . . . . . . . . . . . .10-11 Displaying Disc Information . . . . . . . . . . .12 Setting the clock . . . . . . . . . . . . . . . . . . . .12 Use your player as an alarm clock . . .12-13 Setting the sound mode . . . . . . . . . . . . . .13
Playing a Disc . . . . . . . . . . . . . . . . . . . . . .14
Playing a DivX Movie file . . . . . . . . . . . . .15
Listening to Audio CD,MP3 or WMA files . . .15-16
Viewing photo files . . . . . . . . . . . . . .16-17 Listening to the radio . . . . . . . . . . . . . . . . .17 Listening to music from your portable
player . . . . . . . . . . . . . . . . . . . . . . . . . . . .18
Connecting your portable USB player . . . . .18 USB DIRECT RECORDING . . . . . . . . . . . . .19 Using iPod mode (Optional) . . . . . . . . . . . . .20 Using OSD iPod mode (Optional) . . . . . . . . .20 Language Codes . . . . . . . . . . . . . . . . . . . . .21 Area Codes . . . . . . . . . . . . . . . . . . . . . . . . . .21 Troubleshooting . . . . . . . . . . . . . . . . . . . . . .22 Specifications . . . . . . . . . . . . . . . . . . . . . . . .23
Power Save Mode
You can set up the unit into an economic power save mode.
In power-on status, press and hold 1 (STANDBY/ON) button for about
3 seconds.
- Nothing is displayed in the display window when the unit is turned off. To cancel, press 1 (STANDBY/ON) , CLOCK, TIMER or VSM/DEMO.
Precautions in using the touch buttons
•Use the touch buttons with clean and dry hands.
-In a humid environment, wipe out any moisture on the touch buttons before using.
•Do not press the touch buttons hard to make it work.
-If you apply too much strength, it can damage the sensor of the touch buttons.
•Touch the button that you want to work in order to operate the function correctly.
•Be careful not to have any conductive material such as metallic object on the touch buttons. It can cause malfunctions.
4 |
DVD Micro Hi-Fi System ] USER GUIDE |
FB163-A0P_ENG_HZ_2813 2/13/09 12:44 PM Page 5
Setting up
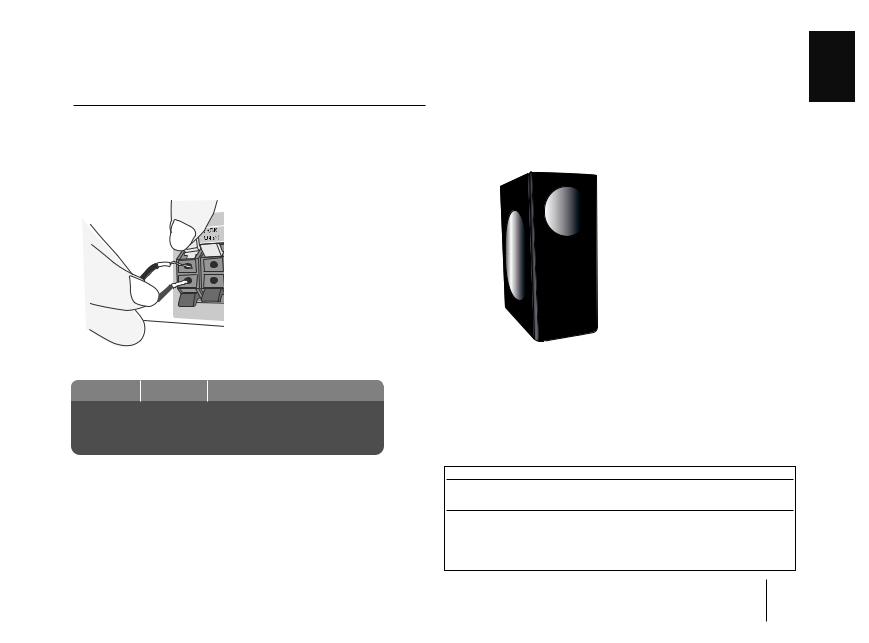
Attaching the speakers to the unit
Connect the wires to the unit.
Match each wire’s coloured band to the same coloured connection terminal on the reverse of the unit.
To connect the cable to the unit, press each plastic finger pad to open the connection terminal. Insert the wire and release the finger pad
The connector will open ready to receive a cable.
Connect the red end of each wire to the terminals marked +(plus) and the black end to the terminals marked - (minus).
Speaker Deco : This part of speaker makes a no sound.
COLOUR |
SPEAKER |
POSITION |
Red |
Front |
In front of you, to the right of |
|
|
the screen |
White |
Front |
In front of you, to the left of |
|
|
the screen |
Be careful of the following
•Be careful to make sure children not to put their hands or any objects into the speaker duct.
•Speaker duct : A hall for plentiful bass sound on speaker cabinet (enclosure).
Remote control Operation
Point the Remote Control at the remote sensor and press the buttons.
Remote control Battery Installation
Detach the battery cover on the rear of the remote control, and insert two R03 (size AAA) batteries with 3 and # aligned correctly.
Do not mix old and new batteries. Never mix different types of batteries (standard, alkaline, etc.).
DVD Micro Hi-Fi System ] USER GUIDE |
5 |
FB163-A0P_ENG_HZ_2813 2/13/09 12:44 PM Page 6
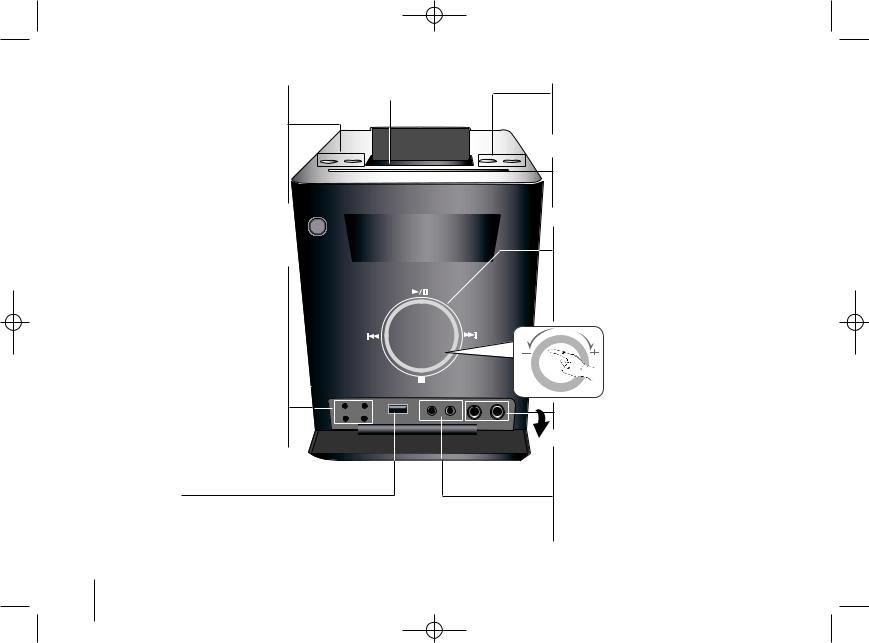
Main unit
• FUNC. To select the Functions press |
iPod DOCKING (Optional) |
FUNC.. |
|
(DVD/CD →USB → OSD IPOD (Optional) →IPOD |
|
(Optional)→TV-AUDIO(Optional) →PORTABLE → |
|
FM→ AM ) |
|
• XDSS Plus (MP3 Optimizer) |
|
Reinforce the treble, bass and surround effect,XDSS ON will show in the display,press again for NORMAL. (Page 13)
•1 (STANDBY/ON) 
Turn on or off
•TIMER (Use your player as a desired
time.)
•CLOCK For setting the clock and checking the time.(see setting the clock)
•VSM (VIRTUAL SOUND MATRIX )
/ DEMO Press DEMO in power off state to demonstrate the function on display window. To cancel it, press 1 or DEMO again.
• SET confirms the time you have selected when setting the clock.
- RDS (OPTIONAL) shows information about radio stations. (see listening to the radio)
• USB connector
Connect a remote USB compatible player here.
•USB Rec. USB DIRECT RECORDING (Page 19)
•Z EJECT Ejects or inserts the CD from the slot loader.
•CD slot loader - Do not push a disc forcibly.
- Do not pull or push a disc while a disc is eject.
- Press Z again to reinsert the disc after ejecting it .
•. or > AUTO TUNING -TUNER / (. or
>) SKIPCD buttons
•B/]] (PLAY/PAUSE)
•x STOP button
•VOLUME Adjustment
Moves your finger to inside of touch wheel. (Refer to the page 4.)
•MIC1/MIC2 Connect the microphone.
( 6.3 mm) - Optional
•PORTABLE IN For connecting a portable device and playing it through the system’s speaker.
•Headphone jack
Connect a headphone plug ( 3.5 mm) into the jack to listen to the sound through headphones
(not supplied).
6 DVD Micro Hi-Fi System ] USER GUIDE

FB163-A0P_ENG_HZ_2813 2/13/09 12:44 PM Page 7
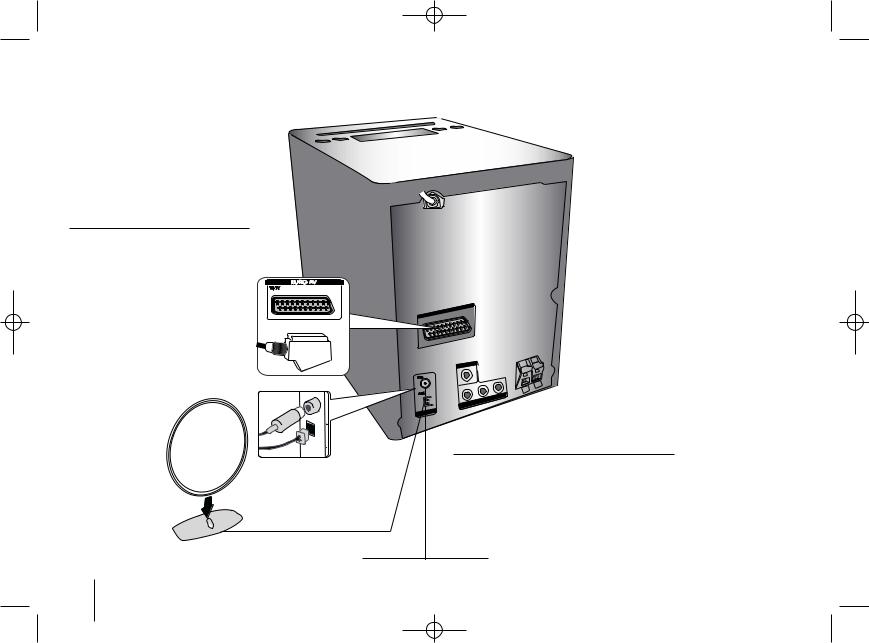
Hooking up the unit - I
MONITOR OUT / OUT PUT(COMPONENT /PROGRESSIVE SCAN) connections
MONITOR jack connection
Connect the VIDEO jack on the unit to the corresponding  input jacks on your TV using
  a Video cable.
OUT PUT (COMPONENT VIDEO) jacks connection
Connect one end of the component(Y PB PR) cable to the COMPONENT VIDEO jack on the unit and other end to the COMPONENT INPUT jack on your TV.
DVD Micro Hi-Fi System ] USER GUIDE |
7 |
FB163-A0P_ENG_HZ_2813 2/13/09 12:44 PM Page 8
Hooking up the unit -II (Optional)
SCART connectionOptional
a Connect one end of the scart cable into the TO TV SCART jack on the unit and other end to the corresponding in jack on your TV.
You can get Audio and Video signals together with this connection.
b Plug the power cord into the power source.
Antenna connection
Fit the AM loop aerial to its stand
Connect the AM loop aerial to the player.
Connect the FM aerial
The reception will be at its best when the two loose ends of the aerial are in a straight line and horizontal.
8 |
DVD Micro Hi-Fi System ] USER GUIDE |
 Loading...