

Page 1
MP-100
Reverb & Effects Card
for the Core2 Audio System
U s e r G u i d e
Page 2

Unpacking and Inspection
After unpacking the system modules, save all packing materials in case you ever need to ship the units. Thoroughly inspect the modules and packing
materials for signs of damage. Report any damage to the carrier at once; report equipment malfunction to your dealer.
Communications Notice
This equipment has been tested and found to comply with the limits for a Class B digital device, pursuant to Part 15 of the FCC Rules. These limits
are designed to provide reasonable protection against harmful interference in a residential installation. This equipment generates, uses and can
radiate radio frequency energy and, if not installed and used in accordance with the instructions, may cause harmful interference to radio
communications. However, there is no guarantee that interference will not occur in a particular installation. If this equipment does cause harmful
interference to radio or television reception, which can be determined by turning the equipment off and on, the user is encouraged to try to correct
the interference by one or more of the following measures:
Reorient or relocate the receiving antenna
Increase the separation between the equipment and receiver
Connect the equipment into an outlet on a circuit different from that to which the receiver is connected
Consult the dealer or an experienced radio/TV technician for help
Le présent appareil numérique de la classe B respecte toutes les exigences du Règlement sur le materiel brouiller du Canada.
Copyright 1999, Lexicon Inc.
All Rights Reserved.
Lexicon Part # 070-13820
Lexicon Inc.
3 Oak Park
Bedford MA 01730-1441
Telephone 781-280-0300
Fax 781-280-0490
www.lexicon.com
Page 3

Table of Contents
Using the MP-100
Basic Operation....................................................1
Inserting MP-100 within an MMIO Application ..2
Routing an Audio Channel through the
MP-100 Using Aux Sends and Returns •
Selecting MP-100 and Making Settings •
Naming Effects • Saving Effects • Loading
Effects • Editing Effects
Using MP-100 within an MMIO Application.......5
Routing an Audio Channel through the
MP-100 • Making Settings for the MP-100
The Interface ........................................................7
Loading Effects ................................................. 8
Editing Effects...................................................9
Tempo Functions ............................................ 10
Bypass ............................................................ 10
Saving Effects.................................................11
Beyond the Basics .............................................12
Routing a Plug-In ............................................ 12
Automating the MP-100 .................................. 15
MP-100 Programs and Parameters
About the MP-100 Programs.............................. 17
Bank: Plate......................................................... 18
Bank: Gate ......................................................... 19
Bank: Hall........................................................... 20
Bank: Chamber .................................................. 21
Bank: Ambience ................................................. 22
Bank: Room ....................................................... 23
Bank: Tremolo.................................................... 24
Bank: Rotary ...................................................... 25
Bank: Chorus ..................................................... 26
Bank: Flange ...................................................... 27
Bank: Pitch ......................................................... 28
Bank: Detune ..................................................... 29
Bank: Delay, Echo.............................................. 30
About the Dual Programs ...................................32
Bank: Flange-Delay............................................ 34
Bank: Pitch-Delay............................................... 35
Bank: Chorus-Delay ........................................... 36
Bank: Delay-Reverb ........................................... 37
Bank: Flange-Reverb ......................................... 38
Bank: Pitch-Reverb ............................................39
Bank: Chorus-Reverb......................................... 40
Bank: Special FX................................................ 41
Page 4

Basic Operation
The MP-100 combines the quality and power of Lexicon reverb and effects on dedicated hardware
with the ease and elegance of a software plug-in interface. Unlike software-based plug-ins, the MP100 provides outstanding sonic quality without burdening your computer’s performance.
If you are installing the MP-100 into an existing Core2 system, please refer to the Read Me file
accompanying your software, the hardware installation instructions and the section of the Core2 User
Guide describing the procedure for updating drivers.
Different procedures are used to access the MP-100 interface in ASIO and MMIO applications. These
are described separately in the following sections, followed by detailed descriptions of the MP-100
controls and features.
Using the MP-100MP-100 User Guide
1
Using the MP-100
1
1
Page 5

Using the MP-100
Inserting MP-100 within an ASIO Application
The following procedure details the steps to open a MP-100 plug-in in an ASIO-capable program such
as Cubase VST or Opcode Vision DSP. This procedure will vary depending on your application.
Routing an Audio Channel through the MP-100 Using Aux Sends and Returns
1. In the Audio menu, select System.
2. Set Monitoring to Tape Type and press the ASIO Control Panel button.
3. On the Lexicon Control Panel Core2 tab, make sure the Aux Send and Aux Return are enabled.
If they are not, enable them, then restart Cubase.
4. In the Cubase Audio menu, select Inputs. Enable the Aux Return input. Make note of the
corresponding Cubase input (e.g. In 3 L&R), as you will need it later.
5. In the Cubase Audio menu, select Master and enable the Aux Send Output bus. Make note of
the corresponding Cubase output bus number or name, as you will need it later.
6. On the Lexicon Control Panel, go to the Effects tab and set the routing for MP-100 as follows:
From Aux Send L (VST) and Aux Send R (VST) To Aux Return L (VST) and Aux Return R (VST).
7. In the Cubase Audio menu, select Monitor.
8. On an unused stereo track, select the Aux Return input corresponding to the input selected in Step
3. Enable that input. (The button should be yellow.)
9. Click on the FX button on the audio channel where you want effects. This will open the selected
Channel Settings window.
10. Click on the pop-up menu below the Effect Send knob, and select the output bus number or name
noted in Step 4.
11. Make sure the Dry button is off. (This deactivates all four effect sends for the channel.)
12. Click On for each effect send you want to activate, and turn the corresponding Send Level knob
to a moderate value.
13. If you want the signal to be sent to the effects before the faders, click on the Pre button for the
send.
Lexicon
2
2
Page 6

Using the MP-100MP-100 User Guide
14. With Pre-fader effect sends, the amount of effect for the channel is not affected by the volume
fader. With Post-fader effect sends (Pre button not pressed), the amount of effect is proportional
to the channel volume, and will change with the volume fader movements.
The next step is to select programs and set the parameters for the effect processors. As you will
probably need to adjust the send levels while doing this, leave the FX window open.
Selecting MP-100 and Making Settings
Effect types and programs are selected in the Effects window:
1. Pull down the Audio menu and select Effects. This window resembles an effects rack, with
stacked processors.
2. Pull down the pop-up menu in the processor’s upper right corner and select MP-100 to activate
an MP-100 Rack within VST. Click on the Power button.
3. Use the Send Level knob in the FX window to control the amount of effect for the audio channel.
4. Click the Edit button to activate the MP-100 interface. See
details on the MP-100 controls.
5. Use the Aux Send knob assigned to the MP-100 to set the input level to the MP-100. High values
may cause clipping (distortion) in the MP-100.
The Interface
later in this chapter for
NOTE: As the Cubase VST Rack Xpander was designed specifically for software plug-ins, some of
its controls are not designed to work with the MP-100 – most notably, the Input Level and Bus Select
Buttons. MP-100 Input Level is controlled by the Aux Send knob in the channels monitor section.
MP-100 bus selection is performed on the Reverb page of the Lexicon Studio Control Panel.
3
3
Page 7

Using the MP-100
Lexicon
Naming Effects
1. Click on the Program name in the top center of the effect processor display to open a name dialog.
2. Type in a new name.
3. On the keyboard, press Return.
Saving Effects
Save your edited effects in the File pop-up menu to the right, under the Effect Type pop-up.
1. To save the current Program, select Save Effect.
2. To save all Programs of the same Effect Type, select Save Bank.
3. In the file dialog that appears, select a name and location for the file. (You might want to create
a special folder for your MP-100 effects.)
4. Click Save.
Loading Effects
Load effects from disk into the MP-100 as follows:
1. Pull down the File menu.
2. To load a single Program, select Load Effect.
3. To load a complete Program Bank, select Load Bank.
4. In the file dialog that appears, find and click on the file you want to load.
Effect settings are saved with your Song. If you want to use your edited effects in other Songs, you
can save and load them separately.
Editing Effects
You can create your own programs or edit any of the programs with the editor. To open the MP-100
interface, click the Edit button on the MP-100 Rack Xpander. Skip the following section on MMIO
applications, and read about the MP-100 features and controls under
4
4
The Interface.
Page 8

Using MP-100 within an MMIO Application
Routing an Audio Channel through the MP-100
Like traditional effects devices, the MP-100 can be used in two ways: as auxiliary effects or as line
effects.
Using the MP-100MP-100 User Guide
Most effects processors are used as
the aux send and returns to send specific channels to the effects devices, then back to the board where
the end result is mixed with the dry outputs of the board. Typically, the Mix ratio is kept at 100% wet,
since the signal is mixed with the board outputs. Most of the multi-channel applications available today
(such as Cubase VST, Logic Audio, Cakewalk Pro Audio) simulate this functionality with virtual aux
sends and returns.
Effects devices can also be used as line effects by placing them in series with the signal chain.
Steinberg WaveLab is capable of doing this through its VST plug-in architecture, which does not
require additional routing. MMIO programs that do not support VST plug-ins must route audio to the
MP-100, where it is mixed into the entire signal. Typically, the Mix ratio for reverb in this situation
should be set at 50%, to have a mixture of direct and reverberated signal.
Routing MMIO audio to and from the MP-100 is done in the Effects tab of LexPanel.exe.
To route audio:
1. Boot LexPanel.exe by double-clicking on the Lexicon Studio icon at the bottom right corner of your
task bar.
2. Click the Effects tab to view all MMIO routing and control options for the MP-100.
3. Click Monitor to make all routing selections available.
4. Using the To and From pulldown menu for the MP-100, route your audio according to which MMIO
channel and interface outputs you would like to use.
auxilliary effects
. On a typical console, this is achieved by using
5
5
Page 9
Using the MP-100
Lexicon
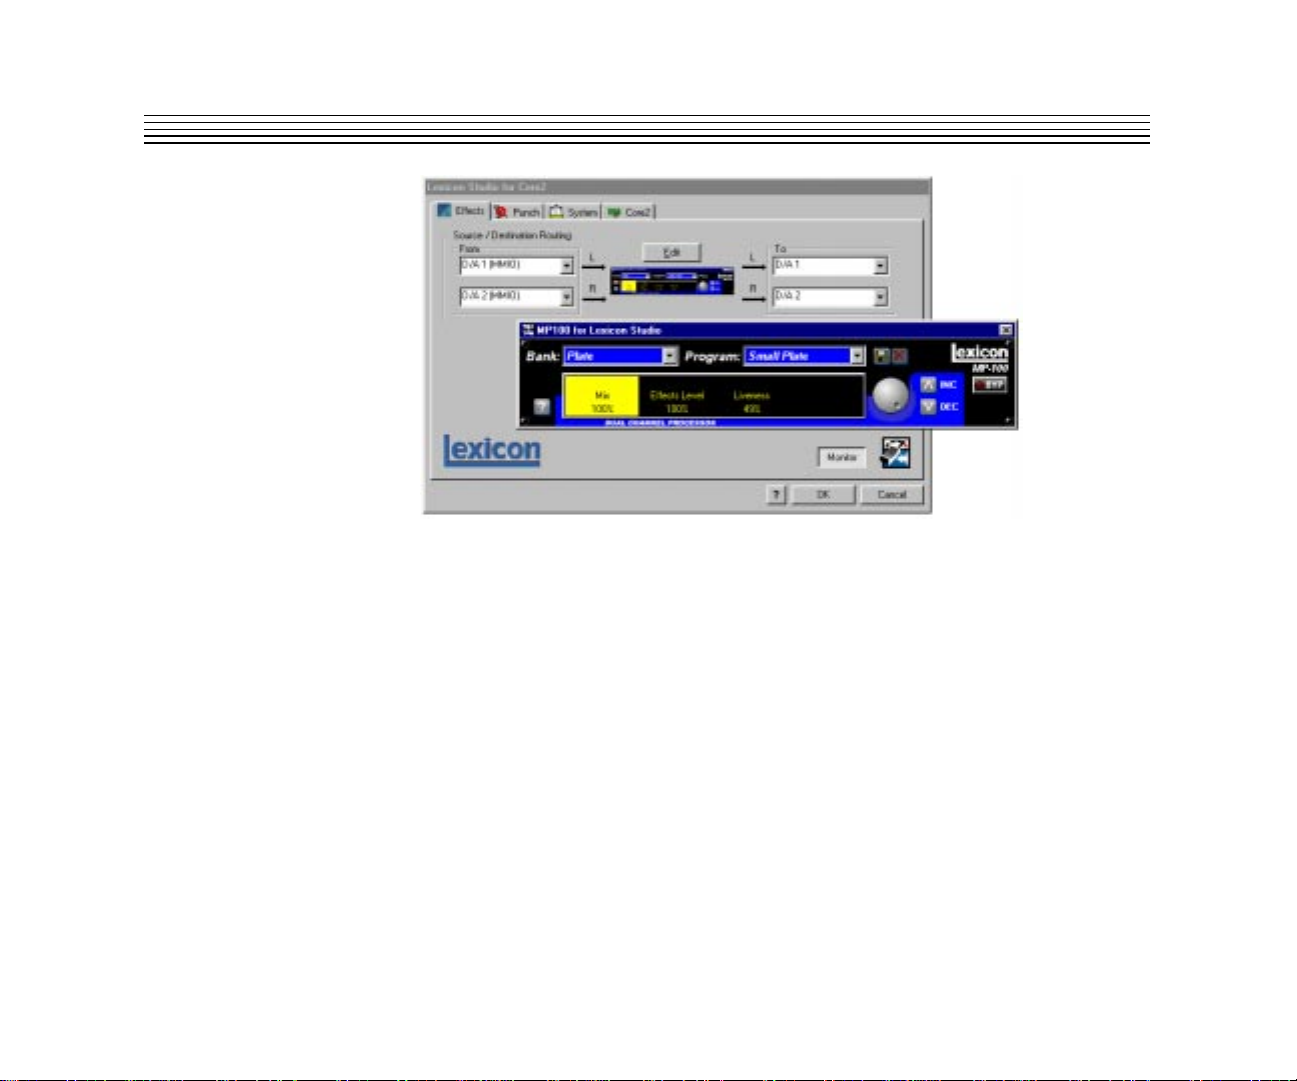
The LexPanel with the MP-100 Interface
Making Settings for the MP-100
The MMIO programs for the MP-100 are virtually identical to those available when using MP-100 with
ASIO applications such as Cubase VST. The only differences are in the Mix values. As most MMIO
applications will use the MP-100 as a line effect, the Mix values have been saved at 50% wet. If you
are using an MMIO program that supports VST plug-ins (such as Steinberg WaveLab or Emagic Logic
Audio), remember to change the Mix values in the programs you are using to 100% wet.
6
6
Page 10
The Interface
Using the MP-100MP-100 User Guide
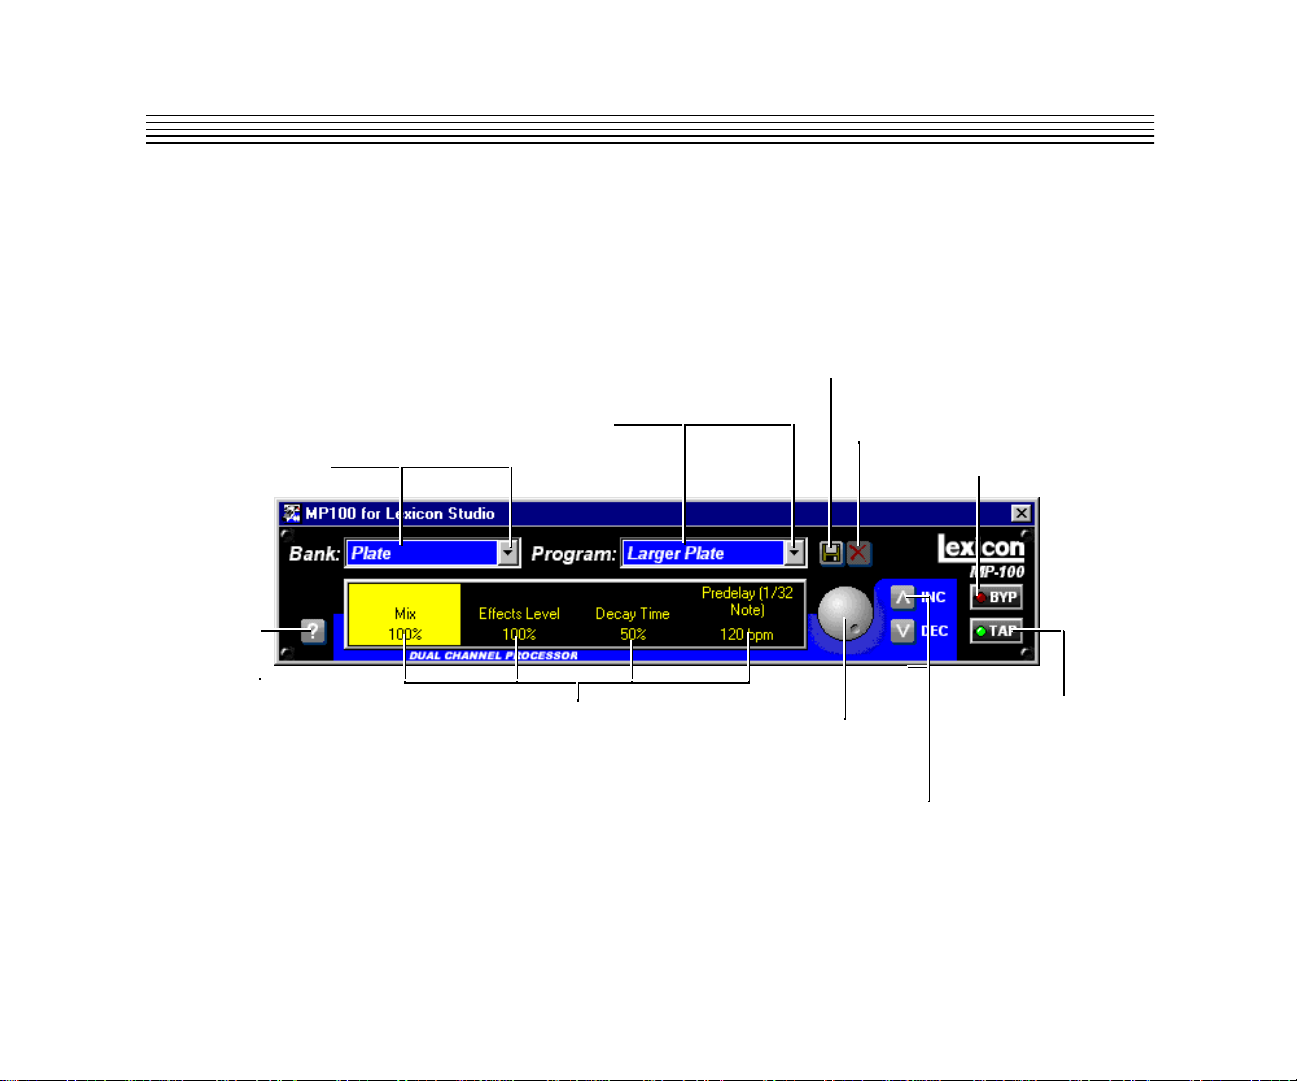
The MP-100 interface provides a straightforward control surface for access to all programs and
parameters. Each of the controls is briefly described in the following illustration.
Bank Press the arrowed button to
scroll to another program Bank.
Click in the display area to display
a list of all of the MP-100 Banks.
? Press to activate on-screen
help messages for all controls.
Program Press the arrowed button to
scroll to another Program. Click in the
display area to display a list of all of the
MP-100 Programs.
Parameters Click on any displayed
parameter to highlight it. Adjustments
to the selected parameter can be
made by scrolling in the display area,
by turning the front panel knob, or with
the INC and DEC controls.
Store Press to name and
store User programs.
X Deletes displayed
User program.
Adjust Knob Turn this
knob to change the highlighted parameter value.
INC/DEC Allows fine tuning of the selected
parameter by incrementing/decrementing
the value by single units.
BYP Engages Bypass.
(LED on).
TAP LED will light when the
selected program has tempo
controlled parameters. Tap
twice in rhythm to set the
tempo.
7
7
Page 11
Using the MP-100
Lexicon
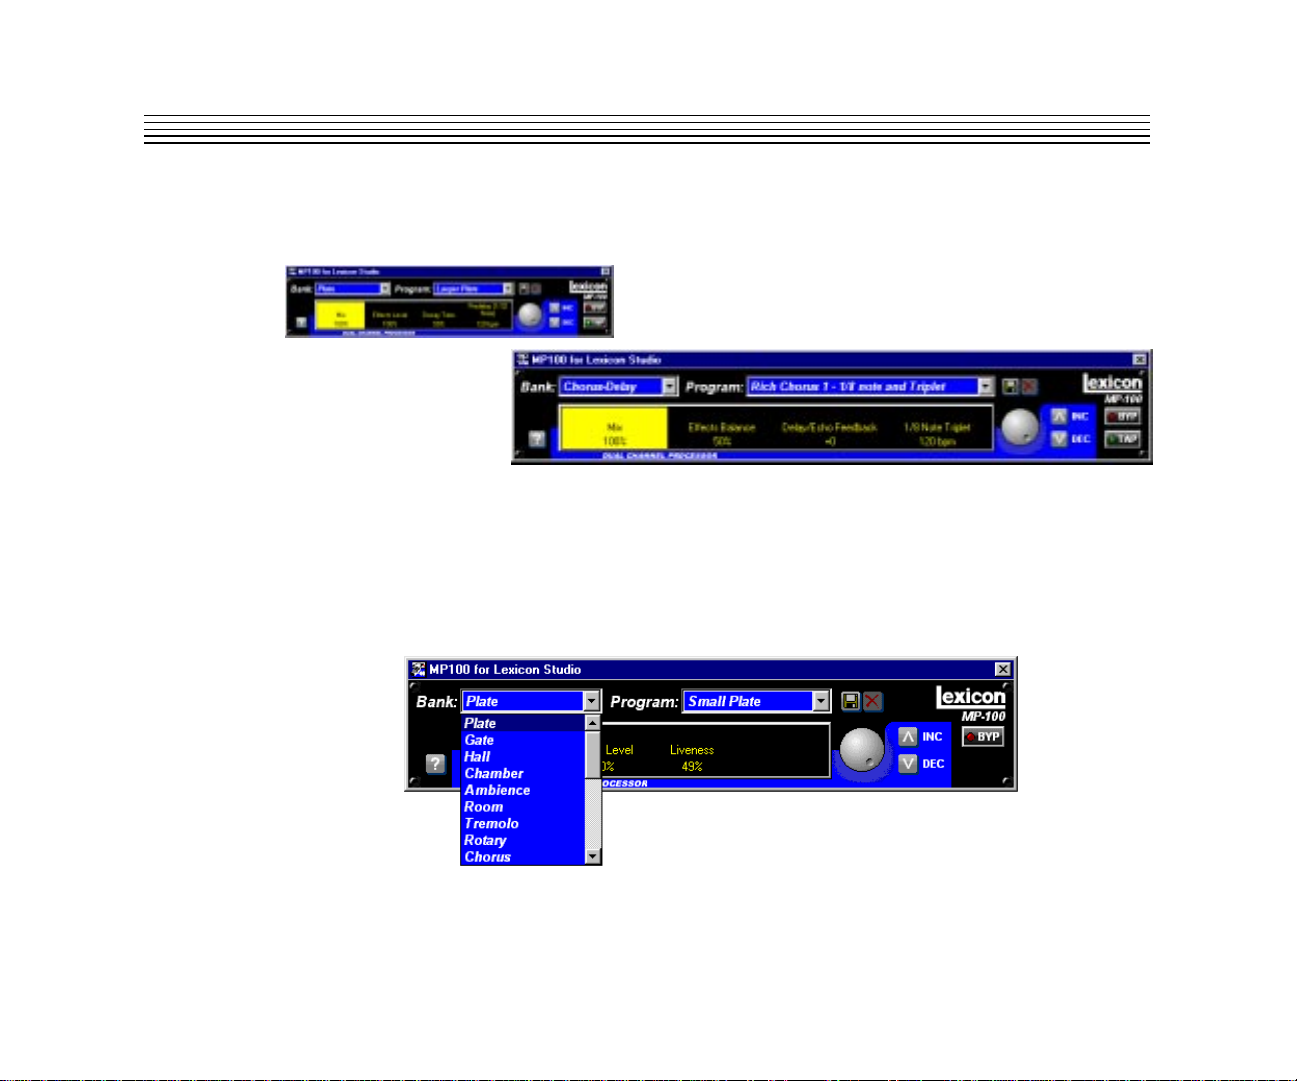
If you have a large monitor, note you can expand the interface to a larger size by clicking and dragging
on the right side of the panel.
Click and drag on the right side of the MP-100
panel to display the extended view.
➔ ➔
Loading Effects
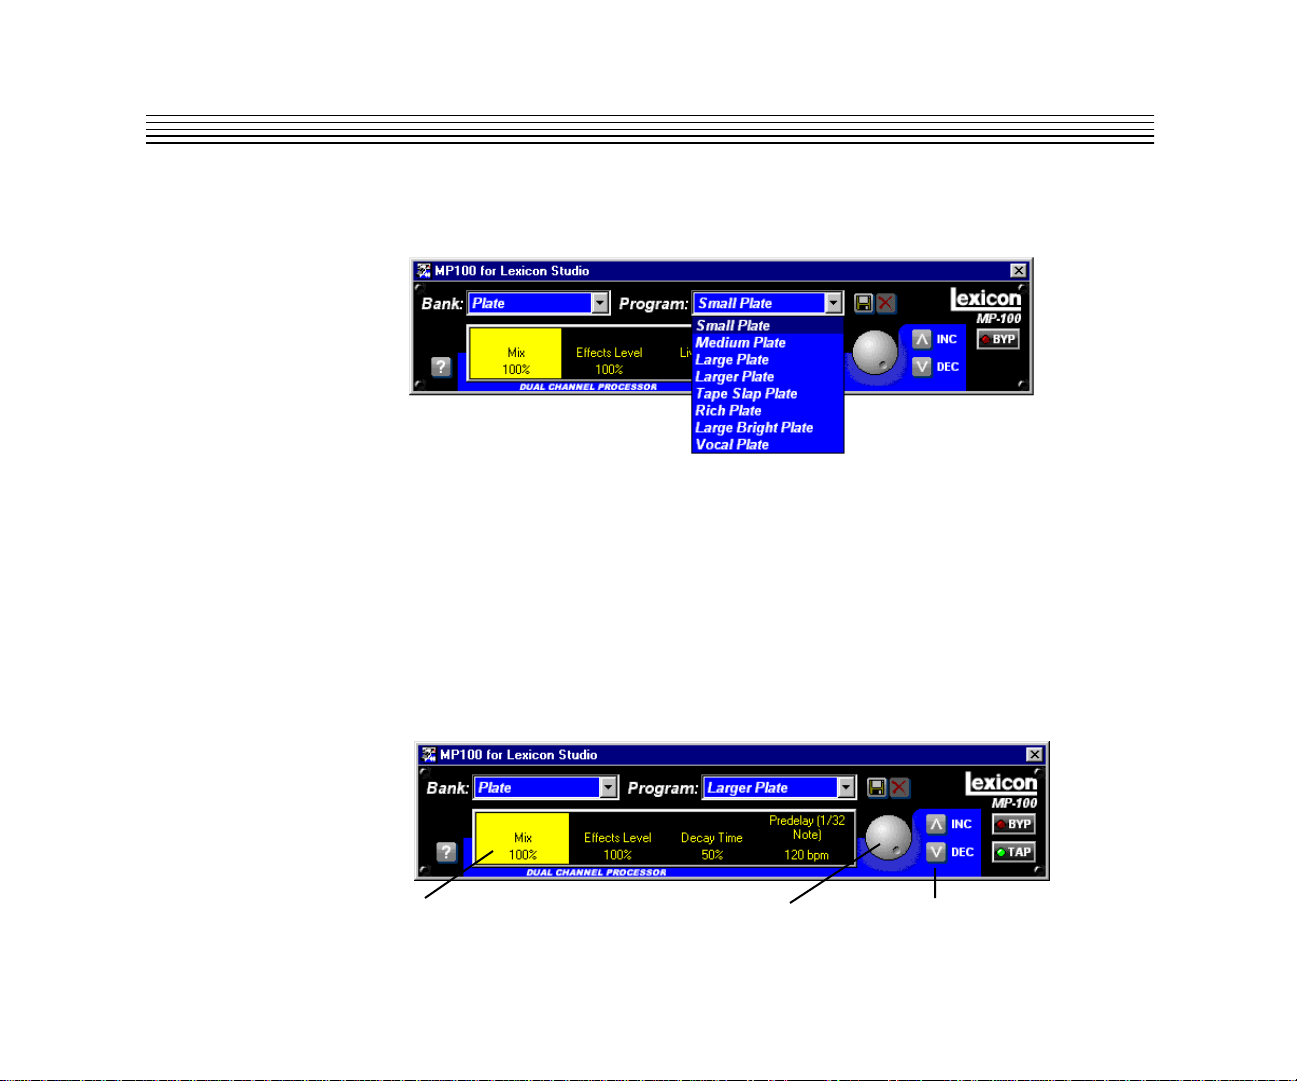
The MP-100 comes with 240 factory programs organized into Banks, and a User Bank where you
can store edited versions of the factory programs. Click on the Bank display to view a list of all of the
available Banks. Use the scroll bar to view more of the list.
8
8
Page 12
Using the MP-100MP-100 User Guide
Click on the Program display to view all of the programs available within the selected Bank. Programs
are automatically loaded when selected.
Editing Effects
Whenever a new program is loaded, three or four edit parameters will appear in the main display area
of the interface: Mix, Effects Level (Effects Balance in the Dual programs) and a parameter unique
to the selected program (Decay Time in our illustration). These parameters will always appear in the
same order for any selected program. Click on any displayed parameter to highlight it and select it
for editing. Select another parameter by clicking on it or by using the left and right keyboard arrowed
keys to select it.
Change the value of the selected parameter with the displayed knob,with the INC and DEC buttons,
by clicking and dragging the cursor to the desired value, or by using the keyboard up and down
arrowed keys.
Click on a parameter
to select it for editing.
Use the knob to quickly change the
value of the selected parameter over
its entire range.
Use the Incremement/Decrement
buttons to fine tune parameter settings.
9
9
Page 13

Using the MP-100
Lexicon
Tempo Functions
The MP-100 Tap Tempo feature allows you to set the delay times and modulation rates of tempobased programs to the beat of the music. Whenever a tempo-based program is selected, a TAP button
will appear on the interface, and the adjustable parameter will appear in the rightmost position on the
main edit display. A light on the displayed TAP button will flash at the selected tempo rate.
To change the tempo, you can adjust the displayed parameter in BPM, or tap in a tempo by clicking
twice on the Tap button in time with the music — the MP-100 will figure out the time for you.
When a tempo-based program is selected,
tap in a tempo, or select the tempo parameter
and set it in BPM with the knob.
Your new tempo will be saved and recalled as part of the program when you store it.
10
10
Bypass
Pressing the Bypass button (at the right edge of the interface) will cause the MP-100 to pass only dry,
unprocessed audio.
Page 14
Using the MP-100MP-100 User Guide
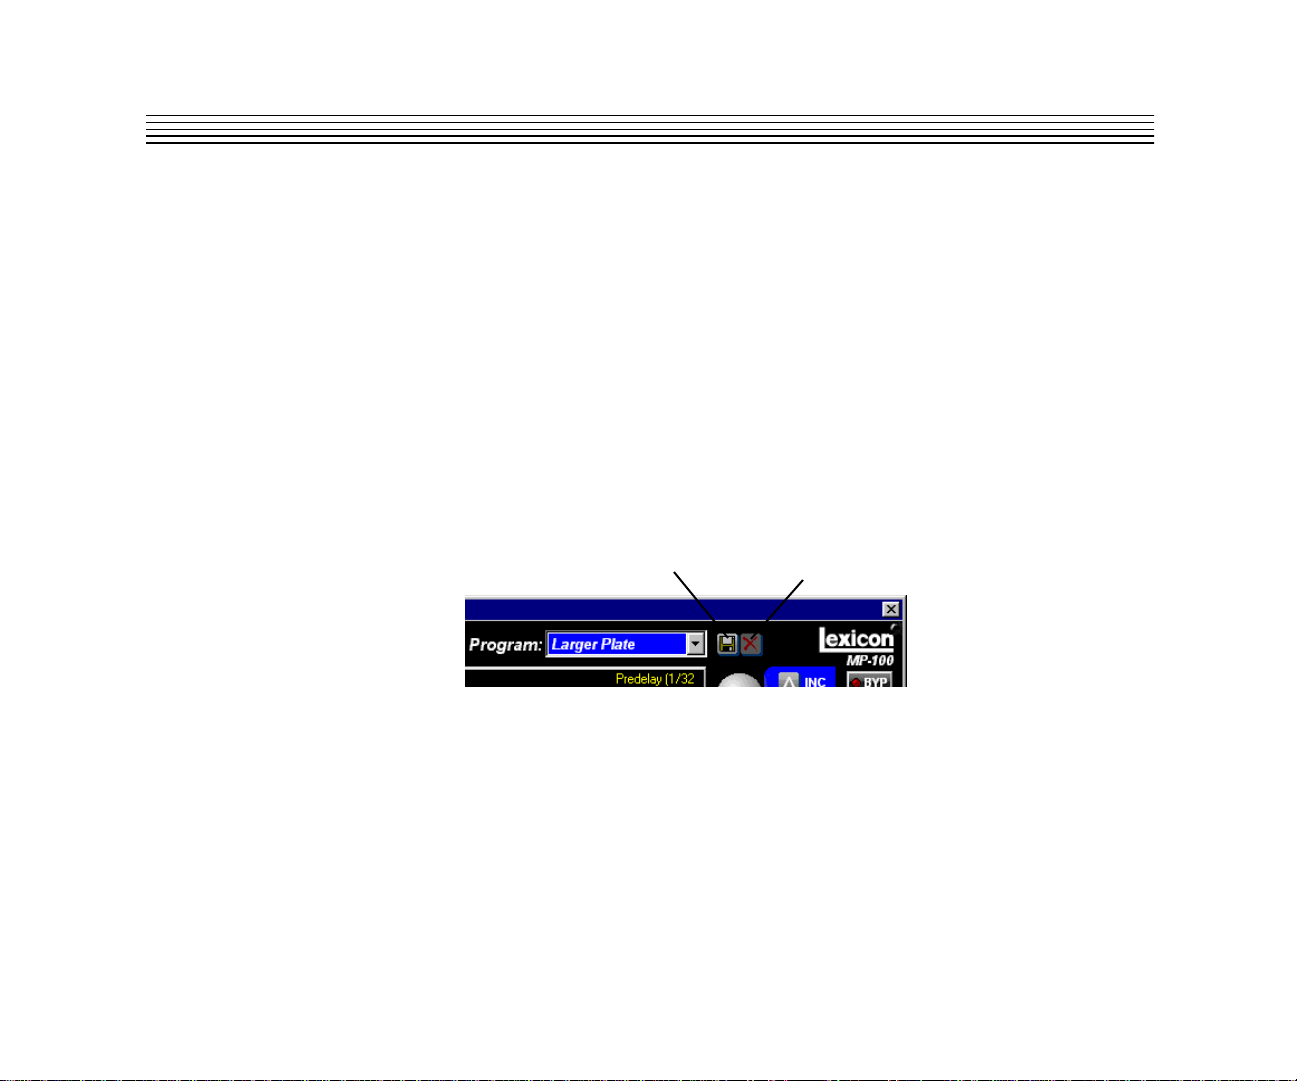
Saving Effects
To save any program, click on the disk symbol next to the Program display. A dialog naming box will
appear with a default name consisting of the Bank and Program (separated by a comma). You can
use this name, or type in a name of your own choosing.
When you have finished entering the name, click OK. The new program will be stored in the first
available space in the User Bank.
NOTE: Programs in the User Bank can be overwritten. If you try to save a program with a name which
has already been assigned to a User program, an alert dialog will appear to make sure that you want
to replace the older program with the one you are saving.
Press the X button, next to the Store button to delete any currently selected User program.
Press the disk icon to
store a program.
Press X to delete any
selected User program.
11
11
Page 15

Using the MP-100
Beyond the Basics
Routing a Plug-In
A default routing is set in your Lexicon Studio system, to allow you to use your MP-100 as an auxiliary
effect, monitoring the audio through the analog outputs on your audio interface as soon as it is
installed. This default routing configuration can be easily changed for your particular studio setup with
the following procedure.
The Effects tab on the LexPanel allows you to route a stereo pair through any of the connectors of
your audio interface.
To assign a source to any of the input channels in your MP-100:
1. Make sure the Monitor button is enabled.
2. Click the left mouse button on the down-arrow of an input selector to open a menu displaying all
Sources available for routing to the MP-100.
3. Use the scrollbar to view additional Source selections.
4. Click on a source to route it as an input source. The input selector will display your selection.
Lexicon
12
12
NOTE: Input sources can only be be routed one at a time.
To assign a destination to any of the output channels in your MP-100:
1. Click the left mouse button on the down-arrow of an output selector to open a menu of available
destinations.
2. Use the scrollbar to view additional destination selections.
3. Click on an output to designate it as an output destination. The output selector will display your
selection.
NOTE: Only resources that have been enabled in the Core2 tab are available as sources/destinations.
Page 16

Using the MP-100MP-100 User Guide
The diagram below is a flow chart of a routing example. Notice that PC-90 receives its input from
Cubase VST via the VST_Aux_Send_1L and VST_Aux_Send_1R sources. These sources route
any audio assigned to that bus into the MP-100.
Aux Send Sum
VST_Aux_Send_1L
Wave
VST_Aux_Send_1R
MP-100
or
ASIO
Inputs
VST_Analog_L
VST_Analog_R
Analog_Out_L
Analog_Out_R
Core2
Outputs
D/A 1
D/A 2
Core2
As Analog_Out_L and Analog_Out_R are selected as destinations, MP-100 audio is summed with
the outputs of Cubase VST, which are also routed to the analog outputs. This allows monitoring of
MP-100 reverb and all audio from VST through the same outputs of the interface.
Cascade with Input
Core2
Inputs
A/D 1
A/D 2
MP-100
Wave or
ASIO Inputs
A/D 1
A/D 2
Cascade with Output
Wave or
ASIO Outputs
D/A 1
D/A 2
MP-100
Core2
Outputs
D/A 1
D/A 2
13
13
Page 17

Using the MP-100
Lexicon
The reverb routing matrix is flexible, and can provide a wide array of configurations. The previous
configuration would not be ideal if, for example, you were mixing audio simultaneously from a digital
tape deck and your computer to a digital mixer, and wanted to send your reverb into your digital mixer
on independent channels. In this case, you can easily reroute your destinations to other channels,
such as TOSLINKs 1 & 2 simply by changing the output destinations on the Control Panel.
Aux Send/Aux Return
Wave or
ASIO Sources
Aux Send
Aux Send
1
2
MP-100
14
14
Aux Return
Aux Return
L
R
Page 18

Automating the MP-100
The MP-100 Digital Reverberator can be completely automated within any control software that
supports automation. Refer to the user guide for your particular software package for support offered
for this functionality. The following section describes MP-100 automation within Cubase VST.
To write enable the channel that the MP-100 is assigned to, open the Cubase VST Mixer window
and click the Write button.
Changes made to MP-100 parameters will be recorded to an Audio Mix Part. Any changes (even
those made while the transport is in Stop) are recorded, as long as the Write button is enabled.
If you check the Arrange window when playback is stopped, you will note that a special Mixer Track
called Audiomix has been created. This Track contains one long Part named Audiomix, in which all
your Monitor mixer actions are stored. Don’t worry about the length of this Part — it will automatically
be lengthened if you record past its end.
Please note that there is only one Audiomix Part/Track, created the first time you use the Write
function in your Arrangement. The next time you use the Write function, information is added to the
existing Part.
To stop writing automation events, click the Write button a second time, or close the Mixer window.
All changes to this track and its plug-ins will cease to record.
Using the MP-100MP-100 User Guide
To play back automation in your mix:
1. Check that the Audiomix Track or Part is not muted.
2. Activate automated playback by clicking on the Read button in the upper left corner of the Monitor
window. If you want to watch and listen to your recorded mixer actions, for example, while you’re
recording fader movements for another mixer channel, you can activate Read and Write
simultaneously.
Begin playback as usual. The monitor faders and controls will move automatically, following your
recorded actions. You will also hear your plug-in automation events playing back with your audio.
15
15
Page 19

Using the MP-100
Lexicon
16
16
Page 20

About the MP-100 Programs
The 240 programs in the MP-100 are designed to provide a full palette of high caliber ambience,
reverb, delay, pitch shift and other effects. Each program gives you control over Mix Level, Effect Level
(or Effect Balance inthe Dual programs) as well as a special parameter customized for each individual
program. In many cases this parameter controls several effect parameters simultaneously to provide
simple control of a complicated editing process. In many Chamber and Room programs, for example,
a "liveness" parameter alters the character of the space by changing decay, EQ and early reflections
all at the same time.
The following section provides a general description of each MP-100 Bank along with tables that detail
all of the programs available in each Bank. These details include the function of the custom parameter
and the Tap button (for variations that use tempo-controlled rate or delay times).
MP-100 Programs and ParametersMP-100 User Guide
2
MP-100 Programs and Parameters
17
17
Page 21

MP-100 Programs and Parameters
Bank: Plate
The Plate programs synthesize the sound of metal plates with high initial diffusion and a relatively
bright, colored sound. These programs are designed to be heard as part of the music, mellowing and
thickening the initial sound. Plates are a popular choice for enhancing popular music, particularly
percussion.
Plate Programs Effect Parameter Tap
Small Plate Liveness –
Medium Plate Liveness –
Large Plate Liveness Predelay (1/32 Note)
Larger Plate Decay Time Predelay (1/32 Note)
Tape Slap Plate
Rich Plate Decay Time Predelay (1/32 Note)
Large Bright Plate Decay Time Predelay (1/32 Note)
Vocal Plate Low Cut, Decay Time Echo
Plate reverb was originally generated by a large, thin sheet of metal suspended upright under
tension on springs. Transducers attached to the plate transmitted a signal that made the plate
vibrate — making sounds broadcast through the plate seem to be occurring in a large open space.
Lexicon
± Decay/15ips or 7.5ips –
18
18
Page 22

Bank: Gate
MP-100 Programs and ParametersMP-100 User Guide
The Gate programs provide a fairly constant sound with no decay until the reverb is cut off abruptly.
These programs work well on percussion — particularly on snare and toms, but be sure to experiment
with other sound sources as well.
* Note that audio is muted briefly when Duration is altered.
Gate Programs Effect Parameter Tap
Straight Gate Duration* –
Drum Gate Duration* –
Slope Down Duration* –
140 ms Gate High Cut Predelay (1/32 Note)
240 ms Gate High Cut Predelay (1/32 Note)
340 ms Gate High Cut Predelay (1/32 Note)
440 ms Gate High Cut Predelay (1/32 Note)
540 ms Gate High Cut Predelay (1/32 Note)
Gated reverbs were originally created by feeding a reverb, such as a metal plate, through an analog
gate device. The decay time was set to instant, and the hold time varied the duration of the sound.
19
19
Page 23

MP-100 Programs and Parameters
Bank: Hall
The clean reverberation of the Hall programs is designed to add spaciousness, while leaving the
source material unchanged. In addition to general instrumental and vocal applications, the Hall
programs are good choices for giving separately recorded tracks the sense of belonging to the same
performance.
Hall Programs Effect Parameter Tap
Recital Hall Decay –
Small Church Decay –
Jazz Hall Decay –
Dance Hall Decay –
Synth Hall Decay –
Medium Hall Decay –
Large Hall Decay –
Large Church Decay –
Lexicon's Hall programs recreate the acoustics of actual places, from grand reverberant enclosures
to small concert halls.
Lexicon
20
20
Page 24

Chamber
MP-100 Programs and ParametersMP-100 User Guide
The stereo Chamber programs produce an even, relatively dimensionless reverberation, with little
change in color as the sound decays. The initial diffusion is similar to the Hall programs, but the sense
of space and size is much less obvious. This characteristic, along with the low color of the decay tail
makes the Chamber programs useful on a wide range of material — especially on spoken voice, giving
a noticeable increase in loudness with very low color.
Chamber Programs Effect Parameter Tap
Brick Wall Liveness –
Basement Liveness –
Live Concert Liveness Eko Delay
Percussion 1 Liveness –
Percussion 2 Liveness –
Live Chamber Liveness –
Vocal 1 Liveness Eko Delay
Vocal 2 Liveness Eko Delay
Historically, recording studio chambers were often oddly shaped rooms with a loudspeaker and
set of microphones to pick up the ambience in various parts of the room.
21
21
Page 25

MP-100 Programs and Parameters
Bank: Ambience
The Ambience programs simulate reflections from room surfaces with random reflections, a gradual
decay of overall level, and a gradual narrowing of the bandwidth.
This Bank provides a series of rooms in increasing sizes.
Ambience Programs Effect Parameter Tap
Voice Over High Cut –
Very Small Ambience High Cut –
Small Ambience High Cut –
Medium Ambience High Cut –
Studio D High Cut –
Bright Ambience Decay Level –
Dark Ambience Decay Level –
Marble Foyer Liveness
Ambience gives warmth, spaciousness and depth to a performance without coloring the direct
sound, and is commonly used to add a room sound to recorded music or speech.
Lexicon
–
22
22
Page 26

Bank: Room
MP-100 Programs and ParametersMP-100 User Guide
The Room programs are very useful on drums and percussion and can also be applied to electric
guitar tracks.
This Bank provides a series of rooms in increasing sizes.
Room Programs Effect Parameter Tap
Bedroom Wall Reflections –
Tiled Room Low Frequency Cut –
Studio C Liveness –
Small Room Liveness –
Studio B Decay Time –
Rehearsal Room High/Low Equalizer –
Studio A Decay Time –
Large Room High/Low Equalizer –
The Room programs emulate actual rooms where there is a more apparent sense of being in a small
live place.
23
23
Page 27

MP-100 Programs and Parameters
Bank: Tremolo
The Tremolo programs offer a variety of tremolo shapes (square, sawtooth, triangle, sine and rectified
sine). The synchronization of the left and right sides can be adjusted to produce mono and stereo
effects. As the tremolo rates of several variations are set with Tap, it’s easy to match the tempo of the
music. Other variations let you set left and right channel waveforms out-of-phase, resulting in a
panning motion.
All of the Tremolo programs should be used with Mix set to fully Wet. By adding more dry to the wet/
dry mix, Mix effectively sets the depth of the Tremolo.
As tremolo is essentially a rhythmic effect, care should be taken to make the rate work with the tempo
of the music.
Tremolo Programs Effect Parameter Tap
Rectified Sine Wave Rate: 0.4-15Hz –
Square Wave Rate: 0.4-15Hz –
Sawtooth Wave Rate: 0.4-15Hz –
Rectified Sine Wave Sweep: 0, 90, 180, 270 Rate (1/8 Note)
Square Wave Sweep: 0, 90, 180, 270 Rate (1/8 Note)
Sawtooth Wave Sweep: 0, 90, 180, 270 Rate (1/8 Note)
Triangle Wave Sweep: 0, 90, 180, 270 Rate (1/8 Note)
Sine Wave Sweep: 0, 90, 180, 270 Rate (1/8 Note)
Lexicon
24
24
Tremolo is a rhythmic change in loudness, commonly employed as an expressive technique by
vocalists and wind instrument players. It is also one of the oldest electronic effects — frequently
used with electric guitar, electric piano and, sometimes, vocals. Different tremolo effects are largely
determined by the rate and waveform shape of the loudness change (fast or slow, smooth or sharp).
If the effect is used in a stereo mix, the left and right can be synchronized in a variety of ways to
produce dramatic side-to-side motion.
Page 28

Bank: Rotary
The Rotary programs are detailed simulations of a Leslie-style cabinet. The input signal is split into
high and low frequency bands. The rotation effect is created by a synchronized combination of pitch
shifting, tremolo and panning. Like the physical model, the high (horn) and low (drum) frequencies are
“spun” in opposite directions. Horn and drum speeds are independent, and are designed with
acceleration and deceleration characteristics to simulate the inertia of the original mechanical
elements.
A virtual requirement for any organ sound, the rotary effect also sounds great with guitar and electric
piano rhythm parts. In fact, it’s a great alternative to chorus and tremolo effects for any sound source.
All of the programs in this Bank should be used with Mix set to fully Wet for the full effect.
MP-100 Programs and ParametersMP-100 User Guide
Rotary Programs Effect Parameter Tap
Rotary Slow/Fast –
Rotary Slow/Fast, Width –
Rotary Slow/Fast, Balance –
Slow Rotary
Varispeed Rotary Speed –
Tap Rotary Balance Rate (Quarter-Note)
Tap Rotary Width Rate (Quarter-Note)
Tap Rotary
± Resonance –
± Resonance Rate (Quarter-Note)
Rotary speaker cabinets were originally designed to provide a majestic vibrato/choir effect for
electronic theater and church organs. The most well known rotary speaker is the Leslie™ Model 122,
which has two counter-rotating elements — a high frequency horn and a low frequency rotor with
slow and fast speeds. The sound generated as the spinning elements change speed is truly magical.
The swirling, spacious effect is hard to describe, but is instantly reconizable.
25
25
Page 29

MP-100 Programs and Parameters
Bank: Chorus
The stereo Chorus programs use six independently randomized delay voices panned across the
stereo field. These programs, inherited from Lexicon's PCM 80, generate a rich, airy effect that can
simulate the sound of multiple sound sources from a single source.
These programs are stunning on acoustic or clean electric guitar.
All of the programs in this Bank should be used with Mix set to fully Wet to achieve the full richness
of the 6-voice chorus.
Chorus Programs Effect Parameter Tap
Rich Chorus ± Resonance –
Rich Chorus
Rich Chorus Rate –
Rich Chorus High Cut –
Diffuse Chorus Diffusion –
Slap Chorus Diffusion –
Slap Chorus
Slap Chorus
Lexicon
± Depth –
± Resonance –
± Depth –
26
26
Chorus effects multiply the original audio source to create a lush, full sound. Traditionally used to
fatten up tracks and to add body to guitar without coloring the original tone, chorus effects are also
often used in combination with echoes, plates and other reverb effects.
Page 30

Bank: Flange
The stereo Flange programs have two 2-tap delays —one per channel. The first tap is fixed, and the
second sweeps past it. Mixing the two delay taps together creates the flanging effect.
All of these programs should be used with Mix set to fully Wet to achieve the full flange effect.
MP-100 Programs and ParametersMP-100 User Guide
Flange Programs Effect Parameter Tap
Light Flange: in phase sweep ± Resonance —
Light Flange: out of phase sweep
Light Flange: in phase sweep Rate —
Light Flange: out of phase sweep Rate —
Deep Flange: in phase sweep
Deep Flange: out of phase sweep
Light Flange Sweep: 0, 90, 180, 270 —
Deep Flange Sweep: 0, 90, 180, 270 —
Flanging effects were originally created by simultaneously recording and playing back two identical
programs on two tape recorders, then using hand pressure against the flange of the tape reels to
slow down first one machine, then the other. The result was a series of changing phase cancellations and reinforcements, with a characteristic swishing, tunnelling and fading sound.
± Resonance —
± Resonance —
± Resonance —
27
27
Page 31

MP-100 Programs and Parameters
Bank: Pitch
The stereo polyphonic Pitch programs allow complete program material or monophonic sources to
be shifted down two octaves or up one octave.
For pitch correction, use these programs with Mix set to fully Wet. For harmonization, use the desired
amount of wet/dry Mix.
Pitch Programs Effect Parameter Tap
Semi-tone Shift -2 to +1 octaves —
Glide Shifter ± 1 octave —
+/-100 cents
Minor 3rd to 4th Harmony Flat 3rd to 4th Up —
4th/5th Harmony 4th to 5th Up —
5th/6th Harmony 5th to 6th Up —
2nd Inversion Triad Minor/Major 3rd —
Power Chords Inversion —
Lexicon
± 100 cents —
28
28
Altering the pitch of a sound allows a variety of effects from subtle detuning to the creation of
harmonies and chords.
Page 32

Bank: Detune
The 4-voice stereo Detune programs have one pair of voices per channel. As more detune amount
is applied (with Adjust), the pair grow more out of tune, providing a lush sound without the need for
a dry signal to be mixed in.
All of these programs should be used with Mix set to fully Wet to achieve the full effect.
MP-100 Programs and ParametersMP-100 User Guide
Detune Programs Effect Parameter Tap
Mild Detuning –
Moderate Detuning –
Heavy Detuning –
FullRange Detuning –
Warm & Mild Detuning –
Warm & Moderate Detuning –
Warm & Heavy Detuning –
Slap Detuner Detuning –
Detune effects add a delayed/pitch shifted version of the original source — thickening up the sound.
They can be particularly effective when used to simulate double-tracking. They are also great
alternatives to chorus effects, adding the richness of a chorus without the audible sweep caused
by the chorus rate.
29
29
Page 33

MP-100 Programs and Parameters
Bank: Delay, Echo
The Delay, Echo programs include mono (5.5 seconds), stereo (2.7 seconds) and 6-voice multitap
effects. Each of the programs can be used for digital delay or tape echo effects. When the Delay
parameter value is increased, tape echo effects are produced. (Each repeat is darker and softer.)
When the Delay parameter value is decreased, digital delay effects are produced. (Each repeat is
the same timbre, but softer.)
In the first eight programs, Delay Echo Feedback also sets the amount of feedback — with an
increasing number of repeats as the parameter value is increased. Delay time is set with Tap. Each
variation is preset with a different useful rhythm.
In the second eight programs, the amount of feedback is preset and Delay Echo Time controls Delay
time.
Delays and echoes are effects that repeat a sound a short time after it first occurs. The simplest (and
oldest) delay effect is tape slap — a single repeat about 100ms after the original sound. (It was often
used on Elvis’s voice and rockabilly guitar tracks.) Tape slap becomes tape echo when the output
of the tape is fed back into the input (feedback),turning a single repeat into a series of repeats —
each a little softer and a little darker than the last. This darkening of each repeat is characteristic
of the analog tape recording process. Digital delays don’t have this characteristic — each repeat
has the same exact timbre and the only difference from repeat to repeat is in loudness.
Digital delay and tape echo are both useful, but they are different. Tape echo is warmer and allows
the original sound to stand out more, while digital delay can present a “perfect” copy of the orignal
sound.
Lexicon
30
30
Page 34

MP-100 Programs and ParametersMP-100 User Guide
When using any type of delay or echo effects with music, always pay attention to the way the repeats
fall rhythmically to the beat. The most effective delay and echo patterns are those that lock in with
the tempo of the tune.
Delay, Echo Programs Effect Parameter Tap
Mono Quarter-Note Delay/Echo Feedback Delay Time
Stereo Quarter-Note Delay/Echo Feedback Delay Time
Triplet Shuffle Delay/Echo Feedback Delay Time
Dotted Eighth-Note Delay/Echo Feedback Delay Time
Eighth-Note and Triplet Delay/Echo Feedback Delay Time
Ping Pong Quarter-Note Delay/Echo Feedback Delay Time
Triplet Rhythm 1 Delay/Echo Feedback Delay Time
Triplet Rhythm 2 Delay/Echo Feedback Delay Time
Mono Delay/Echo Time: 0-5.5sec
Stereo Delay/Echo Time: 0-2.7sec
Tape Slap Delay/Echo Time: 3 3/4 to 30ips
Multi Bounce Delay/Echo Time: 0-100ms
Multi Linear Delay/Echo Time: 0-400ms
Multi Inverse Delay/Echo Time: 0-400ms
Multi Repeat Delay/Echo Time: 0-150ms + Fbk
Multi Pong Delay/Echo Time: 0-200ms + Fbk
31
31
Page 35

MP-100 Programs and Parameters
L
R
L
R
L
R
L
R
BA
Cascade
Dual Mono
A
B
Mono Split
A
B
L
R
L
R
L
R
L
R
Dual Stereo (Parallel)
Programs
1-6
Programs
7-10
Programs
11-14
Programs
15-16
A
B
About the Dual Programs
The MPX 100 Dual programs combine either a Delay or Reverb algorithm with a Flange, a Pitch or
a Chorus. Effects Lvl/Bal controls the relative balance of each effect in the combination.
Four routing configurations are used in the variations of each Dual program: Dual Stereo (Parallel),
Cascade, Mono Split and Dual Mono.
Programs 1-6 are set up in the Parallel configuration - two
stereo effects placed side by side so that they receive and
output stereo audio from both left and right channels.
Programs 7-10 are set up in the Cascade configuration two stereo effects, one placed after the other (for example,
Flange-Delay, Flange passes its stereo signal to the
Delay).
Lexicon
32
32
Programs 11-14 are set up in the Mono Split configuration
which is similar to Parallel, however one effect (Flange)
receives audio from the left input and the other effect
(Delay) receives audio from the right input. Both effects
then output stereo audio.
Programs 15 and 16 are set up in the Dual Mono configuration where one effect (Flange) appears on the left
channel only and the other effect (Delay) appears on the
right channel only.
Page 36

MP-100 Programs and ParametersMP-100 User Guide
Generally, the Effects Lvl/Bal parameter controls the balance of the two effects in each dual program.
In the cascade programs, rather than simply controlling balance, the parameter varies the amount of
the first effect or dry signal which is fed into the second effect.
The effect of the
Effects Balance parameter
(lowest to highest setting)
in the Pitch–Delay
Cascade Programs
At the lowest setting, you get only
pitch shift
DelayPitch
Increasing the setting provides pitch
shift plus delayed pitch shift
At mid-point, you get delayed pitch
Pitch
Delay
DelayPitch
shift
Settings beyond the mid-point provide
DelayPitch
delayed pitch plus delayed dry signal
At the highest setting, you get only
DelayPitch
delayed dry signal
Behavior of Effects Lvl/Bal in the cascade variations. Several points from the
parameter's range are illustrated here, using the Pitch-Delay program as an
example.
33
33
Page 37

MP-100 Programs and Parameters
Bank: Flange – Delay
Flange-Delay Programs Effect Parameter Tap Routing
Deep Flange - Stereo Delay Delay/Echo Fdbk Delay Time (1/4 Note)
Deep Flange - Stereo Delay Delay/Echo Fdbk Dotted 1/8 Note
Deep Flange - Stereo Delay Delay/Echo Fdbk 1/8 Note Triplet
Light Flange - Ping Pong Delay/Echo Fdbk Delay Time (1/4 Note)
Light Flange - Repeat Delay/Echo Time: 0-150ms, Fdbk —
Light Flange - Bounce Delay/Echo Time: 0-200ms, Fdbk —
Deep Flange>Stereo Delay Delay/Echo Fdbk Delay Time (1/4 Note)
Deep Flange>Repeat Delay/Echo Time: 0-150ms, Fdbk —
Deep Flange>Ping Pong Delay/Echo Fdbk Delay Time (1/4 Note)
Deep Flange> Bounce Delay/Echo Time: 0-200ms, Fdbk —
Light Flange+Stereo Delay Delay/Echo Fdbk Delay Time (1/4 Note)
Light Flange+Ping Pong Delay/Echo Fdbk Delay Time (1/4 Note)
Light Flange+Repeat Delay/Echo Time: 0-150ms, Fdbk —
Light Flange+Bounce Delay/Echo Time: 0-200ms, Fdbk —
Deep Flange/Mono Delay Delay/Echo Fdbk Delay Time (1/4 Note)
Deep Flange/Mono Delay Delay/Echo Fdbk Delay Time (Dotted 1/4 Note)
L
R
L
Flange Delay
R
L
R
L
R
Flange
Delay
Flange
Delay
Flange
Delay
Lexicon
L
R
L
R
L
R
L
R
34
34
Page 38

MP-100 Programs and ParametersMP-100 User Guide
Bank: Pitch – Delay
Pitch-Delay Programs Effect Parameter Tap Routing
5th Up/Down - Stereo Quarter-Note ± 5th Delay Time
Octave Up/Down - Triplet Shuffle
Octave Up/Down - Eighth and Triplet
3rd Up/4th Up - Ping Pong Quarter-Note Minor 3rd to 4th Up Delay Time
4th Up/5th Up - Triplet Rhythm 1 4th to 5th Up Delay Time
5th Up/6th Up - Triplet Rhythm 2 5th to 6th Up Delay Time
Octave Up/Down > Triplet Rhythm 1
5th Up/Down > Triplet Rhythm 2
Major/Minor Minor/Major 3rd w/Fdbk Delay Time
Intervals Up Ascending Intervals w/Fdbk Delay Time
5th Up/Down + Stereo Quarter-Note
Octave Up/Down + Triplet Shuffle
4th Up/5th Up + Triplet Rhythm 1 4th to 5th Up Delay Time
5th Up/6th Up + Triplet Rhythm 2 5th to 6th Up Delay Time
Octave Up/Down / Mono Quarter-Note
Octave Up/Down / Triplet Shuffle
± 1 octave Delay Time
± 1 octave Delay Time
± 1 octave Delay Time
± 5th Delay Time
± 5th Delay Time
± 1 octave Delay Time
± 1 octave Delay Time
± 1 octave Delay Time
L
R
L
Pitch Delay
R
L
R
L
R
Pitch
Delay
Pitch
Delay
Pitch
Delay
L
R
L
R
L
R
L
R
35
35
Page 39

MP-100 Programs and Parameters
L
R
L
R
Chorus
Delay
L
R
L
R
Chorus Delay
Bank: Chorus– Delay
Chorus-Delay Programs Effect Parameter Tap Routing
Rich Chorus 1 - Stereo 1/4 Note Delay/Echo Feedback Delay Time
Rich Chorus 1 - Dotted 1/8 Note Delay/Echo Feedback Delay Time
Rich Chorus 1 - 1/8 Note and Triplet Delay/Echo Feedback Delay Time
Rich Chorus 1 - Ping Pong 1/4 Note Delay/Echo Feedback Delay Time
Rich Chorus 1 - Multi Repeat Delay/Echo Time: 0-150ms, Fdbk —
Rich Chorus 1 - Multi Pong Delay/Echo Time: 0-200ms, Fdbk —
Rich Chorus 1 - Stereo 1/4 Note Delay/Echo Feedback Delay Time
Rich Chorus 2 - Multi Repeat Delay/Echo Time: 0-150ms, Fdbk —
Rich Chorus 2 - Ping Pong 1/4 Note Delay/Echo Feedback Delay Time
Rich Chorus 3 - Multi Pong Delay/Echo Time: 0-200ms, Fdbk
Rich Chorus 1 - Stereo 1/4 Note Delay/Echo Feedback Delay Time
Rich Chorus 1 - Ping Pong 1/4 Note Delay/Echo Feedback Delay Time
Rich Chorus 1 - Crossfeed Delay/Echo Time: 0-150ms, Fdbk —
Rich Chorus 1 - Multi Pong Delay/Echo Time: 0-200ms, Fdbk —
Rich Chorus 4 - Mono 1/4 Note Delay/Echo Feedback Delay Time
Rich Chorus 4 - Dotted 1/8 Note Delay/Echo Feedback Delay Time
L
Chorus
R
Delay
L
Chorus
R
Delay
Lexicon
L
R
L
R
36
36
Page 40

MP-100 Programs and ParametersMP-100 User Guide
Bank: Delay–Reverb
Delay-Reverb Programs Effect Parameter Tap Routing
Stereo 1/4 Note - Small Space Decay Time Delay Time
Triplet Shuffle - Medium Space Decay Time Delay Time
1/8 Note and Triplet - Large Space Decay Time Delay Time
Ping Pong 1/4 Note - Small Space Decay Time Delay Time
Triplet Rhythm 1 - Medium Space Decay Time Delay Time
Triplet Rhythm 2 - Large Space Decay Time Delay Time
Stereo 1/4 Note > Room Decay Time Delay Time
1/8 Note and Triplet > Large Space Decay Time Delay Time
Triplet Rhythm 1 > Room Decay Time Delay Time
Triplet Rhythm 2 > Large Space Decay Time Delay Time
Stereo 1/4 Note + Medium Space Decay Time Delay Time
Ping Pong 1/4 Note + Large Space Decay Time Delay Time
Triplet Rhythm 1 + Medium Space Decay Time Delay Time
Triplet Rhythm 2 + Small Space Decay Time Delay Time
Mono 1/4 Note / Room Decay Time Delay Time
Triplet Rhythm 2 / Large Space Decay Time Delay Time
L
R
L
Delay Reverb
R
L
R
L
R
Delay
Reverb
Delay
Reverb
Delay
Reverb
L
R
L
R
L
R
L
R
37
37
Page 41

MP-100 Programs and Parameters
L
R
L
R
Flange Reverb
Bank: Flange – Reverb
Flange-Reverb Programs Effect Parameter Tap Routing
Light Flange - Small Space Decay Flange Rate (Whole Note)
Light Flange - Medium Space Decay Flange Rate (Whole Note)
Light Flange - Large Space Decay Flange Rate (Whole Note)
Deep Flange - Small Space Decay —
Deep Flange - Medium Space Decay —
Deep Flange - Large Space Decay —
Light Flange > Large Space Decay Flange Rate (Whole Note)
Deep Flange > Large Space Decay —
Light Flange > Room Liveness Flange Rate (Whole Note)
Deep Flange > Room Liveness —
Light Flange + Medium Space Decay Flange Rate (Whole Note)
Light Flange + Room Liveness Flange Rate (Whole Note)
Deep Flange + Medium Space Decay —
Deep Flange + Room Liveness —
Light Flange / Large Space Decay Flange Rate (Whole Note)
Light Flange / Large Space Decay Flange Rate (Whole Note)
L
Flange
Reverb
R
L
Flange
R
Reverb
L
Flange
R
Reverb
Lexicon
L
R
L
R
L
R
38
38
Page 42

MP-100 Programs and ParametersMP-100 User Guide
Bank: Pitch– Reverb
Pitch-Reverb Programs Effect Parameter Tap Routing
Minor 3rd to 4th - Room 3rd to 4th Up PreDelay (1/32 Note)
4th to 5th - Room 4th to 5th Up PreDelay (1/32 Note)
5th to 6th - Room 5th to 6th Up PreDelay (1/32 Note)
±1 Octave - Medium Space ± 1 octave PreDelay (1/32 Note)
Power Chords - Medium Space Decay Time PreDelay (1/32 Note)
Manual Detune - Room Detuning PreDelay (1/32 Note)
±100 > Small Space ± 100 cents PreDelay (1/32 Note)
Power Chords - Large Space Decay Time PreDelay (1/32 Note)
4ths > Medium Space Decay Time PreDelay (1/32 Note)
Octaves > Medium Space Decay Time PreDelay (1/32 Note)
4th to 5th + Room 4th to 5th Up PreDelay (1/32 Note)
5th to 6th + Room 5th to 6th Up PreDelay (1/32 Note)
4ths + Large Space Decay Time PreDelay (1/32 Note)
Octaves + Medium Space Decay Time PreDelay (1/32 Note)
Octaves / Medium Space Decay Time PreDelay (1/32 Note)
4ths / Large Space Decay Time PreDelay (1/32 Note)
L
R
L
R
L
R
L
R
Pitch
Reverb
Pitch Reverb
Pitch
Reverb
Pitch
Reverb
L
R
L
R
L
R
L
R
39
39
Page 43

MP-100 Programs and Parameters
L
R
L
R
Chorus
Reverb
L
R
L
R
Chorus Reverb
Bank: Chorus– Reverb
Chorus-Reverb Programs Effect Parameter Tap Routing
Rich Chorus 1 - Small Space Decay Time —
Rich Chorus 1 - Medium Space Decay Time —
Rich Chorus 1 - Large Space Decay Time —
Rich Chorus 2 - Small Space Decay Time —
Rich Chorus 2 - Medium Space Decay Time —
Rich Chorus 2 - Large Space Decay Time —
Rich Chorus 1 > Room Liveness —
Rich Chorus 2 > Room Liveness —
Rich Chorus 3 > Room Liveness —
Rich Chorus 1 > Small Space Decay Time —
Rich Chorus 1 + Small Space Decay Time —
Rich Chorus 2 + Medium Space Decay Time —
Rich Chorus 2 + Large Space Decay Time —
Rich Chorus 1 + Large Space Decay Time —
Rich Chorus 1 / Room Liveness —
Rich Chorus 4 / Room Liveness —
L
Chorus
R
Reverb
L
Chorus
R
Reverb
Lexicon
L
R
L
R
40
40
Page 44

Bank: Special FX
The Special FX programs showcase the flexibility and creative possibilities of the MP-100. Adjust
is completely different in each of the Variations, so be sure to experiment with all of them.
Special FX Programs Effect Parameter Tap
Infinite Reverb High Cut Echo
The Abyss
Jet Flange Tone Rate (Whole Note)
Chorus Verb High Cut –
Rotary Delay Dly/Echo Time: 0-150ms+Fbk Rate (1/4 Note)
Fader Verb Input Volume Echo
PCM 60 - LgSize Decay Time –
LowRumble Decay Time –
Ducking Reverb Decay Time –
Ducking Chorus>Delay
Ducking Triplets Delay/Echo Feedback –
Subdividing Delay Beat Value: 1/32-Whole Note Delay Time
Panning Delays Delay/Echo Feedback Dly Time, Pan Rate
Dream Sequence
Infinite Repeat Feedback: 0-Infinite Dly Time (Whole Note)
Diffusor Diffusion –
MP-100 Programs and ParametersMP-100 User Guide
± Pitch Bend –
± Resonance –
± Shift Amount –
41
41
 Loading...