

Page 1

Accessories
Remote
Maintenance
EthernetCAN
_ _ _ _ _ _ _ _ _ _ _ _ _ _ _ _ _ _ _ _ _ _ _ _ _ _ _ _ _ _
EMF2180IB
Communication Manual EN
Ä.ObBä
13466533
L
Page 2

Contents
_ _ _ _ _ _ _ _ _ _ _ _ _ _ _ _ _ _ _ _ _ _ _ _ _ _ _ _ _ _ _ _ _ _ _ _ _ _ _ _ _ _ _ _ _ _ _ _ _ _ _ _ _ _ _ _ _ _ _ _ _ _ _ _
1 About this documentation _ _ _ _ _ _ _ _ _ _ _ _ _ _ _ _ _ _ _ _ _ _ _ _ _ _ _ _ _ _ _ _ _ _ _ _ _ _ _ 4
1.1 Document history _ _ _ _ _ _ _ _ _ _ _ _ _ _ _ _ _ _ _ _ _ _ _ _ _ _ _ _ _ _ _ _ _ _ _ _ _ _ _ _ _ _ _ _ 6
1.2 Conventions used _ _ _ _ _ _ _ _ _ _ _ _ _ _ _ _ _ _ _ _ _ _ _ _ _ _ _ _ _ _ _ _ _ _ _ _ _ _ _ _ _ _ _ _ 7
1.3 Terminology used _ _ _ _ _ _ _ _ _ _ _ _ _ _ _ _ _ _ _ _ _ _ _ _ _ _ _ _ _ _ _ _ _ _ _ _ _ _ _ _ _ _ _ _ 8
1.4 Definition of the notes used _ _ _ _ _ _ _ _ _ _ _ _ _ _ _ _ _ _ _ _ _ _ _ _ _ _ _ _ _ _ _ _ _ _ _ _ _ _ 9
2Safety instructions _ _ _ _ _ _ _ _ _ _ _ _ _ _ _ _ _ _ _ _ _ _ _ _ _ _ _ _ _ _ _ _ _ _ _ _ _ _ _ _ _ _ _ _ 10
2.1 General safety instructions and application notes _ _ _ _ _ _ _ _ _ _ _ _ _ _ _ _ _ _ _ _ _ _ _ _ _ _ 10
2.2 Device and application-specific safety instructions _ _ _ _ _ _ _ _ _ _ _ _ _ _ _ _ _ _ _ _ _ _ _ _ _ _ 11
2.3 Residual hazards _ _ _ _ _ _ _ _ _ _ _ _ _ _ _ _ _ _ _ _ _ _ _ _ _ _ _ _ _ _ _ _ _ _ _ _ _ _ _ _ _ _ _ _ _ 11
3 Product description _ _ _ _ _ _ _ _ _ _ _ _ _ _ _ _ _ _ _ _ _ _ _ _ _ _ _ _ _ _ _ _ _ _ _ _ _ _ _ _ _ _ _ 12
3.1 Application as directed _ _ _ _ _ _ _ _ _ _ _ _ _ _ _ _ _ _ _ _ _ _ _ _ _ _ _ _ _ _ _ _ _ _ _ _ _ _ _ _ _ 12
3.2 Identification _ _ _ _ _ _ _ _ _ _ _ _ _ _ _ _ _ _ _ _ _ _ _ _ _ _ _ _ _ _ _ _ _ _ _ _ _ _ _ _ _ _ _ _ _ _ _ 13
3.3 Connections and interfaces _ _ _ _ _ _ _ _ _ _ _ _ _ _ _ _ _ _ _ _ _ _ _ _ _ _ _ _ _ _ _ _ _ _ _ _ _ _ _ 13
4 Technical data _ _ _ _ _ _ _ _ _ _ _ _ _ _ _ _ _ _ _ _ _ _ _ _ _ _ _ _ _ _ _ _ _ _ _ _ _ _ _ _ _ _ _ _ _ _ 14
4.1 General data and operating conditions _ _ _ _ _ _ _ _ _ _ _ _ _ _ _ _ _ _ _ _ _ _ _ _ _ _ _ _ _ _ _ _ 14
4.2 Protective insulation _ _ _ _ _ _ _ _ _ _ _ _ _ _ _ _ _ _ _ _ _ _ _ _ _ _ _ _ _ _ _ _ _ _ _ _ _ _ _ _ _ _ 15
4.3 Dimensions _ _ _ _ _ _ _ _ _ _ _ _ _ _ _ _ _ _ _ _ _ _ _ _ _ _ _ _ _ _ _ _ _ _ _ _ _ _ _ _ _ _ _ _ _ _ _ 16
5Installation _ _ _ _ _ _ _ _ _ _ _ _ _ _ _ _ _ _ _ _ _ _ _ _ _ _ _ _ _ _ _ _ _ _ _ _ _ _ _ _ _ _ _ _ _ _ _ _ 17
5.1 Mechanical installation _ _ _ _ _ _ _ _ _ _ _ _ _ _ _ _ _ _ _ _ _ _ _ _ _ _ _ _ _ _ _ _ _ _ _ _ _ _ _ _ _ 18
5.1.1 Mounting _ _ _ _ _ _ _ _ _ _ _ _ _ _ _ _ _ _ _ _ _ _ _ _ _ _ _ _ _ _ _ _ _ _ _ _ _ _ _ _ _ _ _ _ 18
5.1.2 Dismounting _ _ _ _ _ _ _ _ _ _ _ _ _ _ _ _ _ _ _ _ _ _ _ _ _ _ _ _ _ _ _ _ _ _ _ _ _ _ _ _ _ _ 19
5.2 Electrical installation _ _ _ _ _ _ _ _ _ _ _ _ _ _ _ _ _ _ _ _ _ _ _ _ _ _ _ _ _ _ _ _ _ _ _ _ _ _ _ _ _ _ 20
5.2.1 Communication via Ethernet and CAN _ _ _ _ _ _ _ _ _ _ _ _ _ _ _ _ _ _ _ _ _ _ _ _ _ _ _ _ 20
5.2.2 Connecting the CAN bus _ _ _ _ _ _ _ _ _ _ _ _ _ _ _ _ _ _ _ _ _ _ _ _ _ _ _ _ _ _ _ _ _ _ _ _ 21
5.2.2.1 Assignment of the 9-pin Sub-D plug connector _ _ _ _ _ _ _ _ _ _ _ _ _ _ _ _ _ 22
5.2.2.2 Specification of the CAN bus cable _ _ _ _ _ _ _ _ _ _ _ _ _ _ _ _ _ _ _ _ _ _ _ _ 22
5.2.3 Bus cable length (CAN) _ _ _ _ _ _ _ _ _ _ _ _ _ _ _ _ _ _ _ _ _ _ _ _ _ _ _ _ _ _ _ _ _ _ _ _ _ 23
5.2.3.1 Total cable length _ _ _ _ _ _ _ _ _ _ _ _ _ _ _ _ _ _ _ _ _ _ _ _ _ _ _ _ _ _ _ _ _ 23
5.2.3.2 Segment cable length _ _ _ _ _ _ _ _ _ _ _ _ _ _ _ _ _ _ _ _ _ _ _ _ _ _ _ _ _ _ _ 24
5.2.3.3 Checking the use of repeaters _ _ _ _ _ _ _ _ _ _ _ _ _ _ _ _ _ _ _ _ _ _ _ _ _ _ 25
5.2.4 Connecting the Ethernet cable _ _ _ _ _ _ _ _ _ _ _ _ _ _ _ _ _ _ _ _ _ _ _ _ _ _ _ _ _ _ _ _ 26
5.2.4.1 Ethernet cable specification _ _ _ _ _ _ _ _ _ _ _ _ _ _ _ _ _ _ _ _ _ _ _ _ _ _ _ 27
5.2.4.2 Pin assignment and use of the Ethenet cable _ _ _ _ _ _ _ _ _ _ _ _ _ _ _ _ _ _ 29
5.2.5 Voltage supply _ _ _ _ _ _ _ _ _ _ _ _ _ _ _ _ _ _ _ _ _ _ _ _ _ _ _ _ _ _ _ _ _ _ _ _ _ _ _ _ _ 30
6 Commissioning _ _ _ _ _ _ _ _ _ _ _ _ _ _ _ _ _ _ _ _ _ _ _ _ _ _ _ _ _ _ _ _ _ _ _ _ _ _ _ _ _ _ _ _ _ 32
6.1 Commissioning with the Lenze "System bus configurator" _ _ _ _ _ _ _ _ _ _ _ _ _ _ _ _ _ _ _ _ _ _ 32
6.1.1 Installing/updating software _ _ _ _ _ _ _ _ _ _ _ _ _ _ _ _ _ _ _ _ _ _ _ _ _ _ _ _ _ _ _ _ _ 32
6.1.2 Configuring the communication module _ _ _ _ _ _ _ _ _ _ _ _ _ _ _ _ _ _ _ _ _ _ _ _ _ _ _ 33
6.1.3 After completing the configuration _ _ _ _ _ _ _ _ _ _ _ _ _ _ _ _ _ _ _ _ _ _ _ _ _ _ _ _ _ _ 35
6.2 Commissioning with the web server _ _ _ _ _ _ _ _ _ _ _ _ _ _ _ _ _ _ _ _ _ _ _ _ _ _ _ _ _ _ _ _ _ _ 36
6.2.1 Assigning a fixed IP address _ _ _ _ _ _ _ _ _ _ _ _ _ _ _ _ _ _ _ _ _ _ _ _ _ _ _ _ _ _ _ _ _ _ 38
6.2.2 Assigning a dynamic IP address _ _ _ _ _ _ _ _ _ _ _ _ _ _ _ _ _ _ _ _ _ _ _ _ _ _ _ _ _ _ _ _ 39
6.2.3 Entering user name and password _ _ _ _ _ _ _ _ _ _ _ _ _ _ _ _ _ _ _ _ _ _ _ _ _ _ _ _ _ _ 41
6.2.4 Firmware update ("FW update") _ _ _ _ _ _ _ _ _ _ _ _ _ _ _ _ _ _ _ _ _ _ _ _ _ _ _ _ _ _ _ 41
6.2.5 Displaying Ethernet states _ _ _ _ _ _ _ _ _ _ _ _ _ _ _ _ _ _ _ _ _ _ _ _ _ _ _ _ _ _ _ _ _ _ _ 42
6.2.6 Displaying alarms and events _ _ _ _ _ _ _ _ _ _ _ _ _ _ _ _ _ _ _ _ _ _ _ _ _ _ _ _ _ _ _ _ _ 43
6.3 Before initial switch-on _ _ _ _ _ _ _ _ _ _ _ _ _ _ _ _ _ _ _ _ _ _ _ _ _ _ _ _ _ _ _ _ _ _ _ _ _ _ _ _ _ 44
6.4 Initial switch-on _ _ _ _ _ _ _ _ _ _ _ _ _ _ _ _ _ _ _ _ _ _ _ _ _ _ _ _ _ _ _ _ _ _ _ _ _ _ _ _ _ _ _ _ _ 45
6.4.1 Signalling sequence of the LEDs _ _ _ _ _ _ _ _ _ _ _ _ _ _ _ _ _ _ _ _ _ _ _ _ _ _ _ _ _ _ _ _ 45
6.4.2 LED signalling in compliance with DR303-3 _ _ _ _ _ _ _ _ _ _ _ _ _ _ _ _ _ _ _ _ _ _ _ _ _ 46
2 Lenze · EMF2180IB communication module (EthernetCAN) · Communication Manual · DMS 5.0 EN · 07/2014 · TD17
Page 3

Contents
_ _ _ _ _ _ _ _ _ _ _ _ _ _ _ _ _ _ _ _ _ _ _ _ _ _ _ _ _ _ _ _ _ _ _ _ _ _ _ _ _ _ _ _ _ _ _ _ _ _ _ _ _ _ _ _ _ _ _ _ _ _ _ _
7 Data transfer _ _ _ _ _ _ _ _ _ _ _ _ _ _ _ _ _ _ _ _ _ _ _ _ _ _ _ _ _ _ _ _ _ _ _ _ _ _ _ _ _ _ _ _ _ _ _ 47
7.1 Access to the inverter codes _ _ _ _ _ _ _ _ _ _ _ _ _ _ _ _ _ _ _ _ _ _ _ _ _ _ _ _ _ _ _ _ _ _ _ _ _ _ _ 47
7.2 Data transfer via CAN _ _ _ _ _ _ _ _ _ _ _ _ _ _ _ _ _ _ _ _ _ _ _ _ _ _ _ _ _ _ _ _ _ _ _ _ _ _ _ _ _ _ 48
7.3 Data transfer via Ethernet _ _ _ _ _ _ _ _ _ _ _ _ _ _ _ _ _ _ _ _ _ _ _ _ _ _ _ _ _ _ _ _ _ _ _ _ _ _ _ _ 49
8Diagnostics _ _ _ _ _ _ _ _ _ _ _ _ _ _ _ _ _ _ _ _ _ _ _ _ _ _ _ _ _ _ _ _ _ _ _ _ _ _ _ _ _ _ _ _ _ _ _ _ 50
8.1 Error: Cause and remedy _ _ _ _ _ _ _ _ _ _ _ _ _ _ _ _ _ _ _ _ _ _ _ _ _ _ _ _ _ _ _ _ _ _ _ _ _ _ _ _ 50
8.2 LED status displays for the communication module and for CAN communication _ _ _ _ _ _ _ _ _ 50
8.3 LED status displays for Ethernet communication _ _ _ _ _ _ _ _ _ _ _ _ _ _ _ _ _ _ _ _ _ _ _ _ _ _ _ 52
9 Parameter reference _ _ _ _ _ _ _ _ _ _ _ _ _ _ _ _ _ _ _ _ _ _ _ _ _ _ _ _ _ _ _ _ _ _ _ _ _ _ _ _ _ _ _ 53
10 Implemented CANopen objects _ _ _ _ _ _ _ _ _ _ _ _ _ _ _ _ _ _ _ _ _ _ _ _ _ _ _ _ _ _ _ _ _ _ _ _ _ 66
Index _ _ _ _ _ _ _ _ _ _ _ _ _ _ _ _ _ _ _ _ _ _ _ _ _ _ _ _ _ _ _ _ _ _ _ _ _ _ _ _ _ _ _ _ _ _ _ _ _ _ _ 68
Your opinion is important to us _ _ _ _ _ _ _ _ _ _ _ _ _ _ _ _ _ _ _ _ _ _ _ _ _ _ _ _ _ _ _ _ _ _ _ _ _ 70
Lenze · EMF2180IB communication module (EthernetCAN) · Communication Manual · DMS 5.0 EN · 07/2014 · TD17 3
Page 4

1 About this documentation
_ _ _ _ _ _ _ _ _ _ _ _ _ _ _ _ _ _ _ _ _ _ _ _ _ _ _ _ _ _ _ _ _ _ _ _ _ _ _ _ _ _ _ _ _ _ _ _ _ _ _ _ _ _ _ _ _ _ _ _ _ _ _ _
1 About this documentation
Contents
This documentation exclusively describes the EMF2180IB communication module (EthernetCAN).
Note!
This documentation supplements the mounting instructions supplied with the
communication module and the "Remote maintenance" manual.
The mounting instructions contain safety instructions which must be observed!
The features and functions of the communication module are described in detail.
Typical applications are illustrated by means of examples.
The theoretical context is only explained as far as it is required for understanding the function of
the communication module.
This documentation does not describe any software provided by other manufacturers. No warranty
can be given for corresponding data provided in this documentation. For information on how to use
the software, please refer to the host (PLC, IO Controller) documents.
All product names mentioned in this documentation are trademarks of their corresponding owners.
"Remote maintenance" communication manual
Here you'll find some further information about remote maintenance scenarios.
4 Lenze · EMF2180IB communication module (EthernetCAN) · Communication Manual · DMS 5.0 EN · 07/2014 · TD17
Page 5

1 About this documentation
_ _ _ _ _ _ _ _ _ _ _ _ _ _ _ _ _ _ _ _ _ _ _ _ _ _ _ _ _ _ _ _ _ _ _ _ _ _ _ _ _ _ _ _ _ _ _ _ _ _ _ _ _ _ _ _ _ _ _ _ _ _ _ _
Target group
This documentation is intended for all persons who plan, install, commission and maintain the
networking and remote servicing of a machine.
Tip!
Current documentation and software updates with regard to Lenze products can be found
in the download area at:
www.lenze.com
Validity
The information given in this documentation is valid for the following devices:
Extension module Type designation From hardware
version
Communication module EthernetCAN EMF2180IB 1x 1x
Screenshots/application examples
All screenshots in this documentation are application examples. Depending on the firmware
version of the communication module and the software version of the engineering tools installed
(e.g. »Engineer«), the screenshots in this documentation may differ from the actual screen
representation.
From software
version
Lenze · EMF2180IB communication module (EthernetCAN) · Communication Manual · DMS 5.0 EN · 07/2014 · TD17 5
Page 6

1 About this documentation
1.1 Document history
_ _ _ _ _ _ _ _ _ _ _ _ _ _ _ _ _ _ _ _ _ _ _ _ _ _ _ _ _ _ _ _ _ _ _ _ _ _ _ _ _ _ _ _ _ _ _ _ _ _ _ _ _ _ _ _ _ _ _ _ _ _ _ _
1.1 Document history
Version Description
1.0 11/2004 TD06 First edition
2.0 03/2005 TD06 • Update for the system bus configurator V1.2
• Lenze codes supplemented
3.0 04/2009 TD16 Publication as online help for the Lenze »Engineer«
4.0 09/2012 TD06 Commissioning with the web server supplemented
5.0 07/2014 TD17 • New layout
• General corrections
6
Lenze · EMF2180IB communication module (EthernetCAN) · Communication Manual · DMS 5.0 EN · 07/2014 · TD17
Page 7

1 About this documentation
1.2 Conventions used
_ _ _ _ _ _ _ _ _ _ _ _ _ _ _ _ _ _ _ _ _ _ _ _ _ _ _ _ _ _ _ _ _ _ _ _ _ _ _ _ _ _ _ _ _ _ _ _ _ _ _ _ _ _ _ _ _ _ _ _ _ _ _ _
1.2 Conventions used
This documentation uses the following conventions to distinguish between different types of
information:
Type of information Writing Examples/notes
Notation of numbers
Decimal Standard notation Example:1234
Decimal separator Point The decimal point is used throughout this documentation.
for example: 1234.56
Hexadecimal 0x[0 ... 9, A ... F] Example: 0x60F4
Binary
• Nibble
Text
Version information Blue text colour All information that applies to from a certain software
Program name " " The Lenze PC software »Engineer«...
Control element bold The OK button... / the Copy command... / the Characteristics
Sequence of menu
commands
Hyperlink Underlined
Symbols
Page reference ( 9) Optically highlighted reference to another page. In this
Step-by-step instructions
In quotation marks
Point
Example: ’100’
Example: ’0110.0100’
version of the device onwards are marked accordingly in this
documentation.
Example: This function extension is available from software
version V3.0 onwards!
tab... / the Name input field...
If several commands are required to execute one function,
the single commands are separated by an arrow: Select the
Open command to...
File
Optically highlighted reference to another topic. It is
activated with a mouse-click in this online documentation.
online documentation activated via mouse-click.
Step-by-step instructions are identified by a pictograph.
Lenze · EMF2180IB communication module (EthernetCAN) · Communication Manual · DMS 5.0 EN · 07/2014 · TD17 7
Page 8

1 About this documentation
1.3 Terminology used
_ _ _ _ _ _ _ _ _ _ _ _ _ _ _ _ _ _ _ _ _ _ _ _ _ _ _ _ _ _ _ _ _ _ _ _ _ _ _ _ _ _ _ _ _ _ _ _ _ _ _ _ _ _ _ _ _ _ _ _ _ _ _ _
1.3 Terminology used
Term Meaning
Code Parameter which serves to parameterise and monitor the drive. In normal usage,
Subcode If a code contains several parameters they are stored in so-called "subcodes".
Use DHCP The "Dynamic Host Configuration Protocol" (DHCP) is a communication protocol
Engineering PC The Engineering PC and the Engineering tools installed serve to configure and
Engineering tools Lenze software solutions for the configuration and commissioning of Lenze
Inverter Generic term for Lenze frequency inverter, servo inverter
FW Firmware
HW Hardware
SW Software
the term is usually referred to as "Index".
In the documentation, the slash "/" is used as a separator between the code and
the subcode (e.g. "C00118/3").
In everyday language, the term is also referred to as "subindex".
providing for the assignment of the network configuration to cients by a server.
parameterise the system.
The Engineering PC communicates with the controller via Ethernet.
devices.
The EMF2180IB communication module is configured via the "System bus
configurator", which is part of the following Engineering tools:
• »Engineer«
• »Drive Server«, from version 1.1 onwards
• »Drive PLC Developer Studio« (DDS), from version 2.2 onwards
• »Global Drive Control« (GDC), from version 4.7 onwards
• »Global Drive Loader« (GDL), from version 2.2 onwards
Commissioning
( 32)
8
Lenze · EMF2180IB communication module (EthernetCAN) · Communication Manual · DMS 5.0 EN · 07/2014 · TD17
Page 9

1 About this documentation
1.4 Definition of the notes used
_ _ _ _ _ _ _ _ _ _ _ _ _ _ _ _ _ _ _ _ _ _ _ _ _ _ _ _ _ _ _ _ _ _ _ _ _ _ _ _ _ _ _ _ _ _ _ _ _ _ _ _ _ _ _ _ _ _ _ _ _ _ _ _
1.4 Definition of the notes used
This documentation uses the following signal words and symbols to indicate dangers and
important information:
Safety instructions
Structure of safety instructions:
Danger!
(characterises the type and severity of danger)
Note
(describes the danger and gives information about how to prevent dangerous
situations)
Pictograph Signal word Meaning
Danger! Danger of personal injury through dangerous electrical voltage
Danger! Danger of personal injury through a general source of danger
Stop! Danger of property damage
Application notes
Pictograph Signal word Meaning
Note! Important note to ensure troublefree operation
Reference to an imminent danger that may result in death or serious personal
injury if the corresponding measures are not taken.
Reference to an imminent danger that may result in death or serious personal
injury if the corresponding measures are not taken.
Reference to a possible danger that may result in property damage if the
corresponding measures are not taken.
Tip! Useful tip for simple handling
Reference to other documentation
Lenze · EMF2180IB communication module (EthernetCAN) · Communication Manual · DMS 5.0 EN · 07/2014 · TD17 9
Page 10

2 Safety instructions
2.1 General safety instructions and application notes
_ _ _ _ _ _ _ _ _ _ _ _ _ _ _ _ _ _ _ _ _ _ _ _ _ _ _ _ _ _ _ _ _ _ _ _ _ _ _ _ _ _ _ _ _ _ _ _ _ _ _ _ _ _ _ _ _ _ _ _ _ _ _ _
2 Safety instructions
Note!
It is absolutely vital that the stated safety measures are implemented in order to prevent
serious injury to persons and damage to material assets.
Always keep this documentation to hand in the vicinity of the product during operation.
2.1 General safety instructions and application notes
Danger!
If the following basic safety measures are disregarded, severe injuries to persons and
damage to material assets may result.
Lenze drive and automation components ...
• must only be used as directed.
Application as directed
• must never be commissioned if it displays any signs of damage.
• must never be modified technically.
( 12)
• must never be commissioned if it is not fully mounted.
• must never be operated without the required covers.
• during and after operation can have live, moving and rotating parts, depending on their degree
of protection. Surfaces can be hot.
The following applies to Lenze drive components ...
• only use the accessories approved.
• Only use genuine spare parts supplied by the manufacturer of the product.
Observe all specifications contained in the enclosed documentation and related documentation.
• This is the condition for safe and troublefree operation and the achievement of the specified
product features.
• The specifications, processes, and circuitry described in this document are for guidance only and
must be adapted to your own specific application. Lenze does not take responsibility for the
suitability of the process and circuit proposals.
All works on and with Lenze drive and automation components must only be carried out by qualified
personnel. According to IEC 60364 or CENELEC HD 384 these are persons who ...
• are familiar with installing, commissioning and operating the product.
• have the qualifications necessary for their occupation.
10
• know and are able to apply all regulations for the prevention of accidents, directives and laws
that apply to the location of use.
Lenze · EMF2180IB communication module (EthernetCAN) · Communication Manual · DMS 5.0 EN · 07/2014 · TD17
Page 11

2 Safety instructions
2.2 Device and application-specific safety instructions
_ _ _ _ _ _ _ _ _ _ _ _ _ _ _ _ _ _ _ _ _ _ _ _ _ _ _ _ _ _ _ _ _ _ _ _ _ _ _ _ _ _ _ _ _ _ _ _ _ _ _ _ _ _ _ _ _ _ _ _ _ _ _ _
2.2 Device and application-specific safety instructions
• During operation, the communication module must be firmly connected to the inverter.
• Only use cables that meet the listed specifications.
Specification of the CAN bus cable
Ethernet cable specification ( 27)
• Decouple your Ethernet home network from the system network for Ethernet-capable Lenze
devices, in order to prevent Ethernet communication faults.
Connecting the Ethernet cable
• Before switching on the mains voltage, check ...
• the entire wiring for completeness, short circuit and earth fault:
• whether the bus system is terminated through a bus terminating resistor at the first and last
physical bus station.
Connecting the CAN bus
( 21)
( 22)
( 26)
Documentation for the inverter, control system, system/machine
All the other measures prescribed in this documentation must also be implemented.
Observe the safety instructions and application notes contained in this manual.
2.3 Residual hazards
Device protection
• The communication module contains electronic components which may be damaged or
destroyed by electrostatic discharge.
Installation
• To prevent the RJ45 socket from being damaged, insert or remove the Ethernet cable connector
straight (at a right angle) into or from the socket.
Connecting the Ethernet cable
• Observe the following to prevent any damage to the plug-on terminal strips and contacts:
• Wire the plug-on terminal strips first, then plug them on.
• Plug-on terminal strips that are not assigned must also be plugged on.
Voltage supply
( 17)
( 26)
( 30)
Lenze · EMF2180IB communication module (EthernetCAN) · Communication Manual · DMS 5.0 EN · 07/2014 · TD17 11
Page 12

3 Product description
3.1 Application as directed
_ _ _ _ _ _ _ _ _ _ _ _ _ _ _ _ _ _ _ _ _ _ _ _ _ _ _ _ _ _ _ _ _ _ _ _ _ _ _ _ _ _ _ _ _ _ _ _ _ _ _ _ _ _ _ _ _ _ _ _ _ _ _ _
3 Product description
3.1 Application as directed
The communication module ...
• by remote maintenance is used for parameterisation or programming, commissioning and
diagnostics of the applicable Lenze devices;
• is suitable
and parameter data;
• is a device intended for use in industrial power systems;
• should only be used under the operating conditions prescribed in this documentation.
Any other use shall be deemed inappropriate!
Application range
The communication module can be used with the following Lenze devices:
• Servo Drives 9400
• 9300 servo inverter
• 9300 vector
• 9300 Servo PLC
• ECS servo system
• 8200 motec motor inverter
• 8200 vector frequency inverter
•Drive PLC
• 82XX frequency inverter
• starttec motor starter
• Terminal extension 9374
• Control / display unit (EPM-HXXX)
for the transmission of IEC61131 programs, application data (such as profile data)
12
• I/O system IP20 (EPM-TXXX)
Lenze · EMF2180IB communication module (EthernetCAN) · Communication Manual · DMS 5.0 EN · 07/2014 · TD17
Page 13

3 Product description
E82AF000P0B201XX
L
Type
Id.-No.
Prod.-No.
Ser.-No.
MAC
3.2 Identification
_ _ _ _ _ _ _ _ _ _ _ _ _ _ _ _ _ _ _ _ _ _ _ _ _ _ _ _ _ _ _ _ _ _ _ _ _ _ _ _ _ _ _ _ _ _ _ _ _ _ _ _ _ _ _ _ _ _ _ _ _ _ _ _
3.2 Identification
The type designation, hardware version and software version of a communication module are
indicated on its nameplate:
1 "33.2180IBxxyy" type designation:
• 33.2180IB: device series
• xx: hardware version
• yy: software version
2180FEW099
[3-1] Identification data
3.3 Connections and interfaces
[3-2] EMF2180IB communication module (EthernetCAN)
2180FEW001D
A ... D LED status displays for the communication module
and for CAN communication ( 50)
E Ethernet connection
RJ45 socket with 2 LED status displays
F CAN connection
9-pole Sub-D plug connector
G Voltage supply
4-pole plug connector with spring connection
H PE connection
When it is plugged in, the communication module is
automatically connected to the DIN rail.
The DIN rail must be connected to PE!
I, K LED status displays for Ethernet communication
( 52)
Lenze · EMF2180IB communication module (EthernetCAN) · Communication Manual · DMS 5.0 EN · 07/2014 · TD17 13
Page 14

4Technical data
4.1 General data and operating conditions
_ _ _ _ _ _ _ _ _ _ _ _ _ _ _ _ _ _ _ _ _ _ _ _ _ _ _ _ _ _ _ _ _ _ _ _ _ _ _ _ _ _ _ _ _ _ _ _ _ _ _ _ _ _ _ _ _ _ _ _ _ _ _ _
4 Technical data
4.1 General data and operating conditions
Range Values
Order designation EMF2180IB
Communication media (system) CAN (ISO 11898)
Ethernet (100 Base TX, IEEE802.3u)
Number of nodes at the CAN bus Max. 100
Baud rate • For communication via CAN
•20 kbit/s
•50 kbit/s
•125 kbit/s
•250 kbit/s
•500 kbit/s
• 1000 kbps
• For communication via Ethernet
• 10 Mbps
•100 Mbits/s
Voltage supply (external) via
separate power supply unit
18 ... 30 V DC, max. 100 mA (in compliance with IEC/EN 61131-2)
Conformity and approval
CE See hardware manual of the used Inverter.
UL See hardware manual of the used Inverter.
EAC TP TC 020/2011
(TR ZU 020/2011)
TP TC 004/2011
(TR ZU 004/2011)
Operating conditions Values Deviations from standard
Climatic conditions
Storage 1 K3 to IEC/EN 60721-3-1 - 10 °C ... + 60 °C
Transport 2 K3 to IEC/EN 60721-3-2 - 10 °C ... + 70 °C
Operation 3 K3 to IEC/EN 60721-3-3 - 0 °C ... + 60 °C
Enclosure of the plugged
communication module
Degree of pollution 2 to IEC/EN 61800-5-1
Electromagnetic compatibility of
technical means
On safety of low voltage equipment
IP20
Eurasian Conformity
TR CU: Technical Regulation of Customs Union
14
Lenze · EMF2180IB communication module (EthernetCAN) · Communication Manual · DMS 5.0 EN · 07/2014 · TD17
Page 15

4Technical data
4.2 Protective insulation
_ _ _ _ _ _ _ _ _ _ _ _ _ _ _ _ _ _ _ _ _ _ _ _ _ _ _ _ _ _ _ _ _ _ _ _ _ _ _ _ _ _ _ _ _ _ _ _ _ _ _ _ _ _ _ _ _ _ _ _ _ _ _ _
4.2 Protective insulation
[4-1] Protective insulation according to EN 61800-5-1
Connection Type of insulation
E Ethernet Functional insulation
F CAN bus Functional insulation
G Voltage supply No insulation
2180FEW001F
Lenze · EMF2180IB communication module (EthernetCAN) · Communication Manual · DMS 5.0 EN · 07/2014 · TD17 15
Page 16

4Technical data
aa
e
4.3 Dimensions
_ _ _ _ _ _ _ _ _ _ _ _ _ _ _ _ _ _ _ _ _ _ _ _ _ _ _ _ _ _ _ _ _ _ _ _ _ _ _ _ _ _ _ _ _ _ _ _ _ _ _ _ _ _ _ _ _ _ _ _ _ _ _ _
4.3 Dimensions
A Mounting rail
a 117 mm
b 103 mm
e 22.5 mm
2180FEW001B
[4-2] Dimensions
16
Lenze · EMF2180IB communication module (EthernetCAN) · Communication Manual · DMS 5.0 EN · 07/2014 · TD17
Page 17

5 Installation
_ _ _ _ _ _ _ _ _ _ _ _ _ _ _ _ _ _ _ _ _ _ _ _ _ _ _ _ _ _ _ _ _ _ _ _ _ _ _ _ _ _ _ _ _ _ _ _ _ _ _ _ _ _ _ _ _ _ _ _ _ _ _ _
5 Installation
Stop!
Electrostatic discharge
Electronic components within the communication module can be damaged or destroyed
by electrostatic discharge.
Possible consequences:
• The communication module is defective.
• Fieldbus communication is not possible or faulty.
Protective measures
Before touching the module, be sure that you are free of electrostatic charge.
Lenze · EMF2180IB communication module (EthernetCAN) · Communication Manual · DMS 5.0 EN · 07/2014 · TD17 17
Page 18

5 Installation
5.1 Mechanical installation
_ _ _ _ _ _ _ _ _ _ _ _ _ _ _ _ _ _ _ _ _ _ _ _ _ _ _ _ _ _ _ _ _ _ _ _ _ _ _ _ _ _ _ _ _ _ _ _ _ _ _ _ _ _ _ _ _ _ _ _ _ _ _ _
5.1 Mechanical installation
5.1.1 Mounting
2181FEW002B
[5-1] Mounting
Switch off voltage supply (1) and attach communication module to DIN rail (2 ... 4).
18
Lenze · EMF2180IB communication module (EthernetCAN) · Communication Manual · DMS 5.0 EN · 07/2014 · TD17
Page 19

5 Installation
5.1 Mechanical installation
_ _ _ _ _ _ _ _ _ _ _ _ _ _ _ _ _ _ _ _ _ _ _ _ _ _ _ _ _ _ _ _ _ _ _ _ _ _ _ _ _ _ _ _ _ _ _ _ _ _ _ _ _ _ _ _ _ _ _ _ _ _ _ _
5.1.2 Dismounting
[5-2] Dismounting
Unlock communication module (1) and remove from DIN rail (2, 3).
2181FEW001E
Lenze · EMF2180IB communication module (EthernetCAN) · Communication Manual · DMS 5.0 EN · 07/2014 · TD17 19
Page 20

5 Installation
(CAN on board)
CAN
Ethernet
Servo Drives 9400
9400
9400
9400
5.2 Electrical installation
_ _ _ _ _ _ _ _ _ _ _ _ _ _ _ _ _ _ _ _ _ _ _ _ _ _ _ _ _ _ _ _ _ _ _ _ _ _ _ _ _ _ _ _ _ _ _ _ _ _ _ _ _ _ _ _ _ _ _ _ _ _ _ _
5.2 Electrical installation
Documentation for inverters, the control system, system/machine
Observe the notes and wiring instructions contained in this documentation.
5.2.1 Communication via Ethernet and CAN
[5-3] Communication via Ethernet and CAN
Installation steps
Step Position Additional information
1. Establish a connection to the CAN bus:
Plug "EWZ0046" Sub-D plug (see accessories) into the
communication module.
2. Connect the following components via Ethernet with
each other:
• Communication module
• Engineering PC
• Servo Drive 9400
• Other Ethernet nodes
3. Connect voltage supply to the plug connector. G Voltage supply
F Connecting the CAN bus
E
L
S
Connecting the Ethernet cable
( 26)
( 30)
2180FEW008
( 21)
20
Lenze · EMF2180IB communication module (EthernetCAN) · Communication Manual · DMS 5.0 EN · 07/2014 · TD17
Page 21

5 Installation
L
EWZ0046
O
F
F
O
N
OFF
ON
ON
OFF
ð
ð
ð
ð
OUTIN IN IN
On
Off
On
120 120
120
L
EWZ0046
L
EWZ0046
L
EWZ0046
5.2 Electrical installation
_ _ _ _ _ _ _ _ _ _ _ _ _ _ _ _ _ _ _ _ _ _ _ _ _ _ _ _ _ _ _ _ _ _ _ _ _ _ _ _ _ _ _ _ _ _ _ _ _ _ _ _ _ _ _ _ _ _ _ _ _ _ _ _
5.2.2 Connecting the CAN bus
2180FEW001K
The CAN bus must be terminated with resistors (120 ) between CAN-low and CAN-high.
The EWZ0046 Lenze system connector with an integrated terminating resistor complies with the
DS102-1 recommendation of the CiA CAN user organisation. The system connector is not contained
in the scope of supply of the communication module.
2181FEW004
Lenze · EMF2180IB communication module (EthernetCAN) · Communication Manual · DMS 5.0 EN · 07/2014 · TD17 21
Page 22

5 Installation
1
6
5
9
5.2 Electrical installation
_ _ _ _ _ _ _ _ _ _ _ _ _ _ _ _ _ _ _ _ _ _ _ _ _ _ _ _ _ _ _ _ _ _ _ _ _ _ _ _ _ _ _ _ _ _ _ _ _ _ _ _ _ _ _ _ _ _ _ _ _ _ _ _
5.2.2.1 Assignment of the 9-pin Sub-D plug connector
View Pin Assignment
1-
2CAN-LOW
3CAN-GND
4-
5-
6-
7CAN-HIGH
8-
9-
5.2.2.2 Specification of the CAN bus cable
We recommend the use of CAN cables according to ISO 11898-2:
CAN cable according to ISO 11898-2
Cable type Twisted in pairs with shield
Impedance 120 (95 ... 140 )
Cable resistance/cross-section
Cable length 300 m:
Cable length 301 ... 1000 m:
Signal propagation delay 5 ns/m
70 m/m / 0.25 ... 0.34 mm
40 m/m / 0.5 mm
2
2
(AWG20)
(AWG22)
22
Lenze · EMF2180IB communication module (EthernetCAN) · Communication Manual · DMS 5.0 EN · 07/2014 · TD17
Page 23

5 Installation
5.2 Electrical installation
_ _ _ _ _ _ _ _ _ _ _ _ _ _ _ _ _ _ _ _ _ _ _ _ _ _ _ _ _ _ _ _ _ _ _ _ _ _ _ _ _ _ _ _ _ _ _ _ _ _ _ _ _ _ _ _ _ _ _ _ _ _ _ _
5.2.3 Bus cable length (CAN)
Note!
• It is absolutely necessary to comply with the permissible cable lengths.
• If the total cable lengths of the CAN nodes differ for the same baud rate, the smaller
value must be used to determine the max. cable length.
• Observe the reduction of the total cable length due to the signal delay of the
repeater.Checking the use of repeaters
5.2.3.1 Total cable length
The baud rate also determines the total cable length.
Baud rate [kbps] Max. bus length [m]
10 8075
20 4012
50 1575
125 600
250 275
500 112
800 38
1000 12
( 25)
Lenze · EMF2180IB communication module (EthernetCAN) · Communication Manual · DMS 5.0 EN · 07/2014 · TD17 23
Page 24

5 Installation
5.2 Electrical installation
_ _ _ _ _ _ _ _ _ _ _ _ _ _ _ _ _ _ _ _ _ _ _ _ _ _ _ _ _ _ _ _ _ _ _ _ _ _ _ _ _ _ _ _ _ _ _ _ _ _ _ _ _ _ _ _ _ _ _ _ _ _ _ _
5.2.3.2 Segment cable length
The segment cable length is determined by the cable cross-section used and by the number of
nodes. Repeaters divide the total cable length into segments. If no repeaters are used, the segment
cable length is identical to the total cable length.
Max. number of
nodes per segment
2 240 m 430 m 650 m 940 m
5 230 m 420 m 640 m 920 m
10 230 m 410 m 620 m 900 m
20 210 m 390 m 580 m 850 m
32 200 m 360 m 550 m 800 m
63 170 m 310 m 470 m 690 m
100 150 m 270 m 410 m 600 m
Cable cross-section (can be interpolated)
0.25 mm
(AWG 24)
2
0.50 mm
(AWG 21)
2
0.75 mm
(AWG 19)
2
1.00 mm
(AWG 18)
2
Example: Selection help
Given
Total cable length to be
implemented
Number of nodes 63
Results
Max. possible baud rate 250 kbit/s
Required cable cross-section
(interpolated)
Cable cross-section of standard CAN
cable
200 m
(derived from the table Total cable length
0.30 mm
(derived from the table Segment cable length
0.34 mm
Specification of the CAN bus cable
2
(AWG23)
2
(AWG22)
( 23))
( 22)
( 24))
24
Lenze · EMF2180IB communication module (EthernetCAN) · Communication Manual · DMS 5.0 EN · 07/2014 · TD17
Page 25

5 Installation
5.2 Electrical installation
_ _ _ _ _ _ _ _ _ _ _ _ _ _ _ _ _ _ _ _ _ _ _ _ _ _ _ _ _ _ _ _ _ _ _ _ _ _ _ _ _ _ _ _ _ _ _ _ _ _ _ _ _ _ _ _ _ _ _ _ _ _ _ _
5.2.3.3 Checking the use of repeaters
Compare the values derived from tables Total cable length ( 23) and Segment cable length ( 24).
• If the sum of the segment cable lengths is smaller than the total cable length to be
implemented, either repeaters must be used or the cable cross-section must be increased.
• If the use of repeaters reduces the max. possible total cable length so much that it is smaller
than the total cable length to be implemented, then the cable cross-section must be increased
or less repeaters must be used or the baud rate must be decreased.
• The use of a further repeater is recommended as ...
•service interface
Advantage: trouble-free connection during bus operation is possible.
• calibration interface
Advantage: the calibration/programming unit remains electrically isolated.
Example
Given
Total cable length to be
implemented
Number of nodes 32
Cable cross-section 0.50 mm
Baud rate 125 kbit/s
Repeater used Lenze repeater EMF2176IB
Reduction of the max. total cable
length per repeater (EMF2176IB)
450 m
30 m
2
(AWG 20)
Results
Max. possible total cable length 600 m
(see table Total cable length
Max. segment cable length 360 m
(see table Segment cable length
Comparison The max. segment cable length is smaller than the total cable length to be
implemented.
Conclusion A repeater must be installed at the determined max. segment cable length
of 360 m.
Results with 1 repeater
Max. possible total cable length 570 m
(Reduction of the Total cable length
Sum of the segment cable lengths 720 m
Comparison Both the possible total cable length and the segment cable lengths are larger
than the total cable length to be implemented.
Conclusion 1 repeater is sufficient to implement the total cable length of 450 m.
( 23))
( 24))
( 23) by 30 m)
Lenze · EMF2180IB communication module (EthernetCAN) · Communication Manual · DMS 5.0 EN · 07/2014 · TD17 25
Page 26

5 Installation
5.2 Electrical installation
_ _ _ _ _ _ _ _ _ _ _ _ _ _ _ _ _ _ _ _ _ _ _ _ _ _ _ _ _ _ _ _ _ _ _ _ _ _ _ _ _ _ _ _ _ _ _ _ _ _ _ _ _ _ _ _ _ _ _ _ _ _ _ _
5.2.4 Connecting the Ethernet cable
Note!
• Decouple your Ethernet house network from the system network for Ethernetcapable Lenze devices in order to prevent EthernetCAN communication faults.
Further information about this can be obtained from the "Ethernet in the industrial
application" manual.
• To prevent the RJ45 socket from being damaged, insert or remove the Ethernet cable
connector straight (at a right angle) into or from the socket.
2181FEW004A
[5-4] Ethernet connection
26
Lenze · EMF2180IB communication module (EthernetCAN) · Communication Manual · DMS 5.0 EN · 07/2014 · TD17
Page 27
5 Installation
5.2 Electrical installation
_ _ _ _ _ _ _ _ _ _ _ _ _ _ _ _ _ _ _ _ _ _ _ _ _ _ _ _ _ _ _ _ _ _ _ _ _ _ _ _ _ _ _ _ _ _ _ _ _ _ _ _ _ _ _ _ _ _ _ _ _ _ _ _
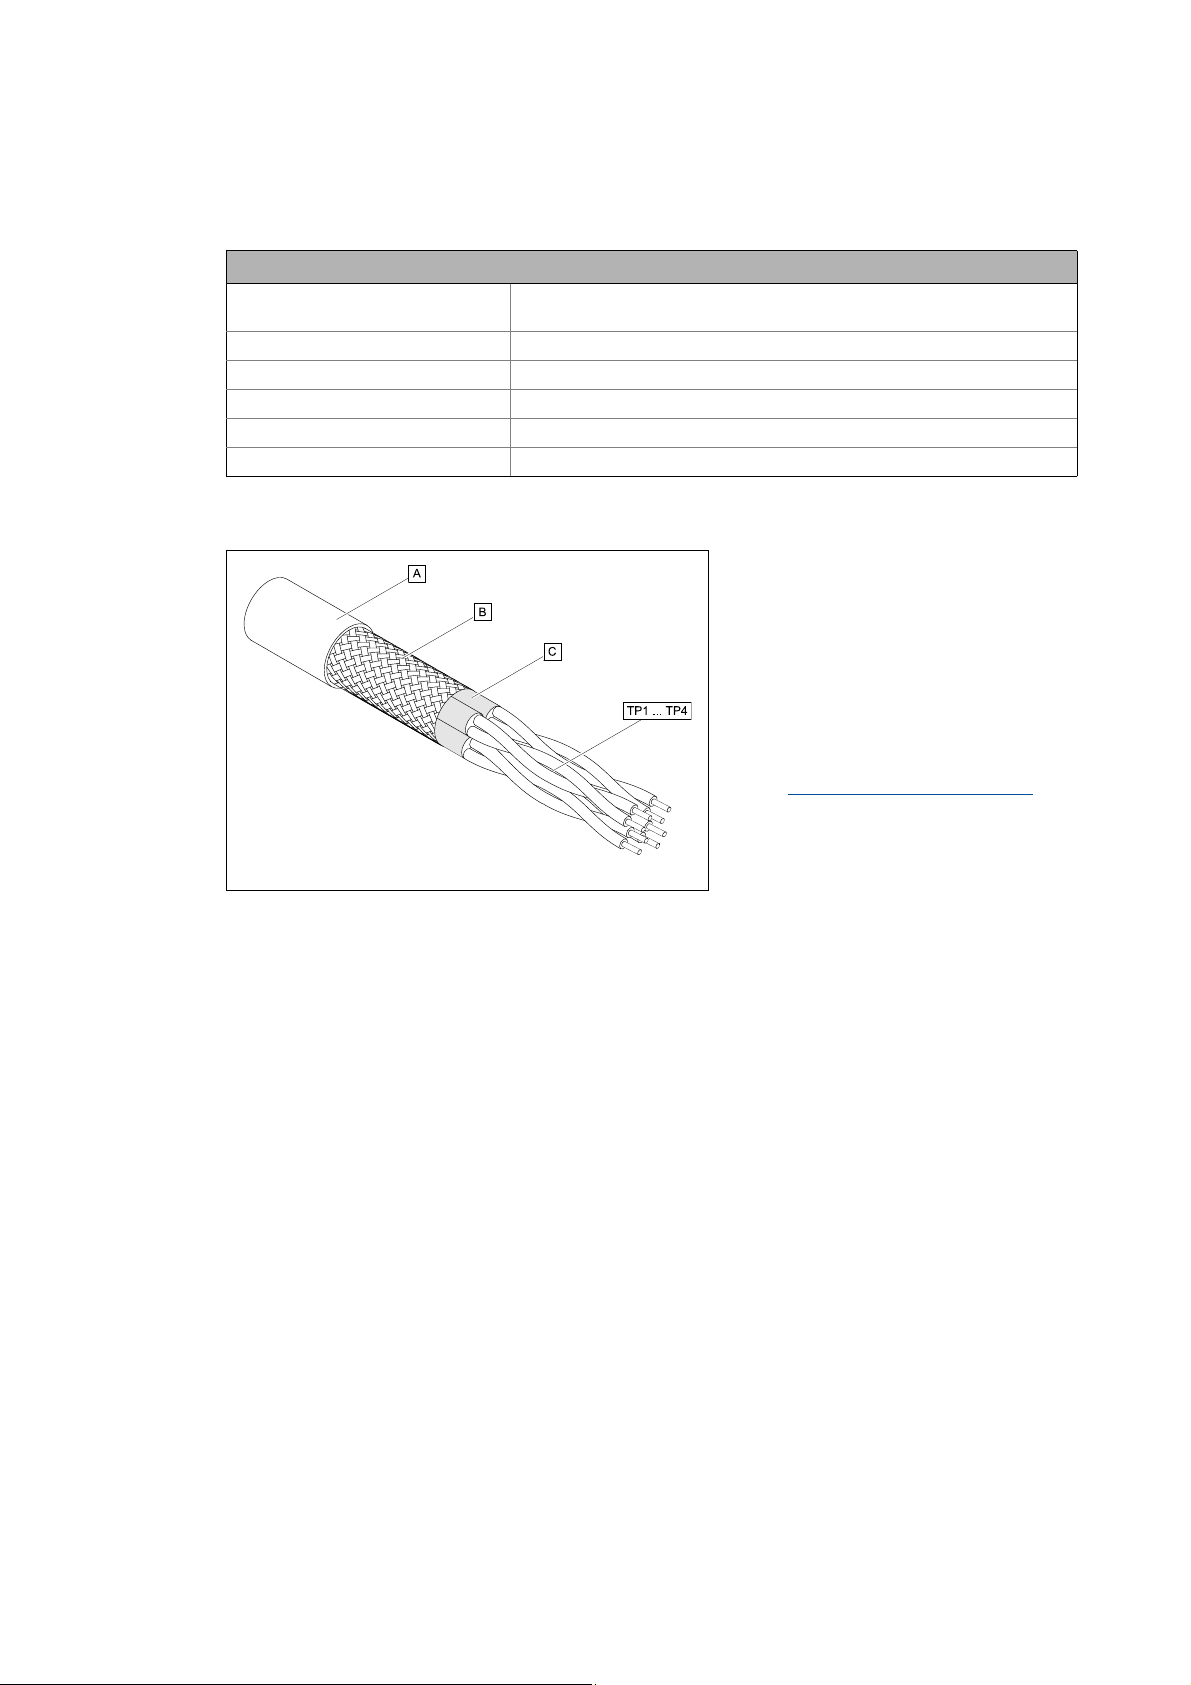
5.2.4.1 Ethernet cable specification
Ethernet cable in compliance with IEEE 802.3
Ethernet standard Standard Ethernet (in accordance with IEEE 802.3), 100Base-TX (Fast
Cable type S/FTP (Screened Foiled Twisted Pair), ISO/IEC 11801 or EN 50173, CAT 5e
Damping 23.2 dB (for 100 MHz and 100 m each)
Crosstalk damping 24 dB (for 100 MHz and 100 m each)
Return loss 10 dB (100 m each)
Surge impedance 100
Structure of the Ethernet cable
Ethernet)
a Cable insulation
[5-5] Structure of the Ethernet cable (S/FTP, CAT 5e)
E94YCEP016
B Braid
C Foil shielding
TP1
Twisted core pairs 1 ... 4
...
Colour code of the Ethernet cable
TP4
( 28)
Lenze · EMF2180IB communication module (EthernetCAN) · Communication Manual · DMS 5.0 EN · 07/2014 · TD17 27
Page 28

5 Installation
5.2 Electrical installation
_ _ _ _ _ _ _ _ _ _ _ _ _ _ _ _ _ _ _ _ _ _ _ _ _ _ _ _ _ _ _ _ _ _ _ _ _ _ _ _ _ _ _ _ _ _ _ _ _ _ _ _ _ _ _ _ _ _ _ _ _ _ _ _
Colour code of the Ethernet cable
Note!
Wiring and colour code are standardised in EIA/TIA 568A/568B.
In accordance with the industrial standard, the use of 4-pin Ethernet cables is
permissible. The cable type only connects the assigned pins 1, 2, 3 and 6 to one another.
E94YCEI004A
[5-6] Ethernet plug in accordance with EIA/TIA 568A/568B
Pair Pin Signal EIA/TIA 568A EIA/TIA 568B
3 1 Tx + white / green white / orange
2 Tx - Green orange
2 3 Rx + white / orange white / green
1 4 blue blue
5 white / blue blue / white
2 6 Rx - orange Green
4 7 white / brown white / brown
8brown brown
28
Lenze · EMF2180IB communication module (EthernetCAN) · Communication Manual · DMS 5.0 EN · 07/2014 · TD17
Page 29

5 Installation
1Tx+ Tx+1
2Tx- Tx-2
3Rx+ Rx+3
44
55
6Rx- Rx-6
77
88
1Tx+ Tx+1
2Tx- Tx-2
3Rx+ Rx+3
44
55
6Rx- Rx-6
77
88
5.2 Electrical installation
_ _ _ _ _ _ _ _ _ _ _ _ _ _ _ _ _ _ _ _ _ _ _ _ _ _ _ _ _ _ _ _ _ _ _ _ _ _ _ _ _ _ _ _ _ _ _ _ _ _ _ _ _ _ _ _ _ _ _ _ _ _ _ _
5.2.4.2 Pin assignment and use of the Ethenet cable
100BaseTX - CrossOver Cable 100BaseTX - Standard Patch Cable
The "100BaseTX - CrossOver Cable" is used for direct
coupling of the Engineering PC with the communication
module.
The "100BaseTX - Standard Patch Cable" is used in
conjunction with hubs and switches.
Lenze · EMF2180IB communication module (EthernetCAN) · Communication Manual · DMS 5.0 EN · 07/2014 · TD17 29
Page 30

5 Installation
5.2 Electrical installation
_ _ _ _ _ _ _ _ _ _ _ _ _ _ _ _ _ _ _ _ _ _ _ _ _ _ _ _ _ _ _ _ _ _ _ _ _ _ _ _ _ _ _ _ _ _ _ _ _ _ _ _ _ _ _ _ _ _ _ _ _ _ _ _
5.2.5 Voltage supply
2181FEW001G
[5-7] Communication via the diagnostic interface (only for Servo Drives 9400)
Handling of pluggable terminal strips
Stop!
Observe the following to prevent any damage to the plug-on terminal strips and
contacts:
• Wire the plug-on terminal strips first, then plug them on.
[5-8] Use of pluggable terminal strip with spring connection
• Plug-on terminal strips that are not assigned must also be plugged on.
E82ZAFX013
30
Lenze · EMF2180IB communication module (EthernetCAN) · Communication Manual · DMS 5.0 EN · 07/2014 · TD17
Page 31

5 Installation
5.2 Electrical installation
_ _ _ _ _ _ _ _ _ _ _ _ _ _ _ _ _ _ _ _ _ _ _ _ _ _ _ _ _ _ _ _ _ _ _ _ _ _ _ _ _ _ _ _ _ _ _ _ _ _ _ _ _ _ _ _ _ _ _ _ _ _ _ _
Terminal data
Range Values
Electrical connection Plug connector with spring connection
Possible connections rigid:
2.5 mm2 (AWG 12)
flexible:
without wire end ferrule
2
2.5 mm
with wire end ferrule, without plastic sleeve
2.5 mm
with wire end ferrule, with plastic sleeve
2.5 mm
Bare end 10 mm
(AWG 12)
2
(AWG 12)
2
(AWG 12)
Lenze · EMF2180IB communication module (EthernetCAN) · Communication Manual · DMS 5.0 EN · 07/2014 · TD17 31
Page 32

6 Commissioning
6.1 Commissioning with the Lenze "System bus configurator"
_ _ _ _ _ _ _ _ _ _ _ _ _ _ _ _ _ _ _ _ _ _ _ _ _ _ _ _ _ _ _ _ _ _ _ _ _ _ _ _ _ _ _ _ _ _ _ _ _ _ _ _ _ _ _ _ _ _ _ _ _ _ _ _
6 Commissioning
6.1 Commissioning with the Lenze "System bus configurator"
Via the "System bus configurator", the EMF2180IB communication module is configured for
communication with the fieldbus nodes and the Lenze Engineering tools.
The "System bus configurator" is part of the following Lenze Engineering tools:
• »Engineer«
• »Drive Server«, from version 1.1 onwards
• »Drive PLC Developer Studio« (DDS), from version 2.2 onwards
• »Global Drive Control« (GDC), from version 4.7 onwards
• »Global Drive Loader« (GDL), from version 2.2 onwards
Note!
Some of the Engineering tools mentioned offer alternative communication paths for
CAN. In this case, always select the "OPC" communication path.
Tip!
6.1.1 Installing/updating software
We recommend always using the most recent version of the Lenze Engineering tools.
Current software updates for the Engineering tools and information about the system
requirements can be found in the ”Download” area at:
www.lenze.com
How to install or update the Lenze Engineering tools:
1. Download the corresponding file from the Download area of the Lenze homepage to your
Engineering PC.
2. Start the installation program by double-clicking the file downloaded.
3. Follow the further instructions of the installation program.
32
After having carried out the installation successfully, you can open the "System bus configurator"
via the MS Windows® start menu under:
All Programs Lenze Communication System bus configurator
Lenze · EMF2180IB communication module (EthernetCAN) · Communication Manual · DMS 5.0 EN · 07/2014 · TD17
Page 33
6 Commissioning
6.1 Commissioning with the Lenze "System bus configurator"
_ _ _ _ _ _ _ _ _ _ _ _ _ _ _ _ _ _ _ _ _ _ _ _ _ _ _ _ _ _ _ _ _ _ _ _ _ _ _ _ _ _ _ _ _ _ _ _ _ _ _ _ _ _ _ _ _ _ _ _ _ _ _ _
6.1.2 Configuring the communication module
Before communication with the communication module can be established, you have to carry out
settings for the following parameters:
•CAN parameters
The CAN parameters are saved in the communication module and contain specific data for the
CAN bus such as the baud rate, parameter data channel, or time-out.
• Parameters for access to the communication module
The communication module is an Ethernet node. Each Ethernet node has 2 addresses: a MAC
address and an IP address.
The MAC address serves to unambiguously identify a device worldwide. Observe the MAC
address entry on the nameplate of the communication module. The MAC address is hard-coded
in the device and cannot be changed. If an Ethernet connection to the communication module
has already been established, the MAC address can be read out online.
The IP address is a logical address which must be adapted to the corresponding Ethernet
network.
How to configure the communication module:
1. Open the "System bus configurator" via the MS Windows® start menu under:
All Programs Lenze Communication System bus configurator
2. Click the Add button and select the "EMF2180IB" communication module from the list.
3. Click the Settings tab.
4. Enter the CAN parameters.
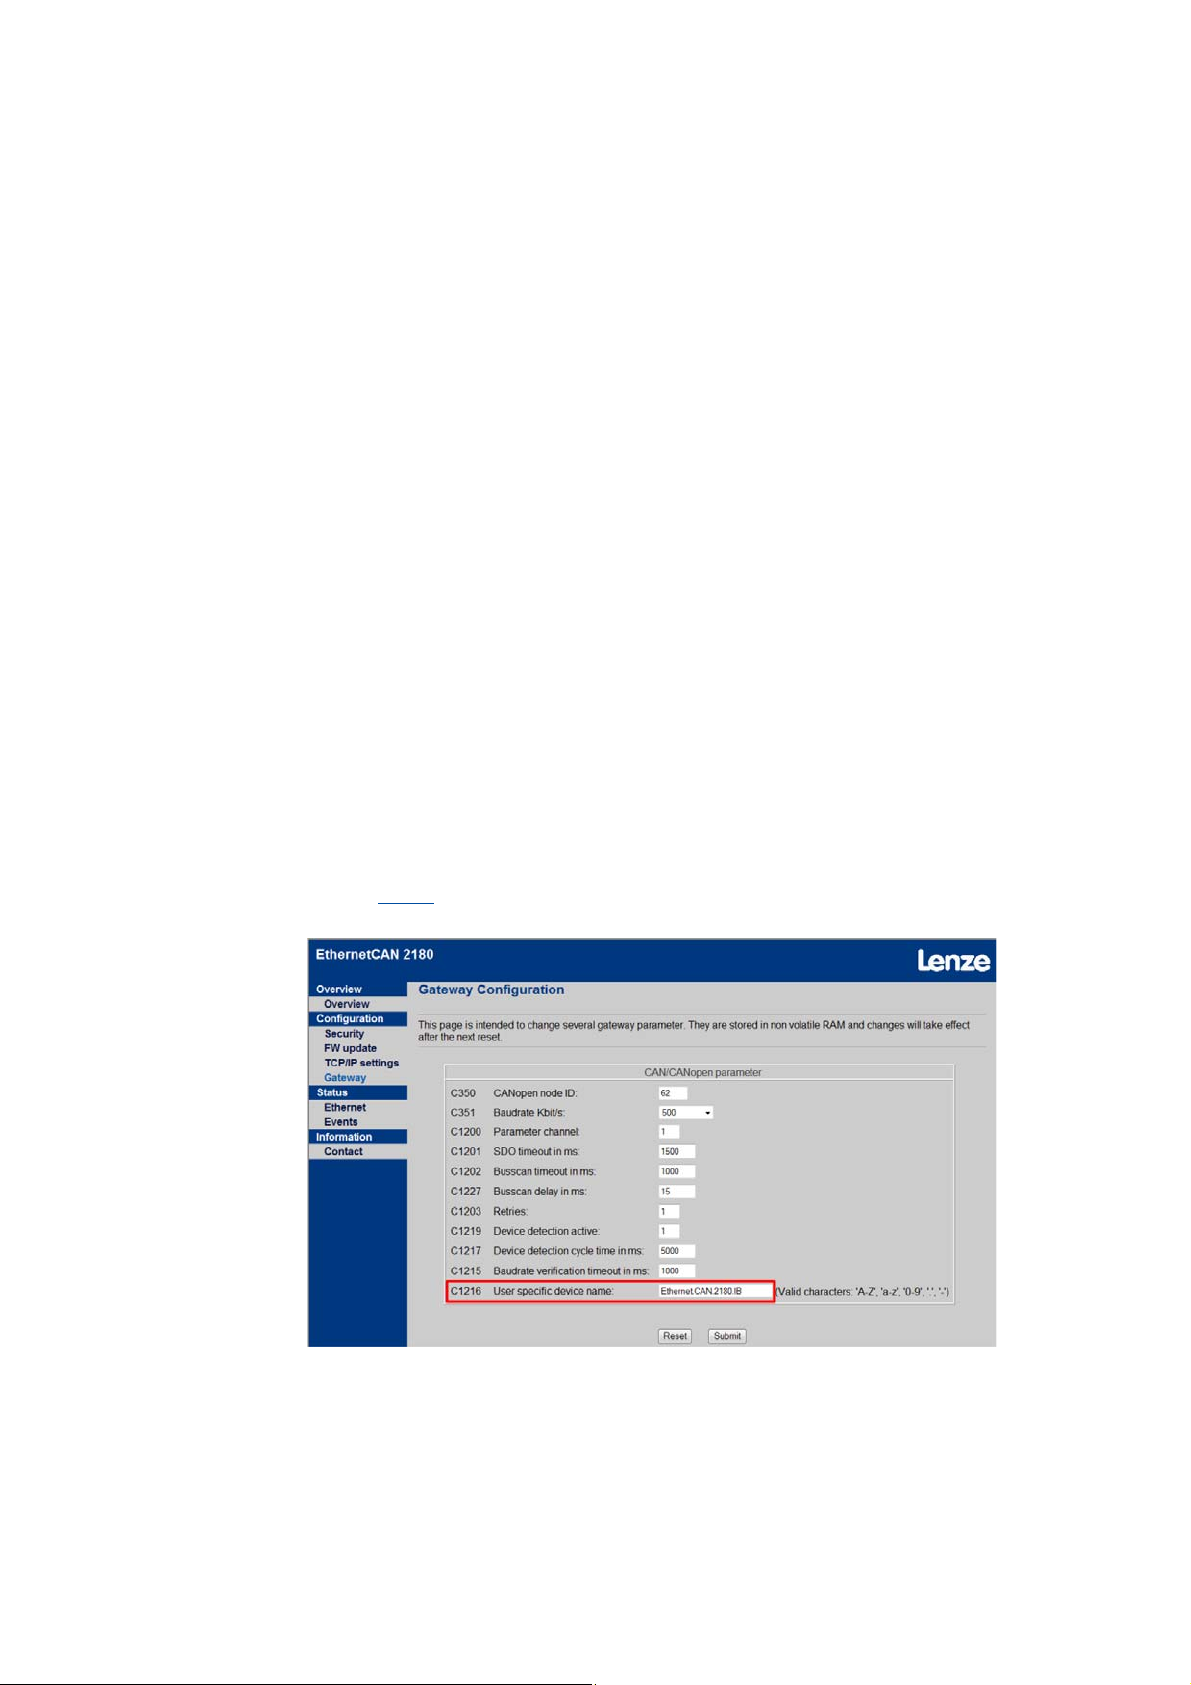
The following function is available from version 1.7 onwards!
Via code C1216
communication module:
or the web interface, you can assign an alphanumeric name to the
2180FEW016
Lenze · EMF2180IB communication module (EthernetCAN) · Communication Manual · DMS 5.0 EN · 07/2014 · TD17 33
Page 34

6 Commissioning
6.1 Commissioning with the Lenze "System bus configurator"
_ _ _ _ _ _ _ _ _ _ _ _ _ _ _ _ _ _ _ _ _ _ _ _ _ _ _ _ _ _ _ _ _ _ _ _ _ _ _ _ _ _ _ _ _ _ _ _ _ _ _ _ _ _ _ _ _ _ _ _ _ _ _ _
5. Enter the MAC address of the nameplate or identify it online.
6. Enter the desired IP address and transfer it to the communication module online.
Afterwards an automatic reset is carried out by the communication module, which may
take some seconds (observe LEDs).
7. When the communication module is ready for operation again, change to the General tab.
8. Click the Diagnostics tab.
An attempt is made to establish a connection to the communication module. First, a
comparison is made, checking whether the CAN parameters configured are identical to
those in the device. If this is not the case, an adjustment is carried out.
9. Then search the CAN bus for nodes connected.
10. Confirm the confirmation prompt with Yes, or select No to abort the diagnostics process.
34
Lenze · EMF2180IB communication module (EthernetCAN) · Communication Manual · DMS 5.0 EN · 07/2014 · TD17
Page 35

6 Commissioning
6.1 Commissioning with the Lenze "System bus configurator"
_ _ _ _ _ _ _ _ _ _ _ _ _ _ _ _ _ _ _ _ _ _ _ _ _ _ _ _ _ _ _ _ _ _ _ _ _ _ _ _ _ _ _ _ _ _ _ _ _ _ _ _ _ _ _ _ _ _ _ _ _ _ _ _
6.1.3 After completing the configuration
Communication with Lenze Engineering tools
When the configuration of the communication module has been completed successfully, the Lenze
Engineering tools can communicate via the communication module. The Lenze Engineering tools
only carry out the selection of the bus system to be used.
All system bus-specific settings as well as the selection of the communication module are
exclusively carried out via the "System bus configurator".
Note!
For some older program versions of the Lenze Engineering tools, settings for "Interrupt"
and "I/O address" can still be made, which, for the EMF2180IB communication module,
are irrelevant.
Communication with nodes
If the communication module can communicate successfully with the corresponding nodes, the
CAN node addresses of the nodes found are listed in the Device status field.
The communication module itself answers with its CAN node address or with "0" if it doesn't have
a CAN node address (depending on the setting in C0350
the communication module itself are not visible on the CAN bus.
Communication failed
If there is no communication with the nodes, a corresponding error message is output.
). The data frames for communication with
Lenze · EMF2180IB communication module (EthernetCAN) · Communication Manual · DMS 5.0 EN · 07/2014 · TD17 35
Page 36

6 Commissioning
6.2 Commissioning with the web server
_ _ _ _ _ _ _ _ _ _ _ _ _ _ _ _ _ _ _ _ _ _ _ _ _ _ _ _ _ _ _ _ _ _ _ _ _ _ _ _ _ _ _ _ _ _ _ _ _ _ _ _ _ _ _ _ _ _ _ _ _ _ _ _
6.2 Commissioning with the web server
Commissioning via the integrated web server is an alternative to commissioning with the "System
bus configurator".
The integrated web server makes it possible to configure the communication module by means of
a simple web browser.
The following function is available from version 1.7 onwards!
When the DHCP function is activated, the DHCP server automatically assigns an IP address to the
communication module.
If an invalid combination of IP address and subnet mask is detected, an error message is output via
the web page:
2180FEW019
In this case, the two values (IP address, subnet mask) will not be saved in the EEPROM of the
communication module.
The gateway IP is only valid if it is inside the user's own network (exception: gateway IP ’0.0.0.0’).
36
Lenze · EMF2180IB communication module (EthernetCAN) · Communication Manual · DMS 5.0 EN · 07/2014 · TD17
Page 37

6 Commissioning
6.2 Commissioning with the web server
_ _ _ _ _ _ _ _ _ _ _ _ _ _ _ _ _ _ _ _ _ _ _ _ _ _ _ _ _ _ _ _ _ _ _ _ _ _ _ _ _ _ _ _ _ _ _ _ _ _ _ _ _ _ _ _ _ _ _ _ _ _ _ _
The following function only applies to version <1.7!
Prerequisite for commissioning via web server:
• The IP address of the communication module must have been assigned by the "System bus
configurator" before.
• The IP address must be within the range that can be addressed by the Engineering PC
connected.
If one of the preconditions is not met, the IP address has to be changed using the "System bus
configurator":
2180FEW017
Lenze · EMF2180IB communication module (EthernetCAN) · Communication Manual · DMS 5.0 EN · 07/2014 · TD17 37
Page 38

6 Commissioning
6.2 Commissioning with the web server
_ _ _ _ _ _ _ _ _ _ _ _ _ _ _ _ _ _ _ _ _ _ _ _ _ _ _ _ _ _ _ _ _ _ _ _ _ _ _ _ _ _ _ _ _ _ _ _ _ _ _ _ _ _ _ _ _ _ _ _ _ _ _ _
6.2.1 Assigning a fixed IP address
Note!
The Lenze standard setting of the IP address is ’0.0.0.0’. With this (invalid) IP address, the
communication module at the start automatically finds its own IP address in the range
of ’169.254.xxx.xxx’ according to the standardised APIPA process.
Start your web browser and then enter the communication module's IP address that is known to you
as URL (instead of "xxx.xxx.xxx.xxx"):
2180FEW010
The web interface of the communication module will appear. Here you can carry out all further
settings.
2180FEW011
38
Lenze · EMF2180IB communication module (EthernetCAN) · Communication Manual · DMS 5.0 EN · 07/2014 · TD17
Page 39

6 Commissioning
6.2 Commissioning with the web server
_ _ _ _ _ _ _ _ _ _ _ _ _ _ _ _ _ _ _ _ _ _ _ _ _ _ _ _ _ _ _ _ _ _ _ _ _ _ _ _ _ _ _ _ _ _ _ _ _ _ _ _ _ _ _ _ _ _ _ _ _ _ _ _
6.2.2 Assigning a dynamic IP address
By corresponding configuration, the communication module can also dynamically obtain the IP
address by the DHCP server.
For this, activate the "Use DHCP" checkbox under the TCP/IP settings:
Note!
Since the procedure for the dynamically assigned IP address is not found in industrial
environments very often, its use is not recommended.
Ethernet communication manual
Here you'll find more information about the configuration of an Ethernet network.
2180FEW013
Lenze · EMF2180IB communication module (EthernetCAN) · Communication Manual · DMS 5.0 EN · 07/2014 · TD17 39
Page 40

6 Commissioning
6.2 Commissioning with the web server
_ _ _ _ _ _ _ _ _ _ _ _ _ _ _ _ _ _ _ _ _ _ _ _ _ _ _ _ _ _ _ _ _ _ _ _ _ _ _ _ _ _ _ _ _ _ _ _ _ _ _ _ _ _ _ _ _ _ _ _ _ _ _ _
The following function is available from version 1.7 onwards!
You can activate DHCP in the »Engineer« via code C1228
So far, this has only been possible via a checkbox on the "TCP/IP Settings" page of the web interface.
A static IP configuration that has already been configured is maintained after the activation of
DHCP. Even after the deactivation of DHCP and
configuration is still valid.
subsequent mains switching or reset, the static IP
:
2180FEW018
40
Lenze · EMF2180IB communication module (EthernetCAN) · Communication Manual · DMS 5.0 EN · 07/2014 · TD17
Page 41

6 Commissioning
6.2 Commissioning with the web server
_ _ _ _ _ _ _ _ _ _ _ _ _ _ _ _ _ _ _ _ _ _ _ _ _ _ _ _ _ _ _ _ _ _ _ _ _ _ _ _ _ _ _ _ _ _ _ _ _ _ _ _ _ _ _ _ _ _ _ _ _ _ _ _
6.2.3 Entering user name and password
All settings that can be carried out under "Configuration" are protected by a combination of a user
name and a password. The Lenze standard setting is:
•User name: Lenze
• Password: Lenze
The user name and password can be changed as often as desired. The entries are case-sensitive.
Via the Submit button, the data that have been altered are written to the EEPROM of the
communication module. They are only active after the next restart.
6.2.4 Firmware update ("FW update")
Note!
This page is only used for Lenze-internal purposes and cannot be accessed freely.
2180FEW012
Lenze · EMF2180IB communication module (EthernetCAN) · Communication Manual · DMS 5.0 EN · 07/2014 · TD17 41
Page 42

6 Commissioning
6.2 Commissioning with the web server
_ _ _ _ _ _ _ _ _ _ _ _ _ _ _ _ _ _ _ _ _ _ _ _ _ _ _ _ _ _ _ _ _ _ _ _ _ _ _ _ _ _ _ _ _ _ _ _ _ _ _ _ _ _ _ _ _ _ _ _ _ _ _ _
6.2.5 Displaying Ethernet states
These states are displayed:
• Current transfer rate (10/100 Mbit/s)
• Transmission mode (half/full duplex)
• MAC ID of the EMF2180IB communication module
• Static parameters of the Ethernet connection
2180FEW014
42
Lenze · EMF2180IB communication module (EthernetCAN) · Communication Manual · DMS 5.0 EN · 07/2014 · TD17
Page 43

6 Commissioning
6.2 Commissioning with the web server
_ _ _ _ _ _ _ _ _ _ _ _ _ _ _ _ _ _ _ _ _ _ _ _ _ _ _ _ _ _ _ _ _ _ _ _ _ _ _ _ _ _ _ _ _ _ _ _ _ _ _ _ _ _ _ _ _ _ _ _ _ _ _ _
6.2.6 Displaying alarms and events
After the communication module has been started, alarms and events are recorded and displayed
in a list.
Events are classified by severity into:
• Error
• Warning
•Info
The list also contains the time when the alarm or the event occurred.
Note!
The list is deleted every time the communication module is restarted.
Date and time are only correct if a "time server" is configured. Without configuration of
the "time server", the computation of time always starts with the restart of the
communication module on 01.01.1970 at 0:00 h.
2180FEW015
Lenze · EMF2180IB communication module (EthernetCAN) · Communication Manual · DMS 5.0 EN · 07/2014 · TD17 43
Page 44

6 Commissioning
6.3 Before initial switch-on
_ _ _ _ _ _ _ _ _ _ _ _ _ _ _ _ _ _ _ _ _ _ _ _ _ _ _ _ _ _ _ _ _ _ _ _ _ _ _ _ _ _ _ _ _ _ _ _ _ _ _ _ _ _ _ _ _ _ _ _ _ _ _ _
6.3 Before initial switch-on
Stop!
Before switching on the mains voltage, check ...
• the entire wiring for completeness, short circuit and earth fault:
• whether the bus system is terminated by means of a bus terminating resistor at the
first and last physical bus station.
Connecting the CAN bus
Automatic address allocation and detection of the baud rate
The EMF2180IB communication module is provided with the following functions:
• Automatic address assignment
• Automatic detection of the baud rate
( 21)
These functions are used to prevent failures due to an incorrectly set node address and baud rate.
Note!
In the Lenze standard setting, these functions are not activated.
For this, observe the information relating to codes ...
• C0350
• C0351
(CAN node address)
(CAN baud rate)
44
Lenze · EMF2180IB communication module (EthernetCAN) · Communication Manual · DMS 5.0 EN · 07/2014 · TD17
Page 45

6 Commissioning
6.4 Initial switch-on
_ _ _ _ _ _ _ _ _ _ _ _ _ _ _ _ _ _ _ _ _ _ _ _ _ _ _ _ _ _ _ _ _ _ _ _ _ _ _ _ _ _ _ _ _ _ _ _ _ _ _ _ _ _ _ _ _ _ _ _ _ _ _ _
6.4 Initial switch-on
6.4.1 Signalling sequence of the LEDs
[6-1] LEDs on the front of the communication module
Signalling sequence after switch-on:
1. Initialisation phase of peripherals starts:
•LED D (voltage supply, green) is lit.
2. After the CAN controller initialisation:
•LED C (RUN-LED, green) is blinking.
3. Ethernet connection is established:
•LED I is lit.
•LED A shows the baud rate of the Ethernet connection (10 Mbps or 100Mbps).
•When LED A is blinking, the communication module is currently determining the IP address.
Communication via Ethernet is only possible when this process has been completed.
Now, the device is ready for operation.
2181FEW001H
Lenze · EMF2180IB communication module (EthernetCAN) · Communication Manual · DMS 5.0 EN · 07/2014 · TD17 45
Page 46

6 Commissioning
6.4 Initial switch-on
_ _ _ _ _ _ _ _ _ _ _ _ _ _ _ _ _ _ _ _ _ _ _ _ _ _ _ _ _ _ _ _ _ _ _ _ _ _ _ _ _ _ _ _ _ _ _ _ _ _ _ _ _ _ _ _ _ _ _ _ _ _ _ _
6.4.2 LED signalling in compliance with DR303-3
Connection status to the CAN bus with the following signalling:
LEDs Description
off Connection to the master is available.
Green CANopen status ("Z")
Red CANopen error ("F")
Status display (LED) Explanation
Constantly red F: Bus-off
Flicker Automatic baud rate detection is active.
Blinking green every 0.2 s Z: Pre-operational, F: No errors
Blinking green every 0.2 s
1 x red blinking, 1 s OFF
Green blinking every 0.2 s
2 x red blinking, 1 s OFF
Constantly green Z: Operational, F: No errors
Z: Pre-operational, F: Warning limit reached
Z: Pre-operational, F: Node guarding event
Constantly green
1 x red blinking, 1 s OFF
Constantly green
2 x red blinking, 1 s OFF
Constantly green
3 x red blinking, 1 s off
Green blinking every second Z: Stopped, F: No errors
Green blinking every second
1 x red blinking, 1 s OFF
Green blinking every second
2 x red blinking, 1 s OFF
Z: Operational, error: Warning limit reached
Z: Operational, F: Node guarding event
Z: Operational, F: Sync message error
Z: Stopped, F: Warning limit reached
Z: Stopped, F: Node guarding event
46
Lenze · EMF2180IB communication module (EthernetCAN) · Communication Manual · DMS 5.0 EN · 07/2014 · TD17
Page 47

7 Data transfer
7.1 Access to the inverter codes
_ _ _ _ _ _ _ _ _ _ _ _ _ _ _ _ _ _ _ _ _ _ _ _ _ _ _ _ _ _ _ _ _ _ _ _ _ _ _ _ _ _ _ _ _ _ _ _ _ _ _ _ _ _ _ _ _ _ _ _ _ _ _ _
7 Data transfer
The master (e.g. a PLC) and inverter communicate with each other by exchanging data frames via
the fieldbus. The user data area of the data frame either contains network management data,
parameter data, or process data.
Different communication channels are assigned to parameter and process data in the inverter.
Parameters are for instance operating parameters, motor data, or diagnostic information, which are
stored under a code in the Lenze inverters.
Normally, the transfer of parameters is not as time-critical as the transfer of process data.
7.1 Access to the inverter codes
Documentation for the inverter
Here you can find some detailed information on the codes and value ranges.
Via the communication module, a higher-level master (e.g. a PLC) can change the properties and the
response of each inverter integrated in the network.
In Lenze inverters, parameters to be changed are listed under codes.
Inverter codes are addressed via indexes when accessing the code through the communication
module.
The indexes for Lenze code numbers are between 16576 (0x40C0) and 24575 (0x5FFF).
Indexing of codes using the example of code C0001 (operating mode)
Decimal Hexadecimal
Index = 24575 - Lenze code number Index
Index = 24575 - 1 = 24574 Index = 0x5FFF - 0x1 = 0x5FFE
= 0x5FFF - Lenze code number [hex]
Lenze · EMF2180IB communication module (EthernetCAN) · Communication Manual · DMS 5.0 EN · 07/2014 · TD17 47
Page 48

7 Data transfer
(CAN on board)
CAN
Ethernet
Servo Drives 9400
9400
9400
9400
7.2 Data transfer via CAN
_ _ _ _ _ _ _ _ _ _ _ _ _ _ _ _ _ _ _ _ _ _ _ _ _ _ _ _ _ _ _ _ _ _ _ _ _ _ _ _ _ _ _ _ _ _ _ _ _ _ _ _ _ _ _ _ _ _ _ _ _ _ _ _
7.2 Data transfer via CAN
[7-1] Parameter data transfer via CAN
2180FEW008
Parameter data are transmitted via the CAN bus as so-called "Service Data Objects (SDOs) and are
acknowledged by the receiver. The SDO enables read and write access to the object directory.
Indexes (e.g. I-1000
in the object directory. In order to be able to transfer SDOs, the information contained in the user
data must comply with the CAN-SDO protocol.
) provide for access to parameters and functions of the device, which are stored
CAN/CANopen communication manual
Here you'll find some detailed information relating to the CAN frame structure.
CANopen parameter channels
The communication module is provided with two parameter data channels.
In the Lenze standard setting, both channels are activated.
Note!
Compatibility with CANopen
Switch off the second parameter data channel via code C1200 in order to establish
compatibility with CANopen.
48
Lenze · EMF2180IB communication module (EthernetCAN) · Communication Manual · DMS 5.0 EN · 07/2014 · TD17
Page 49

7 Data transfer
7.3 Data transfer via Ethernet
_ _ _ _ _ _ _ _ _ _ _ _ _ _ _ _ _ _ _ _ _ _ _ _ _ _ _ _ _ _ _ _ _ _ _ _ _ _ _ _ _ _ _ _ _ _ _ _ _ _ _ _ _ _ _ _ _ _ _ _ _ _ _ _
7.3 Data transfer via Ethernet
The Engineering PC and the communication module communicate via a proprietary protocol which
is based on TCP/IP. The port number '22080' is used for the communication module.
The port number may have to be cleared if a firewall or something similar is used.
Port '3677' is used to search for fieldbus nodes.
Port '80' is required to operate the web server.
Tip!
The search via Ethernet is only possible within one network. The frames are not
transmitted via routers.
Ethernet communication manual
Here you'll find some detailed information relating to the Ethernet data frame structure.
Lenze · EMF2180IB communication module (EthernetCAN) · Communication Manual · DMS 5.0 EN · 07/2014 · TD17 49
Page 50

8Diagnostics
8.1 Error: Cause and remedy
_ _ _ _ _ _ _ _ _ _ _ _ _ _ _ _ _ _ _ _ _ _ _ _ _ _ _ _ _ _ _ _ _ _ _ _ _ _ _ _ _ _ _ _ _ _ _ _ _ _ _ _ _ _ _ _ _ _ _ _ _ _ _ _
8 Diagnostics
8.1 Error: Cause and remedy
Diagnostics Possible cause of error Remedy
Power LED (P) is not on. The device is not switched on. Check external voltage supply
Error LED (E) is on or blinking. CAN bus error Check CAN wiring.
Link LED is not on. Ethernet wiring error Check Ethernet wiring.
8.2 LED status displays for the communication module and for CAN communication
2180FEW001D
[8-1] LED status displays for the communication module and for CAN communication
LED Colour Status Description
B Yellow off Ethernet baud rate: 10 Mbps
on
Ethernet baud rate: 100 Mbps
blinking
The IP address is not assigned yet; it is currently being identified.
50
Lenze · EMF2180IB communication module (EthernetCAN) · Communication Manual · DMS 5.0 EN · 07/2014 · TD17
Page 51

8Diagnostics
8.2 LED status displays for the communication module and for CAN communication
_ _ _ _ _ _ _ _ _ _ _ _ _ _ _ _ _ _ _ _ _ _ _ _ _ _ _ _ _ _ _ _ _ _ _ _ _ _ _ _ _ _ _ _ _ _ _ _ _ _ _ _ _ _ _ _ _ _ _ _ _ _ _ _
LED Colour Status Description
E
(Error)
Red off No error; the device is ready for operation.
on
"Bus off" state
The CAN controller is in the "Bus off" state.
"Diagnostic interface" operating mode
In this operating mode, the LED is lit if no device is connected.
blinking once
(single flash)
Warning limit is reached
At least one of the error counters of the CAN controller has reached or
exceeded the warning level (too many error frames).
blinking twice
(double flash)
Error control event
A guard event (NMT slave or NMT master) or heartbeat event (heartbeat
consumer) has occurred.
R
(Run)
blinking 3 times
(triple flash)
SYNC error
The sync message has not been received within the time configured for
the time monitoring of the communication cycle..
flickering
AutoBaud/LLS
The automatic detection of the baud rate or LSS services is/are executed.
(The LEDs E and R are flickering alternately red/green.)
Green off No communication
on
"Operational" state
The communication module is in the "Operational" state.
blinking
"Pre-operational" state
The communication module is in the "Pre-operational" state.
blinking once
(single flash)
"Stopped" state
The communication module is in the "Stopped" state.
flickering
AutoBaud/LLS
The automatic detection of the baud rate or LSS services is/are executed.
(The LEDs E and R are flickering alternately red/green.)
Lenze · EMF2180IB communication module (EthernetCAN) · Communication Manual · DMS 5.0 EN · 07/2014 · TD17 51
Page 52

8Diagnostics
8.3 LED status displays for Ethernet communication
_ _ _ _ _ _ _ _ _ _ _ _ _ _ _ _ _ _ _ _ _ _ _ _ _ _ _ _ _ _ _ _ _ _ _ _ _ _ _ _ _ _ _ _ _ _ _ _ _ _ _ _ _ _ _ _ _ _ _ _ _ _ _ _
LED Colour Status Description
P
(Power)
8.3 LED status displays for Ethernet communication
Green off The communication module is not supplied with voltage.
on
The communication module is supplied with voltage.
2180FEW001D
[8-2] LED status displays for Ethernet communication
LED Colour Status Description
A
(Link)
B
(Activity)
Green off No connection to Ethernet
on
Ethernet connection is available.
Green off No data transfer
on or
flickering
Data are transmitted or received.
52
Lenze · EMF2180IB communication module (EthernetCAN) · Communication Manual · DMS 5.0 EN · 07/2014 · TD17
Page 53

9 Parameter reference
_ _ _ _ _ _ _ _ _ _ _ _ _ _ _ _ _ _ _ _ _ _ _ _ _ _ _ _ _ _ _ _ _ _ _ _ _ _ _ _ _ _ _ _ _ _ _ _ _ _ _ _ _ _ _ _ _ _ _ _ _ _ _ _
9 Parameter reference
This chapter lists all parameters of the communication module in numerically ascending order.
C0002
C0093
C0099
Parameter | Name:
C0002 | Load default setting
C0002 shows the status of the device command executed last. C0150 can be used to enquire the current status of
the device control.
Selection list (Lenze setting printed in bold) Info
0Load Def. Load Lenze standard setting
• Only possible with controller inhibit and stopped user
program.
1 Load PS Load parameter set
• The parameter set stored in the memory module is
loaded.
• Only possible with controller inhibit and stopped user
program.
Read access Write access CINH PLC STOP No transfer
Parameter | Name:
C0093 | Device type
The display for the EMF2180IB communication module is "2180 0000".
Display range (min. value | unit | max. value)
-214748 214748
Read access Write access CINH PLC STOP No transfer Scaling factor: 10000
Data type: INTEGER_32
Index: 24573 = 0x5FFD
Data type: INTEGER_32
Index: 24482 = 0x5FA2
Parameter | Name:
C0099 | Software version
Display "x.y"
(x: major version, y: index)
Display range (min. value | unit | max. value)
0.0 100.0
Read access Write access CINH PLC STOP No transfer Scaling factor: 10000
Data type: INTEGER_32
Index: 24476 = 0x5F9C
Lenze · EMF2180IB communication module (EthernetCAN) · Communication Manual · DMS 5.0 EN · 07/2014 · TD17 53
Page 54

9 Parameter reference
_ _ _ _ _ _ _ _ _ _ _ _ _ _ _ _ _ _ _ _ _ _ _ _ _ _ _ _ _ _ _ _ _ _ _ _ _ _ _ _ _ _ _ _ _ _ _ _ _ _ _ _ _ _ _ _ _ _ _ _ _ _ _ _
C0150
C0200
C0202
Parameter | Name:
C0150 | Status word
The binary interpretation of the displayed decimal value reflects the bit statuses of the status word:
• Bit 0: Ready for operation
• Bit 1: Dial-up connection is available
• Bit 2: Internal error
Value is bit-coded:
Bit 0 Ready for operation
Bit 1 Reserved
... ...
Bit 15 Reserved
Read access Write access CINH PLC-STOP No transfer
Parameter | Name:
C0200 | Software ID
During initialisation, the manufacturer's product code is used to determine which device is connected as node.
The display for the EMF2180IB communication module is "33S2180F_10000".
Read access Write access CINH PLC-STOP No transfer
Parameter | Name:
C0202 | Software ID (octet)
In subcodes 1 ... 4, the corresponding octet of the manufacturer's product code is shown.
Display range (min. value | unit | max. value)
-2147483647 2147483647
Subcodes Info
C0202/1 1st octet
C0202/2 2nd octet
C0202/3 3rd octet
C0202/4 4th octet
Read access Write access CINH PLC-STOP No transfer
Data type: UNSIGNED_16
Index: 24425 = 0x5F69
Data type: VISIBLE_STRING
Index: 24375 = 0x5F37
Data type: INTEGER_32
Index: 24373 = 0x5F35
54 Lenze · EMF2180IB communication module (EthernetCAN) · Communication Manual · DMS 5.0 EN · 07/2014 · TD17
Page 55

9 Parameter reference
_ _ _ _ _ _ _ _ _ _ _ _ _ _ _ _ _ _ _ _ _ _ _ _ _ _ _ _ _ _ _ _ _ _ _ _ _ _ _ _ _ _ _ _ _ _ _ _ _ _ _ _ _ _ _ _ _ _ _ _ _ _ _ _
C0350
C0351
Parameter | Name:
C0350 | CAN node address
The node address can be set via the CAN bus using the code C0350.
If zero is used as address, the communication module does not have a node address of its own. It can then not be
addressed from the CAN bus (no parameter setting, node guarding, etc.), but only serves as a dial-in option for reading parameters via the CAN bus.
If the communication module is to have an address, after determination of the baud rate, check whether this
address is still free. Then an attempt is made to read the implemented CANopen object -1000. If this address is
already assigned to another node, another free address is selected automatically.
Note:
Node addresses in the range of 64 ... 127 can only be assigned if code C1200 is set to the value "0" (CANopen
conformity)
Changes that are made to the settings will be accepted after ...
• reconnection to the mains;
• a "Reset node" or "Reset communication" via the bus system;
• a "Reset node" via code C0358
Setting range (min. value | unit | max. value) Lenze setting
0 127 63
Read access Write access CINH PLC STOP No transfer
Parameter | Name:
C0351 | CAN baud rate
The baud rate over the CAN bus can be set using this code.
Prior to accessing the CAN bus, the baud rate used is determined by the communication module and is compared
with the baud rate configured.
If there is a difference between the two values, the baud rate determined is used. Code C1209
out the baud rate detected by the communication module.
If there is no data exchange on the CAN bus, the baud rate cannot be determined. The subsequent response of the
communication module depends on the selection configured in code C0351
Selection 0 ... 5
After a time-out that can be configured using code C1215
Selection 16 (automatic detection of the baud rate)
The communication module is not accessed by the bus until a baud rate has been detected.
Changes that are made to the settings will be accepted after ...
• reconnection to the mains;
• a "Reset node" command via the bus system;
• a "Reset node" via code C0358
Selection list (Lenze setting printed in bold)
0 500 kbit/s
1 250 kbit/s
2 125 kbit/s
3 50 kbit/s
4 1000 kbps
5 20 kbit/s
16 Autom. baud rate detection
Read access Write access CINH PLC STOP No transfer
.
:
, the CAN bus is accessed with the baud rate configured.
.
Data type: INTEGER_32
Index: 24225 = 0x5EA1
Data type: INTEGER_32
Index: 24224 = 0x5EA0
can be used to read
Lenze · EMF2180IB communication module (EthernetCAN) · Communication Manual · DMS 5.0 EN · 07/2014 · TD17 55
Page 56

9 Parameter reference
_ _ _ _ _ _ _ _ _ _ _ _ _ _ _ _ _ _ _ _ _ _ _ _ _ _ _ _ _ _ _ _ _ _ _ _ _ _ _ _ _ _ _ _ _ _ _ _ _ _ _ _ _ _ _ _ _ _ _ _ _ _ _ _
C0358
Parameter | Name:
C0358 | CAN reset node
After a reset any changes to communication parameters such as baud rate or node address are applied.
A "Reset node" can be activated by:...
• reconnection of the mains;
• a "Reset node" via the bus system;
• a "Reset node" via code C0358.
Selection list (Lenze setting printed in bold)
0No function
1CAN reset
Read access Write access CINH PLC STOP No transfer
Data type: INTEGER_32
Index: 24217 = 5E99
56 Lenze · EMF2180IB communication module (EthernetCAN) · Communication Manual · DMS 5.0 EN · 07/2014 · TD17
Page 57

9 Parameter reference
_ _ _ _ _ _ _ _ _ _ _ _ _ _ _ _ _ _ _ _ _ _ _ _ _ _ _ _ _ _ _ _ _ _ _ _ _ _ _ _ _ _ _ _ _ _ _ _ _ _ _ _ _ _ _ _ _ _ _ _ _ _ _ _
C0359
Parameter | Name:
C0359 | CAN bus status
This code displays the current operating status of the CAN controller. Here, the following states are distinguished:
Selection 0: "Operational"
In this state the bus system is fully functional.
Selection 1: "Pre-operational"
In this state only parameter data (codes) can be transferred via the bus system. It is not possible to exchange process
data. To change to the "Operational" state, a network management frame must be output on the bus.
A state change from "Pre-operational" to "Operational" can be made with the following actions:
• A drive is defined as master using the inverter code C0352. During mains connection, an automatic state change
for the whole drive system is performed after the boot-up time defined in C0356/1
• "Reset node" via code C0358
• With the "Reset node" binary input signal which can, for instance, be set via a terminal if inverter code C0364 is
configured accordingly (precondition: C0352 = 1).
• A network management message from a CAN master.
Selection 2: "Warning"
Incorrect frames have been received if the state is "Warning". The CAN node is now only involved in a passive way;
no more data are sent from the inverter.
The reason for this situation can be:
• A missing bus terminator
• Inadequate shielding
• Potential differences at the ground connection for the control electronics
• An excessively high bus load
• CAN node is not connected to the bus
Selection 3: "Bus Off"
The frequency of the erroneous frames has caused the CAN node to decouple from the bus. A change-over to "PreOperational" can be effected by ...
•a "TRIP reset";
• a "Reset node";
• reconnection to the mains.
Selection 4: "Stopped"
Only NMT frames can be received.
The state can be changed to "Pre-operational" by ...
• a "Reset node" via code C0358
• a "Reset node" via the bus system;
• reconnection to the mains.
Selection list (read only)
0 Operational
1 Preoperational
2 Warning
3 Bus Off
4 Stopped
Read access Write access CINH PLC-STOP No transfer
(precondition: C0352 = 1).
;
Data type: INTEGER_32
Index: 24216 = 0x5E98
Lenze · EMF2180IB communication module (EthernetCAN) · Communication Manual · DMS 5.0 EN · 07/2014 · TD17 57
Page 58

9 Parameter reference
_ _ _ _ _ _ _ _ _ _ _ _ _ _ _ _ _ _ _ _ _ _ _ _ _ _ _ _ _ _ _ _ _ _ _ _ _ _ _ _ _ _ _ _ _ _ _ _ _ _ _ _ _ _ _ _ _ _ _ _ _ _ _ _
C0360
C0361
Parameter | Name:
C0360 | CAN frame counter
All CAN frames of the CAN node that have been transmitted and received are counted.
The counters have 32 bits, i. e. when a value of 4294967295 is exceeded, the counting process starts again at 0.
Display range (min. value | unit | max. value)
-2147483647 2147483647
Subcodes Info
C0360/1 Number of frames transmitted
C0360/2 Number of frames received
Read access Write access CINH PLC-STOP No transfer
Parameter | Name:
C0361 | CAN bus load
Using this code the percentage total bus load can be determined. Erroneous messages are not taken into account
here.
Note:
• The bus load for all devices involved should not exceed 80 %.
• If other devices, e. g. decentralised inputs and outputs are connected, these messages are also to be taken into
account.
Display range (min. value | unit | max. value)
0 % 100
Read access Write access CINH PLC-STOP No transfer
Data type: INTEGER_32
Index: 24215 = 0x5E97
Data type: INTEGER_32
Index: 24214 = 0x5E96
C1200
Parameter | Name:
C1200 | Parameter data channel
This code indicates which of the two parameter data channels is used to communicate with other nodes. The
unused parameter data channels can be switched off, if required.
All Lenze inverters are provided with two parameter data channels featuring different addresses. The address of
parameter data channel 2 is calculated as follows:
Address of parameter data channel 2 = address of parameter data channel 1 + offset 64
Note:
The selection 0 means that the bus is operating in compliance with CANopen and there is no limitation on the
address space.
In this case, the parameter data channel SDO2 is inactive.
Selection list (Lenze setting printed in bold)
0CANopen
11
22
Read access Write access CINH PLC STOP No transfer
Data type: INTEGER_32
Index: 23375 = 0x5B4F
Address ranges
Selection Accessible address range Active parameter data channels
0 1...127 SDO 1
11 ... 63 SDO 1 / SDO 2
2 65 ... 127 SDO 1 / SDO 2
58 Lenze · EMF2180IB communication module (EthernetCAN) · Communication Manual · DMS 5.0 EN · 07/2014 · TD17
Page 59

9 Parameter reference
_ _ _ _ _ _ _ _ _ _ _ _ _ _ _ _ _ _ _ _ _ _ _ _ _ _ _ _ _ _ _ _ _ _ _ _ _ _ _ _ _ _ _ _ _ _ _ _ _ _ _ _ _ _ _ _ _ _ _ _ _ _ _ _
C1201
C1202
C1203
Parameter | Name:
C1201 | CAN communication time-out
Data type: INTEGER_32
Index: 23374 = 0x5B4E
The time set defines the time frame within which a CAN node must respond to a request.
If there is no response by the node, the requesting communication module assumes that the node is not available.
Setting range (min. value | unit | max. value) Lenze setting
500 MS 100000 1500 ms
Read access Write access CINH PLC STOP No transfer
Parameter | Name:
C1202 | Time limit for finding nodes
Data type: INTEGER_32
Index: 23373 = 0x5B4D
For node search, the time set is regularly maintained. It must be selected high enough to enable the nodes to have
enough time to respond. Otherwise, a too high value delays the search.
Note:
If required, the settings in C1202 must be adapted if the delay time for search frames is increased using code C1227
Setting range (min. value | unit | max. value) Lenze setting
500 MS 3500 1000 ms
Read access Write access CINH PLC STOP No transfer
Parameter | Name:
C1203 | Retries
Data type: INTEGER_32
Index: 23372 = 0x5B4C
The value to be set in code C1203 indicates the number of repetitions of those CAN frames which have not reached
the receiver.
The precondition for using this functionality is the activation of the device identification via code C1219
.
Setting range (min. value | unit | max. value) Lenze setting
0101
The following setting applies from version 1.7 onwards!
0
The Lenze setting of the repeat tests was changed to "0"
in order to obtain a corresponding return value from the
communication module as soon as possible if a bus node
is not available ("DEVICE_NOT_PRESENT").
Read access Write access CINH PLC STOP No transfer
.
Lenze · EMF2180IB communication module (EthernetCAN) · Communication Manual · DMS 5.0 EN · 07/2014 · TD17 59
Page 60

9 Parameter reference
_ _ _ _ _ _ _ _ _ _ _ _ _ _ _ _ _ _ _ _ _ _ _ _ _ _ _ _ _ _ _ _ _ _ _ _ _ _ _ _ _ _ _ _ _ _ _ _ _ _ _ _ _ _ _ _ _ _ _ _ _ _ _ _
C1209
C1210
Parameter | Name:
C1209 | Read out CAN baud rate
Code C1209 can be used to determine which baud rate was detected on the CAN bus.
When "16" is displayed, no data are exchanged on the CAN bus.
Selection list (read only)
0 500 kbit/s
1 250 kbit/s
2 125 kbit/s
3 50 kbit/s
4 1000 kbps
5 20 kbit/s
16 not detected
Read access Write access CINH PLC-STOP No transfer
Parameter | Name:
C1210 | IP address
The IP address is the identification number of a device in the network. Each network node receives a unique address
in the network. Compared to the MAC-ID, the IP address is a logic address that can be changed via software.
By default, the address 0.0.0.0 is set. Since this is not a valid IP address, the device searches for a free address in the
subnetwork 169.254.xxx.xxx at the start, as specified by the APIPA process.
The IP addresses always consist of 4 octets (subcodes 1 ... 4). In order to improve readability, the octets are separated
from each other by points (e.g. 128.133.10.123).
The first octet determines the network class. The network class specifies the number of available hosts in a network.
Note:
The data are only accepted when the mains has been switched the next time.
The following function is available from version 1.7 onwards!
After the code has been changed, the IP address and subnet mask combination is checked with regard to its validity.
If the IP address and subnet mask combination is invalid, the gateway is set to the IP address 0.0.0.0, and DHCP is
set to dynamic assignment of the IP address (code C1228
Setting range (min. value | unit | max. value)
0 255
Subcodes Lenze setting Info
C1210/1 0 IP address 1
C1210/2 0 IP address 2
C1210/3 0 IP address 3
C1210/4 0 IP address 4
Read access Write access CINH PLC STOP No transfer
).
Data type: INTEGER_32
Index: 23366 = 0x5B46
Data type: UNSIGNED_32
Index: 23365 = 0x5B45
The IP addresses are divided into 3 classes:
Class IP address classes Maximum number of hosts
a 01.x.x.x - 126.x.x.x 16.777.214
B 128.x.x.x - 191.x.x.x 65.534
C 192.x.x.x - 223.x.x.x 254
x: complete octet
60 Lenze · EMF2180IB communication module (EthernetCAN) · Communication Manual · DMS 5.0 EN · 07/2014 · TD17
Page 61
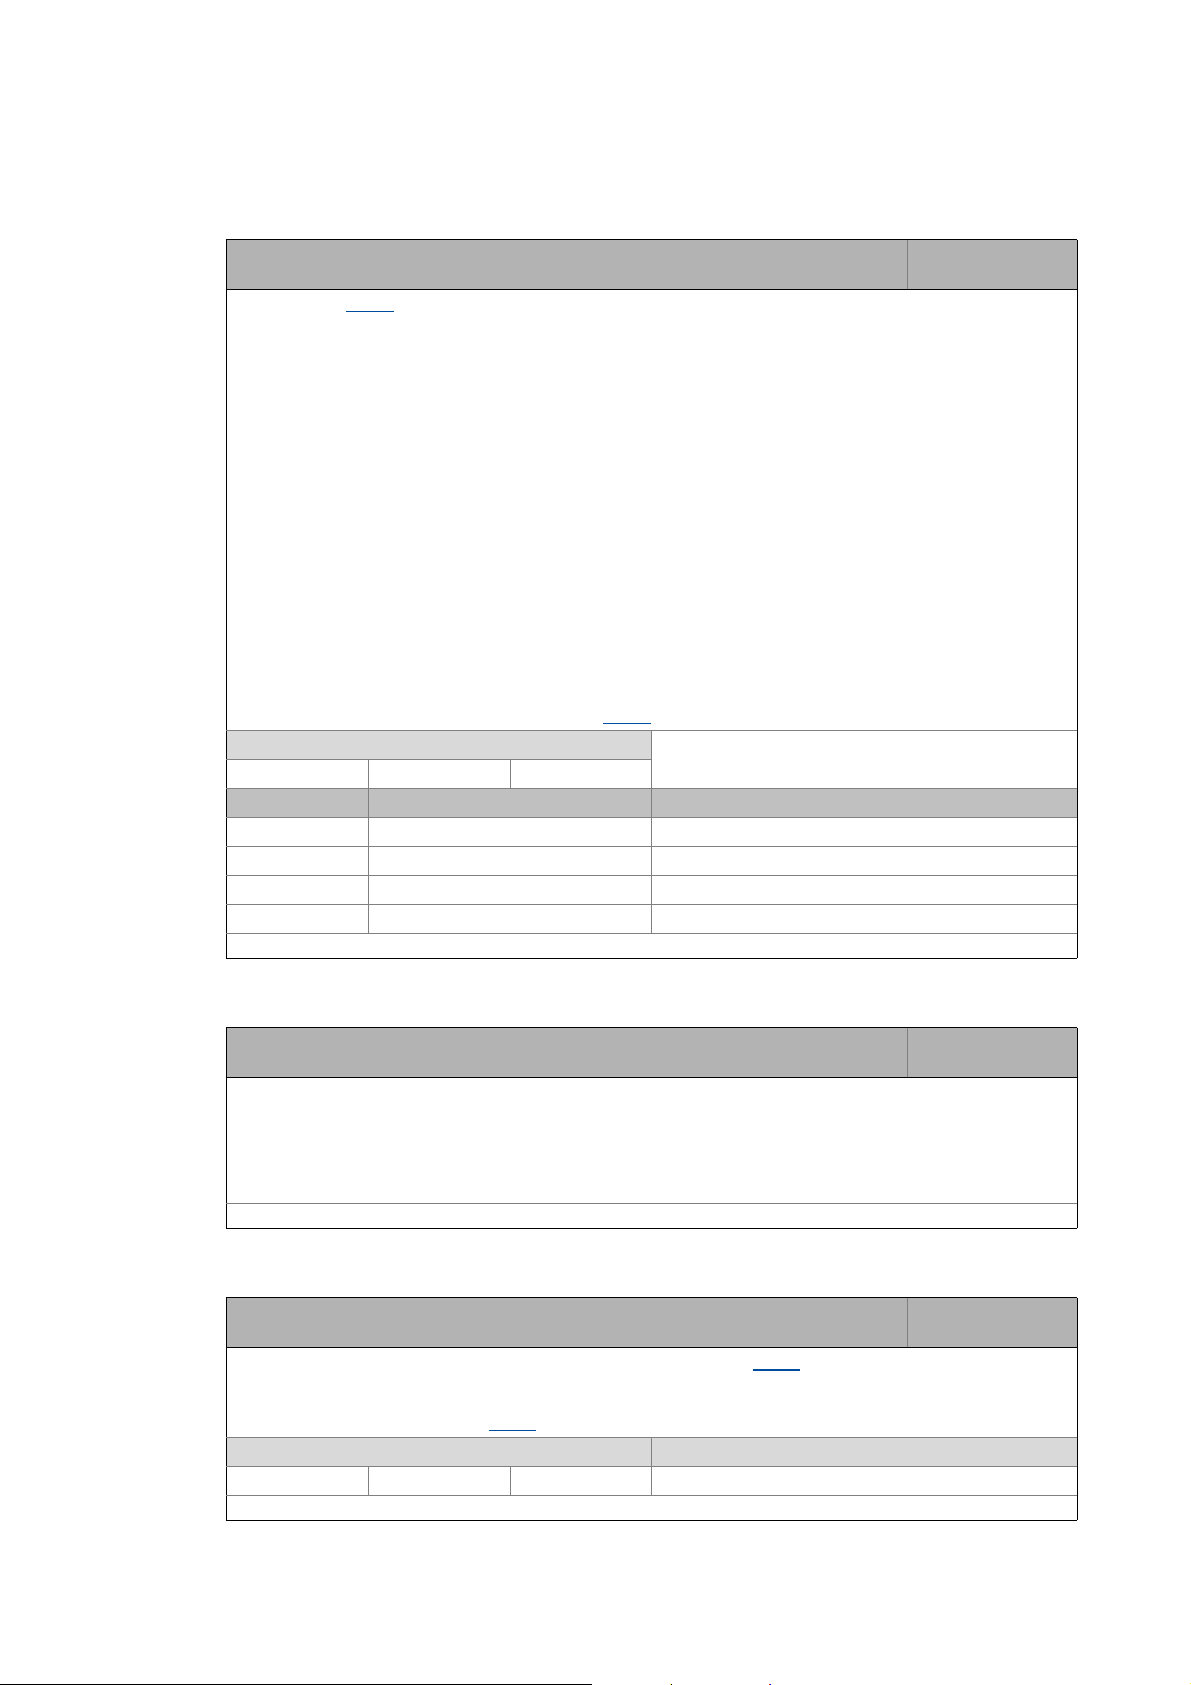
9 Parameter reference
_ _ _ _ _ _ _ _ _ _ _ _ _ _ _ _ _ _ _ _ _ _ _ _ _ _ _ _ _ _ _ _ _ _ _ _ _ _ _ _ _ _ _ _ _ _ _ _ _ _ _ _ _ _ _ _ _ _ _ _ _ _ _ _
C1211
Parameter | Name:
C1211 | Subnet mask
Data type: UNSIGNED_32
Index: 23364 = 0x5B44
The IP address (C1210) is superimposed by the subnet mask. The subnet mask serves to identify which part of the
IP address indicates the network and which part represents the device part in the network.
All bits of the network part of the subnetwork mask are set to the value "1 ", and all bits of the device part are set to
the value "0".
A logic AND operation of both binary codes provides information on ...
• the network ID,
• the corresponding network,
•the computer ID.
The TCP/IP protocol is used to determine the path of the message:
• Same network: communication via broadcast
• Other network: communication via router
The standard subnet masks are divided into 3 classes:
• Class A: 255.0.0.0
• Class B: 255.255.0.0
• Class C: 255.255.255.0
Note:
The data are only accepted when the mains has been switched the next time.
The following function is available from version 1.7 onwards!
After the code has been changed, the IP address and subnet mask combination is checked with regard to its validity.
If the IP address and subnet mask combination is invalid, the gateway is set to the IP address 0.0.0.0, and DHCP is
set to dynamic assignment of the IP address (code C1228
).
Setting range (min. value | unit | max. value)
0 255
Subcodes Lenze setting Info
C1211/1 0 Subnet mask 1
C1211/2 0 Subnet mask 2
C1211/3 0 Subnet mask 3
C1211/4 0 Subnet mask 4
Read access Write access CINH PLC STOP No transfer
C1214
C1215
Parameter | Name:
C1214 | MAC address
Data type: VISIBLE_STRING
Index: 23361 = 0x5B41
Each communication module has a 48-bit identification, the so-called MAC-ID (Media Access Control). The MAC-ID
is stored non-volatilely in the EEPROM of the communication module.
Basically, the identification of the communication module is allocated by the IEEE (Institute of Electrical and
Electronical Engineers). The IEEE assigns a so-called OUI (Organizationally Unique Identifier) to each manufacturer.
The OUI represents the first 24 bits of the card address. The remaining bits of the address are assigned by the
manufacturer for each card. The numbering of each card must be unique.
Read access Write access CINH PLC-STOP No transfer
Parameter | Name:
C1215 | CAN time-out
Data type: INTEGER_32
Index: 23360 = 0x5B40
By defining a time-out in code C1215, the baud rate (display with code C1209) on the CAN bus can be determined.
The baud rate is not checked if the value configured in code C1215 is set to zero.
When the time-out configured in code C1215 elapses, the CAN bus is accessed (for further information and
restriction: see description of code C0351
).
Setting range (min. value | unit | max. value) Lenze setting
0 MS 60000 1000 ms
Read access Write access CINH PLC STOP No transfer
Lenze · EMF2180IB communication module (EthernetCAN) · Communication Manual · DMS 5.0 EN · 07/2014 · TD17 61
Page 62

9 Parameter reference
_ _ _ _ _ _ _ _ _ _ _ _ _ _ _ _ _ _ _ _ _ _ _ _ _ _ _ _ _ _ _ _ _ _ _ _ _ _ _ _ _ _ _ _ _ _ _ _ _ _ _ _ _ _ _ _ _ _ _ _ _ _ _ _
C1216
C1217
Parameter | Name:
C1216 | User-specific device name
The device name can be defined with maximally 25 characters by the user.
The following characters can be used for creating or changing the name:
• Letters: A ... Z, a ... z
•Numbers: 0 ... 9
• Special characters: "." and "-"
Characters deviating from this are replaced by a point.
The device name can also be entered on the gateway configuration web page.
Notes:
• The device name is saved in the communication module with mains failure protection.
• The automatic transfer of the device name to a DNS server does not take place.
• By loading the Lenze standard setting (via code C0002
Read access Write access CINH PLC STOP No transfer
Parameter | Name:
C1217 | Cycle time for CAN device monitoring
This code serves to set the cycle time for CAN device monitoring (C1220).
The cycle time can also be set via the gateway configuration web page.
Setting range (min. value | unit | max. value) Lenze setting
1000 MS 30000 5000 ms
Read access Write access CINH PLC STOP No transfer
), the device name is neither reset nor changed.
Data type: VISIBLE_STRING
Index: 23359 = 0x5B3F
Data type: UNSIGNED_32
Index: 23358 = 0x5B3E
C1219
Parameter | Name:
C1219 | Activation of CAN device monitoring
The activated device monitoring enables the detection of bus nodes with disturbed bus communication.
The device monitoring function can also be activated via code C1220/0
Selection list (Lenze setting printed in bold)
0 Not activated
1activated
Read access Write access CINH PLC STOP No transfer
or the gateway configuration web page.
Data type: UNSIGNED_32
Index: 23356 = 0x5B3C
62 Lenze · EMF2180IB communication module (EthernetCAN) · Communication Manual · DMS 5.0 EN · 07/2014 · TD17
Page 63

9 Parameter reference
_ _ _ _ _ _ _ _ _ _ _ _ _ _ _ _ _ _ _ _ _ _ _ _ _ _ _ _ _ _ _ _ _ _ _ _ _ _ _ _ _ _ _ _ _ _ _ _ _ _ _ _ _ _ _ _ _ _ _ _ _ _ _ _
C1220
Parameter | Name:
C1220 | CAN device monitoring
This code serves to ...
• activate the CAN device monitoring function (subcode 0);
• detect interrupted CAN communication for each node and record it i n a bit mask (subcodes 1 ... 4 ) when the CAN
device monitoring function is activated.
Recording of interrupted nodes
Subcodes 1 ... 4 contain a bit mask in which each node (a maximum of 127) with interrupted bus communication or
with an inexistent physical presence is recorded with the value "1".
The status bit immediately adopts the value "0" when communication of the node has been re-established.
For testing purposes, the bit mask can be written to by the user. The values written are accepted at the end of the
CAN device monitoring cycle time in each case (C1217
In the »Engineer«, a change-over to the hexadecimal representation is recommended.
Setting range (min. value | unit | max. value)
0 60000
Subcodes Lenze setting Info
C1211/0 0 0: device monitoring not activated
C1211/1 0 Bits: 31 (MSB) ... 0 (LSB)
C1211/2 0 Bits: 63 (MSB) ... 32 (LSB)
C1211/3 0 Bits: 95 (MSB) ... 64 (LSB)
C1211/4 0 Bits: 127 (MSB) ... 96 (LSB)
Read access Write access CINH PLC STOP No transfer
).
1: device monitoring activated
(Activation can also be carried out via C1219
gateway configuration web page.)
Data type: UNSIGNED_8
Index: 23355 = 0x5B3B
or the
C1224
Parameter | Name:
C1224 | Gateway address
If the communication module is in another subnetwork than the Engineering PC, the IP address of the
corresponding router must be entered into this code
The data are only accepted when the mains has been switched the next time.
Setting range (min. value | unit | max. value)
0 255
Subcodes Lenze setting Info
C1224/1 0 Gateway Address 1
C1224/2 0 Gateway Address 2
C1224/3 0 Gateway Address 3
C1224/4 0 Gateway Address 4
Read access Write access CINH PLC STOP No transfer
Data type: UNSIGNED_32
Index: 23351 = 0x5B37
Lenze · EMF2180IB communication module (EthernetCAN) · Communication Manual · DMS 5.0 EN · 07/2014 · TD17 63
Page 64

9 Parameter reference
_ _ _ _ _ _ _ _ _ _ _ _ _ _ _ _ _ _ _ _ _ _ _ _ _ _ _ _ _ _ _ _ _ _ _ _ _ _ _ _ _ _ _ _ _ _ _ _ _ _ _ _ _ _ _ _ _ _ _ _ _ _ _ _
C1227
C1228
Parameter | Name:
C1227 | Delay time for search frames
Searching the CAN bus during the start of a PC program can lead to faults if a bus is heavily loaded. In order to
prevent this, a delay time between the transmission frames can be set. This, however, leads to an increase of the
total search time. If required, the time limit for the node search (C1202
Setting range (min. value | unit | max. value) Lenze setting
0 MS 100 0ms
Read access Write access CINH PLC STOP No transfer
Setting Meaning
0 Quickest possible search
1 ... 10 Delay time 1 ms
11 ... 19 Delay time 10 ms
20 ... 29 Delay time 20 ms
... ...
90...100 Delay time 90 ms
Parameter | Name:
C1228 | DHCP activation
This code enables access to the CAN bus system via the "Dynamic Host Configuration Protocol" (DHCP).
Changes that are made to the settings will be accepted after ...
• reconnection to the mains;
• a device reset via code C1229
The parameterisation of this code is then stored with mains failure protection in the communication module
immediately.
Selection list (Lenze setting printed in bold)
0 Not activated
1activated
Read access Write access CINH PLC STOP No transfer
(with the value "2" or "3").
) has to be adapted.
Data type: INTEGER_32
Index: 23348 = 0x5B34
Data type: UNSIGNED_32
Index: 23347 = 0x5B33
C1229
Parameter | Name:
C1229 | Activation of IP settings, device reset
This code ...
• stores the IP adress, the network mask, and the gateway address with mains failure protection;
•executes a device reset;
• enables the combination of the two actions mentioned first.
Selection list (Lenze setting printed in bold) Info
0No function
1 Save IP settings The IP adress, the network mask, and the gateway
address are saved in the communication module with
mains failure protection.
2 Device reset Reset of the communication module
3 Saving IP settings and device reset Storage of the IP address, network mask, and gateway
address with a subsequent device reset.
Read access Write access CINH PLC STOP No transfer
Data type: UNSIGNED_32
Index: 23346 = 0x5B32
64 Lenze · EMF2180IB communication module (EthernetCAN) · Communication Manual · DMS 5.0 EN · 07/2014 · TD17
Page 65

9 Parameter reference
_ _ _ _ _ _ _ _ _ _ _ _ _ _ _ _ _ _ _ _ _ _ _ _ _ _ _ _ _ _ _ _ _ _ _ _ _ _ _ _ _ _ _ _ _ _ _ _ _ _ _ _ _ _ _ _ _ _ _ _ _ _ _ _
C1230
C1231
C1232
Parameter | Name:
C1230 | Current IP address (display)
This code shows the currently active IP address.
An IP address that is altered using code C1210
then, the currently active IP address differs from the IP address set in C1210
will only become active after the next mains switching process. Until
.
Display range (min. value | unit | max. value)
0 60000
Read access Write access CINH PLC-STOP No transfer
Parameter | Name:
C1231 | Current subnet mask (display)
This code shows the currently active subnet mask.
A subnet mask that is altered using code C1211
Until then, the currently active subnet mask differs from the subnet mask set in C1211
will only become active after the next mains switching process.
.
Display range (min. value | unit | max. value)
0 60000
Read access Write access CINH PLC-STOP No transfer
Parameter | Name:
C1232 | Current gateway address (display)
This code shows the currently active gateway address.
A gateway address that is altered using code C1224
will only become active after the next mains switching process.
Until then, the currently active gateway address differs from the gateway address set in C1224
Display range (min. value | unit | max. value)
0 60000
Read access Write access CINH PLC-STOP No transfer
Data type: UNSIGNED_32
Index: 23345 = 0x5B31
Data type: UNSIGNED_32
Index: 23344 = 0x5B30
Data type: UNSIGNED_32
Index: 23343 = 0x5B2F
.
Lenze · EMF2180IB communication module (EthernetCAN) · Communication Manual · DMS 5.0 EN · 07/2014 · TD17 65
Page 66

10 Implemented CANopen objects
_ _ _ _ _ _ _ _ _ _ _ _ _ _ _ _ _ _ _ _ _ _ _ _ _ _ _ _ _ _ _ _ _ _ _ _ _ _ _ _ _ _ _ _ _ _ _ _ _ _ _ _ _ _ _ _ _ _ _ _ _ _ _ _
10 Implemented CANopen objects
Lenze devices can both be parameterised with Lenze codes and manufacturer-independent
"CANopen objects". A completely CANopen-compliant
using CANopen objects for parameter setting. The CANopen objects described in this chapter are
defined in the CAN specification DS301 V4.02.
communication can only be achieved by
Note!
Some of the terms used here derive from the CANopen protocol.
This chapter lists the implemented CANopen objects of the communication module in numerically
ascending order.
I-1000 - Device type
I-1001 - Error register
Index
I-1000
Subindex Lenze-
0: Device type 0 0 4294967295 ro U32
Name:
Device type
Setting
Display range
(min. value | unit | max. value)
Access Data type
The I-1000 CANopen index shows the profile for this device. Furthermore, additional information
defined in the device profile itself can be shown here.
If you are not working with a specific device profile, the content is "0x0000".
Data frame assignment
Byte 8 Byte 7 Byte 6 Byte 5
U32
Device profile number Additional information
Index:
I-1001
Subindex Lenze-
0: Error register - 0 255 ro U8
Name:
Error register
Setting
Display range
(min. value | unit | max. value)
Access Data type
The error register displays the error status in data bytes (U8) in a bit-coded form:
Bit 7 Bit 6 Bit 5 Bit 4 Bit 3 Bit 2 Bit 1 Bit 0 Error status
00000000No error
00000001 Error of the communication module
0001 0001 Communication error
66 Lenze · EMF2180IB communication module (EthernetCAN) · Communication Manual · DMS 5.0 EN · 07/2014 · TD17
Page 67

10 Implemented CANopen objects
_ _ _ _ _ _ _ _ _ _ _ _ _ _ _ _ _ _ _ _ _ _ _ _ _ _ _ _ _ _ _ _ _ _ _ _ _ _ _ _ _ _ _ _ _ _ _ _ _ _ _ _ _ _ _ _ _ _ _ _ _ _ _ _
I-1017 - Producer heartbeat time
Index:
I-1017
Subindex Lenze-
0: Producer heartbeat time 0 0 MS 65535 rw U16
The "heartbeat producer" cyclically sends a heartbeat message to one or several "heartbeat
consumers".
After configuration of the producer heartbeat time, the heartbeat message is automatically
transmitted at the transition from the NMT "Initialisation" state to the NMT "Pre-Operational" state
when a time > 0 ms is set.
Note!
I-1018 - Identity object
Name:
Producer heartbeat time
Setting
Input area
(min. value | unit | max. value)
Access Data type
In contrast to "Node/Life guarding" monitoring, the heartbeat message does not contain
a "Remote Transmit Request" (RTR).
Therefore a response by the receiver (consumer) upon receipt of a heartbeat message is
not required.
Index:
I-1018
Subindex Lenze-
0: Highest subindex
supported
1: Vendor ID
2: Product code
3: Revision number
4: Serial number
Subindex Meaning
0 Highest subindex
1 Manufacturer's identification number
2 Product code
3 Revision number
4 Serial number
Name:
Identity object
Display range
Setting
see below 0 4294967295 ro U32
The identification number allocated to Lenze by the organisation "CAN in
Automation e. V." is "0x0000003B".
(min. value | unit | max. value)
Access Data type
Lenze · EMF2180IB communication module (EthernetCAN) · Communication Manual · DMS 5.0 EN · 07/2014 · TD17 67
Page 68

Index
Index
_ _ _ _ _ _ _ _ _ _ _ _ _ _ _ _ _ _ _ _ _ _ _ _ _ _ _ _ _ _ _ _ _ _ _ _ _ _ _ _ _ _ _ _ _ _ _ _ _ _ _ _ _ _ _ _ _ _ _ _ _ _ _ _
A
Access to the inverter codes 47
Activation of CAN device monitoring (C1219) 62
Activation of IP settings, device reset (C1229) 64
Application as directed 12
Application notes 9
Application range 12
Assigning a dynamic IP address 39
Assigning a fixed IP address 38
Assignment of the 9-pin Sub-D plug connector 22
Automatic address assignment 44
Automatic detection of the baud rate 44
B
Baud rate 14
Baud rate (CAN) 55
Before initial switch-on 44
Bus cable length 23
C
C0002 | Load default setting 53
C0093 | Device type 53
C0099 | Software version 53
C0150 | Status word 54
C0200 | Software ID 54
C0202 | Software ID (octet) 54
C0350 | CAN node address 55
C0351 | CAN baud rate 55
C0358 | CAN reset node 56
C0359 | CAN bus status 57
C0361 | CAN bus load 58
C1200 | Parameter data channel 58
C1201 | CAN communication time-out 59
C1202 | Time limit for finding nodes 59
C1203 | Retries 59
C1209 | Read out CAN baud rate 60
C1210 | IP address 60
C1211 | Subnet mask 61
C1214 | MAC address 61
C1215 | CAN time-out 61
C1216 | User-specific device name 62
C1217 | Cycle time for CAN device monitoring 62
C1219 | Activation of CAN device monitoring 62
C1220 | CAN device monitoring 63
C1224 | Gateway address 63
C1227 | Delay time for search frames 64
C1228 | DHCP activation 64
C1229 | Activation of IP settings, device reset 64
C1230 | Current IP address (display) 65
C1231 | Current subnet mask (display) 65
C1232 | Current gateway address (display) 65
CAN baud rate (C0351) 55
CAN bus cable (specification) 22
CAN bus load (C0361) 58
CAN bus status (C0359) 57
CAN communication time-out (C1201) 59
CAN device monitoring (C1220) 63
CAN frame counter 58
CAN frame counter (C0360) 58
CAN node address 55
CAN reset node (C0358) 56
CAN time-out (C1215) 61
CANopen parameter channels 48
Codes 53
Codes of the inverter (access) 47
Colour code of the Ethernet cable 28
Commissioning 32
Commissioning with the Lenze "System bus configurator" 32
Commissioning with the web server 36
Communication media 14
Compatibility with CANopen 48
Completion of the configuration 35
Configuration completed 35
Configuring the communication module 33
Connecting the CAN bus 21
Connecting the Ethernet cable 26
Connection of Ethernet 26
Connection of the CAN bus 21
Connections 13
Conventions 7
Conventions used 7
Current gateway address (display) (C1232) 65
Current IP address (display) (C1230) 65
Current subnet mask (display) (C1231) 65
Cycle time for CAN device monitoring (C1217) 62
D
Data transfer 47
Data transfer via CAN 48
Data transfer via Ethernet 49
Delay time for search frames (C1227) 64
Detection of the baud rate 44
Device and application-specific safety instructions 11
Device protection 11
Device type (C0093) 53
Device type (I-1000) 66
DHCP activation (C1228) 64
Diagnostics 50
Dimensions 16
Dismounting 19
Displaying alarms and events 43
Document history 6
68 Lenze · EMF2180IB communication module (EthernetCAN) · Communication Manual · DMS 5.0 EN · 07/2014 · TD17
Page 69

Index
_ _ _ _ _ _ _ _ _ _ _ _ _ _ _ _ _ _ _ _ _ _ _ _ _ _ _ _ _ _ _ _ _ _ _ _ _ _ _ _ _ _ _ _ _ _ _ _ _ _ _ _ _ _ _ _ _ _ _ _ _ _ _ _
E
Electrical installation 20
E-mail to Lenze 70
Error: Cause and remedy 50
Error register (I-1001) 66
Ethernet cable (specification) 27
Ethernet cable specification 27
Ethernet cable, colour code 28
Ethernet cable, structure 27
Ethernet states 42
F
Feedback to Lenze 70
G
Gateway address (C1224) 63
General data 14
General safety instructions and application notes 10
I
I-1000 (Device type) 66
I-1001 (Error register) 66
I-1017 (Producer heartbeat time) 67
I-1018 (Identity object) 67
Identification 13
Identity object (I-1018) 67
Implemented CANopen objects 66
Indexing of codes 47
Initial switch-on 45
Installation 17
Installing/updating software 32
Interfaces 13
IP address (C1210) 60
L
Layout of the safety instructions 9
LED signalling at initital switch-on 45
LED signalling in compliance with DR303-3 46
LED status displays for Ethernet communication 52
LED status displays for the communication module and for CAN
communication
Load default setting (C0002) 53
50
M
MAC address (C1214) 61
Mechanical installation 18
N
Nameplate 13
Number of nodes 14
O
Operating conditions 14
P
Parameter data channel (C1200) 58
Parameter reference 53
Pin assignment 29
Producer heartbeat time (I-1017) 67
Product description 12
Protective insulation 15
R
Read out CAN baud rate (C1209) 60
Residual hazards 11
Retries (C1203) 59
S
Safety instructions 9, 10
Screenshots/application examples 5
Segment cable length 24
Signalling in compliance with DR303-3 46
Signalling of the LEDs at initital switch-on 45
Software ID (C0200) 54
Software ID (octet) (C0202) 54
Software version (C0099) 53
Specification of the CAN bus cable 22
Status displays for Ethernet communication 52
Status displays for the communication module and for CAN
communication
Status word (C0150) 54
Structure of the Ethernet cable 27
Structure of the safety instructions 9
Sub-D-plug connector (assignment) 22
Subnet mask (C1211) 61
System bus configurator 32
50
T
Target group 5
Technical data 14
Terminals 31
Terminology used 8
Time limit for finding nodes (C1202) 59
Total cable length 23
U
Use of repeaters 25
User-specific device name (C1216) 62
Using the communication module 12
V
Validity 5
Voltage supply 14, 30
Lenze · EMF2180IB communication module (EthernetCAN) · Communication Manual · DMS 5.0 EN · 07/2014 · TD17 69
Page 70

Your opinion is important to us
)(('%$&.
These instructions were created to the best of our knowledge and
belief to give you the best possible support for handling our product.
Perhaps we have not succeeded in achieving this objective in every
respect. If you have suggestions for improvement, please e-mail us
to:
feedback-docu@lenze.com
Thank you very much for your support.
Your Lenze documentation team
70
Page 71

EMF2180IB communication module (EthernetCAN) · Communication Manual · EDSEMF2180IB · 13466533 · DMS 5.0 EN · 07/2014 · TD17
Lenze Automation GmbH
Postfach 10 13 52, D-31763 Hameln
Hans-Lenze-Straße 1, D-31855 Aerzen
Germany
+49 5154 82-0
+49 5154 82-2800
lenze@lenze.com
www.lenze.com
Service
Lenze Service GmbH
Breslauer Straße 3, D-32699 Extertal
Germany
008000 24 46877 (24 h helpline)
+49 5154 82-1112
service@lenze.com
L
 Loading...