

Page 1

EDKMF2113
.>~@
L−force Communication
Montageanleitung
Mounting Instructions
Instructions de montage
INTERBUS
Ä.>~@ä
EMF2113IB
Kommunikationsmodul
Communication module
Module de communication
Page 2

Lesen Sie zuerst diese Anleitung und die Dokumentation zum Grundgerät,
bevor Sie mit den Arbeiten beginnen!
Beachten Sie die enthaltenen Sicherheitshinweise.
Please read these instructions and the documentation of the standard
device before you start working!
Observe the safety instructions given therein!
Lire le présent fascicule et la documentation relative à l’appareil de base
avant toute manipulation de l’équipement !
Respecter les consignes de sécurité fournies.
Page 3

2113IBU015
Page 4

Legende zur Abbildung auf der Ausklappseite
Pos. Beschreibung Ausführliche
Statusanzeige (grün) Spannungsversorgung
Statusanzeige (gelb) Kommunikation INTERBUS
Statusanzeige (rot/grün) des Antriebs
DIP−Schalter
l zur Konfiguration
– der Prozessdatenwörter
– der PCP−Datenwörter
– des ID−Codes
– der Übertragungsrate (Baudrate)
l zur Auswahl von Gerätesteuerung AIF−CTRL oder DRIVECOM−PROFIL21
INTERBUS−Ausgang (OUT), Sub−D−Buchsenleiste, 9−polig
INTERBUS−Eingang (IN), Sub−D−Stiftleiste, 9−polig
PE−Anschluss (nur bei 82XX)
Befestigungsschraube
Steckerleiste, Anschluss für externe Spannungsversorgung
Typenschild 5
0Abb. 0Tab. 0
Information
33
26
27
27
29
28
23
21
13
Tipp!
Dokumentationen und Software−Updates zu weiteren Lenze Produkten finden
Sie im Internet im Bereich "Services & Downloads" unter
http://www.Lenze.com
4
EDKMF2113 DE/EN/FR 5.1
Page 5

Informationen zur Gültigkeit
Diese Anleitung ist gültig für
ƒ Kommunikationsmodule EMF2113IB (INTERBUS) ab Version 1x.1x.
Diese Anleitung ist nur gültig zusammen mit der zugehörigen Dokumentation der für den
Einsatz zulässigen Grundgeräte.
Identifikation
L
Type
Id.-No.
Prod.-No.
Ser.-No.
E82AF000P0B201XX
Gerätereihe
Hardwarestand
Softwarestand
Bestellbezeichnung
EMF2113IB
Funktion
Das Kommunikationsmodul koppelt Lenze−Antriebsregler an das Kommunikationssystem
INTERBUS.
EDKMF2113 DE/EN/FR 5.1
99371BC013
33.2113IB 1x 1x
5
Page 6

Einsetzbarkeit
Das Kommunikationsmodul ist einsetzbar in Verbindung mit Grundgeräten ab folgenden
Typenschildbezeichnungen:
Version
Gerätetyp Ausführung
33.820X E./C. 2x. 1x. Vxxx 8201 − 8204
33.821X E./C. 2x. 2x. Vxxx 8211 − 8218
33.822X E. 1x. 1x. Vxxx 8221 − 8227
33.824X E./C. 1x. 1x. Vxxx 8241 − 8246
82EVxxxxxBxxxXX Vx 1x 8200 vector
82CVxxxxxBxxxXX Vx 1x 8200 vector, Cold plate
82DVxxxKxBxxxXX Vx 1x 8200 vector, thermisch sepa-
EPL 10200 E 1x 1x Drive PLC
33.93XX xE. 2x 1x Vxxx 9321 − 9332
33.938X xE. 1x 0x 9381 − 9383
33.93XX xC. 2x 1x Vxxx 9321 − 9332, Cold plate
33.93XX EI / ET 2x 1x Vxxx 9300 Servo PLC
33.93XX CI / CT 2x 1x Vxxx 9300 Servo PLC, Cold plate
1)
ECSxPxxxx4xxxxXX 1A 6.0 ECSxP (Posi and Shaft)
1)
ECSxSxxxx4xxxxXX 1A 6.0 ECSxS (Speed and Torque)
1)
ECSxAxxxx4xxxxXX 1A 2.3 ECSxA (Application)
1)
Grundgerät nicht einsetzbar mit DRIVECOM−Steuerung
HW SW
Variante Erläuterung / Hinweise
riert
6
EDKMF2113 DE/EN/FR 5.1
Page 7

Inhalt i
1 Sicherheitshinweise 8 . . . . . . . . . . . . . . . . . . . . . . . . . . . . . . . . . . . . . . . . . . . . . . . . . .
Verwendete Hinweise 8 . . . . . . . . . . . . . . . . . . . . . . . . . . . . . . . . . . . . . . . . . . . . . . . .
Restgefahren 9 . . . . . . . . . . . . . . . . . . . . . . . . . . . . . . . . . . . . . . . . . . . . . . . . . . . . . . .
2 Lieferumfang 10 . . . . . . . . . . . . . . . . . . . . . . . . . . . . . . . . . . . . . . . . . . . . . . . . . . . . . . .
3 Mechanische Installation 11 . . . . . . . . . . . . . . . . . . . . . . . . . . . . . . . . . . . . . . . . . . . . .
4 Elektrische Installation 12 . . . . . . . . . . . . . . . . . . . . . . . . . . . . . . . . . . . . . . . . . . . . . . .
EMV−gerechte Verdrahtung 12 . . . . . . . . . . . . . . . . . . . . . . . . . . . . . . . . . . . . . . . . . . .
DC−Spannungsversorgung 13 . . . . . . . . . . . . . . . . . . . . . . . . . . . . . . . . . . . . . . . . . . . .
Verdrahtung 16 . . . . . . . . . . . . . . . . . . . . . . . . . . . . . . . . . . . . . . . . . . . . . . . . . . . . . . . .
Verbindungsaufbau vom INTERBUS 20 . . . . . . . . . . . . . . . . . . . . . . . . . . . . . . . . . . . . .
Verbindungsaufbau zum INTERBUS 22 . . . . . . . . . . . . . . . . . . . . . . . . . . . . . . . . . . . . .
5 Inbetriebnahme 24 . . . . . . . . . . . . . . . . . . . . . . . . . . . . . . . . . . . . . . . . . . . . . . . . . . . . .
Vor dem ersten Einschalten 24 . . . . . . . . . . . . . . . . . . . . . . . . . . . . . . . . . . . . . . . . . . .
Einstellmöglichkeiten durch frontseitige DIP−Schalter 25 . . . . . . . . . . . . . . . . . . . . .
Einstellmöglichkeiten durch INTERBUS−Master 30 . . . . . . . . . . . . . . . . . . . . . . . . . . .
Übereinstimmung zum Feldbusmodul 2111 INTERBUS herstellen 31 . . . . . . . . . . .
Erstes Einschalten 32 . . . . . . . . . . . . . . . . . . . . . . . . . . . . . . . . . . . . . . . . . . . . . . . . . . .
Statusanzeige 33 . . . . . . . . . . . . . . . . . . . . . . . . . . . . . . . . . . . . . . . . . . . . . . . . . . . . . . .
6 Technische Daten 34 . . . . . . . . . . . . . . . . . . . . . . . . . . . . . . . . . . . . . . . . . . . . . . . . . . . .
Allgemeine Daten und Einsatzbedingungen 34 . . . . . . . . . . . . . . . . . . . . . . . . . . . .
Schutzisolierung 35 . . . . . . . . . . . . . . . . . . . . . . . . . . . . . . . . . . . . . . . . . . . . . . . . . . . . .
Abmessungen 38 . . . . . . . . . . . . . . . . . . . . . . . . . . . . . . . . . . . . . . . . . . . . . . . . . . . . . . .
EDKMF2113 DE/EN/FR 5.1
7
Page 8

1 Sicherheitshinweise
Verwendete Hinweise
1 Sicherheitshinweise
Verwendete Hinweise
Um auf Gefahren und wichtige Informationen hinzuweisen, werden in dieser Dokumentation folgende Piktogramme und Signalwörter verwendet:
Sicherheitshinweise
Aufbau der Sicherheitshinweise:
Gefahr!
(kennzeichnet die Art und die Schwere der Gefahr)
Hinweistext
(beschreibt die Gefahr und gibt Hinweise, wie sie vermieden werden kann)
Piktogramm und Signalwort Bedeutung
Gefahr von Personenschäden durch gefährliche elektrische Spannung
Gefahr!
Gefahr!
Stop!
Hinweis auf eine unmittelbar drohende Gefahr, die den
Tod oder schwere Verletzungen zur Folge haben kann,
wenn nicht die entsprechenden Maßnahmen getroffen
werden.
Gefahr von Personenschäden durch eine allgemeine Gefahrenquelle
Hinweis auf eine unmittelbar drohende Gefahr, die den
Tod oder schwere Verletzungen zur Folge haben kann,
wenn nicht die entsprechenden Maßnahmen getroffen
werden.
Gefahr von Sachschäden
Hinweis auf eine mögliche Gefahr, die Sachschäden zur
Folge haben kann, wenn nicht die entsprechenden Maßnahmen getroffen werden.
8
EDKMF2113 DE/EN/FR 5.1
Page 9

Anwendungshinweise
Piktogramm und Signalwort Bedeutung
Sicherheitshinweise
Restgefahren
1
Hinweis!
Tipp!
Restgefahren
Wichtiger Hinweis für die störungsfreie Funktion
Nützlicher Tipp für die einfache Handhabung
Verweis auf andere Dokumentation
Gefahr!
Beachten Sie die in den Anleitungen zum Grundgerät enthaltenen
Sicherheitshinweise und Restgefahren.
EDKMF2113 DE/EN/FR 5.1
9
Page 10

2 Lieferumfang
2 Lieferumfang
Drivecom
Length
Baud
PCP
PD
OPEN
12345678
OUT
IN
Pos. Lieferumfang siehe
Kommunikationsmodul EMF2113IB
Montageanleitung
Steckerleiste mit Schraubanschluss, 2−polig
2113
Bus
Drive
L
INTERBUS
24V DC
+
_
8
2113IBS001, E82ZAFX021
14
10
EDKMF2113 DE/EN/FR 5.1
Page 11

Mechanische Installation 3
3 Mechanische Installation
2102LEC014
Abb. 1 Kommunikationsmodul aufstecken
ƒ Stecken Sie das Kommunikationsmodul auf das Grundgerät (hier: 8200 vector).
ƒ Schrauben Sie das Kommunikationsmodul mit der Befestigungsschraube auf dem
Grundgerät fest, um eine gute PE−Verbindung sicher zu stellen.
Hinweis!
Zur internen Versorgung des Kommunikationsmoduls durch den
Frequenzumrichter 8200 vector muss der Jumper in der Schnittstellenöffnung
(siehe Abb. oben) angepasst werden.
Beachten Sie die Hinweise (15).
EDKMF2113 DE/EN/FR 5.1
11
Page 12

4 Elektrische Installation
EMV−gerechte Verdrahtung
4 Elektrische Installation
EMV−gerechte Verdrahtung
Für eine EMV−gerechte Verdrahtung beachten Sie bitte folgende Punkte:
Hinweis!
ƒ Bei den Antriebsreglern 820X und 821X können elektromagnetische
Einstrahlungen die Kommunikation beeinträchtigen. Eine sichere
Kommunikation wird durch ein zusätzliches Kabel zwischen dem
PE−Anschluss des Grundgerätes und dem PE−Anschluss des
Kommunikationsmoduls ermöglicht.
Bei den übrigen Antriebsreglern, die zum Einsatz mit dem
Kommunikationsmodul zulässig sind, ist dies nicht notwendig.
ƒ Zur Vermeidung von Potentialdifferenzen zwischen den
Kommunikationsteilnehmern eine Ausgleichsleitung mit großem
Querschnitt einsetzen (Bezug: PE).
ƒ Steuerleitungen getrennt von Motorleitungen verlegen.
ƒ Legen Sie die Schirme der Datenleitungen beidseitig auf.
ƒ Beachten Sie die weiteren Hinweise zur EMV−gerechten Verdrahtung in
den Anleitungen des Grundgerätes.
12
EDKMF2113 DE/EN/FR 5.1
Page 13

Elektrische Installation
DC−Spannungsversorgung
DC−Spannungsversorgung
Externe Spannungsversorgung
Versorgen Sie bei Bedarf das Kommunikationsmodul über die zweipolige Steckerleiste mit
einer separaten Versorgungsspannung.
Verwenden Sie bei größeren Entfernungen zwischen den Schaltschränken in jedem Schaltschrank ein separates Netzteil.
Steckerleiste Erläuterung
Anschluss "+" U = 24VDC (21,6 V − 0% ... 26,4 V + 0 %)
Anschluss "−" Bezugspotential für externe Spannungsversorgung
Antriebsregler Externe Spannungsversorgung
820X Immer erforderlich.
821X / 822X / 824X /
93XX / 9300 Servo
PLC / Drive PLC /
ECSxS / ECSxA
8200 vector Siehe Hinweise unter "Interne Spannungsversorgung" 15
I = 120 mA
Nur dann notwendig, wenn das Netz der entsprechenden Antriebsregler
abgeschaltet werden soll, die Kommunikation aber nicht unterbrochen werden darf.
Bei diesen Grundgeräten können Sie die interne Spannungsversorgung verwenden.
4
EDKMF2113 DE/EN/FR 5.1
13
Page 14

4 Elektrische Installation
DC−Spannungsversorgung
Daten der Anschlussklemmen
Bereich Werte
Elektrischer Anschluss Steckerleiste mit Schraubanschluss
Anschlussmöglichkeiten
Anzugsmoment 0.5 ... 0.6 Nm (4.4 ... 5.3 lb−in)
Abisolierlänge 6 mm
starr:
flexibel:
1.5 mm
ohne Aderendhülse
1.5 mm
mit Aderendhülse, ohne Kunststoffhülse
1.5 mm
mit Aderendhülse, mit Kunststoffhülse
1.5 mm
2
(AWG 16)
2
(AWG 16)
2
(AWG 16)
2
(AWG 16)
14
EDKMF2113 DE/EN/FR 5.1
Page 15

Elektrische Installation
DC−Spannungsversorgung
Interne Spannungsversorgung
Hinweis!
Die Vorgabe der internen Spannungsversorgung ist bei Grundgeräten mit
erweiterter AIF−Schnittstellenöffnung (z. B. Frontseite 8200 vector) gegeben.
Die in der Grafik grau hervorgehobene Fläche kennzeichnet die
Jumper−Position.
ƒ Im Auslieferungszustand des Grundgerätes werden diese nicht intern
versorgt.
ƒ Zur internen Spannungsversorgung platzieren Sie den Jumper auf die
unten angegebene Position.
Bei allen anderen Gerätereihen (9300, ECS) ist eine Spannungsversorgung vom
Grundgerät immer vorhanden.
(Nur externe Spannungsversorgung möglich.)
Auslieferungszustand
Interne Spannungsversorgung
4
EDKMF2113 DE/EN/FR 5.1
15
Page 16

4 Elektrische Installation
Verdrahtung
Verdrahtung
Verdrahtung mit einem Leitrechner
Hinweis!
Sie müssen eine zusätzliche Potentialtrennung installieren, wenn
ƒ ein Antriebsregler 820X oder 821X mit einem INTERBUS−Master verbunden
wird und
ƒ eine sichere Potentialtrennung (verstärkte Isolierung nach EN61800−5−1)
notwendig ist.
Verwenden Sie z .B. eine Busklemme oder eine Anschaltbaugruppe für den
INTERBUS−Master mit einer zusätzlichen Potentialtrennung (siehe jeweilige
Herstellerangaben).
Der ankommende Bus (IN) ist von der Versorgungsspannung und dem
abgehenden Bus (OUT) potentialgetrennt.
Die Versorgungsspannung liegt auf demselben Potential wie der abgehende
Datenbus (OUT).
ƒ Das Bussystem ist als Ring auszuführen.
ƒ Hin− und Rückleitungen werden im gleichen Buskabel aufgenommen.
ƒ Der Ring führt vom INTERBUS−Master über sämtliche Busteilnehmer wieder zurück.
16
EDKMF2113 DE/EN/FR 5.1
Page 17
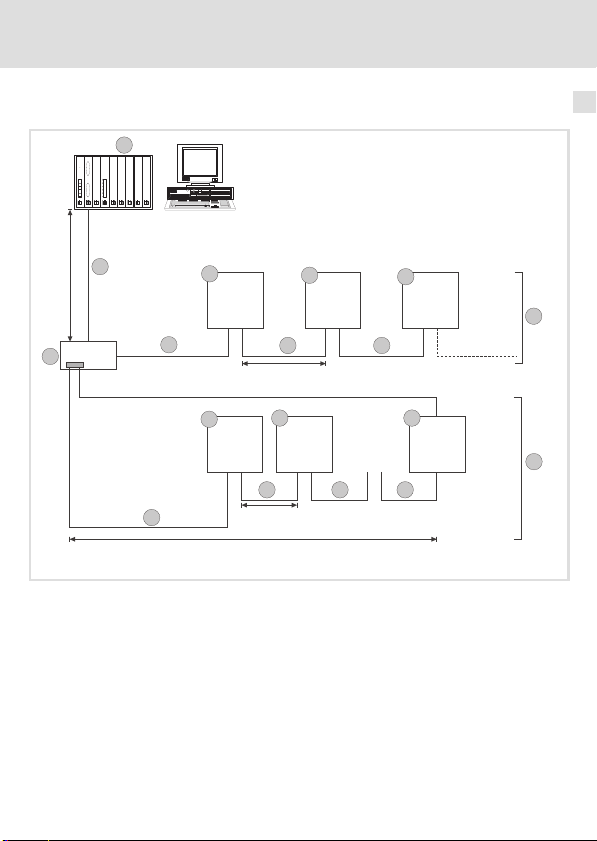
Verdrahtungsbeispiel
1
Elektrische Installation
Verdrahtung
4
3.2
£ 400 m
2
4.2
3.2
3.1
8200 vector
+
2113
4.1
82XX
+
2112
4.2 4.24.2
£ 20 m
INTERBUS-Loop 200 m£
£ 400 m
93XX
2112
3.1
93XX
+
2113
+
3.23.2
3.1
82XX
2111
4.14.1
8200 vector
Abb. 2 Verdrahtungsbeispiel, INTERBUS (Übertragungsrate 500 kBit/s)
EDKMF2113 DE/EN/FR 5.1
+
2112
3
+
4
2131IBU003
17
Page 18

4 Elektrische Installation
Verdrahtung
Pos. Element Erläuterung
1 INTERBUS−Master mit
Anschaltbaugruppe
2 INTERBUS−Loop−Bus-
klemme
3 Fernbus
Abb. 2 Pos. 3
3.1 Fernbus−Modul Busteilnehmer im Fernbus, z. B. Lenze−Antriebsregler mit INTERBUS−
3.2 Fernbus−Kabel Verbindet die INTERBUS−Master−Anschaltgruppe mit den Busklem-
4 INTERBUS−Loop, Peri-
pheriebus
Abb. 2 Pos. 4
4.1 INTERBUS−Loop−Modul Busteilnehmer im INTERBUS−Loop; z. B. Lenze−Antriebsregler mit
4.2 INTERBUS−Loop−Kabel Verbindung innerhalb des Loop
Das gesamte Bussystem ist ein Master−Slave−System, d. h. ein INTERBUS−Master ist mit mehreren Feldgeräten (Slaves) verbunden.
Die Busklemme koppelt Fern− und Peripheriebus.
Im Fernbus sind Verbindungen möglich zwischen
l der INTERBUS−Master−Anschaltbaugruppe und der ersten Bus-
klemme oder dem ersten Kommunikationsmodul 2113
l Busklemme und Kommunikationsmodul 2113
l zwei Kommunikationsmodule 2113
Modul (Slave). Hier sind keine Busklemmen zur Vernetzung erforderlich.
men und/oder den Fernbus−Modulen.
Verbindung innerhalb einer Peripheriebus−Station
Eine Peripheriebus−Station besteht aus:
l einer Busklemme (Abb. 2 Pos. 2)
l bis zu acht Peripheriebus−Modulen (Abb. 2 Pos. 3)
INTERBUS−Loop−Modul 2112
18
EDKMF2113 DE/EN/FR 5.1
Page 19

Elektrische Installation
Verdrahtung
Eigenschaften der Verdrahtung
Kommunikationsmedium
Netzwerk−Topologie Ring
Maximale Anzahl An-
triebsregler
Übertragungsrate
Spezifikation des Übertragungskabels
Allgemeine Eigenschaften
Kabeltyp Meterware,
Leiteranzahl 3 × 2, paarig verseilt, mit gemeinsamer Abschirmung
Leiterquerschnitt > 0.2 mm
DC−Leitungswiderstand
Impedanz (charakteristisch)
Kapazitätsbelag < 60 nF/km (f = 800 Hz)
RS485
Abhängig vom INTERBUS−Master (z. B. Phoenix Contact G4−Master).
Für folgende Angaben gilt in Abhängigkeit mit/ohne PCP−Kommunikation
der jeweils kleinere Wert:
l mit PCP−Kommunikation:
l ohne PCP−Kommunikation:
l 500 kBit/s bei 400 m Abstand zwischen benachbarten Teilnehmern
l 2 MBit/s bei 150 m Abstand zwischen benachbarten Teilnehmern
(z. B. PHOENIX CONTACT: IBS RBC Meter−T, Best.−Nr.
28 06 28 6)
< 96 /km
l 120 20 % (f = 64 kHz)
l 100 15 (f > 1 MHz)
62 oder
256 / Anzahl PZD
2
4
EDKMF2113 DE/EN/FR 5.1
19
Page 20

4 Elektrische Installation
Verbindungsaufbau vom INTERBUS
Verbindungsaufbau vom INTERBUS
2113IBU010
20
EDKMF2113 DE/EN/FR 5.1
Page 21
Elektrische Installation
4
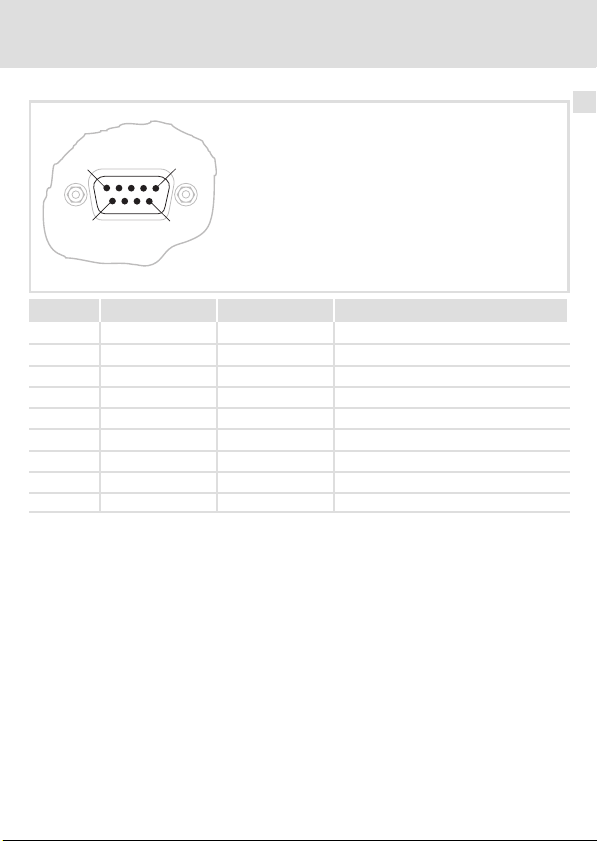
Verbindungsaufbau vom INTERBUS
1
6
IN
Pin Bezeichnung Ein−/Ausgang Beschreibung
1 DO1 Eingang RS485: DO1 nicht invertiert
2 DI1 Ausgang RS485: DI1 nicht invertiert
3 GND Bezugspotenzial
4 frei nicht belegt
5 Vcc5 Ausgang 5 V DC
6 /DO1 Eingang RS485: DO1 invertiert
7 /DI1 Ausgang RS485: DI1 invertiert
8 Vcc5 Ausgang 5 V DC
9 frei nicht belegt
5
9
2113IBU012
EDKMF2113 DE/EN/FR 5.1
21
Page 22

4 Elektrische Installation
Verbindungsaufbau zum INTERBUS
Verbindungsaufbau zum INTERBUS
2113IBU014
22
EDKMF2113 DE/EN/FR 5.1
Page 23

Elektrische Installation
4
Verbindungsaufbau zum INTERBUS
5
9
OUT
Pin Bezeichnung Ein−/Ausgang Beschreibung
1 DO2 Ausgang RS485: DO2 nicht invertiert
2 DI2 Eingang RS485: DI2 nicht invertiert
3
4
5 Vcc5 Ausgang 5 V DC
6 /DO2 Ausgang RS485: DO2 invertiert
7 /DI2 Eingang RS485: DI2 invertiert
8 Vcc5 Ausgang 5 V DC
9 RBST Melde−Eingang Verbindung zum abgehenden INTERBUS
GND
GND
1
6
2113IBU011
Bezugspotenzial
gesteckt.
EDKMF2113 DE/EN/FR 5.1
23
Page 24

5 Inbetriebnahme
Vor dem ersten Einschalten
5 Inbetriebnahme
Vor dem ersten Einschalten
Stop!
Bevor Sie das Grundgerät mit Feldbusmodul erstmalig im INTERBUS−Netzwerk
einschalten, überprüfen Sie die gesamte Verdrahtung auf Vollständigkeit,
Kurzschluss und Erdschluss.
24
EDKMF2113 DE/EN/FR 5.1
Page 25

Einstellmöglichkeiten durch frontseitige DIP−Schalter
Einstellmöglichkeiten durch frontseitige DIP−Schalter
Hinweis!
Verbleiben die Schalter S1 ... S8 in der Lenze−Einstellung OFF, werden beim
Einschalten die Konfigurationen aus den Codestellen C1910, C1911 und C1912
aktiv.
Wird einer oder werden mehrere der Schalter S1 ... S7 in Stellung ON geschaltet,
ƒ sind alle Schalterstellungen gültig!
ƒ müssen eingestellt werden:
– Anzahl der Prozessdaten−Wörter (PZD),
– Anzahl der Parameterdaten−Wörter (PCP) und
– Gerätesteuerung AIF−CTRL / DRIVECOM−Steuerung
Geänderte Einstellungen werden aktiv, indem die die Spannungsversorgung des Kommunikationsmoduls aus− und anschließend wieder eingeschaltet wird.
Die Datenwortsumme (PZD + PCP) darf maximal 10 Wörter betragen.
Beachten Sie, dass nur die in nachfolgenden Tabellen dargestellten Schalterkombinatio-
nen definierte Zustände sind. Bei unzulässigen Einstellungen blinkt die gelbe LED auf der
Frontseite des Kommunikationsmoduls mit f = 8Hz.
Inbetriebnahme
5
EDKMF2113 DE/EN/FR 5.1
25
Page 26

5 Inbetriebnahme
Einstellmöglichkeiten durch frontseitige DIP−Schalter
Anzahl der Prozessdaten−Wörter (PZD) einstellen
Hinweis!
ƒ Unzulässige Einstellungen werden durch die gelbe LED (Kommunikation)
signalisiert (33).
ƒ Anzeige der aktuellen SchalterstellungS1...S4 für Anzahl der
Prozessdaten−Wörter (PZD) durch Codestelle C1915 möglich.
Length
PD
OPEN
12345678
Schalter
PZD
1 OFF OFF OFF ON
2 OFF OFF ON OFF
3 OFF OFF ON ON
4 OFF ON OFF OFF
5 OFF ON OFF ON
6 OFF ON ON OFF
7 OFF ON ON ON
8 ON OFF OFF OFF
9 ON OFF OFF ON 1
10 ON OFF ON OFF 0
S1 S2 S3 S4
OFF
ON
Max. Anzahl Parameterdaten−
Wörter (PCP)
2113IBU005
4
2
26
EDKMF2113 DE/EN/FR 5.1
Page 27

Einstellmöglichkeiten durch frontseitige DIP−Schalter
Anzahl der Parameterdaten−Wörter (PCP) einstellen
Hinweis!
Unzulässige Einstellungen werden durch die gelbe LED (Kommunikation)
signalisiert (33).
Anzeige der aktuellen Schalterstellung S5/S6 für Anzahl der
Parameterdaten−Wörter (PCP) durch Codestelle C1917 möglich.
Length
Inbetriebnahme
PCP
OPEN
12345678
Schalter
PCP S5 S6
0 OFF OFF 10 0x03
1 OFF ON 9 0xE3
2 ON OFF 8 0xE0
4 ON ON 6 0xE1
Max. Anzahl Prozessdaten−
Wörter (PD)
OFF
ON
5
2113IBU005
ID−Code
EDKMF2113 DE/EN/FR 5.1
27
Page 28

5 Inbetriebnahme
Einstellmöglichkeiten durch frontseitige DIP−Schalter
Gerätesteuerung AIF−CTRL oder DRIVECOM−Steuerung auswählen
Hinweis!
Anzeige der aktuellen Schalterstellung S7 durch Codestelle C1916 möglich.
Drivecom
OFF
OPEN
1234567 8
Schalter S7 Erläuterung
OFF mit Gerätesteuerung AIF−CTRL
ON mit DRIVECOM−Steuerung
ON
2113IBU005
28
EDKMF2113 DE/EN/FR 5.1
Page 29

Einstellmöglichkeiten durch frontseitige DIP−Schalter
Übertragungsrate einstellen
Hinweis!
Die Übertragungsrate kann ausschließlich über den Schalter S8 eingestellt
werden.
Baud
Inbetriebnahme
5
OPEN
12345678
Schalter S8 Übertragungsrate Maximale Leitungslänge zwischen benachbarten Teilneh-
OFF 500 kBit/s 400 m
ON 2 MBit/s 150 m
EDKMF2113 DE/EN/FR 5.1
mern
OFF
ON
2113IBU005
29
Page 30

5 Inbetriebnahme
Einstellmöglichkeiten durch INTERBUS−Master
Einstellmöglichkeiten durch INTERBUS−Master
Hinweis!
Verbleiben die Schalter (S1 ... S8) in der Lenze−Einstellung OFF, werden beim
Einschalten die Konfigurationen aus den Codestellen C1910, C1911 und C1912
aktiv.
Geänderte Einstellungen werden aktiv, indem die die Spannungsversorgung des Kommunikationsmoduls aus− und anschließend wieder eingeschaltet wird.
Beachten Sie weiterhin:
ƒ Unzulässigen Einstellungen werden durch die gelbe LED (Kommunikation)
signalisiert (33).
ƒ Die Datenwortsumme (PZD + PCP) darf maximal 10 Wörter betragen.
ƒ Indexermittlung: 24575 − Lenze−Codestellennummer (Cxxxx)
Codestellen zur Konfiguration
Codestelle Werte Erläuterung
C1910 2 ... 20 (1 ... 10 Wörter) Anzahl der Prozessdaten−Bytes
C1911
C1912
0: Gerätesteuerung AIF−CTRL
1: DRIVECOM−Steuerung
Anzahl Parameterdaten−Wörter (PCP)
0 0x03
1 0xE3
2 0xE0
4 0xE1
ID−Code
(2Prozessdaten−Bytes=1Prozessdaten−
Wort)
Betrieb mit Gerätesteuerung AIF−CTRL
oder
Betrieb mit DRIVECOM−Profil 21
Anzahl Parameterdaten−Wörter (PCP)
30
EDKMF2113 DE/EN/FR 5.1
Page 31

Übereinstimmung zum Feldbusmodul 2111 INTERBUS herstellen
Übereinstimmung zum Feldbusmodul 2111 INTERBUS herstellen
Hinweis!
Das Verhalten entspricht dem des Kommunikationsmoduls EMF2111IB
(INTERBUS), solange die folgenden Lenze−Einstellungen der Schalter und
Codestellen nicht verändert werden:
ƒ Schalter S1 ... S7 = OFF
ƒ C1910=4
ƒ C1911=1
ƒ C1912=1
Drivecom
Length
Inbetriebnahme
Length
PD
OPEN
12345678
S1 ... S8 Erläuterung
OFF Lenze−Einstellung der Schalter
PCP
Baud
OFF
ON
5
2113IBU005
EDKMF2113 DE/EN/FR 5.1
31
Page 32

5 Inbetriebnahme
Erstes Einschalten
Erstes Einschalten
1. Das Kommunikationsmodul muss auf dem Antriebsregler gesteckt sein (11).
2. Antriebsregler und ggf. die separate Spannungsversorgung des
Kommunikationsmoduls einschalten (13).
3. Signalisierung am Kommunikationsmodul prüfen:
– Die grüne Bus−LED signalisiert den Betriebsstatus entsprechend der Beschreibung
Pos. (33).
– Die gelbe Bus−LED signalisiert den Kommunikationsstatus ensprechend der
Beschreibung Pos. (33).
– Sehr schnelles Blinken (8 Hz) ist die Reaktion der gelben Bus−LED auf unzulässige
Einstellungen.
4. Nun können Sie mit dem Antrieb kommunizieren.
Hinweis!
PCP−Kommunikation
ƒ Bei einer PCP−Kommunikation können Sie erst dann auf die Parameter des
Antriebsreglers zugreifen, wenn Sie den PCP−Dienst "Initiate" durchführen.
Danach können Sie mit den PCP−Diensten "Read" und "Write" auf die
Parameter des Antriebsreglers zugreifen.
ƒ Eine ausführliche Beschreibung finden Sie im Kommunikationshandbuch
INTERBUS.
LED’s auf der Frontseite des Kommunikationsmoduls
Beachten Sie die Hinweise zur Statusanzeige (33).
32
EDKMF2113 DE/EN/FR 5.1
Page 33

Statusanzeige
LED
Pos. Farbe Zustand
grün
an Kommunikationsmodul ist mit Spannung versorgt und hat Ver-
aus Kommunikationsmodul ist nicht mit Spannung versorgt. Grund-
blinkt Kommunikationsmodul ist mit Spannung versorgt, hat aber
gelb
an Kommunikationsmodul initialisiert,
aus Kommunikationsmodul ist noch nicht initialisiert.
blinkt Aktive INTERBUS−Kommunikation
rot /
grün
Inbetriebnahme
Statusanzeige
Beschreibung
bindung zum Grundgerät.
gerät oder externe Spannungsversorgung ist ausgeschaltet.
(noch) keine Verbindung zum Grundgerät, weil
l das Kommunikationsmodul nicht korrekt auf den Grundgerät
gesteckt wurde.
l der Datentransfer vom/zum Grundgerät noch nicht möglich
ist (z.B. Grundgerät in der Initialisierungsphase).
inaktive INTERBUS−Kommunikation vom Master
l LANGSAM (1 Hz): Prozessdaten und PCP−Kommunikation
l SCHNELL (4 Hz): nur Prozessdaten
l SEHR SCHNELL (8 Hz)
– Kennzeichnet unzulässige Einstellungen:
Datenwortsumme: PD + PCP > 10 oder Anzahl Prozessdaten−Wörter: PD=0.
– Das Kommunikationsmodul arbeitet intern mit folgenden
Werten weiter: PD = 2 und PCP = 1
Rote und grüne Drive−LED kennzeichnet den Betriebszustand des
Grundgerätes 82XX, 8200 vector, 93XX, Servo PLC 9300 und Drive
PLC (siehe Betriebsanleitung des Grundgerätes)
5
EDKMF2113 DE/EN/FR 5.1
33
Page 34

6 Technische Daten
Allgemeine Daten und Einsatzbedingungen
6 Technische Daten
Allgemeine Daten und Einsatzbedingungen
Bereich Werte
Kommunikationsmedien RS485
Netzwerk−Topologie Ring
Kommunikations−Profil PCP 2.0
Antriebs−Profil DRIVECOM Profil 21
INTERBUS−Teilnehmer Slave
Übertragungsrate
l 500 kBit/s
l 2 MBit/s
Externe Spannungsversorgung
Anschluss "+" U = 24VDC (21,6 V − 0% ... 26,4 V + 0 %)
Anschluss "−" Bezugspotential für externe Spannungsversorgung
Umgebungsbedingungen
Klimatische Bedingungen
Lagerung
Transport 2 K3 nach IEC/EN 60721−3−2 − 25 °C ... + 70 °C
Verschmutzungsgrad 2 nach IEC/EN 61800−5−1
Schutzart IP20
34
Werte
I = 120 mA
1 K3 nach IEC/EN 60721−3−1 − 25 °C ... + 60 °C
Betrieb 3 K3 nach IEC/EN 60721−3−3 0 °C ... + 55 °C
EDKMF2113 DE/EN/FR 5.1
Page 35

Technische Daten
Schutzisolierung
Schutzisolierung
Isolierung zwischen ankommenden Bus und ... Art der Isolierung (nach EN 61800−5−1)
l Bezugserde / PE
l externer Versorgung
l Leistungsteil
– 820X / 821X Basisisolierung
– 822X / 8200 vector verstärkte Isolierung
– 93XX / 9300 Servo PLC verstärkte Isolierung
– Servosystem ECS verstärkte Isolierung
l Steuerklemmen
– 820X / 8200 vector Betriebsisolierung
– 821X Betriebsisolierung
– 822X Basisisolierung
– Drive PLC Basisisolierung
– 93XX / 9300 Servo PLC Basisisolierung
– Servosystem ECS verstärkte Isolierung
l abgehenden Bus (OUT)
Betriebsisolierung
Betriebsisolierung
keine Potentialtrennung
6
EDKMF2113 DE/EN/FR 5.1
35
Page 36

6 Technische Daten
Schutzisolierung
Isolierung zwischen abgehenden Bus und ... Art der Isolierung (nach EN 61800−5−1)
l Bezugserde / PE
l externer Versorgung
l Leistungsteil
– 820X / 821X Basisisolierung
– 822X / 8200 vector verstärkte Isolierung
– 93XX / 9300 Servo PLC verstärkte Isolierung
– Servosystem ECS verstärkte Isolierung
l Steuerklemmen
– 820X / 8200 vector (bei interner Versorgung) keine Potentialtrennung
– 8200 vector (bei externer Versorgung) Basisisolierung
– 821X Betriebsisolierung
– 822X Basisisolierung
– Drive PLC Basisisolierung
– 93XX / 9300 Servo PLC Basisisolierung
– Servosystem ECS verstärkte Isolierung
l ankommenden Bus (IN)
Betriebsisolierung
keine Potentialtrennung
Potentialtrennung
36
EDKMF2113 DE/EN/FR 5.1
Page 37

Technische Daten
Schutzisolierung
Protokoll−Daten
Bereich Werte
Maximale Anzahl der Antriebsregler
Prozessdaten−Wörter (PD)
Parameterdaten−Wörter (PCP) 0, 1, 2, 4 Lenze−Einstellung: 1 Wort
Maximale Anzahl der Datenwörter
INTERBUS−Kennung
(Modul−ID)
Maximale PDU−Länge 64 Byte
Unterstützte PCP−Dienste Initiate, Abort, Status, Identify, Get−0V−long, Read, Write
Abhängig vom INTERBUS−Master (z. B. Phoenix Contact G4−Master).
Für folgende Angaben gilt in Abhängigkeit mit/ohne PCP−Kommunikation der jeweils kleinere Wert:
l mit PCP−Kommunikation:
l ohne PCP−Kommunikation:
1 ... 10 (einstellbar) Lenze−Einstellung: 2 Wörter
Die Datenwortsumme (PD + PCP) darf maximal 10 Wörter betragen.
Baugruppenkennung für eingestellte Länge
3 = 0x03 PCP, 0 Wörter
227 = 0xE3 PCP, 1 Wörter
224 = 0xE0 PCP, 2 Wörter
225 = 0xE1 PCP, 4 Wörter
62 oder
256/Anzahl PD
6
EDKMF2113 DE/EN/FR 5.1
37
Page 38

6 Technische Daten
Abmessungen
Abmessungen
Drivecom
Length
Baud
PCP
PD
OPEN
12345678
75
OUT
IN
2113
Bus
Drive
L
INTERBUS
24V DC
+
_
38
61
alle Maße in mm
31
41
2113IBU013
EDKMF2113 DE/EN/FR 5.1
Page 39

Technische Daten
Abmessungen
6
EDKMF2113 DE/EN/FR 5.1
39
Page 40

Legend for fold−out page
Pos. Description Detailed
Status display (green) for voltage supply
Status display (yellow ) for INTERBUS communication
Status display (red/green) of drive
DIP switches
l for configuration
– of process data words
– of PCP data words
– of ID code
– of baud rate
l for selecting the AIF−CTRL device control or DRIVECOM profile 21
INTERBUS output (OUT), Sub−D socket connector, 9−pole
INTERBUS input (IN), Sub−D pin connector, 9−pole
PE connection (only with 82XX)
Fixing screw
Plug connector, connection for external voltage supply
Nameplate 41
0Fig. 0Tab. 0
information
69
62
63
63
65
64
59
57
49
Tip!
Documentation and software updates for further Lenze products can be found
on the Internet in the "Services & Downloads" area under
http://www.Lenze.com
40
EDKMF2113 DE/EN/FR 5.1
Page 41

Validity information
These instructions are valid for
ƒ EMF2113IB communication modules (INTERBUS) as of version 1x.1x.
These instructions are only valid together with the documentation for the standard devices
permitted for the application.
Identification
L
Type
Id.-No.
Prod.-No.
Ser.-No.
E82AF000P0B201XX
Series
Hardware version
Software version
Order designation
EMF2113IB
Function
The communication module connects Lenze controllers to the INTERBUS communication
system.
EDKMF2113 DE/EN/FR 5.1
99371BC013
33.2113IB 1x 1x
41
Page 42

Application range
The communication module can be used together with basic devices with the following
nameplate data:
Version
Device type Design
33.820x E./C. 2x. 1x. Vxxx 8201 − 8204
33.821x E./C. 2x. 2x. Vxxx 8211 − 8218
33.822x E. 1x. 1x. Vxxx 8221 − 8227
33.824x E./C. 1x. 1x. Vxxx 8241 − 8246
82EVxxxxxBxxxXX Vx 1x 8200 vector
82CVxxxxxBxxxXX Vx 1x 8200 vector, cold plate
82DVxxxKxBxxxXX Vx 1x 8200 vector, thermally
EPL 10200 E 1x 1x Drive PLC
33.93XX xE. 2x 1x Vxxx 9321 − 9332
33.938x xE. 1x 0x 9381 − 9383
33.93XX xC. 2x 1x Vxxx 9321 − 9332, cold plate
33.93XX EI / ET 2x 1x Vxxx 9300 Servo PLC
33.93XX CI / CT 2x 1x Vxxx 9300 Servo PLC, cold plate
1)
ECSxPxxxx4xxxxXX 1A 6.0 ECSxP (Posi and Shaft)
1)
ECSxSxxxx4xxxxXX 1A 6.0 ECSxS (Speed and Torque)
1)
ECSxAxxxx4xxxxXX 1A 2.3 ECSxA (Application)
1)
Basic device cannot be used with DRIVECOM control
HW SW
Variant Explanation / notes
separated
42
EDKMF2113 DE/EN/FR 5.1
Page 43

Contents i
1 Safety instructions 44 . . . . . . . . . . . . . . . . . . . . . . . . . . . . . . . . . . . . . . . . . . . . . . . . . . .
Notes used 44 . . . . . . . . . . . . . . . . . . . . . . . . . . . . . . . . . . . . . . . . . . . . . . . . . . . . . . . . .
Residual hazards 45 . . . . . . . . . . . . . . . . . . . . . . . . . . . . . . . . . . . . . . . . . . . . . . . . . . . . .
2 Scope of supply 46 . . . . . . . . . . . . . . . . . . . . . . . . . . . . . . . . . . . . . . . . . . . . . . . . . . . . .
3 Mechanical installation 47 . . . . . . . . . . . . . . . . . . . . . . . . . . . . . . . . . . . . . . . . . . . . . . .
4 Electrical installation 48 . . . . . . . . . . . . . . . . . . . . . . . . . . . . . . . . . . . . . . . . . . . . . . . . .
Wiring according to EMC 48 . . . . . . . . . . . . . . . . . . . . . . . . . . . . . . . . . . . . . . . . . . . . . .
DC voltage supply 49 . . . . . . . . . . . . . . . . . . . . . . . . . . . . . . . . . . . . . . . . . . . . . . . . . . .
Wiring 52 . . . . . . . . . . . . . . . . . . . . . . . . . . . . . . . . . . . . . . . . . . . . . . . . . . . . . . . . . . . . .
Connection from INTERBUS 56 . . . . . . . . . . . . . . . . . . . . . . . . . . . . . . . . . . . . . . . . . . .
Connection to INTERBUS 58 . . . . . . . . . . . . . . . . . . . . . . . . . . . . . . . . . . . . . . . . . . . . . .
5 Commissioning 60 . . . . . . . . . . . . . . . . . . . . . . . . . . . . . . . . . . . . . . . . . . . . . . . . . . . . .
Before switching on 60 . . . . . . . . . . . . . . . . . . . . . . . . . . . . . . . . . . . . . . . . . . . . . . . . .
Possible settings via the front DIP switches 61 . . . . . . . . . . . . . . . . . . . . . . . . . . . . . .
Possible settings by INTERBUS master 66 . . . . . . . . . . . . . . . . . . . . . . . . . . . . . . . . . . .
Conformity with 2111 INTERBUS fieldbus module 67 . . . . . . . . . . . . . . . . . . . . . . . . .
Initial switch−on 68 . . . . . . . . . . . . . . . . . . . . . . . . . . . . . . . . . . . . . . . . . . . . . . . . . . . . .
Status display 69 . . . . . . . . . . . . . . . . . . . . . . . . . . . . . . . . . . . . . . . . . . . . . . . . . . . . . . .
6 Technical data 70 . . . . . . . . . . . . . . . . . . . . . . . . . . . . . . . . . . . . . . . . . . . . . . . . . . . . . . .
General data and operating conditions 70 . . . . . . . . . . . . . . . . . . . . . . . . . . . . . . . .
Protective insulation 71 . . . . . . . . . . . . . . . . . . . . . . . . . . . . . . . . . . . . . . . . . . . . . . . . .
Dimensions 74 . . . . . . . . . . . . . . . . . . . . . . . . . . . . . . . . . . . . . . . . . . . . . . . . . . . . . . . . .
EDKMF2113 DE/EN/FR 5.1
43
Page 44

1 Safety instructions
Notes used
1 Safety instructions
Notes used
The following pictographs and signal words are used in this documentation to indicate
dangers and important information:
Safety instructions
Structure of safety instructions:
Danger!
(characterises the type and severity of danger)
Note
(describes the danger and gives information about how to prevent dangerous
situations)
Pictograph and signal word Meaning
Danger of personal injury through dangerous electrical
Danger!
Danger!
Stop!
voltage.
Reference to an imminent danger that may result in
death or serious personal injury if the corresponding
measures are not taken.
Danger of personal injury through a general source of
danger.
Reference to an imminent danger that may result in
death or serious personal injury if the corresponding
measures are not taken.
Danger of property damage.
Reference to a possible danger that may result in
property damage if the corresponding measures are not
taken.
44
EDKMF2113 DE/EN/FR 5.1
Page 45

Application notes
Pictograph and signal word Meaning
Safety instructions
Residual hazards
1
Note!
Tip!
Residual hazards
Important note to ensure troublefree operation
Useful tip for simple handling
Reference to another documentation
Danger!
Observe the safety instructions and residual hazards included in the
instructions for the standard device.
EDKMF2113 DE/EN/FR 5.1
45
Page 46

2 Scope of supply
2 Scope of supply
Drivecom
Length
Baud
PCP
PD
OPEN
12345678
OUT
IN
Item Scope of delivery see
EMF2113IB communication module
Mounting Instructions
Plug connector with screw connection, 2−pin
2113
Bus
Drive
L
INTERBUS
24V DC
+
_
8
50
2113IBS001, E82ZAFX021
46
EDKMF2113 DE/EN/FR 5.1
Page 47

Mechanical installation 3
3 Mechanical installation
2102LEC014
Fig. 1 Attaching the communication module
ƒ Plug the communication module onto the standard device (here: 8200 vector).
ƒ Tighten the communication module to the standard device using the fixing screw in
order to ensure a good PE connection.
Note!
For the internal supply of the communication module by the 8200 vector
frequency inverter the jumper has to be adjusted within the interface opening
(see illustration above).
Observe the notes (51).
EDKMF2113 DE/EN/FR 5.1
47
Page 48

4 Electrical installation
Wiring according to EMC
4 Electrical installation
Wiring according to EMC
Please observe the following for wiring according to EMC guidelines:
Note!
ƒ With 820X and 821X controllers, communication can be impaired by
electromagnetic interferences. For safe communication, use an additional
cable between the PE connection of the basic device and the PE connection
of the communication module.
This is not necessary for all other controllers that can be used together
with the communication module.
ƒ Differences in potential between the devices can be avoided by using an
equalizing conductor with a large cross−section (reference: PE).
ƒ Separate control cables from motor cables.
ƒ Connect the data cable shields at both ends.
ƒ Please see the information on wiring according to EMC guidelines in the
Operating Instructions for the basic device.
48
EDKMF2113 DE/EN/FR 5.1
Page 49

Electrical installation
DC voltage supply
DC voltage supply
External voltage supply
If required, feed the communication module with a separate supply voltage via the
two−pole plug connector.
Use a separate supply unit in every control cabinet if the distance between the control
cabinets is larger than normal.
Plug connector Explanation
"+" U = 24VDC (21.6 V − 0% ... 26.4 V + 0 %)
"−" Reference potential for external voltage supply
Controller External voltage supply
820X Always required
821X / 822X / 824X /
93XX / 9300 Servo
PLC / Drive PLC /
ECSxS / ECSxP /
ECSxA
8200 vector See notes given in "Internal voltage supply" 51
I = 120 mA
Only required if the mains supplying the corresponding controller is to be
switched off but communication must not be interrupted.
For these basic devices the internal voltage supply can be used.
4
EDKMF2113 DE/EN/FR 5.1
49
Page 50

4 Electrical installation
DC voltage supply
Terminal data
Area Values
Electrical connection Plug connector with screw connection
Possible connections
Tightening torque 0.5 ... 0.6 Nm (4.4 ... 5.3 lb−in)
Stripping length 6 mm
rigid:
flexible:
2
1.5 mm
(AWG 16)
without wire end ferrule
2
(AWG 16)
1.5 mm
with wire end ferrule, without plastic sleeve
2
(AWG 16)
1.5 mm
with wire end ferrule, with plastic sleeve
2
(AWG 16)
1.5 mm
50
EDKMF2113 DE/EN/FR 5.1
Page 51

Electrical installation
DC voltage supply
Internal voltage supply
Note!
Internal voltage supply has been selected in the case of standard devices with
an AIF advanced interface opening (e.g. front of 8200 vector). The area shown
on a grey background in the graphic marks the jumper position.
ƒ By default, this is not supplied internally in the standard device.
ƒ For internal voltage supply place the jumper on the position indicated
below.
In the case of all other device series (9300, ECS), voltage is always supplied
from the standard device.
(Only external voltage supply possible.)
Lenze setting
Internal voltage supply
4
EDKMF2113 DE/EN/FR 5.1
51
Page 52

4 Electrical installation
Wiring
Wiring
Wiring to a host
Note!
Additional electrical isolation is required, if
ƒ an 820X or 821X controller is connected to an INTERBUS master and
ƒ a safe electrical isolation (reinforced insulation to EN61800−5−1) is
necessary.
Use e.g. a bus terminal or an interface module for the INTERBUS master with
an additional electrical isolation (see the corresponding information of the
manufacturer).
The incoming bus (IN) is isolated from the supply voltage and the outgoing bus
(OUT).
The supply voltage has the same potential as the outgoing data bus (OUT).
ƒ The bus system must be designed as a ring.
ƒ Go− and return lines are both contained in the same bus cable.
ƒ The ring connects the INTERBUS master with all devices connected to the bus.
52
EDKMF2113 DE/EN/FR 5.1
Page 53

Wiring example
Electrical installation
4
Wiring
1
3.2
£ 400 m
2
4.2
3.2
3.1
8200 vector
+
2113
4.1
82XX
+
2112
4.2 4.24.2
£ 20 m
INTERBUS-Loop 200 m£
£ 400 m
93XX
2112
3.1
93XX
+
2113
+
Fig. 2 Wiring example, INTERBUS (baud rate 500 kbits/s)
EDKMF2113 DE/EN/FR 5.1
3.23.2
3.1
82XX
+
2111
4.14.1
8200 vector
2112
3
+
4
2131IBU003
53
Page 54

4 Electrical installation
Wiring
Item Element Explanation
1 INTERBUS master with
interface module
2 INTERBUS loop bus
terminal
3 Remote bus
Fig. 2 pos. 3
3.1 Remote bus module Node in the remote bus, e.g. Lenze controller with INTERBUS module
3.2 Remote bus cable Connects the INTERBUS master interface module with the bus
4 INTERBUS loop,
peripheral bus
Fig. 2 pos. 4
4.1 INTERBUS loop
module
4.2 INTERBUS loop cable Connection within the loop
The bus system is a master−slave system, i.e. an INTERBUS master is
connected to several field devices (slaves).
The bus terminal connects a remote bus to a peripheral bus.
The following connections are possible with remote buses:
l Connections between INTERBUS master interface module and
first bus terminal or first 2113 communication module
l Connection between bus terminal and 2113 communication
module
l Connection between two 2113 communication modules
(slave). Networking does not require bus terminals.
terminals and/or the remote bus modules.
Connection in a peripheral−bus station
A peripheral−bus station consists of:
l a bus terminal (Fig. 2 pos. 2)
l up to eight peripheral bus modules (Fig. 2 pos. 3)
Node in the INTERBUS loop; e.g. Lenze controller with INTERBUS loop
module 2112
54
EDKMF2113 DE/EN/FR 5.1
Page 55

Electrical installation
Features
Communication
medium
Network topology Ring
Maximum number of
controllers
Baud rate
Specification of the transmission cable
General characteristics
Cable type Sold by the meter,
Number of conductors 3 × 2, twisted pairs, with shared shield
Conductor cross−section > 0.2 mm
DC cable resistance
Impedance (characteristic)
Capacitance per unit length < 60 nF/km (f = 800 Hz)
RS485
Dependent on INTERBUS master (e.g. Phoenix Contact G4 master).
For the following data, always the smaller value applies dependent on the
fact, whether PCP communication is available or not:
l with PCP communication:
l without PCP communication:
l 500 kbits/s with a distance of 400 m between neighbouring nodes
l 2 Mbits/s with a distance of 150 m between neighbouring nodes
(e.g. PHOENIX CONTACT: IBS RBC Meter−T, Order No.
28 06 28 6)
< 96 /km
l 120 20 % (f = 64 kHz)
l 100 15 (f > 1 MHz)
62 or
256 / number of PCD
2
Wiring
4
EDKMF2113 DE/EN/FR 5.1
55
Page 56

4 Electrical installation
Connection from INTERBUS
Connection from INTERBUS
2113IBU010
56
EDKMF2113 DE/EN/FR 5.1
Page 57

Electrical installation
4
Connection from INTERBUS
1
6
IN
Pin Designation Input/Output Description
1 DO1 Input RS485: DO1 not inverted
2 DI1 Output RS485: DI1 not inverted
3 GND Reference potential
4 free not assigned
5 Vcc5 Output 5 V DC
6 /DO1 Input RS485: DO1 inverted
7 /DI1 Output RS485: DI1 inverted
8 Vcc5 Output 5 V DC
9 free not assigned
5
9
2113IBU012
EDKMF2113 DE/EN/FR 5.1
57
Page 58

4 Electrical installation
Connection to INTERBUS
Connection to INTERBUS
2113IBU014
58
EDKMF2113 DE/EN/FR 5.1
Page 59

Electrical installation
4
Connection to INTERBUS
5
9
OUT
Pin Designation Input/Output Description
1 DO2 Output RS485: DO2 not inverted
2 DI2 Input RS485: DI2 not inverted
3
4
5 Vcc5 Output 5 V DC
6 /DO2 Output RS485: DO2 inverted
7 /DI2 Input RS485: DI2 inverted
8 Vcc5 Output 5 V DC
9 RBST Signal input Connection to outgoing INTERBUS
GND
GND
1
6
Reference potential
plugged in.
2113IBU011
EDKMF2113 DE/EN/FR 5.1
59
Page 60

5 Commissioning
Before switching on
5 Commissioning
Before switching on
Stop!
Please check the entire wiring with regard to completeness, short circuit and
earth fault, before you switch on the basic device with function module in the
INTERBUS network.
60
EDKMF2113 DE/EN/FR 5.1
Page 61

Possible settings via the front DIP switches
Possible settings via the front DIP switches
Note!
If switches S1 ... S8 remain in the Lenze setting OFF, the configurations set
under the codes C1910, C1911 and C1912 will become active when the device
is switched on.
If one or several switches of switches S1 ... S7 are switched over to ON,
ƒ all switch positions are valid!
ƒ the following must be set:
– Number of process data words (PCD),
– Number of parameter data words (PCP), and
– Device control AIF−CTRL / DRIVECOM control
Switch off the voltage supply of the communication module and afterwards on again to
activate changed settings.
As a maximum, the data word sum (PCD + PCP) is to amount to 10 words.
Please note that only the switch combinations listed in the following tables represent
defined states. If the settings are unacceptable, the yellow LED at the front of the
communication module will start blinking with f = 8Hz.
Commissioning
5
EDKMF2113 DE/EN/FR 5.1
61
Page 62

5 Commissioning
Possible settings via the front DIP switches
Setting the number of process data words (PCD)
Note!
ƒ Impermissible settings are indicated by the yellow LED (communication)
(69).
ƒ The current switch position of S1...S4 for the number of process data
words (PCD) can be displayed under code C1915.
Length
PD
OPEN
12345678
Switches
PCD
1 OFF OFF OFF ON
2 OFF OFF ON OFF
3 OFF OFF ON ON
4 OFF ON OFF OFF
5 OFF ON OFF ON
6 OFF ON ON OFF
7 OFF ON ON ON
8 ON OFF OFF OFF
9 ON OFF OFF ON 1
10 ON OFF ON OFF 0
S1 S2 S3 S4
OFF
ON
Max. number of parameter data
words (PCP)
2113IBU005
4
2
62
EDKMF2113 DE/EN/FR 5.1
Page 63

Possible settings via the front DIP switches
Setting the number of parameter data words (PCP)
Note!
Impermissible settings are indicated by the yellow LED (communication)
(69).
The current switch position of S5/S6 for the number of parameter data words
(PCP) can be displayed under code C1917.
Length
Commissioning
PCP
OPEN
12345678
Switches
PCP S5 S6
0 OFF OFF 10 0x03
1 OFF ON 9 0xE3
2 ON OFF 8 0xE0
4 ON ON 6 0xE1
Max. number of process data
words (PD)
OFF
ON
ID code
5
2113IBU005
EDKMF2113 DE/EN/FR 5.1
63
Page 64

5 Commissioning
Possible settings via the front DIP switches
Selecting AIF−CTRL or DRIVECOM control
Note!
The current switch position of S7 can be displayed under code C1916.
Drivecom
OFF
OPEN
1234567 8
Switch S7 Explanation
OFF with AIF−CTRL device control
ON with DRIVECOM control
ON
2113IBU005
64
EDKMF2113 DE/EN/FR 5.1
Page 65

Setting the baud rate
Note!
The baud rate can only be set via switch S8.
Baud
Possible settings via the front DIP switches
Commissioning
5
OPEN
12345678
Switch S8 Baud rate Maximum cable length between neighbouring nodes
OFF 500 kbits/s 400 m
ON 2 Mbits/s 150 m
EDKMF2113 DE/EN/FR 5.1
OFF
ON
2113IBU005
65
Page 66

5 Commissioning
Possible settings by INTERBUS master
Possible settings by INTERBUS master
Note!
If switches (S1 ... S8) remain in the Lenze setting OFF, the configurations set
under the codes C1910, C1911 and C1912 will become active when the device
is switched on.
Switch off the voltage supply of the communication module and afterwards on again to
activate changed settings.
Please note:
ƒ Impermissible settings are indicated by the yellow LED (communication) (69).
ƒ As a maximum, the data word sum (PCD + PCP) is to amount to 10 words.
ƒ Index determination: 24575 − Lenze code number (Cxxxx)
Codes for configuration
Code Values Explanation
C1910 2 ... 20 (1 ... 10 words) Number of process data bytes
C1911
C1912
0: AIF−CTRL device control
1: DRIVECOM control
Number of
parameter data
words (PCP)
0 0x03
1 0xE3
2 0xE0
4 0xE1
ID code
(2 process data bytes=1 process data
word)
Operation with AIF−CTRL device control
or
operation with DRIVECOM profile 21
Number of parameter data words (PCP)
66
EDKMF2113 DE/EN/FR 5.1
Page 67

Conformity with 2111 INTERBUS fieldbus module
Conformity with 2111 INTERBUS fieldbus module
Note!
The response is the same as that of the EMF2111IB communication module
(INTERBUS), if the following Lenze settings for the switches and codes remain
unchanged:
ƒ Switches S1 ... S7 = OFF
ƒ C1910=4
ƒ C1911=1
ƒ C1912=1
Drivecom
Length
Commissioning
Length
PD
OPEN
12345678
S1 ... S8 Explanation
OFF Lenze setting for the switches
PCP
Baud
OFF
ON
5
2113IBU005
EDKMF2113 DE/EN/FR 5.1
67
Page 68

5 Commissioning
Initial switch−on
Initial switch−on
1. The communication module must be attached to the controller (47).
2. Switch on the controller and, if required, the separate voltage supply for the
communication module (49).
3. Check communication module signals:
– The green bus LED indicates the operating status according to the description
under pos. (69).
– The yellow bus LED indicates the communication status according to the
description under pos. (69).
– Quick blinking (8 Hz) is the reaction of the yellow bus LED to impermissible
settings.
4. You can now communicate with the drive.
Note!
PCP communication
ƒ With a PCP communication the controller parameters can only be accessed
after having executed the PCP service "Initiate". After this, the controller
parameters can be accessed with the PCP services "Read" and "Write".
ƒ For a detailed description, please see the INTERBUS Communication
Manual.
LEDs at the front of the communication module
Please see the notes for the status display (69).
68
EDKMF2113 DE/EN/FR 5.1
Page 69

Status display
LED
Pos. Colour Condition
green
on Communication module is supplied with voltage and is
off Communication module is not supplied with voltage. Basic device
blinking Communication module is supplied with voltage, but is (still) not
yellow
on Communication module is being initialised,
off Communication module is not yet initialised.
blinking Active INTERBUS communication
red /
green
Commissioning
Status display
Description
connected to the basic device.
or external voltage supply is switched off.
connected to the basic device because
l the communication module has not been correctly attached
to the basic device
l it is not yet possible to transfer data from/to the basic device
(e.g. basic device in the initialisation phase).
inactive INTERBUS communication of the master
l SLOW (1 Hz): process data and PCP communication
l FAST (4 Hz): only process data
l VERY FAST (8 Hz)
– Indicates impermissible settings:
Data word sum: PD + PCP > 10 or number of process data
words: PD=0.
– The communication module continues internally with the
following values: PD = 2 and PCP = 1
Red and green drive LEDs indicate the operating status of the
82XX, 8200 vector, 93XX, Servo PLC 9300 and Drive PLC basic
device (see Operating Instructions for the basic device)
5
EDKMF2113 DE/EN/FR 5.1
69
Page 70

6 Technical data
General data and operating conditions
6 Technical data
General data and operating conditions
Field Values
Communication media RS485
Network topology Ring
Communication profile PCP 2.0
Drive profile DRIVECOM profile 21
INTERBUS node Slave
Baud rate
External voltage supply Values
"+" U = 24VDC (21.6 V − 0% ... 26.4 V + 0 %)
"−" Reference potential for external voltage supply
l 500 kbits/s
l 2 Mbits/s
I = 120 mA
Ambient conditions
Climatic conditions
Storage
1 K3 to IEC/EN 60721−3−1 − 25 °C ... + 60 °C
Transport 2 K3 to IEC/EN 60721−3−2 − 25 °C ... + 70 °C
Operation 3 K3 to IEC/EN 60721−3−3 0 °C ... + 55 °C
Degree of pollution 2 to IEC/EN 61800−5−1
Enclosure IP20
70
EDKMF2113 DE/EN/FR 5.1
Page 71

Technical data
Protective insulation
Protective insulation
Insulation between incoming bus and ... Type of insulation (to EN 61800−5−1)
l Reference earth / PE
l With external supply
l Power stage
– 820X / 821X Basic insulation
– 822X / 8200 vector Reinforced insulation
– 93XX / 9300 Servo PLC Reinforced insulation
– ECS servo system Reinforced insulation
l Control terminals
– 820X / 8200 vector Functional insulation
– 821X Functional insulation
– 822X Basic insulation
– Drive PLC Basic insulation
– 93XX / 9300 Servo PLC Basic insulation
– ECS servo system Reinforced insulation
l Outgoing bus (OUT)
Functional insulation
Functional insulation
No electrical isolation
6
EDKMF2113 DE/EN/FR 5.1
71
Page 72

6 Technical data
Protective insulation
Insulation between outgoing bus and ... Type of insulation (to EN 61800−5−1)
l Reference earth / PE
l With external supply
l Power stage
– 820X / 821X Basic insulation
– 822X / 8200 vector Reinforced insulation
– 93XX / 9300 Servo PLC Reinforced insulation
– ECS servo system Reinforced insulation
l Control terminals
– 820X / 8200 vector (with internal supply) No electrical isolation
– 8200 vector (with external supply) Basic insulation
– 821X Functional insulation
– 822x Basic insulation
– Drive PLC Basic insulation
– 93XX / 9300 Servo PLC Basic insulation
– ECS servo system Reinforced insulation
l Incoming bus (IN)
Functional insulation
No electrical isolation
Electrical isolation
72
EDKMF2113 DE/EN/FR 5.1
Page 73

Technical data
Protective insulation
Protocol data
Field Values
Maximum number of
controllers
Process data words (PD)
Parameter data words (PCP) 0, 1, 2, 4 Lenze setting: 1 word
Maximum number of data
words
INTERBUS ID
(module ID)
Maximum PDU length 64 bytes
Supported PCP services Initiate, Abort, Status, Identify, Get−0V−long, Read, Write
Dependent on INTERBUS master (e.g. Phoenix Contact G4 master).
For the following data, always the smaller value applies dependent
on the fact, whether PCP communication is available or not:
l with PCP communication:
l without PCP communication:
1 ... 10 (selectable) Lenze setting: 2 words
As a maximum, the data word sum (PD + PCP) is to amount to 10
words.
Module ID for set length
3 = 0x03 PCP, 0 words
227 = 0xE3 PCP, 1 word
224 = 0xE0 PCP, 2 words
225 = 0xE1 PCP, 4 words
62 or
256/number of PD
6
EDKMF2113 DE/EN/FR 5.1
73
Page 74

6 Technical data
Dimensions
Dimensions
Drivecom
Length
PCP
PD
OPEN
12345678
75
OUT
IN
2113
Baud
Bus
Drive
L
INTERBUS
24V DC
+
_
74
61
All dimensions in mm
31
41
2113IBU013
EDKMF2113 DE/EN/FR 5.1
Page 75

Technical data
Dimensions
6
EDKMF2113 DE/EN/FR 5.1
75
Page 76

Légende de l’illustration de la page dépliante
Pos. Description Informations
Affichage d’état (vert) Alimentation
Affichage d’état (jaune) Communication INTERBUS
Affichage d’état (rouge/vert) du variateur
Interrupteur DIP
l pour la configuration
– des mots de données process
– des mots de données PCP
– du code ID
– de la vitesse de transmission
l pour sélectionner le contrôle variateur AIF−CTRL ou DRIVECOM−PROFIL21
Sortie INTERBUS (OUT), connecteur femelle Sub−D, à 9 pôles
Entrée INTERBUS (IN), connecteur mâle Sub−D, à 9 pôles
Raccordement PE (uniquement pour le 82XX)
Vis de fixation
Bornier, raccordement pour alimentation externe
Plaque signalétique 77
0Fig. 0Tab. 0
détaillées
105
98
99
99
101
100
95
93
85
Conseil !
Les mises à jour de logiciels et les documentations relatives aux produits Lenze
sont disponibles dans la zone "Téléchargements" du site Internet :
http://www.Lenze.com
76
EDKMF2113 DE/EN/FR 5.1
Page 77

Informations relatives à la validité
Le présent document s’applique au produit suivant :
ƒ modules de communication EMF2113IB (INTERBUS) à partir de la version 1x.1x.
Ce document est uniquement valable avec la documentation relative aux appareils de base
compatibles.
Identification
L
Type
Id.-No.
Prod.-No.
Ser.-No.
E82AF000P0B201XX
Série d’appareils
Version de matériel
Version de logiciel
Référence de commande
EMF2113IB
Fonction
Le module de communication permet de relier le variateur Lenze au système de
communication INTERBUS.
EDKMF2113 DE/EN/FR 5.1
99371BC013
33.2113IB 1x 1x
77
Page 78

Utilisation
L’utilisation du module de communication est autorisée sur les appareils de base à partir de
la version suivante (voir plaque signalétique) :
Version
Type d’appareil Version
33.820x E./C. 2x. 1x. Vxxx 8201 − 8204
33.821x E./C. 2x. 2x. Vxxx 8211 − 8218
33.822x E. 1x. 1x. Vxxx 8221 − 8227
33.824x E./C. 1x. 1x. Vxxx 8241 − 8246
82EVxxxxxBxxxXX Vx 1x 8200 vector
82CVxxxxxBxxxXX Vx 1x 8200 vector, montage sur
82DVxxxKxBxxxXX Vx 1x 8200 vector, isolé
EPL 10200 e 1x 1x Drive PLC
33.93XX xE. 2x 1x Vxxx 9321 − 9332
33.938x xE. 1x 0x 9381 − 9383
33.93XX xC. 2x 1x Vxxx 9321 − 9332, montage sur
33.93XX EI / ET 2x 1x Vxxx Servo PLC 9300
33.93XX CI / CT 2x 1x Vxxx Servo PLC 9300, montage sur
1)
ECSxPxxxx4xxxxXX 1A 6.0 ECSxP (Posi and Shaft)
1)
ECSxSxxxx4xxxxXX 1A 6.0 ECSxS (Speed and Torque)
1)
ECSxAxxxx4xxxxXX 1A 2.3 ECSxA (Application)
1)
Cet appareil de base ne peut pas être utilisé avec le système de commande DRIVECOM
HW SW
Variante Explication / Remarques
semelle de refroidissement
thermiquement
semelle de refroidissement
semelle de refroidissement
78
EDKMF2113 DE/EN/FR 5.1
Page 79

Sommaire i
1 Consignes de sécurité 80 . . . . . . . . . . . . . . . . . . . . . . . . . . . . . . . . . . . . . . . . . . . . . . . .
Consignes utilisées 80 . . . . . . . . . . . . . . . . . . . . . . . . . . . . . . . . . . . . . . . . . . . . . . . . . . .
Dangers résiduels 81 . . . . . . . . . . . . . . . . . . . . . . . . . . . . . . . . . . . . . . . . . . . . . . . . . . .
2 Equipement livré 82 . . . . . . . . . . . . . . . . . . . . . . . . . . . . . . . . . . . . . . . . . . . . . . . . . . . .
3 Installation mécanique 83 . . . . . . . . . . . . . . . . . . . . . . . . . . . . . . . . . . . . . . . . . . . . . . .
4 Installation électrique 84 . . . . . . . . . . . . . . . . . . . . . . . . . . . . . . . . . . . . . . . . . . . . . . . .
Câblage conforme CEM 84 . . . . . . . . . . . . . . . . . . . . . . . . . . . . . . . . . . . . . . . . . . . . . . .
Alimentation CC 85 . . . . . . . . . . . . . . . . . . . . . . . . . . . . . . . . . . . . . . . . . . . . . . . . . . . . .
Câblage 88 . . . . . . . . . . . . . . . . . . . . . . . . . . . . . . . . . . . . . . . . . . . . . . . . . . . . . . . . . . . .
Etablissement de la connexion depuis INTERBUS 92 . . . . . . . . . . . . . . . . . . . . . . . . . .
Etablissement de la connexion vers INTERBUS 94 . . . . . . . . . . . . . . . . . . . . . . . . . . . .
5 Mise en service 96 . . . . . . . . . . . . . . . . . . . . . . . . . . . . . . . . . . . . . . . . . . . . . . . . . . . . . .
Avant la première mise sous tension 96 . . . . . . . . . . . . . . . . . . . . . . . . . . . . . . . . . . . .
Réglages possibles via l’interrupteur DIP frontal 97 . . . . . . . . . . . . . . . . . . . . . . . . . .
Réglages possibles via le maître INTERBUS 102 . . . . . . . . . . . . . . . . . . . . . . . . . . . . . . .
Etablir une correspondance avec le module bus de terrain 2111 INTERBUS 103 . . . .
Première mise en service 104 . . . . . . . . . . . . . . . . . . . . . . . . . . . . . . . . . . . . . . . . . . . . . .
Affichage d’état 105 . . . . . . . . . . . . . . . . . . . . . . . . . . . . . . . . . . . . . . . . . . . . . . . . . . . . .
6 Spécifications techniques 106 . . . . . . . . . . . . . . . . . . . . . . . . . . . . . . . . . . . . . . . . . . . . .
Caractéristiques générales et conditions d’utilisation 106 . . . . . . . . . . . . . . . . . . . .
Isolement de protection 107 . . . . . . . . . . . . . . . . . . . . . . . . . . . . . . . . . . . . . . . . . . . . . .
Encombrements 110 . . . . . . . . . . . . . . . . . . . . . . . . . . . . . . . . . . . . . . . . . . . . . . . . . . . . .
EDKMF2113 DE/EN/FR 5.1
79
Page 80

1 Consignes de sécurité
Consignes utilisées
1 Consignes de sécurité
Consignes utilisées
Pour indiquer des risques et des informations importantes, la présente documentation
utilise les mots et symboles suivants :
Consignes de sécurité
Présentation des consignes de sécurité
Danger !
(Le pictogramme indique le type de risque.)
Explication
(L’explication décrit le risque et les moyens de l’éviter.)
Pictogramme et mot associé Explication
Situation dangereuse pour les personnes en raison d’une
tension électrique élevée
Danger !
Danger !
Stop !
Indication d’un danger imminent qui peut avoir pour
conséquences des blessures mortelles ou très graves en
cas de non−respect des consignes de sécurité
correspondantes
Situation dangereuse pour les personnes en raison d’un
danger d’ordre général
Indication d’un danger imminent qui peut avoir pour
conséquences des blessures mortelles ou très graves en
cas de non−respect des consignes de sécurité
correspondantes
Risques de dégâts matériels
Indication d’un risque potentiel qui peut avoir pour
conséquences des dégâts matériels en cas de non−respect
des consignes de sécurité correspondantes
80
EDKMF2113 DE/EN/FR 5.1
Page 81

Consignes d’utilisation
Pictogramme et mot associé Explication
Consignes de sécurité
Dangers résiduels
1
Remarque
importante !
Conseil !
Dangers résiduels
Remarque importante pour assurer un fonctionnement
correct
Conseil utile pour faciliter la mise en oeuvre
Référence à une autre documentation
Danger !
Tenir compte des consignes de sécurité et des dangers résiduels décrits dans la
documentation de l’appareil de base concerné.
EDKMF2113 DE/EN/FR 5.1
81
Page 82

2 Equipement livré
2 Equipement livré
Drivecom
Length
Baud
PCP
PD
OPEN
12345678
OUT
IN
Pos. Contenu de l’emballage Voir
Module de communication EMF2113IB
Instructions de montage
Bornier avec fixation par vis, à 2 bornes
2113
Bus
Drive
L
INTERBUS
24V DC
+
_
8
2113IBS001, E82ZAFX021
86
82
EDKMF2113 DE/EN/FR 5.1
Page 83

Installation mécanique 3
3 Installation mécanique
2102LEC014
Fig. 1 Brancher le module de communication
ƒ Enficher le module de communication dans l’appareil de base (ici : 8200 vector).
ƒ Visser le module de communication sur l’appareil de base à l’aide de la vis de fixation
pour assurer une bonne liaison avec la terre.
Remarque importante !
Pour l’alimentation interne du module de communication par le convertisseur
de fréquence 8200 vector, le cavalier doit être inséré dans l’ouverture prévue à
cet effet (voir schéma ci−dessus).
Voir également les remarques (87).
EDKMF2113 DE/EN/FR 5.1
83
Page 84

4 Installation électrique
Câblage conforme CEM
4 Installation électrique
Câblage conforme CEM
Pour s’assurer que le câblage est conforme aux exigences à respecter en matière de CEM,
vérifier les points suivants :
Remarque importante !
ƒ Avec les variateurs de vitesse 820X et 821X, des perturbations
électromagnétiques sont susceptibles d’entraver la communication. Pour
une communication fiable, utiliser un câble supplémentaire entre le
raccordement PE de l’appareil de base et celui du module de
communication.
Pour les autres variateurs compatibles avec le module de communication, il
n’est pas nécessaire d’utiliser ce câble supplémentaire.
ƒ Prévoir une ligne de compensation de section importante (référence : PE)
afin d’éviter les différences de potentiel entre les différents participants.
ƒ Séparer physiquement les câbles de commande des câbles moteur.
ƒ Blinder les câbles de transmission des données aux deux extrémités.
ƒ Tenir compte des autres indications contenues dans la documentation des
appareils de base sur un câblage conforme aux exigences à respecter en
matière de CEM.
84
EDKMF2113 DE/EN/FR 5.1
Page 85

Installation électrique
Alimentation CC
Alimentation CC
Alimentation externe
Si nécessaire, le module de communication peut être alimenté par une tension externe via
une prise double.
En cas de distances importantes entre les armoires électriques, utiliser un bloc
d’alimentation externe dans chaque armoire.
Bornier enfichable Description
Raccordement "+" U = 24VCC (21,6 V − 0% ... 26,4 V + 0 %)
Raccordement "−" Potentiel de référence pour alimentation externe
Variateur de vitesse Alimentation externe
820X Toujours nécessaire.
821X / 822X / 824X /
93XX / 9300 Servo
PLC / Drive PLC /
ECSxS / ECSxP /
ECSxA
8200 vector Voir remarques sous "Alimentation interne" 87
I = 120 mA
Nécessaire uniquement lorsque les variateurs doivent être coupés du réseau
et que la communication doit être maintenue.
Pour ces appareils de base, l’alimentation interne peut être utilisée.
4
EDKMF2113 DE/EN/FR 5.1
85
Page 86

4 Installation électrique
Alimentation CC
Spécifications pour bornier de raccordement
Domaine Valeurs
Raccordement électrique Bornier à vis
Possibilités de raccordement
Couple de serrage 0.5... 0.6 Nm (4.4 ... 5.3 lb−in)
Longueur du fil dénudé 6 mm
Fixe :
Souple :
1.5 mm
sans embout
1.5 mm
avec embout, sans cosse en plastique
1.5 mm
avec embout et cosse en plastique
1.5 mm
2
(AWG 16)
2
(AWG 16)
2
(AWG 16)
2
(AWG 16)
86
EDKMF2113 DE/EN/FR 5.1
Page 87

Installation électrique
Alimentation CC
Alimentation interne
Remarque importante !
Les appareils de base dotés d’une interface AIF étendue (face avant du 8200
vector par exemple) offrent la possibilité d’une alimentation interne. Sur
l’illustration, la partie grise désigne la position du cavalier.
ƒ A la livraison de l’appareil de base, une alimentation interne du module de
communication n’est pas prévue.
ƒ Pour l’alimentation interne, positionner le cavalier comme indiqué
ci−dessous.
Pour toutes les autres séries d’appareil (9300, ECS), une alimentation depuis
l’appareil de base est toujours disponible.
Etat à la livraison
(alimentation externe uniquement)
Alimentation interne
4
EDKMF2113 DE/EN/FR 5.1
87
Page 88

4 Installation électrique
Câblage
Câblage
Raccordement au maître
Remarque importante !
Il faut prévoir un isolement supplémentaire, dans le cas où
ƒ un variateur de vitesse 820X ou 821X est raccordé à un maître INTERBUS et
ƒ une séparation du potentiel sûre (isolement renforcé selon EN61800−5−1)
est nécessaire.
Utiliser par ex. une tête de station ou une interface pour le maître INTERBUS
avec une séparation du potentiel supplémentaire (voir les indications du
fabricant correspondantes).
L’isolement du bus entrant (IN) par rapport à la tension d’alimentation et au
bus sortant est assurée par une séparation du potentiel.
La tension d’alimentation se trouve sur le même potentiel que le bus de
données sortant (OUT).
ƒ Le système de bus doit être exécuté sous forme d’anneau.
ƒ Les circuits aller et retour sont logés dans le même câble de bus.
ƒ L’anneau part du maître INTERBUS et revient en passant par l’ensemble des
participants au bus.
88
EDKMF2113 DE/EN/FR 5.1
Page 89

Exemple de câblage
1
Installation électrique
Câblage
4
3.2
£ 400 m
2
4.2
3.2
3.1
8200 vector
+
2113
4.1
82XX
+
2112
4.2 4.24.2
£ 20 m
INTERBUS-Loop 200 m£
£ 400 m
93XX
2112
3.1
93XX
+
2113
+
3.23.2
3.1
82XX
+
2111
4.14.1
8200 vector
2112
+
Fig. 2 Exemple de câblage, INTERBUS (vitesse de transmission 500 kbits/s)
EDKMF2113 DE/EN/FR 5.1
3
4
2131IBU003
89
Page 90

4 Installation électrique
Câblage
Pos. Elément Explication
1 Maître INTERBUS avec
interface
2 Tête de station de
boucle INTERBUS
3 Bus interstation
Fig. 2 pos. 3
3.1 Module de bus
interstation
3.2 Câble de bus
interstation
4 Boucle INTERBUS, bus
local
Fig. 2 pos. 4
4.1 Module de boucle
INTERBUS
4.2 Câble de boucle
INTERBUS
Le système de bus complet est un système maître−esclave, ce qui
signifie qu’un maître INTERBUS est relié à plusieurs appareils de
terrain (esclaves).
La tête de station permet de relier le bus interstation et le bus local.
Dans le bus interstation, il est possible d’effectuer des raccordements
entre
l l’interface maître INTERBUS et la première tête de station ou le
premier module de communication 2113
l la tête de station et le module de communication 2113
l deux modules de communication 2113
Participant au bus dans le bus interstation, par exemple, variateur
Lenze avec module INTERBUS (esclave). Dans ce cas, aucune tête de
station n’est nécessaire pour la mise en réseau.
Relie l’interface maître INTERBUS aux têtes de station et/ou aux
modules de bus interstation.
Raccordement à l’intérieur d’une station de bus local
Composants d’une station de bus local :
l une tête de station (Fig. 2 pos. 2)
l jusqu’à huit modules de bus local (Fig. 2 pos. 3)
Participant au bus dans la boucle INTERBUS ; par ex., variateur Lenze
avec module de boucle INTERBUS 2112
Raccordement à l’intérieur de la boucle
90
EDKMF2113 DE/EN/FR 5.1
Page 91

Installation électrique
Caractéristiques du câblage
Support de
communication
Topologie du réseau Anneau
Nombre maximal de
variateurs
Vitesse de
transmission
Spécifications pour câble de transmission
Caractéristiques générales
Type de câble Au mètre,
Nombre de conducteurs 3 × 2, torsadés par paire, avec blindage
Section de câble > 0.2 mm
Résistivité CC
Impédance (caractéristique)
Capacité linéique < 60 nF/km (f = 800 Hz)
RS485
En fonction du maître INTERBUS (par exemple, maître Phoenix Contact G4).
Pour les indications suivantes, c’est la valeur la moins importante avec/sans
communication PCP qui s’applique :
l avec communication PCP :
l sans communication PCP :
l 500 kbits/s pour une distance de 400 m entre participants voisins
l 2 kbits/s pour une distance de 150 m entre participants voisins
(ex. : PHOENIX CONTACT : IBS RBC Meter−T, réf. de
commande 28 06 28 6)
< 96 /km
l 120 20 % (f = 64 kHz)
l 100 15 (f > 1 MHz)
62 ou
256 / nombre de mots de données
process
2
Câblage
4
EDKMF2113 DE/EN/FR 5.1
91
Page 92

4 Installation électrique
Etablissement de la connexion depuis INTERBUS
Etablissement de la connexion depuis INTERBUS
2113IBU010
92
EDKMF2113 DE/EN/FR 5.1
Page 93

Installation électrique
4
Etablissement de la connexion depuis INTERBUS
1
6
IN
Broche Désignation Entrée/sortie Description
1 DO1 Entrée RS485 : DO1 non inversé
2 DI1 Sortie RS485 : DI1 non inversé
3 GND Potentiel de référence
4 Libre Non affecté
5 Vcc5 Sortie 5 V cc
6 /DO1 Entrée RS485 : DO1 inversé
7 /DI1 Sortie RS485 : DI1 inversé
8 Vcc5 Sortie 5 V cc
9 Libre Non affecté
5
9
2113IBU012
EDKMF2113 DE/EN/FR 5.1
93
Page 94

4 Installation électrique
Etablissement de la connexion vers INTERBUS
Etablissement de la connexion vers INTERBUS
2113IBU014
94
EDKMF2113 DE/EN/FR 5.1
Page 95

Installation électrique
4
Etablissement de la connexion vers INTERBUS
5
9
OUT
Broche Désignation Entrée/sortie Description
1 DO2 Sortie RS485 : DO2 non inversé
2 DI2 Entrée RS485 : DI2 non inversé
3
4
5 Vcc5 Sortie 5 V cc
6 /DO2 Sortie RS485 : DO2 inversé
7 /DI2 Entrée RS485 : DI2 inversé
8 Vcc5 Sortie 5 V cc
9 RBST Entrée de
GND
GND
1
6
signalement
Potentiel de référence
Raccordement effectué avec l’Interbus
entrant.
2113IBU011
EDKMF2113 DE/EN/FR 5.1
95
Page 96

5 Mise en service
Avant la première mise sous tension
5 Mise en service
Avant la première mise sous tension
Stop !
Avant la première mise sous tension de l’appareil de base avec module bus de
terrain dans le réseau INTERBUS, vérifier le câblage dans son intégralité pour
éviter un court−circuit ou un défaut terre.
96
EDKMF2113 DE/EN/FR 5.1
Page 97

Réglages possibles via l’interrupteur DIP frontal
Réglages possibles via l’interrupteur DIP frontal
Remarque importante !
Lorsque les interrupteurs S1 ... S8 sont maintenus sur le réglage Lenze OFF, les
configurations sont activées à partir des codes C1910, C1911 et C1912.
Si un ou plusieurs des interrupteurs S1 ... S7 sont mis en position ON,
ƒ toutes les positions d’interrupteur sont valables !
ƒ Réglages à effectuer impérativement :
– nombre de mots de données process (PZD),
– nombre de mots de données paramètres (PCP) et
– contrôle variateur AIF−CTRL / commande DRIVECOM
Pour activer les modifications apportées aux réglages, désactiver puis réactiver
l’alimentation du module de communication.
La somme des mots de données (PZD + PCP) peut comporter 10 mots au maximum.
Notez que seules les combinaisons d’interrupteur présentées dans les tableaux suivants
sont des états définis. En cas de réglages non autorisés, la LED jaune clignote sur la face
avant du module de communication selon f = 8Hz.
Mise en service
5
EDKMF2113 DE/EN/FR 5.1
97
Page 98

5 Mise en service
Réglages possibles via l’interrupteur DIP frontal
Régler le nombre de mots de données process (PZD)
Remarque importante !
ƒ Les réglages non autorisés sont signalés par la LED jaune (communication)
(105).
ƒ Il est possible d’afficher la position courante des interrupteurs S1...S4
pour le nombre de mots de données process (PZD) au moyen du code
C1915.
Length
PD
OPEN
12345678
Nombre de mots
de données
process (PZD)
1 OFF OFF OFF ON
2 OFF OFF ON OFF
3 OFF OFF ON ON
4 OFF ON OFF OFF
5 OFF ON OFF ON
6 OFF ON ON OFF
7 OFF ON ON ON
8 ON OFF OFF OFF
9 ON OFF OFF ON 1
10 ON OFF ON OFF 0
S1 S2 S3 S4
Interrupteur
OFF
ON
Nombre de mots de données
process (PZD)
2113IBU005
4
2
98
EDKMF2113 DE/EN/FR 5.1
Page 99

Réglages possibles via l’interrupteur DIP frontal
Régler le nombre de mots de données paramètres (PCP)
Remarque importante !
Les réglages non autorisés sont signalés par la LED jaune (communication)
(105).
Il est possible d’afficher la position courante des interrupteurs S5/S6 pour le
nombre de mots de données paramètres (PCP) au moyen du code C1917.
Length
Mise en service
PCP
OPEN
12345678
Interrupteur
Nombre de mots
de données
paramètres
(PCP)
0 OFF OFF 10 0x03
1 OFF ON 9 0xE3
2 ON OFF 8 0xE0
4 ON ON 6 0xE1
S5 S6
Nombre max. de mots de
données process (PD)
OFF
ON
5
2113IBU005
Code ID
EDKMF2113 DE/EN/FR 5.1
99
Page 100

5 Mise en service
Réglages possibles via l’interrupteur DIP frontal
Sélectionner le contrôle variateur AIF−CTRL ou le système de commande DRIVECOM
Remarque importante !
Il est possible d’afficher la position courante de l’interrupteur S7 au moyen du
code C1916.
Drivecom
OFF
OPEN
1234567 8
Interrupteur S7 Explication
OFF avec contrôle variateur AIF−CTRL
ON avec système de commande DRIVECOM
ON
2113IBU005
100
EDKMF2113 DE/EN/FR 5.1
 Loading...