

Instruction Manual
Leica knife holder CE/ knife holder CN
V2.2 English – 08/2005
Always keep this manual near the instrument.
Read carefully prior to operating the knife holders.
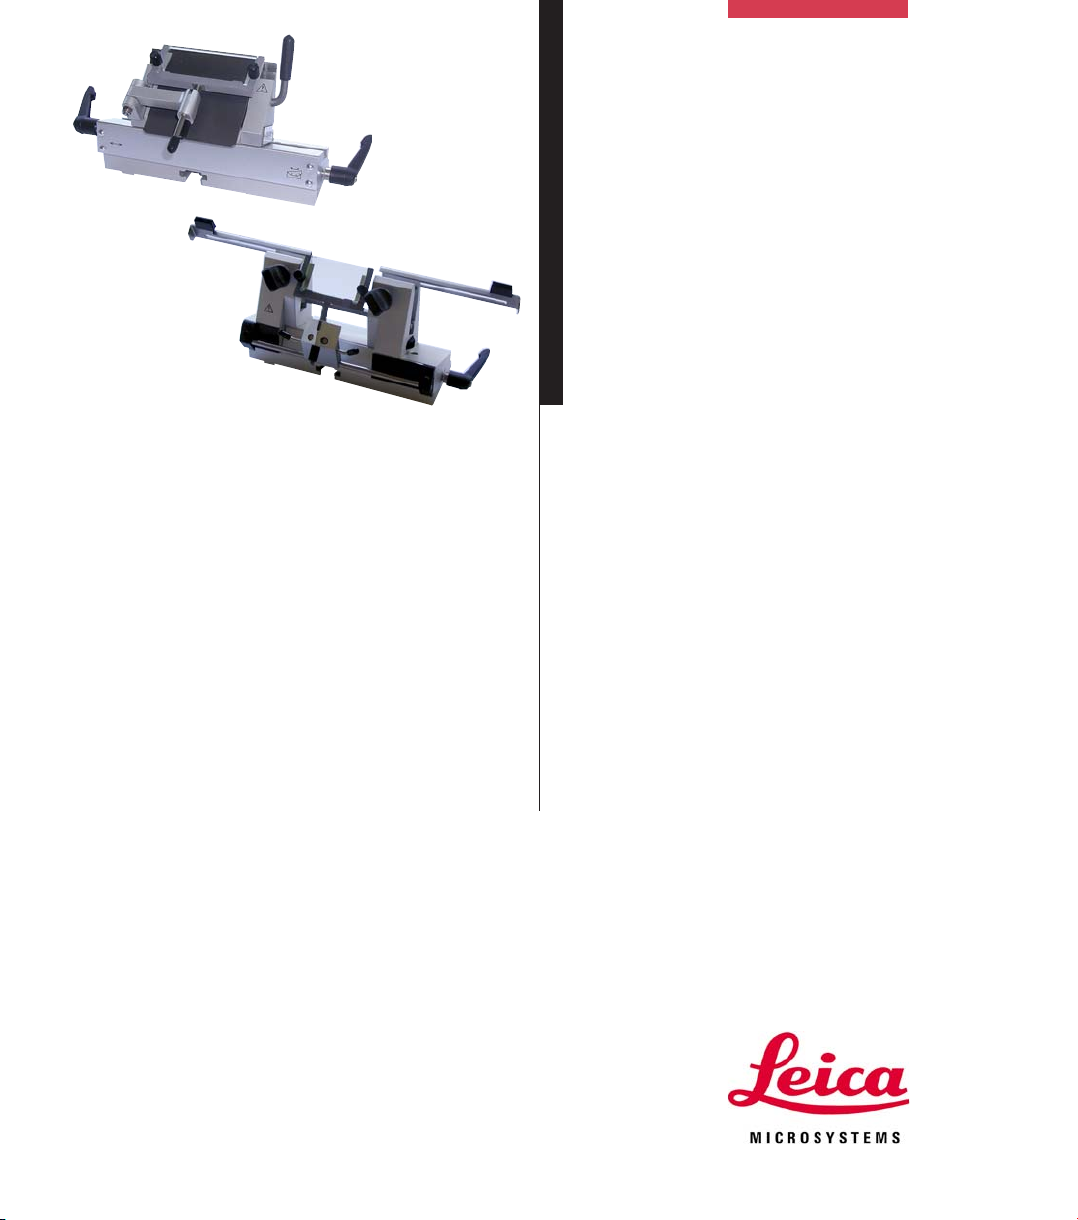
Leica CE/
Leica CN
Knife holder


NOTE
The information, numerical data, notes and value
judgments contained in this manual represent the
current state of scientific knowledge and stateof-the-art technology as we understand it following thorough investigation in this field.
We are under no obligation to update the present
manual according to the latest technical developments, nor to provide our customers with additional copies, updates etc. of this manual.
For erroneous statements, drawings, technical
illustrations etc. contained in this manual we exclude liability as far as permissible according to
the national legal system applicable in each individual case. In particular, no liability whatsoever
is accepted for any financial loss or consequential damage caused by or related to compliance
with statements or other information in this manual.
Statements, drawings, illustrations and other information as regards contents or technical details of the present manual are not to be considered as warranted characteristics of our
products.
These are determined only by the contract provisions agreed between ourselves and our customers.
Leica reserves the right to change technical
specifications as well as manufacturing processes without prior notice. Only in this way is it possible to continuously improve the technology and
manufacturing techniques used in our products.
This document is protected under copyright laws.
Any copyrights of this document are retained by
Leica Microsystems Nussloch GmbH.
Any reproduction of text and illustrations (or of
any parts thereof) by means of print, photocopy,
microfiche, web cam or other methods – including any electronic systems and media – requires
express prior permission in writing by Leica Microsystems Nussloch GmbH.
For the instrument serial number and year of
manufacture, please refer to the name plate at
the back of the instrument.
© Leica Microsystems Nussloch GmbH
Published by:
Leica Microsystems Nussloch GmbH
Heidelberger Str. 17 - 19
D-69226 Nussloch
Germany
Telephone: +49 (0)6224 143-0
Fax: +49 (0)6224 143-200
Internet: http://www.histo-solutions.com
Leica knife holder CE /CN
3
1. Operation
Danger!
Microtome knives and blades have extremely sharp cutting edges!
1
2
3
54
1
Fig. 1
For disinfection we recommend Leica
Cryofect disinfection spray.
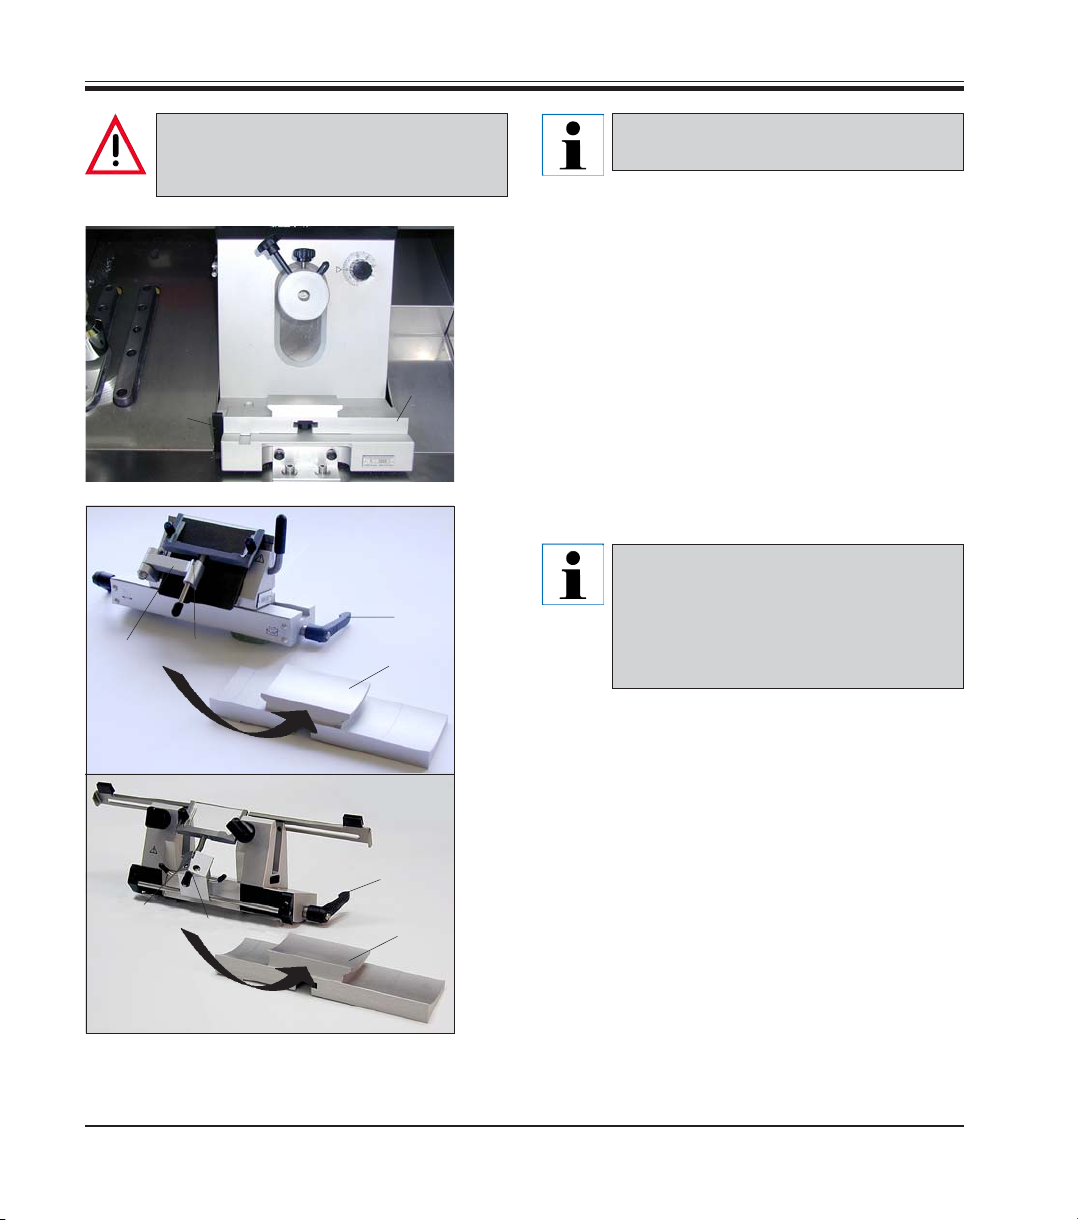
Mounting the knife holder base
1. Mount the knife holder base (1) as shown in
Fig. 1.
2. Rotate lever (2) clockwise to clamp.
Mounting the knife holder
1. Mount the knife holder as shown in Fig. 2.
When inserting the knife holder
base, apply sufficient pressure towards the left to overcome the resistance of the spring in the bottom
part of the knife holder.
2. Rotate lever (3) clockwise to clamp.
3
5
4
4
1
Fig. 2
Instruction manual V 2.2 – 08/2005
1. Operation
Mounting the anti-roll system
1. Insert the glass plate into the changing frame and
7
6
8
7
clamp evenly with the knurled screws (7).
2. From above, insert the axle (8) of the metal frame
into the opening of the swivel arm of the anti-roll
system (4, Fig. 2), so that the pin (6) rests in the
groove (5, Fig. 2).
3. From below, slide the white plastic washer (9) onto
axle (2).
4. Screw knurled nut (10) onto axle (2) from below.
9
10
Fig. 3
All 4 longitudinal edges of the anti-roll
glass plate can be used.
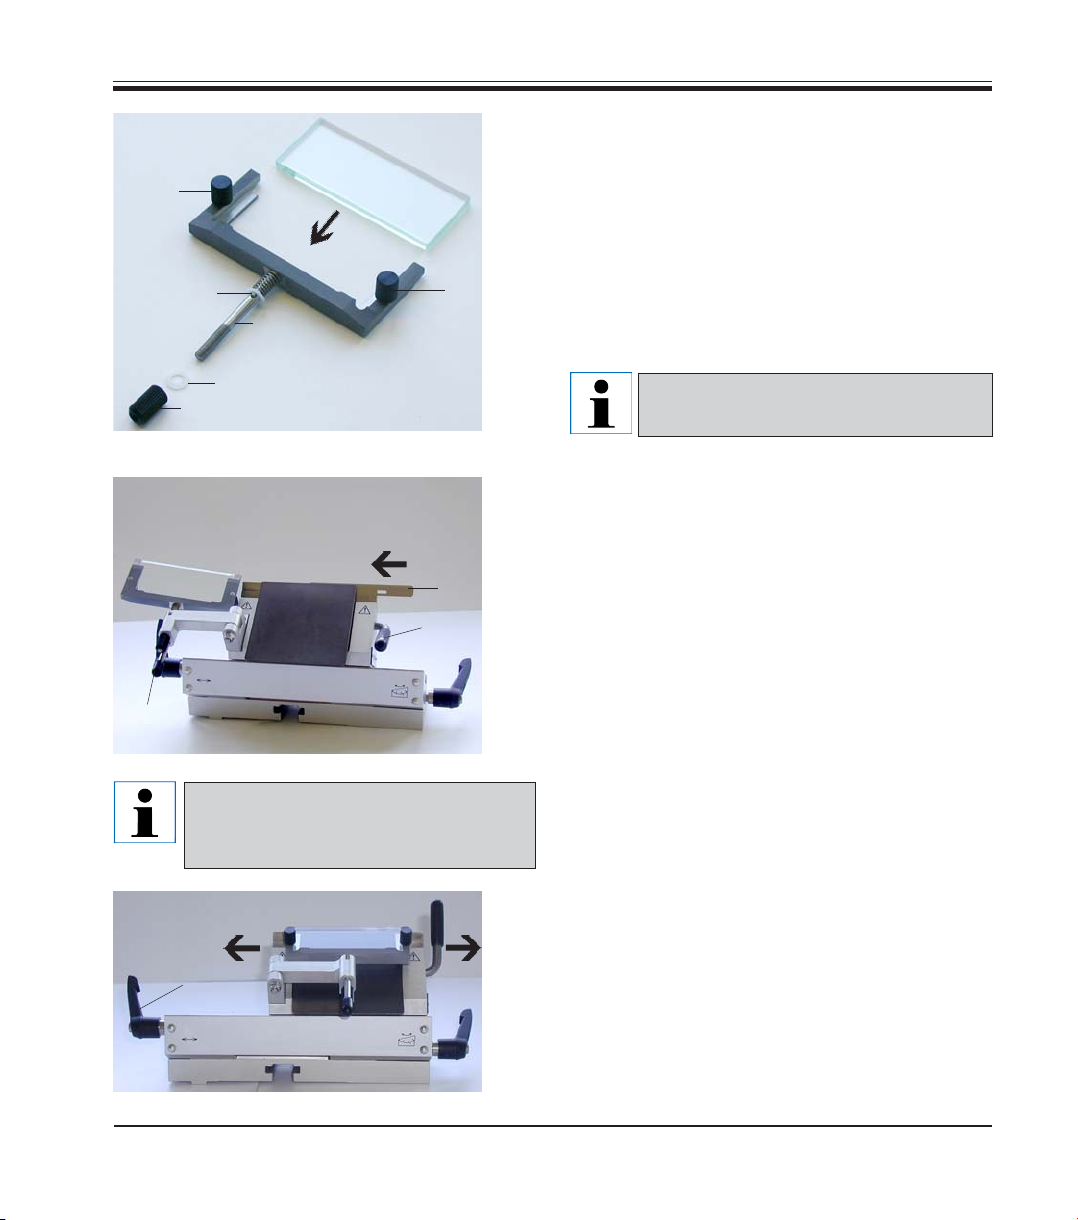
Inserting the blade into knife holder CE
1. Tilt anti-roll system to the left – to do so hold
system at lever (11) (not at the set screw of the
anti-roll system) to avoid altering the height of
13
12
the anti-roll system.
2. Open clamping lever (12) by rotating it counter-
clockwise.
3. Carefully insert the blade (13) between clamp-
ing plate and back plate, either from above or
11
Fig. 4
from one side. Make sure the blade is properly
centered.
4. Rotate lever (12) clockwise to clamp.
ATTENTION!
Anti-roll system also works as finger
guard!
5. Grip anti-roll system at lever (11) and tilt back
onto blade.
Lateral adjustment
If sectioning results are not satisfactory, adjust the
knife holder laterally to section with another part of
the blade.
14
For that purpose:
1. Rotate clamping lever (14) backwards to loosen
and slide the knife holder laterally into the desired position.
Fig. 5
2. Rotate clamping lever (14) forward to clamp.
Leica knife holder CE /CN
5

1. Operation
Inserting the knife into knife holder CN and
knife height adjustment
15
15
Knife holder CN can be operated with all wedgeshaped c- and d-profile knives. To fit disposable
blades into knife holder CN, use the blade holder
for disposable blades. Prior to inserting the
Fig. 6
knives (from above) completely loosen the two
clamping screws (15).
Adjust the knife height before retightening screw
(15).
15
The knife height is adjusted via the knurled nuts
(16). The upper edge of the back plate (rear clamp-
16
ing plate) serves as an index to determine the
appropriate knife height. The knife edge should
16
be at the same level as the back plate; even knives
that have been greatly reduced in height by frequent resharpening (up to a height of 25 mm) can
be properly height-adjusted and clamped in the
Fig. 7
knife holder CN.
The anti-roll system is laterally adjustable
(84-mm wide system only). A groove (17) in the
17
18
axle (18) facilitates centering of the anti-roll system.
Fig. 8
6
Instruction manual V 2.2 – 08/2005

1. Operation
19
Finger guards
The finger guards are integrated into the clamping jaws. Use handles (19) to slide them back and
forth. The width of the finger guards is sufficient
for knives up to 22 cm long. Once you finish sectioning, always cover the knife edge with the finger guards.
Fig. 9
Prior to any work on knife and object,
each time before changing the specimen block and during work breaks the
knife edge must be covered with the finger guards!
Shifting the clamping jaws
20
21
21
Fig. 10
23
22
In the factory, the clamping jaws are mounted at
a distance of 64 mm from each other. If necessary, the clamping jaws can be relocated to a distance of 84 mm.
To shift the clamping jaws the knife holder must
be removed from the knife holder base. Loosen
lever (20) and remove knife holder from base. With
a size 4 Allen key, loosen the screws (21) located
at the bottom surface of the knife holder. Shift the
clamping jaws (22) and retighten the screws. Insert
the longer of the two knife support bars (part of standard delivery).
Leica knife holder CE /CN
Fig.11
Never work with just one clamping jaw.
Otherwise sufficient stability for the
sectioning process cannot be guaranteed. In addition, long knives will no
longer be sufficiently covered by the finger guard.
7

1. Operation
Knife support bar
Ensure that the recess (24) is pointing
away from the microtome.
Danger!
Microtome knives and blades have extremely sharp cutting edges! Never try
to catch a falling knife!
Clearance angle adjustment
The harder the specimen the wider the
clearance angle. However: the wider
the clearance angle the greater the compression of the sections.
Clearance angle adjustment - knife holder CE
25
Fig. 13
24
If the clearance angle is too small, thickthin sections may result.
Also, remember that by adjusting the
clearance angle, the position of the knife
edge relative to the specimen may be altered.
Therefore, always place the specimen
block above the knife prior to adjusting
the clearance angle. Otherwise, the
specimen block may collide with the
knife when it is moved back upwards.
Fig. 12
Readjust the clearance angle with every new
type of specimen material!
1. The clearance angle scale is located on the
left side of the knife holder.
2. Loosen the lever (23, Fig. 11) on the right side
of the knife holder and select a clearance
angle setting of ‘0’ (index marker (25) must be
in line with figure ‘0’). Retighten lever (23, Fig.
11). If the sectioning results are not satisfactory, increase the clearance angle setting in
1° steps, until the desired result is achieved.
8
Instruction manual V 2.2 – 08/2005

1. Operation
Clearance angle adjustment - knife holder CN
27
26
28
Fig. 14
Prior to setting the clearance angle, the knife
edge must be located exactly in the spin axis of
the knife holder.
First, set a clearance angle of ‘0’. To do so, loosen lever (23, see Fig. 11) and bring the index
marker (26) in line with the figure ‘0’ on the clearance angle scale (27). Retighten the lever (23). If
the sectioning results obtained are not satisfactory, slowly increase the clearance angle in 1°
steps, until the desired section quality is
achieved.
Parallel adjustment - knife holder CE
(Adjusting the anti-roll system)
This type of adjustment has to be done each time
after exchanging either the entire anti-roll system or the change frame.
Loosen Allen screw (28) and then, via the axle
extension (29), adjust the upper edge of the glass
anti-roll plate parallel to the knife edge. Retighten
Allen screw (28).
31
Leica knife holder CE /CN
29
Fig. 15
Parallel adjustment - knife holder CN
(Adjusting the anti-roll system)
After loosening the two screws (30) the anti-roll
30
system can be adjusted parallel to the knife edge.
After carrying out the adjustment, retighten the
screws (30).
32
Fig. 16
9

1. Operation
Use the knurled nut to height-adjust the anti-roll
system:
• rotate counterclockwise to move the anti-roll
system towards the knife;
• rotate clockwise to move the anti-roll system
away from the knife.
If the anti-roll system is not correctly adjusted
relative to the knife edge, the following problems
occur:
Fig. I: The sections roll up on the
glass plate of the anti-roll system.
Problem: glass plate situated too
low. Solution: rotate knurled nut
I
I
II
counterclockwise until the section
slides down between blade and
anti-roll plate as shown in Fig. III).
Fig. II: The sections tear and after
each section the specimen block
collides with the glass plate.
Problem: glass plate situated too
high. Solution: rotate knurled nut
clockwise until the section slides
down between blade and anti-roll
plate as shown in Fig. III).
Fig. 17
III
10
We recommend pre-adjusting the
anti-roll system at a relatively high
section thickness setting (e.g. 10
µm). – From there, slowly decrease
the section thickness, slightly readjusting the anti-roll system via the
knurled nut (see description above)
each time you select a lower section thickness setting.
Fig. 18
Instruction manual V 2.2 – 08/2005

1. Operation
Cleaning the knife holder CE
Daily cleaning procedure
33
1. Tilt the anti-roll system (33) to the left, hold at
lever (34) while doing so.
2. Loosen clamping lever (35) of pressure plate.
3. Now you can remove the pressure plate (36)
for cleaning (use alcohol or acetone).
34
Fig. 19
38
39
37
36
35
Fig. 20
From time to time, lubricate axles (37) and (38), as
well as groove (39) with a drop of cryostat oil
(type 407).
For disinfection purposes, standard
commercial detergents and disinfectants can be used – our recommendation is Leica Cryofect.
Cleaning the knife holder CN
Daily cleaning procedure
For daily cleaning, it is sufficient to remove section waste from the knife holder with a dry brush.
Make sure to use a cold brush, otherwise the sections will thaw and stick to the knife holder.
Thorough cleaning
From time to time, all movable parts should be
removed for cleaning and subsequent lubrication
with cryostat oil, type 407.
Disinfection
Use e.g. Leica Cryofect.
Spray disinfectant generously and evenly on all
contaminated surfaces (or apply generously with
cloth moistened with disinfectant), allow to soak
for 15 minutes and wipe dry.
Leica knife holder CE /CN
11

2. Ordering information for knife holders CE / CN
Ordering information - knife holder CE
• Knife holder CE for low-profile blades, assy.
• Knife holder CE for high-profile blades, assy.
• Pressure blade for high-profile blades
• Pressure blade for low-profile blades
• Anti-roll systems (metal change frame w/ glass insert)
• Retrofit kit (metal change frame w/ glass insert and swivel arm)
• Glass insert, 70 mm wide
• Low-profile blades - 50 blades in dispenser
• High-profile blades - 50 blades in dispenser
• Leica Cryofect spray disinfectant
Technical specification - knife holder CN
- Variable working distance between clamping jaws: 64 mm or 84 mm
- Usable knife lengths: 12 cm - 22 cm
- Knife height: min. 25 mm - max. 40.3 mm
- Knife height adjustment: max. 16 mm
- Clearance angle setting: 0 - 10, continuously adjustable
Ordering information - knife holder CN
• Knife holder CN, assy.
• Knife support bars – 13 cm and 15 cm long
• Anti-roll system CN (metal change frame and glass insert)
• Glass insert, 50 mm wide
• Knives from 12 to 22 cm long
• Leica Cryofect spray disinfectant
12
Instruction manual V 2.2 – 08/2005

Warranty
Leica Microsystems Nussloch GmbH guarantees that the contractual product delivered has been subjected to a comprehensive quality control
procedure based on the Leica in-house testing standards, and that the product is faultless and complies with all technical specifications and/or agreed
characteristics warranted.
The scope of the warranty is based on the content of the concluded agreement. The warranty terms of your Leica sales organization or the organization from which you have purchased the contractual product shall apply
exclusively.
Technical service information
If you require technical service or replacement parts, please contact your
Leica sales representative or dealer who sold the product.
Please provide the following information:
• Model name and serial number of the instrument.
• Location of the instrument and name of the person to contact.
• Reason for the service call.
• Date of delivery.
3. Warranty and service
Decommissioning and disposal
The instrument or parts of the instrument must be disposed of in compliance
with the local laws.
Leica knife holder CE
13

Notes
14
Instruction manual V 2.1 – 05/2001
 Loading...