


WT535
RADIO CONTROLLED PROJECTION CLOCK WITH DIGITAL THERMOMETER
INTRODUCTION:
Congratulations on purchasing this Projection clock with DCF-77 radio-controlled time. The operation of this
product is simple and straightforward and by reading this operating manual, users will receive the optimum
benefits of all its features.
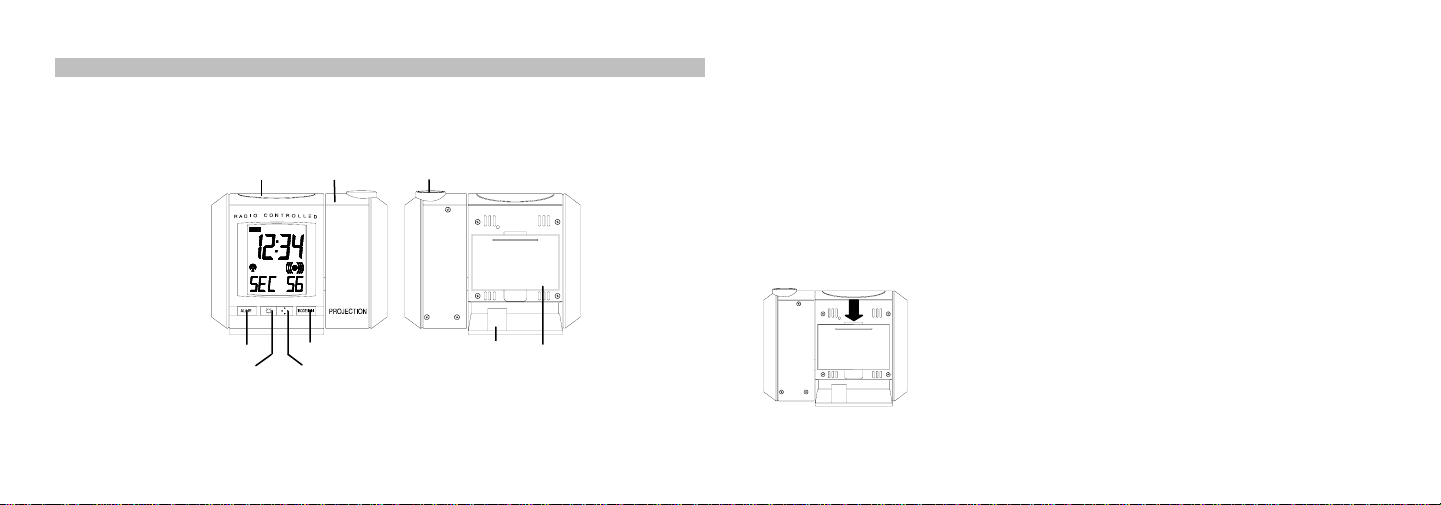
SNOOZE key
Instructions manual
Adjustable projector
Projector lens
AL/HR key
Brightness key
FEATURES:
• DCF-77 Radio controlled time with manual setting option
• 24 hours time display (hour, minutes, seconds)
MODE/MIN key
Direction key
Adapter socket
Battery cover
• Time projection (hour and minute)
• Projection with adjustable brightness and projection orientation possible
• Calendar display (weekday, date, month)
• Alarm setting with snooze function
• Time zone (±9 hours)
• Indoor temperature display in degree Celsius
• LED back-light
SETTING UP:
The Projection clock can be batteries operated or powered by the provided AC/DC adapter.
BATTERIES INSTALLATION
The Projection Clock uses 2 x AA, IEC LR6, 1.5V batteries. To install and replace the batteries, please follow
the steps below (the battery cover is located at the back of the unit):
1a) Press down at the arrow mark on top of the battery cover and pull to
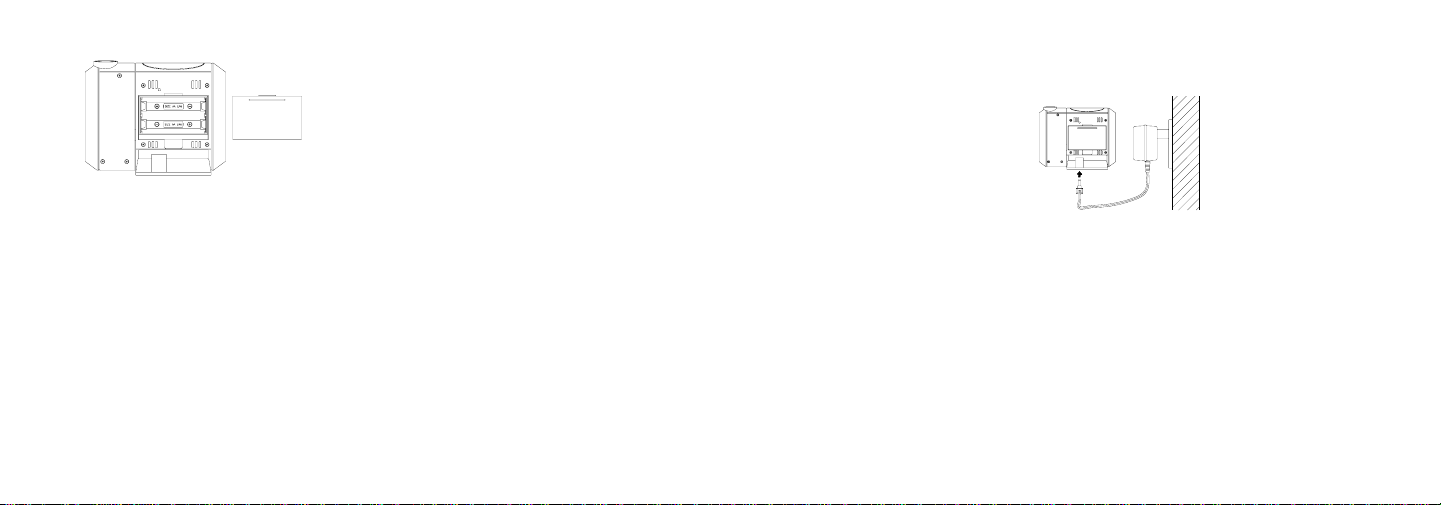
b) Observing the correct polarity, insert the batteries (see markings inside
c) After inserting the batteries, replace the battery cover by clicking into
open to reveal the battery compartment
the battery compartment)
place
Or
2a) Using a finger or other suitable object in the space at the
bottom center of the battery cover and pull to remove
b) Observing the correct polarity, insert the batteries (see
markings inside the battery compartment)
c) After inserting the batteries, replace the battery cover by
1. When the batteries are inserted, all the segments of the LCD will light up briefly and a “beep” will sound.
The Projection clock will now start receiving the DCF time signal. After approximate 3 to 5 minutes, the
DCF time and ‘DCF-77 Tower’ icon will be displayed.
2. If reception is not successful within approximately 10 minutes, either manually set the time or wait for the
clock to receive DCF time. Usually, the Projection clock will attempt to receive the DCF signal in the next
following hour. When this is successful, the received DCF time will override the manually set time. The
date is also updated with the received DCF time (Please refer also to notes on “Radio Controlled Time”
and “Manual Time Setting”).
Your Projection clock is now operational.
Note:
If the batteries are used as the main power source:
1. Projected image brightness, alarm volume and back-light strength would be weaker.
2. Battery life time would be much less than 1 year.
clicking into place
TO USE THE PROJECTOR POWER ADAPTER
The unit comes with an adapter unit for using the projector for an extended period of time, such as throughout
the night.
TO CONNECT THE ADAPTER:
Important!
Make sure that your household voltage is 230V! Otherwise it can result in damaging your
Projection clock.
1. Connect the power adapter to a wall socket.
2. Insert the adapter into the jack at the bottom of the clock.
3. The Projection clock will now start receiving the DCF time signal. After approximate 3 to 5 minutes, the
DCF time and ‘DCF-77 Tower’ icon will be displayed.
4. If reception is not successful within approximately 10 minutes, either manually set the time or wait for the
clock to receive DCF time. Usually, the Projection clock will attempt to receive the DCF signal in the next
following hour. When this is successful, the received DCF time will override the manually set time. The
date is also updated with the received DCF time (Please refer also to notes on “Radio Controlled Time”
and “Manual Time Setting”).
Your Projection clock is now operational.

Note:
If the Projection clock is powered through the adapter, the projection will be constantly ON at the highest
brightness level unless the brightness level is manually changed to a lower brightness level afterwards. And the
brightness of the projection can be change accordingly to enhance the clarity of the projected time by pressing
the
key.
If the Projection clock is battery operated, the projection will be ON at the highest brightness level only when the
SNOOZE key is pressed. The intensity of the brightness level of the projection cannot be changed. If the
SNOOZE is released, the projection will be turned OFF.
Important!
If the DCF-77 signal is not being received, no keys functions can be used. In that case, either
wait for the next reception of the DCF signal or proceed to manual time setting after reset of the
clock for activation of the keys function.
BATTERIES POWERED WITH THE USE OF AC/DC ADAPTER
If the Projection clock is first powered by batteries and the power adapter is subsequently used for extended
period of time, the main power source of the Projection clock will switch to AC/DC power. The batteries will then
act as a backup power source in case of power failure.
TO RESET THE PROJECTION CLOCK
To reset the Projection clock to the factory default setting or in case of a malfunction, please remove all
batteries from the unit and unplug the AC/DC adapter from any power source. Wait at least for 3 minutes
before powering up the Projection clock again.
FUNCTION KEYS:
The radio-controlled Projection clock uses the following keys:
SNOOZE : Activate or deactivate snooze function
Alarm snooze function
: Activate the projection brightness at the highest level
: Exit the setting modes
: Back-light-On
AL/HR : Enter alarm setting mode
: Activate or deactivate alarm
: Stop alarm and snooze function
: Set the hours and day
: Back-light-On
MODE/MIN : Enter manual time setting mode
: Toggle between indoor temperature, seconds, alarm time, and date display
: Enter time zone setting mode
: Set the minutes, weekday and month
: Stop alarm and snooze function
: Back-light-On
: Set the brightness level of the projection (in A/C power mode)
(BRIGHTNESS
(4 levels: High, Medium, Low, OFF)
key)
: Back-light On
: Project the image direction (can display 4 different orientations)
(DIRECTION
: Back-light On
key)
 Loading...