


LA CROSSE TECHNOLOGY WT489 User Manual [fr]
INSTRUCTION MANUEL of WT489
Wake-Up Light with Clock Radio and Nature Sounds
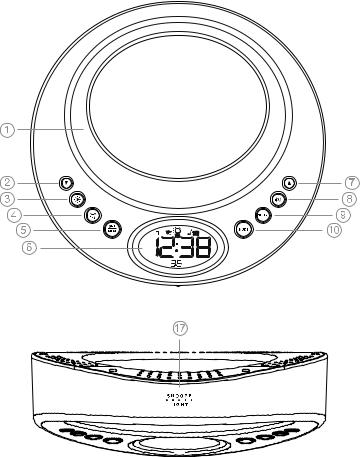
FRONT VIEW
TOP VIEW
P. 1

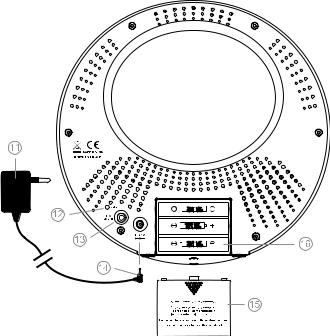
BACK VIEW
P. 2
1 |
LED LIGHT/ LED MOOD LIGHT |
2 |
DOWN |
3 |
LCD HI-L DIMMER |
4 |
ALARM 1 / ALARM 2 |
5 |
SET / MEMORY |
6 |
LCD DISPLAY |
7 |
UP |
8 |
VOLUME |
9 |
SLEEP |
10 |
MODE |
11 |
AC/DC ADAPTOR |
12 |
RESET |
13 |
AUX LINE-IN |
14 |
DC PLUG-IN JACK |
15 |
BATTERY DOOR |
16 |
INSERT 3 X AAA AS BACK UP BATTERIES |
17 |
SNOOZE / LIGHT |
P. 3
FEATURE LISTS:
Gentle Wake-Up-light 15 or 30 minutes before alarm time
Power-saving super bright white LED Light with 15-level brightness control
Color changing LED mood light
Touch sensor for snooze and light
PLL digital tuning FM radio
Wake-by-radio, wake-by-buzzer, wake-by-nature sounds
Digital volume control (30 levels)
Ascending alarm sound
Dual alarm
12 HR / 24 HR time format
10 preset memory radio station
Sleep timer from 5 to 120 minutes
Hi-Lo LCD backlight dimmer control
Programmable snooze alarm 5-60 minutes
Four nature sounds (Birds, Forest, Beach / Water Front, Rain & Storm)
Aux line-in (to play MP3, ipod, iphone)
Battery back-up (3 x AAA batteries, not included)
External power saving AC/DC adaptor (included)
P. 4
QUICK START
For best reception of radio signal, keep your clock few feet away from the AC outlet, AC/DC adaptor, any electronic or mobile devices.
Plug the AC/DC adaptor to any household AC outlet, and then plug the DC jack to the back of your unit. The LCD shows the default time 0:00 and it is ready to work for you.
Extend the FM wire antenna fully and vary the direction for best FM reception. Do not strip, alter or attach to other antennas.
BATTERY BACK-UP INSTALLATION
In the event that the AC/DC adaptor power is disconnected or a power failure or other interruptions occur, the back-up batteries will maintain the time and alarm settings. The light functions do not work when batteries are only used to power your unit.
1.Remove the battery cover at the back.
2.Insert 3 xAAA batteries (alkaline batteries preferred) by observing the + and - polarity signs inside the battery compartment.
3.Replace the battery cover, making sure the cover locks into place.
Note: Please note the white LED light, the colored mood light, always-on LCD backlight do not work while the clock is operating on battery power only.
P. 5
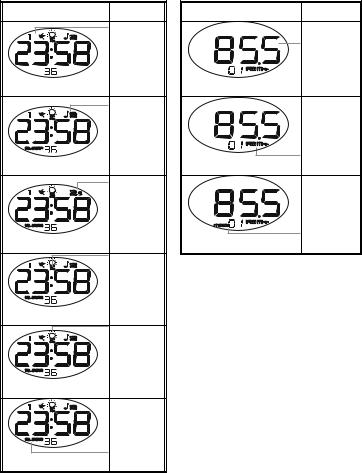
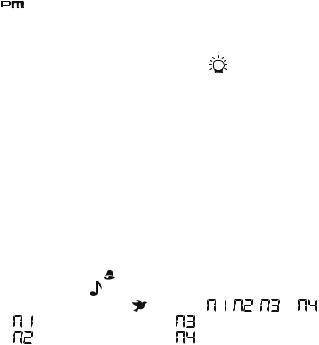
NORMAL CLOCK
DISPLAY
ALARM 1 (WAKE-BY
-
NATURE SOUND)
ALARM 2 (WAKE-BY -RADIO)
ALARM 2 (WAKE-BY
-
BUZZER)
SNOOZE
ICON
LED
LIGHT
ICON
SLEEP
ICON
RADIO FREQUENCY
DISPLAY
RADIO
FREQUENC
Y
DISPLAY
FM RADIO
BAND
PRESET
MEMORY
RADIO
STATION
P. 6

TO SET TIME, 12/24 TIME, SNOOZE DURATION AND WAKE-UP LIGHT
1.Press SET / MEM to enter time set mode, the time digits “0:00” flash. Press ▲ or ▼ to set your desired time. Press and hold ▲ or ▼ will accelerate setting in faster speed.
2.Press SET / MEM again, the clock display shows 24Hr and flashes. Then press ▲ or ▼ to select 12Hr or 24Hr. When 12Hr time format is selected, the  icon will appear on the clock display to indicate the afternoon time.
3.Then press SET / MEM again, the clock display shows Zz and “09” flashes. Press ▲ or ▼ to set your desired snooze duration from 5 to 60 minutes.
4.Then press SET / MEM again, the clock display shows 

 and “OFF” flashes. Then press ▲ or ▼ to set :
15 : turns light on and brighter gently 15 minutes before your set alarm time
30 : turns light on and brighter gently 30 minutes before your set alarm time
OFF: turn off the Wake-Up-Light feature
Press SET / MEM again (or if no key is pressed within 8 seconds) to return to normal time display.
TO SET THE DAILY ALARM 1 & ALARM 2
1.Press ALM 1.2 button once, the LCD display shows  and “0:00” and flashes.
2.Press ▲ or ▼ to set your desired alarm 1 time. Press and hold ▲ or ▼ will accelerate setting in faster speed.
3.Press SET / MEM one at a time to select which alarm type you would like to wake up with:
Wake-by-Buzzer ( icon appears) Wake-by-Radio (
 icon appears)
Wake-by-nature sounds ( icon appears with

 ,
, 
 ,
, 

 or
or 

 below the time digits)
: birds |
: beach / water front |
: forest |
: rain and storm |
4.When both  ,
,  or
or  icon disappear, the alarm is turned off.
5.Press ALM 1.2 again, the LCD display shows  and “0:00” and flashes. You could do alarm 2 settings by repeating Step 2 to Step 4 above.
P.7

TO STOP AND RESET THE ALARM TO COME ON THE NEXT DAY
When the alarm is sounding, press the ALM 1.2 to stop the alarm sound and automatically reset it to
come on the following day.
TO USE THE SNOOZE ALARM
When alarm is sounding, touch the SNOOZE…LIGHT on the top of your unit once, the alarm will be silenced and come on again according to the set snooze duration.
AUTOMATIC SNOOZE ALARM
If the SNOOZE….LIGHT is not touched during the alarm is sounding, the alarm will last for 3 minutes and then turns off automatically. The alarm will stop temporarily according to the set snooze duration (5-60 minutes) and then sound again. This automatic snooze function will last for 1 hour.
To stop the alarm sound, press the ALM 1.2 to stop the alarm sound and automatically reset it to come on the following day.
TO USE THE WHITE LED LIGHT OR THE COLOR CHANGING MOOD LIGHT
1.Simply tap on the top SNOOZE…LIGHT of your unit to turn on the white LED light. The LCD display shows L10, which is the default brightness of the white LED light. You could press ▲ or ▼ to increase or reduce the brightness Level from 0 (lowest) to L15 (highest).
2.Touch the top SNOOZE…LIGHT again to turn on the color changing mood light. The LCD shows 

3.Touch the top SNOOZE…LIGHT again to fix a color of your mood light. The LCD shows
4.Touch the top SNOOZE…LIGHT again to turn off all the light function.
Note: The LCD display will return to time display in 8 seconds if there is no further press of any button.
TO USE THE HI-LO DIMMER CONTROL
Simply press 
 once to select Hi-Lo brightness of the LCD display.
P. 8

TO USE THE MODE FUNCTION
Simply press MODE to change the mode as belows:
Clock Mode → Radio Mode → Nature Sounds Mode → AUX Function Mode → Return to Clock
Mode
TO LISTEN TO THE RADIO
1.Press MODE once to turn on the radio, the clock display will show the radio frequency in 
 .
.
2.Then press ▲ or ▼ to tune into a desired radio station. To scan the stations, touch and hold ▲ or ▼ for a few seconds and release. The radio will search and stop on the next strong station.
Remark: keep your radio away from fluorescent lamps or mobile phone, which may cause interference to the radio.
TO LISTEN TO NATURE SOUNDS |
|
|
|
|
|
Press MODE one at a time, the LCD shows |
, |
, |
or |
with the |
icon to |
indicate your selected nature sound: |
|
|
|
|
|
: birds |
|
|
|
: beach / water front |
|
: forest |
|
|
|
: rain and storm |
|
TO USE THE AUX FUNCTION TO PLAY MUSIC IN YOUR IPHONE, IPOD OR MP3
You could play the music in your iphone, ipod or MP3 device on your Wake-Up-Light radio by using
the AUX function.
1.Press MODE one at a time until the LCD shows  under the time digits.
2.Plug in the AUX cable to the AUX Line-in socket at the back of your Wake-Up-Light Radio and one end to the earphone socket of your iPhone, iPod or MP3 device.
3.Turn on your MP3, iPhone or iPod to play the music you like. Adjust the volume by using the 
 and ▲ or ▼ if you need.
You could stop playing the radio, the nature sound or your MP3 music anytime by pressing and
holding MODE for 2 seconds.
P. 9
TO SET VOLUME OF YOUR MUSIC OR NATURE SOUNDS
1.Press 
 once, the LCD display “L15” (Volume Level 15), then press ▲ or ▼ to adjust to your desired volume level from Level 0 to 30.
2.The LCD display will return to time display in 8 seconds if there is no further press of any button.
TO USE THE MEMORY SET (RADIO PRESET) FUNCTION
This clock radio features a total of 10 preset memory of FM station. This allows you to preset your
favorite stations and access them quickly.
1.Press MODE once to turn on the radio.
2.Press ▲ or ▼ to select a radio station you like to preset memory.
3.Then press and hold the SET / MEM for 2 seconds until  icon flashes and “01” is shown under the radio frequency digits.
4.Press and hold SET /MEM for 2 second to store Memory 01.  icon becomes static.
To preset Memory 2 and other FM station
1.Press ▲ or ▼ to select another radio station you want to preset.
2.Press and hold SET / MEM for 2 seconds until  flashes and “01” appears at upper right of LCD.
3.Single press SET / MEM to select “02”, then press and hold SET/ MEM to store Memory 2.
4.Repeat above step 1-3 to preset up to ten FM stations.
5.To listen to a preset station at any time: turn on the radio first, single press the SET /MEM to select a preset station while the radio is on.
6.To edit a preset station, select another station and then repeat Step 2-4. This overrides the original setting.
P. 10
TO USE THE SLEEP TIMER
You could use Sleep Timer to control your light, radio, nature sound or music before you go to sleep.
1.Press the SLEEP once, the LCD display shows the SLEEP icon and “120” (120 minutes) and flashes. Press SLEEP one at a time to select a 120-, 90-, 60-, 45-, 30-, 15-, 10-, 5-minute sleep timer.
2.The sleep timer display remains for few seconds and then returns to normal time display. The  icon will appear, showing the timer is activated.
3.The radio will play for the programmed sleep time and then shut off. To check how many sleep time is remaining, press SLEEP once.
4.To turn off the radio before the sleep time has elapsed, press and hold MODE for 2 seconds. Remark: the SLEEP function could also control your white LED light, colored mood Light, nature sounds or the AUX function in the same way.
TROUBLE SHOOTING
If your unit displays irrelevant time or does not function properly, which maybe caused by electro-static discharge or other interference, use a thin object to press the RESET button at the back of your unit. All
the settings will be reset to default settings and you need to set your unit again.
CARE OF YOUR PRODUCT
1.Place your clock radio on a stable surface, away from sources of direct sunlight or excessive heat or moisture.
2.Protect your furniture when placing your units on a natural wood and lacquered finish by using a cloth or protective material between it and the furniture.
3.Clean your unit with a soft cloth moistened only with mild soap and water. Stronger agents such as Benzine, thinner or similar materials can damage the surface of the unit. Make sure the unit is unplugged before cleaning.
4.Do not mix old and new batteries. Do not mix alkaline, standard (carbon-zinc), or rechargeable (nickel-cadimium) batteries.
P.11

5.If the unit is not to be used for a prolonged period, such as a month or longer, remove the batteries to prevent possible corrosion. Should the battery compartment become corroded or dirty, clean the compartment thoroughly and replace the batteries.
6.Do not open the inner back case or tamper with any components of this unit.
7.Do not plug in any other AC/DC adaptor with incorrect specifications or voltage.
LIABILITY DISCLAIMER
The electrical and electronic wastes contain hazardous substances. Disposal of electronic waste in wild country and/or in unauthorized grounds strongly damages the environment.
Please contact your local or/and regional authorities to retrieve the addresses of legal dumping grounds with selective collection.
All electronic instruments must from now on be recycled. User shall take an active part in the reuse, recycling and recovery of the electrical and electronic waste.
The unrestricted disposal of electronic waste may do harm on public health and the quality of environment.
As stated on the gift box and labeled on the product, reading the “User manual” is highly recommended for the benefit of the user. This product must however not be thrown in general rubbish collection points.
The manufacturer and supplier cannot accept any responsibility for any incorrect readings and any consequences that occur should an inaccurate reading take place.
This product is designed for use in the home only as indication of the temperature.
This product is not to be used for medical purposes or for public information.
The specifications of this product may change without prior notice.
This product is not a toy. Keep out of the reach of children.
No part of this manual may be reproduced without written authorization of the manufacturer.
P. 12
MANUEL D’UTILISATION WT489
Radio réveil lumineux avec sons de la nature
FACE AVANT
VUE DU DESSUS
P. 13
FACE ARRIERE
P. 14
1 |
LUMIERE BLANCHE / COULEUR CHANGEANTE |
2 |
FLECHE VERS LE BAS |
3 |
VARIATEUR DE LUMINOSITE |
4 |
ALARME 1 / ALARME 2 |
5 |
SET / MEMORY |
6 |
AFFICHAGE LCD |
7 |
FLECHE VERS LE HAUT |
8 |
VOLUME |
9 |
MINUTEUR |
10 |
MODE |
11 |
ADAPTATEUR AC/DC |
12 |
RESET |
13 |
ENTREE AUXILIAIRE |
14 |
FICHE DE CONNEXION SECTEUR |
15 |
COUVERCLE DU COMPARTIMENT DES PILES |
16 |
INSEREZ 3 PILES DE TYPE AAA |
17 |
SNOOZE / LUMIERE |
P. 15
FONCTIONS :
Réveil lumineux 15 ou 30 minutes avant l’alarme programmée
Lumière blanche avec 15 niveaux de contraste
Lumière LED changeante
Touches “Snooze” et “Lumière” tactiles
Radio FM à réglage digital
Réveil par radio, par sonnerie, ou par sons de la nature
Réglage digital du volume (30 niveaux)
Sonnerie progressive de l’alarme
2 alarmes programmables
Format 12 HR ou 24 HR
10 stations radio peuvent être mémorisées
Minuteur programmable de 5 à 120 minutes
Variateur de luminosité de l’écran
Répétition de l’alarme de 5 à 60 minutes (snooze)
4 sons de la nature (oiseaux, forêt, bord de mer, tempête)
Entrée auxiliaires (MP3, ipod, iphone)
Alimentation : 3 x AAA LR3, non incluses
Adaptateur secteur AC/DC inclu
P. 16
MISE EN OEUVRE
Pour une réception radio optimisée, placez votre radio réveil éloigné des prises secteur ou tout appareil électrique.
Branchez l’adaptateur AC/DC à une prise secteur, puis connectez le câble secteur à la fiche du radio réveil prévue à cet effet (au dos). L’affichage LCD affiche par défaut l’heure “0:00”. Le réveil est maintenant prêt à être utilisé.
Etendez complètement l’antenne FM et variez en la position pour une meilleure réception. L’antenne ne doit être ni dénudée, ni modifiée, ni attachée à d’autres antennes.
INSTALLATION DES PILES
Dans le cas où l’alimentation secteur serait déconnectée, ou s’il y a des coupures de courant, les piles de secours prendraient le relais afin de conserver l’heure et l’alarme. Les fonctions “lumière” ne fonctionneront pas si le seul mode d’alimentation sont les piles.
1.Retirez le couvercle des piles situé au dos de l’appareil
2.Insérez 3 piles de type AAA (piles alcaline conseillées) en respectant les polarités +/- indiquées dans le compartiment des piles
3.Replacez le couvercle en veillant à sa bonne fermeture
Note: Dans le cas où l’alimentation du radio réveil ne se ferait que par piles, les fonctions “lumière blanche”, “lumière couleurs changeantes” et “rétro éclairage constant” ne sont pas opérationnelles.
P. 17

AFFICHAGE NORMAL
ALARME 1 (REVEIL PARSONS DE LA NATURE )
ALARME 2 (REVEIL PAR-RADI O)
ALARME 2 (REVEIL PARSONNERI E)
ICONE
SNOOZE
ICONE
LUMIERE
ICONE
MINUTEU
R
AFFICHAGE DES
FREQUENCES RADIO
AFFICHAG
E
FREQUENC
E RADIO
BANDE
RADIO FM
STATION
RADION
PRE-ENRE
GISTREE
P. 18
REGLAGE DE L’HEURE, DU FORMAT 12/24 HEURE, DUREE DU SNOOZE ET LUMIERE DE
REVEIL
1.Appuyez sur la touche SET / MEM pour entrer dans les réglages : l’heure “0:00” clignote. Appuyez sur les touches ▲ ou ▼ pour régler l’heure. Maintenez la pression sur les touches ▲ ou ▼ pour un réglage rapide.
2. |
Appuyez encore une fois sur la touche SET / MEM : 24Hr clignote. Utilisez les touches ▲ |
||
|
ou ▼ pour sélectionner le format 12H ou 24H. Si le format 12H est sélectionné, l’icône |
||
|
va s’afficher pour indiquer l’heure d’après midi. |
|
|
3. |
Appuyez encore une fois sur SET / MEM : l’écran va afficher |
Zz et “09” qui clignote. |
|
|
Appuyez sur les touches ▲ ou ▼ pour régler la durée de répétition de l’alarme, de 5 à 60 |
||
|
minutes. |
|
|
4. |
Appuyez encore une fois sur SET / MEM : l’écran affiche |
et “OFF” clignote. Appuyez |
|
|
ensuite sur |
▲ ou ▼ pour : |
|
|
15 : allumer la lumière 15 minutes avant l’heure d’alarme programmée |
||
|
30 |
: allumer la lumière 30 minutes avant l’heure d’alarme programmée |
|
OFF: désactiver la fonction lumière
Appuyez ensuite sur SET / MEM (ou n’activez aucune touche durant 8 secondes) pour retourner à l’affichage principal.
REGLAGE ALARME 1 & ALARME 2
1.Appuyez une fois sur la touche ALM 1.2 : l’écran affiche  et “0:00” clignote.
2. |
Utilisez les touches ▲ ou ▼ pour régler l’heure d’alarme 1 souhaitée. Maintenez les |
|
touches ▲ ou ▼ pour un réglage rapide. |
3. |
Appuyez sur la touche SET / MEM afin de sélectionner le type d’alarme souhaitée : |
Réveil par sonnerie ( |
apparaît) |
|
|
|
|
|
Réveil par radio ( |
apparaît) |
|
|
|
|
|
Réveil par son de la nature ( |
apparaît avec |
, |
, |
ou |
) |
|
: oiseaux |
|
|
: bord de mer |
|
|
|
: forêt |
|
|
: tempête |
|
|
|
4.Si toutes les icônes  ,
,  et
et  disparaissent, l’alarme est désactivée.
P.19

5.Appuyez encore une fois sur la touche ALM 1.2 : l’écran affiche  et “0:00” clignote. Vous pouvez régler l’alarme 2 en répétant les étapes de 2 à 4 (voir ci-dessus).
ARRET DE L’ALARME
Lorsque l’alarme sonne, appuyez sur la touche ALM 1.2 pour l’arrêter. L’alarme sonnera alors le
lendemain, à l’heure programmée.
UTILISATION DE LA REPETITION DE L’ALARME (SNOOZE)
Lorsque l’alarme sonne, effleurez SNOOZE…LIGHT sur le dessus du réveil. L’alarme va être arrêtée et reprendra après la durée de répétition programmée.
REPETITION AUTOMATIQUE DE L’ALARME
Si la zone SNOOZE….LIGHT n’est pas effleurée lorsque l’alarme sonne, l’alarme sonnera durant 3 minutes puis s’éteindra automatiquement. L’alarme s’arrêtera automatiquement pendant le temps programmé (de 5 à 60 minutes) puis sonnera à nouveau. La répétition automatique s’arrêtera au bout d’1 heure.
Pour arrêter complètement l’alarme, appuyez sur la touche ALM 1.2 L’alarme sonnera alors le lendemain, à l’heure programmée.
LUMIERE BLANCHE & COULEUR CHANGEANTE
1.Effleurez la zone SNOOZE…LIGHT pour allumer la lumière blanche. L’écran affiche L10, ce qui est le niveau de contraste par défaut. Utilisez les touches ▲ ou ▼ pour ajuster le contraste désiré, de 0 à L15.
2.Effleurez encore une fois la zone SNOOZE…LIGHT pour sélectionner la lumière changeante. L’écran affiche 
 .
.
3.Effleurez SNOOZE…LIGHT pour sélectionner la couleur. L’écran affiche 
4.Effleurez encore une fois la zone SNOOZE…LIGHT pour éteindre tout éclairage.
Note: Si aucune touche n’est activée durant 8 secondes, l’affichage repasse à l’affichage principal
de l’heure.
ECLAIRAGE DE L’ECRAN
Appuyez sur la touche 
 pour activer ou désactiver l’éclairage de l’écran. P. 20
FONCTION “MODE”
Appuyez sur la touche MODE pour passer successivement aux fonctions suivantes : “Heure” → “Radio” → “Sons de la nature” →” Auxiliaires” → Retour à la fonction “Heure”
ECOUTER LA RADIO
1.Appuyez une fois sur la touche MODE pour allumer la radio. L’écran affiche alors la fréquence radio 
 .
.
2. |
Utilisez les touches ▲ et ▼ pour sélectionner la fréqunce radio souhaitée. Pour un |
|
balayage des stations radio, maintenez les touches ▲ ou ▼ durant quelques secondes puis |
|
relâchez. La station radio principal suivante sera sélectionnée. |
Remarque : placez votre radio réveil éloigné de lampes fluorescentes qui pourraient provoquer des interférences radio.
SONS DE LA NATURE
Après la fonction radio, une nouvelle pression sur la touche MODE vous permet d’écouter les sons
de la nature. L’écran affiche successivement |
, |
, |
ou |
avec l’icône |
pour vous indiquer le son sélectionné : |
|
|
|
|
: oiseaux |
|
|
: bord de mer |
|
: forêt |
|
|
: tempête |
|
FONCTION “AUXILIAIRE” POUR BRANCHEMENT IPHONE, IPOD OU MP3
Vous pouvez écouter la musique enregistrées sur votre iphone, ipod ou MP3 sur ce radio réveil grâce à la fonction AUX.
1.Après les sons de la nature, appuyez encore une fois sur la touche MODE. L’écran affiche alors  .
.
2.Branchez le câble de votre appareil dans la fiche AUX Line-in située au dos du radio réveil et l’écouteur dans la fiche de votre iPhone, iPod ou MP3.
3.Allumez ensuite votre MP3, iPhone ou iPod pour écouter la musique. Ajustez le volume en
utilisant la touche 
 et ▲ ou ▼ si besoin.
Vous pouvez stopper à tout moment l’écoute de la radio, les sons de la nature ou la lecture de votre MP3 en maintenant la touche MODE pendant 2 secondes.
P. 21
REGLAGE DU VOLUME (lecture de votre musique ou des sons de la nature)
1.Appuyez une fois sur la touche 
 : l’écran affiche “L15” (Volume niveau 15), puis ajustez le volume à l’aide des touches ▲ ou ▼ , de 0 à 30.
2.Si aucune touche n’est activée durant 8 secondes, l’affichage repasse à l’affichage principal de l’heure.
FONCTION MEMOIRE (STATIONS RADIO PRE-ENREGISTREES)
Ce radio réveil vous offre la possibilité d’entrer en mémoire une sélection de 10 stations de radio FM. Vous avez ainsi la possibilité de pré-sélectionner vos stations radio préférées pour pouvoir ensuite les sélectionner rapidement.
1.Appuyez sur la touche MODE une fois pour allumer la radio.
2. |
Utilisez les touches ▲ ou ▼ pour sélectionner la station de radio que vous souhaitez |
|
enregistrée |
3.Maintenez ensuite la pression sur la touche SET / MEM pendant 2 secondes jusqu’à ce que
 clignote à l’écran et que “01” s’affiche.
4.Maintenez ensuite la touche SET /MEM pendant 2 secondes pour enregistrer en mémoire 01 la station radio.  s’affiche alors de façon permanente.
MEMOIRE 02 ET AUTRES STATIONS RADIO FM
1.Appuyez sur les touches ▲ ou ▼ pour sélectionner une autre station radio que vous souhaitez enregistrée
2.Maintenez la touche SET / MEM pendant 2 secondes jusqu’à ce que  clignote et que “01” apparaisse dans le coin en haut à droite de l’écran
3.Utilisez la touche SET / MEM pour sélectionner “02”, puis maintenez la touche SET/ MEM pour enregistrer la station radio en mémoire 2.
4.Répétez les étapes de 1 à 3 pour enregistrer jusqu’à 10 stations radio FM
5.Pour écouter une station de radio préalablement enregistrée : allumez la radio, appuyez sur la touche SET / MEM pour sélectionner une station de radio pré-enregistrée
6.Si vous souhaitez modifier une station radio enregistrée, sélectionnez la nouvelle station de radio et répétez les étapes 2 à 4. La programmation d’origine est alors annulée.
P.22
UTILISATION DU MINUTEUR
Vous pouvez utiliser cette fonction “Minuteur” pour arrêter la lumière, la radio, les sons de la nature
ou la musique avant d’aller vous coucher.
1.Appuyez une fois sur la touche SLEEP : l’écran affiche l’icône SLEEP et “120” (120 minutes) clignote. Appuyez successivement sur la touche SLEEP pour sélectionner un minuteur de 120, 90, 60, 45, 30, 15, 10 ou 5-minutes.
2.L’écran du minuteur reste affiché durant quelques secondes puis l’affichage revient à l’affichage principal. L’icône  apparaît alors, indiquant que le minuteur est activé.
3.La radio sera allumée pendant la durée programmée puis s’éteindra automatiquement une fois le temps écoulé. Pour consulter la durée restante d’écoute de la radio, appuyez sur la touche SLEEP une fois.
4.Pour arrêter la radio avant l’écoulement de la durée du minuteur, appuyez une fois sur la touche MODE pendant 2 secondes.
Remarque: La fonction “Minuteur” peut également contrôler l’arrêt de la lumière, de la lumière changeante, des sons de la nature et des auxiliaires connectés.
PROBLEME
Si votre radio réveil affiche une heure fausse ou ne fonctionne pas correctement, ce qui peut être causé par des ondes électromagnétiques ou des interférences, utilisez un objet fin et pointu et appuyez sur le bouton RESET situé au dos du radio réveil. Celui-ci sera alors ré-initialisé aux paramètres d’usine et les réglages devront être refaits.
ENTRETIEN
1.Placez votre radio réveil sur une surface stable, protégé du soleil direct et de l’humidité
2.Si vous placez le radio réveil sur un meuble en bois ou laqué, placez une protection entre le radio réveil et le meuble afin de protéger celui-ci
3.Nettoyez le radio réveil ave un chiffon doux humide. N’utilisez pas de produits détergents qui pourraient endommager l’appareil. Assurez vous que la radio réveil est débranché du secteur avant nettoyage.
4.Ne mélanger pas nouvelles et anciennes piles. Ne mélanger pas des piles alcalines, des piles
standards (carbon-zinc), et des piles rechargeables (nickel-cadimium). P. 23

5.Si l’appareil n’est pas utilisé pour une longue période, il est conseillé d’en retirer les piles. Si le compartiment des piles est sale ou corrodé, nettoyez le et replacez ensuite les piles.
6.N’ouvrez pas l’appareil et n’intervenez pas sur ces composants
7.N’utilisez pas d’autre adaptateur secteur AC/DC que celui livré avec le produit (les spécificités et tension peuvent être différentes).
INFORMATION DES CONSOMMATEURS :
Le rejet des déchets électroniques dans des décharges sauvages et/ou non contrôlées nuit fortement à l’environnement
Consultez les services officiels locaux ou régionaux pour connaître les points de collecte sélective et de traitement les plus proches de chez vous
Tous les appareils électroniques doivent être désormais recyclés. Chaque utilisateur doit contribuer activement au recyclage de ses propres déchets
Le rejet sauvage des déchets électroniques peut avoir des conséquences sur la santé publique et sur la qualité de l’environnement
Ainsi qu’il est indiqué sur la boîte et sur le présent produit, la lecture du manuel est recommandée pour une utilisation optimisée ; ce produit ne doit pas être jeté dans des poubelles non-spécialisées.
Le fabricant et ses fournisseurs déclinent toute responsabilité pour tous relevés incorrects et toutes conséquences consécutives à des relevés incorrects.
Cet appareil ne doit pas être utilisé à des fins médicales ou pour l'information du public.
Cet appareil n'est conçu que pour un usage individuel à titre d'indication du temps qu'il va faire et ne prétend pas être rigoureusement exact.
Les spécifications de ce produit sont susceptibles de modifications sans avis préalable.
Ce produit n'est pas un jouet. Le conserver hors de la portée des enfants.
La reproduction de tout ou partie de ce livret est interdite sans l'accord écrit du fabricant
DIRECTIVE R&TTE 1999/5/CE
Résumé de la Déclaration de Conformité : Nous certifions que ce dispositif de transmission sans fil est conforme aux dispositions essentielles de la Directive R&TTE 1999/5/CE.
P. 24
 Loading...