

Page 1
BR 40/10 C
English 3
Français 10
Español 19
59630320 07/12
Page 2

2
Page 3
IMPORTANT SAFETY IN-
English
STRUCTIONS
READ ALL INSTRUCTIONS
BEFORE USING.
WARNING
To reduce the risk of fire, electric
shock, or injury:
– Do not leave appliance when
plugged in. Unplug from outlet
when not in use and before servicing.
WARNING
– TO REDUCE THE RISK OF ELEC-
TRIC SHOCK-USE INDOORS
ONLY
– Do not allow to be used as a toy.
Close attention is necessary when
used by or near children.
– Use only as discribed in this manu-
al. Use only manufacturer`s recommended attachments.
– Do not use with damaged cord or
plug. If appliance is not working as
it should, has been dropped, damaged, left outdoors, or dropprd into
water, return it to a service center.
– Do not pull or carry by cord, use
cord as a handle, close a door on
cord, or pull cord around sharp edges or corners. Do not run appliance
over cord. Keep cord away from
heated surfaces.
– Do not unplug by pulling on cord. To
unplug, grasp the plug, not the
cord.
– Do not handle plug or appliance
with wet hands.
– Do not put any object into openings.
Do not use with any opening
blocked; keep free of dust, lint, hair,
and anything that may reduce air
flow.
– Keep hair, loose clothing, fingers,
and all parts of body away from
openings and moving parts.
– Turn off all controls before unplug-
ging.
– Use extra care when cleaning on
stairs.
– Do not use to pick up flammable or
combustible liquids, such as gasoline, or use in areas where they may
be present.
– Connect to a properly grounded
outlet only. See Grounding Instruction.
SAVE THESE INSTRUCTIONS
GROUNDING INSTRUCTIONS
This appliance must be grounded. If it
should malfunction or breakdown,
grounding provides a path of least resistance for electric current to reduce
the risk of electric shock. This appliance is equipped with a cord having an
equipment-grounding conductor and a
grounding plug. The plug must be inserted into an appropriate outlet that is
properly installed and grounded in accordance with all local codes and ordinances.
WARNING
Improper connection of the equipment
grounding conductor can result in a
risk of electric shock. Check with a
qualified electrician or service person if
you are in doubt as to whether the outlet is properly grounded. Do not modify
the plug provided with the appliance-if
it will not fit the outlet, have a proper
outlet installed by a qualified electrician.
This appliance is for use on a nominal
120-volt circuit and has a grounding attachment plug that looks like the plug
illustrated in sketchpicture A. Make
sure that the appliance is connected to
an outlet having the same configuration as the plug. No adaptor should be
used with this appliance.
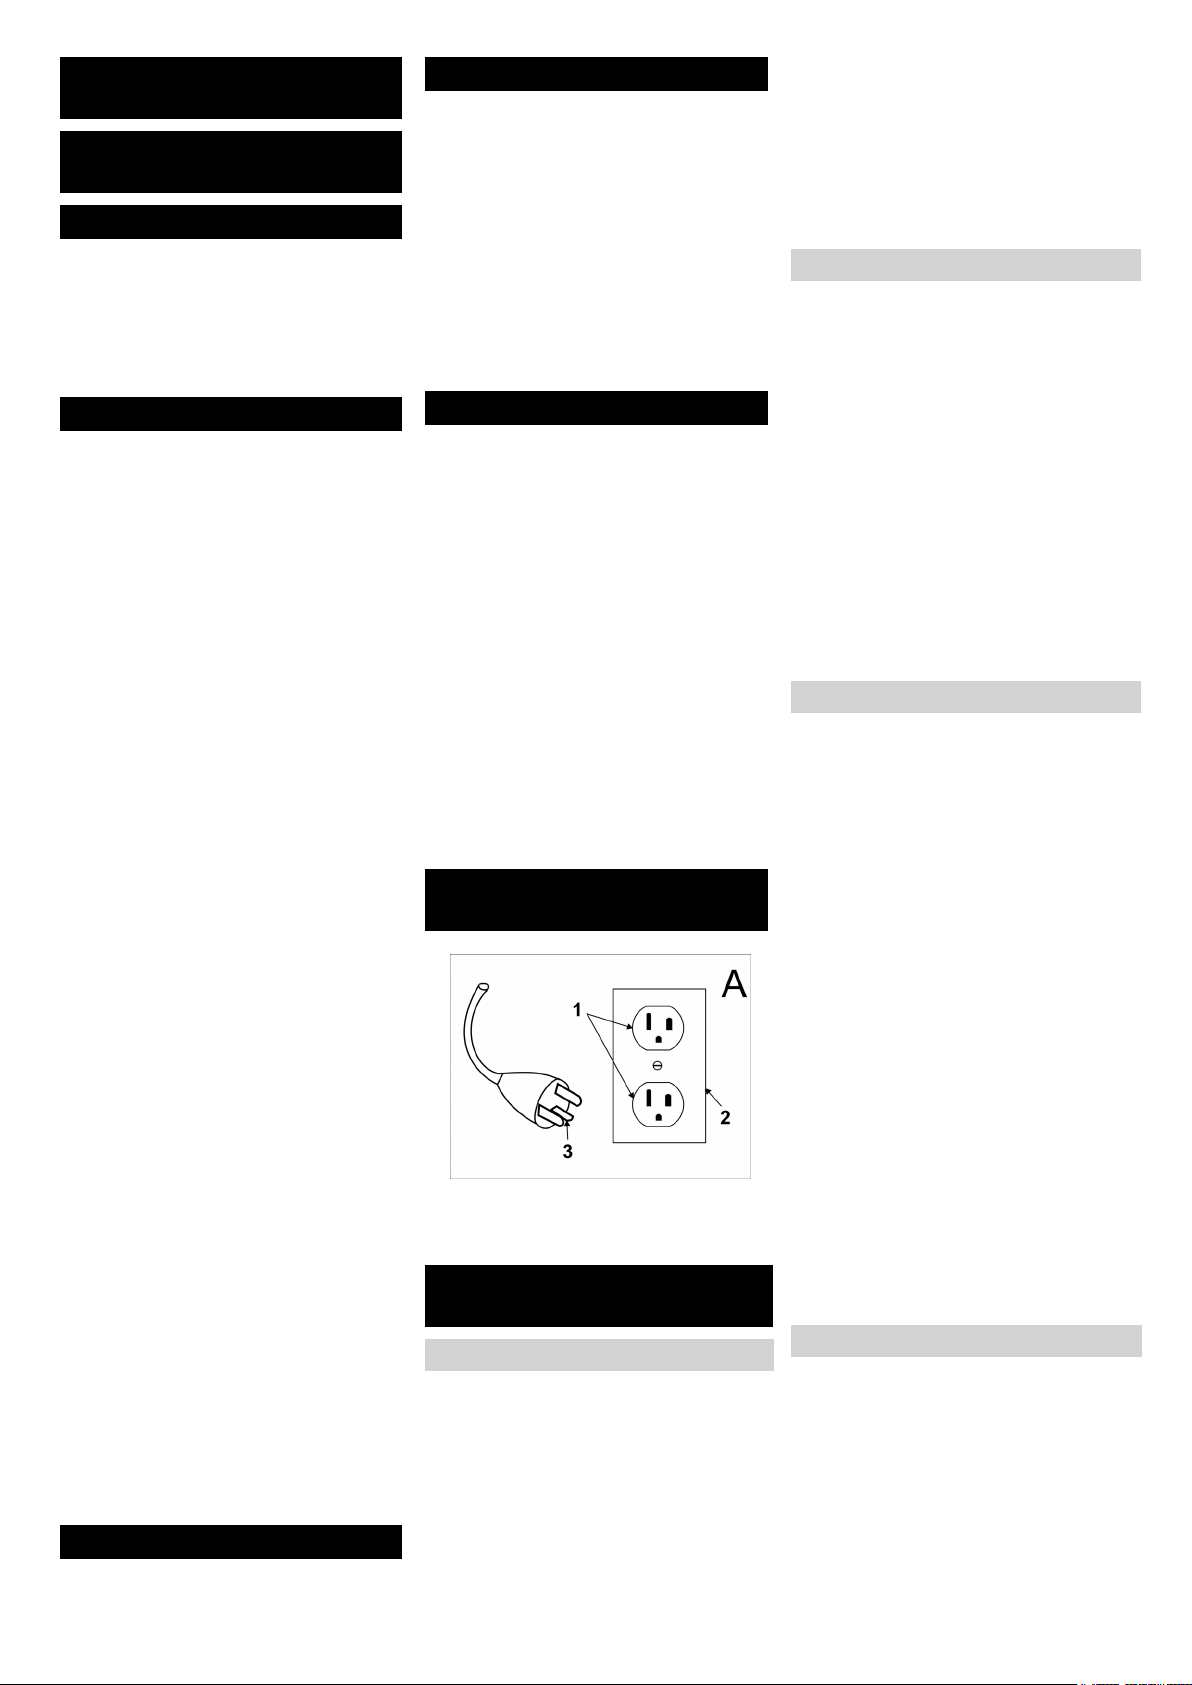
CONNECT TO A PROPERLY
GROUNDED OUTLET ONLY
1 Grounded outlet
2 Grounded outlet Box
3 Grounded Pin
OPERATING SAFETY RULES
AND PRACTICES
Operator Responsibility
Save operation is in the responsibility
of the operator.
The operator shall be familiar with the
operation and function of all controls
and instruments before undertaking to
operate the unit.
Before operating the unit, operators
shall have read and be familiar with the
operator’s manual for the particular
unit being operated and they shall also
abide by the safety rules and practices
in the following paragraphs.
Before operating any unit, the operator
shall be familiar with unusual operating
conditions which may require additional safety precautions or special operating instructions.
General
Before starting to operate the unit be in
operating position.
Do not start or operate the unit, any of
its functions or attachments, from any
place other than from the designated
operators position.
Before leaving the operator’s position:
A bring the unit to a complete stop;
B if the unit must be on an incline,
block the wheels.
Maintain a safe distance from the edge
of ramps, platforms, and other similar
working surfaces.
Do not add to, or modify the unit.
Do not block access to fire aisles, stairways or fire equipment.
Travelling
Yield the right of way to pedestrians
and emergency vehicles such as ambulances and fire trucks.
Cross railroad tracks at an angle wherever possible. Do not park closer than
6 ft (1800 mm) to the nearest rail of a
railroad track.
Keep a clear view of the path of travel
and observe for other traffic, personnel, and safe clearances.
Under all travel conditions, operate the
unit at a speed that will pernit it to be
brought to a stop in a safe manner.
Do not indulge in stunt driving or horseplay.
Slow down for wet and slippery floors.
Before driving over a dockboard or
bridge plate, be sure that it is properly
secured. Drive carefully and slowly
across the dockboard or bridge plate,
and never exceed its rated capacity.
When negotiating turns, reduce speed
to a safe level consistent with the operating environment. Make the turns
smoothly.
Operator care of the unit
If the unit is found to be in need of repair or in any way unsafe, or contributes to an unsafe condition, the matter
shall be reported immediately to the
user’s designated authority, and the
unit shall not be operated until it has
been restored to safe operating condition.
If during operation the unit becomes
unsafe in any way, the matter shall be
- 1
3EN
Page 4
reported immediately to the user’s designated authority, and the unit shall not
be operated until it has been restored
to safe operating condition.
Do not make repairs or adjustments
unless specifically authorized to do so.
MAINTENANCE AND REBUILD
PRACTICES
Operation of the unit may be hazardous if maintenance is neglected or repairs, rebuilds, or adjustments are not
performed in accordance with the manufacturer’s design criteria. Therefore,
maintenance facilities (on or off premises), trained personnel, and detailed
procedures shall be provided.
Maintenance and inspection of the unit
shall be performed in conformance
with the following practices:
A a schedules planned maintenance,
lubrication, and inspection system
shall be followed; consult the manufacturer’s recommendations.
B only tranined and authorized per-
sonnel shall be permitted to maintain, repair, adjust, and inspect the
unit, and in accordance with manufacturer’s specifications.
Avoid fire hazards and have fire protection equipment present in the work
area. Do not use open pans of fuel or
flammable cleaning fluids for cleaning
parts.
FIRE SAFETY STANDARD
Any unit not in safe operating condition
shall be removed from service.
Repairs shall not be made in Class I,
Class II, and Class III locations.
Fire Prevention: The unit shall be kept
in a clean condition and reasonably
free of lint, excess oil, and grease.
Noncombustible agents are preferred
for cleaning the unit. Flammable liquids
[those having flash points at or above
100°F (37,8°C)] are not allowed. Precautions regarding toxicity, ventilation,
and fire hazard shall be appropriate for
the agent or solvent used.
Nameplate Visibility: The unit type designations as shown on the nameplate
and the type markers shall not be covered over with paint so that their identification information is obscured.
The unit shall not be used in classified
areas.
Please read and comply
with these instructions prior to the initial operation of your appliance. Retain these operating
instructions for future reference or for
subsequent possessors.
Contents
Function. . . . . . . . . . . . . . . . EN . . . 2
Proper use . . . . . . . . . . . . . . EN . . . 2
Environmental protection. . . EN . . . 2
Operating elements . . . . . . . EN . . . 3
Before Commissioning. . . . . EN . . . 3
Operation. . . . . . . . . . . . . . . EN . . . 4
Maintenance and care . . . . . EN . . . 5
Faults. . . . . . . . . . . . . . . . . . EN . . . 5
Specifications. . . . . . . . . . . . EN . . . 6
Accessories . . . . . . . . . . . . . EN . . . 7
Warranty . . . . . . . . . . . . . . . EN . . . 7
Spare parts . . . . . . . . . . . . . EN . . . 7
Safety instructions
Before using the appliance for the first
time, read and observe these operating instructions and the accompanying
brochure: Safety information for brush
cleaning units and spray-extraction
units, 5.956-251.
Symbols
The following symbols are used in this
operating manual:
Danger
Indicates an immediate threat of danger. Failure to observe the instruction
may result in death or serious injuries.
몇 Warning
Indicates a possibly dangerous situation. Failure to observe the instruction
may result in light injuries or damage to
property.
Note
Indicates useful tips and important information about the product.
Function
The appliance is used for the wet
cleaning or polishing of level floors.
Two brush rollers located opposite of
each other clean the floor by means of
the added detergent liquid. A working
width of 400 mm and a capacity of 10 l
each of the fresh and dirt water reservoirs allow for effective cleaning.
The power supply operation allows a
high capacity without a restriction of
the working time.
Note
The appliance can be equipped with
various accessories depending on the
cleaning task. Please request our catalogue or visit us on the Internet at
www.kaercher.com.
Proper use
Use this appliance only as directed in
these operating instructions.
– The appliance may only be used for
the cleaning of hard surfaces that
are not sensitive to moisture and
polishing operations.
The application temperature ranges
from +5°C to +40°C.
– The appliance is not suited for the
cleaning of frozen grounds (e.g. in
cold stores).
– The appliance may only be
equipped with original accessories
and spare parts.
– The appliance has been designed
for the cleaning of floors inside or or
covered surfaces. With respect to
other applications the usage of alternative brushes must be checked.
– The appliance is not intended for
the cleaning of public traffic routes.
Environmental protection
The packaging materials
are recyclable. Please do
not throw packaging in the
domestic waste but pass it
on for recycling.
Old units contain valuable
recyclable materials. Batteries, oil and similar substances may not be released into
the environment. Therefore
please dispose of old units
through suitable collection
systems.
Notes about the ingredients
(REACH)
You will find current information about
the ingredients at:
www.kaercher.com/REACH
4 EN
- 2
Page 5
25
24
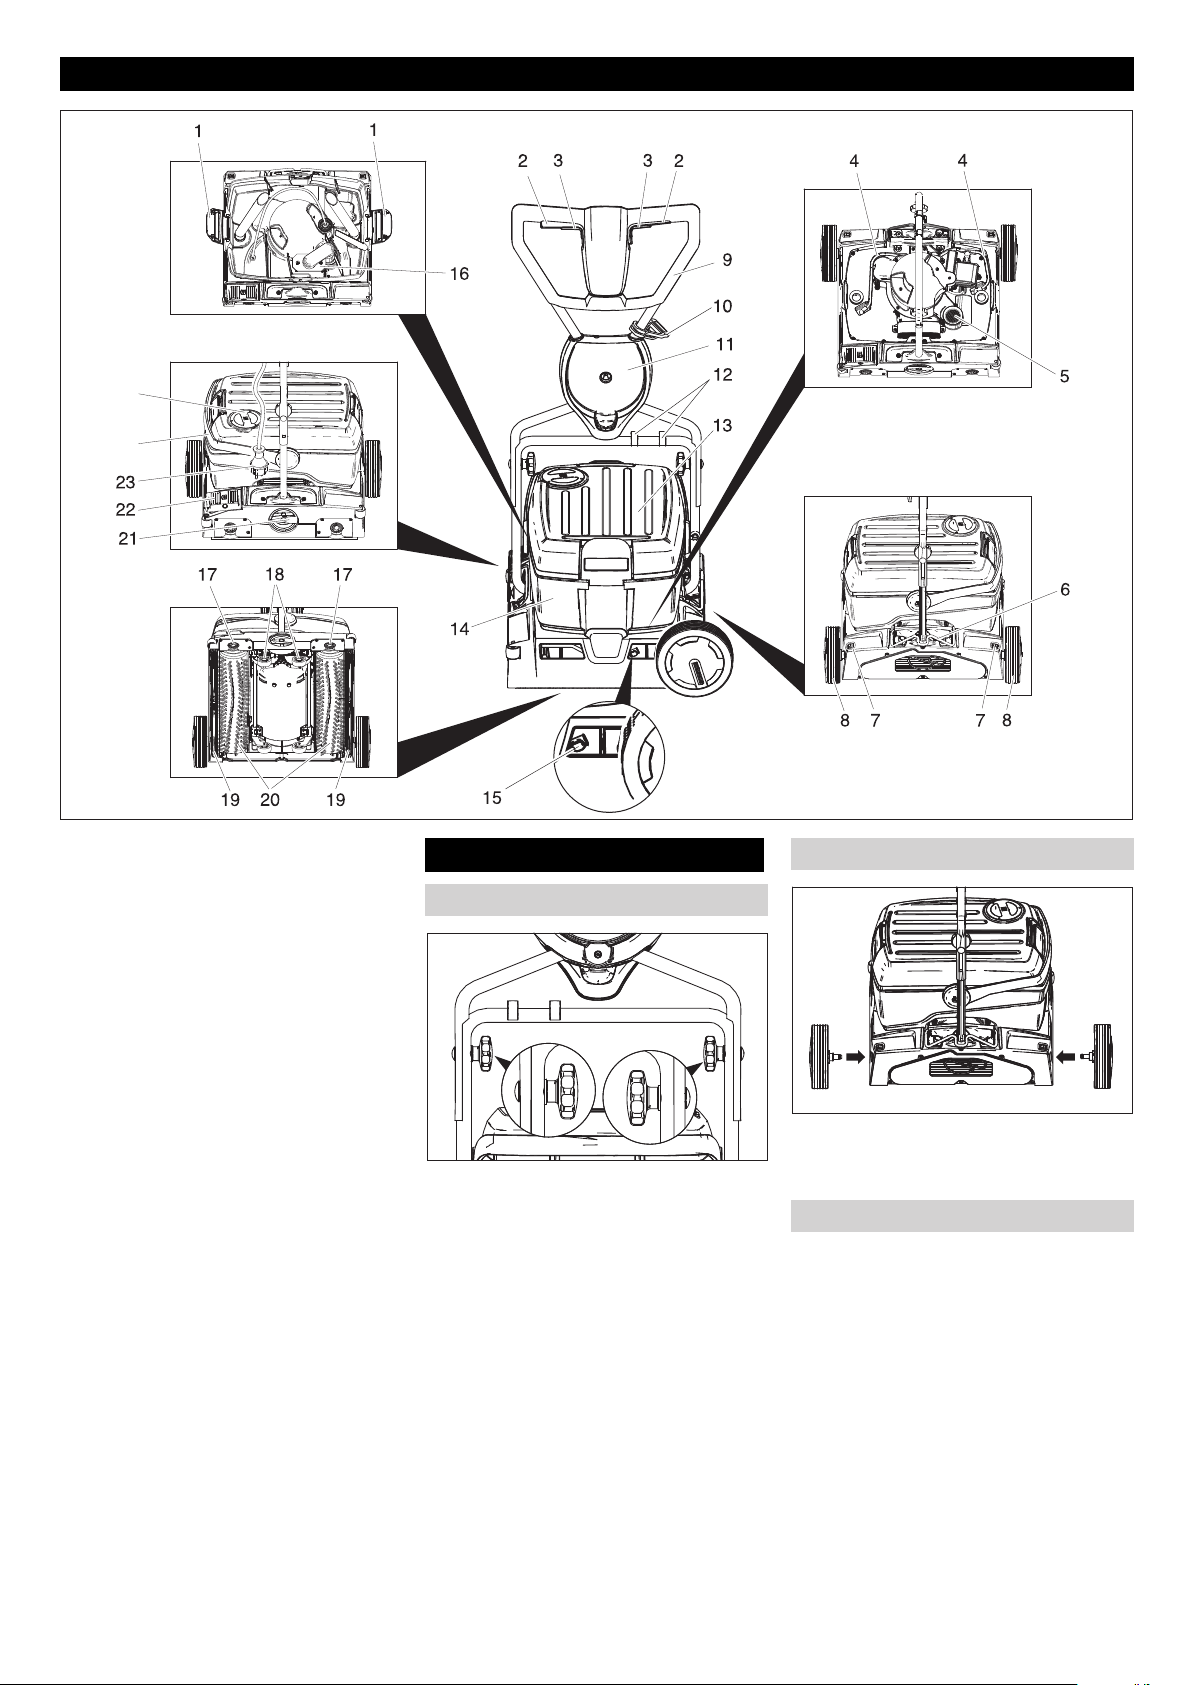
Operating elements
1 Lock for fresh water reservoir
2 Switch for brush drive
3 Switch for detergent solution
4 Hose for detergent solution
5 Lint sieve (suction)
6 Lock of pushing handle
7 Release button for the transport
wheel
8 Bearing wheel
9 Push handle
10 Strain relief clamp
11 Support of the transport wheel
12 Clip
13 Fresh water tank
14 Dirt water reservoir
15 Push-button for vacuum bar
change
16 Float
17 Button for brush change
18 Chassis
19 Vacuum bar
20 Brushing rollers
21 Rotating handle for brush contact
pressure
22 Pedal to lower vacuum bar
23 Mains plug
24 Carrying handle for wastewater res-
ervoir
25 Fresh water tank cover
Before Commissioning
Installing the pushing handle
Slide the upper slider half onto the
lower slider half.
몇 Warning
Risk of damage. Do not pinch the cable
during the installation.
Align the borings (2 possible height
adjustments).
Connect the slider halves to the
lock screws, discs and star grips.
Fasten the cable to the slider using
clips.
Installing the transport wheels
Insert the transport wheel axles into
the borings on the appliance and
lock them.
Installing the Brushes
The brushes must be installed before
the initial operation (see "Maintenance
works").
- 3
5EN
Page 6
Operation
Driving to the Place of Use
Establish mains contact
Note
To take the brush drive out of operation, immediately release brush drive
switch.
Filling in detergents
몇 Warning
Risk of damage. Only use the recommended detergents. With respect to
different detergents the operator bears
the increased risk regarding the operational safety and danger of accident.
Only use detergents that are free from
solvents, hydrochloric acid and hydrofluoric acid.
Note
Do not use highly foaming detergents.
Observe the dosing notes.
Recommended detergents:
Application Detergent
Routine cleaning of all
water resistant floors
Routine cleaning of
glossy surfaces (e.g.
granite)
Routine cleaning and
basic cleaning of industrial floors
Routine cleaning and
basic cleaning of fine
stoneware tiles
Routine cleaning of tiles
in sanitary areas
Cleaning and disinfection in sanitary areas
Removal of coating
from all alkali-resistant
floors (e.g. PVC)
Removal of coating
from linoleum floors
Open the cover of the fresh water
reservoir.
Pour in water/detergent mixture.
Maximum temperature of the liquid
50°C
Note
The fresh water reservoir cover can be
used to meter the detergent. The capacity of the cover up to the mark represents 1% of the fresh water reservoir
capacity.
Close the cover of the fresh water
reservoir.
RM 746
RM 780
RM 755 es
RM 69
ASF
RM 753
RM 751
RM 732
RM 752
RM 754
Short distances on even surfaces
Place the slider vertically.
Position the rotary handle for the
brush contact pressure in the drive
position.
Use the pushing handle to push the
appliance to the place of use.
Longer distances on uneven surfaces
Place the slider vertically and tilt the
lock up.
Install the transport wheels.
몇 Warning
Danger of damage due to leaking water. Remove the waste water and fresh
water reservoirs before tilting the appliance.
Remove the filled waste and fresh
water reservoirs from the appliance
and transport them separately.
Tilt the appliance to the side and
drive it to the place of use on its
transport wheels.
If the transport wheels hinder the use
of the appliance:
Press the transport wheel release
button and pull the transport wheel
out.
Insert the transport wheels into their
holder until they stop.
Adjust the brush contact pressure
Place the slider vertically.
Adjust the rotary handle of the
brush contact pressure to the desired value.
Note
Carry out the initial cleaning attempts
with less contact pressure. Increase
contact pressure step-by-step until the
desired cleaning result is achieved. A
correct setting of the contact pressure
reduces the wear and tear of the
brushes.
The brush drive is switched off when
there is overload.
When cleaning with microfibre rollers,
the contact pressure must not be adjusted higher than the position mentioned below. With a higher contact
pressure, there is a danger of destroying the microfibre rollers.
+
-
Danger
Check the mains cables of the machine each time before using the machine to see that it is not damaged.
Never operate a machine with damaged cables. Get the damaged cables
replaced by an electrician.
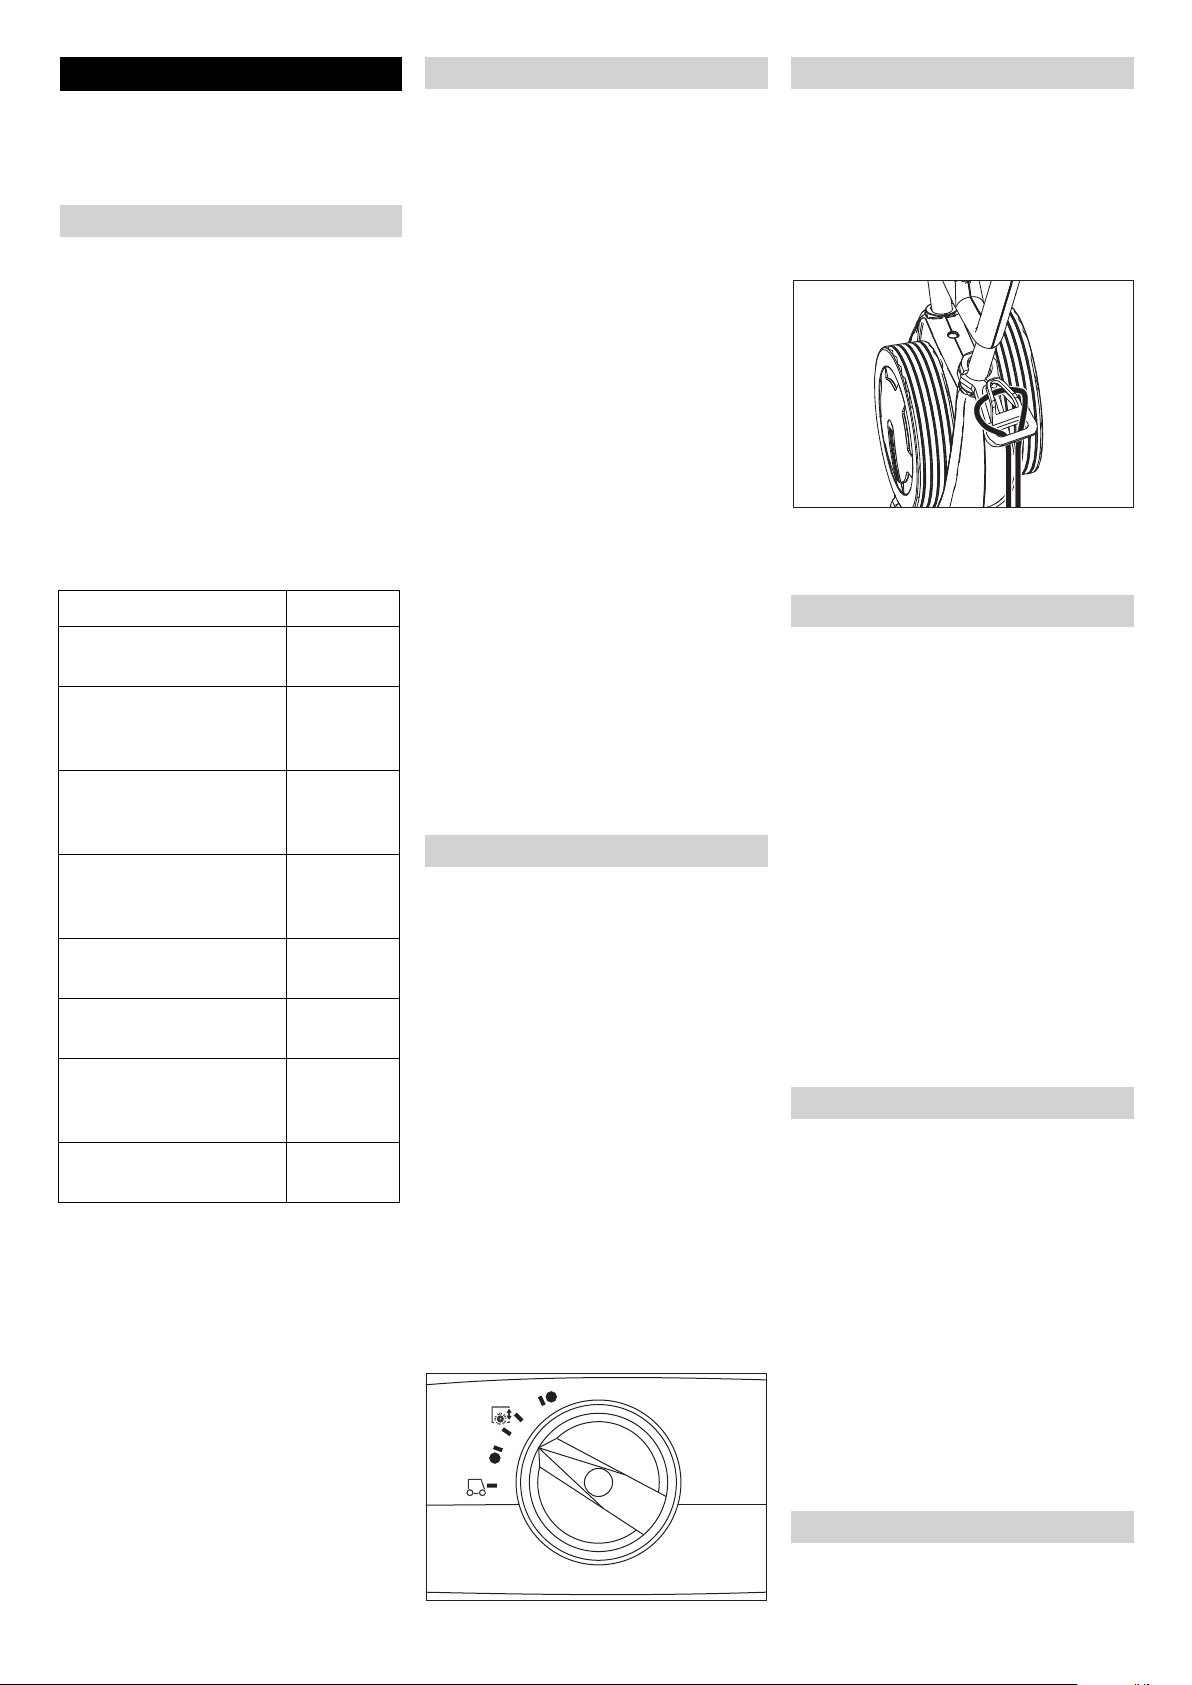
Insert the looped end of the exten-
sion cable in the strain relief hook.
Plug in the mains plug.
Cleaning
If the detergent solution is to be
vacuumed off after the cleaning
process, use the vacuum bar lowering pedal.
Swivel the slider toward the opera-
tor - the chassis is retracted and the
brushes touch the floor.
Turn on the brushes by using the
switch for the brush drive.
Turn on the brush irrigation by us-
ing the switch for the detergent solution.
Move the appliance over the sur-
face to be processed by the slider.
몇 Warning!
Risk of damage to the floor covering.
Do not operate the appliance on the
spot.
Polishing
Swivel the slider toward the opera-
tor - the chassis is retracted and the
brushes touch the floor.
Turn on the brushes by using the
switch for the brush drive.
Move the appliance over the sur-
face to be processed by the slider.
몇 Warning!
Risk of damage to the floor covering.
Do not operate the appliance on the
spot.
Note
To polish furniture, the fresh water and
wastewater reservoirs can be removed.
Shutting Down the Appliance
6 EN
Release the switch for detergent
solution.
- 4
Page 7

Push the appliance forward for an-
other 1-2 m to draw off residual wa-
ter.
Release the brush drive button.
Press the pedal to lower the vacu-
um bar.
Place the slider vertically - the
brushes are elevated.
Disconnect the mains plug.
몇 Warning
Danger of deforming the brushes.
When switching off the appliance, take
the load off the appliance by placing
the slider vertically.
Emptying the Fresh Water Res-
ervoir
Open the locks for the fresh water
reservoir.
Tilt the carrying hanlde for the
wastewater reservoir towards the
side.
Lift up the fresh water reservoir and
carry it to the disposal site.
몇 Warning
Please observe the local provisions regarding the wastewater treatment.
Remove the cover of the fresh wa-
ter reservoir and pour out the liquid
via the notch.
Emptying the Dirt Water Reser-
voir
Note
If the dirt water reservoir is full the float
closes the suction channel. The suction operation is interrupted. Empty the
dirt water reservoir.
Remove the fresh water reservoir,
as described above.
Lift up the wastewater reservoir and
carry it to the disposal site.
몇 Warning
Please observe the local provisions regarding the wastewater treatment.
Pour out dirt water.
Rinse the dirt water tank with clear
water.
Transport
If you want to transport the appli-
ance on a vehicle secure it from
slipping.
To reduce the required space, the
pushing handle can be folded or disassembled:
Release the star grips of the push-
ing handle fastening.
Unscrew the star grips, remove the
screws and take off the upper push
handle half.
Maintenance and care
Danger
Risk of injury!
Pull the plug from the mains before
carrying out any tasks on the appliance.
몇 Warning
Risk of damage to the appliance on account of water leakage. Drain out dirt
water and the remaining free water before wokring at the machine.
Maintenance schedule
After the work
몇 Warning
Risk of damage. Do not wash down the
appliance with water and do not use
aggressive detergents.
Pour out dirt water.
Rinse the dirt water tank with clear
water.
Empty the fresh water reservoir.
Fill the fresh water tank with clear
water and rinse the appliance to
avoid residue buildup.
Remove the remaining water from
the fresh water tank.
Check the seal in the ball valve in
the fresh water reservoir.
Check the fluff filter, clean if re-
quired
Let the reservoirs dry prior to clos-
ing them to prevent odor creation.
Clean the outside of the appliance
with a damp cloth which has been
soaked in mild detergent.
Clean the vacuum lips, check for
wear and replace the vacuum bar if
required.
Check the brushes for wear, re-
place if required.
Clean the water distribution bars
above the brushes.
Monthly
Check the condition of the seals be-
tween the appliance and the wastewater reservoir; replace if required.
Clean the brush tunnel.
Yearly
Have the prescribed inspection car-
ried out by the customer service.
Maintenance Works
Replacing the vacuum bar
Lift the vacuum bar by activating
the pedal for the vacuum bar lowering.
Press the push-button for the vacu-
um bar change toward the inside the vacuum bar will release.
Pull off the vacuum bar downwards.
Remove the screw springs and in-
stall the new vacuum bar.
Align the new vacuum bar so that
the locking nose points toward the
centre of the appliance.
Insert the screw springs into the
pickups on the appliance.
Insert the vacuum bar into the appli-
ance and lock it in.
Repeat process on the second bar.
Note
Regular exchanges of the two vacuum
bars will improve the scraping effect
and will prolong their life.
Replacing the brush rollers
Lay the device on its side.
Press the brush change key and si-
multaneously tilt the brush roller
downwards.
Pull out the brush roller.
Place the new brush roller on the
driver and lock into place.
Maintenance contract
To ensure a reliable operation of the
appliance maintenance contracts can
be concluded with the competent
Kärcher sales office.
Frost protection
In case of danger of frost:
Empty the fresh and dirt water res-
ervoirs.
Push the button for detergent solu-
tion until no more water is expelled.
Store the appliance in a frost-pro-
tected room.
Faults
Danger
Risk of injury!
Pull the plug from the mains before
carrying out any tasks on the appliance.
몇 Warning
Risk of damage to the appliance on account of water leakage. Drain out dirt
water and the remaining free water before wokring at the machine.
In case of faults that cannot be remedied using the table below please contact the customer service.
- 5
7EN
Page 8

Faults
Fault Remedy
Appliance cannot be started Check if the mains plug is connected.
Socket fuse rating too low, look for proper socket.
Insufficient water quantity Check fresh water level, refill tank if necessary.
Clean the ball valve in the fresh water reservoir.
Check and ensure that the fresh water reservoir is seated properly on the appliance.
Filter in the fresh water reservoir is plugged, clean filter.
Check hoses for blockages; clean if required.
Insufficient vacuum performance
Insufficient cleaning result Increase brush contact pressure.
Brushes do not turn Check if foreign matters block the brushes; remove foreign matter if required.
Appliance vibrates. Brush rollers are deformed because they were not unloaded by tilting the slider verti-
Empty the wastewater reservoir.
Check and ensure that the fresh water reservoir is seated properly on the wastewater
reservoir.
Check seals on the fresh water reservoir, clean if necessary.
Clean the seals between the appliance and the dirt water reservoir and check for tight-
ness, replace if required.
Clean the fluff filter.
Clean the vacuum lips on the vacuum bar, replace if required
Suction channel plugged, clean.
Check if the vacuum bar is plugged, remove plug if required
Check the brushes for wear, replace if required.
Use brush rollers suited for the type of dirt and floor covering.
Reduce contact pressure.
Overcurrent protective switch was triggered. The overcurrent protective switch will al-
low the operation after max. one minute.
cally when parking the appliance; replace brush rollers.
Specifications
Power
Nominal voltage V/Hz 120 / 60
Average power consumption W 1100
Suction engine output W 500
Brush engine output W 1700
Vacuuming
Cleaning power, air quantity l/s 20
Cleaning power, negative pressure kPa 10
Cleaning brushes
Working width mm 400
Brush diameter mm 96
Brush speed 1/min 650
Dimensions and weights
Theoretical surface cleaning performance m²/h 400
Fresh/dirt water reservoir volume l 10
Length (without pushing handle) mm 520
Width (without vacuum bar) mm 470
Height (without pushing handle) mm 380
Weight (without tank contents) kg 30
Noise emission
Sound pressure level (EN 60704-1) dB(A) 71
Machine vibrations
Vibration total value (ISO 5349) m/s² 1,0
8 EN
- 6
Page 9

Accessories
Order No.
Piece
Brush roller, red (medium, standard)
Brush roller, green (grit) For cleaning heavily dirtied floors. 4.762-252.0 1 2
Brush roller, orange (high/ low) For scrubbing structured floors (safety tiles, etc.). 4.762-251.0 1 2
Brush roller, white (soft) For polishing floors. 4.762-250.0 1 2
Pad roller shaft For intake of roller pads. 4.762-228.0 1 2
Pad, very soft, white For cleaning and polishing sensitive floorings. 6.369-727.0 1 2
Pad, soft, yellow For polishing floors. 6.369-724.0 1 2
Pad, medium soft, red For cleaning slightly dirtied floors. 6.369-726.0 1 2
Pad, hard, green For cleaning normal to heavily dirtied floors. 6.369-725.0 1 2
Microfibre roller To remove grey tint 4.114-003.0 1 2
Vacuum bar, standard 4.777-323.0 1 2
Vacuum bar, oil-resistant 4.777-322.0 1 2
Extension cable 20 m 6.647-022.0 1 1
For cleaning slightly dirtied or sensitive floors. 4.762-249.0 1 2
Warranty
The warranty terms published by our
competent sales company are applicable in each country. We will repair potential failures of your accessory within
the warranty period free of charge, provided that such failure is caused by
faulty material or defects in fabrication.
In the event of a warranty claim please
contact your dealer or the nearest authorized Customer Service center.
Please submit the proof of purchase.
Machine requires
piece
Spare parts
– Only use accessories and spare
parts which have been approved by
the manufacturer. The exclusive
use of original accessories and
original spare parts ensures that
the appliance can be operated
safely and trouble free.
– At the end of the operating instruc-
tions you will find a selected list of
spare parts that are often required.
– For additional information about
spare parts, please go to the Ser-
vice section at www.kaercher.com.
- 7
9EN
Page 10

INSTRUCTIONS IMPOR-
Français
TANTES EN MATIÈRE DE SÉ-
CURITÉ
LIRE TOUTES LES INSTRUC-
TIONS AVANT DE FAIRE
FONKTIONNER
Attention
Pour réduire les risques d'incendie, de
chok électrique ou de blessure:
– Ne pas laisser l'appareil sans
surveillance lorsqu'il est branché.
Débrancher lorsque l'appareil n'est
pas utilisé et avant l'entretien.
Attention
– Pour réquire les risques de choc
électrique, utiliser à l'interieur
seulement.
– Ne pas permettre aux enfants de
jouer avec l'appareil. Une attention
particulière est nécessaire lorsque
l'appareil est utilisé par des enfants
ou à proximité de ces derniers.
– N'utiliser que conformément à cette
notice avec les accessoires
recommandés par le fabricant.
– Ne pas utiliser si le cordon ou la
fiche est endommagé. Retourner
l'appareil à un atelier de réparation
s'il ne fonctionne pas bien, s'il est
tombé ou s'il a été endommagé,
oublie à l'extérieur ou immergé.
– Ne pas tirer soulever ni traîner
l'appareil par le cordon. Ne pas
utiliser le cordon comme une
poignée, le coincer dans
l'embrasure d'une porte ou
l'appuyer contre des arêtes vives
ou des coins. Ne pas faire rouler
l'appareil sur le cordon. Garder le
cordon à l'écart des surfaces
chaudes.
– Ne pas débrancher en tirant sur le
cordon. Tirer plutôt la fiche.
– Ne pas toucher la fiche ni l'appareil
lorsque vos mains sont humides.
– N'insérer aucun objet dans les
ouvertures. Ne pas utiliser l'appareil
lorsqu'une ouverture est bloquée.
S'assurer que de la poussière, de la
peluche, des cheveux ou d'autres
matières ne réduisent pas le debit
d'air.
– Maintenir les cheveux, les
vêtements amples, les doigts et
toutes les parties du corps à l'écart
des ouvertures et des pièces
mobiles.
– Mettre toutes les commandes à la
position ARRÊT avant de
débrancher l'appareil.
– User de prudence lors du nettoyage
des escaliers.
– Ne pas aspirer des liquides
inflammables ou combustibles,
comme de l'essence, et ne pas faire
functionner dans des endroits où
peuvent se trouver de tels liquides.
– Ne brancher qu'à une prise de
courant avec mise à la terre. Voir
les instructions la mise à la terre.
CONSERVER CES INSTRUC-
TIONS
INSTRUCTIONS VISANT LA
MISE À LA TERRE
Cet appareil doit être mis à la terre. En
cas de défaillance ou de panne, la
mise à la terre fournit au courant un
chemin de moindre résistance qui
réduit le risque de choc électrique. Cet
appareil est pourvu d'un cordon muni
d'un conducteur de terre et d'une fiche
avec broche de terre. La fiche doit être
branchée dans une prise appropriée
correctement installée et mise à la
terre conformément aux règlements et
ordonnances municipaux.
Attention
Un conducteur de terre mal raccordé
peut entraîner un risque de choc électrique. Consulter un électricien ou un
technicien d'entretien qualifié si vous
n'êtes pas certain que la prise est correctement mise à la terre. Ne pas modifier la fiche fournie avec l'appareil - si
elle ne peut être insérée dans la prise,
fair installer une prise adéquate par un
électricien qualifié.
Cet appareil est destiné à un circuit de
120 V et est muni d'une fiche de mise
à la terre semblable à celle illustrée par
le croqui A. S'assurer que l'appareil est
branché à une prise de courant ayant
la même configuration que la fiche. Aucun adaptreur nr devrait être utilisé
avec cet appareil.
NE BRANCHER QU'À UNE
PRISE DE COURANT AVEC
MISE À LA TERRE
1 Sortie avec mise à la terre
2 Boîte avec mise à la terre
3 Fiche avec mise à la terre
REGLES ET PRATIQUES DE
SECURITE DE FONCTION-
NEMENT
Responsabilité de l'opérateur
Un fonctionnement sûr est la responsabilité de l'opérateur.
L'opérateur doit être au courant du
fonctionnement et des fonctions de
toutes les commandes et de tous les
instruments avant d'entreprendre de
faire fonctionner l'unité.
Avant de faire fonctionner l'unité, les
opérateurs doivent avoir lu et bien
connaître le manuel d'utilisation pour
l'unité particulière en fonctionnement
et ils doivent également obéir aux
règles et pratiques de sécurité énoncées dans les paragraphes suivants.
Avant de faire fonctionner l'unité, l'opérateur doit bien connaître les conditions de fonctionnement inhabituelles
qui peuvent nécessiter des précautions de sécurité supplémentaires ou
des instructions de fonctionnement
spéciales.
Généralités
Avant de commencer à faire fonctionner l'unité, soyez dans une position
d'opération.
Ne démarrez pas ou n'opérez pas l'unité, l'une quelconque de ses fonctions
ou accessoires, depuis tout endroit
autre que la position désignée pour les
opérateurs.
Avant de quitter la position de l'opérateur :
A arrêtez complètement l'unité ;
B si l'unité doit se trouver sur un plan
incliné, bloquez les roues.
Conservez une distance de sécurité
depuis le bord des rampes, plateformes et autres surfaces de travail similaires.
N'effectuez aucun ajout ou aucune
modification à l'unité.
Ne bloquez pas l'accès aux couloirs à
incendie, escaliers ou équipement de
lutte contre les incendies.
Déplacements
Donnez la priorité aux piétons et véhicules d'urgence tels que les ambulances et les camions de pompiers.
Traversez les voies ferrées de manière
angulaire si possible. Ne vous garez
pas à moins de 1800 mm du rail le plus
proche d'une voie ferrée.
Conservez une vision claire du chemin
de déplacement et prenez garde au
reste de la circulation, au personnel et
aux dégagements sûrs.
10 FR
- 1
Page 11

Opérez l'unité à une vitesse qui lui permettra d'être arrêtée de manière sûre
dans toutes les conditions de déplacement.
Ne vous adonnez pas aux cascades
ou à la brutalité.
Ralentissez en cas de sols mouillés et
glissants.
Avant de passer sur un bord de quai ou
sur la chaussée d'un pont, assurezvous qu'il/elle est correctement fixé(e).
Conduisez prudemment et lentement
sur le bord de quai ou la chaussée d'un
pont et ne dépassez jamais sa capacité nominale.
Lors de la prise de virages, ralentissez
à une vitesse sûre en correspondance
avec l'environnement de fonctionnement. Prenez les virages en douceur.
Entretien de l'unité par l'opéra-
teur
Si l'unité s'avère nécessiter des réparations ou être dangereuse d'une manière quelconque ou contribue à une
condition dangereuse, le problème doit
être rapporté immédiatement au supérieur désigné de l'utilisateur et l'unité
ne doit pas être opérée jusqu'à ce
qu'elle ait été remise en une condition
de fonctionnement sûre.
Si l'unité devient dangereuse d'une
manière quelconque au cours du fonctionnement, le problème doit être rapporté immédiatement au supérieur
désigné de l'utilisateur et l'unité ne doit
pas être opérée jusqu'à ce qu'elle ait
été remise en une condition de fonctionnement sûre.
N'effectuez pas de réparations ou de
réglages à moins d'y être autorisé spécifiquement.
PRATIQUES D'ENTRETIEN
ET DE RECONSTRUCTION
Le fonctionnement de l'unité peut être
dangereux si l'entretien est négligé ou
si des réparations, reconstructions ou
réglages ne sont pas effectués conformément aux critères de conception du
constructeur. Par conséquent, des installations d'entretien (sur site ou au dehors), du personnel qualifié et des
procédures détaillées doivent être
fournis.
L'entretien et l'inspection de l'unité doivent être réalisés conformément aux
pratiques suivantes :
A un système d'entretien, de lubrifica-
tion et d'inspection planifié doit être
suivi ; consultez les recommanda-
tions du constructeur.
B seul du personnel qualifié et autori-
sé doit être autorisé à effectuer l'en-
tretien, réparer, régler et inspecter
l'unité et ce conformément aux spécifications du constructeur.
Evitez les risques d'incendie et disposez d'un équipement de protection
contre les incendies dans la zone de
travail. N'utilisez pas de récipients ouverts d'essence ou de fluides de nettoyage inflammables pour le nettoyage
des pièces.
NORME DE SECURITE IN-
CENDIE
Toute unité ne se trouvant pas dans
une condition de fonctionnement sûre
doit être mise hors service.
Les réparations doivent être effectuées dans les emplacements de
Classe I, Classe II et Classe III.
Prévention incendie : L'unité doit être
conservée dans une condition propre
et raisonnablement exempte de peluche, d'huile en excès et de graisse.
Des agents non combustibles sont préférés pour le nettoyage de l'unité. Les
liquides inflammables [ceux possédant
des points d'inflammation à ou supérieurs à 100°F (37,8°C)] ne sont pas
permis. Les précautions concernant la
toxicité, la ventilation et les risques
d'incendie doivent être appropriées à
l'agent ou au solvant utilisé.
Visibilité de la plaque signalétique :
Les désignations du type d'unité telles
qu'illustrées sur la plaque signalétique
et les marqueurs de type ne doivent
pas être recouverts par de la peinture
de sorte que les informations concernant leur identification sont obscurcies.
L'unité ne doit pas être utilisée dans
des zones classifiées.
Lisez attentivement ce
mode d’emploi avant la
première utilisation de l’appareil et respectez les conseils y figurant. Conservez ce mode d’emploi pour une
utilisation ultérieure ou un éventuel repreneur de votre matériel.
Table des matières
Fonction . . . . . . . . . . . . . . . FR . . 2
Utilisation conforme . . . . . . FR . . 3
Protection de l’environnement FR . . 3
Eléments de commande. . . FR . . 4
Avant la mise en service. . . FR . . 4
Fonctionnement . . . . . . . . . FR . . 5
Entretien et maintenance . . FR . . 6
Pannes . . . . . . . . . . . . . . . . FR . . 7
Données techniques. . . . . . FR . . 8
Accessoires . . . . . . . . . . . . FR . . 9
Garantie . . . . . . . . . . . . . . . FR . . 9
Pièces de rechange . . . . . . FR . . 9
Consignes de sécurité
Lire la présente notice d'instructions
ainsi que la brochure ci-jointe
Consignes de sécurité pour les nettoyeurs à brosses n° 5.956-251 avant
d'utiliser l'appareil et respecter les instructions.
Symboles
Les symboles suivants sont utilisés
dans ces instructions de service :
Danger
Signalise un danger imminent. Un non
respect de cette consigne peut
conduire à la mort ou entraîner de
graves blessures.
몇 Avertissement
Signalise une situation éventuellement
dangereuse. Un non respect de cette
consigne peut entraîner de légères
blessures ou encore des dégâts matériels.
Remarque
Donne des conseils pour l'utilisation et
d'importantes informations relatives au
produit.
Fonction
L’appareil est employé pour nettoyer
ou pour polir des sols plans par voie
humide.
Deux brosses rotatives opposées nettoient le sol à l'aide du fluide de nettoyage alimenté. Une largeur de travail
de 400 mm et une capacité de 10 l pour
chaque réservoir d'eau propre et d'eau
sale permettent un nettoyage efficace.
Un fonctionnement par courant permet
d'obtenir une capacité élevée sans limitation de la durée de travail.
- 2
11FR
Page 12

Remarque
L'appareil peut être équipé de différents accessoires en fonction de l'application respective. De plus amples
détails figurent dans notre catalogue
ou sur notre site Internet www.kaercher.com.
Utilisation conforme
L'utilisation de l'appareil doit être faite
en conformité avec les consignes figurant dans les instructions de service.
– L'appareil doit uniquement être uti-
lisé pour nettoyer des surfaces
planes non sensibles à l'humidité ni
au polissage.
La plage de température pour l'utilisation est de +5°C à +40°C.
– L'appareil n'est pas approprié pour
nettoyer des sols gelés (par
exemple dans des entrepôts frigorifiques)
– L'appareil doit uniquement être
équipé d'accessoires et de pièces
de rechange d'origine.
– L'appareil est conçu pour le net-
toyage de sols dans le domaine intérieur ou bien de surfaces
couvertes d'un toit. Pour d'autres
domaines d'application, il faut
contrôler l'éventuelle nécessité
d'utiliser d'autres brosses.
– L'appareil n'est pas destiné au net-
toyage de voies publiques.
Protection de l’environne-
ment
Les matériaux constitutifs
de l'emballage sont recyclables. Ne pas jeter les
emballages dans les ordures ménagères, mais les
rendre à un système de recyclage.
Les appareils usés contiennent des matériaux précieux recyclables lesquels
doivent être rendus à un
système de recyclage. Des
batteries, de l’huile et
d'autres substances semblables ne doivent pas être
tout simplement jetées.
Pour cette raison, utiliser
des systèmes adéquats de
collecte pour éliminer les
appareils usés.
Instructions relatives aux ingrédients (REACH)
Les informations actuelles relatives
aux ingrédients se trouvent sous :
www.kaercher.com/REACH
12 FR
- 3
Page 13

25
24
Eléments de commande
1 Verrouillage réservoir d'eau propre
2 Commutateur d'entraînement de
brosse
3 Commutateur solution de net-
toyage
4 Tuyau solution de nettoyage
5 Filtre pour des bouloches de dé-
chets (aspiration)
6 Blocage guidon de poussée
7 Touche de verrouillage roue de
transport
8 Roulette de transport
9 Guidon de poussée
10 Crochet de soulagement de traction
11 Support roue de transport
12 Clip
13 Réservoir d'eau propre
14 Réservoir d'eau sale
15 Poussoir changement de barre
d'aspiration
16 Flotteur
17 Touche changement de brosse
18 Train de roulement
19 Barre d'aspiration
20 Brosses rotatives
21 Poignée rotative pression d'appui
des brosses
22 Pédale abaissement barre d'aspira-
tion
23 Fiche secteur
24 Poignée de transport du réservoir
d'eau sale
25 Couvercle réservoir d'eau fraîche
Avant la mise en service
Monter le guidon de poussée
Pousser la moitié supérieure de
l'étrier de poussée sur la moitié inférieure de l'étrier de poussée.
몇 Avertissement
Risque d'endommagement. Ne pas
coincer le câble lors du montage.
Aligner les alésages (2 réglages en
hauteur possibles).
Connecter les deux moitiés de
l'étrier de poussée avec les boulons
bruts à tête bombée et collet carré,
les rondelles et les poignées en
étoile.
Fixer les câbles avec les clips sur
l'étrier de poussée.
Monter les roues de transport
Enficher les essieux des roues de
transport dans les alésages sur
l'appareil et les enclencher.
Montage des brosses
Les brosses doivent être montées
avant la mise en service (voir 'Travaux
de maintenance').
- 4
13FR
Page 14

Fonctionnement
Remarque
Relâcher l'étrier de commande pour
mettre immédiatement l'entraînement
des brosses hors service.
Remplissage de carburant
몇 Avertissement
Risque d'endommagement. Utiliser
uniquement les détergents recommandés. Pour tout autre détergent, l'exploitant prend des risques plus élevés
quant à la sécurité du travail et au
risque d'accident. Utiliser uniquement
des détergents exempts de solvants,
d'acide chlorhydrique et fluorhydrique.
Remarque
Ne jamais utiliser de détergents extrêmement moussants. Tenir compte des
consignes de dosage.
Détergents recommandés :
Application Produit
détergent
Nettoyage d'entretien
de tous les sols résistants à l'eau
Nettoyage d'entretien
de surfaces brillantes
(par exemple du granite)
Nettoyage d'entretien et
nettoyage minutieux de
sols dans le secteur industriel
Nettoyage d'entretien et
nettoyage minutieux de
carrelages en grès cérame fin
Nettoyage d'entretien
de carrelages dans le
secteur sanitaire
Nettoyage et désinfection dans le secteur sanitaire
Enlèvement d'une
couche sur tous les sols
résistants aux alcalis
(par exemple PVC)
Enlèvement d'une
couche sur des sols en
linoléum
Ouvrir le couvercle du réservoir
d'eau propre.
Remplir de mélange détergent-eau.
Température maximale du liquide,
50°C..
Remarque
Le couvercle du réservoir d'eau propre
peut être utilisé pour le dosage du détergent. Le contenu jusqu'au repère du
RM 746
RM 780
RM 755 es
RM 69
ASF
RM 753
RM 751
RM 732
RM 752
RM 754
couvercle retourné est de 1% du réservoir d'eau propre.
Fermer le couvercle du réservoir
d'eau propre.
Déplacement vers le lieu d'utili-
sation
Voies courtes sur une surface plane
Mettre l'étrier de poussée en posi-
tion verticale.
Mettre la poignée rotative de pres-
sion d'appui des brosses dans la
position déplacement.
Pousser l'appareil sur le lieu d'utili-
sation au moyen du guidon de
poussée.
Voies longues, surfaces inégales
Mettre l'étrier de poussée en posi-
tion verticale et faire basculer le
blocage vers le haut.
Monter les roues de transport.
몇 Avertissement
Risque d'endommagement dû à de
l'eau qui s'écoule ! Retirer les réservoir
d'eau propre et d'eau sale avant de
basculer l'appareil.
Retirer les réservoirs d'eau propre
et d'eau sale de l'appareil et les
transporter séparément.
Basculer l'appareil sur le côté et le
pousser vers le site de mise en
œuvre sur les roues de transport.
Si les roues de transport gênent lors de
la mise en œuvre de l'appareil :
appuyer sur la touche de déver-
rouillage de la roue de transport et
retirer celle-ci.
Enficher les roues de transport jus-
qu'à la butée dans le support de
roue de transport.
Régler la pression de la brosse
Mettre l'étrier de poussée en posi-
tion verticale.
Régler la poignée rotative de pres-
sion d'appui des brosses sur la valeur souhaitée.
Remarque
Effectuer les premiers essais de nettoyage avec une pression d'appui réduite. Augmenter peu à peu la
pression jusqu'à atteindre le résultat
de nettoyage désiré. Un bon réglage
de la pression d'appui diminue l'usure
des brosses.
En cas de surcharge, l'entraînement
de brosse est mis hors service.
Lors du nettoyage avec des brosses à
microfibres, la pression d'appui doit
être réglée sur la position montrée cidessous au maximum. Si la pression
d'appui est supérieure, il existe un
risque de destruction des brosses à
microfibres.
+
-
Établir le raccordement de ré-
seau
Danger
Vérifier le bon état de la conduite de
raccordement de réseau de l'appareil
avant chaque fonctionnement. Ne pas
mettre l'appareil en service avec un
câble endommagé. Laisser changer le
câble endommagé par un électricien.
Accrocher l'extrémité de la rallonge
comme boucle dans le crochet de
soulagement de traction.
Brancher la fiche secteur.
Nettoyage
Si la solution de nettoyage doit être
aspirée après le processus de nettoyage, actionner la pédale d'abaissement de barre d'aspiration.
Basculer l'étrier de poussée vers
l'opérateur, le train de roulement
est rentré et les brosses touchent le
sol.
Mettre les brosses en service en
actionnant le commutateur d'entraînement de brosses.
Mettre l'arrosage des brosses en
service en actionnant le commutateur de solution de nettoyage.
Guider l'appareil sur la surface à
traiter avec l'étrier de poussée.
몇 Avertissement !
Risque d'endommagement pour le revêtement de sol. Ne pas exploiter l'appareil sur place.
Polissage
Basculer l'étrier de poussée vers
l'opérateur, le train de roulement
est rentré et les brosses touchent le
sol.
14 FR
- 5
Page 15

Mettre les brosses en service en
actionnant le commutateur d'entraî-
nement de brosses.
Guider l'appareil sur la surface à
traiter avec l'étrier de poussée.
몇 Avertissement !
Risque d'endommagement pour le revêtement de sol. Ne pas exploiter l'appareil sur place.
Remarque
Pour le polissage sous les objets
d'ameublement, il est possible de retirer le réservoir d'eau propre et le réservoir d'eau sale.
Arrêt et mise hors marche de
l'appareil
Relâcher le commutateur de solu-
tion de nettoyage.
Avancer l'appareil d'encore 1 à 2 m
pour aspirer l'eau restante.
Relâcher le commutateur d'entraî-
nement de brosse.
Actionner la pédale d'abaissement
de barre d'aspiration.
Mettre l'étrier de poussée en posi-
tion verticale, les brosses sont sou-
levées.
Débrancher le câble d'alimentation.
몇 Avertissement
Risque de déformation des brosses.
Lors du rangement de l'appareil, décharger la contrainte de l'étrier de
poussée en mettant les brosses en position verticale
Vidange du réservoir d'eau
propre
Ouvrir les verrouillages du réservoir
d'eau propre.
Basculer la poignée de transport du
réservoir d'eau sale sur le côté.
Soulever le réservoir d'eau propre
et l'emmener au dispositif d'élimina-
tion.
몇 Avertissement
Tenir compte des prescriptions locales
pour le traitement des eaux usées.
Enlever le couvercle du réservoir
d'eau propre et verser le fluide sur
la rainure.
Vidange du réservoir d'eau sale
Remarque
Si le réservoir d'eau sale est plein, le
flotteur ferme le canal d'aspiration.
L'aspiration est alors interrompue. Vider le réservoir d'eau sale.
Réserver le réservoir d'eau propre
de la manière décrite précédem-
ment.
Soulever le réservoir d'eau sale et
l'emmener au dispositif d'élimination.
몇 Avertissement
Tenir compte des prescriptions locales
pour le traitement des eaux usées.
Faire couler l'eau sale.
Rincer le réservoir d'eau sale à
l'eau propre.
Transport
Pour le transport sur un véhicule,
bloquer l'appareil pour l'empêcher
de glisser.
Pour réduire la place nécessaire, il est
possible de rabattre ou de démonter
l'étrier de poussée :
Desserrer les boutons cannelés
pour la fixation du guidon de poussée.
Dévisser les poignées en étoile,
sortir les vis et retirer la moitié supérieure du guidon de poussée.
Entretien et maintenance
Danger
Risque de blessure !
Avant d'effectuer tout type de travaux
sur l'appareil, débrancher la fiche secteur.
몇 Avertissement
Risque de dommage pour l'appareil
par eau que fuit. Vider l'eau sale et
l'eau propre résiduaire avant comencer les travaux à l'appareil.
Plan de maintenance
Après le travail
몇 Avertissement
Risque d'endommagement. Ne pas laver l'appareil au jet d'eau et ne jamais
utiliser de détergents agressifs.
Faire couler l'eau sale.
Rincer le réservoir d'eau sale à
l'eau propre.
Vider le réservoir d'eau propre.
Remplir le réservoir d'eau propre
d'eau claire et rincer l'appareil pour
éviter les dépôts.
Enlever l'eau restante du réservoir
d'eau propre.
Contrôler le joint du robinet sphé-
rique d'arrêt dans le réservoir d'eau
propre.
Contrôler le tamis à peluches et le
cas échéant, le nettoyer.
Laisser sécher les réservoir avant
de les refermer pour éviter la formation d'odeurs.
Nettoyer l'extérieur de l'appareil
avec un chiffon humide et imbibé
de détergent doux.
Nettoyer les lèvres d'aspiration,
puis contrôler leur degré d'usure et
le cas échéant remplacer la barre
d'aspiration.
Contrôler le degré d'usure des
brosses et le cas échéant, les remplacer.
Nettoyer les barres de distribution
de l'eau au-dessus des brosses.
Mensuellement
Contrôler les joints entre le réser-
voir d'eau sale et l'appareil ; le cas
échéant, les remplacer.
Nettoyer le tunnel de brosse.
Tous les ans
L'inspection prescrite doit être ef-
fectuée par le service après-vente.
Travaux de maintenance
Remplacer la barre d'aspiration
Soulever la barre d'aspiration en
actionnant la pédale Abaissement
de la barre d'aspiration.
Presser le poussoir de changement
de barre d'aspiration vers l'intérieur,
la barre d'aspiration se dégage.
Sortir la barre d'aspiration vers le
bas.
Retirer les ressorts cylindriques et
les enficher sur la nouvelle barre
d'aspiration.
Aligner la nouvelle barre d'aspira-
tion de telle manière que le nez
d'enclenchement soit orienté vers
le centre de l'appareil.
Enfiler les ressorts cylindriques
dans les réceptions sur l'appareil.
Enfoncer la barre d'aspiration dans
l'appareil et l'enclencher.
Renouveler le processus pour la
seconde barre d'aspiration.
Remarque
Un replacement régulier des deux
barres d'aspiration améliore l'effet du
raclage et prolonge la durée de vie.
Remplacement des rouleauxbrosses
Disposer l'appareil sur le côté.
Appuyer sur la touche de change-
ment de brosse et basculer simultanément la brosse rotative vers le
bas.
- 6
15FR
Page 16

Retirer le rouleau-brosse.
Enficher la nouvelle brosse rotative
sur l'entraîneur et l'enclencher.
Contrat de maintenance
Afin de pouvoir garantir un fonctionnement fiable de l'appareil, il est possible
de conclure des contrats de maintenance avec le bureau de ventes Kärcher responsable.
Protection antigel
En cas de risque de gel :
Vider le réservoir d'eau propre et le
réservoir d'eau sale.
Actionner le commutateur solution
de nettoyage jusqu'à ce qu'il ne
sorte plus d'eau.
Déposer l'appareil dans une pièce à
l'abri du gel.
Pannes
Danger
Risque de blessure !
Avant d'effectuer tout type de travaux
sur l'appareil, débrancher la fiche secteur.
몇 Avertissement
Risque de dommage pour l'appareil
par eau que fuit. Vider l'eau sale et
l'eau propre résiduaire avant comencer les travaux à l'appareil.
En cas de pannes ne pouvant pas être
résolues grâce aux instructions de ce
tableau, appeler le service aprèsvente.
16 FR
- 7
Page 17

Pannes
Panne Remède
Il est impossible de mettre l'appareil en marche
Quantité d'eau insuffisante Contrôler le niveau d'eau propre et en cas de besoin, remplir le réservoir
Puissance d'aspiration insuffisante
Résultat de nettoyage insuffisant
Les brosses ne se tournent pas Vérifier si des corps étrangers bloquent les brosses et le cas échéant, éliminer les
L'appareil vibre Les brosses rotatives sont ovalisées car elles n'ont pas été déchargées de leur
Vérifier si la fiche secteur est branchée.
Protection par fusible de la prise trop faible, recherche une prise appropriée.
Nettoyer le robinet sphérique d'arrêt dans le réservoir d'eau propre.
Contrôler que le réservoir d'eau propre est correctement fixé sur l'appareil.
Filtre dans le réservoir d'eau propre bouché, nettoyer le filtre.
Contrôler si les flexibles sont bouchés, en cas de besoin nettoyer.
Vider le réservoir d'eau sale.
Contrôler que le réservoir d'eau propre est correctement fixé sur le réservoir d'eau sale.
Contrôler et nettoyer le joint sur le réservoir d'eau propre.
Nettoyer les joints entre le réservoir d'eau sale et l'appareil et vérifier s'ils sont
étanches, en cas de besoin remplacer.
Nettoyer le tamis à peluches.
Nettoyer les lèvres d'aspiration sur la barre d'aspiration et en cas de besoin remplacer.
Canal d'aspiration bouché, le nettoyer.
Vérifier si la barre d'aspiration est colmatée et le cas échéant, éliminer le colmatage
Augmenter la pression d'appui des brosses.
Contrôler le degré d'usure des brosses et le cas échéant, les remplacer.
Utiliser des brosses rotatives adaptées au type d'encrassement et au revêtement de
sol.
corps étrangers.
Diminuer la pression.
Le disjoncteur protecteur de surintensité s’est déclenché. Le disjoncteur protecteur de
surintensité permet de nouveau le service après une minute au maximum.
contrainte par une mise en position verticale de l'étrier de poussée.
Données techniques
Performances
Tension nominale V/Hz 120 / 60
Puissance absorbée moyenne W 1100
Puissance du moteur d'aspiration W 500
Puissance de moteur de brosses W 1700
Aspiration
Puissance d'aspiration, débit d'air l/s 20
Puissance d'aspiration, dépression kPa 10
Brosses de nettoyage
Largeur de travail mm 400
Diamètre des brosses mm 96
Vitesse des brosses t/min 650
Dimensions et poids
Surface théoriquement nettoyable m²/h 400
Volume du réservoir d'eau propre/réservoir d'eau sale l 10
Longueur (sans guidon de poussée) mm 520
Largeur (sans barre d'aspiration) mm 470
Hauteur (sans guidon de poussée) mm 380
Poids (sans contenu du réservoir) kg 30
Emissions sonores
Niveau de pression acoustique (EN 60704-1) dB(A) 71
Vibrations de l'appareil
Valeur globale de vibrations (ISO 5349) m/s² 1,0
- 8
17FR
Page 18

Accessoires
N° de réf.
Pièce
Brosse d'aération, rouge
(moyenne, standard)
Brosse d'aération, verte (grit) Pour le nettoyage des sols très sales. 4.762-252.0 1 2
Brosse d'aération, orange (haut/
bas)
Brosse d'aération, blanche
(douce)
Rouleau de pad Pour la réception de pads de rouleau. 4.762-228.0 1 2
Pad, très doux, blanc Pour le nettoyage et le polissage des sols sensibles. 6.369-727.0 1 2
Pad, doux, jaune Pour le polissage des sols. 6.369-724.0 1 2
Pad, moyenne doux, rouge Pour le nettoyage des sols pas trop sales. 6.369-726.0 1 2
Pad, dur, vert Pour le nettoyage des sols normal ou très sales. 6.369-725.0 1 2
Brosse à microfibres To remove grey tint 4.114-003.0 1 2
Barre d'aspiration, standard 4.777-323.0 1 2
Barre d'aspiration, résistante à
l'huile
Câble de rallonge 20 m 6.647-022.0 1 1
Garantie
Dans chaque pays, les conditions de
garantie en vigueur sont celles publiées par notre société de distribution
responsable. Les éventuelles pannes
sur les accessoires sont réparées gratuitement dans le délai de validité de la
garantie, dans la mesure où celles-ci
relèvent d'un défaut matériel ou d'un
vice de fabrication. En cas de recours
en garantie, adressez-vous à votre revendeur ou au service après-vente
agréé le plus proche munis de votre
preuve d'achat.
Pour le nettoyage des sols pas trop sales ou sensibles. 4.762-249.0 1 2
Pour frotter des sols structurés (carrelage de protection
etc.).
Pour le polissage des sols. 4.762-250.0 1 2
– Plus information sur les pièces de
rechange vous les trouverez sous
www.kaercher.com sous le menu
Service.
4.762-251.0 1 2
4.777-322.0 1 2
L'appareil besoin la pièce
Pièces de rechange
– Utiliser uniquement des acces-
soires et des pièces de rechange
autorisés par le fabricant. Des ac-
cessoires et des pièces de re-
change d’origine garantissent un
fonctionnement sûr et parfait de
l’appareil.
– Une sélection des pièces de re-
change utilisées le plus se trouve à
la fin du mode d'emploi.
18 FR
- 9
Page 19

INSTRUCCIONES IMPOR-
Español
TANTES DE SEGURIDAD
LEA TODAS LAS INSTRUC-
CIONES ANTES DE USAR LA
MÁQUINA
ADVERTENCIA
Para evitar el peligro de incendio, descarga eléctrica o heridas:
– No se aleje de la máquina mientras
esté enchufada. Saque el enchufe
de la base cuando no la esté usan-
do, y antes del mantenimiento.
ADVERTENCIA
– PARA EVITAR PELIGRO DE DES-
CARGAS ELÈCTRICAS, LA
MÀQUINA SÒLO DEBE EM-
PLEARSE EN INTERIORES
– La máquina no es un juguete. Lle-
var mucho cuidado si va a utilizarse
donde hay niños.
– La máquina sólo debe emplearse
tal como se describe en este ma-
nual. Sólo deben usarse los acce-
sorios recomendados por el
fabricante.
– No emplearla si el cable o el enchu-
fe están dañados. Si la máquina no
funciona correctamente, si se ha
caído, si está averiada, si ha per-
manecido al exterior o si ha caído al
agua, devolverla al servicio pos-
venta.
– No tirar de la máquina ni alzarla
con el cable, no emplear el cable
como manija, no aprisionarlo con
una puerta ni pasarlo sobre esqui-
nas o bordes agudos. No pasar la
máquina sobre el cable. Mantener
el cable alejado de fuentes de ca-
lor.
– Al desenchufar, no tirar del cable.
Para desenchufar, tomar el enchu-
fe y no el cable.
– No tocar el enchufe ni la máquina
con las manos mojadas.
– No colocar objetos en las abertu-
ras. No usar la máquina con las
aberturas obstruidas; éstas deben
estar libres de polvo, pelusa, pelos
y cualquier otro objeto que pueda
impedir el paso de aire.
– Mantener el cabello, la ropa, los de-
dos y todas las partes del cuerpo
alejadas de las aberturas y las pie-
zas móviles.
– Apagar la máquina antes de desen-
chufarla.
– Llevar mucho cuidado al trabajar en
escaleras.
– No emplearla para recoger líquidos
inflamables o combustibles, p.ej.
gasolina, ni en zonas donde pueda
haber dichos líquidos.
– Es imprescindible que la toma eléc-
trica esté debidamente puesta a tierra. Véanse las Instrucciones de
Puesta a Tierra.
GUARDE ESTAS INSTRUC-
CIONES
INSTRUCCIONES DE PUES-
TA A TIERRA
La máquina debe ser puesta a tierra.
Si no funciona bien, o si se estropea, la
puesta a tierra constituye una vía de
menor resistencia para la corriente
eléctrica, para disminuir el peligro de
descarga eléctrica. La máquina está
provista de cable con conductor de
puesta a tierra, y enchufe con puesta a
tierra. El enchufe debe insertarse en
una base de enchufe adecuada, debidamente instalada y puesta a tierra,
conforme a la legislación y las normas
válidas en el lugar de utilización.
ADVERTENCIA
Si el conductor de puesta a tierra de la
máquina está mal conectado, puede
haber peligro de descarga eléctrica.
Consulte a un electricista experto o a
un técnico de mantenimiento, si Ud. no
sabe con certeza si la base de enchufe
está correctamente puesta a tierra. No
cambie el enchufe suministrado con la
máquina - no encajará en la base de
enchufe; acuda a un electricista experto.
La máquina está diseñada para emplearla en un circuito de
120 voltios; tiene un enchufe de puesta
a tierra cuyo aspecto es como se ilustra en la Figura A. Cerciórese de conectar la máquina a una base de
enchufe de la misma configuración
que el conector. Con esta máquina no
deben emplearse adaptadores.
CONECTAR SÓLO A UNA
BASE DE ENCHUFE CO-
RRECTAMENTE PUESTA A
TIERRA
1 Enchufe puesto a tierra
2 Caja de enchufe puesta a tierra
3 Pin puesto a tierra
NORMAS Y PROCEDIMIEN-
TOS DE SEGURIDAD DU-
RANTE EL
FUNCIONAMIENTO
Responsabilidad del operario
El operario será responsable de garantizar un funcionamiento seguro.
El operario deberá estar familiarizado
con el manejo y las funciones de todos
los elementos de mando y todos los
instrumentos antes de proceder al manejo de la unidad.
Antes de poner en funcionamiento la
unidad, los operarios deberán haber
leído el manual de instrucciones de la
unidad particular de que se trate y estar familiarizados con él; además, deberán respetar las normas y
procedimientos de seguridad que se
describen a continuación.
Antes de poner en funcionamiento una
unidad cualquiera, el operario deberá
conocer bien las posibles condiciones
inusuales de funcionamiento que requieren la adopción de determinadas
precauciones especiales o para las
que existen unas instrucciones de manejo especiales.
Generalidades
Antes de poner en funcionamiento la
unidad, ésta deberá encontrarse en la
posición de servicio.
No ponga en marcha ni utilice la unidad ni ninguna de sus funciones o sus
aditamentos desde un lugar que no
sea el concebido para el operario.
Antes de abandonar la posición del
operario:
A pare la unidad por completo;
B si es necesario dejar la unidad en
una pendiente, bloquee las ruedas.
Guarde una distancia segura respecto
a los bordes de las rampas y las plata-
- 1
19ES
Page 20

formas, y respecto a los de otras superficies de trabajo similares.
No efectúe ampliaciones ni modificaciones en la unidad.
No bloquee el acceso a las salidas previstas en caso de incendio, las escaleras o los extintores.
Durante la circulación
Ceda el paso a los peatones y a los vehículos de emergencia, como son las
ambulancias y los camiones de bomberos.
Siempre que sea posible, cruce las
vías férreas formando un ángulo con
ellas. No estacione a menos de 6 ft
(1800 mm) de distancia respecto a los
raíles o las vías férreas más cercanos.
Asegúrese de mantener una vista libre
de obstáculos del trayecto a recorrer,
respete las normas de tráfico, tenga
cuidado con las personas y guarde las
distancias de seguridad.
Sean cuales sean las condiciones de
circulación, conduzca la unidad siempre a una velocidad tal que le permita
detenerse por completo de modo seguro.
Durante la conducción, no acceda jamás a realizar acrobacias o competiciones.
Cuando circule por pisos húmedos o
resbaladizos, reduzca la velocidad.
Antes de circular por un muelle o por el
tablero de un puente, asegúrese de
que dichos elementos estén correctamente sujetos. Conduzca con precaución y despacio por el muelle y el
puente, y no sobrepase nunca la capacidad nominal de los mismos.
Cuando tenga que efectuar giros, reduzca la velocidad hasta que sea seguro efectuarlos conforme al entorno
en que esté maniobrando. Realice los
giros con suavidad.
Cuidado de la unidad por parte
del operario
Si se descubre la necesidad de reparar
la unidad o se detecta que ésta resulta
insegura de alguna manera o que contribuye a crear condiciones de inseguridad, se debe informar de inmediato a
la autoridad designada por el usuario.
Además, la unidad no deberá volver a
utilizarse hasta que se la haya devuelto a un estado operativo seguro.
Si, durante el funcionamiento, la unidad se vuelve insegura de alguna manera, se debe informar de inmediato a
la autoridad designada por el usuario.
Además, la unidad no deberá volver a
utilizarse hasta que se la haya devuelto a un estado operativo seguro.
No lleve a cabo reparaciones ni practique ajuste alguno a no ser que haya
sido expresamente autorizado para
ello.
TAREAS DE MANTENIMIEN-
TO Y ACONDICIONAMIENTO
Si se descuida el mantenimiento o se
practican en la unidad reparaciones,
tareas de acondicionamiento o ajustes
en los que no se respeten los criterios
de diseño del fabricante, su manejo
puede resultar peligroso. Por ello, se
debe disponer de servicios de mantenimiento (dentro o fuera de las instalaciones), contar con personal
cualificado y establecer unos modos
de proceder detallados.
El mantenimiento y la inspección de la
unidad deberán llevarse a cabo respetando las tareas que se indican a continuación:
A se deben seguir unos esquemas de
mantenimiento, lubricación e inspección conforme a su planificación; consulte las
recomendaciones del fabricante.
B el mantenimiento, las reparaciones,
los ajustes y las inspecciones de la
unidad sólo podrán ser llevados a
cabo por personal cualificado y autorizado; además, dichas tareas se
realizarán siempre de conformidad
con las especificaciones del fabricante.
Evite las posibles fuentes de peligro de
incendio y disponga siempre de extintores en la zona de trabajo. En la limpieza de las piezas, no use recipientes
de combustible abiertos ni líquidos limpiadores inflamables.
NORMAS DE SEGURIDAD
CONTRA INCENDIOS
Cuando las condiciones operativas de
una unidad no sean seguras, ésta deberá ponerse fuera de servicio.
En los emplazamientos de la clase I, la
clase II y la clase III está prohibido
efectuar reparaciones.
Prevención contra incendios: la unidad
se debe mantener limpia y debe estar
razonablemente libre de pelusas, restos de aceite y grasa. Para limpiar la
unidad, se recomienda usar preferiblemente agentes incombustibles. No
está permitido emplear líquidos inflamables [aquellos cuyo punto de inflamación esté en 100°F (37,8°C) o por
encima]. Se deben adoptar precauciones adecuadas al tipo de agente o disolvente empleado en lo que a la
toxicidad, la ventilación y el peligro de
incendios respecta.
Visibilidad de la placa de características: las denominaciones de tipo y las
marcas de tipo de la unidad indicadas
en la placa de características no deben
cubrirse con pintura que oscurezca la
información identificativa allí contenida.
No se debe utilizar la unidad en zonas
clasificadas.
20 ES
- 2
Page 21

Antes de poner en marcha
por primera vez el aparato,
lea el presente manual de instrucciones y siga las instrucciones que figuran en el mismo. Conserve estas
instrucciones para su uso posterior o
para propietarios ulteriores.
Índice de contenidos
Función . . . . . . . . . . . . . . . . ES . . 3
Uso previsto . . . . . . . . . . . . ES . . 3
Protección del medio ambiente ES . . 3
Elementos de mando . . . . . ES . . 4
Antes de la puesta en marcha ES . . 4
Funcionamiento . . . . . . . . . ES . . 5
Conservación y mantenimiento ES . . 6
Averías . . . . . . . . . . . . . . . . ES . . 7
Datos técnicos . . . . . . . . . . ES . . 8
Accesorios . . . . . . . . . . . . . ES . . 9
Garantía . . . . . . . . . . . . . . . ES . . 9
Piezas de repuesto . . . . . . . ES . . 9
Instrucciones de seguridad
Antes de utilizar por primera vez el
aparato, lea y tenga en cuenta el presente manual de instrucciones y el folleto adjunto relativo a las indicaciones
de seguridad para aparatos de limpieza con cepillos y aparatos pulverizadores, 5.956-251.
Símbolos
En este manual de instrucciones se
emplean los siguientes símbolos:
Peligro
Indica la existencia de un peligro inminente. El incumplimiento de la indicación puede acarrear la muerte o
lesiones de suma gravedad.
몇 Advertencia
Hace alusión a una situación potencialmente peligrosa. El incumplimiento
de la indicación puede provocar lesiones leves o daños materiales.
Nota
Identifica consejos de manejo e información importante sobre el producto.
Función
El aparato sirve para efectuar la limpieza en húmedo o el pulido de pisos llanos.
Dos cepillos rotativos contrarrotantes
limpian el suelo con ayuda del líquido
limpiador añadido. Una anchura de trabajo de 400 mm y una capacidad de
los tanques de agua limpia y sucia de
10 l cada uno permiten una limpieza
eficaz.
El funcionamiento vía red eléctrica permite obtener una elevada capacidad
de rendimiento sin limitar de modo alguno el trabajo.
Nota
En función de la tarea de limpieza de
que se desee realizar, es posible dotar
al aparato de distintos accesorios. Solicite nuestro catálogo o visítenos en la
página de internet www.kaercher.com.
Uso previsto
Utilice el aparato únicamente de conformidad con las indicaciones del presente manual de instrucciones.
– El aparato ha sido concebido exclu-
sivamente para la limpieza de suelos lisos resistentes a la humedad y
al pulido.
El margen de temperaturas de servicio está comprendido entre los
+5°C y los +40°C.
– El aparato no es apto para la limpie-
za de pisos congelados (p. ej., en
almacenes frigoríficos).
– Sólo está permitido dotar al aparato
de accesorios y piezas de repuesto
originales.
– El aparato ha sido concebido para
la limpieza de pisos en interiores o
superficies techadas. Para otros
campos de aplicación, deberá considerarse el uso de cepillos alternativos.
– El presente aparato no es apto para
la limpieza de las vías públicas de
tránsito.
Los aparatos viejos contienen materiales valiosos reciclables que debieran
aprovecharse. Evite el contacto de baterías, aceites y
materias semejantes con el
medioambiente. Deshágase de los aparatos viejos recurriendo a sistemas de
recogida apropiados.
Indicaciones sobre ingredientes
(REACH)
Encontrará información actual sobre
los ingredientes en:
www.kaercher.com/REACH
Protección del medio ambien-
te
Los materiales de embalaje
son reciclables. Por favor,
no tire el embalaje al cubo
de basura; llévelo a un lugar
de reciclaje.
- 3
21ES
Page 22

25
24
Elementos de mando
1 Bloqueo de tanque de agua limpia
2 Interruptor accionamiento de los
cepillos
3 Interruptor solución de limpieza
4 Manguera solución de limpieza
5 Filtro de pelusas (aspiración)
6 Dispositivo de bloqueo estribo de
empuje
7 Tecla de desbloqueo rueda de
transporte
8 Rueda de transporte
9 estribo de empuje
10 Gancho de relajación de esfuerzos
mecánicos
11 Soporte rueda de transporte
12 grapa
13 Depósito de agua limpia
14 depósito de agua sucia
15 Pulsador cambio de barra de aspi-
ración
16 flotador
17 Tecla cambio de cepillos
18 Tren de desplazamiento
19 barra de aspiración
20 Escobillas rotativas
21 Empuñadura giratoria presión de
apriete de cepillo
22 Pedal para bajar la barra de aspira-
ción
23 Clavija de red
24 Asa de transporte depósito de agua
sucia
25 Tapa depósito de agua limpia
Antes de la puesta en marcha
Montar el estribo de empuje
Desplazar la mitad superior del es-
tribo de empuje sobre la mitad inferior del estribo de empuje.
몇 Advertencia
Peligro de daños en la instalación. No
enganchar el cable durante el montaje.
Alinear los orificios (2 ajustes de al-
tura posibles).
Unir las mitades del estribo de em-
puje con tornillos de cierre, arandelas y mangos de estrella.
Fijar el cable con clips al estribo de
empuje.
Montar ruedas de transporte
Insertar los ejes de las ruedas de
transporte en los orificios del aparato y encajarlos.
Montaje de los cepillos
Antes de la puesta en servicio, se tienen que montar los cepillos (véase
"Trabajos de mantenimiento").
Funcionamiento
Nota
Para poner el accionamiento de los cepillos fuera de servicio de manera inmediata, afloje el interruptor para el
accionamiento de los cepillos.
Adición de combustibles
몇 Advertencia
Peligro de daños en la instalación. Utilice
únicamente el detergente recomendado.
22 ES
- 4
Page 23

En caso de usar otros detergentes, el propietario-usuario asume unos mayores riesgos en lo que a la seguridad durante el
funcionamiento y al peligro de sufrir accidentes se refiere. Utilice únicamente detergentes que no contengan disolventes,
ácidos clorhídricos ni ácidos hidrofluóricos.
Nota
No utilice detergentes altamente espumosos. Respete las indicaciones de
dosificación.
Detergente recomendado:
Empleo
Limpieza de mantenimiento de todos los sue-
Detergente
RM 746
RM 780
los resistentes al agua
Limpieza de manteni-
RM 755 es
miento de superficies
brillantes (p. ej., granito)
Limpieza de mantenimiento y limpieza a fon-
RM 69
ASF
do de suelos
industriales
Limpieza de manteni-
RM 753
miento y limpieza a fondo de suelos
industriales
Limpieza de manteni-
RM 751
miento de azulejos en el
ámbito sanitario
Limpieza y desinfección
RM 732
en el ámbito sanitario
Decapado de todos los
RM 752
suelos resistentes a los
álcalis (p.ej., PVC)
Decapado de suelos de
RM 754
sintasol
Abra la tapa del depósito de agua
limpia.
Llenar con la mezcla de agua y de-
tergente. Temperatura máxima del
líquido 50°C.
Nota
La tapa del depósito de agua limpia
puede utilizarse para dosificar el detergente. El contenido de la tapa dada la
vuelta hasta la marca equivale al 1%
del depósito de agua limpia.
Cierre la tapa del depósito de agua
limpia.
Conducción hasta el lugar de
empleo
Recorridos cortos sobre superficie
plana
Colocar estribo de empuje vertical-
mente.
Colocar empuñadora giratoria de
presión de apriete del cepillo en la
posición de marcha.
Empuje el aparato hasta el lugar de
uso por el estribo de empuje.
Recorridos largos, superficies no
planas
Colocar verticalmente estribo de
empuje y girar hacia arriba el dispositivo de bloqueo.
Montar ruedas de transporte.
몇 Advertencia
¡Peligro de daños por la salida de
agua! Antes de bascular el aparato,
bascular los depósitos de suciedad y
agua limpia.
Extraer los depósitos llenos de su-
ciedad y agua limpia y transportar
por separado.
Inclinar el aparato a un lado y des-
plazarlo sobre las ruedas de transporte hasta el lugar de empleo.
Si las ruedas de transporte están en
camino al usar el aparato:
Pulsar la tecla de desbloqueo de la
rueda de transporte y sacar rueda
de transporte.
Insertar las ruedas de transporte
hasta el tope en el soporte de ruedas de transporte.
Ajustar la presión de apriete de
los cepillos
Colocar estribo de empuje vertical-
mente.
Ajustar en el valor deseado la em-
puñadura giratoria de la presión de
apriete de cepillos.
Nota
Llevar a cabo los primeros intentos con
menos presión de apriete. Aumentar la presión de apriete poco a poco, hasta alcanzar
el resultado de limpieza deseado. Si se
ajusta correctamente la presión de apriete
se reduce el desgaste de los cepillos.
En caso de sobrecarga se desconectará el
accionamiento del cepillo.
Al limpiar con rodillos de microfibra la presión de apriete debe estar ajustada como
máximo en la posición mostrada abajo. Si
la presión de apriete es mayor existe peligro de que se destruyan los rodillos de microfibra.
+
-
Establecimiento de la conexión
a red
Peligro
Comprobar si la conexión a red del
aparato está en perfecto estado antes
de cada puesta en funcionamiento. No
poner en funcionamiento el aparato si
el cable está dañado. Un electricista
debe cambiar el cable dañado.
Enganche el extremo del cable de
prolongación a modo de lazo en el
gancho de relajación de esfuerzos
mecánicos.
Enchufe la clavija de red.
Limpieza
Si hay que aspirar la solución de
limpieza después del proceso de
limpieza, accionar el pedal de bajada de la barra de aspiración.
Girar el estribo de empuje hacia el
operario - el tren de desplazamiento
se retira y los cepillos tocan el suelo.
Conectar los cepillos accionando el
interruptor accionamiento de cepillos.
Conectar la irrigación de cepillos
accionando el interruptor solución
de detergente.
Dirigir el aparato en el estribo de
empuje sobre la superficie que va a
trabajarse.
몇 Advertencia
Peligro de daños para el revestimiento del
suelo. No utilice el aparato en esa zona.
Pulir
Girar el estribo de empuje hacia el
operario - el tren de desplazamiento
se retira y los cepillos tocan el suelo.
Conectar los cepillos accionando el
interruptor accionamiento de cepillos.
Dirigir el aparato en el estribo de
empuje sobre la superficie que va a
trabajarse.
몇 Advertencia
Peligro de daños para el revestimiento del
suelo. No utilice el aparato en esa zona.
Nota
Para pulir debajo de muebles puede
retirarse el depósito de agua limpia y
sucia.
Detención y apagado
Soltar el interruptor de la solución
de limpieza.
Conduzca el aparato entre 1-2 m
hacia delante para aspirar el agua
restante.
Soltar interruptor para el acciona-
miento de los cepillos.
- 5
23ES
Page 24

Accionar pedal de bajada de barra
de aspiración.
Colocar verticalmente el estribo de
empuje - los cepillos se elevan.
Desenchufe el cable de red.
몇 Advertencia
Peligro de deformación de los cepillos.
Al apagar el aparato descargar los cepillos colocando verticalmente el estribo de empuje
Vaciado del depósito de agua
limpia
Abrir bloqueos de depósito de agua
limpia.
Girar a un lado el asa de transporte
del depósito de agua sucia.
Elevar depósito de agua limpia y
llevar a instalación de eliminación.
몇 Advertencia
Respetar la normativa local vigente en materia de tratamiento de aguas residuales.
Retirar tapa de depósito de agua
limpia y verter el líquido a través de
la entalladura.
Vaciado del depósito de agua
sucia
Nota
Cuando el depósito de agua sucia está
lleno, el flotador cierra el canal de admisión. La aspiración se interrumpe.
Vaciar el depósito de agua sucia.
Retirar el depósito de agua limpia,
como se describe arriba.
Elevar depósito de agua sucia y lle-
var a instalación de eliminación.
몇 Advertencia
Respetar la normativa local vigente en
materia de tratamiento de aguas residuales.
Verter el agua sucia.
Aclare el depósito de agua sucia
con agua limpia.
Transporte
Para el transporte sobre un vehícu-
lo, fije el aparato para impedir que
resbale.
Para reducir el espacio requerido, se
puede plegar o desmontar el estribo de
empuje:
Afloje el mango en estrella de la fi-
jación del estribo de empuje.
Destornillar los mangos de estrella,
retirar los tornillos y retirar la mitad
superior del estribo de empuje.
Conservación y mantenimien-
to
Peligro
Peligro de lesiones
Antes de realizar cualquier trabajo en
el aparato, desenchúfelo:
몇 Advertencia
Si se sale agua se puede dañar el aparato. Purgar el agua sucia y el resto de
agua limpia antes de trabajar en el
aparato.
Plan de mantenimiento
Después del trabajo
몇 Advertencia
Peligro de daños en la instalación. No
salpique al aparato con agua ni utilice
detergentes agresivos.
Verter el agua sucia.
Aclare el depósito de agua sucia
con agua limpia.
Vaciar el depósito de agua limpia.
Llenar el depósito de agua limpia
con agua limpia y aclarar el aparato
para evitar sedimentos.
Retirar el agua restante del depósi-
to de agua limpia.
Comprobar la junta de la válvula de
bola en el depósito de agua limpia.
Compruebe el filtro de pelusas; en
caso necesario, límpielo.
Dejar secar los depósitos antes de
cerrarlos para evitar la formación
de olores.
Limpie el aparato por fuera con un
trapo húmedo ligeramente empapado en una solución jabonosa suave.
Limpie los labios de aspiración;
compruebe si presentan desgaste
y, en caso necesario, cambiar la
barra de aspiración.
Compruebe si los cepillos presen-
tan desgaste y, en caso necesario,
cámbielos.
Limpiar las regletas de distribución
de agua encima de los cepillos.
Mensualmente
Compruebe el estado de las juntas
situadas entre el aparato y el depósito de agua sucia y, en caso necesario, cámbielas.
Limpie el canal de los cepillos.
Anualmente
Encargue al servicio técnico la revi-
sión anual obligatoria.
Trabajos de mantenimiento
Renovar la barra de aspiración
Elevar la barra de aspiración accio-
nando el pedal de bajada de barra
de aspiración.
Apretar el pulsador de cambio de barra de aspiración hacia adentro - la
barra de aspiración se desencaja.
Sacar la barra de aspiración empu-
jándola hacia abajo.
Retirar los resortes de tornillos e in-
sertarlos en la nueva barra de aspiración.
Alinear la nueva barra de aspira-
ción de modo que la lengüeta de retención apunte al centro del
aparato.
Enhebrar los resortes de tornillo en
los alojamientos del aparato.
Empujar la barra de aspiración en
el aparato y encajarla.
Repetir el procedimiento para la se-
gunda barra de aspiración.
Nota
El intercambio regular de las dos barras de aspiración mejora el efecto frotador y prolonga la duración.
Recambio del cepillo cilíndrico
Colocar el aparato a un lado.
Pulsar la tecla de cambio de cepi-
llos y simultáneamente abatir los
cepillos rotativos.
Extraer el cepillo rotativo.
Insertar los nuevos cepillos rotati-
vos en el arrastrador y encajarlos.
Contrato de mantenimiento
Para garantizar el funcionamiento seguro del aparato, es posible firmar contratos de mantenimiento con el
departamento comercial correspondiente de Kärcher.
Protección antiheladas
En caso de peligro de heladas:
Vacíe el depósito de agua limpia y
el depósito de agua sucia.
Pulsar el interruptor de solución de
detergente hasta que ya no salga
agua.
Guarde el aparato en un lugar pro-
tegido de las heladas.
Averías
Peligro
Peligro de lesiones
Antes de realizar cualquier trabajo en
el aparato, desenchúfelo:
몇 Advertencia
Si se sale agua se puede dañar el aparato. Purgar el agua sucia y el resto de
agua limpia antes de trabajar en el
aparato.
Cuando las averías no se puedan solucionar con ayuda de la tabla que
aparece a continuación, acuda al servicio técnico.
24 ES
- 6
Page 25

Averías
Avería Modo de subsanarla
No se puede poner en marcha
el aparato
Caudal de agua insuficiente Compruebe el nivel de agua limpia y, de ser necesario, llene el depósito.
Potencia de aspiración insuficiente
Resultados de limpieza insuficientes
Los cepillos no giran Compruebe si hay cuerpos extraños bloqueando los cepillos y, de ser así, elimínelos.
El aparato vibra Los cepillos rotativos están deformados porque al apagar el aparato no han sido des-
Compruebe si está enchufada la clavija de red
Fusible de la toma de corriente demasiado bajo, buscar una toma de corriente adecua-
da.
Limpie la válvula de bola del depósito de agua limpia.
Comprobar si el depósito de agua limpia está asentado correctamente en el aparato.
Filtro en depósito de agua limpia obstruido, limpiar filtro.
Comprobar si los tubos están atascados, si es necesario limpiar.
Vacíe el depósito de agua sucia.
Comprobar si el depósito de agua limpia está asentado correctamente sobre el depó-
sito de agua sucia.
Comprobar junta del depósito de agua limpia, limpiar.
Limpie las juntas situadas entre el aparato y el depósito de agua sucia; compruebe su
estanqueidad y, en caso necesario, cámbielas.
Limpiar el filtro de pelusas.
Limpie los labios de aspiración de la barra de aspiración y, en caso necesario, cámbielos
Canal de aspiración obstruido, limpiar.
Compruebe si la barra de aspiración está obstruida y, de ser necesario, desatásquela
Elevar la presión de apriete de cepillo.
Compruebe si los cepillos presentan desgaste y, en caso necesario, cámbielos.
Utilizar los cepillos rotativos adecuados al tipo de suciedad y el tipo de suelo.
Reducir la presión de apriete.
El interruptor de protección contra sobrecorriente se ha activado. El interruptor de pro-
tección contra sobrecorriente vuelve a activar el servicio después de un minuto como
máximo.
cargados colocando en posición vertical el estribo de empuje, cambiar los cepillos rotativos.
Datos técnicos
Potencia
Tensión nominal V/Hz 120 / 60
Consumo medio de potencia W 1100
Potencia del motor de aspiración W 500
Potencia del motor de barrido W 1700
Aspirar
Potencia de aspiración, caudal de aire l/s 20
Potencia de aspiración, depresión kPa 10
Cepillos de limpieza
Anchura de trabajo mm 400
Diámetro cepillos mm 96
Nº de rotaciones de los cepillos 1/min 650
Medidas y pesos
Potencia teórica por metro cuadrado m²/h 400
Volumen de los depósitos de agua limpia y agua sucia l 10
Longitud (sin estribo de empuje) mm 520
Anchura (sin barra de aspiración) mm 470
Altura (sin estribo de empuje) mm 380
Peso (con el depósito vacío) kg 30
Emisión sonora
Nivel de presión acústica (EN 60704-1) dB(A) 71
Vibraciones del aparato
Valor total de la vibración (ISO 5349) m/s² 1,0
- 7
25ES
Page 26

Accesorios
Nº referencia
Unidad
Cepillo rotativo, rojo (medio, estándar)
Cepillo rotativo, verde (Grit) Para limpiar pavimentos muy sucios. 4.762-252.0 1 2
Cepillo rotativo, naranja (alto/
profundo)
Cepillo rotativo, blanco (suave) Para pulir pavimentos. 4.762-250.0 1 2
Eje de cilindro pad Para alojamiento del pad del cilindro. 4.762-228.0 1 2
Almohadilla, muy suave, blanca Para limpiar y pulir pavimentos delicados. 6.369-727.0 1 2
Almohadilla, suave, amarilla Para pulir pavimentos. 6.369-724.0 1 2
Almohadilla, suavidad media,
rojo
Almohadilla, dura, verde Para limpiar pavimentos de suciedad normal hasta gran-
Rodillos de microfibra To remove grey tint 4.114-003.0 1 2
Barra de aspiración, estándar 4.777-323.0 1 2
Barra de aspiración, resistente
al aceite
Para limpiar pavimentos de poca suciedad o delicados. 4.762-249.0 1 2
Para frotar pavimentos con estructura (alicatado de seguridad etc.)
Para limpiar pavimentos ligeramente sucios. 6.369-726.0 1 2
de.
4.762-251.0 1 2
6.369-725.0 1 2
4.777-322.0 1 2
Aparato necesita pieza
cable de prolongación 20 m 6.647-022.0 1 1
Garantía
En todos los países rigen las condiciones de garantía establecidas por nuestra empresa distribuidora. Las averías
del accesorio serán subsanadas gratuitamente dentro del periodo de garantía, siempre que se deban a
defectos de material o de fabricación.
En un caso de garantía, le rogamos
que se dirija con el comprobante de
compra al distribuidor donde adquirió
el aparato o al servicio al cliente autorizado más próximo a su domicilio.
– En el área de servicios de
www.kaercher.com encontrará
más información sobre piezas de
repuesto.
Piezas de repuesto
– Sólo deben emplearse accesorios y
piezas de repuesto originales o autorizados por el fabricante. Los accesorios y piezas de repuesto
originales garantizan el funcionamiento seguro y sin averías del
aparato.
– Podrá encontrar una selección de
las piezas de repuesto usadas con
más frecuencia al final de las instrucciones de uso.
26 ES
- 8
Page 27

Page 28

AE Karcher FZE, P.O. Box 17416, Jebel Ali Free Zone (South),
Dubai, United Arab Emirates,
+971 4 886-1177, www.kaercher.com
AR Kärcher S.A., Urugguay 2887 (1646) San Fernando,
Pcia. de Buenos Aires
+54-11 4506 3343, www.karcher.com.ar
AT Alfred Kärcher Ges.m.b.H., Lichtblaustraße 7, 1220 Wien,
+43-1-25060-0, www.kaercher.at
I Kärcher S.p.A., Via A. Vespucci 19, 21013 Gallarate (VA),
+39-848-998877, www.karcher.it
IE Kärcher Limited (Ireland), C1 Centrepoint Business Park,
Oak Road, Dublin 12,
(01) 409 7777, www.kaercher.ie
JP Kärcher (Japan) Co., Ltd., Irene Kärcher Building, No. 2, Matsusaka-Daira 3-chome, Taiwa-cho, Kurokawa-gun, Miyagi 981-3408,
+81-22-344-3140, www.karcher.co.jp
AU Kärcher Pty. Ltd., 40 Koornang Road, Scoresby VIC 3179,
Victoria,
+61-3-9765-2300, www.karcher.com.au
BE Kärcher N.V., Industrieweg 12, 2320 Hoogstraten,
+32-3-340 07 11, www.karcher.be
BR Kärcher Indústria e Comércio Ltda., Av. Professor
Benedicto Montenegro no 419, Betel,
Paulínia - Estado de Sao Paulo, CEP 13.140-000
+55-19-3884-9100, www.karcher.com.br
CA Kärcher Canada Inc., 6535 Millcreek Road, Unit 67,
Mississauga, ON, L5N 2M2,
+1-905-672-8233, www.karcher.ca
CH Kärcher AG, Industriestrasse, 8108 Dällikon, Kärcher SA,
Croix du Péage, 1029 Villars-Ste-Croix,
0844 850 864, www.kaercher.ch
CN Kärcher (Shanghai) Cleaning Systems, Co., Ltd., Part F, 2nd
Floor, Building 17, No. 33, XI YA Road, Waigaogiao Free Trade,
Pudong, Shanghai, 200131
+86-21 5076 8018, www.karcher.cn
CZ Kärcher spol. s r.o., Modletice c.p. 141, CZ-251 01 Ricany,
+420/323/606 014, www.kaercher.cz
DE Alfred Kärcher Vertriebs-GmbH, Friedrich-List-Straße 4,
71364 Winnenden,
+49-7195/903-0, www.kaercher.de
DK Kärcher Rengøringssystemer A/S, Helge Nielsens Alle 7 A,
8723 Løsning,
+45-70206667, www.karcher.dk
ES Kärcher, S.A., Pol. Industrial Font del Radium,
Calle Josep Trueta, 6-7, 08403 Granollers (Barcelona),
+34-902 17 00 68, www.karcher.es
F Kärcher S.A.S., Z.A. des Petits Carreaux,
5, avenue des Coquelicots, 94865 Bonneuil-sur-Marne,
+33-1-4399-6770, www.karcher.fr
FI Kärcher OY, Yrittäjäntie 17, 01800 Klaukkala,
+358-207 413 600, www.karcher.fi
GB Kärcher (U.K.) Ltd., Kärcher House, Beaumont Road,
Banbury, Oxon OX16 1TB,
+44-1295-752-000, www.karcher.co.uk
GR Kärcher Cleaning Systems A.E., 31-33, Nikitara str. &
Konstantinoupoleos str., 136 71 Aharnes,
+30-210-2316-153, www.karcher.gr
HK Kärcher Limited, Unit 10, 17/F., Apec Plaza, 49 Hoi Yuen Road,
Kwun Tong, Kowloon,
++(852)-2357-5863, www.karcher.com.hk
HU Kärcher Hungaria KFT, Tormásrét ut 2., (Vendelpark),
2051 Biatorbagy,
+36-23-530-64-0, www.kaercher.hu
KR Karcher (Korea) Co. Ltd., 162 Gukhoe-daero, (872-2 SinjeongDong), Seoul, Korea
02-322 6588, A/S. 1544-6577, www.karcher.co.kr
LV Karcher SIA, Mārupes nov., Mārupe, Kārļa Ulmaņa gatve 101,
ga, LV-1046
Rī
+371-67 80 87 07
MX Karcher México, SA de CV, Av. Gustavo Baz No. 29-C, Col. Naucalpan Centro, Naucalpan, Edo. de México, C.P. 53000 México,
+52-55-5357-04-28, www.karcher.com.mx
MY Karcher Cleaning Systems Sdn. Bhd., 71 & 73 Jalan TPK 2/8, Taman
Perindustrian Kinrara, Seksyen 2, 47100 Puchong, Selangor Darul Ehsan
+603 8073 3000, www.karcher.com.my
NL Kärcher B.V., Postbus 474, 4870 AL Etten-Leur,
0900-33 666 33, www.karcher.nl
NO Kärcher AS, Stanseveien 31, 0976 Oslo, Norway,
+47 815 20 600, www.karcher.no
NZ Karcher Limited, 12 Ron Driver Place, East Tamaki,
Auckland, New Zealand,
+64 (9) 274-4603, www.karcher.co.nz
PL Kärcher Sp. z o.o., Ul. Stawowa 140, 31-346 Kraków,
+48-12-6397-222, www.karcher.pl
RO Karcher Romania srl, Sos. Odaii 439, Sector 1, RO-013606 BUKAREST,
+40 37 2709001, www.kaercher.ro
RU Karcher Ltd. Service Center, 105082, Москва, ул. Б.Почтовая, д. 40
+7-495 789 90 76, www.karcher.ru
SE Kärcher AB, Tagenevägen 31, 42502 Hisings-Kärra,
+46 (0)31-577 300, www.karcher.se
SGP Karcher South East Asia Pte. Ltd., 5 Toh Guan Road East,
#01-00 Freight Links Express Distripark, Singapore 608831,
+65-6897-1811, www.karcher.com.sg
SK Kärcher Slovakia, s.r.o., Beniakova 2, SK-94901 NITRA,
+421 37 6555 798, www.kaercher.sk
TR Kärcher Servis Ticaret A.S., Mahmutbey Mahallesi İstoç,
Petrol Plaza C-Blok Kat: 2-3, Bağcılar, 34218 Istanbul
+90-212-659-43 69, www.karcher.com.tr
TW Karcher Limited, 7/F, No. 66, Jhongijheng Rd., Sinjhuang City,
Taipei County 24243, Taiwan,
+886-2-2991-5533, +886-800-666-825, www.karcher.com.tw
UA Kärcher Ltd., Petropavlivska Str., 4, Petropavlivska Borschagivka, Kyiv region, 08130,
+380 44 594 7576, www.karcher.com.ua
USA To locate your local dealer please visit our web site at
http://www.karchercommercial.com or call us at 888.805.9852
ZA Kärcher (Pty) Ltd., 144 Kuschke Street, Meadowdale,
Edenvale, 1614,
+27-11-574-5360, www.karcher.co.za
06/12
 Loading...