

Page 1
BR 30/4 C
BR 30/4 C Adv
English 3
Français 14
Español 27
Register and win!
www.kaercher.com
59649540 10/12
Page 2
2
Page 3

IMPORTANT SAFETY IN-
STRUCTIONS
READ ALL INSTRUCTIONS
BEFORE USING.
WARNING
To reduce the risk of fire, electric
shock, or injury:
– DO NOT LEAVE appliance unat-
tended when plugged in. Unplug
from outlet when not in use and before servicing.
WARNING
– TO REDUCE THE RISK OF ELEC-
TRIC SHOCK-USE INDOORS
ONLY
– Do not allow to be used as a toy.
Close attention is necessary when
used near children.
– Use only as discribed in this manu-
al. Use only manufacturer’s recommended attachments.
– Do not use with damaged cord or
plug. If appliance is not working as
it should, has been dropped, damaged, left outdoors, or dropped into
water, return it to a service center.
– Do not pull or carry by cord, use
cord as a handle, close a door on
cord, or pull cord around sharp edges or corners. Do not run the unit
over cord. Keep cord away from
heated surfaces.
– Do not unplug by pulling on cord. To
unplug, grasp the plug, not the cord.
– Do not handle plug or appliance
with wet hands.
– Do not put any object into openings.
Do not use with any opening
blocked; keep free of dust, lint, hair,
and anything that may reduce air
flow.
– Keep hair, loose clothing, fingers,
and all parts of body away from
openings and moving parts.
– Turn off all controls before unplug-
ging.
– Use extra care when cleaning on
stairs.
– Do not use to pick up flammable or
combustible liquids, such as gasoline, or use in areas where they may
be present.
– Connect to a properly grounded
outlet only. See Grounding Instructions.
SAVE THESE INSTRUCTIONS
GROUNDING INSTRUCTIONS
This appliance must be grounded. If it
should malfunction or break down,
grounding provides a path of least resistance for electric current to reduce
the risk of electric shock.
The plug must be inserted into an appropriate outlet that is properly installed and grounded in accordance
with all local codes and ordinances.
WARNING
Improper connection of the equipmentgrounding conductor can result in a
risk of electric shock.
Check with a qualified electrician or
service person if you are in doubt as to
whether the outlet is properly grounded.
Do not modify the plug provided with
the appliance.
If it will not fit the outlet, have a proper
outlet installed by a qualified electrician.
– 1
3EN
Page 4
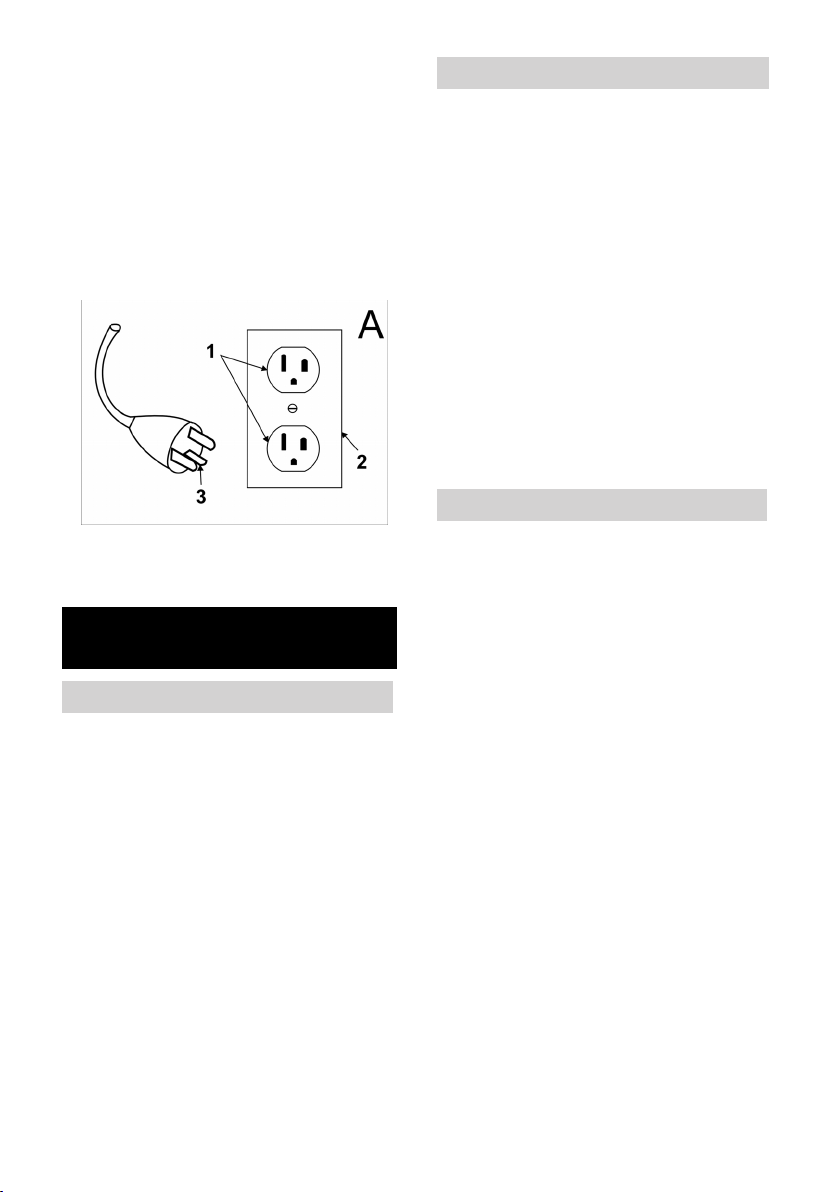
This appliance is for use on a nominal
120-volt circuit and has a grounding attachment plug that looks like the plug
illustrated in sketchpicture A. Make
sure that the appliance is connected to
an outlet having the same configuration as the plug. No adaptor should be
used with this appliance.
CONNECT TO A PROPERLY
GROUNDED OUTLET ONLY
1 Grounded outlet
2 Grounded outlet box
3 Grounded pin
OPERATING SAFETY RULES
AND PRACTICES
Operator Responsibility
Save operation is in the responsibility
of the operator.
The operator shall be familiar with the
operation and function of all controls
and instruments before undertaking to
operate the unit.
Before operating the unit, operators
shall have read and be familiar with the
operator’s manual for the particular
unit being operated and they shall also
abide by the safety rules and practices
in the following paragraphs.
Before operating any unit, the operator
shall be familiar with unusual operating
conditions which may require additional safety precautions or special operating instructions.
General
Before starting to operate the unit be in
operating position.
Do not start or operate the unit, any of
its functions or attachments, from any
place other than from the designated
operators position.
Before leaving the operator’s position:
A bring the unit to a complete stop;
B if the unit must be on an incline,
block the wheels.
Maintain a safe distance from the edge
of ramps, platforms, and other similar
working surfaces.
Do not add to, or modify the unit.
Do not block access to fire aisles, stairways or fire equipment.
Travelling
Yield the right of way to pedestrians
and emergency vehicles such as ambulances and fire trucks.
Cross railroad tracks at an angle wherever possible. Do not park closer than
6 ft (1800 mm) to the nearest rail of a
railroad track.
Keep a clear view of the path of travel
and observe for other traffic, personnel, and safe clearances.
Under all travel conditions, operate the
unit at a speed that will pernit it to be
brought to a stop in a safe manner.
Do not indulge in stunt driving or horseplay.
Slow down for wet and slippery floors.
Before driving over a dockboard or
bridge plate, be sure that it is properly
secured. Drive carefully and slowly
across the dockboard or bridge plate,
and never exceed its rated capacity.
When negotiating turns, reduce speed
to a safe level consistent with the operating environment. Make the turns
smoothly.
4 EN
– 2
Page 5

Operator care of the unit
If the unit is found to be in need of repair or in any way unsafe, or contributes to an unsafe condition, the matter
shall be reported immediately to the
user’s designated authority, and the
unit shall not be operated until it has
been restored to safe operating condition.
If during operation the unit becomes
unsafe in any way, the matter shall be
reported immediately to the user’s designated authority, and the unit shall not
be operated until it has been restored
to safe operating condition.
Do not make repairs or adjustments
unless specifically authorized to do so.
MAINTENANCE AND RE-
BUILD PRACTICES
Operation of the unit may be hazardous if maintenance is neglected or repairs, rebuilds, or adjustments are not
performed in accordance with the manufacturer’s design criteria. Therefore,
maintenance facilities (on or off premises), trained personnel, and detailed
procedures shall be provided.
Maintenance and inspection of the unit
shall be performed in conformance
with the following practices:
A a schedules planned maintenance,
lubrication, and inspection system
shall be followed; consult the manufacturer’s recommendations.
B only tranined and authorized per-
sonnel shall be permitted to maintain, repair, adjust, and inspect the
unit, and in accordance with manufacturer’s specifications.
Avoid fire hazards and have fire protection equipment present in the work
area. Do not use open pans of fuel or
flammable cleaning fluids for cleaning
parts.
FIRE SAFETY STANDARD
Any unit not in safe operating condition
shall be removed from service.
Repairs shall not be made in Class I,
Class II, and Class III locations.
Fire Prevention: The unit shall be kept
in a clean condition and reasonably
free of lint, excess oil, and grease.
Noncombustible agents are preferred
for cleaning the unit. Flammable liquids
[those having flash points at or above
100°F (37,8°C)] are not allowed. Precautions regarding toxicity, ventilation,
and fire hazard shall be appropriate for
the agent or solvent used.
Nameplate Visibility: The unit type designations as shown on the nameplate
and the type markers shall not be covered over with paint so that their identification information is obscured.
The unit shall not be used in classified
areas.
– 3
5EN
Page 6

Please read and comply
with these instructions prior
to the initial operation of your appliance. Retain these operating instructions for future reference or for
subsequent possessors.
Contents
Safety instructions . . . . . . . EN . . .4
Function . . . . . . . . . . . . . . . EN . . .4
Proper use . . . . . . . . . . . . . EN . . .4
Environmental protection . . EN . . .4
Control elements . . . . . . . . EN . . .5
Initial startup. . . . . . . . . . . . EN . . .5
Operation . . . . . . . . . . . . . . EN . . .5
Maintenance and care . . . . EN . . .7
Faults . . . . . . . . . . . . . . . . . EN . . .8
Technical specifications . . . EN . .10
Warranty. . . . . . . . . . . . . . . EN . .11
Spare parts. . . . . . . . . . . . . EN . .11
Safety instructions
Before using the appliance for the first
time, read and observe these operating instructions and the accompanying
brochure: Safety information for brush
cleaning units and spray-extraction
units, 5.956-251.
Symbols in the operating in-
structions
Danger
Immediate danger that can cause severe injury or even death.
몇 Warning
Possible hazardous situation that
could lead to severe injury or even
death.
Caution
Possible hazardous situation that
could lead to mild injury to persons or
damage to property.
Function
The appliance is used for the wet
cleaning of level floors.
A working width of 300 mm and a capacity of 4 l each of the fresh and dirt
water reservoirs enable an effective
cleaning of smaller surfaces.
The power supply operation allows a
high capacity without a restriction of
the working time.
Note
The appliance can be equipped with
various accessories depending on the
cleaning task. Please request our catalogue or visit us on the Internet at
www.kaercher.com.
Proper use
Use this appliance only as directed in
these operating instructions.
– The appliance may only be used for
the cleaning of hard surfaces that
are not sensitive to moisture and
polishing operations.
The application temperature ranges
from +5°C to +40°C.
– The appliance is not suited for the
cleaning of frozen grounds (e.g. in
cold stores).
– The appliance may only be
equipped with original accessories
and spare parts.
– The appliance was designed for the
cleaning of floors inside or of covered surfaces.
– The appliance is not intended for
the cleaning of public traffic routes.
– The appliance is not suited for the
use in potentially explosive environments.
6 EN
– 4
Page 7

Environmental protection
The packaging materials
are recyclable. Please do
not throw packaging in the
domestic waste but pass it
on for recycling.
Old units contain valuable
recyclable materials. Batteries, oil and similar substances may not be released into
the environment. Therefore
please dispose of old units
through suitable collection
systems.
Notes about the ingredients
(REACH)
You will find current information about
the ingredients at:
www.kaercher.com/REACH
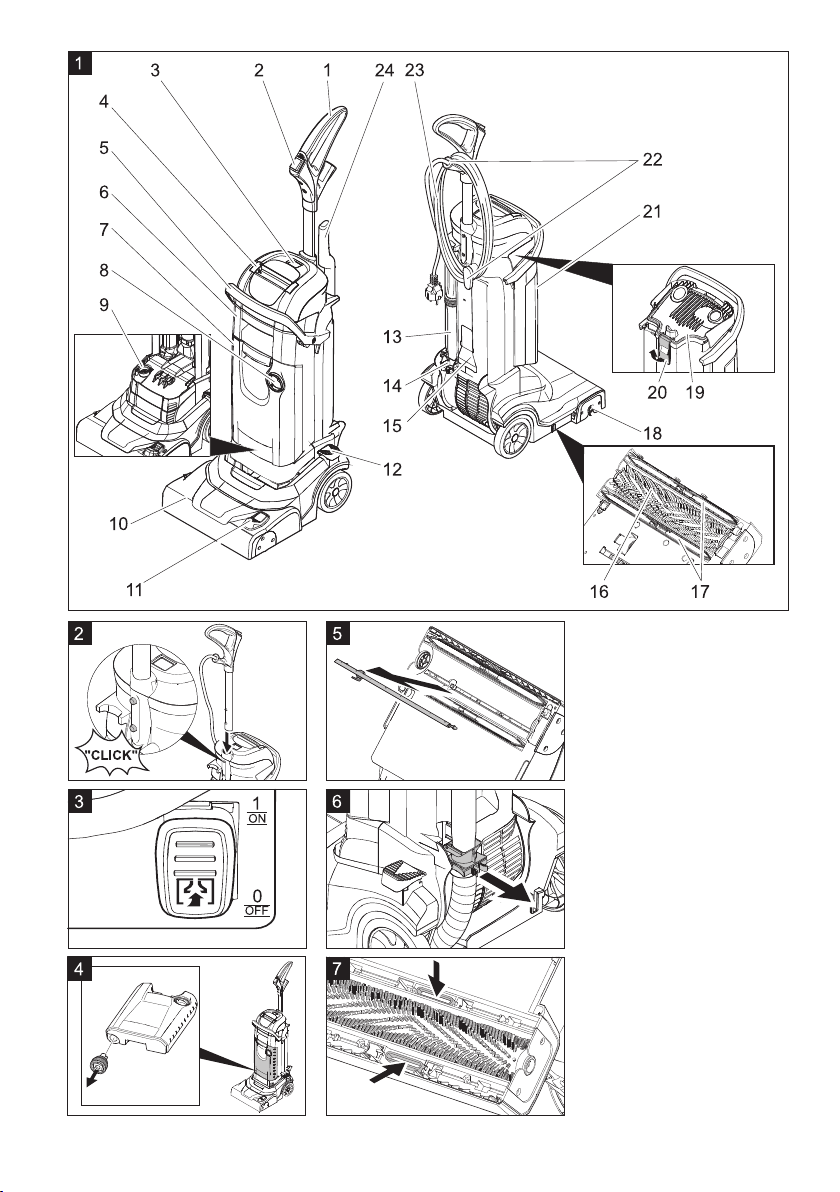
Control elements
17 Unlocking button for the change-
able brush
18 Cover dirt water reservoir
19 Lock
20 Cable hook, rotating
21 Mains cable with mains plug
22 Suction tube handle (BR 30/4 C
Adv only)
Colour coding
– The operating elements for the
cleaning process are yellow.
– The controls for the maintenance
and service are light gray.
Initial startup
Figure 2, see cover page
Insert tube into the opening of the
appliance at the end of the handle.
Press down and slide the handle
into the appliance until it clicks.
Operation
Figure 1, see cover page
1 Handle
2 Water pump switch
3 Main switch for brushing/vacuum-
ing operations
4 Carrying handle
5 Support bow in waste water reser-
voir
6 Dirt water reservoir
7 Fresh water tank
8 Fresh water tank lock
9 Cleaning head
10 Vacuum bar lift pedal
11 Release, park position
12 Suction tube
13 Suction tube connection
14 Suction nozzle (BR 30/4 C Adv on-
ly)
15 Brush roller
16 Vacuum bar
Fill fresh water reservoir
Caution
Risk of damage. Only use the recommended detergents. With respect to
different detergents the operator bears
the increased risk regarding the operational safety, accident risk and reduced
product life of the appliance. Only use
detergents that are free from solvents,
hydrochloric acid and hydrofluoric acid.
Follow the safety instructions for using
detergents.
Note
Do not use highly foaming detergents.
Observe the dosing notes.
Recommended detergents:
– 5
7EN
Page 8

Application Detergent
Everday cleaner, alkali-
RM 743
based
Everyday cleaner, acid-
RM 738
ic, for sanitary applications, swimming pools,
etc. Removes limestone
deposits.
Remove the fresh water reservoir
from the appliance.
Open the cover of the fresh water
reservoir.
Pour in water/detergent mixture.
Maximum temperature of the liquid
50 °C.
Close the cover of the fresh water
reservoir.
Insert the fresh water container into
the appliance.
Establish mains contact
Swivel bottom cable hook upward
and remove cable.
Check mains cable and plug for
damage or breakage. Get them replaced only through customer service agent or an electrician.
Insert the mains plug into the sock-
et.
Cleaning
Danger
Risk of injury on account of electric
shock caused by a damaged mains cable. Do not let the mains cable come in
contact with the rotating brushes.
Caution
Risk of damage to the floor covering.
The cleaning method for severe soiling
must only be used on floors suitable for
this kind of cleaning.
Risk of damage to the fresh water
pump if it runs dry because of empty
fresh water reservoir. Monitor the fill
level indicator and switch the water
pump switch off if the fresh water reservoir is empty.
Normal soiling
Move the suction bar lift pedal to
position „suction off“ (Fig. 3 - position "1/ON", see inside front cover).
Press the park position release and
swivel the handle toward the rear.
Set main switch for brush/vacuum
operation to “1”.
Activate the water pump switch.
Move the appliance over the sur-
face to be cleaned.
Severe soiling
Caution
Risk of damage to the floor covering.
The cleaning method for severe soiling
must only be used on floors suitable for
this kind of cleaning.
Move the vacuum bar lift pedal to
position „do not suction off“ (Fig. 3 position "0/OFF" see inside front
cover) and perform the cleaning as
you would with normal soiling. The
detergent liquid remains on the surface to be cleaned and has time to
settle in.
Move the vacuum bar lift pedal to
position "suction off" and reclean
the surface.
Vacuuming in corners (BR 30/4 C Adv only)
Pull the suction tube out toward the
top, attach the suction nozzle and
vacuum the dirt.
Remove the nozzle, replace the
suction tube and insert handle.
8 EN
– 6
Page 9

Complete cleaning
Turn off the water pump switch.
Push the appliance a little further to
vacuum up the remaining water.
Set main switch for brush/vacuum
operation to “0”.
Swivel the appliance handle for-
ward and arrest in the park position.
Disconnect the main plug from the
socket.
Emptying the Dirt Water Reser-
voir
Note
If the dirt water reservoir is full the float
closes the suction channel. The suction operation is interrupted. Empty the
dirt water reservoir.
몇 Warning
Please observe the local provisions regarding the wastewater treatment.
Turn off the appliance.
Position the appliance upright and
arrest it in the park position.
Remove the fresh water reservoir
from the appliance.
Swivel support bow downward and
remove the waste water reservoir.
Lift the lock and remove the lid of
the waste water reservoir.
Pour out dirt water.
The rinse the dirt water reservoir
with clear water.
Replace the lid of the waste water
reservoir and lock it.
Insert the waste water container
into the appliance.
Emptying the Fresh Water Res-
ervoir
Remove the fresh water reservoir
from the appliance.
Open the cover of the fresh water
reservoir.
Pour out the cleaning liquid.
Close the cover of the fresh water
reservoir.
Insert the fresh water container into
the appliance.
Transport
Caution
Risk of injury and damage! Observe
the weight of the appliance when you
transport it.
Swivel the appliance handle for-
ward and arrest in the park position.
Swivel the pushing handle back-
wards and push the appliance.
or
Lift appliance by the carrying han-
dle and carry it.
When transporting in vehicles, se-
cure the appliance according to the
guidelines from slipping and tipping
over.
Storage
Caution
Risk of injury and damage! Note the
weight of the appliance in case of storage.
This appliance must only be stored in
interior rooms.
Maintenance and care
Danger
Risk of injury by inadvertent startup of
appliance and electrical shock.
First pull out the plug from the mains
before carrying out any tasks on the
machine.
Caution
Risk of damage to the appliance on account of water leakage. Empty the
– 7
9EN
Page 10

waste water reservoir and the fresh
water reservoir prior to performing
maintenance on the appliance.
Maintenance schedule
After the work
Caution
Risk of damage. Do not wash down the
appliance with water and do not use
aggressive detergents.
Empty the dirt water reservoir.
Clean the seals between the waste
water reservoir and the appliance.
Empty the fresh water reservoir.
Rinse the appliance: Fill the fresh
water reservoir with clear water
(without detergent) and let the appliance run for one minute with the
brush water supply turned on.
Empty the fresh water reservoir.
Clean the outside of the appliance
with a damp cloth which has been
soaked in mild detergent.
Clean the vacuum bar, check for
wear and replace if required (see
"Maintenance tasks").
Check the brush for wear and re-
place if required (see "Maintenance
tasks").
Yearly
Have the prescribed safety inspec-
tion carried out by an electrician.
Maintenance Works
Replace the vacuum bar.
Note
The vacuum bars are attached to the
appliance with snaps and can simply
be pulled off.
Move the suction bar lift pedal to
position „suction off“ (Fig. 3 - position "1/ON", see inside front cover).
Remove the fresh water reservoir.
Remove the dirt water reservoir.
Lay the device on the reverse.
Pull off the vacuum bar downwards.
Insert the new vacuum bars and
lock them into place.
Replacing the brush roller
Remove the fresh water reservoir.
Remove the dirt water reservoir.
Lay the device on the reverse.
Press the release button for the
brush roller and swivel the brush
roller toward the bottom and pull it
off the driver.
Place the new brush roller on the
driver and lock into place on the opposite side.
Frost protection
In case of danger of frost:
Empty the fresh and dirt water res-
ervoirs.
Store the appliance in a frost-pro-
tected room.
Faults
Danger
Risk of injury by inadvertent startup of
appliance and electrical shock.
First pull out the plug from the mains
before carrying out any tasks on the
machine.
Caution
Risk of damage to the appliance on account of water leakage. Empty the
waste water reservoir and the fresh
water reservoir prior to performing
maintenance on the appliance.
In case of faults that cannot be remedied using the table below please contact the customer service.
10 EN
– 8
Page 11

Fault Remedy
Appliance cannot
Check if the mains plug is connected.
be started
Insufficient water
quantity
Check fresh water level, refill tank if necessary.
Open the lock of the fresh water reservoir. If a vacuum is
detected when the tank is opened, clean the ventilation
valve in the lock of the fresh water reservoir.
Clean the water distributor (see chapter "Cleaning the water distributor").
Remove the fresh water tanke and check the sieve for contamination. If necessary, remove the sieve and clean it.
Pull off the valve with filter on the fresh water reservoir (Fig.
4, see inside front cover) and rinse in lukewarm water.
Fresh water reservoir drips when re-
Pull off the valve with filter on the fresh water reservoir (Fig.
4, see inside front cover) and rinse in lukewarm water.
filled
Insufficient vacu-
um performance
Empty the dirt water reservoir.
Lock the waste water reservoir in place on the appliance.
Clean the seals between dirt water reservoir and cover and
check for tightness, replace if required.
Check the seals between the lid of the waste water reser-
voir and the appliance. Contact Customer Service if the
seals are damaged.
Check that all vacuum bars are locked into place in the
cleaning head.
Suction bar plugged, clean.
Suction bar worn; exchange the front and rear suctions
bars. If both suction bars are worn, install new suction bars.
Check that both suction tube parts are correctly attached to
the suction tube connection.
Check the suction tube and the suction channel in the
cleaning head for obstruction and remove if necessary (see
"Cleaning suction tube").
Check whether the cable behind the tanks has been routed
flat and whether the included cover is attached.
Insufficient clean-
Check the brush roller for wear, replace if required.
ing result
Brush does not
turn
Creaking sound,
brush does not turn
Check if foreign matters are blocking the brush roller; remove foreign matter if required.
Slip clutch was triggered. Switch off the appliance, check/
clean the brush roller.
– 9
11EN
Page 12

Clean water distributor
Take out the brush roller.
Pull the water distribution bar out of
the brush tunnel (Fig. 5, see inside
front cover).
Clean the irrigation channel and the
opening in the water distribution bar
under running water.
Clean suction tube
Remove the fresh water reservoir
from the appliance.
Swivel support bow downward and
remove the waste water reservoir.
Pull the suction tube connection out
toward the rear of the appliance and
swivel out both ends of the suction
tube (Fig. 6, see inside front cover).
The suction tube is separated and
both ends are accessible for cleaning.
Pull the vacuum bar off toward the
bottom, the suction channel in the
cleaning head is accessible for
cleaning (Fig. 7, see inside front
cover).
Flush the suction hose and the suc-
tion channel with water or pull or
push the obstruction out with a blunt
object.
Technical specifications
Power
Nominal voltage V/Hz 120 /
1~60
Power consumption A 6
Protective class I
Type of protection IPX4
Vacuuming
Cleaning power, air
quantity
Cleaning power, negative pressure
Cleaning brush
Working width in
Brush diameter in
Brush speed 1/min 1550
Dimensions and
weights
Theoretical surface
cleaning performance
Fresh/dirt water reservoir volume
Length in
Width in
Height in
Weight lb (kg) 35.3
Values determined as per EN 60335-272
Hand-arm vibration
value
Uncertainty K m/s
Sound pressure level
L
pA
Uncertainty K
Sound pressure level
L
WA
Uncertainty K
pA
WA
gpm
(l/s)
psi
(kPa)
(mm)
(mm)
ft²/h
(m²/h)
gal (l) 1 (4)
(mm)
(mm)
(mm)
m/s
dB(A) 72
dB(A) 1
dB(A) 85
dB(A) 1
2
2
380
(24)
2.0 (14)
11,8
(300)
2.4 (60)
2152
(200)
15.4
(390)
13.2
(335)
46.5
(1180)
(16)
<2,5
0,2
12 EN
– 10
Page 13

Warranty
The warranty terms published by our
competent sales company are applicable in each country. We will repair potential failures of your accessory within
the warranty period free of charge, provided that such failure is caused by
faulty material or defects in fabrication.
In the event of a warranty claim please
contact your dealer or the nearest authorized Customer Service center.
Please submit the proof of purchase.
Spare parts
– Only use accessories and spare
parts which have been approved by
the manufacturer. The exclusive
use of original accessories and
original spare parts ensures that
the appliance can be operated
safely and trouble free.
– At the end of the operating instruc-
tions you will find a selected list of
spare parts that are often required.
– For additional information about
spare parts, please go to the Service section at www.kaercher.com.
– 11
13EN
Page 14

CONSIGNES DE SÉCURITÉ
IMPORTANTES
LIRE L'INTÉGRALITÉ DES
INSTRUCTIONS AVANT
L'UTILISATION.
AVERTISSEMENT
Afin de réduire les risques d'incendie,
d'électrocution et de blessures,
prendre les précautions suivantes :
– NE PAS LAISSER l'appareil sans
surveillance lorsqu'il est branché.
Débrancher l'appareil lorsqu'il n'est
pas utilisé et avant de procéder à
l'entretien.
AVERTISSEMENT
– UTILISER L'APPAREIL EXCLUSI-
VEMENT À L'INTÉRIEUR POUR
RÉDUIRE LES RISQUES D'ÉLECTROCUTION
– Cet appareil n'est pas un jouet. Ne
jamais le laisser sans surveillance
lorsqu'il est utilisé à proximité d'enfants.
– Respecter impérativement les
consignes d'utilisation de ce manuel. Utiliser uniquement les accessoires recommandés par le
fabricant.
– Ne pas mettre l'appareil en service
en cas d'endommagement du cordon ou de la prise. Si l'appareil ne
fonctionne pas correctement, s'il
est tombé, s’il a été endommagé,
s’il est resté à l’extérieur ou est tombé dans l’eau, le retourner à un
centre de service.
– Ne pas tirer ou transporter l’appa-
reil par le cordon électrique ou se
servir de ce dernier comme d’une
poignée. Veiller à ne pas coincer le
cordon dans une porte et éviter de
le tirer sur des bords ou des coins
tranchants. Ne pas rouler sur le cordon électrique. Tenir le cordon à
l'écart des surfaces chaudes.
– Ne pas tirer sur le cordon électrique
pour débrancher l'appareil. Tirer au
niveau de la fiche pour déconnecter
l'appareil du secteur.
– Ne pas manipuler l’appareil ou la
fiche électrique avec les mains
mouillées.
– Ne rien introduire dans les orifices.
Ne pas utiliser l’appareil si l’un des
orifices est obstrué. Protéger les
orifices de la poussière, des peluches, des cheveux et autres matières susceptibles de réduire le
débit d'air.
– Veiller à ne pas approcher les che-
veux, vêtements larges, doigts ou
toute autre partie du corps des orifices et composants mobiles de
l’appareil.
– Désactiver toutes les commandes
avant de débrancher l'appareil.
– Faire particulièrement attention lors
du nettoyage d'escaliers.
– Ne pas aspirer de liquides inflam-
mables ou combustibles, tels que
de l’essence avec l'appareil. Ne pas
utiliser ce dernier dans des zones
susceptibles de contenir de tels
produits.
– Brancher uniquement sur une prise
correctement reliée à la terre. Voir
les instructions de mise à terre.
CONSERVER CES
CONSIGNES
14 FR
– 1
Page 15

INSTRUCTIONS DE MISE À
LA TERRE
Cet appareil doit être connecté à la
terre. En cas de dysfonctionnement ou
de panne, la mise à la terre fournit un
chemin de moindre résistance pour le
courant électrique pour réduire le
risque de choc électrique.
La fiche doit être branchée dans une
prise électrique qui est correctement
installée et raccordée à la terre en
conformité avec les réglementations et
directives locales.
AVERTISSEMENT
Une connexion incorrecte du conducteur de terre de l'équipement peut avoir
pour résultat un risque de choc électrique.
Contrôler avec un électricien qualifié
ou un technicien de service si vous
avez des doutes relatifs à la mise à la
terre correcte de la prise.
Ne pas modifier la fiche fournie avec
l'appareil.
Si la fiche ne rentre pas dans la prise,
faites installer une prise appropriée par
un électricien qualifié.
Cet appareil a été conçu pour fonctionner à une tension nominale de 120
volts ; sa fiche de mise à la terre est similaire à celle illustrée à la figure A.
S’assurer que la prise de courant utilisée est compatible avec la fiche secteur. Ne pas utiliser d'adaptateur pour
brancher cet appareil.
BRANCHER UNIQUEMENT SUR
UNE PRISE CORRECTEMENT RELIEE A LA TERRE
1 Prise reliée à la terre
2 Socle de prise de courant
3 Fiche de mise à terre
REGLES ET PRATIQUES DE
SECURITE DE FONCTION-
NEMENT
Responsabilité de l'opérateur
Un fonctionnement sûr est la responsabilité de l'opérateur.
L'opérateur doit être au courant du
fonctionnement et des fonctions de
toutes les commandes et de tous les
instruments avant d'entreprendre de
faire fonctionner l'unité.
Avant de faire fonctionner l'unité, les
opérateurs doivent avoir lu et bien
connaître le manuel d'utilisation pour
l'unité particulière en fonctionnement
et ils doivent également obéir aux
règles et pratiques de sécurité énoncées dans les paragraphes suivants.
Avant de faire fonctionner l'unité, l'opérateur doit bien connaître les conditions de fonctionnement inhabituelles
qui peuvent nécessiter des précautions de sécurité supplémentaires ou
des instructions de fonctionnement
spéciales.
Généralités
Avant de commencer à faire fonctionner l'unité, soyez dans une position
d'opération.
– 2
15FR
Page 16

Ne démarrez pas ou n'opérez pas l'unité, l'une quelconque de ses fonctions
ou accessoires, depuis tout endroit
autre que la position désignée pour les
opérateurs.
Avant de quitter la position de l'opérateur :
A arrêtez complètement l'unité ;
B si l'unité doit se trouver sur un plan
incliné, bloquez les roues.
Conservez une distance de sécurité
depuis le bord des rampes, plateformes et autres surfaces de travail similaires.
N'effectuez aucun ajout ou aucune
modification à l'unité.
Ne bloquez pas l'accès aux couloirs à
incendie, escaliers ou équipement de
lutte contre les incendies.
Déplacements
Donnez la priorité aux piétons et véhicules d'urgence tels que les ambulances et les camions de pompiers.
Traversez les voies ferrées de manière
angulaire si possible. Ne vous garez
pas à moins de 1800 mm du rail le plus
proche d'une voie ferrée.
Conservez une vision claire du chemin
de déplacement et prenez garde au
reste de la circulation, au personnel et
aux dégagements sûrs.
Opérez l'unité à une vitesse qui lui permettra d'être arrêtée de manière sûre
dans toutes les conditions de déplacement.
Ne vous adonnez pas aux cascades
ou à la brutalité.
Ralentissez en cas de sols mouillés et
glissants.
Avant de passer sur un bord de quai ou
sur la chaussée d'un pont, assurezvous qu'il/elle est correctement fixé(e).
Conduisez prudemment et lentement
sur le bord de quai ou la chaussée d'un
16 FR
pont et ne dépassez jamais sa capacité nominale.
Lors de la prise de virages, ralentissez
à une vitesse sûre en correspondance
avec l'environnement de fonctionnement. Prenez les virages en douceur.
Entretien de l'unité par l'opéra-
teur
Si l'unité s'avère nécessiter des réparations ou être dangereuse d'une manière quelconque ou contribue à une
condition dangereuse, le problème doit
être rapporté immédiatement au supérieur désigné de l'utilisateur et l'unité
ne doit pas être opérée jusqu'à ce
qu'elle ait été remise en une condition
de fonctionnement sûre.
Si l'unité devient dangereuse d'une
manière quelconque au cours du fonctionnement, le problème doit être rapporté immédiatement au supérieur
désigné de l'utilisateur et l'unité ne doit
pas être opérée jusqu'à ce qu'elle ait
été remise en une condition de fonctionnement sûre.
N'effectuez pas de réparations ou de
réglages à moins d'y être autorisé spécifiquement.
PRATIQUES D'ENTRETIEN
ET DE RECONSTRUCTION
Le fonctionnement de l'unité peut être
dangereux si l'entretien est négligé ou
si des réparations, reconstructions ou
réglages ne sont pas effectués conformément aux critères de conception du
constructeur. Par conséquent, des installations d'entretien (sur site ou au dehors), du personnel qualifié et des
procédures détaillées doivent être
fournis.
L'entretien et l'inspection de l'unité
doivent être réalisés conformément
aux pratiques suivantes :
– 3
Page 17

A un système d'entretien, de lubrifica-
tion et d'inspection planifié doit être
suivi ; consultez les recommandations du constructeur.
B seul du personnel qualifié et autori-
sé doit être autorisé à effectuer l'entretien, réparer, régler et inspecter
l'unité et ce conformément aux spécifications du constructeur.
Evitez les risques d'incendie et disposez d'un équipement de protection
contre les incendies dans la zone de
travail. N'utilisez pas de récipients ouverts d'essence ou de fluides de nettoyage inflammables pour le nettoyage
des pièces.
NORME DE SECURITE IN-
CENDIE
Toute unité ne se trouvant pas dans
une condition de fonctionnement sûre
doit être mise hors service.
Les réparations doivent être effectuées
dans les emplacements de Classe I,
Classe II et Classe III.
Prévention incendie : L'unité doit être
conservée dans une condition propre
et raisonnablement exempte de peluche, d'huile en excès et de graisse.
Des agents non combustibles sont préférés pour le nettoyage de l'unité. Les
liquides inflammables [ceux possédant
des points d'inflammation à ou supérieurs à 100°F (37,8°C)] ne sont pas
permis. Les précautions concernant la
toxicité, la ventilation et les risques
d'incendie doivent être appropriées à
l'agent ou au solvant utilisé.
Visibilité de la plaque signalétique :
Les désignations du type d'unité telles
qu'illustrées sur la plaque signalétique
et les marqueurs de type ne doivent
pas être recouverts par de la peinture
de sorte que les informations concernant leur identification sont obscurcies.
L'unité ne doit pas être utilisée dans
des zones classifiées.
Lisez attentivement ce
mode d’emploi avant la
première utilisation de l’appareil et respectez les conseils y figurant. Conservez ce mode d’emploi pour une
utilisation ultérieure ou un éventuel repreneur de votre matériel.
Table des matières
Consignes de sécurité. . . . . FR . . 4
Fonction. . . . . . . . . . . . . . . . FR . . 5
Utilisation conforme. . . . . . . FR . . 5
Protection de l’environnement FR . . 5
Eléments de commande . . . FR . . 5
Première mise en service . . FR . . 6
Fonctionnement. . . . . . . . . . FR . . 6
Transport . . . . . . . . . . . . . . . FR . . 8
Entreposage . . . . . . . . . . . . FR . . 8
Entretien et maintenance . . FR . . 8
Pannes . . . . . . . . . . . . . . . . FR . 10
Caractéristiques techniques FR . 12
Garantie. . . . . . . . . . . . . . . . FR . 13
Pièces de rechange. . . . . . . FR . 13
Consignes de sécurité
Lire la présente notice d'instructions
ainsi que la brochure ci-jointe
Consignes de sécurité pour les nettoyeurs à brosses n° 5.956-251 avant
d'utiliser l'appareil et respecter les instructions.
Symboles utilisés dans le mode
d'emploi
Danger
Pour un danger immédiat qui peut
avoir pour conséquence la mort ou des
blessures corporelles graves.
몇 Avertissement
Pour une situation potentiellement
dangereuse qui peut avoir pour conséquence des blessures corporelles
graves ou la mort.
– 4
17FR
Page 18

Attention
Pour une situation potentiellement
dangereuse qui peut avoir pour conséquence des blessures légères ou des
dommages matériels.
Fonction
L’appareil est mis en oeuvre pour nettoyer des sols plans par voie humide.
Une largeur de travail de 300 mm et
une capacité respective de 4 l pour le
réservoir d'eau propre et le réservoir
d'eau sale sont les garants pour un
nettoyage efficace de petites bouteilles.
Un fonctionnement par courant permet
d'obtenir une capacité élevée sans limitation de la durée de travail.
Remarque
L'appareil peut être équipé de différents accessoires en fonction de l'application respective. De plus amples
détails figurent dans notre catalogue
ou sur notre site Internet www.kaercher.com.
Utilisation conforme
L'utilisation de l'appareil doit être faite
en conformité avec les consignes figurant dans les instructions de service.
– L'appareil doit uniquement être utili-
sé pour nettoyer des surfaces
dures non sensibles à l'humidité ni
au polissage.
La plage de température pour l'utilisation est de +5°C à +40°C.
– L'appareil n'est pas approprié pour
nettoyer des sols gelés (par
exemple dans des entrepôts frigorifiques)
– L'appareil doit uniquement être
équipé d'accessoires et de pièces
de rechange d'origine.
– L'appareil a été conçu pour le net-
toyage de sols dans le domaine intérieur ou bien de surfaces
couvertes d'un toit.
– L'appareil n'est pas destiné au net-
toyage de voies publiques.
– L'appareil n'est pas approprié pour
l'application dans des environnements à risque d'explosion.
Protection de l’environne-
ment
Les matériaux constitutifs
de l'emballage sont recyclables. Ne pas jeter les
emballages dans les ordures ménagères, mais les
rendre à un système de recyclage.
Les appareils usés
contiennent des matériaux
précieux recyclables lesquels doivent être rendus à
un système de recyclage.
Des batteries, de l’huile et
d'autres substances semblables ne doivent pas être
tout simplement jetées.
Pour cette raison, utiliser
des systèmes adéquats de
collecte pour éliminer les
appareils usés.
Instructions relatives aux ingrédients (REACH)
Les informations actuelles relatives
aux ingrédients se trouvent sous :
www.kaercher.com/REACH
Eléments de commande
Figure 1, cf. page de couverture
1 Poignée
2 Commutateur pompe à eau
18 FR
– 5
Page 19

3 Interrupteur principal mode brosse /
aspiration
4 Poignée de transport
5 Etrier support réservoir d'eau sale
6 Réservoir d'eau sale
7 Réservoir d'eau propre
8 Fermeture du réservoir d'eau
propre
9 Tête de nettoyage
10 Pédale levage barre d'aspiration
11 Déverrouillage position de station-
nement
12 Tuyau d'aspiration
13 Connexion flexible d'aspiration
14 Buse d'aspiration (uniquement BR
30/4 C Adv)
15 Rouleau de brosse
16 Barre d'aspiration
17 Bouton de déverrouillage, brosse
d'échange
18 Couvercle du réservoir d'eau sale
19 Fermeture
20 Crochet de câble, rotatif
21 Câble secteur avec fiche secteur
22 Poignée flexible d'aspiration (uni-
quement BR 30/4 C Adv)
Repérage de couleur
– Les éléments de commande pour le
processus de nettoyage sont
jaunes.
– Les éléments de commande pour la
maintenance et l'entretien sont en
gris clair.
Première mise en service
Figure 2, cf. page de couverture
Insérer le tube à l'extrémité de la
poignée dans l'ouverture sur l'appa-
reil.
Appuyer sur le cran et enfoncer la
poignée jusqu'à ce qu'elle s'en-
clenche dans l'appareil.
Fonctionnement
Remplir le réservoir d'eau
fraîche
Attention
Risque d'endommagement. Utiliser
uniquement les détergents recommandés. Pour tout autre détergent, l'exploitant prend des risques plus élevés
quant à la sécurité du travail, au risque
d'accident et à la durée de vie de l'appareil. Utiliser uniquement des détergents exempts de solvants, d'acide
chlorhydrique et fluorhydrique.
Respecter les consignes de sécurité figurant sur les détergents.
Remarque
Ne jamais utiliser de détergents extrêmement moussants. Tenir compte des
consignes de dosage.
Détergents recommandés :
Application Produit
détergent
Nettoyant d'entretien alcalin
Détergent ménager
acide, pour zones sanitaires, piscines, etc. Enlève les dépôts de
calcaire.
Retirer le réservoir d'eau fraîche de
l'appareil.
Ouvrir le couvercle du réservoir
d'eau propre.
Remplir de mélange détergent-eau.
Température maximale du liquide,
50 °C.
Fermer le couvercle du réservoir
d'eau propre.
Mettre le réservoir d'eau fraîche en
place dans l'appareil.
RM 743
RM 738
– 6
19FR
Page 20

Établir le raccordement de ré-
seau
Basculer le crochet de câble infé-
rieur vers le haut et enlever le
câble.
Contrôler le cable d'alimentation et
la fiche de secteur s'ils sont endom-
magés ou cassés. L'échanger doit
être effectuée que par le service
après-vente ou par une eléctricien.
Brancher la fiche secteur dans une
prise de courant.
Nettoyage
Danger
Risque de blessure par décharge électrique à la suite d'un endommagement
du câble de raccord au réseau. Ne pas
faire entrer le câble de raccord au réseau en contact avec les brosses en
rotation.
Attention
Risque d'endommagement pour le revêtement de sol. La méthode de nettoyage pour le fort encrassement doit
uniquement être utilisé pour des sols
qui sont appropriés à cet effet.
Risque d'endommagement pour la
pompe d'eau fraîche en cas de marche
à sec, si le réservoir d'eau fraîche est
vide. Surveiller l'indicateur de niveau
de remplissage et couper l'interrupteur
de la pompe à eau si le réservoir d'eau
fraîche est vide.
Salissures normales
Amener la pédale levage de barre
d'aspiration dans la position "Aspi-
rer" (illustration 3 - Pos. "1/ON", cf.
page de garde).
Appuyer sur le déverrouillage de la
position de stationnement et bascu-
ler la poignée vers l'arrière.
Tourner l'interrupteur principal
mode brosse / aspiration sur la position '1'.
Activer l'interrupteur pompe à eau.
Déplacer l'appareil par-dessus la
surface qui doit être nettoyée.
Fort encrassement
Attention
Risque d'endommagement pour le revêtement de sol. La méthode de nettoyage pour le fort encrassement doit
uniquement être utilisé pour des sols
qui sont appropriés à cet effet.
Mettre la pédale de levage de barre
d'aspiration en position "ne pas aspirer" (illustration 3 - Pos. "0/OFF",
cf. page de garde) et procéder au
nettoyage comme pour l'encrassement normal. Le fluide de nettoyage reste sur la surface à
nettoyer et a le temps d'agir.
Mettre la pédale levage de barre
d'aspiration dans la position "Aspirer" et parcourir une nouvelle fois la
surface à nettoyer.
Aspirer dans les coins (uniquement BR 30/4 C Adv)
Sortir le tube d'aspiration vers le
haut sur la poignée, enficher la
buse d'aspiration et aspirer la saleté.
Retirer la buse, enficher de nou-
veau le tube d'aspiration et enclencher la poignée.
Terminer le nettoyage
Désactiver l'interrupteur pompe à
eau.
Pousser l'appareil encore sur une
courte distance pour aspirer l'eau
résiduelle.
20 FR
– 7
Page 21

Tourner l'interrupteur principal
mode brosse / aspiration sur la po-
sition '0'.
Pivoter la poignée vers l'avant et
l'enclencher en position de station-
nement.
Débrancher la fiche secteur.
Vidange du réservoir d'eau sale
Remarque
Si le réservoir d'eau sale est plein, le
flotteur ferme le canal d'aspiration.
L'aspiration est alors interrompue. Vider le réservoir d'eau sale.
몇 Avertissement
Tenir compte des prescriptions locales
pour le traitement des eaux usées.
Mettre l’appareil hors tension.
Dresser l'appareil et l'enclencher en
position de stationnement.
Retirer le réservoir d'eau fraîche de
l'appareil.
Pivoter l'étrier support du réservoir
d'eau sale vers le bas et retirer le
réservoir d'eau sale.
Soulever le verrou et retirer le cou-
vercle du réservoir d'eau sale.
Faire couler l'eau sale.
Puis rincer le réservoir d'eau sale à
l'eau propre.
Poser le couvercle sur le réservoir
d'eau sale et l'enclencher.
Mettre le réservoir d'eau fraîche en
place dans l'appareil.
Vidange du réservoir d'eau
propre
Retirer le réservoir d'eau fraîche de
l'appareil.
Ouvrir le couvercle du réservoir
d'eau propre.
Vider le liquide de nettoyage.
Fermer le couvercle du réservoir
d'eau propre.
Mettre le réservoir d'eau fraîche en
place dans l'appareil.
Transport
Attention
Risque de blessure et
d'endommagement ! Respecter le
poids de l'appareil lors du transport.
Pivoter la poignée vers l'avant et
l'enclencher en position de stationnement.
Pivoter la poignée vers l'arrière et
pousser l'appareil
ou
Soulever l'appareil avec la poignée
et le porter.
Sécuriser l'appareil contre les glis-
sements ou les basculements selon
les directives en vigueur lors du
transport dans des véhicules.
Entreposage
Attention
Risque de blessure et d'endommagement ! Prendre en compte le poids de
l'appareil à l'entreposage.
Cet appareil doit uniquement être entreposé en intérieur.
Entretien et maintenance
Danger
Risque de blessure et de choc électrique par un démarrage inopiné de
l'appareil.
Avant d'effectuer tout type de travaux
sur l'appareil, le mettre hors service et
débrancher la fiche électrique.
Attention
Risque de dommage pour l'appareil par
eau que fuit. Vider le réservoir d'eau sale
et le réservoir d'eau propre avant les travaux d'entretien sur l'appareil.
– 8
21FR
Page 22

Plan de maintenance
Après le travail
Attention
Risque d'endommagement. Ne pas laver l'appareil au jet d'eau et ne jamais
utiliser de détergents agressifs.
Vider le réservoir d'eau sale.
Nettoyer les joints entre le réservoir
d'eau sale et l'appareil.
Vider le réservoir d'eau propre.
Rincer l'appareil : Remplir le réser-
voir d'eau propre d'eau claire (sans
détergent) et utiliser l'appareil pen-
dant une minute avec l'irrigation de
brosse en service.
Vider le réservoir d'eau propre.
Nettoyer l'extérieur de l'appareil
avec un chiffon humide et imbibé de
détergent doux.
Nettoyer la barre d'aspiration, en
contrôler l'usure et la remplacer si
nécessaire (cf. "travaux d'entre-
tien").
Contrôler l'usure de la brosse et la
remplacer si nécessaire (cf. "tra-
vaux d'entretien").
Tous les ans
L'inspection de sécurité prescrite
doit être effectuée par un électri-
cien.
Retirer le réservoir d'eau propre.
Retirer le réservoir d'eau sale.
Disposer l'appareil sur le côté ar-
rière.
Tirer la barre d'aspiration vers le
bas.
Mettre une nouvelle barre d'aspira-
tion en place et l'enclencher.
Remplacement du rouleau de brosse
Retirer le réservoir d'eau propre.
Retirer le réservoir d'eau sale.
Disposer l'appareil sur le côté ar-
rière.
Appuyer sur la tête de déverrouil-
lage du rouleau de brosse et pivoter
ce dernier vers le bas et le retirer de
l'entraîneur.
Enficher le nouveau rouleau de
brosse sur l'entraîneur et l'enclencher du côté opposé.
Protection antigel
En cas de risque de gel :
Vider le réservoir d'eau propre et le
réservoir d'eau sale.
Déposer l'appareil dans une pièce à
l'abri du gel.
Travaux de maintenance
Remplacer la barre d'aspiration
Remarque
Les barres d'aspiration sont fixées à
l'appareil avec une connexion encliquetable et peuvent être simplement
retirées.
Amener la pédale levage de barre
d'aspiration dans la position "Aspi-
rer" (illustration 3 - Pos. "1/ON", cf.
page de garde).
22 FR
– 9
Page 23

Pannes
Danger
Risque de blessure et de choc électrique par un démarrage inopiné de
l'appareil.
Avant d'effectuer tout type de travaux
sur l'appareil, le mettre hors service et
débrancher la fiche électrique.
Panne Remède
Attention
Risque de dommage pour l'appareil
par eau que fuit. Vider le réservoir
d'eau sale et le réservoir d'eau propre
avant les travaux d'entretien sur l'appareil.
En cas de pannes ne pouvant pas être
résolues grâce aux instructions de ce
tableau, appeler le service aprèsvente.
Il est impossible de
mettre l'appareil en
marche
Quantité d'eau insuffisante
Le réservoir d'eau
propre goutte lors
de la remise à niveau
Vérifier si la fiche secteur est branchée.
Contrôler le niveau d'eau propre et en cas de besoin, remplir le réservoir
Ouvrir le verrouillage du réservoir d'eau propre. Si une dépression est constatée dans le réservoir, nettoyer la vanne
de ventilation dans le verrou du réservoir d'eau propre.
Nettoyer le distributeur d'eau (cf. "nettoyer le distributeur
d'eau").
Retirer le réservoir d'eau fraîche et vérifier si le tamis est
encrassé. Retirer et nettoyer le tamis, si nécessaire.
Retirer la soupape avec le filtre sur le réservoir d'eau
propre (illustration 4, cf. page de garde) et rincer dans de
l'eau tiède.
Retirer la soupape avec le filtre sur le réservoir d'eau
propre (illustration 4, cf. page de garde) et rincer dans de
l'eau tiède.
– 10
23FR
Page 24

Puissance d'aspiration insuffisante
Vider le réservoir d'eau sale.
Enclencher le réservoir d'eau sale dans l'appareil.
Nettoyer les joints entre le réservoir d'eau sale et le couvercle et vérifier s'ils sont étanches, en cas de besoin remplacer.
Nettoyer les joints entre le couvercle du réservoir d'eau
sale et l'appareil. En cas d'endommagement des joints, se
rendre au service après-vente.
Contrôler sur la poutre d'aspiration est enclenchée dans la
tête de nettoyage.
Barre d'aspiration bouchée, la nettoyer.
Barre d'aspiration usée, échanger les barres d'aspiration
avant et arrière entre elles. Mettre de nouvelles barres
d'aspiration en place lorsque les deux barres d'aspiration
sont usées.
Contrôler si les deux parties du tube d'aspiration sont correctement connectées avec la connexion de tube d'aspiration.
Contrôler si le tube d'aspiration et le canal d'aspiration
dans la tête de nettoyage sont bouchés, si nécessaire éliminer le bouchon (cf. "nettoyer le tube d'aspiration").
Vérifier si le câble repose bien à plat derrière les réservoirs
et si le couvercle fourni est mis en place.
Résultat de nettoyage insuffisant
La brosse ne
tourne pas
Bruit de grincement, la brosse ne
Contrôler le degré d'usure du rouleau de brosse et le cas
échéant, le remplacer.
Vérifier si des corps étrangers bloquent le rouleau de
brosse et le cas échéant, éliminer les corps étrangers.
L'embrayage de glissement s'est déclenché. Arrêter l'appareil, contrôler/nettoyer le rouleau de brosse.
tourne pas
24 FR
– 11
Page 25

Nettoyer le distributeur d'eau
Sortir le rouleau de brosse.
Retirer la barre de distributeur
d'eau dans le tunnel de brosse (il-
lustration 5, cf. page de garde).
Nettoyer le canal d'irrigation et les
ouvertures dans la barre de distri-
bution d'eau à l'eau courante.
Nettoyer le tube d'aspiration
Retirer le réservoir d'eau fraîche de
l'appareil.
Pivoter l'étrier support du réservoir
d'eau sale vers le bas et retirer le
réservoir d'eau sale.
Retirer vers l'arrière la connexion
du tube d'aspiration vers l'arrière et
faire basculer les deux extrémités
du tube d'aspiration vers l'extérieur
(illustration 6, cf. page de garde).
Le tube d'aspiration est interrompu
et les deux extrémités sont acces-
sibles pour le nettoyage.
Retirer la barre d'aspiration vers le
bas, le canal d'aspiration est acces-
sible dans la tête de nettoyage pour
le nettoyage (illustration 7, cf. page
de garde).
Rincer le flexible d'aspiration et le
canal d'aspiration avec de l'eau ou
enlever ou pousser le bouchon
avec un objet émoussé.
Caractéristiques techniques
Performances
Tension nominale V/Hz 120 /
1~60
Courant absorbée A 6
Classe de protection I
Type de protection IPX4
Aspiration
Puissance d'aspiration, débit d'air
Puissance d'aspiration, dépression
Brosse de nettoyage
Largeur de travail in
Diamètre des brosses in
Vitesse des brosses t/min 1550
Dimensions et poids
Surface théoriquement nettoyable
Volume du réservoir
d'eau propre/réservoir
d'eau sale
Longueur in
Largeur in
Hauteur in
Poids lb (kg) 35.3
Valeurs déterminées selon EN 603352-72
Valeur de vibrations
bras-main
Incertitude K m/s
Niveau de pression so-
nore L
pA
Incertitude K
Niveau de puissance
sonore L
Incertitude K
pA
WA
WA
gpm
(l/s)
psi
(kPa)
(mm)
(mm)
ft²/h
(m²/h)
gal (l) 1 (4)
(mm)
(mm)
(mm)
m/s
dB(A) 72
dB(A) 1
dB(A) 85
dB(A) 1
2
2
380
(24)
2.0 (14)
11,8
(300)
2.4 (60)
2152
(200)
15.4
(390)
13.2
(335)
46.5
(1180)
(16)
<2,5
0,2
– 12
25FR
Page 26

Garantie
Dans chaque pays, les conditions de
garantie en vigueur sont celles publiées par notre société de distribution
responsable. Les éventuelles pannes
sur les accessoires sont réparées gratuitement dans le délai de validité de la
garantie, dans la mesure où celles-ci
relèvent d'un défaut matériel ou d'un
vice de fabrication. En cas de recours
en garantie, adressez-vous à votre revendeur ou au service après-vente
agréé le plus proche munis de votre
preuve d'achat.
Pièces de rechange
– Utiliser uniquement des acces-
soires et des pièces de rechange
autorisés par le fabricant. Des accessoires et des pièces de rechange d’origine garantissent un
fonctionnement sûr et parfait de
l’appareil.
– Une sélection des pièces de re-
change utilisées le plus se trouve à
la fin du mode d'emploi.
– Plus information sur les pièces de
rechange vous les trouverez sous
www.kaercher.com sous le menu
Service.
26 FR
– 13
Page 27

INSTRUCCIONES IMPOR-
TANTES DE SEGURIDAD
LEER TODAS LAS INSTRUC-
CIONES ANTES DE USAR.
ADVERTENCIA
Para reducir el riesgo de fuegos, descarga eléctrico o lesiones:
– NO ABANDONAR la unidad mien-
tras esté enchufada. Desenchufar
cuando no esté en uso y antes de
revisar.
ADVERTENCIA
– PARA REDUCIR EL RIESGO DE
DESCARGA ELÉCTRICA, USAR
SOLO EN INTERIORES
– No permita que se use como jugue-
te. Prestar mucha atención cuando
se use cerca de niños.
– Usar exclusivamente como se des-
cribe en este manual. Usar solamente con los complementos
recomendados por el fabricante.
– No usar con el cable o la clavija da-
ñados. Si el aparato no funciona
como debería, se ha caído al suelo,
dañado, dejado al aire libre, o caído
al agua, devuélvalo a servicio o a la
centralita de atención al cliente.
– No tirar del cable ni transportar el
aparato cogido por el cable, no cerrar una puerta sobre el cable, ni
pasar el cable por bordes o esquinas afiladas. No pasar el aparato
por encima del cable. Mantener el
cable alejado de superficies calientes.
– No tirar del cable para desenchufar
el aparato. Para desechufar, tire de
la clavija no del cable.
– No manipular la clavija ni el aparato
con las manos mojadas.
– No introducir objetos en los orifi-
cios. No usar con cualquiera de los
orificios bloqueados; mantener sin
polvo, pelusa, pelo y cualquier otra
cosa que pueda reducir el flujo de
aire.
– Mantener el cabello, la ropa floja,
los dedos y todas las partes del
cuerpo alejadas de los orificios y
partes móviles.
– Apagar los mandos de control an-
tes de desenchufar.
– Usar con especial cuidado cuando
limpie escaleras.
– No usar para recoger líquidos infla-
mables o combustible, como gasolina, ni utilizar el aparato en áreas
donde puedan estar presentes.
– Conectar exclusivamente a una
toma con puesta a tierra. Consultar
las instrucciones de puesta a tierra.
CONSERVE ESTAS INS-
TRUCCIONES
INSTRUCCIONES DE PUES-
TA A TIERRA
Este aparato debe ser puesto a tierra.
Si funciona mal o se estropea, la toma
a tierra ofrece una ruta de menor resistencia para la corriente eléctrica para
reducir el riesgo de una descarga eléctrica.
El enchufe se debe insertar en una clavija apropiada que esté instalada correctamente y puesta a tierra de
acuerdo con los códigos y normativas
locales.
– 1
27ES
Page 28

ADVERTENCIA NORMAS Y PROCEDIMIEN-
Una conexión incorrecta del conductor
del equipo de toma a tierra puede provocar una descarga eléctrica.
Consulte a un electricista cualificado o
a un técnico si tiene dudas acerca de si
el enchufe tiene la toma a tierra correcta.
No modifique el enchufe suministrado
del aparato.
Si no encaja en el enchufe, solicite a
un electricista cualificado que instale
un enchufe correcto.
Este dispositivo está diseñado para
usar en un circuito nominal de 120 V y
tiene un enchufe de toma a tierra que
tiene el aspecto de la figura A. Asegúrese de que el dispositivo esté conectado a una toma de corriente que
tenga la misma configuración que la
clavija. No se debe usar un adaptador
con este equipo.
CONECTAR EXCLUSIVAMENTE A
UNA TOMA DE CORRIENTE CON
PUESTA A TIERRA
TOS DE SEGURIDAD DU-
RANTE EL
FUNCIONAMIENTO
Responsabilidad del operario
El operario será responsable de garantizar un funcionamiento seguro.
El operario deberá estar familiarizado
con el manejo y las funciones de todos
los elementos de mando y todos los
instrumentos antes de proceder al manejo de la unidad.
Antes de poner en funcionamiento la
unidad, los operarios deberán haber
leído el manual de instrucciones de la
unidad particular de que se trate y estar familiarizados con él; además, deberán respetar las normas y
procedimientos de seguridad que se
describen a continuación.
Antes de poner en funcionamiento una
unidad cualquiera, el operario deberá
conocer bien las posibles condiciones
inusuales de funcionamiento que requieren la adopción de determinadas
precauciones especiales o para las
que existen unas instrucciones de manejo especiales.
Generalidades
1 Toma de corriente con puesta a tie-
rra
2 Caja de toma de corriente con
puesta a tierra
3 Clavija con puesta a tierra
28 ES
Antes de poner en funcionamiento la
unidad, ésta deberá encontrarse en la
posición de servicio.
No ponga en marcha ni utilice la unidad ni ninguna de sus funciones o sus
aditamentos desde un lugar que no
sea el concebido para el operario.
Antes de abandonar la posición del
operario:
A pare la unidad por completo;
B si es necesario dejar la unidad en
una pendiente, bloquee las ruedas.
– 2
Page 29

Guarde una distancia segura respecto
a los bordes de las rampas y las plataformas, y respecto a los de otras superficies de trabajo similares.
No efectúe ampliaciones ni modificaciones en la unidad.
No bloquee el acceso a las salidas previstas en caso de incendio, las escaleras o los extintores.
Durante la circulación
Ceda el paso a los peatones y a los vehículos de emergencia, como son las
ambulancias y los camiones de bomberos.
Siempre que sea posible, cruce las
vías férreas formando un ángulo con
ellas. No estacione a menos de 6 ft
(1800 mm) de distancia respecto a los
raíles o las vías férreas más cercanos.
Asegúrese de mantener una vista libre
de obstáculos del trayecto a recorrer,
respete las normas de tráfico, tenga
cuidado con las personas y guarde las
distancias de seguridad.
Sean cuales sean las condiciones de
circulación, conduzca la unidad siempre a una velocidad tal que le permita
detenerse por completo de modo seguro.
Durante la conducción, no acceda jamás a realizar acrobacias o competiciones.
Cuando circule por pisos húmedos o
resbaladizos, reduzca la velocidad.
Antes de circular por un muelle o por el
tablero de un puente, asegúrese de
que dichos elementos estén correctamente sujetos. Conduzca con precaución y despacio por el muelle y el
puente, y no sobrepase nunca la capacidad nominal de los mismos.
Cuando tenga que efectuar giros, reduzca la velocidad hasta que sea seguro efectuarlos conforme al entorno
en que esté maniobrando. Realice los
giros con suavidad.
Cuidado de la unidad por parte
del operario
Si se descubre la necesidad de reparar
la unidad o se detecta que ésta resulta
insegura de alguna manera o que contribuye a crear condiciones de inseguridad, se debe informar de inmediato a
la autoridad designada por el usuario.
Además, la unidad no deberá volver a
utilizarse hasta que se la haya devuelto a un estado operativo seguro.
Si, durante el funcionamiento, la unidad se vuelve insegura de alguna manera, se debe informar de inmediato a
la autoridad designada por el usuario.
Además, la unidad no deberá volver a
utilizarse hasta que se la haya devuelto a un estado operativo seguro.
No lleve a cabo reparaciones ni practique ajuste alguno a no ser que haya
sido expresamente autorizado para
ello.
TAREAS DE MANTENIMIEN-
TO Y ACONDICIONAMIENTO
Si se descuida el mantenimiento o se
practican en la unidad reparaciones,
tareas de acondicionamiento o ajustes
en los que no se respeten los criterios
de diseño del fabricante, su manejo
puede resultar peligroso. Por ello, se
debe disponer de servicios de mantenimiento (dentro o fuera de las instalaciones), contar con personal
cualificado y establecer unos modos
de proceder detallados.
El mantenimiento y la inspección de la
unidad deberán llevarse a cabo respetando las tareas que se indican a continuación:
A se deben seguir unos esquemas de
mantenimiento, lubricación e ins-
– 3
29ES
Page 30

pección conforme a su planificación; consulte las
recomendaciones del fabricante.
B el mantenimiento, las reparaciones,
los ajustes y las inspecciones de la
unidad sólo podrán ser llevados a
cabo por personal cualificado y autorizado; además, dichas tareas se
realizarán siempre de conformidad
con las especificaciones del fabricante.
Evite las posibles fuentes de peligro de
incendio y disponga siempre de extintores en la zona de trabajo. En la limpieza de las piezas, no use recipientes
de combustible abiertos ni líquidos limpiadores inflamables.
NORMAS DE SEGURIDAD
CONTRA INCENDIOS
Cuando las condiciones operativas de
una unidad no sean seguras, ésta deberá ponerse fuera de servicio.
En los emplazamientos de la clase I, la
clase II y la clase III está prohibido
efectuar reparaciones.
Prevención contra incendios: la unidad
se debe mantener limpia y debe estar
razonablemente libre de pelusas, restos de aceite y grasa. Para limpiar la
unidad, se recomienda usar preferiblemente agentes incombustibles. No
está permitido emplear líquidos inflamables [aquellos cuyo punto de inflamación esté en 100°F (37,8°C) o por
encima]. Se deben adoptar precauciones adecuadas al tipo de agente o disolvente empleado en lo que a la
toxicidad, la ventilación y el peligro de
incendios respecta.
Visibilidad de la placa de características: las denominaciones de tipo y las
marcas de tipo de la unidad indicadas
en la placa de características no deben
cubrirse con pintura que oscurezca la
información identificativa allí contenida.
No se debe utilizar la unidad en zonas
clasificadas.
30 ES
– 4
Page 31

Antes de poner en marcha
por primera vez el aparato,
lea el presente manual de instrucciones y siga las instrucciones que figuran en el mismo. Conserve estas
instrucciones para su uso posterior o
para propietarios ulteriores.
Índice de contenidos
Indicaciones de seguridad . ES . . .5
Función . . . . . . . . . . . . . . . ES . . .5
Uso previsto . . . . . . . . . . . . ES . . .5
Protección del medio ambiente ES . . .6
Elementos de mando . . . . . ES . . .6
Primera puesta en marcha. ES . . .6
Funcionamiento . . . . . . . . . ES . . .7
Transporte . . . . . . . . . . . . . ES . . .9
Almacenamiento . . . . . . . . ES . . .9
Cuidados y mantenimiento. ES . . .9
Averías . . . . . . . . . . . . . . . . ES . .10
Datos técnicos . . . . . . . . . . ES . .12
Garantía . . . . . . . . . . . . . . . ES . .13
Piezas de repuesto . . . . . . ES . .13
Indicaciones de seguridad
Antes de utilizar por primera vez el
aparato, lea y tenga en cuenta el presente manual de instrucciones y el folleto adjunto relativo a las indicaciones
de seguridad para aparatos de limpieza con cepillos y aparatos pulverizadores, 5.956-251.
Símbolos del manual de instruc-
ciones
Peligro
Para un peligro inminente que acarrea
lesiones de gravedad o la muerte.
몇 Advertencia
Para una situación que puede ser peligrosa, que puede acarrear lesiones de
gravedad o la muerte.
Precaución
Para una situación que puede ser peligrosa, que puede acarrear lesiones leves o daños materiales.
Función
El aparato sirve para efectuar la limpieza en húmedo de pisos llanos.
Una anchura de trabajo de 300 mm y
unos depósitos de agua limpia y de
agua sucia con una capacidad de 4 l
respectivamente permiten llevar a
cabo una limpieza efectiva de pequeñas superficies.
El funcionamiento vía red eléctrica permite obtener una elevada capacidad
de rendimiento sin limitar de modo alguno el trabajo.
Nota
En función de la tarea de limpieza de
que se desee realizar, es posible dotar
al aparato de distintos accesorios. Solicite nuestro catálogo o visítenos en la
página de internet www.kaercher.com.
Uso previsto
Utilice el aparato únicamente de conformidad con las indicaciones del presente manual de instrucciones.
– El aparato ha sido concebido exclu-
sivamente para la limpieza de superficies duras resistentes a la
humedad y al pulido.
El margen de temperaturas de servicio está comprendido entre los
+5°C y los +40°C.
– El aparato no es apto para la limpie-
za de pisos congelados (p. ej., en
almacenes frigoríficos).
– Sólo está permitido dotar al aparato
de accesorios y piezas de repuesto
originales.
– 5
31ES
Page 32

– El aparato ha sido concebido para
la limpieza de pisos en interiores o
superficies techadas.
– El presente aparato no es apto para
la limpieza de las vías públicas de
tránsito.
– El aparato no es apto para el uso en
entornos con peligro de explosión.
Protección del medio ambien-
te
Los materiales de embalaje
son reciclables. Por favor,
no tire el embalaje al cubo
de basura; llévelo a un lugar
de reciclaje.
Los aparatos viejos contienen materiales valiosos reciclables que debieran
aprovecharse. Evite el contacto de baterías, aceites y
materias semejantes con el
medioambiente. Deshágase de los aparatos viejos recurriendo a sistemas de
recogida apropiados.
Indicaciones sobre ingredientes
(REACH)
Encontrará información actual sobre
los ingredientes en:
www.kaercher.com/REACH
Elementos de mando
Figura 1, véase contraportada
1 asidero
2 Interruptor de la bomba de agua
3 Interruptor principal modo de barri-
do/aspiración
4 Asa de transporte
5 Asa del depósito de agua sucia
6 depósito de agua sucia
7 Depósito de agua limpia
8 Cierre del depósito de agua limpia
9 Cabezal limpiador
10 Pedal para subir la barra de aspira-
ción
11 Desbloqueo posición de estaciona-
miento
12 Tubo de aspiración
13 Conexión tubo de aspiración
14 Boquilla de aspiración (solo BR 30/
4 C Adv)
15 cepillo rotativo
16 barra de aspiración
17 Botón de desbloqueo, cepillo cam-
biable
18 Tapa del depósito de agua sucia
19 Cierre
20 Gancho de cable, giratorio
21 Cable de alimentación con enchufe
de clavija de red
22 Asa boquilla de aspiración (solo BR
30/4 C Adv)
Identificación por colores
– Los elementos de control para el
proceso de limpieza son amarillos.
– Los elementos de control para el
mantenimiento y el servicio son de
color gris claro.
Primera puesta en marcha
Figura 2, véase contraportada
Insertar el tubo al final del asa en el
orificio del aparato.
Presionar las muescas e introducir
el asa hasta que encaje en el apa-
rato.
32 ES
– 6
Page 33

Funcionamiento
Rellenar el depósito de agua lim-
pia
Precaución
Peligro de daños. Utilice únicamente el
detergente recomendado. En caso de
usar otros detergentes, el propietariousuario asume unos mayores riesgos
en lo que a la seguridad durante el funcionamiento, al peligro de sufrir accidentes y la reducción de la vida útil del
aparato se refiere. Utilice únicamente
detergentes que no contengan disolventes, ácidos clorhídricos ni ácidos
hidrofluóricos.
Tener en cuenta las indicaciones de
seguridad de los detergentes.
Nota
No utilice detergentes altamente espumosos. Respete las indicaciones de
dosificación.
Detergente recomendado:
Empleo Detergen-
te
Detegente de mantenimiento alcalino
Detergente de mantenimiento ácido, para
áreas sanitarias, piscinas, etc. Elimina los depósitos de cal.
Extraer el depósito de agua fresca
del aparato.
Abra la tapa del depósito de agua
limpia.
Añadir mezcla de agua y detergen-
te. Temperatura máxima del líquido
50 °C.
Cierre la tapa del depósito de agua
limpia.
RM 743
RM 738
Colocar el depósito de agua limpia
en el aparato.
Establecimiento de la conexión
a red
Desplace el gancho de cable infe-
rior hacia arriba y extraiga el cable.
Comprobar si el cable de alimenta-
ción y la clavija están dañados o ro-
tos. Sólo los puede cambiar el
servicio técnico o un electricista.
Enchufar la clavija de red a una
toma de corriente.
Limpieza
Peligro
Riesgo de lesiones por descarga eléctrica debido a un conducto de alimentación dañado. No permitir que el
conducto de alimentación entre en
contacto con los cepillos rotativos.
Precaución
Peligro de daños para el revestimiento
del suelo. El método de limpieza para
mucha suciedad solo debe utilizarse
en suelos apropiados para el mismo.
Riesgo de daños para la bomba de
agua limpia en caso de marcha en
seco si el depósito de agua limpia está
vacío. Monitorizar el indicador de nivel
y desconectar ell interruptor de la bomba de agua cuando el depósito de
agua limpia esté vacío.
Suciedad normal
Ponga el pedal para subir la barra
de aspiración en posición „aspira-
ción“ (Figura 3 - Posición „1/ON“,
véase la contraportada).
Pulsar desbloqueo posición de es-
tacionamiento e inclinar hacia atrás
el asa.
Coloque el interruptor principal
modo de barrido/aspiración en la
posición "1".
– 7
33ES
Page 34

Encender el interruptor de la bomba de agua.
Mover el aparato sobre la superficie
a limpiar.
Mucha suciedad
Precaución
Peligro de daños para el revestimiento
del suelo. El método de limpieza para
mucha suciedad solo debe utilizarse
en suelos apropiados para el mismo.
Ponga el pedal para subir la barra
de aspiración en posición „no aspirar“ (Figura 3 - Posición „0/OFF“,
véase la contraportada) y efectuar
limpieza como para suciedad normal. El detergente líquido se mantiene en la superficie a limpiar y
tiene tiempo para actuar.
Ponga el pedal para subir la barra
de aspiración en posición „aspiración“ y recorra otra vez la superficie
a limpiar.
Aspiración en esquinas (solo BR 30/ 4 C Adv)
Extraer el tubo de aspiración del
asa, insertar la boquilla de aspiración y aspirar la suciedad.
Retirar la boquilla, volver a colocar
el tubo de aspiración y encajar el
asa.
Finalizar la limpieza
Desconectar el interruptor de la
bomba de agua.
Desplazar todavía un poco el apa-
rato para aspirar el agua restante.
Coloque el interruptor principal
modo de barrido/aspiración en la
posición "0".
A continuación girar hacia delante y
enclavar en posición de estacionamiento.
Saque el enchufe de la toma de co-
rriente.
Vaciado del depósito de agua
sucia
Nota
Cuando el depósito de agua sucia está
lleno, el flotador cierra el canal de admisión. La aspiración se interrumpe.
Vaciar el depósito de agua sucia.
몇 Advertencia
Respetar la normativa local vigente en
materia de tratamiento de aguas residuales.
Desconexión del aparato
Colocar el aparato y enclavar en
posición de estacionamiento.
Extraer el depósito de agua fresca
del aparato.
Girar el asa del depósito de agua
sucia hacia abajo y retirar el depó-
sito de agua sucia.
Levantar el cierre y extraer la tapa
del depósito de agua sucia.
Verter el agua sucia.
A continuación, aclare el depósito
de agua sucia con agua limpia.
Colocar la tapa sobre el depósito de
agua sucia y enclavar.
Insertar el depósito de agua limpia
en el aparato.
Vaciado del depósito de agua
limpia
Extraer el depósito de agua fresca
del aparato.
Abra la tapa del depósito de agua
limpia.
Verter el detergente líquido.
Cierre la tapa del depósito de agua
limpia.
Colocar el depósito de agua limpia
en el aparato.
34 ES
– 8
Page 35

Transporte
Plan de mantenimiento
Precaución
¡Peligro de lesiones y daños! Respetar
el peso del aparato para el transporte.
A continuación girar hacia delante y
enclavar en posición de estacionamiento.
Inclinar hacia atrás el asa y empujar
el aparato
o
Levante el aparato por el asa y de
sopórtelo.
Al transportar en vehículos, asegu-
rar el aparato para evitar que resbale y vuelque conforme a las
directrices vigentes.
Almacenamiento
Precaución
¡Peligro de lesiones y daños! Respetar
el peso del aparato en el almacenamiento.
Este aparato sólo se puede almacenar
en interiores.
Cuidados y mantenimiento
Peligro
Peligro de lesiones causadas por un
aparato que se arranque involuntariamente y descarga eléctrica.
Antes de efectuar cualquier trabajo en
el aparato, hay que desconectar de la
red eléctrica.
Precaución
Si se sale agua se puede dañar el aparato. Vaciar el depósito de agua sucia
y el depósito de agua limpia antes de
realizar tareas de mantenimiento en el
aparato.
Después del trabajo
Precaución
Peligro de daños. No salpique al aparato con agua ni utilice detergentes
agresivos.
Vacíe el depósito de agua sucia.
Limpiar juntas entre el depósito de
agua sucia y el aparato.
Vaciar el depósito de agua limpia.
Enjuagar el aparato: Llenar el de-
pósito de agua limpia con agua lim-
pia (sin detergente) y hacer
funcionar un minuto el aparato con
la irrigación de cepillos conectada.
Vaciar el depósito de agua limpia.
Limpie el aparato por fuera con un
trapo húmedo ligeramente empa-
pado en una solución jabonosa
suave.
Limpie las barras de aspiración;
compruebe si presentan desgaste
y, en caso necesario, cambiar (ver
"Trabajos de mantenimiento").
Compruebe si los cepillos presen-
tan desgaste y, en caso necesario,
cámbielos (véase "Trabajos de
mantenimiento").
Anualmente
Encargue a un electricista la revi-
sión de seguridad obligatoria.
Trabajos de mantenimiento
Cambiar la barra de aspiración
Nota
Las barras de aspiración están fijadas
con una conexión de enganche al aparato y pueden retirarse fácilmente.
Ponga el pedal para subir la barra
de aspiración en posición „aspira-
ción“ (Figura 3 - Posición „1/ON“,
véase la contraportada).
– 9
35ES
Page 36

Extraer el depósito de agua limpia.
Extraer el depósito de agua sucia.
Colocar el aparato sobre la parte
trasera.
Sacar la barra de aspiración empu-
jándola hacia abajo.
Coloque las barras de aspiración
nuevas y encájelas.
Cambio del cepillo rotativo
Extraer el depósito de agua limpia.
Extraer el depósito de agua sucia.
Colocar el aparato sobre la parte
trasera.
Presionar el botón de desbloqueo
del cepillo rotativo y girar cepillo rotativo hacia abajo y extraer del
arrastrador.
Insertar los nuevos cepillos rotati-
vos en el arrastrador y encajarlos
en el lado contrario.
Protección antiheladas
En caso de peligro de heladas:
Vacíe el depósito de agua limpia y
el depósito de agua sucia.
Guarde el aparato en un lugar pro-
tegido de las heladas.
Averías
Peligro
Peligro de lesiones causadas por un
aparato que se arranque involuntariamente y descarga eléctrica.
Antes de efectuar cualquier trabajo en
el aparato, hay que desconectar de la
red eléctrica.
Precaución
Si se sale agua se puede dañar el aparato. Vaciar el depósito de agua sucia
y el depósito de agua limpia antes de
realizar tareas de mantenimiento en el
aparato.
Cuando las averías no se puedan solucionar con ayuda de la tabla que aparece a continuación, acuda al servicio
técnico.
Avería Modo de subsanarla
No se puede poner
Compruebe si está enchufada la clavija de red
en marcha el aparato
Caudal de agua insuficiente
Compruebe el nivel de agua limpia y, de ser necesario, lle-
ne el depósito.
Abrir el cierre del depósito de agua limpia. Si al abrir se de-
tecta una depresión en el depósito, limpiar la válvula de
ventilación en el cierre del depósito de agua limpia.
Limpiar distribuidor de agua (véase "Limpiar distribuidor de
agua").
Extraer el depósito de agua limpia y comprobar la suciedad
del filtro. Si es necesario extraer y limpiar el filtro.
Tirar de la válvula con filtro del depósito de agua limpia
(imagen 4, véase la contraportada) y enjuagar con agua
templada.
36 ES
– 10
Page 37

El depósito de
agua limpia gotea
al rellenarlo
Potencia de aspiración insuficiente
Resultados de limpieza insuficientes
Los cepillos no giran
Crujidos. El cepillo
no gira
Tirar de la válvula con filtro del depósito de agua limpia
(imagen 4, véase la contraportada) y enjuagar con agua
templada.
Vacíe el depósito de agua sucia.
Encajar el depósito de agua sucia en el aparato.
Limpie las juntas situadas entre el depósito de agua sucia
y la tapa; compruebe su estanqueidad y, en caso necesa-
rio, cámbielas
Comprobar las juntas que hay entre la tapa del depósito de
agua sucia y el aparato. Si las juntas están dañadas, llamar
al servicio técnico.
Comprobar si las barras de aspiración están encajadas en
los cabezales limpiadores.
Barra de aspiración obstruida, limpiar.
Las barras de aspiración desgastadas, sustituir las barras
de aspiración delanteras por las traseras. Si ambas barras
de aspiración están desgastadas, colocar nuevas barras
de aspiración.
Comprobar si las dos partes del tubo de aspiración están
correctamente conectadas con la conexión del tubo de as-
piración.
Compruebe si el tubo de aspiración y el canal de aspira-
ción del cabezal limpiador están obstruidos y, de ser nece-
sario, desatásquelos (ver "limpiar tubo de aspiración")
Comprobar si el cable está colocado plano detrás de los
depósito y está puesta la tapa suministrada.
Compruebe si los cepillos rotativos presentan desgaste y,
en caso necesario, cámbielos.
Compruebe si hay cuerpos extraños bloqueando los cepi-
llos rotativos y, de ser así, elimínelos.
El acoplamiento deslizante se ha activado. Desconexión
del aparato, comprobar/limpiar el cepillo rotativo.
– 11
37ES
Page 38

Limpiar el distribuidor de agua
Extraer los cepillos rotativos.
Sacar las tiras de distribución de
agua del canal de los cepillos (Figura 5, véase contraportada).
Limpiar canal de irrigación y orifi-
cios en las tiras del distribuidor de
agua con agua corriente.
Limpiar tubo de aspiración
Extraer el depósito de agua fresca
del aparato.
Girar el asa del depósito de agua
sucia hacia abajo y retirar el depósito de agua sucia.
Sacar del aparato la conexión del
tubo de aspiración empujando hacia atrás y extraer, girando, ambos
extremos del tubo de aspiración
(Figura 6, ver contraportada).
El tubo de aspiración queda interrumpido y ambos extremos son
accesibles para poder limpiarlos.
Retirar hacia abajo la barra de aspi-
ración, el canal de aspiración del
cabezal limpiador queda accesible
para la limpiezas (Figura 7, ver contraportada).
Enjuagar con agua la manguera de
aspiración y el canal de aspiración
o sacar la causa de la obstrucción
estirando o empujando con un objeto obtuso.
38 ES
Datos técnicos
Potencia
Tensión nominal V/Hz 120 /
1~60
Consumo de corriente A 6
Clase de protección I
Categoria de protec-
ción
Aspirar
Potencia de aspiración, caudal de aire
Potencia de aspiración, depresión
Cepillo de limpieza
Anchura de trabajo in
Diámetro cepillos in
Nº de rotaciones de
los cepillos
Medidas y pesos
Potencia teórica por
metro cuadrado
Volumen de los depósitos de agua limpia y
agua sucia
Longitud in
Anchura in
Altura in
Peso lb (kg) 35.3
Valores calculados conforme a la norma EN 60335-2-72
Valor de vibración
mano-brazo
Inseguridad K m/s
Nivel de presión acús-
tica L
pA
Inseguridad K
Nivel de potencia
acústica L
Inseguridad K
– 12
pA
WA
WA
gpm
(l/s)
psi
(kPa)
(mm)
(mm)
1/min 1550
ft²/h
(m²/h)
gal (l) 1 (4)
(mm)
(mm)
(mm)
m/s
dB(A) 72
dB(A) 1
dB(A) 85
dB(A) 1
2
2
IPX4
380
(24)
2.0 (14)
11,8
(300)
2.4 (60)
2152
(200)
15.4
(390)
13.2
(335)
46.5
(1180)
(16)
<2,5
0,2
Page 39

Garantía
En todos los países rigen las condiciones de garantía establecidas por nuestra empresa distribuidora. Las averías
del accesorio serán subsanadas gratuitamente dentro del periodo de garantía, siempre que se deban a
defectos de material o de fabricación.
En un caso de garantía, le rogamos
que se dirija con el comprobante de
compra al distribuidor donde adquirió
el aparato o al servicio al cliente autorizado más próximo a su domicilio.
Piezas de repuesto
– Sólo deben emplearse accesorios y
piezas de repuesto originales o autorizados por el fabricante. Los accesorios y piezas de repuesto
originales garantizan el funcionamiento seguro y sin averías del
aparato.
– Podrá encontrar una selección de
las piezas de repuesto usadas con
más frecuencia al final de las instrucciones de uso.
– En el área de servicios de
www.kaercher.com encontrará más
información sobre piezas de repuesto.
– 13
39ES
Page 40

Page 41

Page 42

Page 43

Page 44

AE Karcher FZE, P.O. Box 17416, Jebel Ali Free Zone
(South), Dubai, United Arab Emirates,
+971 4 886-1177, www.kaercher.com
AR Kärcher S.A., Urugguay 2887 (1646) San Fernando,
Pcia. de Buenos Aires
+54-11 4506 3343, www.karcher.com.ar
AT Alfred Kärcher Ges.m.b.H., Lichtblaustraße 7, 1220 Wien,
+43-1-25060-0, www.kaercher.at
AU Kärcher Pty. Ltd., 40 Koornang Road, Scoresby VIC 3179,
Victoria,
+61-3-9765-2300, www.karcher.com.au
BE Kärcher N.V., Industrieweg 12, 2320 Hoogstraten,
+32-3-340 07 11, www.karcher.be
BR Kärcher Indústria e Comércio Ltda., Av. Professor Benedicto Montenegro no 419, Betel, Paulínia - Estado de Sao
Paulo, CEP 13.140-000
+55-19-3884-9100, www.karcher.com.br
CA Kärcher Canada Inc., 6535 Millcreek Road, Unit 67,
Mississauga, ON, L5N 2M2,
+1-905-672-8233, www.karcher.ca
CH Kärcher AG, Industriestrasse, 8108 Dällikon, Kärcher SA,
Croix du Péage, 1029 Villars-Ste-Croix,
0844 850 864, www.kaercher.ch
CN Kärcher (Shanghai) Cleaning Systems, Co., Ltd., Part F,
2nd Floor, Building 17, No. 33, XI YA Road,
Waigaogiao Free Trade, Pudong, Shanghai, 200131
+86-21 5076 8018, www.karcher.cn
CZ Kärcher spol. s r.o., Modletice c.p. 141, CZ-251 01 Ricany,
+420/323/606 014, www.kaercher.cz
DE Alfred Kärcher Vertriebs-GmbH, Friedrich-List-Straße 4,
71364 Winnenden,
+49-7195/903-0, www.kaercher.de
DK Kärcher Rengøringssystemer A/S, Helge Nielsens Alle 7A,
8723 Løsning,
+45-70206667, www.karcher.dk
ES Kärcher, S.A., Pol. Industrial Font del Radium,
Calle Josep Trueta, 6-7, 08403 Granollers (Barcelona),
+34-902 17 00 68, www.karcher.es
F Kärcher S.A.S., Z.A. des Petits Carreaux,
5, avenue des Coquelicots, 94865 Bonneuil-sur-Marne,
+33-1-4399-6770, www.karcher.fr
FI Kärcher OY, Yrittäjäntie 17, 01800 Klaukkala,
+358-207 413 600, www.karcher.fi
GB Kärcher (U.K.) Ltd., Kärcher House, Beaumont Road,
Banbury, Oxon OX16 1TB,
+44-1295-752-000, www.karcher.co.uk
GR Kärcher Cleaning Systems A.E., 31-33, Nikitara str. &
Konstantinoupoleos str., 136 71 Aharnes,
+30-210-2316-153, www.karcher.gr
HK Kärcher Limited, Unit 10, 17/F., Apec Plaza,
49 Hoi Yuen Road, Kwun Tong, Kowloon,
++(852)-2357-5863, www.karcher.com.hk
HU Kärcher Hungaria KFT, Tormásrét ut 2., (Vendelpark),
2051 Biatorbagy,
+36-23-530-64-0, www.kaercher.hu
I Kärcher S.p.A., Via A. Vespucci 19, 21013 Gallarate (VA),
+39-848-998877, www.karcher.it
IE Kärcher Limited (Ireland), C1 Centrepoint Business Park,
Oak Road, Dublin 12,
(01) 409 7777, www.kaercher.ie
JP Kärcher (Japan) Co., Ltd., Irene Kärcher Building, No. 2,
Matsusaka-Daira 3-chome, Taiwa-cho, Kurokawa-gun,
Miyagi 981-3408,
+81-22-344-3140, www.karcher.co.jp
KR Karcher (Korea) Co. Ltd., 162 Gukhoe-daero, (872-2 Sinjeong-Dong), Seoul, Korea
02-322 6588, A/S. 1544-6577, www.karcher.co.kr
LV Karcher SIA, Mārupes nov., Mārupe, Kārļa Ulmaņa gatve
101, Rīga, LV-1046
+371-67 80 87 07
MX Karcher México, SA de CV, Av. Gustavo Baz No. 29-C,
Col. Naucalpan Centro, Naucalpan, Edo. de México,
C.P. 53000 México,
+52-55-5357-04-28, www.karcher.com.mx
MY Karcher Cleaning Systems Sdn. Bhd., 71 & 73 Jalan
TPK 2/8, Taman Perindustrian Kinrara, Seksyen 2,
47100 Puchong, Selangor Darul Ehsan, Malaysia,
+603 8073 3000, www.karcher.com.my
NL Kärcher B.V., Postbus 474, 4870 AL Etten-Leur,
0900-33 666 33, www.karcher.nl
NO Kärcher AS, Stanseveien 31, 0976 Oslo, Norway,
+47 815 20 600, www.karcher.no
NZ Karcher Limited, 12 Ron Driver Place, East Tamaki,
Auckland, New Zealand,
+64 (9) 274-4603, www.karcher.co.nz
PL Kärcher Sp. z o.o., Ul. Stawowa 140, 31-346 Kraków,
+48-12-6397-222, www.karcher.pl
RO Karcher Romania srl, Sos. Odaii 439, Sector 1,
RO-013606 BUKAREST,
+40 37 2709001, www.kaercher.ro
RU Karcher Ltd. Service Center, Москва, ул. Б.Почтовая, д. 40
+7-495 789 90 76, www.karcher.ru
SE Kärcher AB, Tagenevägen 31, 42502 Hisings-Kärra,
+46 (0)31-577 300, www.karcher.se
SGP Karcher South East Asia Pte. Ltd., 5 Toh Guan Road
East, #01-00 Freight Links Express Distripark,
Singapore 608831,
+65-6897-1811, www.karcher.com.sg
SK Kärcher Slovakia, s.r.o., Beniakova 2, SK-94901 NITRA,
+421 37 6555 798, www.kaercher.sk
TR Kärcher Servis Ticaret A.S., Mahmutbey Mahallesi İstoç,
Petrol Plaza C-Blok Kat: 2-3, Bağcılar, 34218 Istanbul
+90-212-659-43 69, www.karcher.com.tr
TW Karcher Limited, 7/F, No. 66, Jhongijheng Rd.,
Sinjhuang City, Taipei County 24243, Taiwan,
+886-2-2991-5533, +886-800-666-825, www.kar-
cher.com.tw
UA Kärcher Ltd., Petropavlivska Str., 4, Petropavlivska Borschagivka, Kyiv region, 08130,
+380 44 594 7576, www.karcher.com.ua
USA To locate your local dealer please visit our web site at
http://www.karchercommercial.com or call us at 888.805.9852
ZA Kärcher (Pty) Ltd., 144 Kuschke Street, Meadowdale,
Edenvale, 1614,
+27-11-574-5360, www.karcher.co.za
06/12
 Loading...