


 Loading...
MULTIFUNCTIONAL DIGITAL SYSTEMS
Software
Installation Guide

©2009 KYOCERA MITA CORPORATION All rights reserved

Preface
Thank you for purchasing Multifunctional Digital Color Systems. This manual explains the instructions for installing client software. Read this manual before using your Multifunctional Digital Color Systems. Keep this manual within easy reach, and use it to configure an environment that makes best use of this equipment’s functions.
How to read this manual
Symbols in this manual
In this manual, some important items are described with the symbols shown below. Be sure to read these items before using this equipment.
Indicates a potentially hazardous situation which, if not avoided, could result in death, serious injury, or serious damage, or fire in the equipment or surrounding assets.
Indicates a potentially hazardous situation which, if not avoided, may result in minor or moderate injury, partial damage to the equipment or surrounding assets, or loss of data.
Indicates information to which you should pay attention when operating the equipment.
Other than the above, this manual also describes information that may be useful for the operation of this equipment with the following signage:
Describes handy information that is useful to know when operating the equipment.
Pages describing items related to what you are currently doing. See these pages as required.
Screens
y Screens on this manual may differ from the actual ones depending on the use-environment of the equipment such as the installing status of options.
y Screens of when paper in the A/B format is used are given in this manual. If you use paper in the LT format, the display or the order of buttons may differ from that of your equipment.
Trademarks
yThe official name of Windows 2000 is Microsoft Windows 2000 Operating System.
yThe official name of Windows XP is Microsoft Windows XP Operating System.
yThe official name of Windows Vista is Microsoft Windows Vista Operating System.
yThe official name of Windows Server 2003 is Microsoft Windows Server 2003 Operating System.
yThe official name of Windows Server 2008 is Microsoft Windows Server 2008 Operating System.
yMicrosoft, Windows, Windows NT, and the brand names and product names of other Microsoft products are trademarks of Microsoft Corporation in the US and other countries.
yApple, AppleTalk, Macintosh, Mac, Mac OS, Safari, TrueType, and LaserWriter are trademarks of Apple Inc. in the US and other countries.
yAdobe, Adobe Acrobat, Adobe Reader, Adobe Acrobat Reader, and PostScript are trademarks of Adobe Systems Incorporated.
yMozilla, Firefox and Firefox logo are trademarks or registered trademarks of Mozilla Foundation in the U.S. and other countries.
yIBM, AT and AIX are trademarks of International Business Machines Corporation.
yNOVELL, NetWare, and NDS are trademarks of Novell, Inc.
yOther company names and product names in this manual are the trademarks of their respective companies.
Preface 1

CONTENTS
|
Preface....................................................................................................................................... |
1 |
Chapter 1 |
OVERVIEW |
|
|
About the Client CD-ROM ........................................................................................................ |
6 |
|
For Windows.......................................................................................................................... |
6 |
|
For Macintosh........................................................................................................................ |
7 |
|
For UNIX/Linux ...................................................................................................................... |
7 |
|
Contents of Installer................................................................................................................. |
8 |
|
Precautions for using Firewall Software ................................................................................ |
9 |
|
Downloading Software from COMMAND CENTER.............................................................. |
10 |
|
Setting up NetWare Print Server ........................................................................................... |
14 |
|
Setting up the NetWare in NDS mode................................................................................. |
15 |
|
Setting up the NetWare in NDPS mode .............................................................................. |
16 |
|
Setting up the NetWare in iPrint mode ................................................................................ |
20 |
Chapter 2 |
RECOMMENDED INSTALLATION |
|
|
Procedure for Recommended Installation ........................................................................... |
28 |
Chapter 3 INSTALLING PRINTER DRIVERS FOR WINDOWS |
|
|
|
Before Installation .................................................................................................................. |
32 |
|
Type of printer drivers.......................................................................................................... |
32 |
|
System requirements........................................................................................................... |
32 |
|
About installation procedure ................................................................................................ |
32 |
|
Installing the Printer Drivers ................................................................................................. |
34 |
|
Other Installations .................................................................................................................. |
48 |
|
USB printing ........................................................................................................................ |
48 |
|
Point and Print..................................................................................................................... |
56 |
|
IPP printing .......................................................................................................................... |
57 |
|
Novell iPrint ......................................................................................................................... |
70 |
|
Web Service Print................................................................................................................ |
71 |
|
Uninstalling Printer Drivers ................................................................................................... |
76 |
|
Windows Vista/Server 2008 ................................................................................................ |
76 |
|
Windows 2000/XP/Server 2003........................................................................................... |
78 |
Chapter 4 INSTALLING PRINTER DRIVERS FOR MACINTOSH |
|
|
|
About the Installation............................................................................................................. |
80 |
|
About client software for Macintosh..................................................................................... |
80 |
|
Planning for installation ....................................................................................................... |
80 |
|
Installing the Printer on Mac OS X 10.2.4 to Mac OS X 10.5.x............................................ |
81 |
|
Installing the Macintosh PPD file ......................................................................................... |
81 |
|
Configuring the printer on Mac OS X 10.5.x........................................................................ |
84 |
|
Configuring the printer on Mac OS X 10.4.x........................................................................ |
93 |
|
Configuring the printer on Mac OS X 10.2.4 to Mac OS X 10.3.x ..................................... |
102 |
|
Uninstalling the Macintosh PPD File .................................................................................. |
112 |
CONTENTS 3

Chapter 5 INSTALLING PRINTER DRIVERS FOR UNIX/Linux |
|
Setting Up the UNIX/Linux Filters ....................................................................................... |
116 |
About UNIX/Linux filters .................................................................................................... |
116 |
System requirements......................................................................................................... |
116 |
Configuring UNIX/Linux printing using UNIX/Linux filters.................................................. |
117 |
Setting Up the CUPS ............................................................................................................ |
125 |
About CUPS ...................................................................................................................... |
125 |
Configuring UNIX/Linux printing using CUPS.................................................................... |
126 |
Chapter 6 INSTALLING SCAN DRIVER AND UTILITIES |
|
Before Installation ................................................................................................................ |
142 |
Type of scan driver and utilities......................................................................................... |
142 |
System requirements......................................................................................................... |
142 |
Installing Scan Driver and Utilities ..................................................................................... |
143 |
Uninstalling Scan Driver and Utilities................................................................................. |
147 |
Chapter 7 INSTALLING NETWORK FAX UTILITIES |
|
Before Installation ................................................................................................................ |
150 |
Type of network fax utilities ............................................................................................... |
150 |
System requirements......................................................................................................... |
150 |
Installing Network Fax Utilities ........................................................................................... |
151 |
Installing Web Service Print ................................................................................................ |
156 |
Web Service Print.............................................................................................................. |
156 |
Uninstalling the Network Fax Software .............................................................................. |
161 |
Deleting the N/W-Fax driver .............................................................................................. |
161 |
Deleting AddressBook Viewer ........................................................................................... |
165 |
Chapter 8 INSTALLING e-Filing BACKUP/RESTORE UTILITIES |
|
Before Installation ................................................................................................................ |
168 |
System requirements......................................................................................................... |
168 |
Installing e-Filing Backup/Restore Utilities........................................................................ |
169 |
Uninstalling e-Filing Backup/Restore Utilities................................................................... |
172 |
Chapter 9 INSTALLATION MAINTENANCE |
|
Uninstalling Client Software................................................................................................ |
174 |
Repairing Client Software.................................................................................................... |
176 |
INDEX ................................................................................................................................................................... |
179 |
4 CONTENTS

OVERVIEW |
|
This section describes the overview of the software installation. |
|
About the Client CD-ROM........................................................................................................ |
6 |
For Windows .......................................................................................................................................................... |
6 |
For Macintosh......................................................................................................................................................... |
7 |
For UNIX/Linux....................................................................................................................................................... |
7 |
Contents of Installer................................................................................................................. |
8 |
Precautions for using Firewall Software................................................................................ |
9 |
Downloading Software from COMMAND CENTER.............................................................. |
10 |
Setting up the NetWare in NDS mode.................................................................................................................. |
15 |
Setting up the NetWare in NDPS mode ............................................................................................................... |
16 |
Setting up the NetWare in iPrint mode ................................................................................................................. |
20 |

1 OVERVIEW
About the Client CD-ROM
For Windows
The contents of the Client Utilities CD-ROM:
Client software installer
y[Client Utilities CD-ROM]:\Setup\Setup.exe
This is the setup program to install the printer drivers on your computer.
PCL6 printer drivers
y[Client Utilities CD-ROM]:\Client\Drivers\PCL6\W2K_XP_VISTA\<language>\
This includes the setup files to install the PCL6 printer driver on the Windows 2000/XP/Vista/Server 2003/Server 2008 for each language version by Add Printer Wizard or Plug and Play.
y[Client Utilities CD-ROM]:\Client\Drivers\PCL6\XP_VISTA_X64\<language>\
This includes the setup files to install the PCL6 printer driver on the Windows XP/Vista/Server 2003/Server 2008 64-bit edition for each language version by Add Printer Wizard or Plug and Play.
PS3 printer drivers (PostScript)
y[Client Utilities CD-ROM]:\Client\Drivers\PS\W2K_XP_VISTA\<language>\
This includes the setup files to install the PS3 printer driver on the Windows 2000/XP/Vista/Server 2003/Server 2008 for each language version by Add Printer Wizard or Plug and Play.
y[Client Utilities CD-ROM]:\Client\Drivers\PS\XP_VISTA_X64\<language>\
This includes the setup files to install the PS3 printer driver on the Windows XP/Vista/Server 2003/Server 2008 64-bit edition for each language version by Add Printer Wizard or Plug and Play.
XPS printer drivers
y[Client Utilities CD-ROM]:\Client\Drivers\XPS\W2K_XP_VISTA\<language>\
This includes the setup files to install the XPS printer driver on the Windows XP/Vista/Server 2003/Server 2008 for each language version by Add Printer Wizard or Plug and Play.
y[Client Utilities CD-ROM]:\Client\Drivers\XPS\XP_VISTA_X64\<language>\
This includes the setup files to install the XPS printer driver on the Windows XP/Vista/Server 2003/Server 2008 64-bit edition for each language version by Add Printer Wizard or Plug and Play.
The XPS printer driver can be installed on Windows Vista/Server 2008 computers, or those of Windows XP SP2, Windows Server 2003 SP1 or later versions with XPS Essentials Pack installed.
N/W-Fax drivers
y[Client Utilities CD-ROM]:\Client\Drivers\FAX\W2K_XP_VISTA\<language>\
This includes the setup files to install the N/W-Fax driver on the Windows 2000/XP/Vista/Server 2003/Server 2008 for each language version by Add Printer Wizard or Plug and Play.
y[Client Utilities CD-ROM]:\Client\Drivers\FAX\XP_VISTA_X64\<language>\
This includes the setup files to install the N/W-Fax driver on the Windows XP/Vista/Server 2003/Server 2008 64-bit edition for each language version by Add Printer Wizard or Plug and Play.
AddressBook Viewer
y[Client Utilities CD-ROM]:\Client\ADRBK\PS\32\
This includes the setup files to install the AddressBook Viewer on the Windows 2000/XP/Vista/Server 2003/Server 2008.
y[Client Utilities CD-ROM]:\Client\ADRBK\PS\64\
This includes the setup files to install the AddressBook Viewer on the Windows XP/Vista/Server 2003/Server 2008 64bit edition.
Remote Scan drivers
y[Client Utilities CD-ROM]:\Client\RS\
This includes the setup files to install the Remote Scan driver.
TWAIN drivers
y[Client Utilities CD-ROM]:\Client\TWAIN\
This includes the setup files to install the TWAIN driver.
File Downloader
y[Client Utilities CD-ROM]:\Client\FD\
This includes the setup files to install the File Downloader.
6 About the Client CD-ROM

1 OVERVIEW
WIA drivers
yThis includes the setup files to install the WIA driver on the Windows XP/Vista/Server 2003/Server 2008.
For Macintosh
The contents of the Client Utilities CD-ROM:
Macintosh PPD files
y[Client Utilities CD-ROM]:MacPPD:OSX
This includes the PPD file to enable printing from Macintosh on the Mac OS X 10.2.4 to Mac OS X 10.5.x.
For UNIX/Linux
The contents of the Client Utilities CD-ROM:
Solaris filter
y[Client Utilities CD-ROM]/Admin/SolarisFilter/Usa/ This includes the Tar file for Solaris v2.6/2.7/7.8/8/9.
HP-UX filter
y[Client Utilities CD-ROM]/Admin/HP-UXFilter/Usa/
This includes the Tar file for HP-UX ver.10.20/11.x and HP-UX64 ver.11.31.
AIX filter
y[Client Utilities CD-ROM]/Admin/AIXFilter/Usa/ This includes the Tar file for AIX 4.3.3.
Linux filter
y[Client Utilities CD-ROM]/Admin/LinuxFilter/Usa/
This includes the Tar file for Red Hat 7.x/8.x/9.x, Red Hat Enterprise WS2, SuSE Linux 7.x/8.x/9.x, Mandrake Linux 7.x/8.x/9.x and Turbo Linux 8/10.
SCO UNIX filter
y[Client Utilities CD-ROM]/Admin/OpenUnixFilter/Usa/
This includes the Tar file for SCO UnixWare 7 and SCO OpenUNIX 8.
CUPS PPD file
y[Client Utilities CD-ROM]/Admin/CUPS/Usa/
This includes the PPD file to enable printing from CUPS.
About the Client CD-ROM 7

1 OVERVIEW
Contents of Installer
The following software can be installed by the Installer in the Client Utilities CD-ROM.
Printer drivers
Printer drivers are software components that enable application programs to interact with this MFP. The MFP comes with three printer drivers, PCL6, PS3 (PostScript) and XPS printer drivers. These printer drivers offer document print, layout and assembly functions that are not available with many applications.
The XPS printer driver can be installed on Windows Vista/Server 2008 computers, or those of Windows XP SP2, Windows Server 2003 SP1 or later versions with XPS Essentials Pack installed.
TWAIN driver
This software component enables you to import e-Filing documents into TWAIN-compliant applications.
File Downloader
This software component enables you to import e-Filing documents into your hard disk.
Remote Scan driver
This software allows you to perform scanning the originals set in the equipment remotely from a client computer and acquire the image into the TWAIN-compliant application.
WIA driver
This software allows you to perform scanning the originals set in the equipment remotely from a client computer and acquire the image into the WIA-compliant application.
N/W-Fax driver
The N/W-Fax driver enables you to set up send lists and send electronic documents from your PC to one or more destinations. You print to the fax much the same way you would choose to print to a designated printer that makes using the N/W-Fax driver quick and simple. You can select the fax properties.
AddressBook Viewer
With the AddressBook Viewer you can easily add or modify fax recipient names, fax numbers, and Internet Fax address (e-mail address) to the address book. This utility allows you to manage recipients of the fax, select and display fax recipients from the address book, as well as recipient fax numbers and other contact information.
8 Contents of Installer
1 OVERVIEW
Precautions for using Firewall Software
When firewall software is used on Windows computers, installation may not be performed since network communication between this equipment and the computers is blocked by firewall software.
Check if firewall software is used before installation, and follow the directions of your network administrator if it is used.
Client software required for network communications and the execution files are given as follows. Use this information for the exception setting of the firewall software.
Individual installer: setup.exe
Launcher installer: Setup.exe
Printer driver, N/W-FAX driver: printui.exe
File Downloader: ESFileDL.exe
AddressBook Viewer: ABVExe.exe (for 32-bit edition), ABVExe6.exe (for 64-bit edition)
Backup/Restore Utility: ESeFBKRT.exe
yFor a TWAIN driver, Remote Scan driver and WIA driver, the execution files of the corresponding application software need to be set as exceptions.
yWhen Individual installer or Launcher installer is set as an exception, release the exception setting after installation.
Precautions for using Firewall Software 9
1 OVERVIEW
Downloading Software from COMMAND CENTER
If the system administrator has uploaded the software to the MFP, you can download the software from COMMAND CENTER to install them on your computer.
The following software can be downloaded from COMMAND CENTER.
yInstaller for Windows
yMacintosh PPD files
yUNIX/Linux filters
yWhen using Windows Server 2003 that the Service Pack is installed, the installation from COMMAND CENTER cannot be performed. In that case, please install the software in the other method.
yFor instructions on how to upload the software in the equipment, please refer to the COMMAND CENTER Guide.
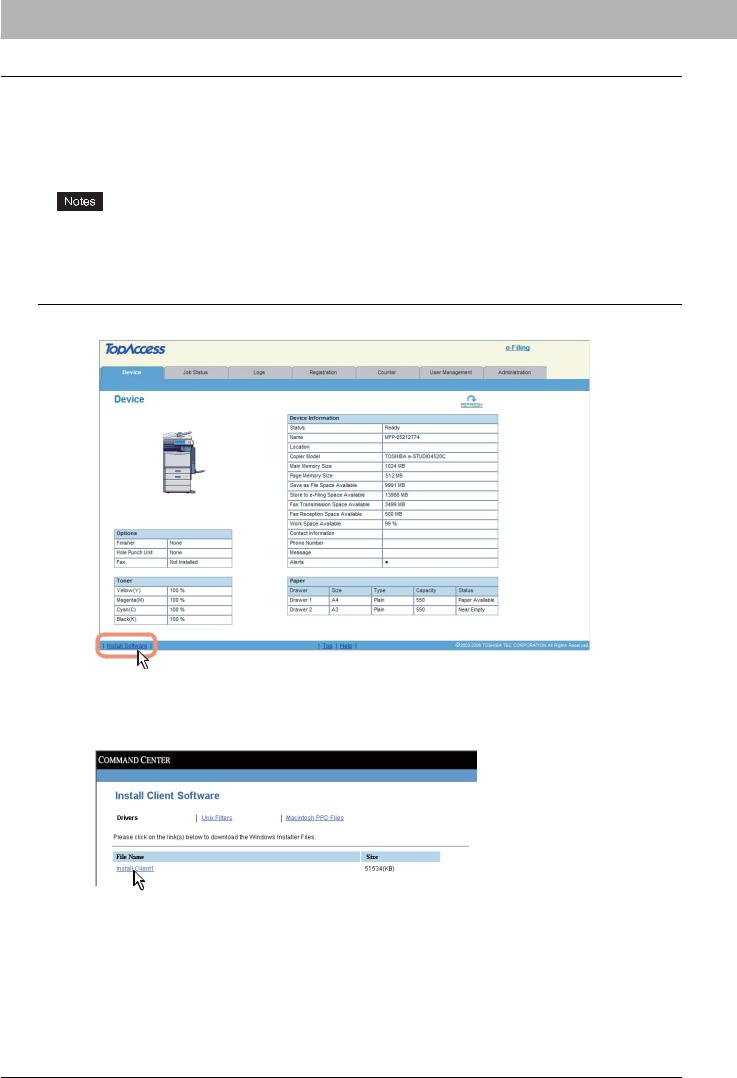
Downloading installer for Windows from COMMAND CENTER
1 In COMMAND CENTER, click the [Install Software] link at the bottom of the screen.
The Install Client Software page opens.
2 Click the [Install Client1] link to download the installer file.
3 Download the installer file on your desktop by following the prompts.
10 Downloading Software from COMMAND CENTER
1 OVERVIEW
4 |
Double-click the downloaded file to extract the installer files. |
y After extracting the downloaded file, the folders that includes WebInstaller.exe are created. In order to install |
software using these files, you must run the WebInstaller.exe with an “Administrators” privilege. If you do not have the “Administrators” privilege, you can install by entering the Administrator password.
The names of folders that includes WebInstaller.exe are followings. - ABV32 — contains the installer for AddressBook Viewer.
- ABV64 — contains the installer for AddressBook Viewer for Windows 64-bit edition OSs. - Drivers — contains the printer drivers and N/W-Fax driver.
- FD — contains the installer for File Downloader.
- RS — contains the installer for Remote Scan driver. - XPS — contains the installer for XPS printer driver. - NWFAX — contains the installer for N/W-Fax driver.
- PCL6 — contains the installer for PLC6 printer driver.
- PS3 — contains the installer for PS3 (PostScript) printer driver. - TWAIN — contains the installer for TWAIN driver.
- WIA — contains the installer for WIA driver.
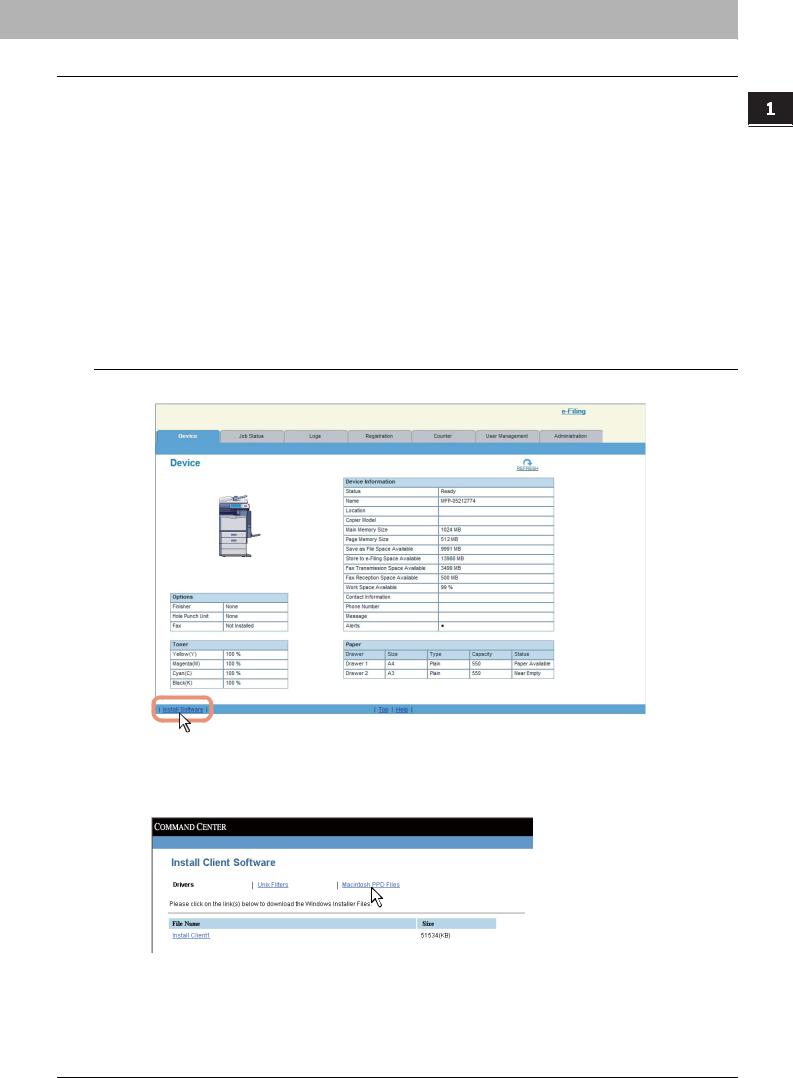
Downloading Macintosh PPD Files from COMMAND CENTER
1 In COMMAND CENTER, click the [Install Software] link at the bottom of the screen.
The Install Client Software page opens.
2 Click the [Macintosh PPD Files] link.
The software components list is displayed.
Downloading Software from COMMAND CENTER 11
1 OVERVIEW
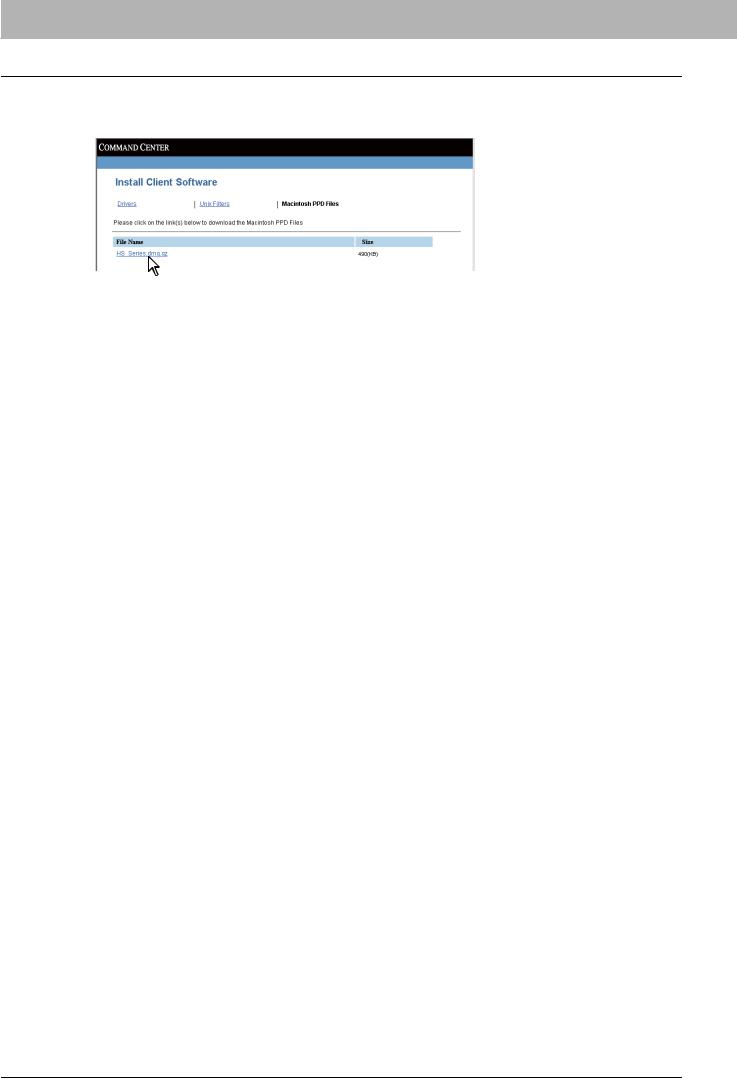
3 Click the File Name link that you want to download.
HS_Series.dmg.gz — Click this link to download the PPD file for Mac OS X 10.2.4 to Mac OS X 10.5.x.
4 Downloadprompts. the PPD file of your Mac OS version on your desktop by following the
12 Downloading Software from COMMAND CENTER

1 OVERVIEW
Downloading UNIX/Linux Filters from COMMAND CENTER
1 In COMMAND CENTER, click the [Install Software] link at the bottom of the screen.
The Install Client Software page opens.
2 Click the [Unix Filters] link.
The software components list is displayed.
3 Click the UNIX/Linux filter link that you want to install.
4 Download the UNIX/Linux tar file containing the UNIX/Linux filters on your desktop by following the prompts.
Downloading Software from COMMAND CENTER 13

1 OVERVIEW
Setting up NetWare Print Server
This equipment supports the following Novell printing services:
yNetWare 6.0/6.5 NDS mode (over IPX/SPX only)
yNetWare 6.0/6.5 NDPS mode
yNetWare 6.0/6.5 iPrint mode
This chapter provides an overview of how to set up this equipment as a Novell Network Printer, Print Server, or NDPS Printer Agent. For more detailed information, refer to your Novell documentation.
14 Setting up NetWare Print Server

1 OVERVIEW
Setting up the NetWare in NDS mode
The following explains how to set up a NetWare 6.0/6.5 file server with NDS so that network users can print to this equipment from their computers, and this equipment can obtain print jobs from the NetWare server. More detail is provided in your NetWare documentation.
Setting up the NDS with NetWare Administrator
1 |
In NetWare Administrator, select the container object to create the printer and click the |
[Object] menu and select [Create]. |
|
|
The [New Object] dialog box appears. |
2 |
In the [Class of new object] list, select [Print Queue] and click [OK]. |
The [Create Print Queue] dialog box appears. |
|
3 |
Select [Directory Service Queue] and enter the name of the print queue in the [Print |
Queue name] box. |
|
4 |
Click the [browse] at the next to the [Print Queue Volume] box. |
The [Select Object] dialog box appears. |
|
5 |
Select the volume to create a print queue and click [OK]. |
6 |
Click [Create]. |
The print queue is created. |
|
7 |
Click the [Object] menu and select [Create]. |
The [New Object] dialog box appears. |
|
8 |
In the [Class of new object] list, select [Printer] and click [OK]. |
The [Create Printer] dialog box appears. |
|
9 |
Enter the printer name, select the [Define additional properties] check box and click |
[Create]. |
|
10 |
Display the Assignments window and click [Add]. |
The [Select Object] dialog box appears. |
|
11 |
Select a created queue and click [OK]. |
12 |
Display the Configuration window, select [Other/Unknown] at the Printer Type drop |
down box and click [OK]. |
The printer is created.
13
14
Click the [Object] menu and select [Create].
The [New Object] dialog box appears.
In the [Class of new object] list, select [Print Server] and click [OK].
The [Create Print Server] dialog box appears.
15 Enter the print server name, select the [Define additional properties] check box and click [Create].
The print server name must be “MFP_[NIC Serial Number]”. You can find the Unit Serial Number of the equipment on the NIC Configuration list that can be printed from the control panel.
16 Display the Assignments window and click [Add].
The [Select Object] dialog box appears.
17 Select a created printer and click [OK].
18 Click [OK] to close Assignments window for the print server.
The print server is created.
Setting up NetWare Print Server 15

1 OVERVIEW
Setting up the NetWare in NDPS mode
This equipment supports printing over NetWare 6.0/6.5 networks running either the TCP/IP protocols or the IPX protocol. For pure IP printing, this equipment takes advantage of features in NDPS (Novell Distributed Print Services).
An administrator can use either Novell Printer Gateway to set up the NetWare server in NDPS mode. P.16 “Setting up NDPS using Novell Printer Gateway”
Setting up a NetWare environment correctly requires the presence and active cooperation of the Novell network administrator. You must have administrator privileges on the network to create new NDPS objects.
Setting up NDPS using Novell Printer Gateway
NDPS is not like the earlier queue-based versions of NetWare printing. Instead, you use an NDPS Manager and a Printer Agent, which control the tasks previously handled by a print queue, print server, and spooler. You can also make the printer driver available for clients to download from Windows client computers.
Before configuring the NetWare file server in NDPS mode, please confirm followings:
yFor NetWare 6.5, the Support Pack 5 and Novell Gateway version 3.00 or later with ndps3sp2c are installed.
yMake sure you have a valid IP address for this equipment and for any computers that will print to it (when used in the TCP/IP network).
yIn the equipment setup, enable TCP/IP and enter the IP address, Subnet mask, and Gateway address for this equipment (when used in the TCP/IP network).
Setting up the NDPS with NetWare Administrator
1 |
In NetWare Administrator, select the container object to create the printer and click the |
||
[Object] menu and select [Create]. |
|||
|
The [New Object] dialog box appears. |
||
2 |
Select [NDPS Broker] and click [OK]. |
||
The [Create NDPS Broker Object] dialog box appears. |
|||
|
|
|
|
|
|
|
|
|
|
If the NetWare file server has been installed as supporting the NDPS service, the NDPS Broker is created as |
|
|
|
default. In this case, you can use the default NDPS Broker. |
|
3 |
Specify the [NDPS Broker Name] and [RMS Volume] options, and click [Create]. |
||
The NDPS Broker is created. |
|||
4 |
Click the [Object] menu and select [Create]. |
||
The [New Object] dialog box appears. |
|||
5 |
Select [NDPS Manager] and click [OK]. |
||
The [Create NDPS Manager Object] dialog box appears. |
|||
6 |
Specify the [NDPS Manager Name], [Resident Server], and [Database Volume] option, |
||
and click [Create]. |
|||
|
The NDPS Manager is created. |
||
7 |
After creating the NDPS Broker and NDPS Manager, please load the NDPS Broker and |
||
NDPS Manager by entering the following commands in the Console screen of the |
|||
|
NetWare server. |
||
|
load broker [Created NDPS Broker Name] |
||
8 |
load NDPSM [Created NDPS Manager Name] |
||
Double-click the NDPS Broker object that you created. |
|||
The NDPS Broker dialog box appears. |
|||
9 |
Click [Resource Management (RMS)]. |
||
16 Setting up NetWare Print Server

1 OVERVIEW
10 Click [Add Resources].
The [Manage Resources] dialog box appears.
If the [Add Resources] button is disabled, make sure that the broker is loaded. This button will be enabled only when the broker is loaded.
11
12
Select the applicable OS icon in the [Resource Types] list, and click [Add].
The [Add Resources] dialog box appears.
Click [Browse].
The [Select Printer Driver] dialog box appears.
The [Browse] button may not be available according to the Support Pack version. If the [Browse] button is disabled, specify “/DISABLETLSMGR” option when starting the nwadmin32.exe.
13 Insert the Client Utilities CD-ROM into the CD-ROM drive.
When inserting the Client Utilities CD-ROM, the installer may automatically start. Click [Cancel] to exit the installer and continue the operation.
14 Locate the directory where the printer driver for your Windows version is located, select the INF file.
yTo install the PCL6 printer driver, locate
“[CD-ROM drive]:\Client\Drivers\PCL6\W2K_XP_VISTA\<language>”
yTo install the PS3 printer driver, locate
“[CD-ROM drive]:\Client\Drivers\PS\W2K_XP_VISTA\<language>”.
When using 64-bit edition of each Windows XP/Vista/Server 2003/Server 2008, select the following folder.
-To install the PCL6 printer driver, locate
“[CD-ROM drive]:\Client\Drivers\PCL6\XP_VISTA_X64\<language>”.
-To install the PS3 printer driver, locate
“[CD-ROM drive]:\Client\Drivers\PS\XP_VISTA_X64\<language>”.
15 Click [OK].
Returns to the [Add Resources] dialog box.
16 Click [OK].
Returns to the [Manage Resources] dialog box.
17 Repeat the procedure from Step 10 to Step 15 to add all printer drivers for the applicable OS.
18 Click [OK] to close the [Manage Resources] dialog box.
Returns to the [NDPS Broker] dialog box.
19 Click [OK] to close the [NDPS Broker] dialog box.
20 Click the [Object] menu and select [Create].
The [New Object dialog] box appears.
21 Select [NDPS Printer] and click [OK].
The [Create NDPS Printer Object] dialog box appears.
22 Specify the [NDPS Printer Name] option, select [Create a New Printer Agent], and click [Create].
The [Create Printer Agent] dialog box appears.
23 Specify the [Printer Agent (PA) Name] and [NDPS Manager Name] option. Then select [Novell Printer Gateway] in the [Gateway Types] list and click [OK].
The [Warning] dialog box appears.
Setting up NetWare Print Server 17

1 OVERVIEW
24
25
26
Click [OK].
When it finishes initializing, the [Information] dialog box appears.
Click [OK].
The [Configure Novell PDS for Printer Agent] dialog box appears.
Select [((NONE))] in the [Printer Type] list and select [Novell Port Handler] in the [Port Handler Type] list. Then click [OK].
The [Configure Port Handler for Printer Agent] dialog box appears.
27 Continue the procedure according to which connection type to be used.
P.18 “Configuring the LPR connection in the TCP/IP network”
P.19 “Configuring the queue based connection in the IPX/SPX network”
Configuring the LPR connection in the TCP/IP network
1 |
In the [Configure Port Handler for Printer Agent] dialog box, select [Novell LPR Printer |
Gateway (SNMP)] (or [Remote (LPR on IP)]) and click [Next]. |
|
2 |
Enter the IP address of this equipment in the [Host Address] box, and click [Finish]. |
It takes about 60 seconds to load the Printer Agent. After it finishes loading the Printer Agent, the Select Printer |
|
|
Drivers dialog box appears. |
3 |
Select the printer drivers to be installed in the [Printer Drivers] list at each OS tab, and |
click [Continue]. |
|
|
The [Information] dialog box appears. |
4 |
Click [OK]. |
It takes about 60 seconds to complete the creation of the NDPS Printer object. |
|
5 |
Double-click the NDPS Printer object that you created. |
y The NDPS Printer dialog box appears. |
|
6 |
Click [NDPS Remote Printer Management]. |
7 |
Select the [Install to workstation in this container] and click [Update driver]. |
8 |
Click [OK] to close the [NDPS Printer] dialog box. |
18 Setting up NetWare Print Server
1 OVERVIEW
Configuring the queue based connection in the IPX/SPX network
1 |
In the [Configure Port Handler for Printer Agent] dialog box, select [Forward Jobs to a |
||
Queue] and click [Next]. |
|||
2 |
Enter the NDS queue name in the [Queue Name] box and the user name in the [Queue |
||
User Name] box. Then click [Finish]. |
|||
|
The [Select Printer Drivers] dialog box appears. |
||
|
|
|
|
|
|
|
|
|
|
The NDS queue must be created. |
|
3 |
Select the printer drivers to be installed in the [Printer Drivers] list at each OS tab, and |
||
click [Continue]. |
|||
|
The [Information] dialog box appears. |
||
4 |
Click [OK]. |
||
It takes about 60 seconds to complete the creation of the NDPS Printer object. |
|||
5 |
Double-click the NDPS Printer object that you created. |
||
The [NDPS Printer] dialog box appears. |
|||
6 |
Click [NDPS Remote Printer Management]. |
||
7 |
Select the [Install to workstation in this container] and click [Update]. |
||
8 |
Click [OK] to close the [NDPS Printer] dialog box. |
||
Setting up NetWare Print Server 19

1 OVERVIEW
Setting up the NetWare in iPrint mode
This equipment also supports the Novell iPrint.
Using the iPrint system, you can set up the printer that can be accessed using URL from client computers. The iPrint system is based on the NDPS architecture so that you must have NDPS installed and configured in the NetWare 6.0/6.5 server.
Before configuring the NetWare file server in NDPS mode, please confirm followings:
yThe NDPS Broker, NDPS Manager, and NDPS Printer must be created. P.16 “Setting up the NDPS with NetWare Administrator”
yThe Novell iManager must be installed.
For more information to install the Novell iManager, please see the documentation for the Novell iManager that is provided by Novell, Inc.
In order to set up the iPrint system, the network administrator must do the following: 1. Installing iPrint
P.20 “Installing iPrint”
2. Enabling the DNS on the Printer Services Manager
P.20 “Enabling DNS on the Printer Services Manager”
3. Enabling iPrint service
P.21 “Enabling iPrint Service”
Installing iPrint
1 Click [Novell] in the GUI screen of NetWare and select [Install]. 2 Click [Add].
If the iPrint/NDPS is displayed in the list, iPrint has already been installed during the installation of NetWare. In that case, you do not have to operate the installation for iPrint.
3 Insert the NetWare Operating System CD-ROM into your CD-ROM drive.
4 Select the “PRODUCT.Nl” file that is located in the root of the CD-ROM, and click [OK]. 5 Follow the prompts to install iPrint/NDPS.
Enabling DNS on the Printer Services Manager
Before enabling DNS for the Printer Services Manager, you should add the DNS name for the Printer Services Manager to the DNS server.
After you add the DNS to the DNS server, follow the steps below to enable the DNS on the Printer Services Manager.
1 At the server console, enter the following syntax.
NDPSM <NDPS Manager Name> /dnsname=<NDPS Manager DNS Name>
20 Setting up NetWare Print Server

1 OVERVIEW
Enabling iPrint Service
After enabling DNS on the Printer Services Manager, enable the iPrint Service using the iManager.
yTo do this, iManager must be installed on your NetWare server. For information about installing iManager, see the documentation for iManager that is provided by Novell, Inc.
yYou must use a supported browser to access iManager. The supported browsers vary depending on the version of iManager that you installed.
For iManager 1.5.2
-Microsoft Internet Explorer 5.5 or later (Recommended)
-Netscape 6.2 or later
For iManager 2.0.x
-Microsoft Internet Explorer 6 SP1 or later (Recommended)
-Netscape 7.1 or later
-Mozilla 1.4 or later
1Enter the URL “https://<IP address>:2200” in the address bar of your browser, and click the [iManager] link for the NetWare server under eDirectory iManager.
2Enter the user name and password to log in to iManager.
3Click [iPrint] in the Contents Panel and click [Manage Printer].
4Select the printer that you created for the equipment.
5Click [Client Support] and click [iPrint support].
6Select the [Enable iPrint support] check box.
7If you want to secure printing, select the [Enable secure printing (Require SSL/TSL and user authentication)] check box.
When the [Require Security] option is enabled, users must be authenticated to eDirectory using the user name and password.
8 Click [Apply] and [OK] to save settings.
The IPPSRVR.NLM is automatically loaded.
Setting up NetWare Print Server 21

1 OVERVIEW
22 Setting up NetWare Print Server

1 OVERVIEW
Setting up NetWare Print Server 23

1 OVERVIEW
24 Setting up NetWare Print Server

1 OVERVIEW
Setting up NetWare Print Server 25

1 OVERVIEW
26 Setting up NetWare Print Server

RECOMMENDED INSTALLATION
This section describes about the recommended installation of the Installer. |
|
Procedure for Recommended Installation ........................................................................... |
28 |

2 RECOMMENDED INSTALLATION
Procedure for Recommended Installation
Please install the software by the recommended installation when you want to install all software on a Windows computer.
Installing the client software by recommended installation
The following describes an installation on Windows Vista. The procedure is the same when other versions of Windows are used.
y You must log into Windows as a user who has the “Administrators” or “Power Users” privilege. You must log into Windows as a user who has the “Administrators” privilege when using Windows XP/Vista/Server 2003/Server 2008.
y Only users with the administrator privilege can perform this. For users without the administrator privilege, installation is possible by performing the following procedure and having the administrator privilege temporarily. - Double-click “Open folder to view files” in the AutoPlay menu.
- Open the “Setup” folder, right click “Setup.exe” and then select “Run as administrator”.
- Enter the administrator's password of the client computer to operate with an administrator's privilege and click [OK].
1 Insert the Client Utilities CD-ROM into the CD-ROM drive.
If the installer does not automatically start, use the Explorer to open the “Setup” folder in the Client Utilities CDROM and double-click “Setup.exe”.
2 Select [I agree to the terms of the License Agreement.] and click [Next].
yTo change the display language, select a desired language from the [Select Language] box.
yThe main menu window is displayed.
3 Click [Recommended].
28 Procedure for Recommended Installation
Loading...