


OWNER'S MANUAL |
KWANG YANG MOTOR CO.,LTD. |
XCITING 500 AFI |
XCITING 500 |
XCITING 250 AFI |
XCITING 250 |
Issued: 15.02.2006 |

FOREWORD
Thank you for purchasing this KYMCO scooter and welcome to the family of KYMCO scooter riders.
Please read this owner's manual carefully before riding so that you will be thoroughly familiar with the proper operation of your scooter controls, its features, capabilities, and limitations.
To ensure a long, trouble-free life for your scooter, give it the proper care and maintenance described in this manual.
For replacement parts and accessories, we recommend genuine KYMCO products. They've been specially designed for your vehicle and manufactured to meet KYMCO's demanding standards.
Keep this owner's manual aboard your scooter at all time so that you can refer to it whenever you need information. This manual should be considered a permanent part of the scooter and should remain with the scooter when it is sold.
All information, illustrations, photographs and specifications contained in this manual are based on the latest product information available at the time of publication. Due to improvements or other changes, there may be some discrepancies in this manual.
KYMCO reserves the right to make changes at any time without notice and without incurring any obligation.
A

READ THIS MANUAL CAREFULLY
Your Owner's Manual contains important information on safety, operation, and maintenance. Any one who operates this scooter should carefully read and understand the contents of this manual before riding the scooter.
SPECIAL MESSAGES
Please read this manual and follow its instructions carefully. To emphasize special information the words WARNING, CAUTION and Note carry special meanings and should be carefully reviewed.
Indicates a strong possibility that serious injury or death may WARNING result if instructions are not followed.
CAUTION Indicates a possibility that equipment or property damage could result if instructions are not followed.
NOTE: Gives helpful information
The Owner's Manual should be considered a permanent part of your scooter. It should remain with the vehicle at all times and stay with the scooter if it is sold.
ON-ROAD USE
This scooter is designed to be used only on the road.
B

CONTENTS |
|
Page |
Page |
SCOOTER SAFETY........................ |
1 |
IMPORTANT SAFETY |
|
INFORMATION................................ |
1 |
PROTECTIVE APPAREL................... |
3 |
LOAD LIMITS AND GUIDELINES....... |
5 |
LOCATION OF THE WARNING AND |
|
SPECIFICATION LABELS.................. |
8 |
PARTS LOCATION........................ |
12 |
FRAME NUMBER............................ |
16 |
ENGINE NUMBER........................... |
17 |
KEY NUMBER................................. |
18 |
CONTROLS.................................. |
19 |
KEYS............................................. |
19 |
IGNITION SWITCH.......................... |
19 |
INSTRUMENT AND INDICATORS.... |
21 |
RIGHT HANDLEBAR SWITCH.......... |
25 |
LEFT HANDLEBAR SWITCH............ |
27 |
BRAKES......................................... |
28 |
FUEL FILL CAP................................ |
30 |
FRONT SMALL BOX......................... |
32 |
CENTER SMALL BOX...................... |
33 |
SEAT.............................................. |
34 |
ADJUSTABLE BACKREST............... |
35 |
CENTER COMPARTMENT............... |
36 |
CENTER COMPARTMENT LIGHT..... |
37 |
CELL PHONE SOCKET & CELL |
|
PHONE FIXED SEAT....................... |
37 |
HELMET HOLDERS........................ |
39 |
STAND........................................... |
40 |
SUSPENSION................................. |
42 |
DIAGNOSTIC TOOL CONNECTOR |
|
(XCITING 500 AFI/XCITING 250 AFI).. |
43 |
PRE-RIDE INSPECTION............... |
44 |
OPERATION................................. |
45 |
STARTING THE ENGINE................. |
45 |
RIDING........................................... |
50 |
(Cont'd) |
|
C

Page |
Page |
PARKING........................................ |
55 |
BREAK-IN (RUNNING IN)................ |
57 |
INSPECTION AND |
|
MAINTENANCE............................ |
59 |
THE IMPORTANCE OF |
|
MAINTENANCE.............................. |
59 |
MAINTENANCE SCHEDULE |
|
(XCITING 500 AFI/XCITING 500)....... |
60 |
MAINTENANCE SCHEDULE |
|
(XCITING 250AFI/XCITING 250 )...... |
63 |
TOOL KIT....................................... |
66 |
CRANKCASE BREATHER............... |
66 |
ENGINE OIL................................... |
67 |
TRANSMISSION OIL....................... |
76 |
AIR CLEANER................................ |
78 |
THROTTLE OPERATION................. |
81 |
IDLE SPEED................................... |
82 |
SPARK PLUG.................................. |
84 |
COOLANT....................................... |
85 |
FRONT AND REAR SUSPENSION |
|
INSPECTION.................................. |
87 |
SIDE STAND................................... |
88 |
BRAKE LEVER ADJUSTER............. |
89 |
BRAKE FLUID................................ |
89 |
BRAKE PAD WEAR........................ |
90 |
PARKING BRAKE OPERATION |
|
(XCITING 500 AFI/XCITING 500)....... |
91 |
BATTERY........................................ |
92 |
FUSE REPLACEMENT.................... |
94 |
TIRES............................................ |
97 |
CLEANING................................. |
101 |
STORAGE GUIDE....................... |
106 |
SPECIFICATIONS |
|
(XCITING 500 AFI/XCITING 500)... |
109 |
SPECIFICATIONS |
|
(XCITING 250AFI/XCITING 250).... |
111 |
D

SCOOTER SAFETY
IMPORTANT SAFETY INFORMATION
Your scooter can provide many years of service and pleasure, if you take responsibility for your own safety and understand the challenges that you can meet on the road. There is much that you can do to protect yourself when you ride. You will find many helpful recommendations throughout this manual. Following are a few that we consider most important.
Wear a helmet
Scooter safety equipment starts with a quality helmet. One of the most serious injuries that can happen is a head injury. Always wear a properly approved helmet. You should also wear suitable eye protection.
Make yourself easy to see
To make yourself more visible, wear bright reflective clothing, position yourself so other drivers can see you, signal before turning or changing lanes, and use your horn when it will help others notice you.
Know your limits
Ride within the boundaries of your own skill at all times. Knowing these limits and staying within them will help you to avoid accidents.
1

Keep your scooter in safe condition
For safe riding, it's important to inspect your scooter before every ride and perform all recommended maintenance. Never exceed load limits, and only use accessories that have been approved by KYMCO for this scooter.
Inspection before riding
Do not forget to perform an entire safety inspection to ensure the safety of the rider.
Be extra safety conscious on bad weather days
Riding on bad weather days, especially wet ones, requires extra caution. Braking distance double on a rainy day. Stay off of the painted surface marks, manhole covers and greasy appearing areas as they can be especially slippery. Use extreme caution at railway crossings and on metal gratings and bridges. Whenever in doubt about road conditions, slow down.
Modification
Modification of the scooter, or removal of original equipment may render the vehicle unsafe or illegal. Obey all applicable equipment regulations in your area.
2

PROTECTIVE APPAREL
For your safety, we strongly recommend that you always wear an approved scooter helmet, eye protection, boots, gloves, long pants, and a long-sleeved shirt or jacket whenever you ride.
Helmets and protection
Your helmet is your most important piece of riding gear because it offers the best protection against head injuries. A helmet should fit your head comfortably and securely. Always wear a face shield or goggles to protect your eyes and help your vision.
Additional riding gear
In addition to a helmet and eye protection, we also recommend:Sturdy boots with non-slip soles to help protect your feet and ankles.
Leather gloves to keep your hands warm and help prevent blisters, cuts, burns and bruises.
A scooter riding suit or jacket for comfort as well as protection. Bright-colored and reflective clothing can help make you more noticeable in traffic. Be sure to avoid loose clothes that could get caught on any part of your scooter.
3
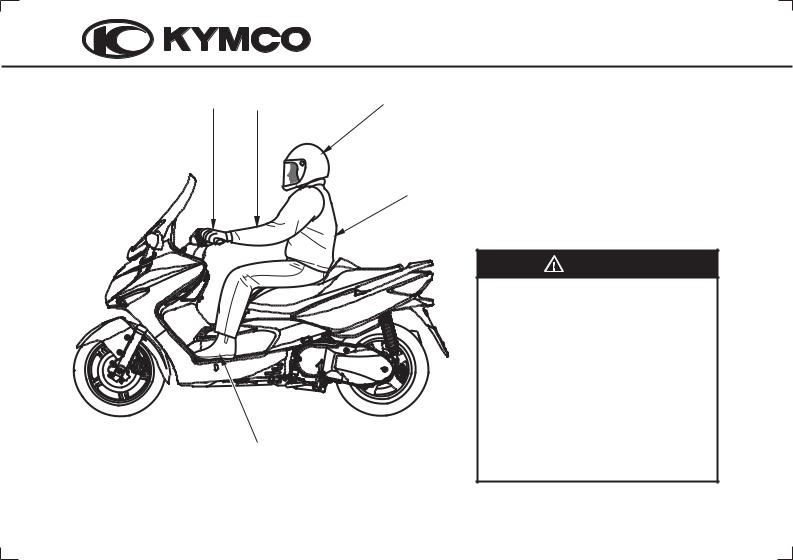
(1)(2)
(5)
(3) |
|
(1)Wear gloves. |
|
|
(2)Clothes should be close-fitting. |
|
|
(3)Always wear an helmet. You |
|
|
should also wear a face shield |
|
|
or goggles. |
|
|
(4)Wear bright or reflective |
|
(4) |
clothing. |
|
(5)Shoes should be close-fitting, |
|
|
|
|
|
|
have low heels and offer ankle |
|
|
protection. |
|
|
WARNING |
|
|
Not wearing a helmet |
|
|
increases the chance of |
|
|
serious injury or death in a |
|
|
crash. |
|
|
Be sure you and your |
|
|
passenger always wear an |
|
|
approved motorcycle helmet |
|
|
that fits properly. You should |
|
|
also wear eye protection and |
|
|
other protective apparel when |
|
|
you ride. |
4
LOAD LIMITS AND GUIDELINES
These general guidelines may help you decide whether or how to equip your scooter and how to load it safely.
Center small box weight limit: 3 kg (6.6 lbs)
Load limits
Following are the load limits for your scooter:
Maximum weight capacity (Includes the weight of the rider, passenger, all cargo and All accessories.): 150 kg (330 lbs)
Maximum cargo weight: 19 kg (42 lbs)
Overloading the individual storage compartments can also affect stability and handling. So be sure to stay within the limits given below:
Maximum weight: |
|
In center compartment |
10 kg (22 lbs) |
In front small box |
1.5 kg (3.3 lbs) |
In center small box |
3 kg (6.6 lbs) |
On rear carrier |
5kg (11 lbs) |
Center compartment weight limit:10 kg (22 lbs)
Rear carrier weight limit:5 kg (11 lbs)
Front small box weight limit: 1.5 kg (3.3 lbs)
5
Loading guidelines
Improperly loading your scooter can affect its stability and handling. You should ride at reduced speeds whenever carrying cargo. Follow these guidelines whenever you carry a passenger or cargo:
Check that both tires are properly inflated.
To prevent loose items from creating a hazard, make sure that all cargo is securely tied down before you ride away
Place cargo weight as close to the center of the scooter as possible.Balance cargo weight evenly on both sides.
WARNING
Overloading or improper loading can cause changes in vehicle handling, stability and braking which could lead to an accident.
Never exceed the stated load capacity for this scooter.
Cargo should be properly distributed and securely attached.
Reduce speed when carrying cargo. Allow greater distance for braking.
6

Accessories and Modification
There are great variety of accessories available to KYMCO owners. KYMCO cannot have direct control over the quality or suitability of accessories you may wish to purchase. The addition of unsuitable accessories can lead to unsafe operating conditions. It is not possible for KYMCO to test each accessory on the market or combinations of all the available accessories; however, your dealer can assist you in selecting quality accessories and installing them correctly.
Use extreme caution when selecting and installing the accessories for your scooter.
WARNING
Improper accessories or modifications can make your scooter unsafe and can lead to an accident.
Never modify this scooter through improper installation or use of accessories. All parts and accessories added to this vehicle should be genuine KYMCO or equivalent components designed for use on this scooter and should be installed and used according to instruction. If you have question, consult an authorized KYMCO dealer.
No modifications
We strongly advise you not to remove any original equipment or modify your scooter in any way that would change its design or operation.
7

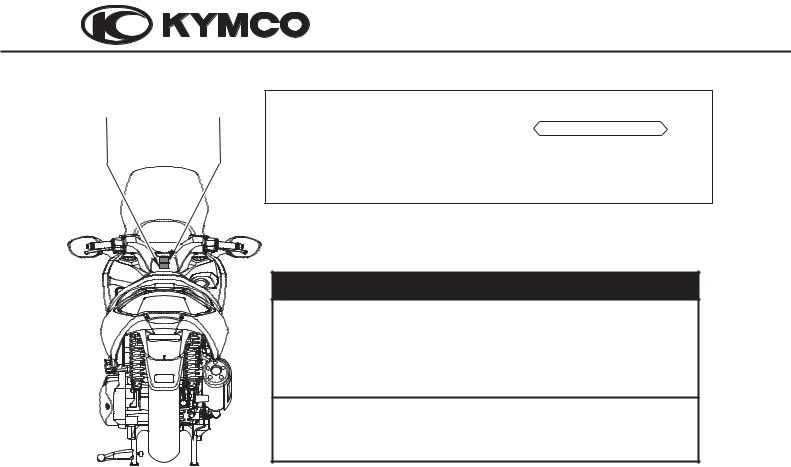
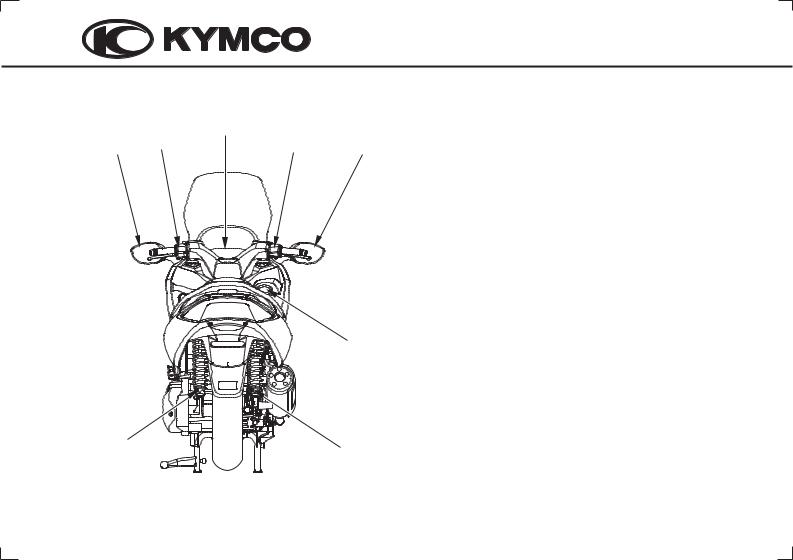
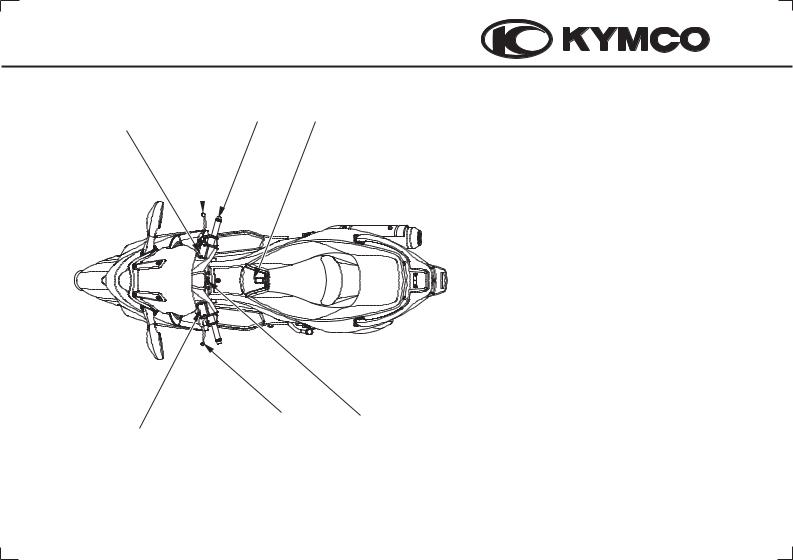
LOCATION OF THE WARNING AND
SPECIFICATION LABELS
(1)
CAUTIONS
Before starting the engine, the side stand shall be kicked up to secure safety.
(1)
8

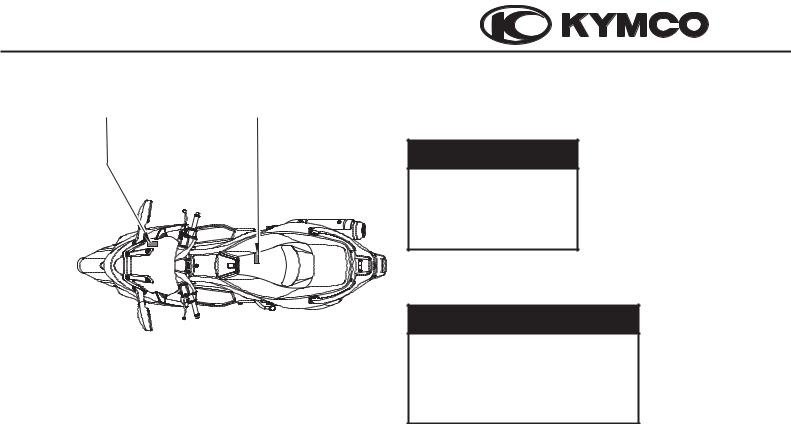
(2): XCITING 500 AFI/XCITING 500
CAUTIONS
Every 6000 km run should exchange the filter.
(3)
CAUTIONS
Never put any article between the rear side cover and the engine to avoid interference of riding.
(2)(3)
9
(4)
(5) |
(4) |
|
Be sure to wear a safety helmet when riding. |
|
Make sure to perform the periodic maintenance |
|
|||||
|
Do not exceed the speed specified by law when |
|
and preride inspection. |
||
|
|
|
|||
|
|
|
riding. |
|
|
|
|
|
The exhaust muffler temperature is very high |
|
Preride Inspection Items |
|
|
|
|
||
|
|
|
after riding. Be sure to park the motorcycle in a |
|
Brake Performance, tires, engine oil level, |
|
|
|
place not easily touched by people. |
|
|
|
|
|
|
lights, horn, and instrument panel. |
|
|
|
|
For riding safety and good performance do not |
|
|
|
|
|
|
|
|
|
|
|
violate the law to modify the motorcycle. |
|
KWANG YANG MOTOR CO., LTD |
|
|
|
|
|
|
|
|
|
|
|
|
|
|
|
|
|
|
Please read the User's Manual carefully to secure driving safely.
(5)
CAUTIONS
Tire Size |
: Front 120/70-15 |
Rear 150/70-14 |
(One Rider) |
: Front 2.00kgf/cm2 |
Rear 2.50kgf/cm2 |
(Two Rider) |
: Front 2.25kgf/cm2 |
Rear 2.50kgf/cm2 |
Load Capacity |
: Shield 1.5kg Clip assy center 3kg |
|
|
(As per KYMCO standard specification) |
|
(Note: The tire pressure must not overpass 2.50kgf/cm2
Check the motor oil level with the dipstick after refilling motor oil.
10
(7) |
(6) |
(6)
CAUTION
Mobile phone charge only, Use other appliance may cause damage.
(7)
CAUTION
DON'T WIPE WITH
ORGANIC SOLVENT
(EX: GAS, THINNER...ETC).USE NEUTRAL SOAP TO
CLEAN WINDSHIELD.
11
PARTS LOCATION |
|
|
|
|
(04) |
|
|
(06) |
(05) |
(03) |
(02) |
(01) Fuel fill cap
(02) Right rearview mirror
(03) Hazard switch/Engine stop switch/Headlight switch/Start button
(04) Instruments/Indicators
(05) Passing switch/Headlight dimmer switch/Turn signal switch/Horn button
(06) Left rearview mirror
(01)(07) Left rear suspension spring preload adjuster
(08)Right rear suspension spring
preload adjuster
(07) |
(08) |
|
12
(12) |
(11) |
(10) |
(09) |
|
|
|
|
|
|
|
|
|
|
|
(09) Center small box
(10) Throttle grip
(11) Front brake lever
(12) Front brake fluid reservoir
(13) Rear brake fluid reservoir
(14) Rear brake lever
(15) Ignition switch
(14)(15)
(13)
13
(18) (17) (16)
(16) Tool kit
(17) Center compartment
(18) Helmet holder
(19) Front small box
(20) Coolant level
(21) Side stand
(22) Center stand
(23) Left passenger footpeg
(24) Air cleaner (XCITING 500 AFI/ XCITING 500)
(25) Air cleaner (XCITING 250 AFI/ XCITING 250)
(19) |
(20) |
(21) |
(22) |
(23) |
(24) |
(25) |
14
(30) |
(29) |
(28) |
(27) |
(26) |
(26) Cell phone fixed seat
(27) Center compartment light/Cell phone socket
(28) Seat
(29) Adjustable backrest
(30) Battery/Fuse box/Spare fuses
(31) Right passenger footpeg
(32) Oil filler cap/Dipstick
(33) Parking brake lever (XCITING 500 AFI/ XCITING 500)
(31) |
(32) |
(33) |
15
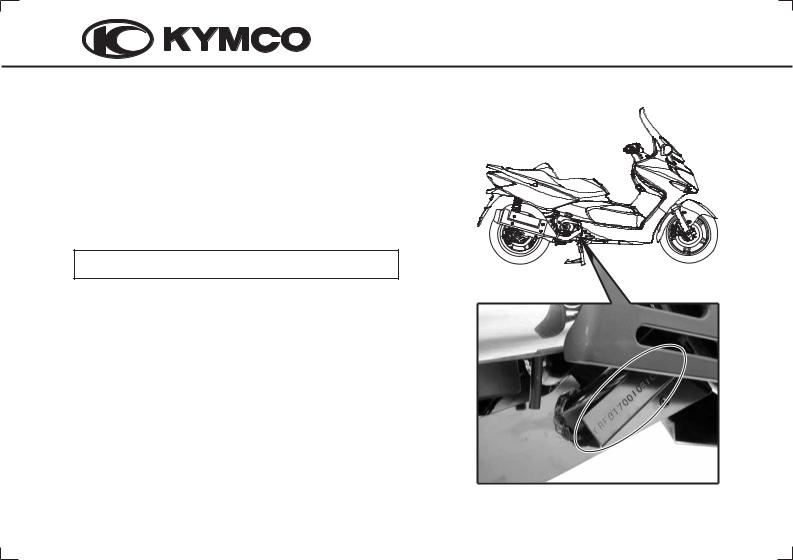
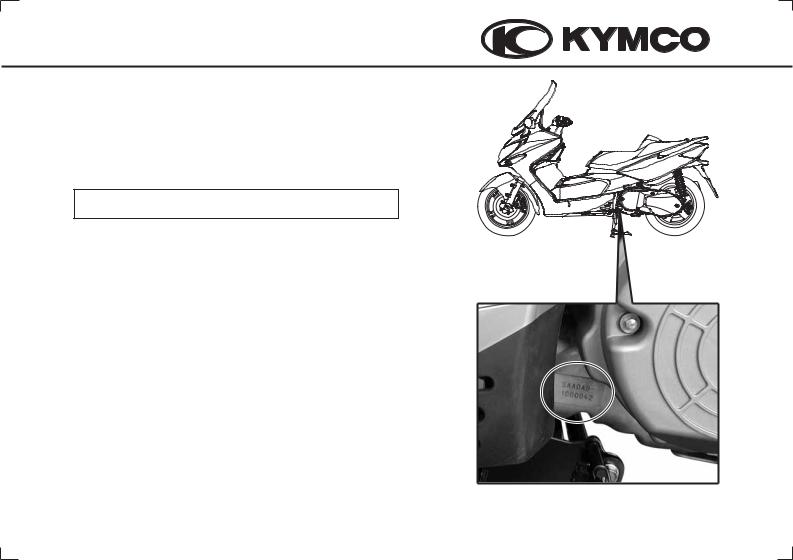
FRAME NUMBER
The read frame number is stamped on right side of the frame. Always check that the frame number stamped on your scooter is the same written in document and warranty scooter is the same written in document and warranty card.
Please write down your frame number in place below.
FRAME NUMBER:
16
ENGINE NUMBER
The engine number is stamped on left engine case. Please write down your engine number in place below.
ENGINE NUMBER:
17
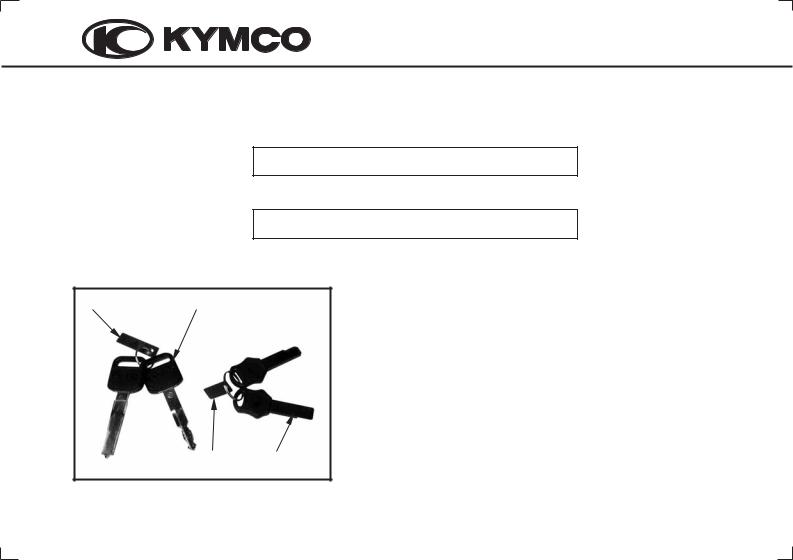
KEY NUMBER
The key number (1) will be needed when you order replacement part. Record the number for your reference.
IGNITION KEY NUMBER:
SHUTTER KEY NUMBER:
(1) |
(2) |
|
|
(1) |
Ignition key number |
|
|
|
(2) |
Ignition key |
|
(3) |
(4) |
(3) |
Shutter key number |
|
(4) |
Shutter key |
|||
|
|
18
CONTROLS |
OPEN |
|
KEYS |
||
|
||
This scooter has two ignition switch keys and shutter |
|
|
keys. |
|
|
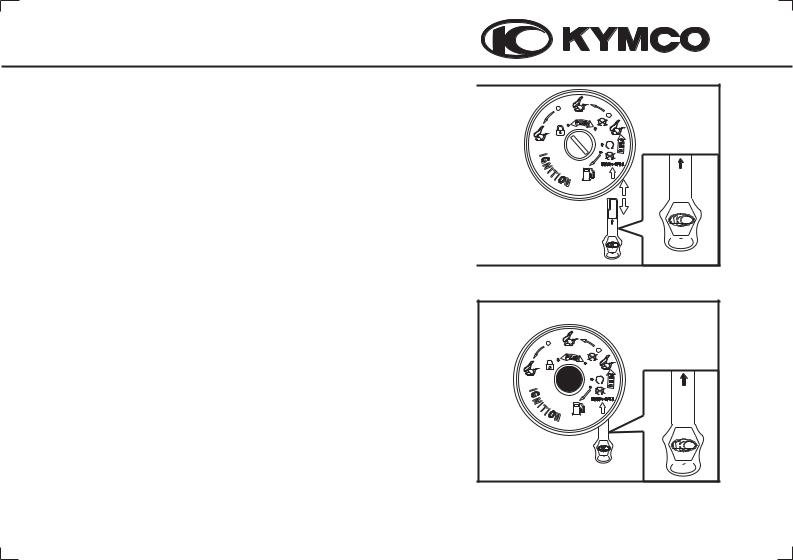
IGNITION SWITCH |
|
|
To open the ignition key-hole shutter with shutter |
|
|
key: |
|
|
Select the shutter key "OPEN" side upward and insert |
|
|
the shutter key into the hole at the ignition switch. |
|
|
|
|
OPEN
OPEN
To shut the ignition key-hole shutter with shutter key:
Select the shutter key "SHUT" side upward and insert the shutter key into the hole at the ignition switch.
NOTE:
Apply anti-freeze chemicals when atmospheric Temperature becomes less than freezing
point to avoid ignition key-hole shutter freezing.
SHUT |
SHUT |
SHUT |
19
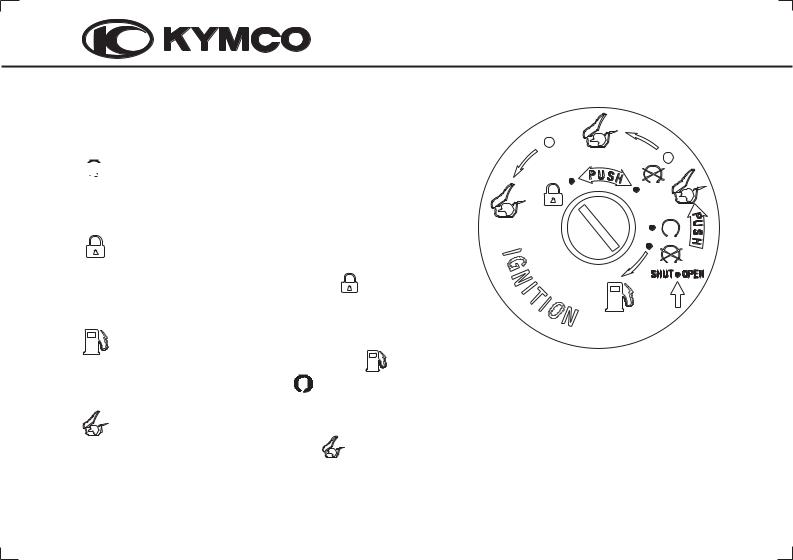
Function
“  " Position:
All electrical circuits are cut off. The engine will not start.
"  " Position:
The ignition circuit is completed and engine can now be started. The key cannot be removed from the ignition switch.
“" Position:
To lock the steering, turn the handlebar all the way to the left. Push down and turn the key to the " " position and remove the key. All electrical circuits are cut off.
“" Position:
To open the fuel fill cap, turn the key to the " |
" position. |
|
Make sure that the key is at the " |
" position when |
|
Starting the engine. |
|
|
"" Position:
To open the seat, turn the key to the " |
" position. |
20
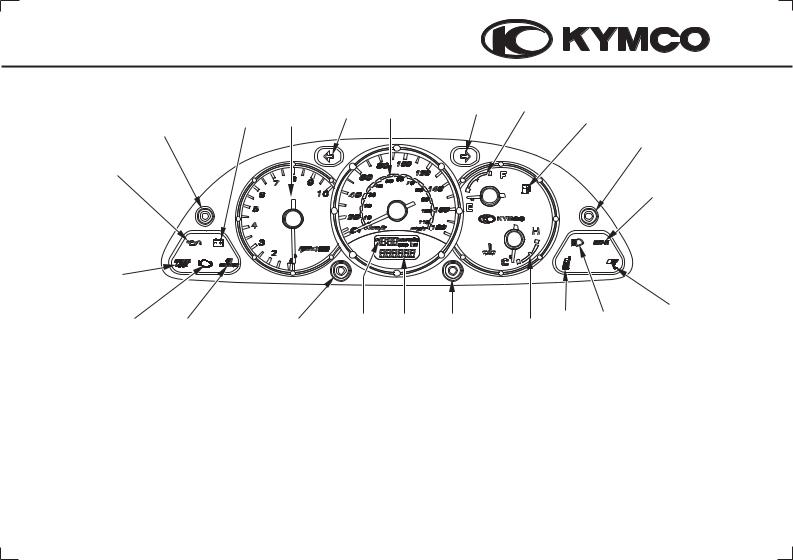
INSTRUMENT AND INDICATORS |
|
|
(5) |
(7) |
|
||
|
|
(4) |
(5) |
(6) |
|
||
|
(3) |
|
(8) |
|
|||
(2) |
|
|
|
|
|||
|
|
|
|
|
|
|
|
|
|
|
|
|
|
|
(9) |
(1) |
|
|
|
|
|
|
|
|
|
|
|
|
|
Oil |
(10) |
|
Mode |
|
|
|
|
Service |
|
|
|
|
|
|
|
||
|
|
|
|
|
|
|
|
(21) |
|
|
H |
|
M |
|
|
|
|
(20) |
(19) |
(18) |
(17) |
(16) |
(15) |
(14) |
(13) |
(12) |
(11) |
|
NOTE:
The indicator of multi-metee will run from zero to maxi limit then zero when connecting the battery (at the state of ignition switch turn on ) and resetting the position of pointer (if the position of pointer is confused)
21

(1) Oil pressure warning indicator"  "
"
Lights when the engine oil pressure is below normal operating range, should light when ignition switch is ON "  " and engine is not running. Should go out when the engine starts, except for occasional flickering at or near idling speed when engine is warm.
NOTE:
Running the engine with insufficient oil pressure may cause serious engine damage.
(2) Mode button
The button is used to select the trip meter, the odometer or reset trip meter.
(3) Battery charge telltale
If the telltale comes on while driving, this indicates the battery voltage is below 11V.
(4) Tachometer
Shows engine revolutions per minute (rpm).
(5)Right/Left turn signal indicator " 
 "
"
Flashes when the right/left turn signal operates.
(6)Speedometer
Shows riding speed.
(7) Fuel gauge
Shows approximate fuel supply available.
22

(8) Fuel refill Indicator"  "
"
Lights when the fuel tank is empty or nearly so and you should refill the tank as soon as possible.
(9)Oil service indicator reset button
The oil service indicator can be reset by pressing the button when the engine oil has been changed.
(10)Seat unlock indicator "MET-IN"
Lights when the seat is not locked fully.
(11)Side stand down indicator
Lights when side stand is left down.
(12) High beam indicator
Lights when the headlight high beam is turned on.
(13) Cell phone socket indicator
Lights when the cell phone socket is used.
(14) Coolant temperature gauge
The coolant temperature gauge indicates engine coolant temperature when the ignition switch is in the "  " position.
(15) Minute adjust button
Push this button to adjust the minute display.
(16) Trip meter/Odometer
The display in the speedometer has two functions, trip meter and odometer.
The trip meter can register the trip distance. The odometer registers the total distance that the scooter has been ridden.
By pressing "(2) Mode button" to select the trip meter (mile or km)or odometer (mile or km). The trip counter can be rest by keeping the button pressed down for more than 2 seconds when the trip counter value is displayed.
23

(17) Clock
Show hour and minute.
(18) Hour adjust button
Push this button to adjust the hour display.
(19) Oil service indicator
If the oil service indicator comes on while driving, this indicates that the engine oil should be changed at each maintenance interval.
NOTE:
The oil service indicator comes on when the vehicle's ignition is turned on and must come off when the engine is running.
(20) CELP: Check engine lamp (XCITING 500 AFI/XCITING 250 AFI)
Flashes when there is any abnormality in the CELP system.
If it comes on at any other time, reduce speed and take the motorcycle to your KYMCO dealer as soom as possible.
NOTE:
Turn the ignition switch “ON” with no engine speed when the side stand is put up and the engine stop switch is at “  ” (RUN), the CELP will light for two second then off. It shows the lamp work normal.
(21) Parking brake indicator (XCITING 500 AFI/XCITING 500)
Lights when the parking brake is applied.
24
 Loading...