


DRIVER'S MANUAL
KWANG YANG MOTOR CO.,LTD.
LIKE 50(2T)

KWANG YANG MOTOR CO.,LTD.
NO.35 Wan Hsing Street, San Min District
Kaohsiung, Taiwan, Republic of PROC
Telephone : 886-7-3822526
FAX : 886-7-3950021

Dear KYMCO Scooter Users:
Thank you for purchasing this KYMCO scooter and welcome to the family of KYMCO scooter riders. To enjoy safer and more pleasant riding, become thoroughly familiar with this owner's manual before you ride the scooter. You safety depends not only on your own alertness and familiarity with the scooter but also the scooter mechanical condition. A pre-ride inspection before every outing and regular maintenance are essential. The quality of each KYMCO scooter is guaranteed.
Note: 1. The information and specifications stated in this manual are for reference only and subject to change without notice.
2.When starting the engine, the battery must be installed to facilitate starting and increase the engine performance.

 TABLE OF CONTENTS
1.PRECAUTIONS FOR A SAFE RIDING |
1 |
2.PARTS LOCATION |
3 |
FRAME NUMBER |
7 |
ENGINE NUMBER KEY NUMBER |
8 |
3.OPERATION INSTRUCTIONS |
9 |
IGNITION SWITCH/STEERING HANDLEBAR LOCK |
9 |
ELECTRIC STARTER BUTTON HEADLIGHT SWITCH |
10 |
HEADLIGHT DIMMER SWITCH/PASSING SIGNAL SWITCH |
11 |
HORN BUTTON/TURN SIGNAL SWITCH |
12 |
SEAT LOCK/MET-IN BOX |
13 |
HELMET HOLDER |
13 |
INSTRUMENTS AND INDACATORS |
14 |
CLOCK SETTING |
16 |
PARKING BRAKE LEVER |
17 |
CELL PHONE SOCKET |
17 |
4.PRE-RIDE INSPECTION |
18 |
ADVANCE INSPECTION ENGINE OIL LEVEL INSPECTION/REFILLING |
18 |
SUSPENSION CONROLS |
20 |

 TABLE OF CONTENTS
BACK STEP USE |
20 |
TIRE INSPECTION |
21 |
FUEL LEVEL INSPECTION/REFILLING |
23 |
STEERING HANDLEBAR INSTRUMENT LIGHTS INSPECTION |
24 |
BRAKE FLUID LEVEL INSPECTION |
25 |
BRAKE PAD WEAR BRAKE SHOE WEAR |
26 |
BRAKE LEVER FREE PLAY INSPECTION & ADJUSTMENT |
27 |
HORN/LIGHT INSPECTION |
29 |
FRONT/REAR SHOCK ABSORBER INSPECTION BRAKE PERFORMANCE |
|
INSPECTION BACK MIRROR ANGLE CHECK LICENSE PLATE CHECK |
|
REFLECTOR CHECK PREVIOUS ABNORMAL PARTS INSPECTION |
|
LUBRICATION POINT CHECK |
30 |
5.ENGINE STARTING METHODS |
31 |
6.NORMAL RIDING METHOD |
35 |
7.PRECAUTIONS FOR RIDING |
37 |
8.HOW TO STOP RIDING |
41 |
9.EASY MAINTENANCE |
43 |

 TABLE OF CONTENTS
AIR CLEANER CLEANING & REPLACEMENT |
43 |
APPEARANCE CLEANING |
45 |
BATTERY |
46 |
FUSE CHANGE |
48 |
TRANSMISSION GEAR OIL |
50 |
SPARK PLUG INSPECTION |
51 |
BRAKE FLUID LEVEL INSPECTION/REFILLING RUBBER COVER |
|
INSPECTION FOR WIRE AND CABLE |
52 |
10.IMPORTANT NOTICES |
53 |
POLLUTION-FREE PERIODIC MAINTENANCE SCHEDULE |
54 |
SPECIFICATIONS |
55 |
11.KYMCO CLEAN AIR SYSTEM (FOR EURO 2) |
56 |
1.PRECAUTIONS FOR A SAFE RIDING
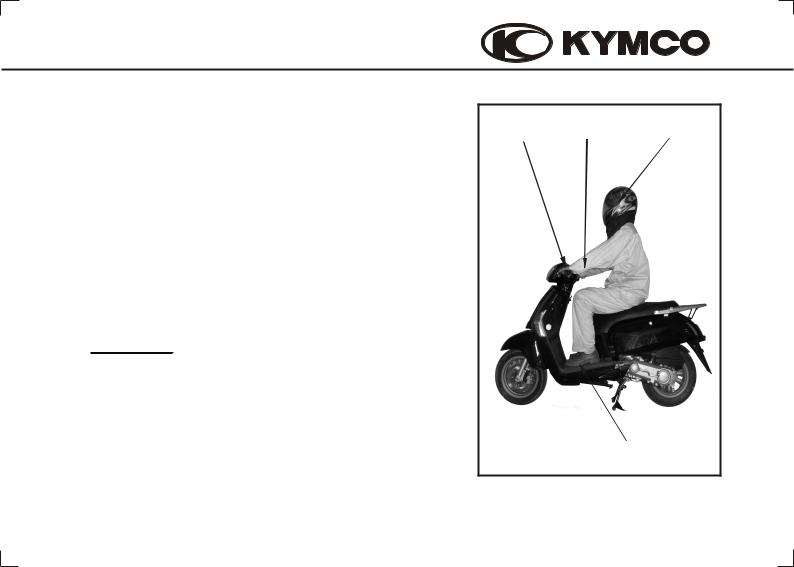
(1) CLOTHES |
(2) |
(1) |
(4) |
||
To relax and wear comfortable clothes are the main |
|
|
points for a safe riding. |
|
|
To observe traffic laws, keep a cool mind, relax and be |
|
|
careful will provide you a safe riding. |
|
|
(1)Wear helmet and fasten it tightly.
(2)Have the clothes well-arranged. Fasten shirt cuffs and keep them from hooking the brake lever.
(3)Wear low-heeled shoes for a safe riding.
(4)When riding, use both hands to grasp the handlebar. it is very dangerous to hold the handlebar with one hand.
 CAUTION:
A scooter rider should not wear loose or too long clothes to avoid danger.
During riding or 10 minutes after the scooter is stopped, do not touch the exhaust muffler to avoid
scalding.
(3)
When parking the scooter, keep it away from dry lawn or inflammables to avoid danger.
1
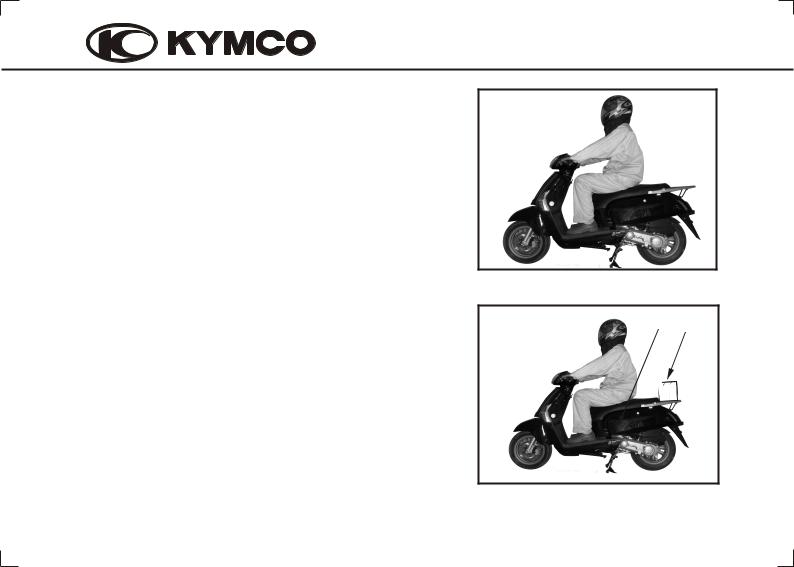
(2)RIDING METHOD
The safety of two-wheel vehicles is influenced by sitting position. The rider should sit on the central part of the seat cushion. If the rider sits on the rear part of the seat, the load of front wheel will decrease. As a result, the handlebar will swing and cause danger to the rider. When making a turn, it will be easier for the rider to steer the scooter by leaning the body inward slightly. The scooter will lose its balance if the rider fails to keep his body leaning inward.
When riding on a damaged or macadam road. Slow down the speed and hold the handlebar tightly.
(3)CARRYING GOODS
(1) (2)
Keep a good sitting posture to operate the scooter
properly.
The feel of the handlebar will be different when carrying
goods on the scooter. Overloading may cause the
handlebar to swing. Avoid riding with overload.
(1)Max. loading capacity of the met-in box is 10kg.
(2)Max. loading capacity of the rear carrier is 5kg.
2
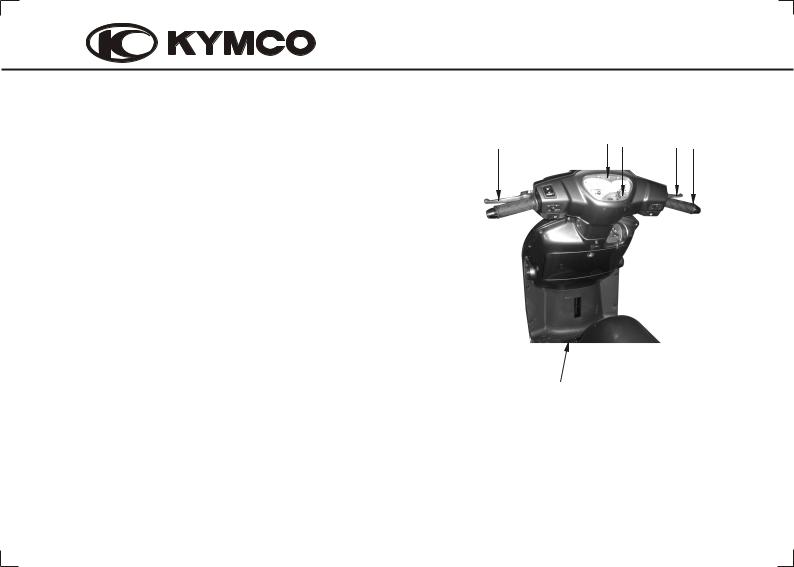
2. PARTS LOCATION |
|
(1) Headlight switch (P.10)/ |
(5) (4) (3) (2) (1) |
Electric starter button (P.10) |
|
(2)Tun right signal indicator light (P.15)
(3)Speedometer (P.14)
(4)Tun left signal indicator light (P.15)
(5)Headlight dimmer switch (P.11)/ Passing signal switch (P.11)/Turn signal switch (P.12)/Horn button(P.12)
3
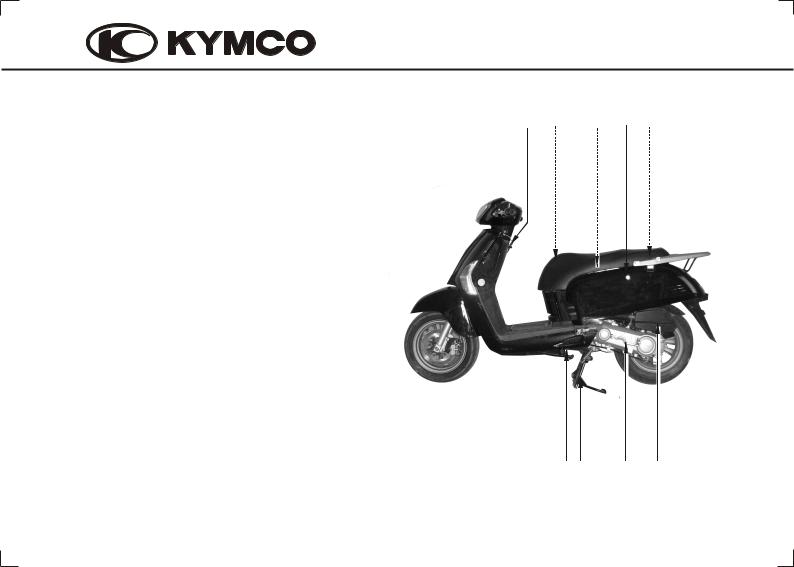
(1)Seat lock (P.13)
(2)Fuel fill cap (P.21)
(3)Met-in box (P.13)
(4)Helmet holder (P.13)
(5)Center hook
(6)Side stand
(7)Main stand
(8)Kickstarter pedal (P.32)
(9)Air cleaner housing (P.41)
(5) |
(4) |
(3) |
(1) |
(2) |
(6)(7) (8) (9)
4
(1) Ignition switch (P.9) |
(3) |
(2) (1) |
(2)Helmet holder (P.13)
(3)Engine oil tank cap (P.16)
5
(1) |
Low oil level indicator (P.15) |
(2) |
(6)(1) |
(5)(4) |
(2) |
Rear brake lever (P.25) |
(3)Battery (P.44)/Fuse (P.46)
(4)Throttle grip
(5)Front brake lever
(6)High beam indicator light (P.25)
(3)
6
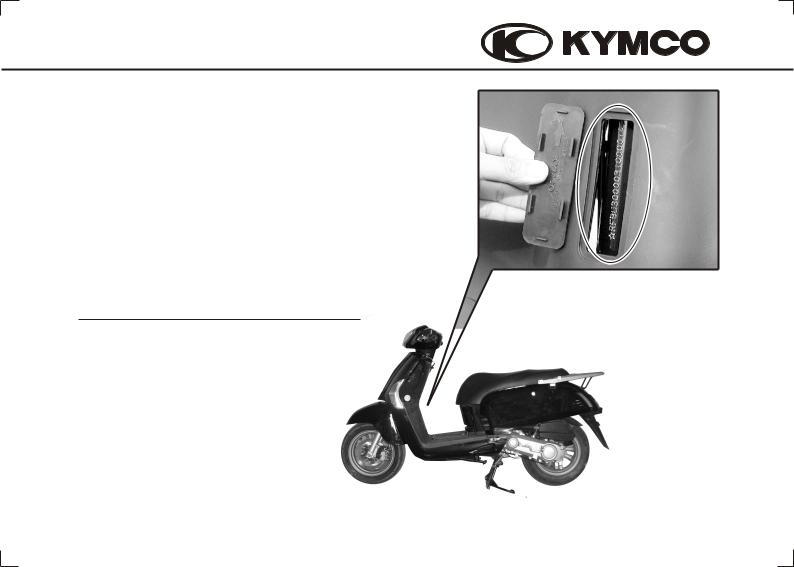
FRAME NUMBER
The read frame number, please remove the cover on inner cover with a flat head screwdriver.
Always check that the frame number stamped on your scooter is the same written in document and warranty scooter is the same written in document and warranty card.
Please write down your frame number in place below.
FRAME NUMBER:
7
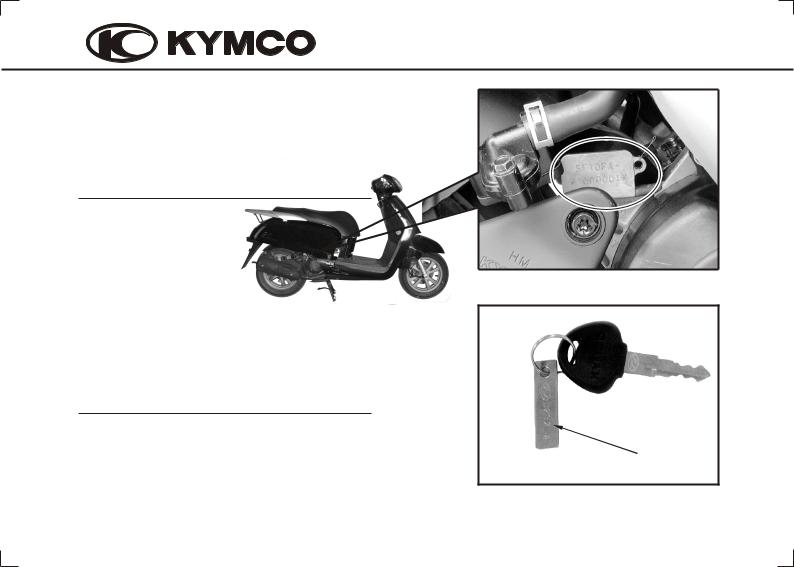
ENGINE NUMBER
The engine number is stamped on right engine case. Please write down your engine number in place below.
ENGINE NUMBER:
KEY NUMBER
The key number (1) will be needed when you order replacement part. Record the number for your reference.
KEY NUMBER:
(1)
8
3.OPERATION INSTRUCTIONS
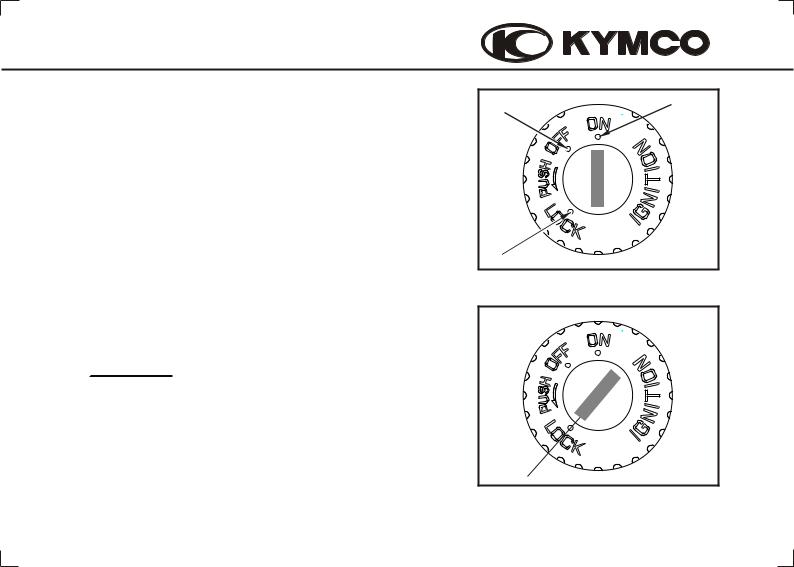
(1)IGNITION SWITCH/STEERING HANDLEBAR LOCK
(1)ON : At this position, power is connected to start the engine. The key cannot be taken out.
(2)OFF : At this position, power is cut off and the engine stops. The key can be taken out.
(3)LOCK : At this position, the steering handlebar is locked. The key can be taken out
Locking Method
Turn the steering handlebar left to the full and then push and turn the ignition switch key left to the "LOCK" position the handlebar can be locked.
Unlocking Method
Turn the ignition switch key right to the"OFF" and the "LOCK" is released automatically.
 CAUTION:
After locking, turn the handlebar gently to make sure that it is locked.
Do not turn the ignition switch to the"LOCK" position during riding, otherwise the handlebar will be out of control and cause accidents. Don't park your scooter at a place to hinder the traffic.
9
(2)

 (1)
(1)
(3)

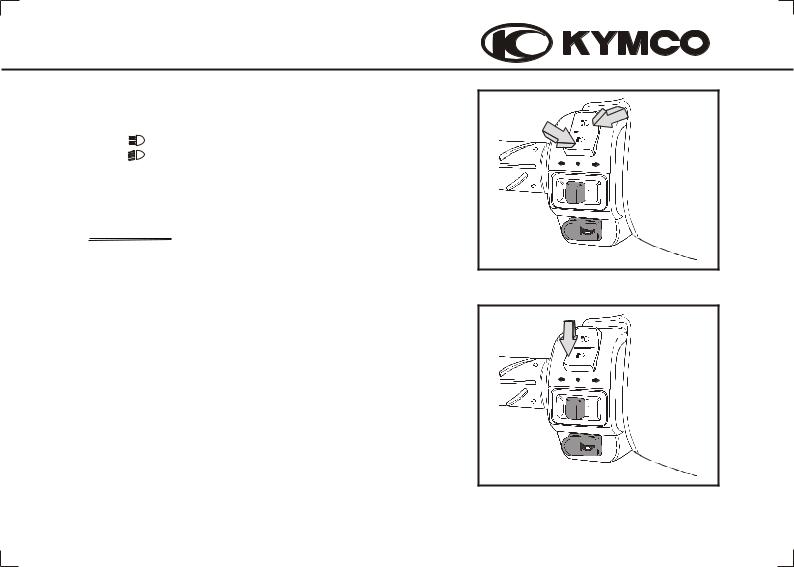
(2) ELECTRIC STARTER BUTTON " "
"
To start the engine, first turn on the ignition switch "ON "and then push the electric starter button. At this time, be sure to fully apply the front or rear brake lever in order to connect the power.
 CAUTION:
During engine running, do not push the electric starter button to avoid engine damage.
Turn the headlight switch off and turn signal switch off before using the electric starter button. Release the electric starter button immediately after the engine is started.
(3) HEADLIGHT SWITCH
At this position, the position light, headlight, instrument lights and taillight turn off together.
At this position, the position light, instrument lights and taillight light turn on.
At this position, the position light, headlight, instrument lights and taillight light all turn on.
10
(4) HEADLIGHT DIMMER SWITCH/PASSING SIGNAL SWITCH
(1) |
Switch to this position for using high beam. |
(2) |
When riding in downtown area or there is a |
|
car coming from the opposite direction, use |
|
low beam to avoid affecting the visibility of |
|
coming cars. |
 CAUTION:
This indicator light comes on when the long distance light is turned on.
PASSING When passing, if there are cars coming from the opposite direction, press and release the PASSING switch and the headlight will wink to warn the coming cars.
11
(1) |
(2) |
PASSING |
PASSING |
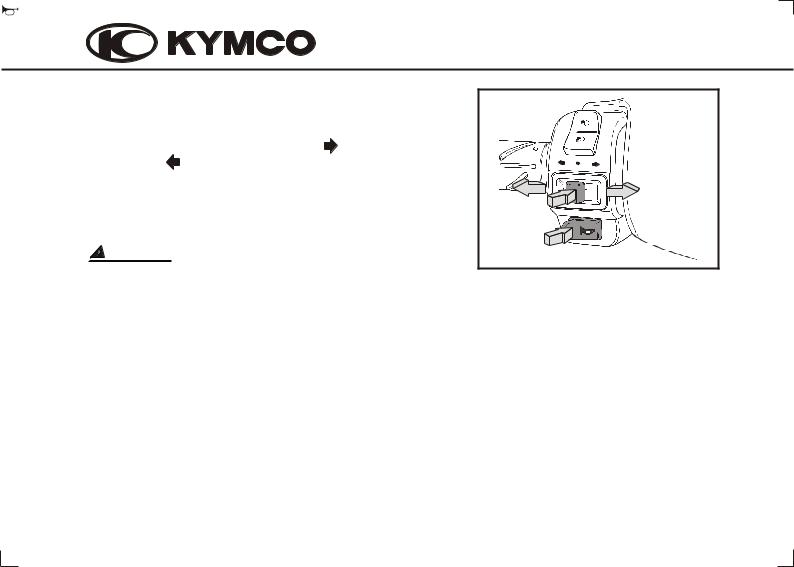
(5) HORN BUTTON " |
"/TURN SIGNAL SWITCH |
|
|
When the ignition switch key is turned the"ON" |
|
||
position, push the horn button and it will sound. |
|
||
Move the turn signal switch to (1) |
For turning to the |
PASSING |
|
right. (2) For turning to the left. (3) Push the turn |
|
||
signal switch button to release it. |
|
(2) |
|
(4) Horn Button. |
|
|
(1) |
The horn and turn signal switch do not work when the |
(3) |
||
ignition switch is the"OFF". |
|
(4) |
|
CAUTION: |
|
|
|
|
|
|
|
The turn signal light will not release automatically. |
|
||
Be sure to reset it after use; otherwise it may |
|
||
affect the traffic safety. |
|
|
|
12
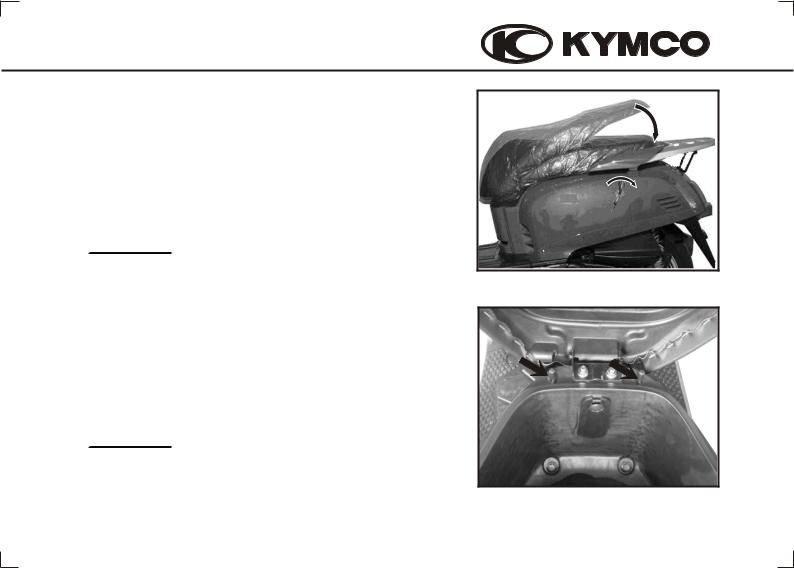
(6) SEAT LOCK/MET-IN BOX
Unlock the seat and put the helmet in the MET-IN box. Unlocking Method
Stop the engin and turn the ignition switch to the "OFF" position. Insert the ignition switch key into the seat lock and turn it clockwise..
To lock the seat, push on it until it lock automatically. Make sure the seat is secure before riding.
 CAUTION:
Never put the key inside the seat cushion to lock
the seat.
(7) HELMET HOLDER
1.Open the seat with the ignition switch key and lift up the seat.
2.Put the helmet retaining ring into the helmet holder. 3.Put down the seat and it will lock automatically.
Take out the helmet in the reserve order of the above steps.
 CAUTION:
Never exceed the maximum weight limit of the storage compartment, as vehicle handing and stability may be severely affected . Do not leave the ignition switch key under the seat. 13
 Loading...