


 Loading...
Do not remove this Owner’s Manual from the vehicle. Read this manual carefully before operating the vehicle as it contains important safety information.
Read this manual carefully.
This Owner’s Manual contains important information on safety, operation and maintenance of your KYMCO Super 8 scooter. Any one who operates your scooter should carefully read and understand the contents of this manual before riding the scooter.
For your safety, understand and follow all of the warnings contained in this Owner’s Manual and the labels applied to your scooter. This Owner’s Manual should be considered a permanent part of the vehicle, keep it with your scooter at all times.
ON-ROAD USE ONLY This scooter has been designed to be used on the road.
Particularly important information is called out in this manual by the following icons and notations:
 WARNING
 CAUTION
NOTE
The SAFETY ALERT symbol with the exclamation point in the triangle means ATTENTION! BE ALERT! YOUR SAFETY CAN BE AFFECTED.
Failure to follow instructions associated with a WARNING symbol could result in severe injury or death to the rider, a passenger, a bystander, or a person inspecting or repairing the scooter.
A CAUTION symbol indicates that special precautions must be taken to avoid damaging the scooter.
The NOTE symbol indicates key information about a procedure or to clarify an operation.
California Proposition 65
 WARNING
This product contains or emits chemicals known to the State of California to cause cancer and birth defects or other reproductive harm.

TABLE OF CONTENTS |
|
Manual Icon Legend .................................................... |
(inside of front-cover) |
CA Prop 65 Warning .................................................... |
(inside of front-cover) |
Table of Contents .......................................................................................... |
1 |
SECTION 1 - SAFETY ................................................................. |
2 - 6 |
Foreword ....................................................................................................... |
2 |
Scooter Safety ......................................................................................... |
3 - 4 |
Load Limits & Guidelines ............................................................................. |
5 |
Accessories & Modifications ........................................................................ |
6 |
SECTION 2 - CONTROLS & FEATURES ............................... |
7 - 13 |
Locations of Parts & Controls ...................................................................... |
7 |
Keys ............................................................................................................... |
8 |
Ignition Switch ............................................................................................... |
8 |
Right-hand Handlebar Switch ...................................................................... |
9 |
Engine-stop Switch ....................................................................................... |
9 |
Electric Start Button ...................................................................................... |
9 |
Left-hand Handlebar Switch ....................................................................... |
10 |
Headlight Dimmer Switch ........................................................................... |
10 |
Turn Signal Switch ...................................................................................... |
10 |
Under-seat Storage Compartment ............................................................ |
11 |
Helmet Posts ............................................................................................... |
11 |
Main Stand .................................................................................................. |
12 |
Instruments .......................................................................................... |
12 - 13 |
Passenger Pegs ......................................................................................... |
13 |
SECTION 3 - OPERATION ..................................................... |
14 - 30 |
Break-in Recommendations ....................................................................... |
14 |
Tire Break-in ................................................................................................ |
15 |
Troubleshooting .......................................................................................... |
15 |
Pre-ride Inspection .............................................................................. |
16 - 23 |
Engine Oil Inspection ................................................................................. |
17 |
Brake Lever Free-play Inspection .............................................................. |
17 |
Tire Inspection ..................................................................................... |
18 - 19 |
Fuel Level / Filler Cap ................................................................................ |
19 |
Fuel Recommendation ............................................................................... |
19 |
Steering & Handlebar Inspection ............................................................... |
20 |
|
Instrument Inspection ................................................................................. |
20 |
|
Brake Adjustment & Pad Inspection .......................................................... |
21 |
|
Horn & Lights Inspection ............................................................................ |
22 |
|
Chassis Inspection ..................................................................................... |
23 |
|
Starting the Engine (electric start) ...................................................... |
24 - 25 |
|
Starting the Engine (kick start) ................................................................... |
25 |
|
Riding Your Scooter ............................................................................. |
26 - 29 |
|
Parking Your Scooter .................................................................................. |
30 |
|
SECTION 4 - MAINTENANCE ............................................... |
31 - 48 |
|
Importance of Maintenance ....................................................................... |
31 |
|
Maintenance Schedule ........................................................................ |
32 - 33 |
|
Tires ............................................................................................................. |
34 |
|
Tire Pressure ............................................................................................... |
34 |
|
Air Filter Maintenance ................................................................................ |
35 |
|
Fuel Hoses .................................................................................................. |
36 |
|
Battery .................................................................................................. |
36 - 37 |
|
Fuses ........................................................................................................... |
37 |
|
Engine Oil .................................................................................................... |
38 |
|
Engine Oil Level Inspection & Change ............................................... |
38 - 39 |
|
Transmission Fluid Inspection & Change .................................................. |
40 |
|
Spark Plug ................................................................................................... |
41 |
|
Brake Fluid Level Inspection ...................................................................... |
41 |
|
Cleaning Your Scooter ......................................................................... |
42 - 43 |
|
Storage ........................................................................................................ |
44 |
|
Maintenance Record .................................................................................. |
45 |
|
Specifications (50 model) ........................................................................... |
46 |
|
Specifications (150 model) ......................................................................... |
47 |
|
Exhaust Emission Control System ..................................................... |
48 - 49 |
|
Emission Information & EPA Warranty ...................................................... |
50 |
|
KYMCO Limited Scooter Warranty ............................................................ |
51 |
|
Index ............................................................................................................ |
52 |
|
Identification Numbers Record .................................. |
(inside of back-cover) |
1 |
|
|

SECTION 1 -
FOREWORD & SAFETY INTRODUCTION
Thank you for purchasing this KYMCO Super 8 scooter, and welcome to the KYMCO riding family.
Please read this owner's manual carefully before riding so that you will be thoroughly familiar with the proper operation of your scooter’s controls, its features, its capabilities, and its limitations.
To ensure a long, trouble-free life for your scooter, provide it with the proper care and maintenance as described in this manual.
For replacement parts and accessories, you should always use genuine KYMCO products, as they have been specially designed for your vehicle and manufactured to meet KYMCO's demanding standards.
Keep this owner's manual aboard your scooter at all times, so that you can refer to it whenever you need information. This manual should be considered a permanent part of the scooter and should remain with the scooter when it is sold.
All information, illustrations, photographs and specifications contained in this manual are based on the latest product information available at the time of publication. Due to improvements or other changes, there may be information in this manual that differs slightly from your vehicle. KYMCO reserves the right to make product and publication changes at any time, without notice, and without incurring any obligation.
2

SCOOTER SAFETY
IMPORTANT SAFETY INFORMATION
Your scooter can provide you many years of service and pleasure if you take responsibility for your own safety and understand the challenges that you can meet on the road. There is much that you can do to protect yourself when you ride. You will find many helpful recommendations throughout this manual. Here are some very important safety tips:
Wear a helmet
Scooter safety equipment starts with a quality helmet. One of the most serious injuries you can suffer in a crash is a head injury. Always wear a properly approved helmet. You should also wear suitable eye protection.
Make yourself easy to see
To make yourself more visible, wear bright reflective clothing, position yourself so other drivers can see you, signal before turning or changing lanes, and use your horn when it will help others notice you.
Know your limits
Ride within the boundaries of your own skill at all times. Knowing these limits and staying within them will help you to avoid accidents. Always ride with both hands on the handlebars.
Keep your scooter in safe condition
For safe riding, it is important to inspect your scooter before every ride and perform all recommended maintenance. Never exceed load limits, and only use accessories that have been approved by KYMCO for this scooter.
Inspect your scooter before riding
Remember to perform an entire safety inspection to ensure you, and your passenger's safety, before each ride.
Be extra cautious on bad weather days
Riding on bad weather days, especially wet ones, requires extra caution. Braking distances can double on a rainy day. Stay off of the painted surfaces, manhole covers and greasy appearing areas on the pavement, as they can be especially slippery. Use extreme caution at railway crossings and on metal gratings and bridges. Whenever you are in doubt about the road conditions, slow down.
Modification
Modification of your scooter, or removal of original equipment may render the vehicle unsafe or illegal. Obey all applicable equipment regulations in your area.
3
SCOOTER SAFETY
PROTECTIVE APPAREL
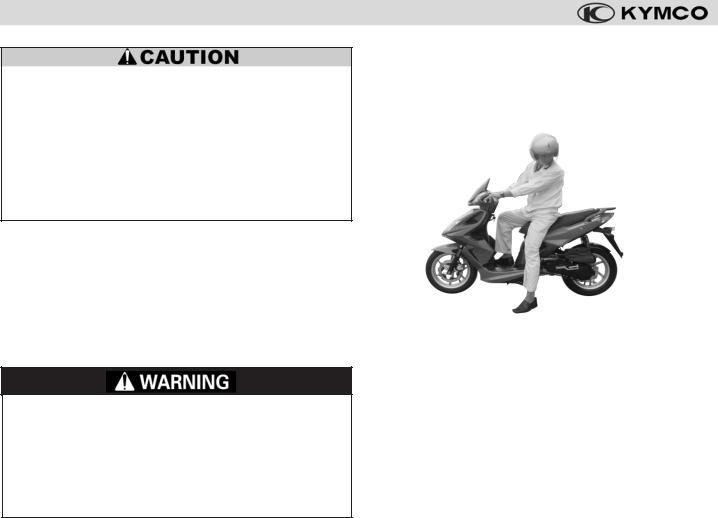
For your safety, always wear an approved motorcycle or scooter helmet, eye protection, boots, gloves, long pants, and a longsleeved shirt or jacket whenever you ride your scooter.
Helmets and protection
Your helmet is your most important piece of riding gear because it offers the best protection against head injuries. Your helmet should fit your head comfortably and securely. Always wear a face shield or goggles to protect your eyes and to aid your vision.
Additional riding gear
In addition to a helmet and eye protection, you should also use:
•Sturdy boots with nonslip soles to help protect your feet and ankles
•Leather gloves to keep your hands warm and help prevent blisters, cuts, burns and bruises
•A motorcycle or scooter riding suit or jacket that has been designed for comfort as well as protection. Bright colored and reflective clothing can help make you more noticeable in traffic. Be sure to avoid loose clothing that can get caught on any part of your scooter.
Not wearing a helmet increases your chance of serious injury or death in a crash.
2 |
3 |
|
1
4
1 Wear gloves
2 Wear bright or reflective clothing. Clothes should fit properly (not too tight or loose)
3 Always wear a helmet. You should also wear eye protection
4 Footwear should be the proper size, have low heels, and offer ankle protection
Be sure you and your passenger always wear an approved motorcycle helmet that fits properly. You should also wear eye protection and other protective apparel when you ride.
4
LOAD LIMITS & LOADING GUIDELINES
These general guidelines may help you decide how to add accessories to your scooter and how to load it properly.
Load limits
These specifications are the load limits for your Super 8 scooter.
Overloading the scooter will affect its stability and handling, be sure to stay within the limits listed below:
Maximum weight capacity
(includes the weight of the rider, passenger, cargo and
accessories): ............................................... |
330 lbs (150 kg) |
Maximum cargo weight: ................................... |
33 lb (15 kg) |
Rear carrier (rack) 5 weight Iimit: .................. |
22 lbs (10 kg) |
Under-seat compartment 6 weight Iimit: ....... |
11 lbs (5 kg) |
Overloading or improper loading will affect vehicle handling, stability and braking, and can lead to an accident.
Never exceed the stated load capacity of your scooter.
Cargo should be properly distributed and securely attached. Reduce speed when carrying cargo and allow for more room for braking.
5
6
Loading guidelines
Improperly loading your scooter will affect its stability and handling. You should ride at reduced speeds when you are carrying a passenger or cargo. Follow these guidelines whenever you carry a passenger or cargo:
• Check that both tires are properly inflated
• To prevent loose items from creating a hazard, make sure all cargo is securely tied down before you ride
• Place cargo weight as close to the center of the scooter as possible
• Balance cargo weight evenly on both sides of the
scooter
5
ACCESSORIES & MODIFICATION
There is a large variety of accessories available to KYMCO scooter owners. KYMCO cannot have direct control over the quality or suitability of any accessories you may wish to purchase. The addition of unsuitable accessories to your scooter can lead to unsafe operating conditions. It is not possible for KYMCO to test each available accessory on the market or combinations of all such available accessories; however, your KYMCO dealer can assist you in the selection and installation of quality accessories.
Use extreme caution when selecting and installing the accessories for your scooter.
No modifications
KYMCO strongly advises you against removing any original equipment from, or modifying your scooter in any way that would change its design or operation.
Improper accessories or modifications can make your scooter unsafe and can lead to an accident.
Never modify your scooter through the improper installation or use of accessories. All parts and accessories added to this vehicle should be genuine KYMCO or equivalent components designed for use on this scooter and should be installed and used according to the accessory manufacturer’s instructions. If you have any questions, consult an authorized KYMCO dealer.
6
SECTION 2 -
CONTROLS & FEATURES
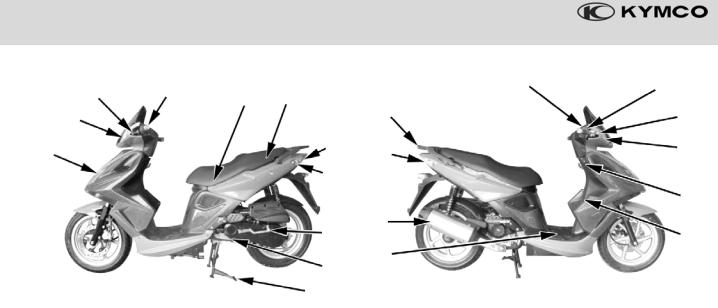
Location of parts & controls
3 |
4 |
5 |
6 |
AO |
2 |
|
|
|
|
|
|
|
|
|
1 |
|
|
7 |
AN |
|
|
|
||
|
|
|
8 |
|
|
|
|
9 |
AM |
|
|
|
AT |
AL |
|
|
|
|
AK
1Headlights
2Front Turn Signal
3Rear Brake Lever
4Turn Signal Switch, Headlight dimmer switch, Horn Button
5Under-seat Storage
6Fuel Filler (gas cap)
7Tail/Brake Light
8 Rear Turn Signal
9 Kick Start Lever
AT ESN (Engine Serial Number)
AK Main Stand
AL Battery
AM Muffler
AN Rear Turn Signal
AP AQ
AR
AS
BT
BK
AO Rear Carrier (rack)
AP Instruments
AQ Throttle, Engine Stop Switch &
Starter Button
AR Front Brake Lever
AS Front Turn Signal
BT Ignition Switch
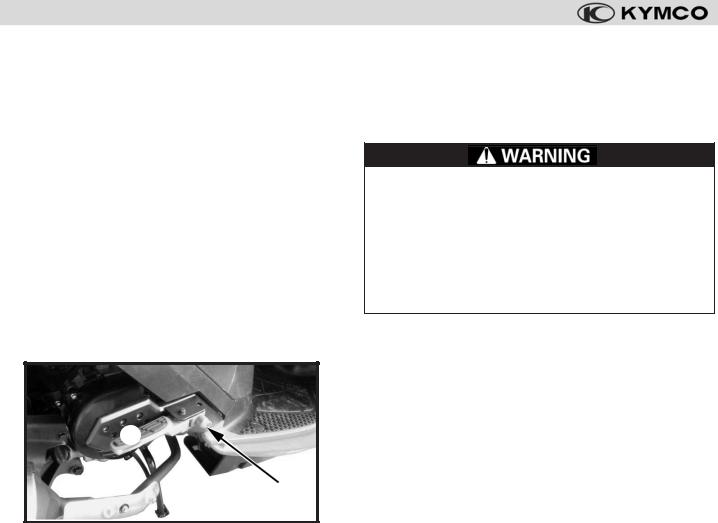
BK VIN (Vehicle Identification Number)
NOTE: Write your scooter’s VIN and ESN in the boxes provided on the inside, rear cover of this Owner's Manual. |
|
NOTE: Your scooter may differ slightly in appearance from the images in this manual. |
7 |
CONTROLS & FEATURES
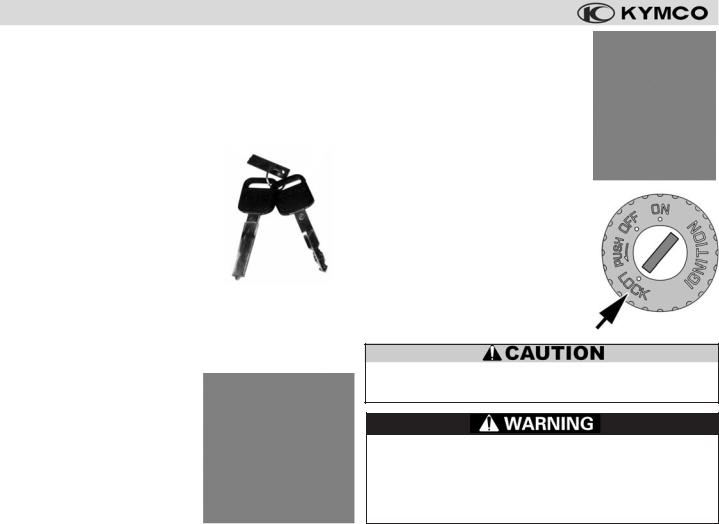
Keys
Your Super 8 scooter is supplied with two identical ignition switch keys 1. The ignition key operates the ignition switch, and the steering lock, and is used to open the seat to gain access to the under-seat storage compartment.
NOTE: The keys have a unique 1 code stamped on the tab supplied
with the keys. This code is not stamped on the scooter or recorded in the vehicle's basic documentation (for security reasons). Since this code is required to obtain replacement keys, record this important code in the box provided
on the inside, rear cover of this Owner's Manual.
Ignition switch & Steering lock
Use the ignition key to operate the ignition switch and the steering lock:
OFF Position: All electrical circuits are off. The engine will not start or run. The key can be removed from the ignition switch.
8
ON Position: The ignition circuit is "ON" and engine can now be started. The key cannot be removed from the ignition switch in this position.
LOCK Position: To lock the steering, turn the handlebar all the way to the left, push in and turn the key to the "LOCK" position and remove the key. All electrical circuits are off and the key can be removed.
After locking the ignition switch, turn the handlebar gently to confirm that the steering is locked.
Do not turn the ignition switch to the lock position when riding, as this could cause the steering to lock and re-
sult in you losing control of your scooter. Do not park your scooter in a position that will interfere with vehicle or pedestrian traffic.
CONTROLS & FEATURES
Right handlebar switch
1
Engine stop switch 1 " |
& |
": |
The engine stop switch turns off the ignition, stopping the engine. The scooter’s lights and horn will still function.
Electric starter button 2 " ":
Press the electric starter button to activate the starter motor.
NOTE: The starter motor will not engage unless the ignition switch is “ON” and one of the brake levers are squeezed at the same time the starter button is pressed.
To prevent damage to the starter motor, do not operate the starter motor for more than five seconds at a time. If the scooter fails to start immediately, check the fuel level and the battery condition, and allow the starter motor to cool before attempting to start the engine again.
2
9
CONTROLS & FEATURES
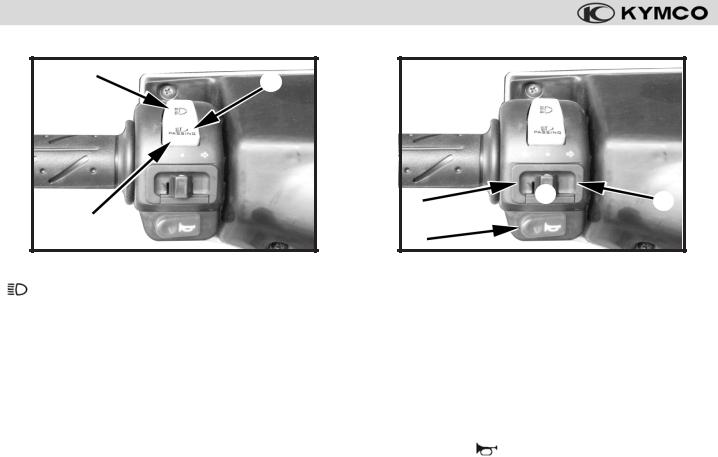
Left handlebar switch
3 4
6 |
8 |
7 |
|
||
5 |
|
|
9 |
|
|
Dimmer switch -UP 3:
" "switch position turns the headlight high beam on and the high beam indicator light on the dash is activated as well.
Dimmer switch -DOWN 4:
" " switch position turns the headlight low beam on.
Passing light button - PRESS DOWN 5:
Press down on the rocker switch to rapidly flick the headlight high beam on and off to signal other vehicles that you wish to pass.
Turn signal switch:
Use the turn signal indicator to signal to other traffic your intention to turn or change lanes. The turn signal light on the dash will flash to alert the rider that the switch is engaged.
6" " for turning to the "left".
7" " for turning to the "right".
To cancel the turn signal, press in on the signal switch 8.
Horn button 9 " ":
Press the horn button to sound the horn.
NOTE: The horn will only sound when the ignition is “ON”.
10
CONTROLS & FEATURES
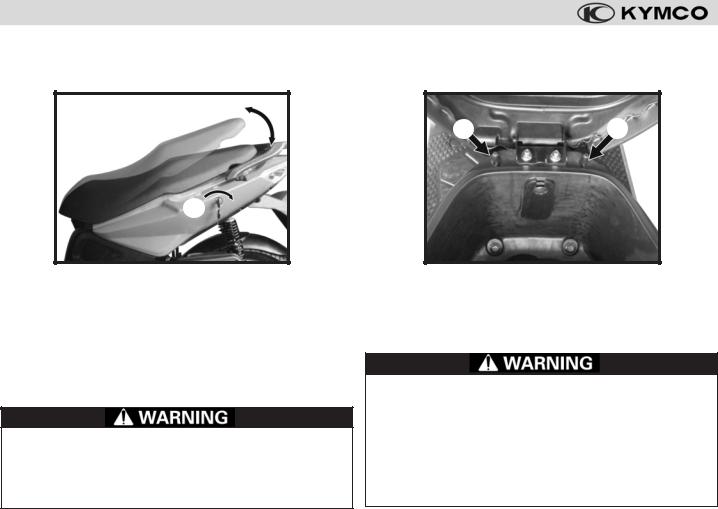
Under-seat storage compartment
Your Super 8 scooter is equipped with an under-seat storage compartment that permits you to secure your helmet or other items.
Helmet posts
Your Super 8 scooter has two helmet posts AK so you can secure your helmet(s) outside of the under-seat storage compartment.
AK AK
AT
To open the seat, insert the ignition switch key into the seat lock AT and turn it clockwise. When the latch releases, lift up the seat.
Under-seat compartment weight Iimit: .......... |
11 lbs (5 kg) |
To close the seat, lower the seat and press down until it is secured by the latch. Gently lift up on the seat to make sure it is locked before riding.
Never exceed the maximum weight limit of the storage compartment, as vehicle handling and stability may be severely affected. Do not leave the ignition switch key under the seat.
With the seat up, put the helmet’s retaining ring onto the helmet post. Lower and press down on the seat to lock it and secure the helmet in place. To remove the helmet, open the seat.
Do not ride your scooter with a helmet hanging from a helmet post. The helmet can interfere with your ability to control your scooter, causing an accident.
The under-seat storage compartment may become warm from engine heat. Do not store food, or flammable materials, which are susceptible to heat damage in this compartment.
11

CONTROLS & FEATURES
Main stand (center stand)
Your Super 8 scooter is equipped with a main (center) stand.
To park your scooter on the main stand, stand on the left side of the scooter and grasp the handlebar with your left hand while grasping the side of the rear rack with your right hand. Step down on the foot pad of the main stand with your foot while pulling up and back on the rear rack. This lifting motion will allow the scooter to rock backwards and up onto the main stand.
Always park your the scooter on firm, level ground to help prevent it from falling over. If you must park on an incline, aim the front of your scooter uphill.
12
Instruments |
|
1 2 |
3 |
4 |
9 |
|
5 |
|
|
|
8 |
7 |
6 |
|
|
1 Speedometer: Indicates the road speed in MPH (miles per hour) and K/PH (kilometers per hour).
2Odometer: Indicates the total riding mileage of the scooter.
3 High Beam Indicator Light: This light is illuminated when the headlight high beam is on.
4 Fuel Gauge: This gauge indicates the amount of gasoline in the fuel tank. As the needle approaches “E” that indicates the tank is near empty and should be refilled with unleaded gasoline.
CONTROLS & FEATURES
5Right Turn Signal Indicator Light: Flashes when the right turn signal is being used.
6 Clock Adjust Button: Pressing this button will advance the clock for adjusting the time display.
7 Clock: Digital clock display.
8 Clock Setting Button: Pressing this button will activate the “adjust mode” of the clock. Press the adjust button 6 to change the display. Press the setting button again after adjusting the time to “lock” the clock display.
9 Left Turn Signal Indicator Light: Flashes when the left turn signal is being used.
Passenger foot pegs
Your Super 8 scooter is equipped with additional pegs for use when you are carrying a passenger.
1.To move the passenger pegs ATout from the scooter’s body, press the release button AK.
2.When you are not carrying a passenger, press the pegs back into place.
Riding with a passenger will change the handling characteristics of your scooter. Allow for extra braking distance and use extra care when riding in traffic.
Be sure you and your passenger always wear an approved motorcycle helmet that fits properly. You should also wear eye protection and other protective apparel when you ride.
AT
AK
13

SECTION 3 -
OPERATION
Break-in recommendations
The first 600 miles (1,000 km) of riding are the most important in the life of your scooter. Proper break-in operation during this time will help ensure maximum life and performance from your new scooter. Proper break-in operation allows the machined surfaces to polish each other and mate smoothly.
Your scooter’s reliability and performance depend on special care and restraint exercised during the break-in period. It is especially important that you avoid operating the engine in a manner which could expose the engine parts to excessive heat.
The following guidelines should be followed during the breakin period:
Maximum throttle operation: |
|
Initial 300 miles (600 km): ............... |
Less than 1/2 throttle |
Up to 600 miles (1,000 km): ............ |
Less than 3/4 throttle |
Vary the engine speed:
The engine speed should be varied and not held at a constant rate for long periods of time. This allows the parts to be "loaded" with pressure, and then unloaded, allowing the parts to cool. This aids in the mating process of the engine and transmission components. It is essential that some stress be placed
on these components during break-in to ensure this mating process. Do not, however, apply excessive load on the scooter's drive line.
Avoid constant low speed:
Operating the engine at constant low speed (light load) can cause parts to glaze and not seat in properly. Allow the engine to accelerate freely through the gears, without exceeding the recommended throttle openings.
Avoid using full throttle for the first 300 miles (500 km). The initial service:
Observe your first and most critical service. The 200 mile (300 km) initial service is the most important service your scooter will receive. During the break-in period all of the engine components will have worn in and all of the other parts will have seated in, so adjustments will be required. All fasteners will be tightened, and the contaminated engine oil will be replaced.
NOTE: Completion of the 200 mile (300 km) initial service will ensure optimum service life and performance from your scooter. Do not delay in having this service performed once your scooter reaches this mileage.
14
OPERATION
The 200 mile (300 km) service should be performed as outlined in the maintenance schedule section of this owner's manual. Pay particular attention to the cautions and warnings in the maintenance schedule section.
Unless you have formal training as a service technician and have access to KYMCO technical reference materials, it is strongly suggested that you have the initial service performed by a KYMCO dealer.
Breaking in the new tires
New tires need proper break-in to assure maximum performance, just as your scooter's engine does. Wear in the tread surface by gradually increasing your cornering lean angles over the first 100 miles (160 km) before attempting maximum lean angles. Avoid hard acceleration, hard cornering, and hard braking for the first 100 miles (160 km).
Failure to break in your tires could cause the tires to slip and could result in you losing control of the scooter.
Use extra care when riding on new tires. Perform proper break-in of the tires as described in this Owner’s Manual and avoid hard acceleration, hard cornering, and hard braking for the first 100 miles (160 km).
Troubleshooting
It can be fustrating if your scooter fails to start or stops running while your are riding. In the rare instance this happens, take a few moments to check some items and you may be back to riding your scooter soon. ?
√Do you have enough gasoline in the fuel tank?
√Did you follow the correct procedure for starting the engine?
√Is the battery voltage low (you may need to kick start your scooter)?
√Is the main fuse in good condition?
NOTE: Use this Owner’s Manual to check components and adjustments that are within your technical ability. If you cannot resolve the problem, do not hesitate to contact your
KYMCO dealer for assistance.
15
Loading...