

Page 1
O
CafféEspresso
P
N
J
M
F088
XS1000
d
B
B
L
A
A
C
C
i
a
b
c
I
e
CafféEspresso
E
f
F
D
G
g
h
H
J
1 cup
K
Page 2
CafféEspresso
CafféEspresso
CafféEspresso
CafféEspresso
CafféEspresso
CafféEspresso
CafféEspresso
CafféEspresso
1 2 3
9
4
7
5 6
8
10
Page 3
!!
1
2
11 12
18
CafféEspresso
CafféEspresso
CafféEspresso
CafféEspresso
=
x 1
x 2
=
13
16
14
17
15
19 20 21 22
Page 4
1x4
23
25
CafféEspresso
CafféEspresso
CafféEspresso
CafféEspresso
24
26
29
27
x 1 =1
30
28
31
Page 5
Espresso XP2000
Deutsch 8
English 19
Français 28
Nederlands 37
Español 46
Português 55
Italiano 64
Dansk 73
Norsk 82
Svenska 90
Suomi 98
∂ Ελληνικά 107
Deutsch
T
Türkçe
Slovensko
7
Page 6

Deutsch
BESCHREIBUNG
EXPRESSO:
A : DECKEL DER EXPRESSO-MASCHINE MIT
FILTERFACH
B : ABNEHMBARER WASSERBEHÄLTER DER
EXPRESSO-MASCHINE
C : TASSENVORWÄRMPLATTE
D : BRÜHKOPF
E : DAMPFDÜSE
F : CAPPUCCINO-AUFSCHÄUMHILFE
G : ABSTELLGITTER
H : HERAUSNEHMBARE AUFFANGSCHALE
FÜR TROPFWASSER
I : FILTERTRÄGER
J : EXPRESSO-FILTER FÜR KAFFEEPULVER 1 &
2 TASSEN
K : EXPRESSO-FILTER FÜR ESE-
EINZELPORTIONEN (EASY SERVING
EXPRESSO)
L : „CLARIS - AQUA FILTER SYSTEM F088”
EXPRESSO-FILTER (NICHT MITGELIEFERTES
ZUBEHÖRTEIL)
M : MESSLÖFFEL FÜR GEMAHLENEN KAFFEE
N : AN/AUS SCHALTER MIT BLAUER
BETRIEBSKONTROLLLEUCHTE
O : WAHLTASTE FÜR EXPRESSO-FUNKTIONEN
P : ORANGEFARBENE
TEMPERATURKONTROLLLEUCHTE
KAFFEE:
a : DECKEL DER KAFFEEMASCHINE –
ZUGANG ZU WASSERBEHÄLTER UND
FILTERTRÄGER
b : WASSERBEHÄLTER DER
KAFFEEMASCHINE
c : GEHÄUSE DES FILTERTRÄGERS
d : FILTERTRÄGER MIT FESTSTELLGRIFF
e : WASSERSTANDSANZEIGE DES
WASSERBEHÄLTERS DER
KAFFEEMASCHINE
f : SCHARNIERDECKEL DER KANNE DER
KAFFEEMASCHINE
g : KANNE FÜR FILTERKAFFEE
h : WARMHALTEPLATTE
8
i : „DUO FILTER XS 1000” KAFFEEFILTER
(NICHT MITGELIEFERTES ZUBEHÖRTEIL)
j : AN/AUS SCHALTER MIT BLAUER
BETRIEBSKONTROLLLEUCHTE FÜR DIE
KAFFEEMASCHINE
SICHERHEITSHINWEISE
• LESEN SIE DIESE BEDIENUNGSANLEITUNG
VOR DER INBETRIEBNAHME IHRER
ESPRESSOMASCHINE AUFMERKSAM
DURCH. SCHLIEßEN SIE DAS GERÄT NUR AN
EINE GEERDETE SCHUTZLEITER-STECKDOSE
AN. ÜBERPRÜFEN SIE, DASS DIE AUF DEM
TYPENSCHILD DIESES GERÄTES
ANGEGEBENE SPANNUNG MIT DER IHRES
STROMNETZES ÜBEREINSTIMMT.
• STELLEN SIE DAS GERÄT NICHT AUF HEIßE
FLÄCHEN (Z.B. HERDPLATTE) ODER IN DIE
NÄHE VON OFFENEN FLAMMEN.
• ENTFERNEN SIE DEN MIT KAFFEEMEHL
GEFÜLLTEN FILTERTRÄGER NICHT WÄHREND
DES DURCHLAUFES, DA DAS GERÄT UNTER
DRUCK STEHT.
• BENUTZEN SIE DAS GERÄT NICHT, WENN
AUFFANGSCHALE UND ABSTELLGITTER
NICHT IN POSITION SIND.
• BEI PROBLEMEN WÄHREND DES
BRÜHVORGANGS UND VOR DER
REINIGUNG DES GERÄTES MUSS DER
NETZSTECKER GEZOGEN WERDEN.
• ZIEHEN SIE DEN STECKER NICHT DURCH
ZIEHEN AM NETZKABEL UND LEGEN SIE
DIESES NICHT ÜBER SCHARFE KANTEN
ODER ÜBER ECKEN VON MÖBELSTÜCKEN.
• VERMEIDEN SIE EINEN KONTAKT DES
NETZKABELS UND IHRER HÄNDE MIT DEN
HEIßEN TEILEN DES GERÄTES
(TASSENVORWÄRMPLATTE, FILTERTRÄGER,
DAMPFDÜSE, CAPPUCCINOAUFSCHÄUMHILFE, WARMHALTEPLATTE).
• TAUCHEN SIE DAS GERÄT NIEMALS INS
WASSER.
• HALTEN SIE KINDER VOM GERÄT FERN UND
LASSEN SIE DAS NETZKABEL NICHT
HERUNTERHÄNGEN.
• HALTEN SIE SICH AN DIE
ENTKALKUNGSHINWEISE IN DER
BEDIENUNGSANLEITUNG.
• BENUTZEN SIE DAS GERÄT KEINESFALLS,
WENN DIESES ODER DAS NETZKABEL
BESCHÄDIGT SIND.
Page 7

• WENN DAS NETZKABEL ODER ANDERE
SPEZIFISCHE ELEMENTE BESCHÄDIGT SIND,
DÜRFEN SIE NUR VON EINEM
ZUGELASSENEN KRUPSKUNDENDIENSTZENTRUM AUSGETAUSCHT
WERDEN. DAS GERÄT DARF NICHT VON
IHNEN GEÖFFNET WERDEN.
• STELLEN SIE, BEVOR SIE MIT DER
KAFFEEZUBEREITUNG BEGINNEN, SICHER,
DASS DER EXPRESSO-FILTERTRÄGER GUT
FESTGEZOGEN IST UND STELLEN SIE DIE
WAHLTASTE AUF O ZURÜCK, BEVOR SIE
DEN FILTERTRÄGER ENTNEHMEN.
• DAS GERÄT DARF NICHT IN REICHWEITE
VON NICHT ÜBERWACHTEN KINDERN
AUFGESTELLT WERDEN - KLEINE KINDER
UND STARK BEHINDERTE PERSONEN
DÜRFEN DAS GERÄT NUR UNTER DER
AUFSICHT EINES ERWACHSENEN
BENUTZEN.
• WENN SIE DEN DECKEL DER
KAFFEEMASCHINE WÄHREND DES
AUFBRÜHENS ABNEHMEN, BESTEHT EIN
VERBRENNUNGSRISIKO.
• GIESSEN SIE DIREKT NACH DEM
AUFBRÜHEN KEIN KALTES WASSER IN DEN
WASSERBEHÄLTER DER KAFFEEMASCHINE.
LASSEN SIE DAS VOR DEM ERNEUTEN
AUFFÜLLEN DES WASSERBEHÄLTERS
ABKÜHLEN.
• WENN SIE NICHT DIE VON KRUPS
EMPFOHLENEN FILTERPATRONEN BENUTZEN:
GIESSEN SIE NUR WASSER UND DIE IN
DIESER ANLEITUNG AUFGEFÜHRTEN
SPEZIELLEN ENTKALKERLÖSUNGEN IN DIE
WASSERBEHÄLTER DER EXPRESSO- UND
DER KAFFEEMASCHINE.
• DRÜCKEN SIE ZUM AUSSCHALTEN DES
GERÄTS DIE AUS-TASTE UND ZIEHEN SIE
DEN NETZSTECKER.
• BENUTZEN SIE DIESES GERÄT NUR
BESTIMMUNGSGEMÄß.
• LASSEN SIE BEI DER BENUTZUNG DER
DAMPFFUNKTION ÄUßERSTE VORSICHT
WALTEN.
• IHR GERÄT IST AUSSCHLIEßLICH FÜR DEN
HAUSGEBRAUCH UND NUR FÜR DEN
EINSATZ IN GESCHLOSSENEN RÄUMEN
VORGESEHEN.
• ZIEHEN SIE DEN NETZSTECKER NACH JEDER
BENUTZUNG UND VOR JEDER REINIGUNG
DES GERÄTES UND LASSEN SIE DAS GERÄT
ABKÜHLEN.
• DAS GERÄT, DIE ZULEITUNG ODER DEN
STECKER NIEMALS IN WASSER ODER EINE
ANDERE FLÜSSIGKEIT TAUCHEN.
• VERWENDEN SIE ZU IHRER EIGENEN
SICHERHEIT NUR ORIGINAL ZUBEHÖR UND
ERSATZTEILE.
• FÜLLEN SIE KEIN HEIßES WASSER ODER
ANDERE FLÜSSIGKEITEN IN DEN
WASSERBEHÄLTER.
• BENUTZEN SIE DEN GLASKRUG NICHT IN
DER MIKROWELLE UND NICHT AUF
OFFENER FLAMME (GASOFEN) ODER
HERDPLATTE.
• EINE UNSACHGEMÄßE BEDIENUNG
ENTBINDET KRUPS/ROWENTA /TEFAL VON
JEGLICHER HAFTUNG.
BEI FEHLERHAFTEM ANSCHLUSS ERLISCHT
DIE GARANTIE.
• BENUTZEN SIE IHR GERÄT NICHT, WENN ES
NICHT FEHLERFREI FUNKTIONIERT, GEFALLEN
IST, SICHTBARE SCHÄDEN AUFWEIST ODER
UNDICHT IST.
• BEI VERWENDUNG EINER
VERLÄNGERUNGSSCHNUR MUSS DIESE
EINEN STECKER MIT ERDUNG AUFWEISEN
UND SIE MUSS SO VERLEGT WERDEN, DASS
NIEMAND DARÜBER STOLPERN KANN.
DER EXPRESSO
FÜR EINEN VOLLENDETEN EXPRESSO MUSS
EIN ECHTER EXPRESSOKAFFEE MIT
OPTIMALER MAHLUNG DER BOHNEN
VERWENDET WERDEN. DAS GERÄT STELLT
EINEN DRUCK VON 15 BAR HER, MIT DEM
DAS HEIßE WASSER IN KURZER ZEIT DURCH
DAS FEINE KAFFEEMEHL GEPRESST WIRD, UM
EINEN ÄUßERST WOHLSCHMECKENDEN
SCHWARZEN EXPRESSO MIT VOLLEM AROMA
ZU ERHALTEN: DIE KONZENTRIERTE ESSENZ
DES KAFFEES.
EXPRESSO WIRD NICHT IN EINER
HERKÖMMLICHEN KAFFEETASSE SERVIERT,
SONDERN IN KLEINEN 70 ML TÄSSCHEN. EIN
PERFEKTER EXPRESSO IST VON EINEM
WUNDERBAR DICHTEN, GOLDFARBENEN
SCHAUM GEKRÖNT. DIESER „CREMA”
GENANNTE SCHAUM BESTEHT AUS DEM
NATÜRLICHEN ÖL DER KAFFEEBOHNEN UND
VERLEIHT DEM EXPRESSO SEINEN VOLLEN
GESCHMACK UND SEIN AROMA.
9
Page 8

IHR EXPRESSOKAFFEE MUSS RICHTIG
GERÖSTET UND GEMAHLEN SEIN. WENN SIE
KEINEN BEREITS GEMAHLENEN
EXPRESSOKAFFEE KAUFEN, BENUTZEN SIE
EINE KAFFEEMÜHLE ZUM MAHLEN DER
KAFFEEBOHNEN UND MAHLEN SIE IHN NICHT
ZU FEIN. ER MUSS NOCH LEICHT KÖRNIG
SEIN UND EINE TEXTUR ZWISCHEN MEHL
UND ZUCKER BESITZEN. ZU FEIN
GEMAHLENER KAFFEE ERGIBT EINEN
BITTEREN EXPRESSO UND KÖNNTE DAS
BRÜHSIEB UND DEN FILTER VERSTOPFEN, ZU
GROB GEMAHLENER KAFFEE ERGIBT EINEN
EXPRESSO MIT SCHWACHEM GESCHMACK.
DIE DREI WEITEREN FAKTOREN, WELCHE DIE
QUALITÄT IHRES EXPRESSOS BEEINFLUSSEN,
SIND NEBEN DEM VERWENDETEN KAFFEE
WASSER, TEMPERATUR UND DRUCK. IHRE
EXPRESSO-MASCHINE VON KRUPS
GARANTIERT DIE PRÄZISION DIESER DREI
FAKTOREN MIT EINER SPEZIELL FÜR DIESEN
ZWECK ANGELEGTEN TECHNOLOGIE. BITTE
VERWENDEN SIE NUR FRISCH AUS DEM
WASSERHAHN GELASSENES (DAMIT ES NACH
DEM KONTAKT MIT DER LUFT NICHT
ABGESTANDEN SCHMECKT), RELATIV KÜHLES
WASSER, DAS NICHT NACH CHLOR RIECHT.
WIR EMPFEHLEN, DAS WASSER MIT EINER
IM HANDEL ERHÄLTLICHEN CLARIS AQUA FILTER SYSTEM FILTERPATRONE
(ART.-NR. F088) VON KRUPS ZU FILTERN.
ÜBER EXPRESSO SIND EINIGE FALSCHE IDEEN
IM UMLAUF. DIE ERSTE FALSCHE IDEE
BESTEHT DARIN, DASS ER BITTER IST UND
VERBRANNT SCHMECKT. EIN GUT
ZUBEREITETER EXPRESSO IST AROMATISCH
UND HAT EINEN BITTER-SÜßEN (NICHT
BITTEREN) GESCHMACK, DER INTENSIV UND
LANGE IM ABGANG IST.
DIE ZWEITE FALSCHE IDEE IST DER MYTHOS,
DASS MAN NACH EINEM EXPRESSO DIE
GANZE NACHT LANG NICHT SCHLAFEN
KANN. TROTZ SEINES INTENSIVEN
GESCHMACKS ENTHÄLT EXPRESSO WENIGER
KOFFEIN ALS NORMALER KAFFEE, NÄMLICH
ETWA 60 BIS 80 MG PRO TASSE - KAFFEE
DAGEGEN 80 BIS 100 MG. DIESER UMSTAND
IST AUF DIE KÜRZERE PERKOLATIONSDAUER
FÜR EINEN EXPRESSO ZURÜCKZUFÜHREN.
UND SCHLIEßLICH GLAUBEN VIELE LEUTE,
10
DASS DIE ZUBEREITUNG EINES EXPRESSO
LANGWIERIG UND SCHWIERIG IST. IN
WAHRHEIT IST EXPRESSO, WIE SCHON SEIN
NAME BESAGT, SCHNELL UND EINFACH
ZUZUBEREITEN. SIE WERDEN ES SELBST
FESTSTELLEN: IHRE EXPRESSO-MASCHINE
VON KRUPS IST GESCHICKT KONZIPIERT - DIE
ZUBEREITUNG IST EIN KINDERSPIEL UND DAS
GERÄT HAT EINE LANGE LEBENSDAUER.
VOR DEM ERSTEN GEBRAUCH
BITTE LESEN SIE DIE UNTENSTEHENDEN
ANWEISUNGEN VOR DER ERSTEN
INBETRIEBNAHME IHRES GERÄTS
AUFMERKSAM UND VOLLSTÄNDIG DURCH,
DAMIT SIE IHRE NEUE EXPRESSO-MASCHINE
VON KRUPS RICHTIG EINSETZEN.
• STELLEN SIE DIE EXPRESSO-MASCHINE AUF
EINE STABILE, HITZEUNEMPFINDLICHE
FLÄCHE, DIE SICH NICHT IN DER NÄHE DER
KOCHPLATTEN ODER EINER FLAMME
BEFINDEN DARF.
• SCHLIEBEN SIE DAS GERÄT NUR AN EINE
GEERDETE STECKDOSE AN. ÜBERPRÜFEN
SIE, DASS DIE AUF DEM TYPENSCHILD
DIESES GERÄTES ANGEGEBENE SPANNUNG
MIT DER IHRES STROMNETZES
ÜBEREINSTIMMT.
• BENUTZEN SIE DAS GERÄT NICHT, WENN
AUFFANGSCHALE UND ABSTELLGITTER
NICHT IN POSITION SIND.
EXPRESSO
BEVOR SIE IHR GERÄT DAS ERSTE MAL
BENUTZEN, REINIGEN SIE DAS GESAMTE
SYSTEM:
• ÖFFNEN SIE DEN DECKEL UND ENTNEHMEN
SIE DEN WASSERBEHÄLTER AM GRIFF (1).
FÜLLEN SIE DEN WASSERBEHÄLTER (2) MIT
KÜHLEM ODER KALTEM WASSER.
• SETZEN SIE DEN WASSERBEHÄLTER ERNEUT
EIN UND ACHTEN SIE DABEI DARAUF, IHN
FEST NACH UNTEN ZU DRÜCKEN (3).
SCHLIEBEN SIE DEN DECKEL
• SETZEN SIE DAS GERÄT DURCH EINEN
DRUCK AUF DEN SCHALTER (N) IN BETRIEB
(4). DIE PUMPE LÄUFT DANN 2 SEKUNDEN
LANG, UM DAS GERÄT MIT WASSER ZU
VERSORGEN UND SICHERZUSTELLEN, DASS
Page 9

DER KAFFEE VON DER ERSTEN TASSE AN
RICHTIG HEISS IST.
• SOBALD DAS GERÄT DIE RICHTIGE
TEMPERATUR ERREICHT HAT, GEHT DIE
ORANGEFARBENE
TEMPERATURKONTROLLLEUCHTE AUS.
• IHRE EXPRESSO-MASCHINE IST MIT DREI
VERSCHIEDENEN FILTERN
AUSGESTATTET: FÜR EINE ODER ZWEI
TASSEN AUS KAFFEEMEHL SOWIE FÜR
ESE-EINZELPORTIONEN (EASY SERVING
EXPRESSO). DER FILTER FÜR EINE TASSE
WIRD IM FILTERTRÄGER (l) GELIEFERT,
DIE BEIDEN ANDEREN FILTER SIND IN
DER TRANSPORTVERPACKUNG DES
GERÄTS UNTERGEBRACHT.
• WÄHLEN SIE DEN GEWÜNSCHTEN FILTER
UND SETZEN SIE IHN IN DEN FILTERTRÄGER
EIN (5). VERSTAUEN SIE DIE BEIDEN
ANDEREN FILTER IM FILTERFACH DES
DECKELS DER EXPRESSO-MASCHINE (A).
• SETZEN SIE DANN DEN FILTERTRÄGER IN
DEN BRÜHKOPF DES GERÄTES EIN. UM DEN
FILTERTRÄGER KORREKT EINZUSETZEN,
HALTEN SIE DEN GRIFF DES FILTERTRÄGERS
IN EINEM 45 GRAD WINKEL NACH LINKS
(6), SETZEN DEN FILTERTRÄGER DIREKT AN
DEN BRÜHKOPF, DRÜCKEN IHN NACH OBEN
UND DREHEN DEN GRIFF DANN NACH SO
WEIT WIE MÖGLICH NACH RECHTS (7).
• STELLEN SIE EIN MÖGLICHST GROßES
GEFÄß UNTER DEN FILTERTRÄGER (8).
• STELLEN SIE DIE WAHLTASTE NACH RECHTS
(O) AUF DEN EXPRESSO-MODUS (9) UND
DAS WASSER BEGINNT, DURCH DIE
LEITUNGEN DES GERÄTS ZU LAUFEN.
• LASSEN SIE ETWA 250 ML DURCHLAUFEN
UND STELLEN SIE DANN DIE WAHLTASTE (O)
WIEDER IN DIE MITTELSTELLUNG (10).
DIE VORBEREITUNG DER KAFFEEMASCHINE
IST IM ABSCHNITT FILTERKAFFEE
BESCHRIEBEN
GEBRAUCH DER
VERSCHIEDENEN FUNKTIONEN
DER EXPRESSO-MASCHINE
1. ZUBEREITUNG VON EXPRESSO
DAMIT SICH DAS KAFFEEAROMA VOLL
ENTWICKELN KANN UND SIE
ZUFRIEDENSTELLT, SETZT VOR JEDER
ZUBEREITUNG EINES KAFFEES EIN
VORBRÜHVORGANG EIN. DIE PUMPE LÄUFT
3 SEKUNDEN LANG, STOPPT DANN
3 SEKUNDEN UND FÜHRT DEN
BRÜHVORGANG ZU ENDE.
.MIT GEMAHLENEM KAFFEE
UM EIN GUTES ERGEBNIS ZU ERZIELEN,
EMPFEHLEN WIR IHNEN, DIE ZUBEHÖRTEILE
(FILTERTRÄGER, FILTER UND TASSEN) OHNE
ZUGABE VON GEMAHLENEM KAFFEE WIE
FOLGT VORZUWÄRMEN:
• FÜLLEN SIE DEN WASSERBEHÄLTER (1) (2)
(3) MIT KÜHLEM ODER KALTEM WASSER
UND SCHALTEN SIE DAS GERÄT EIN (4).
• SETZEN SIE DEN FILTERTRÄGER UND EINEN
LEEREN FILTER (6) (7) EIN UND STELLEN SIE
EINE ODER ZWEI EXPRESSOTASSEN
DARUNTER.
• SOBALD DAS GERÄT DIE RICHTIGE
TEMPERATUR ERREICHT HAT, GEHT DIE
ORANGEFARBENE
TEMPERATURKONTROLLLEUCHTE AUS.
• STELLEN SIE DIE WAHLTASTE NACH RECHTS
(O) AUF DEN KAFFEE-MODUS (9).
BERÜCKSICHTIGEN SIE DEN
VORBRÜHVORGANG.
• DIE TASSEN WERDEN MIT WARMEM
WASSER GEFÜLLT. LASSEN SIE, SOBALD SIE
VOLL SIND, DIE WAHLTASTE (O) WIEDER IN
DIE MITTELSTELLUNG UND LEEREN SIE DIE
TASSEN AUS.
WENN DER ERSTE EXPRESSO ZUBEREITET UND
DAS GERÄT EINMAL WARM IST, KÖNNEN DIE
EXPRESSOTASSEN SPÄTER AUCH AUF DER
TASSENVORWÄRMPLATTE (C) VORGEWÄRMT
WERDEN.
. ZUBEREITUNG VON EXPRESSO:
• FÜLLEN SIE DEN WASSERBEHÄLTER (1) (2)
(3) UND SCHALTEN SIE DAS GERÄT EIN (4).
• SETZEN SIE DEN FILTER FÜR 1 ODER 2
TASSEN IN DEN FILTERTRÄGER EIN (5).
• GEBEN SIE 1 BZW. 2 MESSLÖFFEL
GEMAHLENEN KAFFEE IN DEN FILTER UND
DRÜCKEN SIE DIESEN BIS AN DEN RAND
DES FILTERS MIT DEM MESSLÖFFEL LEICHT
AN (11) (12).
• SÄUBERN SIE DEN RAND DES FILTERS VON
KAFFEEMEHL (13).
• SETZEN SIE DEN FILTERTRÄGER IN DAS
GERÄT EIN. DREHEN SIE DEN FILTERTRÄGER,
DAMIT ER FEST SITZT (6) (7).
11
Page 10

• STELLEN SIE EINE ODER ZWEI
EXPRESSOTASSEN UNTER DEN
FILTERTRÄGER.
• SOBALD DAS GERÄT DIE RICHTIGE
TEMPERATUR ERREICHT HAT, GEHT DIE
ORANGEFARBENE
TEMPERATURKONTROLLLEUCHTE AUS.
• STELLEN SIE DIE WAHLTASTE NACH RECHTS
(O) AUF DEN KAFFEE-MODUS (9).
BERÜCKSICHTIGEN SIE DEN
VORBRÜHVORGANG.
• STELLEN SIE, SOBALD DIE GEWÜNSCHTE
MENGE EXPRESSO ERREICHT IST, DIE
WAHLTASTE (O) WIEDER IN DIE
MITTELSTELLUNG (10).
• NEHMEN SIE DEN FILTERTRÄGER AUS DEM
GERÄT UND LEEREN SIE DAS KAFFEEMEHL
AUS (14).
NACH ERNEUTER FÜLLUNG DES FILTERS
KANN DER NÄCHSTE EXPRESSO ZUBEREITET
WERDEN
ACHTUNG: WENN DIE WASSERPUMPE BEI
LEEREM WASSERBEHÄLTER LÄUFT,
ENTSTEHT EIN GERÄUSCH, DAS LAUTER
IST ALS DAS NORMALE
BETRIEBSGERÄUSCH. DRÜCKEN SIE IN
DIESEM FALL DEN AN/AUS SCHALTER (4).
ÜBERPRÜFEN SIE DEN WASSERBEHÄLTER
UND FÜLLEN SIE IHN GEGEBENENFALLS
AUF.
LASSEN SIE DAS GERÄT NIE MIT LEEREM
WASSERBEHÄLTER IN BETRIEB, DIE PUMPE
KÖNNTE DABEI SCHADEN NEHMEN.
.MIT DEM „ESE” SPEZIALFILTERTRÄGER
DAS SYSTEM E.S.E. WURDE ENTWICKELT, UM
EINEN STARKEN ITALIENISCHEN EXPRESSO
‘RISTRETTO’ (KURZER EXPRESSO) ZUBEREITEN
ZU KÖNNEN. DIE MENGE DER EINZELNEN ESEEINZELPORTION IST FÜR 35 ML WASSER
BESTIMMT, DIE INNERHALB VON
20 SEKUNDEN DURCHLAUFEN.
„ESE” BEDEUTET „EASY SERVING EXPRESSO”
(EINFACHE EXPRESSOZUBEREITUNG) UND IST
EINE PORTION AUSGEWÄHLTEN,
HOCHWERTIGEN KAFFEES, GEMAHLEN UND
VERDICHTET ZWISCHEN ZWEI PAPIERFILTERN,
DIE SOFORT EINSATZBEREIT IST. DIESES
SYSTEM VEREINFACHT IHNEN DIE
EXPRESSOZUBEREITUNG, INDEM ES IHNEN
DIE DOSIERUNG UND DAS STOPFEN DES
EXPRESSOMEHLS ABNIMMT UND IHNEN DIE
REINIGUNG DES GERÄTES ERLEICHTERT.
12
ES IST WEDER VORGESEHEN NOCH
EMPFEHLENSWERT, MEHR ALS 35 ML
WASSER DURCH DIE ESEEINZELPORTIONEN DURCHLAUFEN ZU
LASSEN UND DEN EXPRESSO DAMIT ZU
STRECKEN (LANGER EXPRESSO).
WIR EMPFEHLEN IHNEN, DIE ESEEINZELPORTIONEN SO ZU HANDHABEN UND
AUFZUBEWAHREN, DASS DIESE NICHT
VERFORMT WERDEN.
WIR EMPFEHLEN IHNEN, DIE ZUBEHÖRTEILE
(FILTERTRÄGER, FILTER UND TASSEN) OHNE
KAFFEEMEHL VORZUWÄRMEN. LESEN SIE
DAZU DEN OBENSTEHENDEN ABSCHNITT
„ZUBEREITUNG VON EXPRESSO”.
. ZUBEREITUNG DES EXPRESSO:
• FÜLLEN SIE DEN WASSERBEHÄLTER (1) (2)
(3) UND SCHALTEN SIE DAS GERÄT EIN (4).
SETZEN SIE DIE ESE-EINZELPORTION EIN (18).
REIBEN SIE ÜBERFLÜSSIGES PAPIER AN DER
GELOCHTEN ECKE VON DER EINZELPORTION
AB. LEGEN SIE DIE ESE-EINZELPORTION MIT
DER ROTEN SEITE NACH UNTEN IN DEN
FILTERTRÄGER EIN (BIEGEN SIE DIE
PAPIERECKEN NACH UNTEN).
• ACHTEN SIE DARAUF, DASS DAS GANZE
PAPIER IM FILTER UNTERGEBRACHT
WIRD, ANDERNFALLS KOMMT ES ZU
TROPFWASSERBILDUNG.
DURCH RICHTIGES EINLEGEN DER ESEEINZELPORTION BEKOMMT DER EXPRESSO
EINEN REICHHALTIGEREN, DICHTEREN
SCHAUM.
UM TROPFWASSERBILDUNG AM
FILTERTRÄGER ZU VERMEIDEN UND ZUR
OPTIMIERUNG DES BRÜHVORGANGES MUSS
DER GRIFF HERMETISCH UND KORREKT
FESTGEZOGEN WERDEN.
SETZEN SIE DEN FILTERTRÄGER IN DEN
BRÜHKOPF EIN UND ZIEHEN SIE DEN GRIFF SO
WEIT WIE MÖGLICH NACH RECHTS FEST (6)
(7) (8).
• SOBALD DAS GERÄT DIE RICHTIGE
TEMPERATUR ERREICHT HAT, GEHT DIE
ORANGEFARBENE
TEMPERATURKONTROLLLEUCHTE AUS.
• STELLEN SIE DIE WAHLTASTE NACH RECHTS
(O) AUF DEN KAFFEE-MODUS (9).
BERÜCKSICHTIGEN SIE DEN
VORBRÜHVORGANG.
• STELLEN SIE, SOBALD DIE GEWÜNSCHTE
MENGE EXPRESSO ERREICHT IST (35 ml), DIE
Page 11

WAHLTASTE (O) WIEDER IN DIE
MITTELSTELLUNG (10).
• ENTFERNEN SIE DEN FILTERTRÄGER VOM
BRÜHKOPF UND WERFEN SIE DIE BENUTZTE
KAFFEEPORTION WEG.
2. FUNKTION DAMPF
DAS TAKTGERÄUSCH WÄHREND DER
DAMPFZUBEREITUNG ENTSTEHT DURCH DIE
INTERVALLSTEUERUNG DER WASSERPUMPE
UND HAT KEINERLEI EINFLUSS AUF DIE
FUNKTIONSTÜCHTIGKEIT DES GERÄTS.
FALLS SIE DIREKT NACH DER
DAMPFERZEUGUNG EINEN ESPRESSO
ZUBEREITEN WOLLEN, MUSS DAS GERÄT
ZUERST ABGEKÜHLT WERDEN, UM DIE ZUR
ESPRESSOZUBEREITUNG GEEIGNETE
TEMPERATUR ZU ERREICHEN.
• WENN DER WAHLSCHALTER AUF O
GESTELLT WIRD, KÜHLT DAS GERÄT
AUTOMATISCH AB, INDEM ES 3
PUMPDURCHGÄNGE DURCHFÜHRT. DAS
HEIZSYSTEM WIRD DABEI VOM
DURCHLAUFENDEN KALTEN WASSER
ABGEKÜHLT. IM LAUFE DER
PUMPDURCHGÄNGE WIRD DER
ÜBERSCHÜSSIGE DAMPF IM HEIZSYSTEM
FREIGESETZT UND FLIESST IN FORM VON
HEISSEM WASSER IN DIE AUFFANGSCHALE
AB. DIE ABGABE VON DAMPF UND DAS
DAMIT EINHERGEHENDE GERÄUSCH
SIND ZUM ABKÜHLEN DES GERÄTS
NOTWENDIG.
ACHTUNG: WÄHREND UND NACH DEM
BETRIEB DES GERÄTS KÖNNEN DIE
METALLTEILE DER DAMPFDÜSE (E) UND DER
CAPPUCCINO-AUFSCHÄUMHILFE (F)
ÄUßERST HEIß WERDEN.
. GEBRAUCH DER CAPPUCCINOAUFSCHÄUMHILFE (F)
DIE CAPPUCCINO-AUFSCHÄUMHILFE
ERLEICHTERT DIE ZUBEREITUNG VON HEIßER
MILCH SOWIE DAS AUFSCHÄUMEN VON
MILCH ZUR ZUBEREITUNG VON CAPPUCCINO, LATTE ODER HEIBER SCHOKOLADE.
AM BESTEN BENUTZEN SIE FRISCHE UND
KALTE HALBFETTMILCH (AUS DEM
KÜHLSCHRANK).
• FÜLLEN SIE DEN WASSERBEHÄLTER MIT
FRISCHEM, KALTEM WASSER (1) (2) (3)
UND SCHALTEN SIE DAS GERÄT EIN (4).
• SETZEN SIE DIE CAPPUCCINOAUFSCHÄUMHILFE (F) AUF DIE DAMPFDÜSE
AUF.
• DREHEN SIE DIE CAPPUCCINOAUFSCHÄUMHILFE VOM GERÄT WEG.
• GEBEN SIE CA. 100 ML KALTE MILCH IN EIN
KLEINES, SCHMALES GEFÄB MIT EINEM
FASSUNGSVERMÖGEN VON ETWA 0,5
LITERN, DAS UNTER DIE CAPPUCCINOAUFSCHÄUMHILFE PASST. DIE MILCH UND
DAS GEFÄB MÜSSEN GUT GEKÜHLT SEIN
(DAS GEFÄß SOLLTE DESHALB VOR DEM
AUFSCHÄUMEN DER MILCH NICHT UNTER
HEIßES WASSER GEHALTEN WERDEN).
• SOBALD DAS GERÄT BEREIT IST FÜR DIE
ZUBEREITUNG EINES EXPRESSO, STELLEN SIE
DIE WAHLTASTE (O) AUF DEN VORHEIZMODUS
(15).
• DIE ORANGEFARBENE TEMPERATUR-
KONTROLLLEUCHTE LEUCHTET AUF.
SOBALD DIE TEMPERATURKONTROLLLEUCHTE AUSGEHT, IST DAS GERÄT
BETRIEBSBEREIT.
HALTEN SIE DAS GEFÄß SO UNTER DIE
CAPPUCCINO-AUFSCHÄUMHILFE, DASS SIE
IN DIE MILCH EINTAUCHT, OHNE DEN BODEN
DES GEFÄßES ZU BERÜHREN (17).
• STELLEN SIE DIE WAHLTASTE (O) AUF DEN
DAMPF-MODUS
(16).
• SOBALD DIE GEWÜNSCHTE MENGE
MILCHSCHAUM ERHALTEN WORDEN IST,
STELLEN SIE DIE WAHLTASTE (O) WIEDER IN
DIE MITTELSTELLUNG (10).
BEFOLGEN SIE FOLGENDE HINWEISE, UM DAS
ANTROCKNEN DER MILCH AN DER CAPPUCCINO-AUFSCHÄUMHILFE ZU VERHINDERN:
• STELLEN SIE EIN MIT WASSER GEFÜLLTES
GEFÄB UNTER DIE CAPPUCCINOAUFSCHÄUMHILFE (F).
WENDEN SIE DIE OBEN BESCHRIEBENE
VORGEHENSWEISE FÜR AUFGESCHÄUMTE
MILCH AN UND ERSETZEN SIE DIE MILCH
DURCH WASSER, CA. 1 MINUTE LANG.
• STELLEN SIE DIE WAHLTASTE (O) IN DIE
MITTELSTELLUNG (10).
• REINIGEN SIE DIE CAPPUCCINO-
AUFSCHÄUMHILFE MIT EINEM FEUCHTEN
TUCH.
• LESEN SIE BETREFFEND DER GRÜNDLICHEN
REINIGUNG DER CAPPUCCINOAUFSCHÄUMHILFE DAS KAPITEL „PFLEGE”.
13
Page 12

REZEPTE
GENIEßEN SIE IHREN EXPRESSO SO, WIE SIE
IHN MÖGEN: ZUR ENTSPANNUNG UND ZUM
ABSCHLUSS EINER GUTEN MAHLZEIT.
NACHSTEHEND EINIGE REZEPTE FÜR IHRE
EXPRESSO-MASCHINE.
. ORIGINAL-EXPRESSO
• NEHMEN SIE EINEN MESSLÖFFEL VOLL
GUTEM, RICHTIG GERÖSTETEM
EXPRESSOKAFFEE UND FÜLLEN SIE IHN
DIREKT IN DIE VORGEWÄRMTE TASSE EIN.
WENN SIE EINEN GUTEN, RICHTIG
GEMAHLENEN KAFFEE BENUTZEN, IST DIE
TASSE VON EINEM SCHÖNEN SCHAUM
GEKRÖNT.
• GEBEN SIE GEGEBENENFALLS ZUCKER ZU
UND GENIEßEN SIE IHREN KAFFEE. DER
ORIGINAL-EXPRESSO WIRD OHNE MILCH
GETRUNKEN.
. CAPPUCCINO
DIE IDEALEN MENGEN FÜR EINEN RICHTIGEN
CAPPUCCINO SIND: 1/3 KAFFEE, 1/3 HEIßE
MILCH, 1/3 MILCHSCHAUM. DIE MENGE AN
HEIßER MILCH + MILCHSCHAUM ENTSPRICHT
ETWA DEM DOPPELTEN DES ZUBEREITETEN
KAFFEES.
• BENUTZEN SIE GROßE, VORGEWÄRMTE
TASSEN.
• GEBEN SIE ETWA EINE EXPRESSOTASSE
VOLL EXPRESSO HINEIN UND FÜLLEN SIE SIE
MIT DER CAPPUCCINO-AUFSCHÄUMHILFE
AUFGESCHÄUMTER MILCH AUF.
• BESTÄUBEN SIE DEN CAPPUCCINO ZUM
SCHLUSS MIT SCHOKOLADENPULVER.
. CAFÉ CRÈME
• BEREITEN SIE EINEN KLASSISCHEN
EXPRESSO IN EINER GROßEN TASSE ZU.
• GEBEN SIE EIN WENIG SAHNE BEI, UM
EINEN CAFÉ CRÈME ZU ERHALTEN.
ANSTATT VON SAHNE KANN HEIßE MILCH
BEIGEGEBEN WERDEN.
. CAFÉ CORRETTO*
• BEREITEN SIE EINEN KLASSISCHEN
EXPRESSO ZU.
• VERBESSERN SIE DEN GESCHMACK DURCH
ZUGABE EINES 1/4 ODER 1/2 LIKÖR-GLASES
COGNAC.
14
ES KÖNNEN EBENFALLS ANISETTE,
TRAUBENSCHNAPS, SAMBUCO, KIRSCHLIKÖR
ODER COINTREAU ZUGEGEBEN WERDEN.
EIN EXPRESSO KANN AUF UNZÄHLIGE ANDRE
WEISEN „VERBESSERT” WERDEN, DER
PHANTASIE SIND KEINE GRENZEN GESETZT.
. KAFFEE-LIKÖR*
• MISCHEN SIE IN EINER LEEREN 0,75 LITER
FLASCHE 3 TASSEN EXPRESSO, 250 G
BRAUNEN KANDISZUCKER, 1/2 LITER
COGNAC ODER KIRSCH.
• LASSEN SIE DIE MISCHUNG MINDESTENS 2
WOCHEN LANG DURCHZIEHEN.
DAS ERGEBNIS IST EIN KÖSTLICHER LIKÖR,
DER BESONDERS LIEBHABERN VON KAFFEE
MUNDEN WIRD.
. EISKAFFEE AUF ITALIENISCHE
ART 4 KUGELN VANILLEEIS, 2 TASSEN KALTER,
GEZUCKERTES EXPRESSO, 1/8 L MILCH,
CRÈME FRAÎCHE, SCHOKORASPEL.
• MISCHEN SIE DEN KALTEN EXPRESSO MIT
DER MILCH.
• GEBEN SIE DIE KUGELN VANILLEEIS IN DIE
GLÄSER, GIEßEN SIE DEN KAFFEE DARAUF
UND VERZIEREN SIE DAS GANZE MIT CRÈME
FRAÎCHE UND SCHOKORASPEL.
. FRIESENKAFFEE*
• GIEßEN SIE EIN GLAS RUM IN EINE TASSE
GEZUCKERTEN EXPRESSO.
• VERZIEREN SIE DAS GANZE MIT EINER
GUTEN PORTION CRÈME FRAÎCHE UND
SERVIEREN SIE.
. FLAMBIERTER EXPRESSO*
2 TASSEN EXPRESSO, 2 GLÄSCHEN COGNAC,
2 TEELÖFFEL BRAUNER ZUCKER, CRÈME
FRAÎCHE.
• GIEßEN SIE DEN COGNAC IN HITZEFESTE
GLÄSER, MACHEN SIE DIESE HEIß UND
FLAMBIEREN SIE SIE.
• GEBEN SIE DEN ZUCKER BEI, MISCHEN SIE
IHN UNTER, GIEßEN SIE DEN KAFFEE DAZU
UND VERZIEREN SIE DAS GANZE MIT CRÈME
FRAÎCHE.
GEGEBENENFALLS KANN DER EXPRESSO
AUCH MIT EIN WENIG KOCHENDEM WASSER
VERLÄNGERT WERDEN.
. PERFEKTER EXPRESSO*
2 TASSEN EXPRESSO, 6 EIGELB, 200 G
ZUCKER, 1/8 LITER GEZUCKERTE CRÈME
FRAÎCHE, 1 GLÄSCHEN ORANGENLIKÖR.
Page 13

• SCHLAGEN SIE DIE EIGELB MIT DEM
ZUCKER, BIS EINE DICKE, SCHAUMIGE
MASSE ENTSTEHT.
• GEBEN SIE DEN KALTEN EXPRESSO UND
DEN ORANGENLIKÖR BEI.
• GEBEN SIE ANSCHLIEßEND DIE
GESCHLAGENE CRÈME FRAÎCHE DAZU.
• GIEßEN SIE DAS GANZE IN GLÄSER.
• STELLEN SIE DIE GLÄSER INS TIEFKÜHLFACH.
. MOKKA-PUDDING
2 TASSEN EXPRESSO, 1/2 LITER MILCH,
1 PÄCKCHEN VANILLE-PUDDINGPULVER,
3 EIGELB, 1/8 LITER GEZUCKERTE CRÈME
FRAÎCHE, 150 G ZUCKER.
• BEREITEN SIE DEN VANILLEPUDDING MIT
MILCH, VANILLEPULVER UND ZUCKER ZU.
• GEBEN SIE DIE EIGELB ZUM NOCH
WARMEN PUDDING DAZU.
• LASSEN SIE IHN ABKÜHLEN UND GEBEN SIE
DEN EXPRESSO UND DIE SCHLAGSAHNE
BEI.
(*: ALKOHOL IST GESUNDHEITSSCHÄDLICH.)
REINIGUNG DES GERÄTS
- REINIGEN SIE DIE ZUBERHÖRTEILE IHRER
EXPRESSO-MASCHINE NICHT IN DER
GESCHIRRSPÜLMASCHINE.
NACH GEBRAUCH MUSS DER
WASSERBEHÄLTER ENTLEERT WERDEN, UM
KALKABLAGERUNGEN ZU VERMEIDEN.
. AUFFANGSCHALE FÜR TROPFWASSER
FALLS MEHRERE ESPRESSO NACHEINANDER
ZUBEREITET WERDEN, SOLLTE DIE
AUFFANGSCHALE VON ZEIT ZU ZEIT ENTLEERT
WERDEN (CA. ALLE 7 BIS 8 TASSEN) (19).
WENN WASSER AUSTRITT, HEIßT DAS NICHT,
DASS DAS GERÄT UNDICHT IST, SONDERN
DASS DER THERMOBLOCK DES GERÄTS
ENTLEERT WIRD. DIESER VORGANG IST
GANZ NORMAL. FALLS NOTWENDIG,
REINIGEN SIE DIE AUFFANGSCHALE UND DAS
ABSTELLGITTER MIT WASSER, DEM ETWAS
MILDES SPÜLMITTEL BEIGEFÜGT IST, SPÜLEN
SIE SIE NACH UND TROCKNEN SIE SIE AB.
ACHTEN SIE AUF EINEN KORREKTEN
WIEDERZUSAMMENBAU (20).
. BRÜHKOPF, FILTER UND FILTERTRÄGER
DIESE ZUBEHÖRTEILE MÜSSEN NACH JEDER
BENUTZUNG GEREINIGT WERDEN. ES
GENÜGT, DEN BRÜHKOPF MIT EINEM
FEUCHTEN TUCH ABZUWISCHEN UND DIE
ANDEREN ZUBEHÖRTEILE MIT WASSER, DEM
ETWAS MILDES SPÜLMITTEL BEIGEFÜGT IST,
ABZUSPÜLEN.
IM FALLE EINER STARKEN VERSCHMUTZUNG
DES BRÜHKOPFES SCHRAUBEN SIE DAS SIEB
MIT HILFE EINER MÜNZE AB, REINIGEN SIE ES
UND MONTIEREN SIE ES WIEDER, INDEM SIE
ES GUT FESTSCHRAUBEN (21).
LASSEN SIE DEN FILTERTRÄGER NICHT
EINGESETZT, WENN DAS GERÄT NICHT
BENUTZT WIRD, DA DIES DIE DICHTUNG
BEANSPRUCHT UND SEINE LEBENSDAUER
VERKÜRZT.
. TASSENVORWÄRMPLATTE: ENTNEHMEN
SIE DIESE ZUR REINIGUNG MIT WASSER UND
EINEM MILDEN SPÜLMITTEL, SPÜLEN SIE SIE
NACH UND TROCKNEN SIE SIE AB.
. CAPPUCCINO-AUFSCHÄUMHILFE
ZUR GRÜNDLICHEN REINIGUNG KANN DIE
CAPPUCCINO-AUFSCHÄUMHILFE VOM
GERÄT ABGENOMMEN WERDEN.
REINIGEN SIE SIE MIT WASSER, DEM ETWAS
MILDES SPÜLMITTEL BEIGEFÜGT IST UND
EINER KLEINEN BÜRSTE. SPÜLEN SIE SIE NACH
UND TROCKNEN SIE SIE AB.
BITTE VERSICHERN SIE SICH VOR DEM
WIEDEREINSETZEN, DASS DIE
LUFTEINTRITTSÖFFNUNGEN (AN BEIDEN
SEITEN DES METALLSCHLAUCHS) NICHT VON
MILCHRESTEN VERSTOPFT SIND. REINIGEN SIE
SIE GEGEBENENFALLS MIT EINER NADEL (22).
ENTKALKUNG
• ENTKALKEN SIE IHRE ESPRESSOMASCHINE,
JE NACH ÖRTLICHER WASSERHÄRTE,
REGELMÄSSIG MIT ZITRONENSÄURE ODER
WEINSÄURE.
• LASSEN SIE BEIM ENTKALKEN IHRER
ESPRESSOMASCHINE VORSICHT WALTEN,
DA ARBEITSFLÄCHEN UND ANDERE
OBERFLÄCHEN BEI BERÜHRUNG MIT DER IM
ENTKALKER ENTHALTENEN SÄURE ZU
SCHADEN KOMMEN KÖNNEN.
• DIE GARANTIE GREIFT NICHT FÜR
ESPRESSOMASCHINEN, DIE AUFGRUND
15
Page 14

FEHLENDER ENTKALKUNG NICHT ODER
SCHLECHT FUNKTIONIEREN.
WIR EMPFEHLEN DAS KRUPS
ENTKALKUNGSSET ART. F054, WELCHES IN
DEN KRUPS KUNDENDIENSTEN ERHÄLTLICH
IST. DIESES SET ENTHÄLT, NEBEN ZWEI
PORTIONEN ENTKALKER, EINEN
WASSERHÄRTE-TESTSTREIFEN, UM DIE
HÄUFIGKEIT DER ENTKALKUNG IHRES
GERÄTES BEI NORMALEM GEBRAUCH ZU
BESTIMMEN. DIE VERKALKUNG HÄNGT VON
DER WASSERHÄRTE, ABER AUCH VON DER
BENUTZUNG AB. DIE ERMITTELTE
ENTKALKUNGSHÄUFIGKEIT, IST DAHER NUR
ALS ANHALTSPUNKT ZU VERSTEHEN.
- GEHEN SIE NACH FOLGENDER METHODE
VOR:
• NEHMEN SIE GEGEBENENFALLS DIE CLARISAQUA FILTER SYSTEM FILTERPATRONE
HERAUS.
• SCHRAUBEN SIE DAS SIEB AM BRÜHKOPF
AB UND REINIGEN SIE SIEB UND BRÜHKOPF
VON KAFFEERESTEN UND KALKPARTIKELN
(21).
• LÖSEN SIE EIN PÄCKCHEN DES ENTKALKERS
KRUPS ART.F054 IN EINEM HALBEN LITER
LAUWARMEM WASSER AUF UND GIESSEN
SIE DIESE LÖSUNG IN DEN LEEREN
WASSERBEHÄLTER.
• SCHALTEN SIE DAS GERÄT MIT EINEM
DRUCK AUF DIE TASTE (N) (4) EIN. SOBALD
DAS GERÄT DIE RICHTIGE TEMPERATUR
ERREICHT HAT, GEHT DIE ORANGEFARBENE
TEMPERATURKONTROLLLEUCHTE AUS.
• STELLEN SIE EIN GEFÄSS UNTER DEN
BRÜHKOPF DES GERÄTES. GERÄT
EINSCHALTEN. LASSEN SIE ETWA EIN
DRITTEL DER FLÜSSIGKEIT DIREKT
DURCHLAUFEN, INDEM SIE DEN
WAHLSCHALTER AUF
(9) STELLEN.
• SCHALTEN SIE DAS GERÄT MIT EINEM
DRUCK AUF DIE TASTE (N) (4) AUS, ABER
LASSEN SIE DEN WAHLSCHALTER IN
POSITION
(9) UND LASSEN SIE DIE
LÖSUNG 10 BIS 15 MINUTEN EINWIRKEN.
• SCHALTEN SIE DANN DAS GERÄT MIT
EINEM DRUCK AUF DIE TASTE (N) (4)
WIEDER EIN UND LASSEN SIE DIE RESTLICHE
FLÜSSIGKEIT DURCHLAUFEN.
• LASSEN SIE ANSCHLIESSEND 2
WASSERBEHÄLTERFÜLLUNGEN KLARES
WASSER DURCHLAUFEN, REINIGEN SIE DEN
16
BRÜHKOPF UND MONTIEREN SIE DAS SIEB
WIEDER AN DEN BRÜHKOPF (SIEHE
ABSCHNITT „REINIGUNG DES GERÄTS”)
IM PANNENFALL
PROBLEME MÖGLICHE ABSTELLMASS-
URSACHE NAHMEN
DER ESPRESSO IST TASSEN, WÄRMEN SIE DIE
NICHT HEISS FILTERSIEB, ZUBEHÖRTEILE
GENUG FILTERTRÄGER (TASSEN,
SIND KALT. FILTERSIEB,
FILTERTRÄGER)
VOR. SIEHE
ABSCHNITT
„ESPRESSOZUBEREITUNG“
ESPRESSO TRITT DER FILTERTRÄGER SIEHE ABSCHNITT
OBERHALB DES WURDE NICHT „ESPRESSO
FILTERTRÄGERS RICHTIG ZUBEREITUNG“.
AUS ODER NICHT FEST
GENUG
ANGEZOGEN.
ES LIEGT REINIGEN SIE DEN
KAFFEEMEHL FILTERRAND.
AUF DEM RAND
DES FILTERS.
DIE BRÜHKOPF- REINIGEN SIE DIE
DICHTUNG IST DICHTUNG MIT
VERSCHMUTZT. EINEM FEUCHTEN
TUCH.
DIE BRÜHKOPF- WENDEN SIE SICH
DICHTUNG IST AN DEN KRUPS
DEFEKT. KUNDENDIENST.
SEHR LAUTES KEIN WASSER IM FÜLLEN SIE DEN
PUMPEN- WASSERBEHÄLTER. WASSERBEHÄLTER
GERÄUSCH AUF.
WASSERBEHÄLTER DRÜCKEN SIE DEN
NICHT RICHTIG WASSERBEHÄLTER
EINGESETZT. KRÄFTIG NACH
UNTEN.
KAFFEEMEHL ZU BENUTZEN SIE
ALT ODER SEHR FRISCHES KAFFEETROCKEN, SO MEHL.
DASS DIE PUMPE
KEINEN DRUCK
AUFBAUEN KANN.
ES TRITT KEIN KEIN WASSER IM FÜLLEN SIE DEN
WASSER/ WASSERBEHÄLTER. WASSERBEHÄLTER
ESPRESSO AUS AUF.
WASSERBEHÄLTER DRÜCKEN SIE DEN
NICHT RICHTIG WASSERBEHÄLTER
EINGESETZT. KRÄFTIG NACH
UNTEN.
Page 15

DAS FILTERSIEB IST REINIGEN SIE DEN
VERSTOPFT, DAS FILTER UND DAS
KAFFEEMEHL IST SIEB DES BRÜHZU FEIN ODER ZU KOPFES (S. KAP.
SEHR ZUSAMMEN- „PFLEGE“)
GEDRÜCKT UND BENUTZEN SIE
EINE WENIGER
FEINE MAHLUNG.
BRÜHKOPFSIEB LEGEN SIE DAS SIEB
VERSCHMUTZT. IN ENTKALKER-
LÖSUNG ZUM
EINWEICHEN
(S. KAP. „PFLEGE“).
GERÄT VERKALKT. SIEHE KAPITEL
„ENTKALKUNG“.
WASSER LÄUFT KAFFEEMEHL ZU VERWENDEN SIE
ZU SCHNELL GROB. FEINERES
DURCH KAFFEEMEHL.
ZU WENIG KAFFEE- BENUTZEN SIE DEN
MEHL EINGEFÜLLT. MITGELIEFERTEN
MESSLÖFFEL ZUM
DOSIEREN.
KAFFEEMEHL NICHT DRÜCKEN SIE DAS
ANGEDRÜCKT. KAFFEEMEHL
FESTER AN.
DER ESPRESSO KAFFEEMEHL ZU VERWENDEN SIE
HAT KEINE GROB. FEINERES
CREMA KAFFEEMEHL.
(SCHAUMSCHICHT AUF
DEM KAFFEE)
MILCH IST NICHT AUFSCHÄUMHILFE SIEHE KAPITEL
GENUG VERSTOPFT. «PFLEGE».
AUFGESCHÄUMT
ZUVIEL WASSER ESPRESSOMEHL DRÜCKEN SIE DAS
AUF DEM WURDE NICHT ESPRESSOMEHL
ESPRESSOMEHL AUSREICHEND FESTER AN.
KAFFEEMEHL DRÜCKEN SIE DAS
NICHT GENÜGEND KAFFEEMEHL
ANGEDRÜCKT. FESTER AN.
KAFFEEMEHL ZU VERWENDEN SIE
ALT ODER ZU FRISCHES
TROCKEN. KAFFEEMEHL.
MILCH ZU ALT. BENUTZEN SIE
FRISCHE MILCH.
MILCH LAUWARM. STELLEN SIE DIE
MILCH IN DEN
KÜHLSCHRANK.
ANGEDRÜCKT.
ES IST ZU WENIG FÜLLEN SIE MEHR
ESPRESSOMEHL IM ESPRESSOMEHL IN
FILTERSIEB. DAS FILTERSIEB.
FILTERKAFFEE
VOR DEM ERSTEN GEBRAUCH
• SETZEN SIE DIE KAFFEEMASCHINE BEIM
ERSTEN MAL OHNE WASSER UND
KAFFEEMEHL IN BETRIEB.
ZUBEREITUNG VON KAFFEE
DIE QUALITÄT DES BENUTZTEN WASSERS
BESTIMMT DEN GESCHMACK IHRES KAFFEES.
BITTE VERWENDEN SIE NUR FRISCH AUS DEM
WASSERHAHN GELASSENES (DAMIT ES NACH
DEM KONTAKT MIT DER LUFT NICHT
ABGESTANDEN SCHMECKT), RELATIV KÜHLES
WASSER, DAS NICHT NACH CHLOR RIECHT.
WIR EMPFEHLEN, DAS WASSER MIT EINER
IM HANDEL ERHÄLTLICHEN DUO FILTER
FILTERPATRONE (ART.-NR. XS 1000) VON
KRUPS ZU FILTERN.
• BEACHTEN SIE DIE ABBILDUNGEN 23 BIS
28.
• BENUTZEN SIE AUSSCHLIEßLICH KALTES
WASSER UND EINEN PAPIERFILTER N°4.
• DIE KAFFEEMASCHINE IST MIT EINEM
TROPF-STOPP AUSGESTATTET, DER DAS
SERVIEREN EINES KAFFEES VOR DER
BEENDIGUNG DER ZUBEREITUNG DES
KAFFEES ERLAUBT. STELLEN SIE DIE KANNE
SCHNELL ZURÜCK, UM ÜBERLAUFEN ZU
VERMEIDEN.
• HALTEN SIE SICH AN DIE AM
WASSERSTANDSANZEIGER ANGEGEBENE
HÖCHSTFÜLLMENGE DES
WASSERBEHÄLTERS (e).
• WARTEN SIE EIN PAAR MINUTEN, BEVOR SIE
ERNEUT KAFFEE ZUBEREITEN.
• DIE KANNE (g) UND DER DECKEL (f)
KÖNNEN IM MIKROWELLENHERD ERHITZT
WERDEN. DIE KANNE DARF NICHT LEER
MIKROWELLENHERD ERHITZT WERDEN.
17
Page 16

REINIGUNG
IM PROBLEMFALL
• ENTNEHMEN SIE ZUR ENTNAHME DES
BENUTZTEN KAFFEEMEHLS DEN
FILTERTRÄGER AUS DER KAFFEEMASCHINE
(30).
• ZIEHEN SIE DEN NETZSTECKER.
• REINIGEN SIE DAS GERÄT NICHT, SOLANGE
ES HEIß IST.
• REINIGEN SIE DAS GERÄT MIT EINEM
FEUCHTEN TUCH ODER EINEM FEUCHTEN
SCHWAMM.
• TAUCHEN SIE DAS GERÄT NICHT INS
WASSER UND HALTEN SIE ES NICHT UNTER
FLIEßENDES WASSER.
• DIE GLASKANNE, DER DECKEL UND DER
FILTERTRÄGER SIND SPÜLMASCHINENFEST.
ENTKALKUNG
ANZAHL ZYKLEN ZWISCHEN 2 ENTKALKUNGEN
OHNE DUO-FILTER MIT DUO-FILTER
WEICHES WASSER 60 120
HARTES WASSER 40 80
BENUTZEN SIE ENTWEDER:
• EIN IN 250 ML WASSER AUFGELÖSTES
PÄCKCHEN ENTKALKER
• ODER 250 ML WEIßEN ALKOHOLESSIG
• GIESSEN SIE DIE MISCHUNG IN DEN
WASSERBEHÄLTER (b) UND SETZEN SIE DIE
KAFFEEMASCHINE IN BETRIEB (OHNE
KAFFEEMEHL).
• LASSEN SIE DIE HÄLFTE DER KANNE (g)
DURCHLAUFEN UND HALTEN SIE DAS
GERÄT AN.
• LASSEN SIE DIE MISCHUNG EINE STUNDE
LANG EINWIRKEN.
• SETZEN SIE DIE KAFFEEMASCHINE ERNEUT
IN BETRIEB, UM DEN DURCHLAUFVORGANG
ABZUSCHLIEßEN.
• SPÜLEN SIE DIE KAFFEEMASCHINE DURCH,
INDEM SIE 2 ODER 3 MAL KLARES WASSER
DURCHLAUFEN LASSEN.
DIE GARANTIE GREIFT NICHT FÜR
ESPRESSOMASCHINEN, DIE AUFGRUND
FEHLENDER ENTKALKUNG NICHT ODER
SCHLECHT FUNKTIONIEREN.
18
- ÜBERPRÜFEN SIE:
• DEN ANSCHLUSS.
• DASS SICH DER AN/AUS SCHALTER IN DER
„I” STELLUNG BEFINDET.
- ES SCHEINT FLÜSSIGKEIT AUSZULAUFEN
• ÜBERPRÜFEN SIE, OB DER
WASSERBEHÄLTER NICHT ÜBER DEN
HÖCHSTSTAND BEFÜLLT WURDE.
- DER WASSERDURCHLAUF DAUERT ZU
LANGE UND ES KOMMT ZU UNMÄßIGER
GERÄUSCHENTWICKLUNG:
• ENTKALKEN SIE IHRE KAFFEEMASCHINE.
DAS GERÄT FUNKTIONIERT IMMER NOCH
NICHT? WENDEN SIE SICH AN EIN
ZUGELASSENES KRUPS
KUNDENDIENSTZENTRUM.
DENKEN SIE AN DEN
SCHUTZ DER UMWELT!
IHR GERÄT ENTHÄLT WERTVOLLE
ROHSTOFFE, DIE WIEDER VERWERTET
WERDEN KÖNNEN.
GEBEN SIE IHR GERÄT DESHALB BITTE BEI
EINER SAMMELSTELLE IHRER STADT ODER
GEMEINDE AB.
Page 17

English
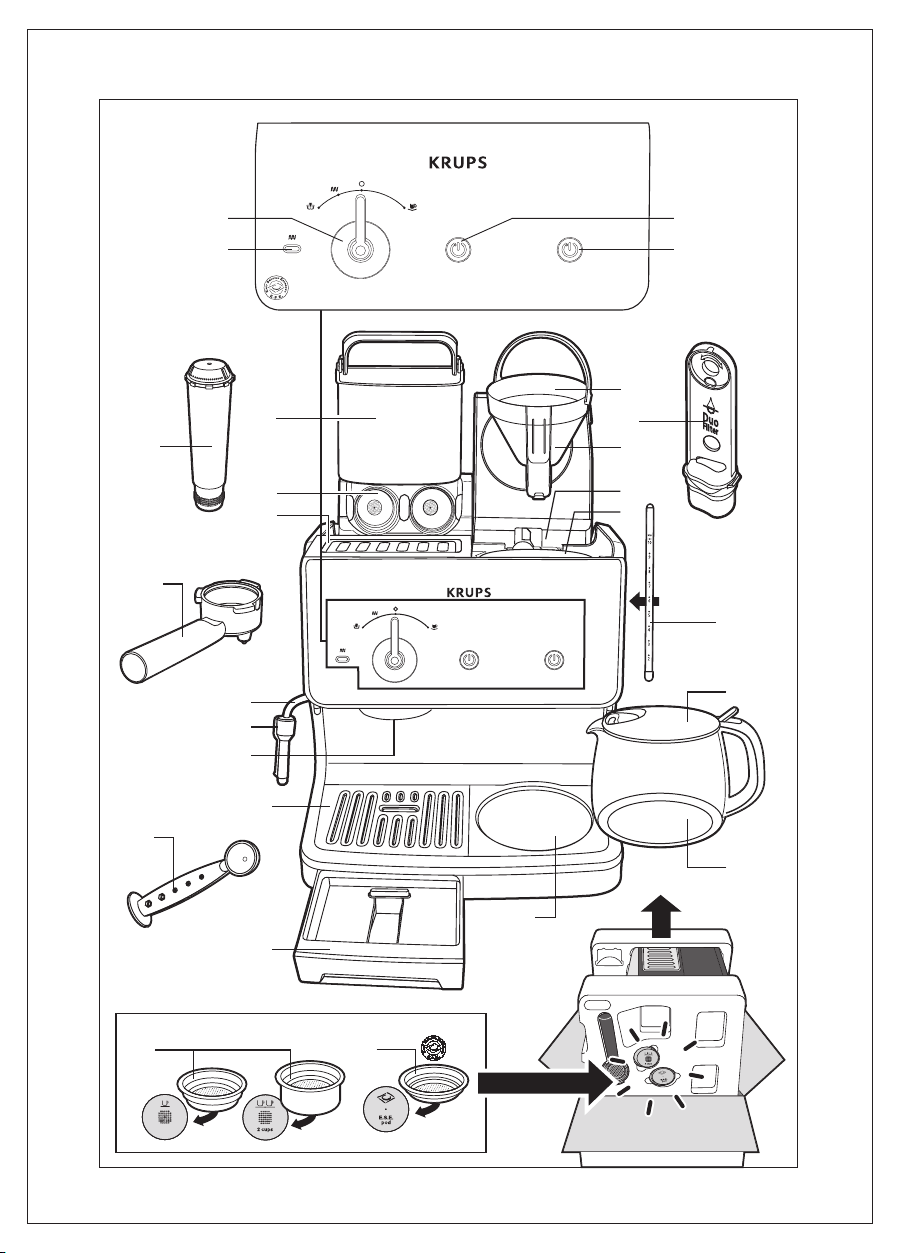
Description
Espresso :
A : Espresso lid with filter storage
B : Removable espresso tank
C : Cup warming plate
D : Brewing head
E : Steam nozzle
F : Cappuccino accessory for frothing milk
G : Drip tray grid
H : Drip tray
I : Filter holder
J : 1 & 2 cup powder espresso filters
K : Espresso filter for ESE pods (Easy Serving
Espresso)
L: “CLARIS” water filter -Aqua
Filter System F088 (accessory not provided)
M : Loose coffee measuring spoon
N : Start / Stop switch with blue operating
indicator
O : espresso function selection button
P : orange temperature control light
Coffee :
a : Coffee maker lid – access to the tank and
filter holder
b : Coffee maker tank
c : Filter-holder housing
d : Filter holder with carrying handle
e : Calibrated water level indicator for the
coffee maker tank
f : Hinged lid of filter coffee jug
g : Filter coffee jug
h : Coffee warming plate
i: ”Duo Filter XS 1000” water filter
(accessory not provided)
j : Start/stop filter coffee switch with blue
operating indicator
Safety recommendations
• Please read these instructions carefully
before first using your espresso.The
appliance must only be connected to the
mains via an earthed plug. Check that the
voltage shown on the appliance’s indicator
plate corresponds to that of your electricity
supply. It complies with the requirements of
the EEC Directive (89/336/EEC) and (72/23/
EEC).
• Never put your espresso on a hot surface
(electric warming plate, for example) or close
to a flame. Place on a flat, stable heatresistant surface.
• Never remove the filter holder containing
the coffee grounds while water is being
passed through, since the appliance is under
pressure at this time.
• Never use the appliance if the drip tray and
the drip tray grid are not in position.
• Disconnect the electricity if there is any
problem while the coffee is brewing or prior
to cleaning your appliance.
• Never unplug the appliance by pulling on
the cord and never lay the cord across a
sharp edge or the corner of an item of
furniture.
• Do not allow the cord or your hands to
come into contact with the hot parts of the
appliance (cup warming plate, filter holder,
steam nozzle, cappuccino accessory).
• Never immerse the appliance in water.
• Keep away from children and do not allow
the cord to hang down.
• Follow the instructions given for descaling.
• Never start the machine if it is damaged or
not operating correctly or if the cord is in
poor condition.
• If the cord or any other specific part
becomes defective, these can only be
replaced by a Krups approved service centre.
You must never, under any circumstances,
open the appliance yourself, in order to
avoid any danger.
• Check that the filter holder is firmly in
position before starting the coffee and turn
the selection button back to O before
releasing the filter holder.
• Do not leave the appliance in the reach of
unsupervised children - young children and
severely handicapped persons must only use
the appliance under the supervision of a
responsible adult.
• This product has been designed for domestic
use only. Any commercial use, inappropriate
use or failure to comply with the instructions, the manufacturer accepts no
19
Page 18

responsibility and the guarantee will not
apply.
• There is a risk of burns if the lid of the coffee
maker is removed while the coffee is
brewing.
• Never pour cold water into the coffee maker
tank immediately after the brewing cycle.
Let the appliance cool down before refilling
the tank.
• If you are unable to use the filter cartridges
recommended by Krups, only pour water
and the descaling solutions specified in the
manual into the espresso and coffee maker
water tanks.
• To disconnect, turn the switch to “OFF”,
then remove plug from wall socket.
• Do not use appliance for other than
intended use.
• Use extreme caution when dispensing hot
steam.
Espresso Coffee
For optimal results, choose special ground
espresso coffee, which is ideally compacted.
Due to the pressure created by your machine’s
15-bar pump, hot water passes through this
finely ground coffee for a shorter time. The
resulting liquid is rich, dark, and extremely
flavourful and intensely aromatic: the
concentrated essence of the coffee bean.
Espresso is not served in regular coffee cups,
but in small 35ml shots. The perfect espresso
shot is topped by beautiful, thick, golden
foam known as crema, a product of the
natural oils in the coffee bean, and the source
of its rich flavour and aroma.
In addition to the coffee you use, the other
three factors that determine perfect espresso
results are water, temperature and pressure.
Your Krups machine ensures all three are
precision-controlled by expertly designed
technology. What you must ensure is that the
water you use is freshly-drawn (so that it has
not had time to stagnate in the air), without
any chlorine odour and at a fairly cold
temperature.
We recommend that you filter your water
using a commercially available KRUPS
Claris - Aqua Filter System cartridge
(reference F088).
There are a number of misconceptions
surrounding espresso. The first is that espresso
should be bitter and burnt tasting. In fact, the
ideal espresso shot should be aromatic,
bittersweet (not bitter) and assertive, with a
lingering aftertaste.
The second myth is that drinking espresso will
keep you awake all night. Actually, despite its
strong flavour, espresso contains less caffeine
than regular coffee; typically 60-80 mg per
shot compared to 80-100 mg per cup of
regular coffee due to espresso's shorter
percolation time.
And finally, many people think that espresso
takes too long to prepare. The truth is, as the
name implies, an espresso is intended to be
served quickly, without elaborate preparation.
As you will discover, your Krups espresso
machine has been intuitively designed for easy
use and built for the long term.
It is important to note that your espresso
coffee must be both well roasted coffee and
correctly ground. If you cannot buy ground
espresso coffee, use a coffee grinder to grind
the beans. The coffee must not be ground too
fine. It must be slightly granulated, with a
consistency somewhat between flour and
sugar. Too fine a grind results in bitter, overextracted espresso and a risk of blocking the
grid of the brewing head and the filter; too
coarse and the espresso will be weak and
under-extracted.
20
Getting Started
To successfully enjoy the full benefits of your
new Krups espresso machine, please carefully
read these instructions in their entirety before
using this product.
• Place your espresso machine on a stable,
heat resistant surface away from water
splashes and sources of heat such as, an
electrical heating plate or near a flame.
Page 19

• Ensure the drip tray and drip tray grid are in
place when using the machine.
Using the various functions of
your espresso machine
Before First Use
Espresso
Before using your machine for the first time,
clean the system completely as follows:
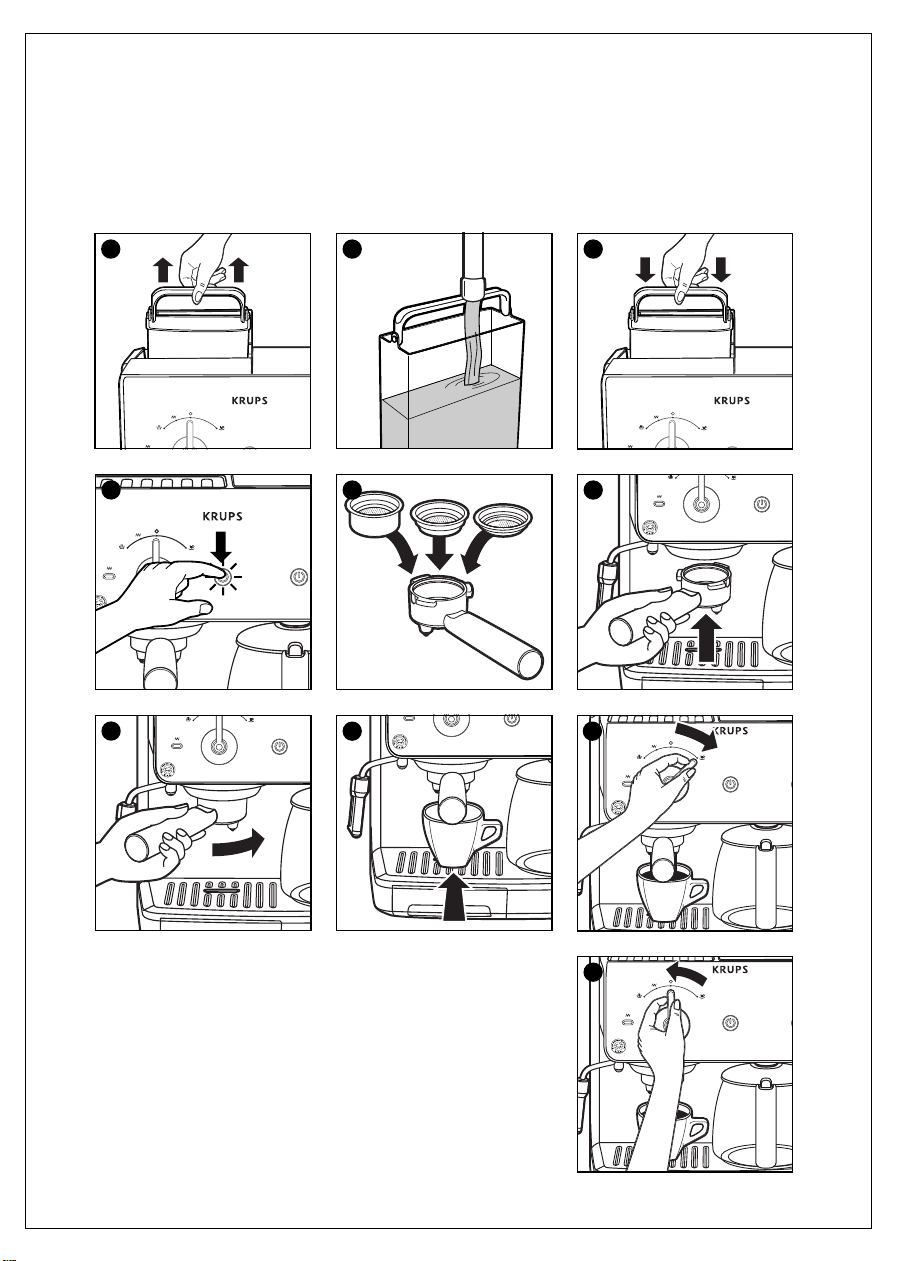
• Open the lid and lift out the water container
using the handle (1). Fill the water container
with fresh, cold water (2).
• Place the water container back into the
machine by positioning it firmly in the water
container compartment (3) and close the lid.
• Turn on the machine by pressing button (N)
(4). The pump will work for 2 seconds to fill
the system with hot water for a cup a hot
coffee from the start.
• As soon as the appliance reaches the right
temperature, the orange temperature
control light switches off.
•Your espr esso maker is equipped with
three filters designed for 1 cup, or for 2
cups of espresso using ground coffee, or
for E.S.E. (Easy Serving Espresso) pods.
The first comes in the filter holder (I),
the other two are found in the
appliance’s transport packaging.
• Choose the filter that you wish to use and
place it in the filter holder (5). Store the 2
others in the espresso lid (A).
• Then place the filter holder under the
appliance’s brewing head. To ensure that the
filter holder is in the correct position, turn
the handle so it points to the left at a 45
degree angle (6), place the filter holder flat
against the brewing head, then turn the
handle towards the right (7) as far as it can
go.
• Place a container, as large as possible,
beneath the filter holder (8).
The machine is ready to operate.
• By turning the control button to the right (O)
to espresso mode; the water will flow
through the pipes of the appliance (9).
• Let approximately 250 ml flow through, then
turn the control button (O) back to the
central position (10).
To start the coffee maker part, see the FILTER
COFFEE section.
1. MAKING ESPRESSO
The appliance will pre-brew the coffee before
making each cup in order to bring out the full
flavour for a satisfying cup of coffee. The
pump will work for 3 seconds, stop for
3 seconds, then continue with the cycle until
the end of the process.
. WITH GROUND COFFEE
For best results, we recommend that you first
pre-heat the accessories (filter holder, filters
and cups) without putting in ground
coffee. To do this:
• Fill the water container with fresh, cold
water (1) (2) (3) and turn on the machine
(4).
• Put the filter holder and an empty filter in
place (6) (7), and place the espresso cups
underneath.
• As soon as the appliance reaches the right
temperature, the orange temperature
control light switches off.
• Turn the control button (O) to espresso
mode (9). Take the pre-brewing into
account.
• The cups will fill with hot water. Once filled,
turn the button (O) back to the central
position and empty the cups.
After making your first espresso and the
machine is warmed, the espresso cups can
then be pre-heated on the cup warming plate.
. Preparing an espresso:
• Fill the water container (1) (2) (3) and turn
on the machine (4).
• Put the filter for one or two cups into the
filter holder (5).
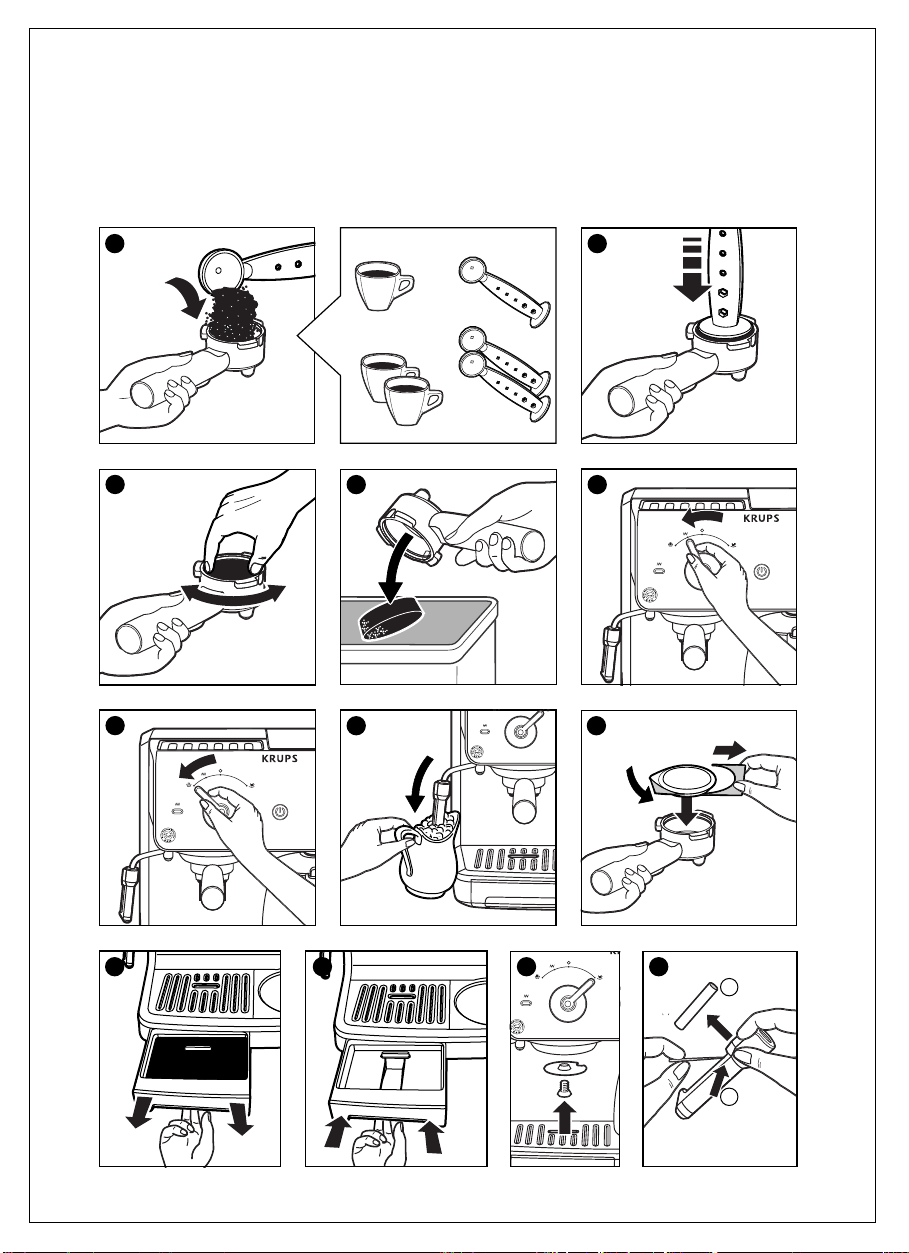
• Place some ground coffee in the filter (1 or 2
measuring scoops), and then tamp it down
firmly; the coffee should reach the lip of the
filter (11) (12).
• Remove any ground coffee which is lying
around the filter (13).
• Replace the filter holder into the machine.
Turn the filter holder until it is firmly locked
into place (6) (7).
• Place one or two espresso cups beneath the
filter holder’s coffee outlets.
21
Page 20

As soon as the appliance reaches the right
temperature, the orange temperature control
light switches off.
• Turn the control button (O) to espresso
mode (9). Take the pre-brewing into
account.
• When the desired quantity of espresso has
been made, turn the button (O) to the
central position (10).
• Remove the filter holder and the filter from
the machine and take out the coffee
grounds (14).
The filter can be refilled to make more
espressos.
Caution: if the water container is empty
and the pump is running, you will hear a
very distinct noise, which is louder than
the normal operating sound. If this
happens, press the start/stop switch (4).
Check the water container and refill as
needed.
Never let the machine run when the
water container is empty as this can
damage the pump.
USING THE SPECIAL “ E.S.E. “ FILTER
.
The E.S.E. system was designed for making
Italian-style “espresso ristreto” (squeezed).
The amount of coffee is 35 ml and the water
should take 20 seconds to run through.
"ESE", which stands for "Easy Serving
Espresso", is a selected measure of coffee,
ground and pressed between two filter papers
making it ready for use. This system makes it
easy for you to prepare your espresso because
you avoid the measurement and tamping
down operations and it also makes it easier
for you to clean the appliance.
We do not intend, or recommend, that
the E.S.E. servings be used for making
more then one single serving or a “long
espresso”.
We recommend that you take care when
handling and storing the E.S.E. pre-portioned
pods so that they do not become deformed.
For best results, we recommend that you preheat the accessories (filter holder, filter basket
and cups) without any coffee. To do this, see
section entitled “Espresso Making” above.
. Preparing an espresso:
• Fill the water tank (1) (2) (3) and turn on the
machine (4).
22
Positioning the E.S.E. pod (18).
Tear excess paper from pod at perforated
edge. Place the E.S.E. pod with the RED
MARKING FACE DOWN (bend the paper
corners down) in the E.S.E. filter holder fitted
with its own filter.
•Take care to put all the paper inside the
filter or you may get some drips.
Placing the E.S.E. pod correctly will create a
richer, thicker crema.
Locking the handle tightly and properly will
also help avoid leakage from the filter holder
and ensure a better brewing cycle.
Place the filter holder inside the brewing head
and firmly turn the handle as far right as
possible (6) (7) (8).
As soon as the appliance reaches the right
temperature, the orange temperature control
light switches off.
• Turn the control button (O) to espresso
mode (9). Take the pre-brewing into
account.
• When the desired quantity of espresso has
been made (35 ml), turn the control button
(O) to the central position (10).
• Remove the filter holder from the brewing
head and throw away the used coffee pod.
2. STEAM FUNCTION
The thumping noise which occurs while steam
is being produced comes from the intermittent regulation of the pump and has no effect
on the proper working of the machine.
If you wish to make an espresso
immediately after using the steam
function, the appliance must first be allowed
to cool down in order to achieve the correct
temperature for preparing an espresso.
• When you turn the selector to the O setting,
the appliance automatically cools down,
launching 3 pumping cycles. The cold
water pumped in this way cools down the
heating system. During the pumping cycles,
the excess steam contained in the heating
system is released along with hot water into
the drip tray. The release of steam and
the accompanying noise are required for
the appliance to cool down.
Caution: during and after use, the metal
parts of the nozzle (E) and the cappuccino
accessory (F) are very hot.
Page 21

. Using the Cappuccino accessory (F)
The cappuccino accessory makes it easy to
produce hot milk or frothy milk for making a
cappuccino, latte or hot chocolate, for
example.
It is preferable to use very cold, very fresh,
milk (kept in the refrigerator).
• Fill the water container with fresh, cold
water (1) (2) (3) and turn on the machine
(4).
• Put the cappuccino accessory in place on the
steam nozzle.
• Place a cup under the cappuccino accessory.
• Pour about 100 ml of cold milk into a
container.
• When your appliance is ready to make an
espresso, turn the control button (O) to
preheat mode
• The orange temperature control light comes
on. As soon as the light switches off, the
appliance is ready.
Next put your container under the accessory
so that the end of the accessory is plunged
into the milk, without touching the bottom
(17).
• Turn the control button (O) to steam mode
(16).
• Once the desired quantity of milk froth has
been produced, return the control button
(O) to the central position (10).
Follow the cleaning operation below in order
to prevent the milk from drying on the
cappuccino accessory:
• Place a cup under the auto cappuccino
accessory (F).
Repeat the procedure for preparing frothy
milk, but this time with water, for
approximately 1 minute.
• Turn the control button (O) to the central
position (10).
• Clean the cappuccino accessory with a damp
cloth.
• For more thorough cleaning of the auto
cappuccino accessory, please refer to the
section below entitled "Cleaning the
machine".
(15).
Recipes
Savour your espresso just as you like it: when
you want to relax or to round off a good
meal.
Here are a few recipes which you will be able
to create with your espresso machine.
. Original espresso
• Take one measuring spoonful of good
quality well roasted espresso coffee, and run
it directly into the pre-heated cup.
If you use good, finely ground coffee, the cup
will be crowned by a fine head of froth.
• Add sugar if desired and treat yourself.
Original espresso is drunk without milk but
plenty of sugar.
. Cappuccino
For a state of the art cappuccino, the ideal
quantities are as follows: 1/3 coffee, 1/3 hot
milk, 1/3 milk froth. The quantity of hot milk
+ froth obtained should be about double the
amount of coffee prepared.
• Use large cups which have been pre-heated.
• Fill them with coffee to the equivalent of
one cup of espresso and top up with milk
which has been frothed up using the
cappuccino accessory.
• Lastly, sprinkle with drinking chocolate
powder.
. Café crème
• Prepare a classic espresso in a large cup.
• Add a cloud of cream to make an espresso
with milk.
You can also replace the cream with hot milk.
. Caffe corretto *
• Prepare a cup of espresso in the normal way.
• Then slightly ‘correct’ the taste by adding
1/4 or 1/2 a glass of cognac.
You can also use anisette, grappa, Sambuco,
Kirsch or Cointreau for the same effect.
. Coffee Liqueur *
• Mix in an empty 0.75 litre bottle: 3 cups of
espresso, 250 g brown cane sugar, 1/2 litre
cognac or Kirsch.
• Leave the mixture to soak for at least
2 weeks.
23
Page 22

You will then have a delicious liqueur,
especially for coffee lovers.
. Iced coffee à l’italienne
4 vanilla ice cubes, 2 cups of cold sugared
espresso, 1/8 litre milk, fresh cream, grated
chocolate.
• Mix the cold espresso with milk.
• Distribute the ice cubes among the glasses,
pour the coffee over them and decorate
with fresh cream and grated chocolate.
. Friesian coffee *
• Add a small glass of rum to a sugared cup of
espresso.
• Decorate with a good layer of fresh cream
and serve.
. Espresso flambé *
2 cups of espresso, 2 small glasses of cognac,
2 teaspoonfuls of brown sugar, fresh cream.
• Pour the cognac into heat-resistant glasses,
heat and flame.
• Add sugar, mix, pour the coffee and
decorate with fresh cream.
If you like, the espresso can also be diluted
with a little boiling water.
. Perfect espresso *
2 cups of espresso, 6 egg yolks, 200g sugar,
1/8 litre whipped fresh cream, 1 small glass of
orange liqueur.
• Beat the egg yolks with the sugar until it
forms a thick foamy mass.
• Add the cold espresso and orange liqueur.
• Then mix in the fresh whipped cream.
• Pour the mixture into cups or glasses.
• Put the cups into the freezer.
(*: The abuse of alcohol is dangerous to your
health).
be water present; this does not indicate
that there is a leak, but that your
machine’s thermoblock is being purged. If
necessary, clean the drip tray and drip tray
grid with water and a little non-abrasive
washing-up liquid, rinse and dry. Replace it
correctly (20).
. The brewing head, the filter and the
filter holder
These must be cleaned after each use. All you
need to do is wipe with a damp cloth over the
brewing head of your machine and to wash
the other accessories in water and a little nonabrasive washing up liquid, rinse and dry.
If the brewing head is heavily clogged up,
unscrew the grid, clean it and refit it, pressing
down firmly (21).
When your espresso machine is not being
used, do not leave the filter holder on the
machine as it will cause unnecessary wear
of the gasket.
. The cup warming plate: remove this to
clean it with water and a little non-abrasive
dishwashing liquid, rinse and dry.
. The cappuccino accessory
For more thorough cleaning the auto cappuccino accessory can be dismantled from the
machine.
Clean it with water, a little non-abrasive
washing up liquid and a small brush. Rinse
and dry it.
Before putting it back in place, make sure that
the air inlet holes (on both sides of the little
metal tube) are not blocked by residues of
milk. Unblock them with a needle if necessary
(22).
Descaling
Cleaning the Machine
- Never wash your espresso machine
accessories in the dishwasher.
After use, the water tank must be emptied.
. Drip tray
If several espressos are being prepared one
after the other, the drip tray should be
emptied from time to time (about once every
7 - 8 espressos) (19). It is normal for there to
24
• Descaling of your espresso should be done
fairly frequently with citric or tartaric acid.
• Use caution when descaling your espresso
machine as the acid substance within the
descaling poweder may damage countertops
or any other surface it comes in contact
with.
• The guarantee does not include
espresso machines which do not
function, or do not function properly,
because descaling has not been carried
out.
Page 23

However, we would advise you to use the
Krups descaling accessory, reference F054,
which is available from Krups after-sales service centres. This accessory includes, apart
from two descaling doses, a testing strip for
water hardness to assess the frequency of
descaling of your appliance in normal use.
Descaling depends on the hardness of the
water, but also on the use cycle. The frequently
of descaling indicated by the F054 accessory is
thus given by way of indication only.
- Then follow the following method:
• Remove the Claris-Aqua Filter System
cartridge if you have installed one.
• Unscrew the grid from the brewing head of
the appliance and clean it (21).
• Dissolve a sachet of KRUPS descaling
accessory, reference F054, in half a litre of
lukewarm water and pour the whole lot into
the empty water tank.
• Start the appliance by pressing button (N)
(4). As soon as the appliance reaches the
right temperature, the orange temperature
control light switches off.
• Place a container under the brewing head.
Run through about 1/3 of the liquid
immediately, setting the selector to the posi-
tion
(9).
• Stop the appliance by pressing button (N) (4)
and leaving the position
(9) engaged
and wait for 10 – 15 minutes to allow the
descaler to take effect.
• Next, start the machine again by pressing
button (N) (4) and allow the rest of the
liquid to run through.
• Then rinse with two water tanks of fresh
water, clean the brewing head and replace
the grid on the head of the appliance
(Consult the “Cleaning the Machine”
section).
Troubleshooting
Problems Probable Corrective
causes actions
Espresso not hot Cups, filter and Preheat the
enough filter holder accessories (cups,
are cold. filter, filter holder)
See paragraph
"Preparing an
espressoé.
Coffee leaks The filter holder See paragraph
around the filter is not mounted "Preparing an
holder correctly or has espresso".
not been tightened
sufficiently.
There are coffee Clean around the
grounds on the filter and the
edge of the filter gasket.
The brewing head Clean the gasket
gasket is dirty. with a damp
cloth.
The brewing Contact an
head gasket approved Krups
is defective. service centre.
Pump is very noisy No water in the Fill the water tank.
water tank.
Water tank incor- Press firmly down
rectly mounted. on the water tank.
Coffee grounds too Use fresh coffee.
old or very dry
and the pump cannot produce
pressure.
Water does not No water in the Fill the water tank.
run through water tank. Press firmly down
Water tank incor- on the water tank.
rectly mounted.
The filter is blocked, Clean the filter and
the coffee grounds the grid on the
are too fine or head.
tamped down too See the paragraph
hard. "Maintenance"
and try a coarser
coffee.
Brewing head Put the grid to
grid is encrusted soak in descaling
solution
See paragraph
"Maintenance".
Appliance needs See paragraph
descaling. "Descaling".
Water runs Coffee grounds too Try a finer coffee
through too coarse
quickly
25
Page 24

Quantity of Use the spoon
ground coffee provided to
is insufficient. measure out the
coffee.
Coffee grounds not Tamp down the
tamped down coffee again.
firmly enough
The espresso has Coffee grounds Try a finer-ground
no froth (froth on too coarse coffe
coffee)
Coffee grounds Tamp down the
not tamped. coffee again.
Coffee grounds Use fresh coffee.
stale or too dry.
The milk is not Cappuccino acces- See paragraph
very frothy. sory blocked. "Maintenance".
Milk not fresh. Use very fresh milk.
Milk is lukewarm. Put milk in
refrigerator.
Milk not suitable. Try another brand
of milk.
Lots of water on Grounds not Tamp down the
the coffee properly tamped grounds.
grounds. down.
Insufficient quantity Increase the
of ground coffee. quantity of ground
coffee.
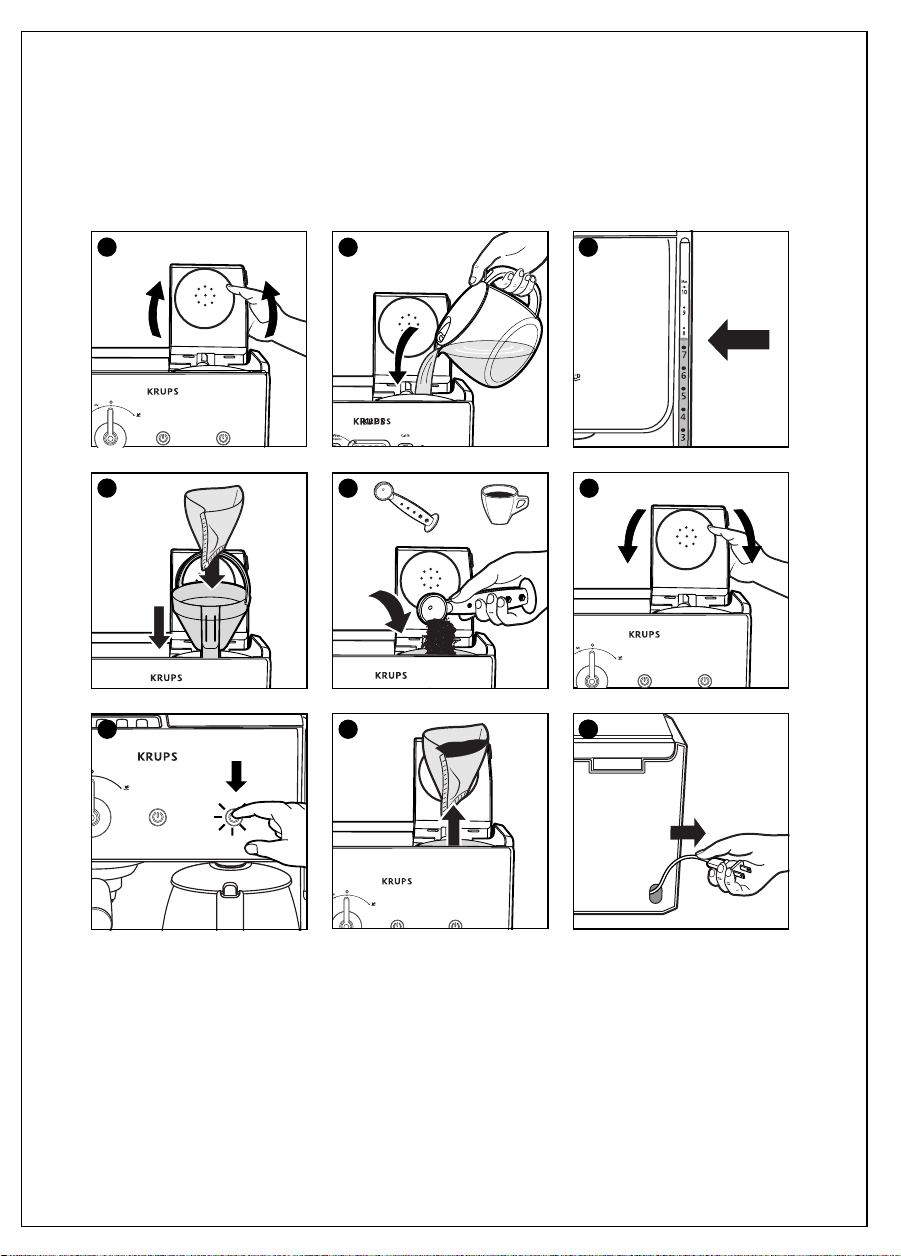
• The coffee maker is fitted with a drip-stop
device, allowing you to serve coffee before
the water has finished running through.
Replace the jug quickly to avoid overflow.
• Do not exceed the maximum capacity of the
water tank as shown by the water level
indicator (e).
• Wait for a few minutes before making
coffee a second time.
• The jug (g) and its lid (f) may be used for
warming up coffee in the microwave. Never
put the empty jug in the microwave.
Cleaning
•To dispose of the used grounds, lift the filter
holder out of the coffee maker (30).
• Unplug the appliance.
• Do not clean the appliance while hot.
• Clean with a damp cloth or sponge.
• Never immerse the appliance in water or put
it under running water.
• The glass coffee jug, the lid and the filter
holder can be washed in the dishwasher.
Filter coffee
Before First Use
• Operate the coffee machine for the first time
with 1 litre of water, without any grounds.
Making Coffee
The quality of the water that you use
determines the taste of your coffee. You must
ensure that the water is freshly drawn from
the tap (so that it has not had the time to
stagnate in the air), that it does not smell of
chlorine and that it is at a fairly cold
temperature.
We recommend that you filter your water
using a Krups Duo Filter cartridge,
reference XS 1000.
• Follow the illustrations from 23 to 28.
• Use only cold water and a N° 4 filter paper
or a permanent filter.
26
Descaling
Number of cycles between 2 descaling operations
Without Duo Filter With Duo Filter
Soft water 60 120
Hard water 40 80
You may use:
• either a sachet of descaler diluted in 250 ml
of water,
• or 250 ml of white vinegar.
• Pour into the tank (b) and start the coffee
maker (without coffee).
• Allow half the liquid to run into the coffee
jug (g), then switch off.
• Leave to work for one hour.
• Restart the coffee maker to complete the
run-through.
• Rinse the coffee maker by running it 2 or 3
times with 1 Litre of clean water.
The guarantee does not cover coffee
makers that fail or work badly, due to
scale.
Page 25

In the event of a problem
- Check:
• that the appliance is properly connected,
• that the switch is in the “I” position.
- There seems to be a leak
• Check if the water tank has been filled
above the maximum level.
- The time taken for the water to run
through is too long and the appliance is
very noisy:
• descale your coffee maker.
Your appliance still does not work?
Contact a Krups approved service centre.
HELPLINE:
If you have any product problems or queries,
please contact our Customer Relations Team
first for expert help and advice:
0845 602 1454 - UK
(01) 4751947 - Ireland
Or consult our website - www.krups.co.uk
Environment protection
first!
Your appliance contains valuable materials
which can be recovered or recycled.
Leave it at a local civic waste collection
point.
27
Page 26

Français
Description
Espresso :
A : couvercle espresso avec rangement des
filtres
B: réservoir espresso amovible
C : plaque repose-tasses
D: tête de percolation
E : buse vapeur
F : accessoire Cappuccino pour moussage du
lait
G : grille récolte-gouttes
H : tiroir récolte-gouttes
I : porte-filtre
J : filtres espresso poudre 1 & 2 tasses
K : filtre espresso pour dosettes ESE
(Easy Serving Espresso)
L : filtre espresso « CLARIS - Aqua Filter
System F088» (accessoire non fourni)
M : cuillère doseur pour mouture
N : interrupteur marche / arrêt avec voyant
bleu de mise en marche
O : sélecteur de fonctions espresso
P : voyant orange de température
Café :
a : couvercle cafetière – accès réservoir et
porte-filtre
b : réservoir cafetière filtre
c : logement du porte-filtre
d : porte filtre avec poignée à verrouillage
e : niveau d’eau gradué du réservoir cafetière
filtre
f : couvercle à charnière de verseuse café
filtre
g : verseuse pour café filtre
h : plaque chauffante de maintient au chaud
i : filtre café « Duo Filter XS 1000 »
(accessoire non fourni)
j: interrupteur marche /arrêt café filtre avec
voyant bleu de mise en marche
Consignes de sécurité
• Avant la mise en marche de votre espresso,
lisez attentivement ce mode d’emploi. Ne
branchez l’appareil que sur une prise avec
terre. Vérifiez que la tension indiquée sur la
plaque signalétique de l’appareil corresponde bien à celle de votre installation
électrique.
• Ne posez pas votre espresso sur une surface
chaude (plaque électrique, par exemple) ou
à proximité d’une flamme.
• N’enlevez pas le porte-filtre contenant la
mouture durant le passage de l’eau car
l’appareil est alors sous pression.
• N’utilisez pas l’appareil si le tiroir et la grille
récolte-gouttes ne sont pas mis en place.
• La prise doit être retirée en cas de problème
durant l’écoulement du café ou avant de
nettoyer votre appareil.
• Ne débranchez pas l’appareil en tirant sur le
cordon et ne placez pas le cordon sur un
angle vif ou le coin d’un meuble.
• Evitez le contact du cordon ou de vos mains
avec les parties chaudes de l’appareil (plaque
repose tasses, porte-filtre, buse vapeur,
accessoire cappuccino, plaque chauffante de
maintien au chaud).
• Ne plongez jamais l’appareil dans l’eau.
• Tenez les enfants à distance et ne laissez pas
pendre le cordon.
• Conformez-vous à la notice pour les
instructions de détartrage.
• Ne mettez pas l’appar
endommagé ou si le cordon est en mauvais
état.
• Si le cordon ou tout autre élément spécifique
devenait défectueux, ils devront être
remplacés uniquement par un centre service
agréé Krups. En aucun cas, l’appareil ne doit
être ouvert par vos soins.
• Vérifiez que le porte-filtre espresso est bien
serré avant de faire couler le café et
remettez le sélecteur sur O avant de déserrer
le porte-filtre.
• Tenez l’appareil hors de portée des enfants.
Les jeunes enfants et les personnes handicapées ne doivent utiliser l’appareil que sous la
surveillance d’un adulte responsable.
eil en marche s’il est
28
Page 27

• Il y a risque de brûlures si le couvercle de
cafetière est enlevé pendant l’infusion.
• Ne versez jamais de l’eau froide dans le
réservoir cafetière filtre, immédiatement
après le cycle d’infusion. Laissez refroidir
l’appareil avant de remplir à nouveau le
réservoir.
• A défaut d’utilisation des cartouches
filtrantes préconisées par Krups, ne versez
dans les réservoirs d’eau espresso et
cafetière que de l’eau et des solutions de
détartrage spécifiées dans le manuel.
• Pour éteindre, appuyez sur le bouton « off »
puis débranchez.
• Utilisez cet appareil uniquement pour
l’usage auquel il est destiné.
• Soyez extrêmement prudent lors de
l’utilisation de la fonction vapeur.
Café espresso
Pour un résultat optimal, choisissez une
mouture spéciale espresso idéalement
compactée. Grâce à la pression créee par la
pompe 15 bars de votre machine, l’eau
chaude passe à travers cette mouture fine
pendant un temps réduit. Il en résulte un
liquide riche, noir, extrêmement savoureux et
plein d’arômes: l’essence concentrée du café.
L’espresso n’est pas servi dans une tasse à café
traditionnelle, mais plutôt dans de petites
tasses de 70 ml. Le parfait espresso est
recouvert d’une magnifique mousse épaisse et
dorée qu’on appelle « crème », un produit
provenant de l’huile naturelle des grains de
café qui donne à l’espresso toute la richesse
de sa saveur et de son arôme.
Il est important que votre café espresso soit
bien torréfié et adéquatement moulu. Si vous
ne pouvez pas acheter du café espresso déjà
moulu, utilisez un moulin à caf
les grains. Le café ne doit pas être moulu trop
finement. Il doit être légèrement granuleux,
avec une consistance variant entre celle de la
farine et du sucre. Une trop fine mouture
donnera un espresso amer et risque de
bloquer la grille de la tête de percolation et le
filtre; une mouture trop grossière donnera un
espresso faiblement extrait.
é pour moudr
e
Les trois autres facteurs qui détermineront la
qualité de votre espresso, outre le café que
vous utilisez, sont l’eau, la température et la
pression. Votre machine à espresso Krups
assure la précision de ces trois facteurs au
moyen d’une technologie spécialement
conçue à cette fin. Vous devez vous assurer
que l’eau est fraîchement sortie du robinet
(afin qu’elle n’ait pas eu le temps de devenir
stagnante au contact de l’air), qu’elle est
exempte d’odeur de chlore et qu’elle est
relativement froide.
Nous vous recommandons de la filtrer
avec une cartouche KRUPS Claris - Aqua
Filter System (réference F088) disponible
dans le commerce.
Il circule quelques fausses idées au sujet de
l’espresso. La première veut qu’il soit amer et
qu’il goûte le brûlé. En fait, l’espresso idéal est
aromatique, doux-amer (et non amer), très
pré
sent en bouche, avec un goût persistant.
Le second mythe est que
vous gardera éveillé toute la nuit. Or, malgré
son goût plus prononcé, l’espresso contient
en fait moins de caféine que le café ordinaire,
soit environ 60 à 80 mg par tasse en comparaison avec 80 à 100 mg par tasse; cela est dû
à une durée de percolation moins longue pour
un espresso.
Enfin, certains pensent que l’espresso est trop
long et compliqué à préparer. En vérité,
l’espresso, comme son nom le dit, est conçu
pour être servi rapidement, sans préparation
élaborée. Comme vous le découvrirez, votre
machine à espresso Krups a été conçue avec
flair pour une facilité d’utilisation et pour
qu’elle soit durable.
: boire de l’espresso
Pour commencer
Pour profiter pleinement des avantages de
votre nouvelle machine à espresso Krups,
veuillez lire attentivement et en entier les
directives ci-dessous avant d’utiliser l’appareil.
• Placez votre machine espresso sur une
surface stable et résistante à la chaleur, loin
des plaques chauffantes électriques, par
exemple, ou d’une flamme.
29
Page 28

• Branchez l’appareil dans une prise mise à la
terre. Vérifiez que le voltage indiqué dans les
spécifications techniques, sous l’appareil,
correspond à votre installation électrique.
• Assurez-vous que le plateau d’égouttage et
la grille sont en place lorsque vous utilisez
l’appareil.
Espresso
• Laissez couler environ 250 ml puis replacez
le bouton de commande (O) en position
centrale (10).
Pour la mise en route de la partie cafetière, se
reporter au chapitre CAFE FILTRE.
Utilisation des différentes
fonctions de votre espresso
Avant d’utiliser votre appareil pour la première
fois, nettoyez le système au complet :
• Ouvrez le couvercle et enlevez le réservoir
d’eau en utilisant la poignée (1). Remplissez
le réservoir d’eau fraîche et froide (2).
• Replacez le réservoir sur l’appareil et assurezvous qu’il est solidement en place (3) puis
refermez le couvercle.
• Mettez l’appareil en marche en appuyant
sur le bouton (N) (4). La pompe fonctionne
alors pendant 2 secondes afin d’alimenter le
systéme en eau et garantir un café chaud
dès le 1ére tasse.
• Dés que l’appareil atteint la bonne température, le témoin lumineux orange s’éteint.
• Votre espresso est équipé de trois filtres
conçus soit pour 1 tasse, soit pour 2
tasses d’espresso à partir de café moulu,
soit pour les dosettes E.S.E. (Easy
Serving Espresso). Le premier est livré
dans le porte-filtre (I), les 2 autres sont
dans les calages de transport de l’appareil.
• Choisissez le filtre que vous souhaitez utiliser
et placez le dans le porte-filtre (5). Rangez
les 2 autres dans le couvercle espresso (A).
• Placez ensuite le porte-filtre sous la tête de
percolation de l’appareil. Pour vous assurer
que le porte-filtre est mis en place correctement, tournez la poignée de façon à ce
qu‘elle pointe vers la gauche, à un angle de
45 degrés (6), placez le porte-filtr
ment sous la tête de percolation, levez puis
tournez la poignée vers la droite (7) aussi
loin que possible.
• Placez un récipient aussi large que possible
sous le porte-filtre (8).
• En tournant le bouton de commande vers la
droite (O) en mode espresso, l’eau coulera
dans les tuyaux de l’appareil (9).
30
e directe-
1. PRÉPARATION D’UN ESPRESSO
Afin de dégager tous les arômes du café et
vous donner entière satisfaction, cette
machine réalise une pré-infusion avant chaque
café. La pompe fonctionne 3 secondes,
s’interrompt les 3 secondes suivantes puis
continue le cycle jusqu’à la fin de la prépara-
tion.
. AVEC DU CAFÉ MOULU
Pour de meilleurs résultats, nous vous
recommandons de préchauffer les accessoi-
res (porte-filtre, filtre et tasses) sans y mettre
de café moulu. Pour ce faire :
• Remplissez le réservoir d’eau fraîche et
froide (1) (2) (3) et mettez l’appareil en
marche (4).
• Mettez en place le porte-filtre et un filtre
vide (6) (7), et placez les tasses à espresso
en dessous.
• Dés que l’appareil atteint la bonne température, le témoin lumineux orange s’éteint.
• Tournez le bouton de commande (O) en
mode espresso (9). Tenir compte de la pré-
infusion.
• Les tasses se rempliront d’eau chaude. Une
fois qu’elles sont remplies, remettez le
bouton (O) en position centrale et videz les
tasses.
Après avoir préparé votre premier espresso et
une fois que l’appareil est chaud, vous pouvez
préchauffer les tasses sur le repose-tasses (C).
. Préparer un espresso :
• Remplissez le réservoir d’eau (1) (2) (3) et
mettez l’appareil en marche (4).
• Placez le filtre d’une tasse ou de deux tasses
dans le porte-filtre (5).
• Mettez du café moulu dans le filtre (1 ou 2
mesures) et compactez-le fermement; le café
doit êtr
filtre (11) (12).
e au même niveau que le rebord du
Page 29

• Enlevez tout reste de café sur le pourtour du
filtre (13).
• Replacez le porte-filtre dans l’appareil.
Tournez le porte-filtre de façon à ce qu’il soit
solidement verrouillé en place (6) (7).
• Placez une ou deux tasses à espresso sous
les sorties café du porte-filtre.
Dés que l’appareil atteint la bonne température, le témoin lumineux orange s’éteint.
• Tournez le bouton de commande (O) en
mode café (9). Tenir compte de la pré-
infusion.
• Lorsque la quantité d’espresso désirée est
atteinte, tournez le bouton (O) en position
centrale (10).
• Retirez le porte-filtre et jetez le marc de café
utilisé (14).
Le filtre peut être rempli de nouveau pour
préparer d’autres espressos.
Attention : si le réservoir d’eau est vide et
que la pompe fonctionne, vous entendrez
un son très particulier, plus fort que le son
normal de fonctionnement. Si cela
survient, appuyez sur l’interrupteur
marche / arrêt (4). Vérifiez le réservoir
d’eau et remplissez-le au besoin.
Ne laissez jamais l’appareil fonctionner
lorsque le réservoir d’eau est vide car cela
peut endommager la pompe.
. AVEC LE FILTRE SPÉCIAL POUR DOSETTES E.S.E.
Le système E.S.E est conçu pour la réalisation
d’espressos « ristretto » (serré) à l’italienne. La
quantité de café correspond à 35 ml et à
20 secondes de passage de l’eau.
« ESE » pour « Easy Serving Espresso »
(préparation simplifiée de l’espresso) est une
dosette de café sélectionnée, moulue et
compactée entre deux papiers filtres qui la
rendent prête à l’emploi. Ce système simplifie
la préparation de l’espresso en évitant les
opérations de dosage, de tassage et en
facilitant le nettoyage de l’appareil.
Il n’est pas recommandé d’utiliser les
dosettes E.S.E. pour préparer plus d’un
espresso ou pour préparer un espresso
allongé.
Nous vous conseillons de prendre soin de ne
pas déformer les dosettes E.S.E. lorsque vous
les manipulez ou les rangez.
Pour de meilleurs résultats, nous vous
recommandons de préchauffer les accessoires
(porte-filtre, panier-filtre et tasses) sans café.
Pour ce faire, consultez la section «
tion d’un espr
. Préparer un espresso :
• Remplissez le réservoir d’eau (1) (2) (3) et
mettez l’appareil en marche (4).
Placez la dosette E.S.E. (18).
Déchirez l’excédant de papier autour de la
dosette en suivant les pointillés. Placez la
dosette E.S.E. dans le porte-filtre AVEC
L’INSCRIPTION ROUGE VERS LE BAS
(repliez bien les coins du papier).
• Assurez-vous de placer le papier complètement à l’intérieur du filtre, sinon il
pourrait y avoir des fuites.
Pour une crème plus riche et épaisse, il faut
placer la dosette E.S.E. correctement.
Pour éviter les fuites du porte-filtre et assurer
un meilleur cycle de percolation, il faut
verrouiller la poignée hermétiquement et
adéquatement.
Placez le porte-filtre dans la tête de
percolation et tournez fermement la poignée
vers la droite, aussi loin que possible (6) (7)
(8).
• Dés que l’appareil atteint la bonne température, le témoin lumineux orange s’éteint.
• Tournez le bouton de commande (O) en
mode espresso (9). Tenir compte de la pré-
infusion.
• Lorsque la quantité d’espresso désirée est
atteinte (35 ml), tournez le bouton de
commande (O) en position centrale (10).
ez le porte-filtre de la tête de
• Retir
percolation et jetez la dosette de café
usagée.
esso » ci-dessus.
Prépara-
2. FONCTION VAPEUR
Le bruit sourd que vous entendez lorsque
l’appareil produit de la vapeur provient de la
régulation intermittente de la pompe et n’a
aucun effet sur le bon fonctionnement de
l’appareil.
Si vous voulez faire un expresso immédiatement après la vapeur, l’appareil devra
d’abord être refroidi pour atteindre la
température adéquate pour la préparation de
l’expresso.
• Lorsque vous ramenez le sélecteur en
position O, l'appareil refroidit automati-
31
Page 30

quement en lançant 3 cycles de pompage. L’eau froide ainsi pompée va venir
refroidir le système de chauffe. Durant les
cycles de pompage, le surplus de vapeur
contenu dans le système de chauffe se libère
avec l’eau chaude dans le plateau récolte-
gouttes. Le dégagement de vapeur et le
bruit qui l’accompagne sont nécessaires
au refroidissement de l’appareil.
Attention : pendant et après l’utilisation, les
parties métalliques de la buse (E) et de
l’accessoire cappuccino (F) sont très chaudes.
. Utilisation de l’accessoire cappuccino (F)
L’accessoire cappuccino facilite la préparation
de lait chaud ou de mousse de lait pour la
réalisation d’un cappuccino, d’un café latte ou
d’un chocolat chaud par exemple.
Il est préférable d’utiliser du lait 1/2 écrémé,
frais et froid (conservé au réfrigérateur).
• Remplissez le réservoir d’eau fraîche et
froide (1) (2) (3) et mettez l’appareil en
marche (4).
• Placez l’accessoire cappuccino (F) sur la buse.
• Déplacez l’accessoire cappuccino vers
(15).
(16).
eil.
l’extérieur de l’appar
• Versez environ 100 ml de lait froid dans un
petit récipient étroit ayant environ une
capacité de 0,5 litre et pouvant passer sous
l’accessoire cappuccino. Le lait doit être bien
refroidi ainsi que son récipient (il est donc
déconseillé de passer sous l’eau chaude le
récipient avant de faire mousser le lait).
• Lorsque votre appareil est prêt pour la
préparation d’un espresso, tournez le
bouton de commande (O) en mode
préchauffage
• Le témoin lumineux orange s’allume. Dés
que le témoin s’éteint, l’appareil est prêt.
Approchez votre récipient sous l’accessoire de
façon à ce que son extrémité trempe dans le
lait, sans toucher le fond (17).
• Tournez le bouton de commande (O) en
mode vapeur
• Une fois la quantité désirée de mousse de
lait obtenue, ramenez le bouton de commande (O) en position centrale (10).
Pour éviter que le lait ne sèche sur l’accessoire
à cappuccino, suivez les directives suivantes :
• Placez un récipient rempli d’eau sous
l’accessoire cappuccino (F).
32
Procédez comme pour la préparation de lait
mousseux mais cette fois avec de l’eau,
pendant environ 1 minute.
• Tournez le bouton de commande (O) en
position centrale (10).
• Nettoyez l’accessoire cappuccino avec un
linge humide.
• Pour un nettoyage en profondeur de
l’accessoire cappuccino, reportez-vous au
paragraphe «entretien».
Recettes
Dégustez votre espresso comme vous l’aimez:
lorsque vous désirez vous détendre ou pour
terminer un bon repas.
Voici quelques recettes à réaliser avec votre
machine à espresso.
. Espresso original
• Prenez une cuillère doseur de café à espresso
de bonne qualité, bien torréfié et réalisez-le
directement dans la tasse préchauffée.
Si vous utilisez du bon café bien moulu, une
belle couronne de mousse décorera la tasse.
• Ajoutez du sucre si vous le souhaitez et
régalez-vous. L’espresso original se boit sans
lait.
. Cappuccino
Pour un cappuccino dans les règles de l’art, les
quantités idéales sont les suivantes: 1/3 de
café, 1/3 de lait chaud, 1/3 de mousse de lait.
La quantité lait chaud + mousse obtenue doit
donc être d’environ le double du café préparé.
• Utilisez de grandes tasses que vous aurez
chauffées au préalable.
• Remplissez-les de café pour l’équivalent
d’une tasse à espresso et complétez avec du
lait que vous aur
l’accessoire cappuccino.
• Pour finir, saupoudrez de chocolat en
poudre.
. Café crème
• Préparez un espresso classique dans une
grande tasse.
• Ajoutez un nuage de crème pour obtenir un
café crème.
Vous pouvez aussi remplacer la crème par du
lait chaud.
ez fait mousser en utilisant
Page 31

. Café corretto*
• Préparez une tasse d’espresso comme
d’habitude.
• Corrigez ensuite légèrement le goût en
ajoutant 1/4 ou 1/2 verre à liqueur de
cognac.
L’anisette, l’eau de vie de raisins, le Sambuco,
le Kirsch et le Cointreau conviennent aussi à
cet effet.
Il existe encore de nombreuses autres
possibilités pour «anoblir» l’espresso.
L’imagination est illimitée.
. Liqueur au café*
• Mélangez dans 1 bouteille vide de 0,75 litre,
3 tasses d’espresso, 250 g de sucre candi
brun, 1/2 litre de Cognac ou de Kirsch.
• Laissez macérer le mélange pendant au
moins 2 semaines.
Vous aurez ainsi une liqueur délicieuse,
surtout pour les amateurs de café.
. Café glacé à l’italienne
4 boules de glace à la vanille, 2 tasses
d’espresso froid sucré, 1/8 l de lait, crème
fraîche, chocolat râpé.
• Mélangez l’espresso froid avec du lait.
• Répartissez les boules de glace dans des
verres, versez le café dessus et décorez avec
la crème fraîche et le chocolat râpé.
. Café à la frisonne*
• Ajoutez un petit ver
d’espresso sucré.
• Décorez avec une bonne couche de crème
fraîche et servez.
. Espresso flambé*
2 tasses d’espresso, 2 petits verres de Cognac,
2 cuillerées à café de sucre brun, crème
fraîche.
• Versez le Cognac dans des verres résistant à
la chaleur, chauffez et flambez.
• Ajoutez le sucre, mélangez, versez le café et
décorez de crème fraîche.
Si on le désire, l’espresso peut aussi être dilué
avec un peu d’eau bouillante.
. Espresso parfait*
2 tasses d’espresso, 6 jaunes d’œuf, 200g de
sucre, 1/8 litre de crème fraîche sucrée, 1 petit
verre de liqueur d’orange.
re de rhum à une tasse
• Battez les jaunes d’œuf avec le sucre jusqu’à
formation d’une masse épaisse et mousseuse.
• Ajoutez l’espr
d’orange.
• Mélangez ensuite la crème fraîche fouettée.
• Versez le tout dans des coupes ou des
verres.
• Mettez les coupes dans le congélateur.
. Pudding à la mocca
2 tasses d’espresso, 1/2 litre de lait, 1 sachet
de poudre à pudding à la vanille, 3 jaunes
d’œuf, 1/8 litre de crème fraîche sucrée,
150 g de sucre.
• Préparez un pudding à la vanille avec le lait,
la poudre à la vanille et le sucre.
• Ajoutez les jaunes d’œuf au pudding encore
chaud.
• Faites refroidir et ajoutez l’espresso et la
crème fouettée.
(* : L’abus d’alcool est dangereux pour la
santé.)
esso froid et la liqueur
Nettoyer l’appareil
- Ne lavez jamais les accessoires de votre
machine à espresso au lave-vaisselle.
Vous devez vider le réservoir d’eau après
utilisation pour éviter les traces de calcaire.
. Le tiroir récolte-gouttes
Si vous préparez plusieurs espressos de suite,
vous devez vider le plateau de temps en
temps (environ chaque 7 à 8 espressos) (19). Il
est normal qu’il y ait de l’eau, cela n’indique
pas la présence d’une fuite mais la purge
du thermoblock de votre machine. Au
besoin, nettoyez le tiroir et la grille récolte-
gouttes avec de l’eau et un peu de savon
liquide non abrasif, rincez-les et séchez-les.
Remettez-les en place correctement (20).
. La tête de percolation, le filtre et le
porte-filtre
Idéalement, ces accessoires doivent être
nettoyés après chaque utilisation. Passez
simplement un linge humide sur la tête de
percolation et lavez les autres pièces avec de
l’eau et un peu de savon à vaisselle non
abrasif, rincez-les et séchez-les.
33
Page 32

Si la tête de percolation est très obstruée,
dévissez la grille à l’aide d’une pièce de
monnaie, nettoyez-la puis replacez-la en
pressant fermement (21).
Lorsque vous n’utilisez pas votre machine à
espresso, ne laissez pas le porte-filtre en place
afin de prévenir l’usure du joint d’étanchéité.
. La plaque repose-tasses : pour la nettoyer,
enlevez-la et lavez-la avec de l’eau et un peu
de savon à vaisselle non abrasif, rincez-la et
séchez-la.
. L’accessoire cappuccino
L’accessoire cappuccino est démontable pour
permettre un nettoyage en profondeur.
Lavez-le avec de l’eau et un peu de savon à
vaisselle non abrasif au moyen d’une petite
brosse. Rincez-le et séchez-le.
Avant de le remettre en place, assurez-vous
que les trous d’entrée d’air (de part et d’autre
du petit tube métallique) ne sont pas obstrués
par des résidus de lait. Les déboucher avec
une aiguille si nécessaire (22).
Détartrage
• Dévissez la grille de la tête de percolation et
nettoyez-la (21).
• Dissolvez un sachet de l’accessoire F054 dans
un demi-litre d’eau tiède et versez le tout
dans le réservoir d’
• Mettez l’appar
eau vide.
eil en marche en appuyant sur
le bouton (N) (4). Dés que l’appareil atteint la
bonne température, le témoin lumineux
orange s’éteint.
• Placez un récipient sous la tête de
percolation. Faites passer environ 1/3 du
liquide directement, en mettant le sélecteur
sur la position
(9).
• Arrêtez l’appareil en appuyant sur le bouton
(N) (4) et en laissant la position
(9)
enclenchée et attendez 10 à 15 minutes
pour laisser agir le détartrant.
• Remettez ensuite l'appareil en marche en
appuyant sur le bouton (N) (4) et laissez
s’écouler le reste du liquide.
• Rincez ensuite avec deux réservoirs d’eau
claire, nettoyez la tête de percolation et
remettez la grille sur la tête de l’appareil
(consultez la section « Nettoyer l’appareil »).
• Détartrez régulièrement votre expresso avec
de l’acide citrique ou tartrique.
• Attention : lorsque vous procédez au
détartrage de votre appareil à expresso,
l'acide contenu dans la poudre de détartrage
peut endommager le plan de travail ou toute
autre surface avec laquelle il serait en
contact.
• La garantie exclut les expressos qui ne
fonctionnent pas ou mal à cause de
l’absence de détartrage.
Cependant, nous vous conseillons d’utiliser
l’accessoire de détartrage Krups, référence F054, disponible dans les centres
service agréés Krups. Cet accessoire comprend, en plus de deux doses de détartrage,
un ruban testeur de dureté de l’eau pour
évaluer la fréquence de détartrage de votre
appareil en utilisation normale. L’entartrage
dépend de la dureté de l’eau mais aussi du
cycle d’utilisation. La fréquence de détartrage
indiquée par l’accessoire F054 est donc
donnée à titre indicatif.
- Suivez ensuite la méthode suivante :
• Enlevez la cartouche Claris-Aqua Filter
System si vous en avez mis une en place.
34
Dépannage
Problèmes Causes Actions
probables correctives
L’expresso n’est Les tasses, le Préchauffez les
pas assez chaud. filtre et porte-filtre accessoires (tasses,
sont froids. filtre et porte-filtre).
Voir le paragraphe
«Préparation d’un
expresso».
Fuite de café Le porte filtre n’est Voir paragraphe
au niveau du pas monté«Préparation d’un
porte-filtre. correctement ou expresso».
insuffisamment
sérré.
Il reste de la mou- Nettoyez le tour du
ture sur le bord du filtre et le joint.
filtre.
Le joint de la tête Nettoyez le joint
de percolation est avec un linge
sale. humide.
Le joint de la tête Contactez un
de percolation est centre service
défectueux. agréé Krups.
Bruit très fort Pas d’eau dans le Remplissez le ré-
dans la pompe. réservoir. servoir.
Page 33

Réservoir mal Appuyez fermemonté. ment sur le réser-
voir.
Mouture trop vieille Utilisez une mouou très sèche et la ture fraîche.
pompe ne peut
créer de pression.
L’eau ne passe Pas d’eau dans le Remplissez le réser-
pas. réservoir. voir.
Réservoir mal Appuyez fermemonté. ment sur le réser-
voir.
Le filtre est bouché, Nettoyez le filtre et
la mouture est trop la grille de la tête.
fine ou trop tassée. Voir le paragraphe
«Entretien» et
essayez une mouture moins fine.
Grille de la tête de Mettez la grille à
percolation tremper dans la
encrassée. solution de
détartrage.
Voir le
paragraphe
«Entretien».
Appareil entartré. Voir le paragraphe
«détartrage».
L’eau passe trop Mouture trop Essayez une mou-
vite. grosse. ture plus fine.
Quantité de mou- Utilisez la cuillère
ture insuffisante. fournie pour doser
le café.
Mouture non Tassez plus la
tassée. mouture.
L’expresso n’a pas Mouture trop Essayez une mou-
de crème. grosse. ture plus fine.
(mousse
sur le café)
Mouture pas assez Tassez plus la
tassée. mouture.
Mouture vieille ou Utilisez une moutrop sèche. ture fraîche.
Le lait n’est pas Accessoire Voir paragraphe
très mousseux. cappuccino «Entretien».
bouché.
Lait trop vieux. Utilisez du lait frais.
Lait tiède. Mettez le lait au
réfrigérateur.
Beaucoup d’eau Mouture non Tassez bien la
sur la mouture. tassée. mouture.
Quantité de mou- Rajoutez de la
ture insuffisante. mouture.
Café filtre
Avant la première utilisation
• Faites fonctionner une première fois la
cafetière avec 1 L d’eau , sans mouture.
Préparation du café
La qualité de l’eau que vous utilisez est
déterminante pour le goût de votre café. Vous
devez vous assurer que l’eau est fraîchement
sortie du robinet (afin qu’elle n’ait pas eu le
temps de devenir stagnante au contact de
l’air), qu’elle est exempte d’odeur de chlore et
qu’elle est relativement froide.
Nous vous recommandons de la filtrer
avec une cartouche Krups Duo Filter
référence XS 1000 disponible dans le
commerce.
• Suivez les illustrations de 23 à 28.
• Utilisez uniquement de l’eau froide et un
filtre papier n°4.
• La cafetière est équipée d’un stop-gouttes
permettant de se servir un café avant la fin
de la préparation du café. Replacez rapidement la verseuse pour éviter tout déborde-
ment.
• Respectez la quantité d’eau maximum dans
le réservoir en se référant au niveau d’eau
(e).
• Attendre quelques minutes avant de réaliser
une seconde préparation de café.
• La verseuse (g) et son couvercle (f) sont
compatibles pour un réchauffage au microondes. Ne laissez jamais votre verseuse vide
dans le micro-ondes.
Nettoyage
• Pour évacuer la mouture usagée, retirez le
porte-filtre de la cafetière (30).
• Débranchez l’appareil.
• Ne nettoyez pas l’appareil chaud.
• Nettoyez-le avec un chiffon ou une éponge
humide.
35
Page 34

• Ne mettez jamais l’appareil dans l’eau ou
sous l’eau courante.
• La verseuse verre, le couvercle et le portefiltre sont lavables au lave-vaisselle.
Détartrage
Nombre de cycles entre 2 détartrages
Sans Duo Filter Avec Duo Filter
Eau douce 60 120
Eau dure 40 80
Participons à la protection
de l’environnement !
Votre appareil contient de nombreux
matériaux valorisables ou recyclables.
Confiez celui-ci dans un point de collecte
ou à défaut dans un centre service agrée
pour que son traitement soit effectué.
Vous pouvez utiliser :
• soit un sachet de détartrant dilué dans
250 ml d’eau,
• soit 250 ml de vinaigre d’alcool blanc.
• Versez dans le réservoir (b) et mettre la
cafetière en marche (sans mouture).
• Laissez couler la moitié dans la verseuse (g),
puis arrêter.
• Laissez agir pendant une heure.
• Remettez la cafetière en marche pour
terminer l’écoulement.
• Rincez la cafetière en la faisant fonctionner
2 ou 3 fois avec 1 L d’eau claire.
La garantie exclut les cafetières ne
fonctionnant pas ou mal par absence de
détartrage.
En cas de problème
- Vérifiez :
• le branchement.
• que l’interrupteur est en position «I».
- Il semble y avoir une fuite
• Vérifiez si le réservoir d’eau n’a pas été
rempli au delà de la limite maximale.
- Le temps d’écoulement de l’eau est trop
long ou les bruits sont excessifs :
• détartrez votre cafetière.
Votre appareil ne fonctionne toujours
pas ? Adressez-vous à un centre service agréé
Krups.
.
36
Page 35

Nederlands
Omschrijving
Espresso:
A : espressodeksel met opbergvak voor de
filters
B : afneembaar espressoreservoir
C : warmhoudplaat kopjes
D : percolatorkop
E : stoombuis
F : cappuccino-accessoire voor melkschuim
G : lekrooster
H : lekbak
I : filterhouder
J : espressofilters voor poederkoffie 1 &
2 kopjes
K : espressofilter voor ESE coffeepads (Easy
Serving Espresso)
L : espressofilter «CLARIS - Aqua Filter
System F088» (niet meegeleverd
accessoire)
M : doseerlepel voor gemalen koffie
N : aank/uitknop met blauw controlelampje
voor inschakeling
O : keuzeknop espressofuncties
P : oranje controlelampje temperatuur
Koffie:
a : deksel koffiezetapparaat - toegang
reservoir en filterhouder
b : reservoir koffiezetapparaat met filter
c : zitting filterhouder
d : filterhouder met vergrendelbare
handgreep
e : waterniveau met maatverdeling van het
reservoir koffiezetapparaat met filter
f : scharnierend deksel van de koffiekan met
filter
g : koffiekan voor filterkoffie
h : warmhoudplaatje om de koffie warm te
houden
i : koffiefilter «Duo Filter XS 1000» (niet
meegeleverd accessoire)
j : aan/uit-schakelaar filterkoffie met blauw
controlelampje
Veiligheidsinstructies
• Lees deze gebruiksaanwijzing zorgvuldig
door alvorens u het apparaat in gebruik
neemt. Dit apparaat mag uitsluitend
aangesloten worden op een stopcontact met
randaarde. De op het typeplaatje vermeld
spanning dient overeen te komen met de
netspanning bij u thuis.
• Plaats uw espresso niet op een hete
ondergrond, zoals een kookplaat, of in de
buurt van open vuur.
• Verwijder de filterhouder met koffiemaling
niet zolang het water doorloopt, want het
apparaat staat op dat moment onder druk.
• Maak geen gebruik van het apparaat zonder
de lekbak en het rooster.
• Trek de stekker uit het stopcontact als er
tijdens het doorlopen van de koffie een
storing optreedt en voordat u het apparaat
gaat schoonmaken.
• Trek niet aan het snoer maar aan de stekker
als u de stekker uit het stopcontact haalt.
Laat het snoer niet over hoeken en randen
hangen.
• Vermijd contact tussen het snoer of uw
handen en de heet geworden delen van het
apparaat (warmhoudplaat kopjes,
filterhouder, stoombuis, cappuccinoaccessoire, warmhoudplaatje om de koffie
warm te houden) niet aan.
• Dompel het apparaat nooit onder in water.
• Houd het apparaat buiten bereik van
kinderen. Laat het snoer niet laag hangen.
• Neem de instructies voor het ontkalken in
acht.
• Gebruik het apparaat niet als het snoer of
het apparaat zelf beschadigd is.
• Als het netsnoer of een ander onderdeel van
dit apparaat beschadigd is, laat het dan, om
persoonlijk letsel te voorkomen, repareren
door de KRUPS reparatie-service. Maak het
apparaat nooit zelf open.
• Controleer of de espresso-filterhouder goed
aangedraaid is voordat u de koffie laat
doorlopen en zet de keuzeschakelaar op O
voordat u de filterhouder losdraait.
• Houd het apparaat buiten het bereik van
kinderen. Dit apparaat mag uitsluitend
onder toezicht van een verantwoordelijke
37
Page 36

volwassene door jonge kinderen en
gehandicapte personen gebruikt worden.
• U kunt brandwonden oplopen indien u het
deksel van het koffiezetapparaat optilt
tijdens het doorlopen van de koffie.
• Giet nooit onmiddellijk na het doorlopen
koud water in het reservoir van het
koffiezetapparaat. Laat het apparaat
afkoelen alvorens het reservoir opnieuw te
vullen.
• Indien u de door Krups aanbevolen
filterpatronen niet gebruikt, giet dan
uitsluitend water en de in deze handleiding
aangegeven ontkalkingsoplossingen in het
waterreservoir van het espresso- en
koffiezetapparaat.
• Druk voor het uitschakelen op de «off»
knop en haal vervolgens de stekker uit het
stopcontact.
• Gebruik dit apparaat uitsluitend voor het
gebruik waar het voor bestemd is.
• Wees zeer voorzichtig tijdens het gebruik
van de stoomfunctie.
Espressokoffie
kunnen verstoppen, terwijl een te grove
maling een te slappe espresso geeft.
De drie andere factoren die buiten de
gebruikte koffie bepalend zijn voor de
kwaliteit van uw espresso zijn het water, de
temperatuur en de druk. Uw Krups
espressomachine rekent deze drie factoren
nauwkeurig uit door middel van een speciaal
voor dit doeleinde ontworpen technologie. U
moet zorgen dat het water direct uit de kraan
komt (zodat dit niet in contact met de lucht
kan stagneren), het niet naar chloor ruikt en
relatief koud is.
Wij raden u aan het water te filteren met
een KRUPS Claris patroon - Aqua Filter
System (referentie F088) dat in de winkel
verkrijgbaar is.
Er doen veel onjuiste verhalen de ronde over
espresso. Het eerste is dat deze koffie bitter
zou zijn en een verbrande smaak zou hebben.
In feite heeft de ideale espresso veel aroma, is
bitterzoet (en niet bitter) en heeft een volle
smaak die niet meteen verdwijnt.
Kies voor een optimaal resultaat een speciale
espressomaling, die zeer fijn is. Door de door
de pomp verzorgde druk van 15 bar loopt het
warme water in zeer korte tijd door deze fijne
maling. Het resultaat is een rijke, zwarte, zeer
smakelijke koffie vol aroma: koffie-extract.
Espresso wordt niet in een normaal
koffiekopje geserveerd, maar liever in kleine
kopjes van 70 ml. De volmaakte espresso
heeft een prachtig laagje goudbruin dik
schuim, dat «schuim» genoemd wordt, een
product dat voortkomt uit de natuurlijke olie
van de koffiebonen en dat de espresso zijn
rijke smaak en aroma geeft.
Het is belangrijk dat uw espressokoffie goed
gebrand en naar behoren gemalen is. Indien u
geen gemalen espressokoffie kunt krijgen,
gebruik dan een koffiemolen om de bonen te
malen. De koffie mag niet te fijn gemalen
worden. Hij moet enigszins korrelig zijn, met
een dichtheid tussen meel en suiker. Een te
fijne maling geeft een bittere espresso en zou
het rooster van de percolatorkop en het filter
38
De tweede legende zegt dat u na het drinken
van een espresso de hele nacht wakker blijft.
Hoewel espresso een uitgesproken smaak
heeft, bevat deze koffie in feite minder
cafeïne dan gewone koffie, namelijk ongeveer
60 tot 80 mg per kopje, in plaats van 80 tot
100 mg per kopje; dit komt omdat het
percoleren bij een espresso minder lang duurt.
Als laatste denken sommige mensen dat het
bereiden van espresso te lang duurt en
gecompliceerd is. In werkelijkheid is espresso,
zoals zijn naam al zegt, ontwikkeld om snel
geserveerd te worden, zonder lange
voorbereiding. Zoals u zult ontdekken, is uw
Krups espressomachine met flair ontworpen
voor een groot gebruiksgemak en een lange
levensduur.
Om te beginnen
Om optimaal te profiteren van de voordelen
van uw nieuwe Krups espressomachine
vragen wij u onderstaande richtlijnen
Page 37

aandachtig en volledig door te lezen alvorens
het apparaat te gebruiken.
• Plaats uw espressomachine op een stabiele,
hittebestendige ondergrond uit de buurt van
elektrische kookplaten en open vuur.
• Steek de stekker van het apparaat in een
geaard stopcontact. Controleer of de bij de
technische kenmerken onder het apparaat
vermelde spanning overeenkomt met uw
elektrische installatie.
• Controleer of de lekplaat en het rooster op
hun plaats zitten wanneer u het apparaat
gebruikt.
op en draai de handgreep zo ver mogelijk
naar rechts (7).
• Plaats een zo breed mogelijke kom onder de
filterhouder (8).
• Wanneer u de bedieningsknop naar rechts
(O) draait op de espressostand, stroomt het
water in de buizen van het apparaat (9).
• Laat ongeveer 250 ml stromen en zet
vervolgens de bedieningsknop (O) weer
terug in de middenpositie (10).
Zie voor het inschakelen van het
koffiezetapparaat het hoofdstuk FILTERKOFFIE.
Espresso
Aak voor het eerste gebruik van uw apparaat
het systeem volledig schoon:
• Open het deksel en verwijder het
waterreservoir met behulp van de handgreep
(1). Vul het reservoir met vers, koud water
(2).
• Zet het reservoir terug op het apparaat en
controleer of dit stevig op zijn plaats zit (3),
sluit vervolgens het deksel.
• Zet het apparaat aan door op de knop (N) te
drukken (4). De pomp werkt vervolgens
2 seconden om het systeem van water te
voorzien en meteen bij het eerste kopje hete
koffie te schenken.
• Zodra het apparaat de juiste temperatuur
bereikt heeft, gaat het oranje controlelampje
uit.
• Uw espresso-apparaat is voorzien van
drie filters, ontworpen voor 1 of
2 kopjes espresso met gemalen koffie of
voor de E.S.E. coffeepads (Easy Serving
Espresso). Het eerste filter zit in de
filterhouder (I), de andere 2 bevinden
zich in de transportvakken van het
apparaat.
• Kies het filter dat u wilt gebruiken en plaats
dit in de filterhouder (5). Berg de andere
2 filters op in het espressodeksel (A).
• Plaats vervolgens de filterhouder onder de
percolatorkop van het apparaat. Om te
controleren of u de filterhouder goed op zijn
plaats heeft gezet, draait u de handgreep
zodanig dat deze naar links wijst in een hoek
van 45 graden (6), plaats de filterhouder
rechtstreeks onder de percolatorkop, til hem
Gebruik van de verschillende
functies van uw espressoapparaat
1. HET BEREIDEN VAN EEN ESPRESSO
Om te zorgen dat het volle koffiearoma
vrijkomt voor een lekker kopje koffie laat deze
machine de koffie vooraf trekken. De pomp
werkt 3 seconden, stopt vervolgens
3 seconden en gaat hiermee door tot het
einde van de bereiding.
. MET GEMALEN KOFFIE
Voor het beste resultaat raden wij u aan de
accessoires voor te verwarmen
(filterhouder, filter en kopjes) zonder hier de
gemalen koffie in te doen. Ga hiervoor als
volgt te werk:
• Vul het reservoir met vers, koud water (1)
(2) (3) en zet het apparaat in werking (4).
• Zet de filterhouder en een leeg filter (6) (7)
op hun plaats en zet de espressokopjes er
onder.
• Zodra het apparaat de juiste temperatuur
bereikt heeft, gaat het oranje controlelampje
uit.
• Draai de bedieningsknop (O) in de
espressostand (9). Houd rekening met het
vooraf trekken.
• De kopjes worden gevuld met warm water.
Zet de knop (O) terug in de middenpositie
en leeg ze wanneer ze helemaal gevuld zijn.
Na het bereiden van uw eerste espresso en
wanneer het apparaat eenmaal warm is, kunt
u de kopjes voorverwarmen op de
warmhoudplaat voor de kopjes (C).
39
Page 38

. Het bereiden van een espresso:
• Vul het reservoir met water (1) (2) (3) en zet
het apparaat in werking (4).
• Plaats het filter voor één of twee kopjes in
de filterhouder (5).
• Doe de gemalen koffie in het filter (1 of 2
schepjes) en druk deze stevig aan, de koffie
moet op hetzelfde niveau zitten als de rand
van het filter (11) (12).
• Verwijder de rest van de koffie rond het
filter (13).
• Zet de filterhouder terug in het apparaat.
Draai de filterhouder zodanig dat hij goed
op zijn plaats vergrendeld is (6) (7).
• Zet één of twee espressokopjes onder de
koffiebuizen van de filterhouder.
Zodra het apparaat de juiste temperatuur
bereikt heeft, gaat het oranje controlelampje
uit.
• Draai de bedieningsknop (O) in de
espressostand (9). Houd rekening met het
vooraf trekken.
• Draai, wanneer de gewenste hoeveelheid
espresso verkregen is, de knop (O) in de
middenpositie (10).
• Verwijder de filterhouder en gooi het
gebruikte koffiedik weg (14).
Het filter kan opnieuw gevuld worden voor de
bereiding van andere espresso’s.
Let op: indien het waterreservoir leeg is
en de pomp werkt, hoort u een typisch
geluid, dat sterker is dan het geluid dat u
bij de normale werking hoort. Wanneer
dit gebeurt, druk dan op de aan/uit-knop
(4). Controleer het waterreservoir en vul
dit, indien nodig, met water.
Laat het apparaat nimmer met een leeg
waterreservoir werken, hierdoor zou de
pomp kunnen beschadigen.
MET DE SPECIALE FILTERHOUDER «ESE»
.
Het E.S.E-systeem is ontwikkeld voor het
maken van een «ristretto» (sterke) Italiaanse
espresso. De hoeveelheid koffie is 35 ml en
het water loopt in 20 seconden door.
«ESE» staat voor «Easy Serving Expresso»
(vereenvoudigde bereiding van espresso) en is
een coffeepad met geselecteerde, gemalen en
tussen twee papieren filters samengeperste
koffie die klaar voor gebruik is. Met dit
vereenvoudigde systeem voor de bereiding
van een espresso is doseren en samendrukken
niet nodig en is het apparaat eenvoudiger
schoon te maken.
Het is niet aanbevolen de E.S.E.coffeepads te gebruiken voor het
bereiden van meer dan één espresso of
voor het bereiden van een met water
aangelengde espresso.
Wij raden u aan er voor te zorgen dat de
E.S.E.-coffeepads niet vervormd worden
wanneer u deze gebruikt of opbergt.
Voor het beste resultaat raden wij u aan de
accessoires voor te verwarmen (filterhouder,
filter en kopjes) zonder koffie. Zie hiervoor het
gedeelte «Het bereiden van een espresso»
hieronder.
. Het bereiden van een espresso:
• Vul het reservoir met vers, koud water (1)
(2) (3) en zet het apparaat in werking (4).
Zet de E.S.E.-coffeepad op zijn plaats (18).
Scheur het overtollige papier rond de
coffeepad weg volgens de stippellijn. Zet de
E.S.E.-coffeepad in de filterhouder MET HET
RODE OPSCHRIFT NAAR BENEDEN GERICHT
(de hoeken van het papier goed omvouwen).
• Zorg dat het papier volledig binnen het
filter zit om lekken te voorkomen.
Voor een romiger en dikker schuim moet u
zorgen dat de E.S.E.-coffeepad goed op zijn
plaats gezet wordt.
Om lekkage van de filterhouder te voorkomen
en een goede percolatie te bevorderen, moet
de handgreep hermetisch en naar behoren
vergrendeld worden.
Plaats de filterhouder in de percolatorkop en
draai de handgreep stevig, zo ver mogelijk,
naar rechts (6) (7) (8).
Zodra het apparaat de juiste temperatuur
bereikt heeft, gaat het oranje controlelampje
uit.
• Draai de bedieningsknop (O) in de
espressostand (9). Houd rekening met het
vooraf trekken.
• Draai, wanneer de gewenste hoeveelheid
esso verkregen is (35 ml), de knop in de
espr
middenpositie (10).
erwijder de filterhouder uit de
• V
percolatorkop en werp de gebruikte
coffeepad weg.
40
Page 39

2. STOOMFUNCTIE
Het doffe geluid dat u hoort wanneer het
apparaat stoom produceert komt door de
onderbroken regeling van de pomp en heeft
geen invloed op de goede werking van het
apparaat.
Als u direct na gebruik van de
stoomfunctie espresso wilt bereiden, dan
dient het apparaat eerst af te koelen tot de
geschikte temperatuur voor bereiding van
espresso.
• Wanneer u de keuzeschakelaar terug zet op
O, koelt het apparaat automatisch af
door 3 pompcycli te starten. Het zo
opgepompte koude water koelt het
verwarmingssysteem af. Tijdens de
pompcycli stroomt de overtollige stoom in
het verwarmingssysteem samen met het
warme water in de lekbak. Het
ontsnappen van de stoom en het
begeleidende geluid zijn nodig om het
apparaat af te laten koelen.
Let op: tijdens en na het gebruik zijn de
metalen delen van de buis (E) en het cappuccino-accessoire (F) zeer heet.
. Gebruik van het cappuccino-accessoire
(F)
Met het cappuccino-accessoire is het
eenvoudiger warme melk of melkschuim te
bereiden voor een cappuccino, een café latte
of warme chocolademelk, bijvoorbeeld.
Het beste is om verse, koude halfvolle melk te
gebruiken (uit de koelkast).
• Vul het reservoir met vers, koud water (1)
(2) (3) en zet het apparaat in werking (4).
• Zet het automatische capuccino-accessoire
(F) op de buis.
• Verplaats het cappuccino-accessoire naar de
buitenzijde van het apparaat.
• Giet ca. 100 ml koude melk in een smal
kannetje van ca. 0,5 liter dat onder het
cappuccino-accessoire past. De melk en het
kannetje moeten goed koud zijn (het wordt
dan ook afgeraden het kannetje met warm
water om te spoelen alvorens de melk te
laten schuimen).
• Wanneer uw apparaat klaar is voor het
bereiden van een espresso, draait u de
bedieningsknop (O) op de
voorverwarmstand
(15).
• Het oranje controlelampje gaat branden.
Zodra het controlelampje uitgaat, is het
apparaat gereed.
Plaats het kannetje zodanig onder het
accessoire dat het uiteinde in de melk
gedompeld wordt, zonder de bodem aan te
raken (17).
• Draai de bedieningsknop
stoomstand (16).
• Wanneer eenmaal de gewenste hoeveelheid
melkschuim verkregen is, zet u de
bedieningsknop (O) terug in de
middenpositie (10).
Om te voorkomen dat de melk op het
cappuccino-accessoire opdroogt, dient u de
volgende richtlijnen op te volgen:
• Zet een met melk gevuld kannetje onder het
cappuccino-accessoire (F).
Ga te werk als voor het bereiden van
schuimende melk, maar dit keer met water,
gedurende ca. 1 minuut.
• Draai de bedieningsknop (O) naar de
middenpositie (10).
• Maak het cappuccino-accessoire schoon met
een vochtige doek.
• Zie voor een grondige reinigingsbeurt van
het cappuccino-accessoire de paragraaf
«onderhoud».
(O) op de
Recepten
Drink uw espresso zoals u hem graag heeft:
wanneer u zich wilt ontspannen of aan het
einde van een heerlijke maaltijd.
Hierna volgen enkele recepten die u met uw
espressomachine kunt bereiden.
. Originele espresso
• Neem een doseerschepje goed gebrande
espressokoffie van goede kwaliteit en bereid
hem rechtstreeks in het voorverwarmde
kopje.
Wanneer u goed gemalen koffie gebruikt, zal
er een mooie schuimkraag op het kopje
zitten.
• Voeg, als u wilt, suiker toe en geniet. De
originele espresso wordt zonder melk
gedronken.
41
Page 40

. Cappuccino
Voor een cappuccino volgens de regels zijn de
ideale hoeveelheden: 1/3 koffie, 1/3 warme
melk, 1/3 melkschuim. De hoeveelheid warme
melk + verkregen schuim is dus ongeveer
twee keer de hoeveelheid bereidde koffie.
• Gebruik grote, van tevoren voorverwarmde
koppen.
• Vul ze met de hoeveelheid van een
espressokopje met koffie en giet hier de met
behulp van het cappuccino-accessoire tot
schuim opgeklopte melk op.
• Strooi er tenslotte wat chocoladepoeder
over.
. Koffie met room
• Bereid een klassieke espresso in een grote
kop.
• Voeg een wolkje room toe voor koffie met
room.
U kunt de room ook vervangen door warme
melk.
. Café corretto*
• Bereid een kopje espresso zoals u gewend
bent.
• Corrigeer vervolgens de smaak enigszins
door 1/4 of 1/2 glas cognac toe te voegen.
U kunt hiervoor ook anisette, boerenjongens,
Sambuco, Kirsch of Cointreau gebruiken.
Er zijn nog talrijke andere mogelijkheden om
de espresso te «veredelen». Laat uw fantasie
de vrije loop.
. Koffielikeur*
• Meng in een lege fles van 0,75 liter, 3
kopjes espresso, 250 g bruine kandijsuiker,
1/2 liter Cognac of Kirsch.
• Laat het mengsel gedurende minstens 2
weken trekken.
U heeft nu een heerlijke likeur, vooral als u
van koffie houdt.
. Italiaanse ijskoffie
4 bolletjes vanille-ijs, 2 kopjes koude zoete
espresso, 1/8 l melk, zure room, geraspte
chocolade.
• Meng de koude espresso met de melk.
• Verdeel de ijsbolletjes over de glazen, giet er
de koffie overheen en versier het geheel met
verse room en geraspte chocolade.
. Koffie à la frisonne*
• Voeg een klein glaasje rum toe aan een
kopje zoete espresso.
• De koffie met een dikke laag zure room
versieren en serveren.
. Geflambeerde espresso*
2 kopjes espresso, 2 kleine glaasjes Cognac, 2
theelepels bruine suiker, zure room.
• Doe de Cognac in hittebestendige glazen,
verwarmen en flamberen.
• De suiker toevoegen, doorroeren, de koffie
er op gieten en met de zure room versieren.
Als u wilt, kunt u de espresso ook met wat
kokend water verdunnen.
. Perfecte espresso*
2 kopjes espresso, 6 eidooiers, 200g suiker, 1/
8 liter zure room met suiker, 1 klein glaasje
sinaasappellikeur.
• Klop de eidooiers op met de suiker totdat u
een dikke, schuimige massa heeft.
• Voeg de koude espresso en de
sinaasappellikeur toe.
• Meng vervolgens de opgeklopte zure room
er door heen.
• Giet het geheel in coupes of glazen.
• Doe de coupes in de diepvriezer.
. Mokkapudding
2 kopjes espresso, 1/2 liter melk, 1 zakje
vanillepuddingpoeder, 3 eidooiers, 1/8 liter
zure room met suiker, 150 g suiker.
• Bereid de vanillepudding met de melk, de
vanillepoeder en de suiker.
• Voeg de eidooiers aan de nog warme
pudding toe.
• Laat het geheel afkoelen en voeg de
espresso en de opgeklopte room toe.
(*: Geniet, maar drink met mate.)
Het apparaat reinigen
- Doe de accessoires van uw espressomachine
nooit in de vaatwasser.
U moet het waterreservoir na gebruik legen
om kalkaanslag te voorkomen.
. Lekbak
Wanneer u meerdere espresso’s achter elkaar
bereidt, moet u af en toe de plaat legen (na
ca. 7 tot 8 espresso’s) (19). Het is normaal dat
42
Page 41

hier water is, dat wil niet zeggen dat er
een lek is, maar dat het thermoblok van
uw machine afgetapt wordt. Indien nodig
kunt u de lekbak en het rooster met water en
een beetje niet-schurende vloeibare zeep
reinigen, afspoelen en afdrogen. Zet ze weer
goed op hun plaats terug (20).
. De percolatorkop, het filter en de
filterhouder
Deze accessoires moeten na ieder gebruik
gereinigd worden. Neem de percolatorkop af
met een vochtige doek en was de andere
onderdelen af met water en een nietschurend afwasmiddel, afspoelen en
afdrogen.
Wanneer de percolatorkop erg verstopt is,
schroef het rooster dan los met behulp van
een muntstuk, maak het schoon en zet het
terug door hier stevig tegenaan te drukken
(21).
Wanneer u uw espressomachine niet gebruikt,
laat de filterhouder dan niet op zijn plaats
zitten om slijtage van de pakking te
voorkomen.
. De warmhoudplaat van de kopjes:
verwijder deze voor het reinigen en was hem
af met water en een beetje niet-schurend
afwasmiddel, afspoelen en afdrogen.
. Het cappuccino-accessoire
Het cappuccino-accessoire kan gedemonteerd
worden voor een grondige schoonmaakbeurt.
Was het af met water en een beetje nietschurend afwasmiddel en een borsteltje.
Afspoelen en afdrogen.
Kijk, alvorens het terug te zetten, na of de
luchtinlaatgaten (aan beide zijden van het
kleine metalen buisje) niet verstopt zijn door
melkresten. Ontstop ze indien nodig met een
naald (22).
Ontkalken
• Het espresso-apparaat dient regelmatig
ontkalkt te worden met citroenzuur of
wijnsteenzuur.
• Let op: tijdens het ontkalken van uw
espresso-apparaat kan het zuur dat zich in
de ontkalkingspoeder bevindt het werkblad
of andere oppervlakken waarmee het in
contact komen, beschadigen. Leg daarom
altijd iets onder het apparaat.
• De garantie sluit espresso-apparaten uit
die niet of slecht werken als gevolg van
niet of niet tijdig ontkalken.
Wij raden u echter aan om het Krups
ontkalkingsaccessoire te gebruiken (ref.
F054, verkrijgbaar bij uw leverancier of bij de
Krups Onderdelenservice). Dit accessoire bevat
2 zakjes ontkalkingsmiddel en een teststrip
om de hardheid van het water te bepalen.
Daaruit kunt u afleiden hoe vaak u het
espresso-apparaat dient te ontkalken bij een
normaal gebruik. De hoeveelheid kalkaanslag
is afhankelijk van de hardheid van het water,
maar ook van het aantal keren dat u het
apparaat gebruikt. De ontkalkingsfrequentie,
aangegeven op accessoire F054, is dan ook bij
benadering gegeven.
- Ga volgens onderstaande methode te
werk:
• Verwijder de patroon Claris-Aqua Filter
System indien u deze geplaatst heeft.
• Schroef het roosterplaatje van de
percolatiekop los en maak het schoon (21).
• Los een zakje ontkalkingsmiddel van Krups
(ref. F054) op in een halve liter lauw water
en schenk dit in het lege waterreservoir.
• Schakel het apparaat in door op de knop (N)
te drukken (4). Zodra het apparaat de juiste
temperatuur bereikt heeft, gaat het oranje
controlelampje uit.
• Plaats een kom onder de percolatiekop. Zet
de keuzeknop op stand
ongeveer 1/3 deel van de vloeistof direct
doorlopen.
• Schakel het apparaat uit door op de knop
(N) te drukken (4) en laat deze op stand
(9) staan, wacht 10 tot 15 minuten om het
ontkalkingsmiddel in te laten werken.
• Schakel het apparaat weer in door op de
knop (N) te drukken (4) en laat de rest van
de vloeistof doorlopen.
• Spoel vervolgens het apparaat door, door
nog 2x het reservoir met schoon water te
vullen , reinig de percolatorkop. Plaats
tenslotte het roosterplaatje weer op de
percolatiekop (raadpleeg de paragraaf “Het
apparaat reinigen”).
(9) en laat
43
Page 42

Reparatie
Probleem Mogelijke Oplossing
oorzaak
De espresso wordt De accessoires zijn Verwarm de
niet warm koud (kopjes, filter, accessoires voor
genoeg. filterhouder). (kopjes, filter,
filterhouder).
Zie hoofdstuk
«Espresso-functie».
Er komt koffie via De filterhouder is Zie hoofdstuk
de zijkanten uit de niet op de juiste «Espresso-
filterhouder. wijze geplaatst functie».
of onvoldoende
aangedraaid.
Er ligt nog koffie Maak de rand van
op de rand het filter en de
van het filter. afdichting schoon.
De afdichting van Maak de afdichting
de percolatiekop schoon met een
is vies. vochtige doek.
De afdichting van Neem contact op
de percolatiekop met de Krups
is versleten. Consumenten-
service.
De pomp maakt Er zit geen water Vul het reservoir.
lawaai. in het reservoir.
Het reservoir is niet Druk krachtig op
juist geplaatst. het reservoir.
De koffiemaling is Gebruik verse
te oud of te droog koffiemaling.
en de pomp geeft
geen druk.
Het water loopt Er zit geen water in Vul het reservoir.
niet door. het reservoir.
Het reservoir is niet Druk krachtig op
juist geplaatst. het reservoir.
Het filter is verstopt, Maak het filter en
de koffiemaling het roosterplaatje
is te fijn of te hard van de percolatieaangedrukt. kop schoon (zie
hoofdstuk
Onderhoud») en
gebruik een
grovere
koffiemaling.
Roosterplaatje van Laat het
de percolatiekop roosterplaatje
is verontreinigd. weken in een
ontkalkingsoplossing (zie
hoofdstuk
Onderhoud).
Het apparaat heeft Zie hoofdstuk
kalkaanslag. «Ontkalken».
44
Het water loopt te De koffiemaling is Probeer een fijnere
snel door. te grof. koffiemaling.
Te weinig koffie- Gebruik het
maling. maatschepje om de
juiste dosering te
bepalen.
De koffiemaling is Druk de
niet genoeg koffiemaling
aangedrukt. steviger aan.
De espresso heeft De koffiemaling is Probeer een fijnere
geen schuimlaagje. te grof. koffiemaling.
De koffiemaling is Druk de
niet genoeg koffiemaling
aangedrukt. steviger aan.
De koffiemaling is Gebruik verse
te oud of te droog. koffiemaling.
De melk wordt Het cappuc- Zie hoofdstuk
niet schuimig. cino-hulpstuk «Onderhoud».
is verstopt.
De melk is niet vers. Gebruik verse
melk.
De melk is lauw. Zet de melk in de
koelkast.
Veel water op de De koffiemaling is Druk de koffiemakoffiemaling. niet aangedrukt. ling aan.
Te weinig koffie- Voeg meer koffiemaling. maling toe.
Filterkoffie
Vóór de eerste ingebruikname
• Laat het koffiezetapparaat de eerste keer
met 1 L water, zonder koffie werken.
Koffiezetten
De kwaliteit van het door u gebruikte water is
bepalend voor de smaak van uw koffie. U
moet zorgen dat het water direct uit de kraan
komt (zodat dit niet in contact met de lucht
kan stagneren), het niet naar chloor ruikt en
relatief koud is.
Wij raden u het te filteren met een Krups
Duo Filter patroon met referentie XS 1000
dat in de winkel verkrijgbaar is.
• Volg de illustraties 23 tot en met 28.
• Gebruik uitsluitend koud water en een
papieren filter n°4.
Page 43

• Het koffiezetapparaat is voorzien van een
druppel-stop waarmee u al koffie kunt
schenken voordat al het water is
doorgelopen. Plaats de schenkkan snel weer
terug in de koffiezetter om overlopen van de
filterhouder te voorkomen.
• Zorg dat u de maximale hoeveelheid water
in het reservoir niet overschrijdt, zie hiervoor
het waterpeil (e).
• Wacht enkele minuten alvorens opnieuw
koffie te zetten.
• De schenkkan (g) en zijn deksel (f) zijn
geschikt voor een gebruik in de
magnetronoven. Doe uw schenkkan nimmer
leeg in de magnetronoven.
Reiniging
• Verwijder voor het wegwerpen van het
gebruikte koffiemaalsel de filterhouder uit
het koffiezetapparaat (30).
• Haal de stekker van het apparaat uit het
stopcontact.
• Het apparaat niet reinigen wanneer dit nog
warm is.
• Reinigen met een vochtige doek of spons.
• Nimmer het apparaat in water
onderdompelen of onder de kraan houden.
• De glazen schenkkan, het deksel en de
filterhouder kunnen in de vaatwasser
gereinigd worden.
Ontkalken
Aantal cycli tussen 2 ontkalkingsbeurten
Zonder Duo Filter Met Duo Filter
Zacht water 60 120
Hard water 40 80
• Laat de helft van het water in de schenkkan
(g) stromen en zet het apparaat uit.
• Laat het gedurende 1 uur inwerken.
• Zet het koffiezetapparaat weer aan totdat al
het water doorgelopen is.
• Spoel het koffiezetapparaat om en laat het
2 of 3 keer werken met 1 L schoon water.
De garantie geldt niet voor apparaten die
niet of nauwelijks functioneren omdat zij
niet ontkalkt zijn.
In geval van problemen
- Controleer:
• of de stekker goed in het stopcontact zit.
• of de knop op “I” staat.
- Het lijkt er op dat er een lek is.
• Controleer of het waterreservoir niet tot
boven de maximale grens gevuld is.
- Het doorlopen van het water duurt te lang
of het apparaat maakt veel lawaai:
• ontkalk het koffiezetapparaat.
Werkt uw apparaat nog steeds niet?
Neem contact op met een erkende
servicedienst van Krups.
Wees vriendelijk voor het
milieu !
Uw apparaat bevat materialen die geschikt
zijn voor hergebruik.
Lever het in bij het milieustation in uw
gemeente of bij onze technische dienst.
U kunt hiervoor gebruiken:
• ofwel een zakje ontkalkmiddel, verdund met
250 ml water,
• ofwel 250 ml schoonmaakazijn.
• Giet dit in het reservoir (b) en zet het
koffiezetapparaat aan (zonder
koffiemaalsel).
45
 Loading...